"#$!%$&'!()*++$,! -&$,!./*0$!
|
|
|
- Winfred Morgan
- 6 years ago
- Views:
Transcription

1 !!!! "#$!%$&'!()*++$,! -&$,!./*0$!!!!!!!!!!! 1!
2 Contents Preface... 5 What is Article Spinning?... 5 How Does Article Spinning Software Work?... 5 Organization of this Guide... 5 User Guide Conventions... 5 Downloading & Installing The Best Spinner... 6 Installing the Microsoft.NET Framework... 8 Opening The Best Spinner for the First Time... 9 Adding an article to The Best Spinner Opening an Existing Article in The Best Spinner Pasting an Existing Article in The Best Spinner Typing a New Article in The Best Spinner Getting Ready to Spin your First Article Identifying Synonyms Spinning an Article Removing a Synonym from the Spintax Viewing a Spun Article Removing Synonyms Directly on the Spun Article Tab Copying a Spun Article to another Application Publishing a Spun Article to your Blog Verifying the Uniqueness of your Articles Copyscape Check The Best Spinner Check Spinning Articles with EasySpin Spinning an Article by Manually Selecting Synonyms Selecting Synonyms Manually Selecting Synonyms for Words and Phrases Speeding up Your Spinning with SpinGroups
3 Removing a Synonym or Spin Group from The Spintax Spinning One Version of an Article by Replacing Words Spinning Sentences and Paragraphs Spinning Paragraphs Spinning Sentences Protecting Words and Phrases Protecting Terms Managing your Protected Terms Adding a Protected Terms Category Adding a Protected Term Deleting One or All Protected Term(s) Bulk Add Protected Terms Working with Multiple Articles at the Same Time Creating and Managing Hyperlinks Creating Hyperlinks Spinning Your Hyperlinks Managing Your Links with the Hyperlink Manager Applying Hyperlinks Creating and Managing Projects Using the Project Management Window Creating a New Project Creating Folders and Subfolders Saving the Articles within a Project and Saving the Project Opening an Existing Project Closing a Project Mastering the Synonym Window Understanding the Synonym Window Adding Synonyms to the Synonym Window Removing Synonyms from the Synonym Window Speeding up Your Spinning SpinGroups Replace All
4 Save Favorite Alphabetical Replace Spin Skip Using the Synonym Window Tabs Creating Nested Spins Creating Nested Spins in the Article Window Creating Nested Spins with the NestedSpin tab Tracking (Nested) Spin Quality Creating, Managing and Using Favorites Creating Your Own Favorites Using Your Own Favorites Creating Categories for Favorites Managing Your Favorites Spinning with Automated Tools Spinning with Auto Rewrite Spinning with Auto- Select Synonyms Spinning Multiple Articles with Automated Tools Spinning with Data Merge Background & Prerequisites Merging Your Data Generating Multiple Articles Generating Articles vs. Bulk Spin Comparing Articles Comparing Two Articles Comparing Multiple Articles Exporting Your Spins Getting Instant Access to Free Spun Content Generating Unique Content Fast Advanced Spinning Strategies Spinning and Search Engine Rankings Understanding Article Writing
5 Number of Words and Sentences Article Layout Backlinks Uniqueness Checklist Deeply Spin Words, Phrases, Sentence and Paragraphs Spin Sentence and Paragraph Structures Spin the Number of Words and Sentences Spin Article Layout Spinning Line Breaks Using the HTML Break Tag Using other HTML tags Spin images, videos and other media Spin Backlinks Use Data Merge Customizing The Best Spinner Adjusting Font and Font Size Setting Nested Spin and Word Replace Colors Entering Your Copyscape User Details Disabling Auto- Identify Synonyms Disabling the Use of SpinGroups Adjusting the Quick Access Toolbar Removing Icons from the Quick Access Toolbar Adding Icons to the Quick Access Toolbar Moving the Quick Access Toolbar Minimizing the Ribbon to Create Additional Space Customizing the Status Bar Adjusting Window Sizes Updating The Best Spinner Software Keyboard Shortcuts List of Videos
6 Preface What is Article Spinning? Article spinning is the process of creating a unique version of an existing article by replacing the words and phrases in that article with synonyms. How Does Article Spinning Software Work? The purpose of spinning software is to select synonyms for all the words and phrases in an article and then run that article through a generator that produces a unique version of the article by randomly choosing some of the synonyms for each of the words. VIDEO: For an overview of article spinning and spinning software, watch this video. (5:27 mins.) Organization of this Guide This guide describes the extensive functionality of The Best Spinner. The first part of the guide covers downloading and installing the software. The second part of the guide explains how to open and use the software and create your first spun articles with The Best Spinner. The third part of the guide focuses on a deeper understanding of the functionality of The Best Spinner and gives many tips and tricks to improve the speed and quality of your spinning. User Guide Conventions Boldface type is used to indicate items you click or select. This includes buttons, menu items, dialog options, keyboard keys, and icons. Throughout the guide you will find links to videos ( All other links within the text will take you to other sections of this user guide. You can use these links to quickly skip to other parts of interest. 5

7 Downloading & Installing The Best Spinner After you have signed up and paid for a software download of The Best Spinner, you will receive an with a download link. It will look similar to the following image: To download and install The Best Spinner 1. Click the link in the Your internet browser will open and will ask you what to do with the file. Note that it will depend on your browser (e.g. Firefox, Chrome, Internet Explorer) and on your browser settings, how you will be asked what to do with the file and where to save it. Some browsers save to a certain folder by default, whereas others will always ask you where to save a file. TIP: Refer to the support pages of your specific browser if you are not comfortable downloading files from the internet and saving them to a specific location on your computer. 3. Save the file to your computer. Make sure you remember which folder you are saving the file to, so you will be able to find it again later. 4. After you have saved the file to your computer, open the folder in which you have saved it. 5. Right click the file. A context menu will open. 6. Select Run as administrator from the context menu to start the installation. Windows may display the User Account Control as shown in the following image and ask you to confirm that you have initiated the installation of the file. 6
8 7. If you see this message, click Allow to continue with the installation. 8. The Best Spinner setup wizard will guide you through the installation process. The first dialog box shows the Installation Options. 9. If you do not want The Best Spinner to add start menu shortcuts, then uncheck the Start Menu Shortcuts checkbox. If you do want The Best Spinner to add start menu shortcuts, click Next. 10. The next window allows you to choose the folder where you want to install The Best Spinner. For most people the suggested folder will be fine. 11. To change the folder, click and select the desired folder on your computer. 7
9 12. To accept the suggested folder and start the installation, click Install. The installation does not take long and you will soon see a message that the installation was completed. 13. Click Close to close the setup wizard. You have successfully installed The Best Spinner. Installing the Microsoft.NET Framework If you have trouble starting the application after the installation, you may also need to download and install the Microsoft.NET Framework Version 2.0 Redistributable Package (x86). Use the link below to get the correct version: b0d- 8edd- aab15c5e04f5 8


10 Opening The Best Spinner for the First Time VIDEO: video. (5:36 mins.) To open The Best Spinner 1. Click the Windows Start button, and click All Programs. 2. Find the folder called TheBestSpinner3 in the list of installed programs. If you have a lot of programs installed, you may need to scroll down to find the folder. 3. First click the folder called TheBestSpinner3 to open it and then click TheBestSpinner. The Login window will open. You have to log in every time you use The Best Spinner, so that the application can get the latest thesaurus data. 9


11 4. Enter the login details ( address and password) that you received in the together with the download link for the software. NOTE: Forgot your password? Click here! link. A new password will be ed to you. Make sure to add thebestspinner.com to 5. Check the Save my login information checkbox if you want The Best Spinner to remember your login details. 6. Click Login to start the software. The Best Spinner will open as shown in the following image, ready for you to spin your first article. The next step is for you to learn how to work with The Best Spinner. 10
12 Remember that The Best Spinner offers a lot of functionality and that it may take you a while to get the most out of all the available options. In the next chapters all functionality will be discussed step by step. 11
13 Adding an article to The Best Spinner To start spinning any article with The Best Spinner, you need to get the text of that article into The Best Spinner first. There are three ways to do that: 1. Open an existing article (that you have on your computer) in The Best Spinner 2. Paste an existing article in The Best Spinner 3. Type an article in The Best Spinner VIDEO: For an overview of loading and preparing content for spinning, watch this video. (3:07 mins.) Opening an Existing Article in The Best Spinner To open an existing article in The Best Spinner 1. Click the Open button on the quick access toolbar along the top of the application. 2. Alternatively, you can click the button with the pencil in the upper left- hand corner of the application and select Open on the menu. 3. Both methods will open a window that allows you to navigate to the correct folder on your computer and select a file to open in The Best Spinner. 12

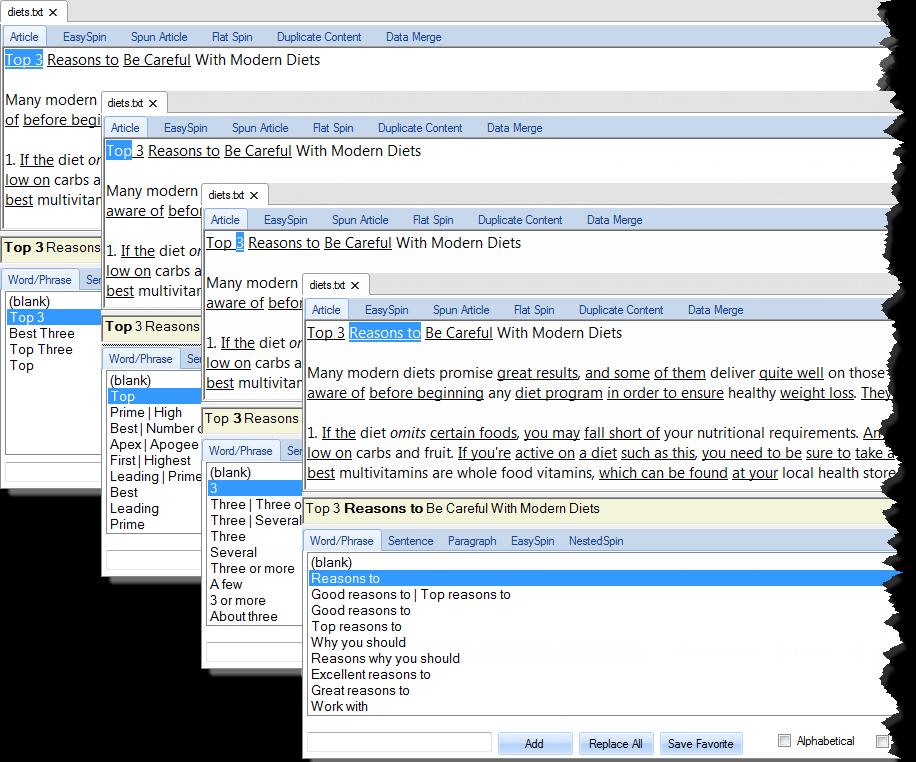
14 4. Select the file and then click Open to load the article into The Best Spinner. NOTE: The Best Spinner can only work with plain text files. A plain text file is a file without any formatting. Such files will have the.txt extension. The Best Spinner cannot work with Microsoft Word documents. The problem with Word documents is that they typically contain extended characters, such as smart quotes, that can cause The Best Spinner to crash. Bullets and other text decoration elements can also cause problems. Make any text as format- free as possible before opening it in The Best Spinner. 5. The article will be opened as shown in the following image. 13

15 6. Note that The Best Spinner has loaded the article in a new tab that displays the name of the original file (diets.txt in this example). 7. When you have opened your article in The Best Spinner, click Identify Synonyms on the Spin Tools tab on the ribbon. This will start the process of checking all words in the article against the massive synonym database to get the article ready for spinning. Pasting an Existing Article in The Best Spinner The Best Spinner allows you to paste existing articles from other sources (e.g. a web page or a plain text file) into the program and work with them. To paste an existing article in The Best Spinner 1. Select and copy the text of the article. You can use your mouse to make a selection or press Ctrl + A on your keyboard to select all text. Selected text will be highlighted in blue. 14


16 2. Copy the text to your clipboard 1 by pressing Ctrl + C on your keyboard. 3. Open The Best Spinner and do one of the following: Click Paste in the Clipboard section of the ribbon. Click inside the blank Article Window. Then press Ctrl + V on your keyboard. Right click inside the blank article window and select Paste from the menu that appears. The text will appear as shown in the following image. Note that the article is displayed in the New Article tab. 1 The clipboard is a built- in temporary memory function of your computer. When you use the copy function (or Ctrl + C) in any program, your computer will remember what you copied so you can paste it somewhere else (e.g. another program). 15


17 4. When you have pasted your article into The Best Spinner, click Identify Synonyms on the Spin Tools tab on the ribbon. This will start the process of checking all words in the article against the massive synonym database to get the article ready for spinning. Typing a New Article in The Best Spinner If you still need to write an article that you want to spin later, you can also type that article in The Best Spinner directly. To write an article in The Best Spinner 1. Click in the blank Article Window and start typing as you would in any text editor. When you have finished typing your article into The Best Spinner, click Identify Synonyms on the Spin Tools tab on the ribbon. This will start the process of checking all words in the article against the massive synonym database to get the article ready for spinning. 16

18 Getting Ready to Spin your First Article The Best Spinner offers many different ways of spinning articles. This chapter explains how to get ready to start spinning your first article. In the next chapters the different spinning methods will be discussed. 1. Spinning an article by r 2. Spinning an article by manually selecting synonyms 3. Spinning one version of an article by replacing words 4. Spinning sentences and paragraphs To spin your first article 1. Make sure to have your article ready in The Best Spinner as shown in the following image. TIP: For instructions on how to open, paste, or type an article in The Best Spinner, see the chapter called Adding an article to The Best Spinner. 2. s thesaurus contains millions of words and most of the text in the Article Window will be instantly recognized by the software. The Best Spinner even identifies synonym alternatives for entire phrases, which are indicated by the underlined text. When a word is displayed in italics it means there was no synonym found in The Best Spinner's database. 17

19 3. As you can see in the article in the preceding image, virtually every word has been recognized by The Best Spinner's synonym database. Identifying Synonyms 4. If yo lick Identify Synonyms on the Spin Tools tab to make sure The Best Spinner identifies all possible synonym variations for your article. 5. After clicking Identify Synonyms only the words that are not in the huge user- built thesaurus are in italics. 6. All other words have been recognized by The Best Spinner. You can verify this by selecting any word in your article. The Best Spinner will immediately display all the available synonyms for that word in the Synonym Window. 18

20 7. Use the scroll bar on the right to see even more synonyms for the same word. If you prefer to order synonyms alphabetically, check the Alphabetical checkbox at the bottom of the synonym window. 8. built by the thousands and thousands of users as they use the program. And the thesaurus is not limited to individual words. If you select a phrase, The Best Spinner will give you a list of synonyms for that entire phrase, as shown in the following image. 19
.")


21 Spinning an Article by Replacing E Favorites By far the quickest way to spin an article is by your article, identify the favorite synonyms of other users spintax). VIDEO: For an video. (4:57 mins.) : 1. Make sure to have your article open in The Best Spinner. Click on the Spin Tools tab on the ribbon. 2. The dialog box will open. 3. Use the dropdown list to select the quality level of the favorites that will be used. Good yields the most synonyms, but the spins will be of lower quality. 20
.")
22 Better yields less synonyms, but the spins will be of higher quality. Best yields the fewest synonyms, but the highest quality spins. Best- >Better- >Good performs three replacement passes in the stated order (best, better, then good). You'll need to experiment to see what suits your way of working, but generally you should start with Best, until you're used to The Best Spinner. 4. If your article is already in spin format and you wish to create additional spin levels, check. 5. The advanced settings are optional, but allow you to tailor the Everyone's Favorites operation to your specific needs. 6. Keeping the original word found in the article is set by default, but deselecting this option may make your spun copies less prone to duplication issues. You can also make The Best Spinner choose only the absolute best synonyms for your spins. If your article is already spin- formatted and has Nested Spins, you can set the Spin Levels you wish to apply Everyone's Favorites to. For example, setting Spin Levels from 1 to 2 means that Replace Everyone's Favorites will only apply to already spin- formatted content, at levels 1 and 2. Unspun / original text, and Nested Spins deeper than level 2, will not be affected. Finally, you can set the maximum number of synonyms creating the new spintax. 7. For now, select Best in the Select Quality Level dropdown list and ignore the rest of the settings in the dialog box. 8. Click Replace. 9. The Best Spinner takes just a few moments to analyze your text and then adds multiple spin variations to your article, based on the user- built synonym database. 21

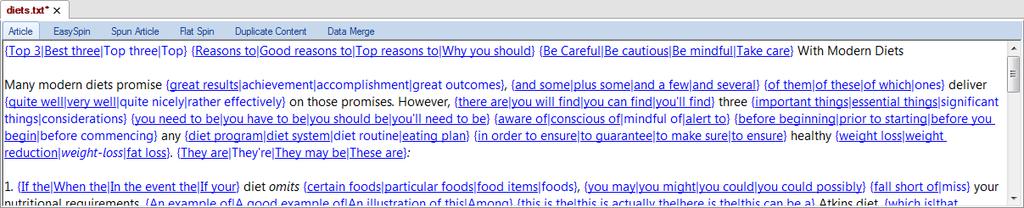
23 10. The following image shows what your article may look like after The Best Spinner has spin- formatted your article. 11. The blue text inside the curly brackets is your spintax, out of which The Best Spinner will create unique article variations. As you can see, The Best Spinner has done an enormous amount of work for you, and with a few click of your mouse you have realized 36% uniqueness already. NOTE: Of course it is important to check for quality when using any of The Best Spinner's automated tools, but using Everyone's Favorites can increase your spin output, which can really add up in weeks, months and years of spinning. Removing a Synonym from the Spintax The next step is for you to manually review the synonyms that The Best Spinner has added to your article and make sense in this context or result in grammatically incorrect sentences. In the sentence below the word being remove it from the spintax. 22

24 To remove a word from the spintax 1. Press Ctrl on your keyboard and then click on the word inside the spintax. The word will be removed instantly. 2. If you remove all of the synonyms, the spintax brackets will be removed completely, as shown in the following image. Viewing a Spun Article After adding synonyms, you will probably want to see the result. It is good practice to check your spins to make sure synonym choices are appropriate and that your spun articles make sense. VIDEO: For an overview of checking the quality of your spins, watch this video To view a spun version of an article 1. Click the Spun Article tab right above the article window. 2. The Spun Article tab shows you a single version of your spin-formatted article that has been created using the synonyms in the spintax. 3. To generate a new version of a spun article, click New Spin. The Best Spinner will select another combination of synonyms to create a different version of the article. There is no limit to the number of articles you can output. 23


25 4. Every time you click New Spin, The Best Spinner works through your article's spintax, and randomly chooses synonyms to output another unique variation of your article. This process is very fast, but very long articles can take a little longer. By generating new spins a few times, you will see if your spintax is working well. Removing Synonyms Directly on the Spun Article Tab Reading through the different versions of the articles you may conclude that you need to remove synonyms from the spintax. The quickest way to do this is directly from the Spun Article tab. To remove a synonym on the Spun Article tab 1. Click the word you want to remove. The Synonym Window will display all the synonyms you selected for the word. 24

26 2. Deselect any synonym by clicking it in the article window. The Best Spinner will no longer use the word in new spin versions of the article. 3. Alternatively, you can switch back to your the Article tab to remove synonyms. Copying a Spun Article to another Application When you have finished spinning your article and are happy with the way it looks, you may want to copy it to another application such as NotePad or Word so you can save, print, or edit it. VIDEO: For an overview of copying a spun article to another application, watch this video. (2:46 mins.) To copy your spun article 1. Go to the Spun Article tab. 2. Click Copy on the Spin Tools tab on the ribbon. 3. The text of your spun article memory) and you will see a message appear at the bottom of the synonym window, confirming this. 4. Open the application where you want to use your spun article. Most applications offer several ways to paste text. o You can right- click your mouse to bring up a context menu. From the context menu, select Paste. Note that based on the application you are using, the context menu may look different from what is shown in the following image. 25


27 o You can press Ctrl + V on your keyboard. o You can select Paste from the Edit, Paste, in Word select Paste on the Home tab on the ribbon) 5. You should now have your text available for you to save it, print it, format it, etc. Publishing a Spun Article to your Blog When you have finished spinning your article and are happy with the way it looks, you may want to publish it on your blog. You can do this by copying the spun article text from The Best Spinner and pasting it into a new blog post, but if you have a WordPress blog, the quickest way is to use the built- in Post to Blog feature. VIDEO: For an overview of publishing your spun articles, watch this video (6:01 mins.) 26


28 To publish your spun article 1. Go to the Spun Article tab. 2. Click Post To Blog on the Publish tab on the ribbon. A popup window will open. 3. Click Add Blog and enter your Blog Details on the right, as shown in the preceding image. 4. Click Save to have The Best Spinner verify the connection. NOTE: For security reasons, only WordPress Author credentials are allowed when setting up a connection between The Best Spinner and a WordPress blog. This eliminates the security risk of giving The Best Spinner Administrator access to your WordPress account. 5. If the details are correct, you will see a confirmation. 27

29 6. Select the Blog Category you want to post the entry in and click Post To Blog. Uncheck Publish post immediately if you prefer the post to be added to the blog as Draft. You will have to go into your blog to publish the post. If you want the post to be published immediately, leave Publish post immediately checked. 7. You can easily add (or delete) other blogs by using the buttons at the bottom of this window. 8. The Best Spinner will confirm that the post was added to your blog successfully. 9. You can go to your blog to verify that the post was published. 28
30 When you p Article Directory, you give other users permission to use your articles. This helps you build valuable backlinks with every user who chooses to use your submitted articles. VIDEO: For an overview of publishing your spun articles, watch this video. (6:01 mins.) TIP: Before submitting any articles to the article directory, it is important that you understand our quality and content guidelines to avoid delays in approval: Article Submission Guidelines To publish a spin- 1. Make sure to have your spin- formatted article loaded in The Best Spinner. If you want to use a spin- formatted article from another source, skip to step Click Article Directory on the Publish tab on the ribbon. 3. The Article Directory window opens. On the left you see the list of categories in the Article Directory, followed by the number of articles in that catory (in brackets). 29
31 4. Click the New Submission tab. 30

32 5. Select a Category, enter your name (Author), and enter the article Title. Decide if you want other people to only be able to use spun versions of your article. Check the checkbox below the article accordingly. NOTE: Even when you allow users to modify your articles, it is against The Best Spinner policy for users to remove any of the links present in your article. 6. Click Load Article From Editor or paste a spin- formatted article from another source. Note that if you want to use an article from another source, it needs to be in The Best Spinner's standard spintax format to use it. 7. Click Submit For Review. 8. Once the article is submitted, you can check its status on the My Submissions tab. 9. Once the article is accepted in the directory, you can track its stats, such as the number of times it was viewed and to how many blogs it was posted. 31


33 Verifying the Uniqueness of your Articles After you have spun an article and are happy with the quality, you need to verify its uniqueness. The Best Spinner offers two ways to verify uniqueness. You can do this right from the Spun Article tab by clicking TBS Check or Copyscape Check. VIDEO: For an overview of verifying the uniqueness of your articles, watch this video (4:19 mins.) It will depend on your personal preferences which check you prefer. The Best Spinner Check is free to use, but Copyscape requires a paid account / API key. TIP: It's up to you how much you wish to refine your spins for them to pass the duplicate content test, but remember that the more unique your articles, the more they will be indexed as such by the search engines. Copyscape Check you can sign up for it here: To check your articles with Copyscape 1. Make sure your Copyscape username and API key have been correctly entered on the Settings and Options tab on the ribbon. 2. Click Copyscape Check on the Spun Article tab. 3. The Duplicate Content tab will open and The Best Spinner will make contact with Copyscape to check the uniqueness of your article. This can take a few moments. 32


34 4. The Best Spinner will then display the results of the Copyscape check. 5. Copyscape will tell you if duplicates were found, and if so, how many duplicates exist, what the URLs of the duplicates are (in case you want to see the entire article), and how many duplicate words are found in your spun article. 6. The most useful indicator is the duplicate text highlight as shown in the following image. The yellow highlights clearly indicate what text you need to change in your article in order to pass the Copyscape check. 33

35 The Best Spinner Check The TBS Check is free and you can use it without having to sign up for anything. To check your articles with The Best Spinner s TBS Check 1. Click TBS Check on the Spun Article tab 2. The Duplicate Content tab will open and The Best Spinner will start checking the uniqueness of your article. This can take a few moments. 3. TBS Checker lists all the URLs of the duplicate documents. 4. Clicking a link in the list once will display the URL in blue at the bottom of the popup window. Click the link in blue to open the original article. 5. Double- click any of the URLs in the list to open a popup window that displays both your spun article and the duplicate document, side- by- side. 34

36 6. The highlighted text indicates the content that is found in both articles, making it extremely easy for you to see what changes need to be made in order to make your spun article more unique. 35

37 Spinning Articles with EasySpin The Best Spinner offers an alternative way of manually spinning words and phrases, called EasySpin. EasySpin is a powerful, visually- driven interface that lists all of the synonym alternatives under each word and phrase recognized by The Best Spinner. VIDEO: For an overview of spinning with EasySpin, watch this video. (1:46 mins.) To spin your articles with EasySpin 1. Make sure to have your article open in The Best Spinner. 2. Click the EasySpin tab. 3. Individual synonym windows are displayed under each word, with phrase alternatives when available. 4. The original text appears in bold for easy reference, with a colored background when synonym phrases have been identified. 36


38 5. Just highlight the synonyms you wish to use, moving from one word or phrase to the next with great ease and speed. 6. You can check your article's spintax by clicking the Article tab. 7. The article is spun in exactly the same way as when spinning on the Article tab. 8. When working on the Article tab, you can also work on a split Article / EasySpin layout by clicking the EasySpin tab in the synonym window. 37

39 9. In this case, EasySpin displays all of the synonym alternatives, one sentence at a time. Working through your articles in default Article Spin mode or the alternative EasySpin method is a matter of personal choice. Choose the technique that works best for you. 38

40 Spinning an Article by Manually Selecting Synonyms You can use The Best Spinner to handpick the synonyms for your spintax that will allow you to create hundreds of high quality spun articles. This chapter explains how. VIDEO: For an overview of manually spinning words and phrases, watch this video. (2:55 mins.) Selecting Synonyms Manually To manually select synonyms for the words and phrases in your articles 1. Make sure to have your article open in The Best Spinner. 2. Identify Synonyms on the Spin Tools tab on the ribbon. 3. Put your cursor before the first word of the first sentence (or the title) or your article. 4. Now use either the Tab key on your keyboard or the button as indicated in the preceding image to navigate through your text and select words and phrases. 39

41 5. If you press the Tab key or click a few times in a row, you will see how The Best Spinner steps through the text of your article. The synonyms for the word that is selected in the Article Window are displayed in the bottom half of the window, the Synonym Window. 6. Use Shift + Tab on your keyboard or the button in The Best Spinner to move backwards through the words and phrases of the article. 7. When you are tabbing through your article and The Best Spinner comes across a phrase, it will first select and provide synonyms for the phrase, and then select and provide synonyms for the individual words within that phrase. This is demonstrated in the following image. 40
42 41
 along with several alternative words and phrases as visible in the preceding image.")
. Spintax is indicated by curly brackets: { and }.")
43 Selecting Synonyms for Words and Phrases When you step through the words and phrases of your article, you will see the synonyms for those words and phrases displayed in the Synonym Window of The Best Spinner. The synonym list displays the original word or phrase (highlighted in blue) along with several alternative words and phrases as visible in the preceding image. To add a synonym to your article 1. Click that synonym in the list. 2. The synonym will be highlighted blue in the list and be added to the original word in your article to create your spintax (spin syntax). Spintax is indicated by curly brackets: { and }. The words/phrases and synonyms within the spintax are separated by a pipe bar. 3. In the preceding images you can see how spintax is created for the word Modern by adding the synonym Contemporary. As soon as you move to the next word in the article, you will see how the original words and all associated synonyms have turned blue and are put within curly brackets. 4. If you add more synonyms, the spintax for the word Modern might look like this: Note how phrases within the spintax are underlined to easily distinguish them from single words. The Best Spinner will use the spintax to create unique variations of the article. You can add as many synonyms as you like, as long as they make sense in the article and produce grammatically correct sentences. 42


44 5. As you move through the text of your article, adding synonyms for all the words and phrases, your spintax will soon look something like this. Speeding up Your Spinning with SpinGroups You may have noticed that some synonyms in the synonym list are grouped together. These are called SpinGroups, and using them can greatly speed up your spinning. Instead of picking through individual synonyms, one by one, selecting a spin group allows you to insert several contextually related synonyms in one click. This makes spinning your articles and creating multi- synonym spintax much more efficient and will help you increase the uniqueness of your articles. SpinGroups are grouped based on context and meaning. For examp /, or I Grouping synonyms by context was designed to help you speed up your spinning by allowing you to create multi- synonym spintax with just one click. You can combine individual synonyms and SpinGroups to create your spintax. 43
45 Remember that the whole essence of spinning is to go through all the words and phrases in your article and add as many spin variations as you can think of. NOTE: The SpinGroups feature is enabled by default in the Settings and Options menu. You can turn it off, but using SpinGroups is highly recommended for optimizing spinning performance. Removing a Synonym or Spin Group from The Spintax To remove a word from the spintax, press Ctrl on your keyboard and then click on the word inside the spintax. The word will be instantly removed. Alternatively, you can click a highlighted synonym in the list of synonyms to remove it from the spintax. You can also click a highlighted Spin Group to remove all synonyms in that group from the spintax. 44
46 Spinning One Version of an Article by Replacing Words If you don't need to generate dozens or hundreds of variations of an article, but just need to get one great rewrite super- fast, The Best Spinner's built- in Replace feature makes that easy to do. VIDEO: For an overview of rewriting an article by replacing words, watch this video. (0:48 mins.) When rewriting an article with the Replace feature, you work in exactly the same way as you would to create spintax, but instead of adding synonyms to the original words in article, you replace those words with a synonym. This will have the effect of replacing your original text with one new version only, instead of creating the multi- synonym spintax designed to generate multiple article variations. You work through your content choosing the best suitable synonym, until you have completely rewritten your article. To rewrite an article with the Replace feature 1. Make sure to have your article open in The Best Spinner. 2. Identify Synonyms on the Spin Tools tab on the ribbon. 3. Check the Replace checkbox at the bottom of the program, below the synonym window. 45


47 4. Put your cursor before the first word of the first sentence (or the title) or your article and use either the Tab key on your keyboard or the button in The Best Spinner to navigate through your text and select words and phrases. 5. When a word or phrase is selected, the synonym window will display all synonyms. 46
48 6. Select the best synonym by clicking it. The original word or phrase will be instantly replaced by the synonym, and The Best Spinner will move to the next word. The new word/phrase is displayed in gray, indicating that it is a replacement of the original. 7. Keep selecting synonyms and moving through your article to replace as much as possible of the original text. You will have created a new version of the article in no time. TIP: When using the Replace feature, it is better to turn SpinGroups off. clutter your list of synonyms with spin groups when creating a single new version of your article. The following images show an original sentence (top image, first sentence) and the completely rewritten version of that same sentence (bottom image, sentence in gray). The sentence says the same thing, but sounds completely different. This is very easy to achieve with The Best Spinner Replace feature and will save you a lot of time. 47
49 Spinning Sentences and Paragraphs One way to further increase the quality of your spins is by spinning entire sentences and paragraphs. This is a powerful way to increase the uniqueness of your articles. Remember that in most cases, the more of the article that you spin, the better your published content will be. TIP: Taking two passes at spinning (paragraphs and sentences first, and then individual words and phrases) can yield extremely well- spun articles quite easily. Spinning Paragraphs VIDEO: For an overview of spinning paragraphs and sentences, watch this video. (2:10 mins.) To spin entire paragraphs 1. Click the Paragraph tab in the synonym window. 2. To select a paragraph, click your cursor anywhere in the previous paragraph and press Tab on your keyboard or use the button. The entire paragraph will be selected. Alternatively, you can double- click anywhere inside a sentence to select the sentence. Alternatively, you can select a paragraph with your mouse. 48

50 3. To add a rewrite of the paragraph, type the rewrite in the text box below the synonym window as shown in the following image. 4. Click Add to add the new paragraph to the list of synonyms and to your article. The original and the alternative paragraphs now form a new spintax. 49

, The Best Spinner will randomly select one of the")
51 5. Repeat the process as many times as you like to add several alternatives to the original paragraph. This is a very powerful spinning strategy that will significantly increase the uniqueness of your articles in the eyes of the search engines. 6. When you spin the article (go to the Spun Article tab and click New Spin), The Best Spinner will randomly select one of the paragraphs in your spintax. 7. When you have finished adding rewrites for your paragraphs, the next step is to spin sentences. 50
 To spin sentences 1. Click the Sentence tab in the synonym window. 2.")
52 Spinning Sentences Spinning entire sentences is very similar to spinning paragraphs as discussed in the preceding section of this manual. VIDEO: For an overview of spinning paragraphs and sentences, watch this video. (2:10 mins.) To spin sentences 1. Click the Sentence tab in the synonym window. 2. To select a sentence, click your cursor anywhere in the sentence and press Tab on your keyboard or use the button. The entire sentence will be selected. Alternatively, you can double- click anywhere inside a sentence to select the sentence. 3. To add a rewrite of the sentence, type the rewrite in the text box below the synonym window as shown in the following image. 51

53 4. Click Add to add the new sentence to the list of synonyms and to your article. The original and the alternative sentence now form a new spintax. 52


54 5. Press Tab on your keyboard or use the button to move to the next sentence. You will now see that the sentences have become a nested spin, because the paragraph was spun first. The nested spin is highlighted in another color, as shown in the following image. Note that spin colors can be adjusted in the Settings and Options menu. 6. Repeat the process as many times as you like to add several alternatives to the original sentence. This is a very powerful spinning strategy that will significantly increase the uniqueness of your articles in the eyes of the search engines. 7. When you spin the article (go to the Spun Article tab and click New Spin), The Best Spinner will randomly select one of the sentences in your spintax. 8. When you have finished adding rewrites for your sentences, the next step is to spin individual phrases and words. 53

 Protecting Terms To protect terms 1. Right- click the word or term you want to protect and select. 2.")
55 Protecting Words and Phrases Protected Terms is a feature of The Best Spinner that can significantly reduce your post- spin cleanup time. When you spin your articles, there are times when you may want to protect certain words or phrases from being spun by The Best Spinner. Such terms could be a brand name, a name of a product, a trademark, or a particular saying you wish to keep intact. You can ensure that by using the Protected Terms function. VIDEO: For an overview of protecting words and phrases, watch this video. (3:40 mins.) Protecting Terms To protect terms 1. Right- click the word or term you want to protect and select. 2. The word(s)/term(s) you protect will be saved to the #DEFAULT# Category of the Protected Terms list and be highlighted in bold 3. The terms you have protected will be skipped by The Best Spinner when using automatic features such as Auto Rewrite, Auto Select Synonyms,, etc. 54


56 Managing your Protected Terms Saving terms in the default category as explained in the preceding sections is great for generic or common words you wish to protect. But The Best Spinner also allows you to create specific categories of protected terms. To manage your protected terms 1. Click Protected Terms on the Setting and Options tab on the ribbon. 2. This will open the Protected Terms window where you can delete protected terms, organize protected terms into categories and bulk add protected terms. ADDING A PROTECTED TERMS CATEGORY To add a category 1. Click Add next to the Protected Terms Category dropdown and type the category name in the Add Category pop up window that opens. 55


57 . 2. Click OK to save the new category. 3. When adding new protected terms, make sure to have the correct category selected in the dropdown. 4. After you have added a category, you can save Protected Terms to that category from the context menu in the Article Window. 5. First select the category from the dropdown list, then click Protec. ADDING A PROTECTED TERM To add a protected term 1. Select the correct category (if you have multiple categories) from the dropdown list in the Protected Terms window. 56

 To delete a protcted term 1.")
58 2. Click Add Term at the bottom of the Protected Terms window and type the term in Add Term pop up window that opens. 3. Click OK to save the term to the list. The pop up window will stay open for you to quickly add a series of protected terms. Click Cancel to close the pop up. DELETING ONE OR ALL PROTECTED TERM(S) To delete a protcted term 1. Select the term in the list of protected terms. 2. Click Delete Term. 3. Delete All. You will 57
59 BULK ADD PROTECTED TERMS To bulk add protected terms 1. Click Bulk Add at the bottom of the Protected Terms window. 2. In the window that opens, enter your protected terms one word/phrase per line. 3. Alternatively, you can copy and paste a list of terms from another source such as a word processing document 4. Click OK to save the list. 58


60 Working with Multiple Articles at the Same Time The Best Spinner allows you to work on several articles at once and you can open or create more than one article, with each article displayed under its own tab. This allows you to easily switch between articles, without the need to open and close each article document. This multi- tab article architecture is also designed to facilitate the execution of common tasks on several articles simultaneously. Notice that the following icons on the Spin Tools tab on the ribbon have a small arrow to their right: Identify Synonyms, Auto Rewrite, Auto- Select Synonyms, Replace My Favorites, Everyone's Favorites, Remove Original Word and Check Spelling. When using the arrow instead of the button itself, these actions can be applied to all articles that you have open in The Best Spinner. For example, when you click the arrow next to Check Spelling, you can choose to check the spelling for All Open Articles. The Best Spinner will cycle through all open articles to check the spelling. This multi- tab spinning capability makes your spinning much more efficient when working on several open articles at once. 59

61 Creating and Managing Hyperlinks The Best Spinner lets you add hyperlinks to your articles, verify if they work from within the application, and manage your hyperlinks. The Best Spinner can also spin your hyperlinks based on keyword and target URL. VIDEO: For an overview of creating and managing hyperlinks, watch this video. (4:01 mins.) Creating Hyperlinks To create a hyperlink 1. Select and then right- click the text you want to create the link for. This will bring up a context menu. 2. Click Create Hyperlink. The following window will open. 3. Enter the full URL of the website or webpage you want to link to. 60
62 4. Click OK. 5. The new hyperlink is displayed in the article window in HTML format, showing the original/selected text, which is also called the anchor text, and the target URL. 6. Alternatively, you can type the hyperlink HTML code directly in the article window. The Best Spinner will complete the hyperlink code by adding the closing tag, and your cursor will be blinking at the right position for you to enter the anchor text. This functionality applies to all HTML code you type directly in the article window. Spinning Your Hyperlinks An important strategy in search engine optimization consists of creating backlinks to a target site based on keywords you wish to rank for. To be effective, those backlinks need to have: Keyword diversity: the anchor text of all those backlinks pointing to your site cannot be exactly the same because that does not look natural in the eyes of the search engines and may result in some of those links being discounted. Landing page diversity: backlinks must not all point to the same target URL for the same reason; it does not look natural to the search engines. This means you will have to spin your hyperlinks. The Best Spinner allows you to do this easily and quickly through its Hyperlink Manager. Managing Your Links with the Hyperlink Manager To open the Hyperlink Manager 1. Right- click anywhere within the article window to bring up a context menu. 61


63 2. Click Hyperlink Manager. The Hyperlink Manager window will open. 3. Click New to create a hyperlink. The fields in the Hyperlink Details section will become editable. 4. Create a Category simply by entering a category name. You can use categories to group multiple hyperlinks under a similar theme. 5. Enter a keyword. This is the word/phrase that will be replaced by a link by The Best Spinner. In the example above, every time The Best Spinner comes across the word diet it will replace it with a link. 62
64 6. Enter a keyword, or multiple keywords, in the Replace With Keywords field. The link that will be created by The Best Spinner will contain the keywords you enter in this field. If you want to use multiple keywords so The Best Spinner can spin them, you will have to enter them in spin format. {keyword1 keyword2 keyword3 etc.}. 7. Enter the destination website or web pages in the Hyperlink URLs field. If you want to use multiple web pages so The Best Spinner can spin them, you will have to enter the URLs in spin format. { etc.} 8. Click OK to save these settings. The hyperlink will be added to the list as shown in the following image. There is no limit the number of article words and phrases you can transform into hyperlinks. However, to keep things organized, you may occasionally want to delete hyperlinks you no longer intend to use. Applying Hyperlinks To apply the hyperlinks you created in the Hyperlink Manager 1. Right- click anywhere in your article to bring up the context menu. 63


65 2. Click Replace With Hyperlinks. A popup window opens. 3. Select the category of links you wish to use, as well as the number of occurrences of each article keyword you want the Hyperlink Manager to replace with a link. You can choose to replace All occurrences or any number of occurences between the First to the First Click OK. New links will be created instantly based on your hyperlink management criteria. TIP: s advanced but easy to use hyperlinking capability to make your spinning more efficient and boost the quality of your backlinks at the same time. 64

 Using the Project Management Window By default the Project Management Window is hidden from view.")

66 Creating and Managing Projects The Best Spinner allows you to create and manage sophisticated spinning projects in just a few clicks. Using projects allows you to speed up your spinning significantly by performing actions to all documents within a project. Executing tasks at project- level can be a tremendous time saver. VIDEO: For an overview of creating and managing projects, watch this video. (6:48 mins.) Using the Project Management Window By default the Project Management Window is hidden from view. Hover your mouse over the Project tab to the left of the article window call out the Project Management Window. Note that the Project Management Window will hide again when you move your mouse somewhere else. To force the Project Management Window to stay open and facilitate working with the project, click the pin in the upper right- hand corner of the window. 65


67 The article window will be resized so the Project Management Window text. Creating a New Project To create a project 1. Click Create Project on the Project tab on the ribbon. Alternatively, press CTRL + SHIFT + N on your keyboard. 2. A new project will be created and all open articles will be automatically added to the project. Any new article you open will also be added to the project. 3. Right- click the Project to bring up a context menu with several options. 66

68 4. The options in the context menu allow you to do the following: Rename Add New Article Add New Folder Import Files Rename the Project or Article. Add a new article tab to the list of tabs for the project. In the project window this article will be shown as New Document. Add a new folder to the project. This allows you to further organize the articles within the project. Import files into the Project or a Folder. Use Ctrl on your keyboard to select multiple files at once. You can also use Import Files on the Project tab on the ribbon. Import Folder Import folders into the Project or a Folder. Select a folder containing one or more plain- text (.txt) files. The text files in the selected folder will be replaced with their new spun version. You can also use Import Folder on the Project tab on the ribbon. Remove Article From Project Auto Rewrite Auto- Select Synonyms Replace My Favorites Remove an article or an entire folder from your project. Apply Auto Rewrite to a single article, a folder, or to the entire project. Apply Auto- Select Synonyms to a single article, a folder, or to the entire project. Apply Replace My Favorites to a single article, a folder, or to the entire project. Apply to a single article, a folder, or to the entire project. NOTE: The action depends on whether you have right- clicked the Project, an article, or a folder. 67
folder will be added to the project. 4.")
69 Creating Folders and Subfolders To create a folder or subfolder 1. Click the main project folder or any other folder that you want to create a folder under. 2. Click New Folder on the Project tab on the ribbon. 3. The new (sub)folder will be added to the project. 4. You can now add articles by either importing or creating new ones or by pressing CTRL+N on your keyboard. 68

70 Saving the Articles within a Project and Saving the Project As shown in the following image, some articles are in red. This means that recent changes were made to those articles that still need to be saved. Clicking Save on the quick access bar or pressing Ctrl + S on your keyboard button will prompt you with a succession of popup windows. Because this is a new project, you will first be prompted to save the project and then to save each of the new, unsaved articles. Projects are saved with the.tbs extension. Opening an Existing Project To open an existing project, click the pencil button in the upper left- hand corner of the application. Select the project from the list of recent projects and articles (if available) or click Open on the menu and browse for the project on your computer. Alternatively, you can click Open on the quick access toolbar. Remember that The Best Spinner projects can be recognized by the.tbs extension. Closing a Project To close a project and revert back to working on individual articles, click the arrow next to the New icon on the quick access toolbar and select New Stand Alone Article. 69

71 Mastering the Synonym Window The Synonym Window is probably the most important window in the software, as this is where most of the manual spinning functions are located. But it is also where you will clean up your automated spins. For these reasons, mastering the Synonym Window is key to your spinning success. VIDEO: For an overview of mastering the synonym window, watch this video. (6:59 mins.) Understanding the Synonym Window The Synonym Window lists all of the available synonyms for words and phrases, sorting them based on usage popularity. The most- used synonyms (as per the software's extensive user base) are listed first, which makes The Best Spinner's thesaurus more intelligent than a canned listing of all possible synonyms. Highlighted text words, phrases, and SpinGroups are synonyms that make up the spin- formatted content of your article, also called spintax, as shown in the preceding image. Clicking on synonyms in the Synonym Window will highlight them blue and include them in the spintax, while clicking on the highlighted ones will remove them. Removing synonyms this way is useful when cleaning up automated spins. 70


72 Adding Synonyms to the Synonym Window If there are synonyms variations that you would like to use in your article but that are not listed in The Best Spinner's thesaurus, you can manually include them in your spins by using the Add field at the bottom of the Synonym Window. Enter the term and click Add to add the synonym to the Synonym Window as well as the spintax. If you Window. It will no longer be highlighted blue and it will be removed from your spintax. Removing Synonyms from the Synonym Window You can also remove synonyms from the Synonym Window. To remove a synonym, right- click the synonym in the Synonym Window to bring up a removal message. Click the message to confirm removal. 71

73 Speeding up Your Spinning There are a number of features available in the Synonym Window that will make your manual spinning and post- spinning cleanup faster. SPINGROUPS While manually working on your article, make sure you make full use of SpinGroups to speed up your spinning. SpinGroups are synonym groupings made up of the most popular synonyms used by The Best Spinner's extensive user base. More about SpinGroups. REPLACE ALL Another feature designed to speed up manual spinning is the Replace All function. As the name implies, you can apply a particular spintax to all instances of a specific word or phrase. For example, if you come across the word diets for the first time, you will create the spintax for it as you normally would. You might end up with something like this: Now while your newly created spintax is still highlighted blue in the Article Window, click Replace All at the bottom of the Synonym Window. Throughout your entire article, the word diets will be instantly replaced by the same spintax. 72

74 This is a great feature to improve your spinning efficiency. SAVE FAVORITE An extension of the Replace All concept is Save Favorite. If you have found a great synonym grouping that you wish to reuse in future article spinnings, you can save that grouping by clicking Save Favorite. More about Creating, Managing and Using Favorites. ALPHABETICAL Check the Alphabetical box to sort the synonyms alphabetically. This is a practical feature if you prefer to alphabetically scan for suitable synonyms, especially if the synonym list is very long. REPLACE Check the Replace box if you wish to simply rewrite your article, and not create spintax. This will replace original text with one synonym- variation only. More about the Replace feature. SPIN SKIP Check the Spin Skip box to jump over already spin- formatted text. With this checkbox ticked, entire spin variations are skipped, immediately jumping to the next un- spun word or phrase. This will help you move forward through your text and land directly on the text you need to work on. 73
75 The Spin Skip option is enabled (checked) by default. Uncheck this option to facilitate the creation of Nested Spins in the Article Window. More about Nested Spinning. Using the Synonym Window Tabs The Synonym window is set to the Word/Phrase tab by default, and changing tabs will change the functions available. If you spin sentences and paragraphs, the Replace All, Save Favorite, Alphabetical and Spin skip options are no longer relevant, and are therefore removed from these tabs. Only the Add field remains on these tabs and you can add as many sentence and paragraph variations to build complex spintax, which will yield extremely well- spun articles. More about Spinning Sentences and Paragraphs. The Add function is also the only option available under the EasySpin tab, but it is accessed different than in the other tabs. To manually add synonyms, right- click inside the small synonym window right under its associated word or phrase. In the popup window that appear you can manually add your synonym. The last tab in the Synonym window is the NestedSpin tab, which allows you to create spins within spins. 74
76 Creating Nested Spins You can significantly increase the uniqueness of your articles by performing multiple levels of spinning. Multi- level spins are called Nested Spins. VIDEO: For an overview of working with nested spins, watch this video. (4:52 mins.) So far this manual has been focused entirely on creating single- level spins: transforming a word or phrase into a spin- formatted grouping of synonyms. But synonyms within that grouping can themselves be transformed into their own spintax, thereby creating spins that are nested within other spins. Visually, Nested Spins look like this: Single- level spin 2 level spin 3 level spin 4 level spin 75
77 There is no limit to the number of levels you can use in your spins. You can go as deep as you want. And the more levels you create, the more likely your articles will be extremely unique. There are two ways you can create Nested Spins. You can use the Article Window or you can use the advanced, visually- driven Nested Spin builder located in the Synonym window. The Best Spinner uses color coding to distinguish the different spin levels and dynamically assigns colors as you create your Nested Spins. This is extremely helpful as Nested Spins can get very complicated very fast, and the different color levels act as great visual reference points. You can customize the spin colors in the Settings and Options menu. Creating Nested Spins in the Article Window To create Nested Spins in the Article Window 1. Step through your text as you normally would, and assign synonyms to create your spintax. 2. Uncheck the Skip Spin checkbox at the bottom of the Synonym Window. 3. Put your cursor at the beginning of your article, and step through your text again. Where possible, assign synonyms to the existing spintax to create second level Nested Spins. 4. further. 5. Go to the Spun Article tab to verify your spins and see the high levels of uniqueness you have managed to create with this technique. Creating Nested Spins with the NestedSpin tab The NestedSpin tab allows you to build complex spins in the Synonym Window by simply pointing and clicking. After a little practice you will notice this is significantly faster than making Nested Spins in the Article Window. To create Nested Spins with the NestedSpin tab 1. Click the NestedSpin tab. 76

78 2. Notice that the synonym list displayed here is exactly the same as the one found in the Word/Phrase tab: level 1, or single- level, spinning options. 3. Select your synonyms as you would under the Word/Phrase tab. Your spintax will be created in the Article Window. However, you will also notice that a second list of synonyms is being displayed in the Synonym Window. 4. The second synonym listing shows the synonym possibilities for a second level of spin. Hover your mouse over any of the synonyms in the first list, to see the synonym options for that word or phrase. In the preceding image, hovering over the word Fashionable shows possible synonyms for that word. 5. To create another level of spin, click a word or phrase from the second level list of synonyms. 77


79 6. Note the Add box at the bottom of every list of synonyms. This gives you the option to manually add synonyms. 7. Keep building as many spin levels as you want to create very unique articles. The more levels you create, the more likely you'll be able to produce a great number of very unique articles. NOTE: Nested Spins can get very complicated, making it difficult to track content meaning and readability. Remember that our spins need to make sense and read well, respecting the quality of our original article. 78

80 Tracking (Nested) Spin Quality An easy way to track spin quality is through the unspun (original) sentence window located just beneath the Article Window. Clicking a word within the spintax will highlight it in bold in the original sentence. This helps you quickly verify if that synonym choice will read well when your article is spun. Continue to select synonyms to verify their readability. 79

81 Creating, Managing and Using Favorites The Best Spinner's Favorites tools will help power spinners significantly speed up their spinning efficiency. A favorite is spintax that has been saved, so that it can be recalled and used in future spins. There are two types of favorites made available by The Best Spinner: 1. Favorites that you create yourself 2. Favorites created by all other The Best Spinner users that you can use in your own spinning This chapter covers the use of your own favorites. M s Favorites. VIDEO: For an overview of creating, managing, and using favorites, watch this video. (6:45 mins.) Creating Your Own Favorites While spinning your content, you sometimes create a great spintax that you know you will use again in the future. To be able to use it again in the future, you will need to save it as a Favorite. To save spintax as a Favorite 1. Highlight the spintax and click Save Favorite in the Synonym Window. 2. The following popup window will open. 80


82 3. From the dropdown list, select the category in which you want to save the favorite and click Add Favorite. 4. More about creating Categories for Favorites. 5. You have now saved this particular spintax for use in future spins. The favorite will be saved under the original word. In the example above spintax was created and saved for the word Modern. So the spintax will be saved under the word Modern. Using Your Own Favorites The next time you work on an article with the same or a fairly similar subject, you can use the Favorites you have added to The Best Spinner earlier. To use your own Favorites 1. Click Replace My Favs on the Spin Tools tab on the ribbon. 2. The following popup window will open. 3. From the dropdown list, select the category you want to use and, depending on your preferences, check or uncheck the checkboxes to leave (or remove) the original word in the article and to replace (or not) favorites inside spun text. Leave original word in article is checked by default, but unchecking it may increase the uniqueness of your article and reduce the chance of content duplication. 81

83 Checking Replace favorites inside spun text is unchecked by default, but checking it is a great way to automatically create multi- level spins. 4. Click Replace. 5. The Best Spinner will go through your article and replace your favorites with the saved spintax. Creating Categories for Favorites You are recommended to create categories for your favorites. Categories are a great way to organize your favorite spins based on such criteria as the type of article you are writing, its style, its theme, etc. There are two ways to create categories. 1. While adding your favorites 2. While managing your favorites (discussed under Managing Your Favorites) To create a category while adding your favorites 1. Select the spintax you want to save as a favorite. 2. Click Save Favorite at the bottom of the Synonym Window to open the following popup window. 3. Click Create New Category to open the following popup window. 4. Enter the Category Name and click OK. Managing Your Favorites Managing your favorites allows you to add, delete, import and export favorites, and manage your favorites categories. To manage your favorites and favorites categories 82

84 1. Click Manage My Favorites on the Spin Tools tab on the ribbon. 2. This will open the following popup window. Select a category from the dropdown list to display all the saved favorite spins for that category. 3. Click a favorite on the left to display all words and phrases that make up the spintax for that favorite. 4. To delete a synonym from the spintax, select it in the list on the right and click Delete below the Synonyms list. 5. To add a synonym to the spintax, click Add below the Synonyms list. A new window will pop up for you to add a synonym. 83
85 6. Enter the synonym and click OK. 7. To add a new category, click New Category. A new window will pop up for you to add a category. 8. When you are done managing your favorites, click Save to save your changes and then click Close. To exit the window without saving changes, just click Close. This is how you use the Manage My Favs option to manage all the terms and corresponding synonyms, by adding and deleting terms, adding and deleting synonyms, and also by importing and exporting a category's terms and spintax, which is a great way to share your personal favorites with other The Best Spinner users. 84

 Spinning with Auto Rewrite The Auto Rewrite function allows you to automatically rewrite your entire article or selected text, by replacing most of the content with the very thesaurus.")
86 Spinning with Automated Tools The Best Spinner offers three automated spinning tools:, Auto Rewrite, and Auto- Select Synonyms. This chapter covers Auto Rewrite and Auto- Select Synonyms. Auto Rewrite is designed to automatically produce a single article, whereas Auto- Select Synonyms is designed to automatically create spin- formatted text. VIDEO: For an overview of spinning with automated tools, watch this video. (5:41 mins.) Spinning with Auto Rewrite The Auto Rewrite function allows you to automatically rewrite your entire article or selected text, by replacing most of the content with the very thesaurus. Please note that this function works best on articles that have straightforward, common language terms. The function may not work very well on complex or very specialized content. Try it first on a short paragraph to see how it works. To spin with Auto Rewrite 1. Select the paragraph you want to have automatically rewritten. 2. Click Auto Rewrite. 3. The Best Spinner will take a second to rewrite the paragraph, and this is how it looks now. The new version is not perfect, but it already reads pretty well. All you have to do now is tweak those parts that need a little improvement, and your text will be completely rewritten. 85

87 Spinning with Auto-Select Synonyms The Auto- Select Synonyms option is designed to automatically and quickly create spin- formatted text. To spin an article with Auto- Select Synonyms 1. Click Auto- Select Synonyms on the Spin Tools tab on the ribbon. 2. The following popup window will open. 3. From the Auto- Select dropdown list, select if you want The Best Spinner to spin Words and Phrases, or Phrases only. 4. Spinning phrases only may reduce the need for post- spinning cleanup, while spinning both words and phrases will increase spun article uniqueness. 5. Set the Maximum number of Synonyms for the auto- generated spintax. 6. Choose the spinning Frequency, choosing from every word, down to every fourth word. The lower the number, the higher the chance you will create unique articles and prevent duplicate content issues. 7. Finally, decide whether you want The Best Spinner to create spins within already spun text or not. Creating spins inside spun text is a quick and effective way to auto- generate multi- level spins. 8. Click Auto- Select to start the process. 9. The article has been automatically spin- formatted based on the automation criteria as shown in the image below. 86
88 87


89 Spinning Multiple Articles with Automated Tools The Best Spinner also allows you to apply auto spin operations to a large number of articles simultaneously. NOTE: To run this function on a set of articles, the articles all need to be located in the same folder. To automatically spin multiple articles 1. Click Bulk Spin on the Publish tab on the ribbon. The Browse For Folder window opens. 2. Navigate to the folder where your articles are located and click OK. The following popup window opens. 3. As you can see, all of automated spinning tools are available: Auto- select Synonyms, Replace My Favorites, Replace Everyone's Favorites, Auto Rewrite, and Generate Spun Articles. 4. Click on the operation you wish to apply to your articles. 5. Depending on the operation you choose, another window will open for you to select the settings for that operation (e.g. when choosing Replace My Favorites you will have to select the category of favorites to replace). 88
90 6. Confirm the settings and all the articles in the folder you selected will be automatically transformed. 89

91 Spinning with Data Merge Data merge is a way of creating a batch of articles that have certain pieces of text, or information, taken from a separate file - the data file. Data merge can be useful if you are writing general articles for hundreds of different towns, for example. The power of data merge is in the numbers. NOTE: It is outside the scope of this user guide to teach you about the concept of data merge. This guide only shows you how to use data merge in The Best Spinner. If you don't know why you might want to use data merge, there's a very good chance you don't need to use it, at least not right now. VIDEO: For an overview of spinning with data merge, watch this video. (3:21 mins.) Background & Prerequisites In this chapter, the following example is used: Assume you are promoting a learning initiative that has new drop- in learning centers for adults in 121 cities. The basic article you write is going to be the same for each center. Specifics, however, such as city name and center address would all vary. And that is where you can save a lot of time using The Best ata merge feature. Suppose that for each center you have the following information: City name Center address Center phone number Center manager details Center opening hours Now you can create 121 spun articles and then go through each one, adding in the details for each city one by one, or you can create a file that looks like the example in the following image. It's a plain text file called edu_fields.csv. A real data merge file might have hundreds of entries, but in the example file there are only 2. The first line of the file is reserved for information headings. 90

92 The next lines (called records) contain data fields that match the headings. In the preceding image the first field is the city name, followed by a comma, the second field is the address, followed by a comma, etc. To be able to use data merge you have to make sure the data file is saved with the.csv extension. In the following image you see a very short example article. The data merge placeholders are marked blue. Notice the format for the placeholders. Every merge data field name is enclosed in brackets, like this: [cname] The placeholders correspond to the field headings from the data file, surrounded by square brackets. When this article is data merged with the data file containing the address and opening hours, it will produce a new article for each line in the data file. There are only 2 records in the example data file (a center in New York, and one in Bakersfield), so only two new articles will be produced, but the process is the same even if you have hundreds of records. Merging Your Data To merge the text of your article with the data fields in your.csv file 1. Click the Data Merge tab. 2. On the Data Merge tab, click Load Data From File. 91


93 3. The Load Merge Data popup window opens. By default, it looks for.csv files. 4. Browse your computer for the location of the file and open it. The data records will be loaded into The Best Spinner and shown on the Data Merge tab. 5. Verify that the content of the fields corresponds to the headers. If not, click Clear Merge Data, fix the file, and reopen it. 6. If the fields seem to be correctly populated, click Merge Data With Article. The following popup will open. 92


94 7. The Number of Articles that are created depends on the number of records in the data files, and cannot be changed here. The Best Spinner will automatically create an article for every record in the file. 8. If you wish, you can enter an Article Filename Prefix to the generated articles. Ascending numbers will be added to the articles automatically. 9. If you prefer to create one single file containing all of your articles, instead of a new file for every article, check the Generate a single text file checkbox. You can also define your own article separator here. 10. Finally, check the Select N- th synonym for each spin block if you want to create the highest possible level of uniqueness for your articles. 11. Click Generate Articles to start the data merge process. The Save Generate Articles popup window will open. (If in the previous step you have chosen to generate a single article, instead of multiple articles, skip to step 14.) 93


95 12. The Best Spinner will save and compress all your articles to a.zip file. Enter a name for the file and click Save. Your articles will be generated instantly. 13. On your computer, navigate to the location where you have saved the.zip file to see its contents. As shown in the following image, two articles were generated. 14. If in step 7 you have chosen to generate a single article, instead of multiple articles, the Save Generate Articles popup will save your article as a.txt file. 94

96 15. Enter a name for the file and click Save. Your articles will be generated instantly, and saved to one single file. 16. On your computer, navigate to the location where you have saved the.txt file to see its contents. As shown in the following image, there are two articles in the single file. Data merge becomes extremely powerful when dealing with hundreds or even thousands of entries, each with their unique data. 95
97 Generating Multiple Articles The Best Spinner not only allows you to create a single spun version of an article which is great for publishing a single blog post but it can also help you generate hundreds of different versions of an article for use in article directories, for example. VIDEO: For an overview of generating articles, watch this video. (3:53 mins.) To generate multiple versions of an article 1. Click Generate Articles on the Publish tab on the ribbon. 2. The article generator window opens. 3. The Number of Articles determines how many versions of the article will be generated. The maximum number is 1, If you wish, you can enter an Article Filename Prefix to the generated articles. Ascending numbers will be added to the articles automatically. 5. Some blogging systems and 3rd party software require different versions of the same article to be saved in one single text file. If that applies to your articles, check the Generate a single text file checkbox. You can also define the article separator here to indicate to 3rd party systems where one article ends and the next begins. 6. Finally, check the Select N- th synonym for each spin block if you want to create the highest possible level of uniqueness for your articles. The N- th Synonym operation works through your 96

98 article, taking the first synonym from each spintax for the first article, then taking the second synonym from each spintax for the second article, etc. This option is designed for users that create very large spintax. Normally, you can stick with The Best Spinner's default random selection process. 7. Click Generate Articles to start the process. The Save Generate Articles popup window will open. 8. The Best Spinner will save and compress all your articles to a.zip file. Enter a name for the file and click Save. Your articles will be generated instantly. 9. On your computer, navigate to the location where you have saved the.zip file to see its contents. As shown in the following image, ten articles were generated. 97
99 Generating Articles vs. Bulk Spin Another way to generate several spun articles is through the Bulk Spin function. Refer to Spinning with Automated Tools and Spinning Multiple Articles with Automated Tools for a detailed explanation of the Bulk Spin function. Compared with the Generate Articles operation, Bulk Spin will take several original articles and output a specified number of spun versions for each of the original articles. For instance, if you have 10 original articles, and tell The Best Spinner to generate 10 spun versions of each article, a total a 100 articles will be produced. Note that to use this feature, all original articles need to be in the same folder. 98
100 Comparing Articles It can be very useful to see how unique articles are when compared with each other compare function makes it easy to do that. The Best Spinner allows you to compare two articles, or compare multiple articles. VIDEO: For an overview of comparing articles, watch this video. (2:05 mins.) Comparing Two Articles To compare two articles 1. Click Compare Articles on the Publish tab on the ribbon. 2. The Comparison Window will open. 3. Paste the two articles you want to compare into the Spin 1 and Spin 2 fields and click Compare. 99


101 4. The Best Spinner shows the level of uniqueness of the articles and highlights duplicate areas in yellow. This makes it easy to see which areas of the articles still need some work to reduce duplication. 5. To facilitate the editing process, you can copy the article you wish to modify and paste it into a word processor. To do so, click Copy Article. You will be asked if you want to copy the yellow highlights too. 6. Click either Yes or No to copy the article to the clipboard and paste it in the desired application to continue editing. 100
102 Comparing Multiple Articles With The Best Spinner you can also compare several articles against each other. To compare multiple articles 1. Click Generate & Compare on the Publish tab on the ribbon. 2. The Generate And Compare Spins window opens. 3. Specify the number of spun articles you wish to compare and click Generate. The articles will be generated and compared. 101


103 4. The numbers along the top or the article allow you to open the different articles and read through them. The table at the bottom shows how unique articles are when compared to each other. In the preceding image article 1 and 4 are 94% unique when compared to each other, but articles 6 and 7 only have a 56% uniqueness. It is clear that the article may need some additional spinning to ensure higher uniqueness across all articles. 5. Double- click a percentage in the table to open the two articles in the comparison window. The Best Spinner's advanced comparison tools allows you to really dig deeper and surgically target duplication areas, thereby increasing article uniqueness like never before. 102

 To export your spins 1. Click Export Spin on the Publish tab on the ribbon. 2. The Export Window will open. 3. Click the spin format you want to use to export your article.")
104 Exporting Your Spins The Best Spinner uses the most popular spintax format when outputting spin- formatted versions of your articles. However, there may be instances when you want to submit spin- formatted articles to 3rd party services that utilize different spin formats than the standard used by The Best Spinner. For that reason, The Best Spinner allows you to export your spin- formatted articles to match these unique formats. VIDEO: For an overview of exporting your spins, watch this video. (1:30 mins.) To export your spins 1. Click Export Spin on the Publish tab on the ribbon. 2. The Export Window will open. 3. Click the spin format you want to use to export your article. The format settings for the spin format you select are displayed on the right. 103
105 4. You can also create a custom format, in case you need an export format that is not already listed here. 5. With the format chosen, click Export to File to create a text file of the newly spin- formatted article, or click Export To Clipboard, which will allow you to copy paste to other applications and web submission forms. With The Best Spinner, you can export your work in virtually any spin format imaginable, so you know that your spins will be universally compatible with any spin submission service. 104
106 Getting Instant Access to Free Spun Content Having good quality content is the obvious starting point to any spin project. Getting good content, however, can be a challenge. You may not have the time or the inspiration to write content yourself, or lack the necessary budget to outsource article creation. The Best Spinner solves these problems by giving you access to free, high- quality spin content, that you can further spin with The Best Spinner, or use immediately as a completed spin project. You can get this free content in seconds in very own Article Directory, found under the Publish menu. VIDEO: For an overview of getting seed content fast, watch this video. (3:11 mins.) To get free spun content 1. Click Article Directory on the Publish tab on the ribbon. 2. The Article Directory opens. 105
category on the right.")
107 From here, you can browse article categories to find suitable content. 3. Click on the + sign next to a category to display the subcategories. The number of articles is shown between brackets. 4. Clicking a category or a subcategory will display the articles in that (sub)category on the right. Alternatively, you can click Keyword Search Articles in the bottom left- hand corner of the window to quickly find articles 106

108 5. Clicking the name of the author/article will display the content of the article and some other important information about the article, such as the % uniqueness, word count, and whether or not editing is allowed. 6. In the preceding image editing allowed is set to Yes, which would make this article a great spin project, allowing you to personalize it to your own content needs. 7. From here you can use this article in several ways. You can take a single spun version to post to your WordPress blogs directly from here You can create a new spin here, copy the new spin to the Clipboard, and paste it to another article directory's submission form You can open this article in NOTE: When using free content from The Best Spinner Article Directory, you have to agree not to remove any of the article backlinks inserted by the author. Someone is giving you free, high quality content, in exchange for having backlinks pointing back to their site. 107
109 Generating Unique Content Fast quick and easy strategies that will make your articles unique enough to pass content duplication tests. These strategies include using the following The Best Spinner features: Auto- Select Synonyms Remove Original Word Copyscape Check TIP: Even though this chapter relies on a paid solution (Copyscape) to check for duplicate content, you can also use the free The Best Spinner Checker instead. If you are following along and want to get a feel for this strategy, you should use an unspun article that will not pass Copyscape because it has already been published on the internet. NOTE: This chapter covers advanced techniques and assumes that you know your way around The Best Spinner software. VIDEO: For an overview of generating unique content fast, watch this video. (4:09 mins.) 108


110 To quickly generate unique content 1. Open your unspun article in The Best Spinner. 2. Click Spun Article right above the Article Window. 3. Click Copyscape Check to launch the duplication check. 4. As was to be expected, duplicates are found. 109


111 5. To create your unique, duplication- safe article, return to the Article tab, and click Auto- Select Synonyms. 6. Now all you need is to understand how Copyscape works, so you can use the Auto- Select Synonym options to your advantage and spin your articles in a way that will meet Copyscape's uniqueness criteria. 110
112 How does Copyscape Work? Copyscape checks 4 word segments to determine uniqueness. If it finds the same 4 words in another content somewhere on the internet, it will consider that segment as not unique. So when you run a Copyscape check on your article, it will go and check every 4th word, checking this word, and then this word, and so on. This means that theoretically as long as every 4th word in your article is completely unique, it will pass Copyscape. And if your article passes Copyscape, it is very likely that search engines will also consider your article to be unique. This assumption is based on the fact that a 4- word combination is statistically more prone to be unique both in terms of author and content, than a 3- word, 2- word or 1- word segment. It is for this reason that Copyscape and most likely the search engines will only flag duplication on four- word phrase matches. 7. So your strategy for creating an article that will be considered to be unique rests on changing at least every 4 th word (every 3 rd or 2 nd is better) and you can do this automatically with the Auto- select Synonyms' Frequency option. To be on the safe side, the recommended setting for the Frequency option is every 2nd word and phrase. The reason for this is that if The Best Spinner has identified a lot of phrase synonyms, and some of these phrases are made up of 3 or 4 words, then setting the Frequency to 4 will result in The Best Spinner counting these long phrases as one word and moving forward 2 more words before creating its spin. As a result, your article may not pass Copyscape. 8. Set the Auto- Select option to Words and Phrases. 9. Click Auto Select to start the process. 10. The Best Spinner will now change every 2nd word and phrase. However, this does not guarantee your article will pass Copyscape. Included in your new spintax is still the original word of the article, so there may be some spins where the original word is used, thereby creating instances where NOT every 2nd word and phrase will be unique. 11. To ensure this is not the case, you can remove all original words from your spins in just one click, by clicking Remove Orig Word on the Spin Tools tab on the ribbon. 111


113 This should ensure complete uniqueness of your article. 12. But why not have Copyscape confirm? Run another Copyscape check. As expected, the article has passed the test. 13. All that is left to do is to verify that the grammar of your article is correct and all the sentences make sense. In just a few clicks, you have produced a unique article that passes duplication tests, and that in all likelihood will also be considered to be unique by the search engines. 112
114 Advanced Spinning Strategies This chapter covers advanced spinning strategies to help your spun articles achieve close to 100% uniqueness. The techniques in this chapter are optional, and maybe you necessary to reach near- perfect uniqueness all the time. NOTE: This chapter mainly focuses on the rationale behind effective spinning. By gaining a better understanding of how to spin effectively, you will be able to get the most out of using The Best Spinner. Spinning and Search Engine Rankings As a general rule you can say that the higher the quality of your spins, the higher their uniqueness. And from a search engine perspective, the more unique your articles, the better. In indexing content, it is a well- known fact that search engines will give maximum priority to high quality, completely unique content. One way to create lots of content that can be considered unique by the search engines is through article spinning. Article spinning has gained great popularity in search engine optimization, because article spinning simply works. Spinning an article into hundreds or even thousands of unique spun versions, and having all those versions indexed by the search engines, can have a massive, positive impact on search engine rankings. However, search engines are catching on to this article spinning trend, and are actively developing ways to go beyond simple word- level duplication to filter for uniqueness. The risk for spinners is that not all spun content will be considered unique, and therefore not all content will be indexed. To reach near 100% indexing, your spun articles really need to read as if they were written by a completely different person. And The Best Spinner is the perfect tool to help you do that. This chapter will show you how. VIDEO: For an overview of advanced spinning strategies, watch this video. (9:46 mins.) 113
115 Understanding Article Writing Consider how two different people would write an article on a similar topic. How would those two articles be different? 1. Word Variations, and 2. Article Synonymity It would be very unlikely for two people to use the exact same words to describe the same thing. That notion is the basis of article spinning. And that's how most people spin their content. They only change word and phrase variations, in the hopes of search engines judging their spun content as unique. But word and phrase variations may not be enough to create true uniqueness. Varying words in a sentence will not change its basic construction and the words will still express the idea in the exact same way. For example, the sentences and Your approach to dog training has a big impact on the actual training results you will get. Your method of canine training will have a major effect on the real training results you will eventually get. Are constructed in the same way, and there is a chance search engine algorithms will judge them as duplicate. Would two people, or better yet, would 100 people express this dog training idea in such a similar way? Probably not. NUMBER OF WORDS AND SENTENCES How likely would it be for two articles, written by two different authors, to have the exact number of words or sentences? As most simply spun articles have the exact same sentences with close to the exact same number of words, this can be a red flag for search engines, and some of your spun articles may therefore not be indexed. ARTICLE LAYOUT It is also very unlikely that both articles would have the exact same layout. 114
116 One author may use bullets where another may use several images. The use of headings, underlines and bolds may be different. Also, the number of paragraphs, as well as the number of sentences per paragraph, may vary greatly. BACKLINKS Another red flag would be if all of your spun articles are pointing to the exact same web page, in the exact same manner. That may not look natural to the search engines. The normal linking patterns search engines look for when determining rankings may be something like this: Various sites, all with varying content, pointing to a particular site in their own unique way. All those incoming links will naturally have varying anchor text, from having the URL as anchor text to the Incoming links will also be pointing to different webpages of the target site. In this continually evolving search environment, the solution is to spin content as if every single one of the spun articles were written by completely different people. Why? Because quality spins will yield quality results. Luckily, with The Best Spinner achieving high quality spins with very high levels of uniqueness is easier than you may think. Uniqueness Checklist Use the following uniqueness checklist to ensure high quality spins that boost the uniqueness of your articles. Adequately spin words, phrases, sentences and paragraphs Spin sentence and paragraph structures Spin the number of words and sentences Spin the layout of your articles, from bullets, images, to text formatting Spin backlink anchor text and destination URL DEEPLY SPIN WORDS, PHRASES, SENTENCE AND PARAGRAPHS One of the best ways to create deep synonym variations is through Nested Spins. 115
117 SPIN SENTENCE AND PARAGRAPH STRUCTURES Beyond simply spinning words and phrases, it is important to convey similar ideas expressed in completely different sentence and/or paragraph structures. An example would be: {Your approach to dog training has a big impact on the actual training results you will get. How effectively your dog is trained is to a great extent influenced by the training techniques you use}. This type of spinning makes it difficult, if not impossible, for search engines to consider these two sentences as coming from the same author. SPIN THE NUMBER OF WORDS AND SENTENCES You can break up the word and sentence count of your spun articles by adding optional phrases and sentences. Here's an example: Dogs are pack animals { and {naturally } look to their pack leader for guidance}. { Therefore, you will have to establish your role as pack leader.} In the preceding example blank text has been added next to a spin pipe. Using blanks as spin options will make sentences or words completely optional. That means they may or may not appear in your spun articles. This can significantly vary word and sentence count, which will further increase article uniqueness. SPIN ARTICLE LAYOUT Spinning paragraphs is a great way to break- up and spin an article's layout. As with words and sentences, you can make entire paragraphs entirely optional by using the blank method like this: { Dogs respond best to positive reinforcement. One of the best ways to ensure success in dog training is to reward good behavior and ignore unwanted behavior. This will encourage your dog to repeat those behaviors that earn him praises and treats, and refrain from exhibiting behaviors that get him nothing in return.} By putting a blank next to the pipe, you make the entire paragraph optional. You can also spin paragraphs by preparing two or more different versions, and spinning them together by using the Spin Together icon. 116

118 The Best Spinner will ask you whether you wish to include a blank paragraph in the spin, which can further break- up article layout. SPINNING LINE BREAKS You can also increase the number of paragraphs by using and spinning line breaks. For example, this 4- sentence paragraph can be spun into two paragraphs by entering a new line after a pipe. USING THE HTML BREAK TAG You can also use the <br /> tag instead of a new line break. The <br /> tag is HTML code, and if you are comfortable with HTML, you can take you spins further by spinning such things as text formatting. 117
119 USING OTHER HTML TAGS Here's an example of spinning bold and italics formats with normal text. Headings can also be spun in this way: You can also play with having bullets in some articles, and line break listings in others: The preceding example uses bullets, and after the pipe you see the same text but with line breaks instead of bullets. SPIN IMAGES, VIDEOS AND OTHER MEDIA Also consider spinning images, videos and other media. And if are very comfortable with HTML, the sky is the limit, as you can spin such things as tables, block elements, complex lists, and so on. SPIN BACKLINKS Spinning backlinks will help build authority for the website you are targeting. Refer to the chapter Creating and Managing Hyperlinks for more information. USE DATA MERGE Finally, if you are a data merge expert, you can add a data- driven element to the strategies discussed above and truly take your spins to the next level. Remember to take full advantage Nested Spinning capability to really push the limits of spinning. 118


120 Customizing The Best Spinner veral aspects of the interface to suit your personal preferences, such as font and font size, spintax colors, but also lets you manage your protected terms and store your Copyscape user details. VIDEO: For an overview of how to customize The Best Spinner, watch this video. (4:09 mins.) Adjusting Font and Font Size To adjust the font The Best Spinner uses to display your texts, use the dropdown list next to Font on the Settings and Options tab on the ribbon. To adjust the font size The Best Spinner uses to display your texts, use the dropdown list next to Size on the Settings and Options tab on the ribbon. Setting Nested Spin and Word Replace Colors To adjust the colors of your nested spins and the color used by the word replace option, click the color you want to change on the Settings and Options tab on the ribbon. 119

121 Select a new color from the grid, or click Define Custom Colors for an ever wider choice of colors. Click OK to confirm. Entering Your Copyscape User Details If you have a Copyscape account, you can fill out your Copyscape user details on the Settings and Options tab on the ribbon. This will allow you to run Copyscape checks from within The Best Spinner, saving you a lot of time. Settings and Options tab to get one. Disabling Auto-Identify Synonyms The Best Spinner to do this, you need to check the - identify synonyms checkbox on the Setting and Options tab on the ribbon. 120


122 Disabling the Use of SpinGroups By default, The Best Spinner uses SpinGroups when suggesting synonyms for your articles, as it tends to speed up spinning. use SpinGroups, you need to uncheck the Use SpinGroups checkbox on the Setting and Options tab on the ribbon. Adjusting the Quick Access Toolbar The Best Spinner has a Quick Access Toolbar that gives you one- click access to options you tend to use a lot. Three functions are there by default: Open, Create new article or project, and Save. REMOVING ICONS FROM THE QUICK ACCESS TOOLBAR You can quickly remove any icon on the Quick Access Toolbar by right- clicking it, and selecting Remove from Quick Access Toolbar. ADDING ICONS TO THE QUICK ACCESS TOOLBAR You can add an icon to the Quick Access Toolbar by right- clicking any function on the ribbon and clicking Add to Quick Access Toolbar. You can further customize the Quick Access Toolbar by selecting Customize Quick Access Toolbar. 121


123 This will open a dialog box displaying all icons currently in our quick access toolbar, along with all remaining functions and commands available. Notice that the functions are grouped by functionality to help locate the ones you want. To add a command to the Quick Access Toolbar, select it on the left and click Add as shown in the following image. 122


124 Click Reset to remove all commands from the toolbar. Click OK to save and exit, or click Cancel to exit without saving. MOVING THE QUICK ACCESS TOOLBAR You can move the Quick Access Toolbar closer to the Editor as some users prefer. Click the arrow next to the Quick Access Toolbar, and select Place Quick Access Toolbar below the Ribbon. 123


125 Minimizing the Ribbon to Create Additional Space Once you have added all your favorite commands to the Quick Access Toolbar, you can gain some additional screen real estate by minimizing the Menu Ribbon. Click the arrow next to the Quick Access Toolbar, and select Minimize the Ribbon. The difference in screen space is shown in the two following images. 124


126 To show the ribbon again, click the arrow next to the Quick Access Toolbar, and deselect Minimize the Ribbon. Customizing the Status Bar You can customize the Status Bar located on the lower right- hand corner of the interface by right- clicking it. A menu with several options will open. Choose which indicators you want to display or hide. Adjusting Window Sizes You can expand or reduce the windows to your liking, by pointing to a border. Your cursor will change into a double- headed arrow, allowing you to drag the window's border to adjust its size. 125


127 Updating The Best Spinner Software The Best Spinner is regularly updated with new functionality, user suggestions, and bug fixes. To reduce support issues resulting from using old versions of the software, you are required to update to the latest version whenever a new version is available. If a new version of The Best Spinner is available, you will see the following message upon starting the software. Click OK to download and install the update. NOTE: If you click Cancel you will exit the software and not be able to continue working with The Best Spinner. The Best Spinner will automatically download the update. After downloading the update, The Best Spinner will start the installation process. Windows may display the User Account Control as shown in the following image and ask you to confirm that you have initiated the installation of the file. 126
128 If you see this message, click Allow to continue with the installation. Installation Options The Best Spinner setup wizard will guide you through the installation process. The first dialog box shows the Installation Options. If you do not want The Best Spinner to add start menu shortcuts, then uncheck the Start menu Shortcuts checkbox. If you do want The Best Spinner to add start menu shortcuts, click Next. Installation Folder The next window allows you to choose the folder where you want to install The Best Spinner. For most people the suggested folder will be fine. 127
129 To change the folder, click and select the desired folder on your computer. To accept the suggested folder and start the installation, click Install. The installation does not take long and you will soon see a message that the installation was completed. Click Close to close the setup wizard. You have successfully updated The Best Spinner. The Version History will be shown to inform you of the changes that were made to the software. 128

130 Click Close to close the version history and start working with The Best Spinner. 129
OU EDUCATE TRAINING MANUAL
 OU EDUCATE TRAINING MANUAL OmniUpdate Web Content Management System El Camino College Staff Development 310-660-3868 Course Topics: Section 1: OU Educate Overview and Login Section 2: The OmniUpdate Interface
How to Edit Your Website
 How to Edit Your Website A guide to using your Content Management System Overview 2 Accessing the CMS 2 Choosing Your Language 2 Resetting Your Password 3 Sites 4 Favorites 4 Pages 5 Creating Pages 5 Managing
Get Article Pro Documentation
 Get Article Pro Documentation Table of Contents Installation... 2 Get Article Pro User Interface... 2 Get Article Pro Directories... 4 Get Article Pro Settings... 6 Get Article Pro Help Menu... 10 Spinner...
How to Edit Your Website
 How to Edit Your Website A guide to using your Content Management System Overview 2 Accessing the CMS 2 Choosing Your Language 2 Resetting Your Password 3 Sites 4 Favorites 4 Pages 5 Creating Pages 5 Managing
Word for Research Writing I: Text and Structure
 Word for Research Writing I: Text and Structure Last updated: 10/2017 Shari Hill Sweet dteditor@nd.edu or 631-7545 1. The Graduate School Template...1 1.1 Document structure... 1 1.1.1 Beware of Section
DRAFT. Table of Contents About this manual... ix About CuteSITE Builder... ix. Getting Started... 1
 DRAFT Table of Contents About this manual... ix About CuteSITE Builder... ix Getting Started... 1 Setting up... 1 System Requirements... 1 To install CuteSITE Builder... 1 To register CuteSITE Builder...
Using Sitecore 5.3.1
 Using Sitecore 5.3.1 An End-User s Guide to Using and Administrating Sitecore Author: Sitecore Corporation Date: December 12, 2007 Release: Rev. 1.0 Language: English Sitecore is a registered trademark.
MICROSOFT WORD 2010 BASICS
 MICROSOFT WORD 2010 BASICS Word 2010 is a word processing program that allows you to create various types of documents such as letters, papers, flyers, and faxes. The Ribbon contains all of the commands
Word - Basics. Course Description. Getting Started. Objectives. Editing a Document. Proofing a Document. Formatting Characters. Formatting Paragraphs
 Course Description Word - Basics Word is a powerful word processing software package that will increase the productivity of any individual or corporation. It is ranked as one of the best word processors.
page 1 OU Campus User Guide
 page 1 OU Campus User Guide Logging Into OU Campus page page 2 1. Navigate to a page on your site that you wish to edit. 2. Scroll down to the footer and click the symbol. 3. Enter your OU Campus username
Lava New Media s CMS. Documentation Page 1
 Lava New Media s CMS Documentation 5.12.2010 Page 1 Table of Contents Logging On to the Content Management System 3 Introduction to the CMS 3 What is the page tree? 4 Editing Web Pages 5 How to use the
Word 97: Increasing Efficiency
 Windows 95 Word 97: Increasing Efficiency Increasing Your Efficiency Word for Windows has a number of features that can help you perform word processing tasks more quickly or to increase efficiency by
San Pedro Junior College. WORD PROCESSING (Microsoft Word 2016) Week 4-7
 Week 4-7") WORD PROCESSING (Microsoft Word 2016) Week 4-7 Creating a New Document In Word, there are several ways to create new document, open existing documents, and save documents: Click the File menu tab and then
WORD PROCESSING (Microsoft Word 2016) Week 4-7 Creating a New Document In Word, there are several ways to create new document, open existing documents, and save documents: Click the File menu tab and then
Microsoft Word Part I Reference Manual
 Microsoft Word 2002 Part I Reference Manual Instructor: Angela Sanderson Computer Training Coordinator Updated by: Angela Sanderson January 11, 2003 Prepared by: Vi Johnson November 20, 2002 THE WORD SCREEN
Ektron Advanced. Learning Objectives. Getting Started
 Ektron Advanced 1 Learning Objectives This workshop introduces you beyond the basics of Ektron, the USF web content management system that is being used to modify department web pages. This workshop focuses
Microsoft Word Part 3 Office 2013
 Microsoft Word Part 3 Office 2013 Hyperlinks When a document is sent as an electronic copy, hyperlinks can be added to direct the reader to a web page. To add a hyperlink: Highlight the word, phrase, paragraph,
Creating Pages with the CivicPlus System
 Creating Pages with the CivicPlus System Getting Started...2 Logging into the Administration Side...2 Icon Glossary...3 Mouse Over Menus...4 Description of Menu Options...4 Creating a Page...5 Menu Item
User Guide. Chapter 6. Teacher Pages
 User Guide Chapter 6 s Table of Contents Introduction... 5 Tips for s... 6 Pitfalls... 7 Key Information... 8 I. How to add a... 8 II. How to Edit... 10 SharpSchool s WYSIWYG Editor... 11 Publish a...
Microsoft Office Word. Part1
 Microsoft Office 2010 - Word Part1 1 Table of Contents What is Microsoft Word?... 4 Creating a document... 5 Toolbar... 6 Typing in MS Word Text Area... 7 Cut, Copy and Paste Text... 9 Paste Preview...
Introduction to 9.0. Introduction to 9.0. Getting Started Guide. Powering collaborative online communities.
 Introduction to 9.0 Introduction to 9.0 Getting Started Guide Powering collaborative online communities. TABLE OF CONTENTS About FirstClass...3 Connecting to your FirstClass server...3 FirstClass window
Introduction to Microsoft Word 2010
 Introduction to Microsoft Word 2010 Microsoft Word is a word processing program you can use to write letters, resumes, reports, and more. Anything you can create with a typewriter, you can create with
User s guide to using the ForeTees TinyMCE online editor. Getting started with TinyMCE and basic things you need to know!
 User s guide to using the ForeTees TinyMCE online editor TinyMCE is a WYSIWYG (what you see is what you get) editor that allows users a familiar word-processing interface to use when editing the announcement
USING DRUPAL. Hampshire College Website Editors Guide https://drupal.hampshire.edu
 USING DRUPAL Hampshire College Website Editors Guide 2014 https://drupal.hampshire.edu Asha Kinney Hampshire College Information Technology - 2014 HOW TO GET HELP Your best bet is ALWAYS going to be to
The SBCC Web Publishing Process The process of creating new web pages or editing existing pages within the OmniUpdate system is straightforward.
 Table of Contents Introduction 2 The SBCC Web Publishing Process 2 Staging Server vs. Production Server 2 Roles, Permissions, Levels and Authority 2 Logging In 3 Workflow 3 Dashboard Tab, Content Tab,
Drupal 7 guide CONTENTS. p. 2 Logging In
 Drupal 7 guide Drupal is a widely used, open-source, free platform that has an easy-to-use content management system for updating websites. This guide was created by the Health Communication Core (www.healthcommcore.org)
Word for Research Writing I: Text and Structure
 Word for Research Writing I: Text and Structure Last updated: 12/2017 Shari Hill Sweet dteditor@nd.edu or 631-7545 1. The Graduate School Template... 1 1.1 Document structure... 1 1.1.1 Beware of Section
Working with Pages... 9 Edit a Page... 9 Add a Page... 9 Delete a Page Approve a Page... 10
 Land Information Access Association Community Center Software Community Center Editor Manual May 10, 2007 - DRAFT This document describes a series of procedures that you will typically use as an Editor
Web Site Documentation Eugene School District 4J
 Eugene School District 4J Using this Documentation Revision 1.3 1. Instruction step-by-step. The left column contains the simple how-to steps. Over here on the right is the color commentary offered to
Boise State University. Getting To Know FrontPage 2000: A Tutorial
 Boise State University Getting To Know FrontPage 2000: A Tutorial Writers: Kevin Gibb, Megan Laub, and Gayle Sieckert December 19, 2001 Table of Contents Table of Contents...2 Getting To Know FrontPage
NYLearns Curriculum Administration:
 NYLearns Curriculum Administration: Creating a Curriculum Map May 2014 2 This page left intentionally blank 3 Contents Signing in to NYLearns... 4 Curriculum Mapping... 6 Creating Curriculum Maps... 7
FileNET Guide for AHC PageMasters
 PageMasters have the permissions necessary to perform the following tasks with Site Tools: ACADEMIC HEALTH CENTER 2 Application Requirements...3 Access FileNET...3 Log in to FileNET...3 Navigate the Site...3
WORD BASICS: MICROSOFT OFFICE 2010
 WORD BASICS: MICROSOFT OFFICE 2010 GETTING STARTED PAGE 02 Prerequisites What You Will Learn USING MICROSOFT WORD PAGE 03 Microsoft Word Components The Keyboard SIMPLE TASKS IN MICROSOFT WORD PAGE 08 Typing
GoLive will first ask you if your new site will be for one individual or a work group; select for a Single User, and click Next.
 Getting Started From the Start menu, located the Adobe folder which should contain the Adobe GoLive 6.0 folder. Inside this folder, click Adobe GoLive 6.0. GoLive will open to its initial project selection
Microsoft Office Word 2010
 Microsoft Office Word 2010 Content Microsoft Office... 0 A. Word Basics... 4 1.Getting Started with Word... 4 Introduction... 4 Getting to know Word 2010... 4 The Ribbon... 4 Backstage view... 7 The Quick
COPYRIGHTED MATERIAL. Making Excel More Efficient
 Making Excel More Efficient If you find yourself spending a major part of your day working with Excel, you can make those chores go faster and so make your overall work life more productive by making Excel
Published by SDL International ( Copyright SDL International. All rights reserved. Documentation for SDLX2004.
 Guide to SDL Edit & Translating ITDs Published by SDL International (http://www.sdlintl.com). Copyright SDL International. All rights reserved. Documentation for SDLX2004. Microsoft and Windows are registered
ALES Wordpress Editor documentation ALES Research websites
 ALES Wordpress Editor documentation ALES Research websites Contents Login... 2 Website Dashboard... 3 Editing menu order or structure... 4 Add a new page... 6 Move a page... 6 Select a page to edit...
FileNET Guide for AHC PageMasters
 ACADEMIC HEALTH CENTER 2 PageMasters have the permissions necessary to perform the following tasks with Site Tools: Application Requirements...3 Access FileNET...3 Login to FileNET...3 Navigate the Site...3
Intro to Microsoft Word
 Intro to Microsoft Word A word processor is a computer program used to create and print text documents that might otherwise be prepared on a typewriter. The key advantage of a word processor is its ability
Beginners Guide to Snippet Master PRO
 Beginners Guide to Snippet Master PRO This document assumes that Snippet Master has been installed on your site. If not please contact the Bakas IT web team at webreg@bakasit.com.au. Initial Login Screen...
APPENDIX THE TOOLBAR. File Functions
 APPENDIX THE TOOLBAR Within the WYSIWYG editor, there are a variety of functions available to the user to properly update the page. Below is a list of all the functions available. Keep in mind that the
BCI.com Sitecore Publishing Guide. November 2017
 BCI.com Sitecore Publishing Guide November 2017 Table of contents 3 Introduction 63 Search 4 Sitecore terms 66 Change your personal settings 5 Publishing basics 5 Log in to Sitecore Editing 69 BCI.com
Introduction to Microsoft Word 2010
 Introduction to Microsoft Word 2010 Microsoft Word is a word processing program you can use to write letters, resumes, reports, and more. Anything you can create with a typewriter, you can create with
PowerPoint 2010 Level 1 Computer Training Solutions Student Guide Version Revision Date Course Length
 Level 1 Computer Training Solutions Version 1.2 Revision Date Course Length 2012-Feb-16 6 hours Table of Contents Quick Reference... 3 Frequently Used Commands... 3 Manitoba ehealth Learning Management
PRESENCE. RadEditor Guide. SchoolMessenger 100 Enterprise Way, Suite A-300 Scotts Valley, CA
 PRESENCE RadEditor Guide SchoolMessenger 100 Enterprise Way, Suite A-300 Scotts Valley, CA 95066 800-920-3897 www.schoolmessenger.com Contents Contents... 2 Introduction... 3 What is RadEditor?... 3 RadEditor
Training Manual and Help File
 Training Manual and Help File 30.06.2011 Update Manage Grow Welcome to your new Juniper Website Management System with CMS Introduction The Juniper Website Management System with CMS (Website Content Management
Creating Teacher Webpages on the New APS WordPress Site
 Creating Teacher Webpages on the New APS WordPress Site TABLE OF CONTENTS INTRODUCTION 3 THE EDITING DASHBOARD 4 CREATING A NEW PAGE 5 EDITING YOUR PAGE 6 1. Page Title 7 2. Toolbar/ toolbar icons 7 3.
CROMWELLSTUDIOS. Content Management System Instruction Manual V1. Content Management System. V1
 Content Management System Instruction Manual V1 www.cromwellstudios.co.uk Cromwell Studios Web Services Content Management System Manual Part 1 Content Management is the system by which you can change
ADRION PROJECT WEBSITES USER S MANUAL
 ADRION PROJECT WEBSITES USER S MANUAL September 2018 Summary 1. The ADRION Project Website... 3 2. Content instructions... 3 3. Contacts for technical assistance... 3 4. Login... 3 5. Editable contents...
TABLE OF CONTENTS TABLE OF CONTENTS... 1 INTRODUCTION... 2 USING WORD S MENUS... 3 USING WORD S TOOLBARS... 5 TASK PANE... 9
 TABLE OF CONTENTS TABLE OF CONTENTS... 1 INTRODUCTION... 2 USING WORD S MENUS... 3 DEFINITIONS... 3 WHY WOULD YOU USE THIS?... 3 STEP BY STEP... 3 USING WORD S TOOLBARS... 5 DEFINITIONS... 5 WHY WOULD
Microsoft Word 2010 Basics
 1 Starting Word 2010 with XP Click the Start Button, All Programs, Microsoft Office, Microsoft Word 2010 Starting Word 2010 with 07 Click the Microsoft Office Button with the Windows flag logo Start Button,
EKTRON 101: THE BASICS
 EKTRON 101: THE BASICS Table of Contents INTRODUCTION... 2 TERMINOLOGY... 2 WHY DO SOME PAGES LOOK DIFFERENT THAN OTHERS?... 5 LOGGING IN... 8 Choosing an edit mode... 10 Edit in context mode (easy editing)...
Who should use this manual. Signing into WordPress
 WordPress Manual Table of Contents Who should use this manual... 3 Signing into WordPress... 3 The WordPress Dashboard and Left-Hand Navigation Menu... 4 Pages vs. Posts... 5 Adding & Editing Your Web
Website Management with the CMS
 Website Management with the CMS In Class Step-by-Step Guidebook Updated 12/22/2010 Quick Reference Links CMS Login http://staging.montgomerycollege.edu/cmslogin.aspx Sample Department Site URLs (staging
Microsoft Word Tutorial
 Microsoft Word Tutorial 1 GETTING STARTED Microsoft Word is one of the most popular word processing programs supported by both Mac and PC platforms. Microsoft Word can be used to create documents, brochures,
MS Word Basics. Groups within Tabs
 MS Word Basics Instructor: Bev Alderman L e t s G e t S t a r t e d! Open and close MS Word Open Word from the desktop of your computer by Clicking on the Start>All programs>microsoft Office >Word 2010
Site Owners: Cascade Basics. May 2017
 Site Owners: Cascade Basics May 2017 Page 2 Logging In & Your Site Logging In Open a browser and enter the following URL (or click this link): http://mordac.itcs.northwestern.edu/ OR http://www.northwestern.edu/cms/
Microsoft Office Word 2013
 Microsoft Office Word 2013 Accessibility University Information Technology Services Training, Outreach, Learning Technologies & Video Production Copyright 2016 KSU Division of University Information Technology
Microsoft Word Intermediate March 25, Exercise 1: Open Word Click on Word. OR Click Start. Click All Programs. Click Microsoft Office.
 Microsoft Word Intermediate March 25, 2014 Exercise 1: Open Word Click on Word. OR Click Start. Click All Programs. Click Microsoft Office. Exercise 2: Create a new document Click File Tab. Select New.
Section Editor Quick Start. Schoolwires Academic Portal Version 4.0
 Schoolwires Academic Portal Version 4.0 TABLE OF CONTENTS The Basics about Your Schoolwires Website...1 Website Navigation Elements...1 Prior to Signing In...1 After Signing In...2 Channel bar...2 Site
Microsoft PowerPoint 2016 Part 2: Notes, Links, & Graphics. Choosing a Design. Format Background
 Microsoft PowerPoint 2016 Part 2: Notes, Links, & Graphics Choosing a Design Open PowerPoint. Click on Blank Presentation. Click on the Design tab. Click on the design tab of your choice. In part one we
Comodo Chromium Secure Software Version 36.1
 Comodo Chromium Secure Software Version 36.1 User Guide Guide Version 36.1.111114 Comodo Security Solutions 1255 Broad Street Clifton, NJ 07013 Table of Contents 1. Comodo Chromium Secure - Introduction...4
Understanding Word Processing
 Understanding Word Processing 3.0 Introduction In this chapter you are going to learn how to create a simple memo or note or a complex and complicated multi column business document using word processing
Office Wo Office W r o d r 2007 Revi i ng and R d Refifini ng a D Document
 Office Word 2007 Lab 2 Revising i and Refining i a Document In this lab, the student will learn more about editing documents They will learn to use many more of the formatting features included in Office
TEACHER PAGES USER MANUAL CHAPTER 6 SHARPSCHOOL. For more information, please visit: Chapter 6 Teacher Pages
 SHARPSCHOOL USER MANUAL CHAPTER 6 TEACHER PAGES For more information, please visit: www.customernet.sharpschool.com 0 TABLE OF CONTENTS 1. 2. 3. 4. 5. 6. 7. 8. 9. 10. 11. INTRODUCTION... 1 I. TEACHER PAGE
Confluence User Training Guide
 Confluence User Training Guide Below is a short overview of wikis and Confluence and a basic user training guide for completing common tasks in Confluence. This document outlines the basic features that
Introduction to MS Word XP 2002: An Overview
 Introduction to MS Word XP 2002: An Overview Sources Used: http://www.fgcu.edu/support/office2000/word/files.html Florida Gulf Coast University Technology Skills Orientation Word 2000 Tutorial The Computer
What is OU Campus? Log into OU Campus
 OU Campus v10 Content Providers User Guide This document is designed to provide (level 5) Content Providers with basic information needed to do most tasks. Those needing additional information are encouraged
Managing your Website s Content in WordPress
 Managing your Website s Content in WordPress Prepared for Westmont Aged Care Services Ltd 1 December 2016 For further support please contact: Annie O Shea M: 0412 169 664 E: annie@webstrategies.net.au
Joomla! 2.5.x Training Manual
 Joomla! 2.5.x Training Manual 1 Joomla is an online content management system that keeps track of all content on your website including text, images, links, and documents. This manual includes several
Useful Google Apps for Teaching and Learning
 Useful Google Apps for Teaching and Learning Centre for Development of Teaching and Learning (CDTL) National University of Singapore email: edtech@groups.nus.edu.sg Table of Contents About the Workshop...
Introduction to Microsoft Office 2016: Word
 Introduction to Microsoft Office 2016: Word Last Updated: September 2018 Cost: $2.00 Microsoft Word is a word processing software. You can use it to type letters, reports, and other documents. This class
Lesson 4 - Creating a Text Document Using WordPad
 Lesson 4 - Creating a Text Document Using WordPad OBJECTIVES: To learn the basics of word processing programs and to create a document in WordPad from Microsoft Windows. A word processing program is the
Fall 2016 Exam Review 3 Module Test
 1. What is the block of text at the bottom of the page called? Header Footer Document Area Ribbon 2. Which word processing tool can help you find synonyms to improve your word choice? Spelling and Grammar
MadCap Software. Index Guide. Flare 2017 r2
 MadCap Software Index Guide Flare 2017 r2 Copyright 2017 MadCap Software. All rights reserved. Information in this document is subject to change without notice. The software described in this document
Using WebBoard at UIS
 Using WebBoard at UIS Accessing your WebBoard Course...3 Logging in to WebBoard...3 Understanding the WebBoard Environment...4 The Menubar...5 The Conferences Menu...5 Conferences...5 Topics...6 Messages
The first time you open Word
 Microsoft Word 2010 The first time you open Word When you open Word, you see two things, or main parts: The ribbon, which sits above the document, and includes a set of buttons and commands that you use
Computer Nashua Public Library Introduction to Microsoft Word 2010
 Microsoft Word is a word processing program you can use to write letters, resumes, reports, and more. Anything you can create with a typewriter, you can create with Word. You can make your documents more
Lucid CMS User Guide
 "We create exceptional business solutions for cash-pay healthcare professionals that enable them to realize their full potential." Lucid CMS User Guide Version 1.2 3/13/2012 1 Table of Contents Table of
File Cabinet Manager
 Tool Box File Cabinet Manager Java File Cabinet Manager Password Protection Website Statistics Image Tool Image Tool - Resize Image Tool - Crop Image Tool - Transparent Form Processor Manager Form Processor
OU Campus VERSION 10
 OU Campus VERSION 10 End User Manual Last Update: 9/8/2015 Contact Tish Sailer with comments or questions regarding this Manual. Contents INTRODUCTION...3 HELP DOCUMENTS AND SUPPORT... 3 ACCESSING PAGES
Dreamweaver Basics Outline
 Dreamweaver Basics Outline The Interface Toolbar Status Bar Property Inspector Insert Toolbar Right Palette Modify Page Properties File Structure Define Site Building Our Webpage Working with Tables Working
There are six main steps in creating web pages in FrontPage98:
 This guide will show you how to create a basic web page using FrontPage98 software. These instructions are written for IBM (Windows) computers only. However, FrontPage is available for Macintosh users
Introduction to Microsoft Office 2007
 Introduction to Microsoft Office 2007 What s New follows: TABS Tabs denote general activity area. There are 7 basic tabs that run across the top. They include: Home, Insert, Page Layout, Review, and View
DOING MORE WITH WORD: MICROSOFT OFFICE 2007
 DOING MORE WITH WORD: MICROSOFT OFFICE 2007 GETTING STARTED PAGE 02 Prerequisites What You Will Learn USING MICROSOFT WORD PAGE 03 Viewing Toolbars Adding and Removing Buttons MORE TASKS IN MICROSOFT WORD
1.0 Overview For content management, Joomla divides into some basic components: the Article
 Joomla! 3.4.x Training Manual Joomla is an online content management system that keeps track of all content on your website including text, images, links, and documents. This manual includes several tutorials
Word 2016 Tips. Rylander Consulting
 Word 2016 Tips Rylander Consulting www.rylanderconsulting.com sandy@rylanderconsulting.com 425.445.0064 Word 2016 i Table of Contents Screen Display Tips... 1 Create a Shortcut to a Recently Opened Document
WORD 2010 TIP SHEET GLOSSARY
 GLOSSARY Clipart this term refers to art that is actually a part of the Word package. Clipart does not usually refer to photographs. It is thematic graphic content that is used to spice up Word documents
Word 2016 Advanced. North American Edition SAMPLE
 Word 2016 Advanced Word 2016 Advanced North American Edition WORD 2016 ADVANCED Page 2 2015 Cheltenham Group Pty. Ltd. All trademarks acknowledged. E&OE. No part of this document may be copied without
Introduction to Microsoft Word 2007 Quickguide
 Introduction to Microsoft Word 2007 Quickguide Opening Word -Click the Start button -Click Programs from the start menu -Select Microsoft Office -Click Microsoft Office Word 2007 -A new blank document
Creating Jump Searches
 Creating Jump Searches Jump Searches are created in Website Administration, and they are used to create dynamic hyperlinks for ReeceAndNichols.com property search pages. 1. Open your web browser, and go
FrontPage. Directions & Reference
 FrontPage Directions & Reference August 2006 Table of Contents Page No. Open, Create, Save WebPages Open Webpage... 1 Create and Save a New Page... 1-2 Change the Background Color of Your Web Page...
Tips & Tricks for Microsoft Word
 T 330 / 1 Discover Useful Hidden Features to Speed-up Your Work in Word For what should be a straightforward wordprocessing program, Microsoft Word has a staggering number of features. Many of these you
HOW TO USE THE CONTENT MANAGEMENT SYSTEM (CMS) TABLE OF CONTENTS
 TABLE OF CONTENTS") HOW TO USE THE CONTENT MANAGEMENT SYSTEM (CMS) TABLE OF CONTENTS GETTING STARTED (LOGIN) 2 SITE MAP (ORGANIZE WEBPAGES) 2 CREATE NEW PAGE 3 REMOVE PAGE 6 SORT PAGES IN CHANNEL 7 MOVE PAGE 8 PAGE PROPERTIES
HOW TO USE THE CONTENT MANAGEMENT SYSTEM (CMS) TABLE OF CONTENTS GETTING STARTED (LOGIN) 2 SITE MAP (ORGANIZE WEBPAGES) 2 CREATE NEW PAGE 3 REMOVE PAGE 6 SORT PAGES IN CHANNEL 7 MOVE PAGE 8 PAGE PROPERTIES
New Website User Manual
 New Website User Manual General Notes 3 How To Login To Your Website And Access Admin Dashboard 4 Adding / Editing Sliders 5 Home Slider 5 School Slider (Same steps for ALL school pages) - Add a Slide
Beginning a presentation
 L E S S O N 2 Beginning a presentation Suggested teaching time 40-50 minutes Lesson objectives To learn how to create and edit title and bullet slides, you will: a b c d Select slide types by using the
DOING MORE WITH WORD: MICROSOFT OFFICE 2010
 DOING MORE WITH WORD: MICROSOFT OFFICE 2010 GETTING STARTED PAGE 02 Prerequisites What You Will Learn USING MICROSOFT WORD PAGE 03 Viewing Toolbars Adding and Removing Buttons MORE TASKS IN MICROSOFT WORD
Creating a PowerPoint Presentation
 powerpoint 1 Creating a PowerPoint Presentation Getting Started 1. Open PowerPoint from the "Start" "Programs" Microsoft Office directory. 2. When starting PowerPoint, it usually starts with a new blank
Word Processing. Delete text: Allows you to erase characters, words, lines, or pages as easily as you can cross them out on paper.
 Word Processing Practice Of all computer applications, word processing is the most common. To perform word processing, you need a computer, a special program called a word processor, and a printer. A word
UTAS CMS. Easy Edit Suite Workshop V3 UNIVERSITY OF TASMANIA. Web Services Service Delivery & Support
 Web Services Service Delivery & Support UNIVERSITY OF TASMANIA UTAS CMS Easy Edit Suite Workshop V3 Web Service, Service Delivery & Support UWCMS Easy Edit Suite Workshop: v3 Contents What is Easy Edit