Videos...31 Training Videos...32 Webinar recording: Monday 5th December
|
|
|
- Edmund Sims
- 5 years ago
- Views:
Transcription
1 GATORCREATOR
2 Table of Contents Articles... 3 Drag and Drop Editor (Overview)... 4 Hidden Elements...15 Tracked Mailto: Links...18 Template Restrictions Custom Templates...21 Nifty Images User Guide...22 Frequently Asked Questions: Drag and Drop Editor...26 Videos...31 Training Videos...32 Webinar recording: Monday 5th December
3 Articles Page 3
 or GatorMail (our HTML editor).")
4 Drag and Drop Editor (Overview) Read the guide below to find out the core functionality of our drag and drop editor. Creative - When creating a new from the Creative tab, you'll be presented with the two options: (our drag and drop editor) or GatorMail (our HTML editor). Select and Create New to begin. Page 4

5 Select a template to begin Once you've selected to build your creative, this is where you'll begin. There are four different template areas for you to choose from, as highlighted above. You can click on each of these tabs to preview the template options available to you. 1. Styled templates - examples of layouts using colour and imagery to help you visualise how your campaign could look. These are customisable once you select the template, and any changes you make will not overwrite this example template. 2. Basic templates - examples of templates in grey-scale with placeholders instead of images, providing you with a blank canvas to build your creative. 3. Seasonal templates - examples of festive templates available for you to use. 4. Custom templates - you'll find the templates our design team have created especially for your instance here. You can click on any of the templates to preview the full design, with the option to scroll, before choosing. When you have chosen a template you want to start customising, simply click the 'select' button below it. Page 5
6 Where to begin The first options you'll be presented with is whether you'd like to 1. run the setup wizard, or 2. go straight to the content. Please note, the editor is disabled until you have selected an option. 1. Yes, I'd like to run the setup wizard: You'll be presented with a few options to set your primary, secondary and tertiary colours (we recommend using your company colour palette). 2. No, take me straight to the content: as it says on the tin, get stuck in. Page 6

7 The setup wizard - select colours Click on the colours to customise the template according to your palette. There are four different colour swatch pickers available to choose your colours, as well as being able to input hex codes, and once you've used the tool more, a recently selected tab. Click 'select' when you've chosen your colour. Page 7

8 The setup wizard - styling options The second step after choosing your main colour palette is the overall style (a bit like CSS). Here you can select the defaults for page and module colours, font, size and link styles. Once you've completed this step, you can click 'finish wizard' to start customising your modules and content. Page 8

9 Content blocks The blocks on the left show the various options you can drag onto the canvas to build your creative. Unless marked with a number, the icon depicts the layout of the module. 1. links: this is typically used in the pre-header of the and contains 'view online' and 'send to a friend' links. 2. Social share: this row allows you to link to your social media pages using the official icons. You can add or remove using the dropdown list within this block. 3. Unsubscribe: this module contains the standardised opt out wording and link. Page 9

10 Core options 1. Content - edit the module you've selected. 2. Block style - edit the style of the module, such as font, colours, padding etc. 3. View the text version of your creative. 4. Preview your creative: with options to view your preview responsively, on desktop and inbox. 5. Your content is automatically saved as you make changes, so you only need to manually save when you're exiting the editor. 6. Next to save and exit, there is a dropdown arrow which allows you to save what you have done as a template. 7. On each module you'll see the red bin icon, which allows you to delete that module. Please note: there is no undo option. 8. The icon allows you to duplicate the module you have selected. 9. You'll also see the option to move the module by dragging it up or down the canvas. 10. If you're editing a module, 'return to blocks' lets you finish editing and return to the main options. Page 10
11 Editing core modules The options in the section apply to all modules that contain text elements. Page 11

12 Editing text button block style For the purpose of making it easier to visualise the two background colour options, this module has been recoloured. Please note: this is not a design, purely to help illustrate controls. 1. Choose between one or two column layout. 2. As illustrated, this is the background colour of the module. 3. As illustrated, this is the background colour of the content, within the module. 4. Controls border settings: border width must be specified for these to apply. 5. Padding controls the margin between the edge of the content and the content itself. Page 12

13 Editing text button block content Double click on the text to edit the copy and how it looks. Highlight the text to update the format, such as underline, bold, colour, links and more. You'll also be able to add tracked links, landing zones, surveys, confirmation opt in, unsubscribe and view online using the symbols you may be familiar with from using GatorMail editor. Page 13
 4. Add another network: click here to select the available options. 5.")
14 Social Share When editing the Social Share module, the left menu will show the options available. 1. Delete row 2. Move up (or left on creative) 3. Move down (or towards the right) 4. Add another network: click here to select the available options. 5. Once you've finished, click return to blocks to continue customising your creative. Page 14

15 Hidden Elements Within the design that you build within, it is possible to hide certain images or elements from being displayed within the editor; see how in the example below where we have chosen not to display the banner image. Step One 1. Select your image. 2. Select 'Block Style'. Page 15

16 Step Two 1. Select the check box 'Hide Image' 2. Select the toggle 'Hide Hidden Elements' to visually see the responsive deigns with all elements/ images hidden. Page 16

17 Preview Note: The block on design view is retained so you are able to reinstate at any time, however there will be no spacing add on live preview or upon send. Page 17

18 Tracked Mailto: Links This article takes you through creating a tracked mailto link within, allowing you to report on responses along side your normal website tracking, document links etc... Step One 1. Highlight the required click through text 2. Click insert link/mailto link Page 18
 Note for further tracking: It is")
19 Step Two 1. 'Hyperlink' tab, this is selected by default 2. Provide the required mailto: address (note: on applying mailto: within the link address bar the properties of the page will change and display 'Tracked Mail To') Note for further tracking: It is possible to add further code to the mailto: link to provide not only the address but the subject and body text; You are able to include spaces within the body text by adding %20 between each word, please see the example below. inquiry&body=i%20would%20like%20to%20register%20my%20event%20interest 3. Select the 'Tracked Mail To' check box 4. Provide your 'Link Description' 5. Click 'Insert' Note for non-tracked links: The 'MAILTO' tab struck out in the image above and below, can be used but only if you wish to create non-tacked links. Page 19

20 Example Note: The only negative out come to creating tracked mailto links is that it will open a blank browser window/ tab on launching the new reply, see below. Page 20

21 Template Restrictions Custom Templates It is possible to restrict the end user from only seeing the 'Custom Template' tab, this restricts the user to only be able to use your own branded templates found within 'Custom Templates'. If you would like this to be enabled please request this via Preview Page 21

22 Nifty Images User Guide Nifty Images Nifty Images is our latest plugin exclusively for use on templates. It enables you to add personalisation to images in your campaigns, based on mapped fields from your CRM or data held within GatorMail. Start with your template First you'll need to create your template in. Once you've added your images, simply click on the one you wish to personalise to begin. 1. Enables you to create an animated countdown 2. Enables you to add personalisation to your images Page 22

23 Create Countdown Please note: Outlook does not support the full dynamic countdown, a static countdown that refreshes on open will show Once you've selected an area to add a countdown timer to, click 'create countdown'. A window will pop up with the options below: 1. Select your background colour, either by adding a hex code or using the colour pallette 2. Select a font 3. Select your font size 4. Select your font colour, either by adding a hex code or using the colour pallette 5. Live preview 6. Choose 'back' to cancel 7. Once you have finished, click 'save' Create Personalised Image Once you've selected an image to personalise, click 'personalize'. A window will pop up with the options below: 1. Change text enables you to add your copy to the image 2. Font style: select the font from the dropdown and size Page 23

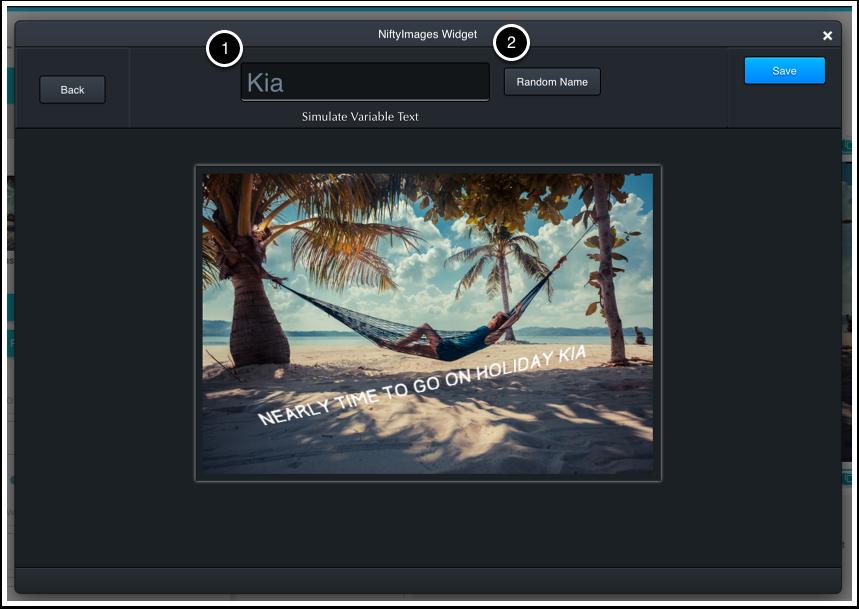
24 3. Text format: select alignment, fit, bold, italic or underline 4. Change colour: choose your font colour using the pallette selection tool, a hex code or intelligent colour scheme selection based on your image, plus opacity 5. Alignment: select vertical and horizontal alignments 6. Min/Max: if you need to limit the characters in the image, you can do so here 7. Rotate/Skew: use the adjustment tools to change the angle of your text 8. Save when you're done (please note: you can't go back and edit your image futher at this point) 9. Preview: check how your end result will look with personalisation added 10. Real time preview of your image Preview Personalised Image Preview your image with personalisation. 1. Type anything here to see it populate the image below 2. Use the randomiser to populate the field in your personalised image When you're happy, click save If you want to make more changes, click 'back' Page 24
25 Page 25

26 Frequently Asked Questions: Drag and Drop Editor 1. Why would you "save as template" rather than copy an existing ? Saving an as a template as one big benefit, any of the styles you custom created on the right hand side on save will be populated identically back to the left hand side blocks. So when picking a template you get the styling on your blocks. 2. Image too big? What and why and how to sort sets the size of your images to fit with the HTML widths, so a large image will be resized by HTML to fit correctly. HOWEVER, if your image is large, for example greater than 600px wide, then shows a warning. This means the physical size of your image may be too big and resizing will help especially on the download of the image speed. If you know the HTML width size for the image is, for example 250px, then use the 'Edit image' section and you can set it to 250px width and it will be resized for you and inserted back into the HTML correctly. 3. Rounding images/buttons and background of text Rounded corners is a feature of the style selection for images and buttons in. Page 26

27 4. 'Apply All' on styling The apply all button only applies to the selected item styles. For example if you pick an image or a button then rounded the corners, then 'Apply All' will warn you first before updating every button or image in your design. 5. 'Apply to Block' on styling The apply to block function applies the selected item styling to any item of the same type in the same block. For example, if you use the navigation block and have 3 buttons, apply to block will update all the buttons based on the styles of the selected button item. 5. Lose the button style so they look like traditional hyperlinks The styling on buttons can be set to look like text hyperlinks by setting the selected button background colour and the text and underline feature. then apply to all buttons in block or all buttons in design. 5. Switch caption images The caption image blocks allow you under the styles section to switch the images from left, right and top and bottom as required. 6. Adding style around text as borders Page 27

28 To highlight a block of text in an you can set the background text colour of the block, add some padding (say 10px) to all edges and then rounding the corners. This gives a good highlighted effect. 7. How can I change the editor headings formats for Page 28


29 go back to blocks then page style, under the page properties 8. How do I save my design as a template? Page 29
30 Either you can start the creation of an from the Templates/ Templates section of GatorMail OR if you have created an you can in under the 'Save And Exit' button drop down and hit the 'Save as template' Page 30
31 Videos Page 31
32 Training Videos An Introduction to Watch The Video >>> Using Styled Templates Watch The Video >>> Creating and Copying Templates Within Watch The Video >>> Page 32
33 Webinar recording: Monday 5th December 2016 Elliott (Senior Product Specialist) demonstrates how to use the new GatorMail drag and drop editor,. Watch and learn: How to customise templates About editing content blocks Setting global font styles on your new template Adding links Uploading, hosting and editing images Best practice recommendations Watch it here. Page 33
CreateASite Beginner s Guide
 Contents Getting Started... 3 Access the CreateASite Control Panel... 3 Select a Category/Subcategory... 4 Select a Template... 6 Change the Site Template... 10 Change Colours... 12 Change Fonts... 13
UTAS CMS. Easy Edit Suite Workshop V3 UNIVERSITY OF TASMANIA. Web Services Service Delivery & Support
 Web Services Service Delivery & Support UNIVERSITY OF TASMANIA UTAS CMS Easy Edit Suite Workshop V3 Web Service, Service Delivery & Support UWCMS Easy Edit Suite Workshop: v3 Contents What is Easy Edit
Nauticom NetEditor: A How-to Guide
 Nauticom NetEditor: A How-to Guide Table of Contents 1. Getting Started 2. The Editor Full Screen Preview Search Check Spelling Clipboard: Cut, Copy, and Paste Undo / Redo Foreground Color Background Color
Create, Customize & Send an
 How-To Guide Create, Customize & Send an Email Getting your first email out the door is easy with Constant Contact. This guide will walk you through creating, customizing, and sending an email to your
Act! Marketing Automation
 Act! Marketing Automation A Guide to Getting Started Helping your business grow with marketing automation Act! Marketing Automation Getting Started Guide 2 Contents Page Page 8 Page 10 Page 11 Page 11
Dreamweaver Basics Outline
 Dreamweaver Basics Outline The Interface Toolbar Status Bar Property Inspector Insert Toolbar Right Palette Modify Page Properties File Structure Define Site Building Our Webpage Working with Tables Working
PBwiki Basics Website:
 Website: http://etc.usf.edu/te/ A wiki is a website that allows visitors to edit or add their own content to the pages on the site. The word wiki is Hawaiian for fast and this refers to how easy it is
PRESENCE. RadEditor Guide. SchoolMessenger 100 Enterprise Way, Suite A-300 Scotts Valley, CA
 PRESENCE RadEditor Guide SchoolMessenger 100 Enterprise Way, Suite A-300 Scotts Valley, CA 95066 800-920-3897 www.schoolmessenger.com Contents Contents... 2 Introduction... 3 What is RadEditor?... 3 RadEditor
Layout Manager - Toolbar Reference Guide
 Layout Manager - Toolbar Reference Guide Working with a Document Toolbar Button Description View or edit the source code of the document (for advanced users). Save the contents and submit its data to the
Set & Forget Marketing
 Set & Forget Marketing POS Sites User Guide A Product Of Table of Contents Introduction... 1 Before you Begin.... 2 1. Decide on the look and feel of your Marketing E-mails... 2 2. Getting your Logo in
This document contains information that will help you to create and send graphically-rich and compelling HTML s through the Create Wizard.
 This document contains information that will help you to create and send graphically-rich and compelling HTML emails through the Create Email Wizard. or warranty by AT&T and is subject to change. 1 Contents
QRG: Using the WYSIWYG Editor
 WYSIWYG Editor QRG: Using the WYSIWYG Editor WYSIWYG stands for What You See Is What You Get. The WYSIWYG Editor is the reason you don t need to be an IT Programmer to write content for your web page.
Confirmation Opt-In. User Guide
 User Guide User Guide CONFIRMATION OPT-IN (COI) HAS BEEN DESIGNED SO CUSTOMERS CAN USE IT STRAIGHT AWAY. EVERY CUSTOMER WILL HAVE A DEFAULT CONFIRMATION OPT-IN. THIS CANNOT BE DELETED AND WILL ALWAYS BE
Creating an with Constant Contact. A step-by-step guide
 Creating an Email with Constant Contact A step-by-step guide About this Manual Once your Constant Contact account is established, use this manual as a guide to help you create your email campaign Here
A PRACTICAL GUIDE TO USING WIX TO BUILD A WEBSITE
 A PRACTICAL GUIDE TO USING WIX TO BUILD A WEBSITE AN AID TO ENABLE STUDENTS TO UNDERSTAND THE FUNDAMENTELS OF WEBSITE DESIGN WITHIN THE FRAMEWORK OF A WEBSITE PROJECT USING WEB DESIGN TOOLS YANNIS STEPHANOU
Oracle Eloqua s User Guide
 http://docs.oracle.com Oracle Eloqua Emails User Guide 2017 Oracle Corporation. All rights reserved 08-Dec-2017 Contents 1 Emails Overview 6 2 Examples of emails 7 3 Creating emails 19 4 Email authoring
Introduction to Moodle: Creating & Sharing Content
 Introduction to Moodle: Creating & Sharing Content Aim This guide will help to get you started and develop your understanding of how to add, edit and create courses using Moodle. This guide is for Moodle
OU EDUCATE TRAINING MANUAL
 OU EDUCATE TRAINING MANUAL OmniUpdate Web Content Management System El Camino College Staff Development 310-660-3868 Course Topics: Section 1: OU Educate Overview and Login Section 2: The OmniUpdate Interface
1. Navigation and menus
 1. Navigation and menus Screen 1 Your website is made up of a number of different pages, which are organised into your site's menu and form the main navigation for your site (Screen 1, Number 1). The menu
Creating an with Constant Contact. A step-by-step guide
 Creating an Email with Constant Contact A step-by-step guide About this Manual Once your Constant Contact account is established, use this manual as a guide to help you create your email campaign Here
BT Web Hosting. Features and functionality
 BT Web Hosting Features and functionality 1 Hopefully you will now have a website that is activated and potentially even published. This guide will take you through some of the additional features and
ECDL Full Course Content
 ECDL Full Course Content Module 1 1. Getting Started 1.1. Computer Terms 1.2. Computer Hardware 1.3. Computer Accessories 1.4. Memory and Storage 1.5. Computer Software 2. Using Information Technology
1 Introduction Working with Folders Working with Images and Files Creating a Banner Image... 39
 Inn Websitee User Manual Produced by the Umbraco Community Umbraco v4 [9. 16.13] Contents 1 Introduction... 3 1.1 American Inns of Court Inn Websites... 3 1.2 Introduction to Umbraco... 3 2 Getting Started
TinyMCE Users Guide. This user manual will show you all the basics of the TinyMCE editor.
 Introduction TinyMCE is a platform independent web based Javascript HTML WYSIWYG editor. What this means is that it will let you create html content on your web site. TinyMCE supports a lot of Operation
CROMWELLSTUDIOS. Content Management System Instruction Manual V1. Content Management System. V1
 Content Management System Instruction Manual V1 www.cromwellstudios.co.uk Cromwell Studios Web Services Content Management System Manual Part 1 Content Management is the system by which you can change
Quick Start Guide - Contents. Opening Word Locating Big Lottery Fund Templates The Word 2013 Screen... 3
 Quick Start Guide - Contents Opening Word... 1 Locating Big Lottery Fund Templates... 2 The Word 2013 Screen... 3 Things You Might Be Looking For... 4 What s New On The Ribbon... 5 The Quick Access Toolbar...
ProSystem fx Site Builder. enewsletters
 ProSystem fx Site Builder enewsletters December 2011 Copyright 2010-2011, CCH INCORPORATED. A Wolters Kluwer business. All Rights Reserved. Material in this publication may not be reproduced or transmitted,
Table of Contents. Page 2 of 72. High Impact 4.0 User Manual
 Table of Contents Introduction 5 Installing High Impact email 6 Installation Location 6 Select Mail Client 6 Create a ReadyShare Account 6 Create a Default Profile 6 Outlook Configuration Message 6 Complete
Grande Prairie, Alberta. LibraryAware Manual. Samantha Mercer, Digital Learning & Outreach Librarian
 Grande Prairie, Alberta www.peacelibrarysystem.ab.ca LibraryAware Manual Samantha Mercer, Digital Learning & Outreach Librarian November 2017 Table of Contents Login Access 1 How to Login... 4 2 Forgot
GoLive will first ask you if your new site will be for one individual or a work group; select for a Single User, and click Next.
 Getting Started From the Start menu, located the Adobe folder which should contain the Adobe GoLive 6.0 folder. Inside this folder, click Adobe GoLive 6.0. GoLive will open to its initial project selection
A Guide to Using WordPress + RAVEN5. v 1.4 Updated May 25, 2018
 + v 1.4 Updated May 25, 2018 Table of Contents 1. Introduction...................................................................................3 2. Logging In.....................................................................................4
Advanced Training Manual: Surveys Last Updated: October 2013
 Advanced Training Manual: Surveys Last Updated: October 2013 Advanced Training Manual: Surveys Page 1 of 28 Table of Contents Introduction Training Objective Surveys Overview Survey Table Survey Options
Oracle Eloqua s User Guide
 http://docs.oracle.com Oracle Eloqua Emails User Guide 2018 Oracle Corporation. All rights reserved 11-Jan-2018 Contents 1 Emails Overview 6 2 Examples of emails 7 3 Creating emails 19 4 Email authoring
Content Author's Reference and Cookbook
 Sitecore CMS 7.2 Content Author's Reference and Cookbook Rev. 140225 Sitecore CMS 7.2 Content Author's Reference and Cookbook A Conceptual Overview and Practical Guide to Using Sitecore Table of Contents
MN Studio Website - User Guide
 MN Studio Website - User Guide Version 1.1 MN Studio Website Program 1. Introduction Welcome to the new website program! The MN Studio Website program allows you to create your own website with customized
Contents. Announcer Pro Version 4.6 Page 2 of 35 Version V4.6
 User Guide Contents 1. Introduction... 3 1.1. Getting Started... 3 1.2. Navigation... 4 2. Create a Newsletter... 6 2.1. Confirm Company Details... 6 2.2. Choose Template... 8 2.3. Edit Newsletter... 8
EDITOR GUIDE. Button Functions:...2 Inserting Text...4 Inserting Pictures...4 Inserting Tables...8 Inserting Styles...9
 EDITOR GUIDE Button Functions:...2 Inserting Text...4 Inserting Pictures...4 Inserting Tables...8 Inserting Styles...9 1 Button Functions: Button Function Display the page content as HTML. Save Preview
USER GUIDE: EDITOR. Drag & drop system: Content Manager Style Editor Add Elements Undo/Redo Save...
 USER GUIDE: EDITOR Drag & drop system:... 2 1. Content Manager... 3 2. Style Editor... 5 3. Add Elements... 6 4. Undo/Redo... 13 5. Save... 13 When we access Zeendo s website editor, we can see a series
Managing Your Schoolwires Web Site
 Managing Your Schoolwires Web Site 1. Sign in at the district web site. 2. Select the school where your teacher or organization s web site is located as shown below. 3. Select the Teacher or Departments
How to set up a local root folder and site structure
 Activity 2.1 guide How to set up a local root folder and site structure The first thing to do when creating a new website with Adobe Dreamweaver CS3 is to define a site and identify a root folder where
Access Groups. Collect and Store. Text Currency Date/Time. Tables Fields Data Type. You Your Friend Your Parent. Unique information
 Tutorial A database is a computerized record keeping system used to collect, store, analyze and report electronic information for a variety of purposes. Microsoft Access is a database. There are three
VisualPST 2.4. Visual object report editor for PowerSchool. Copyright Park Bench Software, LLC All Rights Reserved
 VisualPST 2.4 Visual object report editor for PowerSchool Copyright 2004-2015 Park Bench Software, LLC All Rights Reserved www.parkbenchsoftware.com This software is not free - if you use it, you must
Table of content. Creating signup form Associating automation tools to signup form Signup form reports...42
 A User Guide Signup forms are the most popular tools for building a subscriber database. They let your website visitors become subscribers by entering basic details such as name and email address. The
Quick Reference Guide: Genesis 2
 : Genesis 2 TABLE OF CONTENTS REGISTRATION...2 LAUNCH GENESIS 2 WIZARD...4 MANAGE MY PROFILE...33 CONFIGURE MY WEBSITE...34 REPORTS...35 1 REGISTRATION Before you can access the administration section
Zeppelin Website Content Manager User Manual
 Zeppelin Website Content Manager User Manual 1. Introduction Zeppelin Website Content Manager is made for maintaining and editing the content of the website easily. Most of the contents inside the website
Center for Faculty Development and Support Making Documents Accessible
 Center for Faculty Development and Support Making Documents Accessible in Word 2007 Tutorial CONTENTS Create a New Document and Set Up a Document Map... 3 Apply Styles... 4 Modify Styles... 5 Use Table
Emma Marketing Training Manual
 Emma Email Marketing Training Manual Table of Contents Section 1 - Getting Started with Emma... 1 1.1 - Logging in to Emma... 1 Recovering Username & Password... 1 1.2 Introducing the Emma User Interface
Fuse Creator User Guide Standard Edition 1.4
 Fuse Creator User Guide Standard Edition 1.4 P/N: 1N3-694 Copyright 2010 RM Education plc All rights reserved. Microsoft, Internet Explorer, Windows, Windows Server and Windows Vista operating system are
SPARK. User Manual Ver ITLAQ Technologies
 SPARK Forms Builder for Office 365 User Manual Ver. 3.5.50.102 0 ITLAQ Technologies www.itlaq.com Table of Contents 1 The Form Designer Workspace... 3 1.1 Form Toolbox... 3 1.1.1 Hiding/ Unhiding/ Minimizing
Learn more about Pages, Keynote & Numbers
 Learn more about Pages, Keynote & Numbers HCPS Instructional Technology May 2012 Adapted from Apple Help Guides CHAPTER ONE: PAGES Part 1: Get to Know Pages Opening and Creating Documents Opening a Pages
Websites. Version 1.7
 Websites Version 1.7 Last edited 15 Contents MyNetball Information...3 Websites...4 Web packages...4 Setting up the layout...5 Uploading files and images...6 Using Dropbox to Increase your Website Data...7
Joomla! 2.5.x Training Manual
 Joomla! 2.5.x Training Manual 1 Joomla is an online content management system that keeps track of all content on your website including text, images, links, and documents. This manual includes several
WEEK NO. 12 MICROSOFT EXCEL 2007
 WEEK NO. 12 MICROSOFT EXCEL 2007 LESSONS OVERVIEW: GOODBYE CALCULATORS, HELLO SPREADSHEET! 1. The Excel Environment 2. Starting A Workbook 3. Modifying Columns, Rows, & Cells 4. Working with Worksheets
PUBLISHING ON THE SD MINES WEBSITE EKTRON ALOHA EDITOR EDITING A PAGE
 1 2/14/17 PUBLISHING ON THE SD MINES WEBSITE EKTRON ALOHA EDITOR EDITING A PAGE Logging In Note: If you are off-campus, you will first need to vpn in, before following the instructions below. Ektron works
Using Sitecore 5.3.1
 Using Sitecore 5.3.1 An End-User s Guide to Using and Administrating Sitecore Author: Sitecore Corporation Date: December 12, 2007 Release: Rev. 1.0 Language: English Sitecore is a registered trademark.
User Guide. Web Intelligence Rich Client. Business Objects 4.1
 User Guide Web Intelligence Rich Client Business Objects 4.1 2 P a g e Web Intelligence 4.1 User Guide Web Intelligence 4.1 User Guide Contents Getting Started in Web Intelligence 4.1... 5 Log into EDDIE...
Step 1 Download and Install KompoZer Step by step instructions to build your first web page using KompoZer web editor.
 All Creative Designs HTML Web Tutorial for PC Using KompoZer New version 2012 now available at: http://www.allcreativedesigns.com.au/pages/tutorials.html Step 1 Download and Install KompoZer Step by step
Muse Training for Webeditors
 Muse Training for Webeditors 1. Install Muse through the Adobe Creative Cloud Suite 2. Saving/Sharing Processes - Dropbox or T: Drive>(website name) Folder>(either) Assets or Documents Muse file should
1.0 Overview For content management, Joomla divides into some basic components: the Article
 Joomla! 3.4.x Training Manual Joomla is an online content management system that keeps track of all content on your website including text, images, links, and documents. This manual includes several tutorials
Virto SharePoint Forms Designer for Office 365. Installation and User Guide
 Virto SharePoint Forms Designer for Office 365 Installation and User Guide 2 Table of Contents KEY FEATURES... 3 SYSTEM REQUIREMENTS... 3 INSTALLING VIRTO SHAREPOINT FORMS FOR OFFICE 365...3 LICENSE ACTIVATION...4
Quick Start guide. for windows and mac. creative learning tools. Kar2ouche Quick Start Guide Page 1
 Quick Start guide for windows and mac creative learning tools Kar2ouche Quick Start Guide Page 1 Step 1: The Activity Screen Open a Kar2ouche title by double clicking on the icon on your desktop. You will
Keynote 08 Basics Website:
 Website: http://etc.usf.edu/te/ Keynote is Apple's presentation application. Keynote is installed as part of the iwork suite, which also includes the word processing program Pages and the spreadsheet program
Mihaylo College Website Content Editing Guide
 Mihaylo College Website Content Editing Guide The following guide will take you through the steps necessary to update website content for https://business.fullerton.edu through the OmniUpdate (OUCampus)
Reporter Tutorial: Intermediate
 Reporter Tutorial: Intermediate Refer to the following sections for guidance on using these features of the Reporter: Lesson 1 Data Relationships in Reports Lesson 2 Create Tutorial Training Report Lesson
CUSTOMER PORTAL Splash Pages
 CUSTOMER PORTAL Splash Pages SPLASHPAGES In the splash page area, you can either create a custom splash page or use our editing tool and create a custom splash page using your own code. These splash pages
Basic Concepts 1. For this workshop, select Template
 Basic Concepts 1 When you create a new presentation, you re prompted to choose between: Autocontent wizard Prompts you through a series of questions about the context and content of your presentation not
Ektron Advanced. Learning Objectives. Getting Started
 Ektron Advanced 1 Learning Objectives This workshop introduces you beyond the basics of Ektron, the USF web content management system that is being used to modify department web pages. This workshop focuses
Beginners Guide to Snippet Master PRO
 Beginners Guide to Snippet Master PRO This document assumes that Snippet Master has been installed on your site. If not please contact the Bakas IT web team at webreg@bakasit.com.au. Initial Login Screen...
Basic Concepts 1. Starting Powerpoint 2000 (Windows) For the Basics workshop, select Template. For this workshop, select Artsy
 For the Basics workshop, select Template. For this workshop, select Artsy") 1 Starting Powerpoint 2000 (Windows) When you create a new presentation, you re prompted to choose between: Autocontent wizard Prompts you through a series of questions about the context and content of
1 Starting Powerpoint 2000 (Windows) When you create a new presentation, you re prompted to choose between: Autocontent wizard Prompts you through a series of questions about the context and content of
Website Creating Content
 CREATING WEBSITE CONTENT As an administrator, you will need to know how to create content pages within your website. This document will help you learn how to: Create Custom Pages Edit Content Areas Creating
GROUP CANVAS USER SIDE FUNCTIONS
 Group Canvas V5.0 17 GROUP CANVAS USER SIDE FUNCTIONS INTRODUCTION Once the template is available on the user side there are a number of functions that the users have access to. This section of the manual
INFORMATION TECHNOLOGY
 INFORMATION TECHNOLOGY PowerPoint Presentation Section Two: Formatting, Editing & Printing Section Two: Formatting, Editing & Printing By the end of this section you will be able to: Insert, Edit and Delete
FrontPage 98 Quick Guide. Copyright 2000 Peter Pappas. edteck press All rights reserved.
 Master web design skills with Microsoft FrontPage 98. This step-by-step guide uses over 40 full color close-up screen shots to clearly explain the fast and easy way to design a web site. Use edteck s QuickGuide
EventsNow. Getting Started Guide
 EventsNow Getting Started Guide Contents Creating Your First Event... 3 Name Your Event... 3 Add an Event Contact... 3 Add Event Details... 5 Upload Your Logo/Image... 6 Add Tickets... 6 Add Donations...
Project 1: Creating a Web Site from Scratch. Skills and Tools: Use Expression Web tools to create a Web site
 E00EW3.qxp 4/14/2007 3:17 PM Page 1 Workshops w Introduction The Workshop is all about being creative and thinking outside of the box. These workshops will help your right-brain soar, while making your
Website Editor. User Guide - Table of Contents. Overview. Use Case(s) Accessing the Tool. Editor Tools. Quick Tab Toolbar. Menu Bar.
 Accessing the Tool. Editor Tools. Quick Tab Toolbar. Menu Bar.") 2016 - Fall Edition Website Editor User Guide - Table of Contents Overview Use Case(s) Accessing the Tool Editor Tools Quick Tab Toolbar Menu Bar Adding Content Inserting Content Inserting Images Styling
2016 - Fall Edition Website Editor User Guide - Table of Contents Overview Use Case(s) Accessing the Tool Editor Tools Quick Tab Toolbar Menu Bar Adding Content Inserting Content Inserting Images Styling
Forms for Android Version Manual. Revision Date 12/7/2013. HanDBase is a Registered Trademark of DDH Software, Inc.
 Forms for Android Version 4.6.300 Manual Revision Date 12/7/2013 HanDBase is a Registered Trademark of DDH Software, Inc. All information contained in this manual and all software applications mentioned
Dreamweaver MX Overview. Maintaining a Web Site
 Dreamweaver MX Overview Maintaining a Web Site... 1 The Process... 1 Filenames... 1 Starting Dreamweaver... 2 Uploading and Downloading Files... 6 Check In and Check Out Files... 6 Editing Pages in Dreamweaver...
Table of Contents. Word. Using the mouse wheel 39 Moving the insertion point using the keyboard 40 Resume reading 41
 Table of Contents iii Table of Contents Word Starting Word What is word processing? 2 Starting Word 2 Exploring the Start screen 4 Creating a blank document 4 Exploring the Word document window 5 Exploring
Excel 2003 Tutorial II
 This tutorial was adapted from a tutorial by see its complete version at http://www.fgcu.edu/support/office2000/excel/index.html Excel 2003 Tutorial II Charts Chart Wizard Chart toolbar Resizing a chart
Dreamweaver Basics. Planning your website Organize site structure Plan site design & navigation Gather your assets
 Dreamweaver Basics Planning your website Organize site structure Plan site design & navigation Gather your assets Creating your website Dreamweaver workspace Define a site Create a web page Linking Manually
Wolf. Responsive Website Designer. Mac Edition User Guide
 Wolf Responsive Website Designer Mac Edition User Guide Version 2.10.3 Table of Contents What is Wolf Website Designer? Editor overview Save and open website Create responsive layout How to create responsive
Requirements Document
 GROUP 9 Requirements Document Create-A-Page Matthew Currier, John Campbell, and Dan Martin 5/1/2009 This document is an outline of what was originally desired in the application in the Project Abstract,
Sedao Ltd. QuickChange PROject. User Manual for QuickChange PROject version 2.1.5
 Sedao Ltd QuickChange PROject User Manual for QuickChange PROject version 2.1.5 Contents What is QuickChange PROject?... 2 Simple Artwork Creation... 5 Creating a project... 7 QuickChange PROject Template
Access Groups. Collect and Store. Text Currency Date/Time. Tables Fields Data Type. You Your Friend Your Parent. Unique information
 Tutorial A database is a computerized record keeping system used to collect, store, analyze and report electronic information for a variety of purposes. Microsoft Access is a database. There are three
NYLearns Curriculum Administration:
 NYLearns Curriculum Administration: Creating a Curriculum Map May 2014 2 This page left intentionally blank 3 Contents Signing in to NYLearns... 4 Curriculum Mapping... 6 Creating Curriculum Maps... 7
Useful Google Apps for Teaching and Learning
 Useful Google Apps for Teaching and Learning Centre for Development of Teaching and Learning (CDTL) National University of Singapore email: edtech@groups.nus.edu.sg Table of Contents About the Workshop...
Excel 2010 Tutorials - Video File Attributes
 Get Familiar with Excel 2010 42.30 2.70 The Excel 2010 Environment 4.10 0.18 Quick Access Toolbar 3.10 0.27 Excel 2010 Ribbon 3.10 0.26 File Tab 3.10 0.28 Home Tab 5.10 0.17 Insert Tab 3.10 0.18 Page Layout
4/27/2018 Blackbaud Internet Solutions 4.5 US 2015 Blackbaud, Inc. This publication, or any part thereof, may not be reproduced or transmitted
 Email Guide 4/27/2018 Blackbaud Internet Solutions 4.5 Email US 2015 Blackbaud, Inc. This publication, or any part thereof, may not be reproduced or transmitted in any form or by any means, electronic,
Enhancing your Page. Text Effects. Paragraph Effects. Headings
 Enhancing your Page You can make your pages more visually appealing and organize page content by using text effects, paragraph effects, macros, images, tables, etc. To begin, select the "Edit" button for
Documentation > Product Info > Site Manager > 7.3 & 7.4 > Content > Add Content
 Add Content Site Manager Community Extranet - TERMIN... Documentation > Product Info > Site Manager > 7.3 & 7.4 > Content > Add Content Add Content Site Manager Version: 7.3: +. Minimum User Level: Contributor
SET UP A MOODLE BOOK
 SET UP A MOODLE BOOK Book is, essentially, a series of connected web pages and you can therefore build into your book anything which is possible in Page, except that you are not restricted to just one
APPLICATION USER GUIDE. Application: EasySiteWizard PRO Version: 8.7
 APPLICATION USER GUIDE Application: EasySiteWizard PRO Version: 8.7 EasySiteWizard Professional allows you to create a completely customized website in a few simple steps. There are several creative and
V12 Highlights. What s new in Richmond ServiceDesk V12?
 V12 Highlights What s new in? Richmond ServiceDesk v12 incorporates many new features including a new Report Generator, a new CSP Homepage Designer, a new CSP Menu Designer, a new CSP Panels and new CSP
Quick Reference Card Business Objects Toolbar Design Mode
 Icon Description Open in a new window Pin/Unpin this tab Close this tab File Toolbar New create a new document Open Open a document Select a Folder Select a Document Select Open Save Click the button to
Excel 2007 Tutorials - Video File Attributes
 Get Familiar with Excel 2007 42.40 3.02 The Excel 2007 Environment 4.10 0.19 Office Button 3.10 0.31 Quick Access Toolbar 3.10 0.33 Excel 2007 Ribbon 3.10 0.26 Home Tab 5.10 0.19 Insert Tab 3.10 0.19 Page
Understanding Word Processing
 Understanding Word Processing 3.0 Introduction In this chapter you are going to learn how to create a simple memo or note or a complex and complicated multi column business document using word processing
Checkbox 5 - Style Guide
 Checkbox 5 - Style Guide Survey Styles are style templates that can be applied to surveys and reports. This guide will show you how to create a new Survey Style and apply it (and other appearance configurations)
User Guide. Chapter 6. Teacher Pages
 User Guide Chapter 6 s Table of Contents Introduction... 5 Tips for s... 6 Pitfalls... 7 Key Information... 8 I. How to add a... 8 II. How to Edit... 10 SharpSchool s WYSIWYG Editor... 11 Publish a...
Rich Text Editor Quick Reference
 Rich Text Editor Quick Reference Introduction Using the rich text editor is similar to using a word processing application such as Microsoft Word. After data is typed into the editing area it can be formatted