A PRACTICAL GUIDE TO USING WIX TO BUILD A WEBSITE
|
|
|
- Johnathan Perkins
- 6 years ago
- Views:
Transcription


1 A PRACTICAL GUIDE TO USING WIX TO BUILD A WEBSITE AN AID TO ENABLE STUDENTS TO UNDERSTAND THE FUNDAMENTELS OF WEBSITE DESIGN WITHIN THE FRAMEWORK OF A WEBSITE PROJECT USING WEB DESIGN TOOLS YANNIS STEPHANOU
2 CONTENTS. INTRODUCTION TO THE WIX WEB DEVELOPMENT PLATFORM 4 A BRIEF DESCRIPTION OF THE TOOL 4 B MAIN ADVANTAGES AND DISADVANTAGES 4. GETTING STARTED 5 A SETTING UP AN ACCOUNT 5 B USING THE SERVICE (FOR EXISTING USERS) 7 C LANGUAGE SUPPORT 8 D CHOOSING A TEMPLATE 9 E SAVING YOUR SITE & DOMAIN NAME REGISTRATION 6 F EDITING TOOLS BASICS 8 3 WEB AND PAGE STRUCTURE 3 3A PLANNING 3 3B FORM THE STRUCTURE OF THE WEBSITE 4 4 EDITING 3 4A BACKGROUND COLOUR 3 4B TEXT FORMATTING 36 4B (I) EDITING EXISTING TEXT WITHIN A TEMPLATE 36 4B (II) ADDING NEW TEXT 4 4C IMAGE MANAGEMENT 43 4C (I) MANAGING EXISTING IMAGES IN THE TEMPLATE 43 4C (II) INSERTING A NEW IMAGE 46 4D CREATING LINKS 48 4D (I) ON TEXT 48 4D (II) ON IMAGES 50 4D (III) TO A SPECIFIC PART OF A PAGE (ANCHOR) 5 4E BANNERS (GALLERY) 53 4E (I) EDITING AN EXISTING BANNER IN TEMPLATE 53 4E (II) ADDING A NEW BANNER OR GALLERY 53 4F ADDING A FORM OR MAP 54 4F (I) INSERT AND EDIT A CONTACT FORM, SUBSCRIPTION FORM OR MAP 54 4F (II) ADD OTHER TYPES OF FORMS 56 4G ADDING A TABLE 57 4H ADDING OTHER TYPES OF CONTENT 58 5 MOBILE & TABLETS 59 6 APPS & ADDITIONAL MODULES 6 6A ADDING APPS TO YOUR SITE 6 6B ADDING AN ESTORE TO YOUR SITE 6 6C ADDING HTML CODE AND FLASH 63 7 PUBLISHING YOUR SITE 64 /59
3 3/59
4 . INTRODUCTION TO THE WIX WEB DEVELOPMENT PLATFORM A BRIEF DESCRIPTION OF THE TOOL Wix is a web development platform that enables you to build a website without any technical or programming knowledge. Using an Internet browser and drag and drop tools, all tasks needed to develop the website can be performed. It is entirely cloud-based, without the need to save anything on a computer. Wix enables you to add a number of functionalities such as forms, estores, social medial plug ins and blogs. Additionally, an App store exists, through which additional functionality is offered by Wix and third-party developers. This web development platform is offered for free but a number of premium plans are offered, such as connecting a domain name to the site, the removal of Wix advertising and extra storage and bandwidth. B MAIN ADVANTAGES AND DISADVANTAGES Wix has the following advantages and disadvantages. ADVANTAGES Easy to use requiring no technical knowledge Easy to understand and teach for children and adults without any prior knowledge of website development Cloud based enabling the user to work from any internet connected PC without the worry of where to store the work or for security backups Sites are created in HTML5, which is the modern standard of creating websites, enabling rich content and functionality Mobile-friendly view produced A large community of App developers, which enables a number of functionalities and more interesting content Search Engine friendly, enabling better ranking in Search Engines such as Google. DISADVANTAGES Not able to perform programming coding for more sophisticated work The sites produced are not responsive but adaptive. This means that the sites do not resize based on the screen size but instead display a different site when a mobile device is used, making the appearance not always optimal on some devices. 4/59

5 . GETTING STARTED A SETTING UP AN ACCOUNT Step Starting You can set up an account by visiting on your Internet Browser and clicking on Start Now (). Alternatively you can click on Sign In in the upper right corner. Step Enter and set password Enter your and the password ( & ) you wish to use or alternatively use your Facebook or Google + account (3). 3 Name@ Address.com ******************* 5/59

6 Step 3 Completing the setup Your account will be set up immediately and you can either choose your template immediately after or use your login credentials to login at any time. You will receive the following as a confirmation, which you can also use to start using the platform. 6/59
 to enter the service. Click on the I m an existing user radio button ().")
7 B USING THE SERVICE (FOR EXISTING USERS) Step Where to Sign In from Use the Sign In button in the top right to enter the service. Step Entering the service Use your and password (&3) to enter the service. Click on the I m an existing user radio button (). Alternatively use your Facebook or Google + account (4). 4 Name@ Address.com 3 ******************* 7/59

8 C LANGUAGE SUPPORT The service supports a number of languages, which can be called by clicking on the globe icon on the top right of the screen. 8/59
.")
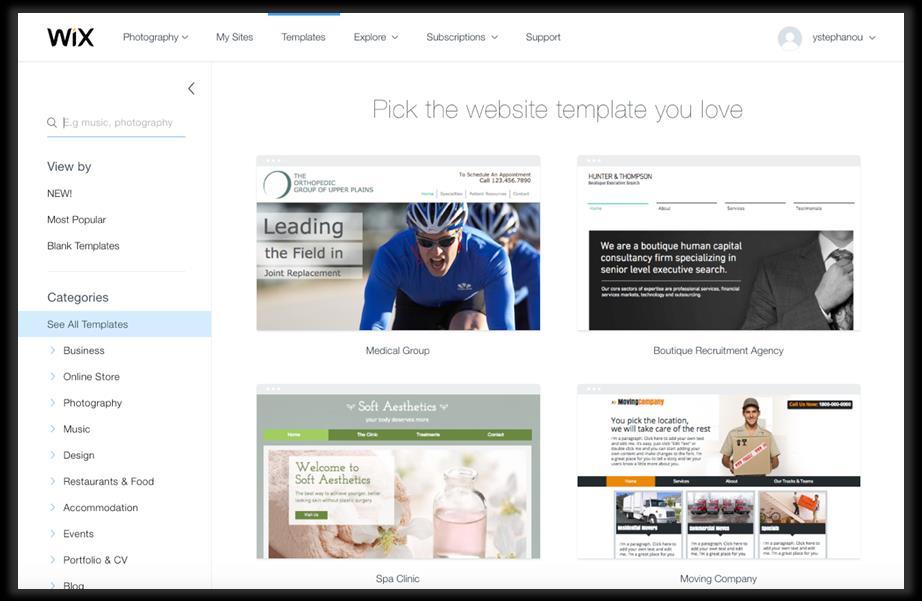
9 D CHOOSING A TEMPLATE You can choose your template as soon as you sign in or once you sign up to the service. Step Finding preset template categories or finding other ones You can choose from one of the preset templates (). Alternatively you can choose from a number of other templates, if the category you are looking for is not found in the preset templates by clicking on Other. Step Finding specific templates Choose from a number of categories 9/59
10 0/59


11 Step 3 Finding the template you wish to use Once you find the category you wish click on it to expand the menu Once you choose your category, you can choose a sub-category /59
12 Step 4 Choosing your template Click on the template you want to see the template menu (). Click on View to see how your template looks () /59
13 Once in the Viewing mode you can see how this template looks on the web. Use the upper menu to switch between the desktop and menu views (3) /59
14 Step 5 Selecting to edit the template Once you like a template you can choose to edit the site either from the templates area by clicking on edit (). Or from the template view mode by clicking on Edit this site () 4/59

15 Step 6 See the site in edit mode You will then be moved to the wix editor, from where you can edit your site. 5/59
16 E SAVING YOUR SITE & DOMAIN NAME REGISTRATION Wix allows you to have a web address in the following format: Additionally you can choose to buy a domain, in order to have your own web address, such as: You can select your domain name by choosing to save your site by clicking on Save () in the edit mode. 6/59
 lets you connect to your own customized domain. http://yourname.wix.com/ NameOfSite For more on domains visit https://www.wix.com/support/html5/domains/ 7/59")
17 Once you click on save, a pop up appears that lets you save the site to a particular domain. The first option () lets you choose a name for your site under the Wix.com domain. The second option () lets you connect to your own customized domain. NameOfSite For more on domains visit 7/59
 Header and Footer The Header area is seen in dark blue and the Footer appears in black in the screenshot below.")

18 F EDITING AREAS IN WIX This section shows the basic areas that one uses within Wix. F (i) Header and Footer The Header area is seen in dark blue and the Footer appears in black in the screenshot below. A header and footer appear on all pages, unless you choose not to have them on a particular page. More about headers here More about footers here F (ii) Page and Backround Seen in blue, this is the page area that you use to add all the web elements you wish to show on your page. 8/59
19 The Background area is seen in red. The footer, header, page area, as well as any other element you add will appear above the background. 9/59
20 G A BRIEF DESCRIPTION OF WIX TOOLS G (i) Main menu Drop down used to see the pages and structure of your website. Manage your site from here 3 Choose what set of tools you wish to have available while you edit your site. 4 Use this to find support on all elements in Wix 5 Click in order to upgrade your site 6 Undo or redo changes 7 Move to the mobile view editing 8 Save your site either to your own domain or under the Wix domain 9 Click to preview your site and see how it appears in the Internet browser 0 Click to publish once you are done with your changes /59

21 G (ii) Tools used to add content to your site Page Background: Add or change a background. Add Web Elements: Add web elements to your page such ass text, images, menus and buttons. 3 Wix App Market: Add widgets or plugins created by Wix or third-party developers. 4 My Uploads: Upload or view your uploaded files. 5 Blogs: Add blog to your site /59
22 G (iii) Positioning and Editing Tools. Use? to get more support, the dots to move the tools around the page and x to close the tools.. Use this set to copy, paste, duplicate or delete a web element. 3. Use this set to move elements in front or behind other elements, align a selection of or more elements, distribute a selection of or more elements or match the size of elements. 4. Rotate an image using this tool. 5. Use this set to resize an element accurately based on pixels. 6. Use this set to more accurately position an element on the page. X is for horizontal movements and Y for vertical. 7. Choosing an element and turning the option Show on all pages on makes this element appear on all pages on the location this exists /59
23 3 WEB AND PAGE STRUCTURE 3A PLANNING Before you start editing your site it is recommended that you plan the structure of your site before you start. An example of a site plan is the following: Home Services Service Additional Services Additional Services Service Service 3 About Who we are What we do Contact Us Following this, it is important to have a rough guideline of what will be placed on each page. 3/59
 to see the page structure of your website (). 4/59")
24 3B FORM THE STRUCTURE OF THE WEBSITE Step Open the page structure Click on the upper left menu of Pages () to see the page structure of your website (). 4/59


 and then choose to")
25 Step Adding, Subtracting and Renaming Pages You can add new pages by clicking on + Add Pages Button () at the bottom of the menu You can delete pages by clicking on the button on the right of each page name () to get the individual page menu (3) and then choose to delete it /59

 on the left of a page name and grab it by holding down your mouse, which then enables you to")
26 You can also use this page submenu to Rename, Duplicate (copy an existing page) and Hide a page. Hiding a page means that it will not appear in the menu. Step 3 Reordering Pages To change the order that the pages appear you need to click on the grid () on the left of a page name and grab it by holding down your mouse, which then enables you to move the page up and down your structure. 6/59


27 If you wish a page to be situated under another page, that is be its child page, you simply move your mouse under that page and shift it slightly to the right. The page name button will change to appear as a child, as seen below: You can use the + and buttons to expand the child pages or to hide them, so that you see only the parent page. Expanded View Contracted View 7/59
 You can then choose the type of transition from the submenu that")
28 Step 4 Page Transitions Once you finish your pages structure you can also select what kind of transitions (animation) a viewer will experience once he selects to go to a page. You can do so by finding the submenu Page Transitions at the bottom of the Pages menu and clicking on the type of transition () You can then choose the type of transition from the submenu that appears (). 8/59
 on the right of each page name) you also have a number other options () as seen in the screenshot below.")
29 Step 5 Additional Options From the menu of each individual page, which can be populated by clicking on the. Button () on the right of each page name) you also have a number other options () as seen in the screenshot below. Page Info enables you to change the name of the page, set the page as a home page and hide the page from the menu. 9/59

30 Layouts enables you to manage if the page will carry the Header and Footer that all pages within your website have. Headers & Footers are the way Wix enables you to design elements once, which then show on all pages of the site. Permissions allow you to set if the page will be viewed by the visitors of the website without any restrictions, using a password or only if they are registered members. 30/59

31 SEO (Google) enables you to set the Search Engine Optimisation parameters of the page. Search Engine Optimisation enables your site to talk to Search Engines such as Google and to enable visitors to find the site more easily on them. More on SEO here: More on using SEO on Wix: Explaining SEO in simple terms 3/59

32 4 EDITING 4A BACKGROUND COLOUR The background colour is the colour that appears behind all the elements you add to a web page. This appears as red in the screenshot below. Step Setting the background of your website Move to the page you wish to apply a background and click on the button with the square shape () to see the sub menu. 3/59
 and once you select one it will appear in the background of your page.")
33 Step Select the type of background you wish Using the submenu you can select from 3 types of background styles: Colour, Image or Video. Image and video assets are available to use from the thumbnail menu () and once you select one it will appear in the background of your page. Whatever asset you choose to use as a background of the particular page you are on, you can choose to apply it to all pages by clicking on the Apply to Other Pages Button (). You can then select which pages you wish to apply this background on using the submenu (). 33/59

 to get a selection of colour swatches to choose from (3).")
 or Video () buttons to upload and use them, from where you can also select")
34 To choose a colour for the background, click on the Color button () and then select the colour you wish. If the color you want to use is not available in the submenu then click on the button Change () to get a selection of colour swatches to choose from (3). 3 If you wish to use your own assets as a background just click on the Image () or Video () buttons to upload and use them, from where you can also select from categories of ready to use assets as well. 34/59
 button to upload new images or simply drag and drop the image in the space shown () or any of the tabs Social")

35 By clicking on the image button you can see all media that you have already uploaded. You can click on the Upload Images () button to upload new images or simply drag and drop the image in the space shown () or any of the tabs Social Images (3), Free from Wix (4) and Bigstock Images (5) to find images from various categories Note that Bigstock Images are not free and every time you click on the image in this tab the price appears. If you click on the Video button from the Page Background Menu, you get a similar window that you can use in a similar way as you would do with Images. 35/59


36 4B TEXT FORMATTING 4B (i) Editing existing text within a template Step Finding and moving text Go to the text you wish to change within the template you are using and click on it in order to see the menu. Use the arrows () to move the text up and down the page without altering the layout. Alternatively click and hold the text box so that you can move it anywhere you wish. Step Editing text and its settings Click on Edit Text () to be able to amend it and manage the attributes of this text (). 36/59
. Change your font () and font size (3) 3.")
37 Step 3 Change how your text looks Using the text settings menu you can define various aspects of your text. You can use the scroll button on your mouse to move down the menu. You can perform the following changes to your text:. Choose from various text themes (). Change your font () and font size (3) 3. Format your text (4) as bold, italics and/or underline, change the colour of the text or highlight it with a colour of your choice. You can create a text link from here by selecting the text you wish and clicking on the link button (See section 4D Creating Links) 4. Using the set of tools seen as (5) you can change your text alignment, add bullet or number lists, decrease and increase your text indentation and change the orientation. 5. Effects (6) let you give your text a number of effect. 6. You can change the line spacing using this category of tools (7) 7. At any time you can reset your changes to that of the theme (8) 37/59


38 For more detailed information on how to edit text in Wix visit or click on the? button above the tool set. 38/59
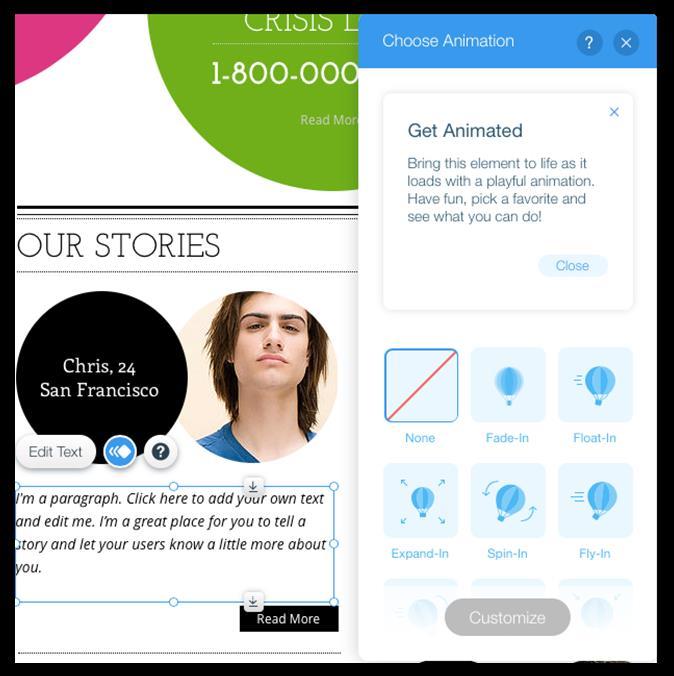
 to resize the text box. Step 5 Animating your text You can also choose to animate your text by clicking on the Animate button ().")
39 Step 4 Typing in your text and resizing the text box As you are typing, the text will enlarge to push down the other web elements but maintaining the layout of the page. You can aslo use the various points on the text box (e.g. ) to resize the text box. Step 5 Animating your text You can also choose to animate your text by clicking on the Animate button (). You can then choose from a number of animations () and you also customise them (3). 39/59
40 3 3 40/59
 to")

41 4B (ii) Adding new text Step Go to add menu Click on the + button () to add an element to your site Step Select text from the menu that appears () 4/59
, click on it and keeping your mouse pressed grab it and drop it where you wish to use it in your site.")
42 Step 3 Choose the text you wish to add Once you find the text you wish to use (e.g. 3), click on it and keeping your mouse pressed grab it and drop it where you wish to use it in your site. 3 Step 4 Edit your text Once you drop the text where you wish, you can then edit it in the same way shown in Section 4B (i) Editing existing text within a template. 4 4/59
 to move the image up and down the page without affecting the layout of the page by clicking and dragging it (holding down your mouse button) up and down.")
43 4C IMAGE MANAGEMENT 4C (i) Managing existing images in the template Step Find the Image you wish to manipulate Click on the image you wish to manage () to populate a set of tools () Step Move the image You can use the arrows () to move the image up and down the page without affecting the layout of the page by clicking and dragging it (holding down your mouse button) up and down. Alternatively, you can click on the image and drag and drop it anywhere on the page. 43/59
44 Step 3 Resizing your image Use the various points on the box (e.g. 3) to resize your image Step 4 Change your image Click on Change Image to replace your image 4 44/59
.")
45 Step 5 Choose your new image Use the tabs My Images, Social Images, Free from Wix and Bickstock Images () to find the library of images you wish to use and then select the image you wish to use. Alternatively you can choose to upload your own image using the Upload Images button (). Step 6 Editing your image and additional options Additionally you can edit your image using the following options.. Manage the image settings (). Customise the design with themed frames () 3. Crop and edit your image (3) 4. Create an animation for your Image (4) 5. Link your image to an internal or external page (5) /59
 Step Select to insert")
.")
46 4C (ii) Inserting a new image Step Click the + button to add a new element on the website () Step Select to insert an image on the website Once you click on Image () then you can choose from which library to choose from (). 46/59
 Managing existing images in the")
 Managing")
47 Step 3 Choose your image from the library Once you choose from the library of images, in the same manner as step 5 of 4C (i) Managing existing images in the template you can then drop it anywhere on the web page. You can then edit the image in the same manner as seen in 4C (i) Managing existing images in the template. 47/59
 Step Place link")
 and then click on the link button () in the text settings set of tools.. 48/59")
48 4D CREATING LINKS 4D (i) On text Step Click on the text box in which the text you wish to place the link on is found and then click on Edit Text () Step Place link on selected text Use your mouse to select the text you wish to place your link on () and then click on the link button () in the text settings set of tools.. 48/59
49 Step 3 Choose the type of link Wix offers a number of link options:. Choose a page within your website (). Simply click and select (). To link to an anchor on another page go to Section 4D (iii) Creating a Links to a specific part of a page (anchor). Enter an external web address () 3. Place an address (3). When visitors click on this link, a new message will be opened with your address entered in the sender field. 4. Link to an uploaded document (4). Choose document and then upload the document you wish to link to. 5. Top of Page (5) and Bottom of Page (6) take you to that location within the same page /59
50 4D (ii) On images Step Select the image to link from Once you select the image you wish to add a link to (), then click on the link tool () Step Select where the image will be linked to Choose the link type by using the options in the window that appears. See what options are available in Step 3 in Section 4D (i) Creating Links on text Adding links on buttons is done in the same way as it is done for images. 50/59
. Select More () and scroll down the menu to find the Anchors options.")
 pops up a menu that allows you")
51 4D (iii) To a specific part of a page (anchor) Step Place anchor on page Choose the page you wish to place an anchor on and click on the + button (). Select More () and scroll down the menu to find the Anchors options. Click on the anchor image (4) and drag and drop it on the height of the page you wish. 3 4 Once on the page, you can move the anchor up or down, whilst clicking on it (5) pops up a menu that allows you to rename it or define its settings. 5/59 5
 in the window that will appear.")
52 Step Choose the image or text you wish to add the link to the anchor Select where the link will be added (6) and click on the link button (7) 7 6 Step 3 Linking to an anchor Select Page/Anchor (8) in the window that will appear. Select which page on the site you wish the anchor to be placed (9) 8 9 5/59

53 4E BANNERS (GALLERY) 4E (i) Editing an existing banner in template Click on the banner (gallery) () in order to see the pop up menu (). Use this pop up menu to choose the images that will appear on your carousel banner, affect the settings such as the transition speed between images and choose what type of animation will be used. 4E (ii) Adding a new banner or gallery Click on the + Button () and select the Gallery style you wish to use (). Edit it in the same manner as indicated in section 4E (i). 53/59
 and then on Contact (). Choose the form or map style you wish and drop it onto your page.")
54 4F ADDING A FORM OR MAP 4F (i) Insert and edit a contact form, subscription form or map Click on the + button () and then on Contact (). Choose the form or map style you wish and drop it onto your page. 54/59


55 When you click on the form, a menu of tools will pop up, which will enable you to set the the form will be received, once submitted by a user, add and remove cells and change the settings of the form. When you click on the map you have added, a menu of tools will pop up, which will enable you to set the address and change the settings of the map. If you are unable to find your address by typing it in you can enter the coordinates directly in the format , See how to find the coordinates of your location at 55/59
. Scroll down to Related Apps (3) to choose from a number of form services.")
56 4F (ii) Add other types of forms You can add other types of forms by clicking on the + button () and then on contact (). Scroll down to Related Apps (3) to choose from a number of form services. 3 56/59
, searching for table in the search box and")


57 4G ADDING A TABLE You can add a table to your site by clicking on the Wix App Market (), searching for table in the search box and then adding Table Master to the site (). You can then define the settings of the table by clicking on it and then on settings and using the menu that is populated to edit the text in the table, to edit the table itself, to define the rows and columns and colours of the table. 57/59
 with the options seen in () available:")
58 4H ADDING OTHER TYPES OF CONTENT Wix enables you to add a number of web elements and content by clicking on the + button () with the options seen in () available: 58/59

59 5 MOBILE & TABLETS Step Move to mobile view Click on the mobile icon () to switch to the mobile view. Then click on the Edit Mobile View radio button () 59/59
 and then on the hide")
60 Step Edit the mobile view You can edit your mobile view in the same way you did your desktop version. Step 3 Hiding elements If you wish to hide elements that appear on the desktop version from the mobile view you can do so by clicking on the item you wish to hide () and then on the hide button (). You can then view which items are hidden using the Hidden Elements button (3). 3 60/59

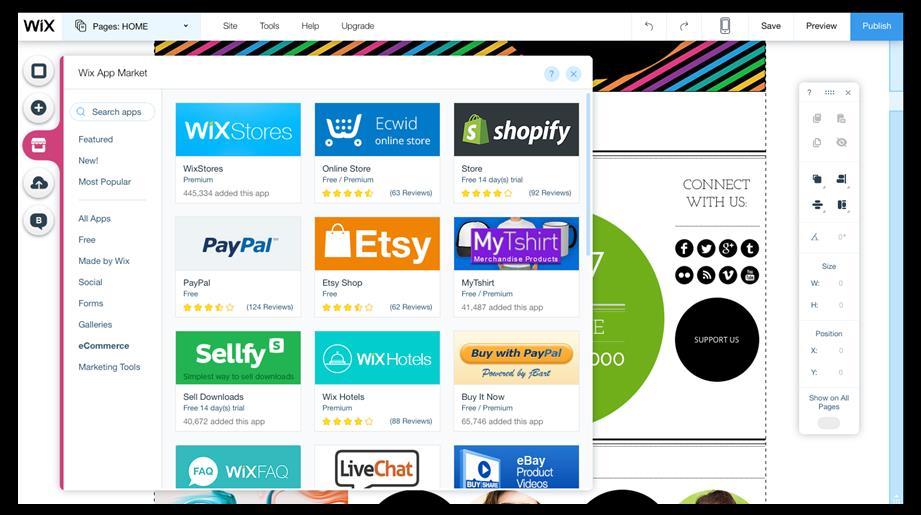
61 6 APPS & ADDITIONAL MODULES Wix enables you to add a number of apps and features to your site. Apps enable you to add various types of functionality to your website, such as forms, calenders or stores. 6A ADDING APPS TO YOUR SITE To add an App to your site, click on the Wix App Market button () and choose the app you wish to add. Although some apps are free, some apps are available at a charge. 6B ADDING AN ESTORE TO YOUR SITE By clicking on the Wix App Market button () and then on the ecommerce button () you can select from a number of estores for your site. 6/59
62 6/59
 and choose Embed a site, embed a site or flash.")
63 6C ADDING HTML CODE AND FLASH To add other functionality to your site you might wish to use Html code or flash. Click on the + Button () and choose Embed a site, embed a site or flash. 63/59
. Your site will now be live and available to all viewers on the Internet.")
64 7 PUBLISHING YOUR SITE Once you preview your site by clicking on Preview () and seeing that your site is exactly the way you want it, you can then publish it by clicking on Publish (). Your site will now be live and available to all viewers on the Internet. 64/59
While editing a page, a menu bar will appear at the top with the following options:
 Page Editor ===> Page Editor How Can I Use the Page Editor? The Page Editor will be your primary way of editing your website. Page Editor Basics While editing a page, you will see that hovering your mouse
Layout Manager - Toolbar Reference Guide
 Layout Manager - Toolbar Reference Guide Working with a Document Toolbar Button Description View or edit the source code of the document (for advanced users). Save the contents and submit its data to the
CreateASite Beginner s Guide
 Contents Getting Started... 3 Access the CreateASite Control Panel... 3 Select a Category/Subcategory... 4 Select a Template... 6 Change the Site Template... 10 Change Colours... 12 Change Fonts... 13
NETZONE CMS User Guide Copyright Tomahawk
 NETZONE CMS User Guide Copyright 2015. Tomahawk 1 Phone: + 64 9 522 2333 Email: getintouch@tomahawk.co.nz Tomahawk 2015 www.tomahawk.co.nz 2 NETZONE CMS USER GUIDE WHAT YOU LL FIND INSIDE LOGGING IN 4
Swiiit User Guide 09/11/2016
 Swiiit User Guide 09/11/2016 Contents Getting Started... 4 Overview of Main Tools... 5 Webpages... 6 Main pages (Sections)... 6 Rearrange Sections... 6 Subpages... 7 Change the Title of a Webpage... 8
Microsoft Office PowerPoint 2013 Courses 24 Hours
 Microsoft Office PowerPoint 2013 Courses 24 Hours COURSE OUTLINES FOUNDATION LEVEL COURSE OUTLINE Using PowerPoint 2013 Opening PowerPoint 2013 Opening a Presentation Navigating between Slides Using the
A Guide to Using WordPress + RAVEN5. v 1.4 Updated May 25, 2018
 + v 1.4 Updated May 25, 2018 Table of Contents 1. Introduction...................................................................................3 2. Logging In.....................................................................................4
GoLive will first ask you if your new site will be for one individual or a work group; select for a Single User, and click Next.
 Getting Started From the Start menu, located the Adobe folder which should contain the Adobe GoLive 6.0 folder. Inside this folder, click Adobe GoLive 6.0. GoLive will open to its initial project selection
Learn more about Pages, Keynote & Numbers
 Learn more about Pages, Keynote & Numbers HCPS Instructional Technology May 2012 Adapted from Apple Help Guides CHAPTER ONE: PAGES Part 1: Get to Know Pages Opening and Creating Documents Opening a Pages
Swiiit User Guide 03/09/2015
 Swiiit User Guide 03/09/2015 Contents Getting Started... 4 Overview of Main Tools... 5 Webpages... 6 Main pages (Sections)... 6 Rearrange Sections... 6 Subpages... 7 Change the Title of a Webpage... 8
ECDL Module 6 REFERENCE MANUAL
 ECDL Module 6 REFERENCE MANUAL Presentation Microsoft PowerPoint XP Edition for ECDL Syllabus Four PAGE 2 - ECDL MODULE 6 (USING POWERPOINT XP) - MANUAL 6.1 GETTING STARTED... 4 6.1.1 FIRST STEPS WITH
Websites. Version 1.7
 Websites Version 1.7 Last edited 15 Contents MyNetball Information...3 Websites...4 Web packages...4 Setting up the layout...5 Uploading files and images...6 Using Dropbox to Increase your Website Data...7
Logging Into Your Site
 This training document is meant as a step-by-step guide to creating and delivering a UW-Madison site in the current UW-Madison theme. In this training class, you will learn how to log in to access your
User s guide to using the ForeTees TinyMCE online editor. Getting started with TinyMCE and basic things you need to know!
 User s guide to using the ForeTees TinyMCE online editor TinyMCE is a WYSIWYG (what you see is what you get) editor that allows users a familiar word-processing interface to use when editing the announcement
Using Sitecore 5.3.1
 Using Sitecore 5.3.1 An End-User s Guide to Using and Administrating Sitecore Author: Sitecore Corporation Date: December 12, 2007 Release: Rev. 1.0 Language: English Sitecore is a registered trademark.
UTAS CMS. Easy Edit Suite Workshop V3 UNIVERSITY OF TASMANIA. Web Services Service Delivery & Support
 Web Services Service Delivery & Support UNIVERSITY OF TASMANIA UTAS CMS Easy Edit Suite Workshop V3 Web Service, Service Delivery & Support UWCMS Easy Edit Suite Workshop: v3 Contents What is Easy Edit
Creating Teacher Webpages on the New APS WordPress Site
 Creating Teacher Webpages on the New APS WordPress Site TABLE OF CONTENTS INTRODUCTION 3 THE EDITING DASHBOARD 4 CREATING A NEW PAGE 5 EDITING YOUR PAGE 6 1. Page Title 7 2. Toolbar/ toolbar icons 7 3.
General Training Curriculum
 General Training Curriculum Table of Contents 1.0 Getting Started 1.1 What is MODX? 1.2 Browser Support 1.3 How Do I Log In? 2.0 MODX Dashboard 2.1 What is a Dashboard? 2.2 Global Top Menu Bar 2.2.0 MODX
BHM Website Teacher User Guide
 BHM Website Teacher User Guide How to Login 1. Go to HUhttp://bhmschools.org/userUH 2. Enter your username and password and click Log in How to Change Your Password 1. Go to My Account in your Nav bar
INFORMATION TECHNOLOGY
 INFORMATION TECHNOLOGY PowerPoint Presentation Section Two: Formatting, Editing & Printing Section Two: Formatting, Editing & Printing By the end of this section you will be able to: Insert, Edit and Delete
Contact at Once Widget..5. Contact Us Widget...5 Contact Info Widget. 6 Dealership Contacts Widget. 6
 Table of Contents Flexible Design Overview. 3 Selecting the Flex Design. 3 Widget Overview. 4 Configuring Widgets..5 Contact at Once Widget..5 Contact Us Widget...5 Contact Info Widget. 6 Dealership Contacts
How to set up a local root folder and site structure
 Activity 2.1 guide How to set up a local root folder and site structure The first thing to do when creating a new website with Adobe Dreamweaver CS3 is to define a site and identify a root folder where
Introduction to the Weebly Toolkit for Building Websites
 Introduction to the Weebly Toolkit for Building Websites Maureen Pratchett July 2015 1 Objective The purpose of this workshop is not to teach you how to design or even build a website, but rather to introduce
PBwiki Basics Website:
 Website: http://etc.usf.edu/te/ A wiki is a website that allows visitors to edit or add their own content to the pages on the site. The word wiki is Hawaiian for fast and this refers to how easy it is
Updated: February 13th, Guide to Wix
 Updated: February 13th, 2016 Guide to Wix Table of Contents What is Wix?...p. 3 Creating a Wix Account.......p. 4 Selecting a Template....p. 5 Managing your Pages.......p. 7 Editing the Page Content.........p.
Wix Tutorial 10/2/2015. Prof. María L. Moctezuma
 Wix Tutorial 10/2/2015 Prof. María L. Moctezuma TABLE OF CONTENTS Free Site Basics... 1 Signing Up... 2 Choosing Your Template... 3 Before You Select a Template... 3 Navigating Through Wix's Template
BT Web Hosting. Features and functionality
 BT Web Hosting Features and functionality 1 Hopefully you will now have a website that is activated and potentially even published. This guide will take you through some of the additional features and
How to Edit Your Website
 How to Edit Your Website A guide to using your Content Management System Overview 2 Accessing the CMS 2 Choosing Your Language 2 Resetting Your Password 3 Sites 4 Favorites 4 Pages 5 Creating Pages 5 Managing
Cascade User Guide. Introduction. Key System Features. User Interface
 Cascade User Guide Introduction Key System Features User Interface Menus and Moving Through the System Files and Pages Working with Existing Pages File Action Menu Version Control Deleting files Restoring
Publisher 2010 Foundation. Publisher 2010 Foundation Level SAMPLE
 Publisher 2010 Foundation Publisher 2010 Foundation Level Microsoft Publisher 2010 Foundation - Page 2 1995-2012 Cheltenham Courseware Pty. Ltd. All trademarks acknowledged. E&OE. No part of this document
Beginners Guide to Snippet Master PRO
 Beginners Guide to Snippet Master PRO This document assumes that Snippet Master has been installed on your site. If not please contact the Bakas IT web team at webreg@bakasit.com.au. Initial Login Screen...
Do It Yourself Website Editing Training Guide
 Do It Yourself Website Editing Training Guide Version 3.0 Copyright 2000-2011 Sesame Communications. All Rights Reserved. Table of Contents DIY Overview 3 What pages are editable using the DIY Editing
This document contains information that will help you to create and send graphically-rich and compelling HTML s through the Create Wizard.
 This document contains information that will help you to create and send graphically-rich and compelling HTML emails through the Create Email Wizard. or warranty by AT&T and is subject to change. 1 Contents
A Guide to Blogging on Wordpress
 A Guide to Blogging on Wordpress Below is a written guide with pictures for using the WordPress blogging platform. If you re more of a visual person, there are videos here: http://wordpress.tv/category/howto/
Publisher 2016 Foundation SAMPLE
 Publisher 2016 Foundation Publisher 2016 Foundation Microsoft Publisher 2016 Foundation - Page 2 2015 Cheltenham Group Pty. Ltd. All trademarks acknowledged. E&OE. No part of this document may be copied
SharePoint List Booster Features
 SharePoint List Booster Features Contents Overview... 5 Supported Environment... 5 User Interface... 5 Disabling List Booster, Hiding List Booster Menu and Disabling Cross Page Queries for specific List
Digication eportfolio Student s Guide (Last update: 8/2017)
") Digication eportfolio Student s Guide (Last update: 8/2017) 2 Table of Contents Introduction... 1 Creating Your eportfolio... 3 Editing Your eportfolio... 4 Area 1: Top Menu Bar... 6 Area 2: The Main Tabs...
Digication eportfolio Student s Guide (Last update: 8/2017) 2 Table of Contents Introduction... 1 Creating Your eportfolio... 3 Editing Your eportfolio... 4 Area 1: Top Menu Bar... 6 Area 2: The Main Tabs...
Create & Use Your Own Teaching Website BJORN CANDEL FUJAIRAH MEN S COLLEGE
 Create & Use Your Own Teaching Website BJORN CANDEL FUJAIRAH MEN S COLLEGE 2 Go to www.kahoot.it 3 Here are some different ways to communicate with your students and deliver your classes 28 February 2018
Microsoft Word 2010 Basics
 1 Starting Word 2010 with XP Click the Start Button, All Programs, Microsoft Office, Microsoft Word 2010 Starting Word 2010 with 07 Click the Microsoft Office Button with the Windows flag logo Start Button,
USER GUIDE: EDITOR. Drag & drop system: Content Manager Style Editor Add Elements Undo/Redo Save...
 USER GUIDE: EDITOR Drag & drop system:... 2 1. Content Manager... 3 2. Style Editor... 5 3. Add Elements... 6 4. Undo/Redo... 13 5. Save... 13 When we access Zeendo s website editor, we can see a series
Introduction to PowerPoint 2007
 Introduction to PowerPoint 2007 PowerPoint is one of the programs included in the Microsoft Office suite. It s used to create presentations, also called slide shows, that are typically displayed via a
The Gardens Trust WordPress Manual. thegardenstrust.org. Page: 1
 The Gardens Trust WordPress Manual thegardenstrust.org Page: 1 Login Before you can make any changes to the site, you will need to log in. The login of the site is found at the following URL - http://thegardenstrust.org/wp-admin.
Pages are static content, generally linked in your navigation. They are used for things like your about page and contact page.
 North Star Marketing Client : The Guthrie Group Deliverable : Website Training +++ LOGGING IN AND OUT +++++++++ 1. Go to http://tgg.northstarmarketing.com/wp admin/. This is the address for the staging
An Quick Introduction to Weebly
 An Quick Introduction to Weebly Weebly is an online, template-driven website creation tool. It is easy to sign up, and the setting up of the web address and the hosting are all contained within the Weebly
QRG: Using the WYSIWYG Editor
 WYSIWYG Editor QRG: Using the WYSIWYG Editor WYSIWYG stands for What You See Is What You Get. The WYSIWYG Editor is the reason you don t need to be an IT Programmer to write content for your web page.
Videos...31 Training Videos...32 Webinar recording: Monday 5th December
 GATORCREATOR Table of Contents Articles... 3 Drag and Drop Email Editor (Overview)... 4 Hidden Elements...15 Tracked Mailto: Links...18 Template Restrictions Custom Templates...21 Nifty Images User Guide...22
Contents. Announcer Pro Version 4.6 Page 2 of 35 Version V4.6
 User Guide Contents 1. Introduction... 3 1.1. Getting Started... 3 1.2. Navigation... 4 2. Create a Newsletter... 6 2.1. Confirm Company Details... 6 2.2. Choose Template... 8 2.3. Edit Newsletter... 8
WPI Project Center WordPress Manual For Editors
 WPI Project Center WordPress Manual For Editors April 17, 2015 Table of Contents Who should use this manual... 3 Signing into WordPress... 3 The WordPress Dashboard and Left-Hand Navigation Menu... 4 Adding
Microsoft PowerPoint 2016 Basics Unit 9 Final Review - Student Notes Directions: Fill in the blanks.
 Directions: Fill in the blanks. 1. PowerPoint Window Layout 2. File Tab When clicked, opens - automatically opens the Info option by default Holds the following options: - Info - New - Open - Save - Save
TEACHER PAGES USER MANUAL CHAPTER 6 SHARPSCHOOL. For more information, please visit: Chapter 6 Teacher Pages
 SHARPSCHOOL USER MANUAL CHAPTER 6 TEACHER PAGES For more information, please visit: www.customernet.sharpschool.com 0 TABLE OF CONTENTS 1. 2. 3. 4. 5. 6. 7. 8. 9. 10. 11. INTRODUCTION... 1 I. TEACHER PAGE
SEWD Acceptance Test Plan
 SEWD Acceptance Test Plan Version 1.0 Ashwin Hamal, John Martino, Gurvinder Singh, Dan Weaver, Michael Witucki DREXEL UNIVERSITY NOVEMBER 23, 2010 Revision History Reviewer Date Reason for Revisions Version
MN Studio Website - User Guide
 MN Studio Website - User Guide Version 1.1 MN Studio Website Program 1. Introduction Welcome to the new website program! The MN Studio Website program allows you to create your own website with customized
WebsiteBuilder. Manual
 WebsiteBuilder Manual August 2016, Copyright Webland AG 2016 Table of Contents Introduction Getting Familiar With WebsiteBuilder Creating and Editing Websites Editing Websites Structure: Pages and Navigation
Teachers College Content Management System (TC-CMS) Faculty Module
 Faculty Module") Teachers College Content Management System (TC-CMS) Faculty Module Welcome to the Faculty Online Profile manager. We hope that you find using the profile manager to be an intuitive and simple way to manage
Teachers College Content Management System (TC-CMS) Faculty Module Welcome to the Faculty Online Profile manager. We hope that you find using the profile manager to be an intuitive and simple way to manage
Newcastle University Personal Web Publishing
 Newcastle University Personal Web Publishing User Guide (v1.1) Support: it.servicedesk@ncl.ac.uk Feedback: wordpress-feedback@ncl.ac.uk May 2014 Research and Collaborative Services, ISS Contents Section
Requirements Document
 GROUP 9 Requirements Document Create-A-Page Matthew Currier, John Campbell, and Dan Martin 5/1/2009 This document is an outline of what was originally desired in the application in the Project Abstract,
Website Reference Guide
 Website Reference Guide MU LTIMEDIA B Contents Login 04 Dashboard 05 Toolbar 08 Posts and Pages 09 Adding Content 12 Visual Editor 14 Adding images and other media 18 Adding HTML links 26 Saving and Publishing
Website Publishing Tool Manual
 Customer Support Website Publishing Tool Manual This is a designed as a definitive guide to all the features and tools available within Website Publishing Tool. Contents Introduction... 4 Adding Content...
Contents. Page Builder Pro Manual
 PRISM Contents 1. Website/Pages/Stripes/Items/Elements... 2 2. Click & Edit, Mix & Match (Drag & Drop)... 3 3. Adding a Stripe... 4 4. Managing Stripes... 5 5. Adding a Page... 7 6. Managing Pages and
Somerville College WordPress user manual. 7th October 2015
 Somerville College WordPress user manual 7th October 05 0 INDEX YOUR SITE IMAGES FORMS THE MENU 4 4 5 0 YOUR SITE The Content Management System The Somerville website has been built using the WordPress
Nauticom NetEditor: A How-to Guide
 Nauticom NetEditor: A How-to Guide Table of Contents 1. Getting Started 2. The Editor Full Screen Preview Search Check Spelling Clipboard: Cut, Copy, and Paste Undo / Redo Foreground Color Background Color
WordPress A Reference Guide for TU Students Version:
 WordPress A Reference Guide for TU Students Version: 2017.11.17 Adapted from OTS Training s Reference Guide for Faculty/Staff by OTS Student Computing Services scs@towson.edu 410-704-5151 www.towson.edu/scs
WordPress Manual For Massachusetts Academy of Math and Science
 WordPress Manual For Massachusetts Academy of Math and Science September 19, 2017 Table of Contents Who should use this manual... 4 Signing into WordPress... 4 The WordPress Dashboard and Left-Hand Navigation
HOW TO USE WORDPRESS TO BUILD A WEBSITE A STEP-BY-STEP GUIDE
 HOW TO USE WORDPRESS TO BUILD A WEBSITE A STEP-BY-STEP GUIDE YOUR WEBSITE How to login Go to your website and add /wp-admin: www.palondoncourse.co.uk/xxxxxxxxx/wp-admin This will bring up the login screen.
How to Edit Your Website
 How to Edit Your Website A guide to using your Content Management System Overview 2 Accessing the CMS 2 Choosing Your Language 2 Resetting Your Password 3 Sites 4 Favorites 4 Pages 5 Creating Pages 5 Managing
Creating a Website with Publisher 2016
 Creating a Website with Publisher 2016 Getting Started University Information Technology Services Learning Technologies, Training & Audiovisual Outreach Copyright 2017 KSU Division of University Information
REDESIGNING YOUR WEBSITE USING ONLINE PRESENCE BUILDER CUSTOMER USER GUIDE
 REDESIGNING YOUR WEBSITE USING ONLINE PRESENCE BUILDER CUSTOMER USER GUIDE 1 CONTENTS 1 GETTING STARTED...3 2 PLANNING...4 3 BACKING UP YOUR WEBSITE...5 4 REFRESHING YOUR WEBSITE...6 4.1 SETTING UP YOUR
Basic Concepts 1. For this workshop, select Template
 Basic Concepts 1 When you create a new presentation, you re prompted to choose between: Autocontent wizard Prompts you through a series of questions about the context and content of your presentation not
MockupScreens - User Guide
 MockupScreens - User Guide Contents 1. Overview...4 2. Getting Started...5 Installing the software... 5 Registering... 9 3. Understanding the Interface...11 Menu Bar... 11 Tool bar... 14 Elements... 14
User Guide. Chapter 6. Teacher Pages
 User Guide Chapter 6 s Table of Contents Introduction... 5 Tips for s... 6 Pitfalls... 7 Key Information... 8 I. How to add a... 8 II. How to Edit... 10 SharpSchool s WYSIWYG Editor... 11 Publish a...
What is EasyWeb?! 3 EasyWeb QuickStart! 4. Publishing Your Website! 10
 What is EasyWeb?! 3 EasyWeb QuickStart! 4 Website List! 6 Toolbar! 6 Inspector, Assets and Widgets! 7 Assets! 8 Widgets! 8 EasyWeb s Web Page Designer! 8 Publishing Your Website! 10 Head and Footer Code!
OU EDUCATE TRAINING MANUAL
 OU EDUCATE TRAINING MANUAL OmniUpdate Web Content Management System El Camino College Staff Development 310-660-3868 Course Topics: Section 1: OU Educate Overview and Login Section 2: The OmniUpdate Interface
Basic Concepts 1. Starting Powerpoint 2000 (Windows) For the Basics workshop, select Template. For this workshop, select Artsy
 For the Basics workshop, select Template. For this workshop, select Artsy") 1 Starting Powerpoint 2000 (Windows) When you create a new presentation, you re prompted to choose between: Autocontent wizard Prompts you through a series of questions about the context and content of
1 Starting Powerpoint 2000 (Windows) When you create a new presentation, you re prompted to choose between: Autocontent wizard Prompts you through a series of questions about the context and content of
Lesson 8: Presentation Enhancements Microsoft PowerPoint 2016
 Lesson 8: Presentation Enhancements Microsoft PowerPoint 2016 IN THIS CHAPTER, YOU WILL LEARN HOW TO Set up presentations for delivery. View and change slide masters. Add WordArt text. Create hyperlinks.
MICROSOFT WORD. Table of Contents. What is MSWord? Features LINC FIVE
 Table of Contents What is MSWord? MSWord is a word-processing program that allows users to insert, edit, and enhance text in a variety of formats. Word is a powerful word processor with sophisticated editing
Centricity 2.0 Section Editor Help Card
 Centricity 2.0 Section Editor Help Card Accessing Section Workspace In order to edit your section, you must first be assigned Section Editor privileges. This is done by the Director of your Site, Subsite,
WELCOME TO ALL-TECH SYSTEMS & CO INTRODUCTION TO MICROSOFT WORD TUTORIAL
 WELCOME TO ALL-TECH SYSTEMS & CO INTRODUCTION TO MICROSOFT WORD TUTORIAL 1 Microsoft Office Word 2010 allows you to create and edit personal and business documents, such as letters, reports, invoices,
Dreamweaver MX Overview. Maintaining a Web Site
 Dreamweaver MX Overview Maintaining a Web Site... 1 The Process... 1 Filenames... 1 Starting Dreamweaver... 2 Uploading and Downloading Files... 6 Check In and Check Out Files... 6 Editing Pages in Dreamweaver...
Advanced Training Manual: Surveys Last Updated: October 2013
 Advanced Training Manual: Surveys Last Updated: October 2013 Advanced Training Manual: Surveys Page 1 of 28 Table of Contents Introduction Training Objective Surveys Overview Survey Table Survey Options
Getting Started with. Office 2008
 Getting Started with Office 2008 Copyright 2010 - Information Technology Services Kennesaw State University This document may be downloaded, printed, or copied, for educational use, without further permission
Publisher 2016 Foundation. North American Edition SAMPLE
 Publisher 2016 Foundation Publisher 2016 Foundation North American Edition Microsoft Publisher 2016 Foundation - Page 2 2015 Cheltenham Group Pty. Ltd. All trademarks acknowledged. E&OE. No part of this
How to Create a Google Sites Website
 How to Create a Google Sites Website * Google Sites must be built and maintained in either Google Chrome or Firefox. Google Sites is not supported by Internet Explorer. Let s get started! Go to google.com
Google Sites 101. Mrs. Wilson
 Google Sites 101 Mrs. Wilson Google Sites 101 Create a site 1. Go to http://sites.google.com/ 2. Login with your Google Account [or Google Apps account] email address and password You can create a Google
GROUP CANVAS USER SIDE FUNCTIONS
 Group Canvas V5.0 17 GROUP CANVAS USER SIDE FUNCTIONS INTRODUCTION Once the template is available on the user side there are a number of functions that the users have access to. This section of the manual
* You can also just type in log in if you haven't already, and will be taken to the Slides page.
 1. Go to Google's home page and click on the grid in the upper right hand corner. From there, click on the Drive icon. You will be redirected to a log in page if you are signed out, if not you will be
Using New Google Sites
 Using New Google Sites With the New Google Sites, building websites is easy. Just drag content where you need it. Create a onestop destination for all important information, including videos, images, calendars,
How to use: TMA Live
 How to use: TMA Live Page 1 of 17 Contents Welcome to TMA Live... 3 Getting to TMA Live... 3 From Your Desktop PC... 3 From Your Mobile Device... 3 Logging in to TMA Live... 4 TMA Live Home Screen... 5
Word 2013 Quick Start Guide
 Getting Started File Tab: Click to access actions like Print, Save As, and Word Options. Ribbon: Logically organize actions onto Tabs, Groups, and Buttons to facilitate finding commands. Active Document
2016 TRTA Content Managers Resource Guide How to update and edit your local unit website. Roy Varney, TRTA Multimedia Specialist
 2016 TRTA Content Managers Resource Guide How to update and edit your local unit website. Roy Varney, TRTA Multimedia Specialist Table of Contents Introduction... 1 Basic information... 1 - How to log
Table of Contents. Word. Using the mouse wheel 39 Moving the insertion point using the keyboard 40 Resume reading 41
 Table of Contents iii Table of Contents Word Starting Word What is word processing? 2 Starting Word 2 Exploring the Start screen 4 Creating a blank document 4 Exploring the Word document window 5 Exploring
Publisher 2013 Foundation SAMPLE
 Publisher 2013 Foundation Publisher 2013 Foundation Microsoft Publisher 2013 Foundation - Page 2 2013 Cheltenham Group Pty. Ltd. All trademarks acknowledged. E&OE. No part of this document may be copied
Users who require access to this application must seek it from their Security Administrator.
 WEB EDITOR SUBARU CONNECT Web Editor is now available on Subaru Connect, located under Applications > Website Maintenance > Webpage Editor. This completely redesigned version of the Web Editor enables
GETTING STARTED... 2 PLANNING... 2 BACK UP YOUR WEBSITE... 3 REFRESHING YOUR WEBSITE...
 Contents GETTING STARTED... 2 PLANNING... 2 BACK UP YOUR WEBSITE... 3 REFRESHING YOUR WEBSITE... 3 SETUP YOUR NEW ONLINE PRESENCE SITE... 3 CUSTOMIZING YOUR ONLINE PRESENCE SITE... 7 PREVIEWING YOUR WEBSITE...
SCHULICH MEDICINE & DENTISTRY Website Updates August 30, Administrative Web Editor Guide v6
 SCHULICH MEDICINE & DENTISTRY Website Updates August 30, 2012 Administrative Web Editor Guide v6 Table of Contents Chapter 1 Web Anatomy... 1 1.1 What You Need To Know First... 1 1.2 Anatomy of a Home
Microsoft Office 2000 & Microsoft Word 2000 Page 1. ***** Help Options ***** To access [? ] quickly & for specific use then
![Microsoft Office 2000 & Microsoft Word 2000 Page 1. ***** Help Options ***** To access [? ] quickly & for specific use then](/thumbs/90/104468223.jpg "Microsoft Office 2000 & Microsoft Word 2000 Page 1. ***** Help Options ***** To access [? ] quickly & for specific use then") Microsoft Office 2000 & Microsoft Word 2000 Page 1 ***** Help Options ***** Microsoft Help: Options and Search [ F1 ] Fastest way to get to Office Assistant and MS Office Help! ESC to Exit File > Help
Microsoft Office 2000 & Microsoft Word 2000 Page 1 ***** Help Options ***** Microsoft Help: Options and Search [ F1 ] Fastest way to get to Office Assistant and MS Office Help! ESC to Exit File > Help
Website Training Part 2. Administration of the Website
 Rotary Websites: Websites Club, Website Training Part 2 Administration of the Website Club Admin To login first click here Enter your username and password and then click Log In If you have forgotten your
Classroom Blogging. Training wiki:
 Classroom Blogging Training wiki: http://technologyintegrationshthornt.pbworks.com/create-a-blog 1. Create a Google Account Navigate to http://www.google.com and sign up for a Google account. o Use your
Section 3 Formatting
 Section 3 Formatting ECDL 5.0 Section 3 Formatting By the end of this Section you should be able to: Apply Formatting, Text Effects and Bullets Use Undo and Redo Change Alignment and Spacing Use Cut, Copy
Today s workshop introduces CommonSpot, ECU s Web Content Management System, through hands-on training.
 Belinda Perkinson ITCS Training and Communication perkinsons@ecu.edu Introduction Today s workshop introduces CommonSpot, ECU s Web Content Management System, through hands-on training. 1. Introduction
Rich Text Editor Quick Reference
 Rich Text Editor Quick Reference Introduction Using the rich text editor is similar to using a word processing application such as Microsoft Word. After data is typed into the editing area it can be formatted