ACH Concentration Service User Guide
|
|
|
- Amberlynn Goodwin
- 5 years ago
- Views:
Transcription
1 User Guide
2 March 2008 Original Publication 5/2005 Version 9.0 NOTICE We have made every effort to ensure the accuracy of this manual. However, JPMorgan Chase Bank, N.A. and Metavante Corporation make no warranty, expressed or implied, as to the documentation, function or performance of this product. The user is expected to make the final evaluation as to its usefulness in the application environment. The information contained in this document is subject to change without notice. Metavante Corporation. All Rights Reserved. Reprinted with permission. Any further reproduction or redistribution of this document without the express written consent of Metavante Corporation is strictly prohibited. Updates and Diagrams JPMorgan Chase & Co. Publication title: User Guide Dated: February 2008 Version: 9.0 This document is protected under the trade secret and copyright laws as the property of Metavante Corporation. Year of first distribution: Copying or other reproduction, or any other disclosure to third parties, is strictly prohibited. 2/2008 Metavante Corporation
3 Table of Contents Introduction... 2 Using this manual... 2 Customer Functions... 3 User classification... 4 Beginning a Session... 5 Context-Sensitive Help... 6 Customer Support... 7 Terminating a Session... 7 User Information... 8 Profile Information... 8 User Password... 8 System Requirements... 9 Navigation Menu... 9 Organizational Units Intermediate Unit...12 Setup...12 Viewing an Intermediate...15 Organizational Unit...15 Changing an Intermediate Organizational Unit...18 Deleting an Intermediate Organizational Unit...21 Remote Unit Setup...22 Users Adding a User...33 Viewing a User...35 Changing a User...36 Deleting a User...38 Assigning and Managing Entitlements...41 Resetting a User Session...41 Instructions Instructions Sample...45 Master Entry Initiating atransaction...46 Deleting a Transaction...50
4 Reports Report Output...53 Date range...54 General Concentration Reports...55 Miscellaneous Touchtone Considerations/General Conventions...77
5 Introduction The ACH Concentration Service enables the corporate customer to use the Internet to perform a number of functions, among them: setting up users within a corporate hierarchy, initiating transactions, and producing reports on transactions. Using this Manual This manual provides a basic introduction to the product as well as step-by-step instructions through the primary procedures for corporate administrative users. Procedures for creating and maintaining organizational units and users are provided in the following order: Add View Change Delete (where applicable) A user can be entitled to one of more of these functions (add, view, change and delete). This manual makes no assumptions about the entitlements of the reader. The procedures in each section show product pages as they will appear to a user entitled to perform the function described. Screen shots are interspersed throughout the manual to provide clarity. Note: Many procedures have common starting points. In order to keep repetition of screen shots to a minimum, shared pages are included only for the first procedure in a set. View, change and delete sequences of pages typically start from a view option on the navigation menu. Pages shared among them will be shown only in the view procedures. 2
6 Customer Functions The functions performed by the corporate customer are divided into three categories: Home Deposit Concentration Administration These categories are accessible through tabs on the title bar (band of color) near the top of the page. When the user clicks a category tab, the navigation menu along the left side is updated with the functions specific to the category. Home functions cover information about or for the current user: Profile Password System Requirements The Home page itself shows last login and password expiration information. The page may also display a message from JPMorgan Chase Bank, N.A. (the Bank ). Deposit Concentration functions focus on the concentration of funds from a remote organizational unit to a corporate account. These functions include: Initiating and deleting transactions Producing instructions for specific units and corporate users Producing reports on transactions and organizational units as they relate to transactions Administration functions revolve around setups of organizational units and users, including: Defining organizational units Adding and maintaining users at those organizational units Resolving user session lockouts Producing reports on user activities 3
7 The functions that appear on the navigation menu for each category are based on the current user s entitlements. Every corporate user is granted access to a particular set of product functions. These functions will be available through the navigation menu and/or subsequent pages during that session. Product functions to which the user is not entitled will not be accessible. If the user s entitlements are modified, the navigation menu(s) will be updated accordingly. User Classification Product users fall into two levels: (1) corporate administrative, and (2) remote. Corporate Administrative Users For each client, the Bank creates a product or Security Administrator (SA) who has access to all functionality granted to the company. The SA cannot be deleted but the role may be updated as individuals are assigned that role by the company. As SA you are responsible for: Creating and entitling additional corporate users Adding, changing and deleting organizational units Setting up administrative users for each organizational unit Creating users for remote units (i.e., organizational units at the bottom of the corporate hierarchy) You may add other corporate users to share the administrative load. They may maintain their own profile information and change their passwords. They may also be entitled to: Initiate transactions on behalf of remote units reporting up to their unit Delete pending transactions created on behalf of remote units Produce reports displaying transactional or administrative information Remote Users Users attached to remote organizational units perform a limited set of functions: Initiating and deleting transactions Requesting transaction reports 4
8 Beginning a Session The Login page validates the user s login (company ID, user ID and password) before allowing access to product functions. Note: The Forgot Your Password feature is not available for SAs and other corporate users. It is available only for remote users. If you forget the password, the bank must reset it. All other non-remote corporate users (whether they have administrative entitlements or not) must contact the SA to reset their passwords. To log on to the ACH Concentration Service: Enter your company ID. Enter your user ID. Enter your password. Click the Login button. The Home page displays when your logon information has been validated. A user s session will expire if the user has not provided any input for 20 minutes. (Inactivity can be caused by closing the browser without first closing the session.) The system may prevent another user from logging on with the same user ID, displaying the message, Concurrent sessions are not allowed. To log in again, the user can wait for the 20 minutes to elapse or ask a product administrative user to reset their session so that they can log in immediately. Note: If more than one person at a time is allowed to use the user ID, make sure the other person is not logged in before requesting a session reset. 5
9 Field Company ID Description The identifier assigned to the corporate customer. User ID The identifier assigned to the user. May be alphanumeric. Password The password must be 6-20 characters with at least one letter and one number in it. Passwords for touchtone users must consist of 6 to 9 characters. A prominent feature of the product is the title bar near the top of the page. Above it are links for Help, Contact Us and Log Out. Context-Sensitive Help The Help link displays information relevant to the current page. Help information is intended to provide clarity about what is displayed on the page and, where appropriate, to help the user understand how to fill in fields which may not be intuitive or self-evident. Help information will appear in its own window, overlaying the current page, as shown in the example below. 6
10 Customer Support The Contact Us link above the title bar presents a page displaying information for contacting JPMorgan support staff for assistance with the product. The support phone number and address shown on this page were entered by the bank during setup. Contact information is displayed in its own window. Terminating a Session To terminate the Internet session, click Log Out above the title bar. The Login page will reappear. Note: Always remember to use the Log Out link to end a working session. Failure to do so will block attempts at re-entry for 20 minutes. The Home page displays after the user successfully logs in or when the Deposit Concentration or Administration button on the title bar is clicked. 7

11 User Information Navigation links for the Home tab allow the user to update profile information and modify the password. Profile Information The user s profile consists of information entered during corporate and user setup. To change the current user s profile information: Click the Home tab. Click Change Profile on the navigation menu. The Change Profile page will display. Update the information, then click Save. User Password When the profile information has been saved, a confirmation message will appear on the page. If the user clicks Change Password on the navigation menu, the Change Password page will display. To modify the password: Enter the requested information and click Save. 8
12 System Requirements When the password has been changed, a confirmation message will display on the page. Minimum browser and hardware requirements will display when the user clicks View System Requirements on the navigation menu. Navigation Menu The navigation menu, located along the left side of the screen, is customized for each user based on the privileges granted to that user by the customer administrative user. Related functions are grouped together. 9
13 Organizational Units During company setup, JP Morgan Chase establishes the headquarters unit for your company. Then you, as SA set up the organization units that form the rest of the concentration structure within your company s organization. This latter task is accomplished by using the procedures for adding organizational units, described below. Organizational units fall into one of three types: (1) headquarters, (2) intermediate, and (3) remote. The corporate structure that is set up within the product has a single headquarters unit. Remote units are at the bottom of the hierarchy; they concentrate funds to corporate accounts. Intermediate units connect headquarters and remote units; there can be any number of intermediate units (including none) between top and bottom units. Deposit Concentration allows remote units to initiate funds transfers to corporate concentration accounts. To illustrate the process of setting up organizational units, the following example will be used. Company ABC (the customer) has the following units in its ACH Concentration structure: one headquarters unit three intermediate units six remote units The intermediate units are: Northeastern Region Southwestern Region New England The organizational chart represents the reporting structure described above: 10
14 The bank adds Company ABC as a customer and sets up the headquarters unit. The company s SA then enters units for the rest of the corporate structure. For each unit, the company s SA or another corporate user designated by the SA, will follow the procedures described in the Add Organizational Unit sections below: setting up the intermediate units setting up the offices as remote units The process of adding a unit includes attaching each unit to a unit above it ( parent ) in the hierarchy. During the process of adding the Northeastern unit, the SA selects Headquarters as its parent (i.e., the unit to which the Northeastern unit will be attached). Likewise, the SA selects the Northeastern unit as the unit to which the Rochester office will be attached. The corporate hierarchy will be complete when the SA has added all the organizational units involved in the concentration of funds. 11
15 Intermediate Unit Setup This section describes the setup and maintenance of intermediate organizational units. To set up an intermediate organizational unit: Select the Administration button on the title bar. The View Organizational Unit selection page will display. Click Add Organizational Unit on the navigation menu. The Add Organizational Unit Profile page will appear. Enter the requested information, then click Continue. For further information regarding the information field entries, see the Organizational Unit Profile Field Descriptions table on page 31. Note: Select Intermediate unit as the unit type. The Add Organizational Unit Services page will display. Click Add for the Concentration service. 12

16 The Add Service Parameters page will display. Select the account to which funds will concentrate, then click Save. Note: If you select Concentrates to an account defined at a higher organizational unit, the product will check that a concentration account has been set up for at least one unit above the unit you are setting up, up to and including the headquarters unit. 13

17 The Add Organizational Unit Services page will refresh with two changes: A confirmation message informs you that the service has been set up for the intermediate unit. The word Added replaces the Add link for the Concentration service. Click Continue. The Add Organizational Unit Confirmation page will display with a message indicating that setup is complete for the intermediate unit. Repeat these steps to add the remaining intermediate units. 14

18 Viewing an Intermediate Organizational Unit The information for intermediate organizational units can be reviewed. To view the information for an existing intermediate organizational unit: Select the Administration button on the title bar. The View Organizational Unit selection page will display. Select the intermediate organizational unit to view by clicking its unit name. Note: By default, the list of units appears in ascending order by unit name. You may change the order of the list by clicking any underlined column heading. The first time you click a different column heading, the list will appear in ascending order by the values in that column; clicking the column heading again will reverse the order. To narrow the list of units, click search for a unit on the View Organizational Unit selection page. The Organizational Unit Search page will display. 15

19 Enter one or more criteria, then click Search. The Organizational Unit Search Results page will display. Select the organizational unit to view. If the results list does not contain the unit you want to view, you may click refine search criteria and retry, or click return to full unit list on the Organizational Unit Search page. If you selected a unit to view, the View Organizational Unit Profile page will display. 16
20 For an explanation of the fields on this page, see the Organizational Unit Setup Field Descriptions table at the end of this section on Organizational Units. Note: The information on this page is view-only. See the Changing an Intermediate Organizational Unit section below to update an existing unit. To view the services for the organizational unit, click Services. The View Organizational Unit Services selection page will display. Note: Only Concentration services are available at this time. Additional services may be added in future releases. Click Concentration. The View Service Parameters page for the Concentration service will display. 17

21 Changing an Intermediate Organizational Unit Information for intermediate organizational units can be updated as needed. To change an existing intermediate organizational unit: Select the Administration button on the title bar. The View Organizational Unit selection page will display. Select the intermediate organizational unit to change by clicking its unit name. Note: If the list is long, you may reduce the number of selections by following the steps in the Viewing an Intermediate Organizational Unit section above. The View Organizational Unit Profile page will display. To change the profile information for this unit, click Change this profile. The Change Organizational Unit Profile page will display. This page is similar to the Add Organizational Unit page above (see the Adding an Intermediate Organizational Unit section above). Update the information that has changed, then click Save. When the changes have been saved, a confirmation message will appear on the page. 18
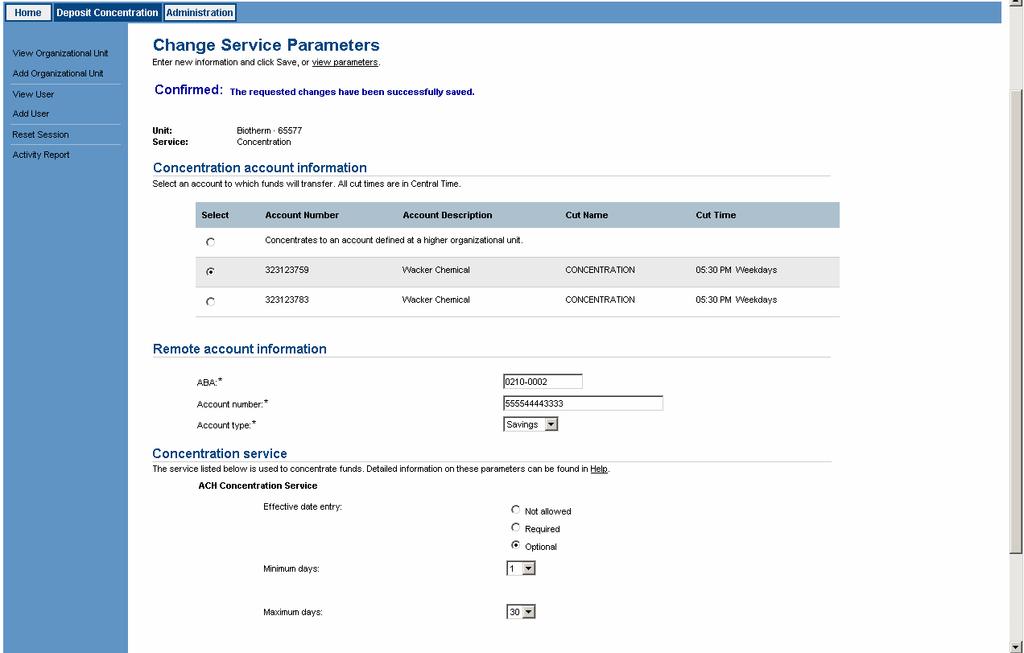
22 To change service parameters, click Services on the View Organizational Unit Profile page. The View Organizational Unit Services page will display. Click Concentration. The View Service Parameters page will appear. Click Change these parameters. The Change Service Parameters page will appear. Update the parameters as needed, then click Save. 19

23 When the changes have been saved, a confirmation message will appear on the page indicating you have successfully changed the service parameters for the intermediate unit. 20
24 Deleting an Intermediate Organizational Unit Organizational units can be deleted from the corporate hierarchy as needed. Note: An organizational unit cannot be deleted unless the following conditions have been met: All units (and their users) below it have been deleted. All users at the unit to be deleted have been deleted. To delete an existing organizational unit: Select the Administration button on the title bar. The View Organizational Unit selection page will appear. Select the unit to delete by clicking its unit ID. The View Organizational Unit Profile page will display. Click Delete this unit. The Delete Organizational Unit Approval page will display as a safety check. Review the profile information to be sure the correct unit was selected, then click Delete this unit. Note: If you do not want to delete this unit, click Don t delete to return to the View Organizational Unit Profile page. The Delete Organizational Unit Confirmation page will display when the unit has been deleted. 21
25 Remote Unit Setup This section describes the setup and maintenance of remote organizational units. Remote units are units at the lowest level of the corporate hierarchy. Note: Remote organizational unit setup and maintenance shares many of the same pages as intermediate organizational unit setup and maintenance. To avoid repetition, the remote section of this manual will show only the pages that are unique to remote unit setup. Please refer to the Intermediate Unit Setup section above for screen shots of common pages. Adding a Remote Organizational Unit To add a remote organization unit: Select the Administration button on the title bar. The View Organizational Unit selection page will display. Click Add Organizational Unit on the navigation menu. The Add Organizational Unit Profile page will appear. Enter the requested information, then click Continue. Note: Select Remote unit as the unit type. 22

26 The Add Organizational Unit Services page will display. Click Add for the Concentration service. The Add Service Parameters page will display. Enter the requested information, then click Save. Important: Effective dating functionality is active for your company only if it was added during client setup. If setup, there are three possible effective date entry options you may select for your remote company users. You may select 1) Not allowed 2) Required or 3) Optional for each remote unit. You also may set effective date entry parameters according to your setup parameters. The table below explains these options in further detail. Effective Date Entry Minimum Days Maximum Days Not allowed: The user is not permitted to specify an effective date for transactions; transactions entered before the cutoff will settle on the next Business Day. Required: The user must enter an effective date for each transaction according to the minimum and maximum date range. Optional: The user is allowed to enter an effective date for each transaction but is not required to do so. The lower limit for effective dates as calculated from today. For example, 1 is tomorrow (i.e., one business day from today); 3 is three business days from today. The upper limit for effective dates as calculated from today (calendar days). 23
27 Example 1: The company has not been set up with effective dating functionality for the remote unit. Example 2: The company has been set up with effective dating functionality for the remote unit. Note: When a company has been set up for effective dating functionality for the unit, the option for each unit is set individually. 24
28 The Add Organizational Unit Services page will reappear with two changes: A confirmation message informs you that the service has been set up for the remote unit. The word Added replaces the Add link for the Concentration service. Click Continue. The Add Organizational Unit Confirmation page will appear with a message indicating that setup is complete for the remote unit. Repeat these steps to add the remaining remote units. Viewing a Remote Organizational Unit To view the information for an existing remote organizational unit: Select the Administration button on the title bar. The View Organizational Unit selection page will appear. Select the remote organizational unit to view by clicking its unit name. Note: By default, the list of units appears in ascending order by unit name. You may change the order of the list by clicking any underlined column heading. The first time you click a different column heading, the list will appear in ascending order by the values in that column; clicking the column heading again will reverse the order. 25
29 The View Organizational Unit Profile page will display. Note: The information on this page is view-only. See the Changing a Remote Organizational Unit discussion below to update an existing unit. To view the services for the organizational unit, click Services. The View Organizational Unit Services page will appear. Click Concentration. The View Service Parameters page for concentration will appear. Example 1: The company has not been set up with effective dating functionality for the remote unit. 26
30 Example 2: The company has been set up with effective dating functionality for the remote unit. Note: When a company has been set up for effective dating functionality for the remote unit, the option for each unit is set individually. Changing a Remote Organizational Unit Information for remote organizational units can be updated as needed. To change an existing remote organizational unit: Select the Administration button on the title bar. The View Organizational Unit selection page will appear. Select the remote organizational unit you want to change by clicking its unit name. The View Organizational Unit Profile page will appear. To change profile information for this unit, click Change this profile. The Change Organizational Unit Profile page will appear. This page is similar to the Add Organizational Unit page above (see the Adding a Remote Organizational Unit section above). Update the information that has changed, then click Save. When the changes have been saved, a confirmation message will appear on the page. 27

31 Note: For a brief explanation of the fields on this page, see the Organizational Unit Setup Field Descriptions table at the end of this section on Organizational Units. To change service parameters, click Services on the View Organizational Unit Profile page. The View Organizational Unit Services page will display. Click Concentration. The View Service Parameters page will appear. Click Change these parameters. The Change Service Parameters page will display. Update the parameters as needed, then click Save. Example 1: The company has not been set up with effective dating functionality for the remote unit. 28

32 Example 2: The customer has been set up with effective dating functionality for the remote unit. Note: When a customer has been set up for effective dating functionality, the option for each unit is set individually. In the image above, effective dating has been disallowed for the remote unit. When the changes have been saved, a confirmation message will display on the page indicating you have successfully changed the service parameters for the remote unit. 29
33 30
34 Deleting a Remote Organizational Unit Remote organizational units can be deleted from the corporate hierarchy as needed. Note: Please refer to the corresponding section for Intermediate Units. Deleting a remote unit is identical to deleting an intermediate unit. Organizational Unit Profile Field Descriptions Field Unit ID Unit Name Unit Type Parent Unit [Contact] Name [Contact] Phone [Contact] Fax [Contact] Address [Support] Phone [Support] Address Description The unique identifier for the organizational unit. The name of the organizational unit. The name may contain letters and numbers. The level in the corporate structure at which to place the organizational unit. Headquarters is at the top of the corporate structure. Remote units are at the bottom; they concentrate funds to corporate accounts. Intermediate units connect headquarters and remote units. The name of the organizational unit to which the new unit reports. Initially, only the top unit set up by the bank appears in the dropdown menu. The list of choices will grow as the customer administrator adds more units. The person in your corporation to contact when there are questions regarding organizational unit setups. The phone number (enter numbers and hyphens only) for the contact person above. Add a telephone extension number as desired (up to six numbers). The FAX phone number (enter numbers and hyphens only) for the contact person. The address for the contact person. The phone number (enter numbers and hyphens only) that users may call to reach your support staff. Add a telephone extension number as desired (up to six numbers). The address for your support staff. 31
35 Organizational Unit Parameters Field Descriptions Field Concentration Account [Remote Account] ABA [Remote Account] Number [Remote Account] Type Concentration Service Effective Date Entry Minimum Days Maximum Days Description The account into which funds are concentrated. Available choices are presented in a list. Bank routing number for the remote unit s bank. This field appears only when Remote unit is selected for the Unit type field above. Bank account for the remote unit, from which funds will be drawn. This field appears only when Remote unit is selected for the Unit type field above. Account type for the remote unit s bank account. The choices are Savings and Checking. This field appears only when Remote unit is selected for the Unit type field above. Method of concentrating funds set by your bank Not allowed: The user is not permitted to specify an effective date for transactions; transactions entered before the cutoff will settle on the next business day. Required: The user must enter an effective date for each transaction. Optional: The user is allowed to enter an effective date for each transaction but is not required to do so. The lower limit for effective dates as calculated from today. For example, 1 is tomorrow (i.e., one business day from today); 3 is three business days from today. The upper limit for effective dates as calculated from today (calendar days). 32
36 Users Once the corporate structure has been set up in ACH Concentration Service, the next step is to attach one or more users to each organizational unit. The first user added for an organizational unit should be an administrative user with all privileges for that unit. The administrative user can then administer (i.e., add, change and delete) all other users for that unit. Note: The Security Administrator is created by the Bank during customer setup. This user has entitlements for all product functions and can set up all other corporate users. The Super Administrator cannot be deleted. Utilize the user setup pages to view, add, change or delete users from the corporate structure and to administer user entitlements (i.e., access to product functions). Adding a User To add a user: Select the Administration button on the title bar. The View Organizational Unit selection page will appear. Click Add User on the navigation menu. A blank Add User page will display. Fill in the requested profile information, then click Continue. Note: The user will be prompted to change the initial password immediately upon first entry. Future access will require using the new password. 33
37 The Add User Entitlements page will appear. Check the product functions that the user may access, then click Save. If the organizational unit for the user (selected from the dropdown list on the Add User page) is a remote unit, an alternate Add User Entitlements page will appear (see below). This page displays a narrower set of product functions that is available to remote users. Check the product functions that the user may access, then click Save. The Add User Confirmation page will appear when the user has been added. Repeat these steps for each user you want to add. Be sure to click Save after completing the information for each. Note: Add at least one user for every remote unit that will initiate funds transfers themselves. 34
38 Viewing a User To view a user s information: Select the Administration button on the title bar. The View Organizational Unit selection page will appear. Click View User on the navigation menu The View User selection page will appear. Select the user by clicking the appropriate user ID. Note: By default, the list of users appears in ascending order by user ID. You may change the order of the list by clicking any underlined column heading. The first time you click a different column heading, the list will appear in ascending order by the values in that column; clicking the column heading again will reverse the order. The View User Profile page will appear. To view the user s entitlements, click Entitlements. The View User Entitlements page will appear, with checkmarks in front of the product functions to which the user has been given access. 35
39 Note: If the user is attached to a unit at the lowest corporate level, the View User Entitlements page will display a set of entitlements appropriate to a remote user. See the remote user example on the Add User Entitlements page above. Changing a User After a user has been set up, the profile information and entitlements can be updated as necessary. To change a user: Select the Administration button on the title bar. The View Organizational Unit selection page will display. Click View User on the navigation menu. The View User selection page will appear. Select the user to update by clicking the appropriate user ID. The View User Profile page will appear. Click Change this profile. The Change User Profile page will display. 36
40 To update the user s profile information, modify the information and click Save. When the changes have been saved, a confirmation message will appear on the page. To update the user s entitlements, click Entitlements. The Change User Entitlements page will display. Update the 37
41 entitlements, then click Save. A confirmation message will appear on the page when the changes have been saved. Note: If the user is attached to a unit at the lowest corporate level, the Change User Entitlements page will display a set of entitlements appropriate to a remote user. See the remote user example in the section for adding user entitlements above. Deleting a User To delete a user: Select the Administration button on the title bar. The View Organizational Unit selection page will appear. Click View User on the navigation menu. The View User selection page will appear. Select a user to delete by clicking the appropriate user ID. The View User Profile page will display. Click Delete this user. The user s profile information will be displayed on the Delete User Approval page. Review the information to ensure you have selected the correct user to delete, then click Delete this user. Note: If you do not want to delete this user, click Don t delete to return to the View User Profile page. 38
42 The Delete User Confirmation page will appear when the user has been deleted. Field Unit ID Status Password User Profile Field Descriptions Confirm Password Organizational Unit First Name Description The unique identifier for the organizational unit. The user s access to the product. Enabled allows the user to use the product; Disabled locks the user out. The user s login password that must be communicated to the user. The password entered here will expire when the user has successfully logged in for the first time. The user must immediately change this password to use the product in future sessions. The user s password. This field is designed to catch typographical errors in assigning the password. The organizational unit to which the user belongs. The user s first name. For informational purposes only. 39
43 Middle Initial Last Name Address Line 1 Address Line 2 City State Postal Code Phone Fax Address The user s middle initial. For informational purposes only. The user s last name. For informational purposes only. The user s street address. For informational purposes only. A second line for the user s street address. For informational purposes only. The user s city. For informational purposes only. The user s 2-letter state code. For informational purposes only. The user s 5-digit zip code. For informational purposes only. The user s phone number. For informational purposes only. The user s FAX phone number. For informational purposes only. The user s address. For informational purposes only. Field User Entitlements Field Descriptions Organizational Units Users User Sessions Activity Report Transactions Instructions Reports Description Access to functions for setting up, maintaining and deleting organizational units for your corporation. Access to functions for setting up, maintaining and deleting users for your corporation, including users for remote units. Access to functions for resetting a user s locked session. A locked session prevents the user from logging into the product. Audit activities of corporate and remote users Access to functions for initiating and deleting master entry transfers on behalf of subordinate units within the user s scope. Access to functions for producing sets of instructions for users in your corporation. Access to functions for producing reports for a variety of data. Entitlements are granted on a report-by-report basis. The particular reports that appear on this list are determined by your bank. 40
44 Assigning and Managing Entitlements Entitlements are privileges to product functionality. They are initially assigned to a user during setup and are updated by the administrator as needed. Entitlements Basic Definitions View - Permits view-only access to the specified information (e.g., user information). Add - Allows the user to add the specified entity (e.g., a user, an organizational unit). Change - Allows the user to update information for an existing entity (e.g., a user). Granting a user the Change privilege automatically grants View access. Delete - Permits the user to remove an existing entity (e.g, an organizational unit, a user). Generate - Permits the user to produce the specified entity (e.g., a report). Resetting a User Session Occasionally, a user s session may be locked and the user cannot log on to the product. (See details in Beginning a Session above.) Resetting the session will resolve the lockout. To reset a user session: Select the Administration button on the title bar. The View User selection page will display. Select Reset Session on the navigation menu. The Reset Session page will display. Enter the user s login ID and click Submit. 41
45 When the user s session has been unlocked, a confirmation message will appear on the page. Reset Session Field Descriptions Field Description User Unique identifier for a user, used for logging on. ID 42
46 Instructions Use the Instructions function to produce product-use instructions for users. Select the Deposit Concentration button on the title bar. The Initiate Transaction page will display. Click Instructions on the navigation menu. The Instructions Search page will appear. Select the subset of units and users for which you want to produce reporting instructions. Note: The subset can be limited to a single user, broadened to encompass all users and all corporate units, or tailored to the users belonging to a unit and all units below it in the corporate hierarchy. Under the Users heading: Click All to produce instructions for every user in every unit for the corporate customer or enter a specific User ID to produce instructions for a single user. Select a Unit to produce instructions for all users belonging to a group within the corporate structure. Group refers to the selected unit and all additional units reporting to it. Under the Input Methods heading: Click All to produce instructions for every input method in the query or click Specific to limit the input methods. Mark the appropriate checkboxes as desired. Choose from Touchtone, Voice Center, Internet - Master Entry, and Internet - Single Entry. Click Search to produce the instructions. Note: The total number of instructions that will be produced can be calculated by multiplying the number of users meeting the Users criteria by the number of input methods you select. JB= another note: Voice Center input is not available at this time. 43
47 For example, if three users meet the Users criteria and you select two input methods, a total of six sets of instructions will be created: two sets (one for each input method) per user. 44
48 Instructions Sample The sample below shows the first two pages of instructions for a user using the Internet as the input method. Instructions Field Descriptions Field Users Input Method Description Individuals attached to specific organizational units within the corporate hierarchy The medium by which the user accessed the product. These include: touchtone [phone], Voice Center, Internet for master entry, and Internet for remote entry. 45
49 Master Entry Master Entry allows a headquarters or intermediate unit to concentrate funds on behalf of a remote unit. The product offers two master entry functions: initiating a transaction and deleting a pending transaction. Initiating a Transaction A headquarters or intermediate organizational unit may initiate a transaction on behalf of a remote unit by drawing funds from the latter unit into a corporate concentration account. There are two starting points from which to initiate a transaction: You may start from a page that lists all the remote units within your scope (i.e., under your unit).. Benefit: To initiate a transaction for a unit, you only have to locate that unit in the list and enter the amount and other supporting transaction data. Note: If you have a large number of units within your scope, you may have to scroll down a long list to locate the unit(s) for which you are initiating a transaction. You may start from a page that requires you to enter a unit ID in addition to a transaction amount and supporting transaction data. Benefit: You can quickly enter a short list of transactions. Note: You must know each unit s ID in order to initiate a transaction for it. To initiate a transaction from the list of all subordinate units within your scope: Select the Deposit Concentration button on the title bar. The Initiate Transaction page will appear. Enter the transaction amount for each unit from which funds are to be drawn as well as other supporting information that is requested, then click Continue. 46


50 This page below shows all the remote units within the user s scope. If the user is at the headquarters level, remote units for the entire corporation will appear on the page. Note: It is not necessary to fill in the fields for all units. Enter amounts only for those units from which funds are to be transferred. The fields that appear on the Initiate Transaction page are specific to the customer s application. The Deposit Amount and Deposit Date fields in the example below appear only for the purpose of illustration. The Approve Transaction page will appear. Review the transactions on the page. If the transaction information is correct as displayed, click Approve transaction(s). If one or more transactions need to be corrected on the Initiate Transaction page, click Edit transaction(s). The Edit Transaction page will display. Make the necessary corrections, and then click Continue. The Approve Transaction page will reappear with the revisions. Click Approve transaction(s) to proceed. The Transaction Confirmation page will appear when the transactions have been saved. 47
51 To initiate additional transactions, click Initiate Transaction on the navigation menu. To initiate transactions by specifying the unit ID in addition to transaction data: Select the Deposit Concentration button on the title bar. The Initiate Transaction page will display. Click specific units on the Initiate Transaction page. A different version of the page will display, allowing the user to quickly enter a short list of transactions. Note: As noted above, this page requires the entry of the unit ID as well as the transaction fields themselves. If you prefer the original Initiate Transaction page, click available units. For each unit for which a transaction will be initiated, enter the unit ID, transaction amount and other supporting information, then click Continue. Note: The unit ID input must be entered exactly as unit appears on list (upper or lower case). The fields that appear on the Initiate Transaction page are specific to the customer s application. The Deposit Amount and Deposit Date fields in the example below appear only for the purpose of illustration. The Approve Transaction page will appear. Review the transactions on the page. If the transaction information is correct, click Approve transaction(s). If one or more transactions need to be corrected on the Initiate Transaction page, click Edit transaction(s). The Edit Transaction page will display. Make the necessary corrections, and then click Continue. 48

52 The Approve Transaction page will reappear with the revisions. Click Approve transaction(s) to proceed. The Initiate Transaction Confirmation page will display when the transactions have been saved. To initiate additional transactions, click Initiate Transaction on the navigation menu. 49
53 Deleting a Transaction A transaction may be deleted if it has not yet been processed. To delete a pending transaction: Select the Deposit Concentration button on the title bar. The Initiate Transaction page will appear. Click Delete Transaction on the navigation menu. The Delete Transaction search page will display. Specify parameters to narrow the list of pending transactions to view, and then click Search. The Reporting units section allows the user to select pending transactions by a subset of remote units. Note: The unit options are limited by the user s scope. A user at the headquarters level will be able to delete pending transactions at all remote units. However, a user at an intermediate unit will be able to delete transactions only for units subordinate to that unit. To manually enter a date range, enter dates in mm/dd/yyyy format. If a single entry date is entered (i.e., only a From or a To date), the succeeding page will show pending transactions limited to that date. The calendar icon provides an alternate way to select dates. Click the icon to display the calendar. Use the arrows to move from month to month. Clicking a date will place it in the associated entry date field. The Delete Transaction page will display. 50

 to delete, then click Continue. The Delete Transaction Approval page will appear. Review the selected transactions.")
54 Note: By default, the list of transactions appears in ascending order by confirmation number. You may change the order of the list by clicking any underlined column heading. The first time you click a different column heading, the list will appear in ascending order by the values in that column; clicking the column heading again will reverse the order. If you want to see details of a particular transaction, you may click its (underlined) confirmation number. A Transaction Detail page will appear, overlaying the current page. On the Delete Transaction page, select the transaction(s) to delete, then click Continue. The Delete Transaction Approval page will appear. Review the selected transactions. When you are satisfied that the list contains the transactions you want to delete, click Delete transaction(s). 51

55 Note: If you do not want to delete one or more of the transactions in the list, click Don t delete to return to the Delete Transaction page, where you may modify your selections. The Delete Transaction Confirmation page will appear with an updated status for each deleted transaction. Note: The confirmation page will notify the user of the success or failure of each attempted deletion. Master Entry Field Descriptions The fields (ie., Amount, Deposit Info, Effective Date, etc.) that appear for Master Entry transactions depend entirely on the application set up by the bank in consultation with your company. Delete Transaction Field Descriptions Field Enter Data Range Description Allows the user to narrow the data to a specific period during which transactions were initiated. The period can be as short as a single day. 52
56 Reports A wide range of data is available through a variety of reports. Transactional data may be reported in summary or detailed format. Administrative reports can be produced for audit events and inactivity. Quick reports allow the user to save frequently used transactional report parameters for future use and schedule reports for automatic delivery. Access to reports can be customized by user. (See the Assigning and Managing Entitlements discussion above.) The reports that a given user sees in the navigation menu depend on the entitlements set up by the administrator. Report Output Output options allow the user to select the output format of the report based on how the data will be viewed or processed. The options listed below are available for most reports. Display on screen The report displays in the user s browser. The user can then use the browser s Print feature to print the page. Download in PDF format The report is written to a file on the user s hard disk in PDF format, suitable for viewing through Adobe Reader at a later time. Download in CSV format Short for Comma-Separated Values, another name for the commadelimited format of data representation. Basically, a CSV output file is a 53
57 data format in which pieces of data on a given line are separated from each other by a comma. This is a popular format for transferring data from one application to another because most applications are able to import and export comma-delimited data. The following example shows data presented in comma-delimited format. Each column value is separated by a comma from the next column s value and each row starts a new line: Download in fixed column width format The report is exported in a fixed format file that presents every field with a fixed length. The example below presents the same data shown in the CSV export section above in fixed length form. Like CSV, fixed format is useful for transferring data to another application. Date range The user is presented with a number of choices for specifying the date(s) of data to include in the report. Today Data in the report will be limited to current day data. Previous day Data in the report will be limited to yesterday s data. Current week Data in the report will be limited to Monday of this week to now. Previous week Data in the report will be limited to Monday of last calendar week through Sunday of this calendar week. 54
58 Current month Data in the report will be limited to the first day of this month to now. Previous month Data in the report will be limited to the first day of last month through the last day of last month. Last n days Data for the last <user-selected number> of days will appear in the report. Between specific dates This date option allows the user to specify the period for which to report data. The period can be as small as a single date: enter the date in either the From or To field. To manually enter the date, use the mm/dd/yyyy format. Note: The date range is subject to the 60-day data retention period (i.e., the maximum period for which data is retained) set by the bank. A calendar icon provides an alternate way of specifying a beginning or ending date. Click the calendar icon to bring up a monthly calendar. Use the right and left arrows at the top of the calendar to move a month forward and backward respectively. To select a date, click the date on the calendar. The calendar will disappear and the date will appear in the From or To field (depending on which calendar icon you clicked earlier). Note: The Concentration Date is always the Business Day prior to the Effective Date of a transaction. Deposit Concentration Reports Deposit Concentration reports display funds transfer data in summary and detailed form, and organizational unit activity. Transaction Detail Report The Transaction Detail Report displays detailed and summary data for each unit. The data is grouped by date. To produce the report: Select the Deposit Concentration button on the title bar. The Initiate Transaction page will appear. Click Transaction Detail Report on the navigation menu. 55
59 The first Transaction Detail Search page displays. Select the parameters to narrow the data to include in the report, then click Continue. The Reporting units are limited by the user s scope. The Transaction section allows the user to select the transactions appearing in the report by their progress toward completion. The user may also indicate that placeholders should be included in the report for non-reporting remote units. The Date Type section allows the user to indicate the particular date type to which to apply the Date range. Note: If you select Entry date as the Date type, it is highly recommended that you run the report after the daily ACH cut time particularly if you wish to capture all transactions reported that day by your units. 56
60 The second Transaction Detail Search page will appear. Select the remaining options for the report and click Run report. Note: For an explanation of the Save as a quick report link, see the Quick Reports section below. If you selected CSV or fixed column width format on the first search page, subtotaling options will not be available on the second search page. Column sorting will also not be available for the report. However, you may import the file into software that allows you to subtotal as well as re-sort the transactions. The Transaction Detail Report page will appear. Most of the search parameters are listed at the top of the report, as well as the time zone used in reporting times for transactions. Note: Deleted transactions are not included in the totals. Transactions will generally appear in ascending order by date and unit ID. Several sample reports are provided below. Note that they show a small subset of the report formats that can be produced. 57


61 Sample report 1: Report with no subtotaling. Note: If no subtotaling options were selected, the user can re-sort the report by clicking any column heading. Sample report 2: Report with one level of grouping and subtotaling (entry date), transaction counts, application field totals, and placeholders for non-reporting units The report is divided into sections. Each section represents one date in the requested date range. Subtotals are provided for each section, with grand totals appearing at the bottom of the report. Note: Totals and subtotals will not be included in CSV or fixed column width reports. 58
.")
62 Sample report 3: Report with two levels of grouping and subtotaling (parent unit and entry date), and transaction counts. The report is divided into major sections by parent unit (first level of grouping). Each section is further divided by effective date (second level of grouping): each minor section represents an effective date within the subset of transactions retrieved for the report. Subtotals are provided for each section, both major and minor. Grand totals are included at the bottom of the report. To produce a report with different data, click refine search. To select another option from the navigation menu, click one of the tabs. Transaction Summary Report The Transaction Summary Report displays summary data by concentration account. To produce the report: Select the Deposit Concentration button on the title bar. The Initiate Transaction page will appear. Click Transaction Summary Report on the navigation menu. 59

63 The first Transaction Summary Search page will display. Select the parameters to narrow the data to include in the report, then click Continue. Note: The summary option you choose will affect the parameters presented on the second page. If you opt to summarize by concentration account, the second search page will present a list of concentration accounts within your scope. If you choose to summarize by remote unit instead, the second page will display several options by which you may select remote units. The second Transaction Summary Search page will display. Select the search option(s) and click Run report. Note: For an explanation of the Save as a quick report link, see the Quick Reports section below. Search page with a list of concentration accounts: Search page with remote unit options 60

.")
64 Note: You may additionally opt to subtotal by parent unit. Choosing this option will divide your report into sections. Remote units reporting to the same parent unit will be grouped together in a section; they will appear in ascending order by unit ID. If you selected CSV or fixed column width format on the first search page, the subtotaling option will not be available on the second search page. The Transaction Summary Report page will display. The search parameters are listed at the top of the report. Each line in the report represents one concentration account or remote unit (depending on the summary option you chose). The total number of transactions and the total amount transferred on the date or period selected earlier are displayed for each account or remote unit. The grand total amount transferred for all accounts appears at the bottom of the report. Sample report 1: Summary by concentration account 61


65 Note: By default, the report appears in ascending order by account number. You may change the order of the report by clicking any underlined column heading. The first time you click a different column heading, the report will appear in ascending order by the values in that column; clicking the column heading again will reverse the order. Sample report 2: Summary by remote unit Note: By default, the report appears in ascending order by unit ID. You may change the order of the report by clicking any underlined column heading. Sample report 3: Summary by remote unit; subtotal by parent unit Note: This report does not provide sortable columns because of the complexity involved with sections. 62
66 To produce a report with different data, click refine search. To select another option from the navigation menu, click one of the tabs. Summary Level Report The Summary Level Report displays summary data by organizational unit, arranged by level and optionally showing subtotals by date. To produce the report: Select the Deposit Concentration button on the title bar. The Initiate Transaction page will appear. Click Summary Level Report on the navigation menu. The Summary Level Search page will display. Enter the desired report parameters, then click Run report. Select the levels to report on, as well as the amount of information to report for each level. By default, level Totals will be included in the report. The user has the option of adding level subtotals by date by selecting the Totals & subtotals by date radio button instead. The Date Type section allows the user to indicate the particular date field to which to apply the Date Range. The Date Range section lets the user select a single date or a period for which to report transactions. For an explanation of the options, see the Date Range discussion in the Reports section above. Note: For an explanation of the Save as a quick report link, see the Quick Reports section below. 63

67 The Summary Level Report page will appear. The search parameters are listed at the top of the report. Each section in the report represents one organizational unit. The total number of transactions and the total amount transferred on the specified date or period are displayed for each unit. If Totals & subtotals by date was selected, additional lines appear in the section, each representing a date in the specified date range and showing that date s subtotals. Note: The Unit IDs are indented to reflect the corporate structure: the deeper the indentation, the lower the unit is in the corporate hierarchy. To produce a report with different data, click refine search. To select another option from the navigation menu, click one of the tabs. Non-Reporter Report The Non-Reporter Report displays a list of remote units that did not report activity on a given date. To produce the report: Select the Deposit Concentration button on the title bar. The Initiate Transaction page will appear. Click Non-Reporter Report on the navigation menu. The Non-Reporter Search page will display. Enter the desired report parameters, then click Run report. 64
68 The Reporting units section allows the user to produce a list of non-reporters for a portion of the remote organizational units. The Entry Date section lets the user select a single date for which to list nonreporting remote units. For an explanation of the calendar icon, see the Date Range discussion in the Reports section above. Note: For an explanation of the Save as a quick report link, see the Quick Reports section below. The Non-Reporter Report page will appear. The search parameters are listed at the top of the report. Each line in the report represents one non-reporting organizational unit. Note: By default, the report appears in ascending order by unit ID. You may change the order of the report by clicking any underlined column heading. To view the contact information for a particular remote unit, click its unit ID. The Contact Information page will overlay the report page. To produce a report with different data, click refine search. 65
69 To select another option from the navigation menu, click one of the tabs. Inactivity Report The Inactivity Report displays a list of inactive remote units. A remote unit is considered inactive when it has reported no activity for the period selected on the Inactivity Search page. To produce the report: Select the Deposit Concentration button on the title bar. The Initiate Transaction page will appear. Click Inactivity Report on the navigation menu. The Inactivity Search page will display. Enter the desired search parameters, then click Run report. The Reporting units section allows the user to narrow the data that will appear on the report by further limiting the units within the user s scope. The Reporting unit setup date section allows the user to specify a setup date threshold for the units appearing in the report. By default, the field is left blank so that the report includes all eligible units within the user s scope. If the user overrides the default by entering a date, the report is limited to units that were set up before that date. The Date range section lets the user select a single date or a period of inactivity. For a discussion of date range options, see the associated section in Reports above. 66
70 The Inactivity Report will appear. The search parameters are listed at the top of the report. Each line in the report represents an inactive remote unit. The unit is identified by unit ID and unit name. Additional information includes the setup date and the last date for which an entry was made. By default, the report appears in ascending order by unit ID. You may change the order of the report by clicking any underlined column heading. To produce a report with different data, click refine search. To select another option from the navigation menu, click one of the tabs. 67
71 Administrative Reports One administrative report on audit activities is available to the customer. Activity Report The Activity Report displays audit information for customer activity that a corporate administrator may wish to monitor. To produce the report: Select the Administration button on the title bar. The View Organizational Unit selection page will appear. Click Activity Report on the navigation menu. The Activity Search page displays. Enter the desired report parameters, then click Run report. The Activity section allows the user to select the particular audit activities to include in the report. The default is All activities. The User section allows the administrator to limit the report to the activities of a single user. The default is All users. The Date Type section allows the user to indicate the particular date field to which to apply the Date Range. The Date Range section lets the user select a single date or a period for which to report transactions. For an explanation of the options, see the Date Range discussion in the Reports section above. 68
72 The Activity Report page will display. The search parameters are listed at the top of the report, as well as the time zone used in reporting times for audit events. Each section in the report represents one organizational unit. The total number of transactions and the total amount transferred on the specified date or period are displayed for each unit. The information displayed for each audit event includes: what activity occurred the object of the action, if appropriate (Completed for) who performed the activity (Completed by) when the activity occurred (Date/Time) what the outcome of the activity was (Result) 69

73 The data initially appears in date/time order, with the most recent activity at the top. You may sort the report by the values in a different column simply by clicking the column heading. The report will re-display with the values in that column in ascending order. Click the column heading again to sort the values in descending order. (This feature is available only within your browser; it is not available for the other three report output options.) If details for a given change activity are available for viewing in your browser, the activity itself will appear as an underlined hyperlink. Click the activity hyperlink to view the change details. Activity details are available only within your browser. A new window will overlap the report page. The information displayed varies widely based on the information that was changed. 70

74 To produce a report with different data, click refine search. To select another option from the navigation menu, click one of the tabs. Quick Reports The Quick Report feature allows the user to save frequently used report settings for future use. Once saved, the quick report can be run at any time by clicking the quick report name in the navigation menu. The user can also schedule automatic delivery of a quick report via encrypted . Multiple quick reports may be based on a single transactional report. Note: The Quick Report feature is not available for the Activity Report at this time. 71
Business Online Banking User Guide
 Business Online Banking User Guide Table of Contents Contents Overview... 2 Logging In... 2 Additional Login Information... 5 Home/Dashboard... 6 Top Line Tool Bar... 6 Bulletins... 7 Dashboard... 8 Accounts...
core user guide business gateway TABLE OF CONTENTS BANKING > WEALTH > INSURANCE
 business gateway core user guide TABLE OF CONTENTS Getting Started... 2 Administration Approval... 8 Logging In... 2 Administration Report... 8 Electronic Report Delivery (ERD)... 17 Security Key... 2
Reference Guide (IRIS)
") Reference Guide For Santander Bank s Interactive Reporting & Initiation Services (IRIS) Equal Housing Lender. Santander Bank, N.A. is a Member FDIC and a wholly owned subsidiary of Banco Santander, S.A.
Reference Guide For Santander Bank s Interactive Reporting & Initiation Services (IRIS) Equal Housing Lender. Santander Bank, N.A. is a Member FDIC and a wholly owned subsidiary of Banco Santander, S.A.
RONA e-billing User Guide
 RONA e-billing Contractor Self-Service Portal User Guide RONA e-billing User Guide 2015-03-10 Table of Contents Welcome to RONA e-billing What is RONA e-billing?... i RONA e-billing system requirements...
Electronic Appraisal Delivery (EAD) Portal. FHA EAD General User Guide
 Portal. FHA EAD General User Guide") Electronic Appraisal Delivery (EAD) Portal FHA EAD General User Guide Last Updated: October 2015 FHA EAD General User Guide Page 2 of 87 Version 1.3.1 TABLE OF CONTENTS INTRODUCTION... 6 WHAT IS THE ELECTRONIC
Electronic Appraisal Delivery (EAD) Portal FHA EAD General User Guide Last Updated: October 2015 FHA EAD General User Guide Page 2 of 87 Version 1.3.1 TABLE OF CONTENTS INTRODUCTION... 6 WHAT IS THE ELECTRONIC
Administrator Guide. Regions itreasury. Administrator Guide
 Administrator Guide Regions itreasury Administrator Guide Revised 082011 itreasury Administrator Guide Welcome to Regions itreasury. This Guide contains information about all administrative duties associated
SmartPay Express User Guide
 SmartPay Express User Guide Table of Contents INTRODUCTION... 4 SmartPay Express Overview... 4 System Requirements... 5 Trusted Sites... 5 Available Resources... 7 Additional Resources... 7 LOGGING IN...
Calendar & Buttons Dashboard Menu Features My Profile My Favorites Watch List Adding a New Request...
 remitview User Guide 1 TABLE OF CONTENTS INTRODUCTION... 3 Calendar & Buttons... 3 GETTING STARTED.... 5 Dashboard.... 7 Menu Features... 8 PROFILE.... 10 My Profile... 10 My Favorites... 12 Watch List...
NetDMR Internal and External User s Guide Version 1
 NetDMR Internal and External User s Guide Version 1 October 17, 2008 CONTENTS i Page 1.0 Introduction to NetDMR Help...1 1.1. Background...1 2.0 Getting Started...2 2.1. Before You Begin...2 2.2. System
Payments & Transfers User Guide
 Payments & Transfers User Guide Table of Contents Payee Maintenance...1 ACH Payments...4. Batch Creation...4 Creating a Manual Batch...4 Transaction Import...6 Templates & Recurring Payments... 7 Wire
NetDMR External User s Guide Version 1
 NetDMR External User s Guide Version 1 October 17, 2008 CONTENTS i Page 1.0 Introduction to NetDMR Help...1 1.1. Background...1 2.0 Getting Started...2 2.1. Before You Begin...2 2.2. System Requirements...2
User s Guide. (Virtual Terminal Edition)
") User s Guide (Virtual Terminal Edition) Table of Contents Home Page... 4 Receivables Summary... 4 Past 30 Day Payment Summary... 4 Last 10 Customer Transactions... 4 View Payment Information... 4 Customers
User s Guide (Virtual Terminal Edition) Table of Contents Home Page... 4 Receivables Summary... 4 Past 30 Day Payment Summary... 4 Last 10 Customer Transactions... 4 View Payment Information... 4 Customers
AndroPay Admin Center Getting Started
 USER MANUAL AndroPay Admin Center Getting Started Introduction: The Customer Administration Center, or Admin Center, is your central site for all things AndroPay. Through the Admin Center, you can upload
ACH Monitor Fraud Review and Approval USER GUIDE
 ACH Monitor Fraud Review and Approval USER GUIDE For informational purposes only, not considered an advertisement. ACH MONITOR - FRAUD REVIEW AND APPROVAL Welcome to M&T Bank s ACH Monitor Fraud Review
E. Account Summary Shows the credit limit, current balance, and amount of available credit for the selected account.
 Cardholder Quick Reference Card ffwelcome to PaymentNet The Welcome screen displays each time you log in to PaymentNet; it serves as your starting point or home screen. The Cardholder Dashboard, which
Business Online Banking
 » Flagstar business Banking Business Online Banking Reference Guide Flagstar Bank Corporate Headquarters 5151 Corporate Drive Troy, MI 48098 (888) 324-4100 flagstar.com/business Member FDIC 1 Table of
Reseller Portal System Administrator
 Reseller Portal System Administrator May 29.2012 Preface BROADPOS Reseller Portal System Administrator Guide Document Version: V20120529 Document No: BROADPOS-RPS-APP-UM-01.00.00 Status: [ ]Draft []Release
OPENING A NEW JACS ACCOUNT... 15
 JACS Online Help TABLE OF CONTENTS ACCESSING YOUR JACS ACCOUNTS ONLINE... 4 REGISTERING FOR A USER NAME AND PASSWORD... 4 Registration Instructions... 4 Step 1 - Terms and Conditions... 5 Step 2 Do You
CashLink Quick Reference Guide
 CashLink Quick Reference Guide Navigating your Account Summary Page After you log in, you will see the Account Summary Page screen. This screen gives you access to all other functions and displays important
ACH Payments. User Guide
 ACH Payments User Guide Table of Contents Overview... 2 Supported SEC Codes... 2 Create Batch... 2 Creating a Free Form Batch... 3 Creating a Batch from a Template... 14 Manage Batch Templates... 21 Transaction
Enterprise Payment Solutions. Remote Deposit Capture. Remote Deposit Capture User Manual
 Enterprise Payment Solutions Remote Deposit Capture 1999-2014 Jack Henry & Associates, Inc. All rights reserved. Information in this document is subject to change without notice. Printed in the United
Secure Transfer Site (STS) User Manual
 User Manual") Secure Transfer Site (STS) User Manual (Revised 3/1/12) Table of Contents Basic System Display Information... 3 Command Buttons with Text... 3 Data Entry Boxes Required / Enabled... 3 Connecting to the
Secure Transfer Site (STS) User Manual (Revised 3/1/12) Table of Contents Basic System Display Information... 3 Command Buttons with Text... 3 Data Entry Boxes Required / Enabled... 3 Connecting to the
OVERVIEW TIMING AND DEADLINES PERMISSIONS, LIMITS, AND APPROVALS PROCEDURES REPORTS STOP PAYMENTS PROCEDURES...
 TABLE OF CONTENTS TABLE OF CONTENTS... 1 ACCESSING THE SYSTEM... 4 LOGGING IN... 4 FIRST TIME LOG-IN ONLY... 4 UPDATING USER PROFILE, USER PASSWORD, AND SECURITY QUESTIONS... 6 ESTABLISHING USER PREFERENCES...
Batch Scheduler. Version: 16.0
 Batch Scheduler Version: 16.0 Copyright 2018 Intellicus Technologies This document and its content is copyrighted material of Intellicus Technologies. The content may not be copied or derived from, through
Eastern Bank TreasuryConnect Balance Reporting User Manual
 Eastern Bank TreasuryConnect Balance Reporting User Manual This user manual provides instructions for setting up or editing a user and accessing services within the three Balance related groups. Within
Production Assistance for Cellular Therapies (PACT) PACT Application System User s Guide
 PACT Application System User s Guide") Production Assistance for Cellular Therapies (PACT) PACT Application System User s Guide Version 1.0 February 9, 2017 Version 1.0 TABLE OF CONTENTS 1.0 Getting Started... 1 1.1 Access to the Internet...
Production Assistance for Cellular Therapies (PACT) PACT Application System User s Guide Version 1.0 February 9, 2017 Version 1.0 TABLE OF CONTENTS 1.0 Getting Started... 1 1.1 Access to the Internet...
 Indiana e-child Care Provider Web User Manual Updated 10/30/2017 www.hoosierchildcare.com Table of Contents 1 Introduction... 6 1.1 About This Guide... 6 1.2 About the Provider Web... 6 2 Provider Web
InBusiness Banking System Companion Guide to Business Banking Video Tutorials
 Banking System Companion Guide to Business Banking Video Tutorials Great Things Happen! Updated 05.5.6 Welcome to the InBusiness System The InBusiness System will help you efficiently and securely manage
User Documentation. Administrator Manual.
 User Documentation Administrator Manual Proposal Software 1140 US Highway 287, Suite 400-102 Broomfield, CO 80020 USA Tel: 203.604.6597 www.proposalsoftware.com Table of Contents Open the WebPro Viewer...
accessmoney Manager ACTION PAGES
 accessmoney Manager ACTION PAGES 1 accessmoney Manager Action Pages accessmoney Manager Action Pages are quick reference pages that provide information for the major components of accessmoney Manger. Click
BBVA Compass Spend Net Payables
 User Guide BBVA Compass Spend Net Payables User Guide Vault Services Table of Contents Introduction 2 Technical Requirements 2 Getting started 3 Sign In 3 General Navigation 4 Upload/Create Payment 5
INBUSINESS BANKING SYSTEM
 Introducing your new INBUSINESS BANKING SYSTEM Companion Guide to Business Banking Video Tutorials Updated 0.09.8 WELCOME TO THE INBUSINESS SYSTEM The InBusiness System will help you efficiently and securely
City National E Deposit SM User Guide
 City National E Deposit SM User Guide July 2016 Copyright 2016 by City National Bank Member FDIC All rights reserved. No part of this User Guide may be reproduced or transmitted in any form or by any means,
Regions OnePassSM USER GUIDE. It s time to expect more. Regions Bank Member FDIC Revised
 Regions OnePassSM USER GUIDE Regions Bank Member FDIC Revised 110614 It s time to expect more. Regions OnePass User Guide Table of Contents Section I. OnePass Basics 3 What Is OnePass? 3 Minimum Browser
HTTPS The New B2Bi Portal. Bank of America s secure web transmission interface user guide
 HTTPS The New B2Bi Portal Bank of America s secure web transmission interface user guide This manual contains proprietary and confidential information of Bank of America and was prepared by the staff of
THE LOGIN PAGE... 3 THE HOME PAGE... 4 REPORTS... 15
 CheckTrack Web Reporting User guide 1 Contents THE LOGIN PAGE... 3 THE HOME PAGE... 4 REPORTS... 5 REPORT SCREEN FUNCTIONALITY... 5 CHECK DETAILS & CHECK IMAGE... 8 NEW CHECKS... 10 ALL ACTIVE CHECKS...
Provider Portal Administration Guide
 Provider Portal Administration Guide Revision Date: 7/22/2011 Table of Contents Table of Contents Introduction... 3 User Accounts Overview... 3 Tier Structure... 3 Security Roles... 4 Guide Conventions...
RealTime Merchant SM (RTM) Marriott User s Guide
 Marriott User s Guide") RealTime Merchant SM (RTM) Marriott Copyright Information 2006/07 Global Card Services, Inc. All rights reserved. Reproduction, adaptation, or translation without prior written permission from Global Card
RealTime Merchant SM (RTM) Marriott Copyright Information 2006/07 Global Card Services, Inc. All rights reserved. Reproduction, adaptation, or translation without prior written permission from Global Card
Introducing your new ACH ALERT USER GUIDE. Updated
 Introducing your new ACH ALERT USER GUIDE Updated 03.09.18 Table of Contents DASHBOARD 3 General...3 Viewing the Dashboard...4 Viewing the Dashboard After EOD with Additional File Load...9 USER PRIVILEGES
etreasury+ Administration Quick Reference Guide
 Add a New Field profiles are automatically saved after each step in the setup process is completed. Administrators can use the Save as draft link to save user profiles at any point in the setup process
Gate City Bank Online Business Banking
 Gate City Bank Online Business Banking i Table Of Contents Table of Contents Online Business Banking... 5 Online Business Banking Overview... 5 Features and Services... 5 FREE* Online Business Banking...
USER GUIDE Time and Attendance User Administration Human Capital Management Suite
 USER GUIDE Time and Attendance User Administration Human Capital Management Suite Ormed Information Systems Ltd. Version 1.2 (January 2015) What s Inside What s Inside...1 Introduction...2 Procedures...3
Webster Web-Link. Table of Contents. Company System Administrator (CSA) User Guide
 User Guide") Table of Contents 1 Welcome... 4 1.1 Overview of the CSA role... 4 1.1.1 What a CSA cannot do... 4 1.2 What is included in this guide?... 5 1.3 How is this guide organized?... 5 1.4 Where to get help...
Table of Contents 1 Welcome... 4 1.1 Overview of the CSA role... 4 1.1.1 What a CSA cannot do... 4 1.2 What is included in this guide?... 5 1.3 How is this guide organized?... 5 1.4 Where to get help...
Wholesale Lockbox User Guide
 Wholesale Lockbox User Guide August 2017 Copyright 2017 City National Bank City National Bank Member FDIC For Client Use Only Table of Contents Introduction... 3 Getting Started... 4 System Requirements...
SYSTEM LOGIN/PASSWORD SUPPORT
 SYSTEM LOGIN/PASSWORD SUPPORT Why am I unable to log into the system? What if I forgot my password? Why do I need to create Security Questions/Answers? Why does it ask me if I want to remember this computer?
Sourcing. Supplier Maintenance and Company Administration Buyer User Guide
 Sourcing Supplier Maintenance and Company Administration Buyer User Guide Version 6.1 Ion Wave Technologies, Inc. 2002-2008 Table of Contents Table of Contents...2 Welcome to Supplier Maintenance and Company
Lockbox: Imaging User Guide
 Lockbox: Imaging User Guide What is Wholesale Lockbox Image? Wholesale Lockbox Image provides lockbox deposit information and associated images, including checks, invoices, and/or correspondence (i.e.,
User Guide. Customer Self Service (CSS) Web Application Progress Software Corporation. All rights reserved.
 Web Application Progress Software Corporation. All rights reserved.") User Guide Customer Self Service (CSS) Web Application 1993-2017 Progress Software Corporation. Version 2.1 March 2017 Table of Contents Welcome... 3 Accessing the Customer Self Service (CSS) Web Application...
User Guide Customer Self Service (CSS) Web Application 1993-2017 Progress Software Corporation. Version 2.1 March 2017 Table of Contents Welcome... 3 Accessing the Customer Self Service (CSS) Web Application...
Heritage Bank Correspondent Lockbox. Lockbox. User Guide
 Heritage Bank Correspondent Lockbox Lockbox User Guide Contents Accessing Lockbox... 1 Messages... 2 Moving messages... 4 Batch messages... 5 Message administration... 6 Creating a message... 6 Recalling
Enterprise Payment Solutions User Administrator. User Administrator Handbook
 Enterprise Payment Solutions 1999-2014 Jack Henry & Associates, Inc. All rights reserved. Information in this document is subject to change without notice. Printed in the United States of America. No part
Simply e C A S H M A N A G E M E N T U S E R G U I D E
 Simply e C A S H M A N A G E M E N T U S E R G U I D E Simply e Cash Management Rev. 06/01/15 Simply e Cash Management Rev. 06/01/15 Table of Contents 1. WELCOME TO 7 1A. TYPES OF ACTIVITY 7 1B. GETTING
A MEMBER OF THE TEXAS A&M UNIVERSITY SYSTEM. Texas AgriLife Research Texas AgriLife Extension Service. Pathway Net Guide REVISED 2/29/08
 A MEMBER OF THE TEXAS A&M UNIVERSITY SYSTEM Texas AgriLife Research Texas AgriLife Extension Service Pathway Net Guide REVISED 2/29/08 1 TABLE OF CONTENTS Logging On Page 3 Viewing Transactions Page 6
SANTANDER TREASURY LINK USER GUIDE
 SANTANDER TREASURY LINK USER GUIDE Welcome to Santander Treasury Link Santander Treasury Link is a secure Web application that allows you to manage accounts, payments, transfers, reports, and users. This
Getting Started with Commercial Services
 Getting Started with Commercial Services USER GUIDE For informational purposes only, not considered an advertisement. WELCOME TO M&T BANK S COMMERCIAL SERVICES M&T Bank s Commercial Services system provides
Business ebanking Online Wire Transfers
 Business ebanking Online Wire Transfers This guide instructs users how to originate Wire transfers through Business ebanking. If you need support, please contact Treasury Services Support at (877) 920
Alerts Webster Web-Link Descriptions
 Treasury & Payment Solutions Quick Reference Guide Alerts Webster Web-Link Descriptions This Quick Reference Guide describes the Security and Operational Alerts that are sent from Web-Link, including what
Present and Pay. User Manual Payer Analyst
 Present and Pay User Manual Payer Analyst Table of Contents 1.0 Glossary of Terms... 1 2.0 How to Use this Manual... 3 3.0 Common User Features and Functions... 3 3.1 Present and Pay User Interface...
Customer Portal User Guide
 Customer Portal User Guide COPYRIGHT NOTICE ViaWest Customer Portal User Guide is published and copyrighted 2012 by ViaWest Inc. All rights reserved. No part of this manual may be reproduced in any form,
Business Online Banking User Guide
 Business Online Banking User Guide Table of Contents 1. WELCOME!... 3 1A. TYPES OF ACTIVITIES 3 1B. GETTING STARTED 3 1C. IF YOU NEED HELP 3 2. TRANSACTION ACTIVITY... 4 2A. ACCESSING YOUR BUSINESS ACCOUNTS
Online Reporting and Information Management System (ORIMS) Manage Financial Returns User Guide for Banks & Trust Companies
 Manage Financial Returns User Guide for Banks & Trust Companies") (ORIMS) Manage Financial Returns User Guide for Banks & Trust Companies March 31, 2015 Version 1.0 Version History Version Changes Date 1.0 Original release March 31, 2015 2 Table of Contents 1. Introduction...
(ORIMS) Manage Financial Returns User Guide for Banks & Trust Companies March 31, 2015 Version 1.0 Version History Version Changes Date 1.0 Original release March 31, 2015 2 Table of Contents 1. Introduction...
CyberSource Business Center
 CyberSource Business Center CS3-609-06-16-09 Copyright 2009 Harris Connect, LLC. all rights reserved. Reproduction in any form without the express written consent of Harris Connect, LLC. is strictly prohibited
INSERVICE. Version 5.5. InService Easily schedule and monitor attendance for your training programs, even at remote locations.
 INSERVICE Version 5.5 InService Easily schedule and monitor attendance for your training programs, even at remote locations. 5/15/2014 Page 0 of 11 Table of Contents 1.1 Logging In... 2 1.2 Navigation...
Receivables Edge SM User Guide
 TREASURY SERVICES Receivables Edge SM User Guide Receivables Edge SM is an internet-based management application and account reconciliation solution. Receivables Edge combines advanced image and data capture
Order Management Bookings - Getting Started Guide for Manufacturers
 Order Management Bookings - Getting Started Guide for Manufacturers Table Of Contents Order Management Bookings Getting Started Guide... 3 Purpose of this Document... 3 What is Order Management Bookings?...
NetDMR National Installation. Regulatory Authority User Guide
 NetDMR National Installation Regulatory Authority User Guide Table of Contents Chapter 1. Introduction...1 1.1. Structure of this Guide...1 1.1.1. Organization...1 1.1.2. User Guide Notation and Conventions...1
Quick reference Cardholder
 The Commercial Card Expense Reporting (CCER) service Quick reference Cardholder Accessing the Commercial Card Expense Reporting (CCER) service 1. Sign on to the Commercial Electronic Office (CEO ) portal
TransUnion Direct User Guide
 Topics Welcome to TransUnion Direct... 2 The First Time You Log Into TransUnion Direct... 4 Individual Services... 5 Portfolio Services... 15 Activity Reports... 17 Your User Profile... 19 Help Resources...
The One Net ACH. User Guide. January 2005
 The One Net ACH User Guide SM January 2005 The One Net ACH User Guide may not, in whole or in part, be copied, photocopied, translated, or reduced to any electronic medium or machine readable form or otherwise
HDS Web Compliance Management System (WCMS) User s Guide Version 6. Virginia Housing Development Authority
 User s Guide Version 6. Virginia Housing Development Authority") HDS Web Compliance Management System (WCMS) User s Guide Version 6 Virginia Housing Development Authority 601 South Belvidere Street Richmond, Virginia 23220-6505 (804) 782-1986 HDS WEB COMPLIANCE MANAGEMENT
HDS Web Compliance Management System (WCMS) User s Guide Version 6 Virginia Housing Development Authority 601 South Belvidere Street Richmond, Virginia 23220-6505 (804) 782-1986 HDS WEB COMPLIANCE MANAGEMENT
Electronic Grants Administration & Management System - EGrAMS
 Electronic Grants Administration & Management System - EGrAMS Introduction EGrAMS is an enterprise-wide web-based scalable, configurable, business rule driven and workflow based end-to-end electronic grants
Regions Image Lockbox Online User Guide Options
 Regions Image Lockbox Online User Guide Options 2011 Regions Bank. Regions Lockbox Services subject to product terms and conditions. Rev. 041411. Image Lockbox Online Image Lockbox Online allows you to
Company System Administrator (CSA) User Guide
 User Guide") BMO HARRIS ONLINE BANKING SM FOR SMALL BUSINESS Company System Administrator (CSA) User Guide Copyright 2011 BMO Harris Bank N.A. TABLE OF CONTENTS WELCOME... 1 Who should use this guide... 1 What it covers...
BMO HARRIS ONLINE BANKING SM FOR SMALL BUSINESS Company System Administrator (CSA) User Guide Copyright 2011 BMO Harris Bank N.A. TABLE OF CONTENTS WELCOME... 1 Who should use this guide... 1 What it covers...
General Radiology Improvement Database
 The American College of Radiology General Radiology Improvement Database User Guide October 12, 2010 American College of Radiology 1891 Preston White Drive Reston, VA 20191-4397 Copyright 2010, American
BEEDS portal Bank of England Electronic Data Submission portal. User guide. New PRA Authorisations Version 1.1
 BEEDS portal Bank of England Electronic Data Submission portal User guide New PRA Authorisations Version 1.1 May 2018 Contents Document versions 3 1. Introduction 3 a. Bank of England contact details 4
PDMP User s Guide. Oregon Health Authority Prescription Drug Monitoring Program
 Oregon Health Authority Prescription Drug Monitoring Program March 2014 Contents Contents 1 Document Overview... 1 Purpose and Contents... 1 RxSentry Update... 1 2 System Overview... 3 About the RxSentry
Software: Netscape Navigator (v or higher) or Internet Explorer (v. 5.5 or higher), set at 800 x 600 screen resolution (minimum)
 or Internet Explorer (v. 5.5 or higher), set at 800 x 600 screen resolution (minimum)") TEXAS TECH UNIVERSITY HEALTH SCIENCES CENTER PURCHASING CARD USER S MANUAL PATHWAY NET SYSTEM Pathway Net is the software application that automates the TTUHSC Purchasing Card reconciliation process. This
TEXAS TECH UNIVERSITY HEALTH SCIENCES CENTER PURCHASING CARD USER S MANUAL PATHWAY NET SYSTEM Pathway Net is the software application that automates the TTUHSC Purchasing Card reconciliation process. This
Pathway Net User s Guide
 Pathway Net User s Guide TABLE OF CONTENTS 3. Logging onto Pathway Net 4. Changing Passwords 5. Transaction View 7. Viewing Transaction Detail 8. Reallocating Transactions 9. Splitting Transactions 11.
E-Online User Guide Updated for version January 14, 2013
 E-Online User Guide Updated for version 2.0 - January 14, 2013 Client Version Once your company has been approved and set-up on E-Online and users have been given usernames and passwords, they can log-on
About MassMutual Electronic Bill Presentment & Payment
 Group Billing and Collections Frequently Asked Questions (FAQs) for ebill and epay About MassMutual Electronic Bill Presentment & Payment E-Bill Questions and Problems Payment Process Questions Payment
Digital Intelligence Systems, LLC PeopleSoft Guide Vendors
 Digital Intelligence Systems, LLC PeopleSoft Guide Vendors Version 1.0 July 2016 CONTENTS INTRODUCTION... 3 1.1 Change Password... 3 PROFILE INFORMATION... 5 2.1 Identifying Information... 6 2.2 Address...
META Admin User Guide
 META Admin User Guide Version 3.0, October 2018 Welcome to the META Admin User Guide... 4 Administer Site... 4 Navigating the Administrative Area... 5 Navigating and Sorting Tables 5 Using Filter Conditions
1. Register Computer: Each computer you use to access PaymentNet must now be registered. The first computer you will log on with, will be
 Call or email the PCard Administrators to: 1. Make changes to cardholders profile 2. Deactivate/close a cardholder s account 3. Clarify PCard policies and procedures 4. Resolve declined transactions 5.
VolunteerMatters Standard
 VolunteerMatters Standard Creating and Editing Volunteer Calendars... 3 Assigning Volunteer Administrators... 4 Managing Volunteer Shifts and Assignments... 5 Adding Shifts... 6 Deleting Shifts... 8 Editing
Check Positive Pay. User Guide
 Bu Check Positive Pay User Guide Table of Contents Overview... 2 Issues... 2 Issue Entry... 2 Import Issues... 5 Issue Activity... 17 Decisions... 20 Decision Items... 20 Decision Activity... 25 Subscriptions...
MoneyGram OfficialChecks
 MoneyGram OfficialChecks Version 2.6 PrimeLink Portal System Guide This system guide contains instructional information for the general use of the PrimeLink Web Portal. If you need specific assistance
Pay. Quick Start Guide Debit Orders
 Pay Quick Start Guide Debit Orders 2017 Our easy to use guide will get you up and running in no time! Index Page: 3 Login 4 Working with groups A) Creating groups B) Managing clients in groups 5 Managing
BlackBerry AtHoc Networked Crisis Communication. Self Service User Guide
 BlackBerry AtHoc Networked Crisis Communication Self Service User Guide Release 7.6, September 2018 Copyright 2014 2018 BlackBerry Limited. All Rights Reserved. This document may not be copied, disclosed,
Spontania Administrators Manual
 Spontania Administrators Manual ClearOne 5225 Wiley Post Way Suite 500 Salt Lake City, UT 84116 Telephone 1.800.945.7730 1.801.975.7200 Spontania Support 801-974-3612 TechSales 1.800.705.2103 FAX 1.801.977-0087
E-Bill & Collect User Guide June 2016
 E-Bill & Collect User Guide June 2016 Table of Contents Page Introduction Simple Web Manual Payments Enter Payment Details Verify Payment Details Payment Confirmed Authenticated & SSO Payments Lookup Account
Regions OnePass USER GUIDE. It s time to expect more. Regions Bank Member FDIC Revised
 Regions OnePass USER GUIDE It s time to expect more. Regions Bank Member FDIC Revised 051616 User Guide Table of Contents Section I. Regions OnePass Basics 3 What Is Regions OnePass? 3 Minimum Browser
Provider Portal User Guide
 Provider Portal User Guide Updated: January 1, 2019 Table of Contents Introduction... 1 How to Register for the Provider Portal... 3 Manage Your Profile... 5 User Administration... 8 Authorizations & Referrals...
Major League Baseball Club Accreditation System
 Functional Specifications User Guide System Administrator Major League Baseball Club Accreditation System Club Accreditation User Guide System Administrator - v1.4 Page 1 Date Versio n Revision History
Avaya Event Processor Release 2.2 Operations, Administration, and Maintenance Interface
 Avaya Event Processor Release 2.2 Operations, Administration, and Maintenance Interface Document ID: 13-603114 Release 2.2 July 2008 Issue No.1 2008 Avaya Inc. All Rights Reserved. Notice While reasonable
Oracle Banking Digital Experience
 Oracle Banking Digital Experience Core Corporate Admin User Manual Release 17.1.0.0.0 Part No. E83887-01 March 2017 Core Corporate Admin User Manual March 2017 Oracle Financial Services Software Limited
VERSION ASSET TRACKING SYSTEM USER MANUAL STARTER EDITION
 VERSION 4.20.3 ASSET TRACKING SYSTEM USER MANUAL STARTER EDITION ATS USER MANUAL- STARTER EDITION TABLE OF CONTENTS ATS User Manual- Starter Edition... 2 Table of Contents... 2 Quick Start Overview...
Classification: Public ANZ TRANSACTIVE GLOBAL ADMINISTRATION USER GUIDE
 Classification: Public ANZ TRANSACTIVE GLOBAL ADMINISTRATION USER GUIDE 03 2015 CONTENTS OVERVIEW 3 FUNCTION ROLES AND DATA ROLES 4 FUNCTION ROLES 4 Create a Function Role 7 View a Function Role 8 Modify
Attorney Registration System User Guide
 Attorney Registration System User Guide June 1, 2018 Administrative Office of Pennsylvania Courts http://ujsportal.pacourts.us Contents Section 1: Introduction... 1 Section 2: UJS Web Portal Access Accounts...
USPTO Accommodation Point User Guide VERSION 1.0
 USPTO Accommodation Point User Guide VERSION 1.0 ii PUBLISHED BY MicroPact, Inc. 12901 Worldgate Drive, Suite 800, Herndon, VA 20170 COPYRIGHT MICROPACT, INC. All rights reserved. No part of the contents
HOW TO SETUP A NEW USER
 In this guide you will learn how to create a new user, define their settings, assign limits and permissions, and establish their Single Sign On credentials in the Online Banking System. User Administration
Chapter 1 - Overview of Works Features Account Spending Account Funding Spend Reconciliation Card Control...
 Works User s Guide Works Table of Contents Chapter 1 - Overview of Works Features... 12 Account Spending...12 Account Funding...12 Spend Reconciliation...13 Card Control...13 Real-Time Reporting...13 About