BrightLink Welcome Kit
|
|
|
- Alan Maxwell
- 5 years ago
- Views:
Transcription


1 BrightLink Welcome Kit


2 Welcome to BrightLink! This kit has everything you need to get started with BrightLink. Here s how: 1 First, follow the steps on the Start Here card to get up and running. 2 Install the manuals from the BrightLink 475Wi/ 480i/485Wi CD in this kit. 3 Then click the BrightLink Training Resources link on your desktop to get a DVD containing BrightLink training videos. BrightLink Training Resources 4 Play with the software. Tip sheets for TeamBoard Draw and Easy Interactive Tools are right in this kit. For help, software, manuals, FAQs, and more, go to epson.com/brightlinkdownloads (U.S.) or epson.ca/brightlinkdownloads (Canada).
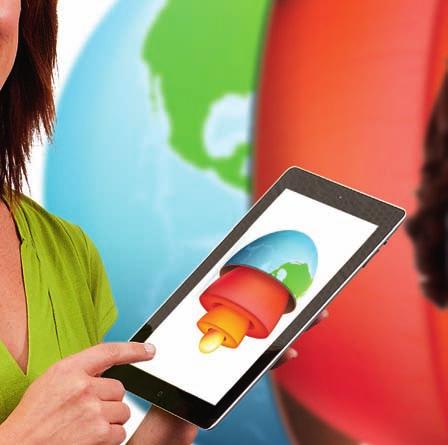
3 EPSON iprojection for ipad, iphone, and ipod touch The EPSON iprojection app lets you show documents and photos wirelessly from Apple devices on your BrightLink! If the projector is on a network that includes a wireless access point (or you have the optional wireless module), the app will work for you. You can download EPSON iprojection for free from the App Store. For more information, visit: (U.S.) or (Canada). Still need help? The PrivateLine service is for you! All you have to do is call (800) This service is available for the duration of your warranty period. You may also speak with a projector support specialist by dialing (562) (U.S.) or (905) (Canada). Support hours are 6 AM to 8 PM, Pacific Time, Monday through Friday and 7 AM to 4 PM, Pacific Time, Saturday. Days and hours of support are subject to change without notice. Toll or long distance charges may apply.
4 Getting up and running with BrightLink is easy! Learning BrightLink basics takes less than 30 minutes. The resources in this kit will help you take your first steps toward a more interactive classroom. The BrightLink online support center provides lots of additional resources. Click the BrightLink Training Resources link on your desktop or go to epson.com/brightlink (U.S.) or epson.ca/brightlink (Canada). Training options include: Free webinars will help you use BrightLink s interactivity to engage students and enhance your instruction. Short tutorials can help you master a new tool or application of your BrightLink in mere minutes. Watch, listen, and follow along. Onsite professional development provides more specific and personalized training for your school. With the help of these tools and resources, you can start using your BrightLink in powerful ways from the very first day you turn it on!
5 Epson America, Inc. Epson Canada, Ltd Kilroy Airport Way 185 Renfrew Drive Long Beach, CA Markham, Ontario L3R 6G3 EPSON and BrightLink are registered trademarks and EPSON Exceed Your Vision is a registered logomark of Seiko Epson Corporation. PrivateLine is a registered trademark of Epson America, Inc. General Notice: Other product names used herein are for identification purposes only and may be trademarks of their respective owners. Epson disclaims any and all rights in those marks Epson America, Inc. 6/12 CPD-36467R1
. This software lets you use the pen as a mouse to annotate, save, and interact with content from your computer.")
.")
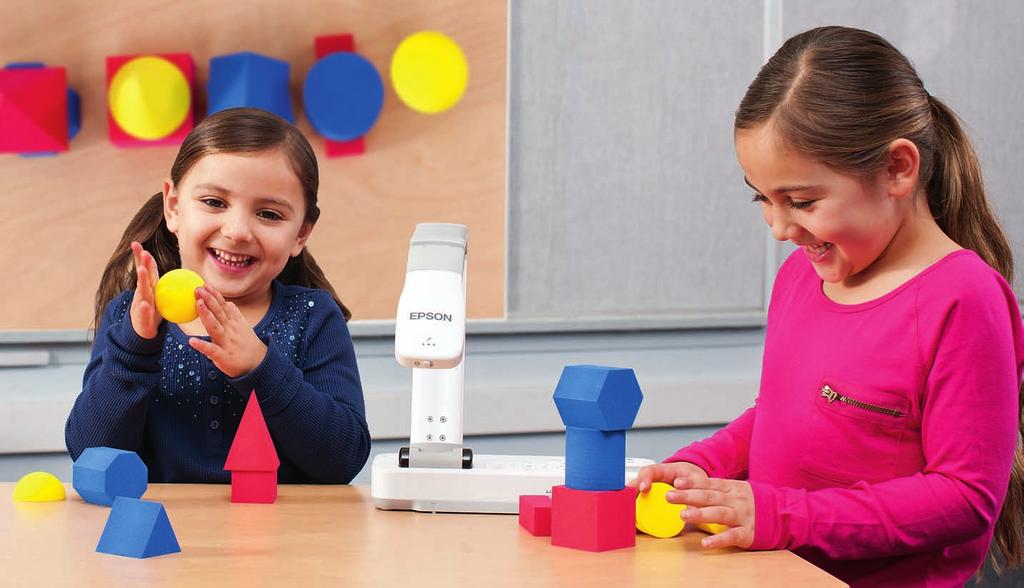
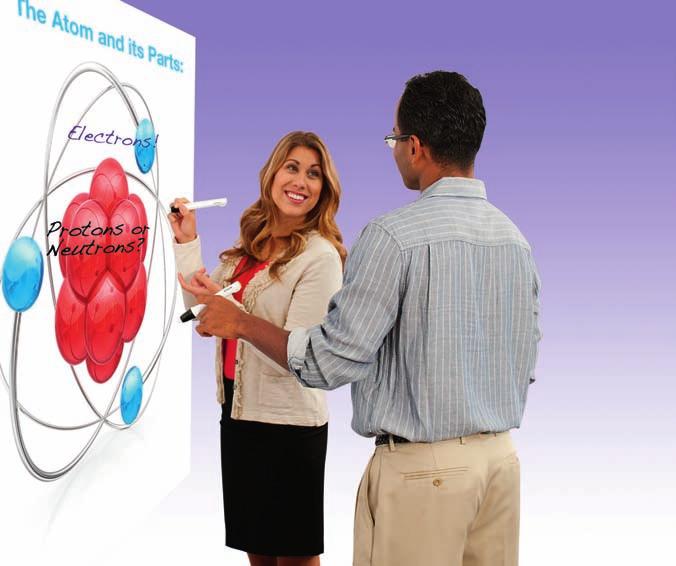
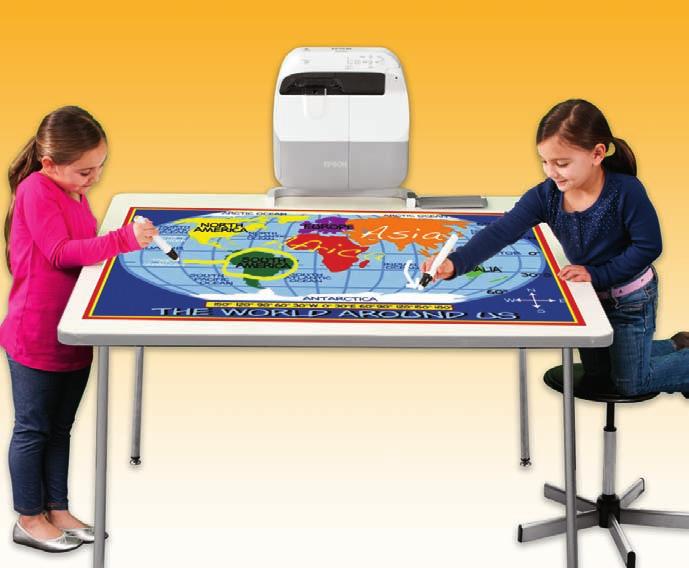
6 BrightLink Interaction The BrightLink interactive pens turn any wall or table into an interactive area, either with or without a computer. With a computer, you can use Easy Interactive Tools (dual pens). This software lets you use the pen as a mouse to annotate, save, and interact with content from your computer. Without a computer, you can use the Start Here Follow the steps on this card to get started with your BrightLink: 1 Connect your computer and turn on the projector 2 Make sure the software is installed 3 Calibrate Using the remote control 4 Use the pens Choosing the right tool 5 Use the built-in toolbar toolbar that is built into the projector (single pen). This lets you annotate images from a document camera, tablet, DVD player, or other source connected to your projector. Students and colleagues can connect their own laptops and annotate on the fly using the built-in toolbar, without installing software. Get a DVD containing BrightLink training videos! Just click the BrightLink Training Resources link on your desktop or go to and request a DVD.


7 1 Connect Your Computer and Turn on the Projector 1 Connect the USB cable directly to any available USB port on your computer. 6 Select Use Source and press Enter. 2 USB cable Connect an HDMI or VGA cable from the projector to your computer. 7 Select the source where your computer is connected. For example, if your computer is connected with a VGA cable to the projector s Computer1 port, select Computer1. If your computer is connected with an HDMI cable, select HDMI. If you don t know which source to select, check with your school s tech coordinator. HDMI 8 Display an image from your computer. If the image doesn t appear, try one of the following: 3 4 VGA Turn on the projector by pressing the red power button on the remote control. In Windows, you may see messages about device drivers or new hardware. Depending on how your computer is connected to the projector, you may need to select your source for computer interaction. Press the Menu button on the remote control, select the Extended menu, and press Enter. On some Windows laptops, you may need to hold down the Fn key on the keyboard and press F7 or the function key that lets you display on an external monitor. It may have an icon such as, or it may be labelled CRT/LCD. On a Mac, you may need to open System Preferences and select Displays. Select the VGA Display or Color LCD option if necessary, then click the Arrange or Arrangement tab, and select the Mirror Displays check box. Try pressing the Source Search button on the remote control. 5 Select the Easy Interactive Function setting and press Enter.


 epson.")


8 2 Make Sure the Software Is Installed You may already have the software on your computer, or you may need to install it yourself. For Mac OS X, you need Easy Interactive Driver and Easy Interactive Tools. For Windows, you only need Easy Interactive Tools. Here s how to find out if the software is installed on your computer: If you need to install the software Do one of the following: Use the CD that came with the projector, labeled EPSON Projector Software for Easy Interactive Function If you are using a Mac: Look for the Easy Interactive Driver and Easy Interactive Tools folders in the Application folder on your hard drive. If you see these folders, the software is installed. Download the most up-to-date version from: epson.com/brightlinkdownloads (U.S.) epson.ca/brightlinkdownloads (Canada) For more information about Easy Interactive Tools, see the Easy Interactive Tools Tips sheet in this Welcome Kit or the BrightLink User s Guide. If you are using Windows: Select or Start > All Programs or Programs > EPSON Projector > Easy Interactive Tools Ver If you see Easy Interactive Tools Ver. 2.00, the software is installed. You can also install TeamBoard Draw, an intermediate level annotation program, from the CD that came with the projector. For more information, see the TeamBoard Draw Tips sheet in this Welcome Kit or the TeamBoard videos at epson.com/brightlink (U.S.) or epson.ca/brightlink (Canada). If the software is not installed, follow the steps in the next column to install it.


9 3 Calibrate Calibration coordinates the position of the pen with the location of your cursor. If the pen position and cursor location don t match, you can try auto calibration, or you can calibrate manually for even greater accuracy. You don t need a computer, and you won t need to calibrate again unless the projector or image is moved, or the image is resized. Using the Remote Control Turn projector on/off Select from various image sources connected to the projector 1 To start calibration, press the User button on the remote control. 2 When you see the Auto Calibration screen, do one of the following: Press Enter to try auto calibration, then wait until calibration is complete. Access menu system for additional adjustments Enter 3 Select No, then press Enter and follow the steps below to calibrate manually. When you see this screen, select Manual Calibration. Calibrate Page through documents Temporarily turn off image Zoom in and out Stop video action 4 When you see this screen, press Enter to select Yes. For more information on using the remote control and cool time-saving buttons: See the BrightLink User s Guide on your computer or on the CD in this Welcome Kit. Go to the training section and watch a video or two at epson.com/brightlink (U.S.) or epson.ca/brightlink (Canada) or atomiclearning.com. 5 Follow the instructions on the screen to touch the circles and perform manual calibration. For more detailed instructions, see the on-screen BrightLink User s Guide.
10 4 Use the Pens Your projector came with 2 pens that have different colored ends, orange and blue. Make sure one AA battery is installed in each pen. Power switch Battery light Choosing the Right Tool If you already have annotation software, you can use it with BrightLink. If you are using Microsoft Office 2003 or later, you can also use the inking tools to add handwritten notes to your documents and PowerPoint presentations. Here are some tips on choosing among the tools that came with your BrightLink projector: To turn on the pen, slide the power switch. The green light comes on briefly. If the battery is low, the light flashes. Hold the pen perpendicular to the board, as shown below. Built-In Toolbar Easy Interactive Tools TeamBoard Draw To left-click, tap on the board. To double-click, tap twice. To right-click, press the board with the pen for about 3 seconds. To click and drag, tap and drag with the pen. To move the cursor, hover over the board without touching it. Annotate on computer display Annotate on white background Annotate on images from document cameras or other sources Use both pens simultaneously Save annotations Record lessons and import/ export files When you are finished, slide the power switch to turn off the pen. Note: The pens turn off automatically after about 20 minutes of inactivity. Slide the switch to turn the pen back on. Ready to Learn More?

11 5 Use the Built-In Toolbar The projector s built-in toolbar lets you annotate images from other devices that have been connected to the projector, such as a document camera, tablet, or other source. You can write with only one pen at a time, but you can use both pens and trade off. 1 Press one of the Source buttons on the remote control to select the source for the image you want to annotate. (Make sure you do not select the same source that is selected for Easy Interactive Function in the Extended menu.) Two different toolbars are available, one for annotation mode and one for whiteboard mode. Annotation mode displays the built-in toolbar on whatever image is being projected. Whiteboard mode lets you project a white or black screen or background pattern, and use the pen to write or draw as you would on a chalkboard or dry erase board. Select annotation mode Undo Image from a computer connected to the Computer2 port Image from a computer with an HDMI connection, or a video player 2 Image from an external device connected to the USB port Image from a computer or ipad connected through a wired or wireless network To activate the toolbar, tap the board with the pen. You see arrow icons on the left and right side of the projected image. Note: The toolbar arrows disappear if they are not used. To make them reappear, tap the board with the pen. 3 4 To display the toolbar, select one of the arrows. To close the toolbar, select the bottom of the toolbar. Select background color or pattern* Select whiteboard mode Redo Zoom into image Recalibrate Change custom pen color and width Change highlighter color Use black, red, or blue pen select small dot for thin line Erase select small dot for thin eraser Hide toolbar after each annotation Use custom pen Use hightlighter Use black, red, or blue pen select large dot for thick line Erase select large dot for thick eraser Clear all annotations Close toolbar * In annotation mode, the freeze tool appears instead of this one. It lets you stop or resume action in a video. icon at the Note: Many of the built-in tools are the same as Easy Interactive Tools, but fewer functions are available. All of the tools are available, even if they have a gray background. Ready to Learn More? Sign up for complimentary webinars Watch helpful how-to videos Find out about cool, free interactive sites EPSON and BrightLink are registered trademarks and EPSON Exceed Your Vision is a registered logomark of Seiko Epson Corporation. PrivateLine is a registered trademark of Epson America, Inc. General Notice: Other product names used herein are for identification purposes only and may be trademarks of their respective owners. Epson disclaims any and all rights in those marks. This information is subject to change without notice Epson America, Inc. 6/12 Printed in USA CPD-36468R2 Click the BrightLink Training Resources link on your desktop or go to

12 Easy Interactive Tool Tips 1 To start Easy Interactive Tools on your computer, do one of the following: Windows : Select Or, double-click the or Start > All Programs or Programs > EPSON Projector > Easy Interactive Tools. Easy Interactive Tools icon on your desktop. Mac OS X : Select Applications > Easy Interactive Tools > Easy Interactive Tools. The Easy Interactive toolbar appears on the projected image, and an arrow appears on the other side of the image. Two different toolbars are available, one for interactive mode and one for whiteboard mode: Interactive Mode In interactive mode, the toolbar appears on the projected image and lets you use the pen as a mouse to open applications, access links, and operate scroll bars, for example. Interactive tools Whiteboard tools Whiteboard Mode In whiteboard mode, the toolbar appears on a blank surface, background image, or pattern. You can write or draw with the pen, add images, and save or print your pages. In this mode, you can also annotate whatever is displayed from your computer or document camera and save or print your pages. Annotation tools Annotation tools Annotating You can use the annotation tools at the bottom of the toolbar in either mode. 2 3 Interactive toolbar Whiteboard toolbar To toggle between modes, select the Annotation mode icon to display the interactive toolbar, or the Whiteboard mode icon to display the whiteboard toolbar. To exit Easy Interactive Tools, select the Exit icon in the lower right corner of the toolbar. You can also minimize the toolbar by selecting the Close icon, then select the arrow to redisplay the toolbar. Tools for Interactive Mode Switch to interactive mode Toggle between pen and mouse modes Switch to whiteboard mode Save the current screen Undo/redo multiple operations (one at a time) Page up/down in a browser or other program Display the image from a document camera connected to the computer via USB Use the magnifier to enlarge the image Display additional tools for saving, printing, and more Use an on-screen keyboard to enter text in a browser or other program Insert a circle, square, triangle, or other shape


13 Tools for Annotation Change custom pen color and width Change highlighter pen color and width Write or draw with custom pen Write or draw with transparent highlighter pen Use black, red, or blue pen select small dot for thin lines Use black, red, or blue pen select large dot for thick lines Erase select small dot for thin eraser Clear all annotations Toggle between hiding the toolbar after use and showing it continuously Erase select large dot for thick eraser Exit Easy Interactive Tools Hide/minimize the toolbar Tools for Whiteboard Mode Switch to interactive mode Select from background patterns or colors, or display an image from a document camera Display a list of pages currently being edited Insert an image from a file or from a document camera connected to the computer Use the magnifier to enlarge the image Display additional tools for saving, printing, and more Switch to whiteboard mode Save the current screen Undo/redo multiple operations (one at a time) Open a new page Delete the current page Display a cursor that lets you resize or move an inserted image Insert a circle, square, triangle, or other shape Tools for Saving, Printing, and More To display the tools shown below, select the Other tools icon on the toolbar. Display a movable spotlight effect. Print the currently displayed image. In whiteboard mode, you can select the pages to print. Change the next pen tap to a right click (interactive mouse mode only) Cover the image with a movable shade Open the settings screen, which lets you select settings for saving your pages and more Display help (interactive mouse mode only) To save your screen or pages as.jpg files in your Documents > Easy Interactive Tools folder, simply select the Save tool. Easy Interactive Tools names your file automatically based on the date and time. To select other locations and formats for saving, select the Settings tool, then select the Save settings tab, as shown on the right. Select the location, file name, and file type for saving pages. You can save all your pages as one PDF file. If you want to select different settings each time you save, select the Check when saving checkbox. Select OK to close the Settings window Epson America, Inc. 2/12 Printed in USA CPD-36473
 and select TeamBoard Draw. Mac OS X : Open the Applications folder and select Draw.")
 Small eraser Colored pens Copy page Navigation tools Large eraser Insert page Print page The Main toolbar has 7 key tools.")
14 TeamBoard Draw Tips 1 To start TeamBoard, do one of the following: Windows : Select or Start > All Programs or Programs > Teamboard > Draw. Or, right-click the TeamBoard Draw icon in your system tray (lower right corner of your screen) and select TeamBoard Draw. Mac OS X : Open the Applications folder and select Draw. Add clip art Spotlight Record View tutorials Hide/reveal Page sorter Standard toolbar Main toolbar Pen Shapes Text Clipboard Eraser Creative pen Move Submenu Main tools Action toolbar (Select View > Toolbars > Action Bar) Small eraser Colored pens Copy page Navigation tools Large eraser Insert page Print page The Main toolbar has 7 key tools. Each tool has its own submenu on the right side (after the red arrow). 2 Move your mouse or interactive pen over any of the tool icons to see a definition. Pen tools Shape tools Creative pen tools Eraser tools Clipboard tools Cut Move tools Paste Text tools Speak sentence Multi-copy Copy Multi-cut Move object Color fill Link object Select word Speak word Word bank TeamBoard training videos and webinars are available at (U.S.) or (Canada). Select BrightLink for Education, then Training.

 and select Annotation.")


15 Using the Annotation Toolbar Collapse toolbar Select Freehand or Rectangle to capture screen Use virtual keyboard Presenting and Annotating in PowerPoint First, you need to associate PowerPoint with TeamBoard. 1 Open the Tools menu and select Options. 2 Select the Application Control tab, then select the Add button. Full-screen annotate Open full TeamBoard Draw screen Open application list 1 To access the floating annotation toolbar or dashboard, do one of the following: Windows: Select or Start > All Programs or Programs > Teamboard > Annotation. Or, right-click the TeamBoard Draw icon in your system tray (lower-right corner of your screen) and select Annotation. Mac OS X: Select the TeamboardAnnotate icon on your screen. 2 To take a full-screen snapshot for annotation, select the camera icon. The following toolbar appears: 3 Locate and select POWERPNT.EXE in your Program Files\Microsoft Office folder. 4 Select OK, then select OK again to close the Options window. Once you have associated PowerPoint, you can open it from the TeamBoard annotation toolbar: You can use all of the TeamBoard tools to draw or annotate on a web page or anything else on your computer. 3 To save your annotations and return to your desktop, select the icon on the right end of the toolbar. 4 To save annotated images in TeamBoard, open the File menu and select one of the following: Save as (to save in.tmb file format) Export (to save in.jpg,.ppt,.bmp,.pdf,.html,.tif,.png, or.iwb file formats) After you export a.ppt file, you can open it in PowerPoint. First you need to associate PowerPoint with TeamBoard by following the steps in the next column. Additional tools appear on the toolbar as shown below: Start/stop presentation Pens Erasers Black screen Arrow tool In-show slide management You can open your PowerPoint file and annotate it using the TeamBoard tools. When you are finished, select Keep to save your ink annotations with the PowerPoint file. This is great for sharing meeting notes Epson America, Inc. 2/12 CPD-34012R1 Printed in USA
BrightLink Welcome Kit
 BrightLink Welcome Kit Welcome to BrightLink! This kit has everything you need to get started with BrightLink. Here s how: 1 First, follow the steps on the Start Here card to get up and running. 2 Install
Need More Help? VD containing BrightLink training videos in this Welcome Kit.
 Need More Help? BrightLink software, manuals, FAQs, and more are available at epson.com/brightlinkdownloads (U.S.) or epson.ca/brightlinkdownloads (Canada). VD containing BrightLink training D videos in
EASY INTERACTIVE WHITEBOARD
 EASY INTERACTIVE WHITEBOARD CONNECT COMPUTER/TURN ON PROJECTOR LAPTOP For the projectors in the labs, a computer is connected. These instructions are for you to connect a laptop computer to the projector.
Get Started with BrightLink Pro
 BrightLink Pro 470Ui Get Started with BrightLink Pro BrightLink Pro is a meeting room and classroom productivity tool that allows you to create a digital whiteboard wherever you need it. Add new blank
Get Started with BrightLink Pro
 BrightLink Pro 450Ui/460Ui Get Started with BrightLink Pro BrightLink Pro is a meeting room and classroom productivity tool that allows you to create a digital whiteboard wherever you need it. Add new
This guide will help you with many of the basics of operation for your Epson 485wi BrightLink Projector with interactive functionality.
 This guide will help you with many of the basics of operation for your Epson 485wi BrightLink Projector with interactive functionality. If you need further assistance with questions, you can refer to the
SMART Board Interactive Whiteboard Basics
 SMART Board Interactive Whiteboard Basics This Quick Reference Guide provides an overview of the information you need to begin using a SMART Board interactive whiteboard. Before you begin, make sure the
SMART Board Quick Reference
 The Ready Light Your SMART Board interactive whiteboard includes a Ready Light that indicates the status of your interactive whiteboard. Color of Ready Light Not lit Solid green Flashing green Solid red
Was this document helpful? smarttech.com/docfeedback/ SMART Ink 5.2 USER S GUIDE
 Was this document helpful? smarttech.com/docfeedback/171190 SMART Ink 5.2 USER S GUIDE Trademark notice SMART Ink, SMART Notebook, SMART Meeting Pro, Pen ID, smarttech, the SMART logo and all SMART taglines
SMART Board Training Packet. Notebook Software 10.0
 SMART Board Training Packet Notebook Software 10.0 Bob Mallory SMART Certified Trainer Bob.Mallory@avispl.com Brian Leeser SMART Certified Trainer Brian.Leeser@avispl.com Chris de Treville Chris.deTreville@avispl.com
Hardware Basics for Front Projection SMART Board Interactive Whiteboards
 Hardware Basics for Front Projection SMART Board Interactive Whiteboards The SMART Board interactive whiteboard is touch sensitive and operates as part of a system that includes a computer and a projector.
Standard Toolbar. Main Toolbar. Page Sorter. Action Toolbar
 TEAMBOARD DRAW This is an annotation software that can be used with the interactive pen to write or draw on the projection surface. This software also provides advanced tools for saving and editing annotations
Interactive Devices. EPSON Interactive whiteboard
 Interactive Devices EPSON Interactive whiteboard The Interactive Whiteboard is the white projection surface under the projector labelled Main (ilecture). On this surface you will be able to write over
CLEAR TOOL... 7 BASIC NAVIGATION... 7 PAGE SORTER... 7
 Interwrite Workspace WHAT IS WORKSPACE?...2 INSTALLATION...2 SETUP...2 CONNECTING DEVICES... 2 NAMING DEVICES... 3 CALIBRATING DEVICES... 3 THE PEN...3 INTERACTIVE MODE...4 THE TOOLBAR...4 MOVING THE TOOLBAR...
INSERVICE DAY - 11/11/11 TECHNOLOGY
 INSERVICE DAY - 11/11/11 TECHNOLOGY Converting PowerPoints into Movies (examples using imovie& Windows MovieMaker) (More detailed tutorials with pictures can be found at http://www.whsd.net/olc/teacher.aspx?s=1452).
Business Products Quick Reference Bundle
 Business Products Quick Reference Bundle TABLE OF CONTENTS Section 1 Getting Started with Your SMART Board 800 Series Interactive Whiteboard 4 Subsection 1.1 Turning On Your Interactive Whiteboard 4 Subsection
Contents About DuoLink... 5 DuoLink Requirements... 6 Projector Positioning Guidelines... 7 Configuring the Computer... 10
 DuoLink Setup Guide Contents About DuoLink... 5 DuoLink Requirements... 6 Projector Positioning Guidelines... 7 Configuring the Computer... 10 Connecting Your Computer and Projectors... 10 Configuring
Fundamentals. Training Kit. Presentation Products, Inc. 632 W 28th St, 7th fl New York, NY f presentationproducts.
 Fundamentals Training Kit Presentation Products, Inc. 632 W 28th St, 7th fl New York, NY 10001 212.736.6350 f 212.736.6353 presentationproducts.com Table of Contents Getting Started How Does the SMART
Welcome & Introduction
 Welcome & Introduction Welcome to ebeam Interactive Suite 3. Overview ebeam Interactive Suite 3 allows you to create lessons with provided resources and enhances curriculum delivery with dynamic annotation
Help us make this document better smarttech.com/docfeedback/ SMART Ink 3.1 USER S GUIDE FOR WINDOWS OPERATING SYSTEMS
 Help us make this document better smarttech.com/docfeedback/170830 SMART Ink 3.1 USER S GUIDE F WINDOWS OPERATING SYSTEMS Trademark notice SMART Ink, SMART Notebook, SMART Meeting Pro, Pen ID, smarttech,
The MimioTeach package contains the following items: 1 MimioTeach bar 5 Mounting plates. 2 USB power adapter 6 MimioStudio DVD
 Chapter 3 MimioTeach What's Included Using MimioTeach with a projector, you can deliver lessons and presentations directly from your whiteboard. Using MimioStudio Interactive mode, you control the movement
Interwrite Workspace v. 8.9 Beginning
 Interwrite Workspace v. 8.9 Beginning What is Workspace?... 2 Getting Started... 2 Charging the Interwrite Mobi... 2 Charging the Interactive Pens for the Interactive Whiteboard... 2 Installation of Software...
Vision Pointer Tools
 Vision Pointer Tools Pointer Tools - Uses Pointer Tools can be used in a variety of ways: during a Vision Demo to annotate on the master station s screen during a Remote Control session to annotate on
USING SMART NOTEBOOK SOFTWARE
 USING SMART NOTEBOOK SOFTWARE THE NOTEBOOK INTERFACE The Notebook interface is easy to use and many functions (such as inserting pictures, saving files etc.) will be famillar as they are simillar to those
Easy Interactive Tools v4.20 Operation Guide
 Easy Interactive Tools v4.20 Operation Guide Contents Introduction to Easy Interactive Tools... 5 Easy Interactive Tools Features... 5 Drawing on the Projected Image (Annotation Mode)... 5 Drawing on
OnPoint s Guide to MimioStudio 9
 1 OnPoint s Guide to MimioStudio 9 Getting started with MimioStudio 9 Mimio Studio 9 Notebook Overview.... 2 MimioStudio 9 Notebook...... 3 MimioStudio 9 ActivityWizard.. 4 MimioStudio 9 Tools Overview......
Using the Mac Instructor Station
 Using the Mac Instructor Station Instructor Station Handouts Index Page 1 Getting Started Page 2 Using the Touch Screen Page 3 Connecting your Peripherals Page 4 Using the Blu ray DVD player Page 5 Using
Press Input to open the on screen input menu. Then tap on any input to select it.
 Power LED Remote IR Sensor PC Home Screen USB Ports Not Used Power Input Exit Home Settings Vol. - Vol. + Screen Press Input to open the on screen input menu. Then tap on any input to select it. Page #:
Lesson Planning and Delivery with Notebook Software
 Lesson Planning and Delivery with Notebook Software Before you start Before you begin your lesson, ensure that your computer is turned on and the SMART Board interactive whiteboard is connected and oriented.
SmartBoard and Notebook Part 2
 SmartBoard and Notebook Part 2 The SmartBoard is an Interactive Whiteboard that allows you to touch the board and interact with the computer using your finger as the mouse. 4/2009 Floating Tools Control
Basic Classroom Tools Promethean Module 1 (ActivInspire)
") Basic Classroom Tools Promethean Module 1 (ActivInspire) Section 1: Power On The Promethean ActivBoard is activated when the power cord is plugged into the wall outlet. The flame icon in the upper right
Basic Classroom Tools Promethean Module 1 (ActivInspire) Section 1: Power On The Promethean ActivBoard is activated when the power cord is plugged into the wall outlet. The flame icon in the upper right
Fundamentals. Training Kit. Presentation Products, Inc. 632 W 28th St, 7th fl New York, NY f presentationproducts.
 Fundamentals Training Kit Presentation Products, Inc. 632 W 28th St, 7th fl New York, NY 10001 212.736.6350 f 212.736.6353 presentationproducts.com How Does the SMART Board Interactive Whiteboard Work?
TeamBoard Quick Start #1
 www.touchboards.com 205 Westwood Ave.Long Branch, NJ 07740 1-866-942-6273 Sales@touchboards.com Quick Start #1 Welcome to! These Quick Start Cards address some basics, from installation steps to creating
ActivInspire Layout and Tools Orientation
 ActivInspire Layout and Tools Orientation Here are some ideas on how to start using your board: Project What s on the Computer Most simply, you can use the interactive whiteboard as a screen to project
WorkSpace for Java. User Guide 6.3
 WorkSpace for Java User Guide 6.3 WorkSpace for Java 2 TABLE OF CONTENTS ABOUT WORKSPACE 4 Technical Requirements 4 Getting Started 6 Downloading and Installing WorkSpace for Mac 6 Downloading and Installing
Magic-E-Board. User Manual
 Magic-E-Board Magic-E-Board Magic-E-Board...2 1) Included Parts and Optional Accessories...4 1.1) Package Checklist...4 1.2) Optional Accessories...4 2) Magic-E-Board Software Installation...5 3) Magic-E-Board
Using the SHARP touchscreen
 Click a menu link to jump straight to that section: SHARP touchscreen essentials Accessing & saving files Annotation with SHARP touchscreens Connecting other devices SHARP touchscreens with Adobe Troubleshooting
Promethean Board. Guide to Basics
 Promethean Board Guide to Basics 1 Table of Contents Introduction... 3 Aligning the Projector Image... 3 Calibrating the ACTIVboard... 4 Opening ACTIVstudio/Creating a Profile... 4 Features Located Within
If you require assistance please contact the IT Centre at ext or
 Using the SMART Board in the Dean s Conference Room In this booklet you will find information on how to use the SMART board in the Dean s conference room at Ivey. Basic requirements: Laptop computer with
D5510. Quick Start Guide
 D5510 Quick Start Guide Contents Screen Layout... 2 1. General... 3 A. Using Finger to Highlight Screen... 4 B. Using Fingers to Zoom in or Move Image... 5 C. Undo / Redo... 6 D. Magnify... 5 E. Page management...
Operating Instructions
 Operating Instructions For safe and correct use, be sure to read the Safety Information in Read This First before using the machine. TABLE OF CONTENTS Introduction... 7 How to Read This Manual... 8 Symbols...8
WORKSPACE PC FOR NEW USERS
 WorkSpace PC for New Users 1 WORKSPACE PC FOR NEW USERS Before Class Charging the MobiView The MobiView should arrive partially charged and ready to be installed. Turning Technologies recommends that MobiView
TeamBoard. TeamBoard Suite 4.0 User Guide (For Windows)
") TeamBoard TeamBoard Suite 4.0 User Guide (For Windows) This guide is for use with TeamBoard software for Windows. Revised July 31, 2003. Developed for Egan TeamBoard Inc. by Front Runner Publishing Solutions
TeamBoard TeamBoard Suite 4.0 User Guide (For Windows) This guide is for use with TeamBoard software for Windows. Revised July 31, 2003. Developed for Egan TeamBoard Inc. by Front Runner Publishing Solutions
1. Click the Share menu at the top of the screen and then click File (Including Video)
") WebEx Sharing Resources for Mac Introduction During a WebEx session, the host has the ability to share resources with attendees. This document will take you through the process of sharing documents, applications,
WebEx Sharing Resources for Mac Introduction During a WebEx session, the host has the ability to share resources with attendees. This document will take you through the process of sharing documents, applications,
SMART Meeting Pro 4.2 personal license USER S GUIDE
 smarttech.com/docfeedback/170973 SMART Meeting Pro 4.2 personal license USER S GUIDE Product registration If you register your SMART product, we ll notify you of new features and software upgrades. Register
SMART Board Notebook Software, Version 10
 SMART Board Notebook Software, Version 10 Interactive Whiteboard is the generic name for SMART Board, Mimio, etc. SMART Board Notebook is an application that comes with SMART Board and works on the Mimio
For safe and correct use, be sure to read the Safety Information in Read This First before using the machine. Operating Instructions
 For safe and correct use, be sure to read the Safety Information in Read This First before using the machine. Operating Instructions TABLE OF CONTENTS Introduction... 7 How to Read This Manual... 8 Symbols...8
Unpack Your Scanner. Scanner. ArcSoft Suite CD-ROM. LaserSoft SilverFast Ai 6 CD-ROM with IT8 targets (1640XL Graphic Arts Edition only)
") Start Here EPSON Expression 1 Unpack Your Scanner 1 Remove everything from the box. 1640XL Scanner User s Guide Power cord USB cable Scanner Software CD-ROM Adobe Photoshop Elements CD-ROM ArcSoft Suite
Start Here EPSON Expression 1 Unpack Your Scanner 1 Remove everything from the box. 1640XL Scanner User s Guide Power cord USB cable Scanner Software CD-ROM Adobe Photoshop Elements CD-ROM ArcSoft Suite
Edupen Pro User Manual
 Edupen Pro User Manual (software for interactive LCD/LED displays and monitors) Ver. 3 www.ahatouch.com Some services in Edupen Pro require dual touch capability. In order to use dual touch, your computer
SMART Meeting Pro PE 4.1 software
 Help us make this document better smarttech.com/feedback/170973 SMART Meeting Pro PE 4.1 software USER S GUIDE Product registration If you register your SMART product, we ll notify you of new features
SmartBoard & Smart Notebook Software
 SmartBoard & Smart Notebook Software A SMART Board is an interactive whiteboard that is connected to a computer, touch sensitive display acting as both a monitor and input device. SMART Notebook software
CyberLink. U Webinar. User's Guide
 CyberLink U Webinar User's Guide Copyright and Disclaimer All rights reserved. To the extent allowed by law, U Webinar IS PROVIDED AS IS, WITHOUT WARRANTY OF ANY KIND, EITHER EXPRESS OR IMPLIED, INCLUDING
Technology Instructions
 Technology Instructions for General Purpose Classrooms Texas Tech University IT Help Central Classroom Technology Services 806. 742. 5381 General-Purpose Classroom Technology Instructions Starting the
SMART AirLiner Slate. Giving you the freedom to teach from anywhere in the classroom and even more options to make digital content interactive.
 SMART AirLiner Slate Giving you the freedom to teach from anywhere in the classroom and even more options to make digital content interactive. Olathe District Schools Instructional Technology Department
Notebook collaborative learning software 10. Extraordinary made simple
 Notebook collaborative learning software 10 Extraordinary made simple Create extraordinary moments in the classroom Award-winning Notebook software is setting the worldwide standard for creating, teaching
SMART board Training. April 2014 Erika Kindoll
 SMART board Training April 2014 Erika Kindoll Lots of Resources My website: http://tulpytechteacher.wikispaces.com/smart%20res ources Links also on Turtlenet Under Shared Documents, Technology, SMARTboard
LIGHTCAST V1.2 Software Guide for projectors
 LIGHTCAST V1.2 Software Guide for projectors 009-1683-01 CONTENTS Introduction...3 Registration when using a LightCast Key...4 Basic Navigation... 7 Using the remote and projector keypad... 7 Using the
MINT Interactive User s Guide
 MINT Interactive User s Guide MINT Interactive is very powerful board software including rich functions and gallery software, which are very useful for lecture environment. It will be continuously upgraded
Contents. Introduction.1. Specification Data and Package.2. Working Environment Software Installation 3. Hardware Installation.
 User Manual V 1.0N Contents Introduction.1 Specification Data and Package.2 Working Environment...... 3 Software Installation 3 Hardware Installation.4 Calibration Software Manual 7 tboard Software Manual..
Mississippi University for Women
 Mississippi University for Women Objectives Connect to Doceri Learn the Doceri Interface Remote Mouse Mode Drawing Mode Doceri Desktop Mode Using Doceri, your presentations are right at your fingertips.
Introducing Activstudio
 Introducing Activstudio Version 3 COPYRIGHT INFORMATION Introducing Activstudio Version 3 Copyright 2007 Promethean Limited. All rights reserved. If this guide is distributed with Activstudio software,
SPECIFICATION SHEET P
 SPECIFICATION SHEET BrightLink 575Wi Widescreen 585Wi Widescreen Ultra bright Interactive Series Projectors Interactive BrightLink 585Wi shown. Wall mount included. The bright choice in interactive projectors
BrightLink Pro 1420Wi 1430Wi
 Leading Bright Ideas. BrightLink Pro 1420Wi 1430Wi Imagine writing on a whiteboard, even if you re not in the room. Epson Projectors eco.epson.com Epson America, Inc. 3840 Kilroy Airport Way, Long Beach,
SMARTBOARD TRAINING HANDBOOK
 SMARTBOARD TRAINING HANDBOOK Created by Nicki Callahan Library Media Specialist, RLMS Computer Resource Teacher, FWMS Image from: Teacher Training Online, http://teacheronlinetraining.com/images/smartboard1.gif
XPress 2.3 Annotation
 XPress 2.3 Annotation XPress is our popular desktop annotation and white boarding application. Starting with XPress version 2.2 you can create XPress documents using our Mac or Windows version and then
ActivInspire Intro Training Manual
 Spring Branch ISD ActivInspire Intro Training Manual Hardware Calibration Formative Assessment ACTIVote Teachers are expected to routinely use Learner Response Systems (ACTIV votes, ACTIVexpressions, or
UNIVERSITY OF SHEFFIELD SYMPODIUM USER GUIDE (2011)
") UNIVERSITY OF SHEFFIELD SYMPODIUM USER GUIDE (2011) Index Overview... 1 Switching On... 2 Using Pen Tool Buttons... 3 Using Sympodium Pen as a Mouse... 3 Using Sympodium Pen to Write... 4 Using Floating
UNIVERSITY OF SHEFFIELD SYMPODIUM USER GUIDE (2011) Index Overview... 1 Switching On... 2 Using Pen Tool Buttons... 3 Using Sympodium Pen as a Mouse... 3 Using Sympodium Pen to Write... 4 Using Floating
POWERPOINT BASICS: MICROSOFT OFFICE 2010
 POWERPOINT BASICS: MICROSOFT OFFICE 2010 GETTING STARTED PAGE 02 Prerequisites What You Will Learn USING MICROSOFT POWERPOINT PAGE 03 Microsoft PowerPoint Components SIMPLE TASKS IN MICROSOFT POWERPOINT
Polycom VisualBoard Technology Application
 [Type the document title] User s Guide Polycom VisualBoard Technology Application Document Version 2.0 July 2013 3725-65174-002/A Polycom Document Title 1 Trademark Information POLYCOM and the names and
Microsoft PowerPoint 2007 Beginning
 Microsoft PowerPoint 2007 Beginning Educational Technology Center PowerPoint Presentations on the Web... 2 Starting PowerPoint... 2 Opening a Presentation... 2 Microsoft Office Button... 3 Quick Access
BrightLink 455Wi+ Interactive Projector. User s Guide
 TM BrightLink 455Wi+ Interactive Projector User s Guide Important Safety Information WARNING: Never look into the projector lens when the lamp is turned on; the bright light can damage your eyes. Never
CONTENTS Getting Started Using the Livescribe+ Menu
 CONTENTS Getting Started.............................................. 4 Setting Up Livescribe+...................................................... 4 Connecting Your Smartpen and Device........................................
Migration Guide. Notebook to ActivInspire
 Migration Guide Notebook to ActivInspire 1 DESKTOP ICON Once your software has been installed, you will notice an ActivInspire icon on your desktop. DASHBOARD The Welcome Center is now called your ActivInspire
Interwrite Workspace v. 8.7 Intermediate Technology Integration Center
 Interwrite Workspace v. 8.7 Intermediate The Toolbar... 2 Moving the Toolbar... 2 Resizing the Toolbar... 2 Toolbar Settings... 2 Enable the K-6 Toolbar... 2 Enable Properties with Right Click... 2 Customized
Technology Instructions
 Technology Instructions for General Purpose Classrooms Texas Tech University IT Help Central Classroom Technology Services 806. 742. 5381 General-Purpose Classroom Technology Instructions Starting the
ActivPanel. User Guide for Staff. Produced by C&IT Services
 ActivPanel User Guide for Staff Produced by C&IT Services TABLE OF CONTENTS TABLE OF CONTENTS... 2 OVERVIEW... 4 1.0 WHERE CAN I USE ACTIVPANEL?... 4 2.0 THE ACTIVPANEL COMPONENTS... 5 2.1 THE LCD TABLET...
MEETINGS ACROSS THE MILES
 3 Learning the basics of hosting MEETINGS ACROSS THE MILES A user guide for hosts who want to use the basic features of Zoom for their virtual meetings Provided by Debbie Tschirgi Director of Digital Learning
SMART Meeting Pro 4.1 software
 Help us make this document better smarttech.com/feedback/170897 SMART Meeting Pro 4.1 software USER S GUIDE Product registration If you register your SMART product, we ll notify you of new features and
SMART Ink 1.5. Mac OS X operating system software. Scan the following QR code to view the SMART Ink Help on your smart phone or other mobile device.
 SMART Ink 1.5 Mac OS X operating system software User s guide Scan the following QR code to view the SMART Ink Help on your smart phone or other mobile device. Trademark notice SMART Ink, SMART Notebook,
GETTING STARTED. Interwrite Mobi. for Windows and the Mac
 GETTING STARTED for Windows and the Mac We at einstruction TM are proud of our family of Interwrite products. We strive to continue to bring you the best the technology has to offer. We urge you to visit
Bridgit Conferencing Software User s Guide. Version 3.0
 Bridgit Conferencing Software User s Guide Version 3.0 ii Table Of Contents Introducing Bridgit Conferencing Software... 1 System Requirements... 1 Getting Bridgit Conferencing Software... 2 The Bridgit
Technology Instructions
 Technology Instructions for General Purpose Classrooms Texas Tech University IT Help Central Classroom Technology Services 806. 742. 5381 Ag Science 214 The Basics Starting the system To turn on the projector,
SMART Meeting Pro 4.2 room license USER S GUIDE
 smarttech.com/docfeedback/170897 SMART Meeting Pro 4.2 room license USER S GUIDE Product registration If you register your SMART product, we ll notify you of new features and software upgrades. Register
Interwrite Workspace v. 8.9 Intermediate Technology Integration Center
 Interwrite Workspace v. 8.9 Intermediate The Toolbar... 2 Moving the Toolbar... 2 Resizing the Toolbar... 2 Toolbar Settings... 2 Enable the Primary Toolbar... 2 Enable Properties with Right Click... 2
Join a Skype for Business meeting from an SLT video conferencing room
 THE NEW VIDEO CONFERENCING SYSTEM With the new video conferencing system, joining a Skype for Business online meeting is as easy as a press of a button. It allows you to: Join a scheduled meeting with
Welcome to this staff development training on how to use ēno
 Welcome to this staff development training on how to use ēno interactive whiteboards in your classrooms. ēno interactive whiteboards provide cordless interactivity with a computer using the Bluetooth-enabled
GET STARTED WITH GOODNOTES USER GUIDE
 GET STARTED WITH GOODNOTES USER GUIDE 0. AGENDA WHAT YOU RE GOING TO LEARN 1. Before you start 2. Basics - Getting Started 3. Categories 4. Handwriting Search & -Recognition 5. Thumbnail Panel 6. Import
Using the Brightlink Interactive Projector Training Session Guide
 Using the Brightlink Interactive Projector Training Session Guide Instructional Media/AV Services publication: 0//0 Introduction The Interactive Projector is used to project the classroom computer, and
Getting Started with Featured Promethean Apps
 Getting Started with Featured Promethean Apps Welcome to an introductory guide to using the featured Promethean apps. These are apps designed by teachers for teachers, and they are built into version 2.3
Interactive Whiteboards Introductory Training Manual
 Interactive Whiteboards Introductory Training Manual Contents 1. Using your Whiteboard What can a whiteboard be used for, What are the benefits, what are the pitfalls, Good practice, Safety issues, Troubleshooting,
Part 1: Basics. Page Sorter:
 Part 1: Basics Page Sorter: The Page Sorter displays all the pages in an open file as thumbnails and automatically updates as you add content. The page sorter can do the following. Display Pages Create
Microsoft PowerPoint 2013 Beginning
 Microsoft PowerPoint 2013 Beginning PowerPoint Presentations on the Web... 2 Starting PowerPoint... 2 Opening a Presentation... 2 File Tab... 3 Quick Access Toolbar... 3 The Ribbon... 4 Keyboard Shortcuts...
LiveViewer Pro Presentation Application User s Manual
 LiveViewer Pro Presentation Application User s Manual For ios Ver. 2.1 Maxell, Ltd. Note Before using this application, please update the network firmware of the projector to version 1.02. The contents
Ink2Go Help. Toolbar functions
 Toolbar functions S/N Icons Description 1 New Page Create a new page for annotations. Existing annotations will be saved as previous page. You can then use Previous Page/Next Page buttons to navigate between
ShareLink 200 N Setup Guide
 ShareLink 00 N Setup Guide This guide provides instructions for installing and connecting the Extron ShareLink 00 N Collaboration Gateway Network Version. The ShareLink 00 N allows anyone to present content
LiveViewer Pro Presentation Application User s Manual
 LiveViewer Pro Presentation Application User s Manual For Android Ver. 2.1.1 Maxell, Ltd. Note The contents of this manual are subject to change without notice, including product specifications. In addition,
Version 2.0. Campus 2.0 Student s Guide
 Campus 2.0 Student s Guide Version 2.0 Campus 2.0 Student s Guide Error! No text of specified style in document. i Important Notice Copyright 2008 Tegrity, Inc. Disclaimer 2008 Tegrity, Inc. all rights
SMARTBOARD TRAINING HANDBOOK
 SMARTBOARD TRAINING HANDBOOK Created by Nicki Callahan Library Media Specialist, RLMS Computer Resource Teacher, FWMS Image from: Teacher Training Online, http://teacheronlinetraining.com/images/smartboard1.gif
Turn any wall projection interactive with Integrated Arm
 Turn any wall projection interactive with Integrated Arm Setup Guide For Windows Version 1.0 Ubi Interactive Inc. support@ubi-interactive.com Contents 1. Introduction... 3 2. What you need to get started...
Microsoft PowerPoint 2007 Tutorial
 Microsoft PowerPoint 2007 Tutorial Prepared By:- Mohammad Murtaza Khan I. T. Expert Sindh Judicial Academy Contents Getting Started... 5 Presentations... 5 Microsoft Office Button... 5 Ribbon... 6 Quick