Schedule. Sanford Bernhardt, Sangster, Kumfer, Michalaka. 3:10-5:00 Workshop: Build a speedometer 5:15-7:30 Dinner and Symposium: Group 2
|
|
|
- Rose Fisher
- 5 years ago
- Views:
Transcription
1 Schedule 8:00-11:00 Workshop: Arduino Fundamentals 11:00-12:00 Workshop: Build a follower robot 1:30-3:00 Symposium: Group 1 Sanford Bernhardt, Sangster, Kumfer, Michalaka 3:10-5:00 Workshop: Build a speedometer 5:15-7:30 Dinner and Symposium: Group 2 Strevett, Walewski, Villiers, Siegnethaler

2 Arduino Workshop for Transportation Engineering Educators

3 DISCLAIMER & USAGE The content of this presentation is for informational purposes only and is intended only for students attending Louisiana Tech University. The author of this information does not make any claims as to the validity or accuracy of the information or methods presented. Any procedures demonstrated here are potentially dangerous and could result in injury or damage. Louisiana Tech University and the State of Louisiana, their officers, employees, agents or volunteers, are not liable or responsible for any injuries, illness, damage or losses which may result from your using the materials or ideas, or from your performing the experiments or procedures depicted in this presentation. If you do not agree, then do not view this content. The copyright label, the Louisiana Tech logo, and the living with the lab identifier should not be removed from this presentation. You may modify this work for your own purposes as long as attribution is clearly provided. 3
4 Building a speedometer Dr. Marisa Orr
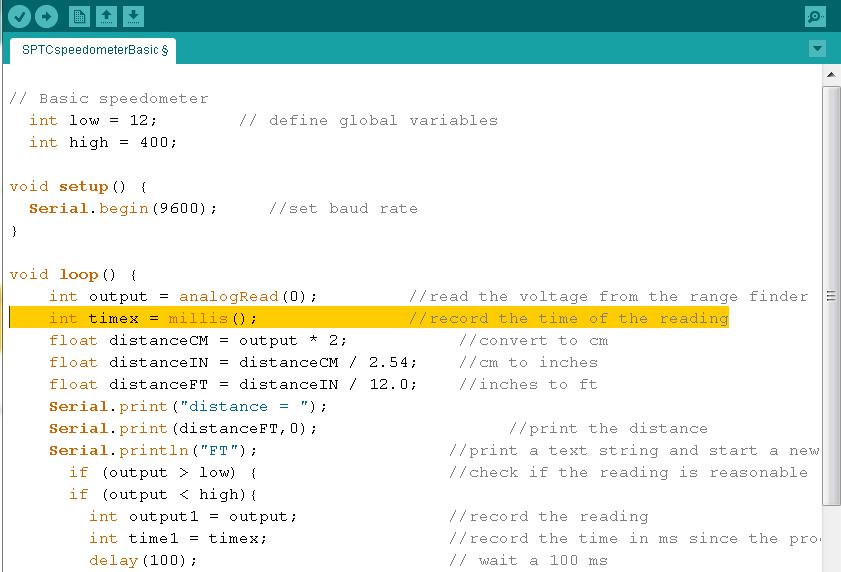
5 Calculating speed Need 2 distances and the time between them New command: millis() outputs the time (in milliseconds) since the program was reset Take a distance measurement, wait a moment, take another
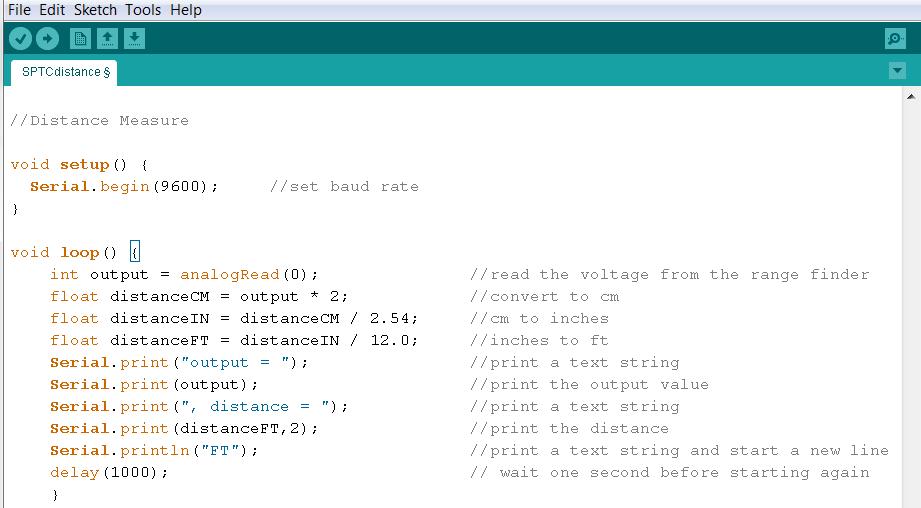
6 Distance

7 Sonar The sensors have a limited range, so we need to filter out bad readings Using the serial monitor decide what range of values you want to use for calculating speed pick a high and a low
8
9 Speed
10 Speed (cont.)
11 ADD AN LCD (LIQUID CRYSTAL DISPLAY)
 with Arduino")
12 using a parallax serial LCD with an Arduino Parallax 4x20 LCD (part number 27979) with Arduino Duemilanove


13 LCD wiring RX = wire to receive serial data from Arduino 5V = power wire GND = ground wire a servo extension is handy for wiring the LCD to the Arduino 13

14 Arduino wiring TX = wire to transmit serial data from digital I/O pin to LCD ground 5V power 14

15 LCD and Arduino together 15

16 Programming Text: Louisiana Tech University is displayed, with character locations chosen to center the text on the first two lines of the LCD Integers: The text i= is printed followed by an integer that varies from 1 to 10 Floating Point Numbers: The text x= is printed followed by a number with four numerals printed to the right of the decimal; the value here ranges from to
; // print Louisiana Tech at (0,3) 0 1 2 3 4 5 6 7 8 9 10 11 12 13 14 15 16 17 18 19 0 128 129 130 131 132 133 134 135 136 137 138 139 140 141 142 143 144 145 146 147 1 148 149")
17 row 0, position 3 2x16 Cursor Position & Printing to the 4x20 LCD Serial.write(131); // move cursor to row 0 position 3 Serial.write("Louisiana Tech"); // print Louisiana Tech at (0,3)
;.")
18 Setting the Communication Rate The dip switches on the back of the LCD are set to SW1=off and SW2=on. This causes the LCD to look for data arriving at a rate of 9600 bits per second. The sketch must include... Serial.begin(9600);... so that the Arduino will know to send data to the LCD at a rate of 9600 bits per second. 18
19 A Complete Sketch This sketch does not require a special library (only the Serial commands commonly used in sketches) /*****************************************************************************/ /* David Hall September 2012 */ /* Example program using a Parallax 4x20 LCD to output text and numbers. */ /* The following screen is printed: */ /* */ /* */ /* Louisiana Tech */ /* University */ /* */ /* i=8 x= where 1<=i<=10 and <=x<= */ /* */ /* */ /* The program prints out both integers and floating point numbers. The */ /* floating point number is printed to four decimal places. */ /* */ /* A partial listing of commands recognized by the LCD is provided below. */ /* See the data sheet for the LCD on the Parallax web site for more details. */ /* Serial.write(8) - move cursor one space left */ /* Serial.write(9) - move cursor one space right */ /* Serial.write(10) - move cursor down one line */ /* Serial.write(12) - clear screen and move cursor to top left */ /* Serial.write(13) - carriage return (will wrap if on last line) */ /* Serial.write(17) - turn backlight on */ /* Serial.write(18) - turn backlight off */ /* Serial.write(21) - turn display off */ /* Serial.write(22) - turn display on, cursor off, no blink */ /* Serial.write(23) - turn display on, cursor off, character blink */ /* Serial.write(24) - turn display on, cursor on, no blink (default) */ /* Serial.write(25) - turn display on, cursor on, character blink */ /* Serial.write(128) moves the cursor to row 0 and position 0 */ /* row and position commands are shown below for all 80 character positions */ /* ROW 0: 128=(0,0) 129=(0,1) 130=(0,2) 131=(0,3) 132=(0,4) */ /* 133=(0,5) 134=(0,6) 135=(0,7) 136=(0,8) 137=(0,9) */ /* 138=(0,10) 139=(0,11) 140=(0,12) 141=(0,13) 142=(0,14) */ /* 143=(0,15) 144=(0,16) 145=(0,17) 146=(0,18) 147=(0,19) */ /* ROW 1: 148=(1,0) 149=(1,1) 150=(1,2) 151=(1,3) 152=(1,4) */ /* 153=(1,5) 154=(1,6) 155=(1,7) 156=(1,8) 157=(1,9) */ /* 158=(1,10) 159=(1,11) 160=(1,12) 161=(1,13) 162=(1,14) */ /* 163=(1,15) 164=(1,16) 165=(1,17) 166=(1,18) 167=(1,19) */ /* ROW 2: 168=(2,0) 169=(2,1) 170=(2,2) 171=(2,3) 172=(2,4) */ /* 173=(2,5) 174=(2,6) 175=(2,7) 176=(2,8) 177=(2,9) */ /* 178=(2,10) 179=(2,11) 180=(2,12) 181=(2,13) 182=(2,14) */ /* 183=(2,15) 184=(2,16) 185=(2,17) 186=(2,18) 187=(2,19) */ /* ROW 3: 188=(3,0) 189=(3,1) 190=(3,2) 191=(3,3) 192=(3,4) */ /* 193=(3,5) 194=(3,6) 195=(3,7) 196=(3,8) 197=(3,9) */ /* 198=(3,10) 199=(3,11) 200=(3,12) 201=(3,13) 202=(3,14) */ /* 203=(3,15) 204=(3,16) 205=(3,17) 206=(3,18) 207=(3,19) */ /* */ /* To print variables to the LCD, you need to use the Serial.print() */ /* command instead of the Serial.write() command. For example, the command */ /* Serial.print(x,4) will send variable "x" to the LCD with four digits */ /* beyond the decimal point. */ /*****************************************************************************/ See the Parallax website ( for more details. Custom characters and other features are available for this LCD. When developing your sketch, print things to the LCD screen only once if they do not change. For example, the text in this sketch is printed once in setup(), while the variables are printed repeatedly in loop(). void setup() { Serial.begin(9600); // use a baud rate of 9600 bps pinmode(1,output); // set pin1 as an output (pin1=tx) Serial.write(12); // clear screen & move to top left position Serial.write(131); // move cursor to row 0, position 3 Serial.write("Louisiana Tech"); // print a text string starting at (0,3) Serial.write(153); // move cursor to row 1, position 5 Serial.write("University"); // print a text string starting at (1,5) Serial.write(190); // move cursor to row 3, position 2 Serial.write("i= x="); // print text string at (3,2) Serial.write(22); // turn cursor off to keep screen clean } void loop() { float x=0.0; for (int i=1;i<=10;i++) { x=x ; // add to variable x Serial.write(192); // move cursor to row 3, position 4 Serial.print(i); // print i at the current cursor position Serial.write(" "); // print blanks to cover previous printing Serial.write(200); // move cursor to row 3, position 12 Serial.print(x,4); // print x to 4 decimal places delay(1000); // delay 1 second between printing numbers } } 19
20 Other LCD commands Serial.write(#) 8 = Backspace / Left - The cursor is moved one position to the left. The command doesn t erase the character. 9 = Right - The cursor is moved one position to the right. The command doesn t erase the character. 10 = Line Feed - The cursor is moved down one line. For the two line LCD model, if on line 0 it goes to line 1. If on line 1, it wraps around to line 0. The horizontal position remains the same. 12 = Form Feed - The cursor is moved to position 0 on line 0 and the entire display is cleared. Users must pause 5mS after this command. 13 = Carriage Return For the two line LCD model, if on line 0 the cursor is moved to position 0 on line 1. If on line 1, it wraps around to position 0 on line = Turn backlight on (only on models 27977, 27979) 18 = Turn backlight off (Default) 21 = Turn the display off 22 = Turn the display on, with cursor off and no blink 23 = Turn the display on, with cursor off and character blink 24 = Turn the display on, with cursor on and no blink (Default) 25 = Turn the display on, with cursor on and character blink
21 LCD practice void setup() { Serial.begin(9600); // use a baud rate of 9600 bps pinmode(1,output); // set pin1 as an output (pin1=tx) Serial.write(12); // clear screen & move to top left position Serial.write(129); // move cursor to row 0, position 1 Serial.write("Louisiana Tech"); // print a text string starting at (0,1) Serial.write(149); // move cursor to row 1, position 1 Serial.write("i= x="); // print text string at (1,1) (four spaces after i= Serial.write(22); // turn cursor off to keep screen clean } void loop() { float x=0.0; for (int i=1;i<=10;i++) { x=x ; } There are 2 mistakes in this code, try it and see if you can find them // add to variable x Serial.write(150); // move cursor to row 1, position 2 Serial.print(i); // print i at the current cursor position Serial.write(" "); // print blanks to cover previous printing Serial.write(167); // move cursor to row 1, position 9 Serial.print(x,4); // print x to 4 decimal places delay(1000); // delay 1 second between printing numbers }
22 living with the lab After downloading your sketch, you may need to press the Arduino reset button to remove gibberish that may be printed on the LCD. reset button 22
23 NOW ADD A LCD DISPLAY TO YOUR SPEEDOMETER CODE
24
25
26 DINNER AND PRESENTATIONS AT THE DAVISON COMPLEX
27
28

29 1. plug in Arduino 2. we will be using digital pin 2 as an output to make an LED go on and off 14 digital I/O pins (I/O = input / output) connect computer to USB plug
30 the circuit 30
 { digitalwrite(2, HIGH); // set the LED on delay(1000); // wait for a second digitalwrite(2, LOW); // set the LED off delay(500); // wait for 500 ms }")
31 enter and run the following sketch Enter and run the following sketch: void setup() { // initialize the digital pin 2 as an output pinmode(2, OUTPUT); } void loop() { digitalwrite(2, HIGH); // set the LED on delay(1000); // wait for a second digitalwrite(2, LOW); // set the LED off delay(500); // wait for 500 ms } 31
32 voltage (V) infinite loop how the sketch works void setup() { pinmode(2, OUTPUT); } initialize pin 0 as an output void loop() { digitalwrite(2, HIGH); delay(1000); digitalwrite(2, LOW); delay(500); } set pin 0 to HIGH (5V) wait 1000 ms set pin 0 to LOW (0V) wait 500 ms 5V 1000 ms 500 ms 0V time (ms) HIGH = 5V and LOW = 0V (Always!!!!) 32
33 now experiment on your own! (1) Try changing the time to 1.5 seconds on and 1 second off (2) Connect the resistor to digital pin 5 and change the program to match (3) Blink out SOS in Morse code (dot-dot-dot-dash-dash-dash-dot-dot-dot) a. three short pulses (0.25 seconds each) followed by... b. three long pulses (0.75 second each) followed by... c. three short pulses (0.25 seconds each) followed by... d. a brief pause (1 second) e. repeat a through d using an infinite loop 33
34 Find each command in the reference section of arduino.cc (discuss each command with others at your table) void setup() { // initialize the digital pin as an output: pinmode(0, OUTPUT); } void loop() { digitalwrite(0, HIGH); // set the LED on delay(1000); // wait for a second digitalwrite(0, LOW); // set the LED off delay(500); // wait for 500 ms } The End 34
Note. The above image and many others are courtesy of - this is a wonderful resource for designing circuits.
 Robotics and Electronics Unit 2. Arduino Objectives. Students will understand the basic characteristics of an Arduino Uno microcontroller. understand the basic structure of an Arduino program. know how
Lab-3: LCDs Serial Communication Analog Inputs Temperature Measurement System
 Mechatronics Engineering and Automation Faculty of Engineering, Ain Shams University MCT-151, Spring 2015 Lab-3: LCDs Serial Communication Analog Inputs Temperature Measurement System Ahmed Okasha okasha1st@gmail.com
Parallax Serial LCD 2 rows x 16 characters Non-backlit (#27976) 2 rows x 16 characters Backlit (#27977)
 2 rows x 16 characters Backlit (#27977)") 599 Menlo Drive, Suite 100 Rocklin, California 95765, USA Office: (916) 624-8333 Fax: (916) 624-8003 General: info@parallax.com Technical: support@parallax.com Web Site: www.parallax.com Educational: www.stampsinclass.com
599 Menlo Drive, Suite 100 Rocklin, California 95765, USA Office: (916) 624-8333 Fax: (916) 624-8003 General: info@parallax.com Technical: support@parallax.com Web Site: www.parallax.com Educational: www.stampsinclass.com
Parallax Serial LCD 2 rows x 16 characters Non-backlit (#27976) 2 rows x 16 characters Backlit (#27977) 4 rows x 20 characters Backlit (#27979)
 2 rows x 16 characters Backlit (#27977) 4 rows x 20 characters Backlit (#27979)") 599 Menlo Drive, Suite 100 Rocklin, California 95765, USA Office: (916) 624-8333 Fax: (916) 624-8003 General: info@parallax.com Technical: support@parallax.com Web Site: www.parallax.com Educational: www.stampsinclass.com
599 Menlo Drive, Suite 100 Rocklin, California 95765, USA Office: (916) 624-8333 Fax: (916) 624-8003 General: info@parallax.com Technical: support@parallax.com Web Site: www.parallax.com Educational: www.stampsinclass.com
Arduino Prof. Dr. Magdy M. Abdelhameed
 Course Code: MDP 454, Course Name:, Second Semester 2014 Arduino What is Arduino? Microcontroller Platform Okay but what s a Microcontroller? Tiny, self-contained computers in an IC Often contain peripherals
StenBOT Robot Kit. Stensat Group LLC, Copyright 2018
 StenBOT Robot Kit 1 Stensat Group LLC, Copyright 2018 Legal Stuff Stensat Group LLC assumes no responsibility and/or liability for the use of the kit and documentation. There is a 90 day warranty for the
Arduino 101 AN INTRODUCTION TO ARDUINO BY WOMEN IN ENGINEERING FT T I NA A ND AW E S O ME ME NTO R S
 Arduino 101 AN INTRODUCTION TO ARDUINO BY WOMEN IN ENGINEERING FT T I NA A ND AW E S O ME ME NTO R S Overview Motivation Circuit Design and Arduino Architecture Projects Blink the LED Switch Night Lamp
Adapted from a lab originally written by Simon Hastings and Bill Ashmanskas
 Physics 364 Arduino Lab 1 Adapted from a lab originally written by Simon Hastings and Bill Ashmanskas Vithayathil/Kroll Introduction Last revised: 2014-11-12 This lab introduces you to an electronic development
Robotics/Electronics Review for the Final Exam
 Robotics/Electronics Review for the Final Exam Unit 1 Review. 1. The battery is 12V, R1 is 400 ohms, and the current through R1 is 20 ma. How many ohms is R2? ohms What is the voltage drop across R1? V
Arduino - DigitalReadSerial
 arduino.cc Arduino - DigitalReadSerial 5-6 minutes Digital Read Serial This example shows you how to monitor the state of a switch by establishing serial communication between your Arduino or Genuino and
Lab 01 Arduino 程式設計實驗. Essential Arduino Programming and Digital Signal Process
 Lab 01 Arduino 程式設計實驗 Essential Arduino Programming and Digital Signal Process Arduino Arduino is an open-source electronics prototyping platform based on flexible, easy-to-use hardware and software. It's
EXPERIMENT 7 Please visit https://www.arduino.cc/en/reference/homepage to learn all features of arduino before you start the experiments
 EXPERIMENT 7 Please visit https://www.arduino.cc/en/reference/homepage to learn all features of arduino before you start the experiments TEMPERATURE MEASUREMENT AND CONTROL USING LM35 Purpose: To measure
Procedure: Determine the polarity of the LED. Use the following image to help:
 Section 2: Lab Activity Section 2.1 Getting started: LED Blink Purpose: To understand how to upload a program to the Arduino and to understand the function of each line of code in a simple program. This
Counter & LED (LED Blink)
") 1 T.R.E. Meeting #1 Counter & LED (LED Blink) September 17, 2017 Contact Info for Today s Lesson: President Ryan Muller mullerr@vt.edu 610-573-1890 Learning Objectives: Learn how to use the basics of Arduino
1 T.R.E. Meeting #1 Counter & LED (LED Blink) September 17, 2017 Contact Info for Today s Lesson: President Ryan Muller mullerr@vt.edu 610-573-1890 Learning Objectives: Learn how to use the basics of Arduino
EEG 101L INTRODUCTION TO ENGINEERING EXPERIENCE
 EEG 101L INTRODUCTION TO ENGINEERING EXPERIENCE LABORATORY 1: INTRODUCTION TO ARDUINO IDE AND PROGRAMMING DEPARTMENT OF ELECTRICAL AND COMPUTER ENGINEERING UNIVERSITY OF NEVADA, LAS VEGAS 1. FYS KIT COMPONENTS
Electronic Brick Starter Kit
 Electronic Brick Starter Kit Getting Started Guide v1.0 by Introduction Hello and thank you for purchasing the Electronic Brick Starter Pack from Little Bird Electronics. We hope that you will find learning
University of Portland EE 271 Electrical Circuits Laboratory. Experiment: Arduino
 University of Portland EE 271 Electrical Circuits Laboratory Experiment: Arduino I. Objective The objective of this experiment is to learn how to use the Arduino microcontroller to monitor switches and
Lecture 7. Processing Development Environment (or PDE)
") Lecture 7 Processing Development Environment (or PDE) Processing Class Overview What is Processing? Installation and Intro. Serial Comm. from Arduino to Processing Drawing a dot & controlling position
Lecture 7 Processing Development Environment (or PDE) Processing Class Overview What is Processing? Installation and Intro. Serial Comm. from Arduino to Processing Drawing a dot & controlling position
FUNCTIONS USED IN CODING pinmode()
") FUNCTIONS USED IN CODING pinmode() Configures the specified pin to behave either as an input or an output. See the description of digital pins for details on the functionality of the pins. As of Arduino
FUNCTIONS USED IN CODING pinmode() Configures the specified pin to behave either as an input or an output. See the description of digital pins for details on the functionality of the pins. As of Arduino
Digital Pins and Constants
 Lesson Lesson : Digital Pins and Constants Digital Pins and Constants The Big Idea: This lesson is the first step toward learning to connect the Arduino to its surrounding world. You will connect lights
BASIC ARDUINO WORKSHOP. Mr. Aldwin and Mr. Bernardo
 BASIC ARDUINO WORKSHOP Mr. Aldwin and Mr. Bernardo 1 BASIC ARDUINO WORKSHOP Course Goals Introduce Arduino Hardware and Understand Input Software and Output Create simple project 2 Arduino Open-source
Contents. List of Figures. TermDriver Datasheet 1. 1 Overview 2. 2 Features 2. 3 Installation with Arduino 3
 TermDriver Datasheet 1 Contents 1 Overview 2 2 Features 2 3 Installation with Arduino 3 4 Operation 4 4.1 ANSI escape codes......................... 5 4.2 High-resolution modes........................
keyestudio Keyestudio MEGA 2560 R3 Board
 Keyestudio MEGA 2560 R3 Board Introduction: Keyestudio Mega 2560 R3 is a microcontroller board based on the ATMEGA2560-16AU, fully compatible with ARDUINO MEGA 2560 REV3. It has 54 digital input/output
Blinking an LED 1 PARTS: Circuit 2 LED. Wire. 330Ω Resistor
 Circuit PIN 3 RedBoard Blinking an LED LED (Light-Emitting Diode) Resistor (33 ohm) (Orange-Orange-Brown) LEDs (light-emitting diodes) are small, powerful lights that are used in many different applications.
Digital Design through. Arduino
 Digital Design through 1 Arduino G V V Sharma Contents 1 Display Control through Hardware 2 1.1 Powering the Display.................................. 2 1.2 Controlling the Display.................................
IME-100 ECE. Lab 4. Electrical and Computer Engineering Department Kettering University. G. Tewolde, IME100-ECE,
 IME-100 ECE Lab 4 Electrical and Computer Engineering Department Kettering University 4-1 1. Laboratory Computers Getting Started i. Log-in with User Name: Kettering Student (no password required) ii.
Workshop on Microcontroller Based Project Development
 Organized by: EEE Club Workshop on Microcontroller Based Project Development Presented By Mohammed Abdul Kader Assistant Professor, Dept. of EEE, IIUC Email:kader05cuet@gmail.com Website: kader05cuet.wordpress.com
IME-100 ECE. Lab 3. Electrical and Computer Engineering Department Kettering University. G. Tewolde, IME100-ECE,
 IME-100 ECE Lab 3 Electrical and Computer Engineering Department Kettering University 3-1 1. Laboratory Computers Getting Started i. Log-in with User Name: Kettering Student (no password required) ii.
ARDUINO. By Kiran Tiwari BCT 2072 CoTS.
 ARDUINO By Kiran Tiwari BCT 2072 CoTS www.kirantiwari.com.np SO What is an Arduino? WELL!! Arduino is an open-source prototyping platform based on easy-to-use hardware and software. Why Arduino? Simplifies
Robotics and Electronics Unit 5
 Robotics and Electronics Unit 5 Objectives. Students will work with mechanical push buttons understand the shortcomings of the delay function and how to use the millis function. In this unit we will use
The Big Idea: Background: About Serial
 Lesson 6 Lesson 6: Serial Serial Input Input The Big Idea: Information coming into an Arduino sketch is called input. This lesson focuses on text in the form of characters that come from the user via the
MAE106 Laboratory Exercises Lab # 1 - Laboratory tools
 MAE106 Laboratory Exercises Lab # 1 - Laboratory tools University of California, Irvine Department of Mechanical and Aerospace Engineering Goals To learn how to use the oscilloscope, function generator,
ARDUINO EXPERIMENTS ARDUINO EXPERIMENTS
 ARDUINO EXPERIMENTS IR OBSTACLE SENSOR... 3 OVERVIEW... 3 OBJECTIVE OF THE EXPERIMENT... 3 EXPERIMENTAL SETUP... 3 IR SENSOR ARDUINO CODE... 4 ARDUINO IDE SERIAL MONITOR... 5 GAS SENSOR... 6 OVERVIEW...
Lesson 4: Animation. Goals
 Introduction: In this session you are going to use custom built tools in Arduino to help you turn images or animation into code that automatically uploads to your DIY Gamer. It is a fun and easy way to
Introduction To Arduino
 Introduction To Arduino What is Arduino? Hardware Boards / microcontrollers Shields Software Arduino IDE Simplified C Community Tutorials Forums Sample projects Arduino Uno Power: 5v (7-12v input) Digital
Arduino Programming and Interfacing
 Arduino Programming and Interfacing Stensat Group LLC, Copyright 2017 1 Robotic Arm Experimenters Kit 2 Legal Stuff Stensat Group LLC assumes no responsibility and/or liability for the use of the kit and
melabs Serial LCD Firmware Version 1.1 3/5/07
 melabs Serial LCD Firmware Version 1.1 3/5/07 The melabs Serial LCD (SLCD) can display serial data from either asynchronous RS232-style or synchronous I 2 C input. A range of baud rates from 2400 to 57,600
USER MANUAL ARDUINO I/O EXPANSION SHIELD
 USER MANUAL ARDUINO I/O EXPANSION SHIELD Description: Sometimes Arduino Uno users run short of pins because there s a lot of projects that requires more than 20 signal pins. The only option they are left
Sten-SLATE ESP Kit. Description and Programming
 Sten-SLATE ESP Kit Description and Programming Stensat Group LLC, Copyright 2016 Overview In this section, you will be introduced to the processor board electronics and the arduino software. At the end
LCD03 - I2C/Serial LCD Technical Documentation
 LCD03 - I2C/Serial LCD Technical Documentation Pagina 1 di 5 Overview The I2C and serial display driver provides easy operation of a standard 20*4 LCD Text display. It requires only a 5v power supply and
Specification. 1.Power Supply direct from Microcontroller Board. 2.The circuit can be used with Microcontroller Board such as Arduino UNO R3.
 Part Number : Product Name : FK-FA1410 12-LED AND 3-BOTTON SHIELD This is the experimental board for receiving and transmitting data from the port of microcontroller. The function of FK-FA1401 is fundamental
This tutorial will show you how to take temperature readings using the Freetronics temperature sensor and an Arduino Uno.
 This tutorial will show you how to take temperature readings using the Freetronics temperature sensor and an Arduino Uno. Note that there are two different module types: the temperature sensor module and
Serial.begin ( ); Serial.println( ); analogread ( ); map ( );
; Serial.println( ); analogread ( ); map ( );") Control and Serial.begin ( ); Serial.println( ); analogread ( ); map ( ); A system output can be changed through the use of knobs, motion, or environmental conditions. Many electronic systems in our world
Control and Serial.begin ( ); Serial.println( ); analogread ( ); map ( ); A system output can be changed through the use of knobs, motion, or environmental conditions. Many electronic systems in our world
Introduction to Arduino
 Introduction to Arduino Paco Abad May 20 th, 2011 WGM #21 Outline What is Arduino? Where to start Types Shields Alternatives Know your board Installing and using the IDE Digital output Serial communication
cs281: Introduction to Computer Systems Lab03 K-Map Simplification for an LED-based Circuit Decimal Input LED Result LED3 LED2 LED1 LED3 LED2 1, 2
 cs28: Introduction to Computer Systems Lab3 K-Map Simplification for an LED-based Circuit Overview In this lab, we will build a more complex combinational circuit than the mux or sum bit of a full adder
m-block By Wilmer Arellano
 m-block By Wilmer Arellano You are free: to Share to copy, distribute and transmit the work Under the following conditions: Attribution You must attribute the work in the manner specified by the author
Introduction 1. Liquid crystal display (16 characters by 2 rows) Contrast dial: turn the dial to adjust the contrast of the display (see page 5)
 Contrast dial: turn the dial to adjust the contrast of the display (see page 5)") Welcome to the GENIE Serial LCD module. Introduction 1 The GENIE Serial LCD module allows GENIE-based projects to display messages on a 16 character by 2 row liquid crystal display (LCD). This worksheet
Welcome to the GENIE Serial LCD module. Introduction 1 The GENIE Serial LCD module allows GENIE-based projects to display messages on a 16 character by 2 row liquid crystal display (LCD). This worksheet
University of Hull Department of Computer Science C4DI Interfacing with Arduinos
 Introduction Welcome to our Arduino hardware sessions. University of Hull Department of Computer Science C4DI Interfacing with Arduinos Vsn. 1.0 Rob Miles 2014 Please follow the instructions carefully.
LCD03 - I2C/Serial LCD Technical Documentation
 LCD03 - I2C/Serial LCD Technical Documentation 2YHUYLHZ The I2C and serial display driver provides easy operation of a standard 20*4 LCD Text display. It requires only a 5v power supply and the two data
3. The circuit is composed of 1 set of Relay circuit.
 Part Number : Product Name : FK-FA1420 ONE CHANNEL 12V RELAY MODULE This is the experimental module for a relay controller as the fundamental controlling programming. It is adaptable or is able to upgrade
m-block By Wilmer Arellano
 m-block By Wilmer Arellano You are free: to Share to copy, distribute and transmit the work Under the following conditions: Attribution You must attribute the work in the manner specified by the author
LCD05 datasheet 1.0
 LCD05 green displays LCD05 blue displays The I2C and serial display driver provides easy operation of a standard 20 x 4 or 16 x 2 LCD Text display. It requires only a 5v power supply and the two data connections
How to Use an Arduino
 How to Use an Arduino By Vivian Law Introduction The first microcontroller, TMS-1802-NC, was built in 1971 by Texas Instruments. It owed its existence to the innovation and versatility of silicon and the
Lab 2 - Powering the Fubarino. Fubarino,, Intro to Serial, Functions and Variables
 Lab 2 - Powering the Fubarino Fubarino,, Intro to Serial, Functions and Variables Part 1 - Powering the Fubarino SD The Fubarino SD is a 56 pin device. Each pin on a chipkit device falls broadly into one
IME-100 Interdisciplinary Design and Manufacturing
 IME-100 Interdisciplinary Design and Manufacturing Introduction Arduino and Programming Topics: 1. Introduction to Microprocessors/Microcontrollers 2. Introduction to Arduino 3. Arduino Programming Basics
3.The circuit board is composed of 4 sets which are 16x2 LCD Shield, 3 pieces of Switch, 2
 Part Number : Product Name : FK-FA1416 MULTI-FUNCTION 16x2 LCD SHIELD This is the experimental board of Multi-Function 16x2 LCD Shield as the fundamental programming about the digits, alphabets and symbols.
ProgRock Operating manual _Pr1.01a_
 1. Introduction ProgRock Operating manual _Pr1.01a_ This is the operating manual for the ProgRock synthesiser kit. It should be read together with the assembly instructions for the ProgRock kit and Si5351A
Halloween Pumpkinusing. Wednesday, October 17, 12
 Halloween Pumpkinusing Blink LED 1 What you will need: 1 MSP-EXP430G2 1 3 x 2 Breadboard 3 560 Ohm Resistors 3 LED s (in Red Color Range) 3 Male to female jumper wires 1 Double AA BatteryPack 2 AA Batteries
Designed & Developed By: Ms. Jasleen Kaur, PhD Scholar, CSE. Computer Science & Engineering Department
 Design & Development of IOT application using Intel based Galileo Gen2 board A Practical Approach (Experimental Manual For B.Tech & M.Tech Students) For SoC and Embedded systems in association with Intel
Web Site: Forums: forums.parallax.com Sales: Technical:
 Web Site: www.parallax.com Forums: forums.parallax.com Sales: sales@parallax.com Technical: support@parallax.com Office: (916) 624-8333 Fax: (916) 624-8003 Sales: (888) 512-1024 Tech Support: (888) 997-8267
Contents. List of Figures. SPIDriver Datasheet 1. 1 Overview 2. 2 Features 2. 3 Installation with Arduino 3
 SPIDriver Datasheet 1 Contents 1 Overview 2 2 Features 2 3 Installation with Arduino 3 4 Operation 4 4.1 ANSI escape codes......................... 5 4.2 High-resolution modes........................ 6
Physics 120/220. Microcontrollers Extras. Prof. Anyes Taffard
 Physics 120/220 Microcontrollers Extras Prof. Anyes Taffard Introduction 2 There are an infinite amount of applications for the Arduino. Lots of interfaces that can be controlled with it. Extension boards
ProgRock Operating manual _Pr1.02_
 1. Introduction ProgRock Operating manual _Pr1.02_ This is the operating manual for the ProgRock synthesiser kit. It should be read together with the assembly instructions for the ProgRock kit and Si5351A
Lab 8: Sensor Characterization Lab (Analog)
") Objectives Lab 8: Sensor Characterization Lab (Analog) This lab introduces the methods and importance for characterizing sensors. Students will learn about how the Arduino interprets an analog signal.
Objectives Lab 8: Sensor Characterization Lab (Analog) This lab introduces the methods and importance for characterizing sensors. Students will learn about how the Arduino interprets an analog signal.
Introduction to Arduino. Wilson Wingston Sharon
 Introduction to Arduino Wilson Wingston Sharon cto@workshopindia.com Physical computing Developing solutions that implement a software to interact with elements in the physical universe. 1. Sensors convert
Overview. Multiplexor. cs281: Introduction to Computer Systems Lab02 Basic Combinational Circuits: The Mux and the Adder
 cs281: Introduction to Computer Systems Lab02 Basic Combinational Circuits: The Mux and the Adder Overview The objective of this lab is to understand two basic combinational circuits the multiplexor and
1 Overview. 2 Basic Program Structure. 2.1 Required and Optional Parts of Sketch
 Living with the Lab Winter 2015 What s this void loop thing? Gerald Recktenwald v: February 7, 2015 gerry@me.pdx.edu 1 Overview This document aims to explain two kinds of loops: the loop function that
Thumb Joystick Retail. Tools and parts you'll need. Things you'll want to know. How does it work? Skill Level: Beginner. by MikeGrusin March 22, 2011
 Thumb Joystick Retail Skill Level: Beginner by MikeGrusin March 22, 2011 Thank you for purchasing our Thumb Joystick! Whether you're blasting aliens or driving a robot, you'll find it a very useful addition
PDF of this portion of workshop notes:
 PDF of this portion of workshop notes: http://goo.gl/jfpeym Teaching Engineering Design with Student-Owned Digital and Analog Lab Equipment John B. Schneider Washington State University June 15, 2015 Overview
Arduino Programming Part 3. EAS 199A Fall 2010
 Arduino Programming Part 3 EAS 199A Fall 2010 Overview Part I Circuits and code to control the speed of a small DC motor. Use potentiometer for dynamic user input. Use PWM output from Arduino to control
CTEC 1802 Embedded Programming Labs
 CTEC 1802 Embedded Programming Labs This document is intended to get you started using the Arduino and our I/O board in the laboratory - and at home! Many of the lab sessions this year will involve 'embedded
A Hacker s Introduction to the Nokia N900
 A Hacker s Introduction to the Nokia N900 Introduction Welcome to the Hacker s Introduction to the Nokia N900. This guide is intended to help you begin connecting the N900 s builtin capabilities to information
Grove - 3 Axis Digital Accelerometer±16g Ultra-low Power (BMA400)
") Grove - 3 Axis Digital Accelerometer±16g Ultra-low Power (BMA400) The Grove - 3-Axis Digital Accelerometer ±16g Ultra-low Power (BMA400) sensor is a 12 bit, digital, triaxial acceleration sensor with smart
Grove - 3 Axis Digital Accelerometer±16g Ultra-low Power (BMA400) The Grove - 3-Axis Digital Accelerometer ±16g Ultra-low Power (BMA400) sensor is a 12 bit, digital, triaxial acceleration sensor with smart
<Table of content> <Parts and description> <Circuit board Guide> <Pins> <Basics of Coding> <Intro to Arduino> <Intro> <Downloading Arduino IDO>
 http://www.arduino.cc/
ARDUINO LEONARDO WITH HEADERS Code: A000057
 ARDUINO LEONARDO WITH HEADERS Code: A000057 Similar to an Arduino UNO, can be recognized by computer as a mouse or keyboard. The Arduino Leonardo is a microcontroller board based on the ATmega32u4 (datasheet).
Workshop Arduino English starters workshop 2
 Workshop Arduino English starters workshop 2 We advice to finish part 1 of this workshop before following this one. There are a set of assignments in this workshop that can be taken individually. First
Make your own secret locking mechanism to keep unwanted guests out of your space!
 KNOCK LOCK Make your own secret locking mechanism to keep unwanted guests out of your space! Discover : input with a piezo, writing your own functions Time : 1 hour Level : Builds on projects : 1,,3,4,5
Arduino Uno Microcontroller Overview
 Innovation Fellows Program Arduino Uno Microcontroller Overview, http://saliterman.umn.edu/ Department of Biomedical Engineering, University of Minnesota Arduino Uno Power & Interface Reset Button USB
LCD Module with I2C / Serial Interface and Keypad Control «LCD I2C/Serial» User s Guide. Copyright 2008 IMS
 LCD Module with I2C / Serial Interface and Keypad Control «LCD I2C/Serial» User s Guide Copyright 2008 IMS CONTENTS 1 INTRODUCTION... 3 2 MODULE CONNECTION... 3 2.1 I2C/Serial interface connector...4 2.2
Alessandra de Vitis. Arduino
 Alessandra de Vitis Arduino Arduino types Alessandra de Vitis 2 Interfacing Interfacing represents the link between devices that operate with different physical quantities. Interface board or simply or
ARDUINO M0 PRO Code: A000111
 ARDUINO M0 PRO Code: A000111 The Arduino M0 Pro is an Arduino M0 with a step by step debugger With the new Arduino M0 Pro board, the more creative individual will have the potential to create one s most
User Manual. ESP8266 Wifi Shield
 User Manual Of ESP8266 Wifi Shield Description The shield is designed based on esp8266 by Espressif Systems, pin-compatible with Arduino UNO/Mega2560 DevBorad. Which can be used as two independent part,
Arduino Platform Part I
 Arduino Platform Part I Justin Mclean Class Software Email: justin@classsoftware.com Twitter: @justinmclean Blog: http://blog.classsoftware.com Who am I? Director of Class Software for almost 15 years
Pridgen Vermeer Robotics ATmega128 Revision 0
 Features: 6x 8-bit I/O Ports 4x A/D Inputs 6x PWM Headers 2x RS 232 Terminals Power Bus LCD Header (4-bit mode) Smart Power Connecter Power Switch Header Power LED Debug LED Note: Some pins have multiple
4Serial SIK BINDER //77
 4Serial SIK BINDER //77 SIK BINDER //78 Serial Communication Serial is used to communicate between your computer and the RedBoard as well as between RedBoard boards and other devices. Serial uses a serial
GRAVITECH GROUP
 GRAVITECH.US uresearch GRAVITECH GROUP 1. Introduction Your Serial LCD has the following features: 20 column by 4 line text display Built-in font with provision for up to 8 user-defined characters Fixed
Chapter 2 The Basic Functions
 Chapter 2 The Basic Functions 2.1 Overview The code you learn to write for your Arduino is very similar to the code you write in any other computer language. This implies that all the basic concepts remain
Quickstart Guide: Programming the Arduino ESP 8266
 Quickstart Guide: Programming the Arduino ESP 8266 V1.0 - March 2018 Part 1: Setting up the Arduino 1. Connect to your wireless network 2. Install Arduino software from www.arduino.cc 3. Check if Windows
Board Of Education USB (#28850)
") 599 Menlo Drive, Suite 100 Rocklin, California 95765, USA Office: (916) 624-8333 Fax: (916) 624-8003 Sales: sales@parallax.com 1-888-512-1024 Tech Support: support@parallax.com 1-888-99-STAMP Web Site:
599 Menlo Drive, Suite 100 Rocklin, California 95765, USA Office: (916) 624-8333 Fax: (916) 624-8003 Sales: sales@parallax.com 1-888-512-1024 Tech Support: support@parallax.com 1-888-99-STAMP Web Site:
User manual. For Keenlon Rarduino.
 User manual For Keenlon Rarduino Design & Executive Service Website Shanghai Keenlon Hi-Tech Co., Ltd. Techsupport@keenlon.com www.keenlon.com Contents 3 Programming software installation guide 5 Programming
CLCD1 Serial 1 wire RS232 LCD development board
 CLCD1 Serial 1 wire RS232 LCD development board Can be used with most 14 pin HD44780 based character LCD displays Use with 1,2,3 or 4 line displays. (Four line LCD shown above) Shown assembled with optional
Arduino Programming. Arduino UNO & Innoesys Educational Shield
 Arduino Programming Arduino UNO & Innoesys Educational Shield www.devobox.com Electronic Components & Prototyping Tools 79 Leandrou, 10443, Athens +30 210 51 55 513, info@devobox.com ARDUINO UNO... 3 INNOESYS
Lab 2 - Powering the Fubarino, Intro to Serial, Functions and Variables
 Lab 2 - Powering the Fubarino, Intro to Serial, Functions and Variables Part 1 - Powering the Fubarino SD The Fubarino SD is a 56 pin device. Each pin on a chipkit device falls broadly into one of 9 categories:
Introduction to Internet of Things Prof. Sudip Misra Department of Computer Science & Engineering Indian Institute of Technology, Kharagpur
 Introduction to Internet of Things Prof. Sudip Misra Department of Computer Science & Engineering Indian Institute of Technology, Kharagpur Lecture - 23 Introduction to Arduino- II Hi. Now, we will continue
MEDIS Module 2. Microcontroller based systems for controlling industrial processes. Chapter 4: Timer and interrupts. M. Seyfarth, Version 0.
 MEDIS Module 2 Microcontroller based systems for controlling industrial processes Chapter 4: Timer and interrupts M. Seyfarth, Version 0.1 Steuerungstechnik 1: Speicherprogrammierbare Steuerungstechnik
Eng.mohammed Albhaisi. Lab#3 : arduino to proteus simulation. for simulate Arduino program that you wrote you have to have these programs :
 Lab#3 : arduino to proteus simulation for simulate Arduino program that you wrote you have to have these programs : 1-Arduino C 2-proteus 3- Virtual Serial Port Driver 4-Arduino library to proteus You
ELECTRONIC DISPLAYS INC. 135 S. CHURCH STREET ADDISON, ILL
 ELECTRONIC DISPLAYS INC. 135 S. CHURCH STREET ADDISON, ILL. 60101 www.electronicdisplays.com PRODUCT PART NUMBER : ED225MPC 2L N1-VERT-1001- KYN1 DESCRIPTION: Indoor 4 digit, 2.25 inch high, red LED, 2
Introduction to Microcontrollers Using Arduino. PhilRobotics
 Introduction to Microcontrollers Using Arduino PhilRobotics Objectives Know what is a microcontroller Learn the capabilities of a microcontroller Understand how microcontroller execute instructions Objectives
LDR_Light_Switch2 -- Overview
 LDR_Light_Switch2 -- Overview OBJECTIVES After performing this lab exercise, learner will be able to: Use LDR (Light Dependent Resistor) to measure the light intensity variation in terms of voltage at
Lab 8 RS232 October 22, 2015
 Lab 8 RS232 October 22, 2015 In this lab you will use the Serial Communications Interface (SCI) system on the HCS12 microcontroller to send and receive characters using the RS232 signal format. You will