Introduction to Microcontrollers Using Arduino. PhilRobotics
|
|
|
- Muriel Tyler
- 6 years ago
- Views:
Transcription

1 Introduction to Microcontrollers Using Arduino PhilRobotics
2 Objectives Know what is a microcontroller Learn the capabilities of a microcontroller Understand how microcontroller execute instructions
3 Objectives Learn how to program a microcontroller using Arduino Configure a pin (Input, Output, Analog, PWM) Write Output State Read Input State Read Analog Input Use PWM
4 Microcontrollers History of Microcontrollers 1971 Intel 4004 was released First microprocessor Followed by 8008 and then Intel 8048 was released Intel President, Luke J. Valenter First Microcontroller

5 Microcontrollers History of Microcontrollers 1976 Zilog, founded by Federico Faggin Z80 Gameboy, TI Calculators 1979 Decided to shift to embedded space Introduced Z8
6 Microcontrollers History of Microcontrollers 1993 Microchip PIC16x84 was released First with EEPROM program memory 1993 Atmel First microcontroller with Flash memory
7 Microcontrollers History of Microcontrollers At present Several companies followed the use of flash memory
8 Microcontrollers Abstract Definition An IC (Integrated Circuit) Configurable Pins Programmable Function With Built-in Memory RAM ROM
9 Microcontrollers Abstract Definition An IC (Integrated Circuit) Configurable Pins Programmable Function With Built-in Memory RAM ROM Has Built-in Peripherals Timer ADC UART/SPI/I2C PWM Comparators

10 Popular Microcontrollers PIC16F84a Developed by Microchip Widely used by hobbyist in the late 90 s Very basic function Later replaced by pin compatible PIC16F628a

11 Popular Microcontrollers PIC16F877a Developed by Microchip Greater pin count than PIC16F84a Has ADC, PWM, UART and is self programmable

12 Popular Microcontrollers PIC18F2550 Developed by Microchip With USB connectivity Used on Pinguino (Arduino equivalent for PIC)

13 Popular Microcontrollers AtMega168 Developed by Atmel Widely used microcontroller on Arduino
14 Atmega168 Microcontroller Developed by Atmel 8-bit Microcontroller 28pins 16Kbytes Flash Memory Self-Programmable
15 Atmega168
16 Atmega168
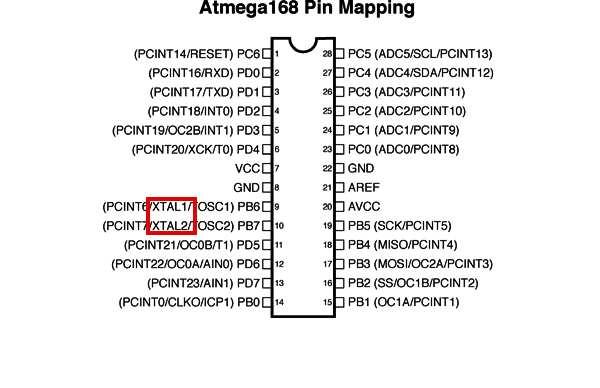
17 Atmega168
18 Atmega168
19 Atmega168
20 Atmega168
21 Atmega168

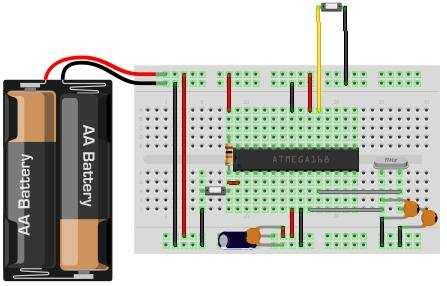
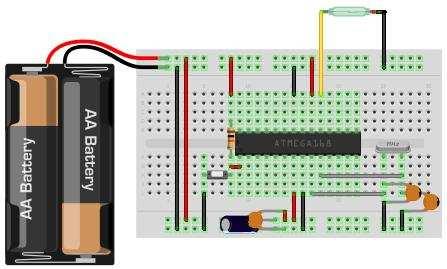
22 AtMega168 Basic Setup

23 Breadboard Basic Setup
24 Supply Basic Setup
25 Supply Basic Setup
26 Crystal Oscillator Basic Setup
27 Crystal Oscillator Basic Setup
28 Resonator Bypass Basic Setup
29 Resonator Bypass Basic Setup
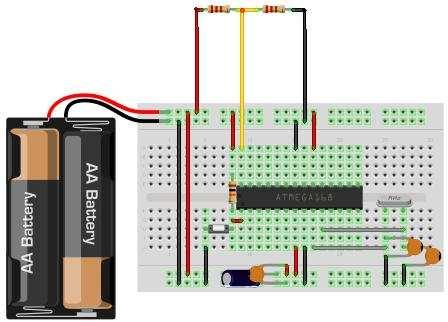
30 Reset Pullup Basic Setup
31 Reset Pullup Basic Setup

32 Filter Capacitor Basic Setup
33 Filter Capacitor Basic Setup
34 Bypass Capacitor Basic Setup
35 Bypass Capacitor Basic Setup
36 Reset Switch Basic Setup
37 Reset Switch Basic Setup
38 ADC Supply Basic Setup
39 Atmega168 Specifications Pins 23 General Purpose IOs
40 Outputs
41 Outputs

42 Outputs
43 Outputs
44 Outputs
45 Outputs
46 Inputs
47 Inputs
48 Inputs
49 Atmega168 Specifications Pins 23 General Purpose IOs 6 Channel 10bit ADC
50 ADC
51 ADC
52 ADC
53 ADC
54 Atmega168 Specifications Pins 23 General Purpose IOs 6 Channel 10bit ADC 6 PWM Channels With Built-in Memory 16 KBytes ROM 1 KBytes RAM 512 Bytes EEPROM
55 Von Neuman
56 Hardvard
57 Programming Basic Challenge I Instruct the robot to draw a 10cm x 10cm yellow square starting 5cm from top and 5cm from the left side of the paper.
58 Programming Basic Challenge II Instruct the robot to draw that same square mentioned on Challenge I 10 times more.
59 Programming Basic Challenge III Instruct the robot to draw that same square for sets 10 pieces of paper forever
60 How MCU Execute Instructions Pipeline

61 Who is Arduino?
62 What is Arduino A project which began in Ivrea (Italy) in 2005 Massimo Banzi David Cuartielles device for controlling student-built interaction design less expensive more modern than what is available Basic Stamp
63 What is Arduino Open Source Hardware Based on Wiring Open Source Software Based on Processing Multi-patform Programmed via USB
64 What is Arduino named the project after a local bar italian masculine first name "strong friend" English equivalent is "Hardwin"
65 What is Arduino

66 What is Arduino
67 Arduino
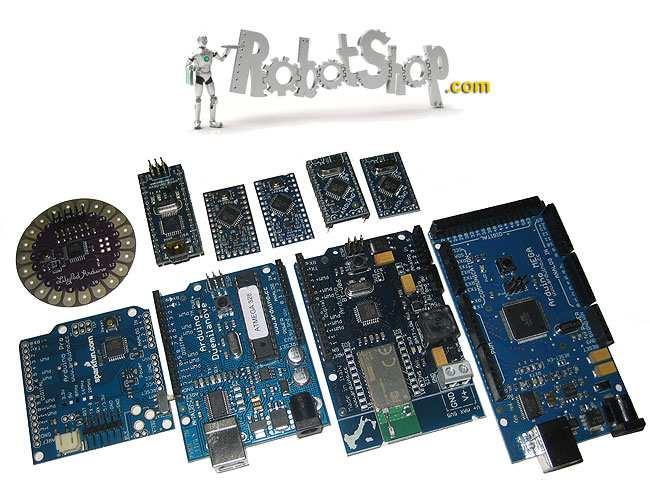
68 Arduino
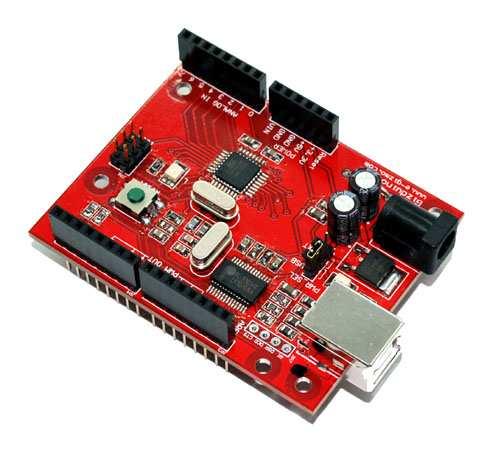
69 Gizduino

70 Getting Started with Arduino Arduino IDE

71 Getting Started with Arduino Arduino IDE
72 Getting Started with Arduino Arduino IDE Homepage: Download: arduino-00xx.zip Device Driver Gizduino uses prolific chip
73 Getting Started with Arduino Testing the Arduino Run Clip 2...

74 Getting Started with Arduino Virtual Breadboard
75 Getting Started with Arduino Virtual Breadboard Run clip 3...
76 Getting Started with Arduino Virtual Breadboard Homepage: Download:
77 Getting Started with Arduino Virtual Breadboard Dependencies Latest version of DirectX.Net 2.0 Redistributable J# 2.0 Redistributable Java JRE 1.6 ( version 6)
78 Getting Started with Arduino Source Code Application Programmer Sketch IDE (Integrated Design Environment)
79 Arduino Programming Setup and Loop void setup() void loop()
80 Arduino Programming Setup() called when a sketch starts running use it to initialize variables, pin modes, start using libraries will only run once, after each powerup or reset of the Arduino board
81 Arduino Programming Setup() int LEDPin; void setup() LEDPin = 13; pinmode(ledpin, OUTPUT); digitalwrite(ledpin, LOW); void loop()
82 Arduino Programming Setup() int LEDPin; void setup() LEDPin = 13; pinmode(ledpin, OUTPUT); digitalwrite(ledpin, LOW); void loop()
83 Arduino Programming Loop() Executed repeatedly Allows the program to change and respond.
84 Arduino Programming Loop() int LEDPin; // setup initializes the LED pin as output // and initially turned off void setup() LEDPin = 13; pinmode(ledpin, OUTPUT); digitalwrite(ledpin, LOW); // loop checks the button pin each time, void loop() delay(500); digitalwrite(ledpin, HIGH); delay(500); digitalwrite(ledpin, LOW);
85 Arduino Programming Loop() int LEDPin; // setup initializes the LED pin as output // and initially turned off void setup() LEDPin = 13; pinmode(ledpin, OUTPUT); digitalwrite(ledpin, LOW); // loop checks the button pin each time, void loop() delay(500); digitalwrite(ledpin, HIGH); delay(500); digitalwrite(ledpin, LOW);
86 Arduino Programming Functions a small set / group of instructions designed to operate on its given input Read more:
87 Arduino Programming Functions return type function name parameter list int get_sum(int Var1, int Var2) return Var1 + Var2; function expressions
88 Arduino Programming Function name Unique identifier for a function Parameter / Argument List Inputs to a function Function Return Output of a function Expressions Describes what a function do
89 Arduino Programming Calling a Functions void loop() result = get_sum(2,3); int get_sum(int Var1, int Var2) return Var1 + Var2; will give us a result of 5 functions must be defined before it can be used
90 Arduino Programming Arduino Built-in Functions Predefined functions to easily configure Arduino Pin Operation Peripheral Operation shortcuts
91 Arduino Programming pinmode(pin, mode) Configures a digital pin to behave either as an input or an output pin: the pin number whose mode you wish to set mode: either INPUT or OUTPUT Example pinmode(13, OUTPUT);
92 Arduino Programming digitalwrite(pin, value) Write a HIGH or a LOW value to a digital pin pin: the pin number whose value you wish to set value: either HIGH or LOW Example digitalwrite(13, HIGH);
93 Arduino Programming digitalread(pin) Reads the value from a specified digital pin pin: the digital pin number you want to read returns either HIGH or LOW Example result = digitalread(13);
94 Arduino Programming analogread(pin) Reads the value from a specified analog pin pin: the analog pin number you want to read returns an integer (0 to 1023)corresponding to pin voltage Example result = analogread(13); result = pinv * 1023/Vref
95 Arduino Programming analogwrite(pin, value) Writes an analog value (PWM wave) to a pin pin will generate a steady square wave of the specified duty cycle 490 Hz
96 Arduino Programming analogwrite(pin, value) Can be used to vary Brightness of LED Speed of the motor Output a sound Low Pass Filter needed
97 Arduino Programming analogwrite(pin, value) pin: the pin to write to value: the duty cycle: between 0 (always off) and 255 (always on) Example analogwrite(9, 127); Duty_Cycle = value / 255 * 100% ~50% = 100 / 255 * 100%

98 Arduino Programming analogwrite(pin, value)
99 Arduino Programming delay(value) Pauses the program for the amount of time value: the number of milliseconds to pause Example delay(1000); will pause for 1000ms, equivalent to 1sec pause
100 Arduino Programming Blinking LED Example int LEDPin; // setup initializes the LED pin as output // and initially turned off void setup() LEDPin = 13; pinmode(ledpin, OUTPUT); digitalwrite(ledpin, LOW); // loop checks the button pin each time, void loop() delay(500); digitalwrite(ledpin, HIGH); delay(500); digitalwrite(ledpin, LOW);
101 Arduino Programming Comments int LEDPin; // setup initializes the LED pin as output // and initially turned off void setup() LEDPin = 13; pinmode(ledpin, OUTPUT); digitalwrite(ledpin, LOW); // loop checks the button pin each time, void loop() delay(500); digitalwrite(ledpin, HIGH); delay(500); digitalwrite(ledpin, LOW);
102 Arduino Programming Comments int LEDPin; // setup initializes the LED pin as output // and initially turned off void setup() LEDPin = 13; pinmode(ledpin, OUTPUT); digitalwrite(ledpin, LOW); // loop checks the button pin each time, void loop() delay(500); digitalwrite(ledpin, HIGH); delay(500); digitalwrite(ledpin, LOW);
103 Arduino Programming Comments Starts with characters // Text after the start marker are ignored by the compiler This is for the programmer (person)
104 Arduino Programming int LEDPin; // setup initializes the LED pin as output // and initially turned off void setup() LEDPin = 13; pinmode(ledpin, OUTPUT); digitalwrite(ledpin, LOW); // loop checks the button pin each time, void loop() delay(500); digitalwrite(ledpin, HIGH); delay(500); digitalwrite(ledpin, LOW);
105 Arduino Programming Variables int LEDPin; // setup initializes the LED pin as output // and initially turned off void setup() LEDPin = 13; pinmode(ledpin, OUTPUT); digitalwrite(ledpin, LOW); // loop checks the button pin each time, void loop() delay(500); digitalwrite(ledpin, HIGH); delay(500); digitalwrite(ledpin, LOW);
106 Arduino Programming Variables int LEDPin; // setup initializes the LED pin as output // and initially turned off void setup() LEDPin = 13; pinmode(ledpin, OUTPUT); digitalwrite(ledpin, LOW); // loop checks the button pin each time, void loop() delay(500); digitalwrite(ledpin, HIGH); delay(500); digitalwrite(ledpin, LOW);
107 Arduino Programming Variables int LEDPin; // setup initializes the LED pin as output // and initially turned off void setup() LEDPin = 13; pinmode(ledpin, OUTPUT); digitalwrite(ledpin, LOW); // loop checks the button pin each time, void loop() delay(500); digitalwrite(ledpin, HIGH); delay(500); digitalwrite(ledpin, LOW);
108 Arduino Programming Variables memory location in RAM that carries a value Variables must be declared name is chosen to uniquely identify a variable the type defines how much memory is used and how it is stored
109 Arduino Programming Data Types Type Description Sample boolean boolean true, false char character A-Z, a-z, CR, LF unsigned char same as byte byte occupies 1 byte / 8bits int integer, occupies 2 bytes / 16bit -32,768 to 32,767 unsigned int unsigned integer, occupies 2 bytes / 16bit 0 to 65,535 word same as unsigned int 0 to 65,535 long long integer, 4bytes / 32bits -2,147,483,648 to 2,147,483,647 unsigned long unsigned long integer, 4bytes / 32bits 0 to 4,294,967,295
110 Arduino Programming Declaring a Variables int VariableName1;
111 Arduino Programming Declaring a Variables type name int VariableName1;
112 Arduino Programming Declaring a Variables type name int byte VariableName1; VariableName2
113 Arduino Programming Declaring a Variables type name int VariableName1; byte VariableName2 // not terminated by semicolon
114 Arduino Programming Declaring a Variables type name int VariableName1; byte VariableName2 // not terminated by semicolon int VariableName3, VariableName4, VariableName5;
115 Arduino Programming Declaring a Variables type name int VariableName1; byte VariableName2 // not terminated by semicolon int VariableName3, VariableName4, VariableName5;
116 Arduino Programming Declaring a Variables data type name int VariableName1; byte VariableName2 // not terminated by semicolon int VariableName3, VariableName4, VariableName5; void Variavle6;
117 Arduino Programming Declaring a Variables data type name int VariableName1; byte VariableName2 // not terminated by semicolon int VariableName3, VariableName4, VariableName5; void Variavle6; // there is no void type
118 Arduino Programming Naming a Variable Starts with an alphabet character No spaces, no special characters int 1Delta;
119 Arduino Programming Naming a Variable Starts with an alphabet character No spaces, no special characters int 1Delta; // variable names cannot start // with numbers
120 Arduino Programming Naming a Variable Starts with an alphabet character No spaces, no special characters int 1Delta; // variable names cannot start // with numbers byte Delta1;
121 Arduino Programming Naming a Variable Starts with an alphabet character No spaces, no special characters int 1Delta; // variable names cannot start // with numbers byte Delta1; int Serial Number;
122 Arduino Programming Naming a Variable Starts with an alphabet character No spaces, no special characters int 1Delta; // variable names cannot start // with numbers byte Delta1; int Serial Number; // must contain no spaces // SerialNumber // Serial_Number
123 Arduino Programming Naming a Variable Starts with an alphabet character No spaces, no special characters int 1Delta; // variable names cannot start // with numbers byte Delta1; int Serial Number; // must contain no spaces // SerialNumber // Serial_Number int Serial,Number;
124 Arduino Programming Naming a Variable Starts with an alphabet character No spaces, no special characters int 1Delta; // variable names cannot start // with numbers byte Delta1; int Serial Number; // must contain no spaces // SerialNumber // Serial_Number int Serial,Number; // These are 2 different variables // having an integer type
125 Arduino Programming Assigning Values int LEDPin; // setup initializes the LED pin as output // and initially turned off void setup() LEDPin = 13; pinmode(ledpin, OUTPUT); digitalwrite(ledpin, LOW); // loop checks the button pin each time, void loop() delay(500); digitalwrite(ledpin, HIGH); delay(500); digitalwrite(ledpin, LOW);
126 Arduino Programming Assigning Values int LEDPin; // setup initializes the LED pin as output // and initially turned off void setup() LEDPin = 13; pinmode(ledpin, OUTPUT); digitalwrite(ledpin, LOW); // loop checks the button pin each time, void loop() delay(500); digitalwrite(ledpin, HIGH); delay(500); digitalwrite(ledpin, LOW);
127 Arduino Programming Assigning Values int LEDPin = 13; // setup initializes the LED pin as output // and initially turned off void setup() pinmode(ledpin, OUTPUT); digitalwrite(ledpin, LOW); // loop checks the button pin each time, void loop() delay(500); digitalwrite(ledpin, HIGH); delay(500); digitalwrite(ledpin, LOW);
128 Arduino Programming Decision Making if statement used to compare variable to a variable if(variable1 > variable2) function(); variable to a constant if(variable1 > 2) function();
129 Arduino Programming Decision Making execute the statement enclosed between if condition is satisfied if(variable1 > variable2) function1(); function2();
130 Arduino Programming Decision Making Comparison operator Less than < Greater than > Equal == Not equal!= Less than or equal <= Greater than or equal >=
131 Arduino Programming Decision Making if/else statement execute the statement enclosed between if condition is satisfied execute the statement enclosed between after else when not if(variable1 > variable2) function1(); else function2();
132 Arduino Programming Decision Making Nested if/else statement if(variable1 > variable2) function1(); else if(variable1 < variable2) function2();
133 Arduino Programming Decision Making Nested if/else statement if(variable1 > variable2) function1(); else if(variable1 < variable2) function2(); else function3();
134 Arduino Programming Blinking LED Example int LEDPin = 13; void setup() pinmode(ledpin, OUTPUT); // set pin 13 output digitalwrite(ledpin, LOW); // Set initially to off void loop() delay(500); digitalwrite(ledpin, HIGH); delay(500); digitalwrite(ledpin, LOW); // Turn LED on // Turn LED off
135 Arduino Programming Blinking LED Example int LEDPin = 13, SWITCHPin = 12, PinState; void setup() pinmode(ledpin, OUTPUT); // set pin 13 output digitalwrite(ledpin, LOW); // Set initially to off pinmode(switchpin, INPUT); // set pin 12 input void loop() delay(500); digitalwrite(ledpin, HIGH); delay(500); digitalwrite(ledpin, LOW); PinState = digitalread(switchpin); // Turn LED on // Turn LED off
136 Arduino Programming Better Blinking LED Example int LEDPin = 13, SWITCHPin = 12, PinState, ledstate; unsigned long previousmillis; void setup() pinmode(ledpin, OUTPUT); // set pin 13 output digitalwrite(ledpin, LOW); // Set initially to off pinmode(switchpin, INPUT); // set pin 12 input void loop() unsigned long currentmillis = millis(); if(currentmillis - previousmillis >= 500) // check if >= 500mS previousmillis = currentmillis; // initialize prev with current // if the LED is off turn it on and vice-versa: if (ledstate == LOW) ledstate = HIGH; else ledstate = LOW; digitalwrite(ledpin, ledstate); PinState = digitalread(switchpin); // Turn LED on/off
137 Arduino Programming Better Blinking LED Example int LEDPin = 13, SWITCHPin = 12, PinState, LEDState; unsigned long previousmillis; void setup() pinmode(ledpin, OUTPUT); // set pin 13 output digitalwrite(ledpin, LOW); // Set initially to off pinmode(switchpin, INPUT); // set pin 12 input void loop() unsigned long currentmillis = millis(); if(currentmillis - previousmillis >= 500) // check if >= 500mS previousmillis = currentmillis; // initialize prev with current // if the LED is off turn it on and vice-versa: if (ledstate == LOW) ledstate = HIGH; else ledstate = LOW; digitalwrite(ledpin, ledstate); PinState = digitalread(switchpin); // Turn LED on/off
138 Arduino Programming Better Blinking LED Example int LEDPin = 13, SWITCHPin = 12, PinState, LEDState; unsigned long previousmillis; void setup() pinmode(ledpin, OUTPUT); // set pin 13 output digitalwrite(ledpin, LOW); // Set initially to off pinmode(switchpin, INPUT); // set pin 12 input void loop() unsigned long currentmillis = millis(); if(currentmillis - previousmillis >= 500) // check if >= 500mS previousmillis = currentmillis; // initialize prev with current // if the LED is off turn it on and vice-versa: if (ledstate == LOW) ledstate = HIGH; else ledstate = LOW; digitalwrite(ledpin, ledstate); PinState = digitalread(switchpin); // Turn LED on/off
139 Arduino Programming Better Blinking LED Example int LEDPin = 13, SWITCHPin = 12, PinState, LEDState; unsigned long previousmillis; void setup() pinmode(ledpin, OUTPUT); // set pin 13 output digitalwrite(ledpin, LOW); // Set initially to off pinmode(switchpin, INPUT); // set pin 12 input void loop() unsigned long currentmillis = millis(); if(currentmillis - previousmillis >= 500) // check if >= 500mS previousmillis = currentmillis; // initialize prev with current // if the LED is off turn it on and vice-versa: if (ledstate == LOW) ledstate = HIGH; else ledstate = LOW; digitalwrite(ledpin, ledstate); PinState = digitalread(switchpin); // Turn LED on/off
140 Arduino Programming Decision Making Logical / boolean operator Logic AND && Logic OR Logic Not or Inversion!
141 Arduino Programming Better Blinking LED Example int LEDPin = 13, SWITCHPin = 12, PinState, LEDState; unsigned long previousmillis; void setup() pinmode(ledpin, OUTPUT); // set pin 13 output digitalwrite(ledpin, LOW); // Set initially to off pinmode(switchpin, INPUT); // set pin 12 input void loop() unsigned long currentmillis = millis(); if(currentmillis - previousmillis >= 500) // check if >= 500mS previousmillis = currentmillis; // initialize prev with current // if the LED is off turn it on and vice-versa: if (ledstate == LOW) ledstate = HIGH; else ledstate = LOW; digitalwrite(ledpin, ledstate); PinState = digitalread(switchpin); // Turn LED on/off
142 Arduino Programming Better Blinking LED Example int LEDPin = 13, SWITCHPin = 12, PinState; unsigned long previousmillis; boolean LEDOn; void setup() pinmode(ledpin, OUTPUT); // set pin 13 output digitalwrite(ledpin, LOW); // Set initially to off pinmode(switchpin, INPUT); // set pin 12 input void loop() unsigned long currentmillis = millis(); if(currentmillis - previousmillis >= 500) // check if >= 500mS previousmillis = currentmillis; // initialize prev with current // if the LED is off turn it on and vice-versa: if (LEDOn) LEDOn = false; else LEDOn = true; digitalwrite(ledpin, LEDOn); PinState = digitalread(switchpin); // Turn LED on/off
143 Arduino Programming Better Blinking LED Example int LEDPin = 13, SWITCHPin = 12, PinState; unsigned long previousmillis; boolean LEDOn, BlinkEnabled = TRUE; void setup() pinmode(ledpin, OUTPUT); // set pin 13 output digitalwrite(ledpin, LOW); // Set initially to off pinmode(switchpin, INPUT); // set pin 12 input void loop() unsigned long currentmillis = millis(); if(currentmillis - previousmillis >= 500) // check if >= 500mS previousmillis = currentmillis; // initialize prev with current // if the LED is off turn it on and vice-versa: if (LEDOn && BlinkEnabled) LEDOn = false; else LEDOn = true; digitalwrite(ledpin, LEDOn); PinState = digitalread(switchpin); // Turn LED on/off
144 Arduino Programming Better Blinking LED Example int LEDPin = 13, SWITCHPin = 12; unsigned long previousmillis; boolean LEDOn, BlinkEnabled; void setup() pinmode(ledpin, OUTPUT); // set pin 13 output digitalwrite(ledpin, LOW); // Set initially to off pinmode(switchpin, INPUT); // set pin 12 input void loop() unsigned long currentmillis = millis(); if(currentmillis - previousmillis >= 500) // check if >= 500mS previousmillis = currentmillis; // initialize prev with current // if the LED is off turn it on and vice-versa: if (LEDOn && BlinkEnabled) LEDOn = false; else LEDOn = true; digitalwrite(ledpin, LEDOn); BlinkEnabled =!digitalread(switchpin); // Turn LED on/off
145 Arduino Programming Looping for loop execute expressions enclosed between continuously as long as a condition is satisfied Starting Count Limit Increment for(i = 1; i <= 10; i++) function();
146 Arduino Programming Libraries #include <Servo.h> Servo myservo; int pos = 0; // create servo object to control a servo // a maximum of eight servo objects can be created // variable to store the servo position void setup() myservo.attach(9); // attaches the servo on pin 9 to the servo object void loop() for(pos = 0; pos < 180; pos += 1) // goes from 0 degrees to 180 degrees // in steps of 1 degree myservo.write(pos); // tell servo to go to position in variable 'pos' delay(15); // waits 15ms for the servo to reach the position for(pos = 180; pos>=1; pos-=1) // goes from 180 degrees to 0 degrees myservo.write(pos); // tell servo to go to position in variable 'pos' delay(15); // waits 15ms for the servo to reach the position
147 Reference Arduino Programming Notebook Getting Started with Arduino 3rd Edition
148 Beyond Arduino

149 Processing Beyond Arduino

150 Toolduino Beyond Arduino

151 Mobile Processing Beyond Arduino

152 Beyond Arduino S4A (Scratch for Arduino)

153 P-Bot Beyond Arduino

154 P-Bot Beyond Arduino
155 Questions, Comments, Suggestions glutnix.neo on gmail glutnix_neo electronicslab.ph/forum
156 Arduino End of Presentation 01/22/11
FUNCTIONS For controlling the Arduino board and performing computations.
 d i g i t a l R e a d ( ) [Digital I/O] Reads the value from a specified digital pin, either HIGH or LOW. digitalread(pin) pin: the number of the digital pin you want to read HIGH or LOW Sets pin 13 to
Arduino Prof. Dr. Magdy M. Abdelhameed
 Course Code: MDP 454, Course Name:, Second Semester 2014 Arduino What is Arduino? Microcontroller Platform Okay but what s a Microcontroller? Tiny, self-contained computers in an IC Often contain peripherals
Introduction to Arduino. Wilson Wingston Sharon
 Introduction to Arduino Wilson Wingston Sharon cto@workshopindia.com Physical computing Developing solutions that implement a software to interact with elements in the physical universe. 1. Sensors convert
IME-100 Interdisciplinary Design and Manufacturing
 IME-100 Interdisciplinary Design and Manufacturing Introduction Arduino and Programming Topics: 1. Introduction to Microprocessors/Microcontrollers 2. Introduction to Arduino 3. Arduino Programming Basics
Lab 01 Arduino 程式設計實驗. Essential Arduino Programming and Digital Signal Process
 Lab 01 Arduino 程式設計實驗 Essential Arduino Programming and Digital Signal Process Arduino Arduino is an open-source electronics prototyping platform based on flexible, easy-to-use hardware and software. It's
The Arduino Briefing. The Arduino Briefing
 Mr. Yee Choon Seng Email : csyee@simtech.a-star.edu.sg Design Project resources http://guppy.mpe.nus.edu.sg/me3design.html One-Stop robotics shop A-Main Objectives Pte Ltd, Block 1 Rochor Road, #02-608,
TANGIBLE MEDIA & PHYSICAL COMPUTING INTRODUCTION TO ARDUINO
 TANGIBLE MEDIA & PHYSICAL COMPUTING INTRODUCTION TO ARDUINO AGENDA ARDUINO HARDWARE THE IDE & SETUP BASIC PROGRAMMING CONCEPTS DEBUGGING & HELLO WORLD INPUTS AND OUTPUTS DEMOS ARDUINO HISTORY IN 2003 HERNANDO
More Arduino Programming
 Introductory Medical Device Prototyping Arduino Part 2, http://saliterman.umn.edu/ Department of Biomedical Engineering, University of Minnesota More Arduino Programming Digital I/O (Read/Write) Analog
Arduino Part 2. Introductory Medical Device Prototyping
 Introductory Medical Device Prototyping Arduino Part 2, http://saliterman.umn.edu/ Department of Biomedical Engineering, University of Minnesota More Arduino Programming Digital I/O (Read/Write) Analog
IME-100 ECE. Lab 3. Electrical and Computer Engineering Department Kettering University. G. Tewolde, IME100-ECE,
 IME-100 ECE Lab 3 Electrical and Computer Engineering Department Kettering University 3-1 1. Laboratory Computers Getting Started i. Log-in with User Name: Kettering Student (no password required) ii.
Arduino Uno Microcontroller Overview
 Innovation Fellows Program Arduino Uno Microcontroller Overview, http://saliterman.umn.edu/ Department of Biomedical Engineering, University of Minnesota Arduino Uno Power & Interface Reset Button USB
Introduction to Arduino
 Introduction to Arduino Mobile Computing, aa. 2016/2017 May 12, 2017 Daniele Ronzani - Ph.D student in Computer Science dronzani@math.unipd.it What are Microcontrollers Very small and simple computers
Arduino 101 AN INTRODUCTION TO ARDUINO BY WOMEN IN ENGINEERING FT T I NA A ND AW E S O ME ME NTO R S
 Arduino 101 AN INTRODUCTION TO ARDUINO BY WOMEN IN ENGINEERING FT T I NA A ND AW E S O ME ME NTO R S Overview Motivation Circuit Design and Arduino Architecture Projects Blink the LED Switch Night Lamp
MEDIS Module 2. Microcontroller based systems for controlling industrial processes. Chapter 4: Timer and interrupts. M. Seyfarth, Version 0.
 MEDIS Module 2 Microcontroller based systems for controlling industrial processes Chapter 4: Timer and interrupts M. Seyfarth, Version 0.1 Steuerungstechnik 1: Speicherprogrammierbare Steuerungstechnik
BASIC ARDUINO WORKSHOP. Mr. Aldwin and Mr. Bernardo
 BASIC ARDUINO WORKSHOP Mr. Aldwin and Mr. Bernardo 1 BASIC ARDUINO WORKSHOP Course Goals Introduce Arduino Hardware and Understand Input Software and Output Create simple project 2 Arduino Open-source
analogwrite(); The analogwrite function writes an analog value (PWM wave) to a PWM-enabled pin.
; The analogwrite function writes an analog value (PWM wave) to a PWM-enabled pin.") analogwrite(); The analogwrite function writes an analog value (PWM wave) to a PWM-enabled pin. Syntax analogwrite(pin, value); For example: analogwrite(2, 255); or analogwrite(13, 0); Note: Capitalization
analogwrite(); The analogwrite function writes an analog value (PWM wave) to a PWM-enabled pin. Syntax analogwrite(pin, value); For example: analogwrite(2, 255); or analogwrite(13, 0); Note: Capitalization
Lab 02 Arduino 數位感測訊號處理, SPI I2C 介面實驗. More Arduino Digital Signal Process
 Lab 02 Arduino 數位感測訊號處理, SPI I2C 介面實驗 More Arduino Digital Signal Process Blink Without Delay Sometimes you need to do two things at once. For example you might want to blink an LED (or some other timesensitive
IME-100 ECE. Lab 4. Electrical and Computer Engineering Department Kettering University. G. Tewolde, IME100-ECE,
 IME-100 ECE Lab 4 Electrical and Computer Engineering Department Kettering University 4-1 1. Laboratory Computers Getting Started i. Log-in with User Name: Kettering Student (no password required) ii.
// The REAL DEAL - Running Code. int led22 = 22; int led23 = 23; int led24 = 24; int led25 = 25; int led27 = 27; int led29 = 29; int led31 = 31;
 /* // The REAL DEAL - Running Code */ int led22 = 22; int led23 = 23; int led24 = 24; int led25 = 25; int led27 = 27; int led29 = 29; int led31 = 31; int led33 = 33; int led35 = 35; int led36 = 36; int
Introduction To Arduino
 Introduction To Arduino What is Arduino? Hardware Boards / microcontrollers Shields Software Arduino IDE Simplified C Community Tutorials Forums Sample projects Arduino Uno Power: 5v (7-12v input) Digital
ARDUINO. By Kiran Tiwari BCT 2072 CoTS.
 ARDUINO By Kiran Tiwari BCT 2072 CoTS www.kirantiwari.com.np SO What is an Arduino? WELL!! Arduino is an open-source prototyping platform based on easy-to-use hardware and software. Why Arduino? Simplifies
Introduction to Arduino
 Introduction to Arduino Paco Abad May 20 th, 2011 WGM #21 Outline What is Arduino? Where to start Types Shields Alternatives Know your board Installing and using the IDE Digital output Serial communication
Adapted from a lab originally written by Simon Hastings and Bill Ashmanskas
 Physics 364 Arduino Lab 1 Adapted from a lab originally written by Simon Hastings and Bill Ashmanskas Vithayathil/Kroll Introduction Last revised: 2014-11-12 This lab introduces you to an electronic development
arduino programming notebook brian w. evans revised by Paul Badger
 arduino programming notebook brian w. evans revised by Paul Badger Arduino Programming Notebook Written and compiled by Brian W. Evans With information or inspiration taken from: http://www.arduino.cc
Make your own secret locking mechanism to keep unwanted guests out of your space!
 KNOCK LOCK Make your own secret locking mechanism to keep unwanted guests out of your space! Discover : input with a piezo, writing your own functions Time : 1 hour Level : Builds on projects : 1,,3,4,5
Workshop on Microcontroller Based Project Development
 Organized by: EEE Club Workshop on Microcontroller Based Project Development Presented By Mohammed Abdul Kader Assistant Professor, Dept. of EEE, IIUC Email:kader05cuet@gmail.com Website: kader05cuet.wordpress.com
FUNCTIONS USED IN CODING pinmode()
") FUNCTIONS USED IN CODING pinmode() Configures the specified pin to behave either as an input or an output. See the description of digital pins for details on the functionality of the pins. As of Arduino
FUNCTIONS USED IN CODING pinmode() Configures the specified pin to behave either as an input or an output. See the description of digital pins for details on the functionality of the pins. As of Arduino
Note. The above image and many others are courtesy of - this is a wonderful resource for designing circuits.
 Robotics and Electronics Unit 2. Arduino Objectives. Students will understand the basic characteristics of an Arduino Uno microcontroller. understand the basic structure of an Arduino program. know how
Interrupts Arduino, AVR, and deep dark programming secrets. What is an Interrupt?
 Interrupts Arduino, AVR, and deep dark programming secrets What is an Interrupt? A transfer of program control that is not directed by the programmer Like a phone call in the middle of a conversation Stop
Arduino Lesson 15. DC Motor Reversing
 Arduino Lesson 15. DC Motor Reversing Created by Simon Monk Last updated on 2017-03-09 04:04:43 PM UTC Guide Contents Guide Contents Overview Parts Part Qty An Experiment In1 In2 Motor Breadboard Layout
Chapter 2 The Basic Functions
 Chapter 2 The Basic Functions 2.1 Overview The code you learn to write for your Arduino is very similar to the code you write in any other computer language. This implies that all the basic concepts remain
Lecture 6: Embedded Systems and Microcontrollers
 Lecture 6: Embedded Systems and Microcontrollers Bo Wang Division of Information & Computing Technology Hamad Bin Khalifa University bwang@hbku.edu.qa 1 What is Embedded System? Embedded System = Computers
USER MANUAL ARDUINO I/O EXPANSION SHIELD
 USER MANUAL ARDUINO I/O EXPANSION SHIELD Description: Sometimes Arduino Uno users run short of pins because there s a lot of projects that requires more than 20 signal pins. The only option they are left
KNOCK LOCK MAKE YOUR OWN SECRET LOCKING MECHANISM TO KEEP UNWANTED GUESTS OUT OF YOUR SPACE! Discover: input with a piezo, writing your own functions
 125 KNOCK LOCK MAKE YOUR OWN SECRET LOCKING MECHANISM TO KEEP UNWANTED GUESTS OUT OF YOUR SPACE! Discover: input with a piezo, writing your own functions Time: 1 HOUR Level: Builds on projects: 1, 2, 3,
Procedure: Determine the polarity of the LED. Use the following image to help:
 Section 2: Lab Activity Section 2.1 Getting started: LED Blink Purpose: To understand how to upload a program to the Arduino and to understand the function of each line of code in a simple program. This
TANGIBLE MEDIA & PHYSICAL COMPUTING MORE ARDUINO
 TANGIBLE MEDIA & PHYSICAL COMPUTING MORE ARDUINO AGENDA RECAP ALGORITHMIC APPROACHES TIMERS RECAP: LAST WEEK WE DID: ARDUINO IDE INTRO MAKE SURE BOARD AND USB PORT SELECTED UPLOAD PROCESS COVERED DATATYPES
8051 Microcontroller
 8051 Microcontroller The 8051, Motorola and PIC families are the 3 leading sellers in the microcontroller market. The 8051 microcontroller was originally developed by Intel in the late 1970 s. Today many
Arduino Programming. Arduino UNO & Innoesys Educational Shield
 Arduino Programming Arduino UNO & Innoesys Educational Shield www.devobox.com Electronic Components & Prototyping Tools 79 Leandrou, 10443, Athens +30 210 51 55 513, info@devobox.com ARDUINO UNO... 3 INNOESYS
Counter & LED (LED Blink)
") 1 T.R.E. Meeting #1 Counter & LED (LED Blink) September 17, 2017 Contact Info for Today s Lesson: President Ryan Muller mullerr@vt.edu 610-573-1890 Learning Objectives: Learn how to use the basics of Arduino
1 T.R.E. Meeting #1 Counter & LED (LED Blink) September 17, 2017 Contact Info for Today s Lesson: President Ryan Muller mullerr@vt.edu 610-573-1890 Learning Objectives: Learn how to use the basics of Arduino
University of Portland EE 271 Electrical Circuits Laboratory. Experiment: Arduino
 University of Portland EE 271 Electrical Circuits Laboratory Experiment: Arduino I. Objective The objective of this experiment is to learn how to use the Arduino microcontroller to monitor switches and
Robotics and Electronics Unit 5
 Robotics and Electronics Unit 5 Objectives. Students will work with mechanical push buttons understand the shortcomings of the delay function and how to use the millis function. In this unit we will use
Goal: We want to build an autonomous vehicle (robot)
") Goal: We want to build an autonomous vehicle (robot) This means it will have to think for itself, its going to need a brain Our robot s brain will be a tiny computer called a microcontroller Specifically
Goal: We want to build an autonomous vehicle (robot) This means it will have to think for itself, its going to need a brain Our robot s brain will be a tiny computer called a microcontroller Specifically
Robotics/Electronics Review for the Final Exam
 Robotics/Electronics Review for the Final Exam Unit 1 Review. 1. The battery is 12V, R1 is 400 ohms, and the current through R1 is 20 ma. How many ohms is R2? ohms What is the voltage drop across R1? V
Embedded Systems Lab Lab 1 Introduction to Microcontrollers Eng. Dalia A. Awad
 Embedded Systems Lab Lab 1 Introduction to Microcontrollers Eng. Dalia A. Awad Objectives To be familiar with microcontrollers, PIC18F4550 microcontroller. Tools PIC18F4550 Microcontroller, MPLAB software,
Intro to Arduino. Zero to Prototyping in a Flash! Material designed by Linz Craig and Brian Huang
 Intro to Arduino Zero to Prototyping in a Flash! Material designed by Linz Craig and Brian Huang Overview of Class Getting Started: Installation, Applications and Materials Electrical: Components, Ohm's
SquareWear Programming Reference 1.0 Oct 10, 2012
 Content: 1. Overview 2. Basic Data Types 3. Pin Functions 4. main() and initsquarewear() 5. Digital Input/Output 6. Analog Input/PWM Output 7. Timing, Delay, Reset, and Sleep 8. USB Serial Functions 9.
Microcontrollers for Ham Radio
 Microcontrollers for Ham Radio MARTIN BUEHRING - KB4MG MAT T PESCH KK4NLK TOM PERRY KN4LSE What is a Microcontroller? A micro-controller is a small computer on a single integrated circuit containing a
Introduction to Microcontrollers
 Introduction to Microcontrollers June 2017 Scott A. Theis W2LW Rev 5 ( 0 8 / 0 2 / 2 0 1 7 ) What s it all about How to get started What are some of the common controller options General introduction to
Introduction to Microcontroller Apps for Amateur Radio Projects Using the HamStack Platform.
 Introduction to Microcontroller Apps for Amateur Radio Projects Using the HamStack Platform www.sierraradio.net www.hamstack.com Topics Introduction Hardware options Software development HamStack project
Laboratory 1 Introduction to the Arduino boards
 Laboratory 1 Introduction to the Arduino boards The set of Arduino development tools include µc (microcontroller) boards, accessories (peripheral modules, components etc.) and open source software tools
keyestudio Keyestudio MEGA 2560 R3 Board
 Keyestudio MEGA 2560 R3 Board Introduction: Keyestudio Mega 2560 R3 is a microcontroller board based on the ATMEGA2560-16AU, fully compatible with ARDUINO MEGA 2560 REV3. It has 54 digital input/output
Project 17 Shift Register 8-Bit Binary Counter
 Project 17 Shift Register 8-Bit Binary Counter In this project, you re going to use additional ICs (Integrated Circuits) in the form of shift registers in order to drive LEDs to count in binary (I will
Physical Programming with Arduino
 CTA - 2014 Physical Programming with Arduino Some sample projects Arduino Uno - Arduino Leonardo look-alike The Board Arduino Uno and its cheap cousin from Borderless Electronics Mini - Breadboard typical
Ali Karimpour Associate Professor Ferdowsi University of Mashhad
 AUTOMATIC CONTROL SYSTEMS Ali Karimpour Associate Professor Ferdowsi University of Mashhad Main reference: Christopher T. Kilian, (2001), Modern Control Technology: Components and Systems Publisher: Delmar
Microcontrollers and Interfacing week 8 exercises
 2 HARDWARE DEBOUNCING Microcontrollers and Interfacing week 8 exercises 1 More digital input When using a switch for digital input we always need a pull-up resistor. For convenience, the microcontroller
INDUSTRIAL TRAINING:6 MONTHS PROGRAM TEVATRON TECHNOLOGIES PVT LTD
 MODULE-1 C Programming Language Introduction to C Objectives of C Applications of C Relational and logical operators Bit wise operators The assignment statement Intermixing of data types type conversion
Arduino Workshop. Overview. What is an Arduino? Why Arduino? Setting up your Arduino Environment. Get an Arduino based board and usb cable
 Arduino Workshop Overview Arduino, The open source Microcontroller for easy prototyping and development What is an Arduino? Arduino is a tool for making computers that can sense and control more of the
EXPERIMENT 7 Please visit https://www.arduino.cc/en/reference/homepage to learn all features of arduino before you start the experiments
 EXPERIMENT 7 Please visit https://www.arduino.cc/en/reference/homepage to learn all features of arduino before you start the experiments TEMPERATURE MEASUREMENT AND CONTROL USING LM35 Purpose: To measure
Arduino. part A. slides rel. 4.3 free documentation. Renato Conte Arduino - 1 /82 -
 Arduino part A slides rel. 4.3 free documentation 2015 Renato Conte Arduino - 1 /82 - Part A Contents What is Arduino? What is an embedded system? The microcontroller Atmega168 / 328 The Arduino board
New APIs and Hacks. Servo API. Chapter 4. The Theory versus Practice
 Chapter 4 New APIs and Hacks The challenge when Intel Galileo was designed was to create a board that would be compatible with Arduino headers and reference language using only the Quark microprocessor,
ELCT708 MicroLab Session #1 Introduction to Embedded Systems and Microcontrollers. Eng. Salma Hesham
 ELCT708 MicroLab Session #1 Introduction to Embedded Systems and Microcontrollers What is common between these systems? What is common between these systems? Each consists of an internal smart computer
How to Use an Arduino
 How to Use an Arduino By Vivian Law Introduction The first microcontroller, TMS-1802-NC, was built in 1971 by Texas Instruments. It owed its existence to the innovation and versatility of silicon and the
Alessandra de Vitis. Arduino
 Alessandra de Vitis Arduino Arduino types Alessandra de Vitis 2 Interfacing Interfacing represents the link between devices that operate with different physical quantities. Interface board or simply or
CN310 Microprocessor Systems Design
 CN310 Microprocessor Systems Design Microcontroller Nawin Somyat Department of Electrical and Computer Engineering Thammasat University Outline Course Contents 1 Introduction 2 Simple Computer 3 Microprocessor
Serial.begin ( ); Serial.println( ); analogread ( ); map ( );
; Serial.println( ); analogread ( ); map ( );") Control and Serial.begin ( ); Serial.println( ); analogread ( ); map ( ); A system output can be changed through the use of knobs, motion, or environmental conditions. Many electronic systems in our world
Control and Serial.begin ( ); Serial.println( ); analogread ( ); map ( ); A system output can be changed through the use of knobs, motion, or environmental conditions. Many electronic systems in our world
Figure 1.1: Some embedded device. In this course we shall learn microcontroller and FPGA based embedded system.
 Course Code: EEE 4846 International Islamic University Chittagong (IIUC) Department of Electrical and Electronic Engineering (EEE) Course Title: Embedded System Sessional Exp. 1: Familiarization with necessary
<Table of content> <Parts and description> <Circuit board Guide> <Pins> <Basics of Coding> <Intro to Arduino> <Intro> <Downloading Arduino IDO>
 http://www.arduino.cc/
Arduino Uno. Power & Interface. Arduino Part 1. Introductory Medical Device Prototyping. Digital I/O Pins. Reset Button. USB Interface.
 Introductory Medical Device Prototyping Arduino Part 1, http://saliterman.umn.edu/ Department of Biomedical Engineering, University of Minnesota Arduino Uno Power & Interface Reset Button USB Interface
Project 16 Using an L293D Motor Driver IC
 Project 16 Using an L293D Motor Driver IC In the previous project, you used a transistor to control the motor. In this project, you are going to use a very popular motor driver IC called an L293D. The
1/Build a Mintronics: MintDuino
 1/Build a Mintronics: The is perfect for anyone interested in learning (or teaching) the fundamentals of how micro controllers work. It will have you building your own micro controller from scratch on
Arduino and Matlab for prototyping and manufacturing
 Arduino and Matlab for prototyping and manufacturing Enrique Chacón Tanarro 11th - 15th December 2017 UBORA First Design School - Nairobi Enrique Chacón Tanarro e.chacon@upm.es Index 1. Arduino 2. Arduino
Arduino Course. Technology Will Save Us - Tim Brooke 10th August Friday, 9 August 13
 Arduino Course Technology Will Save Us - Tim Brooke 10th August 2013 Arduino Projects http://www.instructables.com/id/20-unbelievable-arduino-projects/ Blink /* Blink Turns on an LED on for one second,
The Arduino IDE and coding in C (part 1)
") The Arduino IDE and coding in C (part 1) Introduction to the Arduino IDE (integrated development environment) Based on C++ Latest version ARDUINO IDE 1.8.3 can be downloaded from: https://www.arduino.cc/en/main/software
The Arduino IDE and coding in C (part 1) Introduction to the Arduino IDE (integrated development environment) Based on C++ Latest version ARDUINO IDE 1.8.3 can be downloaded from: https://www.arduino.cc/en/main/software
Ali Karimpour Associate Professor Ferdowsi University of Mashhad
 AUTOMATIC CONTROL SYSTEMS Ali Karimpour Associate Professor Ferdowsi University of Mashhad Main reference: Christopher T. Kilian, (2001), Modern Control Technology: Components and Systems Publisher: Delmar
Arduino Programming and Interfacing
 Arduino Programming and Interfacing Stensat Group LLC, Copyright 2017 1 Robotic Arm Experimenters Kit 2 Legal Stuff Stensat Group LLC assumes no responsibility and/or liability for the use of the kit and
GOOD MORNING SUNSHINE
 Item 11: Good Morning Sunshine Monday, 15 October 2018 12:30 PM GOOD MORNING SUNSHINE EXPLORE WALT: definition and decomposition of complex problems in terms of functional and non-functional requirements
Imperativ Programming. morning (again) Jens Dalsgaard Nielsen Aalborg University (1/24)
 Jens Dalsgaard Nielsen Aalborg University (1/24)") Imperativ Programming morning (again) Jens Dalsgaard Nielsen (jdn@es.aau.dk) Aalborg University (1/24) message Changed timing today Jens Dalsgaard Nielsen (jdn@es.aau.dk) Aalborg University (2/24) Jens
Imperativ Programming morning (again) Jens Dalsgaard Nielsen (jdn@es.aau.dk) Aalborg University (1/24) message Changed timing today Jens Dalsgaard Nielsen (jdn@es.aau.dk) Aalborg University (2/24) Jens
Arduino 07 ARDUINO WORKSHOP 2007
 ARDUINO WORKSHOP 2007 PRESENTATION WHO ARE WE? Markus Appelbäck Interaction Design program at Malmö University Mobile networks and services Mecatronics lab at K3, Malmö University Developer, Arduino community
micro:bit Lesson 2. Controlling LEDs on Breadboard
 micro:bit Lesson 2. Controlling LEDs on Breadboard Created by Simon Monk Last updated on 2018-03-09 02:39:14 PM UTC Guide Contents Guide Contents Overview Parts BBC micro:bit Half-size breadboard Small
PDF of this portion of workshop notes:
 PDF of this portion of workshop notes: http://goo.gl/jfpeym Teaching Engineering Design with Student-Owned Digital and Analog Lab Equipment John B. Schneider Washington State University June 15, 2015 Overview
Arduino provides a standard form factor that breaks the functions of the micro-controller into a more accessible package.
 About the Tutorial Arduino is a prototype platform (open-source) based on an easy-to-use hardware and software. It consists of a circuit board, which can be programed (referred to as a microcontroller)
MT2 Introduction Embedded Systems. MT2.1 Mechatronic systems
 MT2 Introduction Embedded Systems MT2.1 Mechatronic systems Mechatronics is the synergistic integration of mechanical engineering, with electronics and intelligent computer control in the design and manufacturing
University of Hull Department of Computer Science C4DI Interfacing with Arduinos
 Introduction Welcome to our Arduino hardware sessions. University of Hull Department of Computer Science C4DI Interfacing with Arduinos Vsn. 1.0 Rob Miles 2014 Please follow the instructions carefully.
Embedded programming, AVR intro
 Applied mechatronics, Lab project Embedded programming, AVR intro Sven Gestegård Robertz Department of Computer Science, Lund University 2017 Outline 1 Low-level programming Bitwise operators Masking and
Embedded Systems. PIC16F84A Internal Architecture. Eng. Anis Nazer First Semester
 Embedded Systems PIC16F84A Internal Architecture Eng. Anis Nazer First Semester 2017-2018 Review Computer system basic components? CPU? Memory? I/O? buses? Instruction? Program? Instruction set? CISC,
Digital I/O Operations
 Digital I/O Operations CSE0420 Embedded Systems By Z. Cihan TAYŞİ Outline Digital I/O Ports, Pins Direction Pull-up & pull-down Arduino programming Digital I/O examples on Arduino 1 Digital I/O Unlike
INTERFACING HARDWARE WITH MICROCONTROLLER
 INTERFACING HARDWARE WITH MICROCONTROLLER P.Raghavendra Prasad Final Yr EEE What is a Microcontroller? A microcontroller (or MCU) is acomputer-on-a-chip. It is a type of microprocessor emphasizing self-
Arduino Uno. Arduino Uno R3 Front. Arduino Uno R2 Front
 Arduino Uno Arduino Uno R3 Front Arduino Uno R2 Front Arduino Uno SMD Arduino Uno R3 Back Arduino Uno Front Arduino Uno Back Overview The Arduino Uno is a microcontroller board based on the ATmega328 (datasheet).
CARTOOINO Projects Book
 1 CARTOOINO Projects Book Acknowledgement Acknowledgement This Cartooino Projects Book is a cartoon based adaptation of the Arduino Projects Book. The Cartooino Project Book was developed by the GreenLab
TEVATRON TECHNOLOGIES PVT. LTD Embedded! Robotics! IoT! VLSI Design! Projects! Technical Consultancy! Education! STEM! Software!
 Summer Training 2016 Advance Embedded Systems Fast track of AVR and detailed working on STM32 ARM Processor with RTOS- Real Time Operating Systems Covering 1. Hands on Topics and Sessions Covered in Summer
ARDUINO MEGA INTRODUCTION
 ARDUINO MEGA INTRODUCTION The Arduino MEGA 2560 is designed for projects that require more I/O llines, more sketch memory and more RAM. With 54 digital I/O pins, 16 analog inputs so it is suitable for
Earthshine Design Arduino Starters Kit Manual - A Complete Beginners Guide to the Arduino. Project 15. Shift Register 8-Bit Binary Counter
 Project 15 Shift Register 8-Bit Binary Counter 84 Project 15 - Shift Register 8-Bit Binary Counter Right, we are now going to delve into some pretty advanced stuff so you might want a stiff drink before
Microcontrollers and Interfacing week 10 exercises
 1 SERIAL PERIPHERAL INTERFACE (SPI) HARDWARE Microcontrollers and Interfacing week 10 exercises 1 Serial Peripheral Interface (SPI) hardware Complex devices (persistent memory and flash memory cards, D/A
PIC Microcontroller Introduction
 PIC Microcontroller Introduction The real name of this microcontroller is PICmicro (Peripheral Interface Controller), but it is better known as PIC. Its first ancestor was designed in 1975 by General Instruments.
Laboratory 10. Programming a PIC Microcontroller - Part II
 Laboratory 10 Programming a PIC Microcontroller - Part II Required Components: 1 PIC16F88 18P-DIP microcontroller 1 0.1 F capacitor 3 SPST microswitches or NO buttons 4 1k resistors 1 MAN 6910 or LTD-482EC
Computer Hardware Requirements for ERTSs: Microprocessors & Microcontrollers
 Lecture (4) Computer Hardware Requirements for ERTSs: Microprocessors & Microcontrollers Prof. Kasim M. Al-Aubidy Philadelphia University-Jordan DERTS-MSc, 2015 Prof. Kasim Al-Aubidy 1 Lecture Outline:
MAKE & COLLABORATE: SECRET KNOCK LOCK
 MAKE & COLLABORATE: SECRET KNOCK LOCK A project from Arduino Project Handbook: 25 Practical Projects to Get You Started Project 9: Secret KnocK LocK For centuries clandestine groups have used Secret KnocKS
WALT: definition and decomposition of complex problems in terms of functional and non-functional requirements
 Item 5: It's Totally Random Monday, 5 October 08 :5 PM IT'S TOTALLY RANDOM EXPLORE WALT: definition and decomposition of complex problems in terms of functional and non-functional requirements WILF - Defined
Memory Architectures. Hongwei Zhang. Chapter 9
 Chapter 9 Memory Architectures Hongwei Zhang http://www.cs.wayne.edu/~hzhang/ Ack.: this lecture is prepared in part based on slides of Lee, Sangiovanni-Vincentelli, and Seshia. Role of Memory in Embedded
1 Overview. 2 Basic Program Structure. 2.1 Required and Optional Parts of Sketch
 Living with the Lab Winter 2015 What s this void loop thing? Gerald Recktenwald v: February 7, 2015 gerry@me.pdx.edu 1 Overview This document aims to explain two kinds of loops: the loop function that