TOC F1 Operations Manual
|
|
|
- Adelia Rich
- 5 years ago
- Views:
Transcription

1 TOC F1 Operations Manual - 1 -
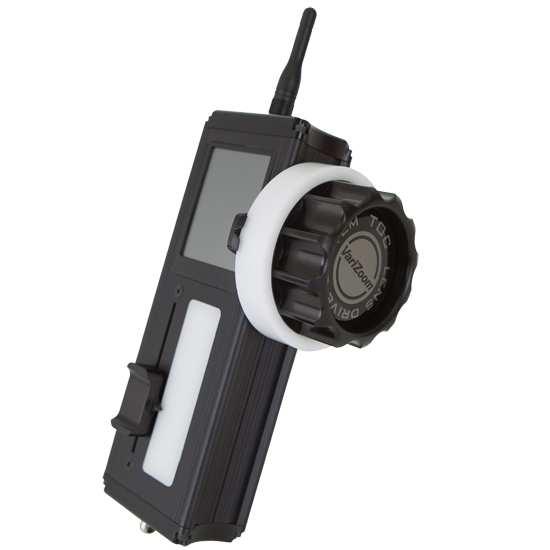
2 General Description The TOC F1 is a single channel wireless lens control system. The system can be used on most broadcast or cinema lenses. The TOC F1 includes a hand held controller/transmitter, rechargeable battery, lens drive motor, single channel receiver, universal gear set, and battery charger Major Components Motor Hand Unit Battery Charger Gear Set Receiver Battery - 2 -


3 1. Setup The TOC is provided with various gears to fit almost any broadcast or cinema lens. Select the proper gear pitch for the proper lens ring. The gears can also be switched to either side of the motor if needed. Warning: If you are using the TOC with a servo powered lens, make absolutely sure that the lens servo for the function you re trying to control is always deactivated, otherwise the lens servos can end up fighting the TOC motors resulting in severe damage to either the lens or the TOC system. Please be aware that some full auto modes may override the lens servo switches. Check with the lens or camera manufacturer s user manual to ensure that this won t interfere. POWERING THE RECEIVER: Only use a VariZoom-supplied cable to power the TOC receiver. It is very important that you power the receiver with a maximum of 24VDC regulated (actual measured voltage some nominal unregulated 24VDC sources can actually go as high as 34VDC). The acceptable range for voltage is VDC if you go higher, the unit will be damaged severely. Before connecting power, mount the TOC motors onto 15mm or 19mm mattebox rods. The motors can be mounted either vertically or horizontally. Side view of TOC motor mounted vertically Front view of TOC motor mounted horizontally Dovetail clamp position example 1 Dovetail clamp position example 2-3 -
4 After the motor has been mounted on the rod, secure the gear against the proper lens ring and tighten the dovetail clamp. Mount your TOC receiver and attach the antenna. First plug the lens motor into TOC receiver (yellow to yellow) Then plug power from camera into TOC receiver (red to red). Do not plug lens motor into receiver while it is already powered up this is called hot swapping and it can lead to minor malfunctions always plug power into receiver LAST. Now put the battery in the hand unit, attach the antenna and turn on the power by holding down the power button for at least two seconds. All five LED lights on both the receiver and the hand unit should now be solid orange. 1 st & 2 nd LED = connection to hand unit; 3 rd 4 th & 5 th LEDs = signal strength meter LEDs: 1 st LED = connection to receiver; 2 nd LED = hand unit transmitting; 3 rd 4 th & 5 th LEDs = signal strength meter Assuming your lens has mechanical end stops (like most broadcast or cine lenses), the TOC motors will calibrate most accurately in Auto mode. Note: If using a lens that doesn t have end stops (e.g., DSLR lenses), you must manually calibrate the lens motors. This will be addressed in chapter 3. To execute auto calibration from the hand unit, select Calibrate from the home menu, then select Automatic. The motor will start moving automatically, and will also automatically stop once resistance is met. Do not touch the lens motor during calibration. Also note that the power required to move the lens rings properly may vary depending on the lens used. The system defaults to 50% power and can be adjusted. (see page 8 for more details) - 4 -
5 The lens motor will then move to the position at which the knob is set. The lens motor is now ready for use, and will move according to the position of the knob on the hand controller. Note: If you turn off power to the receiver, it will store the calibration set in the last use. As long as you don t move the motor or lens, the calibration will be valid. If you have to move the motor and lens from their last position, recalibrate. Basic Operation The TOC has a touch screen that will allow for easy menu navigation. Most operation will be done from this screen. To reset the TOC parameters to their defaults, select System from the home menu. Then select Reset All. It will then ask you to confirm. Select OK, and then all parameters will be set to default. This only applies to lens/motor limits, and motor speed/smoothing settings. Lens calibration is not affected by the system reset. The touch screen allows for easy adjustments and menu navigation. In the rare event that the touch screen becomes unusable, there are five buttons on the top of the controller next to the antenna (see below) that can be used as backup for navigation. Menu Up Enter Return to Home screen Menu Down Power on/off - 5 -

6 1. Home Screen From the Home Screen, you can monitor the current lens position as well as enter the Control, Calibrate, Setup, and System menu screens. 2. Control Menu From the Control menu screen, you can set motor or knob limits, reverse motor or knob response direction, and adjust smoothing. To set a limit, simply move the knob to the where you want the limit, and tap the set limit button. Once a limit is set, the Set Limit button will then read Clear Limit. Tap this button to clear the limit. Motor and knob response direction is changed by selecting the Dir+ button located under either Motor or Knob. This will change the button to be Dir-. Select it again to change it back. Smoothing is adjusted by selecting the set button next to the smooth indicator. Adjust the Lens Smoothing to the desired smoothing level, then press OK Note: The more smoothing you have, the more delay will show between motor and knob/slider response. Press the button in the top left corner of the screen to return to the Home Screen
7 3. Calibrate Menu The Calibrate menu is where you will calibrate the motor to the current lens that you are using. For all lenses that have stop points (most ENG and cinema lenses), after you have mounted the motor to the lens tap the Automatic button, and the motor will automatically move to both ends of the lens range, and then the lens is calibrated. For lenses that don t have stop points (most DSLR lenses), manual calibration is required. Tap Manual to enter the calibrate screen (as shown to the left). Move the slider to the center position as indicated on the screen a center mark will appear and further instructions will be shown on the screen. The slider will now be used to run the motor until the first end point of the lens is reached. The farther you move the slider, the faster the motor will go, so when you get close to the stopping point, slow the motor down by moving the slider back toward the center position the motor stops moving when the slider is at the center position. If you move the motor too far, you can reverse it by moving the slider in the opposite direction past the center position this will move the lens back (stop the motor by returning slider to center position). When the first end point is reached on the lens, tap the OK button. Now move the slider in the opposite direction to find the other end point for the lens. Stop the motor at the correct end point for the lens, and tap the OK button again. The lens motor is now calibrated, and you will automatically be returned to the home screen - 7 -

8 4. Setup Menu The setup menu is where you can adjust power feedback, Com Mode, Backlash compensation, and Controller input. Power Feedback will allow you to adjust the motor output power during auto calibration. Some lenses require more force to move the lens rings than others. If the motor power is set too low, then the motor will not have enough force to push the lens gear to its limits, and result in incorrect calibration. If the motor power is set too high, the motor will exert too much force, and potentially slip off the lens ring, also resulting in incorrect calibration. The system defaults to 50.1, and this is where it will return if the Reset All button is pressed. Com Mode will change how the hand unit will operate. Tap the button to change how the hand unit will operate. Wireless will allow the hand unit and receiver to communicate wirelessly. Wired will disable the wireless card on the hand unit, and allow the hand unit and receiver to communicate through an optional communication cable (that will also provide power to the hand unit, also allowing the hand unit to be powered without a battery). Upgrade will also disable the wireless card, as well as all communication between the hand unit and receiver. This mode is only used when making firmware upgrades, and requires a LEMO to serial cable. Motor Backlash is used to compensate for backlash in the lens rings. Not all lenses have backlash, and this is only necessary if the lens lurches when changing direction. Backlash should be kept to a minimum unless necessary. Input Controller simply allows you to switch between focus knob operation or iris slider operation. Tap the button for the input controller that you wish to use. Most operators will use the focus knob, but iris slider is available if you choose to use it

9 5. System Menu The system menu is where you can monitor battery output, as well as adjust screen brightness, toggle LED s on/off, or reset all parameters if needed. If screen brightness is adjust to 100, it will enter daylight mode, which will change the color scheme to be more visible in extreme brightness. 6. Troubleshooting A) Knob is not responding: Solution 1: Make sure the Input Select is set to Knob (page 8) Solution 2: Disconnect power from hand unit and receiver, then reconnect Solution 3: The knob limits and/or lens limits may have been set to zero range or limited in one direction. Under the Control menu, check to see if any of the buttons read Clear Limit, and tap the button to clear the limits. Solution 4: Under the System menu, tap the Reset All button. This will clear all limits. Solution4: Check to make sure the lens motor didn t get set to zero calibration while being manually calibrated. Check this by re-calibrating the lens motor (see Chapter 5) B) -General Malfunctions: The most common cause of malfunctions is hot swapping the motors (i.e., plugging the motor (yellow plug) into the receiver while it is already connected to its power source (red plug)) Solution = Don t hot swap the motors unplug and re-plug the power to the receiver (red plug) in other words, always make sure the motor is plugged in before the power. C) -Auto Calibrate Mode not functioning properly: Solution 1 = Using an AC adapter? If so, try switching to battery power. Solution 2 = Unplug the power cable (red) and re-plug. Solution 3 = Use Manual Calibrate Mode (page 7) - 9 -
10 D) After Calibrating, the motor does not reach all the way to end of the lens rotation (i.e., it doesn t hit or the nearest focal point): Problem: The focus knob is not properly calibrated Solution: You can calibrate the knob (and the slider) by accessing the hidden knob calibrate menu. Enter the Calibrate menu and once there, depress the two right mechanical buttons on the top of the unit (near the antenna) and while holding these, press the single left mechanical button nearest the touchscreen. This should pull up the calibrate knobs menu. Select knob for the focus knob and it will instruct you to turn the knob all the way in both directions so it can calibrate the knob s electrical range. Once you ve turned the knob all the way in both directions, press OK. You can do the same calibration sequence with the slider if necessary. E) -Motor Moves in Wrong Direction: Solution = Reverse the Motor/Knob (page 6) F) The Motor arrow is lagging behind the Knob arrow on the LCD: This is not a problem - it is a feature. The higher the smoothing is set, the greater the lag will be. G) The Motor has stopped responding: If the red light on the side of the receiver is fully illuminated with no green light, the motor has stalled. Solution 1 = Try disconnecting and reconnecting power to the receiver. Solution 2 = If that doesn t work, you may need to disengage the motor from the lens ring, move the lens ring to the middle of its range and cycle the power again. Re-engage the motor to the lens ring and recalibrate this should always solve the issue, but if this is the only solution, you may want to consider turning the motor power down a bit. Solution 3 = Check Com Mode under the Setup menu, and make sure that it is set to Wireless if you re trying to use it in wireless mode, or set to Wired mode if you re trying to use it in wired mode. Note: Reset All will default the Com Mode to be set to Wireless. H) Motor Moves on its own or Unwanted Jitter in the motor movement Turn the backlash setting down and try turning up the smoothing level. Warning: If you are using the TOC with a servo powered lens, make absolutely sure that the lens servo for the function you re trying to control is always deactivated, otherwise the lens servos can end up fighting the TOC motors resulting in severe damage to either the lens or the TOC system. Please be aware that some full auto modes may override the lens servo switches. More questions? Give us a call at or visit the website for updated instruction manuals
TOC DX1-K Operations Manual
 TOC DX1-K Operations Manual - 1 - General Description The TOC DX1-K is a single channel wireless lens control system. The system can be used on most broadcast or cinema lenses. The TOC DX1-K includes a
Boxer HD-2X Motorized Pan Tilt Head (P-BXR-HD-2X)
") Boxer HD-2X Motorized Pan Tilt Head (P-BXR-HD-2X) I N STR UC TI ON MANUAL All rights reserved No part of this document may be reproduced, stored in a retrieval system, or transmitted by any form or by
Boxer HD-2X Motorized Pan Tilt Head (P-BXR-HD-2X) I N STR UC TI ON MANUAL All rights reserved No part of this document may be reproduced, stored in a retrieval system, or transmitted by any form or by
Focus Command Hand UNIT MANUAL
 1. DESCRIPTION OF THE FRONT PANEL To change the unit of measure (feets/meters). PCMCIA board for radio Focus Motor Control Zoom Motor Control Focus-Iris-Zoom selection Iris Motor Control To change the
If you are missing any of the following items, please contact Stanton Video immediately (602)
") RIGHT ANGLE FOCUS Jan 03 If you are missing any of the following items, please contact Stanton Video immediately (602) 493-9505 1. Right Angle Focus Servo 2. Servo End Cap 3. Lens Gears (32 pitch, 48 pitch,.6
RIGHT ANGLE FOCUS Jan 03 If you are missing any of the following items, please contact Stanton Video immediately (602) 493-9505 1. Right Angle Focus Servo 2. Servo End Cap 3. Lens Gears (32 pitch, 48 pitch,.6
Quick Notes for Impero Versions
 Quick Notes for Impero Versions 1.4 2.1 IMPORTANT: These notes are specific to Birger provided Imperos only, containing Birger provided firmware. They do not apply to Imperos received from View Factor
What s in the Box? REAR VIEW SAFETY
 TM 1 What s in the Box? 1 Full HD Color Infra-red Weather Proof Camera 1 Full HD 7" TFT LCD Color Monitor w/monitor Mount 1 Power Harness 1 66 Camera Cable 1 Power Connection Wire 1 Screw Kit for installation
USB-FC-110 LYNX USB FOCUS CONTROLLER USER MANUAL
 USB-FC-110 LYNX USB FOCUS CONTROLLER USER MANUAL 2 INTRODUCTION Thank you for choosing the Elvid Lynx USB Focus Controller. The Elvid Lynx gives you remote control over focus and exposure (including shutter
M20 Metallurgical Microscope User s Manual. Fein.
 M20 Metallurgical Microscope User s Manual info@feinoptic.com M20 Microscope Components Lamp Housing C-Mount Adapter Eyepieces Analyzer Objective Lens Coarse Focus Mechanical Stage Stage X-Y Control Fine
Master Grips SUP 2.0 Software Update Package 2.0.0:315
 Master Grips SUP 2.0 Software Update Package 2.0.0:315 RELEASE NOTES Date: December 10 th, 2018 Table of Contents A. Introduction... 3 B. Update Instructions... 3 How to get a Software Update Package...
PD1 & PD1-HT QUICKSTART GUIDE. Remote Air Follow Focus System / High Torque System. What s Included
 PD & PD-HT Remote Air Follow Focus System / High Torque System QUICKSTART GUIDE What s Included x Wireless Remote x Receiver/Motor Controller x Follow Focus Motor x P-Tap Power cord x USB Charging Cable
Software Setup Instructions for the Foster Control System used in the Explora Dome Observatories
 Software Setup Instructions for the Foster Control System used in the Explora Dome Observatories Contents Pages 3 & 4 The new tic counter system & home position sensor Page 5 Control Boxes Pages 6-8 Down
v1.1 BETA Release January 2017 CONTENTS Release Notes 1 Gamepad Mode 4 FIZ via MIMIC 5
 MōVI PRO v1.1 BETA Release January 2017 CONTENTS Release Notes 1 Gamepad Mode 4 FIZ via MIMIC 5 RELEASE NOTES MIMIC New Feature: Gamepad Mode New Feature: FIZ Control New Feature: Charging indicator via
Installing the Focus Motor
 The MicroTouch Wireless Autofocuser is designed to work with Feathertouch Focusers from Starlight Instruments. It allows automatic focusing with CCD and DSLR cameras. Included is FocusMax software to automatically
NEX-FS700 V3.10 Upgrade procedure NEX-FS700 V3.10. Upgrade procedure for Win and Mac. November abc
 NEX-FS700 V3.10 Upgrade procedure for Win and Mac New features With V3.10 firmware upgrade, the following functions will be available for your NEX- FS700 camcorder: 1. Distortion correction of E-mount
X-CAM A10-3H 3 Axis Gimbal for GOPRO. User Manual ( V2.00 )
") X-CAM A10-3H 3 Axis Gimbal for GOPRO User Manual ( V2.00 ) The X-CAM A10-3H 3 Axis Gimbal has been setup and calibrated for use with GOPRO cameras, it is ready to use straight from the box. Specifications:
X-CAM A10-3H 3 Axis Gimbal for GOPRO User Manual ( V2.00 ) The X-CAM A10-3H 3 Axis Gimbal has been setup and calibrated for use with GOPRO cameras, it is ready to use straight from the box. Specifications:
ProScale LCD Readout Quick Start Guide
 ProScale LCD Readout Quick Start Guide This Guide includes basic operation instructions for 950, General Purpose, Basic & In-Panel LCD Readouts For the Complete OPERATION Manual go to www.proscale.com/manuals.htm
Pegasus Astro Dual Motor Focus Controller v2.0
 Pegasus Astro Dual Motor Focus Controller v2.0 Thank you for choosing Pegasus Astro - Dual Motor Focus Controller v2.0 (DMFC) Introduction The evolution of technology in astronomy requires a system which
FILM & VIDEO SETUP MANUAL
 FILM & VIDEO SETUP MANUAL Tyler Nose Mount II for Film or Video cameras. PLEASE RETURN THIS MANUAL WITH EQUIPMENT This manual is available for download from our web site. Tyler Camera Systems 14218 Aetna
Instruction Manual. Gold Pan Tilt Head with 12V Joystick Control Box (PT-GOLD)
") Instruction Manual Gold Pan Tilt Head with 12V Joystick Control Box (PT-GOLD) All rights reserved No part of this document may be reproduced, stored in a retrieval system, or transmitted by any form or
Instruction Manual Gold Pan Tilt Head with 12V Joystick Control Box (PT-GOLD) All rights reserved No part of this document may be reproduced, stored in a retrieval system, or transmitted by any form or
THE CONTROLLER. e) f) g) h) i) j) k) a) Menu Button Navigate backwards to the previous menu with this button.
 f) g) h) i) j) k) a) Menu Button Navigate backwards to the previous menu with this button.") SECOND SHOOTER USER GUIDE TABLE OF CONTENTS The Controller... 2 Getting Started: Hardware Set-Up... 3 - Slider Motor... 3-5 - Pan & Tilt Axis... 6 - Intervalometer Connect... 6 Powering Up... 7 Setting
SECOND SHOOTER USER GUIDE TABLE OF CONTENTS The Controller... 2 Getting Started: Hardware Set-Up... 3 - Slider Motor... 3-5 - Pan & Tilt Axis... 6 - Intervalometer Connect... 6 Powering Up... 7 Setting
Pegasus Astro Stepper Motor Focus Controller v1.x
 Pegasus Astro Stepper Motor Focus Controller v1.x Thank you for choosing Pegasus Astro - Stepper Motor Focus Controller v1.x (SMFC) Introduction The evolution of technology in astronomy requires a system
MO-SYS L 40-3rd Axis Quick Set-up Guide
 MO-SYS L 40-3rd Axis Quick Set-up Guide WILLIAM F. WHITE INTERNATIONAL INC. Manual Version 1.0 Questions or concerns, please contact Michael Darby 416.707.1549, mdarby@gmail.com MO-SYS L 40 3rd Axis Intro
Pegasus Astro Dual Motor Focus Controller v3.0. Thank you for choosing our Dual Motor Focus Controller v3.0 (DMFCv3)
") Pegasus Astro Dual Motor Focus Controller v3.0 Thank you for choosing our Dual Motor Focus Controller v3.0 (DMFCv3) Pegasus Astro Copyright 2016 Documentation: Dec/16 Introduction The evolution of technology
Pegasus Astro Dual Motor Focus Controller v3.0 Thank you for choosing our Dual Motor Focus Controller v3.0 (DMFCv3) Pegasus Astro Copyright 2016 Documentation: Dec/16 Introduction The evolution of technology
CORTEX Microcontroller and Joystick User Guide
 This is a User Guide for using the VEX CORTEX Microcontroller and VEX Joystick. Refer to the VEX Wiki (http://www.vexforum.com/wiki/index.php/vex_cortex_microcontroller) for updates to this document. 1.
DESIGNED & MANUFACTURED by FLOATCAM
 DESIGNED & MANUFACTURED by FLOATCAM DC-Slider Motion Control PN377719 Package Includes: Motor Microprocessor Motor to Microprocess or Remote Controller Connection Cable AC Power Cable w/north American
ZYX User Manual V Revision
 ZYX User Manual V.00 206.07.26 Revision Contents Warning and Disclaimer... 3 I. Product Introduction... 4 II. Product List... 5. Package Contents... 5 III. Mounting & Configuration... 6. Gimbal Controller
Camtraptions PIR Motion Sensor v3 Manual. Firmware Version 2.2
 Camtraptions PIR Motion Sensor v3 Manual Firmware Version 2.2 Index Index... 2 What is a PIR Motion Sensor?... 3 What is new in Version 3?... 3 Primary Controls... 4 Dials... 4 Switches... 4 On-off Switch...
A novel form of cinematic expression U S E R M A N UA L
 CINEFADE A novel form of cinematic expression U S E R M A N UA L Oliver Janesh Christiansen Founder Welcome to a novel form of cinematic expression. Cinefade allows filmmakers to vary depth of field in
VEX ARM Cortex -based Microcontroller and VEXnet Joystick User Guide
 1. VEX ARM Cortex -based Microcontroller and VEXnet Joystick Pairing Procedure: a. The Joystick must first be paired to the VEX ARM Cortex -based Microcontroller before they will work using VEXnet Keys.
v1.1 Release CONTENTS Release Notes 3 Gamepad Mode 6 FIZ via MIMIC
 M ō V I P R O v1.1 Release CONTENTS Release Notes 3 Gamepad Mode 6 FIZ via MIMIC MARCH 2017 7 SOFTWARE VERSIONS Please verify that all Freefly Products are up to date, v1.0 is not fully compatible with
PDL & PDL-HT PD Movie Remote Live & PD Remote Live High Torque
 PDL & PDL-HT PD Movie Remote Live & PD Remote Live High Torque QUICKSTART GUIDE What s Included 1 x Multi-control Handgrip 1 x Follow Focus Motor (Check One) 1 x Motor Drive Cable 1 x Adjustable Pan Handle
WHAT YOU LL NEED TABLE OF CONTENTS. Second Shooter Plus Slider Motor Mount Camera Control Cable (or external intervalometer)
") SECOND SHOOTER PLUS USER GUIDE WHAT YOU LL NEED Second Shooter Plus Slider Motor Mount Camera Control Cable (or external intervalometer) TABLE OF CONTENTS The Controller... 2 Getting Started: Hardware
SECOND SHOOTER PLUS USER GUIDE WHAT YOU LL NEED Second Shooter Plus Slider Motor Mount Camera Control Cable (or external intervalometer) TABLE OF CONTENTS The Controller... 2 Getting Started: Hardware
Cinema Pro-K5. Operations Manual
 Cinema Pro-K5 Operations Manual BEFORE YOU START, READ THESE WARNINGS 1) NEVER PLUG POWER DEVICES OTHER THAN THOSE SUPPLIED BY VARIZOOM INTO THE SYSTEM. ONLY USE VARIZOOM POWER SOURCES AND CABLES. USING
WARNING NOT ZTC Controls Ltd
 WARNING If you fail to read the installation instructions properly it is possible that you could accidentally damage your ZTC unit. Such damage is NOT covered by our guarantee. So to prevent avoidable
Gazer VI700A-NTG45 and VI700W-NTG45 INSTALLATION MANUAL
 Gazer VI700A-NTG45 and VI700W-NTG45 INSTALLATION MANUAL Contents List of compatible cars with preinstalled stock Mercedes Command Online NTG 4.5 and Mercedes Audio 20 NTG 4.5 multimedia interfaces... 3
2017 / 18 PRODUCT GUIDE
 2017 / 18 PRODUCT GUIDE In only a decade since the company s inception as a camera stabilisation specialist, Movcam has grown to be a world leader in a wide range of professional camera accessories including:
Jr. Pan Tilt Head (PT-JR) Instruction Manual
 Instruction Manual") 1 Jr. Pan Tilt Head (PT-JR) Instruction Manual 2 At Proaim, our goal is to ensure 100% Customer Satisfaction in all that we do. We back our sales with a 1 year warranty from the date of purchase and work
1 Jr. Pan Tilt Head (PT-JR) Instruction Manual 2 At Proaim, our goal is to ensure 100% Customer Satisfaction in all that we do. We back our sales with a 1 year warranty from the date of purchase and work
Nearus USB2.0 Camera Manual NU-350-USB2PTZ-B
 Nearus USB2.0 Camera Manual NU-350-USB2PTZ-B Safety Tips Please read this manual carefully before installing the camera. Keep the camera away from violent vibration, physical stress, moisture, extreme
HOME SECURITY KIT. USER MANUAL SMART PROTECTION WITH THE ALL-IN-ONE SOLUTION. SMART WINDOW SENSOR SMART POWER SOCKET SMART MOTION SENSOR SMART IP CAM
 HOME SECURITY KIT. SMART PROTECTION WITH THE ALL-IN-ONE SOLUTION. SMART WINDOW SENSOR SMART POWER SOCKET SMART IP CAM SMART MOTION SENSOR USER MANUAL SL-900100/900111 HOME SECURITY KIT A/B SHORT INSTRUCTION
ASI Systems ML5740A Series
 ML5740A Series Electric Linear Valve Actuators Non-Spring Return APPLICATION The ML5740A series actuators operate standard ASI Systems valves in heating, ventilating and air conditioning (HVAC) applications.
MicroBot Push User Guide
 MicroBot Push User Guide Troubleshooting 24 My Microbot App does not detect my MicroBot Push 24 MicroBot Push keeps disconnecting 25 MicroBot Push is not updating 25 Getting Started 2 Meet MicroBot Push
Guide to the SONY HXR-NX5U Videocamera Adapted from the SONY camera/hard disk manuals, and OHM Media Lab Guide January 6, 2011
 Guide to the SONY HXR-NX5U Videocamera Adapted from the SONY camera/hard disk manuals, and OHM Media Lab Guide January 6, 2011 This camera can record on SDHC memory cards. This guide is for HD shooting;
ASI Systems ML5720A Series
 ML5720A Series Electric Linear Valve Actuators Non-Spring Return APPLICATION The ML5720A series actuators operate standard ASI Systems valves in heating, ventilating and air conditioning (HVAC) applications.
WHICH PHONES ARE COMPATIBLE WITH MY HYBRID SMARTWATCH?
 GENERAL SET-UP & APP o WHICH PHONES ARE COMPATIBLE WITH MY HYBRID SMARTWATCH? o Your Hybrid smartwatch is compatible with Android(TM) phones and iphone(r), specifically with Android OS 4.4 or higher, ios
CF3000 Dealer Diagnostic Tool Instruction Manual
 CF3000 Dealer Diagnostic Tool Instruction Manual Table of Contents: About the CF3000......3 Important Precautions......4 Components....5 Charging the CF3000......7 Licensing the CF3000.......8 Updating
Click Install View Touch. Installation starts. Click Next. Click Finish.
 1. Please read the instructions carefully. Improper installation may cause permanent damages, which may not be covered by the warranty. 2. Check all the parts in the package against the following parts
Installation and Setup guide VARIO Series
 Installation and Setup guide VARIO Series VARIO w8 Contents VARIO i8 VARIO w4 VARIO i4 VARIO w2 VARIO i2 Page 2 Pages 3-4 Page 5 Page 6 Page 7 Page 8 Page 9-11 Quick Set-Up and Factory Defaults Complete
Electronic data system application end user manual
 The MalariaCare Toolkit Tools for maintaining high-quality malaria case management services Electronic data system application end user manual Download all the MalariaCare tools from: www.malariacare.org/resources/toolkit.
PEE-POD 500 (FOR SOFTWARE VERSIONS OR LATER) USER'S GUIDE. The PEE POD 500 is a sophisticated tool and extreme care must be taken in its use.
 USER'S GUIDE. The PEE POD 500 is a sophisticated tool and extreme care must be taken in its use.") ref.500userguide.9 PEE-POD 500 (FOR SOFTWARE VERSIONS 2.32.3 OR LATER) USER'S GUIDE IMPORTANT!! The PEE POD 500 is a sophisticated tool and extreme care must be taken in its use. Before the equipment is
ref.500userguide.9 PEE-POD 500 (FOR SOFTWARE VERSIONS 2.32.3 OR LATER) USER'S GUIDE IMPORTANT!! The PEE POD 500 is a sophisticated tool and extreme care must be taken in its use. Before the equipment is
Draper Commissioner User Manual
 Draper Commissioner User Manual Table of Contents Table of Contents...I 1. Getting Started...1 1.1 Initial Startup...1 1.2 Draper Commissioner Startup...1 1.3 Top Panel...1 2. Configuration Screens...2
M40 Microscope User s Manual
 M40 Microscope User s Manual for M40 and M40RT Microscope Components: Trinocular Port Eyepieces Beam Splitter Field Diaphragm Adjustment Aperture Diaphragm Adjustment Filter Slots Analyzer Polarizer Hex
Operation of Digital Features of HD Lenses
 Operation of Digital Features of HD Lenses The zoom can be operated in the following five operation modes. 1. Operation by Zoom Seesaw Control Lever 2. QuickZoom Operation 3. Auto Cruising Zoom Operation
Installing the Focus Motor
 The MicroTouch Autofocuser is designed to work with Feathertouch Focusers from Starlight Instruments. It allows automatic focusing with CCD and DSLR cameras. Included is FocusMax software to automatically
Installing your Nokia Home
 Installing your Nokia Home 1. Installing the Nokia Home app 2. Plugging in your Nokia Home 3. Pairing your Nokia Home with your Device 4. Installing your Nokia Home: - Creating a Nokia account (optional)
pdmovie REMOTE AIR 4 PDMOVIE Wireless Follow Focus System PD2-M1/M2/M3
 pdmovie REMOTE AIR 4 PD-M/M/M3 PDMOVIE Wireless Follow Focus System Welcome To Use REMOTE AIR 4 Notice For Use.REMOTE AIR 4 is a professional three-channel wireless follow focus system. It can simply and
General Security DVR and NVR Troubleshooting
 General Security DVR and NVR Troubleshooting Select one of the scenarios below to view solutions to general DVR or NVR issues. Remote control is not detected by the system. Mouse is not detected by the
INSTALLATION AND MAINTENANCE INSTRUCTIONS For Chemline A- & Q-Series Actuator with Digital (AC) Positioner
 Positioner") INSTALLATION AND MAINTENANCE INSTRUCTIONS For Chemline A- & Q-Series Actuator with Digital (AC) Positioner General: The Digital High-performance position AC Controller is designed to control quarter-turn
INSTALLATION AND MAINTENANCE INSTRUCTIONS For Chemline A- & Q-Series Actuator with Digital (AC) Positioner General: The Digital High-performance position AC Controller is designed to control quarter-turn
Do not place or mount Ocli 1 in an area where it will be exposed to water. Ocli 1 is designed for indoor use.
 1 Manual: Ocli 1 with Observeye Viewer App for Android Setting Up Ocli 1 Live Viewing with Ocli 1 Recording Video and Taking Snapshots Using Advanced Features Setting Up Ocli 1 Place or Mount the Camera
2.4GHz Digital Wireless 7 LCD Surveillance Kit
 2.4GHz Digital Wireless 7 LCD Surveillance Kit User Manual QC-3762 Box Contents: 1 x 7 LCD Monitor 1 x Wireless Camera 2 x Mains Power Adaptors 1 x Camera Antenna 1 x Mounting Hardware Product Diagram:
Linear Actuators (235N)
") Features: Force limiting adaptor Digital or analog models Patented Enerdrive Fail-Safe System* (optional) Auto stroke on power up (analog models) Simple manual override Direct or reverse acting (configurable)
Features: Force limiting adaptor Digital or analog models Patented Enerdrive Fail-Safe System* (optional) Auto stroke on power up (analog models) Simple manual override Direct or reverse acting (configurable)
VR2 R-NET LED R-NET LCD. Controller System Operation
 VR2 R-NET LED R-NET LCD Controller System Operation 1.VR2 Controller Operation 1.1 Controls/JSM 1.2 Button/Indicator 1.3 Control System Status indication 1.4 Module Wiring 1.5 VR2 Locking / Unlocking The
FN-MAZDA3 Installation Manual
 Manual Version: V20150401 FN-MAZDA3 Installation Manual Product Name: FN-Mazda3 Product Type: Interface with build in navigation Application: All Mazda 2014/2015 cars with new Mazda Connect systems What's
Vehicle Applications. Features. Radio Compatibility. Note. Parts Included. Wiring Diagram
 Vehicle Applications BMW 1 SERIES 2011 - Up 1 Series (5 Door) 2012 - Up 1 Series (3 Door) Features 3 SERIES 2012 - Up 3 Series Sedan 2012 - Up 3 Series Wagon 4 SERIES 2013 - Up 4 Series Coupe 2013 4 Series
EF24-105mm f/ IS STM COPY ENG. Instructions
 EF24-105mm f/3.5-5.6 IS STM ENG Instructions Thank you for purchasing a Canon product. The Canon EF24-105mm f/3.5-5.6 IS STM is a high-performance standard zoom lens that makes movie shooting comfortable.
Quick Start Guide V
 Quick Start Guide V1.5 2016.8 1. Get to Know Your DOBBY DOBBY is ZEROTECH s compact, portable, multi-axis aircraft that has been tailor-made for selfie-lovers. It comes with a high definition camera that
Figure 1. 6-Way JAMMA Switcher
 RiddledTV.com 6-Way, Single-Board JAMMA Switcher INSTALLATION GUIDE Figure 1. 6-Way JAMMA Switcher Features: Supports 6 JAMMA boards Only 1 JAMMA board is powered at a time. No external remotes required
Knowledge Base Troubleshooting Tips for Your SMART Board V280 interactive whiteboards
 PLEASE THINK BEFORE YOU PRINT Knowledge Base Troubleshooting Tips for Your SMART Board V280 Interactive Whiteboard SMART Hardware SMART Board V280 interactive whiteboards Overview This document describes
An energy metering system that gives flexibility, security and control. Century House, Roman Road, Blackburn, BB1 2LD
 An energy metering system that gives flexibility, security and control 1 Contents 1. Before you get started...4 What s inside the box?...4 What is vpro2? Why do you have it? How does it work?...4 Liberty
REMOTE CONTROLLED HEAD. User Manual. pdf version of the manual available for download: 9/2016
 REMOTE CONTROLLED HEAD 9/016 User Manual pdf version of the manual available for download: www.slidekamera.com Before you start your work with Slidekamera BULL HEAD remote controlled head we strongly recommend
Cinema Pro JR-K5. Operations Manual
 Cinema Pro JR-K5 Operations Manual BEFORE YOU START, READ THESE WARNINGS 1) NEVER PLUG POWER DEVICES OTHER THAN THOSE SUPPLIED BY VARIZOOM INTO THE SYSTEM. ONLY USE VARIZOOM POWER SOURCES AND CABLES. USING
HOBO Motor On/Off Data Logger (UX90-004x) Manual
 Manual") HOBO Motor On/Off Data Logger (UX90-004x) Manual The HOBO Motor On/Off data logger records motor on and off conditions by detecting the AC magnetic fields given off by a rotating motor using its internal
HOBO Motor On/Off Data Logger (UX90-004x) Manual The HOBO Motor On/Off data logger records motor on and off conditions by detecting the AC magnetic fields given off by a rotating motor using its internal
Wiring Instructions v3
 Wiring Instructions v3 Gatekeeper h4.1 Technical Support support@gymmastersoftware.com USA: 415 678 1270 Australia: 03 9111 0323 : 03 974 9169 Copyright 2017 Treshna Enterprises. All rights reserved. Table
Cinema Pro Operations Manual
 Cinema Pro Operations Manual - 0 - BEFORE YOU START, READ THESE WARNINGS 1) NEVER PLUG POWER DEVICES OTHER THAN THOSE SUPPLIED BY VARIZOOM INTO THE SYSTEM. ONLY USE VARIZOOM POWER SOURCES AND CABLES. USING
SSC32 SERVO SEQUENCER GUIDE
 SSC32 SERVO SEQUENCER GUIDE C O N T E N T S CHAPTER 1 1 Overview 3 INTRODUCTION... 4 USER INTERFACE... 5 CONNECTING... 6 CONNECTING VIA SERIAL CABLE...6 SERVO CONTROLS... 7 SERVO CONFIGURATION...8 CONTROL
H D D A S H C A M E R A
 H D D A S H C A M E R A User Manual All trademarks are acknowledged as the property of their respective owners. Unless otherwise stated their use does not imply that the trademark owner is affiliated with
SensorWATCH Basic RH - Wireless Setup Users Help Guide Part Number: A Revision: 1.1.0
 SensorWATCH Basic RH - Wireless Setup Users Help Guide Part Number: A53-7974-13-001 Revision: 1.1.0 Page 1 SensorWATCH Basic RH - Wireless SetupUsers Help Guide 1.1.0 Table of Contents 1.0 - Quick Setup
Series 803 LED Product Price Display
 Series 803 LED Product Price Display May 2007 Rev. 1.1 1 Installation and Operation Manual Table of contents 1. Safety.......3 2. Series 803 sign features.......4 2.1 Sign descriptions........4 2.2 Control
OSMO MOBILE. User Manual V
 OSMO MOBILE User Manual V1.2 2017.03 Searching for Keywords Search for keywords such as battery and install to find a topic. If you are using Adobe Acrobat Reader to read this document, press Ctrl+F on
Wireless Compact Unit WCU-4 SUP 3.0 Software Update Package wcu4_pkg_3.0_00.07
 Wireless Compact Unit WCU-4 SUP 3.0 Software Update Package wcu4_pkg_3.0_00.07 RELEASE NOTES Date: June 29 nd, 2017 Table of Contents A. Introduction... 3 New features & overview of changes introduced
Introduction. EC2 User Manual with Technical Addendum 1.0 1
 Introduction The EC2 Explorer Experience is a self-serve kiosk that simulates wind and reflective glare conditions. Key features that can aid the associate/customer in making a decision on their sunglass
Instruction Manual for Video OSD Expander Document Version 1.4
 Instruction Manual for Video OSD Expander Document Version 1.4 Thank you for your purchase! This instruction manual will guide you through the installation and operation of your Video OSD Expander (the
Canon PowerShot SD 600 Rear Control Board Replacement
 Canon PowerShot SD 600 Rear Control Board Replacement This guide is about how to remove the orange rear control board. Be aware that this board is connected to the speaker, top controls and the optical
FAC-R Frequency to Analog Converter Installation, Operating & Maintenance Manual
 COMPANY FAC-R Frequency to Analog Converter Installation, Operating & Maintenance Manual 2017 AW-Lake Company. All rights reserved. Doc ID:FACMAN12082017 V4 Table of Contents Product Overview...3 Operation...3
INSPIRE 1 Quick Start Guide V1.0
 INSPIRE Quick Start Guide V.0 The Inspire is a professional aerial filmmaking and photography platform that is ready to fly right out of the box. Featuring an onboard camera equipped with a 0mm lens and
Catalogue. Assembling... 1 Unpack Charge the Battery Install the Memory Card Product Basics Buttons and Connections...
 Catalogue Assembling... 1 Unpack... 1 Charge the Battery... 1 Install the Memory Card... 1 1 Product Basics... 2 1.1 Buttons and Connections... 2 1.2 Start Up and Shut Down... 2 2 Introduction of Google
LEGO Energy Meter. How to Get Started
 LEGO Energy Meter How to Get Started The Energy Meter consists of two parts: the LEGO Energy Display and LEGO Energy Storage. The Energy Storage fits onto the bottom of the Energy Display. To install the
What can the DD700 Do
 What can the DD700 Do RF signal detector for 100HZ to 3.5 GHz - Wireless CCTV (hidden camera) - Wireless Phone line tap detection - Laser taps detection and Laser tapping prevention using white noise generator.
Introduction REAR VIEW SAFETY
 TM 1 What s in the Box? 1 Color Weather Proof Backup Camera 7" Color TFT LCD Digital Clip-on Mirror Monitor 1 3 Channel Multiplexer Control Unit 1 66 Extension Cable for Camera 1 Remote Control 1 Power
G500 SERIES MICROSCOPE OPERATION MANUAL For use with MFR# G502, G502T, G504, G504T, G505, G505T.
 G500 SERIES MICROSCOPE OPERATION MANUAL For use with MFR# G502, G502T, G504, G504T, G505, G505T. United Products & Instruments, Inc. 182 Ridge Road, Suite E Dayton, NJ 08810 USA T. 732 274 1155; F. 732
DODGE Challenger Charger Journey. 6-Pin Video Input Cable 6-Pin Audio In/Out Cable GPS Magnetic Antenna
 CHRYSLER 2011-2014 300c DODGE 2011-2014 Challenger 2011-2014 Charger 2011-2014 Journey FIAT 2011-2014 Freemont Plug and Play connectors make installation simple and easy. Utilizes the latest mapping version
CAM-KIT6. User Manual. Connects2Vision. Mirror with DVR & Rear Camera PRODUCT FEATURES:
 User Manual CAM-KIT6 Mirror with DVR & Rear Camera PRODUCT FEATURES: Display: 5 inch Speaker: Built in MIC: Built in Mini USB: 5V 2A Micro SD Card Support: 32G max (not supplied) Rear Camera Input: 2.5mm
USER HELP GUIDE. NOTE: We suggest that the user s device be upgraded to the most current version.
 USER HELP GUIDE Android Devices (4.4-5.1) Requirements: To install the fansync application on your Android device, the device must be supported by the manufacturer and have BLE enabled. Your Android device
Frequently Asked Questions
 Serene CL-60A Amplified Talking CID Cordless Phone with Slow-Play, Amplified Answering Machine Frequently Asked Questions Q: Base Charging Indicator is not on when handset is placed on the base. A: Move
ASTRO-PHYSICS GTO CONTROL BOX FOR SERVO DRIVE Model GTOCP1
 ASTRO-PHYSICS GTO CONTROL BOX FOR SERVO DRIVE Model GTOCP1 GTO CONTROL BOX GTOCP1 The GTO control box contains all of the circuitry to drive the two servo motors and the logic required to navigate the
1. Introduction P Package Contents 1.
 1 Contents 1. Introduction ------------------------------------------------------------------------------- P. 3-5 1.1 Package Contents 1.2 Tablet Overview 2. Using the Tablet for the first time ---------------------------------------------------
Forward. Product Introduction. Specifications
 User Manual Forward TM Thanks for purchasing Aputure Gigtube Wireless DSLR digital remote viewfinder. Gigtube Wireless is a creative photography accessory which inherits the excellent performance TM of
3D CONTROLLER. User Manual. pdf version of the manual available for download: 11/2017
 3D CONTROLLER 11/2017 User Manual pdf version of the manual available for download: www.slidekamera.com On the margins you will find information, which complement the contents of the manual. They are not
EL7060 Series SERVICE MANUAL
 EL7060 Series SERVICE MANUAL 1 TABLE OF CONTENTS 1 General description... 4 1.1 Exploded view... 5 2 ACCESSIBILITY... 5 2.1 Dust Bag Cover.. 7 2.2 Display Cover.8 2.3 PCB Display/Switch..9 2.4 Top Cover..10
psee Control Software
 psee Control Software Installing psee Software psee is not currently available on the Web and can only be downloaded by submitting a request via e-mail. To obtain the psee URL, send an e-mail to RVision
RONIN THUMB CONTROLLER
 RONIN THUMB CONTROLLER User Manual V1.0 2015.6 Disclaimers and Warnings Congratulations on purchasing your new DJI product. Carefully read the manual and all disclaimers before using this product. By using