A novel form of cinematic expression U S E R M A N UA L
|
|
|
- Elijah Alexander
- 6 years ago
- Views:
Transcription


1 CINEFADE A novel form of cinematic expression U S E R M A N UA L

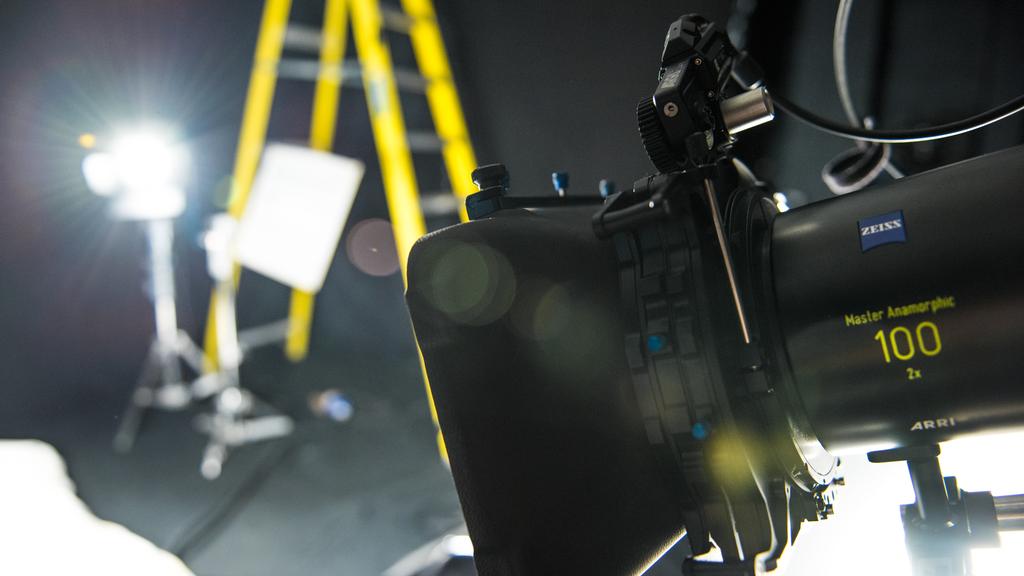
2 Oliver Janesh Christiansen Founder Welcome to a novel form of cinematic expression. Cinefade allows filmmakers to vary depth of field in a single motion picture shot at constant exposure, enabling the gradual transition between a sharp and a blurry background. In partnership with cmotion Lens Control Systems of Austria, London-based filmmaker Oliver Janesh Christiansen has developed a unique system. The incamera effect can immerse viewers in a story or make a client s product stand out in a commercial, enabling a whole new form of cinematic expression. Depth of field is a powerful cinematic storytelling device. In the past, cinematographers have always been limited to choosing either a shallow or a deep depth of field that stays consistent throughout the shot. Cinefade gives them an opportunity to explore the vast creative potential of a variable depth of field. Fading from a deep to a shallow depth and thus gradually blurring the background could, for example, communicate a shift in the subject s emotional state in a narrative or guide the viewer s eyes to focus their attention on a product in a commercial. Cinefade is a really useful and very subtle tool to use in moments of extreme drama. A way of immersing an audience inside the mind of a character during a pivotal moment. Christopher Ross BSC Cinefade uses a custom cmotion lens control system to vary iris diameter, changing depth of field. A custom-built variable Neutral Density filter sits inside a matte box and keeps exposure constant by slaving the filter motor to the iris motor.


3 HOW CINEFADE WORKS A custom cmotion lens control system and a custom light transmission filter are attached to any camera and lens. The iris is gradually opened or closed to vary depth of field. A custom light transmission filter keeps exposure constant. The filter motor is slaved to the motor on the iris. 2" Cinefade"User"Manual"


4 RANGE OF UP TO 5 T-STOPS The light transmission filter achieves a light extinction of up to 6½ stops. After 5 stops however, a small yet noticeable colour cast is introduced into the picture. This colour cast could be easily corrected in post production. At full transmission (parallel polarisers) the filters lose 1.5 stops of light. COMPATIBLE WITH ALL CAMERAS AND LENSES The system is compatible with all film and digital cameras and most modern cinelenses with accurate T-stop markings. FAST AND EASY SET-UP AND OPERATION The system can be mounted on the camera and set up in under 20 minutes. Operating Cinefade is simple and quick. IN PARTNERSHIP WITH Cinefade"User"Manual" 3"

5 CONTENTS Cinefade Kit 7 Setup 13 Light Filter 14 cvolution System 17 Power and Calibration 18 Lens Mapping 19 Operation 23 Load Lens 24 Activate Cinefade Mode 25 Set Iris Limits 26 Example Cinefade Calculation 27 Troubleshooting 29 Known Issues 30 Contact 31 Cinefade"User"Manual" 5"
6 6" Cinefade"User"Manual"

7 -1- CINEFADE KIT Cinefade"User"Manual" 7"


8 KITLIST Cinefade FilterTray The custom FilterTray holds the first custom Schneider circular polariser and allows a motor to be mounted directly onto the handle. Schneider custom circular polariser The second circular polariser is a 4x5.65-sized custom Schneider filter that remains static inside the matte box. Arri CLM-5 motor The kit includes two CLM-5 motors, brackets, 0.8 gears and attached cables. One CLM-5 motor should be mounted on the FilterTray, the other used for focus or iris control. Arri CLM-4 motor The kit includes one CLM-4 motor, bracket and 0.8 gear that should be used for focus or iris control. Hand unit The cmotion cvolution hand unit has a focus knob and iris slider. cmotion camin The camin is the wireless receiver and should be mounted on the camera. 8" Cinefade"User"Manual"


9 cmotion cworld The cworld unit is used to map and save lens data into the system. The unit can be disconnected once the lens has been mapped and saved to the camin. Antenna The kit includes three antennas for hand unit, camin and cworld unit. RS Power cable The RS power cable powers the camin directly from the camera, drawing power and also enabling run/stop control. D-tap power cable The D-tap power cable powers the camin from an external battery with a D-tap connector. CBUS cable The CBUS cable is used to connect and power the cworld unit directly from the camin. CLM-4 motor cable This cable is used to connect the Arri CLM-4 motor to the camin. Batteries Supplied are three cmotion Lithium-ion batteries. Charger and cable Supplied is one charger and cable. Strap The strap may be attached to the hand unit. Cinefade"User"Manual" 9"


10 Power socket adapter An adapter for local power sockets is supplied. Short 15mm rod The short 15mm rod is used to attach the Arri CLM-5 motor to the FilterTray. Once attached to the motor bracket, it can be left attached for convenience. Fastening clamps Two rod-to-rosette clamps to fasten the camin or cworld unit to a 19mm/15mm rod are supplied. Motor extension bracket The motor extension bracket can be used to attach a motor to special lenses. Focus marker ring A total of three unmarked focus marker rings, as well as one iris strip are supplied. Allen Key 2; 2.5; 4 For fastening the FilterTray, opening the camin and removing the focus knob. Phillips head screw driver #0 In special circumstances the screwdriver is used to remove the cover and open up the FilterTray. Hex key For opening the camin unit. Pelicase The Pelicase 1510 has a custom foam insert that fits the entire kit inside a carry-on sized case with wheels. Dimensions 514 (L) x 288 (W) x 191 (D) mm. 10" Cinefade"User"Manual"

11 ADDITIONAL EQUIPMENT to the above kit is required for Cinefade operation. INTERNET-ENABLED DEVICE A smartphone or laptop with wifi and an internet browser is required to access the cworld lens mapping software. MATTE BOX A matte box with at least two filter slots is required to hold the custom FilterTray and the 4x5.65-sized custom circular polarising filter. The Arri LMB5, LMB25 or MB19 are recommended, as well as the TLS Raven or Kite matte boxes. Other matte boxes can be used but may cause issues due to the motor mounted on top of the custom FilterTray. ROD SUPPORT 19mm or 15mm rods are required to mount the motors onto the camera system. Cinefade"User"Manual" 11"
12 12" Cinefade"User"Manual"
13 -2SETUP Cinefade"User"Manual" 13"


14 LIGHT FILTER Following are detailed instructions on how to insert the FilterTray and second polarising filter into the matte box. Together they comprise the light filter and act as a variable ND filter using the principle of cross-polarisation. One polariser remains static, while the other rotates through 90 to vary light transmission. MATTE BOX COMPATIBILITY The custom FilterTray is compatible with an Arri LMB5, LMB25 or MB19 matte box and fits most other matte boxes. The FilterTray may however not fully slot into place, as the mounted motor can present an obstruction. 1. Push short 15mm rod through CLM-5 motor bracket, leaving no more than 1cm sticking out on the side of gear and tighten bracket. 2. Attach motor to custom FilterTray by pushing 15mm rod through hole in handle. 3. Engage motor gear with gear wheel on FilterTray. 4. Fix tightening mechanism with Allen key, applying minimal force. 14" Cinefade"User"Manual"


15 5. Manually rotate motor gear until FilterTray is in position of minimum light transmission. 6. Place 4x5.65 polarising filter into standard filter tray and insert into matte box with THIS SIDE OUT facing towards subject. 7. Insert FilterTray into rear slot of matte box, closest to lens with THIS SIDE TOWARDS LENS facing lens. 8. Make sure FilterTray is in position of minimum transmission and check that there is little to no light passing through light filter before attaching matte box to camera. Cinefade"User"Manual" 15"

16 POLARISING FILTER ORIENTATION The round circular polarising filter that sits inside the FilterTray needs to be correctly aligned so that the point of maximum and minimum light transmission are within the 90 rotation of the FilterTray. Rotate the gear wheel on the FilterTray to the position of minimum light transmission. Shine a bright light source through the two polarising filters or hold the filters inside the matte box up to the light to make sure that only the least amount of light is passing through. If this is not the case, the glass polariser within the FilterTray may have come loose and slipped or the individual stages of the matte box are not correctly aligned. 16" Cinefade"User"Manual"
 and engage with gears of focus ring.")
17 CVOLUTION SYSTEM 1. Screw antenna on to camin and attach to camera. 2. Screw antenna on to cworld unit and (temporarily) attach to camera. 3. Screw antenna on to hand unit and attach battery. 4. Attach second motor and engage with gears of iris ring. 5. Attach third motor (temporarily) and engage with gears of focus ring. NOTE The focus motor and cworld unit are only required for lens mapping in the next step and can be removed after lens mapping is complete. 6. Attach cable from CLM-5 motor on FilterTray to camin (ZOOM). 7. Attach cable from iris motor to camin (IRIS). 8. Attach cable from focus motor to camin (FOCUS). 9. Attach power cable (D-tap or RS power) to camin. 10. Attach CBUS cable from camin to cworld unit. Cinefade"User"Manual" 17"

18 POWER AND CALIBRATION 1. Power on camin and set to preferred channel. 2. Power on cworld unit and turn on wifi. 3. Power on hand unit. 4. Set hand unit to same channel as camin. MENU > Main > Rf channel 5. Press and hold CAL button to calibrate all motors. NOTE Make sure the motors don t jump off the gears or that the gear mount screw on the motor has become loose. SYSTEM SETTINGS Assign slider to iris: Menu > Slider > Scale > Iris Assign GREEN BUTTON to Cinefade: Menu > Buttons > green > DOF Assign motor 1 to focus: Menu > Motor > M1 > Focus Assign motor 2 to iris: Menu > Motor > M2 > Iris Assign motor 3 to Cinefade: Menu > Motor > M3 > DoF Set motor 3 torque to minimum: Menu > Torque > M3 > weak Set iris and Cinefade motor direction: Menu > Direction > M2 Ir > right Menu > Direction > M3 > left 18" Cinefade"User"Manual"


19 LENS MAPPING The cworld system is used only to map new lenses, which can be saved and sent to the camin. The cworld unit can then be disconnected and is not required during operation of Cinefade. INITIAL CONNECTION is necessary to pair your device with cworld unit. 1. Locate sticker on cworld unit with unique serial number, wifi network password and Local Area Network Address. 2. Turn on wifi of internet-enabled device. 3. Connect to cworld wifi signal. 4. Type password: CMcworld1 5. Open internet browser. 6. Navigate to 7. Select Operator. 8. Press yellow CONNECT BUTTON on cworld unit. STEP 1 Connect internet-enabled device to cworld wifi. STEP 2 Open web browser and navigate to STEP 3 Open clensdatabase. Cinefade"User"Manual" 19"


20 STEP 4 Create new lens (Use Lens Assistant). STEP 5 Enter general lens information. STEP 6 Enter general calibration information. STEP 7 Map focus scale by setting lens to infinity using knob on hand unit and selecting the corresponding INF value to create a focus mark. STEP 8 Rotate focus knob to next focus position on lens and select the corresponding value to create a focus mark. STEP 9 Repeat for every focus position on lens. 20" Cinefade"User"Manual"
. Press Next. If you wish to control focus from a separate device, the focus motor may be removed after lens mapping is complete.")
 and enter corresponding value into manual value box. STEP 12 Press add.")
21 FOCUS MAPPING for Cinefade operation is not necessary. To save time, simply choose a minimum of two focus points and proceed to next step. Set focus point 1 (INF). Rotate knob to other end. Set focus point 2 (CF). Press Next. If you wish to control focus from a separate device, the focus motor may be removed after lens mapping is complete. STEP 10 Move iris to largest T-number position (smallest iris diameter) and enter corresponding value. STEP 11 Move iris to smallest T-number position (largest iris diameter) and enter corresponding value into manual value box. STEP 12 Press add. IRIS SCALE If a lens has a linear iris scale, it is not necessary to map every single position of the iris scale. With non-linear iris scales, map every position of the iris scale. Cinefade"User"Manual" 21"

22 STEP 13 Save and load lens. STEP 14 Find newly created lens in the cworld clensdatabase and send to camin. Send to > LBUS devices > cvolution-camin Repeat lens mapping with every lens to be used for Cinefade. TIP If there is no more space on the camin, delete lenses from unit. clensdatabase > external devices > cvolution-camin > [select lens] > delete OPTIONAL The cworld unit is no longer required and may be removed, as long as the mapped lenses have been sent to the camin. A focus motor is not necessary for Cinefade operation and may be removed also. The cworld system uses values expressed in fractions instead of decimal numbers for fractions of a full stop. The following look-up table can be used as a guide. Lens T-stop cworld value Lens T-stop cworld value T T ¾ T /3 T1.9 use closest value T /3 T2 2 T1 1 T2.1 use closest value T1.1 1 ¼ T2.2 2 ¼ T1.2 1 ½ T /3 T1.3 1 ¾ T2.4 2 ½ T T /3 T ¼ T2.6 2 ¾ T /3 T2.7 use closest value T ½ T " Cinefade"User"Manual"
23 -3OPERATION Cinefade"User"Manual" 23"


![Menu > Lens > Load Lens > [Select Lens] > Yes NOTE Check that the displayed iris](/docs-images/76/73880786/images/24-2.jpg "value on the hand unit corresponds to the iris position on the lens.")
24 LOAD LENS After a lens is mapped in cworld and has been sent from the cworld unit to the camin, the cworld unit can be disconnected. The lens is now saved in the camin. The correct lens file must be loaded before a Cinefade can be performed and after every lens change. Menu > Lens > Load Lens > [Select Lens] > Yes NOTE Check that the displayed iris value on the hand unit corresponds to the iris position on the lens. If it does not, invert the iris scale. Menu > Lens > Invert Iris 24" Cinefade"User"Manual"

25 ACTIVATE CINEFADE MODE With the light filter at position of maximum transmission, the iris slider is used to set exposure as usual. Once exposure is set, that iris value is the position of greatest depth of field. As soon as the Cinefade mode is activated the iris slider no longer controls exposure but depth of field only. The lens is opened up from the initial iris value, changing depth of field. The light filter keeps exposure constant. 1. Make sure light filter is in position of maximum transmission. NOTE If the light filter is not in the position of maximum transmission, the system may be experiencing some lag. Temporarily activate Cinefade mode by pressing the GREEN BUTTON, operate the slider and deactivate Cinefade mode again. The filter motor should spin to the position of maximum transmission. 2. Use iris slider to set exposure (and position of greatest depth of field). This is the initial position. 3. Activate Cinefade mode by pressing GREEN BUTTON. 4. The letters DOF should appear on screen of hand unit. NOTE If the letters DOF do not appear, the mode is not activated. Wait for a few seconds and press GREEN BUTTON again. 5. Use iris slider to open up the lens and change depth of field at constant exposure. 6. To exit Cinefade mode and regain control over exposure, hit GREEN BUTTON again. The letters DOF disappear from screen of hand unit. NOTE When closing down the lens past the initial iris value, the light filter is at maximum transmission and the exposure will become darker. To avoid this, set iris limits. Cinefade"User"Manual" 25"

26 SET IRIS LIMITS 1. Activate Cinefade mode or move iris slider to initial position. 2. Press and hold blue LENS BUTTON. 3. Slide iris slider to open up lens to desired position of smallest depth of field. 4. Release blue LENS BUTTON. 5. Iris slider is now limited to values between those two points. TIP Set the iris limits immediately after activating Cinefade mode. Press the GREEN BUTTON to activate Cinefade mode. Then press and hold the LENS BUTTON, operate the slider and release the LENS BUTTON. 26" Cinefade"User"Manual"

27 EXAMPLE CINEFADE CALCULATION In this example the DP has set the camera to ISO 800 at a shutter speed of 1/48 th second and metered the scene at T11½. He/she is using a Leica Summilux-C 29mm T1.4 lens. He/she wishes to perform a 5-stop Cinefade from T11 to T2. The light filter requires an exposure compensation of 1½ stops, so the DP decides to increase the sensor s sensitivity to ISO 1600 to achieve a light meter reading of T16½, allowing him/her to set the iris to T11 for a good overall exposure. Once he/she has set the iris slider to T11 and is happy with the exposure, he/she pushes the GREEN BUTTON on the hand unit to activate Cinefade mode. T11 becomes the initial iris value. He/she then immediately pushes and holds the blue LENS BUTTON on the hand unit, sliding the iris slider until the lens is at T2 before releasing the LENS BUTTON. The iris slider is now limited to a range between T11 and T2. If the light conditions change, the DP pushes the blue LENS BUTTON to release the iris limits and pushes the GREEN BUTTON to exit Cinefade mode so that he/she can control exposure. He/She can now set a new initial iris value for the Cinefade, for example at T8 and open up all the way to T1.4 for a 5-stop Cinefade. Cinefade"User"Manual" 27"
28 28" Cinefade"User"Manual"

29 -4- TROUBLESHOOTING Cinefade"User"Manual" 29"
30 KNOWN ISSUES It is important to understand that the system is still a prototype and likely to encounter teething issues. Some of these possible issues are listed below. OPTICAL SHADING Optical shading or vignetting may occur on some fast, wide prime lenses. This phenomenon should not be confused with vignetting caused by a matte box or filter. EXPOSURE FLUCTUATIONS Imprecise T-stop markings on the iris ring or inaccurate mapping of lens may cause the exposure to vary slightly during a Cinefade. WIFI ISSUES The wifi connection to the cworld unit tends to drop out momentarily, especially if there are other radio signals in the surrounding area. RADIO FREQUENCY ISSUES The connection between hand unit and camin may be lost when the two units are too close to each other. Change Rf power in Main Menu to a lower setting. Use a low power for close proximity and high power for longer range. Menu > main > Rf power IRIS VALUE If the iris value displayed on the hand unit does not correspond with the marking on the lens you may need to invert the iris scale. Menu > Lens > Invert Iris POLARISATION ISSUES The rotating polariser must be positioned behind the static polariser, closest to lens to avoid changes in polarisation effects, such as changes in reflections or blue skies. EXPOSURE Due to the nature of the effect, a large amount of light is required to achieve a 5- stop Cinefade. Most exterior daylight environments are ideal. Interior or studio shoots require a lot of artificial light or very light sensitive cameras. 30" Cinefade"User"Manual"
 77 8993 0557 www.cinefade.com To keep up to date with Cinefade please feel free to follow @cinefade on social media or sign up to our newsletter by emailing us.")
31 CONTACT For all questions, comments or concerns please contact Cinefade Limited in the UK. Oliver Janesh Christiansen +44 (0) To keep up to date with Cinefade please feel free to on social media or sign up to our newsletter by ing us. A digital version of the manual is available at January 2017 Cinefade"User"Manual" 31"
TOC DX1-K Operations Manual
 TOC DX1-K Operations Manual - 1 - General Description The TOC DX1-K is a single channel wireless lens control system. The system can be used on most broadcast or cinema lenses. The TOC DX1-K includes a
Independent Review - Haida 150mm Filter System By Daniel Gangur
 Independent Review - Haida 150mm Filter System By Daniel Gangur www.gippslandimages.com.au Over the past couple of months I have been using Haida s 150mm filter system, these optical glass filters are
TOC F1 Operations Manual
 TOC F1 Operations Manual - 1 - General Description The TOC F1 is a single channel wireless lens control system. The system can be used on most broadcast or cinema lenses. The TOC F1 includes a hand held
Quick Setup Guide for MEC-5-FSL-D3200-N85 Iris Camera
 Quick Setup Guide for MEC-5-FSL-D3200-N85 Iris Camera Contents of the Camera Carry Case MEC-5-FSL-D3200-N85 Contents 1. Camera with macro lens 2. Illuminator 3. Camera Battery Charger 4. Zoom Lens 5. Cord/Accessory
(and what the numbers mean)
") Using Neutral Density Filters (and what the numbers mean) What are ND filters Neutral grey filters that effectively reduce the amount of light entering the lens. On solid ND filters the light-stopping
Using Neutral Density Filters (and what the numbers mean) What are ND filters Neutral grey filters that effectively reduce the amount of light entering the lens. On solid ND filters the light-stopping
Quick manual. V 1.00 October, 2013 Software Release Package 2013_01
 Quick manual V 1.00 October, 2013 Software Release Package 2013_01 Before Use Dear Customer, we would like to take this opportunity to thank you for purchasing the compact ONE Lens & Camera Control System.
Boxer HD-2X Motorized Pan Tilt Head (P-BXR-HD-2X)
") Boxer HD-2X Motorized Pan Tilt Head (P-BXR-HD-2X) I N STR UC TI ON MANUAL All rights reserved No part of this document may be reproduced, stored in a retrieval system, or transmitted by any form or by
Boxer HD-2X Motorized Pan Tilt Head (P-BXR-HD-2X) I N STR UC TI ON MANUAL All rights reserved No part of this document may be reproduced, stored in a retrieval system, or transmitted by any form or by
DSLR KIT-3 BONUS PRO ZOOM SET UP AND OPERATION MANUAL
 DSLR KIT-3 BONUS PRO ZOOM SET UP AND OPERATION MANUAL All rights reserved. No part of this document may be reproduced, stored in a retrieval system, or transmitted by any form or by any means, electronic,
PDL & PDL-HT PD Movie Remote Live & PD Remote Live High Torque
 PDL & PDL-HT PD Movie Remote Live & PD Remote Live High Torque QUICKSTART GUIDE What s Included 1 x Multi-control Handgrip 1 x Follow Focus Motor (Check One) 1 x Motor Drive Cable 1 x Adjustable Pan Handle
DSLR Filmmaking Kit 6-CF
 DSLR Filmmaking Kit 6-CF INSTRUCTION MANUAL All rights reserved. No part of this document may be reproduced, stored in a retrieval system, or transmitted by any form or by any means, electronic, mechanical,
I. BASIC OPERATION (PREPARATION)
") 10 lcon indicators used in this manual I. BASIC OPERATION (PREPARATION) Operation direction Attention Lamp blinking Attaching the Camera Strap 11 1 2 3 1. Use a coin or similar object to slide the clasp
10 lcon indicators used in this manual I. BASIC OPERATION (PREPARATION) Operation direction Attention Lamp blinking Attaching the Camera Strap 11 1 2 3 1. Use a coin or similar object to slide the clasp
M40 Microscope User s Manual
 M40 Microscope User s Manual for M40 and M40RT Microscope Components: Trinocular Port Eyepieces Beam Splitter Field Diaphragm Adjustment Aperture Diaphragm Adjustment Filter Slots Analyzer Polarizer Hex
Lens Backfocus & Adjustment Procedures. 1. Backfocus
 1. Backfocus The distance from the lens mounting surface on the front of the CCTV camera and the position of the pickup device (sensor) is called the flange focal distance, or backfocus distance. The surface
Focus Command Hand UNIT MANUAL
 1. DESCRIPTION OF THE FRONT PANEL To change the unit of measure (feets/meters). PCMCIA board for radio Focus Motor Control Zoom Motor Control Focus-Iris-Zoom selection Iris Motor Control To change the
Truly Cinematic. Pro Camera Accessories SUPPORT SYSTEMS FOLLOW FOCUS MATTE BOXES. for Canon EOS C 100 / 300 / 500
 Truly Cinematic Pro Camera Accessories SUPPORT SYSTEMS FOLLOW FOCUS MATTE BOXES for Canon EOS C 100 / 300 / 500 ARRI Quality for Film and Digital Applications As the world s largest manufacturer of film
USB-FC-110 LYNX USB FOCUS CONTROLLER USER MANUAL
 USB-FC-110 LYNX USB FOCUS CONTROLLER USER MANUAL 2 INTRODUCTION Thank you for choosing the Elvid Lynx USB Focus Controller. The Elvid Lynx gives you remote control over focus and exposure (including shutter
FTM 131 CANON EOS C100 WALKTHROUGH, PART I: 10 Steps to Record a Moving Image
 FTM 131 CANON EOS C100 WALKTHROUGH, PART I: 10 Steps to Record a Moving Image Step 1: TRIPOD - Perform the following steps on your tripod, before you place the camera on it: - Extend the legs to set the
NOKTON 42.5mm F0.95 INSTRUCTION MANUAL
 NOKTON 42.5mm F0.95 INSTRUCTION MANUAL COSINA CO., LTD. Oct 2017, Ver 1.0 Voigtländer Micro Four Thirds-mount lenses are all metal construction with precise focusing even at full aperture. Minimum focus
CAMERA ASSEMBLY. Removal/Replacement of the Camera Box Assembly APR-CA. Install Camera Assembly. Remove Camera Assembly
 CAMERA ASSEMBLY Removal/Replacement of the Camera Box Assembly APR-CA REQUIRED TOOLS: 9/64 hex key Small flat-tip screwdriver Remove Camera Assembly camera 1. Locate the camera assembly underneath the
Help Site. User Manual. Created: Tuesday, May 16, Copyright pictar. All Rights Reserved.
 User Manual Created: Tuesday, May 16, 2017 Copyright pictar. All Rights Reserved. SectIon 4: Changing Settings Table of Contents User Guide... 1 Section 1: Pictar at a Glance... 1 Pictar Overview... 1
Basic guide to Canon EOS C
 Basic guide to Canon EOS C100 2017 This guide is designed to take you through the basic and essential functions of the Canon C100 camcorder. Battery insertion Have the camera in the off position. The power
Another option is a clamping device that has a camera screw adapter attached to it.
 Tripods and Camera Supports When beginners first start using their cameras seriously, they may tend to think of a tripod or other camera support only being necessary when the shutter speed gets to slow
If you are missing any of the following items, please contact Stanton Video immediately (602)
") RIGHT ANGLE FOCUS Jan 03 If you are missing any of the following items, please contact Stanton Video immediately (602) 493-9505 1. Right Angle Focus Servo 2. Servo End Cap 3. Lens Gears (32 pitch, 48 pitch,.6
RIGHT ANGLE FOCUS Jan 03 If you are missing any of the following items, please contact Stanton Video immediately (602) 493-9505 1. Right Angle Focus Servo 2. Servo End Cap 3. Lens Gears (32 pitch, 48 pitch,.6
ViviCam S327 Digital Camera
 ViviCam S327 Digital Camera User Manual 2009-2012 Sakar International, Inc. All rights reserved. Windows and the Windows logo are registered trademarks of Microsoft Corporation. All other trademarks are
ON-SCREEN DISPLAY (OSD) GUIDE FOR PRO-T890 HD CAMERA
 GUIDE FOR PRO-T890 HD CAMERA") ON-SCREEN DISPLAY (OSD) GUIDE FOR PRO-T890 HD CAMERA EN CONTENTS CONTENTS...2 INTRODUCTION...3 OPERATING THE OSD...4 MAIN MENU...5 OUTPUT MODE...7 EXPOSURE...8 SPECIAL...9 SPECIAL - DPC...10 ADJUST...11
ON-SCREEN DISPLAY (OSD) GUIDE FOR PRO-T890 HD CAMERA EN CONTENTS CONTENTS...2 INTRODUCTION...3 OPERATING THE OSD...4 MAIN MENU...5 OUTPUT MODE...7 EXPOSURE...8 SPECIAL...9 SPECIAL - DPC...10 ADJUST...11
LET S FOCUS ON FOCUSING
 LET S FOCUS ON FOCUSING How A Lens Works The distance between the center of the lens and the focal point is called the FOCAL LENGTH. Images are only sharp where the focal plane meets the focal point. To
Ultra short throw lens installation
 Ultra short throw lens installation The ultra short throw lens 0.36 UST GS (P/N: 140-133108-XX) allows you to position your projector as close as possible to your screen or display. Unless otherwise indicated,
Setup Information Panosaurus May 3, 2011
 Setup Information Panosaurus 2.0 www.gregwired.com May 3, 2011 Please take the time to read all of the setup information to ensure success and ease of use of this tripod head. Much of the setup is a one
Lenses & Exposure. Lenses. Exposure. Lens Options Depth of Field Lens Speed Telephotos Wide Angles. Light Control Aperture Shutter ISO Reciprocity
 Lenses & Exposure Lenses Lens Options Depth of Field Lens Speed Telephotos Wide Angles Exposure Light Control Aperture Shutter ISO Reciprocity The Viewfinder Camera viewfinder Image Sensor shutter lens
HANDS ON INFO. High Definition Gear Check (F900).
.") HANDS ON INFO High Definition Gear Check (F900). Insure the camera menu has been preset by the hire company to factory condition before performing the following checks. The check list is a guide only;
HANDS ON INFO High Definition Gear Check (F900). Insure the camera menu has been preset by the hire company to factory condition before performing the following checks. The check list is a guide only;
ASI Photoport TIRF Injector Instruction Manual
 ASI Photoport TIRF Injector Instruction Manual Applied Scientific Instrumentation, Inc. 29391 W. Enid Rd. Eugene, OR 97402-9533 USA Phone: (800) 706-2284 (541) 461-8181 Fax: (541) 461-4018 Web: www.asiimaging.com
Fundamentals of Photography presented by Keith Bauer.
 Fundamentals of Photography presented by Keith Bauer kcbauer@juno.com http://keithbauer.smugmug.com Homework Assignment Composition Class will be February 7, 2012 Please provide 2 images by next Tuesday,
User manual for the 3-D macro lens model 2007
 Ing. J. de Wijs. Populierstraat 44, 4131 AR Vianen, the Netherlands Tel/Fax. +31 (0)347-372242 e-mail: info@dewijs-3d.com Website: www.dewijs-3d.com Design and production of stereoscopic instruments. Bank:
Press Release Sony Introduces New Cyber-shot Digital Cameras T Series with Industry s First Smile Shutter Mode Hong Kong, August 22, 2007
 Press Release Sony Introduces New Cyber-shot Digital Cameras T Series with Industry s First Smile Shutter Mode Sony s latest Cyber-shot T200 and T70 shoot photos automatically with smile shutter mode while
 Basic Specifications Number of pixels Approximately 10.3 mega pixels (gross), Approximately 9.1 mega pixels (effective) Image Sensor 1/2.3 Super HAD CCD Processor BIONZ Scan System Interlace scan Total
Try it......and feel the difference!
 Try it......and feel the difference! > cmotion LCS System l introduction > cmotion LCS System l the company On every film set cmotion was founded in 2002 by Christian Tschida and Martin Waitz with the
TABLE OF CONTENTS SECTION 1 TABLETOP CONFIGURATION SECTION 2 TABLETOP CONFIGURATION ACCESSORIES SECTION 3 SLIDE CONFIGURATION
 S6 USER S MANUAL TABLE OF CONTENTS SECTION 1 TABLETOP CONFIGURATION SECTION 2 TABLETOP CONFIGURATION ACCESSORIES SECTION 3 SLIDE CONFIGURATION SECTION 4 SLIDE CONFIGURATION ACCESSORIES SECTION 5 RACK MOUNT
Users guide
 Users guide 2004-02-19 Congratulations for the acquisition of A-Cam by Ikonoskop. This guide will take You through the basic handling and operation of A-Cam. Please carefully read the entire guide before
Ricoh 35 Flex (aka Sears SL-9) posted 2-29-'04
 posted 2-29-'04") Ricoh 35 Flex (aka Sears SL-9) posted 2-29-'04 This camera manual library is for reference and historical purposes, all rights reserved. This page is copyright by, M. Butkus, NJ. This page may not be sold
Ricoh 35 Flex (aka Sears SL-9) posted 2-29-'04 This camera manual library is for reference and historical purposes, all rights reserved. This page is copyright by, M. Butkus, NJ. This page may not be sold
ZEISS Compact Prime and Zoom lenses Flexibility and performance in a winning combination.
 ZEISS Compact Prime and Zoom lenses Flexibility and performance in a winning combination. // FLEXIBILITY MADE BY ZEISS The moment you shout action! and feel your story come together. This is the moment
CAMBO Wide RS 1200 series CAMBO. Wide RS 1200 series INSTRUCTION MANUAL
 CAMBO Wide RS 1200 series CAMBO Wide RS 1200 series E Rev-10-2012 INSTRUCTION MANUAL 1 Copyright 20 12 Cambo fotografische Industrie. All rights reserved. Revised 15-10-2010 2 CAMBO Wide RS 1200 series
ACCESSORIES FOR GoPro. GOPRO HERO is a trademark or registered trademark of GoPro, Inc. in the United States and other countries.
 P R E S E N T S ACCESSORIES FOR GoPro GOPRO HERO is a trademark or registered trademark of GoPro, Inc. in the United States and other countries. WRIST STRAP For All GoPro GoPro Specifically designed for
NOKTON 17.5mm F0.95 Aspherical INSTRUCTION MANUAL
 NOKTON 17.5mm F0.95 Aspherical INSTRUCTION MANUAL COSINA CO., LTD. Oct 2017, Ver 1.0 Voigtländer Micro Four Thirds-mount lenses are all metal construction with precise focusing even at full aperture. Minimum
Index. 1. Scope of Delivery General The Controls of the Sinar p3-df View Camera Assembly of the camera 6
 p3-df User Manual Thank You! Congratulations on your purchase of this high-quality Sinar product. Made from top quality materials it was carefully manufactured and thoroughly tested for performance and
First-Time Setup. Summary Steps CHAPTER
 CHAPTER 4 Revised: May 9, 2012, This chapter describes the steps you take to configure the CTS 1300 to use it for the first time and includes the following sections: Required Tools and Accessories, page
INSTALLATION INSTRUCTIONS
 INSTALLATION INSTRUCTIONS 19 20 21 01 07 22 23 13 10 12 08 17 18 11 02 14 15 04 03 16 WELCOME PARTS LIST Thank you for purchasing this HealthPoint Technology Cabinet from Humanscale! Before you begin installing
Atlas Edge Alignment Calibration Page 1
 Atlas Edge Alignment Calibration Page 1 ATLAS EDGE ALIGNMENT CALIBRATION GUIDE Figure A Before your calibration, Make sure you have all of the parts included in your Atlas Alignment Calibration Kit. See
SP mm F/4-5.6 Di VC USD for Canon and Nikon (Model A005) SP mm F/4-5.6 Di USD for Sony (Model A005)
 SP mm F/4-5.6 Di USD for Sony (Model A005)") R SP 70-300mm F/4-5.6 Di VC USD for Canon and Nikon (Model A005) SP 70-300mm F/4-5.6 Di USD for Sony (Model A005) Thank you for purchasing the Tamron lens as the latest addition to your photographic equipment.
R SP 70-300mm F/4-5.6 Di VC USD for Canon and Nikon (Model A005) SP 70-300mm F/4-5.6 Di USD for Sony (Model A005) Thank you for purchasing the Tamron lens as the latest addition to your photographic equipment.
EDUCATIONAL SPECTROPHOTOMETER ACCESSORY KIT AND EDUCATIONAL SPECTROPHOTOMETER SYSTEM
 GAIN 0 Instruction Manual and Experiment Guide for the PASCO scientific Model OS-8537 and OS-8539 02-06575A 3/98 EDUCATIONAL SPECTROPHOTOMETER ACCESSORY KIT AND EDUCATIONAL SPECTROPHOTOMETER SYSTEM CI-6604A
OSMO MOBILE. User Manual V
 OSMO MOBILE User Manual V1.2 2017.03 Searching for Keywords Search for keywords such as battery and install to find a topic. If you are using Adobe Acrobat Reader to read this document, press Ctrl+F on
TS-E50mm f/2.8l MACRO TS-E90mm f/2.8l MACRO TS-E135mm f/4l MACRO
 TS-E50mm f/2.8l MACRO TS-E90mm f/2.8l MACRO TS-E135mm f/4l MACRO ENG Instructions Thank you for purchasing a Canon product. The Canon TS-E50mm f/2.8l MACRO, Canon TS-E90mm f/2.8l MACRO, and Canon TS-E135mm
two using your LensbAby
 two Using Your Lensbaby 28 Lensbaby Exposure and the Lensbaby When you attach your Lensbaby to your camera for the first time, there are a few settings to review so that you can start taking photos as
Quick Reference Guide to the Sony I & II MiniDV Camera
 I. CAMERA MODE / VTR MODE Quick Reference Guide to the Sony I & II MiniDV Camera BE CAREFUL WHEN INSERTING AND EJECTING TAPES FROM THE CAMERA. FOLLOW ALL LABELS ON THE CAMERA ITSELF AND THESE DIRECTIONS.
Lenses. Digital Cameras. Lenses. Lenses. Light focused by the lens. Lenses. Aperture Shutter Speed Holding a Camera Steady Shooting Modes ISO
 Lenses Digital Cameras Light focused by the lens Lenses Aperture Shutter Speed Holding a Camera Steady Shooting Modes ISO Lenses Lenses Positive lens Converging lens Focuses image What is difference in
POWER DSLR Camera Cage Shoulder Rig Kit
 FILMCITY POWER SHOULDER RIG 1 POWER DSLR Camera Cage Shoulder Rig Kit I N S T R U C T I O N M A N U A L All rights reserved. No part of this document may be reproduced, stored in a retrieval system, or
LaserLyte-Flex Red & Green Alignment System
 LaserLyte-Flex Red & Green Alignment System LaserLyte-Flex The LaserLyte-Flex is an entry-level laser alignment system. It uses interchangeable optics and a semiconductor laser diode to project a highly
We ll go over a few simple tips for digital photographers.
 Jim West We ll go over a few simple tips for digital photographers. We ll spend a fair amount of time learning the basics of photography and how to use your camera beyond the basic full automatic mode.
5 main methods. 1 Dedicated Macro lens. 2 Extension tubes. 3 Close up Filters. 4 Teleconverters. 5 Stacking lenses.
 Macro Photography The technical part Macrophotography. MacroPhotography is the capturing of an image of an object at lifesize or up to 10 times life size on the recording medium, that is the film or digital
SP mm F/2.8 Di VC USD (Model A009)
") SP 70-200mm F/2.8 Di VC USD (Model A009) Thank you for purchasing the Tamron lens as the latest addition to your photographic equipment. Before using your new lens, please read the contents of this Owner
SP 70-200mm F/2.8 Di VC USD (Model A009) Thank you for purchasing the Tamron lens as the latest addition to your photographic equipment. Before using your new lens, please read the contents of this Owner
OPERATING INSTRUCTIONS:
 List OPERATING INSTRUCTIONS: Preparation For Installation, Product Identification Charging The Batteries ing And Adjusting The Lift Mounting Head s Brackets Mounting Clamps And Quick-Locking Arms Installation
SECURITY MASTERS ADVANCED MODULE 2
 ACADEMY SWANN SECURITY CAMPUS SELL LEARN GROW SECURITY MASTERS ADVANCED MODULE 2 SECURITY MASTERS ADVANCED MODULE 2 Page 2 MODULE OUTLINE How to Install a Hard Drive to Your NVR/DVR 4 Getting to Know Your
Wireless Compact Unit WCU-4 SUP 3.0 Software Update Package wcu4_pkg_3.0_00.07
 Wireless Compact Unit WCU-4 SUP 3.0 Software Update Package wcu4_pkg_3.0_00.07 RELEASE NOTES Date: June 29 nd, 2017 Table of Contents A. Introduction... 3 New features & overview of changes introduced
Microscopic Imaging Research Station (MIRS) Assembly Guide. Version 1.0.0
 Assembly Guide. Version 1.0.0") Microscopic Imaging Research Station (MIRS) Assembly Guide www.adsyscontrols.com Adsys Controls, Inc.2012 Version 1.0.0 I. Assembly of the Adsys Controls MIRS system This document explains the assembly
Microscopic Imaging Research Station (MIRS) Assembly Guide www.adsyscontrols.com Adsys Controls, Inc.2012 Version 1.0.0 I. Assembly of the Adsys Controls MIRS system This document explains the assembly
LOCAL AMBASSADOR TRAINING
 LOCAL AMBASSADOR TRAINING GENERAL DESCRIPTION The Local Ambassador will take panoramas inside shops, restaurants and other businesses to create an online/interactive tour of the establishment. This guide
CINEGEARS SINGLE AXIS FOLLOW FOCUS MANUAL MANUAL BOOK Cine Gears INC. All Rights Reserved.
 CINEGEARS SINGLE AXIS FOLLOW FOCUS MANUAL MANUAL BOOK Contents Controllers 3 Single Axis Motors 4 Accessories Single Axis Accessories Remote Recording Triggers Fingerwheel Accessories CINEGEARS SINGLE
ViviCam X029-10MP Digital Camera
 ViviCam X029-10MP Digital Camera User Manual 2009-2012 Sakar International, Inc. All rights reserved. Windows and the Windows logo are registered trademarks of Microsoft Corporation. All other trademarks
SD Cards = Your Film. Always turn off your camera before removing! First thing, format your card (erases card)
") Core Concepts SD Cards = Your Film Always turn off your camera before removing! First thing, format your card (erases card) Formatting your card Menu Button Top Wheel To Wrench 1 Back Wheel to Format Card
Core Concepts SD Cards = Your Film Always turn off your camera before removing! First thing, format your card (erases card) Formatting your card Menu Button Top Wheel To Wrench 1 Back Wheel to Format Card
Planar Model A480-PL Professional Grade Home Cinema Conversion Lens System
 AKPro system with ATH1 transport shown Planar Model A480-PL Professional Grade Home Cinema Conversion Lens System USER MANUAL AND INSTALLATION GUIDE Including the UH480 Lens, ATH1 Transport and AKPro Projector
A note about our online installation instructions:
 A note about our online installation instructions: Most Modern Fan Co. products have been in our assortment for several years or longer. As we continually work to improve product performance and user experience,
SYSTEM MAINTENANCE MANUAL TACTICAL ENGAGEMENT SIMULATION SYSTEM (TESS) TARGET TRAINING SYSTEM (TTS) OCONUS FIXED LOCATION INSTALLATION
 TARGET TRAINING SYSTEM (TTS) OCONUS FIXED LOCATION INSTALLATION") SYSTEM MAINTENANCE MANUAL TACTICAL ENGAGEMENT SIMULATION SYSTEM (TESS) TARGET TRAINING SYSTEM (TTS) OCONUS FIXED LOCATION INSTALLATION INITIAL SETUP Preconditions Coordinate the TTS setup with the training
SYSTEM MAINTENANCE MANUAL TACTICAL ENGAGEMENT SIMULATION SYSTEM (TESS) TARGET TRAINING SYSTEM (TTS) OCONUS FIXED LOCATION INSTALLATION INITIAL SETUP Preconditions Coordinate the TTS setup with the training
Canon EF f4 L IS USM. A field review
 Canon EF 24-70 f4 L IS USM A field review All Text and Photos SimonDP/Actionimage 2014 ( web: www.actionimage.co.za email: simondp@actionimage.co.za) Introduction An interesting lens, this latest addition
Nearus USB2.0 Camera Manual NU-350-USB2PTZ-B
 Nearus USB2.0 Camera Manual NU-350-USB2PTZ-B Safety Tips Please read this manual carefully before installing the camera. Keep the camera away from violent vibration, physical stress, moisture, extreme
The 2 nd part of the photographic triangle
 The 2 nd part of the photographic triangle Shutter speed refers to the amount of time your sensor is exposed to light. In film photography shutter speed was the length of time that the film was exposed
Installation Guide for. Phase One ixg Camera. Developed for Phase One Cultural Heritage, Scientific and Industrial Imaging Solutions
 Installation Guide for Phase One ixg Camera Developed for Phase One Cultural Heritage, Scientific and Industrial Imaging Solutions Installation Guide for Phase One ixg Camera Developed for Phase One Cultural
28056 Digital Camera
 28056 Digital Camera User Manual HASBRO and its logo and NERF are trademarks of Hasbro and are used with permission. 2012 Hasbro. All rights reserved. Windows and the Windows logo are registered trademarks
Design and production of stereoscopic instruments. User manual for the 3-D macro lens model General. Exposure
 Ing. J. de Wijs. Populierstraat 44, 4131 AR Vianen, the Netherlands Tel/Fax. +31 (0)347-372242 e-mail: info@dewijs-3d.com Website: www.dewijs-3d.com Design and production of stereoscopic instruments. Bank:
This device complies with part 15 of the FCC Rules. Operation is subject to the following two conditions: (1) This device may not cause harmful
 This device may not cause harmful") KC50/55 Camera 1 This device complies with part 15 of the FCC Rules. Operation is subject to the following two conditions: (1) This device may not cause harmful interference, and (2) this device must accept
KC50/55 Camera 1 This device complies with part 15 of the FCC Rules. Operation is subject to the following two conditions: (1) This device may not cause harmful interference, and (2) this device must accept
FILM & VIDEO SETUP MANUAL
 FILM & VIDEO SETUP MANUAL Tyler Nose Mount II for Film or Video cameras. PLEASE RETURN THIS MANUAL WITH EQUIPMENT This manual is available for download from our web site. Tyler Camera Systems 14218 Aetna
Press Release. Brilliant images and additional colour modes
 Press Release New Stylish Cyber-shot DSC-T30 Shoots Sharper Pictures with Sony s Double Anti-Blur Technology The camera offers a large 3-inch LCD screen and STAMINA that takes up to 420 shots Hong Kong,
THE FILMO A TECHNICAL MANUAL COMPILED & WRITTEN BY RENATO TONELLI
 THE FILMO A TECHNICAL MANUAL COMPILED & WRITTEN BY RENATO TONELLI 0 8 7 6 5 FOOTAGE COUNTER STARTING BUTTON ("on") LOCK PIN LENS 5 CRITICAL FOCUSER 6 RATCHET WINDING KEY 7 BACK WIND SLOT 8 TRIPOD MOUNTING
G12/G12x USER S MANUAL
 G12/G12x USER S MANUAL TABLE OF CONTENTS SECTION 1 SLIDE CONFIGURATION SECTION 2 SLIDE CONFIGURATION ACCESSORIES SECTION 3 TABLETOP CONFIGURATION SECTION 4 TABLETOP CONFIGURATION ACCESSORIES SECTION 5
TS-E17mm f/4l TS-E24mm f/3.5l II Instructions
 TS-E17mm f/4l TS-E24mm f/3.5l II ENG Instructions Thank you for purchasing a Canon product. Canon s TS-E lenses are tilt-shift lenses designed for EOS cameras. The tilt-shift mechanism enables photographers
Copy of Instruction Manual
 Copy of Instruction Manual 500/8,0 Tele Mirror Lens T2 Gewerbering 26 86666 Burgheim Tel. +49 84 32 / 9489-0 Fax. +49 84 32 / 9489-8333 email: info@foto-walser.de www.foto-walser.de 1 Content 0.... Introduction
Optec WiFi Board
 Optec WiFi 802.11 Board Installation Instructions for the Optec 802.11b/g Wireless Board. The Optec Wireless Networking Board (WiFi) is an optional accessory for the FocusLynx and Gemini control hubs.
Buxton & District U3A Digital Photography Beginners Group Lesson 6: Understanding Exposure. 19 November 2013
 U3A Group Lesson 6: Understanding Exposure 19 November 2013 Programme Buxton & District 19 September Exploring your camera 1 October You ve taken some pictures now what? (Viewing pictures; filing on your
Digital Imaging Study Questions Chapter 8 /100 Total Points Homework Grade
 Name: Class: Date: Digital Imaging Study Questions Chapter 8 _/100 Total Points Homework Grade True/False Indicate whether the sentence or statement is true or false. 1. You can change the lens on most
Yashica A Posted 8-26-'02
 Yashica A Posted 8-26-'02 This camera manual library is for reference and historical purposes, all rights reserved. This page is copyright by, M. Butkus, NJ. This page may not be sold or distributed without
User English Manual for Sputnik Stereo Camera
 User English Manual for Sputnik Stereo Camera STEREOSCOPIC SET Stereoscopic photography in contrast to conventional to-dimensional photography makes it possible to obtain pictures which give correct three-dimensional
CREATIVE EXPOSURE MODES
 9-6- MM-B08 (E).qxd 0.8. 6: Page 50 DRIVE MODES Focus Lock in Remote Control Mode When your subject is not centered in the focus frame, use manual focus or focus lock. Set the camera to the remotecontrol
Using DSLR for Video
 Using DSLR for Video Is your DSLR the right tool? Shooting objects moving towards or away from the camera is not well suited for DSLR use, and would be best shot with video camera. This is because Auto
DSLR Camera Cage Shoulder Rig Kit (FC-03)
") FILMCITY DSLR Camera Cage Shoulder Rig Kit 1 DSLR Camera Cage Shoulder Rig Kit (FC-03) I N S T R U C T I O N M A N U A L All rights reserved. No part of this document may be reproduced, stored in a retrieval
FILMCITY DSLR Camera Cage Shoulder Rig Kit 1 DSLR Camera Cage Shoulder Rig Kit (FC-03) I N S T R U C T I O N M A N U A L All rights reserved. No part of this document may be reproduced, stored in a retrieval
Olympus Trip 35 Illustrated Repair Instructions
 Olympus Trip 35 Illustrated Repair Instructions Olympus introduced the Trip 35 in 1968. The camera remained in production for 20 years, and Olympus sold over 10 million of them. Both of these numbers must
OUTDOOR SECURITY CAMERA WITH LED FLOODLIGHT
 OUTDOOR SECURITY CAMERA WITH LED FLOODLIGHT Wifi Security Camera With LED Floodlight Features 20W with 1600 Lumens Indoor and Outdoor Wifi IP Camera with LED flood light Passive IR and Motion sensor Support
VMC Touch: Mounting Monitor Bracket Ports Connection And Cables Installation
 The Touch Monitor with the application VMC touch expands a SeMSy III Workstation Software with a convenient multi-touch operation. Many functions of the individual modules of a SeMSy III Workstation Software
615HD Digital Video Camera
 615HD Digital Video Camera User Manual 2009-2011 Sakar International, Inc. All rights reserved. Windows and the Windows logo are registered trademarks of Microsoft Corporation. All other trademarks are
Kodak Retina II (type 122)
") Kodak Retina II (type 122) The type 122 Retina II camera is a very uncommon model, there are probably fewer than a hundred in collections around the world, with instruction books rarer still, so I thought
Kodak Retina II (type 122) The type 122 Retina II camera is a very uncommon model, there are probably fewer than a hundred in collections around the world, with instruction books rarer still, so I thought
2014 All Rights Reserved. Windows and the Windows logo are registered trademarks of Microsoft Corporation. All other trademarks are the property of
 2014 All Rights Reserved. Windows and the Windows logo are registered trademarks of Microsoft Corporation. All other trademarks are the property of their respective companies. 1 Thank you for purchasing
Mac Mini Mid 2010 SSD Installation
 Mac Mini Mid 2010 SSD Installation Replace your Mac Mini Mid 2010's hard drive for more storage space and an increase in speed. Written By: Dozuki System 2017 guides.crucial.com Page 1 of 15 INTRODUCTION
Carl Zeiss Compact Prime CP.2 Lenses
 Carl Zeiss Compact Prime CP.2 Lenses High Flexibility Meets Maximum Quality The Compact Prime CP.2 lenses are the latest members of the ZEISS family of lenses for digital and film cameras. This second
INFINIPROBE TS-160 UNIVERSAL INSTRUCTIONS FOR USE
 Photo-Optical Company Manufacturers of precision optical instruments. 7108 S. Alton Way, Bldg. D, Centennial, CO 80112 Tel: (303) 440-4544 Fax: (303) 440-4144 sales@infinity-usa.com www.infinity-usa.com