Note: If the configuration of your computer is inferior to the recommended configuration, the running performance of the data modem may be affected.
|
|
|
- Laurence Wells
- 5 years ago
- Views:
Transcription


1 Olive CM 200
2 Table of Contents Introduction... 3 System Requirements... 3 Technical Specifications... 3 Installation Guide For Windows... 4 Installation Guide For MAC OS Installation Guide For Linux... 25
3 INTRODUCTION With the TATA Photon Whiz, you can easily: Access the Internet View the statistics Make and answer calls Use the call logs service Send and receive message Use the phonebook SYSTEM REQUIREMENTS CPU: Pentium4 1GHz or above Memory: 256MB or above Hard Disk: 50 MB free disk space Support Operating System: o Windows 2000SP4/XP SP2/Vista/Win7 or o MAC 10.5/10.6 or o Linux Ubuntu 9.04&8.10 Interface: USB 1.1 or above Note: If the configuration of your computer is inferior to the recommended configuration, the running performance of the data modem may be affected. TECHNICAL SPECIFICATIONS Technical Standard: CDMA2000 1X USB Interface Standard: USB 2.0 Full Speed Maximum Transmit Power:>24dBm Data Rate: 153.6kbps Frequency Band: 800 MHz Dimensions: mm Weight: 22g Operating Temperature:0 to 55 Storage Temperature:-20 to 65 Operating Humidity:5 to 95 Storage Humidity:5 to 95
4 INSTALLATION GUIDE FOR WINDOWS The installation process is subject to different operating systems, such as Windows 2000, Windows XP, Windows Vista, Macintosh.During the actual installation, if any step differs from what is described here, follow the specific installation instructions. Installation 1. Put the TATA Photon Whiz into the USB interface; 2. The setup program starts automatically, and the USB Modem installation interface is displayed later. 3. Follow the instructions of the program; 4. Once the installation completes, the shortcut icon for TATA Photon Whiz Manager appears on the desktop; 5. When the system prompts you that the installation is finished, click <Finish> to finish the installation of the TATA Photon Whiz Manager. Uninstalling Uninstalling the TATA Photon Whiz Manager through the Add / Remove in the Windows. Accessing & Exiting Accessing the TATA Photon Whiz Manager GUI To start program, double-click the shortcut icon Manager on the desktop. of the TATA Photon Whiz Exiting the TATA Photon Whiz Manager Click the button on the right corner on the interface.
5 Activation of the device When the installation is complete, the following dialer opens up On dialing *228, the following series of screens appears

6 The instructions will be available on audio. The IVR will prompt you to choose your language of preference, type of service (Prepaid/Postpaid) and th1 4-digit PIN Number. This 14-digit Pin number will be available by scratching the silver strip available on the Activation Card / Get Connected Card. Once these digits are entered, the system will confirm successful activation. In case the activation fails, kindly retry after sometime. Details of the Dialer The initial interface after the TATA Photon Whiz Manager starts is as follows.

7 Shortcut Icon :Access the Connect interface :Start the default internet browser in your operating system :Access the Usage interface :Access the Call and Call log interface :Access the SMS interface :Access the Phonebook interface :Access the Options interface : View the Help document
8 Internet Service Click to display the Connect interface. 1. Choose a profile and click <Connect> to set up a connection; 2. When the connection is set up, click or start the browser on your computer, and then you can access the internet; 3. Click <Disconnect> to disconnect from the network. Usage Service Click and access the Usage interface. You can view the content of the statistics, including sent and received statistic values and the duration of the connection. You can select the operation you need. The operation options are: Reset statistics, Expand all, Collapse all, view net log. Reset statistics Clear the statistical information Expand all Collapse all View net log Start all of the data Close all data View the information of the network Note: The above data of the statistic is for your reference only. Call Service When you use call service, you need to insert the earphone to the earphone jack on the USB Modem. Click to display the Voice Call and History interface. Make a call The TATA Photon Whiz provides many easy and quick ways to make a call. Entering a telephone number directly You can make a call by entering a telephone number directly. 1. Click the telephone keypad on the call interface; 2. Click <Dial> to make a call; 3. Click <End> to hang up.
9 Note: You can press <Clear> to delete number on the call interface digit by digit. You can press and hold <Clear> to clear the whole number. Selecting a telephone number in the phonebook You can make a call by selecting a telephone number in the phonebook. 1. Click <Contacts> and the phonebook interface is displayed. Double-click a contact or select a contact and then click <Dial>. If there is only one number in the selected contact, then the number is displayed on call interface and dial out. If two or more number(s) in the selected contact, double-click the selected number in the pop-up Select interface or click <OK> after selecting the number. The selected number is displayed on the call interface and dial out. 2. Click <End> to hang up. Selecting a recently dialed number You can make a call by selecting a number from the recently dialed number. 1. Click Dialed/Received/Missed, and click <Dial> after selecting the number. Then the number is dialed out. 2. Click <End> to hang up. Answering a call An alert window is displayed when there is an incoming call. You can choose the options as follows. 1. Click <Answer> to answer the call 2. Click <Reject> to reject the call Volume Adjustment You can adjust volume during the call. Call History The call history contains information about dialed, received and missed calls. Each kind of call supports up to 50 items. Missed/Incoming/Outgoing calls
10 Click Missed / Incoming / Outgoing, and the Missed / Incoming / Outgoing calls interface is displayed. Saving a number 1. Select an item and click <Save>; 2. The Select Position interface is displayed, and select the position you want to save; 3. Click <OK>; 4. The New Contact interface is displayed. Enter required relevant information for this contact. 5. Click <OK> to save the contact. Deleting a call You can delete one or more item(s) from the call history. 1. Select one or more item(s), click <Delete>; 2. Click <OK> to confirm. Making a call You can dial the number of the call history. 1. Select an item and click <Dial>; 2. The Dial interface is displayed, and the selected number appears automatically on the interface, and dialed out at the same time. Sending a message You can send a message to the number of the call history. 1. Select any item and click <SMS>; 2. The TATA Photon Whiz automatically retrieves the number in the selected items, and the Write SMS interface is displayed. 3. The retrieved numbers are automatically displayed in the blank field behind the Contacts. Input the content for the message and click <Send>.SMS Click to display the SMS interface.
11 Inbox The inbox stores messages you have received. It supports up to 500 messages. When the inbox is full and a new message is coming, the earliest message in the inbox is deleted automatically. Outbox The messages you have sent out are saved in the Outbox. Up to 500 messages can be stored in the Outbox. When the Outbox is full and an additional message is coming, the earliest message in the Outbox is deleted automatically. Draft The messages that you write on the Write SMS window, if saved, can be store d in the draft. Up to 500 messages can be stored in Draft. Archive The message you have moved from the inbox can be stored in the archive. Up to 500 messages can be stored in the Archive. Viewing a message You can view a message in the Inbox/Outbox/Draft/Archive directly. 1. Click Inbox/Outbox/Draft/Archive to open and browser the Inbox/Outbox/Draft/Archive. 2. When there is a new message, you can see the alert window. Click < View> to view the message, Click <Cancel> to close the window. Writing a new message 1. Click and the Write SMS interface is displayed; 2. Enter the telephone number(s) by one of the following ways: To enter one or more number directly: In the Contacts textbox, enter the numbers separated by semicolons ; To select a number from the Contacts: Click <Contacts>. Select one or more contact(s) and click <OK>. Select the number to send a message in the pop-up dialog box and click <OK>. 3. Input the message. The maximum length of each message is 160 characters. 4. Click <Templates> to insert message template. 5. Click <Send> to send message.
12 After the message is sent successfully, it is automatically saved to the Outbox. If the message is sent unsuccessfully, the message is saved to Outbox. Click <Save> to save message to the Draft. Click <Clear> to clear the message content. Click <Close> to close the window. Note: The TATA Photon Whiz supports to send a message to a group of up to 40 numbers. When your message contains no more than 160 characters, it is sent as one message. If this limit is exceeded, the message is divided to several messages and sent one by one. Replying a message You can reply to a message directly in the inbox. 1. Select a message and click ; 2. The telephone number of the original sender appears automatically in the blank filed behind <Contacts> and you can change it; 3. Input the content for the message to reply; 4. Click <Send> to reply a message. Forwarding a message In Inbox/Outbox, you can forward a message to other contacts. 1. Select a message and click ; 2. Input the telephone number to forward to, or click <Contacts> to select the number; 3. The content of the message to forward displays automatically in the text box. You can edit it. 4. Click <Send> to forward a message. Deleting a message In inbox/outbox/draft/archive, you can delete a message. 1. Select one or more message(s) and click ; 2. Click <OK> to confirm. Extracting a number You can save the number of a message to the phonebook. 1. Select a message and click ; 2. The Select Number interface is displayed, select the number and click <OK>; 3. The Select Position interface is displayed, select the position and click < OK>; 4. Input the required information of this number; 5. Click <OK>. Searching a message The TATA Photon Whiz provides the function of searching a message in the SMS.
13 1. Enter relevant searching term in the text box, and click ; 2. The message that matches the condition specified will be shown on the screen. Making a call You can call back the number of a message sender. 1. Select a message and click.; 2. The Dial interface is displayed. The number of the message sender is displayed and dialed out automatically at the same time. Editing a message In Outbox/Draft, you can edit a message. 1. Select a message and click ; 2. Change the information and click <Send> or <Save>. Archiving a message In Inbox, you can archive a message. 1. Select a message and click ; 2. You can archive a message in the Inbox to the Archive. Resuming a message 1. Select a message and click ; 2. You can resume a message in the Archive to the Inbox. Transferring a message between PC and USB Modem You can import the message saved in the PC and USB Modem from one to another. 1. Click and the Transfer SMS interface is displayed; 2. Select the source location and target location in the drop -down box; 3. Select an operation mode: <Copy> : The SMS in the source location is kept <Move> : The SMS in the source location is deleted 4. Select a message in the source location and click the below arrows: Click : Transfer the SMS from the below side of the arrow to the above side of the arrow. Click : Transfer the SMS from the above side of the arrow to the below side of the arrow.
14 Voic 1. Click <Listen> to open the Voice dialogue box and receive the voic . If the <Listen> is blank, which means there is no voice mail. 2. Click <View last voice mail> to view the text message in last voice mail. 3. Click <Clear voice mail icon> to clear the information of the voice mail. Phonebook Service The TATA Photon Whiz can store up to 500 contacts. You can create, modify and delete the contacts. You can also send messages to the contacts. The TATA Photon Whiz also supports the import/export of the contacts for your convenience to manage the contacts. Click to display the phonebook interface. Creating a contact 1. Click and the Contact interface is displayed; 2. Select an image for the current entry and edit the information of the entry; 3. Click <OK> to save a new contact to the phonebook. Modifying a contact 1. Select a contact and click ; 2. Modify the relative information ; 3. Click <OK> to save. Deleting a contact 1. Select one or more contact(s) from the phonebook and click ; 2. Click <OK> to confirm. Grouping in the phonebook 1. Click and the Group interface is displayed; 2. Click <New> to create a new group; Input the group name, and click <Edit Member> to add or delete the group member; Click <OK> to save the group; Click <Cancel> to close the window. 3. Select the group name and click <Edit> to modify the information of this group; 4. Select the group name and click <Delete> to delete this group; 5. Click <Close> to close the window.
15 Searching a contact The TATA Photon Whiz provides the function of searching a contact in the phonebook. 1. Click and the Search Contact interface is displayed; 2. Enter relevant searching terms in the value text box to click <Search>; 3. Click <Ahead> or <Next> to scroll among the entries which have been found. Making a call You can dial out the number you have selected from the phonebook. 1. Select the contact that contains the number to dial from the phonebook, and click. If the selected contact contains only one telephone number, the dial interface is displayed automatically. If two or more telephone numbers are contained in the selected contact, the Select number interface is displayed and you are prompted to select one number. After doing that, click <OK> and the dial interface is displayed. The selected number is appears on the dial interface automatically and dialed out automatically at the same time. Sending a message The TATA Photon Whiz allows you to select a number from the phonebook and send a message. 1. Select a contact from the phonebook; 2. Click and the Write SMS interface is displayed; 3. The Name or number appears in the blank field behind the <Contacts>. Input the content for the message and Click <Send>. Transferring a contact between PC and USB Modem You can import the contacts saved in the PC and USB Modem from one to another. 1. Click and the Transfer Dialog is displayed; 2. Select the source location and target location in the drop -down box; 3. You can do follows: <Copy Some>: Copy the selected phonebook entries to the target location; <Move Some>: Move the selected phonebook entries from the source location to the target location; <Copy All>: Copy all phonebook entries of the source location to the target location; <Move All>: Move all phonebook entries of the source location to the target location. Importing a contact The TATA Photon Whiz allows you to import the contacts from a file in a specified format to the USB Modem contacts. The TATA Photon Whiz supports for importing of the *.csv and *.vcf files.
16 1. Select Import PB option by clicking the right key of the mouse; 2. Select the importing mode; 3. Click <OK> to load the contact to the phonebook. Exporting a contact The TATA Photon Whiz allows you to export the contacts from the USB Modem contacts to a file. 1. Select Export PB option by clicking the right key of the mouse; 2. Select the desired file format (*csv / *.vcf.); 3. Click <Save> to finish. Options Click to display the Options interface. Text Message Setting Priority Select the priority level for sending a message. Validity Period In the period of validity, the message center will repeat to deliver a message till it is received. Delivery Report You can enable or disable this function. If the function is enabled, after you send a message, the network can send a message to inform you that the receiver has got the message you have sent. Defer Delivery Select the time for sending a message. Voice mailbox number Enter the voice mailbox number in the editing box. Alert Window Check the box, replace the last message automatically when inbox is full; Check the box, and an alert window is displayed whenever a new message comes. Alert tone If a sound file is selected, it plays on the earphone of TATA Photon Whiz whenever a new message comes. Click <Browse > to select a sound file. Click <Save> to save the settings. Call Settings Call settings provide you with the following functions: sound, call diverting, call waiting and call privacy. Sound: If a sound file is selected, it plays on the earphone of TATA Photon Whiz whenever a call comes. Click <Browse > to select a sound file.
17 Call diverting: This service enables you to divert some incoming calls to other preset numbers. Call waiting: You can set enable or disable the call waiting. Voice privacy: You can enable or disable the voice privacy. Profile Setting Creating a profile 1. Click <New> to open the New Profile dialogue box; 2. Enter a new profile name in the Profile Name field; 3. Enter required relevant information for the settings; 4. Click <Save> to finish. Deleting a profile 1. In the Profile Name field, select a profile to delete; 2. Click <Delete>. Modifying a profile 1. In the Profile Name field, select a profile to modify 2. Modify the relevant information for the settings; 3. Click <Save> to finish. Preference Setting Click <Preference> and the Password Confirm interface is displayed. You need to enter the password. The default password is Startup Setting You can set the Dialer to connect internet when program start up, start main window minimized and auto run when USB modem plug in. Standby / Hibernate Setting You can set TATA Photon Whiz Manager to prevent or allow standby / hibernate. Dialer Lock You can set dialer lock. Dialer lock only locks dialer in same PC. International prefix You can select automatic or manual to set the international prefix. Usage Limit 1. Click <Usage limit> and the Usage Limit interface is displayed; 2. Enter required relevant information for the settings;

18 3. Click <OK> to save the settings. Modify PWD 1. Click <Modify PWD> and the Modify Password interface is displayed; 2. Enter the current password and the new password, and click <OK> to modify it Diagnostics The TATA Photon Whiz allows you to query information for the USB Modem. Help Document Click to display the Help interface. The TATA Photon Whiz provides the function of viewing help document. INSTALLATION GUIDE FOR MAC OS Cm200Driver is compatible with Mac OS 10.4 and above version 1. Install Cm200Driver Plug in Cm200 Device, then appears a CD named Haier USB MODEM, double-clicked it.. or We have copy the driver on MAC PC and can run (1/1) Double-click package "cm200_driver_ pkg"(1/1), authenticate with user name and password.
")
19 (1/2) (1/3)
")
20 (1/4) (1/5)


 Open Applications folder, find ZTerm applicaion (2/2),")
21 (1/6) 2. Connecting Pull out the datacard, and restart your computer. Then, plug in your device again, and check the driver status, input " ls /dev/cu.* " in Terminal. Find two ports of cm cm200-app and CM200-Modem. (2/1) Open Applications folder, find ZTerm applicaion (2/2), double-clicked ZTerm. (2/2) Open Settings->Modem Preferences window, select "CM200-APP" (2/3).
.")

22 Then input AT: "at+rf=1", "at+crm=0", like pic(2/4). (2/3) (2/4) Then open System Preference - > Network, click "+" button at then left bottom (2/6), then select Interface "USB Wireless Modem". (2/5)
.")

23 (2/6) (2/7) Click "Create" button to add cm200 interface (2/7). Then, select "cm200", input the correct dial configure : Telephone Number is #777, and Account Name is internet and Password is internet (2/8).

, then can visit the internet. (2/9)")
24 (2/8) Click "Advanced " button at right bottom, set "Vendor" of " Other", "Model" of "HaierDriver", click "OK" to save this configuration, and then click "Apply" button of pic(2/8) Click Connect button of pic(2/8), then can visit the internet. (2/9)

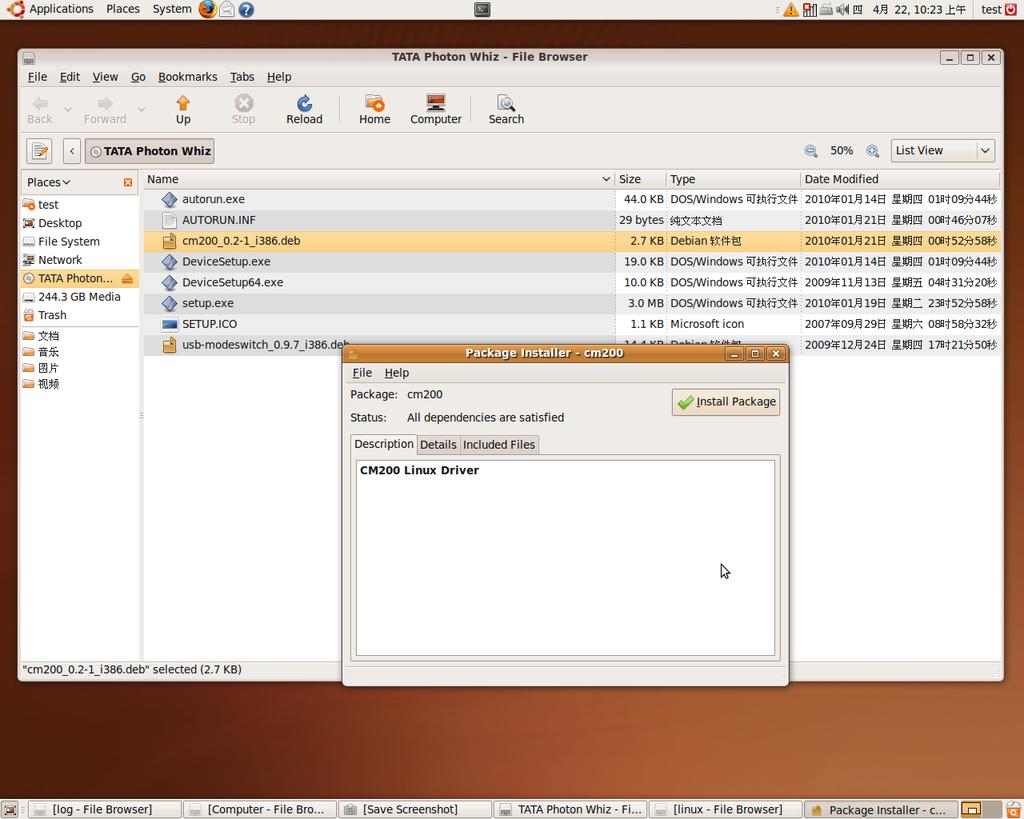
25 (2/10) 3. Uninstall /System/Library/Extensions, find " Cm200Driver.kext " and delete it. INSTALLATION GUIDE FOR LINUX When you first plug CM200 datacard into your computer, please operate according to the following steps: A CD titled with TATA Photon Whiz will appear, which contains the driver for CM200, please double click it as shown in following figure.

26

27 Install usb-modeswitch_0.9.7_i386.deb first After installation:

28 Then install CM200_0.2-1_i386.deb. Note: If you install the package before installing usb-modeswitch_0.9.7_i386.deb, message Error: Dependency is not satisfiable: usb-modeswitch will appear.
29 After installation,

30 Configuration and Connect to internet 1. Click the applications menu and select the accessories submenu, click the terminal item, the terminal will be opened.
31 2. Copy wvdial.config to /etc (enter the following command in terminal) # sudo cp -f /usr/share/doc/haier/wvdial.conf /etc/
32 3. Open the wvdial.conf document. (enter the following command in terminal) # sudo gedit /etc/wvdial.conf 4. Change the phone number/username/password in /etc/wvdial.conf under cm200 section, according to your network requirements.
 # sudo")
33 5. Connect to the network (enter the following command in terminal) # sudo wvdial cm200
34
Wonderful Communication, Mobile Life
 Wonderful Communication, Mobile Life Thank you for choosing Huawei EC325 Data Modem from Huawei Technologies Co., Ltd. HUAWEI EC325 Data Modem User Manual Copyright 2007 Huawei Technologies Co., Ltd. All
Table of Contents Product Features... 3 Device Overview... 3 Technical Specifications... 4 System Requirements Installation Procedure...
 EpiValley 8089 1 Table of Contents Product Features... 3 Device Overview... 3 Technical Specifications... 4 System Requirements... 4 Installation Procedure... 5 Windows... 5 Introduction for installation...
TELTONIKA 3.5G MODEM CONTROL TOOL. User Manual
 TELTONIKA 3.5G MODEM CONTROL TOOL User Manual INDEX INSTALLING TELTONIKA MODEM CONTROL TOOL...3 UNINSTALLING TELTONIKA MODEM CONTROL TOOL...7 3.5G CONNECT INTRODUCTION...8 INTERNET SERVICE...10 SMS SERVICE...11
DG BA Mbps 3.5G Broadband Adapter User Manual
 DG BA3314 14.4Mbps 3.5G Broadband Adapter User Manual V1.0 2013-09-28 As our products undergo continuous development the specifications are subject to change without prior notice COPYRIGHT Copyright 2013
Wonderful Communication, Mobile Life.
 Wonderful Communication, Mobile Life. Welcome to use HUAWEI 3G Data Card from Huawei Technologies Co., Ltd. HUAWEI 3G Data Card User Manual Copyright 2005 Huawei Technologies Co., Ltd. All Rights Reserved
CAMagic Mobile. User s Manual
 CAMagic Mobile User s Manual Table of Contents Welcome... 3 Installing CAMagic Mobile... 4 System Requirements... 4 Installing Software... 5 Pairing... 6 Operating CAMagic Mobile Application... 8 Main
mobile PhoneTools User s Guide
 mobile PhoneTools User s Guide Contents Requirements...2 Installing mobile PhoneTools...3 Mobile installation and configuration...4 Online registration... 6 Uninstalling mobile PhoneTools... 6 mobile PhoneTools
Samsung PC Studio 3.1 User s Guide
 Samsung PC Studio 3.1 User s Guide Copyright 2005-2006 Samsung Electronics Co., Ltd. Contents 1. Samsung PC Studio...3 1.1. System Requirements...3 1.2. PC Studio Features...3 1.3. Live Update...9 2. Connection...11
Central Monitoring by Center V2
 CHAPTER 9 Central Monitoring by Center V2 With Center V2, central monitoring station (CMS) can be deployed immediately because it brings multiple GV systems together into an integrated interface, allowing
IP Softphone 2050 and Mobile Voice Client 2050 User Guide
 Nortel Networks Communication Server 1000 IP Softphone 2050 and Mobile Voice Client 2050 User Guide Revision history Revision history September 2004 Standard 4.00. This document is up-issued for Communication
Wonderful Communication, Mobile Life. Welcome to HUAWEI E220 HSDPA USB Modem. HUAWEI E220 HSDPA USB Modem User Manual
 Wonderful Communication, Mobile Life. Welcome to HUAWEI E220 HSDPA USB Modem. HUAWEI E220 HSDPA USB Modem User Manual Copyright 2006 Huawei Technologies Co., Ltd. All Rights Reserved No part of this manual
USB to Serial Adapter Driver Installation Manual
 USB to Serial Adapter Driver Installation Manual For Windows 98 / ME / 2000 / XP / Vista / 7/ 8 / Mac Contents Introduction Features & Specifications System Requirements Installing the Device Uninstalling
VMS User s Guide: PMM Utility
 Release 1.7 December 2008 NOTICE All rights reserved. No part of this document may be changed, reproduced or transmitted in any form or by any means (electronic, photocopying, recording, or otherwise)
Nortel IP Phone 1120E/1140E User Guide (CICM).
.") Nortel IP Phone 1120E/1140E User Guide (CICM). Overview Nortel IP Phone 1120E/1140E brings voice and data to the desktop by connecting directly to a Local Area Network (LAN) through an Ethernet connection.
Nortel IP Phone 1120E/1140E User Guide (CICM). Overview Nortel IP Phone 1120E/1140E brings voice and data to the desktop by connecting directly to a Local Area Network (LAN) through an Ethernet connection.
Content. 1 D-Link dongle Introduction Installation Functions & Operation Help FAQ & Answers...25
 1 Content 1 D-Link dongle Introduction...3 1.1 Introduction... 3 1.2 Safety Warning and Notice... 3 1.3 Applicability Scope... 4 1.4 System Requirements... 5 1.5 Functions... 5 2 Installation...6 2.1 Connect
PC Phone User s Manual
 PC Phone User s Manual 1 1.Overview... 3 About This Guide... 3 2.Configuration... 4 2.1 Setup Requirements... 4 2.2 Configuration... 4 3. Using The PC Phone... 5 3.1 PC Phone Interface... 5 3.2 Functions...
Welcome Packing List Specifications Safety Precautions
 USER MANUAL Welcome Thanks for purchasing product KOCASO Discover. Please read this instruction manual carefully before use. Packing List Upon opening the package, please check for the following items:
Fixed Wireless Phone. User Manual
 Fixed Wireless Phone User Manual V1.0 Content 1. Introduction... 1 2. Important Information... 2 3. Dos & Don ts... 2 4. Views... 4 5 Key board Introduction... 4 6. Installation... 5 6.1 SIM card installation...
CT-101 CT-101 USB CORDLESS PHONE
 CT-101 CT-101 USB CORDLESS PHONE CT-101 CT-101 USB CORDLESS PHONE User s Manual VERSION 0.99A 1 Table of Content 1. CT-101 USB CORDLESS PHONE..... 3 1.1 Descriptions & Overview.......3 2. PACKAGE CONTENTS...
V520 Mobile Phone User Manual
 V520 Mobile Phone User Manual 1 Mobile Phone Icon Glossary... 3 2 Getting Started... 4 2.1 Inserting the SIM card... 4 2.2 Installing the battery... 4 2.3 Removing the battery... 4 2.4 Charging the battery...
Instructions for SAP CCtr. How to use SAP Contact Center phone system
 Instructions for SAP CCtr How to use SAP Contact Center phone system How to start the program 1. Open Internet Explorer browser. Type http://[sap Contact Center Website].ipcallcenters.eu into the address
HP Travel Phone User s Guide
 HP Travel Phone User s Guide Version 1.0 Copyright 2007 Hewlett-Packard Development Company, L.P. The information contained herein is subject to change without notice. The only warranties for HP products
Version: User Manual. HSPA+ USB Adapter DWM-157
 Version:2.0 2013.1.21 User Manual HSPA+ USB Adapter DWM-157 Introduction... 1 HSPA+ USB Adapter Introduction... 3 Internet service... 5 SMS service... 6 Contacts... 9 USSD...11 Settings...12 FAQ & Answers...15
Voice Mail System User s Guide
 Voice Mail System User s Guide Personal Mailbox Management (PMM) Utility Program VERSION 2.0 MARCH, 2005 PROPRIETARY VMS User s Guide: PMM Utility Program (v. 2) I Contents 1. Introduction...1 2. Personal
Digital Voice Softphone User Guide Version 2.0. Digital Voice Softphone User Guide Version 2.0
 Digital Voice Softphone User Guide 1 TABLE OF CONTENTS 1. Set-up... 3 1.1. Using the Digital Voice Softphone... 3 1.2. Digital Voice Softphone Set-up... 3 1.3. System Requirements... 4 1.4. Installing
User Manual. Consumer OneClick Internet. for Gobi Sierra Version st May 2010
 User Manual Consumer OneClick Internet for Gobi 2000 Sierra Version 1.8 21 st May 2010 WebToGo Mobiles Internet GmbH 81371 München, Oberländerstr. 2a Table of Content 1. General 2. Starting OneClick Connection
User's Guide. Voice Messaging and Fax Software. FaxTalk Communicator SETM
 User's Guide Voice Messaging and Fax Software FaxTalk Communicator SETM FaxTalk Communicator SE for Windows Version 4.7 Telephone Consumer Protection Act of 1991 "It shall be unlawful for any person within
AUGUST CommPortal GUIDE
 AUGUST 2018 CommPortal GUIDE 2 AirePBX CommPortal Guide Table of Contents 1 Introduction...4 1.1 About This Manual...4 2 CommPortal Overview...5 2.1 Interface overview...5 2.2 Browser and Operating System
video phone Quick Start Guide
 600410 IRIS V video phone Quick Start Guide Getting Started 1 3 2 4 Check to make sure that your box contains each of the items pictured above: 1 IRIS V video phone 2 Handset 3 Ethernet cable (RJ-45) 4
User Manual WatchPower
 User Manual WatchPower Management Software for Inverter Table of Contents 1. WatchPower Overview... 1 1.1. Introduction... 1 1.2. Features... 1 2. WatchPower Install and Uninstall... 1 2.1. System Requirement...
Contents. Broadband USB Modem User Manual AU V1.0 1
 Contents 1 Introduction... 3 1.1 Warnings and Safety Notice...3 1.2 Radiation from Electronic Devices...5 1.3 System requirements...6 1.4 Functions...6 1.5 Technical Specifications...7 1.6 LED indications...9
User Manual PDUTracker
 User Manual PDUTracker Management Software for PDU Table of Contents 1. Overview... 1 1.1. Introduction... 1 1.2. Features... 1 2. Install and Uninstall... 1 2.1. System Requirement... 1 2.2. Software
Accession Communicator for Desktop User Guide Hosted IP Phone System
 Download Accession Communicator: Go to: http://portal.popp.com Number: end user s 10-digit phone number Password: initial password provided by POPP [Login] [Downloads] at the bottom of the screen [View
User Manual WatchPower
 User Manual WatchPower Management Software for SP Efecto / SP Brilliant (Plus) / SP Initial Table of Contents 1. WatchPower Overview...1 1.1. Introduction... 1 1.2. Features... 1 2. WatchPower Install
SolarPower Pro. User s Manual. Management Software for Solar Inverter
 SolarPower Pro User s Manual Management Software for Solar Inverter Table of Contents 1. SolarPower Pro Overview... 2 1.1. Introduction... 2 1.2. Structure... 2 1.3. Features... 3 2. SolarPower Pro Install
Check your system requirements
 Check your system requirements 1. Check you have a spare USB port (USB 1.0 or 2.0) 2. You need to be running Windows 2000 / XP / Vista for a PC or OS X 10.5 and above for a Mac 3. The recommended system
User Manual. MPPTracker. Management Software for Solar Charge Controller. Version: 1.2
 User Manual MPPTracker Management Software for Solar Charge Controller Version: 1.2 Table of Contents 1. MPPTracker Overview... 1 1.1. Introduction... 1 1.2. Features... 1 2. MPPTracker Install and Uninstall...
Package Contents: Important Note:
 Contents 1 Introduction... 3 1.1 Introduction... 3 1.2 Warnings and Safety Notice... 3 1.3 Radiation from Electronic Devices... 5 1.4 System requirements... 5 1.5 Functions... 6 1.6 Technical Specifications...
PhoneLink for Outlook User Manual
 PhoneLink for Outlook User Manual for use with 8810, 8610/8620, and 6210/6220 ISDN Telephones PhoneLink for Outlook is an add-in for Microsoft Outlook that manages inbound calls to multiple call appearances
Solutions Reference Guide. IP TalkSM. Voic & Navigator Web Portal
 IP Talk SM Solutions Reference Guide IP TalkSM Voicemail & Navigator Web Portal Table of Contents Voicemail Accessing Your Voicemail................... 1 Voicemail Main Menu........................ 2
The Hong Kong University of Science and Technology Telephone Web Portal User Guide
 The Hong Kong University of Science and Technology Telephone Web Portal User Guide The HKUST IP phone system is enhanced to support many advanced features. This user guide walks through the most useful
Phone Settings 26 Ringer Volume 26. Basic Calling Features 13 Help Online Services 43
 1 Congratulations on purchasing your new VTech product. Before using this telephone, please read the Important safety instructions on page 89 of this manual. The information contained in this manual is
Toolbar User Guide. Release 17.0
 Toolbar User Guide Release 17.0 2012 by Cox Communications. All rights reserved. No part of this document may be reproduced or transmitted in any form or by any means, electronic, mechanical, photocopying,
Unified Communicator Mobile
 MITEL Unified Communicator Mobile Mobile Client Handset User Guide Release 2.2 Mobile Client Handset User Guide NOTICE The information contained in this document is believed to be accurate in all respects
Please read and retain these instructions for future reference v002: 14/03/17. Cradle, Charger, Instruction manual, Lithium-ion Battery 3.7 V d.c.
 Power Details: AC Charger Input voltage: 100-240V ~ 50/60Hz, 200mA Cradle Input Voltage: DC 5V, 500mA Cradle Output Voltage: DC 5V, 500mA Accessories: Cradle, Charger, Instruction manual, Lithium-ion Battery
PL-2303 USB-to-Serial Bridge Controller Mac OS X Universal Binary Driver Installation Guide
 PL-2303 USB-to-Serial Bridge Controller Mac OS X Universal Binary Driver Installation Guide Introduction This installation guide document shows the procedure for installing the MacOS X driver for Prolific
TraiTel Telecommunications. TTMessenger 4.xx. User Manual
 TraiTel Telecommunications TTMessenger 4.xx User Manual Contents Getting Started... 5 What is TTMessenger?... 5 System Requirements... 5 Operating System... 5 Hardware requirements Minimum Recommended...
SAM User Manual. EpiValley. Rev 0.1
 SAM User Manual EpiValley Rev 0.1 October 01, 2007 Revision History Rev 0.1 2007. 08. 22 First issue Hyeong Seop Yoon 2 Contents 1. Installation & Setup... 4 2. Getting Started... 10 3. UIM... 11 4. Internet...
QUICK START GUIDE NTS HOSTED PBX CALL MANAGER. Welcome. Getting Oriented
 QUICK START GUIDE NTS HOSTED PBX Welcome Welcome to NTS Hosted PBX! This guide is intended to get you up and running with the basic features associated with the product. For more in-depth information,
BUSINESS LINE COMMPORTAL GUIDE
 wowforbusiness.com BUSINESS LINE COMMPORTAL GUIDE WOW! Business BCSE.U.1505.O Business Line CommPortal Guide Table of Contents Getting Started...3 Dashboard...4 Messages and Calls...5 Messages...5 Missed
For ClassPad 300. ClassPad Manager. (ProgramLink) Limited Version. User s Guide. RJA
 Limited Version. User s Guide. RJA") For ClassPad 300 E ClassPad Manager (ProgramLink) Limited Version User s Guide RJA510188-4 http://world.casio.com/edu_e/ Note Display examples shown in this User s Guide are intended for illustrative purposes
For ClassPad 300 E ClassPad Manager (ProgramLink) Limited Version User s Guide RJA510188-4 http://world.casio.com/edu_e/ Note Display examples shown in this User s Guide are intended for illustrative purposes
Android Softphone User Guide
 Android Softphone User Guide Dialer Screen From the main screen you can dial local extensions or external phone numbers, and access any of the Softphone features. NOTE: It is NOT to be used to dial 9-1-1.
Creative USB Adapter CB2431 with Bluetooth Wireless Technology. User s Guide
 Creative USB Adapter CB2431 with Bluetooth Wireless Technology User s Guide Application Setup & User s Guide Information in this document is subject to change without notice and does not represent a commitment
Calling Features. Cisco Unified IP Conference Phone 8831 User Guide for Cisco Unified Communications Manager 9.3 1
 You can perform basic call-handling tasks using a range of features and services. Feature availability can vary; contact your system administrator for more information. Softkey feature map, page 2 Answer,
Hosted PBX QUICK START GUIDE. Customer Portal, Unified Desktop, Mobile and Meeting
 Hosted PBX QUICK START GUIDE Customer Portal, Unified Desktop, Mobile and Meeting HOSTED PBX CUSTOMER PORTAL WELCOME Welcome to Hosted PBX. This guide is intended to get you up and running with the Customer
Hosted IP Phone System Voice Operator Panel User Guide
 Voice Operator Panel Main Window: 1. Incoming Calls Incoming calls display here. 2. Outgoing Calls Outgoing calls display here. 3. Dial Enter [10-digit phone number] in this field to make an outgoing call.
ModemUSB/E12 User Manual v0.1
 User Manual v0.1 TABLE OF CONTENTS TABLE OF CONTENTS...2 1. ATTENTION...3 2. FOR YOUR SAFETY...3 3. USER S SERVICE...5 4. BASIC INFORMATION...6 4.1 Introduction...6 4.2 Legal Notice...6 4.3 Contacts...6
User Manual MPPTracker
 User Manual MPPTracker Management Software for Solar Charge Controller Version: 1.0 Table of Contents 1. MPPTracker Overview... 1 1.1. Introduction... 1 1.2. Features... 1 2. MPPTracker Install and Uninstall...
1. Instruction 1.1 Summary
 1. Instruction 1.1 Summary USB Adaptor is analog telephone adaptor with one USB interface to PC, 1 FXS for regular phone and 1FXO for PSTN call relays. All cordless phones and regular phones can be used
TELTONIKA ModemUSB/G10 User Manual v0.1
 Address: Žirmūnų g. 27, Vilnius LT-09105, Tel.: +370 5 2127472, Fax: +3705 276 1380, E-mail: info@teltonika.lt TELTONIKA User Manual v0.1 TABLE OF CONTENTS TABLE OF CONTENTS... 2 1. ATTENTION... 3 2. FOR
SAR (Specific Absorption Rate) information
 information") SAR (Specific Absorption Rate) information This mobile phone is SAR accredited adheres to international quality benchmarks and safety measures concerning the harmful impact of radiations. It complies with
SAR (Specific Absorption Rate) information This mobile phone is SAR accredited adheres to international quality benchmarks and safety measures concerning the harmful impact of radiations. It complies with
CallPilot Unified Messaging Installation and Maintenance Guide
 Part No. P0606020 02 23 March 2004 CallPilot Unified Messaging Installation and Maintenance Guide 2 CallPilot Unified Messaging Installation and Maintenance Guide Copyright 2004 Nortel Networks All rights
1 Instruction. 1.1 Summary. 1.2 Features. 1.3 System Requirements. 1.4 Package Contents
 1 Instruction 1.1 Summary Plugging USB VoIP Phone into your computer s USB port, you can make and receive skype calls. Phone rings for all incoming calls. You can select one from Skype contact list or
FaxTalk FaxCenter Pro Version 9.0 Because your faxes are important! Copyright Thought Communications, Inc. All rights reserved worldwide. Th
 FaxTalk FaxCenter Pro Because your faxes are important! Version 9.0 Send. Receive. Manage. FaxTalk FaxCenter Pro Version 9.0 Because your faxes are important! Copyright 1992-2015 Thought Communications,
Quick Installation Guide TU-S9
 Quick Installation Guide TU-S9 V1 Table of Contents English 1 1. Before You Start 1 2. How to Install 2 Troubleshooting 7 Version 06.24.2010 1. Before You Start Package Contents TU-S9 CD-ROM (Driver) Multi-Language
MANUAL PELITT MINI 1
 MANUAL PELITT MINI 1 TABLE OF CONTENTS 1. Warnings 3 2. Getting Started 3 3. Your Phone 4 4. File Manager 4 5. Phone book 4 6. Fun&Games 4 7. Call center 4 8. Messaging 4 9. Multimedia 5 10. Organizer
F316 & F317 Fixed wireless terminal FAQ
 F316 & F317 Fixed wireless terminal FAQ The first part:(basal Knowledge) 1. Telephone s ID (Including elevation, rear elevation, side elevation, keypad, memory card and insert SIM card) 1 2 3 5 Left function
TELUS Business Connect for Google User Guide
 TELUS Business Connect for Google User Guide TELUS Business Connect for Google User Guide Contents 2 Contents Introduction... 4 About TELUS Business Connect for Google... 5 About this guide... 5 Basics...
Oracle Connector for Outlook User s Guide
 Oracle Connector for Outlook 2003 User s Guide MIT IS&T Oracle Connector for Outlook Release Team Revised: January 7, 2005 MIT IS&T Oracle Connector for Outlook Release Team MIT-OCFO-2003-UG.doc Revised
Logging Into the Web Portal
 V0610 Logging Into the Web Portal Open your Web browser application. In the address field, enter the external WebPortal address, https://lightpathvoice.com Click Go. In the Phone Number field, enter your
VoIPvoice Integration User Guide. VoIPvoice Skype Integration. User Guide. Last Updated 30 November Page 1 of 28
 VoIPvoice Skype Integration User Guide Last Updated 30 November 2005 Page 1 of 28 Contents 1 Getting Started 3 Who are VoIPvoice? 3 What is Skype? 3 Glossary of Terms 3 Minimum System Requirements 4 2
1. Instruction 1.1 Summary
 1. Instruction 1.1 Summary Plug into your computer s USB port, you can make and receive skype calls. Phone rings for all incoming calls, dial Skype contacts and SkypeOut numbers from the phone. With dot-matrix
Mobile Connect User s Guide (Mac)
") Mobile Connect User s Guide (Mac) July 20, 2010 V 2.0 Copyright 2010 Bell Mobility, Inc. All rights reserved. The information in this document is subject to change without notice. The statements, configurations,
Mobile Connect User s Guide (Mac) July 20, 2010 V 2.0 Copyright 2010 Bell Mobility, Inc. All rights reserved. The information in this document is subject to change without notice. The statements, configurations,
RingCentral for Google. User Guide
 RingCentral for Google User Guide RingCentral for Google User Guide Contents 2 Contents Introduction............................................................... 4 About RingCentral for Google..........................................................
Windows, Windows 95 and Windows NT are trademarks of Microsoft Corporation.
 PhoneMaster Desktop Call Control User s Guide Version 2.4 Information furnished by NetPhone, Inc. is believed to be accurate and reliable. However, no responsibility is assumed by NetPhone, Inc. for its
Setting up Polycom VVX phones on the Cloud PBX
 Setting up Polycom VVX phones on the Cloud PBX This document outlines the set-up and use of Polycom VVX termninals on the Cloud PBX Contents List of Polycom phones that are auto provisioned and tightly
Scanner Installation Procedures for edeposit
 Scanner Installation Procedures for edeposit Great Things Happen! Scanner Installation Procedures for edeposit Table of Contents Getting Started Minimum System Requirements...........................1
Avaya Unified Messenger Client User Guide
 Avaya Unified Messenger Client User Guide Version 5.0 Avaya Inc. 211 Mount Airy Road Basking Ridge, New Jersey 07920 www.avaya.com Your comments are welcome. They can assist us in improving our documentation.
Voyant Connect User Guide
 Voyant Connect User Guide WELCOME TO VOYANT CONNECT 3 INSTALLING VOYANT CONNECT 3 MAC INSTALLATION 3 WINDOWS INSTALLATION 4 LOGGING IN 4 WINDOWS FIRST LOGIN 6 MAKING YOUR CLIENT USEFUL 6 ADDING CONTACTS
ELECTRONICS. Printed in Korea Code No.: GH A English. 06/2001. Rev.1.0. World Wide Web
 The Best Global Communication!... By SAMSUNG * Some of the contents in this manual may differ from your phone, depending on the software installed or your service provider. SGH-Q100 Samsung GPRS Wizard/
DBT-120 Bluetooth USB Adapter
 DBT-120 Bluetooth USB Adapter Rev.2.1 (09/25/2002) 2 Contents Introduction... 5 Package Contents... 6 Installing Bluetooth Software... 6 Hardware Installation... 8 Introduction to Bluetooth Software...
Description. Table of Contents. Effective Date. System Requirements
 Description The VoiceEdge for Skype for Business Companion App connects your Comcast Business VoiceEdge service to your Skype for Business account. Using click-to-dial, you can initiate phone calls directly
GSM FWP ETS-6588 USER S MANUAL
 GSM FWP ETS-6588 USER S MANUAL 1 Key lnstructions Key 1,Menu Description 1,Enter main menu. 2, Performs the function indicated at the left bottom of the screen. 2 Description 2. Number 3. #, * Use these
Blackwire C710M /C720M Corded USB headset with Bluetooth. User guide
 Blackwire C710M /C720M Corded USB headset with Bluetooth User guide TM Contents Welcome 3 What s in the package 4 Headset features 5 Accessories/Spares 6 Using your headset 7 Inline controls 7 Wearing
PANASONIC KX TGP-500 B08 & KX TPA-50 DOT (DIGITAL OFFICE TECHNOLOGY) TM USER GUIDE
 TM USER GUIDE") PANASONIC KX TGP-500 B08 & KX TPA-50 DOT (DIGITAL OFFICE TECHNOLOGY) TM USER GUIDE WHAT S INSIDE OVERVIEW OF THE KX TGP-500 AND TPA-50 CORDLESS IP PHONES 3 SETTING UP THE KX TGP-500 BASE UNIT 4 CONNECTING
PANASONIC KX TGP-500 B08 & KX TPA-50 DOT (DIGITAL OFFICE TECHNOLOGY) TM USER GUIDE WHAT S INSIDE OVERVIEW OF THE KX TGP-500 AND TPA-50 CORDLESS IP PHONES 3 SETTING UP THE KX TGP-500 BASE UNIT 4 CONNECTING
GP-N100 Utility Software Manual
 System Requirements En Thank you for your purchase of a GP-N100. This manual describes how to use the GP-N100 Utility to download the latest assisted GPS data from Nikon servers to your GP-N100. To ensure
Windows Utility Operation Guide
 SoftBank 004Z Utility Operations Guide (Windows PC)... 3-2 Overview... 3-2 Packet Communication Settings... 3-3 Connecting/Disconnecting... 3-4 Connection Record... 3-5 SoftBank 004Z Utility Operations
Five9 Agent Desktop Toolkit
 Cloud Contact Center Software Five9 Agent Desktop Toolkit User s Guide November 2017 The Agent Desktop Toolkit comprises the CTI Web Services and the Web toolbar, a softphone integrated in your browser.
8x8 Virtual Office Online with Softphone User Guide
 User Guide Version 2.0, February 2011 Contents Introduction...4 System Requirements...4 Supported Operating Systems...4 Supported Browsers...4 Required ports...4 VoIP...4 Operating System Requirements...4
SkyBox S1 User Manual Table of Contents 1. Introduction Package Contents Product Specification Main Features
 SkyBox S1 User Manual Table of Contents 1. Introduction... 3 1.1 Package Contents... 4 1.2 Product Specification... 4 1.3 Main Features... 5 1.4 Minimum System Requirements... 6 1.5 SkyBox S1 LED... 7
Table of contents. Table of contents
 Table of contents Table of contents 1. About the Phone...4 1.1 Keypad... 4 1.1.1. Number and Letter Keys... 4 1.1.2. Control Keys... 4 1.1.3. Key Operations in Standby Mode... 6 1.2 Display... 7 1.3 Installing
For ClassPad 300 PLUS. ClassPad Manager. Version 2.2 (PROGRAM-LINK TM ) User s Guide.
 User s Guide.") For ClassPad 300 PLUS E ClassPad Manager Version 2.2 (PROGRAM-LINK TM ) User s Guide RJA510188-4 http://world.casio.com/edu/ http://classpad.net/ Note Display examples shown in this User s Guide are intended
For ClassPad 300 PLUS E ClassPad Manager Version 2.2 (PROGRAM-LINK TM ) User s Guide RJA510188-4 http://world.casio.com/edu/ http://classpad.net/ Note Display examples shown in this User s Guide are intended
F7200. Get Started Guide. Push to Talk Capable. Mobile Instant Messaging (IM) Stylish Slider Keypad. Speakerphone
 Stylish Slider Keypad. Speakerphone") Get Started Guide Push to Talk Capable Speakerphone Mobile Instant Messaging (IM) Stylish Slider Keypad e www.lgusa.com PHONE OVERVIEW D U A L- B A N D PTT Key Earpiece Speakerphone Key Headset Jack Text
Get Started Guide Push to Talk Capable Speakerphone Mobile Instant Messaging (IM) Stylish Slider Keypad e www.lgusa.com PHONE OVERVIEW D U A L- B A N D PTT Key Earpiece Speakerphone Key Headset Jack Text
Programming Manual KX-TVA50 KX-TVA200. Voice Processing System. Model No.
 Programming Manual Voice Processing System KX-TVA50 KX-TVA200 Model No. Thank you for purchasing a Panasonic Voice Processing System. Please read this manual carefully before using this product and save
My Phone. My Phone - Overview. Signing In
 My Phone - Overview The Optus Loop My Phone portal gives you full access to your personal phone service settings, allowing you to customise and manage your service to suit your specific requirements. Within
User Manual for USB Phone with LCD
 Unpacking 2 Learn About Your Phone 3 Overview 3 Host System Requirements 3 Specifications 3 Phone Layout 4 Keypad Instructions 5 LCD Icons Instructions 6 Getting Started 7 Step 1: Install the Latest VoIP
1 Instruction. 1.1 Summary. 1.2 Features. 1.3 System Requirements. 1.4 Package Contents
 1 Instruction 1.1 Summary Plugging USB VoIP Phone into your computer s USB port, you can make and receive skype calls. Phone rings for all incoming calls. With keypad and ringer, it is easily used as mobile
8x8 Virtual Office Click2Pop for SugarCRM Setup Guide
 8x8 Virtual Office Click2Pop for SugarCRM Setup Guide May 2012 Table of Contents 8x8 Click2Pop for SugarCRM... 3 Requirements... 3 Server Requirements... 3 Client Requirements... 3 Installation... 3 Installation
CommPortal Portal Guide
 CommPortal Portal Guide The User Portal is available at https://userportal.appiaservices.com. Please contact Appia Support at 877-277-4297, option 3, or support@appiaservices.com if you need login information.
Check your system requirements
 Check your system requirements 1. USB port x 1 (USB 1.0 or 2.0) 2. System Requirements: a. PC - Windows 2000 / XP / Vista b. Mac - OS X 10.4.11 and above CPU Hard Disk RAM Display 1GHz Pentium or above