User manual Electronic logbook software. United Kingdom 3.21
|
|
|
- Kerry Norman
- 6 years ago
- Views:
Transcription


1 User manual Electronic logbook software United Kingdom 3.21
2 Index 1 Configuration 2 Settings 2.1 Crew 2.2 Vessel 2.3 Favorites 2.3.a General 2.3.b Norway 2.3.c GPS & VMS 2.3.d Relation 2.3.e Gear types 2.3.f Templates 2.4 Species a Government 2.5.b Report 2.6 Updates 2.7 Folders 2.8 Backup / Restore 2.9 Message Traffic 3 Standard fishing trip messages 3.a DEP Departure from a port 3.b FAR Fishing Activity Report (Daily information) 3.c PNO Pre Notification of Arrival 3.d EOF End Of Fishing 3.e RTP Return To Port 3.f LAN Landing 4 Other messages 4.1 Inspection message 4.2 Transfer of cargo message 4.3 Relocation message 4.4 Zone change message 4.5 Audit message
3 5 Correct, Resend or Delete messages 5.1 Correct a 24 hour message 5.2 Correct other messages 5.3 Resend messages 5.4 Delete previous send messages 6 Norwegian Sector 6.1 Fill in the tow screen (setting Norway) 6.2 Norwegian Control Points and Areas (CON) 7 Problems with communication 8 Reports 9 Review 10 Quota 10.1 Add Quota 10.2 Increase and lower existing quota 10.3 Remove quota 11 Updates and FAQ 12 Appendix


4 1. CONFIGURATION License key The E-Catch software can be obtained by contacting E-Catch Support (see appendix for contact details) or you can download the program from the website After the installation and E-Catch is started for the first time the software will ask for a license key. As seen in the picture below. The three options are to enter a New license key a Temporary key or closing the software. A new license key will be provided by E-Catch or its resellers, this key is valid for an agreed upon timeframe. When using a temporary key you must use the RSS code as the demo key of the vessel which will be using E-Catch. The temporary key will be valid for 30 days. After this period E-Catch or its resellers can be contacted to obtain a new permanent license key. The picture below is a demonstration of the license input screen. If the license is copied from an you can use the Paste button to insert the key. Use the Confirm key to apply the license key.

5 Once a license key is inserted you will be prompted to insert the initial vessel information. As seen in the picture below: Code: This will be filled automatically from the license key. Name: Fill in the vessels name. Country: Select the vessels country. Call Sign: Fill in the vessels radio call sign. Use the Save button to save you input or use the Cancel button to leave The settings which are defined here can be reviewed or changed in E-Catch in the Vessel settings as shown in chapter 2.2.


6 2. SETTINGS 2.1 Crew At the first start of the program E-Catch you will get the below screen; please provide a captain. Click on: confirm, and you will be redirected to the crew screen, on the right hand side, a series of fields need to be filled out with information on a new crewmember. Note that the fields marked with a * are compulsory. Currently only the skipper/captain has to be added, other crew members are not compulsory. In the picture above is a screenshot from the Crew screen. Use the Add button to start creating a new crew member: First name: First name of the crewmember Last name: Last name of the crewmember Address: Street name of the crewmembers residence Number: Home number of the crewmembers residence Postcode: Post / ZIP code of the crewmembers residence City: City of residence of the crewmember. Country: Country of residence.

7 Function: Crewmembers function. Login name: Create a login name for this crewmember for E-Catch Password: Create a password for this crewmember. Use the Save button to save the input and add the crewmember. Use the Delete button to remove a selected crewmember. Use the Cancel button to clear the not saved input. There are additional tabs name General, Medical and Remarks to insert optional details regarding crewmembers. At least one captain has to be added, once added you will be redirected to the main page. In which the following popup will appear as shown in the picture shown below: The next screen to be filled in under section settings are the Favourites. Click on confirm, this will redirect you to the Favourites menu. This configuration needs to be entered the first time you start up the program and is explained in chapter 2.2.

8 Starting the First Time When you start up the program you have to enter the login and password that have been put in when entering the details for the captain under favorites > section crew. Also explained in chapter 2.1 The next screen is the main screen, where you can see 12 tabs to choose from. These tabs are; Fishing Trip, Communication, Settings, Reports, Review, Quota, Program Language, Help function License key, Template and the tab Close. In this chapter the tab Settings will be further explored. By clicking on the tab Settings a choice menu is unfolded This menu will be explained in the following chapters. 2.2 Vessel Within Settings > Vessel you can insert all the data relevant for the identification of the vessel. The only setting that cannot be changed here is the RSS number, this is extracted from your license key. And the XSD version is set at 3.1 The settings which you can change are: Vessel Name PLN Call Sign: CFR Number : Insert the vessel s name here : Insert the vessel s PLN data here : Insert the vessel s radio call sign here : Insert the vessel s CFR number here

9 2.3 Favourites 2.3.a Favourites-General When clicking on Settings > Favourites you access the general tab of the favourites screen In this screen you can fill out your default data. During a fishing trip these favourite settings will be standard, but you can always still change them if needed. This screen has to be filled out completely, before one can start a fishing trip for the first time. The settings are the following: Anticipated Activity: Return Reason: Economic Zone: Packaging: Time For Acknowledge: Auto Polling Enabled: Auto Polling Interval: Select your default reason for departure here for example Fishing. Select your default reason for returning to port here for example Unloading cargo Select your default economic zone in which you will be located. Select your method of packaging your catch for example woven plastic bag This box can be set at any value you want, this function is to remind you when you haven t had a acknowledgment back from the MMO within the inserted time frame by blinking red at the bottom of the program in the Time Out bar. Tick this box if you wish the use the auto polling. Auto polling will continuously check for an acknowledgment on send messages and won t stop until all messages have a received tick. Define the time between each auto polling action when enabled.
10 VMS Timeout: The value which you set in this box defines the amount of time E- Catch will grant the VMS communication to stay open. When this timeout time has been exceeded E-Catch will stop the send receive process. Use GPS: Backup Directory: When a GPS or VMS is set up (see chapter 2.3.c) you can tick this box which will show a GPS button in all the screens where a position is required. The latitude and longitude will be automatically retrieved from the GPS or VMS device when the GPS button is used. Here you can alter the default folder in which E-Catch will store the backups created at the end of a fishing trip. Landing Dec. by 3rd party: Tick this box when the landing declaration is done by someone other than the skipper on a different location. When this box is ticked landing declarations cannot be made using E-Catch and the fishing trip will be closed when a return tick has been received for the RTP message. Scale installed: Catch is weighed: Scale Polling Directory: Percentage catch Overrun: Communication Profile: Only set as send receive: Gear shot & retrieved: Tick this box when you want to import the data from Catch management When this is ticked you indicated whether or not the catch is weighed. This is the default directory where Catch management records will be stored. The number you put in this field is the percentage that is allowed for catch overrun. When doing your landing declaration, the sold weights that you have filled out and that exceed this percentage will be coloured red. Select the correct profile which works with your setup E-Catch Dialup: For dialup internet connections E-Catch IP: For IP based internet connections E-Catch VMS GPRS + Satellite: for BlueTraker VMS via both GPRS and satellite connections E-Catch VMS GPRS only: for BlueTraker VMS only via GPRS signal E-Catch VMS- satellite only: for BlueTraker VMS only via satellite signal E-Catch webservice: for using the webservice When this box is ticked the option only set as send receive can be used in the communication screen. When this box is ticked the fields to fill out a gear shot and a gear retrieved are always visible in the tow screen (FAR).


11 Pair Fishing: Fishing time in hours: When this box is ticked all the settings can be filled out for the vessel you are pair fishing with. Tick this box to fill in the tow fishing time in hours instead of minutes. 2.3.b Favorites-Norway Within the Norway tab you can select your favorite settings when fishing in the Norwegian zone. See the picture below for an example of this screen. Main vessel activity: Target specie: Use the dropdown menu to choose the vessel s activity in the Norwegian zone. Use the dropdown menu to choose the main target specie you will be fishing. 2.3.c Favorites-GPS & VMS When you use a GPS and/or a VMS in combination with E-Catch e-logbook you need to define the connection parameters in the tab GPS & VMS. See the picture below as an example.
12 The following parameters need to be defined: Comport: Use the dropdown menu to select which Comport the GPS is connected to, or click the button Auto search VMS. Baud Rate: Use the dropdown menu to select the speed of the Comport Parity: Use the dropdown menu to select the parity of the Comport Data bit: Use the dropdown menu to select the data bits of the Comport Stop bit: Use the dropdown menu to select the stop bits of the Comport GPS profile: Use the dropdown menu to select whether you are using a traditional GPS device (Default) or a VMS unit (BlueTraker VMS+). You can use the option Reset BlueTraker to clear the memory of the BlueTraker device. Please bear in mind that it can take up to 4 minutes to finish this action. By clicking the button Get firmware version this information will be displayed behind the button. If you click the option Test GPS the latitude and longitude will be displayed. The settings for the Bluetraker VMS+ device are as shown in the picture apart from the comport which can vary and needs to be selected by clicking Auto search VMS Settings for a traditional GPS are: Comport: select from the possible options (if you are not sure which one, try each comport with the below settings. BaudRate: 4800 Parity: None DataBit: 7 or 8 In most cases 7 Stopbit: None or One In most cases One

13 2.3.d Favorites-Relation The Relation tab in the Settings menu is a requirement when creating CMR letters. Creating CMR letters is explained in chapter 9. To create a CMR in the Relation tab there has to be at least one sender, one transporter and one delivery address defined. See the picture below for an example of the Relation tab. Following is a brief overview of the parameters: Type: Use the dropdown boxes to define the type which you wish to add Name: The name of the person/company you re adding Address 1: The primary address of the relation you re adding Address 2: The secondary address of the relation you re adding Postcode: The ZIP-code of the relation you re adding City: In which city the relation is located Country: In which country the relation is located Phone: The phone number of the relation The address of the relation Contact: Name of the contact person Default: Check this box to make it the default selected relation for cargo documents When adding a new relation, fill out the parameters and use the New button to save it as a new relation. If you wish to change a relation s information, select that relation from the list and edit his information and use the Update button to save the changes. To delete a relation, select it from the list and use the Delete button to delete the entry.

14 2.3.f Favorites-Templates By using templates the user has the option to set which master files he wants visible within E- Catch and which he doesn t. By using templates users can browse through options more quickly and work more efficiently. Setting up Templates Access the template manager which can be found under Settings > Favorites and then the Templates tab. When opening this tab the database with master files will be loaded. As shown in the picture above a full list of all the master files will be displayed. The default template is named ALL, within this template all the master files are selected to be displayed within the menu s and options in E-Catch. The master files are sorted in their categories, ticked files will be displayed and non-ticked files will be hidden. In each category you have the following options: All None Invert Search All: None: Invert: Search: this option will enable all the files within its category this option will disable all the files within its category this options will invert the disabled and the enabled files within its category this options loads a popup window in which a file can be searched either by typing in the name or the code of the files


15 The top toolbar within the template manager is used for selecting, saving and deleting templates. A brief overview of the options displayed in the picture above: Current Set: In this dropdown menu users can select the template which they want to edit or delete. Undo: When changes have been made to a template which hasn t been saved yet using the Undo button will revert the changes. Delete Set: This button deleted the current selected set, this is not applicable for the default All set. Save Set: This options saves the changes made in the current selected set, this is not applicable for the default All set. Save Set As: This options is used when saving a newly created set. Activating templates To change which template needs to be active within E-Catch can be done at any given moment in the program. Switching between templates is done by using the main toolbar of E-Catch. As shown in the picture above, under the button Template there is a drop down menu which shows all available sets of templates. When clicked on a template it will be set as the new active template. This menu also shows which is the current active template using a green icon and the name of the active template is shown in the top left corner of the program. For example the picture above shows Fishing Trip ALL indicating that ALL is the template currently in use.

16 2.3.e Favorites-Gear Types The Gear Types tab allows users to define their fishing gear, this is a requirement when sending a Departure Message. When sending your departure message you also have to report what type of gear you will be using and what type of gear you have onboard. In the picture below is an example of the Gear Types menu. Only fill out the fields that apply for the gear type you are entering. When creating a new Gear Type use the Add button to add this new gear to the list. When changing settings for an existing gear, select the gear you wish to change and after the changes have been made use the Update button to save these changes. When deleting a gear select it from your list and use the Delete button to remove it from your list. The copy button can be used to make a copy of an existing gear. This way you can quickly add for example 4 different kinds of twinrig nets off which only the mesh size is different. 2.4 Species The configurations made here will benefit you when you are reporting your daily Fishing Activity Report. Everything configured in this menu will return later on in the program when adding your tows. Adding fish species In the screen specie types one can select several types of species. To add a specie you have to do the following: At the bottom of the screen, first choose Species (this can be done by clicking on the field and typing the first few letters of the specie type and then selecting it) after this is done go to the field Quality and then Presentation followed by Condition which is the state in which the

17 fish are in. You can also add a standard amount of fish per box in kg. It is important to know that only presentation types can be chosen of which the conversion factor are known. The number of presentation forms per fish type can therefore differ. E.g. Cod will have more presentation forms than Plaice or Sole. If a fish type can t have a certain type of presentation selected, this means that there is no conversion factor known and should be selected as whole. When all fields are filled out and selected use the button +Add and your selection will be added to your species list. In the picture below there are several fish species added to the favorites. Also note that the fish type can be added to favorites multiple times. This can be done, when gutted and whole plaice is landed. Down / Up When a species is selected you can use the Down and Up buttons to arrange the order of the list to your preference. The order of this list will be maintained when filling out your daily catch results.
18 Removing fish species The removal of fish types from the list of favorites can be done by going to the overview and selecting the fish type in question. The selection will turn the bar blue and then you can click on the button Remove selected species from favorites above the overview to remove them. Filling out the price of the fish species If you add the price of a specie type in the list of favorite fish species for instance, by using the price of the previous total, the program will calculate the value of the total amount of fish caught so far. Adding the price goes as follows, select a fish type from the overview, fill in the price in the field labeled price per kg and hit enter. The next fish type in the overview will be automatically selected to be filled out as well. Percentage of total catch In some cases a certain species can only be caught and landed if it does not exceed a certain percentage of the total catch. For these species you can select them on the lift hand side of the screen and type in the percentage on the right hand side of the screen. You can use the < and > sign in the dropdown menu to indicate whether the selected species need to be a minimum or maximum percentage of the catch. Presentation Use the dropdown box to select the presentation state of the caught specie, for example is it gutted or just whole. Condition Use the dropdown box to select the condition of the caught specie, for example is it fresh, frozen, smoked. Per box Here you can fill out how much weight goes into the selected packaging per packaging unit. The weight must be filled out in kilograms, you can use the Ton button to reconfigure the weight into tons. To select which kind of packaging you use see chapter 2.3a in this manual. Conversion Factor By default E-Catch has setup conversion factors for the live weights per specie and presentation. But this factor can be altered and changed. Select the specie in your list and select the conversion factor you want to change. After these selections are made use the Amend factor button. You can input your new conversion factor value in the popup window and confirm the use of this new factor. When manually changed a factor you will notice a tick in the box Manual, this will help remind you of your changes E-Catch gives users the possibility to not only send the mandatory messages to the authorities, but it also allows users to send copies of those messages to third-parties. Within the Settings > menu there are two tabs to choose from, the Government tab and the Report tab. Either E-Catch or your supplier will provide you with the necessary credentials which can be used in these tabs.

19 2.5.a Government The following parameters need to be set up in the government tab in order to be able to send your messages towards the authorities: SMTP Server: SMTP User ID: SMTP User Password: SMTP Port: SMTP Time Out: Address Receiver: POP3 Server POP3 User ID: POP3 User Password: POP3 Port: Address Sender: PGP Encryption: Web service URL: The name or IP address of the outgoing mail server The username to log in on the outgoing mail server The password to log in on the outgoing mail server The port used for the outgoing mail server The time limit set on sending messages The address of the authorities needs to be filled in here The name or IP address of the incoming mail server The username to log in on the incoming mail server The password to log in on the incoming mail server The port used for the incoming mail server With which address you want to send messages. Check or uncheck the box to enable or disable PGP encryption. When using the webservice to send and receive towards the authorities, fill out the address for the webservice here. See the picture below for an example:
20 2.5.b Report The Report tab has a few extra parameters which can be set up. SMTP Server: SMTP User ID: SMTP User Password: SMTP Port: SMTP Time Out: Address Sender: Import personal POP3 Server POP3 User ID: POP3 User Password: POP3 Port: Use SSL ( secured SMTP/POP): The name or IP address of the outgoing mail server The username to log in on the outgoing mail server The password to log in on the outgoing mail server The port used for the outgoing mail server The time limit set on sending messages The address you want to send messages with This box is still in beta and doesn t have a valid function The name or IP address of the incoming mail server The username to log in on the incoming mail server The password to log in on the incoming mail server The port used for the incoming mail server Check or uncheck this box to send messages using SSL security Check or uncheck the boxes of the listed reports to enable or disable them and add addresses in the boxes behind them. Multiple addresses can be used when separated with a semicolon ( ; ) and a space. Report After FAR: Sends a copy after each Fishing Activity Report Report After PNO: Sends a copy after a Prior Notification Report Report After PNO Summary: Sends a copy of the totals after a Prior Notification Report Report After LAN: Sends a copy after submitting your Landing Declaration Report External: Sends your total catch to the third party responsible for your Landing Declarations It is not possible to send reports with any of the VMS+ com profiles active! 2.6 Updates The Updates menu can be used if you wish to update your master files this effects items such as ports, species, fishing gear and conversion factors. This update can be done online when using the Update On-Line button it will download the latest database file and implement it automatically. When the connections won t allow an online update it is also possible to download this update from the E-Catch website to be put on a flash drive or CD-ROM. Once this is inserted into the system which is running E-Catch use the Update Off-line button to browse to the update file and to select it. Once the file is selected use the Update button on the right of the file path to insert the update into E-Catch 2.7 Folders By using the folders menu you can review or send generated messages from E-Catch.
21 2.8 Backup / Restore E-Catch will automatically ask to create a backup every time a fishing trip is closed. This backup will be written on a set location on the hard drive where the program is installed, namely; c:\users\public\documents\e-catch\backup. This location can be changed in the Settings > Favourites menu under the General tab. From this location a manual copy can be made to, for instance, a flash drive which can be brought along. This can also be started manually when going to Setting s> Backup/Restore > Full Backup. When encountering problems with the database, the backup can be restored. This procedure should not be attempted by the user but should be done using the help from E-Catch. For contact information see the appendix contact information. 2.9 Message Traffic Message traffic using the Iridium standard. There is no difference in the manner of sending messages when one selects either E-Catch Dialup or E-Catch IP. In both cases an will be sent to the government when you click on send/receive. The main and most important difference between the two is how the communications will be set up. When using Iridium standard E-Catch have to dialup first using the Iridium standard as a dial up modem. In order for this to work there has to be a dial up connection configured on your operating system called E-Catch Dialup. Message traffic through IP communication. When you choose E-catch IP in the settings the electronic logbook will always assume that there is an IP-connection. If so, communications will always be automatic without there being a dial up connection used. In the report in the communications tab you can see which messages are sent and received. This is applicable for Iridium Open Port, GSM dongle s, VSAT, Wi-Fi, hotspots, Fleetbroadband Message traffic using E-Catch VMS When the Bluetraker VMS+ system is installed, you can also use the VMS+ unit to send and receive your messages. Configuration is required in the tab GPS & VMS of the Favourites menu (see 2.3.c) and you need to select one of the VMS options as communication profile in the Favourites menu by using the dropdown menu. Make sure you are using the correct VMS profile according to your subscription with your airtime provider. E-Catch Webservice Select this profile when wanting to send the messages using the E-Catch webservice. The URL for the webservice must be filled out in the settings see chapter 2.5a in the manual.

22 3. STANDARD FISHING TRIP MESSAGES Starting a Fishing trip: Mark history and after that click on the button + Add Fishing Trip. When a previous trip has been closed down completely this is not required. But when the fields under Departure are greyed out, you must use this procedure.

23 3.a DEP Departure from a port: When creating a DEP most of the parameters are already filled out with settings E-Catch took from your favorites menu. The picture below shows the screen when creating a DEP. Departure Date: The initial date and time will be taken from the computer system clock when you opened the menu. Departure Port: Select the port from which you are departing Gears on this Trip: Use the dropdown menu to select the gear you have onboard on this trip Use the + icon to insert the gears into the DEP and the to remove them. Anticipated activity: Select which activity you will be preforming on this trip. Economic Zone: Select the Economic Zone in which the harbor you are leaving from is located. Captain: Select the active captain for this trip. Cod Recovery: Tick this box when the fishing area outside the port is a cod recovery zone. Fish On Board: Tick this box when you want to create a DEP with retained fish in it. When the DEP message is compiled use the Save button to create the DEP message. When this button is used the message will be created and you will be redirected to the Communication screen to send and receive messages. After sending the message you won t be redirected back to the fishing trip page. Click on Fishing Trip in the main toolbar to get back to the main screen.

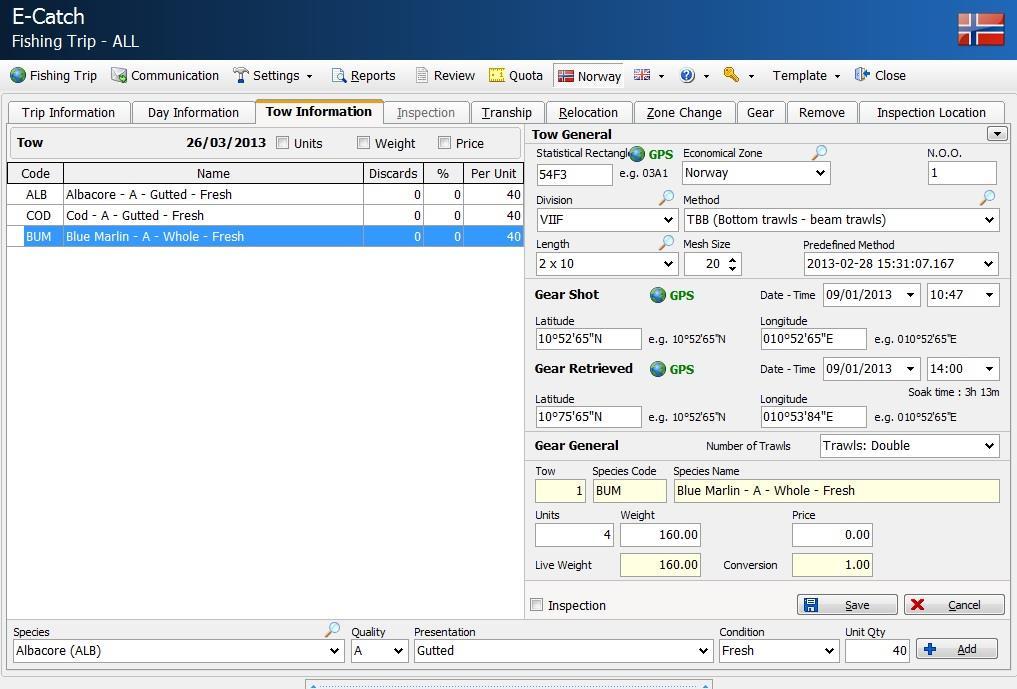
24 3.b FAR Fishing Activity Report (Daily information) It is mandatory to send a FAR every 24 hours To create this message you need to navigate to the default page in the menu Fishing Trip and use the +Add button at the bottom right to add a FAR. This will redirect you to the Day Information tab. In order to create a FAR you need a saved date. This saved date will store the FAR message. The date presented in the menu as seen in the picture below will always by default be the date of the system s clock. Next that that you can fill out the time which time the FAR message is created. There are six buttons in the Day Information tab: Export: Save: Cancel: Delete: Add tow: Select tow: Sends the day information toward towards the MMO Saves the date which allows tows to be added to that date Cancels action Deletes a tow in the saved date, this only works when the day information has not being exported yet and there can be no weights in the tow. Add a tow on that date, the date needs to be saved prior to using this function Opens the selected tow which has already being made, so changes can be made If needed to a saved tow. When you use the Save button, you will be forwarded to the Tow information tab. This is done by default. Within the tow information page are a few parameters that need to be filled out located on the right side of the tow information tab prior to adding weights to the species you will see on the left side. When no species are yet configured you can add them using the bar at the bottom. This bar works similar to the adding species in the favorites screen. (Chapter 2.3) The following parameters must be filled out in the Tow screen: Statistical Rectangle: Economic Zone: N.O.O: Fishing Time: Division: The rectangle where the majority of the catch is caught. Economical zone in which the catch is caught. Insert here the number of fishing operations. The total time in minutes that the nets have been in the water during the tow. Division where the fish is caught.

25 Method: Length: Mesh Size: Predefined method: Latitude/Longitude: Number of trawls: Select which fishing method is used during the tow. Select the length of the nets used. Select the mess size of the nets. Select the preconfigured gear. Insert position data. Use the dropdown box to select the amount of trawls used. When these parameters are filled in you can move on and begin registering catches. When a specie is selected on the left side of the screen you will see this as well on the bottom right in the box Specie name. In here you can either insert the amount of boxes into the Units box when an average weight per box has been set or the amount of kilos you ve caught in the Weight box. You can also insert the amount of discards in the box labeled Discards. Once all the information is filled out you can use the Save button. Once pressed you will be brought back to the Day information tab and you can either add a new tow or use the button Export to be redirected to the Communication screen and send the message to the MMO. The Fishing Activity Report (FAR) must be send daily before midnight. The picture below is an example of a filled out Tow Information screen: The ruler icon located behind the latitude and longitude position field allows you to auto populate the statistical rectangle and economic zone. When multiple economic zones are available this field remains blanc and by using the dropdown menu you can select the correct one to use. When using a GPS this action is done automatically, but you will still need to select the economic zone when multiple choices are available.

 is within the limits given by the MMO.")
26 3.c PNO Prior Notification of Estimated Arrival Creating a PNO message is done in the main screen of Fishing Trip Simply insert you estimated arrival date and time and use the dropdown menu to select which Port you ll be returning to. Use the button Estimated Arrival to create the message and to be redirected to the Communication menu. Note: the estimated arrival message has to be sent at least four hours before actual arrival. The picture below is an example of how to fill out your Prior Notification. The PNO is not mandatory if the fish is landed into a designated port within the time frame given by the MMO and the catch of certain species (cod, hake) is within the limits given by the MMO. Please check their website if its applicable to your situation. 3.d EOF End Of Fishing An EOF message can be created In the tab Trip Information information. Use the section End Of Fishing and fill out the time and date that the ship has stopped fishing. Use the button End of Fishing to create the message and to redirected to the Communication screen. Note: You cannot go forward or backwards in time further than 12 hours. For instance, you cannot make a EOF message on Monday which is to be sent on Friday. The picture below is an example of how and end of fishing message looks like. Note: instead of using the drop down menu s to select the date and time you can also just use the button End of Fishing when the date and time fields are still blank. When you use the button without filling these fields they will be filled with the date and time from the Windows operating system. Note: after sending your End Of Fishing you cannot send any new FAR messages.
27 3.e RTP Return To Port After the end of fishing message has been sent, only one more message needs to be sent. Note that this only applies if the landing declaration by 3rd party has been selected in settings > favorites. For more information read chapter 2.2. The last message which must now be sent is the message which goes out during the actual arrival into the harbor. This message can be created in the tab Trip Information by filling in the arrival time and date. This happens in the same manner as the previous two messages. The reason of arrival must also be stated. This reason may already have been filled out from the drop down menu Settings / Favorites as a favorite reason to return. If there is a different reason for arrival at the port then this reason can be selected from the drop down menu. Once the reason has been entered you can send the RTP message by clicking on Port Arrival. After this message has been sent, a new fishing trip can already be started by clicking on the button + Add Fishing Trip. Note: after the port arrival message has been sent, no messages can be corrected any more. If a third-party does the landing declaration, the fishing trip will be closed after an acknowledgement has been received on this RTP message.

28 3.F LAN Landing: When the landing declaration is done by the skipper himself instead off a third-party the Landing Declaration button in the tab Fishing Trip will be visible. Once you have clicked on this button you are transferred to the Summary tab, an example of this tab is found in the picture below: The left side of the overview shows the total catch. This is divided into two columns, the column Reported KG and the column Sold. The column Reported KG shows a total amount of what the skipper has reported during the fishing trip. The column Sold is set on default to match the amount of Reported KG. The values in the Sold column must be edited to match the final sales. Select the specie which you wish to edit and change the value in the Sold Weight box on the right side and press Save. When you have finished filling in the correct weights for all species, click on the button Export. The program also keeps an eye on the preset overrun percentage in the Favorites screen. The total line and the detailed lines of a specie will show up in red when the difference between caught / reported weight and sold kilograms is more than the preset 10% catch overrun. This means the MMO should be informed about the mistake.

29 4. OTHER MESSAGES Aside from the messages for a normal fishing trip, there are also other messages which won t be used all that much in practice. These four other messages will be explained in this chapter. 4.1 The Inspection message If during the fishing trip at sea, an inspection from the MMO is done, an inspection message must be sent. Creating and sending this message is quite similar when compared to creating a Fishing Activity Report this due to the fact that it is required to send a FAR message when boarded for inspection. When creating your FAR message check the box Inspection like demonstrated in the picture below. When you save this message you will be transferred to the Inspection tab. In which the following fields must be filled in. Country: Inspection date and time: Inspector number: Longitude and latitude: The country that is handling the inspection. The time and date of the inspection. The Id number of the inspector handling the inspection. The place of inspection. The longitude and latitude can be filled in manually, but also by clicking on the GPS button.

, this becomes a correction message. 4.2. The transfer of cargo message (Tranship).")
30 By clicking on save you can get to the communications screen and you will see that there is an I behind the FAR message to indicate there has been an inspection. If you tick the box History on the left bottom of the Trip Information screen you will see the I behind the fishing trips that had inspections. Now, a daily 24 hour messages will be sent with the inspection message attached to it. When the inspection is early in the morning, and you still want to send a daily catch report (close to 12 at night), this becomes a correction message The transfer of cargo message (Tranship). The transfer cargo message can be made by going to the tab Trip Information and in it, click on the tab Tranship. This opens the screen below. The transfer message can be sent to achieve two goals. Either one receives fish, in which case it must be a receiving vessel flagged message, or one transfers fish from one ship to another in which case the field donor vessel must be flagged.
 This can be done either manually, or by clicking on the GPS button. All previous mentioned values will then be automatically filled in.")
31 The fields which must be filled in at the left side of the overview, are date and time, the longitude and latitude, the position where the transfer is to be made. The catch area (division and statistical zone) This can be done either manually, or by clicking on the GPS button. All previous mentioned values will then be automatically filled in. This can only be done when a GPS module is attached to the computer. When the latitude and longitude is filled out manually you can use the ruler icon button. This action will calculate your Division and your Statistical Rectangle. The fishing method and the economy zone must also be filled in. These last three fields can be chosen from the local database in which they may be saved. At the right side of the overview the details of the other ship (receiving or donating) must be filled in. These details are the call sign, the FRN- number and the RSS-number. Also the country to which the other ship belongs has to be chosen. When the transhipment takes place in a port, this has to be chosen too. If not, the port value can be left blank. After all required fields are filled out you have to click on save and afterwards the fish species which are received or transferred can be altered. Adding is done by choosing the specie quality and so on, plus at the end the weight which is going to be transferred. When all the fields are filled in click on the + Add button and the fish species will appear in the overview. Once all fish species which are transferred or received are selected and filled in, one clicks on export and the transfer message will be created. If several transfers are made during a fishing trip then a new message can be created by clicking on + new The relocation message This report is primarily used by vessels engaged in pair fishing. The relocation message can be made by clicking the tab relocation. Filling in the relocation message happens in the same manner as the transfer message. There is one extra field to fill in which is the field relocation type. These are several predefined types from which a choice can be made. At the right side of the overview you can fill out your partnership or ships (if fishing together with 3 ships). When the location information and credentials of the partnership are filled out it needs to be saved first prior to adding the species who are to be relocated.

32 When all fish species which are chosen to be relocated are filled in you can click on export and the relocation message will be made. When export is clicked the communications screen will open and you can click on send/receive to send the message The zone change message The zone change message can be made by clicking the tab Zone Change. Doing so opens a screen where a few fields must be filled out on this screen. Every time you cross a zone (ICES division), you have to send in two messages. The zone which you are leaving and the zone which you are about to enter. The timing of sending the messages is crucial when fishing in Norwegian waters. (See the chapter regarding Norway). The date, time, longitude and latitude can be filled out manually, or by clicking on the GPS button. On the left side of the overview you have to fill in the values of the zone you are about to enter and on the right side the values of the zone you are leaving. When leaving or entering an effort zone, you have to choose a value from the drop down box. When an effort zone does need to be chosen you can leave this value blank. When entering or leaving the Norwegian waters, choose Norway, as effort zone. When export is clicked the communications screen will open and two zone change messages are set to be sent. One message informing which zone you are leaving and one message informing which zone you are entering. You can click on send/receive to send the messages. Note: Prior to sending your zone change message you need to send in a FAR with the catches you ve made in that zone.

33 4.5 Audit When in the Audit tab, all you can do is create a new audit message. This audit message is a way to test communication with the MMO and won t have any implications on the fishing trips. 5. CORRECT, RESEND OR DELETE MESSAGES Of course practice will prove that faulty messages will be sent. This is taken in account by E- Catch and several messages can be corrected. This means that the message can be sent again with the status correction. Note: a single message can be corrected multiple times. 5.1 Correct a 24 hour message The message that needs to be corrected most often is the 24 hour message. This can be done using the following steps. From the tab Trip Information choose one of the days (clicking makes the line blue and selected) and then click on select day. You can also double click on the day and tow. Then choose a tow from the tab day information (in the same manner you selected the day) and then click on select tow. Then the detailed overview of the tow opens. By selecting the fish species in the overview which need to have their total weight in kg altered (selecting will again make the line blue) one can edit the weight on the right side of the screen in the field weight. After editing all that needs to be edited one can click on Save and you will come back to the tab day information. In this tab you have to click export to send the modified 24 hour message. When you click on export a pop up will warn you that a modification will result in the creation of a correction message.

34 When the pop up shows, click confirm this will open a new tab in which you can fill out a reason for the correction. After this is filled out and confirmed the tab communications opens again where you can click on send/receive to send the message. If you click on cancel the corrections are lost and no correction message is created.


35 5.2 Correct other messages The PNO message and the EOF message can also be corrected. It is not possible to make a correction for the RTP message and the LAN message. The PNO message will be used as an example. The other messages work in exactly the same manner. If the PNO message has been sent and it says that arrival will be at 18:00 but it needs to be 17:00. You can change it using the following steps. By going to the tab Trip Information you may change the time of arrival to 17:00 and then click on Estimated Arrival. After you have clicked a pop up will appear saying that the correction will result in a correction message, see screen. By clicking confirm you will be prompted with a new pop up in which you can fill out a reason for the correction. After that is filled out and confirmed the communication screen will open and you can send the message by clicking on send / receive. By clicking on cancel correction will not take place.


36 5.3 Resend messages It is possible to resend a message, to do this go to the communication screen and do a right-click on the message which you wish to resend. Then select the option Resend once clicked you will be prompted with the question to insert your password as a verification method. If you want to resend more than one message, you can use the option Reset sent to untick the boxes of multiple messages and afterwards click on send/receive to resend all reset messages. When you choose the option Open message overview, this will redirect you to the Review page. 5.4 Delete previous send messages Some of the sent messages can be deleted using the tab Remove. If messages are deleted here and this delete request is also sent to the authorities, the message will also be removed in the land application of the MMO. You can remove a message in the following way: First, choose the message one wants to remove in the list and press x delete. After you pressed Delete, you are asked to acknowledge your choice.


37 The last step one has to take is to fill in the reason why the selected message should be deleted. Once the reason is filled in and clicked on ok you are automatically redirected to the communication screen and the message can be send. Important : When you delete a correction of a FAR this will delete not only the correction, but also the original FAR! When you delete a FAR message or a correction on a FAR message you have to send a new FAR before 12 at night. When also discards were reported, you have to send this report also once again. 6. NORWEGIAN SECTOR When fishing in Norwegian waters the use of the program changes a little bit. Some more values have to be filled out and the main change is that you have to fill out your catch tow per tow. Still you have to send one fishing activity report every 24-hours, but in this message the catch will be presented tow per tow. When making your zone change message to the Norwegian sector you will see that the Union Jack flag at the top right corner changes to the Norwegian flag. This indicates that E-Catch works according to the rules applied for Norway. It will remain to do so until a zone change out of the Norwegian sector has been made. Also note that while in the Norway mode the estimate arrival message changes also. When you re planning of landing your fish in a Norwegian port, you have to fill out the location inside the port as well. This can be done by simply typing in the value. The other thing you have to pay attention to, is when entering and leaving Norwegian waters. Entering and leaving Norwegian waters will lead to sending Zone Change messages. When planning on entering Norwegian waters you have to send a Zone Change message no more than 12 hours and no less than 1 hour before you are doing so. Also you have to report the target species. Sending this message will also report the catch you have on board before entering Norwegian waters. To make sure this message is routed to Norway, you have to choose zone

38 code Norway as fishing effort zone and also Norway as economic zone. Screen shows an example of entering Norwegian waters with target specie Plaice. Important: The values have to represent the position where you are going to start your fishing activities in Norwegian waters and when. So when you are planning to fish in Norwegian waters at 17:00 hours. And you are 3 hours steaming away. You can already send in a message before 14:00 hours with position and time (17:00 hours) you think you are going to start fishing. When leaving Norwegian waters you have to follow this procedure. When you are fishing with nets of minimum mesh size of 120mm, you have to send a Zone Change report at least 4 hours before exiting the zone. However, when you choose to continue fishing in the zone, you must submit the report 1 hour before leaving the zone. In both instances a fishing activity report must be submitted at the earliest six hours and at the latest 4 hours before leaving the zone. So the sequence is, send in a fishing activity report between 6 and 4 hours before leaving the zone and after you have done this, you have to send a Zone Change report 4 hours before exiting the zone. An example of leaving Norwegian waters is shown in the picture below.

39 6.1 Filling in the tow screen (setting Norway) When fishing in Norwegian waters the manner of filling in the tow screen changes. You can no longer fill in the complete catch of a day as one tow. It is obliged when fishing in Norwegian waters to fill in your catch tow per tow and also to record the date, time and position of your gear shot and your gear retrieve. On the picture below is an example shown from a tow screen when in Norway mode. Pay attention to the fact Norway is highlighted. Also note that the economic zone is set to Norway. To fill in a tow screen in Norway mode, you fill out first your tow general and gear shot section of the tow. To do so, fill out the statistical rectangle, date and time and the latitude and longitude when you start your tow. Then press Save to save these values. Important : The division is taken from your Favourites setting. Make sure the correct division is chosen. The last thing you have to choose is the start zone where you start your tow. You can choose from to zones. Svalbard and the zone Jan Mayan. When you end your tow, you have to fill out the gear retrieved section of the tow screen and after this you can also fill out your caught species. Pay attention to the fact that while in Norway mode, you cannot fill out any discards. When finished press Save again. This brings you back to the day information screen, where you then can choose to add a tow, or by clicking on export, send in a 24-hours (FAR) message. On the picture below is an example of a filled out tow.
40
41 6.2 Norwegian Control Points and Areas (CON) There are a number of control points and areas in the Norwegian EEZ.. When a vessel has ceased fishing in Norwegian waters North of 62 North then the master must report for control at one of the prescribed points. The report must be transmitted at the latest 12 hours before arriving at the control point. However, if engaged in pelagic fishing and retaining the catch in RSW tanks then the report should be submitted at the latest 4 hours before arriving at the control point. The Norwegian control points are detailed as follows: A 70 35' N 31 40' E E NE of Vardø B N E E N of Fruholmen C N E E NW of Torsvåg D N E E N of Andenes E N E E W of Lofotodden F N E E W of Måløy G N E E S of Bjørnøya Masters engaged in fishing for Norwegian spring spawning herring (Atlanto-Scandian herring ASH) North of 62 North may during the period 1 October to 28 February use the following temporary control point: H N E E W of Lofoten On arriving at the control point the master must contact the Norwegian Coastguard on VHF, MF HF or via a coastal radio station. If a master is engaged in fishing for mackerel in the Norwegian EEZ then he must ensure he reports for one of the following control areas 4 hours prior to the control point: N E N E N E N E N E N E N E N E N E N E N E N E The master must make contact with the Norwegian Coastguard by VHF, MF HF or using coastal radio station at least 1 hour before arriving at the stated position at the boundary of the control area. If a master intends to land the catch at a Norwegian port after fishing in the Norwegian EEZ then no control point area report is required, However, the master must provide a prior notification (PNO) 4 hours before arriving at the port of landing. If a master alters or cancels the position for control then the vessel must report at the control point area originally reported unless otherwise agreed with the Norwegian Coastguard. To send a control Port or point message make sure the button Norway is highlighted. This will ensure an extra tab Inspection Location is available in the program. You will also notice that the Union Jack at the top right corner of E-Catch will change to the Norwegian flag.


42 Please check the website for current information. The picture above is also an example on how to create a control point message. When creating this message the following data must be entered: Control Point: Select the letter refering to your control point. Date: Select the date and time Latitude: Input your latitude position Longitude: Input your longitude position When export is clicked the communications screen will open and you can click on send / receive to send the message. 7. PROBLEMS WITH COMMUNICATION If, for any reason, you have problems with your communication system, you can contact the E- Catch team or one of our agents AST, George West or Martin Sloan (contact information in the appendix). When you are in touch we will ask you to flag the field full logging under the tab communication (see screen).
43 When this field is ticked it will give extra information in the reporting field when trying to connect and with this information we can go through the communication steps with you and solve the problems you have. If, for any reason, one of the messages does not get a return tick after your last message from your current fishing trip (either LAN or RTP message) has been sent and received, you can erase the message. To erase messages flag the field Only Set as Send / Received and click on Send / Receive. This will tick the boxes as send and received and finally close the fishing trip. Possible VMS+ issues When a vessel switches of power, the connection box is also switched of. In some cases after enabling the power, the USB link stays down. This can be solved by reconnecting the USB cable or rebooting the laptop. When the error XML document must have a top level element appears, you need to contact AST. In this case an invalid or corrupt message has been received that cannot be opened in E- Catch and the AST support team will need to remove this in the VMS-import file and the memory of the VMS+ device needs to be cleared. When the upload of the message goes to 99% and then stops, it means that everything was send out but confirmation of the VMS+ device has not yet been received. Contact AST to resolve. Another error is that the upload is rejected or there is a time out. This can be caused by poor signal strength or the memory of the VMS+ needs to be cleared. If a VMS+ communication profile is required and the signal strength indicators for GSM and satellite are both greyed out or red, then there is no local communication between the VMS+ and E-Catch. In this case check cabling (supplied cables must not be extended) or a wrong communication profile is selected in Settings > favorites. With the com profile GPRS + SAT, a message can be send when the signal strength is > 60%. If no return message has been received after some time and the signal strength has dropped below 60%, a pop-up will appear. It states that for one or more messages no answer has been received and possibly it was send via GPRS, but the signal strength was not good enough to complete the transmission. You will be asked if you want to send the message again via SAT and you can chose yes or no. When trying to send a message via VMS+ there is a progress bar with the send status visible in the communication screen which is refreshed every 30 seconds even when the percentage has not changed.
44 8. REPORTS. On the main toolbar of E-Catch you will find the Reports button. As shown on the picture below. In this menu there are 5 tabs to choose from, the default tab Fishing Trip Reports, United Kingdom Reports, CMR, Logbook and Transport Document. In the default tab Fishing Trip Reports users can use the drop down box beneath Fishing Trip Date to choose either their current fishing trip or a trip made in the past. Once a fishing trip is selected an overview of the fishing activity s from the selected trip is generated and displayed. These reports can be printed out if a printer is installed using the Print button beneath the drop down menu which is used to select the fishing trip. In the United Kingdom Reports tab you can select individual XML files to view the content, when using the drop down menu beneath file name in this tab you will see the file name given to the XML messages. Using the Review menu you will be able to quickly trace down which message number you need if you wish to review it in this function. In the tab CMR it is possible to create a CMR letter using information from the fishing trips. These CMR s can either be printed or send by . The logbook tab opens up the Logbook viewer. You can select a trip and view the totals by number of kilo s or units. The result will be displayed in an old fashion styled logbook overview. This can either be printed out or send by . The tab transport document allows you to either print or the electronic document of the selected fishing trip.

45 One of the requirements of being able to create CMR files or Transport documents is that you have added your relations into E-Catch. The relations must be added within E-Catch using Settings > Favourites and then the Relations tab. Begin by selecting the fishing trip from which you wish to create the CMR from the list Fishing Trips. Then select which Catch details will be transported by using the Catch Details menu. After adding a Sender, Transporter and a Delivery address you can either mail or print the CMR or Transport document.

46 9. REVIEW On the main toolbar of E-Catch you will find the Review button. As shown on the picture below. Within the Review menu you can track the message history towards the authorities. By using the drop down menu you can select which fishing trip s history you want to review. As shown in the picture above you can review the message history. When double clicked on a message the XML file which has been sent will pop up in your standard XML viewer. The information you can retrieve from this screen is as listed below: Description: The type of message it entails, for example departure, fishing activity etc. Message: Send: The extra added text send with the message, most commonly used when explaining the reason a corrections message has been sent. When the bar is green the message has being send successfully or has been acknowledged When the bar is red, an error has occurred or the message has been rejected. Acknowledge: When the bar is green the message has being send successfully or has been acknowledged When the bar is red, an error has occurred or the message has been rejected. Created on: Created by: Send by: Filename: When the message was created on the E-Catch system. Each captain has his own login name with which you can identify which captain has created the message. Each captain has his own login name with which you can identify which captain has send the message. What the filename is of the created message. When a right click on a message is done a submenu appears in which you can chose to send messages via and preform XSD validation on the messages.

47 10. QUOTA E-Catch is also fitted with a module to monitor your quota usage. This quota management is found on the main toolbar in E-Catch under the button Quota. The Quota module allows you to monitor status of your quota but it also keeps track of your fishing days. As seen in the example picture below this vessel made a few fishing days but none of his fishing activities affected his quota. You can view your quota progress per year and browse through your history by switching years using the calendar in the top left corner in which you can scroll to the left to go in the past and scroll to the right to go to the future Add Quota When adding Quota use the toolbar at the bottom, in this toolbar you must define the following parameters: Year: Month: Species: Division: Quota: Add: Select the year for which this quota has to be set You can define for which month the quota has to be set, when using the asterisk as selection it will use the entire year. Select the species for which you want to set the quota for. Select the division (ICES area) for which you want to set the quota for. Insert the amount of quota you have for the specie, area and timeframe you have selected. This button will finalize your action and will add the Quota to the list Increasing and lowering an existing quota You can adjust a quota you already set, using the same controls that you need for adding a quota. Increasing Quota
Overview of etrips Mobile2 for Windows
 Overview of etrips Mobile2 for Windows etrips/mobile2 is a mobile application from the ACCSP available on Apple ios, Android tablets and Windows 10 computers. Captains can use it for the submission of
My MessageMedia User Guide
 My MessageMedia User Guide Copyright and Trademark Statement 2011 MessageMedia All rights reserved. Apart from any use permitted under the Copyright Act 1968, no part of this publication may be reproduced,
Grapevine web hosting user manual. 12 August 2005
 Grapevine web hosting user manual 12 August 2005 Grapevine web hosting user manual 2 Contents Contents... 2 Introduction... 4 System features... 4 How it looks... 5 Main navigation... 5 Reports... 6 Web
DSS User Guide. End User Guide. - i -
 DSS User Guide End User Guide - i - DSS User Guide Table of Contents End User Guide... 1 Table of Contents... 2 Part 1: Getting Started... 1 How to Log in to the Web Portal... 1 How to Manage Account Settings...
User Guide. Trade Finance Global. For customers using Guarantees. October nordea.com/cm OR tradefinance Name of document 5/8 2015/V1
 User Guide Trade Finance Global For customers using Guarantees October 2015 nordea.com/cm OR tradefinance Name of document 2015/V1 5/8 Table of Contents 1 Trade Finance Global (TFG) - Introduction... 4
GlobeNewswire. GlobeNewswire, User s Guide USER S GUIDE. Version: 1.16 Issued: By: Global Corporate Services 12/06/
 GlobeNewswire USER S GUIDE Version: 1.16 Issued: 2011-06-12 By: Global Corporate Services 12/06/2011 1.16 1 (31) Table of Contents 1. INTRODUCTION... 4 1.1 Document Objectives... 4 1.2 Document conventions...
Using the Inbox to Manage Messages
 6 Using the Inbox to Manage Messages You can use the Outlook Inbox folder as well as the other mail-item folders (Drafts, Outbox, and Sent Items) to receive, send, and manage email, and send fax messages.
Anchor User Guide. Presented by: Last Revised: August 07, 2017
 Anchor User Guide Presented by: Last Revised: August 07, 2017 TABLE OF CONTENTS GETTING STARTED... 1 How to Log In to the Web Portal... 1 How to Manage Account Settings... 2 How to Configure Two-Step Authentication...
USER GUIDE for Salesforce
 for Salesforce USER GUIDE Contents 3 Introduction to Backupify 5 Quick-start guide 6 Administration 6 Logging in 6 Administrative dashboard 7 General settings 8 Account settings 9 Add services 9 Contact
UNIVERSITY OF WOLLONGONG MICROSOFT OUTLOOK
 UNIVERSITY OF WOLLONGONG MICROSOFT OUTLOOK 2007 EMAIL Table of Contents INTRODUCTION... 2 WHAT S NEW... 2 MOBILE DEVICES... 2 OVERVIEW OF OUTLOOK... 3 NAVIGATION PANE... 3 VIEWING MAIL... 4 READING PANE...
MYINBOX YOUR ONLINE MESSAGING CENTRE USER GUIDE Issue March 30, 2009
 MYINBOX YOUR ONLINE MESSAGING CENTRE USER GUIDE Issue 1.1.0 - March 30, 2009 1 CONTENTS 1 INTRODUCTION TO MYINBOX... 4 1.1 OVERVIEW... 4 1.2 ADDITIONAL FEATURES... 5 1.3 NAVIGATING MYINBOX... 6 2 EMAIL
Kean University. System Guide. cougar.kean.edu. Your window to the world
 Kean University E-Mail System Guide cougar.kean.edu www.kean.edu Your window to the world USING KEAN UNIVERSITY E-MAIL SYSTEM (COUGAR) This document is divided into three sections: Messenger Express Basics:
A Distributor Services Site Features and FAQ s
 A Distributor Services Site Features and FAQ s October 2015 Rev 2.12 Table of Contents Registering/Logging in Page 3 Services Available after Logging In Page 4-5 Frequently Asked Questions Page 6 Log In
Interactive Voice Response (IVR) Extension Type Guide
 Extension Type Guide") 4PSA VoipNow 2.0.3 Interactive Voice Response (IVR) Extension Type Guide For more information about 4PSA VoipNow, check: http://www.voipnow.com Copyrights 2002-2009 Rack-Soft, LLC. VoipNow is a registered
4PSA VoipNow 2.0.3 Interactive Voice Response (IVR) Extension Type Guide For more information about 4PSA VoipNow, check: http://www.voipnow.com Copyrights 2002-2009 Rack-Soft, LLC. VoipNow is a registered
Sourcing. Supplier Maintenance and Company Administration Buyer User Guide
 Sourcing Supplier Maintenance and Company Administration Buyer User Guide Version 6.1 Ion Wave Technologies, Inc. 2002-2008 Table of Contents Table of Contents...2 Welcome to Supplier Maintenance and Company
Halo Administrator GUIDE
 Halo Administrator GUIDE Contents Welcome to Halo... 3 Secure Sign-In... 4 Forgot Password... 4 Messages... 5 Create and Send a Message... 5 Message Enhancements... 6 Quick Note... 6 Mark as Urgent...
HGC SUPERHUB HOSTED EXCHANGE
 HGC SUPERHUB HOSTED EXCHANGE EMAIL OUTLOOK WEB APP (OWA) 2010 USER GUIDE V2013.6 HGC Superhub Hosted Email OWA User Guide @ 2014 HGC. All right reserved. Table of Contents 1. Get Started... 4 1.1 Log into
EasiShare ios User Guide
 Copyright 06 Inspire-Tech Pte Ltd. All Rights Reserved. Page of 44 Copyright 06 by Inspire-Tech Pte Ltd. All rights reserved. All trademarks or registered trademarks mentioned in this document are properties
Cloud Compute. Backup Portal User Guide
 Cloud Compute Backup Portal User Guide Contents Service Overview... 4 Gaining Access... 5 Operational Guide... 6 Landing Page... 6 Profile View... 6 Detailed View... 8 Overview... 8 Cloud Backup... 8
Group Administrators
 Hosted VoIP Phone System Blue Platform Admin Portal Guide for Group Administrators Table of Contents 1 About this Guide... 6 2 Accessing the Hosted VoIP Phone System Admin Portal... 7 3 Hosted VoIP Admin
Rapid Test WINDOWS APP User Manual
 Rapid Test WINDOWS APP User Manual Version Control Version Number Date Changed by 1 25th August 2016 Nicola Latter 2 15 th September 20016 Nicola Latter 3 27 th October 2016 Nicola Latter 4 8 th December
End User Manual. December 2014 V1.0
 End User Manual December 2014 V1.0 Contents Getting Started... 4 How to Log into the Web Portal... 5 How to Manage Account Settings... 6 The Web Portal... 8 How to Upload Files in the Web Portal... 9 How
eprocurement MET Pilot Portal - SUPPLIER GUIDE Pag. 1/56 TABLE OF CONTENTS
 Pag. 1/56 TABLE OF CONTENTS TABLE OF TERMS... 2 REGISTERING TO THE PORTAL... 3 Link on Maire Tecnimont Website... 3 Portal Login Page... 3 Registration Form... 5 1. REGISTRATION FORM... 5 1. BASIC PROFILE
Desktop & Laptop Edition
 Desktop & Laptop Edition USER MANUAL For Mac OS X Copyright Notice & Proprietary Information Redstor Limited, 2016. All rights reserved. Trademarks - Mac, Leopard, Snow Leopard, Lion and Mountain Lion
MT+ Beneficiary Guide
 MT+ Beneficiary Guide Current version MT+ 2.3.0 implemented on 11/04/16 Introduction... 2 How to get access... 3 Login... 4 Automatic notifications... 8 Menu and Navigation... 9 List functionalities...
Xantic (Station 12) WebLink User Manual for Windows 98, Internet Explorer 5.0 and Outlook Express 5.0 Text only
 WebLink User Manual for Windows 98, Internet Explorer 5.0 and Outlook Express 5.0 Text only") Xantic (Station 12) WebLink User Manual for Windows 98, Internet Explorer 5.0 and Outlook Express 5.0 Text only 1. Introduction... 2 1.1. Getting Started... 2 1.2. Required hardware... 2 1.3. Required
Xantic (Station 12) WebLink User Manual for Windows 98, Internet Explorer 5.0 and Outlook Express 5.0 Text only 1. Introduction... 2 1.1. Getting Started... 2 1.2. Required hardware... 2 1.3. Required
U.S. Pacific Albacore Electronic Logbook
 U.S. Pacific Albacore Electronic Logbook Table of Contents U.S. Pacific Albacore Electronic Logbook... 1 Table of Contents... 1 Introduction and Installation... 2 Using the Pacific Albacore Logbook Program...
The TELUS Business Connect Mobile solution. Admin guide
 The TELUS Business Connect Mobile solution Admin guide Table of contents. Part Getting started 4 Introduction 5 Admin homepage 5 Main functions 5 Admin Portal 5 My Extension 6 Do Not Disturb 7 RingOut
SIS offline. Getting Started
 SIS offline We highly recommend using Firefox version 3.0 or newer with the offline SIS. Internet Explorer is specifically not recommended because of its noncompliance with internet standards. Getting
ExpressShipper User Guide
 ExpressShipper Quick User Guide ExpressShipper Section 0 Page 1 of 60 Section 1: Structure of the User Guide In this section This section contains the following topics: Topic See Page What is the purpose
2013 edition (version 1.1)
") 2013 edition (version 1.1) Contents 1 Introduction... 3 2 Signing in to your Office 365 account... 3 2.1 Acceptable Use Policy and Terms of Use... 4 3 Setting your profile and options... 4 3.1 Settings:
2013 edition (version 1.1) Contents 1 Introduction... 3 2 Signing in to your Office 365 account... 3 2.1 Acceptable Use Policy and Terms of Use... 4 3 Setting your profile and options... 4 3.1 Settings:
HeroBase Administrator Training Guide 101
 HeroBase Administrator Training Guide 101 Contents Introduction... 3 Preconditions... 3 What is a campaign?... 3 What is a Project?... 3 How does Campaign Templates relate to Campaigns?... 4 What is Lead
BACKUP APP V7 CLOUUD FILE BACKUP & RESTORE GUIDE FOR WINDOWS
 V7 CLOUUD FILE BACKUP & RESTORE GUIDE FOR WINDOWS Table of Contents 1 Overview... 1 1.1 About This Document... 7 2 Preparing for Backup and Restore... 8 2.1 Hardware Requirement... 8 2.2 Software Requirement...
ithenticate User Guide Getting Started Folders Managing your Documents The Similarity Report Settings Account Information
 ithenticate User Guide Getting Started Folders Managing your Documents The Similarity Report Settings Account Information 1 Getting Started Whether you are a new user or a returning one, to access ithenticate
OUTLOOK WEB ACCESS UOW USER GUIDE INDEX
 OUTLOOK WEB ACCESS UOW USER GUIDE INDEX ACCESSING MAIL... 2 SETTING UP... 2 OPTIONS... 3 VIEWING... 4 ARRANGE MESSAGES... 4 CREATING/SENDING A NEW MESSAGE... 5 REPLYING TO MESSAGES... 5 FORWARDING MESSAGES...
OpenClinica 3.4.x for Investigators
 OpenClinica 3.4.x for Investigators http://www.trialdatasolutions.com 2015 TrialDataSolutions 2015 OpenClinica 3.4.x for Investigators Page 1 of 20 Preface This manual describes the main activities of
exchange Call Center Agent Guide
 exchange Call Center Agent Guide Version 4.6 NBX System Release 6.5 http://www.3com.com Part Number: 900-0419-01 Published April 2009 3Com Corporation, 350 Campus Drive, Marlborough MA 01752-3064 Copyright
Where Is My Package? (a.k.a. WIMP)
") Developers of WIMP Where Is My Package? Where Is My Package? (a.k.a. WIMP) USER GUIDE: How-to for basic WIMP functions December 2011 For an instant how-to, the following pages provide a quick interactive
Developers of WIMP Where Is My Package? Where Is My Package? (a.k.a. WIMP) USER GUIDE: How-to for basic WIMP functions December 2011 For an instant how-to, the following pages provide a quick interactive
ABP Agents Interface Help File
 ABP Agents Interface Help File Table of Contents Introduction... 3 Login... 3 Registering... 4 Request Password... 5 Home Page... 7 Full Access Homepage... 7 Side Menu Bar... 7 Waste User Homepage... 8
Time Reorder Utility User Manual
 Time Reorder Utility User Manual Revisions...3 Introduction...4 Getting Started...5 Running Modes...7 Tray icon menu...7 Enter Password...8 Connections...8 Define Connections...8 Verify Connections...9
Sync User Guide. Powered by Axient Anchor
 Sync Powered by Axient Anchor TABLE OF CONTENTS End... Error! Bookmark not defined. Last Revised: Wednesday, October 10, 2018... Error! Bookmark not defined. Table of Contents... 2 Getting Started... 7
BUSINESS LINE COMMPORTAL GUIDE
 wowforbusiness.com BUSINESS LINE COMMPORTAL GUIDE WOW! Business BCSE.U.1505.O Business Line CommPortal Guide Table of Contents Getting Started...3 Dashboard...4 Messages and Calls...5 Messages...5 Missed
Compliance Desktop Technology Platform Admin User Guide
 Compliance Desktop Technology Platform Admin User Guide Table of Contents 1. Logging into ComplianceDesktop... 4 1.1 ComplianceDesktop Landing Page... 4 1.2 Requesting a New Password... 4 1.3 Requesting
Atlona Manuals Software AMS
 AMS Atlona Manuals Software Version Information Version Release Date Notes 1 03/18 Initial release AMS 2 Welcome to Atlona! Thank you for purchasing this Atlona product. We hope you enjoy it and will take
User Documentation. Administrator Manual.
 User Documentation Administrator Manual Proposal Software 1140 US Highway 287, Suite 400-102 Broomfield, CO 80020 USA Tel: 203.604.6597 www.proposalsoftware.com Table of Contents Open the WebPro Viewer...
Online Backup Manager v7 Office 365 Exchange Online Backup & Restore Guide for Windows
 Online Backup Manager v7 Office 365 Exchange Online Backup & Restore Guide for Windows Copyright Notice The use and copying of this product is subject to a license agreement. Any other use is prohibited.
Wholesale Lockbox User Guide
 Wholesale Lockbox User Guide August 2017 Copyright 2017 City National Bank City National Bank Member FDIC For Client Use Only Table of Contents Introduction... 3 Getting Started... 4 System Requirements...
Acronis Data Cloud Version 7.8
 Acronis Data Cloud Version 7.8 PARTNER'S GUIDE Revision: 10/5/2018 Table of contents 1 About this document...3 2 About Acronis Data Cloud...3 2.1 Services and offerings... 3 2.2 User accounts and tenants...
GRS Enterprise Synchronization Tool
 GRS Enterprise Synchronization Tool Last Revised: Thursday, April 05, 2018 Page i TABLE OF CONTENTS Anchor End User Guide... Error! Bookmark not defined. Last Revised: Monday, March 12, 2018... 1 Table
Terra Dotta Manual for Reviewers
 Terra Dotta Manual for Reviewers Table of Contents Accessing the OSU GO Application System... 3 Defining Terminology... 3 Phases of the Application vs. Statuses... 4 Application Statuses... 4 Application
Isi Net User Manual for Bank customers
 1 Table of Contents 1 Introduction and overview... 4 1.1 Isi Net User Types... 4 1.2 Accessing the Isi Net service... 5 1.2.1 User Login... 5 1.2.2 User Logout... 7 1.3 User Interface... 7 1.3.1 Menus...
Lava New Media s CMS. Documentation Page 1
 Lava New Media s CMS Documentation 5.12.2010 Page 1 Table of Contents Logging On to the Content Management System 3 Introduction to the CMS 3 What is the page tree? 4 Editing Web Pages 5 How to use the
Concord Print2Fax. Complete User Guide. Table of Contents. Version 3.0. Concord Technologies
 Concord Print2Fax Complete User Guide Table of Contents Version 3.0 Concord Technologies 2018 1 Concord Technologies concordfax.com premiumsupport@concordfax.com Copyright 2017 CONCORD Technologies. All
BookData Online Ordering Guide
 BookData Online Ordering Guide BookData Online is a professional bibliographic search tool used by booksellers, publishers and libraries worldwide and provides a unique source of timely, accurate and comprehensive
PlanWell 4.0 User Guide
 PlanWell 4.0 User Guide Contents Finding Planwell and Logging On 2 Planwell Access Portals 2 Document Selection 3 Build a Set 4 Most Current Set 4 Custom Packages 4 Issue Tree 5 Standard Order Process
Spark Nano 3.0. User s Guide WHEN YOU NEED TO KNOW.
 1 Spark Nano 3.0 User s Guide WHEN YOU NEED TO KNOW. 2 What s Inside Spark Nano Wall Charger Cellular SIM Card (Already in device)* Optional Accessories * The missing card is already installed inside of
Administrator Manual
 Administrator Manual CURA Technical Support Email: cura_support@mindscope.com Phone: 1.888.322.2362 x 55 Administrator Manual Page 1 Table of Contents The Setup Module... 3 Skills... 3 Adding or Modifying
User Guide. Version
 User Guide Version 0.19 2-11-2008 StormPro Max User Guide Page 1 of 69 5/10/2008 Table of Contents 1. Overview... 4 1.1 Definition of StormPro Max Terms... 4 2. Accessing StormPro Max... 5 3. Navigating
BBVA Compass Spend Net Payables
 User Guide BBVA Compass Spend Net Payables User Guide Vault Services Table of Contents Introduction 2 Technical Requirements 2 Getting started 3 Sign In 3 General Navigation 4 Upload/Create Payment 5
All hardware and software names are brand names and / or trademarks of their respective manufacturers.
 TecWeb 5.0 User Manual Version: 1.8 (Release 8) Author: TecCom Solution Management Date: 05.12.2017 Supported browsers: Internet Explorer 11 Edge Firefox Chrome The compilation of texts and pictures was
edofe Management Toolkit
 edofe Management Toolkit A guide to effective edofe management for Directly Licensed Centres 1 2 Contents Section one: Setting up the correct infrastructure on edofe... 4 Creating a group... 4 Editing
CITO2 Installation & User Instructions
 CITO2 Installation & User Instructions DD 56107 Stoneridge Electronics Ltd 1. Installation...4 1.1. System Requirements...4 1.2. Installing CITO2...4 1.3. Uninstalling CITO2...4 2. Starting and closing
User Guide. Prepared by activpayroll s activ8 Team - Updated October Page 1 of 6
 User Guide Prepared by activpayroll s activ8 Team - Updated October 2016. activ8@activpayroll.com Page 1 of 6 Contents Contents... 2 How do I view my bank details?... 3 How do I edit my bank details?...
Perceptive Matching Engine
 Perceptive Matching Engine Advanced Design and Setup Guide Version: 1.0.x Written by: Product Development, R&D Date: January 2018 2018 Hyland Software, Inc. and its affiliates. Table of Contents Overview...
Android User Guide. for version 5.3
 Android User Guide for version 5.3 Contents 1. Installation... 3 1.1. How to install Babelnet... 3 1.2. Enter Babelnet in the search field.... 3 1.3. Safety precautions when using Babelnet on your Android...
Office365 End User Training & Self-Service Migration Manual Simplified
 Office365 End User Training & Self-Service Migration Manual Simplified Version 1.0 University Systems and Security 5/25/2016 1 P a g e Table of Contents 2 P a g e Table of Contents Introduction to Office365...
Your . A setup guide. Last updated March 7, Kingsford Avenue, Glasgow G44 3EU
 fuzzylime WE KNOW DESIGN WEB DESIGN AND CONTENT MANAGEMENT 19 Kingsford Avenue, Glasgow G44 3EU 0141 416 1040 hello@fuzzylime.co.uk www.fuzzylime.co.uk Your email A setup guide Last updated March 7, 2017
Oracle Beehive. Before Using Oracle Beehive Client and Communicator. Using BlackBerry with Oracle Beehive Release 2 ( )
") Oracle Beehive Using BlackBerry with Oracle Beehive Release 2 (2.0.1.6) November 2011 Document updated November 4, 2011 This document describes how to access Oracle Beehive from your RIM BlackBerry device
Oracle Beehive Using BlackBerry with Oracle Beehive Release 2 (2.0.1.6) November 2011 Document updated November 4, 2011 This document describes how to access Oracle Beehive from your RIM BlackBerry device
Marketing tools for Check-Inn Setup Guide & Manual. Rev. 1/22/16
 Marketing tools for Check-Inn Setup Guide & Manual Rev. 1/22/16 2015 Innsoft, Inc. Contents License & warranty... 5 Customer support... 6 Acknowledgement... 6 Introduction... 7 Getting Started... 8 Installation...
ADAMS. USER GUIDE FOR NATIONAL CRICKET FEDERATIONS (NCFs)
") ADAMS USER GUIDE FOR NATIONAL CRICKET FEDERATIONS (NCFs) https://adams.wada-ama.org/adams/ TABLE OF CONTENTS Getting Started on ADAMS... 3 Logging In... 3 Forgotten your username and password... 5 ICC
ADAMS USER GUIDE FOR NATIONAL CRICKET FEDERATIONS (NCFs) https://adams.wada-ama.org/adams/ TABLE OF CONTENTS Getting Started on ADAMS... 3 Logging In... 3 Forgotten your username and password... 5 ICC
MT+ Beneficiary Guide
 MT+ Beneficiary Guide Current version MT+ 2.5.0 implemented on 10/08/16 Introduction... 2 How to get access... 3 Login... 4 Automatic notifications... 8 Menu and Navigation... 9 List functionalities...
Patient Portal User Guide The Patient s Guide to Using the Portal
 2014 Patient Portal User Guide The Patient s Guide to Using the Portal Table of Contents: What is the Patient Portal?...3 Enrolling in the Patient Portal.......... 4-19 A. Enrollment Option #1: First-Time
Elizabeth Garrett Anderson. FAQs. The Anderson Team Journey. EGA FAQ s
 Elizabeth Garrett Anderson FAQs The Anderson Team Journey www.leadershipacademy.nhs.uk 1 Contents Entering / editing your team name... 3 Adding team members one at a time... 4 Adding non-team members...
MT+ Beneficiary Guide
 MT+ Beneficiary Guide Introduction... 2 How to get access... 3 Login... 4 Automatic notifications... 8 Menu and Navigation... 9 List functionalities... 12 Project Details... 18 How to manage organisations...
ARADIAL TECHNOLOGIES Aradial Enforcer Manual Version 7.0
 ARADIAL TECHNOLOGIES Aradial Enforcer Manual Version 7.0 Administration Guide A R A D I A L E N F O R C E R Administration Guide Aradial Technologies Ltd. Information in this document is subject to change
Xton Access Manager GETTING STARTED GUIDE
 Xton Access Manager GETTING STARTED GUIDE XTON TECHNOLOGIES, LLC PHILADELPHIA Copyright 2017. Xton Technologies LLC. Contents Introduction... 2 Technical Support... 2 What is Xton Access Manager?... 3
Contents Introduction... 4 Features new to CyDesk Web... 4 Call History: - Show All or Filter by Category... 4 Call History: - View the Call History
 Contents Introduction... 4 Features new to CyDesk Web... 4 Call History: - Show All or Filter by Category... 4 Call History: - View the Call History of other Agents... 4 Busy Agents: - Hover to View who
Android User Guide. Last Updated On: April 07, 2018
 Android User Guide Last Updated On: April 07, 2018 Copyright Notice Copyright 2018 ClickSoftware Technologies Ltd. All rights reserved. No part of this publication may be copied without the express written
OrderSmart. April 21, Passport Health Communications, Inc. All Rights Reserved
 OrderSmart P hysician Office userguide April 21, 2014 2014 Passport Health Communications, Inc. All Rights Reserved Table of Contents 1.0 General Information... 7 1.1 Product Overview... 7 1.2 Authorized
Electronic Appraisal Delivery (EAD) Portal. FHA EAD General User Guide
 Portal. FHA EAD General User Guide") Electronic Appraisal Delivery (EAD) Portal FHA EAD General User Guide Last Updated: October 2015 FHA EAD General User Guide Page 2 of 87 Version 1.3.1 TABLE OF CONTENTS INTRODUCTION... 6 WHAT IS THE ELECTRONIC
Electronic Appraisal Delivery (EAD) Portal FHA EAD General User Guide Last Updated: October 2015 FHA EAD General User Guide Page 2 of 87 Version 1.3.1 TABLE OF CONTENTS INTRODUCTION... 6 WHAT IS THE ELECTRONIC
User Guide support.keytime.co.uk
 User Guide Contents Introduction... 4 Starting Personal Tax... 4 Sorting and Filtering Clients... 5 Print Summary and Print Proforma Letters... 5 Converting Returns from Previous Years... 6 Storing Client
Parish . User Manual
 Parish Email User Manual Table of Contents LOGGING IN TO PARISH EMAIL... 3 GETTING STARTED... 3 GENERAL OVERVIEW OF THE USER INTERFACE... 3 TERMINATE THE SESSION... 4 EMAIL... 4 MESSAGES LIST... 4 Open
VERSION ASSET TRACKING SYSTEM USER MANUAL STARTER EDITION
 VERSION 4.20.3 ASSET TRACKING SYSTEM USER MANUAL STARTER EDITION ATS USER MANUAL- STARTER EDITION TABLE OF CONTENTS ATS User Manual- Starter Edition... 2 Table of Contents... 2 Quick Start Overview...
Collector and Dealer Software - CAD 3.1
 Collector and Dealer Software - CAD 3.1 Your Registration Number Thank you for purchasing CAD! To ensure that you can receive proper support, we have already registered your copy with the serial number
Student Guide INTRODUCTION TO ONLINE RESOURCES
 Student Guide INTRODUCTION TO ONLINE RESOURCES Date: 08. June. 2017 By: Technical Support Team STUDENT GUIDE southwales.unicaf.org 1)Introduction...4 2)Student Panel (SIS)...4 2.1)Student Panel (SIS) Login...4
I. ATTORNEY ADMINISTRATION OVERVIEW...3. HELP CENTER...4 Documents Web Tutorials Online Seminar Technical Support INVITE A CLIENT TO MYCASEINFO...
 I. ATTORNEY ADMINISTRATION OVERVIEW...3 II. III. IV. HELP CENTER...4 Documents Web Tutorials Online Seminar Technical Support INVITE A CLIENT TO MYCASEINFO...7-8 CLIENT MANAGEMENT Sorting and Viewing Clients...8-9
SIMPLE E-LOG APP USER MANUAL Page 1
 SIMPLE E-LOG APP USER MANUAL Page 1 CONTENTS-------------------------------------------------------- Revised on 10/31/2017 1. LOGIN CREDENTIALS... 3 1.1 Enter login credentials... 3 1.2 Forgot password...
Backup APP v7. Office 365 Exchange Online Backup & Restore Guide for Mac OS X
 Backup APP v7 Office 365 Exchange Online Backup & Restore Guide for Mac OS X Revision History Date Descriptions Type of modification 5 Apr 2017 First Draft New Table of Contents 1 Overview... 1 About This
Server Edition USER MANUAL. For Mac OS X
 Server Edition USER MANUAL For Mac OS X Copyright Notice & Proprietary Information Redstor Limited, 2016. All rights reserved. Trademarks - Mac, Leopard, Snow Leopard, Lion and Mountain Lion are registered
ANWB Connect Using the Web Portal Contents
 ANWB Connect Using the Web Portal Contents Login... 2 Forgot Username... 2 Forgot Password... 3 Account Settings... 5 User Settings... 5 Edit or Delete Account Email Address... 9 Change Username... 10
Backup App v7. Quick Start Guide for Windows
 Backup App v7 Quick Start Guide for Windows Revision History Date Descriptions Type of modification 30 Jun 2016 First Draft New 25 Nov 2016 Added Restore Options to Ch 8 Restore Data; Combined Technical
UNDP etendering: User Guide for Bidders. January 2018
 UNDP etendering: User Guide for Bidders January 2018 Quick References to the Guide The UNDP etendering Guide for Bidders is a manual for individuals or companies who wish to participate in a UNDP tender
Student Guide. By UNICAF University
 vnhgfj Student Guide By UNICAF University 1 2 Table of Contents 1) Introduction... 5 2) Student Panel (SIS)... 5 2.1) Student Panel (SIS) Login... 5 2.1.1) Definitions... 5 2.1.2) Registration Email...
User Guide Ahmad Bilal [Type the company name] 1/1/2009
![User Guide Ahmad Bilal [Type the company name] 1/1/2009](/thumbs/92/109182878.jpg "User Guide Ahmad Bilal [Type the company name] 1/1/2009") User Guide Ahmad Bilal [Type the company name] 1/1/2009 Contents 1 LOGGING IN... 1 1.1 REMEMBER ME... 1 1.2 FORGOT PASSWORD... 2 2 HOME PAGE... 3 2.1 CABINETS... 4 2.2 SEARCH HISTORY... 5 2.2.1 Recent
User Guide Ahmad Bilal [Type the company name] 1/1/2009 Contents 1 LOGGING IN... 1 1.1 REMEMBER ME... 1 1.2 FORGOT PASSWORD... 2 2 HOME PAGE... 3 2.1 CABINETS... 4 2.2 SEARCH HISTORY... 5 2.2.1 Recent
itrail Convoy (Global) User s Manual
 User s Manual") itrail Convoy (Global) User s Manual 1 What s Inside 1. Wiring Harness 2. Antenna 3. itrail Convoy Base Device 4. Serial Number (Located on the box and device) 1 2 2 3 4 3 itrail Convoy Wiring Diagram
itrail Convoy (Global) User s Manual 1 What s Inside 1. Wiring Harness 2. Antenna 3. itrail Convoy Base Device 4. Serial Number (Located on the box and device) 1 2 2 3 4 3 itrail Convoy Wiring Diagram
Asset Investment Recovery Ministry of Citizens Services and Open Government BC Auction System Bidder Guide
 Asset Investment Recovery Ministry of Citizens Services and Open Government BC Auction System This guide has been prepared as support for Bidder s use in BC Auction BC AUCTION BIDDER OVERVIEW 1.0 ACCESSING
Online Backup Manager v7 Quick Start Guide for Synology NAS
 Online Backup Manager v7 Quick Start Guide for Synology NAS Copyright Notice The use and copying of this product is subject to a license agreement. Any other use is prohibited. No part of this publication
worksmart!-mobile User Guide Version 3.5 worksmart!-mobile User Guide 1 Copyright 2005 Mobile Workforce, Inc.
 worksmart!-mobile User Guide 1 Copyright 2005 Mobile Workforce, Inc. Copyright Notice Mobile Workforce, Inc. has copyright ownership of the Mobile Workforce-workSmart! applications and other software related
User Guide. Join us on
 User Guide www.neopost.ca Join us on TABLE OF CONTENTS Getting started Hardware and subscription requirements 4 PC requirements - browsers 4 Activating the application 5 Weighing your items Get weight
Miele B2B Portal User Handbook Version 3.0
 Miele B2B Portal Processing Orders via Miele B2B Portal User Handbook Version 3.0 Date: 22/02/2011 Page 1 Contents 1 Opening Website / logging on... 3 2 B2B Homepage... 4 3 Creating/Maintaining Authorisations...