efiling User Manual Table of Contents
|
|
|
- Posy Richardson
- 5 years ago
- Views:
Transcription
1 efiling User Manual Individual User Table of Contents Individual User Registration... 3 Individual User Features... 8 Corporate User Corporate User Registration Corporate User Features HUF User HUF Registration HUF Features Tax Professional (CA) Tax Professional (CA) Registration Tax Professional (CA) Features External Agency ( Bulk PAN Verification User) External Agency Registration (Bulk Pan Verification User) External Agency Features (Bulk Pan Verification User) e-return Intermediary (ERI) User e-return Intermediary (ERI) User Registration e-return Intermediary (ERI) User Features
2 Individual User 2


3 Individual User Registration An Individual should have a valid PAN for registering with the E-Filing application. Registration Process Type in the URL of e-filing application ( ) Click on the 'Register Yourself' tab and select 'Individual' against the radio button found under Individual/HUF. Note: Instructions are provided on the right hand side of the screen. However, user can also refer to HELP menu, should they need help. The user will be directed to the registration page and the user will fill the following fields for further validation. PAN Number Mandatory, should be valid PAN. Surname Mandatory, should be as per the PAN details. First Name Not mandatory, should be as per the PAN details. Middle Name - Not mandatory, should be as per the PAN details. Date of Birth Mandatory, should be as per the PAN details. ID - Mandatory, should be valid ID. Mobile Number Mandatory. 3


4 Click on the Continue button. The registration details page should be displayed. A. Password Details User ID This will be automatically populated by the system, which is entered in the Basic Details screen. Password Mandatory, should be between 8 14 characters, alphanumeric and should contain at least one special character. Confirm Password Mandatory, The user has to enter the same password as entered above. Primary Secret Question Mandatory, The user needs to select any one question from available in the drop down. Primary Secret Answer Mandatory. Secondary Secret Question Mandatory, The user needs to select any one question from available in the drop down. Secondary Secret Answer Mandatory. B. Personal Details These details could be automatically populated by previously entered basic details. 4


5 C. Contact Details Landline Number Not mandatory. Mobile Number Mandatory. Alternate Mobile Number - Non mandatory. ID Mandatory. This field is auto-filled from the previous page. Alternate ID - Non mandatory, should be valid ID. Fax Number Non-mandatory. D. Present Address Flat/Door/Building Mandatory. Road/Street Non-mandatory. Area/Locality Mandatory. Town/City/District Mandatory. State Mandatory, user selects from the drop down provided. Pincode Mandatory. Check the check box Tick the box if Permanent Address is same as Present Address. 5


6 E. Subscribe to Mailing List This will be auto-selected. User can un-check the box provided to un-subscribe for mailing list. F. Enable Alerts, reminder and notifications This will be auto-selected. User can un-check the box provided to disable alerts, reminders and notification. G. Captcha This is mandatory and the user has to type in the numeric code which appears on the screen. Click on SUBMIT. If it is success, user will be navigated to the Registration successful screen. - 6

7 The user receives a confirmation with an activation link. An SMS is also sent to notify on the confirmation mail. In order to activate the account, the user should click on the Activation link. The user account is activated and the database is updated. 7
 Select the option, Answer Secret Question. I. Enter Date of Birth, Secret Question and Secret Answer 8")
8 Individual User Features Forgot Password In efiling application home page, click Login Here button. Click Forgot Password Link. Enter User ID and captcha Click Continue a) Select the option, Answer Secret Question. I. Enter Date of Birth, Secret Question and Secret Answer 8
9 II. Click Submit. Enter New Password and Confirm Password. III. Click Submit b) Select the option, Upload Digital signature Certificate. I. Select one of the option, Upload using.pfx file II. Click Submit. Enter New Password and Confirm Password. 9
10 III. Click Submit c) Select the option, Enter e-filed Acknowledgment number and bank account number. I. Select Assessment year, acknowledgment number and bank account number. II. Click Submit. Enter New Password and Confirm Password. III. Click Submit 10
. Click Login Here button.")

11 Login In browser, enter the URL of the efiling application ( Click Login Here button. Enter user name, password and DOB Click Login. Profile Settings Change Password Navigate to Profile Settings -> Change Password 11

12 Enter old password, new password, confirm password and click submit. Change Secret Question and Answer Navigate to Change Secret Question(s) and Answer(s). Change Primary secret question, answer and Secondary secret question and answer. Click submit Update Contact Details Navigate to Profile settings-> Update contact details. 12

13 13

14 Change the contact details and click submit. Success message will be displayed on the screen. Register Digital Signature Certificate Navigate to Profile settings -> Register digital signature certificate 14

15 Click submit. Success message will be displayed on the screen. Opt for Higher Security Navigate to Profile settings->opt for higher security Upload and match the DSC. Higher security option will be enabled. Success message will be displayed on the screen. Click Disable. Success message will be display on the screen 15

16 View my Profile Navigate to Profile settings -> View my profile 16
 will be")

17 PAN Details Navigate to Profile settings -> PAN details The PAN, Name, Address given while registering for the PAN card, Gender, Status and Date of Birth (DOB) will be displayed. Mailing List Navigate to Profile Settings -> Mailing list User should be able to subscribe or unsubscribe the mailing list. Click Subscribe to subscribe to mailing list. 17
18 Success message is display on the screen. Click Unsubscribe to unsubscribe from mailing list. Success message will be displayed on the screen. Alerts, Reminders and Notifications Navigate to Profile Settings-> Alerts. Reminders and Notification. Click enable. Success message will be displayed on the screen. Users want to unsubscribe.click disable. 18

19 Success message will be displayed on the screen. My Account View Form 26AS (Tax Credit) Navigate to My Account -> View Form 26 AS Click Confirm. The user will be redirected to the TDS- CPC website. My Return/Form Navigate to My Account -My returns/form User will be able to see the status of returns. Click on the Acknowledgment number. The Details of the acknowledgment number is displayed as a pop up. 19


20 Refund/Demand Status User is able to see the status of Refund/Demand. Refund Reissue Request Navigate to Refund Reissue Request Enter the CPC Reference Number, sequence number, DOB, captcha and click submit 20
21 Select Mode of Refund Reissue, bank account details, category and Click submit. Rectification Request Navigate to Rectification request page Select assessment year, enter communication reference number, latest order date and click submit Select the Rectification request type and click submit 21


22 Rectification Status Navigate to My Account -> Rectification Status Select Assessment Year, enter Captcha and Click Submit. User is able to see the status of rectification. Request for Intimation Select assessment year, category, sub-category, captcha and click submit 22

23 Click submit Register Legal Heir Navigate to Register Legal Heir Enter PAN, DOB, Surname, First Name, attach scanned copy of death certificate, enter captcha Click submit Add CA Navigate to My Account -> Add CA Enter the Membership no, select the form name and assessment year, enter captcha. 23


24 Clicks submit. Success message should be displayed on the screen. Individual assesse will be able to Add CA for the following set of Forms 3AC 3CEA 6B 10CCBBA 3AD 3CA-3CD 10B 10CCBC 3AE 3CB-3CD 10BB 10CCBD 3CE 3CEB 10CCB 10CCC Once the assesse has added CA, CA will be able to upload the Forms on behalf of the assesse. List of CAs Navigate to My Account -> List of CAs List of CAs should be displayed. Outstanding Tax Demand Navigate to My Account -> Outstanding Tax Demand 24
25 Disengage CA Navigate to My Account -> Disengage CA Click the select check box in any row. CA should be engaged for the particular Form. Disengage ERI Navigate to My Accounts -> Disengage ERI 25
26 Select Disengage check box and click Disengage. ERI will be disengaged successfully Tax Credit Mismatch Navigate to My Account -> Tax Credit Mismatch Select Assessment Year, enter Captcha and Click Submit. User is able to see the status of tax credit mismatch. 26
27 e-file Upload Return Navigate to e-file -> Upload Return Select the ITR form name, Assessment year and select the Xml. Clicks submit Success message will be displayed on the screen. Click the hyperlink. User should be able to see the ITR-V Acknowledgement. Prepare and Submit ITR Online Login and Navigate to efile -> Prepare and Submit ITR Online ITR 1 & ITR 4S is available Online. 27


28 For ITR 1, enter the details in the Personal Information tab, Income Details tab, TDS tab, Tax paid and Verification tab and 80G Tab. For ITR 4S, enter the details in the Personal Information tab, Income Details tab, 44AE tab, TDS tab, Tax paid and Verification tab and 80G Tab. 28
29 Click submit e-file in Response to Notice 139(9) Navigate to e-file --> e-file in response to Notice u/s139(9) 29
 Navigate to e-file --> Submit Form Online Select the form name, assessment year and click Submit.")
30 Select the ITR form name, assessment year, enter communication reference number, CPC date, Receipt date, verification Pin and browse the file to attach the Xml. Click Submit. Success message will be displayed on the screen. Prepare and Submit Online Form(Other than ITR) Navigate to e-file --> Submit Form Online Select the form name, assessment year and click Submit. Assesse will be able to fill the form and Submit the form for further processing. For an Individual assesse, following are the Forms available 30


31 Form 8 Form 10BA Form 10G Form 41 Form 9 Form 10CCD Form 10H Form 52A Form 10 Form 10CCE Form 35 Form 56 Form 10A Form 10E Form 40C Form 56D Download Income Tax Returns/Forms Navigate to Downloads->Income Tax returns forms. Select the assessment year from the dropdown. Download Pre-filled XML Navigate to Downloads -> Download Prefill Xml Select the assessment year and click submit. User will be able to view the prefilled xml. 31

32 My Request List Navigate to My Request List -> My Request List. Select an option, enter the captcha and click submit My Legal Heir List should be displayed. 32
33 Worklist Navigate to Worklist -> Worklist. Assesse will be able to view the forms submitted by CA on behalf him/her. Click on View Form. Assessee can verify the form and approve/reject the form by choosing the radio button and click Submit. If assesse is rejecting the form he has to provide the comments for rejection 33
34 Helpdesk Submit Request GO to Help Desk -Click Submit Request User selects the category and subcategory from the dropdown. User enters the summary and description. Clicks submit. Success message is display on the screen. 34
35 Request List Navigate to Help Desk -Click Request list. User will be able to see the status of the submitted grievance. Click the Request hyperlink. User is able to update or cancel the request. 35
36 Corporate User 36
 Be a registered user in the e-filing application to avail the services of e-filing")
37 Corporate User Registration Before a Corporate user registers in the new e-filing application, the following conditions should be met. A Corporate user should Have a valid PAN and a Digital Signature Certificate ( DSC is mandatory only for Company) Be a registered user in the e-filing application to avail the services of e-filing REGISTRATION PROCESS Type in the URL of e-filing application in a browser. 1. Click on the 'Register Yourself' tab and select 'Company' against the radio button found under Corporate. 37

38 Note: Instructions are provided on the right hand side of the screen. However, user can also refer to HELP menu, should they need help. 2. The user will be directed to the registration page and the user will fill the following fields for further validation. Corporate PAN - Mandatory, 10 character alphanumeric Organization Name Mandatory, alphanumeric and can contain special characters, limited to 75 characters Date of Incorporation Mandatory, select the date from the calendar provided 3. User clicks CONTINUE and the PAN details are validated and the user credentials are validated with the ICAI database available with e-filing application. 4. On success, the user is directed to the Registration details page and the user needs to enter the following 38
39 details. A. Password Details User ID This will be automatically populated by the system which is already provided at step-1 basic details Password Mandatory, can be between 8 14 characters, alphanumeric and should contain at least one special character and one numeric. Confirm Password The user has to enter the same password as entered above. This is mandatory. Primary Secret Question The user needs to select any one question out of four available in the drop down. This is mandatory. Primary Secret Answer Mandatory, alphanumeric and special characters, limited to 25 characters Secondary Secret Question The user needs to select any one question out of the balance three available in the drop down. This is mandatory. Secondary Secret Answer Mandatory, alphanumeric and special characters, limited to 25 characters B. Personal Details of Principal Contact PAN - Mandatory, 10 characters alphanumeric, If director is an NRI, then PAN is not mandatory. Designation Mandatory, alphanumeric and can contain special characters, limited to 75 characters Surname Mandatory, alphanumeric and can contain special characters, limited to 75 characters First Name Not mandatory, alphanumeric and can contain special characters, limited to 25 characters Middle Name - Not mandatory, alphanumeric and can contain special characters, limited to 25 characters Date of Birth Mandatory, select the date from the calendar provided, and should match the date as given in the PAN card C. Contact Details Landline Number Non-mandatory, numeric field, 10 digits (STD code and the telephone number should not exceed 10 digits. Do not prefix 0 ). Mobile Number - Mandatory, numeric field, 10 digits. Alternate Mobile Number - Non mandatory, numeric field, 10 digits ID - This field is auto-filled from the previous page Alternate ID - Non mandatory, alphanumeric, 125 characters Fax Number - Non-mandatory, numeric field, 10 digits (STD code and the telephone number should not exceed 10 digits. Do not prefix 0 ). D.Corporate office of Postal Address Flat/Door/Building Mandatory, alphanumeric and special characters, limited to 50 characters Road/Street - Non-mandatory, alphanumeric and special characters, limited to 50 characters 39

40 Area/Locality - Mandatory, alphanumeric and special characters, limited to 50 characters Town/City/District - Mandatory, alphanumeric and special characters, limited to 50 characters State Mandatory, user selects from the drop down provided Pin code - Mandatory, numeric, limited to 6 digits Country Mandatory E. Digital Signature Certificate Mandatory only for the company user F. Subscribe to Mailing List This will be auto-selected. User can un-check the box provided to un-subscribe for mailing list G. Enable Alerts, Reminders and Notifications This will be auto-selected. User can un-check the box provided to disable alerts, reminders and notification. H. Captcha Code This is mandatory and the user has to type in the numeric code which appears on the screen. 40


41 User clicks on 'SUBMIT' and the fields are validated for correctness. The user records are captured in the e- filing application. If not, the user will be intimated on unsuccessful registration. 41
42 The user receives a confirmation with an activation link. An SMS is also sent to notify on the confirmation mail. In order to activate the account, the user should click on the link. The user account is activated and the database is updated. 42


43 Corporate User Features Login Step 1: Type in the URL ( of e-filing application in a browser. Step 2: Click 'Login Here' and Enter the User ID, Password and Date of Birth/Incorporation.Click on the Login' button below. Step 3: On a successful login, the user will now be able to view his profile (Dashboard). The top right corner of the profile will let the User know about his/her Last Login' with the date stamp and time. There are also links provided like About us Feedback Contact Us Help The dashboard displays a set of quick links on the left, which will help the User navigate through the pages easily. The quick links provided are as follows: 43
44 Upload Return View form 26AS( Tax Credit) Rectification Request Download ITR e-filings Do's & Don't ITRV- Do's & Don't The profile also shows the various tabs along with their functionalities as follows: The 'My Account tab has the following functionalities: View Form 26AS Refund/Demand Status My Returns and Forms Rectification Request Rectification Status Request for Intimation Add CA List of CA Outstanding Tax Demand Dis-engage CA Dis-engage ERI Tax Credit Mismatch The 'e-file' tab has the following functionalities: Upload Returns e-file in Response to notice U/S 139(9). Prepare and Submit Online Form(Other than ITR) The 'Download' tab has the following functionalities: Income Tax Returns Forms Download Pre-filled XML The 'Profile Settings' tab has the following functionalities: Change Password Change Secret Question /Answer Update Principal Contact Details Update Contact Details Register Digital Certificate Opt for Higher Security View My Profile PAN Details Mailing List Alerts, Reminders and Notifications The My Request List' tab has the following functionalities: My Request List The Worklist tab has the following functionalities: Woklist The 'Helpdesk' tab provides the following functionalities: Submit request Request List 44


45 The dashboard also provides two Hyperlinks to view Returns/Forms and to view the Notifications if any. My Account View Form 26AS In order to View the Form 26AS, the User must perform the following steps: Step 1: Go to 'My Account tab and Click on the 'View Form 26AS' button. Step 2: The User will be notified about being directed to the TDS-CPC website to view the Form 26AS. Click on the 'Confirm' button to view the 26AS statement. My Returns/Forms In order to View the Returns/Forms, the User must perform as follows: Step 1: Go to the 'My Account' tab and Click on the My Returns/Form'.The User will be able to view the Returns/Forms now. Click on the Acknowledgement number.the Details of the acknowledgement number is displayed as a popup. 45

46 Refund/Demand Status In order to check the refund/demand Status, the User must perform the following steps: Step 1: Go to 'My Account tab and Click on the Refund/Demand Status button. Step 2: The User will now be able to view the status of Refund/Demand. Refund Re-issue Request In order to Refund Reissue Request, the User must perform the following steps: Step 1: Go to 'My Account' tab and Click on the 'Refund Reissue Request' link. Step 2: Enter the CPC Reference Number, sequence number, Date of Birth, the 'Captcha Code' and Click on the 'Submit' button. 46
47 Step 3: Select the Mode of Refund Reissue, bank account details and the category. Click on the 'Submit' button. Step 4: A success message will be displayed on the screen. Request for Intimation In order to Request for Intimation, the User must perform the following steps: Step 1: Go to 'My Account' tab and Click on the 'Request for Intimation' link. Step 2: Select assessment year, category and sub-category. Also enter the 'Captcha Code' and Click on the 'Submit' button. 47
48 Step 3: A success message will be displayed on the screen. Rectification Request In order to submit the Rectification Request, the User must perform the following steps: Step 1: Go to 'My Account' tab and Click on the Rectification Request' link. Step 2: Select assessment year, enter communication reference number, latest order date and Click 'Submit' button. Step 3: Select the Rectification request type and Click on the Submit button. 48
49 Step 4: A success message will be displayed on the Screen. Rectification Status In order to view the Rectification status, the User must perform the following steps: Step 1: Go to the 'My Account' tab and Click on the 'Rectification status' link. The User must provide all the mandatory fields along with the 'Captcha code'. Click on the 'Submit' button. Step 2: The User will now be able to see the status of rectification. 49

50 Add CA In order to add a new CA (Chartered Accountant), the user must perform the following steps: Step 1: Go to 'My Account' tab and click on the 'Add CA' link. The User must enter all the mandatory fields required to add a new CA, he must also enter the 'Captcha Code' and Click on the Submit button. On successful addition of a new CA, a successful message will be displayed on the screen. Corporate assesse will be able to Add CA for the following set of Forms - Once the assesse has added CA, CA will be able to upload the Forms on behalf of the assesse. 3AC 3CEA 6B 10CCBBA 10CCF 63 3AD 3CA-3CD 10B 10CCBC 10DA 64 3AE 3CB-3CD 10BB 10CCBD 29B 65 3CE 3CEB 10CCB 10CCC List of CA In order to View the List of CA s, the User must perform the following steps: Step1: Go to My Account and Click on the 'List of CA' link. User will now be able to see the list of CA's. 50


51 Outstanding Tax Demand In order to view the Outstanding Tax Demand, The User must perform the following steps: Step 1: Go to the 'My Account ' tab and Click on the 'Outstanding Tax demand' button. Step 2: It will display whether there is any demand outstanding from the assessee to the Income Tax Department. Dis-engage ERI In order to Dis-engage an ERI, The User must perform the following steps: Step 1: Go to 'My Account' tab and Click on the 'dis-engage ERI' link. Check the Dis-engage check box provided and Click on the 'dis-engage' button. Step 2: The User can Dis-engage the Services of ERI. 51
52 Dis-engage CA In order to Dis-engage a CA, The User must perform the following steps: Step 1: Go to 'My Account' tab and Click on the 'dis-engage CA' link. Check the Dis-engage check box provided and Click on the 'dis-engage' button. Step 2: The User can Dis-engage the Services of CA Tax Credit Mismatch Navigate to My Account -> Tax Credit Mismatch Select Assessment Year, enter Captcha and Click Submit. User is able to see the status of tax credit mismatch. 52
53 e-file UPLOAD RETURN In order to upload a Return the user must perform the following steps: Step 1: Go to the 'e-file' tab and Click on the 'Upload Return' link. Step 2: Enter all the mandatory fields and Click on the 'Submit' button. The respective Success message will be displayed on the screen. Step 3: The user can click on the hyperlink that says 'Click here' and download the ITR-V form. e-file in Response to Notice u/s139(9) In order to file a defective return, the User must perform the following steps: Step 1: 53
54 Go to the e-file' tab and click on the e-file in response to Notice u/s139 (9)' link. Step 2: The User must select the ITR form name and the assessment year from the dropdown. He / She must also fill in all the mandatory details that are required and add attachments if needed. Step 3: Click on the 'Submit button. The User will be able to upload the defective return. The respective success message will be displayed on the screen. Prepare and Submit Online Form(Other than ITR) Navigate to e-file --> Submit Form Online Select the form name, assessment year and click Submit. Assesse will be able to fill the form and Submit the form for further processing. For a Corporate, following are the Forms available Form 3CF-I Form 10A Form 52A Form 63A Form 3CF-II Form 10G Form 56 Form 64 Form 8 Form 35 Form 56D Form 65 Form 9 Form 40C Form 62 Form 66 Form 10 Form 41 Form 63 Downloads Income Tax Returns/Forms In order to download the Income Tax Returns Forms, The User must perform the following steps: 54


55 Step 1: Go to 'Downloads' tab and Click on the 'Income Tax Returns Forms' link. Step 2: The User must select the Assessment Year from the dropdown menu and the respective ITR s will be then displayed on the screen. Step 3: The user can now download the Income Tax Returns Form. Download Pre-filled XML In order to download the Pre-filled XML, The user must perform the following steps: Step 1: Go to 'Downloads' tab and Click on the 'Download Pre-filled Xml' link. 55

56 The User must Select the Assessment Year and Click on the 'Submit' button. The User can now download the Pre-filled XML. Profile Settings Change Password In order to change the password, the user needs to perform the following steps Step 1: Go to the 'Profile settings and Click on the 'Change Password' link. Step 2: The User needs to enter the mandatory details (*) then Click on the 'Submit' button and the fields are validated for correctness. Once the password is changed successfully, a 'success' message will be displayed on the Screen. Change Secret Question(s) / Answer(s) In order to change the secret question / answer, the user needs to perform the following steps: Step 1: Go to 'Profile settings and Click on the 'Change Secret question/answer' link. 56


57 Step 2: User needs to enter all the mandatory fields like the Primary and Secondary questions and their respective answers. The user also needs to provide the correct 'Captcha Code' and Click on the 'Submit' button. The fields are validated for correctness and a Success Message is displayed on the Screen. Update Principal Contact Details In order to update the Principal Contact Details, the user needs to perform the following steps: Step 1: Go to Profile Settings and Click on the 'Update Principal Contact Details' link. Some of the 'Principal Contact Details' of the User would be pre-filled. Step 2: If the User wishes he/she could easily Change the details, provide the 'Captcha Code' and Click on the 'Submit' button. 57

58 Step 3: If the User is an NRI director, select the checkbox, PAN field will be hidden. Step 4: The fields will be validated for correctness and a Successful message will be displayed on the Screen. The database will also be updated. Update Contact Details In order to update the Contact Details, the User needs to perform the following steps: Step 1: Go to Profile Settings and Click on the 'Update Contact Details' link. Some of the 'Contact Details' of the User would be pre-filled. Step 2: If the User wishes he/she could easily Change the details, provide the 'Captcha Code' and Click on the 'Submit' button. 58

59 Step 3: The fields will be validated for correctness and a Successful message will be displayed on the Screen. The database will also be updated. Register Digital Signature Certificate In order to register the Digital Signature Certificate, the user needs to perform the following steps: Step 1: Go to Profile Settings and Click on the 'Register Digital Signature Certificate' link. Step 2: The User needs to select either on the 'Sign with.pfx file' or the 'Sign with your USB token' against the radio button. Click on the 'Submit' button. Step 3: A Success Message will be displayed on the Screen as shown below. 59
60 Opt for Higher Security In order to opt for Higher Security, the user needs to perform the following steps: Step 1: Go to Profile Settings and Click on the 'Opt for Higher Security' link. The User can either enable or disable the higher security as he/she wishes. Step 2: The User Clicks on the 'Enable' button. The respective Success Message will be displayed on the Screen. Else If the User clicks on the 'Disable' button. The respective Success Message will be displayed on the Screen. 60


61 View My Profile In order to View the Profile, the user needs to perform the following steps: Step 1: Go to Profile Settings and Click on the 'View My Profile' link. The User will be able to only View his profile, he will not be allowed to make any changes to his profile details. Pan Details In order to View the PAN Details, the user needs to perform the following steps: Step 1: Go to Profile Settings and Click on the 'PAN Details' link. The User will be able to only View his PAN Details, he will not be allowed to make any changes to the details. 61

62 Alerts/Remainders and Notifications In order to check for any Alerts, Reminders and Notifications, the user needs to perform the following steps: Step 1: Go to Profile Settings and Click on the 'Alerts, Reminders and Notifications' link. The User can either Enable or Disable the Alerts, Reminders and Notifications. Step 2: The User Clicks on the 'Enable' button. The respective Success Message will be displayed on the Screen. Else If the User wants to unsubscribe this feature, He/ She should Click on the 'Disable' button. The respective Success Message will be displayed on the Screen. 62
63 Mailing List In order to Subscribe or Unsubscribe to the Mailing List, the user needs to perform the following steps: Step 1: Go to Profile Settings and Click on the 'Mailing List' link. The User can either Subscribe or Unsubscribe to the Mailing List.. Step 2: The User Clicks on the 'Subscribe' button. The respective Success Message will be displayed on the Screen. Else If the User wants to unsubscribe this feature, He/ She should Click on the 'Unsubscribe' button. The respective Success Message will be displayed on the Screen. My Request List Navigate to My Request List -> My Request List. Select an option, enter the captcha and click submit 63
64 Based on the option chosen, My Request List should be displayed. Worklist Navigate to Worklist -> Worklist. Assesse will be able to view the forms submitted by CA on behalf him/her. Click on View Form. Assessee can verify the form and approve/reject the form by choosing the radio button and click Submit. 64
65 If assesse is rejecting the form he has to provide the comments for rejection Helpdesk In order to submit a Helpdesk Request, the user needs to perform the following steps: Submit Request Step 1: Go to 'Helpdesk' and Click on the Submit Request'. The User needs to fill all the mandatory fields and also the category and sub-category from the drop down menu. After this, The User must enter the Summary and the Description, also he can add any attachments if required. 65
66 The User Clicks on the 'Submit' Button and a Success Message will be displayed on the Screen. Request List In order to view the solution/status of The User's request, the following steps must be followed: Step 1: Go to Helpdesk and Click on the Request List'. Step 2: The User can either select from the list of Request Numbers Link that is provided or he could manually type the particular Request Number he is checking for and Click on the Search Button. Step 3: Once the Particular Request is Open, The User can either update or Cancel the Request. 66
67 67
68 HUF User 68

69 HUF Registration In Browser, type the URL of the e-filing application. ( 2. Click on the 'Register Yourself' tab and select 'HUF' against the radio button found under Individual/HUF. Note: Instructions are provided on the right hand side of the screen. However, user can also refer to HELP menu, should they need help. 69

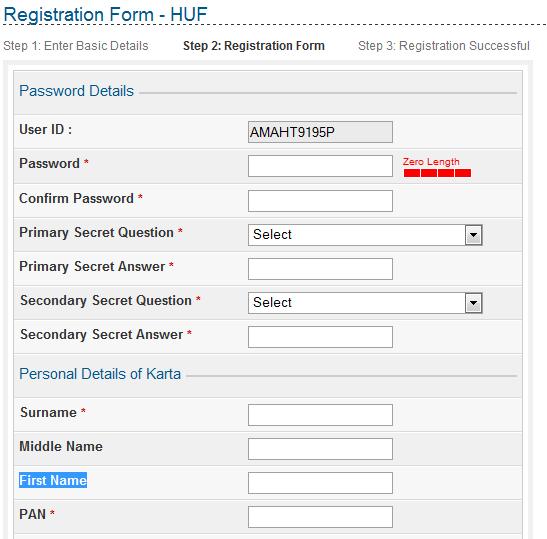
70 Click on the Continue button to proceed. The user will be directed to the registration page and the user will fill the following fields for further validation. PAN Number Mandatory, alphanumeric, limited to 10 digits Name of the HUF Mandatory, alphanumeric and can contain special characters, limited to 75 characters Date of Incorporation Mandatory, select the date from the calendar provided, and should match the date as given in the PAN card 3. If user clicks on CONTINUE button then PAN detail is validated and the individual user credentials are validated with the ICAI database which are available with e-filing application On success, the user is directed to the Registration details page and the user needs to enter the following details. A. Password Details User ID This will be automatically populated by the system, which user had entered in the Basic Details. Password Mandatory, can be between 8 14 characters, alphanumeric and should contain at least one special character and one numeric. Confirm Password Mandatory, The user has to enter the same password as entered above. Primary Secret Question Mandatory, The user needs to select any one question out of four available in the drop down. Primary Secret Answer Mandatory, alphanumeric and special characters, limited to 25 characters Secondary Secret Question Mandatory, The user needs to select any one question out of the balance three available in the drop down. Secondary Secret Answer Mandatory, alphanumeric and special characters, limited to 25 characters. B. Personal Details of Karta Surname Mandatory, alphanumeric and must be validated with the PAN Database. Middle Name Not Mandatory, alphanumeric and special characters, limited to 25 characters. First Name Not Mandatory, alphanumeric and special characters, limited to 25 characters. PAN Mandatory, 10 character alphanumeric 70
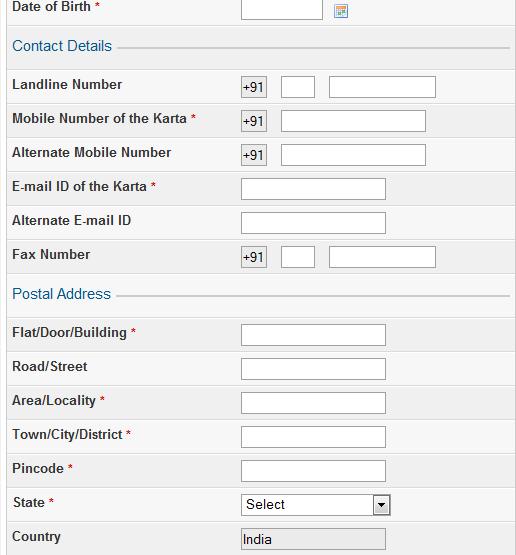
71 Date of Birth Mandatory, select the date from the calendar provided C. Contact Details Landline Number Not mandatory, numeric field, 10 digits (STD code and the telephone number should not exceed 10 digits. Do not prefix 0 ). Mobile Number - Mandatory, numeric field, 10 digits. This field is auto-filled from the previous page Alternate Mobile Number - Non mandatory, numeric field, 10 digits ID Mandatory, This field is auto-filled from the previous page Alternate ID - Non mandatory, alphanumeric, 125 characters Fax Number - Non-mandatory, numeric field, 10 digits (STD code and the telephone number should not exceed 10 digits. Do not prefix 0 ). D. Postal Details Flat/Door/Building Mandatory, alphanumeric and special characters, limited to 50 characters Road/Street - Non-mandatory, alphanumeric and special characters, limited to 50 characters Area/Locality - Mandatory, alphanumeric and special characters, limited to 50 characters Town/City/District - Mandatory, alphanumeric and special characters, limited to 50 characters State Mandatory, user selects from the drop down provided Pincode - Mandatory, numeric, limited to 6 digits E. Digital Signature Certificate(DSC) User can upload this DSC to make his account permanent. F.Subscribe to Mailing List This will be auto-selected. User can un-check the box provided to un-subscribe for mailing list F. Enable Alerts, reminder and notifications This will be auto-selected. User can un-check the box provided to disable alerts, reminders and notification. G. CAPTCHA This is mandatory and the user has to type in the numeric code which appears on the screen 71
72 72

73 73
74 User clicks 'SUBMIT' and the fields are validated for correctness. The user records are captured in the e-filing application. If not, the user will be intimated on unsuccessful registration. The user receives a confirmation with an activation link. An SMS is also sent to notify on the confirmation mail. In order to activate the account, the user should click on the link. The user account is activated and the database is updated. 74


75 HUF Features Login In browser, Enter the URL of the efiling application ( Click Login Here button. Enter user name, password and DOB Click Login. Forgot Password In efiling application home page, click Login Here button. Click Forgot Password Link. Enter User ID and captcha 75
76 Click Continue Select the option, Answer Secret Question. Enter Date of Birth, Secret Question and Secret Answer Click Submit. Enter New Password and Confirm Password. Click Submit 76

77 Select the option, Upload Digital signature Certificate. Select one of the option, Upload using.pfx file Click Submit. Enter New Password and Confirm Password. Click Submit Select the option, Enter e-filed Acknowledgment number and bank account number. Select Assessment year, acknowledgment number and bank account number. Click Submit. Enter New Password and Confirm Password. 77

78 Click Submit Profile Settings Change Password Navigate to Profile Settings -> Change Password Enter old password, new password, confirm password and click submit. Change Secret Question and Answer Navigate to Change Secret Question(s) and Answer(s). 78


79 Change Primary secret question, answer and Secondary secret question and answer. Click submit Update Principal Contact Details Navigate to Profile Settings -> Update Principal Contact Details Edit the principal contact details and click submit. 79

80 Update Contact Details Navigate to Profile settings-> Update contact details. 80

81 Change the contact details and click submit. Success message will be displayed on the screen. Register Digital Signature Certificate Navigate to Profile settings -> Register digital signature certificate 81
82 Click submit. Success message will be displayed on the screen. Opt for Higher Security Navigate to Profile settings->opt for higher security Upload and match the DSC. Higher security option will be enabled. Success message will be displayed on the screen. Click Disable. Success message will be display on the screen 82

 will be")
83 View my Profile Navigate to Profile settings-> View my profile PAN Details Navigate to Profile settings- PAN details The PAN, Name, Address given while registering for the PAN card, Gender, Status and Date of Birth (DOB) will be displayed. 83
84 Mailing List Navigate to Profile Settings -> Mailing list. Click Subscribe to subscribe to mailing list. Success message is display on the screen. Click Unsubscribe to unsubscribe from mailing list. Success message will be displayed on the screen. Alerts, Reminders and Notifications Navigate to Profile Settings-> Alerts. Remainders and Notification. Click enable. Success message will be displayed on the screen. Users want to unsubscribe.click disable. 84
 Navigate to My Account -> View Form 26 AS Click Confirm.")

85 Success message will be displayed on the screen. My Account View Form 26 AS(Tax Credit) Navigate to My Account -> View Form 26 AS Click Confirm. The user will be redirected to the NSDL page. My Return/Form Navigate to My Account -My returns/form User will be able to see the status of returns. Click on the Acknowledgment number. The Details of the acknowledgment number is displayed as a pop up. 85


86 Refund/Demand Status Users will provide PAN (auto-filled) and Assessment Year and enters the Captcha. User is able to see the status of Refund/Demand. Refund Reissue Request Navigate to Refund Reissue Request Enter the CPC Reference Number, sequence number, DOB, captcha and click submit Select Mode of Refund Reissue, bank account details, category 86
87 Click submit Rectification Request Navigate to Rectification request page Select assessment year, enter communication reference number, latest order date and click submit Select the Rectification request type and click submit 87

88 Rectification Status Navigate to My Account -> Rectification Status Select Assessment Year, enter Captcha and Click Submit. User is able to see the status of rectification. Request for Intimation Select assessment year, category, sub-category, captcha and click submit Click submit. 88
89 Add CA Navigate to My Account -> Add CA Enter the Membership no, select the form name and assessment year, enter captcha. Clicks submit. Success message should be displayed on the screen. HUF will be able to Add CA for the following set of Forms 3AC 3CEA 6B 10CCBBA 3AD 3CA-3CD 10B 10CCBC 3AE 3CB-3CD 10BB 10CCBD 3CE 3CEB 10CCB 10CCC Once the assesse has added CA, CA will be able to upload the Forms on behalf of the assesse. List of CAs Navigate to Services -> List of CAs List of CAs should be displayed. 89

90 Outstanding Tax Demand Navigate to My Account -> Outstanding Tax Demand Disengage CA Navigate to My Account -> Disengage CA Click the select check box in any row. CA should be engaged for the particular Form. 90

91 Disengage ERI Navigate to My Accounts -> Disengage ERI Select Disengage check box and click Disengage button Click Disengage. ERI will be disengaged. Tax Credit Mismatch Navigate to My Account -> Tax Credit Mismatch Select Assessment Year, enter Captcha and Click Submit. 91
92 User is able to see the status of tax credit mismatch. e-file Upload Return Navigate to e-file -> Upload Return Select the ITR form name, Assessment year and select the Xml. Clicks submit Success message will be displayed on the screen. 92

93 Click the hyperlink. User should be able to see the ITR-V Acknowledgement. Prepare and Submit ITR Online Login and Navigate to efile -> Prepare and Submit ITR Online ITR 4S is available Online. For ITR 4S, enter the details in the Personal Information tab, Income Details tab, 44AE tab, TDS tab, Tax paid and Verification tab and 80G Tab. 93
94 Click Submit. e-file in Response to Notice 139(9) Navigate to e-file --> e-file in response to Notice u/s139 (9) Select the ITR form name, assessment year, enter communication reference number, CPC date, Receipt date, verification Pin and browse the file to attach the Xml. Click Submit. Success message will be displayed on the screen. 94

95 Prepare and Submit Online Form(Other than ITR) Navigate to e-file --> Submit Form Online Select the form name, assessment year and click Submit. Assesse will be able to fill the form and Submit the form for further processing. For a HUF, following are the Forms available Form 8 Form 10G Form 52A Form 9 Form 35 Form 56 Form 10 Form 40C Form 56D Form 10A Form 41 Download Income Tax Returns/Forms Navigate to Downloads->Income Tax returns forms. Select the assessment year from the dropdown, ITR1 95

96 Download Pre-filled XML Navigate to Downloads -> Download Prefill Xml Select the assessment year and click submit. User will be able to view the prefilled xml. My Request List Navigate to My Request List -> My Request List. Select an option, enter the captcha and click submit Based on the option chosen > Request List is displayed. My Intimation Request List is displayed as shown Worklist Navigate to Worklist -> Worklist. Assesse will be able to view the forms submitted by CA on behalf him/her. 96
97 Click on View Form. Assessee can verify the form and approve/reject the form by choosing the radio button and click Submit. If assesse is rejecting the form he has to provide the comments for rejection 97
98 HelpDesk Submit Request Navigate to Help Desk -> Submit Request Select the category and subcategory from the dropdown. Enter the summary and description. Click submit. Success message will be display on the screen. Request List Navigate to Help Desk -Click Request list. User will be able to see the status of the submitted grievance. 98
99 Click the Request hyperlink. User is able to update or cancel the request. 99
100 Tax Professional (CA) 100
 with a valid Membership Number]. 2. Have a valid PAN and a Digital Signature Certificate 3.")
101 Tax Professional (CA) Registration Before a CA registers in the new e-filing application, the following conditions should be met. A CA should 1. Be a practising CA [should be registered with Institute of Chartered Accountants of India (ICAI) with a valid Membership Number]. 2. Have a valid PAN and a Digital Signature Certificate 3. Be a registered user in the e-filing application to avail the services of e-filing Registration Process Type in the URL of e-filing application in a browser ( Click on the 'Register Yourself' tab and select 'Chartered Accountant' against the radio button found under Tax Professional. 101
102 Note: Instructions are provided on the right hand side of the screen. However, user can also refer to HELP menu, should they need help. The user will be directed to the registration page and the user will fill the following fields for further validation. Membership Number Mandatory, numeric, limited to 6 digits Date of Enrollment Mandatory, select the date from the calendar provided CA s Surname Mandatory, alphanumeric and can contain special characters, limited to 75 characters CA s First Name Not mandatory, alphanumeric and can contain special characters, limited to 25 characters CA s Middle Name - Not mandatory, alphanumeric and can contain special characters, limited to 25 characters CA s PAN - Mandatory, 10 character alphanumeric Date of Birth Mandatory, select the date from the calendar provided, and should match the date as given in the PAN card ID - Mandatory, alphanumeric, limited to 125 characters and should be a valid format Digital Signature Certificate Mandatory and the user uploads the DSC 102

103 User clicks CONTINUE and the PAN detail is validated and the CA credentials are validated with the ICAI database available with e-filing application. On success, the user is directed to the Registration details page and the user needs to enter the following details. A. Password Details User ID This will be generated by the system (Eg: ARCA012345) and will be sent to the user in an with an activation link. Password Mandatory, can be between 8 14 characters, alphanumeric and should contain atleast one special character and one numeric. Confirm Password The user has to enter the same password as entered above. This is mandatory. Primary Secret Question The user needs to select any one question out of four available in the drop down. This is mandatory. Primary Secret Answer Mandatory, alphanumeric and special characters, limited to 25 characters Secondary Secret Question The user needs to select any one question out of the balance three available in the drop down. This is mandatory. Secondary Secret Answer Mandatory, alphanumeric and special characters, limited to 25 characters B. Contact Details Landline Number Non-mandatory, numeric field, 10 digits (STD code and the telephone number should not exceed 10 digits. Do not prefix 0 ). Mobile Number - Mandatory, numeric field, 10 digits. Alternate Mobile Number - Non mandatory, numeric field, 10 digits ID - This field is auto-filled from the previous page Alternate ID - Non mandatory, alphanumeric, 125 characters Fax Number - Non-mandatory, numeric field, 10 digits (STD code and the telephone 103
104 number should not exceed 10 digits. Do not prefix 0 ). Postal Address Flat/Door/Building Mandatory, alphanumeric and special characters, limited to 50 characters Road/Street - Non-mandatory, alphanumeric and special characters, limited to 50 characters Area/Locality - Mandatory, alphanumeric and special characters, limited to 50 characters Town/City/District - Mandatory, alphanumeric and special characters, limited to 50 characters State Mandatory, user selects from the drop down provided Pincode - Mandatory, numeric, limited to 6 digits C. CAPTCHA This is mandatory and the user has to type in the numeric code which appears on the screen D. Subscribe to Mailing List This will be auto-selected. User can un-check the box provided to un-subscribe for mailing list E. Enable Alerts, reminder and notifications This will be auto-selected. User can un-check the box provided to disable alerts, reminders and notification. 104

105 105

106 User clicks 'SUBMIT' and the fields are validated for correctness. The user records are captured in the e-filing application. If not, the user will be intimated on unsuccessful registration. The user receives a confirmation with an activation link. An SMS is also sent to notify on the confirmation mail. In order to activate the account, the user should click on the link. The user account is activated and the database is updated. 106
 in a web browser (Internet Explorer/ Mozilla/ Chrome/ Safari).")

107 Tax Professional (CA) Features Pre-requisites: CA should have a valid membership number. CA should be registered in e-filing application. Login Type the URL of e-filing application ( in a web browser (Internet Explorer/ Mozilla/ Chrome/ Safari). Click on the Login Here button available on the home page. Enter the login credentials i.e., User Id and Password as provided in the and click Login button. Forgot Password CA User can click on the Forgot Password? link available next to Login button to reset the password. CA User has to enter following details User ID of the CA User: Mandatory, alphanumeric. Captcha: This is mandatory and the user has to type in the numeric code which appears on the screen. 107


108 On clicking Continue button, CA User will be directed to a new page where he can select one of the options Answer Secret Question or Upload Digital Signature Certificate provided as radio buttons. On Selecting Answer Secret Question, CA User has to enter his Date of Birth, Secret Question and Secret Answer. On Selecting Upload Digital Signature Certificate, CA User has to upload his Digital Signature Certificate. After selecting either of the above options, CA User should click on Submit button. User is directed to a new page where the New Password has to be entered and user has to Confirm Password. 108
109 CA User has to click on Submit to view the success page displayed on confirming the password reset. Post-login, CA will be provided with Quick links on left, instructions on right and a dashboard with all the activities exercised by CA in the middle. CA user name and last login time is displayed on top right corner. A menu bar is provided on top with following categories and sub-categories: My Account 1. View Forms 2. View Client List E-File 1. Upload Form 2. Prepare and Submit Online Form(Other than ITR) Downloads 1. Download Forms Profile Settings 1. Change Password 2. Change Secret Question(s) / Answer(s) 3. Update Contact Details 4. Register Digital Signature Certificate 5. Opt for Higher Security 6. View My Profile 7. Mailing List 8. Alerts, Remainders & Notifications My Request List 1. My Request List Worklist 1. Worklist Helpdesk 2. Submit Request 3. Request List Functionalities available for CA in e-filing application: View Forms Go to My Account and select View Forms. User should enter the following details. PAN of the Assesse: Mandatory, 10 character alphanumeric. Note: User must have added CA under Add My CA. Captcha: This is mandatory and the user has to type in the numeric code which appears on the screen. 109


110 User clicks 'SUBMIT' and the fields are validated for correctness. A new page is displayed with all the return details of the client. View Client List View Client List displays the list of clients of the CA. Search can be done based on PAN, Form Name, Assessment Year and Status. Upload Form Go to e-file and select Upload Form. User should enter the following details. PAN of the Assesse: Mandatory, 10 character alphanumeric. Note: User must have added CA under Add My CA. PAN of the CA: Mandatory, 10 character alphanumeric. Form Name: Mandatory, dropdown 110


111 Assessment Year: Upload XML: Mandatory, form in XML format Select the Digital Signature Certificate Mandatory and the user uploads the DSC. If user selects form 3CA or 3CB, he has to upload addition attachments like, Balance Sheet: Mandatory Profit Loss Statement: Mandatory Cost Audit Report: Non-mandatory Excise Audit and/or Other Report: Non-mandatory The attachment size should not exceed more than 20Mb and the format should be.pdf or.tiff 111
 Go to e-file and select Submit Form Online. User should enter the following details. PAN of the Assesse: Mandatory, 10 character alphanumeric.")
112 User clicks 'SUBMIT' and the fields are validated for correctness. A success message is displayed on successful upload of Forms. Prepare and Submit Online Form(Other than ITR) Go to e-file and select Submit Form Online. User should enter the following details. PAN of the Assesse: Mandatory, 10 character alphanumeric. Note: User must have added CA under Add My CA. PAN of the CA: Mandatory, 10 character alphanumeric. Form Name: Mandatory, dropdown Assessment Year: Select the Digital Signature Certificate Mandatory and the user uploads the DSC User clicks 'SUBMIT' and the online form will be opened based on the form selected. A success message is displayed on successful upload of form. Assesse has to verify the forms in his/her login and approve/reject the form which is available under Worklist. Downloads Income Tax Return Forms Go to Downloads and select Download Forms. User should first select the assessment year and then click excel or the pdf to download it. 112


113 Profile Settings Change Password Go to Profile Settings and select Change Password. User should enter the following details. Old Password Mandatory, can be between 8 14 characters, alphanumeric and should contain atleast one special character and one numeric. New Password Mandatory, can be between 8 14 characters, alphanumeric and should contain atleast one special character and one numeric. Confirm Password The user has to enter the same password as entered above. This is mandatory Captcha - This is mandatory and the user has to type in the numeric code which appears on the screen. User clicks SUBMIT and a success message page is displayed confirming password change. 113
114 Change Secret Question(s) / Answer(s) Go to Profile Settings and select Change Secret Question(s) / Answer(s). User should enter the following details. Primary Secret Question The user needs to select any one question out of four available in the drop down. This is mandatory. Primary Secret Answer Mandatory, alphanumeric and special characters, limited to 25 characters Secondary Secret Question The user needs to select any one question out of the balance three available in the drop down. This is mandatory. Secondary Secret Answer Mandatory, alphanumeric and special characters, limited to 25 characters. Captcha - This is mandatory and the user has to type in the numeric code which appears on the screen. User clicks SUBMIT and a success message page is displayed confirming change in secret question and secret answer. Update Contact Details Go to Profile Settings and select Update Contact Details. User should enter the following details. Contact Details Landline Number Non-mandatory, numeric field, 10 digits (STD code and the telephone number should not exceed 10 digits. Do not prefix 0 ). Mobile Number - Mandatory, numeric field, 10 digits. Alternate Mobile Number - Non mandatory, numeric field, 10 digits ID - This field is auto-filled from the previous page Alternate ID - Non mandatory, alphanumeric, 125 characters Fax Number - Non-mandatory, numeric field, 10 digits (STD code and the telephone number should not exceed 10 digits. Do not prefix 0 ). Address Details Flat/Door/Building Mandatory, alphanumeric and special characters, limited to

115 characters Road/Street - Non-mandatory, alphanumeric and special characters, limited to 50 characters Area/Locality - Mandatory, alphanumeric and special characters, limited to 50 characters Town/City/District - Mandatory, alphanumeric and special characters, limited to 50 characters State Mandatory, user selects from the drop down provided Pin code - Mandatory, numeric, limited to 6 digits CAPTCHA This is mandatory and the user has to type in the numeric code which appears on the screen. User clicks on SUBMIT after updating the contact details. A success message page is displayed. 115

116 Register Digital Signature Certificate Go to Profile Settings and select Register Digital Signature Certificate. User should select a valid DSC i.e., it should be a.pfx file. Instructions will be provided in the right corner of efiling application when Register Digital Signature Certificate page is opened. User clicks Submit after selecting a DSC, a success message page is displayed. Opt for Higher Security Go to Profile Settings and select Opt for Higher Security. Update and match the DSC to enable higher security. DSC is made mandatory for the user to login. 116


117 View My Profile Go to Profile Settings and select View My Profile. All the details of the user will be displayed. 117
118 Mailing List Go to Profile Settings and select Mailing List. A Subscribe button is available for the user. User clicks on Subscribe button, a success message is displayed. If user is already subscribed to mailing list, Unsubscribe button will be available. User clicks on Unsubscribe button, a success message is displayed. Alerts, Remainders & Notifications Go to Profile Settings and select Alerts, Remainders & Notifications. User will be provided with a Enable button. User clicks on Enable button, a success message is displayed. If user is already enabled to Alerts, Remainders & Notifications, Disable button will be available. 118

119 User clicks on Disable button, a success message is displayed. Worklist Worklist Go to Worklist and Worklist. All the forms submitted by clients of CA will be displayed in this worklist. To View the form click on View Form, CA will be able to verify the form submiited by the client. Helpdesk Submit Request Go to Helpdesk and select Submit Request. User has to enter the following details. Mobile Number - Mandatory, auto-filled, numeric field, 10 digits. ID - Mandatory, alphanumeric, 125 characters Category Mandatory, dropdown Sub-category - Mandatory, dropdown, options available are based on selection of category dropdown Summary Mandatory, minimum of 30 characters has to be entered. Description - Mandatory, minimum of 30 characters has to be entered. Attachment Non-mandatory 119


120 User clicks on SUBMIT, a success message page is displayed. Request List Go to Helpdesk and select Request List. User can search a request raised by using following options. Status: Mandatory, dropdown Start Date: Non- mandatory, a calendar is provided to select the date. End Date: Non- mandatory, a calendar is provided to select the date. User enters the details and clicks on Search button. All the requests based on the filter will be displayed. User should click on the request number which he/she wants to view. 120
121 User can edit the details like Summary, description, etc. 3 buttons are available to the user. Back: Takes user to previous page. Update: Updates the request. Cancel: Request is cancelled. 121
122 Bulk PAN Verification User (External Agency) 122
. 2.")
123 External Agency Registration (Bulk Pan Verification User) For Registering in the e-filing application, an External Agency must have A Valid PAN. For Non-Government Agency, DSC is mandatory. Registration Process: 1. Type in the URL of e-filing application ( 2. Click on the 'Register Yourself' tab and select 'External Agency' against the radio button under the Bulk PAN Verification Users. 123
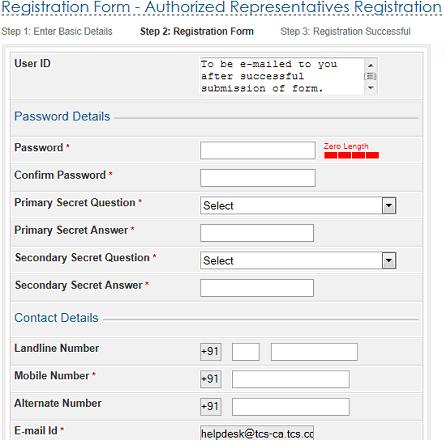
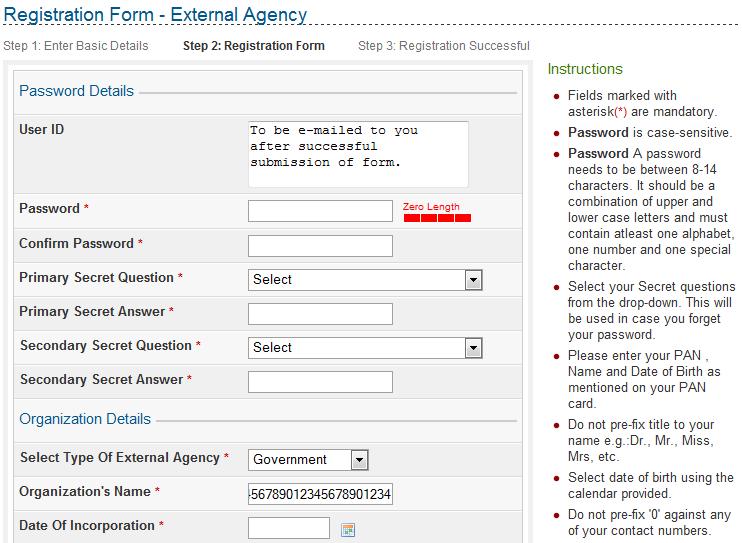
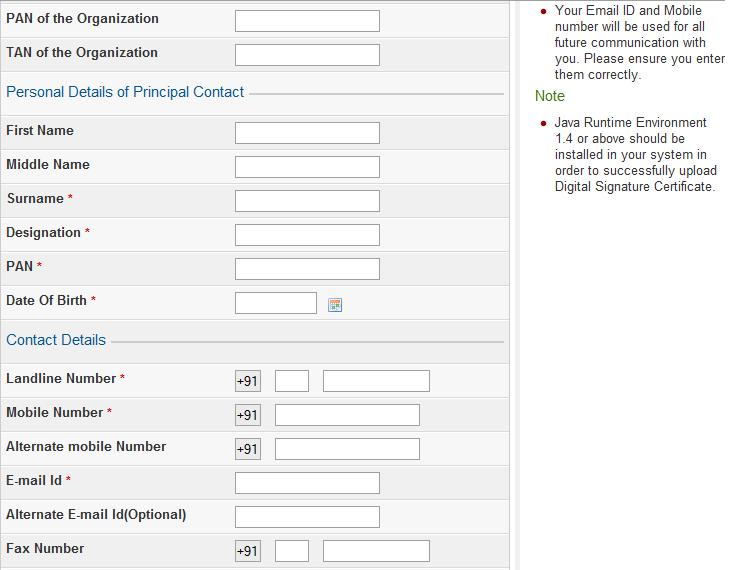
124 e Note: Instructions are provided on the right hand side of the screen. However, user can also refer the HELP menu. 3. The user will be directed to the registration page. A. Password Details User ID This will be generated by the system (Eg: EXTA100100) and will be sent to the user by an along with an activation link. Password Mandatory field can be between 8 14 characters, alphanumeric and should contain at least one special character. Confirm Password Mandatory field. The user has to enter the same password as entered in the Password field above. Primary Secret Question Mandatory field. The user needs to select any one question from the drop down list. Primary Secret Answer Mandatory field. Secondary Secret Question Mandatory field. The user needs to select any one question from the drop down list. Secondary Secret Answer Mandatory field. B. Organization Details Select External type of agency Mandatory field. Organization Name Mandatory field. Date Of Incorporation Mandatory field and should be as per the PAN details. PAN of the Organization Mandatory in case of Non-Government Organisation. TAN of the Organization Mandatory in case of Non-Government Organisation. C. Personal Details of Principal Contact PAN A Valid PAN required. Mandatory field. Designation Mandatory field. Surname Mandatory field and should be as per the PAN details. First Name Not a mandatory field and should be as per the PAN details. Middle Name - Not a mandatory field and should be as per the PAN details. Date of Birth Mandatory field and should be as per the PAN details. 124
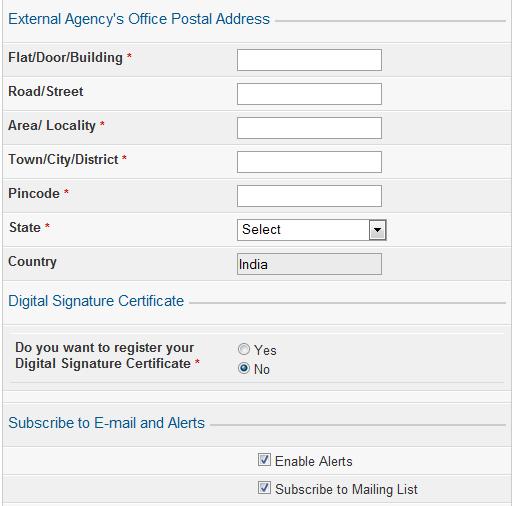
125 D. Contact Details Landline Number Not a mandatory field. Mobile Number Mandatory field. Alternate Mobile Number Not a mandatory field. ID An auto-filled field. Alternate ID Not a mandatory. Fax Number Not a mandatory field. E.External Agency's Office Postal Address Flat/Door/Building Mandatory field. Road/Street Not a mandatory field. Area/Locality Mandatory field. Town/City/District Mandatory field. State Mandatory field. Pin code Mandatory field. Country Mandatory field. F. Digital Signature Certificate(DSC) If it is Government Agency then DSC is not mandatory. If it is Non-Government Agency then DSC is a mandatory field. G. Subscribe to Mailing List This will be auto-selected. In case the User wishes not to subscribe to the same, then he can uncheck the box provided. H. Enable Alerts, reminder and notifications This will be auto-selected. In case the User wishes not to receive alerts related to the same, then he can uncheck the box provided. Captcha Code This is a mandatory field where the user needs to type the code which appears on the screen. 125
126 126

127 User clicks on the 'SUBMIT' button. Figure 5 - Registration Success Page After registration, the user details alongwith the registration request are transferred to the e-filing Admin. User has to send the Authorized Letter issued by the Head of the External Agency and a print out of attachment sent via duly signed to e-filing Admin at the address Income Tax Department, Centralized Processing Centre, Post Bag 12, Electronic City Post Office, Bangalore 100. The e-filing Admin reviews the documents and approves the request. After approval, the User will get the User ID by and SMS. An activation link will also be provided to the user by . User must click on the activation link available in the mail to get activated in e-filing system. 127
 Click on the Login Here button available on the home page. Enter the login credentials i.e., User Id and Password as provided in the e-mail and click Login button.")
128 External Agency Features (Bulk Pan Verification User) Pre-requisites: Login: External Agency user should be registered in e-filing application. Enter the URL of e-filing application in a web browser ( Click on the Login Here button available on the home page. Enter the login credentials i.e., User Id and Password as provided in the and click Login button. Forgot Password CA User can click on the Forgot Password? link available next to Login button to reset the password. CA User has to enter following details User ID: Mandatory, alphanumeric. Captcha: This is mandatory and the user has to type in the numeric code which appears on the screen. 128


129 On clicking Continue button, External Agency user will be directed to a new page where he can select one of the options Answer Secret Question or Upload Digital Signature Certificate provided as radio buttons. On Selecting Answer Secret Question, External Agency user has to enter his Date of Birth, Secret Question and Secret Answer. On Selecting Upload Digital Signature Certificate, External Agency user has to upload his Digital Signature Certificate. After selecting either of the above options, External Agency user should click on Submit button. User is directed to a new page where the New Password has to be entered and user has to Confirm Password. 129

130 External Agency user has to click on Submit to view the success page displayed on confirming the password reset. Post-login, External Agency user will be provided with Quick links on left, instructions on right and a dashboard with all the activities exercised by External Agency users in the middle. External Agency user name and last login time is displayed on top right corner. A menu bar is provided on top with following categories and sub-categories: My Account Bulk PAN Query Profile Settings Helpdesk 1. Token List 1. Token Details 2. Upload Query 1. Change Password 2. Change Secret Question(s) / Answer(s) 3. Update Principal Contact Details 4. Update Contact Details 5. Register Digital Signature Certificate 6. Opt for Higher Security 7. View My Profile 8. Mailing List 9. Alerts, Remainders & Notifications 1. Submit Request 2. Request List 130


131 Token List Go to My Account and select Token List. Token List for the user is displayed with the details like Token number, Date of Submission, Status and Transaction Type. Token Details Go to Bulk PAN Query and select Token Details. User should enter the following details. Token Number: Mandatory, a 9-digit numeric value. Captcha: This is mandatory and the user has to type in the numeric code which appears on the screen. User clicks 'SUBMIT' and the fields are validated for correctness. A new page is displayed with Bulk PAN token details. 131
132 Upload Query Go to Bulk PAN Query and select Upload Query. User should enter the following details. Upload XML: Mandatory, XML file with a valid Bulk PAN format. User clicks 'SUBMIT' and the fields are validated for correctness. A success message is displayed when the details are valid. Profile Settings Change Password Go to Profile Settings and select Change Password. User should enter the following details. Old Password Mandatory, can be between 8 14 characters, alphanumeric and should contain at least one special character and one numeric. New Password Mandatory, can be between 8 14 characters, alphanumeric and should contain at least one special character and one numeric. Confirm Password The user has to enter the same password as entered above. This is mandatory Captcha - This is mandatory and the user has to type in the numeric code which appears on the screen. 132

133 User clicks SUBMIT and a success message page is displayed confirming password change. Change Secret Question(s) / Answer(s) Go to Profile Settings and select Change Secret Question(s) / Answer(s). User should e the following details - enter Primary Secret Question The user needs to select any one question out of four available in the drop down. This is mandatory. Primary Secret Answer Mandatory, alphanumeric and special characters, limited to 25 characters. Secondary Secret Question The user needs to select any one question out of the balance three available in the drop down. This is mandatory. Secondary Secret Answer Mandatory, alphanumeric and special characters, limited to 25 characters. Captcha - This is mandatory and the user has to type in the numeric code which appears on the screen. 133

134 User clicks SUBMIT and a success message page is displayed confirming change in secret question and secret answer. Update Principal Contact Details Go to Profile Settings and select Update Contact Details. User should enter the following details. Surname Mandatory, alphanumeric and can contain special characters, limited to 75 characters First Name Not mandatory, alphanumeric and can contain special characters, limited to 25 characters Middle Name - Not mandatory, alphanumeric and can contain special characters, limited to 25 characters Designation - Mandatory, alphanumeric and can contain special characters, limited to 75 characters PAN - Mandatory, 10 character alphanumeric Date of Birth Mandatory, select the date from the calendar provided, and should match the date as given in the PAN card Mobile Number - Mandatory, numeric field, 10 digits. Alternate Mobile Number - Non mandatory, numeric field, 10 digits ID - This field is auto-filled from the previous page Alternate ID - Non mandatory, alphanumeric, 125 characters 134
.")
135 User clicks on SUBMIT after updating the contact details. A success message page is displayed. Update Contact Details Go to Profile Settings and select Update Contact Details. User should enter the following details. Contact Details Landline Number Non-mandatory, numeric field, 10 digits (STD code and the telephone number should not exceed 10 digits. Do not prefix 0 ). Mobile Number - Mandatory, numeric field, 10 digits. Alternate Mobile Number - Non mandatory, numeric field, 10 digits ID - This field is auto-filled from the previous page Alternate ID - Non mandatory, alphanumeric, 125 characters Fax Number - Non-mandatory, numeric field, 10 digits (STD code and the telephone number should not exceed 10 digits. Do not prefix 0 ). Address Details Flat/Door/Building Mandatory, alphanumeric and special characters, limited to 50 characters Road/Street - Non-mandatory, alphanumeric and special characters, limited to 50 characters Area/Locality - Mandatory, alphanumeric and special characters, limited to 50 characters Town/City/District - Mandatory, alphanumeric and special characters, limited to 50 characters State Mandatory, user selects from the drop down provided Pin code - Mandatory, numeric, limited to 6 digits CAPTCHA This is mandatory and the user has to type in the numeric code which appears on the screen. 135

136 User clicks on SUBMIT after updating the contact details. A success message page is displayed. Register Digital Signature Certificate Go to Profile Settings and select Register Digital Signature Certificate. User should select a valid DSC i.e., it should be a.pfx file. Instructions will be provided in the right corner of efiling application when Register Digital Signature Certificate page is opened. User clicks Submit after selecting a DSC, a success message page is displayed. Opt for Higher Security Go to Profile Settings and select Opt for Higher Security. 136
137 User can disable opt for higher security option by choosing Disable Option. User clicks Disable, a success message page is displayed. View My Profile Go to Profile Settings and select View My Profile. All the details of the user will be displayed. 137
138 Mailing List Go to Profile Settings and select Mailing List. A Subscribe button is available for the user. User clicks on Subscribe button, a success message is displayed. If user is already subscribed to mailing list, Unsubscribe button will be available. User clicks on Unsubscribe button, a success message is displayed. Alerts, Remainders & Notifications Go to Profile Settings and select Alerts, Remainders & Notifications. User will be provided with a Enable button. 138
139 User clicks on Enable button, a success message is displayed. If user is already enabled to Alerts, Remainders & Notifications, Disable button will be available. User clicks on Disable button, a success message is displayed. Helpdesk Submit Request Go to Helpdesk and select Submit Request. User has to enter the following details. Mobile Number - Mandatory, auto-filled, numeric field, 10 digits. ID - Mandatory, alphanumeric, 125 characters Category Mandatory, dropdown Sub-category - Mandatory, dropdown, options available are based on selection of category dropdown Summary Mandatory, minimum of 30 characters has to be entered. Description - Mandatory, minimum of 30 characters has to be entered. Attachment Non-mandatory 139
140 User clicks on SUBMIT, a success message page is displayed. Request List Go to Helpdesk and select Request List. User can search a request raised by using following options. Status: Mandatory, dropdown Start Date: Non- mandatory, a calendar is provided to select the date. End Date: Non- mandatory, a calendar is provided to select the date. User enters the details and clicks on Search button. All the requests based on the filter will be displayed. User should click on the request number which he/she wants to view. 140
141 User can edit the details like Summary, description, etc. 3 buttons are available to the user. Back: Takes user to previous page. Update: Updates the request. Cancel: Request is cancelled. 141
142 e-return Intermediary (ERI) User 142
. 2.")


143 e-return Intermediary (ERI) User Registration 1. ERI makes an application online at NSDL's website using ERI s digital signature certificate (DSC). 2. Application is processed by NSDL on the basis of eligibility criteria set by the Income Tax Department. 3. A temporary User Id and Password is generated by NSDL and intimated to the applicant vide an XML file, if the application is in order. 4. The XML file having details of the applicant and the temporary user Id and password is uploaded onto the Income Tax Department's e-filing website by using NSDL s login credentials. Sample XML which is upload by NSDL looks as shown below; 143


144 NOTE: 1. Registeration Number is available only for Companies and Firms but it is non-mandatory. 1. If the registering ERI Admin belongs to company/firm category, Date of Incorporation is mandatory. A check is provided while uploading the xml. 5. Using this temporary User Id and password, the applicant is required to log onto the Income Tax Department's e-filing website and complete the data transmission test. 144


145 ERI must upload all the ITR s from 1 to 6 for assessment year ITR-7 is not included here as it cannot be electronically filed. ERI will be given a maximum of 15 attempts to upload all the ITR s. 6. After successful data transmission test, a success page is displayed. 7. Post data transmission test, ERI must fill in the additional details and upload digital signature certificate (DSC) in the registration page provided to complete the registration process. 145


146 8. On completion of registration process, a success page is displayed. 146

147 9. Request is sent to e-filing Admin s approval. 10. Once the registration is approved by e-filing Admin, ERI s permanent user ID along with an activation link and an authorization letter will be communicated to the ERI through an and intimation is sent via SMS. 10. ERI Admin has to click on activation link in order to activate his/her account. 11. Once activated, ERI Admin can use the credentials to access the e-filing website and upload the data pertaining to the return of income received by it to the Income Tax Department directly. Post login, ERI Admin can create ERI Sub-users and a maximum of 20 sub-users can be active under that ERI Admin. ERI Admin will be provided with the following functionalities post login My Account 1. View Form 26AS (Tax Credit) 147
148 E-File 2. View Returns 3. Refund/Demand Status 4. Refund Re-issue Request 5. Rectification Request 6. Rectification Status 7. Request for Intimation 8. Outstanding Tax Demand 9. Token List 10. Tax Credit Mismantch 1. Upload Return 2. e-flied Token Details Bulk PAN Query 1. Token Details 2. Token Status 3. Upload Query Downloads 1. Income Tax Return Forms 2. Schema Manage Client 1. Add Clients 2. List of Clients 3. View Client History Manage Sub-user 1. Create Sub-user 2. Activate Sub-user 3. Extend Sub-user Validity 4. De-activate Sub-user 5. View Sub-user History 6. Change Sub-user Password 7. Update Sub-user Contact Details Profile Settings 1. Change Password 2. Change Secret Question(s) / Answer(s) 3. Update Contact Details 4. Register Digital Signature Certificate 5. Opt for Higher Security 6. View My Profile 7. Mailing List 8. Alerts, Remainders & Notifications Helpdesk 1. Submit Request 2. Request List 148
149 149
 in a web browser (Internet Explorer/ Mozilla/ Chrome/ Safari). 1. Click on the Login Here button available on the home page.")

150 e-return Intermediary (ERI) User Features Pre-requisites: Login ERI Admin should be registered in e-filing application. ERI Sub-user must be created and activated by ERI Admin. Type the URL of e-filing application ( in a web browser (Internet Explorer/ Mozilla/ Chrome/ Safari). 1. Click on the Login Here button available on the home page. Enter the login credentials i.e., User Id and Password as provided in the and click Login button. Post-login, ERI will be provided with Quick links on left, instructions on right and a dashboard with all the activities exercised by ERI in the middle. ERI Admin/ ERI Sub-user name and last login time is displayed on top right corner. A menu bar is provided on top with following categories and sub-categories: Services 1. View Form 26AS (Tax Credit) 2. View Returns 3. Refund/Demand Status 4. Refund Re-issue Request 5. Rectification Request 6. Rectification Status 7. Request for Intimation u/s 143(1)/ Outstanding Tax Demand 150
151 E-File 9. Token List 10. Tax Credit Mismatch 1. Upload Return 2. e-flied Token Details Bulk PAN Query 1. Token Details 2. Token Status 3. Upload Query Downloads 1. Income Tax Return Forms 2. Schema Manage Client 1. Add Clients 2. List of Clients 3. View Client History 4. Request List Manage Sub-user 1. Create Sub-user 2. Activate Sub-user 3. Extend Sub-user Validity 4. De-activate Sub-user 5. View Sub-user History 6. Change Sub-user Password 7. Update Sub-user Contact Details Profile Settings 1. Change Password 2. Change Secret Question(s) / Answer(s) 3. Update Contact Details 4. Register Digital Signature Certificate 5. Opt for Higher Security 6. View My Profile 7. Mailing List 8. Alerts, Remainders & Notifications Helpdesk 1. Submit Request 2. Request List Functionalities available for ERI Admin in e-filing application: My Account View Form 26AS (Tax Credit): Available for ERI Admin and ERI Sub-user 151

152 Go to My Account and select View Form 26AS (Tax Credit). User should enter the following details. PAN of the Client: Mandatory, 10 character alphanumeric. Note: User must be added as client under ERI Admin. Date of Birth/Incorporation: Mandatory, select the date from the calendar provided, and should match the date as given in the PAN card. Assessment Year: Mandatory, select the assessment from the dropdown. Captcha: This is mandatory and the user has to type in the numeric code which appears on the screen. User clicks 'SUBMIT' and the fields are validated for correctness and a new page is displayed asking confirmation from user for redirecting to NSDL website. Click on Confirm and you will be redirected to NSDL website. View Returns: Available for ERI Admin and ERI Sub-user Go to My Account and select View Returns. User should enter the following details. PAN of the Client: Mandatory, 10 character alphanumeric. Note: User must be added as client under ERI Admin. Captcha: This is mandatory and the user has to type in the numeric code which appears on the screen. 152


153 User clicks 'SUBMIT' and the fields are validated for correctness. A new page is displayed with all the return details of the client. Refund/Demand Status: Available for ERI Admin and ERI Sub-user Go to My Account and select Refund/Demand Status. User should enter the following details. PAN of the Client: Mandatory, 10 character alphanumeric. Note: User must be added as client under ERI Admin. Assessment Year: Mandatory, select the assessment from the dropdown. Captcha: This is mandatory and the user has to type in the numeric code which appears on the screen. 153


154 User clicks 'SUBMIT' and the fields are validated for correctness. A new page is displayed with details of refund/demand. Refund Re-issue Request: Available for ERI Admin and ERI Sub-user Go to My Account and select Refund/Demand Status. User should enter the following details. PAN of the Client: Mandatory, 10 character alphanumeric. Note: User must be added as client under ERI Admin. Assessment Year: Mandatory, select the assessment from the dropdown. CPC Communication Reference Number: Mandatory, it should be in the format CPC/1111/I1/ Refund Sequence Number: Mandatory. Date of Birth/Incorporation: Mandatory, select the date from the calendar provided, and should match the date as given in the PAN card. Captcha: This is mandatory and the user has to type in the numeric code which appears on the screen. 154


155 User clicks on Validate and he/she will be directed to a new page to enter additional details. User can select the address to which address to be used for that particular refund under the dropdown Category. If the user selects ITR Address, address provided in the ITR uploaded is used. If the user selects PAN Address, address provided in the PAN is used. If the user selects New Address, user has to enter the following details in the additional fields displayed. Flat/Door/Building Mandatory, alphanumeric and special characters, limited to 50 characters Road/Street - Non-mandatory, alphanumeric and special characters, limited to 50 characters Area/Locality - Mandatory, alphanumeric and special characters, limited to 50 characters Town/City/District - Mandatory, alphanumeric and special characters, limited to 50 characters State Mandatory, user selects from the drop down provided Pin code - Mandatory, numeric, limited to 6 digits 155


156 User clicks on SUBMIT and all the fields are validated for correctness. A success message is displayed in a new page after validation. Rectification Request: Available for ERI Admin and ERI Sub-user Go to My Account and select Rectification Request. User should enter the following details. PAN: Mandatory, 10 character alphanumeric. Note: User must be added as client under ERI Admin. Assessment Year: Mandatory, select the assessment from the dropdown. CPC Communication Reference Number: Mandatory, it should be in the format CPC/1111/I1/ Latest CPC Order Date: Mandatory, select the date from the calendar provided, and should match the date as given in the PAN card. User clicks on SUBMIT and all the fields are validated for correctness. On successful validation, an additional dropdown is displayed for selecting Rectification Request Type. User can select the following options from dropdown. 156


157 On selecting, Taxpayer is correcting the data in rectification; a pop-up with 21 radio buttons for selecting an option is displayed. User has to select a radio button and click OK. Again a new page with the following fields is displayed. Reason you selected: Auto-filled. Schedules Being Changed: Mandatory, User can use CTRL + CLICK and select multiple schedules that are provided. Select and upload the rectification XML File: Mandatory, Upload a valid XML file that needs to be rectified. Select the type of Digital certificate: Mandatory, User should upload a valid Digital Certificate. User should click SUBMIT for validating the details and successful rectification upload. 157


158 On selecting, No further Data Correction required. Reprocess the case for TAX CREDIT MISMATCH STATUS MISMATCH TAX/INTEREST COMPUTATION; 3 check-box options are provided. User can select one or more check-boxes as required. User needs to click SUBMIT. A success message is displayed indicating a valid rectification upload. Rectification Status: Available for ERI Admin and ERI Sub-user Go to My Account and select Rectification Status. User should enter the following details. PAN of the Client: Mandatory, 10 character alphanumeric. Note: User must be added as client under ERI Admin. Assessment Year: Mandatory, select the assessment from the dropdown. Captcha: This is mandatory and the user has to type in the numeric code which appears on the screen. User clicks 'SUBMIT' and the fields are validated for correctness. A page with rectification status and a link to withdraw the filed rectification is displayed. 158


159 On clicking the link to withdraw the request, a page requesting for withdrawal of rectification request is displayed. User can withdraw his request within 7 days of rectification request. A successful withdrawal message will be displayed when user clicks on Confirm withdrawal. Request for Intimation u/s 143(1)/154: Available for ERI Admin and ERI Subuser Go to My Account and select Request for Intimation. User should enter the following details. PAN: Mandatory, 10 character alphanumeric. Note: User must be added as client under ERI Admin. Assessment Year: Mandatory, select the assessment from the dropdown. Category: Mandatory, dropdown. Sub-category: Mandatory, dropdown. 159
 and Rectification order u/s 154.")
160 Captcha: This is mandatory and the user has to type in the numeric code which appears on the screen. If New Address is selected, user has to enter the details in the additional fields provided for new address. User can select one of the 2 options from dropdown Category i.e., Intimation u/s 143(1) and Rectification order u/s 154. Depending on the category selected, various options under sub-category dropdown is available for the user. 160

161 User clicks 'SUBMIT' and the fields are validated for correctness. A success message is displayed for valid intimation request. Outstanding Tax Demand: Available for ERI Admin and ERI Sub-user Go to My Account and select Outstanding Tax Demand. User should enter the following details. PAN: Mandatory, 10 character alphanumeric. Note: User must be added as client under ERI Admin. 161


162 User clicks 'SUBMIT' and the fields are validated for correctness. A new page with demand status is displayed. Token List: Available for ERI Admin and ERI Sub-user Go to My Account and select Token List. User should enter the following details. Token List: Mandatory, radio buttons for My Tokens and Sub-user tokens. User ID of the Sub-User: Mandatory when radio button option Sub-user tokens is selected, alphanumeric. Transaction Type: mandatory, drop down Start Date: Calendar, mandatory End Date: Calendar, mandatory Captcha: This is mandatory and the user has to type in the numeric code which appears on the screen. 162


163 User selects My Tokens radio button. All the token numbers of the ERI Admin is displayed. User selects Sub-User Tokens radio button. Token numbers of the Sub-User whose ID was provided will be displayed. Tax Credit Mismatch: Available for ERI Admin and ERI Sub-user Go to My Account and select Tax Credit Mismatch. User should enter the following details. PAN of the Client: Mandatory, 10 character alphanumeric. Note: User must be added as client under ERI Admin. Assessment Year: Mandatory, select the assessment from the dropdown. Captcha: This is mandatory and the user has to type in the numeric code which appears on the screen. 163


164 User clicks 'SUBMIT' and the fields are validated for correctness. A page with tax credit mismatch is displayed. e-file Upload Return: Available for ERI Admin and ERI Sub-user Go to e-file and select Upload Return. User should enter the following details. Upload XML: Mandatory, a zip file containing one or more valid XMLs of ITRs (Bulk ITR). Select the Digital Signature Certificate Mandatory and the user uploads the DSC. User clicks 'SUBMIT' and the fields are validated for correctness. A success message is displayed on successful upload of Bulk ITR. 164


165 E-Filed Token Details: Available for ERI Admin and ERI Sub-user Go to e-file and select e-flied Token Details. User should enter the following details. Token Number: Mandatory, a 9-digit numeric value. Captcha: This is mandatory and the user has to type in the numeric code which appears on the screen. User clicks 'SUBMIT' and the fields are validated for correctness. A new page is displayed with Bulk ITR token status and details. Token Details: Available for ERI Admin and ERI Sub-user Go to Bulk PAN Query and select Token Details. User should enter the following details. Token Number: Mandatory, a 9-digit numeric value. Captcha: This is mandatory and the user has to type in the numeric code which appears on the screen. 165


166 User clicks 'SUBMIT' and the fields are validated for correctness. A new page is displayed with Bulk PAN token details. Token Status: Available for ERI Admin and ERI Sub-user Go to Bulk PAN Query and select Token Status. User should enter the following details. Token Number: Mandatory, a 9-digit numeric value. Captcha: This is mandatory and the user has to type in the numeric code which appears on the screen. User clicks 'SUBMIT' and the fields are validated for correctness. A new page is displayed with Bulk PAN token status. 166
167 Upload Query: Available for ERI Admin and ERI Sub-user Go to Bulk PAN Query and select Upload Query. User should enter the following details. Upload XML: Mandatory, XML file with a valid Bulk PAN format. User clicks 'SUBMIT' and the fields are validated for correctness. A success message is displayed when the details are valid. Income Tax Return Forms: Available for ERI Admin and ERI Sub-user Go to Downloads and select Income Tax Return Forms. User should first select the assessment year and then click on excel or the pdf to download it. 167


168 Schema: Available for ERI Admin and ERI Sub-user Go to Downloads and select Schema. User should click on the link provided for downloading the schema of ITRs. Manage Client Add Clients: Available for ERI Admin and ERI Sub-user Go to Manage Client and select Add Clients. User should enter the following details. PAN - Mandatory, 10 character alphanumeric Date of Birth Mandatory, select the date from the calendar provided, and should match the date as given in the PAN card ID - Mandatory, alphanumeric, limited to 125 characters and should be a valid format Captcha: This is mandatory and the user has to type in the numeric code which appears on the screen. 168


169 User clicks 'SUBMIT' and the fields are validated for correctness. A success message is displayed when the details are valid. List of Clients: Available for ERI Admin and ERI Sub-user Go to Manage Client and select List of Clients. User should enter the following details. Clients List: Mandatory, radio buttons for My Clients and Sub-user Clients. User ID of the Sub-User: Mandatory when radio button option Sub-user Clients is selected, alphanumeric. Captcha: This is mandatory and the user has to type in the numeric code which appears on the screen. User selects My Clients radio button. All the Clients under the ERI Admin are displayed. 169


170 User selects Sub-User Clients radio button. All the Clients under the ERI Admin s Sub-user are displayed. View Client History: Available for ERI Admin and ERI Sub-user Go to Manage Client and select View Client History. User should enter the following details. PAN - Mandatory, 10 character alphanumeric Captcha: This is mandatory and the user has to type in the numeric code which appears on the screen. 170


171 User clicks 'SUBMIT' and the fields are validated for correctness. A new page showing the client s history i.e., all the filings related to the client is displayed. Request List: Available ERI Admin and ERI Sub-user Go to Manage Client and select Request List. User should enter the following details. PAN - Mandatory, 10 character alphanumeric Select an Option: Type of request needed, drop down, mandatory. Captcha: This is mandatory and the user has to type in the numeric code which appears on the screen. User clicks 'SUBMIT' and the fields are validated for correctness. A new page showing the client s status for the requested option is displayed. 171
172 Manage Sub-user Create Sub-user: Available only for ERI Admin Go to Manage Sub-user and select Create Sub-user. User should enter the following details. A. Password Details Password Mandatory, can be between 8 14 characters, alphanumeric and should contain at least one special character and one numeric. Confirm Password The user has to enter the same password as entered above. This is mandatory. Primary Secret Question The user needs to select any one question out of four available in the drop down. This is mandatory. Primary Secret Answer Mandatory, alphanumeric and special characters, limited to 25 characters Secondary Secret Question The user needs to select any one question out of the balance three available in the drop down. This is mandatory. Secondary Secret Answer Mandatory, alphanumeric and special characters, limited to 25 characters. B. Personal Details Surname Mandatory, alphanumeric and can contain special characters, limited to 75 characters First Name Not mandatory, alphanumeric and can contain special characters, limited to 25 characters Middle Name - Not mandatory, alphanumeric and can contain special characters, limited to 25 characters PAN - Mandatory, 10 character alphanumeric Date of Birth Mandatory, select the date from the calendar provided, and should match the date as given in the PAN card Designation: Mandatory. Branch Name: Mandatory. Employee Number: Optional, 6-character, numeric C. Contact Details Landline Number Non-mandatory, numeric field, 10 digits (STD code and the telephone number should not exceed 10 digits. Do not prefix 0 ). Mobile Number - Mandatory, numeric field, 10 digits. Alternate Mobile Number - Non mandatory, numeric field, 10 digits ID - Mandatory, alphanumeric, limited to 125 characters and should be a valid format. Alternate ID - Non mandatory, alphanumeric, 125 characters Fax Number - Non-mandatory, numeric field, 10 digits (STD code and the telephone number should not exceed 10 digits. Do not prefix 0 ). Postal Address Flat/Door/Building Mandatory, alphanumeric and special characters, limited to 50 characters Road/Street - Non-mandatory, alphanumeric and special characters, limited to 50 characters Area/Locality - Mandatory, alphanumeric and special characters, limited to 50 characters Town/City/District - Mandatory, alphanumeric and special characters, limited to 50 characters State Mandatory, user selects from the drop down provided Pin code - Mandatory, numeric, limited to 6 digits D. CAPTCHA This is mandatory and the user has to type in the numeric code which appears on the 172

173 screen E. Subscribe to Mailing List This will be auto-selected. User can un-check the box provided to un-subscribe for mailing list F. Enable Alerts, reminder and notifications This will be auto-selected. User can un-check the box provided to disable alerts, reminders and notification. 173

174 User clicks 'SUBMIT' and the fields are validated for correctness. The user records are captured in the e-filing application. A success message is displayed when a sub-user is created. When the Sub-user is logging in for the first time, a pop up is displayed to Register DSC. User can select OK to Register DSC or click on Cancel and proceed with login. 174


175 . Activate Sub-user: Available only for ERI Admin Go to Manage Sub-user and select Activate Sub-user. User should enter the following details. Select User: Mandatory, radio buttons User ID: Mandatory only when Single User radio button is selected, 10-character alphanumeric. Captcha: This is mandatory and the user has to type in the numeric code which appears on the screen. User should click on Show Details and Select the check-box provided next to Sub-user details. Select a valid date from the calendar provided as the end date. User clicks on 'Activate' and the fields are validated for correctness. The user records are captured in the e- filing application and Sub-User is activated. 175


176 Extend Sub-user Validity: Available only for ERI Admin Go to Manage Sub-user and select Extend Sub-user Validity. User should enter the following details. User ID: Mandatory only when Single User radio button is selected, 10-character alphanumeric. Captcha: This is mandatory and the user has to type in the numeric code which appears on the screen. User clicks 'Get User Current Validity' and the fields are validated for correctness. User should select a date from the calendar provided in the Valid upto field and click on Extend User Validity button to extend the user validity. A success message is displayed to the user. De-activate Sub-user: Available only for ERI Admin. Go to Manage Sub-user and select Activate Sub-user. User should enter the following details. 176

177 Select User: Mandatory, radio buttons User ID: Mandatory only when Single User radio button is selected 10-character alphanumeric. Captcha: This is mandatory and the user has to type in the numeric code which appears on the screen. When All Users radio button is selected; user should click on Show Details. A list of all the Subusers who are active is displayed. Select the check-box of Sub-users whom you want to de-activate. When Single User radio button is selected; user should click on Show Details after entering the user id of sub-user. Details of sub-user will be displayed. 177


178 Select the check-box provided adjacent to the sub-user details and click Deactivate button. A success message will be displayed to the user. View Sub-user History: Available for only ERI Admin Go to Manage Sub-user and select View Sub-user History. User should enter the following details. Select User: Mandatory, radio buttons Single User and All Users are available. User ID: Mandatory only when Single User radio button is selected 10-character alphanumeric. Captcha: This is mandatory and the user has to type in the numeric code which appears on the screen. 178


179 User can select one of the 2 radio buttons, i.e., Single User and All Users. User selects Single User and clicks Show details. The details of all the sub-users will be displayed. User selects All Users and clicks Show details. The details of the sub-user whose user id is entered will be displayed. Change Sub-user Password: Available only for ERI Admin 179

180 Go to Manage Sub-user and select Change Sub-user Password. User should enter the following details. User ID: Mandatory, 10-character alphanumeric. Password Mandatory, can be between 8 14 characters, alphanumeric and should contain at least one special character and one numeric. Confirm Password The user has to enter the same password as entered above. This is mandatory. Captcha: This is mandatory and the user has to type in the numeric code which appears on the screen. User clicks 'SUBMIT' and a success message is displayed on password change. Update Sub-user Contact Details: Available only for ERI Admin Go to Manage Sub-user and select Update Sub-user Contact Details. User should enter the following details. User ID: Mandatory, 10-character alphanumeric. User clicks 'SUBMIT' and a new page is displayed with all the contact details of the sub-user. User can view and edit the following details. Contact Details Landline Number Non-mandatory, numeric field, 10 digits (STD code and the telephone number should not exceed 10 digits. Do not prefix 0 ). Mobile Number - Mandatory, numeric field, 10 digits. Alternate Mobile Number - Non mandatory, numeric field, 10 digits ID - Mandatory, alphanumeric, 125 characters Alternate ID - Non mandatory, alphanumeric, 125 characters Fax Number - Non-mandatory, numeric field, 10 digits (STD code and the telephone number should not exceed 10 digits. Do not prefix 0 ). 180

181 Address Details Flat/Door/Building Mandatory, alphanumeric and special characters, limited to 50 characters Road/Street - Non-mandatory, alphanumeric and special characters, limited to 50 characters Area/Locality - Mandatory, alphanumeric and special characters, limited to 50 characters Town/City/District - Mandatory, alphanumeric and special characters, limited to 50 characters State Mandatory, user selects from the drop down provided Pin code - Mandatory, numeric, limited to 6 digits CAPTCHA This is mandatory and the user has to type in the numeric code which appears on the screen User clicks on Submit. User can view a success message page when the contact details are updated. 181

182 Change Password: Available for ERI Admin and ERI Sub-user Go to Profile Settings and select Change Password. User should enter the following details. Old Password Mandatory, can be between 8 14 characters, alphanumeric and should contain atleast one special character and one numeric. New Password Mandatory, can be between 8 14 characters, alphanumeric and should contain atleast one special character and one numeric. Confirm Password The user has to enter the same password as entered above. This is mandatory Captcha - This is mandatory and the user has to type in the numeric code which appears on the screen. User clicks SUBMIT and a success message page is displayed confirming password change. Change Secret Question(s) / Answer(s): Available for ERI Admin and ERI Subuser Go to Profile Settings and select Change Secret Question(s) / Answer(s). User should enter the following details. Primary Secret Question The user needs to select any one question out of four available in the drop down. This is mandatory. Primary Secret Answer Mandatory, alphanumeric and special characters, limited to 25 characters Secondary Secret Question The user needs to select any one question out of the balance three available in the drop down. This is mandatory. Secondary Secret Answer Mandatory, alphanumeric and special characters, limited to 25 characters. Captcha - This is mandatory and the user has to type in the numeric code which appears on the screen. 182
183 User clicks SUBMIT and a success message page is displayed confirming change in secret question and secret answer. Update Contact Details: Available for ERI Admin and ERI Sub-user Go to Profile Settings and select Update Contact Details. User should enter the following details. Contact Details Landline Number Non-mandatory, numeric field, 10 digits (STD code and the telephone number should not exceed 10 digits. Do not prefix 0 ). Mobile Number - Mandatory, numeric field, 10 digits. Alternate Mobile Number - Non mandatory, numeric field, 10 digits ID - This field is auto-filled from the previous page Alternate ID - Non mandatory, alphanumeric, 125 characters Fax Number - Non-mandatory, numeric field, 10 digits (STD code and the telephone number should not exceed 10 digits. Do not prefix 0 ). Address Details Flat/Door/Building Mandatory, alphanumeric and special characters, limited to 50 characters Road/Street - Non-mandatory, alphanumeric and special characters, limited to 50 characters Area/Locality - Mandatory, alphanumeric and special characters, limited to 50 characters Town/City/District - Mandatory, alphanumeric and special characters, limited to 50 characters State Mandatory, user selects from the drop down provided Pin code - Mandatory, numeric, limited to 6 digits CAPTCHA This is mandatory and the user has to type in the numeric code which appears on the screen. 183

184 User clicks on SUBMIT after updating the contact details. A success message page is displayed. Register Digital Signature Certificate: Available for ERI Admin and ERI Sub-user Go to Profile Settings and select Register Digital Signature Certificate. User should select a valid DSC i.e., it should be a.pfx file. Instructions will be provided in the right corner of efiling application when Register Digital Signature Certificate page is opened. User clicks Submit after selecting a DSC, a success message page is displayed. 184

185 Opt for Higher Security: Available for ERI Admin and ERI Sub-user Go to Profile Settings and select Opt for Higher Security. View My Profile: Available for ERI Admin and ERI Sub-user Go to Profile Settings and select View My Profile. All the details of the user will be displayed. 185
186 Mailing List: Available for ERI Admin and ERI Sub-user Go to Profile Settings and select Mailing List. A Subscribe button is available for the user. User clicks on Subscribe button, a success message is displayed. If user is already subscribed to mailing list, Unsubscribe button will be available. User clicks on Unsubscribe button, a success message is displayed. Alerts, Remainders & Notifications: Available for ERI Admin and ERI Sub-user Go to Profile Settings and select Alerts, Remainders & Notifications. User will be provided with a Enable button. User clicks on Enable button, a success message is displayed. 186
187 If user is already enabled to Alerts, Remainders & Notifications, Disable button will be available. User clicks on Disable button, a success message is displayed. Helpdesk Submit Request: Available for ERI Admin and ERI Sub-user Go to Grievance and select Submit Request. User has to enter the following details. Mobile Number - Mandatory, auto-filled, numeric field, 10 digits. ID - Mandatory, alphanumeric, 125 characters Category Mandatory, dropdown Sub-category - Mandatory, dropdown, options available are based on selection of category dropdown Summary Mandatory, minimum of 30 characters has to be entered. Description - Mandatory, minimum of 30 characters has to be entered. Attachment Non-mandatory 187

188 User clicks on SUBMIT, a success message page is displayed. Request List: Available for ERI Admin and ERI Sub-user Go to Grievance and select Request List. User can search a request raised by using following options. Status: Mandatory, dropdown Start Date: Non- mandatory, a calendar is provided to select the date. End Date: Non- mandatory, a calendar is provided to select the date. 188

189 User enters the details and clicks on Search button. All the requests based on the filter will be displayed. User should click on the request number which he/she wants to view. User can edit the details like Summary, description, etc. 3 buttons are available to the user. Back: Takes user to previous page. Update: Updates the request. Cancel: Request is cancelled. 189
e-filing Registration and Services
 e-filing Registration and Services 1 Table of Contents Services available for various users in e-filing... 3 Individual User Registration... 5 Individual User Features... 9 Other than Individual/HUF User
Instructions to e-file Form 15CA and 15CB
 Instructions to e-file Form 15CA and 15CB Page 1 Table of Contents Registration process for Filing Form 15CA... 3 Filing process... 3 View Form 15CA... 7 Registration process for Filing Form 15CB... 9
PCIT/CIT will be displayed a success message after submitting Form 2. Now the action column will be updated with the status Awaiting Form 3. To print
 Step by Step - Instructions to Forms (Income Declaration Scheme, 2016) Form 1(to be submitted by taxpayer): Form 1 is a Form of Declaration under section 183 of the Finance Act, 2016, in respect of the
View Form 1-Income Declaration Scheme, User Manual for Principal CIT/CIT and Principal CCIT/CCIT officers of the Department
 View Form 1-Income Declaration Scheme, 2016 - User Manual for Principal CIT/CIT and Principal CCIT/CCIT officers of the Department Page 1 Table of Contents Pre-Requisite for Viewing Form 1 Income Declaration
Instructions to e-file Form 15CA and 15CB
 Registration process for Filing Form 15CA To file the Form 15CA, user should hold valid PAN/TAN and should be registered in e- Filing. If not already registered, user should go to Register Yourself, Select
Get Qualified User Manual
 MALTA ENTERPRISE Get Qualified User Manual Student Guide Contents 1. Logon... 3 2. Registration... 3 3. Profile... 3 Ongoing Applications... 3 Editing your profile... 4 Profile... 4 Account... 4 Password...
Register yourself (for new applicants who are registering for Examination 2016)
") Carefully read this guide before you proceed for filling up the form. It will help you to gain knowledge as to how to fill up and submit your Application Form. This segment will guide you through the operational
Carefully read this guide before you proceed for filling up the form. It will help you to gain knowledge as to how to fill up and submit your Application Form. This segment will guide you through the operational
SARS efiling Mobisite Quick Guide
 SARS efiling Mobisite Quick Guide 2012 The SARS efiling mobisite allows taxpayers to file their individual Income Tax Return (ITR12) via efiling from their mobile phones Internet browser. STEP 1: ACCESS
GST Registration Guide
 GST Registration Guide Disclaimer: This guide has been prepared by team at ProfitBooks (Online Accounting Software). Since Indian Government is updating GSTN website regularly, some of the steps mentioned
Student Guide INTRODUCTION TO ONLINE RESOURCES
 Student Guide INTRODUCTION TO ONLINE RESOURCES Date: 12. March. 2018 By: Technical Support Team Table of Contents 1) Introduction 3 2) Student Panel (SIS) 3 2.1) Student Panel (SIS) Login 3 2.1.1) Definitions
User Manual Appointment System
 User Manual Appointment System Page 1 of 17 1.0 TABLE OF CONTENTS TABLE OF CONTENTS... 2 System Overview... 3 Menu Options... 3 Application Access... 3 Patient Registration... 6 Schedule Appointment...
Traders Fresh Registration. User Guide. For. Exporter of Tobacco Products
 Traders Fresh Registration User Guide For Exporter of Tobacco Products User Guide Developed by: Version: 1.0 1 P a g e Contents 1. INTRODUCTION... 3 2. PRE-REQUISITES... 4 2.1. Connectivity:... 4 2.2.
Maharashtra Sales Tax Department USER MANUAL. New Registration under MVAT
 Maharashtra Sales Tax Department USER MANUAL New Registration under MVAT Contents 1. Introduction... 3 2. Instructions... 3 3. Steps of Registration Process... 4 4. Create Temporary Profile... 5 4.1 Login
TaxPro e-tds FY , FY & F.Y Changes and Enhancements
 TaxPro e-tds FY. 2015-16, FY 2016-17 & F.Y. 2017-18 - Changes and Enhancements Enhancements in -- Version 18.1.0.2 - Release Date 25/01/2018 Changes in TDS/TCS Interest Calculation for the TDS Deducted
ISS INDIA Active Directory Self Password Management Solution ISS Facility Services India PVT.LTD.
 ISS INDIA Active Directory Self Password Management Solution ISS Facility Services India PVT.LTD. Page 1 of 14 Contents 1. OVERVIEW... 3 2. USER REGISTRATION PROCESS... 3 STEP 1: USER LOGIN... 3 STEP 2:
I am a normal taxpayer. GST New Registration Procedure
 ST New Registration Procedure Step by Step guide with Screenshots. GST New Taxpayer Registration is started from 25-06-2017 (25th June 2017), Here we provide GST New Registration Step by Step Guide at
What Is BAI ID? 2. Why BAI ID? 2. Procedure for BAI ID 2. How to Update you BAI ID in your MBA profile? 3. What is BWF ID? 3. Why BWF ID?
 What Is BAI ID? 2 Why BAI ID? 2 Procedure for BAI ID 2 How to Update you BAI ID in your MBA profile? 3 What is BWF ID? 3 Why BWF ID? 3 Procedure for BWF ID? 3 How to Update your BWF ID in your profile?
Registration Application > Normal Taxpayer/ Composition/ Casual Taxable Person/ Input Service Distributor (ISD)/ SEZ Developer/ SEZ Unit
/ SEZ Developer/ SEZ Unit") Registration Application > Normal Taxpayer/ Composition/ Casual Taxable Person/ Input Service Distributor (ISD)/ SEZ Developer/ SEZ Unit I am a Normal Taxpayer/ Composition/ Casual Taxable Person/ Input
Registration Application > Normal Taxpayer/ Composition/ Casual Taxable Person/ Input Service Distributor (ISD)/ SEZ Developer/ SEZ Unit I am a Normal Taxpayer/ Composition/ Casual Taxable Person/ Input
Traders Fresh Registration. User Guide. For. Processor of Virginia Tobacco
 Traders Fresh Registration User Guide For Processor of Virginia Tobacco User Guide Developed by: Version: 1.0 1 P a g e Contents 1. INTRODUCTION... 3 2. PRE-REQUISITES... 4 2.1. Connectivity:... 4 2.2.
TaxPro e-tds FY To F.Y Changes and Enhancements
 TaxPro e-tds FY. 2015-16 To F.Y. 2018-19 - Changes and Enhancements Enhancements in -- Version 18.2.0.15 Release Date 06/11/2018 Added Validation in Form 61A for Part-D. Enhancements in -- Version 18.2.0.14
User Guide. To Taxpayers for. GST Enrolment App
 User Guide To Taxpayers for GST Enrolment App Page 1 Contents Contents... 2 1. Landing page:... 3 2. Home page:... 4 3. Business Details:... 5 4. Promoters / Partners:... 7 5. Authorized Signatory... 12
Maharashtra Sales Tax Department USER MANUAL. New Registration under CST
 Maharashtra Sales Tax Department USER MANUAL New Registration under CST Contents 1. Introduction... 3 2. Instructions... 3 3. Steps of Registration Process... 4 4. Create Temporary Profile... 5 4.1 Login
User Manual HPCSA Registration Renewal
 - 1 - User Manual HPCSA Registration Renewal Created by - 2 - TABLE OF CONTENTS 1. INTRODUCTION p3 2. LOGIN p3 2.1 REGISTER p4 2.2 FORGOT PASSWORD p7 3. PERSONAL DETAILS p8 3.1 PROFILE PHOTO p8 3.2 PERSONAL
Aaple Sarkar DBT Portal
 Aaple Sarkar DBT Portal Aaple Sarkar DBT Portal (Direct Benefit Transfer) is an initiative taken by the Government of Maharashtra, which is a unique Platform for Citizens to help them to avail benefits
1. Create Temporary Profile
 1. Create Temporary Profile 2. For New Registration Click on Temporary Profile Creation. ( Screen 1) (Screen 1) 1. Options for Registration 1. You are on "Options for Registration" screen. This screen
MSEDCL e-tendering Contractor Registration Guide
 MSEDCL e-tendering Contractor Registration Guide 1 P a g e 2 P a g e Table Of Contents Getting Started...4 Contractor Registration...5 Adding Company Details...5 Adding Company Contact Details...7 Next
Student Guide INTRODUCTION TO ONLINE RESOURCES
 Student Guide INTRODUCTION TO ONLINE RESOURCES Date: 08. June. 2017 By: Technical Support Team STUDENT GUIDE southwales.unicaf.org 1)Introduction...4 2)Student Panel (SIS)...4 2.1)Student Panel (SIS) Login...4
Digital Signature Certificate (DSC) Guide. April 2017, Version 1.0
 Guide. April 2017, Version 1.0") Digital Signature Certificate (DSC) Guide April 2017, Version 1.0 Contents 1. Introduction... 3 2. Pre-Requisites to get DSC... 3 2.1 Documents for applying for DSC... 3 2.2 Software Specifications...
Digital Signature Certificate (DSC) Guide April 2017, Version 1.0 Contents 1. Introduction... 3 2. Pre-Requisites to get DSC... 3 2.1 Documents for applying for DSC... 3 2.2 Software Specifications...
Pradhan Mantri Fasal Bima Yojana Ministry of Agriculture & Farmers Welfare
 Pradhan Mantri Fasal Bima Yojana Ministry of Agriculture & Farmers Welfare User : Insurance Company INTRODUCTION: Crop Insurance is an integrated IT solution and a web-based ecosystem to speed up service
Student Guide. By UNICAF University
 vnhgfj Student Guide By UNICAF University 1 2 Table of Contents 1) Introduction... 5 2) Student Panel (SIS)... 5 2.1) Student Panel (SIS) Login... 5 2.1.1) Definitions... 5 2.1.2) Registration Email...
Employee User Guide What Employees Need to Know About Using the Burnham & Flower Wealthcare
 Employee User Guide What Employees Need to Know About Using the Burnham & Flower Wealthcare Table of Contents Getting started...2 My accounts...3 My expenses...13 Communications...15 Enrollment...17 Resources...21
USER MANUAL FOR STUDENT REGISTRATION
 THE WEST BENGAL UNIVERSITY OF HEALTH SCIENCES USER MANUAL FOR STUDENT REGISTRATION Version 1.0 Jan-2018 Page 1 of 22 Contents 1. Introduction... 3 2. Steps for Online Registration Process... 3 Check Eligibility
Request Created. Request number will be displayed. Compiled by CA Avinash Rawani 131
 Request Created Request number will be displayed Compiled by CA Avinash Rawani 131 Selecting Replace Challan Option Under Defaults select Tag/ Replace Challan Compiled by CA Avinash Rawani 132 List of
Upload Documents 20/10/2014. Sinewave Computer Services Pvt. Ltd. Page 1
 Upload Documents Page 1 Upload Documents Page 2 Upload Documents Page 3 Upload Documents Page 4 Send Documents through Email Page 5 Download documents for CA Website through DMS Module Page 6 Page 7 Online
New Registration under PTRC-User Manual 1. Create Temporary Profile 1. Click on ë-registration under e-services menu 2. For New Registration Click on
 1. Create Temporary Profile 1. Click on ë-registration under e-services menu 2. For New Registration Click on Temporary Profile Creation. ( Screen 1) (Screen 1) 1. Options for Registration 4 1. You are
MSEDCL e-tendering Contractor Registration Guide
 MSEDCL e-tendering Contractor Registration Guide Table Of Contents Getting Started...4 Getting Started...4 Contractor Registration...5 Adding Company Details...5 Adding Company Contact Details...8 Registration
New Registration under SCPT
 Maharashtra Sales Tax Department USER MANUAL New Registration under SCPT www.taxguru.in Contents New Registration under SCPT... 0 Contents... 1 INSTRUCTIONS... 2 New Registration under SCPT... 3 Road map
The Ethic Management System (EMS) User guide
 User guide") The Ethic Management System (EMS) User guide On the web browser, type the URL link: https://www.witsethics.co.za Click on Login (on right corner of top menu bar) to access the Ethics Management System
The Ethic Management System (EMS) User guide On the web browser, type the URL link: https://www.witsethics.co.za Click on Login (on right corner of top menu bar) to access the Ethics Management System
Introduction. Parent User Instructions
 Parent User Guide May 2018 Introduction SchoolEngage is a comprehensive communication tool that facilitates interaction between students, parents and the school. Key functionality includes on-line forms
Contents Generate New Password for ICSI-SMASH Portal... 3 Process for Registration in Professional Programe... 6 Download ID Card/Registration Letter.
 ICSI - SMASH User Manual For Professional Registration for Students Page 1 Contents Generate New Password for ICSI-SMASH Portal... 3 Process for Registration in Professional Programe... 6 Download ID Card/Registration
MYCIBSE USER GUIDE. Contents
 MYCIBSE USER GUIDE CIBSE upgraded its IT systems on 26th July 2016 to improve core customer functions and increase efficiency and effectiveness. As part of this upgrade members and customers that were
Instruction Page. After reading all the instruction given on the page, click on Proceed button.
 User Manual [Important Instructions for Applicants/Candidates filling AIIMS- Recruitment to the Post of Nursing Officer- 2017 Examination - Online Registration Form] Open the website of All India Institute
Your Guide to Merchant Online
 Your Guide to Merchant Online Merchant Online User Guide Contents 1 Introduction... 2 2 Using the Merchant Online Portal... 2 2.1 Signing In for the First Time... 2 2.2 Updating Your Information... 4 2.2.1
Using the Telstra T-Suite Management Console. Customer Administrator s Reference Manual
 Using the Telstra T-Suite Management Console Customer Administrator s Reference Manual June 2011 Registering With TMC Notice Pivot Path is a registered trademark of Jamcracker, Inc. Registered trademark
National Stock Exchange of India Ltd. User Manual for NICE Plus
 National Stock Exchange of India Ltd. User Manual for NICE Plus Document Name User Manual : Investor Login Version 1.0 Release Date December 15, 2018 User Manual Page 1 of 38 TABLE OF CONTENT 1. ABOUT
DISCRETIONARY GRANT ONLINE SYSTEM
 DISCRETIONARY GRANT ONLINE SYSTEM User Manual Client: Project Name: Author: CATHSSETA training manual Discretionary Grant Training Manual Phemelo Mothusi 31 October 2016 TABLE OF CONTENTS 1 INTRODUCTION...
Meritain Connect User Manual. for Employees. 1 Meritain Connect User Guide for Employees
 Meritain Connect User Manual for Employees 1 Meritain Connect User Guide for Employees Contents Introduction... 4 Accessing Meritain Connect... 5 Logging In... 5 Forgot Password... 6 Registration Process...
Student Manual. Instructions for Signup / Login at Vidyasaarathi Portal:
 Student Manual Instructions for Signup / Login at Vidyasaarathi Portal: Students are required to complete sign up process to register on Vidyasaarathi portal. Students who have completed Sign up / Registration
PLEXUS PAY PORTAL YOUR HOW-TO GUIDE
 PLEXUS PAY PORTAL YOUR HOW-TO GUIDE - 1 - Table of Contents Activate Account Activating Your Pay Portal Account 3 Navigating your Plexus Pay Portal 8 Managing your funds 17 Activating your Prepaid Card
DEPARTMENT OF HIGHER EDUCATION, HARYANA ONLINE ADMISSIONS. URL:
 DEPARTMENT OF HIGHER EDUCATION, HARYANA ONLINE ADMISSIONS User Manual for Online Admissions 2018-2019 URL: http://www.online.highereduhry.com Overview is a unit of the Government of Haryana in India that
E-Bill & Collect User Guide June 2016
 E-Bill & Collect User Guide June 2016 Table of Contents Page Introduction Simple Web Manual Payments Enter Payment Details Verify Payment Details Payment Confirmed Authenticated & SSO Payments Lookup Account
e-tutorial Online Correction- Resolution for Overbooked Challan (Movement of deductee row)
") e-tutorial Online Correction- Resolution for Overbooked Challan (Movement of deductee row) 1 Important Information on Online Correction All type of corrections like Personal information, Deductee details
e-tutorial Online Correction- Resolution for Overbooked Challan (Movement of deductee row) 1 Important Information on Online Correction All type of corrections like Personal information, Deductee details
Assessment of Student Performance and Progress. Test Operations Management System: Adding and Managing Users Guide
 CALIFORNIA Assessment of Student Performance and Progress Test Operations Management System: Adding and Managing Users Guide Winter/Spring 2015 Smarter Balanced Summative Assessments California Standards
ACT Test Accessibility and Accommodations System (TAA) User Guide
 User Guide") ACT Test Accessibility and Accommodations System (TAA) User Guide www.act.org ACT Test Accessibility and Accommodations System (TAA) User Guide Table of Contents Overview... 2 Introduction to the Test
ACT Test Accessibility and Accommodations System (TAA) User Guide www.act.org ACT Test Accessibility and Accommodations System (TAA) User Guide Table of Contents Overview... 2 Introduction to the Test
e-tutorial Online Correction-Add Challan to the statement
 e-tutorial Online Correction-Add Challan to the statement 1 Important Information on Online Correction All type of corrections like Personal information, Deductee details and Challan correction can be
 User Manual for Online Application Process in Swami Vivekananda Merit cum Means Scholarship (V2.0) Government of West Bengal https://svmcm.wbhed.gov.in Steps to be followed to apply online for Swami Vivekananda
User Guide. Join us on
 User Guide www.neopost.ca Join us on TABLE OF CONTENTS Getting started Hardware and subscription requirements 4 PC requirements - browsers 4 Activating the application 5 Weighing your items Get weight
Business ebanking Guide Administration
 Business ebanking Guide Administration Revised 2/2016 Table of Contents ABOUT BUSINESS EBANKING... 4 MINIMUM SYSTEM REQUIREMENTS... 5 APPROVED OS AND BROWSERS FOR COMPANY USERS... 6 SYSTEM CONSIDERATIONS...
PROCEDURE TO FILL APPLICATION FORM FOR GGS INDRAPRASTHA UNIVERSITY
 PROCEDURE TO FILL APPLICATION FORM FOR GGS INDRAPRASTHA UNIVERSITY STEP - 1: The website for filling the forms is https://ipu.ac.in Applicant can fill in the online application form for recruitment to
Florida Lobbyist Registration and Compensation Reporting System
 Florida Lobbyist Registration and Compensation Reporting System User Guide Office of Legislative Services Lobbyist Registration Office (850) 922-4990 Revised on February 25, 2015 Contents Overview... 1
Help Manual. [Important Instructions for Applicants/Candidates filling Online Registration Form for Recruitment to Group B & C post]
![Help Manual. [Important Instructions for Applicants/Candidates filling Online Registration Form for Recruitment to Group B & C post]](/thumbs/89/100356616.jpg "Help Manual. [Important Instructions for Applicants/Candidates filling Online Registration Form for Recruitment to Group B & C post]") Help Manual [Important Instructions for Applicants/Candidates filling Online Registration Form for Recruitment to Group B & C post] Open the website of All India Institute of Medical Sciences. The URL
Help Manual [Important Instructions for Applicants/Candidates filling Online Registration Form for Recruitment to Group B & C post] Open the website of All India Institute of Medical Sciences. The URL
Help file for IRDAI Corporate Agents Registration Portal
 Help file for IRDAI Corporate Agents Registration Portal Submitted By Trade Globe - Ground Floor, J.B. Nagar Andheri-Kurla Road, Andheri (E) Mumbai 400 059 www.nseit.com 10th Feb, 2016 Contents Tips...
FIRMS Application. Foreign investment in India - Reporting in Single Master Form
 FIRMS Application Foreign investment in India - Reporting in Single Master Form Introduction 1.1 The Reserve Bank, in the First Bi-monthly Monetary Policy Review dated April 5, 2018 announced that, with
USER MANUAL FOR PUC ONLINE PORTAL
 USER MANUAL FOR PUC ONLINE PORTAL Page 1 of 36 Content SL No User Manual Type Page No 1 College Registration 3-7 2 Login Detail 8-9 3 Student New Enrolment 10 4 Filling the Application form for 1 st PU
Oracle FLEXCUBE Direct Banking
 Oracle FLEXCUBE Direct Banking Retail Customer Services User Manual Release 12.0.2.0.0 Part No. E50108-01 September 2013 Retail Customer Services User Manual September 2013 Oracle Financial Services Software
1. Get 26AS Information
 1. Get 26AS Information 1.1. Description This Web Service is used to get the 26AS information Authenticated users need to provide PAN, Date of Birth/Incorporation and Assessment Year to get 26AS information.
USER GUIDE. Version 2.0. Reflex Online Cash Management
 TM USER GUIDE Version 2.0 Reflex Online Cash Management Table of Contents USER GUIDE VERSION 2.0 Table of Contents... 2 1. Introduction... 4 1.1 What is Reflex?... 4 1.2 How do I access Reflex?... 4 1.3
SBI Mingle User Manual
 SBI Mingle User Manual 1. Facebook banking for State Bank of India: Registration 1.1 Registration Mode 1: Debit Card 2. Open the SBI Mingle application User visits SBI Official Page, clicks on SBI Mingle
INBIZ HOW TO START? QUICK GUIDE
 INBIZ HOW TO START? This document was created for you, the InBiz user, for your quick orientation in InBiz and to provide you with a brief and simple guide for using the basic InBiz functionalities. QUICK
IRDA BROKER REGISTRATION AND RETURNS SUBMISSION USER MANUAL. Version 1.0/04-April
 IRDA BROKER REGISTRATION AND RETURNS SUBMISSION USER MANUAL Version 1.0/04-April-2014 1 Version History Version History Version Date of No. Release Prepared by (L&T side) Reviewed by (L&T side) Approved
User manual For 1. Obtaining GST provisional user id and password from the Department portal or from unit offices.
 User manual For 1. Obtaining GST provisional user id and password from the Department portal or from unit offices. 2. GST enrollment process at the gst.gov.in portal 1.a Process for obtaining GST provisional
SARS efiling APP QUICK GUIDE
 2012 SARS efiling APP QUICK GUIDE The SARS efiling App is a mobile application which taxpayers can install from the App Store on their mobile device (android phone/ tablet or Apple iphone 4/4S and ipad)
How to submit a batch of documents for on-line registration IN Mauritius e-registry System
 Document format for online subissions: Scan document in PDF format, A4 Portrait, black & white and OCR. Helpline: 201 1859 201 1860 201 1861 Ensure correct alignment; page numbering and good legibility.
Create Account/Login. Create Account/Login
 User Manual Table of Contents Table of Contents Section 1: Create Account Login Section 2: Password Recovery Section 3: Add a Lockbox Section 4: Add a Listing Section 5: Dashboard - Approve Showing Requests
OSLA (Office of Staff Legal Assistance) User Manual. Created Date: 09 th December, 2016 Version: 2.0
 User Manual. Created Date: 09 th December, 2016 Version: 2.0") OSLA (Office of Staff Legal Assistance) User Manual Created Date: 09 th December, 2016 Version: 2.0 Table of Contents (Re-generate the TOC after modifications to the document) Contents Table of Contents
OSLA (Office of Staff Legal Assistance) User Manual Created Date: 09 th December, 2016 Version: 2.0 Table of Contents (Re-generate the TOC after modifications to the document) Contents Table of Contents
FAQ ON GST ENROLMENT PROCESS AS PROVIDED BY GSTN AT
 FAQ ON GST ENROLMENT PROCESS AS PROVIDED BY GSTN AT www.gst.gov.in Overview of Enrolment 1. Who is an existing taxpayer? An existing taxpayer is an entity currently registered under any State or Central
User Manual (e-tendering)
") User Manual (e-tendering) Guidelines to Vendors for Online Tender Submission On MIDC Portal TM Online Tender Management Module PWIMS e-tendering Vendor Guidelines Manual Page 1 Table of Contents 1) Introduction:
User Manual (e-tendering) Guidelines to Vendors for Online Tender Submission On MIDC Portal TM Online Tender Management Module PWIMS e-tendering Vendor Guidelines Manual Page 1 Table of Contents 1) Introduction:
Fulbright Distinguished Awards in Teaching Program Partner Organization Application Manual. Institute of International Education
 Fulbright Distinguished Awards in Teaching Program Partner Organization Application Manual Institute of International Education 2015-2016 Contents International Application...3 Overview...3 Login for Applicants...3
TATA CONSULTANCY SERVICES LIMITED CERTIFYING AUTHORITY REQUEST FORM FOR CLASS-2 CERTIFICATE FOR FOREIGN DIRECTORS.
 TATA CONSULTANCY SERVICES LIMITED CERTIFYING AUTHORITY REQUEST FORM FOR CLASS-2 CERTIFICATE FOR FOREIGN DIRECTORS. USER TYPE INDIVIDUAL Instructions: 1. Please fill the form in BLOCK LETTERS 2. Items marked
Admission Portal Admission entry by the students
 Admission Portal Admission entry by the students How to start? Open internet browser such as Mozilla Firefox, chrome. We recommend chrome for better performance. Type www.bnu.ac.in in the address bar of
User Manual For. EFM I2File.net. September 26, 2017 Version 1.0
 User Manual For EFM I2File.net September 26, 2017 Version 1.0 1 Table of Contents Registration... 3 Register a Firm Account... 3 Register a Self-Represented Account... 5 Login... 8 Forgot Password... 8
HealthInfoNet CLINICAL PORTAL USER REFERENCE GUIDE. Revised: Page 1 of 24
 HealthInfoNet CLINICAL PORTAL USER REFERENCE GUIDE Revised: 6.3.2015 Page 1 of 24 HealthInfoNet User Reference Guide INSIDE: Accessing HealthInfoNet (HIN) 3-5 Clinical Portal 6-11 Notifications and Worklists
MAHARECRUITMENT. maharecruitment.mahaonline.gov.in. Online Application System User Manual
 MAHARECRUITMENT maharecruitment.mahaonline.gov.in Online Application System User Manual Index Sr No Title 1 User - Checklist 2 Application Process Flow 3 Steps : Application Process 4 Step 1: New User
Parcel Data Exchange PDX Web Application Customer Guide
 Parcel Data Exchange PDX Web Application Customer Guide Status: Final Version: 12 Date Last Modified: 08/06/2018 08/06/2018 Parcel Data Exchange (PDX) Customer Guide Page 1 of 21 Table of Contents Table
Administrator Manual. Last Updated: 15 March 2012 Manual Version:
 Administrator Manual Last Updated: 15 March 2012 Manual Version: 1.6 http://www.happyfox.com Copyright Information Under the copyright laws, this manual may not be copied, in whole or in part. Your rights
Isi Net User Manual for Bank customers
 1 Table of Contents 1 Introduction and overview... 4 1.1 Isi Net User Types... 4 1.2 Accessing the Isi Net service... 5 1.2.1 User Login... 5 1.2.2 User Logout... 7 1.3 User Interface... 7 1.3.1 Menus...
Name of Document: ebaalnidan User Manual Version 1.1 Date of Last Change Classification General Audience All users of
 4.0. Complainant: Any individual who wants to register a complaint with NCPCR will have to register with ebaalnidan portal. The complainant can be either an individual or an organisation. If the individual
e-services User Manual
 Chhattisgarh Commercial Tax Department e-services User Manual Return Processing System & Tax Assessment System And Dealer Information System Software Application For Online Services and Portal Table of
How to fill Application Form Guide
 How to fill Application Form Guide This document provides the step by step process on how to fill the COMEDK UGET/Uni-GAUGE EMeD application form. Instructions for Registration If you are a new user, click
User Guide for e-registration of VAT/ CST/Luxury Tax & Composition
 Department of Commercial Tax Government of Chhattisgarh User Guide for e-registration of VAT/ CST/Luxury Tax & Composition Contents General Instructions for VAT/CST/LT/Composition applicants... 4 General
USER MANUAL. SalesPort Salesforce Customer Portal for WordPress (Lightning Mode) TABLE OF CONTENTS. Version: 3.1.0
 TABLE OF CONTENTS. Version: 3.1.0") USER MANUAL TABLE OF CONTENTS Introduction...1 Benefits of Customer Portal...1 Prerequisites...1 Installation...2 Salesforce App Installation... 2 Salesforce Lightning... 2 WordPress Manual Plug-in installation...
USER MANUAL TABLE OF CONTENTS Introduction...1 Benefits of Customer Portal...1 Prerequisites...1 Installation...2 Salesforce App Installation... 2 Salesforce Lightning... 2 WordPress Manual Plug-in installation...
Nuclear Fuel Complex Recruitment Application User Manual
 Nuclear Fuel Complex Recruitment Application User Manual The application is best viewed in Google Chrome Version 66.0.3359.139 Browse the NFC website, following screen will be displayed. For New Applicant,
CENTAC HELP DOCUMENT FOR OTHER STATE. CENTAC Homepage:
 CENTAC HELP DOCUMENT FOR OTHER STATE CENTAC Homepage: http://www.centaconline.in Dear Candidate, Good day and wishes from CENTAC Team for your successful placements via centac. Along this journey I will
UniWeb. New access credentials and qualified signature certificates on remote server
 UniWeb New access credentials and qualified signature certificates on remote server Sommario 1 Process description... 2 2 Migration logics... 3 2.1 2.2 2.3 2.3.1 Pre-requisites... 3 Migration calendar...
Parent User Guide.
 Parent User Guide www.intellimedia.ca Table of Contents INTRODUCTION 3 PARENT USER INSTRUCTIONS 4 PARENT ACCESS TO SCHOOLENGAGE 5 NEW PARENT SIGN UP 5 EXISTING PARENT SIGN IN PARENT PORTAL 7 EXISTING PARENT
Submitting a Form 11 using the ROS Offline Application
 Submitting a Form 11 using the ROS Offline Application To work on your Form 11 offline you must use the ROS Offline Application. Instructions on how to install the ROS Offline Application are available
Exostar Identity Access Platform (SAM) User Guide July 2018
 User Guide July 2018") Exostar Identity Access Platform (SAM) User Guide July 2018 Copyright 2018 Exostar, LLC All rights reserved. 1 Version Impacts Date Owner Identity and Access Management Email Verification (Email OTP) July
Exostar Identity Access Platform (SAM) User Guide July 2018 Copyright 2018 Exostar, LLC All rights reserved. 1 Version Impacts Date Owner Identity and Access Management Email Verification (Email OTP) July
Getting Started. What is the genuine URL for RHB Now Internet Banking? The genuine URL is Username and Password
 Getting Started What is the genuine URL for RHB Now Internet Banking? The genuine URL is https://rhbnow.rhbgroup.com/kh Username and Password What should I do if I've forgotten my Username? Please access
SIDC Online Application Portal
 SIDC Online Application Portal Corporate Account User Guide 1. Overview... 1 2. How to Register Corporate Account?... 1 3. How to Confirm Account?... 7 4. How to Fill Application Form?... 10 4.1 Fill Application
Oracle FLEXCUBE Direct Banking
 Oracle FLEXCUBE Direct Banking Retail Customer Services User Manual Release 12.0.3.0.0 Part No. E52543-01 April 2014 Retail Customer Services User Manual April 2014 Oracle Financial Services Software Limited