Lab 5: Reporting with RPE
|
|
|
- Homer Fletcher
- 5 years ago
- Views:
Transcription
1 Objectives After completing this lab, you will be able to: Report on Rhapsody Models and Linked OSLC Artifacts using Rational Publishing Engine Scenario In this Lab, you will first start the Rhapsody REST server (by starting the Report Publishing Wizard). You will then open Rational Publishing Engine Document Studio and create a simple template to report Use Cases and their linked OSLC artifacts by reporting on the Rhapsody client. You will then create a second template which reports directly on the model in RMM. Note that this lab is only intended to show that you can report on linked elements in RMM models for a more detailed guide on Reporting on Rhapsody please refer to the RPE for Rhapsody lightning lab and the full RPE for Rhapsody course contact your IBM representative for details. It is assumed you are still working in Dan s workspace where the previous lab ended. Copyright IBM Corp


2 Rhapsody Model Manager Tech Jam Task 1: Load Remote Artifact Packages In this task you will login to each of the three remote data sources (CCM, QM and RM) so that the linked artifacts will be resolved and thus available for reporting 1. Login to CCM: a. In the Rhapsody browser, expand the Remote Artifact Packages category b. Right-click the CCM Project: RMM Planning Remote Artifact Package and select Login to Server: c. If asked to login, login as dan/dan: 2. Login to QM: a. In the Rhapsody browser, right-click the QM Project: RMM Testing Remote Artifact Package and select Login to Server 3. Login to RM: a. In the Rhapsody browser, right-click the RM Project: RMM Requirements Remote Artifact Package and select Login to Server b. All three Remote Artifact Packages should now be loaded: 5-2 Copyright IBM Corp. 2018


3 Task 2: Start the Rhapsody REST Server In this task, you will launch the Rhapsody REST Server. The simplest way to do this is to start the IBM Rational Rhapsody Report Generation Wizard which also launches the server in preparation to generate a report. You will cancel the report generation wizard once the REST server has started. In the next task, you will design a simple template from scratch 1. Start the REST Server: a. From the menu, select Tools Publish Generate Report b. Note that this first launches the Rhapsody REST server: c. Then the Report Generator Wizard is launched: Copyright IBM Corp
4 Rhapsody Model Manager Tech Jam d. Click Cancel to close the RRDG report generator wizard 5-4 Copyright IBM Corp. 2018


5 Task 3: Create a New Document Template for Rhapsody In this task, you will start RPE Document Studio, create a new blank template and add Rhapsody as a data source. 1. Start RPE Document Studio: a. Launch Rational Publishing Engine Document Studio from the Windows start menu: 2. Create a New Template: a. Click the New Document Template link on the Welcome page: Copyright IBM Corp


6 Rhapsody Model Manager Tech Jam TIP: Alternatively, from the menu, select File New Document Template. If you use this option then you will be presented with a dialog where you can fill in a Name and Description. Just click Finish (this is metadata that may be filled in later). b. Click OK: 3. Close Guide Views: a. Click the X in the Guide View tab to close it b. Click the X in the New Document Template header to close it: 5-6 Copyright IBM Corp. 2018

7 c. In the blue Add data source to template popup, click Done: TIP: These are useful guides for new users but since this Lab will guide you these windows are simply taking up space. 4. Add Rhapsody as a Data Source: a. From the menu, select Data Add Data Source b. Click Next: c. In the Predefined field, select Rhapsody: Copyright IBM Corp


8 Rhapsody Model Manager Tech Jam d. Click Next e. Click Finish Task 4: Create a Use Case Report In this task, you will create a simple report that outputs the names of all the Use Cases in the model. You will then configure the document specification so that RPE can connect to and report on the currently loaded model. 1. Create a Container to Iterate Over All Use Cases: a. Right-click inside the empty template and select Insert Container: TIP: You may also use the tool palette but note that by default any tool selected stays selected until you click the Select tool. This behavior may be switched off in the preferences b. In the Data Source View, expand the tree to Projects Project Predefined Queries AllUseCases: 5-8 Copyright IBM Corp. 2018
 node from the Data Source View onto")

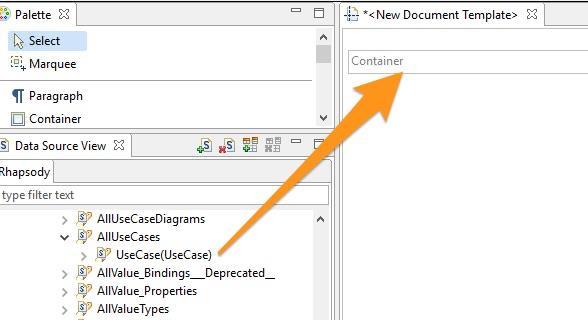
9 c. Expand the AllUseCases node and drag the UseCase(UseCase) node from the Data Source View onto the Container: d. Note that the Container now has the context $1 Projects/Project/PredefinedQueries/AllUseCases/UseCase: 2. Add the Use Case Name: a. Right-click the container and select Insert Paragraph: Copyright IBM Corp


10 Rhapsody Model Manager Tech Jam b. Right-click the new paragraph container and select Insert Text: c. Double-click the new Text container d. In the Set Content for Current Element window, select the Data Expression tab: e. Expand the Attributes section f. Expand $1 Projects/Project/PredefinedQueries/AllUseCases/UseCase g. Select the name attribute: 5-10 Copyright IBM Corp. 2018

11 h. Click OK: 3. Apply a Style: a. Right-click the Paragraph and select Style Heading Styles 1: Copyright IBM Corp

: c. Return to RPE Document Studio 5.")

12 Rhapsody Model Manager Tech Jam 4. Record the Rhapsody REST server URI: a. In the windows taskbar, switch to the Rhapsody REST server console b. Highlight the server URI and right-click to copy it (alternatively simply make a note of it): c. Return to RPE Document Studio 5. Start the Report Configuration and Generation Wizard: a. On the toolbar, click the Generate Document button: b. Click Yes to save the template: 5-12 Copyright IBM Corp. 2018

.")
13 c. Choose a location and a filename for the template (in this sample you can name it Use Case Report) and click Save d. The configuration wizard then starts: e. Click Next f. In the Enter a URL or filepath to the data source field, paste (or type in) the Rhapsody REST server address: g. Click Next h. Note that five output documents will be generated (in parallel). For each output a save location and a style sheet may optionally be selected: Copyright IBM Corp


14 Rhapsody Model Manager Tech Jam i. Click Next j. Note the Finish options: k. Click Finish l. The document is now generated in five output formats and a results window appears: 5-14 Copyright IBM Corp. 2018

15 m. Click the result with the.pdf extension to open the generated PDF document: n. Close Acrobat Reader o. Click Close to close the results generation window: Copyright IBM Corp

 b.")
16 Rhapsody Model Manager Tech Jam Task 5: Report on Linked Requirements In this task, you will complete this simple template adding a container that will report on the Remote Requirements linked to the Use Cases. 1. Add a Container to Iterate Over Dependencies: a. Right-click inside the $1 Container after the Paragraph and select Insert Container: TIP: This should insert a container inside the $1 container after the paragraph: 2. Iterate over Dependencies: a. In the Data Source View panel, scroll down and expand the Dependencies node (make sure you are looking at the child nodes of UseCase(UseCase) b. Drag the Dependency(Dependency) node onto the new container: 5-16 Copyright IBM Corp. 2018
 node - then scroll down and expand the DependsOn node:")
17 c. In the Select Context window, click OK: 3. Cast Dependent Element to Requirement: a. In the Data Source View, expand the Dependency(Dependency) node - then scroll down and expand the DependsOn node: Copyright IBM Corp
 node")

18 Rhapsody Model Manager Tech Jam b. Right-click the ModelElement(ModelElement) node and select Cast to Type: c. In the Select Type window, select Requirement and click OK: 5-18 Copyright IBM Corp. 2018


19 d. In the Data Source View panel, expand the ModelElement(ModelElement) node and note that Requirement appears as a node under ModelElement: 4. Add a Container to report on Requirements: a. In the Template, right-click the $2 Container and select Insert Container: b. Drag the Requirement node from the Data Source View to the new Container and click OK in the Select Context window: Copyright IBM Corp
 twice more you should now have three text elements inside the Paragraph: 5. Report the Requirement ID: a. Double-click the first Text container b.")
20 Rhapsody Model Manager Tech Jam c. Right-click the $3 Container and select Insert Paragraph d. Right-click the new Paragraph and select Insert Text e. Repeat step (d) twice more you should now have three text elements inside the Paragraph: 5. Report the Requirement ID: a. Double-click the first Text container b. In the Set Content for Current Element window, select the Data Expression tab c. Expand the Attributes section d. Note that you may select attributes from any of the three contexts in the template: e. Expand the $3 context and select requirementuserid: 5-20 Copyright IBM Corp. 2018

: c. Click OK 7. Generate the Report: a.")
21 f. Click OK 6. Report the Requirement Specification: a. Double-click the third Text container and repeat the above steps this time selecting the specification attribute b. Double click the second Text container and in the Simple Value tab, type : (that is a space, followed by a colon, followed by another space this is to separate the ID and the Specification in the report): c. Click OK 7. Generate the Report: a. On the toolbar, click the Generate Document button: b. Click Yes to save the template: Copyright IBM Corp


22 Rhapsody Model Manager Tech Jam c. The configuration wizard then starts d. Click Finish e. The document is now generated in all four output formats and a results window appears: f. Click the result with the.pdf extension to open the generated PDF document note the linked requirements in the report: g. Close Adobe Acrobat Reader h. Close the Results window 5-22 Copyright IBM Corp. 2018

23 Task 6: Report on Linked Work Items In this task you will extend your template to report on linked work items. 1. Add an Elaborates container: a. Right-click inside the $1 UseCase container after all of the existing child containers and select Insert Container: b. Right-click the outer $1 UseCase container and select Search Go to Schema: TIP: This is a quick and easy way to find a specific element in the Data Source View panel c. In the Data Source View panel, scroll down and locate the Elaborations node (Make sure you are looking under the UseCase(UseCase) node: d. Expand the Elaborations node: e. Expand the Elaborates(Elaborates) node Copyright IBM Corp
24 Rhapsody Model Manager Tech Jam f. Scroll down and locate (and expand) the DependsOn node: g. Drag the ModelElement(ModelElement) node onto the new container and click OK h. Right-click the $4 container and select Insert Paragraph i. Right-click the new Paragraph container and select Insert Text j. Double-click the new Text container k. Select the Data Expression tab l. Expand the Attributes section: 5-24 Copyright IBM Corp. 2018


25 m. Expand the $4 section n. Select the name attribute: o. Click OK 2. Publish the document: a. In the toolbar, click the twisty in the document generation button and select Generate Document: Copyright IBM Corp


26 Rhapsody Model Manager Tech Jam TIP: This bypasses the document generation wizard since you have already configured the document generation it is no longer needed b. Click Yes to save the template c. Click the generated PDF to view it: d. Close Adobe Acrobat Reader e. Close the results window Task 7: Report on Linked Test Cases In this task you will extend your template further this time reporting on linked test cases. You will also see how to include a hyperlink in the generated document that allows navigation to the linked remote artefact. 1. Add a Validated By container: 5-26 Copyright IBM Corp. 2018
27 a. Right-click inside the $1 container again after all of the existing child containers and select Insert Container: b. Right-click the outer $1 UseCase container and select Search Locate in Schema: c. In the Data Source View panel, scroll down and locate the Validated_By node (Make sure you are looking under the UseCase(UseCase) node: d. Expand the Validated_By Validated_By(Validated_By) node e. Scroll down and locate (and expand) the DependsOn node: Copyright IBM Corp
28 Rhapsody Model Manager Tech Jam f. Drag the ModelElement(ModelElement) node onto the new container and click OK 2. Add a hyperlink: a. Right-click the $5 container and select Insert Hyperlink b. Double-click the new Hyperlink container c. Select the Data Expression tab d. Expand the Attributes section e. Expand the $5 section f. Select the remoteuri attribute and click OK: TIP: This defines the target of the hyperlink you will now configure how the hyperlink will be displayed in the document g. At the bottom of the screen, in the Properties section, click the Specific tab: 5-28 Copyright IBM Corp. 2018


29 h. In the Display field, click the browse button ( ) i. Select the Data Expression tab j. Expand the Attributes section k. Expand the $5 section l. Select the name attribute and click OK 3. Publish the document: a. In the toolbar, click the twisty in the document generation button and select Generate Document: Copyright IBM Corp


30 Rhapsody Model Manager Tech Jam b. Click Yes to save the template c. Click the generated PDF to view it d. Note the included Test Case: e. Click the Test Case link in the document to open it in Rational Quality Manager Task 8: Report on RMM In this task you create a new template that reports directly on the RMM server. In this case you will report on the model in RMM, along with its linked artifacts. Note that you could also report in the other direction for example a DNG Requirements module report that includes linked model data refer to the full RPE training class for details. 1. Create a New Template: a. Close Adobe Acrobat Reader b. Switch back to RPE Document Studio 5-30 Copyright IBM Corp. 2018

 b. Click the Sample Models project to open it c.")
31 c. Close the results window d. Select the menu entry File New Document Template e. Click Finish: 2. Obtain the URL of an RMM project: a. Open a web browser and navigate into Architecture Management (or use the browser shortcut) b. Click the Sample Models project to open it c. Select Designs Explorer: Copyright IBM Corp


32 Rhapsody Model Manager Tech Jam d. Expand the Sample Models Default Component: e. Click the SysMLHandset model: f. In the breadcrumb, click the link button at the end: g. Clear the Add configuration context to link checkbox: 5-32 Copyright IBM Corp. 2018


33 h. Copy the remaining text you will need it in a moment in RPE Document Studio i. Click close 3. Add an RMM Data source: a. Switch back to RPE Document Studio b. From the menu, select Data Add Data Source: c. Click Next: d. In the Type field, select REST: Copyright IBM Corp


34 Rhapsody Model Manager Tech Jam e. In the Schema field, paste in the URL you copied from RMM f. Add the text?metatdata=schema to the end of that URL: g. In the Name field, type RMM h. In the User field, type dan i. In the Password field, type dan j. In the Extra Headers field, select Link: < rel="profile" 5-34 Copyright IBM Corp. 2018


35 k. Click Next l. Click Finish m. Note the new Data Source in the Data Source View: 4. Report on Project a. Right-click inside the empty template and select Insert Container Copyright IBM Corp

36 Rhapsody Model Manager Tech Jam b. Drag the ArchitectureElement(ArchitectureElement) node onto the new container: c. Right-click the $1 container and select Insert Paragraph d. Right-click the new Paragraph container and select Insert Text e. Double-click the new Text container f. Select the Data Expression tab g. Expand the Attributes section h. Expand the $1 section i. Select the name attribute j. Click OK k. Right-click the Paragraph container and select Style Title: 5. Save the Template: a. From the menu, select File Save b. In the File name field, type RMM Report c. Click Save 6. Configure the Data Source: a. In the top, right-hand corner of the application, click the Open Perspective button: 5-36 Copyright IBM Corp. 2018


37 b. Select RPE Launcher: c. Click OK d. In the Document Specification panel (the top, right-hand panel), right-click the Data Source RMM REST and select OSLC Resource Selection: e. In the Root service field, type: Copyright IBM Corp


38 Rhapsody Model Manager Tech Jam f. Click Next g. In the User field, type dan h. In the Password field, type dan i. Click OK j. In the Service provider field, select Sample Models k. Clear the Use external browser checkbox: l. Click Next m. Click Yes: 5-38 Copyright IBM Corp. 2018

39 7. If necessary click Login (and login as dan) a. Click Sample Models Default Component b. Click SysML Handset and click OK TIP: You may need to scroll to see the OK button see below c. Click Finish 8. Add credentials: Copyright IBM Corp

40 Rhapsody Model Manager Tech Jam a. In the Document Specification panel, select the Data Source: RMM REST: b. In the Properties panel underneath it, type dan into both the User Name and Password fields: 9. Generate a Report: a. Click the twisty in the Generate Document button in the toolbar and select Generate Document 5-40 Copyright IBM Corp. 2018

41 b. Open the generated PDF and note that the project name is reported: c. Close Adobe Acrobat Reader d. Close the results window 10. Report on nested elements: a. In the top, right-hand corner of the application, click the RPE Studio button to return to editing the template b. Right-click inside the $1 container after the existing child containers, and select Insert Container: c. In the Data Source View panel, expand the Aggregates node: Copyright IBM Corp


42 Rhapsody Model Manager Tech Jam d. Drag the Aggregates ArchitectureElement(ArchitectureElement) onto the new container and click OK e. Right-click the $2 container and select Insert Paragraph f. Right-click the new Paragraph container and select Insert Text g. Double-click the new Text container h. Select the Data Expression tab i. Expand the Attributes section j. Expand the $2 section k. Select the name attribute l. Click OK 11. Recurse through the tree: a. Select the $2 container: b. In the Properties panel at the bottom, select the Data tab: 5-42 Copyright IBM Corp. 2018


43 c. In the Recursive Level field, type 1 d. In the Recursive Segments field, type Generate a Report: a. Click the twisty in the Generate Document button in the toolbar and select Generate Document b. Click Yes to save the template c. Open the generated PDF and note the document contains a lot more elements: Copyright IBM Corp

44 Rhapsody Model Manager Tech Jam 13. Filter on Packages or Use Cases: a. Close Adobe Acrobat Reader b. Close the results window c. Select the $2 container d. In the properties window at the bottom, select the Data tab e. Click the Browse button next to the Filter field: f. Select the Scripted Filter tab: 5-44 Copyright IBM Corp. 2018


45 g. In the Left operand field, select the type attribute under $2: h. In the Right operand field, type Package and then click Add Copyright IBM Corp


46 Rhapsody Model Manager Tech Jam i. Click Or j. In the Right operand field, type UseCase and then click Add 5-46 Copyright IBM Corp. 2018

 d.")
47 k. Click OK 14. Format headings: a. Select the Paragraph inside $2 b. In the Properties panel at the bottom, select the General tab c. In the Style name field, click the Browse button ( ) d. Select the Script Expression tab: Copyright IBM Corp
 and hit enter to add a carriage return: TIP: If you copy")


48 Rhapsody Model Manager Tech Jam e. In the Script Expression field, type if (type == Package ) and hit enter to add a carriage return: TIP: If you copy and paste this from word you will find that the quotes do not come across correctly and you will get an error when you try to close the editor window if this occurs then manually replace the pasted quotes with typed ones. f. Expand the Variables section g. Drag the _element_level variable into the new line: TIP: RPE will automatically select and element you have dragged into a script expression. If you manually typed an element then you have to select it in the tree you will do that now for the type attribute 5-48 Copyright IBM Corp. 2018

49 h. Expand the Attributes section i. Expand the $2 section j. Select the type attribute: k. Click OK 15. Generate a Report: a. Click the twisty in the Generate Document button in the toolbar and select Generate Document b. Click Yes to save the template c. Open the generated PDF: Copyright IBM Corp

50 Rhapsody Model Manager Tech Jam 16. Report on Linked Artifacts: a. Close Adobe Acrobat Reader b. Close the results window c. Right-click inside the $2 container after any existing child containers and select Insert Container: d. In the Data Source View panel, expand the Aggregated ArchitectureElement(ArchitectureElement) node then expand the Links node TIP: Make sure it is the Links node under the Aggregated Architecture element you are expanding not the Links node at the root 5-50 Copyright IBM Corp. 2018


51 e. Drag the Link(Link) node onto the new container and click OK f. Right-click the $3 container and select Insert Paragraph g. Right-click the new Paragraph and select Insert Text h. Double-click the new Text container i. Select the Data Expression tab j. Expand the Attributes section k. Expand the $3 section l. Select the targeturi and click OK: Copyright IBM Corp


52 Rhapsody Model Manager Tech Jam 17. Generate a Report: a. Click the twisty in the Generate Document button in the toolbar and select Generate Document b. Click Yes to save the template c. Open the generated PDF and note the linked resource URIs: 18. Close Rational Publishing Engine: a. Close Rational Publishing Engine 5-52 Copyright IBM Corp. 2018


53 b. Click No in these dialogs: c. Close the Rhapsody REST Web Server console window TIP: This is as far as we will go with this reporting lab for more information on how to follow the link uris and extract relevant data from the linked elements refer to the full RPE training class. A sample template is also included with this lab: Copyright IBM Corp
Lab 5: Reporting with RPE
 Lab 5: Reporting with RPE Objectives After completing this lab, you will be able to: Report on Rhapsody Models and Linked Requirements using Rational Publishing Engine Scenario In this Lab, you will first
Lab 3: Linking to OSLC Artifacts
 Objectives After completing this lab, you will be able to: Load Remote Collections of OSLC Requirements Add Traceability from Model Elements to Remote Artifacts (Requirements, Test Cases, Work Items) Overview
Lab 1: Creating an RMM Project
 Lab 1: Creating an RMM Project Objectives After completing this lab, you will be able to: Create a Rhapsody Model Manager project on the Jazz Team Server Scenario In this Lab, you will create a new Rhapsody
Lab 9: Global Configurations
 Lab 9: Global Configurations Objectives After completing this lab, you will be able to: Connect to an AM Stream that is under Global Configuration Management (the UK variant) Create a new US variant based
Lab 1: Adding a Rhapsody Model to RMM
 Lab 1: Adding a Rhapsody Model to RMM Objectives After completing this lab, you will be able to: Create an RTC repository workspace and local sandbox Add a Rhapsody model to RMM Link a work item to a change
Lab 2: Adding a Rhapsody Model to RMM
 Lab 2: Adding a Rhapsody Model to RMM Objectives After completing this lab, you will be able to: Create an RTC repository workspace and local sandbox Add a Rhapsody model to RMM Link a work item to a change
Lab 3: Editing a Rhapsody Model in RMM
 Lab 3: Editing a Rhapsody Model in RMM Objectives After completing this lab, you will be able to: Create an RTC repository workspace and local sandbox Load a Rhapsody model from RMM into your local sandbox
Lab 8: Streams & Components
 Lab 8: Streams & Components Objectives After completing this lab, you will be able to: Create a new stream Create components in the stream Restrict Access to those components to specific teams, individuals
RPE Labsful Reporting using IBM Collaborative Lifecycle Management v6
 Getting the most out of Reporting on Collaborative Lifecycle Management Data with JRS and RPE RPE Labsful Reporting using IBM Collaborative Lifecycle Management v6 February 2016 edition NOTICES This information
Make Your Documents Accessible Worksheet (Microsoft Word 2010)
") Make Your Documents Accessible Worksheet (Microsoft Word 2010) This exercise is intended for staff attending the Make your documents accessible course, although other staff will also find this resource
Make Your Documents Accessible Worksheet (Microsoft Word 2010) This exercise is intended for staff attending the Make your documents accessible course, although other staff will also find this resource
Ektron Advanced. Learning Objectives. Getting Started
 Ektron Advanced 1 Learning Objectives This workshop introduces you beyond the basics of Ektron, the USF web content management system that is being used to modify department web pages. This workshop focuses
Introduction to Cognos
 Introduction to Cognos User Handbook 7800 E Orchard Road, Suite 280 Greenwood Village, CO 80111 Table of Contents... 3 Logging In To the Portal... 3 Understanding IBM Cognos Connection... 4 The IBM Cognos
Lab 7: Baselines and History
 Lab 7: Baselines and History Objectives After completing this lab, you will be able to: Compare a historical version of a Rhapsody unit to the current one. Create a baseline in a component Scenario A baseline
Tivoli Common Reporting V Cognos report in a Tivoli Integrated Portal dashboard
 Tivoli Common Reporting V2.1.1 Cognos report in a Tivoli Integrated Portal dashboard Preethi C Mohan IBM India Ltd. India Software Labs, Bangalore +91 80 40255077 preethi.mohan@in.ibm.com Copyright IBM
Acrobat X Professional
 Acrobat X Professional Toolbar Well Page Navigations/Page Indicator Buttons for paging through document Scroll Bar/box page indicator appears when using the scroll button to navigate. When you release
IBM Rational Rhapsody Gateway Add On. Tagger Manual
 Tagger Manual Rhapsody IBM Rational Rhapsody Gateway Add On Tagger Manual License Agreement No part of this publication may be reproduced, transmitted, stored in a retrieval system, nor translated into
Forms/Distribution Acrobat X Professional. Using the Forms Wizard
 Forms/Distribution Acrobat X Professional Acrobat is becoming a standard tool for people and businesses to use in order to replicate forms and have them available electronically. If a form is converted
Horizon Launcher Configuration Guide
 Horizon Launcher Configuration Guide Windows NT and Windows 2000 are registered trademarks of Microsoft Corporation. All other product or company names are trademarks or registered trademarks of their
Introduction to IBM Rational HATS For IBM System z (3270)
") Introduction to IBM Rational HATS For IBM System z (3270) Introduction to IBM Rational HATS 1 Lab instructions This lab teaches you how to use IBM Rational HATS to create a Web application capable of transforming
Introduction to IBM Rational HATS For IBM System z (3270) Introduction to IBM Rational HATS 1 Lab instructions This lab teaches you how to use IBM Rational HATS to create a Web application capable of transforming
Module 3: Working with C/C++
 Module 3: Working with C/C++ Objective Learn basic Eclipse concepts: Perspectives, Views, Learn how to use Eclipse to manage a remote project Learn how to use Eclipse to develop C programs Learn how to
Dreamweaver CS6. Table of Contents. Setting up a site in Dreamweaver! 2. Templates! 3. Using a Template! 3. Save the template! 4. Views!
 Dreamweaver CS6 Table of Contents Setting up a site in Dreamweaver! 2 Templates! 3 Using a Template! 3 Save the template! 4 Views! 5 Properties! 5 Editable Regions! 6 Creating an Editable Region! 6 Modifying
Basic Moodle skills for Teachers
 Basic Moodle skills for Teachers Moodle v2.6 Contents Logging in... 2 Getting started... 2 Lynda.com training... 3 Turning editing on... 3 Editing your section headers... 3 Enabling Completion Tracking
Acrobat 6.0 Standard - Basic Tasks
 Converting Office Documents to PDF 1. Create and edit document in Office application (Word, Excel, PowerPoint) 2. Click the Convert to PDF button on the Acrobat toolbar If the buttons are not visible,
ATS Questionnaire Management Interface (QMI) School Administrator Manual
 School Administrator Manual") 2014 ATS Questionnaire Management Interface (QMI) School Administrator Manual 1 Table of Contents QMI: BATCH PAGE...3 LOGGING IN TO THE QUESTIONNAIRE MANAGEMENT INTERFACE...4 SEARCHING FOR EXISTING BATCHES...5
2014 ATS Questionnaire Management Interface (QMI) School Administrator Manual 1 Table of Contents QMI: BATCH PAGE...3 LOGGING IN TO THE QUESTIONNAIRE MANAGEMENT INTERFACE...4 SEARCHING FOR EXISTING BATCHES...5
Center for Faculty Development and Support Making Documents Accessible
 Center for Faculty Development and Support Making Documents Accessible in Word 2007 Tutorial CONTENTS Create a New Document and Set Up a Document Map... 3 Apply Styles... 4 Modify Styles... 5 Use Table
Using Dropbox with Node-RED
 Overview Often when using Platform services, you need to work with files for example reading in a dialog xml file for Watson Dialog or feeding training images to Watson Visual Recognition. While you can
FrontPage 2000 Tutorial -- Advanced
 FrontPage 2000 Tutorial -- Advanced Shared Borders Shared Borders are parts of the web page that share content with the other pages in the web. They are located at the top, bottom, left side, or right
Working with PDF s. To open a recent file on the Start screen, double click on the file name.
 Working with PDF s Acrobat DC Start Screen (Home Tab) When Acrobat opens, the Acrobat Start screen (Home Tab) populates displaying a list of recently opened files. The search feature on the top of the
UTAS CMS. Easy Edit Suite Workshop V3 UNIVERSITY OF TASMANIA. Web Services Service Delivery & Support
 Web Services Service Delivery & Support UNIVERSITY OF TASMANIA UTAS CMS Easy Edit Suite Workshop V3 Web Service, Service Delivery & Support UWCMS Easy Edit Suite Workshop: v3 Contents What is Easy Edit
Introduction to IBM Rational HATS For IBM System i (5250)
") Introduction to IBM Rational HATS For IBM System i (5250) Introduction to IBM Rational HATS 1 Lab instructions This lab teaches you how to use IBM Rational HATS to create a Web application capable of transforming
Introduction to IBM Rational HATS For IBM System i (5250) Introduction to IBM Rational HATS 1 Lab instructions This lab teaches you how to use IBM Rational HATS to create a Web application capable of transforming
Lava New Media s CMS. Documentation Page 1
 Lava New Media s CMS Documentation 5.12.2010 Page 1 Table of Contents Logging On to the Content Management System 3 Introduction to the CMS 3 What is the page tree? 4 Editing Web Pages 5 How to use the
BusinessObjects Frequently Asked Questions
 BusinessObjects Frequently Asked Questions Contents Is there a quick way of printing together several reports from the same document?... 2 Is there a way of controlling the text wrap of a cell?... 2 How
Dreamweaver MX The Basics
 Chapter 1 Dreamweaver MX 2004 - The Basics COPYRIGHTED MATERIAL Welcome to Dreamweaver MX 2004! Dreamweaver is a powerful Web page creation program created by Macromedia. It s included in the Macromedia
Navigate to Cognos Cognos Analytics supports all browsers with the exception of Microsoft Edge.
 IBM Cognos Analytics Create a List The following instructions cover how to create a list report in IBM Cognos Analytics. A list is a report type in Cognos that displays a series of data columns listing
PagePlus X7. Quick Start Guide. Simple steps for creating great-looking publications.
 PagePlus X7 Quick Start Guide Simple steps for creating great-looking publications. In this guide, we will refer to specific tools, toolbars, tabs, or menus. Use this visual reference to help locate them
Website Management with the CMS
 Website Management with the CMS In Class Step-by-Step Guidebook Updated 12/22/2010 Quick Reference Links CMS Login http://staging.montgomerycollege.edu/cmslogin.aspx Sample Department Site URLs (staging
IBM Notes Client V9.0.1 Reference Guide
 IBM Notes Client V9.0.1 Reference Guide Revised 05/20/2016 1 Accessing the IBM Notes Client IBM Notes Client V9.0.1 Reference Guide From your desktop, double-click the IBM Notes icon. Logging in to the
Imagine. Create. Discover. User Manual. TopLine Results Corporation
 Imagine. Create. Discover. User Manual TopLine Results Corporation 2008-2009 Created: Tuesday, March 17, 2009 Table of Contents 1 Welcome 1 Features 2 2 Installation 4 System Requirements 5 Obtaining Installation
Information Systems Center. FrontPage 2003 Reference Guide for COMM 321 & 421
 Information Systems Center FrontPage 2003 Reference Guide for COMM 321 & 421 September 2008 Table of Contents Portfolio Web Sites & Web Pages... 1 Open Your Portfolio Web Site in FrontPage for Editing...
GoLive will first ask you if your new site will be for one individual or a work group; select for a Single User, and click Next.
 Getting Started From the Start menu, located the Adobe folder which should contain the Adobe GoLive 6.0 folder. Inside this folder, click Adobe GoLive 6.0. GoLive will open to its initial project selection
CREATE AN EKTRON MICRO-SITE
 CREATE AN EKTRON MICRO-SITE A self-guided tutorial, Ektron 9.02 Elements of an Ektron micro-site Whether you are creating an online issue of a newsletter consisting of 5 pages, or a much larger campaign-based
NYU A&S AEM Implementation. Exercise Sheets
 NYU A&S AEM Implementation Exercise Sheets Table of Contents Table of Contents... 2 Exercise 1: Blank Page with Title... 1 A. Create page using template Blank Page with Title... 1 B. Author component Generic
COPYRIGHTED MATERIAL. Using Adobe Bridge. Lesson 1
 Lesson Using Adobe Bridge What you ll learn in this lesson: Navigating Adobe Bridge Using folders in Bridge Making a Favorite Creating metadata Using automated tools Adobe Bridge is the command center
BASIC USER TRAINING PROGRAM Module 4: Topology
 BASIC USER TRAINING PROGRAM Module 4: Topology Objective Students will learn to work in the Topology editor to create devices, specify links between devices, create and set properties. In addition, students
Managing Your Website with Convert Community. My MU Health and My MU Health Nursing
 Managing Your Website with Convert Community My MU Health and My MU Health Nursing Managing Your Website with Convert Community LOGGING IN... 4 LOG IN TO CONVERT COMMUNITY... 4 LOG OFF CORRECTLY... 4 GETTING
Tasktop Sync - Quick Start Guide. Tasktop Sync - Quick Start Guide
 Tasktop Sync - Quick Start Guide 1 Contents Tasktop Sync Server... 4 Minimum Requirements... 4 Sync installer and License... 5 Pre-Sync Installation Requirements... 5 Tasktop Sync Installation on Windows...
5. A small dialog window appears; enter a new password twice (this is different from Dori!) and hit Go.
 and hit Go.") Installing Wordpress from JMA Lab to JMA Server 1. Take note these instructions are streamlined for the JMA lab they can t be performed in this fashion from home! 2. Wordpress is a database driven web
Installing Wordpress from JMA Lab to JMA Server 1. Take note these instructions are streamlined for the JMA lab they can t be performed in this fashion from home! 2. Wordpress is a database driven web
Adobe Experience Manager (AEM) Author Training
 Author Training") Adobe Experience Manager (AEM) Author Training McGladrey.com 11/6/2014 Foster, Ken Table of Contents AEM Training Agenda... 3 Overview... 4 Author and Publish Instances for AEM... 4 QA and Production Websites...
Adobe Experience Manager (AEM) Author Training McGladrey.com 11/6/2014 Foster, Ken Table of Contents AEM Training Agenda... 3 Overview... 4 Author and Publish Instances for AEM... 4 QA and Production Websites...
Logging in to the management system.
 Welcome to your new site! The Wordpress publishing platform is a robust tool that helps you publish your content to the web without getting too involved with the code. This guide is designed to help you
INDEX. Drop-down List object, 60, 99, 211 dynamic forms, definition of, 4 dynamic XML forms (.pdf), 80, 89
, 80, 89") A absolute binding expressions, definition of, 185 absolute URL, 243 accessibility definition of, 47 guidelines for designing accessible forms, 47 Accessibility palette definition of, 16 specifying options
A absolute binding expressions, definition of, 185 absolute URL, 243 accessibility definition of, 47 guidelines for designing accessible forms, 47 Accessibility palette definition of, 16 specifying options
ekaizen Lessons Table of Contents 1. ebook Basics 1 2. Create a new ebook Make Changes to the ebook Populate the ebook 41
 Table of Contents 1. ebook Basics 1 2. Create a new ebook 20 3. Make Changes to the ebook 31 4. Populate the ebook 41 5. Share the ebook 63 ekaizen 1 2 1 1 3 4 2 2 5 The ebook is a tabbed electronic book
Instructor: Clara Knox. Reference:
 Instructor: Clara Knox Reference: http://www.smith.edu/tara/cognos/documents/query_studio_users_guide.pdf Reporting tool for creating simple queries and reports in COGNOS 10.1, the web-base reporting solution.
Guide to the Trial Edition
 Enterprise Architect User Guide Series Guide to the Trial Edition The Trial Edition of Sparx Systems Enterprise Architect provides a free 30-day exploration of the features and facilities of the application,
Enterprise Architect. User Guide Series. Model Wizard
 Enterprise Architect User Guide Series Model Wizard How to create a model quickly? In Sparx Systems Enterprise Architect, the Model Wizard provides Patterns from a wide range of technologies, to help you
Adobe Acrobat 5.0. Overview. Internet & Technology Training Services Miami Dade County Public Schools
 Adobe Acrobat 5.0 Overview Internet & Technology Training Services Miami Dade County Public Schools Preparing Microsoft Office Documents in.pdf Format Converting Documents to.pdf Format Using the Tool
Inspiration Quick Start Tutorial
 Inspiration Quick Start Tutorial 1 Inspiration Quick Start Tutorial This tutorial is a great starting point for learning how to use Inspiration. Please plan on about 45 minutes from start to finish. If
BUILD YOUR OWN SAP FIORI APP IN THE CLOUD Exercise Week 5
 BUILD YOUR OWN SAP FIORI APP IN THE CLOUD Exercise Week 5 Create an App from a Smart Template and Annotation File 1 INTRODUCTION 1.1 Goal Smart Templates in the SAP Web IDE of the SAP HANA Cloud Platform
At the shell prompt, enter idlde
 IDL Workbench Quick Reference The IDL Workbench is IDL s graphical user interface and integrated development environment. The IDL Workbench is based on the Eclipse framework; if you are already familiar
Website Training Manual
 Website Training Manual Version 1.0 9/11/13 Section 1: Manage Users... 3 Adding Users... 3 Managing Users... 3 Section 2: Manage Content... 4 Section 3: Create Content... 5 Featured Slider... 5 Governance...
BEAWebLogic. Portal. Tutorials Getting Started with WebLogic Portal
 BEAWebLogic Portal Tutorials Getting Started with WebLogic Portal Version 10.2 February 2008 Contents 1. Introduction Introduction............................................................ 1-1 2. Setting
User Guide. Web Intelligence Rich Client. Business Objects 4.1
 User Guide Web Intelligence Rich Client Business Objects 4.1 2 P a g e Web Intelligence 4.1 User Guide Web Intelligence 4.1 User Guide Contents Getting Started in Web Intelligence 4.1... 5 Log into EDDIE...
PST for Outlook Admin Guide
 PST for Outlook 2013 Admin Guide Document Revision Date: Sept. 25, 2015 PST Admin for Outlook 2013 1 Populating Your Exchange Mailbox/Importing and Exporting.PST Files Use this guide to import data (Emails,
Microsoft Office 2010 Tutorial
 Microsoft Office 2010 Tutorial Contents Microsoft Office 2010 Tutorial... 1 Find your way through long documents with the new Document Navigation pane and Search... 4 Adjust the spaces between lines or
The following instructions cover how to edit an existing report in IBM Cognos Analytics.
 IBM Cognos Analytics Edit a Report The following instructions cover how to edit an existing report in IBM Cognos Analytics. Navigate to Cognos Cognos Analytics supports all browsers with the exception
18.1 user guide No Magic, Inc. 2015
 18.1 user guide No Magic, Inc. 2015 All material contained herein is considered proprietary information owned by No Magic, Inc. and is not to be shared, copied, or reproduced by any means. All information
Specification Manager
 Enterprise Architect User Guide Series Specification Manager Author: Sparx Systems Date: 30/06/2017 Version: 1.0 CREATED WITH Table of Contents The Specification Manager 3 Specification Manager - Overview
P3e REPORT WRITER CREATING A BLANK REPORT
 P3e REPORT WRITER CREATING A BLANK REPORT 1. On the Reports window, select a report, then click Copy. 2. Click Paste. 3. Click Modify. 4. Click the New Report icon. The report will look like the following
Introducing Rational ClearQuest
 Introducing Rational ClearQuest support@rational.com http://www.rational.com IMPORTANT NOTICE COPYRIGHT NOTICE ClearQuest, copyright 1997-1999 Rational Software Corporation. All rights reserved. THIS DOCUMENT
build a digital portfolio in WebPlus X4
 How to build a digital portfolio in WebPlus X4 Get started Open Serif WebPlus and select Start New Site from the Startup Wizard. WebPlus will open a blank website for you. Take a few moments to familiarise
Adobe Reader (AR) and Internet Explorer (IE) Browser Settings. Adobe Reader and Internet Explorer Browser settings
 and Internet Explorer (IE) Browser Settings. Adobe Reader and Internet Explorer Browser settings") Adobe Reader and Internet Explorer Browser settings Table of Contents 1. INTERNET EXPLORER (IE) BROWSER SETTINGS... 2 1.1 Locating the menu bar... 2 1.2 Clearing cache... 2 1.3 Allow pop-ups from *.cap.org...
Adobe Reader and Internet Explorer Browser settings Table of Contents 1. INTERNET EXPLORER (IE) BROWSER SETTINGS... 2 1.1 Locating the menu bar... 2 1.2 Clearing cache... 2 1.3 Allow pop-ups from *.cap.org...
Lab 4: Pass the Data Streams to a Match Processor and Define a Match Rule
 Lab 4: Pass the Data Streams to a Match Processor and Define a Match Rule In this lab you will feed both the data records and the error records to a match processor and define a match rule. At the end
[ Getting Started with Analyzer, Interactive Reports, and Dashboards ] ]
![[ Getting Started with Analyzer, Interactive Reports, and Dashboards ] ]](/thumbs/88/117545107.jpg "[ Getting Started with Analyzer, Interactive Reports, and Dashboards ] ]") Version 5.3 [ Getting Started with Analyzer, Interactive Reports, and Dashboards ] ] https://help.pentaho.com/draft_content/version_5.3 1/30 Copyright Page This document supports Pentaho Business Analytics
Version 5.3 [ Getting Started with Analyzer, Interactive Reports, and Dashboards ] ] https://help.pentaho.com/draft_content/version_5.3 1/30 Copyright Page This document supports Pentaho Business Analytics
Tivoli Common Reporting V2.x. Reporting with Tivoli Data Warehouse
 Tivoli Common Reporting V2.x Reporting with Tivoli Data Warehouse Preethi C Mohan IBM India Ltd. India Software Labs, Bangalore +91 80 40255077 preethi.mohan@in.ibm.com Copyright IBM Corporation 2012 This
Managing your content with the Adobe Experience Manager Template Editor. Gabriel Walt Product Manager twitter.com/gabrielwalt
 Managing your content with the Adobe Experience Manager Template Editor Gabriel Walt Product Manager twitter.com/gabrielwalt Table of Contents 1. Introduction 3 1.1 Overview 3 1.2 Prerequisites 3 2. Getting
FileNET Guide for AHC PageMasters
 PageMasters have the permissions necessary to perform the following tasks with Site Tools: ACADEMIC HEALTH CENTER 2 Application Requirements...3 Access FileNET...3 Log in to FileNET...3 Navigate the Site...3
InDesign CS Basics. To learn the tools and features of InDesign CS to create publications efficiently and effectively.
 InDesign CS Basics InDesign Basics Training Objective To learn the tools and features of InDesign CS to create publications efficiently and effectively. What you can expect to learn from this class: How
General Training Curriculum
 General Training Curriculum Table of Contents 1.0 Getting Started 1.1 What is MODX? 1.2 Browser Support 1.3 How Do I Log In? 2.0 MODX Dashboard 2.1 What is a Dashboard? 2.2 Global Top Menu Bar 2.2.0 MODX
Introduction to Personal Computers Using Windows 10 and Microsoft Office 2016
 Watsonia Publishing 47 Greenaway Street Bulleen VIC 3105 Australia www.watsoniapublishing.com info@watsoniapublishing.com Introduction to Personal Computers Using Windows 10 and Microsoft Office 2016 Quick
Lab DSE Designing User Experience Concepts in Multi-Stream Configuration Management
 Lab DSE-5063 Designing User Experience Concepts in Multi-Stream Configuration Management February 2015 Please Note IBM s statements regarding its plans, directions, and intent are subject to change or
OBIEE. Oracle Business Intelligence Enterprise Edition. Rensselaer Business Intelligence Finance Author Training
 OBIEE Oracle Business Intelligence Enterprise Edition Rensselaer Business Intelligence Finance Author Training TABLE OF CONTENTS INTRODUCTION... 1 USER INTERFACE... 1 HOW TO LAUNCH OBIEE... 1 TERMINOLOGY...
In this lab, you will build and execute a simple message flow. A message flow is like a program but is developed using a visual paradigm.
 Lab 1 Getting Started 1.1 Building and Executing a Simple Message Flow In this lab, you will build and execute a simple message flow. A message flow is like a program but is developed using a visual paradigm.
Colligo Engage Outlook App 7.1. Connected Mode - User Guide
 7.1 Connected Mode - User Guide Contents Colligo Engage Outlook App 1 Benefits 1 Key Features 1 Platforms Supported 1 Installing and Activating Colligo Engage Outlook App 2 Checking for Updates 3 Updating
Drupal 7 guide CONTENTS. p. 2 Logging In
 Drupal 7 guide Drupal is a widely used, open-source, free platform that has an easy-to-use content management system for updating websites. This guide was created by the Health Communication Core (www.healthcommcore.org)
Specification Manager
 Enterprise Architect User Guide Series Specification Manager How to define model elements simply? In Sparx Systems Enterprise Architect, use the document-based Specification Manager to create elements
Creating a HATS v7.1 Portlet Using Web Express Logon (WEL) and Portal Credential Vault
 and Portal Credential Vault") Creating a HATS v7.1 Portlet Using Web Express Logon (WEL) and Portal Credential Vault Lab instructions The objective of this exercise is to illustrate how to create a HATS portlet that uses Web Express
Creating a HATS v7.1 Portlet Using Web Express Logon (WEL) and Portal Credential Vault Lab instructions The objective of this exercise is to illustrate how to create a HATS portlet that uses Web Express
You can make certain sections of the text clickable by creating hyperlinks. Once clicked, these links navigate users to different
 You can make certain sections of the text clickable by creating hyperlinks. Once clicked, these links navigate users to different pages or, as described in working with anchors, to different sections of
The Dreamweaver Interface
 The Dreamweaver Interface Let s take a moment to discuss the different areas of the Dreamweaver screen. The Document Window The Document Window shows you the current document. This is where you are going
Workbench User's Guide
 IBM Initiate Workbench User's Guide Version9Release7 SC19-3167-06 IBM Initiate Workbench User's Guide Version9Release7 SC19-3167-06 Note Before using this information and the product that it supports,
Dive Into Visual C# 2008 Express
 1 2 2 Dive Into Visual C# 2008 Express OBJECTIVES In this chapter you will learn: The basics of the Visual Studio Integrated Development Environment (IDE) that assists you in writing, running and debugging
ECE QNX Real-time Lab
 Department of Electrical & Computer Engineering Concordia University ECE QNX Real-time Lab User Guide Dan Li 9/12/2011 User Guide of ECE Real-time QNX Lab Contents 1. About Real-time QNX Lab... 2 Contacts...
Cascade User Guide. Introduction. Key System Features. User Interface
 Cascade User Guide Introduction Key System Features User Interface Menus and Moving Through the System Files and Pages Working with Existing Pages File Action Menu Version Control Deleting files Restoring
Result Point v3 User Manual, Revision Accelerated Technology Laboratories, Inc. All rights reserved.
 User Manual Result Point v3 User Manual, Revision 2 Result Point User Manual Table of Contents WELCOME...1 LOGGING IN...1 RETRIEVING YOUR PASSWORD... 1 CHANGING YOUR PASSWORD... 1 CLIENT INTERFACE...2
Using Adobe Contribute 4 A guide for new website authors
 Using Adobe Contribute 4 A guide for new website authors Adobe Contribute allows you to easily update websites without any knowledge of HTML. This handout will provide an introduction to Adobe Contribute
FileNET Guide for AHC PageMasters
 ACADEMIC HEALTH CENTER 2 PageMasters have the permissions necessary to perform the following tasks with Site Tools: Application Requirements...3 Access FileNET...3 Login to FileNET...3 Navigate the Site...3
How to Use Google. Sign in to your Chromebook. Let s get started: The sign-in screen. https://www.youtube.com/watch?v=ncnswv70qgg
 How to Use Google Sign in to your Chromebook https://www.youtube.com/watch?v=ncnswv70qgg Use a Google Account to sign in to your Chromebook. A Google Account lets you access all of Google s web services
Getting Started with IBM Cognos 10 Reports
 UNIVERSITY OF SUSSEX Getting Started with IBM Cognos 10 Reports ITS CIS 9/2/2015 Introduction to some of the features in the Cognos Connection reporting portal. Guides users through initial configuration
Build the application using Rational Build Forge
 Build the application using Rational Build Forge In this lab, as the Build Engineer, you will run a formal build of Release 2.0 of the RatlBankWeb application. After the build completes, you will be able
pi4soa 2.0 Getting Started Guide
 pi4soa 2.0 Getting Started Guide by Gary Brown 1. Overview... 1 2. Installation... 3 2.1. Downloading a pre-configured Eclipse... 3 2.2. Installing pi4soa into an existing Eclipse environment... 3 3.
Web design and content management from Microsoft FrontPage allows you to create, design, modify, and update your own website without learning any
 Web design and content management from Microsoft FrontPage allows you to create, design, modify, and update your own website without learning any complex languages or codes. www.microsoft.com/frontpage
Easy Edit Editing the Public Website
 Easy Edit Editing the Public Website Recommended browser for using the easy edit suite: Firefox Editing a Live Page 2. Click on the edit button 3. Place the page in to safe edit mode Either by clicking