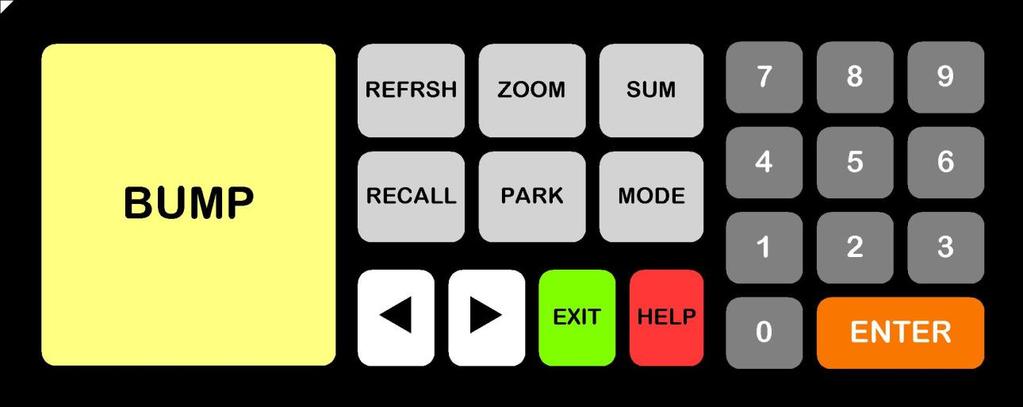
KB9000 Programmable Touch Bumpbar PROGRAMMING MANUAL
|
|
|
- Cleopatra Flynn
- 5 years ago
- Views:
Transcription


1 KB9000 Programmable Touch Bumpbar PROGRAMMING MANUAL
2 Table of Contents 1 Introduction Software Installation Programming the KB Connecting the keyboard Starting the utility Preparing the template Writing into the keyboard Printing legend sheet Programming Features Utility Operations Getting started Key layout Key group selection Editing key properties and key appearances Editing keyboard and legend sheet properties Editing key contents Saving template Testing template Preparing legend sheet Key Codes Key Programming Examples Legend Sheet Examples
3 1 Introduction The KB9000 is a fully programmable bumpbar keypad with touch operations. With the advanced projected capacitive touch technology, the KB9000 provides reliable and durable touch operations that cannot be achieved with resistive contacts. The programming utility software described in this manual helps users to customize the bumpbar layouts to desired number of keys, key locations, key dimensions and key codes that meet the unique requirement of each application and maximize operation efficiency. 2 Software Installation The programming utility software does not require special installation. copy the folder in the software package into a target folder in the computer. Just For PS/2 Interface, a special driver is required for the utility to communicate with the KB9000. Following instructions below to install the driver before running the programming utility. 2.1 Turn off power of computer. 2.2 Plug KB9000 in PS/2 port, and turn on computer power. 2.3 Double click on "install.bat" to install device driver package automatically and wait until installation is complete. or, Double click on "LciKb_x86.msi" or "LciKb_x64.msi" directly to install device driver package. Follow the instructions on screen step by step to finish installation. There are two installation programs for 32 bit (x86) and 64 bit (x64) Windows XP/Vista/7/8. The correct one must be used for installation. If a wrong installation file is selected, the installation will fail. 2.4 Restart computer after the installation is finished. 2.5 Check under Device Manager whether the device driver installed correctly under Keyboards device class. 2
4 3 Programming the KB Connecting the keyboard For PS/2 versions: Turn off power of the PC. Connect the programmable keyboard to the PC with the special interface cable provided. Plug the standard PC keyboard to the female PS/2 connector on the interface cable and plug the male PS/2 connector to the computer. For USB versions: Connect the programmable keyboard to any USB port on the computer. 3.2 Starting the utility Start the Programming Utility by double clicking on the KB9Utility.exe icon in the folder where the utility is installed. 3.3 Preparing the template The utility starts with a blank template (all key definitions are blank). An existing template can be brought into the utility as a starting point for editing. There are 2 ways to get existing template files into the utility -- OPEN from a template file stored on PC, or READ from the KB9000 that contains the previously programmed template. Refer to the Utility Operations section for details of editing key layout and key definitions. 3.4 Writing into the keyboard It is strongly advised that the template should be first saved into a template file for future reference and for programming multiple keyboards. As legend design properties such as key colors and key labels are not saved into the KB9000, these information can only be saved in the template files. After saving the file, click "Write in KB9000" button on the toolbar to write the template into the KB Printing legend sheet Print out the legend sheet and cut to size for installing into the KB9000. It is also possible to export the legend sheet design to a graphic image file (jpg, bmp or png) for printing or further processing by other image edit software. 3
5 4 Programming Features User defined key layout with rich rectangle drawing tools (alignment, grouping, moving, automatic spacing, matrix keys, etc.) Ruler display, grid display, and zoom in/out function for easy positioning and alignment of keys. Quick template design with programmable legend sheet background color, key background color, key label font size/alignment/rotation/color, key shape, key border and image superposition for direct printing of legend sheet. Export legend sheet design to JPEG, Bitmap or PNG format files for further processing with other graphic editing software or printing. Copy and paste for quick duplication of similar key designs. When copying keys, all contents of key will be copied (name and key content). Key content status indicators for easy identification of keys that are empty or modified in the current edit session. Programmable touch sensitivity and sensing delay to suit operator or application preferences on touch operations. Inter-character delay programmable from 1ms to 100ms to slow down output speed to match computer/application response. String output with capitalization not affected by CapsLock status (automatically add Shift key action depending on CapsLock status in order to reserve the required capitalization). Allow emulation of keyboard typing functions such as upper/lower case switching with CapsLock and typmatic. Flexible placement of "break codes" (for indicating release action of the key) for Shift, Alt, Ctrl & Win keys to achieve special key combination operations such as Ctrl-Shift-F2. Key combinations input to simulate actions of holding down up to 3 keys (other than Shift, Alt, Ctrl & Win keys). Programmable pause time of 0.1 sec to 9.9 sec to allow application software to response before later part of key outputs are generated. Macro calls to macro definitions to save programming effort and memory 4
6 space when similar sequence of key actions are required in many keys with just minor variations from key to key. "Repeat" function to program repeated key action multiple times efficiently. Programmable beep pitch and duration for individual keys. Direct input of key definitions from keyboard for most of the required functions. Alternatively, the on-screen keyboard can be used for input. The on-screen keyboard can also be used to enter some keys that are not possible to input via keyboard (due to editing operation requirements or Windows limitation) or not available on the keyboard. Test function for checking output of programmed keyboard by showing key outputs that are otherwise difficult to visualize with normal operations. 5


7 5 Utility Operations 5.1 Getting started The utility starts with a blank template (all key definitions are blank). An existing template can be brought into the utility as a starting point for editing. There are 2 ways to get existing template files into the utility -- OPEN from a template file stored on PC, or READ from the KB9000 that contains the previously programmed template. Open from template file Click "Open" button on the toolbar or click "File" menu and then click "Open" on the pull-down menu. Browse for the template file required, select, and then click "Open". Read from KB9000 Click "Read" button on the toolbar or click "Actions" menu and then click "Read from KB9000" on the pull-down menu. As legend design properties such as key colors and key labels are not saved into the KB9000, these information can only be saved in the template files. Reading template from KB9000 will not read legend sheet and key appearance properties. Only locations, dimensions and key contents will be retrieved. 5.2 Key layout After the blank template or an existing template is loaded from file or KB9000, the key layout can be edited. 6


8 Add a new key Keys can be added by clicking on the "Key", "Slide V", or "Slide H" buttons on the "Add New Key" toolbar. These functions are also accessible from the "Keys" menu. In addition, keys can be added as a matrix of keys. After clicking on the add key buttons, move the mouse cursor to position for first corner of key to be added. Then hold down the left mouse button and drag across to the opposite corner of the key to draw it. When the mouse button is released, the key will be added to the layout. For key matrix, a dialog box will pop up for entering the number of rows, columns and spacing between keys. The spacing count is in 0.5mm steps. For example, if 4mm spacing is needed between keys, enter 8 as spacing. Click "OK" to finish the setting and draw the matrix similar to operations in drawing single keys. If it is necessary to break out the matrix to change keys individually, place mouse cursor on the matrix and right click. Then click "Ungroup" in the pop up menu. 7

. Alternatively, the key location and size can be edited by entering numerical values in the key properties. Click on the key to be edited to show its properties in the properties box.")

9 Editing layout of a key To change size of an existing key, just place the mouse cursor on one of the "handles" at corners or edges of the key, then hold down the left mouse button to drag. Releasing the mouse button will save the new dimensions of the key. To move a key, place mouse cursor anywhere inside the key to select the key, then hold down the mouse button to drag the key to a new position (arrow keys can also be used to move the key once it is selected). Alternatively, the key location and size can be edited by entering numerical values in the key properties. Click on the key to be edited to show its properties in the properties box. Then click in the "Key bounds" item box to edit the values. The units used are in mm. When editing the key layouts which resulted in overlapping of keys, the overlapped parts will be highlighted as hatched yellow area. The keys must then be resized or moved to eliminate the overlaps. Copy and Paste Keys can be copied and pasted for quick key placement. Click the key to be copied, then click the "Copy" button to copy. Then each time the "Paste" button is clicked, a new copy of the key will be placed on the legend sheet. 8
 the same Height, same Width or both to the reference key. These functions are accessible on the toolbar and \"Align\" menu.")

10 Aligning keys The utility provides functions to align a group of keys on Top, Middle, Bottom, Left, Center, and Right. It can also make the selected group of keys (see section 5.3 "Key group selection") the same Height, same Width or both to the reference key. These functions are accessible on the toolbar and "Align" menu. Additional function can be accessed on the "Align" menu to make equal spacing horizontally or vertically for selected group of keys. 5.3 Key group selection Keys can be selected as a group for editing properties together, move together, or do alignment. To select a group of keys, use the mouse to draw a bounding rectangle around the keys. Start from one corner of the bounding rectangle, hold down the left mouse key and drag across. When mouse button is released, all the keys touching the bounding rectangle will be selected. Alternatively, multiple keys can be selected by hold down the Ctrl key and click on the keys to be selected one by one. All keys clicked while Ctrl key is held down will be added to the selected group. To select a key in the group as reference for making same height/width, click the target key in the group. The key's bounding "handles" will change to hallow shape to indicate that this is the reference key. To unselect the group, just click on any space area on the legend outside a key. 9
11 5.4 Editing key properties and key appearances The key properties and appearances can be edited directly in the properties box. When a key (or a group of keys) is selected, the properties will be shown in the properties box. Click on the individual item boxes to edit. Key properties are related to function of the keys and Legend properties are related to appearance of the keys when printing out the legend sheet. Note that Legend properties are not saved into the KB9000. They are only saved in the template file for printing legend sheets. Emulate keyboard Select whether the key will operate with keyboard behavior. True - Key will work with typmatic and CapsLock. False - key will not work with typmatic and output is not affected by CapsLock state. When multiple key strokes are defined for the key, this function is not allowed. Beep pitch Specify the level of pitch for the audio feedback when pressing the key. Valid values are 1 to 10. The lowest pitch is 1 and the highest pitch is 10. Beep duration Specify the duration of beep for the audio feedback when pressing the key. Valid values are 0 to 10. Value of 0 will disable the beep. The shortest beep is 1 and the longest beep is 10. Key bounds (mm) Specify the location and dimension of the key as X, Y, Width, Height in mm. 10
12 Key label Text label that appears on the key in the layout. key. This is used to identify the Key label align Specify how the key label is aligned inside the key outline. Fill Color Specify background fill color for the key (R,G,B). Click the button at the right side of the item box to bring up the color picking dialog box for quick pick of color. Font Color Specify font color for the key label. Border color Specify color of border for outline of the key. Border thickness Specify line thickness of border for the key. Value 0 means no border. Round corner radius The keys can have appearance of corner radii on the legend sheet although the actual key active area is rectangle. Value 0 means no corner radius. Text rotation angle The key label text can be specified to rotate at an angle by this property. Font Specify text font style used for the key label text. Image Specify the graphic image to be overlaid on the key. Most common image formats are supported including bmp, jpg and png. The image sizes should be based on 300dpi to match the legend sheet physical sizes and should fit inside the key outline. If the image specified is larger than the key dimensions, the image will be stretched to fit inside the key outline. Image Align Specify the image alignment position within the key outline. 11
13 5.5 Editing keyboard and legend sheet properties The keyboard and Legend Sheet properties can be edited directly in the properties box. When no key is selected (click any area on legend sheet that is outside a key), these properties will be shown in the properties box. Click on the individual item boxes to edit. Keyboard properties are related to operation of the KB9000 and Legend Sheet properties are related to appearance of the legend sheet. Note that Legend Sheet properties are not saved into the KB9000. They are only saved in the template file. Inter-character delay Specify delay time between output character codes. Increase this delay time if necessary when working with computers or host controllers that cannot respond to the fast keyboard input rate. Valid values are 1 to 100. Touch delay Specify delay time between actual touch and recognition of the touch action. Increasing this delay time will increase stability of touch actions but may slow down operations. Valid values are 1 to 10. Touch sensitivity Specify sensitivity of touch actions. Adjust this value is necessary to match with operation requirements. Valid values are 1 to 10. Background color Specify background fill color for the legend sheet (R,G,B). Show grid Specify whether grid dots are to be shown on the legend sheet area on the utility display. Grid dots can be used to help positioning or aligning the keys. 5.6 Editing key contents After placing layout of the keys, the key contents can be edited. Each key can be programmed with a sequence of standard keyboard key operations. 12


14 Starting the edit Select the key to be edited and then click the edit content box on the toolbar to start entering key contents or editing. After edit is finished, click outside the key outline will register the edited content. Indicators Corners of the keys may shows special markings to indicate status of the key contents. on top right corner indicates that the key content is empty. on the bottom right corner indicates that the key content had been modified and not saved into template file yet. Check these indicators to verify that no accidental unexpected modifications were done before saving the template file overwriting previous file. Entering key contents Most of the keys on the keyboard can be entered into the edit box directly by pressing the keyboard keys. There are some keys controlled by Windows that are not passed to the utility and so not able to be captured into the edit box directly. Activate the on-screen keyboard from the utility for entering those keys. 13

15 If the key content consists of only a single key stroke, it can be enabled to emulate keyboard behavior with typmatic operation and output is affected by CapsLock state. When multiple key strokes are defined for the key, this function is not allowed. When keyboard emulation is set to false, the output string capitalization will follow the entered string in the key content independent of status of CapsLock. To enable keyboard emulation, set Emulate Keyboard property to "True". Ctrl, Shift, Alt, Win These 4 types of keys require special handling in the programming due to their special functions in the operating systems. Unlike regular keys which are emulated as series of key downs and key ups (key makes and key releases) in sequence automatically, these special keys are programmed in pairs of separate key down and key up actions. In the edit box, these are represented as follows. Key-down codes [Shift] [Ctrl] [Alt] [Win] [RightShift] [RightCtrl] [RightAlt] [RightWin] Key-up codes [#Shift] [#Ctrl] [#Alt] [#Win] [#RightShift] [#RightCtrl] [#RightAlt] [#RightWin] For example, a "Ctrl-A" operation is formed with several steps: - press and hold Ctrl key - press down 'a' key - release 'a' key - release Ctrl key 14

16 Pressing down 'a' key and release 'a' key actions are easily programmed by programming the 'a' in the key content as the up and down codes are inserted automatically. However, to indicate that the Ctrl key is only released after the 'a' key, the key up code for Ctrl has to be placed at the end of the sequence. Thus the key content has to be programmed as shown below. [Ctrl]a[#Ctrl] The above can be entered through the keyboard the same way as how Ctrl-A would have been entered normally. For more complicated sequence operations, if it is not possible to capture the key strokes properly, enter the key up codes and key down codes in the required specific positions. Press the required key once, then both the key down code and key up code will be entered. Just use the arrow keys to navigate around and delete the codes that are not required. (Note: if the key only contains a single key such as Ctrl or Alt to be used as its standard keyboard key function, the up codes will not be shown). Key Combinations Normal keyboard operations do not require holding several keys together except the Ctrl, Shift, Alt, and Win keys. Since the regular keys will emulate key down and key up actions automatically in sequence, these keys do not operate as being held together. For example, a sequence 'abc' in the key content means the 'a' key is pressed and released, then 'b' key is pressed and released, then 'c' key is pressed and released. If an application requires that several regular keys are pressed and held together and then released, use the Key Combinations feature to insert the sequence. After clicking on the key content edit box, click "Insert key combination" button on toolbar to bring up the dialog box. Then enter the required keys in the boxes. If only 2 keys are needed, just leave the 3rd box blank. When finished, click "OK". Note that the Ctrl, Shift, Alt and Win keys are not allowed in the key combinations. 15


17 Pause If the application needs some time to bring up a new screen before continuing key operations, a pause can be inserted into the key content. The pause time is adjustable between 0.1 seconds and 9.9 seconds. Repeat To enter a repeated key operation for multiple times, it can be done efficiently by inserting the Repeat function. The repeat count can be adjusted from 1 to 100. After the Repeat code is inserted, the key definition following the Repeat code will be repeated the number of times as specified during actual key output. Repeat function cannot work with Key Combinations, Pause and Macro. Macro If there are key sequence segments that similar in many other keys with just variations in front of or after the segment, using Macro function can enter the contents into multiple keys efficiently. To use the Macro feature, first define duplicated key sequences in the Macro definitions, then include Macro calls in positions where the key sequence is required when editing key contents. Up to 5 Macros can be defined for each template. When key content box is not selected, click "Edit Macro" button to bring up the Macro dialog box for editing the Macros. If the key content box is selected, the Macro dialog box will allow insertion of Macros into the key contents. 16


18 Slide V, Slide H The KB9000 has 2 special keys that can emulate function of swiping actions on touch monitors. When sliding fingers on these keys, the KB9000 will send out different key codes depending on the sliding action to represent the required operation (for example, arrow keys, Ctrl + arrow keys, PgUp, PgDn etc. to achieve cursor movement or screen scrolling results). The Slide V and Slide H keys are drawn on the legend sheet in the same way as regular key. Just make sure that the Slide V keys are drawn vertical to allow space for vertical swiping actions and Slide H keys are drawn horizontal to allow space for horizontal swiping actions. 17


19 When editing the key contents of Slide keys, there are 4 tabs in the edit box to represent 4 different actions. For example, the "Slide H" key contains following tabs: Left Left Hold Right Right Hold Swipe to the left Swipe to the left and hold finger on button at the end of swipe Swipe to the right Swipe to the right and hold finger on button at the end of swipe Click on the tab name to view and edit key contents accordingly. 5.7 Saving template After editing the template, it is recommended to save it as a template file. The saved template file can be used to load into the utility for editing or printing legend sheet. Use the "Save As" menu if it is necessary to save with different name as different versions of the design. 5.8 Testing template To test operations of the template, write the template into the KB


20 Make sure that the KB9000 is connected to the computer. Click on "Detect" toolbar button to verify the proper connection. If KB9000 is not detected correctly, check the connections again. Then click "Write" button to write the current template into the KB9000. After writing the template into KB9000, click the "Test" toolbar button to bring up the dialog box. Press the keys on the KB9000 one by one and verify whether the key code outputs are correct. Please note that there are some keys under control of Windows that cannot be captured by the KB9000 test dialog box. Those keys can only be tested with actual application. 5.9 Preparing legend sheet Click the "File" menu. Then click "Print" to print the legend sheet. The legend sheet can also be exported to graphic image file (jpg, bmp or png) for printing or further processing by other image edit software. 19
21 6 Key Codes Other than regular alphanumeric keys, the key contents are shown with special key codes listed in the table below. Symbol [F1] [F2] [F3] [F4] [F5] [F6] [F7] [F8] [F9] [F10] [F11] [F12] [ESC] [Backspace] [Tab] [CapsLock] [Enter] Key Name Function key <F1> Function key <F2> Function key <F3> Function key <F4> Function key <F5> Function key <F6> Function key <F7> Function key <F8> Function key <F9> Function key <F10> Function key <F11> Function key <F12> Function key <Esc> Key <Backspace> Key <Tab> Key <Caps Lock> Key <Enter> [Shift] [RightShift] [Ctrl] [RightCtrl] [Alt] [RightAlt] [Win] [RightWin] Key <Shift> on left Key <Shift> on right Key <Ctrl> on left Key <Ctrl> on right Key <Alt> on left Key <Alt> on right Key <Win> on left Key <Win> on right [#Shift] [#RightShift] [#Ctrl] Key-up code for key <Shift> on left Key-up code for key <Shift> on right Key-up code for key <Ctrl> on left 20
22 [#RightCtrl] [#Alt] [#RightAlt] [#Win] [#RightWin] Key-up code for key <Ctrl> on right Key-up code for key <Alt> on left Key-up code for key <Alt> on right Key-up code for key <Win> on left Key-up code for key <Win> on right [Space] [Insert] [Delete] [Home] [End] [PageUp] [PageDown] [ArrowUp] [ArrowLeft] [ArrowRight] [ArrowDown] [NumLock] [ScrollLk] [PrintScreen] [PauseBreak] Key <Space bar> Function key <Insert> Function key <Delete> Function key <Home> Function key <End> Function key <Page Up> Function key <Page Down> Function key <Up Arrow> Function key <Left Arrow> Function key <Right Arrow> Function key <Down Arrow> Function key <Num Lock> Function key <Scroll Lock> Function key <Print Screen> Function key <Pause Break> [Menu] [Ctrl+PauseBreak] [Ctrl+PrintScreen] [Alt+PrintScreen] Function key <Menu> Function key <Ctrl>+<Pause Break> Function key <Ctrl>+<Print Screen> Function key <Alt>+<Print Screen> [PAD0] [PAD1] [PAD2] [PAD3] [PAD4] [PAD5] [PAD6] [PAD7] [PAD8] Key <0> on keypad Key <1> on keypad Key <2> on keypad Key <3> on keypad Key <4> on keypad Key <5> on keypad Key <6> on keypad Key <7> on keypad Key <8> on keypad 21
23 [PAD9] [PAD+] [PAD-] [PAD*] [PAD/] [PAD.] [PADEnter] Key <9> on keypad Key <+> on keypad Key <-> on keypad Key <*> on keypad Key </> on keypad Key <.> on keypad Key <Enter> on keypad [NextTrack] [PrevTrack] [Stop] [PlayPause] [Mute] [VolumeUp] [VolumeDown] [Mail] [Calculator] [MyComputer] [wwwsearch] [wwwhome] [wwwback] [wwwforward] [wwwstop] [wwwrefresh] [wwwfavorites] Next Track Previous Track Stop Play / Pause Mute Volume Up Volume Down Mail Calculator My Computer www Search www Home www Back www Forward www Stop www Refresh www Favorites [SysPower] [SysSleep] System Power System Sleep [Pause#.#] Output pause (#.# is value from 0.1 to 9.9) [Repeat#] Repeat next key (# is integer from 1 to 100) [Macro#] Macro call (# is integer from 1 to 5) 22
24 7 Key Programming Examples The following examples show outputs assuming no Caps Lock status and no Shift status. Note that #keyname represents releasing key "keyname". It is used here for indication of key stroke sequences. They are not part of key content keywords (except #Shift, #Ctrl, #Alt, #Win). [Alt]Abc[#Alt][ArrowRight] keystroke output: Alt, Shift, a, #a, #Shift, b, #b, c, #c, #Alt, ArrowRight, #ArrowRight [a+n]aann keystroke output: a, n, #n, #a, a, #a, n, #n [Tab+q][w+PAD+] keystroke output: Tab, q, #q, #Tab, w, PAD+, #PAD+, #w \[A\]=\[App\] keystroke output: [, Shift, a, #Shift, ], =, #=, [, #[, Shift, a, #a, #Shift, p, #p, p, #p, ], #] Bem [Enter] keystroke output: Shift, b, b#, #Shift, e, e#, m, #m, Enter [F1]a[Enter][Tab][Ctrl]b[#Ctrl] keystroke output: F1, #F1, a, #a, Enter, #Enter, Tab, #Tab, Ctrl, b, b#, #Ctrl [F2][Repeat3][Tab][Enter] keystroke output: F2, #F2, Tab, #Tab, Tab, #Tab, Tab, #Tab, Enter, #Enter 23


25 8 Legend Sheet Examples 24


26 25

27 KB9000 Programmable Touch Bumpbar 999 S. Oyster Bay Rd Building #104 Bethpage, NY USA Tel: Fax:
KB9000 Programmable Touch Bumpbar USER MANUAL
 KB9000 Programmable Touch Bumpbar USER MANUAL Table of Contents 1 Introduction...2 1.1 Safety Information... 2 1.2 Electromagnetic compatibility statement... 3 2 Overview... 4 2.1 Appearance... 4 2.2 Features...
Tutorials. Lesson 3 Work with Text
 In this lesson you will learn how to: Add a border and shadow to the title. Add a block of freeform text. Customize freeform text. Tutorials Display dates with symbols. Annotate a symbol using symbol text.
How to...create a Video VBOX Gauge in Inkscape. So you want to create your own gauge? How about a transparent background for those text elements?
 BASIC GAUGE CREATION The Video VBox setup software is capable of using many different image formats for gauge backgrounds, static images, or logos, including Bitmaps, JPEGs, or PNG s. When the software
User Manual Version 1.1 January 2015
 User Manual Version 1.1 January 2015 - 2 / 112 - V1.1 Variegator... 7 Variegator Features... 7 1. Variable elements... 7 2. Static elements... 7 3. Element Manipulation... 7 4. Document Formats... 7 5.
LinkMotion and CorelDraw 9, 10, 11, 12, X3, X4, X5, X6, X7 and X8:
 LinkMotion and CorelDraw 9, 10, 11, 12, X3, X4, X5, X6, X7 and X8: After you install LinkMotion software and set up all settings launch CorelDraw software. Important notes: Solustan s LinkMotion driver
SIMPLE TEXT LAYOUT FOR COREL DRAW. When you start Corel Draw, you will see the following welcome screen.
 SIMPLE TEXT LAYOUT FOR COREL DRAW When you start Corel Draw, you will see the following welcome screen. A. Start a new job by left clicking New Graphic. B. Place your mouse cursor over the page width box.
A Step-by-step guide to creating a Professional PowerPoint Presentation
 Quick introduction to Microsoft PowerPoint A Step-by-step guide to creating a Professional PowerPoint Presentation Created by Cruse Control creative services Tel +44 (0) 1923 842 295 training@crusecontrol.com
WEEK NO. 12 MICROSOFT EXCEL 2007
 WEEK NO. 12 MICROSOFT EXCEL 2007 LESSONS OVERVIEW: GOODBYE CALCULATORS, HELLO SPREADSHEET! 1. The Excel Environment 2. Starting A Workbook 3. Modifying Columns, Rows, & Cells 4. Working with Worksheets
Corel Ventura 8 Introduction
 Corel Ventura 8 Introduction Training Manual A! ANZAI 1998 Anzai! Inc. Corel Ventura 8 Introduction Table of Contents Section 1, Introduction...1 What Is Corel Ventura?...2 Course Objectives...3 How to
Microsoft Word 2010 Basics
 1 Starting Word 2010 with XP Click the Start Button, All Programs, Microsoft Office, Microsoft Word 2010 Starting Word 2010 with 07 Click the Microsoft Office Button with the Windows flag logo Start Button,
Solo 4.6 Release Notes
 June9, 2017 (Updated to include Solo 4.6.4 changes) Solo 4.6 Release Notes This release contains a number of new features, as well as enhancements to the user interface and overall performance. Together
Using SymPrint to Make Overlays, Templates & More...
 Welcome to SymPrint SymPrint is an easy-to-use tool for creating communication overlays, worksheets, classroom activities and more using a modern toolbar and common-sense interface modeled after the programs
Customisation and production of Badges. Getting started with I-Color System Basic Light
 Customisation and production of Badges Getting started with I-Color System Basic Light Table of contents 1 Creating a Badge Model 1.1 Configuration of Badge Format 1.2 Designing your Badge Model 1.2.1
Word 2013 Quick Start Guide
 Getting Started File Tab: Click to access actions like Print, Save As, and Word Options. Ribbon: Logically organize actions onto Tabs, Groups, and Buttons to facilitate finding commands. Active Document
Sending image(s) to report Click Send Snapshot on any screen in Dolphin3D and choose the Send to Report option
 to report Click Send Snapshot on any screen in Dolphin3D and choose the Send to Report option") Dolphin 3D Reports Sending image(s) to report Click Send Snapshot on any screen in Dolphin3D and choose the Send to Report option Creating a report step by step 1. Generate the desired images in Dolphin3D
Dolphin 3D Reports Sending image(s) to report Click Send Snapshot on any screen in Dolphin3D and choose the Send to Report option Creating a report step by step 1. Generate the desired images in Dolphin3D
XnView Image Viewer. a ZOOMERS guide
 XnView Image Viewer a ZOOMERS guide Introduction...2 Browser Mode... 5 Image View Mode...14 Printing... 22 Image Editing...26 Configuration... 34 Note that this guide is for XnView version 1.8. The current
Trace Bitmap. Chapter 7. A. Page Size. Step 1. Click File Menu > New (Ctrl-N).
.") Chapter 7 Trace Bitmap Riverview Rams Sarasota High Booker High A. Page Size. Step 1. Click File Menu > New (Ctrl-N). Step 2. Set page size in the Property bar: Width to 3.2 Fig. 1 Height to 2 Step 3.
Chapter 7 Trace Bitmap Riverview Rams Sarasota High Booker High A. Page Size. Step 1. Click File Menu > New (Ctrl-N). Step 2. Set page size in the Property bar: Width to 3.2 Fig. 1 Height to 2 Step 3.
DEVELOPING DATABASE APPLICATIONS (INTERMEDIATE MICROSOFT ACCESS, X405.5)
") Technology & Information Management Instructor: Michael Kremer, Ph.D. Database Program: Microsoft Access Series DEVELOPING DATABASE APPLICATIONS (INTERMEDIATE MICROSOFT ACCESS, X405.5) Section 5 AGENDA
Technology & Information Management Instructor: Michael Kremer, Ph.D. Database Program: Microsoft Access Series DEVELOPING DATABASE APPLICATIONS (INTERMEDIATE MICROSOFT ACCESS, X405.5) Section 5 AGENDA
StitchGraph User Guide V1.8
 StitchGraph User Guide V1.8 Thanks for buying StitchGraph: the easy way to create stitch layouts for hardanger and other complex embroidery stitch types. StitchGraph is intended to allow you to create
PowerPoint 2010 Level 1 Computer Training Solutions Student Guide Version Revision Date Course Length
 Level 1 Computer Training Solutions Version 1.2 Revision Date Course Length 2012-Feb-16 6 hours Table of Contents Quick Reference... 3 Frequently Used Commands... 3 Manitoba ehealth Learning Management
SMART Meeting Pro 4.2 personal license USER S GUIDE
 smarttech.com/docfeedback/170973 SMART Meeting Pro 4.2 personal license USER S GUIDE Product registration If you register your SMART product, we ll notify you of new features and software upgrades. Register
Reference Services Division Presents. Microsoft Word 2
 Reference Services Division Presents Microsoft Word 2 This handout covers the latest Microsoft Word 2010. This handout includes instructions for the tasks we will be covering in class. Basic Tasks Review
Libraries. Multi-Touch. Aero Peek. Sema Foundation 10 Classes 2 nd Exam Review ICT Department 5/22/ Lesson - 15
 10 Classes 2 nd Exam Review Lesson - 15 Introduction Windows 7, previous version of the latest version (Windows 8.1) of Microsoft Windows, was produced for use on personal computers, including home and
Microsoft PowerPoint 2007 Beginning
 Microsoft PowerPoint 2007 Beginning Educational Technology Center PowerPoint Presentations on the Web... 2 Starting PowerPoint... 2 Opening a Presentation... 2 Microsoft Office Button... 3 Quick Access
EXCEL BASICS: MICROSOFT OFFICE 2007
 EXCEL BASICS: MICROSOFT OFFICE 2007 GETTING STARTED PAGE 02 Prerequisites What You Will Learn USING MICROSOFT EXCEL PAGE 03 Opening Microsoft Excel Microsoft Excel Features Keyboard Review Pointer Shapes
Designer Reference 1
 Designer Reference 1 Table of Contents USE OF THE DESIGNER...4 KEYBOARD SHORTCUTS...5 Shortcuts...5 Keyboard Hints...5 MENUS...7 File Menu...7 Edit Menu...8 Favorites Menu...9 Document Menu...10 Item Menu...12
CPM-200 User Guide For Lighthouse for MAX
 CPM-200 User Guide For Lighthouse for MAX Contents Page Number Opening the software 2 Altering the page size & Orientation 3-4 Inserting Text 5 Editing Text 6 Inserting Graphics 7-8 Changing the Colour
13. Albums & Multi-Image Printing
 13. Albums & Multi-Image Printing The Album function is a flexible layout and printing tool that can be used in a number of ways: Two kinds of albums: At left we used automatic mode to print a collection
Viva Voce Speech Recognition Solutions
 Viva Voce Speech Recognition Solutions Creating macros (custom commands) for Dragon Professional Individual V15 This manual is intended for use as an aid to support face-to-face training. You might not
Impress Guide Chapter 11 Setting Up and Customizing Impress
 Impress Guide Chapter 11 Setting Up and Customizing Impress This PDF is designed to be read onscreen, two pages at a time. If you want to print a copy, your PDF viewer should have an option for printing
EXCEL BASICS: MICROSOFT OFFICE 2010
 EXCEL BASICS: MICROSOFT OFFICE 2010 GETTING STARTED PAGE 02 Prerequisites What You Will Learn USING MICROSOFT EXCEL PAGE 03 Opening Microsoft Excel Microsoft Excel Features Keyboard Review Pointer Shapes
PowerPoint 2007 Cheat Sheet
 ellen@ellenfinkelstein.com 515-989-1832 PowerPoint 2007 Cheat Sheet Contents Templates and Themes... 2 Apply a corporate template or theme... 2 Format the slide master... 2 Work with layouts... 3 Edit
Learn more about Pages, Keynote & Numbers
 Learn more about Pages, Keynote & Numbers HCPS Instructional Technology May 2012 Adapted from Apple Help Guides CHAPTER ONE: PAGES Part 1: Get to Know Pages Opening and Creating Documents Opening a Pages
Chapter 5. Inserting Objects. Highlights
 Chapter 5 Inserting Objects Highlights 5. Inserting AutoShapes, WordArts and ClipArts 5. Changing Object Position, Size and Colour 5. Drawing Lines 5.4 Inserting Pictures and Text Boxes 5.5 Inserting Movies
Microsoft PowerPoint 2013 Beginning
 Microsoft PowerPoint 2013 Beginning PowerPoint Presentations on the Web... 2 Starting PowerPoint... 2 Opening a Presentation... 2 File Tab... 3 Quick Access Toolbar... 3 The Ribbon... 4 Keyboard Shortcuts...
MimioClassroom User Guide
 MimioClassroom User Guide for Windows gkpglobalsolutions.com Mimio LLC. All rights reserved. Revised 10/21/2010. No part of this document or the software may be reproduced or transmitted in any form or
The Fundamentals. Document Basics
 3 The Fundamentals Opening a Program... 3 Similarities in All Programs... 3 It's On Now What?...4 Making things easier to see.. 4 Adjusting Text Size.....4 My Computer. 4 Control Panel... 5 Accessibility
End User Guide. 2.1 Getting Started Toolbar Right-click Contextual Menu Navigation Panels... 2
 TABLE OF CONTENTS 1 OVERVIEW...1 2 WEB VIEWER DEMO ON DESKTOP...1 2.1 Getting Started... 1 2.1.1 Toolbar... 1 2.1.2 Right-click Contextual Menu... 2 2.1.3 Navigation Panels... 2 2.1.4 Floating Toolbar...
The HOME Tab: Cut Copy Vertical Alignments
 The HOME Tab: Cut Copy Vertical Alignments Text Direction Wrap Text Paste Format Painter Borders Cell Color Text Color Horizontal Alignments Merge and Center Highlighting a cell, a column, a row, or the
Microsoft Excel Keyboard Shortcuts
 Microsoft Excel Keyboard Shortcuts Here is a complete list of keyboard shortcuts for Microsoft Excel. Most of the shortcuts will work on all Excel versions on Windows based computer. Data Processing Shortcuts
What is Publisher, anyway?
 What is Publisher, anyway? Microsoft Publisher designed for users who need to create and personalize publications such as marketing materials, business stationery, signage, newsletters and other items
Display Systems International Software Demo Instructions
 Display Systems International Software Demo Instructions This demo guide has been re-written to better reflect the common features that people learning to use the DSI software are concerned with. This
To learn more about the Milestones window choose: Help Help Topics Select the Index tab and type in the feature. For Example toolbox.
 To learn more about the Milestones window choose: Help Help Topics Select the Index tab and type in the feature. For Example toolbox. 1 of 12 CHOOSE THE DATES TAB TO: 1. Set the schedule s Date Range.
Introduction To Inkscape Creating Custom Graphics For Websites, Displays & Lessons
 Introduction To Inkscape Creating Custom Graphics For Websites, Displays & Lessons The Inkscape Program Inkscape is a free, but very powerful vector graphics program. Available for all computer formats
Using Adobe Contribute 4 A guide for new website authors
 Using Adobe Contribute 4 A guide for new website authors Adobe Contribute allows you to easily update websites without any knowledge of HTML. This handout will provide an introduction to Adobe Contribute
BUSINESS PROCESS DOCUMENTATION. Presented By Information Technology
 BUSINESS PROCESS DOCUMENTATION Presented By Information Technology Table of Contents Snipping Tool... 3 Start the Standard Snipping Tool in Windows... 3 Pinning to the Taskbar... 3 Capture a Snip... 3
Microsoft Visio 2016 Foundation. Microsoft Visio 2016 Foundation Level North American Edition SAMPLE
 Microsoft Visio 2016 Foundation Microsoft Visio 2016 Foundation Level North American Edition Visio 2016 Foundation - Page 2 2015 Cheltenham Group Pty. Ltd. All trademarks acknowledged. E&OE. No part of
The American University in Cairo. Academic Computing Services. Word prepared by. Soumaia Ahmed Al Ayyat
 The American University in Cairo Academic Computing Services Word 2000 prepared by Soumaia Ahmed Al Ayyat Spring 2001 Table of Contents: Opening the Word Program Creating, Opening, and Saving Documents
PowerPoint 2016 Building a Presentation
 PowerPoint 2016 Building a Presentation What is PowerPoint? PowerPoint is presentation software that helps users quickly and efficiently create dynamic, professional-looking presentations through the use
Correcting Grammar as You Type
 PROCEDURES LESSON 11: CHECKING SPELLING AND GRAMMAR Selecting Spelling and Grammar Options 2 Click Options 3 In the Word Options dialog box, click Proofing 4 Check options as necessary under the When correcting
Microsoft How to Series
 Microsoft How to Series Getting Started with EXCEL 2007 A B C D E F Tabs Introduction to the Excel 2007 Interface The Excel 2007 Interface is comprised of several elements, with four main parts: Office
Microsoft PowerPoint 2016 Basics Unit 9 Final Review - Student Notes Directions: Fill in the blanks.
 Directions: Fill in the blanks. 1. PowerPoint Window Layout 2. File Tab When clicked, opens - automatically opens the Info option by default Holds the following options: - Info - New - Open - Save - Save
SolidWorks Intro Part 1b
 SolidWorks Intro Part 1b Dave Touretzky and Susan Finger 1. Create a new part We ll create a CAD model of the 2 ½ D key fob below to make on the laser cutter. Select File New Templates IPSpart If the SolidWorks
BASICS OF MOTIONSTUDIO
 EXPERIMENT NO: 1 BASICS OF MOTIONSTUDIO User Interface MotionStudio combines draw, paint and animation in one easy easy-to-use program gram to save time and make work easy. Main Window Main Window is the
PowerPoint Module 2: Modifying a Presentation
 1. In the Outline pane, a highlighted slide icon next to the slide number indicates that the slide is selected. True PowerPoint 26 LEARNING OBJECTIVES: BESK.OFIN.16.297 - Enter text in Outline view 2.
Title bar: The top most bar in Word window that usually displays the document and software names.
 1 MICROSOFT WORD Table of Contents LINC ONE Hiding Standard toolbar, Formatting toolbar, and Status bar: To hide the Standard toolbar, click View Toolbars on the Menu bar. Check off Standard. To hide the
SMART Meeting Pro PE 4.1 software
 Help us make this document better smarttech.com/feedback/170973 SMART Meeting Pro PE 4.1 software USER S GUIDE Product registration If you register your SMART product, we ll notify you of new features
MS Office Word Tabs & Tables Manual. Catraining.co.uk Tel:
 MS Office 2010 Word Tabs & Tables Manual Catraining.co.uk Tel: 020 7920 9500 Table of Contents TABS... 1 BASIC TABS WITH ALIGNMENT... 1 DEFAULT TAB STOP... 1 SET MANUAL TAB STOPS WITH RULER... 2 SET MANUAL
Microsoft PowerPoint 2010 Beginning
 Microsoft PowerPoint 2010 Beginning PowerPoint Presentations on the Web... 2 Starting PowerPoint... 2 Opening a Presentation... 2 File Tab... 3 Quick Access Toolbar... 3 The Ribbon... 4 Keyboard Shortcuts...
Getting Started Guide. Chapter 11 Graphics, the Gallery, and Fontwork
 Getting Started Guide Chapter 11 Graphics, the Gallery, and Fontwork Copyright This document is Copyright 2005 2008 by its contributors as listed in the section titled Authors. You may distribute it and/or
XnView 1.9. a ZOOMERS guide. Introduction...2 Browser Mode... 5 Image View Mode...15 Printing Image Editing...28 Configuration...
 XnView 1.9 a ZOOMERS guide Introduction...2 Browser Mode... 5 Image View Mode...15 Printing... 22 Image Editing...28 Configuration... 36 Written by Chorlton Workshop for hsbp Introduction This is a guide
Quick Access Toolbar. You click on it to see these options: New, Open, Save, Save As, Print, Prepare, Send, Publish and Close.
 Opening Microsoft Word 2007 in the practical room UNIT-III 1 KNREDDY 1. Nyelvi beállítások az Office 2007-hez (Language settings for Office 2007 (not 2003)) English. 2. Double click on the Word 2007 icon
Interwrite Workspace v. 8.7 Intermediate Technology Integration Center
 Interwrite Workspace v. 8.7 Intermediate The Toolbar... 2 Moving the Toolbar... 2 Resizing the Toolbar... 2 Toolbar Settings... 2 Enable the K-6 Toolbar... 2 Enable Properties with Right Click... 2 Customized
CONTASign Pro User Manual
 CONTASign Pro User Manual CONTASign PRO MANUAL v3.5 rev01 Page 1 of 51 CONTA-CLIP Contents Page No. 1. Main Window Layout 4 - Window Layout Customisation 5 - Window Configuration 6 2. Start Menu & Quick
Publisher 2016 Foundation SAMPLE
 Publisher 2016 Foundation Publisher 2016 Foundation Microsoft Publisher 2016 Foundation - Page 2 2015 Cheltenham Group Pty. Ltd. All trademarks acknowledged. E&OE. No part of this document may be copied
Introduction to Microsoft Word 2010
 Introduction to Microsoft Word 2010 Microsoft Word is a word processing program you can use to write letters, resumes, reports, and more. Anything you can create with a typewriter, you can create with
Microsoft Publisher 2013 Foundation. Publisher 2013 Foundation SAMPLE
 Microsoft Publisher 2013 Foundation Publisher 2013 Foundation Microsoft Publisher 2013 Foundation - Page 2 2013 Cheltenham Group Pty. Ltd. All trademarks acknowledged. E&OE. No part of this document may
User Manual Portable Laptop Console Crash Cart Adapter
 User Manual Portable Laptop Console Crash Cart Adapter GUC211V PART NO. M1458 www.iogear.com 2017 IOGEAR. All Rights Reserved. Part No. M1458. IOGEAR, the IOGEAR logo is trademarks of IOGEAR. Microsoft
Rich Text Editor Quick Reference
 Rich Text Editor Quick Reference Introduction Using the rich text editor is similar to using a word processing application such as Microsoft Word. After data is typed into the editing area it can be formatted
Apex Sketch v7. Define First
 Apex Sketch v7 Legacy Draw First Drawing Method Define First Apex Sketch Version 7 Define First Apex Sketch Version 7 uses the same keystrokes as you would use traditionally in any other Apex program.
Publisher 2016 Foundation. North American Edition SAMPLE
 Publisher 2016 Foundation Publisher 2016 Foundation North American Edition Microsoft Publisher 2016 Foundation - Page 2 2015 Cheltenham Group Pty. Ltd. All trademarks acknowledged. E&OE. No part of this
The Mathcad Workspace 7
 For information on system requirements and how to install Mathcad on your computer, refer to Chapter 1, Welcome to Mathcad. When you start Mathcad, you ll see a window like that shown in Figure 2-1. By
2006 Virtual Ink Corporation 150 CambridgePark Drive Cambridge, Massachusetts USA. User s Guide for Windows
 2006 Virtual Ink Corporation 150 CambridgePark Drive Cambridge, Massachusetts 02140 USA User s Guide for Windows Contents Chapter 1: Introduction...1 1.1. What is mimio Studio?...1 1.2. Important Terminology...1
Develop great research posters using Microsoft PowerPoint
 www.qps.qut.edu.au Develop great research posters using Microsoft PowerPoint A step-by-step guide QUT PRINTING SERVICES A step-by-step guide This step-by-step guide will assist you to understand the purpose
Chapter 2 Using Slide Masters, Styles, and Templates
 Impress Guide Chapter 2 Using Slide Masters, Styles, and Templates OpenOffice.org Copyright This document is Copyright 2007 by its contributors as listed in the section titled Authors. You can distribute
Mouse Navigation. Middle Button (wheel) Pan. Click + Drag. Re-Center View. Double-Click. Context Menu. Tool Operation. Click. Click. Multi-Select.
 Pan. Click + Drag. Re-Center View. Double-Click. Context Menu. Tool Operation. Click. Click. Multi-Select.") BLUEBEAM REVU KEYBOARD SHORTCUTS Mouse Navigation Middle Button (wheel) Pan Re-Center View Click + Drag Double-Click Left Button Right Button Tool Operation Click Context Menu Click Pan Click + Spacebar
BLUEBEAM REVU KEYBOARD SHORTCUTS Mouse Navigation Middle Button (wheel) Pan Re-Center View Click + Drag Double-Click Left Button Right Button Tool Operation Click Context Menu Click Pan Click + Spacebar
ekaizen Lessons Table of Contents 1. ebook Basics 1 2. Create a new ebook Make Changes to the ebook Populate the ebook 41
 Table of Contents 1. ebook Basics 1 2. Create a new ebook 20 3. Make Changes to the ebook 31 4. Populate the ebook 41 5. Share the ebook 63 ekaizen 1 2 1 1 3 4 2 2 5 The ebook is a tabbed electronic book
Understanding Word Processing
 Understanding Word Processing 3.0 Introduction In this chapter you are going to learn how to create a simple memo or note or a complex and complicated multi column business document using word processing
A Study of Angles & Curves
 A Study of Angles & Curves Method 1: Cutting Quilt Shapes/Using the Shapes Tools Open BERNINA CutWork Software. Make sure that Create New is selected. Click Next. Place a dot in front of New Graphic. Select
In so many ways summary
 In so many ways summary Many of Word s functions can be activated in a variety of different ways. Often you can use the menu, a tool on the toolbar or a shortcut key to achieve the same result. Rather
Avigilon Control Center Web Client User Guide
 Avigilon Control Center Web Client User Guide Version: 4.12 Standard PDF-WEBCLIENT-S-E-Rev2 Copyright 2013 Avigilon. All rights reserved. The information presented is subject to change without notice.
LABEL MATRIX TEKLYNX V E R S I O N 8 Q U I C K S T A R T G U I D E
 TEKLYNX LABEL MATRIX V E R S I O N 8 Q U I C K S T A R T G U I D E Note Quick Start Guide The information in this manual is not binding and may be modified without prior notice. Supply of the software
Microsoft Office Publisher
 Microsoft Office 2007- Publisher Opening Microsoft Publisher Using the Start Menu, click on All Programs and navigate to the Microsoft Office folder. Click on Microsoft Office Publisher 2007. Choosing
Publisher 2013 Foundation SAMPLE
 Publisher 2013 Foundation Publisher 2013 Foundation Microsoft Publisher 2013 Foundation - Page 2 2013 Cheltenham Group Pty. Ltd. All trademarks acknowledged. E&OE. No part of this document may be copied
Creating a Website in Schoolwires
 Creating a Website in Schoolwires Overview and Terminology... 2 Logging into Schoolwires... 2 Changing a password... 2 Navigating to an assigned section... 2 Accessing Site Manager... 2 Section Workspace
MS Publisher County of Henrico Public Libraries
 MS Publisher 2013 I. About Publisher A. What is it? Publisher is a desktop publishing program that assists you in designing and producing professional documents that combine text, graphics, illustrations,
Interwrite Workspace v. 8.9 Intermediate Technology Integration Center
 Interwrite Workspace v. 8.9 Intermediate The Toolbar... 2 Moving the Toolbar... 2 Resizing the Toolbar... 2 Toolbar Settings... 2 Enable the Primary Toolbar... 2 Enable Properties with Right Click... 2
Introduction to Microsoft Word 2010
 Introduction to Microsoft Word 2010 Microsoft Word is a word processing program you can use to write letters, resumes, reports, and more. Anything you can create with a typewriter, you can create with
COMPUTER DESCRIPTION...
 Conventions used in this document: Keyboard keys that must be pressed will be shown as Enter or Ctrl. Controls to be activated with the mouse will be shown as Start button > Settings > System > About.
Microsoft Excel 2007
 Learning computers is Show ezy Microsoft Excel 2007 301 Excel screen, toolbars, views, sheets, and uses for Excel 2005-8 Steve Slisar 2005-8 COPYRIGHT: The copyright for this publication is owned by Steve
Labels and Envelopes in Word 2013
 Labels and Envelopes in Word 2013 Labels... 2 Labels - A Blank Page... 2 Selecting the Label Type... 2 Creating the Label Document... 2 Labels - A Page of the Same... 3 Printing to a Specific Label on
Changing How the Keyboard Works in Windows 7
 Changing How the Keyboard Works in Windows 7 Mada Assistive Technology Center Tel: 00 974 44594050 Fax: 00 974 44594051 Email: info@mada.org.qa Introduction The keyboard can be adjusted to suit you in
SolidWorks 2½D Parts
 SolidWorks 2½D Parts IDeATe Laser Micro Part 1b Dave Touretzky and Susan Finger 1. Create a new part In this lab, you ll create a CAD model of the 2 ½ D key fob below to make on the laser cutter. Select
Chapter 4 Printing and Viewing a Presentation Using Proofing Tools I. Spell Check II. The Thesaurus... 23
 PowerPoint Level 1 Table of Contents Chapter 1 Getting Started... 7 Interacting with PowerPoint... 7 Slides... 7 I. Adding Slides... 8 II. Deleting Slides... 8 III. Cutting, Copying and Pasting Slides...
Introducing Gupta Report Builder
 Business Reporting Chapter 1 Introducing Gupta Report Builder You can use Report Builder to design reports. This chapter describes: Our approach to building reports. Some of the reports you can build.
Microsoft Office Word. Help. Opening a Document. Converting from Older Versions
 Microsoft Office 2007 - Word Help Click on the Microsoft Office Word Help button in the top right corner. Type the desired word in the search box and then press the Enter key. Choose the desired topic
Word 2010 Beginning. Technology Integration Center
 Word 2010 Beginning File Tab... 2 Quick Access Toolbar... 2 The Ribbon... 3 Help... 3 Opening a Document... 3 Documents from Older Versions... 4 Document Views... 4 Navigating the Document... 5 Moving
Computer Nashua Public Library Introduction to Microsoft Word 2010
 Microsoft Word is a word processing program you can use to write letters, resumes, reports, and more. Anything you can create with a typewriter, you can create with Word. You can make your documents more
MIMAKI ENGINEERING CO., LTD.
 For Windows XP/Windows 2000 Cutting Application Software SimpleCut Operation Manual MIMAKI ENGINEERING CO., LTD. D201463 Contents Introduction 1 About this Manual 2 Chapter 1 Installation Procedure 3
Adobe Photoshop CS2 Reference Guide For Windows
 This program is located: Adobe Photoshop CS2 Reference Guide For Windows Start > All Programs > Photo Editing and Scanning >Adobe Photoshop CS2 General Keyboarding Tips: TAB Show/Hide Toolbox and Palettes