Introduction. Introduction
|
|
|
- Marcus Edwards
- 6 years ago
- Views:
Transcription


1 Tutorial
2 Introduction Introduction The tutorial is divided into multiple lessons. Each lesson stands on its own and does not require you to build on existing lessons. The lessons provide step-by-step instructions on how to achieve the desired results. Some lessons present multiple ways to accomplish a certain task. Note: All lessons assume that 4in. (101.5 mm) tape is installed in the printer Brady Corporation. All Rights Reserved. Y Revision A Brady Corporation 6555 West Good Hope Road P.O. Box 2131 Milwaukee, WI Sales/Customer Support:(800) ii BBP 85 Label Printer Tutorial
3 Contents Contents Before Starting...1 Lesson 1: Creating a Simple Text Label...2 Enter Text...2 Change Font Size...2 Highlight Text...3 Format Text...3 Justify Text...3 Frame an Object...4 Set Label Fixed Length...4 Preview a Label...4 Clear a Label and Return Home...4 Lesson 2: Adding Graphics to Labels...5 Lesson 3: Adding Serialization & Barcode Data...7 Add Text Serialization...7 Add Barcode Data...8 Lesson 4: Using a Template to Create a Label...9 Lesson 5: Saving and Opening a File...10 Save a Label File...10 Open a Saved Label File...10 Delete a Label File...10 Lesson 6: Creating Pipe Markers...11 Lesson 7: Creating QuickLabels...13 Lesson 8: Changing ObjectColors...14 BBP 85 Label Printer Tutorial xi

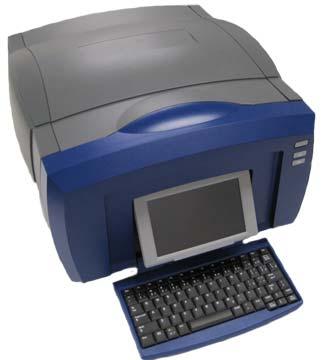
4 1 Tutorial Before Starting Before starting, you should understand the sections of the display screen that will be used in these tutorials. The Home page automatically displays when you first start the printer. The sections of the Home page that you will be using for these lessons are: Item Icon Description # 1 Home: Returns you to the Home page from anywhere in the application. Button is greyed out on the Home page. 2 Editor Text or object entry area. Type, touch or select objects to display and edit in this area. 3 Control Panel Primary area for selecting all of your options for creating, editing and working with labels and objects. The panel changes depending on what option is selected BBP 85 Label Printer Tutorial 1
5 Lesson 1: Creating a Simple Text Label Lesson 1: Creating a Simple Text Label This lesson shows you how to create a simple label, adding formatting attributes and revising the label before printing. For more information on the techniques used in this lesson, see Create Labels on page 3-1 and Printing Labels on page 5-3 of the user s manual. Note: Whenever there is text that you should enter, the word is highlighted in Blue. All other actions are highlighted in bold. Enter Text 1. From the Home page, type: EXIT. The text size is maximized to fit the entire width of the installed tape (e.g., 252 pts). 2. Add a new line by pressing Enter. The text size is reduced so that both lines will fit the entire width of the installed tape (e.g., 126 pts). 3. On the second line, type: LEFT. Change Font Size To decrease the font size: 1. Touch Size twice. Each time you press the button, the font size will change. For example, if the font size was 126 pts to start, pressing Size twice will reduce it to 80 pts. Note: The and size buttons change the font size for all of the text in the text object. To change font size for one word in a text object: 1. Touch the word Exit. 2. Touch Font 3. In the Size dialog, type: 100 (pts). 4. Select OK or press Enter. 2 BBP 85 Label Printer Tutorial
6 Lesson 1: Creating a Simple Text Label Highlight Text You can use the keyboard navigation keys [ ] to move the cursor around in a text box. You can also touch a word to highlight it. 1. Use [ or ] to move the cursor to the beginning or end of the word Left. 2. Hold the Shift key and press [ or ] until the entire word is highlighted. Format Text - or - Touch the word Left. You can change the format of a word by pressing one of the format buttons on the control panel. The action is immediately reflected in the Editor. Pressing the button again, returns the highlighted text to its original state. 1. Select B. The word is immediately bolded. 2. Select U. The word is immediately underlined. 3. Select I. The word is immediately italicized. Justify Text To justify text in an object: 1. Touch the right arrow of More Options. 2. In the Justification area: Justify Left: Select. Justify Right: Select. Justify Center: Select. 3. In the Center on Label area, center the text on the label: Touch the right arrow of More Options. Touch Vert. BBP 85 Label Printer Tutorial 3
7 Lesson 1: Creating a Simple Text Label Frame an Object 1. Touch More Options until you get to the Object Frame options. 2. In the Object Frame options, select Rounded. The framed object is immediately shown in the display. Set Label Fixed Length 1. Touch Menu. 2. Select Size & Orientation. 3. Select Fixed Length. 4. In the Length field, type: Select OK. Preview a Label 1. Create a simple label using the previous procedures. 2. Touch Print. 3. Select Preview. Your label is displayed in the preview window. 4. Select Start Print to print, or Cancel to exit the Print Preview screen. Clear a Label and Return Home 1. From anywhere in the label, press Home. 2. If asked to save changes, select No. 4 BBP 85 Label Printer Tutorial
8 Lesson 2: Adding Graphics to Labels Lesson 2: Adding Graphics to Labels 1. From the Home page, touch anywhere in the Editor. 2. Select Graphic. The box on the left shows the available graphic categories. As you touch a category, the available graphics for that category will display in the box on the right. 3. In the Category list, use the up or down arrows to scroll to the Warning category. 4. Select any of the available graphics to add it to your label. The graphic size is maximized to fit the entire width of the installed tape. 5. To resize the graphic, use the Size or just like text. To set a specific graphic size: 1. Touch the graphic. 2. Touch the right arrow of More Options. 3. Select Exact Size & Position. 4. In the Object width field, enter Select OK. The graphic width is sized proportionally to 2 in. [50.8 mm]. BBP 85 Label Printer Tutorial 5
9 Lesson 2: Adding Graphics to Labels To move objects on the label: There are three ways to move objects on a label: 1. Drag and Drop: a. Touch and hold the object. b. Drag the object to the desired location on the label. 2. Use Keyboard: a. Touch the object. b. Use the keyboard navigation keys [ ] to move the object left, right, up or down on the label. c. Press Shift plus [ ] keys to move the object in larger increments. 3. Exact Size & Position: a. If you are not already there, touch More Options to get to the Exact Size & Position option. b. Select Exact Size & Position. c. In the Distance from left edge box, enter 1. d. Select OK. 6 BBP 85 Label Printer Tutorial
10 Lesson 3: Adding Serialization & Barcode Data Lesson 3: Adding Serialization & Barcode Data In this lesson, you will learn how to apply text and barcode serialization to labels and redefine the sequence numbering. For more information on the techniques used in this lesson refer to Converting Text or Barcode to Variable Data on page 4-31 of the user s manual. Add Text Serialization 1. From the Home page, touch anywhere in the Editor to add an object. 2. Select Serial & Date/Time. 3. Select Serial Text. 4. In the Starting value box, enter Touch the Ending value check box. 6. In the Ending value box, enter Touch in the Before Serial dialog box, and type: PART # 8. Select OK. The text object is converted to serial and the first value is displayed on the screen. BBP 85 Label Printer Tutorial 7

11 Lesson 3: Adding Serialization & Barcode Data Preview Text Serialization To preview all of your labels in the series. 1. With the serialized label in the Editor window, touch Print. 2. Select Preview. Note the Label number indicates 1 of Select Next Label to scroll through all of the serialized labels in your file. 4. Cancel to exit the Print Preview screen. Add Barcode Data 1. From the Home page, touch anywhere in the Editor to add an object. 2. In the Add Object panel, select Barcode. 3. In the Data value field, type: Select OK. 5. Scroll through the More Options buttons to view the available attributes you can change. 8 BBP 85 Label Printer Tutorial
12 Lesson 4: Using a Template to Create a Label Lesson 4: Using a Template to Create a Label 1. From the Home page, select General Templates. 2. In the Category field, touch With Sign Headers. 3. Select the 2 nd template (sign header on top, text and graphic below). 4. Touch the sign header placeholder. 5. From the Sign Header options on the right, touch Caution. This header is added to your template. 6. Touch the text box to select it. 7. Type your First name. 8. Press Enter. 9. Type your Last name. 10. Touch the graphic placeholder. 11. From Category list, choose a category and select a graphic. BBP 85 Label Printer Tutorial 9
13 Lesson 5: Saving and Opening a File Lesson 5: Saving and Opening a File In this lesson, you will learn how to save labels as a file for use at a later date, open a saved label file and delete a label file. For more information on the techniques used in this lesson, refer to Save a Label File on page 6-1, Open a Label File on page 6-2 and Delete a Label File on page 6-3 of the user s manual. Save a Label File 1. From the Home page, type: TEXT. 2. Select Menu. 3. Select Save File. 4. Type the file name: LABEL 5. Select OK. 6. Select Menu and select No to clear the label and return to the Home page. Open a Saved Label File 1. Select Menu. 2. Select Open File. 3. Select LABEL. It will automatically open in the Editor. 4. Select Menu and select No to clear the label and return to the Home page. Delete a Label File 1. Select Menu. 2. Select Delete File. 3. Select LABEL. 4. At the prompt to delete the file, select Yes. The file is deleted from the labels list. 5. Select Cancel to return to the previous menu. 10 BBP 85 Label Printer Tutorial
14 Lesson 6: Creating Pipe Markers Lesson 6: Creating Pipe Markers In this lesson, you will learn how to create, save, open and delete a standard pipe marker label. Note: To create a rollform or symbol/arrow pipe marker, see the user manual. To create a standard pipe marker: 1. From the Home page, select More Label Types. 2. Select Pipe Markers. The Pipe Marker application will load. 3. Select Create New File. 4. From the Pipe Marker Style dialog, select Standard 5. In the Dimensions dialog, choose: 4 in (>10 in). 6. Select Next. 7. In the Pipe contents dialog, use the down arrow to scroll to the category Other. 8. Select Next. 9. In Legend line 1, enter: TOXIC. 10. Select Next. 11. In the Graphics dialog, select Change Category. 12. Use the down arrow to scroll to the category WHMIS. 13. Select the icon. 14. Select Next. 15. In the Arrows dialog, select Left. 16. Select Finish. The new pipe marker is displayed in the Editor. BBP 85 Label Printer Tutorial 11
15 Lesson 6: Creating Pipe Markers To save a pipe marker: 1. With the pipe marker displayed, select Menu. 2. Select Save File. 3. In the File name dialog, enter a file name for the pipe marker. 4. Select OK. The pipe marker is saved. To open an existing pipe marker: 1. From the Pipe Marker control panel, select Open Saved File. 2. In the Open File dialog, select the label: Fire Pipe Marker. To delete a pipe marker: 1. In the Pipe Marker control panel, select Menu. 2. Select Delete File. 3. In the Delete File dialog, select the label Fire Pipe Marker. 4. At the prompt, select Yes. 12 BBP 85 Label Printer Tutorial
16 Lesson 7: Creating QuickLabels Lesson 7: Creating QuickLabels In this lesson, you will learn to create a QuickLabel by entering the label ID and by browsing to the label. Note: After creating the label, you can edit the objects by using the procedures from Lesson 1: Creating a Simple Text Label on page 1-2 and Lesson 2: Adding Graphics to Labels on page 1-5. To create a QuickLabel using the label ID: 1. From the Home page, select Select More Label Types. 2. Select QuickLabel 3. In the Label ID dialog, type or touch: Select OK. The label is immediately loaded in the Editor. To browse for a QuickLabel: 1. From the Home page, select Select More Label Types. 2. Select QuickLabel 3. In the Label ID dialog, touch Browse. 4. In the Category list, select Fire. 5. Select label 358.The label is immediately loaded in the Editor. BBP 85 Label Printer Tutorial 13


17 Lesson 8: Changing Object Colors Lesson 8: Changing Object Colors This lesson shows you how to change the color of ribbon or media for text, barcodes and graphics. For more information on the techniques used in this lesson, see xxx in the user s manual. Note: Whenever there is text that you should enter, the word is highlighted in Blue. All other actions are highlighted in bold. Change Object Color 1. Touch any object in the Editor to select it. 2. In the Control Panel, touch the color selector. 3. In the Object Color dialog, touch a color, then touch OK. 4. If requested, change the ribbon to the color indicated in the prompt. 5. Touch Print. 6. Select Preview. Your label is displayed in the preview window. 7. Select Start Print to print, or Cancel to exit the Print Preview screen. 14 BBP 85 Label Printer Tutorial
18 2012 Brady Worldwide, Inc. All Rights Reserved.
Introduction. Introduction
 Tutorial Introduction Introduction The tutorial is divided into multiple lessons. Each lesson stands on its own and does not require you to build on existing lessons. The lessons provide step-by-step instructions
LABEL PRINTER TUTORIAL
 TUTORIAL LABEL PRINTER Tutorial The tutorial is divided into eight lessons, some lessons building on techniques and processes learned in a previous lesson. For the first time user, it is important to perform
Contents. Launching Word
 Using Microsoft Office 2007 Introduction to Word Handout INFORMATION TECHNOLOGY SERVICES California State University, Los Angeles Version 1.0 Winter 2009 Contents Launching Word 2007... 3 Working with
MICROSOFT WORD 2010 BASICS
 MICROSOFT WORD 2010 BASICS Word 2010 is a word processing program that allows you to create various types of documents such as letters, papers, flyers, and faxes. The Ribbon contains all of the commands
Bold with the Dialog Box Launcher. Locate MS Office and open Word.
 Locate MS Office and open Word. Type the following exactly as shown. Remember, pressing the Enter key starts a new paragraph. Press the Enter key at the end of each of the following lines to start a new
Book Report. Activity 2. Objectives. Benchmarks for Technology Standards. Learning Objectives. Before the Computer.
 Book Report Objectives Each student will use the Google Docs word processing application to create a template that he or she can use to prepare a book report. Benchmarks for Technology Standards Students
Introduction. Format Text. Word 2010 Formatting Text. To Change the Font Size: Page 1
 Word 2010 Formatting Text Introduction Page 1 To create and design effective documents, you need to know how to format text. In addition to making your document more appealing, formatted text can draw
The first time you open Word
 Microsoft Word 2010 The first time you open Word When you open Word, you see two things, or main parts: The ribbon, which sits above the document, and includes a set of buttons and commands that you use
Introduction to Microsoft Office 2016: Word
 Introduction to Microsoft Office 2016: Word Last Updated: September 2018 Cost: $2.00 Microsoft Word is a word processing software. You can use it to type letters, reports, and other documents. This class
Application of Skills: Microsoft Excel 2013 Tutorial
 Application of Skills: Microsoft Excel 2013 Tutorial Throughout this module, you will progress through a series of steps to create a spreadsheet for sales of a club or organization. You will continue to
Basic Millennium INTRODUCTION
 Basic Millennium INTRODUCTION Welcome to the Basic Millennium tutorial. Navigation tools, such as the Continue button, will display as you progress through the presentation, while playback functions are
Application Card Guide. Pipe Markers Signs and Labels Pictograms
 Application Card Guide Pipe Markers Signs and Labels Pictograms Introduction The QuickLabel Application Card allows you to print pre-made labels provided on a compact flash card with your Brady GlobalMark
button Double-click any tab on the Ribbon to minimize it. To expand, click the Expand the Ribbon button
 PROCEDURES LESSON 1: CREATING WD DOCUMENTS WITH HEADERS AND FOOTERS Starting Word 1 Click the Start button 2 Click All Programs 3 Click the Microsoft Office folder icon 4 Click Microsoft Word 2010 1 Click
Display Systems International Software Demo Instructions
 Display Systems International Software Demo Instructions This demo guide has been re-written to better reflect the common features that people learning to use the DSI software are concerned with. This
Using Microsoft Word. Paragraph Formatting. Displaying Hidden Characters
 Using Microsoft Word Paragraph Formatting Every time you press the full-stop key in a document, you are telling Word that you are finishing one sentence and starting a new one. Similarly, if you press
Introducing Gupta Report Builder
 Business Reporting Chapter 1 Introducing Gupta Report Builder You can use Report Builder to design reports. This chapter describes: Our approach to building reports. Some of the reports you can build.
SKILL AREA 210: USE A WORD PROCESSING SOFTWARE. Lesson 1: Getting Familiar with Microsoft Word 2007 for Windows...5
 Contents Microsoft Word 2007...5 Lesson 1: Getting Familiar with Microsoft Word 2007 for Windows...5 The Microsoft Office Button...6 The Quick Access Toolbar...6 The Title Bar...6 The Ribbon...6 The Ruler...6
Corel Ventura 8 Introduction
 Corel Ventura 8 Introduction Training Manual A! ANZAI 1998 Anzai! Inc. Corel Ventura 8 Introduction Table of Contents Section 1, Introduction...1 What Is Corel Ventura?...2 Course Objectives...3 How to
Microsoft Excel 2010 Tutorial
 1 Microsoft Excel 2010 Tutorial Excel is a spreadsheet program in the Microsoft Office system. You can use Excel to create and format workbooks (a collection of spreadsheets) in order to analyze data and
Microsoft Word 2010 Lesson Plan
 Microsoft Word 2010 Lesson Plan Objective: This class is a brief introduction to Word 2010. It consists of 2 one and one-half hour sessions. By the end of this class you should be able to create a simple
Microsoft Word Chapter 1. Creating, Formatting, and Editing a Word Document with Pictures
 Microsoft Word 2010 Chapter 1 Creating, Formatting, and Editing a Word Document with Pictures Objectives Enter text in a Word document Check spelling as you type Format paragraphs Format text Undo and
Computer Nashua Public Library Introduction to Microsoft Word 2010
 Microsoft Word is a word processing program you can use to write letters, resumes, reports, and more. Anything you can create with a typewriter, you can create with Word. You can make your documents more
Lesson 2 Quick Tour and Features
 Lesson 2 Quick Tour and Features Objectives Students will format a document page. Students will use a spell-checker. Students will copy, cut, and paste text. Students will adjust paragraph indentations.
Word 1 Module 3. Word 1. Module 3
 Word 1 Module 3 Word 1 Module 3 Revised 5/1/17 Contents Formatting a Document...2 Bold, Underline, Italicize, Change Font, Font Size...2 Class Walkthrough 3.2...2 Using the Font group of the Home command
Tutorials. Lesson 3 Work with Text
 In this lesson you will learn how to: Add a border and shadow to the title. Add a block of freeform text. Customize freeform text. Tutorials Display dates with symbols. Annotate a symbol using symbol text.
Microsoft Word 2010 Part 1: Introduction to Word
 CALIFORNIA STATE UNIVERSITY, LOS ANGELES INFORMATION TECHNOLOGY SERVICES Microsoft Word 2010 Part 1: Introduction to Word Summer 2011, Version 1.0 Table of Contents Introduction...3 Starting the Program...3
Reference Services Division Presents. Microsoft Word 2
 Reference Services Division Presents Microsoft Word 2 This handout covers the latest Microsoft Word 2010. This handout includes instructions for the tasks we will be covering in class. Basic Tasks Review
Using Inspiration 7 I. How Inspiration Looks SYMBOL PALETTE
 Using Inspiration 7 Inspiration is a graphic organizer application for grades 6 through adult providing visual thinking tools used to brainstorm, plan, organize, outline, diagram, and write. I. How Inspiration
Intermediate Microsoft Office 2016: Word
 Intermediate Microsoft Office 2016: Word Updated January 2017 Price: $1.20 Lesson 1: Setting Margins A margin is the distance from the text to the paper s edge. The default setting is 1 all around the
Users who require access to this application must seek it from their Security Administrator.
 WEB EDITOR SUBARU CONNECT Web Editor is now available on Subaru Connect, located under Applications > Website Maintenance > Webpage Editor. This completely redesigned version of the Web Editor enables
Introduction to Microsoft Word
 Chapter Microsoft Word is a powerful word processing program that allows you to enter text, make changes to it, format it, record and print it. You can use it to produce professional business letters,
Intermediate Word for Windows
 Intermediate Word for Windows Version: 2002 Academic Computing Support Information Technology Services Tennessee Technological University September 2003 1. Opening Word for Windows In the PC labs, click
Center for Faculty Development and Support Making Documents Accessible
 Center for Faculty Development and Support Making Documents Accessible in Word 2007 Tutorial CONTENTS Create a New Document and Set Up a Document Map... 3 Apply Styles... 4 Modify Styles... 5 Use Table
Microsoft Office Training Skills 2010
 Lesson 3 - Creating Documents with MS word 2010 Introduction to Word Processing MS-Word 2010 is word processing application that is used create and edit documents such as: Books, letters, reports, newsletters,
Microsoft Word 2010 Basics
 1 Starting Word 2010 with XP Click the Start Button, All Programs, Microsoft Office, Microsoft Word 2010 Starting Word 2010 with 07 Click the Microsoft Office Button with the Windows flag logo Start Button,
Using Styles In Microsoft Word 2002
 INFORMATION SYSTEMS SERVICES Using Styles In Microsoft Word 2002 This document contains a series of exercises in the use of styles in the Microsoft Word 2002 word processing software. AUTHOR: Information
Microsoft Office Word 2016 for Mac
 Microsoft Office Word 2016 for Mac Formatting Your Document University Information Technology Services Learning Technologies, Training & Audiovisual Outreach Copyright 2016 KSU Division of University Information
Manage Folders and Files in Microsoft Office. Mrs. Eggen and Ms. Miller GMS and HMS Digital Literacy
 Manage Folders and Files in Microsoft Office Mrs. Eggen and Ms. Miller GMS and HMS Digital Literacy Accessing Documents Computer vs. Microsoft Word: Computer will always show all documents. Access files
Correcting Grammar as You Type
 PROCEDURES LESSON 11: CHECKING SPELLING AND GRAMMAR Selecting Spelling and Grammar Options 2 Click Options 3 In the Word Options dialog box, click Proofing 4 Check options as necessary under the When correcting
Enhancing your Page. Text Effects. Paragraph Effects. Headings
 Enhancing your Page You can make your pages more visually appealing and organize page content by using text effects, paragraph effects, macros, images, tables, etc. To begin, select the "Edit" button for
Microsoft Word Basic Features
 Aditya College, Gwalior 1 Microsoft Word Basic Features Lesson 1 familiarized you with the the Microsoft Word window. You are now ready to learn how to create a Word document. To begin, open Microsoft
WEEK NO. 12 MICROSOFT EXCEL 2007
 WEEK NO. 12 MICROSOFT EXCEL 2007 LESSONS OVERVIEW: GOODBYE CALCULATORS, HELLO SPREADSHEET! 1. The Excel Environment 2. Starting A Workbook 3. Modifying Columns, Rows, & Cells 4. Working with Worksheets
Correcting Grammar as You Type. 1. Right-click the text marked with the blue, wavy underline. 2. Click the desired option on the shortcut menu.
 PROCEDURES LESSON 11: CHECKING SPELLING AND GRAMMAR Selecting Spelling and Grammar Options 2 Click Options 3 In the Word Options dialog box, click Proofing 4 Check options as necessary under the When correcting
Lesson 1: Getting Familiar with Microsoft Word 2007 for Windows
 Lesson 1: Getting Familiar with Microsoft Word 2007 for Windows Microsoft Word is a word processing software package. You can use it to type letters, reports, and other documents. This tutorial teaches
Introduction to Microsoft Word 2007 Quickguide
 Introduction to Microsoft Word 2007 Quickguide Opening Word -Click the Start button -Click Programs from the start menu -Select Microsoft Office -Click Microsoft Office Word 2007 -A new blank document
Lesson 8: Presentation Enhancements Microsoft PowerPoint 2016
 Lesson 8: Presentation Enhancements Microsoft PowerPoint 2016 IN THIS CHAPTER, YOU WILL LEARN HOW TO Set up presentations for delivery. View and change slide masters. Add WordArt text. Create hyperlinks.
2. In the Start and End Dates section, use the Calendar icon to change the Displayed Start Date to 1/1/2015 and the Displayed End Date to 5/31/2015.
 Tutorials Lesson 1 - Format a Schedule In this lesson you will learn how to: Change the schedule s date range. Change the date headings. Change the schedule dimensions. Change the legend and add a new
Rethinking the Presentation with Prezi Guide to the Prezi Interface
 Guide to the Prezi Interface Presented by www.jmarkcoleman.com mark@jmarkcoleman.com @jmarkcoleman While Prezi is a mature web tool, it is under constant revision. This guide is current as of early November,
Rich Text Editor Quick Reference
 Rich Text Editor Quick Reference Introduction Using the rich text editor is similar to using a word processing application such as Microsoft Word. After data is typed into the editing area it can be formatted
Managing Document Properties
 PROCEDURES LESSON 20: CHANGING CASE AND MANAGING DOCUMENT PROPERTIES Using Uppercase Mode 1 Press the Caps Lock key 2 Type the desired text in all caps Showing Caps Lock on the Status Bar 1 Right-click
This section provides an overview of the features available within the Standard, Align, and Text Toolbars.
 Using Toolbars Overview This section provides an overview of the features available within the Standard, Align, and Text Toolbars. Using toolbar icons is a convenient way to add and adjust label objects.
Vizit Pro User Manual
 Vizit Pro User Manual 1 Table of Contents Vizit Pro User Manual... 1 Using Vizit Pro... 3 The Vizit Pro User Interface... 3 Toolbars... 4 File Tab Toolbar... 4 Edit Tab Toolbar... 5 Annotations Tab Toolbar...
The major change in Word is the ribbon toolbar. The File menu has been replaced with a button.
 Word 2007 There are a lot of new changes to Office 2007. This handout will provide a few examples on how to do basic formatting. If at any point you get stuck, remember that Office has a feature that allows
Introduction to Microsoft Word 2010
 Introduction to Microsoft Word 2010 Microsoft Word is a word processing program you can use to write letters, resumes, reports, and more. Anything you can create with a typewriter, you can create with
Microsoft Publisher 2010 Tecumseh District Library
 1 Microsoft Publisher 2010 Tecumseh District Library by Anne Keller, Teen Services Librarian 2 Microsoft Publisher 2010 Microsoft Publisher is a powerful desktop publishing program that can create posters,
Reference Services Division Presents WORD Introductory Class
 Reference Services Division Presents WORD 2010 Introductory Class CLASS OBJECTIVES: Navigate comfortably on a Word page Learn how to use the Ribbon tabs and issue commands Format a simple document Edit,
Getting Familiar with Microsoft Word 2010 for Windows
 Lesson 1: Getting Familiar with Microsoft Word 2010 for Windows Microsoft Word is a word processing software package. You can use it to type letters, reports, and other documents. This tutorial teaches
Creating a PowerPoint Presentation
 powerpoint 1 Creating a PowerPoint Presentation Getting Started 1. Open PowerPoint from the "Start" "Programs" Microsoft Office directory. 2. When starting PowerPoint, it usually starts with a new blank
Application of Skills: Microsoft PowerPoint 2013 Tutorial
 Application of Skills: Microsoft PowerPoint 2013 Tutorial Throughout this tutorial, you will progress through a series of steps to create a presentation about yourself. You will continue to add to this
Add Bullets and Numbers
 . Lesson 5: Adding Bullets and Numbers, If you have lists of data, you may want to bullet or number them. When using Microsoft Word, bulleting and numbering are easy. The first part of this lesson teaches
Lesson 21 Getting Started with PowerPoint Essentials
 Getting Started with PowerPoint Essentials Computer Literacy BASICS: A Comprehensive Guide to IC 3, 4 th Edition 1 Objectives Identify the parts of the PowerPoint screen and navigate through a presentation.
Introduction to Microsoft Word 2010
 Introduction to Microsoft Word 2010 Microsoft Word is a word processing program you can use to write letters, resumes, reports, and more. Anything you can create with a typewriter, you can create with
Creating a new project To start a new project, select New from the File menu. The Select Insert dialog box will appear.
 Users Guide Creating a new project To start a new project, select New from the File menu. The Select Insert dialog box will appear. Select an insert size When creating a new project, the first thing you
How To Capture Screen Shots
 What Is FastStone Capture? FastStone Capture is a program that can be used to capture screen images that you want to place in a document, a brochure, an e-mail message, a slide show and for lots of other
Lesson 4 - Creating a Text Document Using WordPad
 Lesson 4 - Creating a Text Document Using WordPad OBJECTIVES: To learn the basics of word processing programs and to create a document in WordPad from Microsoft Windows. A word processing program is the
PowerPoint 2016 Basics for Mac
 1 PowerPoint 2016 Basics for Mac PowerPoint 2016 Basics for Mac Training Objective To learn the tools and features to get started using PowerPoint more efficiently and effectively. What you can expect
NiceForm User Guide. English Edition. Rev Euro Plus d.o.o. & Niceware International LLC All rights reserved.
 www.nicelabel.com, info@nicelabel.com English Edition Rev-0910 2009 Euro Plus d.o.o. & Niceware International LLC All rights reserved. www.nicelabel.com Head Office Euro Plus d.o.o. Ulica Lojzeta Hrovata
TABLE OF CONTENTS TABLE OF CONTENTS... 1 INTRODUCTION... 2 USING WORD S MENUS... 3 USING WORD S TOOLBARS... 5 TASK PANE... 9
 TABLE OF CONTENTS TABLE OF CONTENTS... 1 INTRODUCTION... 2 USING WORD S MENUS... 3 DEFINITIONS... 3 WHY WOULD YOU USE THIS?... 3 STEP BY STEP... 3 USING WORD S TOOLBARS... 5 DEFINITIONS... 5 WHY WOULD
1. Open PowerPoint and you will see the introductory screen that contains different themes and templates. From the selection displayed, choose Slice.
 PowerPoint Assessment ***Remember! This is a test and you cannot ask for help. This must be done completely on your own. If you have forgotten a skill, please go to my Tutorials page on my website and
Section 8 Formatting
 Section 8 Formatting By the end of this Section you should be able to: Format Numbers, Dates & Percentages Change Cell Alignment and Rotate Text Add Borders and Colour Change Row Height and Column Width
4 Timesaving Tips for Word 2010
 Teaching and Learning Center Table of Contents Page 1.0 Overview... 3 1.1 Before you begin... 3 2.0 Quick Styles... 4 2.1 Adding Heading 1 and Heading 2 Quick Styles... 5 3.0 Navigation Pane... 7 3.1 Using
3. Click the Change Case button. 4. On the menu, click the desired case option. Managing Document Properties
 PROCEDURES LESSON 20: CHANGING CASE AND MANAGING DOCUMENT PROPERTIES Using Uppercase Mode 1 Press the Caps Lock key 2 Type the desired text in all caps Showing Caps Lock on the Status Bar 1 Right-click
CPM-200 User Guide For Lighthouse for MAX
 CPM-200 User Guide For Lighthouse for MAX Contents Page Number Opening the software 2 Altering the page size & Orientation 3-4 Inserting Text 5 Editing Text 6 Inserting Graphics 7-8 Changing the Colour
Microsoft Word 2010 Tutorial
 1 Microsoft Word 2010 Tutorial Microsoft Word 2010 is a word-processing program, designed to help you create professional-quality documents. With the finest documentformatting tools, Word helps you organize
Using TBLxNet Updated May 2016
 Updated May 2016 Contents Understanding TBLxNet...3 Setting Your Options...3 Changing the Fonts...3 Selecting Colors...5 Selecting Cursor Options...6 Programming the Function Keys...6 Setting Up Miscellaneous
Creating a Template in WordPerfect
 1. File a. New From Project Creating a Template in WordPerfect b. Go to Options 2. Create A Category 1 3. Name it Family History (or a title of your choice) 4. Find Family History in the Drop down list
Introductory Exercises in Microsoft Access XP
 INFORMATION SYSTEMS SERVICES Introductory Exercises in Microsoft Access XP This document contains a series of exercises which give an introduction to the Access relational database program. AUTHOR: Information
Lesson 1: Creating, Formatting, and Editing a Word Document with a Picture Microsoft Word 2016 IN THIS CHAPTER, YOU WILL LEARN HOW TO
 Lesson 1: Creating, Formatting, and Editing a Word Document with a Picture Microsoft Word 2016 IN THIS CHAPTER, YOU WILL LEARN HOW TO Enter Text in a new document Enhance the Page with a border and Format
Word Getting Started The Word Window u vw. Microsoft QUICK Source. Creating a New Blank Document. Creating a New Document from a Template
 Microsoft QUICK Source Word 2007 Getting Started The Word Window u vw x y z u Quick Access Toolbar contains shortcuts for the most commonly used tools. v Microsoft Office Button contains common file and
How To Capture Screen Shots
 What Is FastStone Capture? FastStone Capture is a program that can be used to capture screen images that you want to place in a document, a brochure, an e-mail message, a slide show and for lots of other
Table of Contents. Contents
 Spring 2009 R.A. Table of Contents Contents Opening PowerPoint... 2 PowerPoint 2007 Interface... 2 PowerPoint Features... 2 Creating, Opening and Saving Presentations... 3 Creating a Presentation... 3
TLMC SHORT CLASS: THESIS FORMATTING
 Table of Contents Introduction... 2 Getting Help... 2 Tips... 2 Working with Styles... 3 Applying a Style... 3 Creating A New Style... 3 Setting Margins... 4 Adding Page Numbers... 5 Step 1: Using Sections
Microsoft Word Chapter 2. Creating a Research Paper with Citations and References
 Microsoft Word 2010 Chapter 2 Creating a Research Paper with Citations and References Objectives Describe the MLA (Modern Language Association documentation style for research papers Change line and paragraph
Microsoft Word 2011 Tutorial
 Microsoft Word 2011 Tutorial GETTING STARTED Microsoft Word is one of the most popular word processing programs supported by both Mac and PC platforms. Microsoft Word can be used to create documents, brochures,
Using Dreamweaver CC. Logo. 4 Creating a Template. Page Heading. Page content in this area. About Us Gallery Ordering Contact Us Links
 Using Dreamweaver CC 4 Creating a Template Now that the main page of our website is complete, we need to create the rest of the pages. Each of them will have a layout that follows the plan shown below.
Using Adobe Contribute 4 A guide for new website authors
 Using Adobe Contribute 4 A guide for new website authors Adobe Contribute allows you to easily update websites without any knowledge of HTML. This handout will provide an introduction to Adobe Contribute
WORD XP/2002 USER GUIDE. Task- Formatting a Document in Word 2002
 University of Arizona Information Commons Training Page 1 of 21 WORD XP/2002 USER GUIDE Task- Formatting a Document in Word 2002 OBJECTIVES: At the end of this course students will have a basic understanding
Microsoft Excel Level 1
 Microsoft Excel 2010 Level 1 Copyright 2010 KSU Department of Information Technology Services This document may be downloaded, printed, or copied for educational use without further permission of the Information
Word 2007 Basic Formatting Objectives
 Word 2007 Basic Formatting Objectives Customize Word 2007 document view. Learn basic page layout changes. Learn to change page background Basic Character Formatting Contents Page Word Document View...
Setup Contacts Add Compose Letter Compose Letter
 17 WORD-RITE Now that we have explored the Contacts and Campaigns sections of the program, it is time to work with WordRite, the integrated, full-function Rich Text word processor that is included with
Introduction WordPerfect tutorials Quattro Pro tutorials Presentations tutorials WordPerfect Lightning tutorial...
 Guidebook Contents Introduction..................................................... 1 WordPerfect tutorials.............................................. 3 Quattro Pro tutorials.............................................
Microsoft Excel 2010 Basic
 Microsoft Excel 2010 Basic Introduction to MS Excel 2010 Microsoft Excel 2010 is a spreadsheet software in the new Microsoft 2010 Office Suite. Excel allows you to store, manipulate and analyze data in
Placing Text in Columns
 Chapter When entering a page of text it is sometimes advantageous to place that text in columns. This can make the passage easier to read and make more efficient use of the space available on a page. Microsoft
Chapter 4 Printing and Viewing a Presentation Using Proofing Tools I. Spell Check II. The Thesaurus... 23
 PowerPoint Level 1 Table of Contents Chapter 1 Getting Started... 7 Interacting with PowerPoint... 7 Slides... 7 I. Adding Slides... 8 II. Deleting Slides... 8 III. Cutting, Copying and Pasting Slides...
What can Word 2013 do?
 Mary Ann Wallner What can Word 2013 do? Provide the right tool for: Every aspect of document creation Desktop publishing Web publishing 2 Windows 7: Click Start Choose Microsoft Office > Microsoft Word
Nauticom NetEditor: A How-to Guide
 Nauticom NetEditor: A How-to Guide Table of Contents 1. Getting Started 2. The Editor Full Screen Preview Search Check Spelling Clipboard: Cut, Copy, and Paste Undo / Redo Foreground Color Background Color
MSOffice WORD Microsoft Office 20 13
 MSOffice WORD Microsoft Office 2013 Objectives: Identify parts of the Word screen Name and save a document Key text into a document Edit text Print a document Close a document Modify font size, style,
Anleitungen für Word 2016 als Word-Dokument zum Ausdrucken und fürs Intranet
 Anleitungen für Word 2016 als Word-Dokument zum Ausdrucken und fürs Intranet 19 Text and Tabs Tabs (tab stops) help you to write a list, for example, for an order or invoice. Larger spaces should not be
Word 2013 Beginning. Technology Integration Center
 Word 2013 Beginning Getting Started... 2 Quick Access Toolbar... 3 The Ribbon... 3 Help... 4 Compatibility Mode... 4 Document Views... 4 Navigating the Document... 5 Moving Around in the Document... 5
MS Word Basics. Groups within Tabs
 MS Word Basics Instructor: Bev Alderman L e t s G e t S t a r t e d! Open and close MS Word Open Word from the desktop of your computer by Clicking on the Start>All programs>microsoft Office >Word 2010