Mandarin M3 Tutorial
|
|
|
- Gavin Francis
- 5 years ago
- Views:
Transcription


1 Mandarin M3 Tutorial TM How to use Mandarin M Last Update: 05/30/2014
2 Table of Contents Table of Contents Introduction...3 Windows OPAC...4 Circulation...13 Cataloging...20 Group Editor...25 Inventory...31 Report Tool...34 Contacts & Credits...35
3 Introduction Introduction Thank you for your interest in the Mandarin M3 Library Automation System. We have prepared this tutorial to give you a tour of M3. After you have imported bibliographic and patron records into M3, you can use this guide to familiarize yourself with M3, to conduct training, etc. This guide is not intended to replace our Users Guide as it only briefly touches on many of M3 s capabilities. If you prefer to use Mandarin s sample record database instead of importing your own records, we offer a version of the M3 Server that includes sample patrons and bibliographic items. This version of M3 Server is available through the same link as the free M3 download on the Mandarin Web site. Note: ReportTool is available This tutorial will walk you through all M3 modules (except ReportTool): Windows OPAC (Online Public Access Catalog) Circulation Cataloging Group Editor Inventory In many cases, there are several ways to perform a function or command. For this tutorial, we have generally chosen to present just one of the options
4 Windows OPAC Windows OPAC OVERVIEW Note: This tutorial may not explain all features available in the OPAC. With the Windows-based OPAC module, you can: Conduct Standard, Enhanced, and Visual Catalog searches of your library s holdings Select different interface languages Determine item availability and location Work with search results in brief and expanded record formats View book cover images View and link to See and See also cross-references with the optional Authority Control module Print records or save records to file Add records to the Bookbag; print or save records in the Bookbag Use Shelf Browse to locate records Review your search session history and return to prior searches Allow patrons to view their transaction history and personal information with the My Account tab Enter or scan barcodes into the Bookbag to create a list of items Use the Bulletin Board to deliver information to patrons Customize the appearance of the OPAC with your library name Customize the Visual Catalog interface STARTING THE OPAC Open the Mandarin M3 folder on your desktop, then double-click the OPAC icon. This displays the main OPAC window (Figure 2.1) with Standard Search selected. FIGURE 2.1
5 Windows OPAC The header can be customized to display the name of your library or institution. Language Options Patrons can change the interface language of the OPAC at any time; this does not change the language of the information in the MARC records. Patrons may choose from English (default), French, Spanish, German, and Italian. Click Languages. This displays the Languages dialog box with the list of language choices. Bulletin Board Feature The Bulletin Board feature links to a local HTML file or a Web page. Use this fea- ture to link to customized information, the library home page, or a page of public service announcements. Click Bulletin Board. This displays a blank bulletin board. To configure your bulletin board, click the Start button, select Programs, select Mandarin M3, select Utilities, and then click Setup Bulletin Board. Follow the prompts. STANDARD SEARCH Tip: To ensure a successful search, M3 automatically searches as follows: The Subject field searches all Subject and Summary fields of the MARC Record. The Title field searches Title, Added Title, Contents, and Notes fields of the MARC Record. The Author field searches Author, Added Author, and Responsibility Statement of the MARC Record. FIGURE 2.2
6 Windows OPAC Standard Search allows patrons to easily search your catalog with the familiar Subject, Title, or Author fields. A patron can enter a search term in the keyword box or click Browse to view a list of all data currently contained in the corresponding record index. M3 can be configured to search more or fewer fields of the MARC record or to default to different record indexes at the librarian s discretion. Search Example 1 In the Subject keyword box, type a keyword, then click Search. This displays the Search Results list (Figure 2.2). A media type icon displays next to the call number of each record. Media type icons in this results list include book, music, video, and Web site. Scroll through the search results list to view titles. When the mouse points to the media type icon, the icon type displays. (It may take a moment for the text to display.) A green box to the left of the record indicates that the item is avail- able; a red box indicates that the item is not available. Clicking this box tags the record for functions such as printing or adding to the Bookbag. Tips: Click Sort to sort by Author, Call Number, Call Number by Prefix, Copy- right Date, or Title. Active Web links can be enabled in the OPAC by entering a Web address and optional description in the bibliographic record. If you add the optional Authority Control module to your M3 system, See and See also cross-references will display in the Cross-Reference box (shown in Figure 2.2). You will be able to view records associated with a cross-reference by clicking the See also term. Tip: Use the truncation asterisk (*), wildcard ques- tion mark (?), and phrase quotation marks ( ) with your keywords. Examples: Farm* finds farms, farmer, farmers, farming, and so on.

7 Windows OPAC Wom?n finds woman and women. African American only looks for the keywords when they appear next to each other. This eliminates false results in which the words are listed separately. Search Example 2 Click the Search tab, and then click Clear. In the Title keyword box, type a title, and then click Search. This displays the Search Results list. Select a record, then click Record Details. This displays detailed information about the selected title. Search Example 3 Click the Search tab, and then click Clear. In the Subject keyword box, type a keyword, and then click Search. Click the Search tab. Click the Browse button next to the Subject keyword box to display a list of subject headings (Figure 2.3). This list allows you to narrow your search to a specific area of interest. FIGURE 2.3 Select a subject heading in the list, and then click OK. The selected term appears in the Subject keyword box. Click Search to view the Search Results list for this subject. Search Example 5 Click the Search tab, and then click Clear. A patron can search the Author field by entering a name in any order: for example, Steinbeck, John or John Steinbeck or just Steinbeck. In the Author keyword box, type any form of an author s name and then click Search. This displays the Search Results list. By default, the records display in bibliographic record format.
8 Windows OPAC Tip: Record Format allows patrons to choose the display format that best suits their needs. Standard options include Bibliographic, List, Full MARC, Catalog Card, Brief Labeled, Expanded Labeled, and Compressed List. To view other record format display options, click Record Format. Select a different format to view, and then click OK. OR Click Cancel to close the Record Format dialog box. To view record details, select a record and then click Record Details. This displays detailed information about the selected title and lists all copies owned by the library, as shown in Figure 2.4. FIGURE 2.4 Tip: Shelf Browse allows you to quickly find records with a call number similar to that of a selected record. This feature creates a virtual electronic shelf and simulates a patron browsing the shelves and discovering books/items that may not be discovered any other way. When finished reviewing the record details, click Back To Record List. USING THE BOOKBAG
 Tag at least three records. Click Add to Bookbag, and then click Add Tagged. Click the Bookbag tab to view the records you added.")
9 Windows OPAC To create a reading list or bibliography, click the green/red check box to tag indi- vidual records in the Search Results list. (Green indicates the item is available; red indicates unavailable.) Tag at least three records. Click Add to Bookbag, and then click Add Tagged. Click the Bookbag tab to view the records you added. From here, you can print or save the list. You can also add records to the list by scanning or entering barcodes, but this feature is not enabled by default; refer to the M3 Users Guide for instructions on enabling this feature. ENHANCED SEARCH Tip: If a patron is not sure what index to search, the Enhanced Search index list includes the Anywhere option. This option searches for the entered term anywhere in the MARC record. Enhanced Search allows the user to type a search query into one or more of three keyword boxes. To select different record indexes or Boolean operators, click the corresponding arrow button, and then select from the list. (You can also use the Browse button to enter a search term, as explained in Search Example 3 on page 2-4.) Search Example Click the Search tab, and then click Enhanced. This displays the Enhanced Search window (Figure 2.5). In the first keyword box (under Subject), type shipwreck. In the Boolean operator list below, select OR. In the second index list, select Subject, then type treasure in the second keyword box. In the second Boolean operator list, select NOT. In the third index list, select Subject, then type titanic in the third keyword box (shown in Figure 2.5). FIGURE 2.5
10 Windows OPAC Tip: The index lists can be customized to display different indexes. Tip: Click History to view a list of your Enhanced Search queries during this session. Click Search. If matches are found, the Search Results list displays. Your options are the same as those described in Standard Search beginning on page 2-3. VISUAL CATALOG SEARCH Visual Catalog Search combines library-definable queries that are organized into a hierarchy of topics and subtopics utilizing graphics and text. This easily configurable graphical interface offers the following benefits: Helps younger patrons quickly find library materials via visual cues, such as Animals or Countries & Cultures Creates databases for special groups, faculty, and students, such as Home Schoolers or Rotary Club Queries special collections, such as New Books, e-books, or Video Collection Launches software applications, such as WordPad Launches CD-ROM applications, such as an encyclopedia Launches URLs (MARC field 856), such as Featured Web Sites of the Week To perform a Visual Search: Click the Search tab, and then click Visual. Click each of the eight buttons featured in the Visual Catalog interface and tour on your own. FIGURE 2.6

11 Windows OPAC Tips: M3 includes over 75 colorful graphics for use in the Visual Catalog. Additional graphics can be used from sources on the Internet or your own files. Topic, query, and launcher buttons look alike. What they do when selected differenti- ates them. A topic button opens a sub-menu. A query button returns search results. A launcher button opens an application or a Web page. Two navigation buttons function as follows: Back returns to the previous menu level; Start Over returns to the first menu level. DATABASES TAB M3 can be configured to host the collections of a single library or the collections of many libraries either as a Classic Merged Union Catalog or Virtual Union Catalog. The system can be configured to search the local collection first and, if the desired record is not found, to then search other collections. A patron can choose which collections to search by clicking the Databases tab. Click the Databases tab to review layout. MY ACCOUNT TAB This feature allows patrons to view their own open and closed transactions as well as their personal information on file with the library. This tab is not enabled by default; refer to the M3 Users Guide for instructions on enabling this feature. Click the My Account tab. This displays the My Login dialog box. In the Patron Barcode box, type a patron barcode that exists in the system. (If you are using Mandarin s sample record database, type P2.)
12 Windows OPAC In the Password box, type the patron s password, then click OK. (If you are using Mandarin s sample record database, type demo.) This displays Open Transactions with any current, or open, transactions that the library has on file for the patron. The Current button is now active. Click Historical to view closed or historical transactions. You can also view patron contact information and a patron photo (if there is one on file), but this feature is not enabled by default; refer to the M3 Users Guide for instructions on enabling this feature. After enabling, a My Info button will appear in this window.
13 Circulation Circulation OVERVIEW With the Circulation module, you can: Conduct loans, returns, reserves, holds, bookings, renewals, and fine pro- cessing Select different interface languages View patron and item status Add, edit, and search for patron and item records Add book cover images and patron photos to records so they can be viewed in Circulation and OPAC Temporarily change the system date Set up one or more circulation schedules Add and delete patron and item messages Attach, edit, and detach messages to patron and item records Enable self checkout, self return, and quick return Send notifications to patrons who owe a fine or have overdue items. Send automatic notifications to patrons when items they reserved are available Track in-house usage Run transactions reports Upload transactions from portable scanners Print receipts STARTING CIRCULATION Open the Mandarin M3 folder on your desktop, then double-click the Cir- culation icon. This displays the Login dialog box. In the Login Name box, type admin. In the Password box, type boca raton, and then click OK. This displays the main Circulation window (Figure 3.1). FIGURE 3.1
, Return (red), Renew (blue), Reserve (yellow), and Status (purple) functions. Click each of these buttons to observe the color change with each function.")
14 Circulation Circulation menu bar Contains File, Mode, Patron, Item, Tools, Settings, and Help menus. Circulation toolbar Contains Loan (green), Return (red), Renew (blue), Reserve (yellow), and Status (purple) functions. Click each of these buttons to observe the color change with each function. Shortcut toolbar Contains buttons for commonly-used functions, such as adding an item or patron, accessing circulation options and the schedule, and changing the interface language. Rest your mouse pointer on each toolbar button for a moment to view a tooltip that explains the function of each button. To turn the shortcut toolbar on or off for the current session, press CTRL+T. Barcode box Allows you to type or scan a patron or item barcode, type a patron or author s last name, or type an item s title to access the matching record. Images can be added to patron and bibliographic records. Patron and item images will display in the Circulation and OPAC modules. CONDUCTING TRANSACTIONS All circulation transactions are accessed from the main Circulation window. You can view patron and item status, loan items, return items, renew items, reserve and hold items, book equipment and rooms, attach patron and item messages, process fine payments, forgive fines, and record patron claims of lost, previously paid, never had, and previously returned. Many of these procedures are covered in the following sections. Loaning Items There are three ways to access the loan function: On the toolbar, click Loan. On the Mode menu, click Loan.
15 Press F5. Circulation Tip: If a patron has a fine, a warning appears. You can: Click Override to ignore the message and continue with the transaction. Click Payment to go to thepayment dialog box. Click Cancel to stop the transaction. Tip: There are several methods for returning items: Single Return Returning a single item from a patron. Multiple Return Returning multiple items from one patron. Return All Returning all items listed. Quick Return Scanning in bookdrop returns without patrons present. In-House Circulation Return Returning items left on tables and desks after in- library use. Loan Example On the toolbar, click Loan. In the Barcode box, type a barcode or patron name, and then press ENTER. This displays information for the patron in the Patron pane. The Patron pane can be customized to display any information that is stored in the patron record. In the Barcode box, type an item barcode, and then press ENTER to check out the first item. Type another barcode and press ENTER to check out a second item. Returning Items Returning a Single Item On the toolbar, click Return. In the Barcode box, type the barcode of the item being returned, and then press ENTER. This returns the item. Returning Multiple Items for the Same Patron On the toolbar, click Loan to reset the screen. In the Barcode box, type the patron s barcode, and then press ENTER. In the Transactions pane, select the check boxes next to the items being returned. Right-click in the Transactions pane to access a transaction menu (shown in Figure 3.2). FIGURE 3.2

16 Circulation Click Return. This batch-returns all checked items. NOTE: You can also return all loaned items by clicking Return All on the transaction menu; you do not need to select the check boxes next to the items. Attaching a Message to a Patron Record In the Barcode box, type a patron barcode, and then press ENTER. On the Patron menu, click Messages. This displays a list of any messages in the system. You can select a message from the list or add a new message for this patron. Click New. Type a message, click OK, and then click Accept. In the Block Type list (click the arrow to view the list), select Information as the block type, and then click Accept. This message will appear the next time this patron s barcode is entered. Message Block Types in M3 Information block You can bypass the message by clicking anywhere on the Circulation window (the least intrusive block type). Nudge block On first occurrence, you must order to proceed. Any time this message appe an information block. Blocking block You must select an option in order to proceed. Privilege block You must type a password t (the most intrusive block type).

17 Circulation Booking an Item Use the Booking feature to reserve an item such as a conference room, a piece of equipment, or group of videos, for a future day and/or time. You can book an item for a single day, a range of days, or for specific days. On the toolbar, click Loan. In the Barcode box, type a patron s barcode, and then press ENTER. On the Mode menu, click Booking. In the Barcode box, type the barcode of an equipment item that exists in the system, and then press ENTER. This displays the Booking dialog box (Figure 3.3). FIGURE 3.3 Tip: Click Hourly to display the current day s agenda. Click Daily to return the calendar to a two-month view. Click the first day you want the item and drag the mouse to the last day you want the item. Click Add, and then click OK. OR Click Hourly, then click the first hour you want the item and drag the mouse to the last hour you want the item. Click Add, and then click OK. To exit Booking mode, click Loan on the toolbar. Locating a Patron Clear the Circulation window by pressing ESC. In the Barcode box, type a patron s last name. This displays the Select Barcode box, which lists all matches for this name. Select a patron and click OK. This displays the patron information in the Patron pane of the Circulation window.

18 Circulation Locating and Loaning an Item With a patron displayed in the Patron pane, type an item s title in the Barcode box, and then press ENTER. This displays the bib and holding information in the Item pane of the Circulation window and loans the item to the patron. Setting Up the Library Calendar On the Tools menu, click Schedule. This displays the Circulation Schedule dialog box. Click each tab and review the contents. General tab Establishes loan period rules. Schedule tab (Shown in Figure 3.4) Establishes the calendar period and the library s opening and closing hour for each day of the week. Create multiple calendar periods to apply to different times of the year. Holidays & Exceptions tab Allows you to eliminate or add irregular dates. Identify days when library is closed because of holidays, and so on. Global Recalls tab Allows you to specify the date when all items have to be back in the library. FIGURE 3.4 When finished, click Cancel to close this dialog box. Transaction Report Utility

19 Circulation M3 provides basic transaction reports to monitor your library status and activity. On the Mode menu, click Library Transactions. In Figure 3.5, notice the All Transactions header in the Transactions pane. FIGURE 3.5 Tip: To resize the bottom pane to allow for easier viewing, drag up the bar at the top of the Transactions pane. Right-click in the Transactions pane to open a shortcut menu with a list of report choices. Click Select Transactions. This displays the Select Transactions dialog box. Under Transaction Type, click Overdue Loans. Under Overdue Loans, click the second option and type 30 in the days or more box. Click OK. Notice the header in the Transactions pane has changed.

20 Cataloging Cataloging OVERVIEW With the Cataloging module, you can: Add, edit, delete, and search for MARC records Use the find and replace utility to modify records Import and export records, including pictures STARTING CATALOGING Open the Mandarin M3 folder on your desktop, then double-click the Cataloging icon. This displays the Login dialog box. In the Login Name box, type admin. In the Password box, type boca raton, and then click OK. This displays the main Cataloging window (Figure 4.1). EDITING AN EXISTING RECORD On the Edit menu, click Search. This displays the Search dialog box. In the Search For list, select Bibliographic. In the first index list, change Subject to Title. In the first keyword box, type the title of an item that exists in your system, and then click Search. This updates the main Cataloging window with the records matching your search (Figure 4.1). FIGURE 4.1 Tips:

21 Cataloging You can sort information by any field in the pane by clicking the field s column heading. The Holding records pane displays all copies linked to the bibliographic record selected in the upper pane. Double-click the first bibliographic record in the Bibliographic records pane. This displays the Bibliographic-Cataloging window with the selected record in full MARC format (Figure 4.2). The record can now be edited. FIGURE 4.2 Tip: Once you have clicked a MARC field to activate the record pane, you can go to the end of a record by pressing CTRL+END. You can also go to the beginning of a record by pressing CTRL+HOME. Right-click any field or subfield to access a context-sensitive menu for editing. In the menu, click Toggle Prompts to switch the display of the MARC numeric tags to text fields. The Override Authority check box is available if you have purchased the optional Authority Control module. With this module, a window automatically appears when you select a field containing a name, subject, or series heading. This window displays all headings in your authority file valid for use in the selected field. You select the desired heading, and the heading is then added to the bibliographic record and a link is created to the authority record. Authorized users can edit an authority controlled bibliographic field directly by selecting the Override Authority check box, then typing the new text in the field. Any errors or cataloging inconsistencies in the record appear in the Validation errors box on the right. To view information explaining each error, click the plus (+) sign to the left of the error. Click Cancel to close the Bibliographic-Cataloging window. CREATING A DUPLICATE OF AN EXISTING HOLDING RECORD

22 Cataloging In the main Cataloging window, double-click the holding record in the Holding records pane (lower pane). Under After saving, click Duplicate. This creates a new holding record for an additional copy of this book. Click Save. This displays a new Holding-Cataloging window containing the duplicate holding record. In the lower pane, scroll to 852#p (barcode) and type a barcode in the field at right (as shown in Figure 4.3). FIGURE 4.3 Click Save. Click Cancel to close the Holding-Cataloging window. The main Cataloging window displays the newly created holding record in the Holding records pane beneath the original holding record. CREATING A NEW BIBLIOGRAPHIC RECORD On the File menu, select New, and then click Bibliographic Record. This displays the Templates window with the list of cataloging templates included with M3 (Figure 4.4). The templates can be used in their current form or customized. FIGURE 4.4

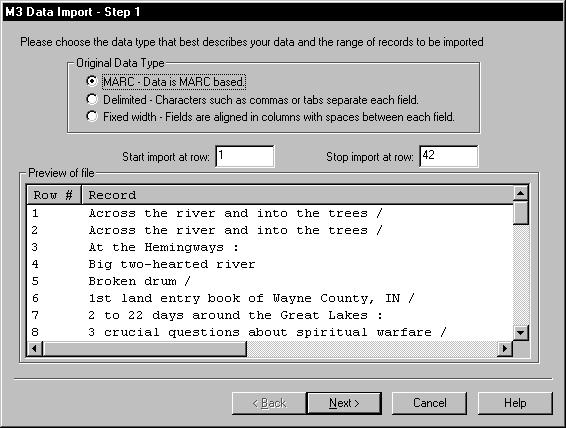
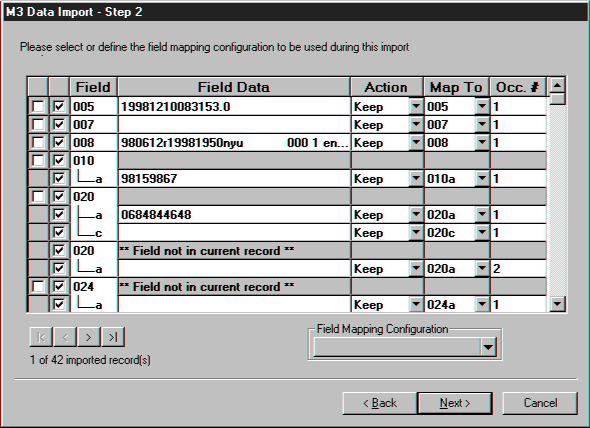
23 Cataloging Select a template, then click OK. This displays the Bibliographic-Cataloging window. Type entries in the blank fields and subfields for the bibliographic record as desired. Click Save. This displays the Holding-Cataloging window with the newly created bibliographic record in the top pane and the associated holding record in the bottom pane. Type entries in the blank fields and subfields for the holding record. Click Save. The bibliographic and holding records have been created. You can now search for this title in the OPAC. IMPORTING RECORDS M3 Cataloging imports bibliographic and patron records in MARC, delimited, and fixed-width formats, and authority records in MARC format. To import bibliographic records, for example, the user: Selects the records, fields, and subfields to import Specifies how fields are displayed Checks for duplicate records Generates holding records Updates barcodes The import feature is not fully documented in this tutorial; however, Figure 4.5 and Figure 4.6 show samples of the Step 1 and Step 2 windows in the import process. FIGURE 4.5
24 Cataloging FIGURE 4.6

25 Group Editor Group Editor OVERVIEW M3 Group Editor enables the librarian to create, customize, and modify the group permissions required to gain access to M3 functions. Using an elaborate, hierar- chical security scheme, librarians are able to assign levels of access for Cata- loging, Circulation, OPAC, and database maintenance features. There are three types of groups: Patron, Item, and Special Reserve. When dis- playing a group listing, a group type icon appears to the left of each group: a head signifies a patron group a book signifies an item group eyeglasses signify a special reserve group STARTING GROUP EDITOR Open the Mandarin M3 folder on your desktop, then double-click the Group Editor icon. This displays the Login dialog box. In the Login Name box, type admin. In the Password box, type boca raton, and then click OK. This displays the main Group Editor window (Figure 5.1). FIGURE 5.1 CREATING A NEW GROUP For this example, we will create a new special reserve group. In the main Group Editor window, click New. This displays the New Group dialog box (Figure 5.2).

26 FIGURE 5.2 Group Editor Click New Special Reserve Group, and then click OK. This places a New Special Reserve Group in the Group Editor window (Figure 5.3). FIGURE 5.3 Select the New Special Reserve Group, then click Edit. This displays the Special Reserve Group window. Here, you can customize this group s patron privileges and item parameters. Click the General tab.

27 In the Name box, type Computer Awareness Program. In the Description box, type Sponsored by FBLA Club. Under Reserve Group Expiration, click Expires, and then select a date. Under Created by Patron Group, leave the entry as Administrators. Under Circulation Access Available to, click All Patrons. Group Editor FIGURE 5.4 Click the Item Members tab. A message appears indicating that there are no records found. Click OK. In the Display list (under the tab names), select Search. This displays the Search dialog box. You can now add item members to the group just created by searching for items. In the first keyword box, type computer*, and then click Search. Select the check box next to each item you want to add to the group, and then click Add. In the Display list, select Items in Current Group Only. The list refreshes to display only the items you selected and added to the group (Figure 5.5). FIGURE 5.5
 and establish circulation time frames and fine amounts in the boxes provided.")
 and establish the circulation quantity limits.")
28 Group Editor Click the Circ Periods tab (Figure 5.6) and establish circulation time frames and fine amounts in the boxes provided. When finished, click Apply. FIGURE 5.6 Click the Circ Limits tab (Figure 5.7) and establish the circulation quantity limits. Select a limit type check box, then establish the limit in the corresponding box. FIGURE 5.7

29 Group Editor When finished, click Apply, and then click OK. This displays the main Group Editor window with the new group listed. To review the Computer Awareness Program group and its attribute, select the group, and then click Edit. VIEWING GROUP INFORMATION Patron Groups To review the privileges and parameters of a patron group: In the main Group Editor window, select a patron group. (If you don t have any patron groups, create one now before proceeding.) Click Edit. This displays the Patron Group window. Click each tab and review the contents. When finished, click Cancel to return to the main Group Editor window. Tip: Use the Item Group Overrides tab to grant a patron group rights to over- ride specific circulation limits connected to item groups. For example, if the item group General Collection has a loan period of 14 days, the Volunteers patron group could be given a loan period of 21 days. NOTE: When the check box corresponding to a feature or limit is selected, the feature or limit is enabled. In this example, the patron group is comprised of Library Assistants. Therefore, you will notice that the members of this group have more privileges than general patrons/students and fewer privileges than the professional library staff. Tip: The Members tab lists items assigned to the item group. New items may be added or removed when necessary. Items assigned to this group adhere to the circulation parameters established in the Circ Periods tab.
30 Group Editor Item Groups To review the parameters of an item group: In the main Group Editor window, select an item group. (If you don t have any item groups, create one now before proceeding.) Click Edit. This displays the Item Group window. Click each tab and review the contents. When finished, click Cancel to return to the main Group Editor window. NOTE: When the check box corresponding to a feature or limit is selected, the feature or limit is enabled. Special Reserve Groups To review the privileges and parameters of a special reserve group: In the main Group Editor window, select a special reserve group. (If you don t have any special reserve groups, create one now before pro- ceeding.). Click Edit. This displays the Special Reserve Group window. Click each tab and review the contents. When finished, click Cancel to return to the main Group Editor window. NOTE: When the check box corresponding to a feature or limit is selected, the feature or limit is enabled. In this example, notice that the tabs Circ Periods, Circ Limits, and Patron Members do not display any information. The items in this special reserve group are being placed into a display case in the lobby of the library; therefore, the items will not circulate.
31 OVERVIEW Inventory Inventory Note: This demonstration guide may not explain all features available in Inventory. With the Inventory module, you can: Conduct a full or partial inventory Enter additional barcodes after the barcode records have been uploaded Remove barcodes during the inventory process Print and save inventory results Export a barcode list of inventory results Conducting an inventory with M3 requires a few basic steps: 1. Scan items to be inventoried 2. Upload the results into the Inventory module 3. Set range limits (partial inventory only) 4. Perform the Do Inventory procedure STARTING INVENTORY Open the Mandarin M3 folder on your desktop, then double-click the Inven- tory icon. This displays the Login dialog box. In the Login Name box, type admin. In the Password box, type boca raton, and then click OK. This displays the Select Inventory Session window. CONDUCTING AN INVENTORY This basic example assumes that you have scanned and uploaded barcodes into M3, and then saved the barcode file. For instructions, refer to the M3 Users Guide. In the Select Inventory Session window, click Create New Session. This displays the main Inventory window (Figure 6.1). FIGURE 6.1


32 Inventory In the File menu, click Add Barcode File. Navigate to your saved barcode file and click Open. In the Barcode pane, click the plus (+) sign next to the barcode file name. This displays the list of barcodes in the file. To review Inventory set-up, click Inventory Options on the Action menu. This displays the Inventory Options window (Figure 6.2). FIGURE 6.2 In this window, you can:
 and selecting a call number prefix When finished in this window, click Save. On the Action menu, click Do Inventory to run the Inventory procedure.")
33 Inventory Configure the Inventory module to recognize a specific pattern of characters, a certain barcode length, or both Indicate a partial inventory by entering the range of call numbers (classification parts) and selecting a call number prefix When finished in this window, click Save. On the Action menu, click Do Inventory to run the Inventory procedure. When finished, a dialog box displays with a summary of the inventory results (Figure 6.3). FIGURE 6.3 Click OK to close the dialog box and return to the main Inventory window. M3 places the appropriate information in each of the nine tabs in the Inventory pane. Newly Found Lists items present in this barcode upload, but previously flagged as missing. Missing Lists all items missing from this barcode upload. Invalid Barcodes Lists items that do not belong in the collection or have the wrong barcode length. Misplaced Lists items that are in the wrong shelf position. Loaned Shelved Lists items that have an availability status of loaned, but are actually on the shelf. No Barcode Lists items that have no barcode on file in the catalog. Duplicate Barcode Lists items that have duplicate barcodes. Out of Range(s) Lists items that are not in the inventory call number range, but are in the barcode upload in shelflist order. Statistics Displays a summary of the current inventory results, as well as statistics regarding this inventory. Click each of the tabs in the Inventory pane to view the Inventory results. Now that all the results are compiled, the reports needed to reconcile the Inventory can be printed from within each tab by clicking Print [List Type] List on the File menu.
34 Report Tool Report Tool OVERVIEW With the ReportTool module, you can: Create and run new reports Access and run preloaded reports Customize your library name on a preloaded report Print reports or download reports to diskette The ReportTool module is a flexible and powerful Windows report generator. More than 900 library-related reports for school, public, academic, and special libraries are offered. You can run these preloaded reports in their current form, customize the preloaded reports, or create new reports.
35 Contacts & Credits POSTAL ADDRESS Mandarin Library Automation, Inc. P.O. Box Boca Raton, FL PHONES AND FAX (800) Toll-free (561) Local (561) Fax REGULAR OFFICE HOURS M-F 8:30AM - 5:00PM EST TECHNICAL SUPPORT HOURS 24x7x hours/day, 7 days/week BY Sales & Marketing: automation@mlasolutions.com Customer Service: automation@mlasolutions.com Technical Support: support@mlasolutions.com Webmaster: webmaster@mlasolutions.com Contacts & Credits
Mandarin M3. Daily Use Handbook ver 1.7SP5g 2014
 Mandarin M3 TM Daily Use Handbook ver 7SP5g 2014 Table of Contents Table of Contents Getting Started with M3...3 Using Circulation...4 Using the OPAC...12 Maintenance...19 Contacts & Credits...20 Getting
Mandarin Oasis TM Library Automation System
 Mandarin Oasis TM Library Automation System Daily Use Handbook This handbook explains routine library tasks using Mandarin Oasis. It is designed to supplement Oasis training by providing simple, step-by-step
Mandarin Textbook. How to Enable the Textbook Module Mandarin Library Automation, Inc. All rights reserved. Last Update: 05/26/2014
 Mandarin Textbook TM How to Enable the Textbook Module 2014 Last Update: 05/26/2014 Table of Contents Table of Contents Introduction...3 Installing Textbook Enabler...4 Generating Barcode Labels...5 Using
Mandarin M5. Users guide ver Mandarin Library Automation, Inc. All rights reserved. Last Update: 02/03/2016
 Mandarin M5 TM Users guide ver 1.0.0 2016 2016 Mandarin Library Automation, Inc. All rights reserved. Last Update: 02/03/2016 Table of Contents Table of Contents Mandarin M5 Overview...4 Introduction...5
Mandarin Oasis. Daily Use Handbook ver
 TM Mandarin Oasis Daily Use Handbook ver 2.9.1 2014 Table of Contents Table of Contents Mandarin Oasis...3 Getting Started with Oasis...4 The Oasis Interface...5 Patron Mode...7 Librarian Mode...8 Using
Mandarin M5. Daily Use Handbook 2016
 Mandarin M5 Daily Use Handbook 2016 Table of Contents Table of Contents Mandarin M5...3 Getting Started with M5...4 The M5 Interface...5 Patron Mode...6 Librarian Mode...7 Using Circulation...9 Circulation
utomation solutions for libraries worldwide
 mpressions, The Mandarin Newsletter of 5 2/8/2011 6:48 PM You're receiving this email because of your relationship with Mandarin Library Automation. Please confirm your continued interest in receiving
Mandarin Library Usage
 Mandarin Library Usage User guide 2014 Last Update: 03/07/2014 Table of Contents Table of Contents Mandarin Library Usage...3 Overview...4 How to Use it...5 Patron Mode...6 Admin Mode...8 Add or Edit Users...10
Circulation. Sierra Training Manual
 Circulation Sierra Training Manual 1 Overview Sierra Circulation allows staff to do the following: check out items, check in items, search all patrons, place holds, maintain hold queues, maintain course
INSIGNIA LIBRARY SYSTEM TRAINING GUIDE FOR TORONTO CATHOLIC SCHOOL DISTRICT DATE: AUG 25 -SEP 05/2014 INSIGNIA SOFTWARE CORPORATION
 INSIGNIA LIBRARY SYSTEM TRAINING GUIDE FOR TORONTO CATHOLIC SCHOOL DISTRICT DATE: AUG 25 -SEP 05/2014 INSIGNIA SOFTWARE CORPORATION Table of Contents Welcome to Insignia Software... 4 System Requirements...
Leap Patron Services & Circulation. Polaris ILS 5.0 SP3 Training THE LIBRARY IS OPEN
 Leap Patron Services & Circulation Polaris ILS 5.0 SP3 Training THE LIBRARY IS OPEN Leap Overview What is Leap? What are some of the features that are available in Leap? Do we still need the Polaris Client?
Workflows Reports Training. 1. Report Session 2. Schedule New Reports 3. Finished Reports
 Workflows Reports Training 1. Report Session 2. Schedule New Reports 3. Finished Reports Report Session 1 Report Session Configuration harringtonlc.org Workflows Help Report Session Configuration For Internet
Moving graphic examples are included on some pages. To view them you need the Flash plugin on your
 Print: Introduction Introduction Understanding the basic components of the Millennium circulation environment and how each function works is key to efficiently using Millennium Circulation. Because there
Overview. Resources to help you. Getting Started with Destiny Library Manager
 Overview Destiny brings all your library automation together on one server: circulation, cataloging, searching, and reporting. It is completely browser-based providing access to your library from virtually
2010 College Center for Library Automation
 Cat al ogi ng Al ephver si on20 2010 College Center for Library Automation Contents Unit 1: Overview of the LINCC Cataloging Module... 1 LESSON 1: NAVIGATING THE CATALOGING MODULE... 1 LESSON 2: USING
INFOLIB2015 USER INSTRUCTION GUIDE
 INFOLIB2015 USER INSTRUCTION GUIDE Welcome to Infolib2015. This is the step-by-step tutorial on how to use Infolib2015. To enter the program, Double click the Infolib Icon from the desktop. For the first
C/W MARS Evergreen Circulation
 C/W MARS Evergreen Circulation This document is an introduction to using Evergreen Circulation to check items in and out, to renew items, to pay fines, and to place and search item holds. It also includes
Mobile Apps Introduction Getting Started Features Resources
 Introduction 2 Install on Apple devices 2 Install on Android devices 2 Getting Started 3 Features 4 Librista for Apple 4 Librista for Android 7 AMI (Atriuum Mobile Interface) 10 AIR (Atriuum Inventory
What's New in Destiny Version Early Adopter Program Version
 What's New in Destiny Version 16.5 Early Adopter Program Version Table of Contents Overview 3 All Destiny Products 4 Destiny Library Manager 5 Destiny Resource Manager 6 All Products 7 Jobs and Reports
Basic Workflows Training
 Basic Workflows Training 1. Menu Bar 2. Tool Bar a. Common Tasks b. User Information and Maintenance c. Item Information and Maintenance d. Holds Information and Maintenance e. In-Transit Items f. Special
INSIGNIA LIBRARY SYSTEM LIBRARIAN TRAINING GUIDE DATE: NOVEMBER 9, 2017 INSIGNIA SOFTWARE CORPORATION
 INSIGNIA LIBRARY SYSTEM LIBRARIAN TRAINING GUIDE DATE: NOVEMBER 9, 2017 INSIGNIA SOFTWARE CORPORATION TABLE OF CONTENTS TABLE OF CONTENTS... 2 WELCOME TO INSIGNIA SOFTWARE... 4 SYSTEM REQUIREMENTS... 4
Qwik Start Guide. For Destiny 9.5 MEDT Dr. Phyllis Snipes. Whitney Fletcher. Natalie Hamlin. Tiffany Johnson
 Qwik Start Guide For Destiny 9.5 MEDT 6468 Dr. Phyllis Snipes Whitney Fletcher Natalie Hamlin Tiffany Johnson 1 Table of Contents Section I: In the Beginning Page # 4 Setting up Patrons types 4 Adding
WorkFlows Learning to Use the Staff Client. Version 3.5
 WorkFlows Learning to Use the Staff Client Version 3.5 Contents Basic Terms... 4 SAILS... 4 Symphony... 4 WorkFlows... 4 Enterprise... 4 Getting Started... 5 Logging into WorkFlows... 5 The WorkFlows screen...
User s. Guide. Integrated Library System. Acquisitions
 User s Guide Integrated Library System Acquisitions VIRTUA ILS INTEGRATED LIBRARY SYSTEM Acquisitions User s Guide Version 43.1 January 2004 Copyright 1999-2004 VTLS Inc. All Rights Reserved. Virtua and
Getting Started with EMS Desktop Client
 Getting Started with EMS Desktop Client Getting Started with EMS Desktop Client What is the EMS Desktop Client? Reservations and Bookings What is an Everyday User Reservation? Starting EMS Managing Database
Report Session Setting pathway to print/view reports
 Report Session Report Session Setting pathway to print/view reports When you first load Sirsi on a computer, after a major software update, or if your computer has been reimaged, you will need to set your
Basic Millennium INTRODUCTION
 Basic Millennium INTRODUCTION Welcome to the Basic Millennium tutorial. Navigation tools, such as the Continue button, will display as you progress through the presentation, while playback functions are
Union List Circulation / OPAC Training Manual. To get to the PrairieCat Encore catalog for searching, go to:
 Union List Circulation / OPAC Training Manual To get to the PrairieCat Encore catalog for searching, go to: http://search.prairiecat.info Revised October 27, 2015 1 Table of Contents Searching in Encore
Horizon Serials. User s and Administrator s Guide
 Horizon Serials User s and Administrator s Guide Microsoft, Windows, and Windows NT are registered trademarks of Microsoft Corporation. Sybase is a registered trademark of Sybase, Inc. Adobe and Acrobat
Pop up of Loan Notes when an Item is Returned Loan Notes will now pop up if the Display Loan Notes checkbox is clicked in Return Options.
 ALEPH VERSION 23 New Features and Functionality CIRCULATION New Buttons Go to Patron Button in the Items tab The List of Items page in the Circulation module has been enhanced to include a Go to Patron
Florida Virtual Campus.
 I nt erl i br aryloan Al ephver si on20 Florida Virtual Campus www.flvc.org Contents Unit 1: Overview of the ILL Module... 1 LESSON 1: UNDERSTANDING IMPORTANT LINCC ILL TERMS... 1 LESSON 2: NAVIGATING
DEVELOPED BY THE SHARE BIBLIOGRAPHIC SERVICES TEAM SPRING 2013 REVISED MAY
 ITEM RECORDS DEVELOPED BY THE SHARE BIBLIOGRAPHIC SERVICES TEAM SPRING 2013 REVISED MAY 2014 Table of Contents General cataloging steps... 3 Matching... 3 General match points... 3 Creating Item Records...
ALEPH/McGill Circulation Module Part One: Basic Circulation
 ALEPH/McGill 1. Training schedule and online calendar... 3 2. Introduction... 4 a) Structure of the course... 4 b) Terminology... 5 c) Shortcuts... 5 d) Help... 5 e) Feedback... 5 3. Getting started...
MODIFYING CIRCULATION WINDOW DISPLAYS
 5-58 Using M3 Circulation MODIFYING CIRCULATION WINDOW DISPLAYS Note: If M3 v1.6 was your first installation of M3, graphic cells appear by default in the Patron and Item panes for all modes. Tip: Create
Spectrum CIRC/CAT Getting Started A guide for getting started with Winnebago Spectrum CIRC/CAT 5.0
 Spectrum CIRC/CAT Getting Started A guide for getting started with Winnebago Spectrum CIRC/CAT 5.0 1995-2001 Sagebrush Corporation, All Rights Reserved. 1995-2001 Sagebrush Corporation, Minneapolis, Minnesota.
Atriuum Mobile Interface
 Introduction Book Systems, Inc. provides the Atriuum Mobile Interface (AMI) application for Apple iphone, ipod touch, ipad, and ipad mini devices and Android devices so that librarians can continue to
WHAT S NEW IN HTML5 TABLE OF CONTENTS
 WHAT S NEW IN HTML5 Insignia Software is proud to announce that our HTML5 version is now available to all our customers. Our major focus in the HTML5 release was making Insignia customizable to your needs.
The terms Offline Interface and Standalone Mode mean the same thing a separate program to handle simple circulation tasks while the network is down.
 Chapter 10 - Standalone Mode The terms Offline Interface and Standalone Mode mean the same thing a separate program to handle simple circulation tasks while the network is down. Several features are available
Table of Contents. Contents. 1 Introduction. 2 The Main Menu Step #2 - PM Schedule. 8 Notification Popups. 9 Service Calendar
 Contents I Table of Contents 1 Introduction...1 2 The Main Menu...1 3 The Equipment...3 Manager...6 4 Step #1 - Establishing Locations/Categories...6 5 Step #2 - PM Schedule Setup...9 6 Step #3 - Adding
Unit 2: Managing Patron Records
 LINCC Circulation Unit 2 Unit 2: Managing Patron Records This unit provides an overview of patron records and describes searching for a patron record, editing patron information, and adding a new patron
Destiny. Understanding Roles and Assigning Permissions Webinar. Participant Guide
 Destiny Understanding Roles and Assigning Permissions Webinar Participant Guide 12011A v11.5 Destiny Understanding Roles and Assigning Permissions Webinar Participant Guide Version 11.5 Participant Guide
CATALOGUING MANUAL. Summer SirsiDynix. All Rights Reserved.
 CATALOGUING MANUAL Summer 2008 2008 SirsiDynix. All Rights Reserved. Table of Contents SIRSI RECORD STRUCTURE AND DISPLAY... 1 ITEM SEARCH AND DISPLAY WIZARD... 2 CALL NUMBER AND ITEM MAINTENANCE WIZARD...
LEAP MANUAL AN OVERVIEW ON THE PUBLIC SERVICES/FRONT DESK FUNCTIONS IN POLARIS LEAP
 LEAP MANUAL AN OVERVIEW ON THE PUBLIC SERVICES/FRONT DESK FUNCTIONS IN POLARIS LEAP MARCH 2018 MARIGOLD POLARIS LEAP MANUAL Last Update: March 2018 This manual provides an overview on the public services/front
Welcome to our new catalog!
 Welcome to our new catalog! Use this guide to become familiar with the new catalog's features and functions. To get started, choose one of these topics: Finding your way around Searching Working with search
Table of Contents. Contents. 1 Introduction. 2 The Main Menu Notification Popups. 9 Service Calendar. 12 Generating Reports ...
 Contents I Table of Contents 1 Introduction...1 2 The Main Menu...1 3 The Equipment...3 Manager...6 4 Step #1 - Establishing Locations/Categories...6 5 Step #2 - Defining Your PM schedules...9 6 Step #3
Offline Circulation Tool
 Introduction... 2 Setup... 2 Installation... 2 Configuration... 4 Circulation... 6 Check Out... 6 Check In... 7 Upload Transactions... 7 Additional Resources...8 Product Support... 8 1 Introduction The
MCDOUGAL LITTELL EASYPLANNER USER S GUIDE
 MCDOUGAL LITTELL EASYPLANNER USER S GUIDE 1 Introduction The McDougal Littell EasyPlanner allows you to quickly and easily access Resource materials such as tests, quizzes, books, and other supporting
All The News That Fits! What s New in Polaris 4.1
 Enter bullet text here Second level All The News That Fits! What s New in Polaris 4.1 Bill Schickling, President and CEO MidAtlantic PUG, April 20, 2012 1 1 Polaris PowerPAC Redesigned! Easier to use,
G3 for TEXTBOOKS. Library Resource Management Systems, Inc. PO Box 727, Sedona, Arizona,
 G3 for TEXTBOOKS Use your Library System for Textbook Distribution, this document addresses Hosted services that is our Internet based system, however Textbook Distribution is available with all versions
INSIGNIA LIBRARY SYSTEM USER MANUAL VERSION 6.4
 INSIGNIA LIBRARY SYSTEM USER MANUAL VERSION 6.4 Insignia Software Corporation Copyrights 1999-2014 2 Welcome Table of Contents Welcome INSIGNIA LIBRARY SYSTEM... 1 USER MANUAL... 1 VERSION 6.4... 1 STARTING
EBSCOhost Web 6.0. User s Guide EBS 2065
 EBSCOhost Web 6.0 User s Guide EBS 2065 6/26/2002 2 Table Of Contents Objectives:...4 What is EBSCOhost...5 System Requirements... 5 Choosing Databases to Search...5 Using the Toolbar...6 Using the Utility
Table of Contents: Use your Library System for Textbook Distribution
 G4 for TEXTBOOKS Use the LRMS Library System for Textbook Distribution This document addresses Textbook Distribution is available with all versions of the G4 Library Management System. No Licensing is
Reports: SQL & SimplyReports. Fall 2014
 Reports: SQL & SimplyReports Fall 2014 General Links on BCCLS Staff page Username/Password the same as Polaris software. Statistics Page SQL Reports: Custom & Delivered http://rpts.bccs.org/reports Use
ReCPro TM User Manual Version 1.15
 Contents Web Module (recpro.net)... 2 Login... 2 Site Content... 3 Create a New Content Block... 4 Add / Edit Content Item... 5 Navigation Toolbar... 6 Other Site Tools... 7 Menu... 7 Media... 8 Documents...
Page Topic 02 Log In to KidKare 02 Using the Navigation Menu 02 Change the Language
 Page Topic 02 Log In to KidKare 02 Using the Navigation Menu 02 Change the Language help.kidkare.com 03 Enroll a Child 03 Withdraw a Child 03 View Pending and Withdrawn Children 04 View Kids by Enrollment
Presented by: CSIR-KNOWGATE. KNOWGATE KNOWGATE Website: knowgate.niscair.res.in
 Presented by: CSIR-KNOWGATE KNOWGATE Email: csirknowgate@niscair.res.in KNOWGATE Website: knowgate.niscair.res.in More > Tools Patrons and Circulation Catalog Additional Tools Patrons and Circulation Catalog
Content Author's Reference and Cookbook
 Sitecore CMS 6 Content Author's Reference and Cookbook Rev. 080627 Sitecore CMS 6 Content Author's Reference and Cookbook A Conceptual Overview and Practical Guide to Using Sitecore Table of Contents Chapter
What's New in Destiny Version 13.5, Including Automatic Updates
 What's New in Destiny Version 13.5, Including Automatic Updates Table of Contents Destiny 13.5 Features 1 All Products 4 Overdue Notices 5 Block Override Code (SSO only) 7 Destiny Library Manager 8 Simplified
Basics FLEETMATE. Getting Started The Main Window Using Your Mouse Window Controls and Buttons Data Entry Filtering Data
 Basics Getting Started The Main Window Using Your Mouse Window Controls and Buttons Data Entry Filtering Data Copyright SCB Consulting, LLC. All rights reserved. www.fleetmate.com Getting Started Welcome
Sierra Circulation MILS
 Sierra Circulation MILS Copyright 2009-2015 by Innovative Interfaces, Inc. This publication is supplied for the exclusive use of customers of Innovative Interfaces with the understanding that it shall
What's New in Destiny Version 14.5
 What's New in Destiny Version 14.5 Table of Contents Destiny 14.5 Features 1 All Products 3 Report Builder Export to Excel 4 Destiny Library Manager 5 Patron Synchronization 6 Digital Resource Usage Reports
***** Archive and Backup your Data before updating*****
 Alexandria 6.1.0 Release Notes 5/6/2010 ============================================================ Current Alexandria v5 customers will need to contact COMPanion prior to updating to version 6. This
Using Standalone/Offline Mode
 Using Standalone/Offline Mode Use standalone/offline mode is for use if your library loses Internet connectivity, and one cannot log into Evergreen. Download Offline Patron List Once a week, download the
Getting Started The Outlook Web Access Window
 QUICK Source Microsoft Outlook Web Access in Exchange Server 2003 Getting Started The Outlook Web Access Window ❶ ❷ ❸ ❹ ❺ ❻ ❼ ❽ Using the Reading Pane The Reading Pane allows you to view your e-mail messages
Marigold Polaris Manual. An overview on the public services/front desk functions in Polaris
 Marigold Polaris Manual An overview on the public services/front desk functions in Polaris www.marigold.ab.ca/pd January 2016 Marigold Polaris Best Practices Manual Last Update: January 2016 This manual
Destiny Library Manager Webinar Training Essentials. Quick Reference Guide
 Destiny Library Manager Webinar Training Essentials Quick Reference Guide Table of Contents Importing Title Records from Titlewave 1 Importing Title Records 5 Adding Title and Copy Records from Resource
W hat s New in Destiny 10.5
 W hat s New in Destiny 10.5 All Rights Reserved. What s New in Destiny 10.5 Contents Destiny 10.5 Features... 1 Destiny (All Products)... 3 Follett Destiny Application for Mobile Devices... 5 How-To Videos
Participant Training Guide
 INTRODUCTION TO THE CCH Tax Research NetWork Tax & Accounting Libraries http://tax.cchgroup.com/network Participant Training Guide January 2008 ACS90089181 Table of Contents Introduction / Course Objectives
BASIC NAVIGATION & VIEWS...
 Content Overview VISUAL TOUR... 5 NEW FEATURES IN OUTLOOK 2010... 6 BASIC NAVIGATION & VIEWS... 7 SETTING PREFERENCES... 7 Creating an Outlook Shortcut... 7 Choosing a Startup View... 7 CUSTOMIZING INBOX
Accessing the L4U Learning Commons Library
 Accessing the L4U Learning Commons Library Your Client code and PIN will work for both of our libraries: Overdrive E-Library link L4U Library link To Find the physical library, go to the HCOS main page
Student Research Center User Guide. support.ebsco.com
 Student Research Center User Guide Table of Contents Student Research Center... 4 Searching Tips User Guide... 4 Using the Student Research Center Home Page... 5 Basic Search... 5 Topic Search... 7 Source
Blackboard 5. Instructor Manual Level One Release 5.5
 Bringing Education Online Blackboard 5 Instructor Manual Level One Release 5.5 Copyright 2001 by Blackboard Inc. All rights reserved. No part of the contents of this manual may be reproduced or transmitted
Office365 End User Training & Self-Service Migration Manual Simplified
 Office365 End User Training & Self-Service Migration Manual Simplified Version 1.0 University Systems and Security 5/25/2016 1 P a g e Table of Contents 2 P a g e Table of Contents Introduction to Office365...
 Contents I Table of Contents 1 Introduction...1 2 The Main Menu...1 3 The Equipment...2 Manager...5 4 Step #1 - Establishing Locations/Categories...6 5 Step #2 - Defining your PM Schedules...9 6 Step #3
Introduction to Cognos
 Introduction to Cognos User Handbook 7800 E Orchard Road, Suite 280 Greenwood Village, CO 80111 Table of Contents... 3 Logging In To the Portal... 3 Understanding IBM Cognos Connection... 4 The IBM Cognos
Offline Circulation Tool
 Introduction 2 Setup 2 Installation 2 Configuration 3 Circulation 4 Check Out 5 Check In 5 Upload Transactions 6 Additional Resources 6 Product Support 6 1 Introduction The Book Systems Offline Circulation
Horizon Launcher Configuration Guide
 Horizon Launcher Configuration Guide Windows NT and Windows 2000 are registered trademarks of Microsoft Corporation. All other product or company names are trademarks or registered trademarks of their
Outlook 2010 One. Wednesday, August 7, 9-11 am. Agenda:
 Page 1 Outlook 2010 One Wednesday, August 7, 9-11 am Agenda: Outlook Search Options Working with Attachments Creating a Signature Marking a Message as Read Flag an item for Follow-Up Reply, Reply All &
Content Author's Reference and Cookbook
 Sitecore CMS 7.0 Content Author's Reference and Cookbook Rev. 130425 Sitecore CMS 7.0 Content Author's Reference and Cookbook A Conceptual Overview and Practical Guide to Using Sitecore Table of Contents
***** Archive and Backup your Data before updating***** ***Ensure that you are running a minimum version of before updating***
 Alexandria 6.20.0 Release Notes 6/17/2011 ============================================================ Current Alexandria v5 customers will need to contact COMPanion prior to updating to version 6. This
Horizon Information Portal provides three searching tools: Search, Browse and Advanced Search.
 1. INTRODUCTION In spring 2004 the Library began to implement the integrated library system Horizon produced by Dynix. This was possible thanks to financial support of the European Centre Natolin. A major
DOCUMENT IMAGING REFERENCE GUIDE
 January 25, 2017 DOCUMENT IMAGING REFERENCE GUIDE AppXtender Web Access version 7 Kent State University Division of Information Services AppXtender Web Access Help: For questions regarding AppXtender Web
Office 365: . Accessing and Logging In. Mail
 Office 365: Email This class will introduce you to Office 365 and cover the email components found in Outlook on the Web. For more information about the Microsoft Outlook desktop client, register for a
Unit 1: Overview of the LINCC Cataloging Module
 LINCC Cataloging Unit 1 Unit 1: Overview of the LINCC Cataloging Module The LINCC Cataloging module consists of three components or modes : Cataloging, Items, and Search. These modes can be accessed by
ebrary Patron User Guide
 ebrary Patron User Guide EBRARY DOES RESEARCH ebrary patron user guide i Welcome to ebrary ebrary provides a unique research platform that hosts thousands of full-text books, reports and maps from leading
Sierra Procedures Manual
 Educational Technology and Library Services Sierra Procedures Manual A library operations guide for DPS Library Media Specialists, Library Techs, and Library Paraprofessionals. Sierra Procedures Manual
vs. ITS forwindows THE LIBRARY CORPORATION
 Hardware requirements Minimum operating system Win2000 Win XP Pro An earlier ITS version (3.61) can still use Win 95 Searching Search dialogs Strict diacritic interpretation! Keyword search! Phrase search!
ebrary ebooks evolvedsm Patron User Guide e b r a r y p at r o n U s e r G u i d e
 ebrary ebooks evolvedsm Patron User Guide Welcome to ebrary ebrary provides thousands of ebooks from the world s leading publishers as well as sophisticated technology to assist with the research process.
Evergreen Standalone Client Procedures
 Evergreen 2.7.2 Standalone Client Procedures Questions? Contact the PINES staff by putting in a Help Desk ticket or calling 404-235-7210. Table of Contents Introduction... 2 One-Time Setup... 2 Receipt
Astra Schedule User Guide Scheduler
 Astra Schedule User Guide 7.5.12 Scheduler 1 P a g e ASTRA SCHEDULE USER GUIDE 7.5.12... 1 LOGGING INTO ASTRA SCHEDULE... 3 LOGIN CREDENTIALS... 3 WORKING WITH CALENDARS... 4 CHOOSING A CALENDAR AND FILTER...
Parent Student Portal User Guide. Version 3.1,
 Parent Student Portal User Guide Version 3.1, 3.21.14 Version 3.1, 3.21.14 Table of Contents 4 The Login Page Students Authorized Users Password Reset 5 The PSP Display Icons Header Side Navigation Panel
Introduction to 9.0. Introduction to 9.0. Getting Started Guide. Powering collaborative online communities.
 Introduction to 9.0 Introduction to 9.0 Getting Started Guide Powering collaborative online communities. TABLE OF CONTENTS About FirstClass...3 Connecting to your FirstClass server...3 FirstClass window
[ Getting Started with Analyzer, Interactive Reports, and Dashboards ] ]
![[ Getting Started with Analyzer, Interactive Reports, and Dashboards ] ]](/thumbs/88/117545107.jpg "[ Getting Started with Analyzer, Interactive Reports, and Dashboards ] ]") Version 5.3 [ Getting Started with Analyzer, Interactive Reports, and Dashboards ] ] https://help.pentaho.com/draft_content/version_5.3 1/30 Copyright Page This document supports Pentaho Business Analytics
Version 5.3 [ Getting Started with Analyzer, Interactive Reports, and Dashboards ] ] https://help.pentaho.com/draft_content/version_5.3 1/30 Copyright Page This document supports Pentaho Business Analytics
My Sysco Reporting Job Aid for CMU Customers. My Sysco Reporting. For CMU Customers (Serviced by Program Sales)
") My Sysco Reporting For CMU Customers (Serviced by Program Sales) 1 Accessing My Sysco Reporting... 2 Logging In... 2 The Reporting Dashboard... 3 My Sysco Reporting Process... 6 Generating a Report...
My Sysco Reporting For CMU Customers (Serviced by Program Sales) 1 Accessing My Sysco Reporting... 2 Logging In... 2 The Reporting Dashboard... 3 My Sysco Reporting Process... 6 Generating a Report...
Introduction. Paradigm Publishing. SNAP for Microsoft Office SNAP for Our Digital World. System Requirements
 Introduction Paradigm Publishing Paradigm understands the needs of today s educators and exceeds the demand by offering the latest technological advancements for coursework settings. With the success of
Unicorn WorkFlows Client for the Java TM Platform Training Guide Cataloging and Authority Control. (Version GL3.1) DOC-CATGEN-U
 DOC-CATGEN-U") Unicorn WorkFlows Client for the Java TM Platform Training Guide Cataloging and Authority Control (Version GL3.1) DOC-CATGEN-U Publication Name: Unicorn WorkFlows Training Guide Cataloging and Authority
Unicorn WorkFlows Client for the Java TM Platform Training Guide Cataloging and Authority Control (Version GL3.1) DOC-CATGEN-U Publication Name: Unicorn WorkFlows Training Guide Cataloging and Authority
Perceptive Data Transfer
 Perceptive Data Transfer User Guide Version: 6.5.x Written by: Product Knowledge, R&D Date: September 2016 2015 Lexmark International Technology, S.A. All rights reserved. Lexmark is a trademark of Lexmark
Microsoft Windows SharePoint Services
 Microsoft Windows SharePoint Services SITE ADMIN USER TRAINING 1 Introduction What is Microsoft Windows SharePoint Services? Windows SharePoint Services (referred to generically as SharePoint) is a tool
The New York Society Library Presents: New Features of the Library Catalog
 The New York Society Library Presents: New Features of the Library Catalog Ingrid Richter, Head of Systems systems@nysoclib.org INDEX: Advanced Search Page 03 Patron Record Page 04 Search Catalog Page
Guide to User Interface 4.3
 Datatel Colleague Guide to User Interface 4.3 Release 18 June 24, 2011 For corrections and clarifications to this manual, see AnswerNet page 1926.37. Guide to User Interface 4.3 All Rights Reserved The