13190 SW 68th Parkway. Suite 200. Portland, OR
|
|
|
- Logan Allison
- 5 years ago
- Views:
Transcription

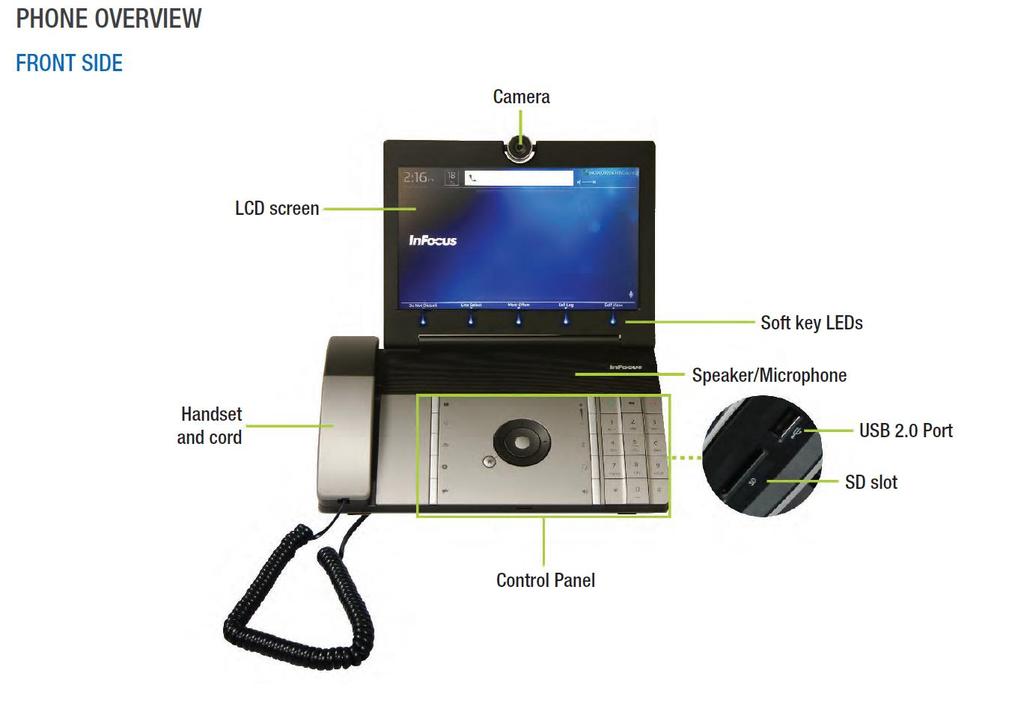
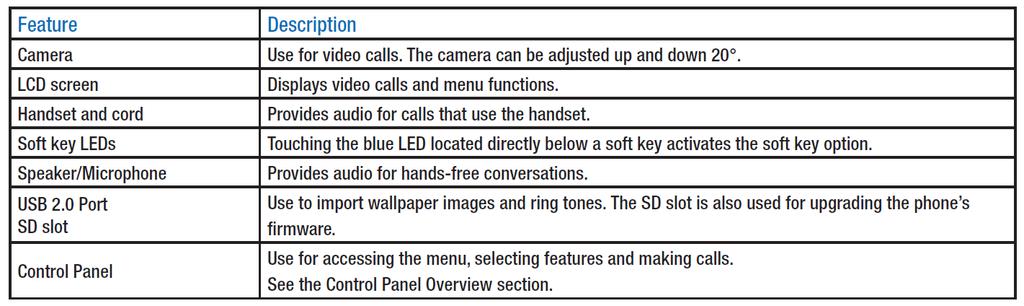
1
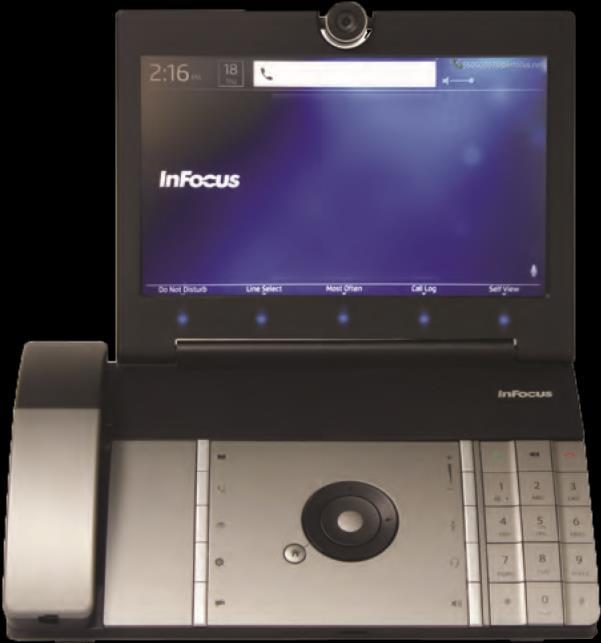
2 MVP100 Operational Overview
3
4
5
6
7
8 PHONE CAPABILITIES AND REQUIREMENTS This phone is a SIP end-point which high definition resolutions with upload resolution up to 720p and the download resolution up to 30 frames per second. This phone supports G.711 and G audio codec, H.264 video codec, and the H.323 standard. Communication with PSTN and other SIP systems is dependent on the SIP provider used. In order for this phone to work successfully, you need the following: 1) Network with Internet connection 2) Upstream and downstream speeds of 128 kbps (kilobytes per second) are supported, however a minimum of 512 kbps is recommended for good performance. By default, the phone is linked to InFocus' SIP service, however you are free to use any SIP provider. Your phone has three Accounts (Account 1, Account 2, and Account 3) which can support different SIP services. Each account can accept many calls; however only one active call is allowed at a time. The other call can be on hold or in an incoming/ringing state. Conference calls can be made using your SIP provider's bridge services.
9 CHANGE PHONE BANDWIDTH Although Factory Default settings are considered best for data and video usage, if multiple phones are being used in a single network, the IT administrator may choose to change these settings to better use the bandwidth and workload of their network infrastructure. 1) Press the Settings button. 2) Touch the User Settings soft key. The Call Features submenu displays. 6:30 22 PM Mon 3) Navigate to Auto Bandwidth. 4) Press the Select button. 5) Navigate to On for automatic bandwidth control or Off to use the manually configured Call Rate. a. If Off is chosen, press the Select button and navigate to Call Rate. b. Press the Select button. c. Use the navigational arrow keys or scroll wheel to choose the desired call rate. 6) Press the Select button. 7) When finished making changes, touch the Exit soft key. 8) Touch the Save soft key to exit the menu system and save your changes.
10 ADJUST THE LCD BRIGHTNESS You can adjust the brightness of the LCD panel. 1) Press the Settings button. 2) Touch the User Settings soft key. 3) Touch the Next soft key until the Display/Sound submenus display. 4) Navigate to LCD Brightness. 5) Press the Select button. 6) Using the scroll wheel or arrow keys, adjust the LCD Brightness slider to the left to decrease the brightness, or to the right to increase the brightness. 7) Press the Select button. 8) When finished making changes, touch the Exit soft key. 9) Touch the Save soft key to exit the menu system and save your changes.
11 ADJUST THE SCREENSAVER You can activate the screensaver feature and change the time interval it appears. 1) Press the Settings button. 2) Touch the User Settings soft key. 3) Touch the Next soft key until the Display/Sound submenus display. 4) Navigate to Screensaver. 5) Press the Select button. 6) Navigate to Off to turn the feature off or On to use the default screensaver. 7) Press the Select button. 8) Navigate to Screensaver Timeout. 9) Press the Select button. 10) Select the screensaver timeout period you want before the screensaver feature is activated. 11) Press the Select button. 12) When finished making changes, touch the Exit soft key. Touch the Save soft key to exit the menu system and save your changes.
12 SET STANDBY PARAMETERS In order to save energy, it is recommended that you set up your phone to go into a standby mode when not in use. This can be done by adjusting the System Standby and Standby Timer features. 1) Press the Settings button. 2) Touch the User Settings soft key. 3) Touch the Next soft key until the Display/Sound submenus display. 4) Navigate to System Standby. 5) Press the Select button. 6) Choose On to activate the System Standby feature or Off to turn this feature off. 7) Press the Select button. 8) Navigate to Standby Timer. 9) Press the Select button. 10) Select the inactivity timeout period you want before the Standby feature is activated. 11) Press the Select button. 12) When finished making changes, touch the Exit soft key. 13) Touch the Save soft key to exit the menu system and save your changes.
13 ADJUST THE RING VOLUME You can adjust the volume of the ringtone by pressing the volume up and down keys on the keypad while the phone is ringing or by using the following method: 1) Press the Settings button. 2) Touch the User Settings soft key. 3) Touch the Next soft key until the Display/Sound submenus display. 4) Navigate to Ring Volume. 5) Press the Select button. 6) Using the scroll wheel or arrow keys, adjust the ring volume slider to the left to decrease the volume, or to the right to increase the volume. 7) Press the Select button. 8) When finished making changes, touch the Exit soft key. 9) Touch the Save soft key to exit the menu system and save your changes.
14 ADJUST THE KEY TONE You can turn the key tone on or off. 1) Press the Settings button. 2) Touch the User Settings soft key. 3) Touch the Next soft key until the Display/Sound submenus display. 4) Navigate to Key Tone. 5) Press the Select button. 6) Navigate to Off to turn the feature off or On to turn the feature on. 7) Press the Select button. 8) When finished making changes, touch the Exit soft key. 9) Touch the Save soft key to exit the menu system and save your changes.
15 CHANGE THE RING TONE You can choose one of the standard ring tones or upload and choose a personal ring tone. Note: To associate a specific ring tone to a Personal Contact, go to the Contacts list and navigate to Edit. 1) Press the Settings button. 2) Touch the User Settings soft key. 3) Touch the Next soft key until the Display/Sound submenus display. 4) Navigate to Ringtone. 5) Press the Select button. 6) Navigate to Off to turn the feature off, choose one of the standard ringtones, or create a customized ringtone. a. To create a customized ringtone, save a ringtone (.wav format; maximum 2MB) onto a USB 2.0 thumb drive or SD card and insert the thumb drive/card in the right-hand slot on the phone. b. Verify that Ringtone is set to User. c. Press the Select button and navigate to Add Ringtone. d. Press the Select button. e. Browse to the desired ringtone on your thumb drive or SD card. f. Press the Select button to copy the file to your phone. Any previously saved custom ringtone file is erased. 7) When finished making changes, touch the Exit soft key. 8) Touch the Save soft key to exit the menu system and save your changes.
 Press the Settings button. 2) Touch the User Settings soft key.")
16 CHANGE THE CAMERA SETTINGS Before starting a video call, we recommend that you turn on Self View, adjust the camera's position and review the image quality. If the camera's White Balance, Brightness or Contrast needs to be adjusted, you can make these adjustments in this menu. 1) Press the Settings button. 2) Touch the User Settings soft key. 3) Touch the Next soft key until the Camera submenu displays. 4) Navigate to Brightness Mode. 5) Press the Select button. 6) Navigate to Auto for automatic brightness control or Manual to use manual Brightness adjustments. a. If Manual is chosen, press the Select button and navigate to Brightness. b. Press the Select button. c. Using the scroll wheel or arrow keys, adjust the Brightness slider to the left to decrease the brightness, or to the right to increase the brightness. 7) Press the Select button. 8) Navigate to Contrast Mode. 9) Press the Select button. 10) Navigate to Default to use the factory default contrast level or Manual to use manual Contrast adjustments. a. If Manual is chosen, press the Select button and navigate to Contrast. b. Press the Select button. c. Use the navigational arrow keys or scroll wheel to adjust the Contrast level as desired. 11) Press the Select button. 12) Navigate to White Balance Mode. 13) Press the Select button.
17 14) Navigate to Auto for automatic White Balance control or Manual to use manual White Balance adjustments. a. If Manual is chosen, press the Select button and navigate to White Balance. b. Press the Select button. c. Use the arrow keys or scroll wheel to adjust the White Balance level as desired. 15) Press the Select button. 16) When finished making changes, touch the Exit soft key. 17) Touch the Save soft key to exit the menu system and save your changes. DEFINE DATE AND TIME SETTINGS You can personalize the date and time formats, and choose between automatic SNTP time synchronization or manual time/date entry modes within this menu. 1) Press the Settings button. 2) Touch the User Settings soft key. 3) Touch the Next soft key until the General/Wallpaper submenus display. 6: PM Mon 4) Navigate to and select the Timezone. Select the GMT equivalent for your time zone. 5) Press the Select button. 6) Navigate to and select Time Format. Select standard (12H) or military time (24H). 7) Press the Select button. 8) Navigate and select the Date Format. Select the date format mm/dd/yyyy, dd/mm/yyyy or yyyy/mm/dd. 9) Press the Select button. 10) When finished making changes, touch the Exit soft key. Touch the Save soft key to exit the menu system and save your changes.
18 CHANGE THE WALLPAPER IMAGE You can choose a standard wallpaper image or upload and choose a personal wallpaper image. Wallpaper images can be up to 2MB and in the following formats: *.jpeg, *.jpg, *.png. Note: Resolutions higher or lower than 1366 x 768 are scaled to match the native resolution of the phone. 1) Press the Settings button. 2) Touch the User Settings soft key. 3) Touch the Next soft key until the General/Wallpaper submenus display. 4) Navigate to Wallpaper. 5) Press the Select button. 6) Navigate to InFocus to use the default wallpaper, or choose one of the other standard wallpaper options, or create a customized wallpaper. a. To add a custom wallpaper, save an image (*.jpeg, *.jpg, *.png; maximum 2MB) onto a USB 2.0 thumb drive or SD card and insert the thumb drive/card in the right-hand slot on the phone. Note: Landscape images are recommended. Portrait images will be stretched. b. Verify that Wallpaper is set to User. c. Press the Select button and navigate to Add Wallpaper. d. Press the Select button. e. Browse to the desired wallpaper image (for example, a family or vacation photo) on your thumb drive or SD card. f. Press the Select button to copy the file to your phone. Any previously saved custom wallpaper image file is erased. 7) When finished making changes, touch the Exit soft key. 8) Touch the Save soft key to exit the menu system and save your changes.
19 ADMINISTRATIVE/IT FEATURES ACCESS THE SYSTEM SETTINGS MENU A PIN is required to access the phone's Advanced Settings. By default, this PIN is "1234," but this can be changed by the IT Administrator. See"Change the System Settings Admin PIN" on page 33. 1) Press the Settings button. 2) Touch the System Settings soft key. 6: PM Mon STATUS Address Proxy Status @infocus.net Registered AUDIO Codec Bit Rate Packet Loss Jitter Transmit Receive 3) Enter the Administrator PIN code (default 1234) using the keypad. 4) Press the Select button (or touch the Accept soft key). 5) You can now begin making System Settings changes. Note: If you enter an incorrect PIN, you will remain on the Enter Administrator PIN field. When you leave the Settings menu, the System Settings become locked again.
20 DEFINE THE PROVISIONING MODE AND AUTHENTICATION CODE By default, your phone is provisioned by InFocus.net, however you can provision your phone with another SIP provider URL in this menu. 1) Access the System Settings menu. The Auto Configure/System submenu displays. 6: PM Mon 2) Navigate to Provisioning Mode. 3) Press the Select button. 4) Select On to turn on the provisioning mode or Off to turn off this feature. By default, this feature is on which allows the system to be configured by the InFocus.net server automatically. If you do not want to use the InFocus.net service, turn this feature off to allow manual configuration. 5) Press the Select button. 6) Navigate to Authentication Code. 7) Press the Select button. 8) Enter the Authentication Code you received from your service provider. If you are using InFocus.net, the you receive has the subject line: "Activation Success". 9) Press the Select button. 10) When finished making changes, touch the Exit soft key. 11) Touch the Save soft key to exit the menu system and save your changes. CHANGE THE SYSTEM SETTINGS ADMIN PIN The IT administrator can redefine the factory default System Settings Administrator PIN, so that Advanced Setting items are protected. Note: Accomplishing a Factory Reset resets the PIN to "1234". 1) Access the System Settings menu. The Auto Configure/System submenu displays.
 When finished making changes, touch the Exit soft key. 8) Touch the Save soft key to exit the menu system and save your changes.")
21 6: PM Mon 2) Navigate to PIN. 3) Press the Select button. 4) Use the Backspace key to erase the existing PIN. 5) Use the keypad to enter the new PIN. 6) Press the Select button. 7) When finished making changes, touch the Exit soft key. 8) Touch the Save soft key to exit the menu system and save your changes. Note: The PIN can only contain alphanumeric characters, underscores and periods. Security and Encryption There are a few reasons you may want to enable encryption on your MVP Keep communication during a SIP call secure from unauthorized monitoring. 2. Resolve call failure due to SIP ALG conflict. To keep your calls secure you will need to enable two encryption settings, TLS, and Media encryption. TLS is used to encrypt certain metadata such as IP addresses. Media encryption is used to encrypt the audio and video media in the call. Enable TLS & Media Encryption 1) Press the settings button on the lower left side of the control panel. 2) Touch the soft key labeled System Settings. 3) Enter the password. (The default password is: 1234) 4) Touch the Accept soft key. 5) Touch the Next soft key to change page until you are on the page for the SIP account you want to encrypt.
 Use the up/down arrow keys to move to the Media Encryption (SRTP) setting. 10) Click the select button and use the up/down arrows to change the setting to Best Effort. 11) Touch the Exit soft key.")
. However this can conflict with the functionality of the MVP100. In this case the problem can be resolved by enabling TLS.")

22 6) Use the Up and Down arrow buttons to highlight the Transport setting. 7) Select TLS by clicking the select key and use the up and down arrows to move to TLS. 8) Click the select key to Select TLS. 9) Use the up/down arrow keys to move to the Media Encryption (SRTP) setting. 10) Click the select button and use the up/down arrows to change the setting to Best Effort. 11) Touch the Exit soft key. 12) Touch the Accept soft key to save the new settings. SIP ALG Conflicts Some networks may have a feature called SIP ALG enabled on their routers. This is usually done to improve quality of service with Voice over IP (VoIP). However this can conflict with the functionality of the MVP100. In this case the problem can be resolved by enabling TLS. It is not necessary to enable Media Encryption in this case. However Media Encryption can be enabled as well, if desired. Account Settings and Line Mapping The system settings is where you can add up to three separate SIP accounts. The account info you will add will vary depending on what SIP service you are using. In most cases you will need to enter the SIP URI, the Username, Password, and the type of Transport as a minimum. 1) Press the settings button on the lower left side of the control panel. 2) Touch the soft key labeled System Settings. 3) Enter the password. (The default password is: 1234) 4) Touch the Accept soft key. 5) Touch the Next soft key to change page until you are on the page for the SIP account you want to add. 6) Use the up/down arrow buttons to navigate to each of the account settings. 7) Use the number pad to enter the information into the necessary fields. 8) Touch the Exit soft key. 9) Touch the Accept soft key to save the new settings. Once the account settings are entered you will need to make the account accessible by setting it up in line mapping. 1) Press the settings button on the lower left side of the control panel. 2) Touch the Line Mapping soft key to get into the Line Mapping configuration.
 Use the up/down arrow buttons to move to the account you want on that line. 6) Click the select button to select the account.")
23 3) Select the line you want to configure by using the up/down buttons to navigate to the line you want to add an account. 4) Press the select button and you will be shown the available accounts. 5) Use the up/down arrow buttons to move to the account you want on that line. 6) Click the select button to select the account. 7) Move to the name and info fields by using the left/right arrow buttons. 8) Use the keypad to enter whatever you like in the name and info fields. 9) Touch the Exit soft key. 10) Touch the Accept soft key to save the new settings. You will then see the lines you just configured represented on the right side of the screen. Lines that have properly registered will have a green bar and green check mark. Lines not configured or not properly registered will have a red X. RESET THE PHONE TO FACTORY DEFAULT SETTINGS A Factory Reset resets everything to factory default settings, including the System Settings Admin PIN. All user settings and the phonebook will be lost. 1) Access the System Settings menu. The Auto Configure/System submenu displays. 2) Navigate to Factory Reset. 3) Press the Select button. 4) Touch the Yes soft key to accomplish a factory reset. The phone will re-boot.
24 UPGRADE THE SOFTWARE Under normal circumstances, your phone will alert you when a software upgrade is available. Follow the onscreen instructions to upgrade your phone. Note: Your phone must be connected to the internet via the network for the upgrade process to work. If you prefer upgrading the software manually using an SD card or USB 2.0 thumb drive, follow the instructions below: 1) Insert a USB 2.0 thumb drive or SD card with the software upgrade into the right-hand side of the phone. 2) Access the System Settings menu. The Auto Configure/System submenu displays. 3) Navigate to Software Upgrade. 4) Press the Select button. 5) Navigate to the software update located on the USB thumb drive or SD card. 6) Press the Select button. The file is copied to and verified by the phone. 7) When the "Upgrade to version..." dialog box displays, touch the Upgrade soft key to start the upgrade process. The menu screen will turn black and then display an "Upgrading Firmware" message. Note: The upgrade process will take several minutes to finish. 8) After the upgrade is complete, the phone will reboot. DEFINE NETWORK SETTINGS The IT administrator defines the network settings for the phone in this menu. 1) Access the System Settings menu. 2) Touch the Next soft key until the IP Settings/DNS Settings submenu displays.
25 6: PM Mon ) Navigate to Protocol. 4) Press the Select button. 5) Choose the protocol (IPv4 or IPv6) appropriate for your organization. 6) Press the Select button. 7) Navigate to Assignment. 8) Press the Select button. 9) Choose DHCP or Static as appropriate for your organization. a. If you choose DHCP, the Address, Subnet Mask, and Gateway information automatically populates. b. If you choose Static, navigate to the Address, Subnet Mask, and Gateway fields and enter the correct information using the keypad. 10) Press the Select button. 11) Navigate to DNS Mode. 12) Press the Select button. 13) Choose Auto or Manual as appropriate for your organization. a. If you choose Auto, the DNS Server information automatically populates. b. If you choose Manual, navigate to the DNS Server fields and enter the correct information using the keypad. 14) Press the Select button. 15) When finished making changes, touch the Exit soft key. Touch the Save soft key to exit the menu system and save your changes.
Wireless VoIP Phone Model: BT-WFP1000
 Table of Contents Wireless VoIP Phone Model: BT-WFP1000 User s Manual Chapter 1 Overview the WiFi Phone... 6 1.1 Front Panel and Keypad... 6 1.2 Removing and Installing the Battery... 8 1.4 Powering the
All Rights Reserved. February 2005 Version 1.1
 All Rights Reserved The use, disclosure, modification, transfer or transmittal of this work for any purpose, in any form, or by any means, without the written permission from Net2Phone is strictly forbidden.
CONFIGURING GRANDSTREAM IP PHONES AND GATEWAYS WITH THE 3CX PHONE SYSTEM
 CONFIGURING GRANDSTREAM IP PHONES AND GATEWAYS WITH THE 3CX PHONE SYSTEM CONFIGURING GRANDSTREAM GXP SERIES WITH THE 3CX PHONE SYSTEM 1. Ensure that you have created the extension that you wish to use
TS-1542/TS-1542-C 15.6 in. HD Touch Screens
 TS-1542/TS-1542-C 15.6 in. HD Touch Screens Supplemental Guide Crestron Electronics, Inc. Original Instructions The U.S. English version of this document is the original instructions. All other languages
XT-13P IP Indoor Monitor User Manual
 XT-13P IP Indoor Monitor User Manual About this manual Thank you for choosing XT-13P IP indoor monitor. This manual is intended for end users, who need to use and configure the indoor monitor. It provides
SPA400 Internet Telephony Gateway with 4 FXO Ports
 SPA400 Internet Telephony Gateway with 4 FXO Ports Administration and Configuration Guide v1.0 Using the SPA400 The SPA400 features the ability to connect up to four (4) standard analog telephones lines
TSS-7/TSS-10 7" and 10.1" Room Scheduling Touch Screens
 TSS-7/TSS-10 7" and 10.1" Room Scheduling Touch Screens Supplemental Guide Crestron Electronics, Inc. Crestron product development software is licensed to Crestron dealers and Crestron Service Providers
Configuring Settings on the Cisco Unified Wireless IP Phone
 CHAPTER 5 Configuring Settings on the Cisco Unified Wireless IP Phone The Settings menu on the Cisco Unified Wireless IP Phone 7921G provides access to view and change network profile settings and several
Cisco Unified IP Phone Settings
 Phone Settings Overview, page 1 Cisco Unified IP Phones 7906G and 7911G Menus, page 1 Phone Setup s, page 4 Network Configuration Menu, page 5 Device Configuration Menu, page 17 Security Configuration
Notices Information. Htek IP Phones UC926E User Manual
 Notices Information Htek IP Phones UC926E User Manual Version 2.0.4.4.24 Feb. 2018 1 Notices Information Notices Information Copyright Copyright 2005-2018 Nanjing Hanlong Technology CO., LTD. All rights
802.11b/g Functional Wi-Fi Phone. User s manual VIP-193. Version 1.0.0
 802.11b/g Functional Wi-Fi Phone VIP-193 User s manual Version 1.0.0 Copyright Copyright (C) 2009 PLANET Technology Corp. All rights reserved. The products and programs described in this User s Manual
LifeSize Passport Configuration Preferences Version 4.7
 LifeSize Passport Configuration Preferences Version 4.7 This document presents a visual depiction of the preferences users and administrators can set to configure LifeSize Passport using software release
XonTel XT-23G User manual
 XonTel XT-23G User manual Notices Information Copyright XonTel owns all the right to revise and change this document at any time. And all the illustrations and instructions in this paper are subject to
GXV-3000 IP Video Phone Quick Installation Guide
 1 GXV-3000 IP Video Phone Quick Installation Guide WARNING: Please DO NOT power cycle the GXV when LED lights are flashing during system boot up or firmware upgrade. You may corrupt firmware images and
A Division of Cisco Systems, Inc. Wireless-G. IP Phone. User Guide. Voice WIP330. Model No.
 A Division of Cisco Systems, Inc. Voice Wireless-G IP Phone User Guide Model No. WIP330 Copyright and Trademarks Specifications are subject to change without notice. Linksys is a registered trademark
Notices Information. Htek IP Phones UC924E User Manual
 Notices Information Htek IP Phones UC924E User Manual Version 2.0.4.4.29 Mar. 2018 1 Notices Information Notices Information Copyright Copyright 2005-2018 Nanjing Hanlong Technology CO., LTD. All rights
Configuring Settings on the Cisco Unified Wireless IP Phone 7921G
 CHAPTER 5 Configuring Settings on the Cisco Unified Wireless IP Phone 7921G The Settings menu on the Cisco Unified Wireless IP Phone 7921G provides access to view and change network profile settings and
UCx Feature Guide for Infinity phones
 UCx Feature Guide for Infinity phones Date: 23 August 2018 Version: 1.4 System: UCx Release: 6.0 Phone models: E-MetroTel will provide support for the following Infinity IP phones, as long as the phones
2757 VoIP Phone Users Guide
 2757 VoIP Phone Users Guide Rev. 1.0 Table of Contents 1 Introduction... 5 1.1 Package Contents... 5 1.2 Features... 5 1.3 Basic Setup... 6 2 Network Setup... 8 2.1 Static IP Address... 8 2-2 PPPoE...11
SDP-R25 User Manual 05/06/2015
 SDP-R25 User Manual 05/06/2015 1 Content Production Overview... 4 1. Production... 4 2. Features...4 Configuration...7 1. Web Login... 7 1.1. Obtaining the IP address... 7 1.2. Login the Web...7 2. Status...8
Configuring and Managing the IP Camera
 CHAPTER 3 The Cisco Video Surveillance IP Camera provides configuration windows that you use to configure and manage the IP camera. This chapter explains how to access the configuration windows, describes
Configuring the Cisco TelePresence System
 3 CHAPTER Revised: August 2011, Contents This chapter contains the following sections: First Time Setup Wizard for the CTS 500 32, page 3-1 First Time Setup for All Other CTS Models, page 3-2 IP Settings,
Network Camera. Application Guide 1.5 Before operating the unit, please read this manual thoroughly and retain it for future reference.
 A-EAK-100-15 (1) Network Camera Application Guide 1.5 Before operating the unit, please read this manual thoroughly and retain it for future reference. 2012 Sony Corporation Table of Contents Overview
Wireless-G. User Guide. IP Phone WIP330. A Division of Cisco Systems, Inc. Model No. Voice
 A Division of Cisco Systems, Inc. Voice Wireless-G IP Phone User Guide Model No. WIP330 Copyright and Trademarks Specifications are subject to change without notice. Linksys is a registered trademark
CyberData SIP Page Server V3 Integration with 8x8 Serial Numbers 1461x
 CyberData SIP Page Server V3 Integration with 8x8 Serial Numbers 1461x This document covers the integration of CyberData s SIP Page Server V3 with 8x8. This document was written for 8x8 and the following
Notices Information. Htek IP Phones UC923 User Manual
 Notices Information Htek IP Phones UC923 User Manual Version 2.0.4.4.29 Mar. 2018 1 Notices Information Notices Information Copyright Copyright 2005-2018 Nanjing Hanlong Technology CO., LTD. All rights
Network Camera. Application Guide 1.8 Before operating the unit, please read this manual thoroughly and retain it for future reference.
 A-EAK-100-18 (1) Network Camera Application Guide 1.8 Before operating the unit, please read this manual thoroughly and retain it for future reference. 2012 Sony Corporation Table of Contents Overview
TSW-560/TSW-760/TSW in., 7 in., and 10.1 in. Touch Screens
 TSW-560/TSW-760/TSW-1060 5 in., 7 in., and 10.1 in. Touch Screens Supplemental Guide Crestron Electronics, Inc. Original Instructions The U.S. English version of this document is the original instructions.
HT801/HT802 Firmware Release Note IMPORTANT UPGRADING NOTE
 HT801/HT802 Firmware Release Note IMPORTANT UPGRADING NOTE Once HT801/HT802 is upgraded to 1.0.5.7 or above, downgrading to 1.0.2.x firmware version or lower is not supported. Once HT801/HT802 is upgraded
CyberData SIP RGB Strobe Integration with 8x8
 CyberData SIP RGB Strobe Integration with 8x8 This document covers the integration of CyberData s SIP RGB Strobe with 8x8. This document was written for 8x8 and the following CyberData Products. 011376
Setting Up a Mitel SX-2000 Digital PIMG Integration with Cisco Unity Connection
 Up a Mitel SX-2000 Digital PIMG Integration with Cisco Unity Connection Up a Mitel SX-2000 Digital PIMG Integration, page 1 Up a Mitel SX-2000 Digital PIMG Integration Task List for Mitel SX-2000 PIMG
IPP-155 WiFi Phone. User Guide
 IPP-155 WiFi Phone User Guide 1 CONTENTS For your safety...5 Getting Started...6 Phone Overview...6 To insert the battery...6 Charging the battery...7 Turn on and turn off the phone...7 VoIP accounts Settings...7
GIGABIT COLOR IP PHONE
 GIGABIT COLOR IP PHONE USER GUIDE UC842 Version:1.0.3.59 Nanjing Hanlong Technology Co., Ltd 86-25-84608050 support@hanlongtek.com Notices Information Notices Information Copyright Copyright 2005-2013
Nortel IP Phone 1120E User Guide
 Nortel IP Phone 1120E User Guide NN10300-022 Document status: Standard Document version: 0103 Document date: 13 April 2007 All Rights Reserved The information in this document is sourced in Canada, the
Configuring and Managing the IP Camera
 CHAPTER 3 The Cisco Video Surveillance IP Camera provides configuration windows that you use to configure and manage the IP camera. This chapter explains how to access the configuration windows, describes
FAQ for KULT Basic. Connections. Settings. Calls. Apps. Media
 FAQ for KULT Basic 1. What do the Icons mean that can be found in notifications bar at the top of my screen? 2. How can I move an item on the home screen? 3. How can I switch between home screens? 4. How
GAC2500 Firmware Release Note
 Firmware Release Note Table of Content FIRMWARE VERSION 1.0.1.44... 2... 2... 2 CHANGES SINCE FIRMWARE VERSION 1.0.1.40... 2... 2 FIRMWARE VERSION 1.0.1.40... 3... 3... 3 CHANGES SINCE FIRMWARE VERSION
Setting up Alcatel 4400 Digital PIMG Integration
 up Alcatel 4400 Digital PIMG Integration with Cisco Unity Connection Up an Alcatel 4400 Digital PIMG Integration with Cisco Unity Connection, on page 1 Up an Alcatel 4400 Digital PIMG Integration with
April AT&T Collaborate SM. Customer Configuration Guide
 April 2018 AT&T Collaborate SM Customer Configuration Guide 1 Content Welcome to the AT&T Collaborate service! This guide will cover the site configurations that need to be configured to work with AT&T
Teléfono inteligente de sobremesa
 Teléfono inteligente de sobremesa KX-UT670 Telefono da scrivania SIP intelligente KEY FEATURES Telefono da scrivania intelligente e programmabile - fino a 6 account SIP Touchscreen a colori da 7" Compatibile
CyberData SIP Intercom Integration with 8x8
 CyberData SIP Intercom Integration with 8x8 This document covers the integration of CyberData s SIP Intercom with 8x8. This document was written for 8x8 and the following CyberData Products: 011214 SIP
19 LCD / 8 CHANNEL DVR COMBO WITH 160GB HDD & 4 CAMERAS
 19 LCD / 8 CHANNEL DVR COMBO WITH 160GB HDD & 4 CAMERAS Overview - New System Setup MODEL: SG19LD804-161 www.lorexcctv.com Copyright 2007 LOREX Technology Inc. New System Setup - Overview New System Setup
Setting Up an Alcatel 4400 Digital PIMG Integration with Cisco Unity Connection
 up Alcatel 4400 Digital PIMG Integration with Cisco Unity Connection Up an Alcatel 4400 Digital PIMG Integration with Cisco Unity Connection, page 1 Up an Alcatel 4400 Digital PIMG Integration with Cisco
Dual Mode Phone FAQ TECHNICAL SPECIFICATION
 Dual Mode Phone FAQ TECHNICAL SPECIFICATION 1. Which are the main GSM bandwidths supported by the phone? Pirelli Dual Mode Phone support GSM 900/1800/1900MHZ. DP-L10 support also the GPRS Class B, multi-slot
Copyright Nanjing Hanlong Technology CO., LTD. All rights reserved.
 UC923 Usermanual 1 Notices Information Notices Information Copyright Copyright 2005-2017 Nanjing Hanlong Technology CO., LTD. All rights reserved. Nanjing Hanlong Technology Co., LTD. owns all the right
Notices Information. Copyright. Safety cautions. WEEE Warning. Copyright XonTel All rights reserved.
 XonTel S23P Notices Information Copyright Copyright 2005-2017 XonTel All rights reserved. XonTel owns all the right to revise and change this document at any time. And all the illustrations and instructions
IP Commander for ios VoIP User Manual
 IP Commander for ios VoIP User Manual Copyright 2014, All Rights Reserved. Ver: R09 D/C: 103-0326 Table of Content 1. INTRODUCTION...4 2. GETTING STARTED...4 2.1 TUNING ON COMMUNICATOR AND CONNECTING IPAD...
EIP 7012 Essence VoIP Phone Administration Guide Version 1.0B
 Essence Technology EIP 7012 Essence VoIP Phone Administration Guide Version 1.0B Table of Contents 1 Introduction... 1 1.1 Hardware Overview... 1 1.2 Software Overview... 1 2 Keypad interface for IP Phone
GSM/GPRS 850/1800/1900 MHZ WORLD CAPABLE. L i f e s L1200. G o o d TRAINING MANUAL
 TRAINING MANUAL L i f e s G o o d GSM/GPRS 850/1800/1900 MHZ WORLD CAPABLE L1200 Don't just say it, show it! OPERATING INSTRUCTIONS Volume Up/Down External Caller-ID Display L1200 Ear Piece Integrated
Statistics Available on the Phone, page 1 Statistics Available from the Phone Web Pages, page 8
 Statistics Available on the Phone, page 1 Statistics Available from the Phone Web Pages, page 8 Statistics Available on the Phone You can see statistics and information about the phone from the Settings
Yealink VCS Network Deployment Solution
 Yealink VCS Network Deployment Solution Aug. 2016 V21.20 Yealink Network Deployment Solution ii Table of Contents Table of Contents... iii Network Requirements Overview... 1 Bandwidth Requirements... 1
KTA1010 INSTALL GUIDE
 KTA1010 INSTALL GUIDE Table of Contents 1 Check for Required Items... 2 2 Installation... 2 2.1 Installation View... 2 2.2 Connection Chart to determine cable types... 3 3 Ready to use... 3 3.1 Network
Notices Information. Htek IP Phones UC912 User Manual
 Notices Information Htek IP Phones UC912 User Manual Version 2.0.4.4.29 Mar. 2018 1 Notices Information Notices Information Copyright Copyright 2005-2018 Nanjing Hanlong Technology CO., LTD. All rights
Notices Information. Htek IP Phones UC912E User Manual
 Notices Information Htek IP Phones UC912E User Manual Version 2.0.4.4.45 Jun.2018 1 Notices Information Notices Information Copyright Copyright 2005-2018 Nanjing Hanlong Technology CO., LTD. All rights
Figures Tables Safety Instruction Overview... 9
 User Manual XT-22G Table of Content Figures... 5 Tables... 7 1 Safety Instruction... 8 2 Overview... 9 3 Installation... 10 3.1 Use PoE or external Power Adapter... 10 3.2 Desktop and Wall-mount Installation...
EEG DE361 HD BAS Decoder Product Manual
 EEG DE361 HD BAS Decoder Product Manual All rights reserved. [This page left intentionally blank] eeg Table Of Contents Introduction 2 Product Description... 2 Installation 3 Front Panel... 3 Rear Panel...
IS-381 / IS-382 IP Audio gateway. User Manual
 IS-381 / IS-382 IP Audio gateway User Manual IS-381 IS-382 PORTech Communications Inc. Content 1. Introduction... 1 2. Functions... 1 3. Parts list... 2 4.Main body size... 2 5.Panel description... 3 6.Link
/ / UC912P Usermanual 1
 // UC912P Usermanual 1 Notices Information Notices Information Copyright Copyright 2005-2017 Nanjing Hanlong Technology CO., LTD. All rights reserved. Nanjing Hanlong Technology CO., LTD. owns all the
AR168F SIP Phone User Guide
 AR168F SIP Phone User Guide - 1 - INDEX 1. PRODUCT OVERVIEW...4 2. FEATURES AND SPECIFICATION...4 2.1. Hardware Features...4 2.2. Software Features...5 2.3. Standard and Protocol...6 2.4. Electric Requirements...7
Cisco TelePresence Video Systems
 Cisco TelePresence Video Systems 1 EX Series MX200 Profile Series Quick Set C20 / C20 Plus Codec C Series Software version TC4.2 JULY 2011 2 Thank you for choosing Cisco! Your Cisco product has been designed
CyberData SIP Paging Amplifier Integration with 8x8
 CyberData SIP Paging Amplifier Integration with 8x8 This document covers the integration of CyberData s SIP Paging Amplifier with 8x8. This document was written for 8x8 and the following CyberData Products.
Configuring and Managing the IP Camera
 CHAPTER 3 The Cisco Video Surveillance IP Camera provides configuration windows that you use to configure and manage the IP camera. This chapter explains how to access the configuration windows, describes
HT801/HT802 Firmware Release Note IMPORTANT UPGRADING NOTE
 HT801/HT802 Firmware Release Note IMPORTANT UPGRADING NOTE Once HT801/HT802 is upgraded to 1.0.3.2 or above, downgrading to 1.0.2.x firmware version or lower is not supported. Once HT801/HT802 is upgraded
Wireless-G. User Guide. IP Phone WIP300. Voice. Model No.
 Voice Wireless-G IP Phone User Guide Model No. WIP300 Copyright and Trademarks Specifications are subject to change without notice. Linksys is a registered trademark or trademark of Cisco Systems, Inc.
Figures Tables Safety Instruction Overview Installation... 12
 Figures... 9 Tables... 12 1 Safety Instruction... 10 2 Overview... 11 3 Installation... 12 3.1 Use PoE or External Power Adapter... 12 3.2 Desktop and Wall-mount Installation... 13 4 Introduction to the
Platform Compatibility... 1 Enhancements... 2 Known Issues... 3 Upgrading SonicOS Enhanced Image Procedures... 3 Related Technical Documentation...
 SonicOS Contents Platform Compatibility... 1 Enhancements... 2 Known Issues... 3 Upgrading SonicOS Enhanced Image Procedures... 3 Related Technical Documentation...7 Platform Compatibility The SonicOS
CyberData SIP Paging Ceiling Speaker V3 Integration with 8x8
 CyberData SIP Paging Ceiling Speaker V3 Integration with 8x8 This document covers the integration of CyberData s SIP Paging Speaker V3 with 8x8. This document was written for 8x8 and the following CyberData
REVOLABS FLX UC 1000 & REVOLABS FLX UC 1500
 REVOLABS FLX UC 1000 & REVOLABS FLX UC 1500 IP & USB Conference Phone Installation and Operation Guide Models: 10-FLXUC1000 10-FLXUC1500 1 2017 REVOLABS, INC. All rights reserved. No part of this document
Table of Content. Figures Tables Safety Instruction Overview Installation... 12
 Table of Content Figures... 6 Tables... 6 1 Safety Instruction... 10 2 Overview... 11 3 Installation... 12 3.1 Use PoE or External Power Adapter... 12 3.2 Desktop and Wall-mount Installation... 13 4 Introduction
IN-SESSION ROOM SCHEDULER
 SETUP GUIDE: COMMON SETTINGS RS-TOUCH SERIES IN-SESSION ROOM SCHEDULER 24/7 AT OR BLACKBOX.COM TABLE OF CONTENTS 1. INTRODUCTION... 3 1.1 Description... 3 1.2 Network Infrastructure Requirements... 3 1.3
PLEASE READ. This user manual is from the manufacturer Jive Communications may not support some features discussed in this document.
 PLEASE READ This user manual is from the manufacturer Jive Communications may not support some features discussed in this document. Please see our online documentation or contact us for a complete list
The VH2 can handle one or two VoIP accounts (a single account can be assigned to both channels).
.") VH2 Quickstart Guide The VH2 is a studio telephone interface device designed to work on VoIP telephone systems. This guide will give you the minimum you need to know to get the system hooked up and running.
VH2 Quickstart Guide The VH2 is a studio telephone interface device designed to work on VoIP telephone systems. This guide will give you the minimum you need to know to get the system hooked up and running.
Yealink VCS Network Deployment Solution
 Yealink VCS Network Deployment Solution Feb. 2017 V22.15 Table of Contents Table of Contents Table of Contents... iii Network Requirements Overview... 1 Bandwidth Requirements... 1 Bandwidth Requirement
Steady green On hook. Slow flashing green Off hook. Off Port not ready. Off No link. Fast flashing green Upgrading firmware.
 Product Features Product Features Top Panel Feature Description Steady green On hook. Phone Phone 2 Slow flashing green Off hook. Off Port not ready. Flashing green Transmitting or receiving data through
Grandstream IP Phone Configuration Guides
 Grandstream IP Phone Configuration Guides Version 1.0 Yeastar Information Technology Co. Ltd. Table of Contents FOR GRANDSTREAM GXP SERIES... 3 Register with MyPBX... 3 Provisioning for MyPBX... 5 Phone
Table of Content. Safety Instruction Overview Installation... 6
 Table of Content Safety Instruction... 4 1 Overview... 5 2 Installation... 6 2.1 Use PoE or external Power Adapter... 6 2.2 Desktop and Wall-mount Installation... 7 3 Introduction to the Phone User Interface...
PLEASE READ. This user manual is from the manufacturer Jive Communications may not support some features discussed in this document.
 PLEASE READ This user manual is from the manufacturer Jive Communications may not support some features discussed in this document. Please see our online documentation or contact us for a complete list
Android OS4.2 Video IP Phone UTT 990 Datasheet
 Android OS4.2 Video IP Phone UTT 990 Datasheet Main Features Support 2.0 and correlative RFCs 4 SIP accounts Supports PSTN (Optional) The ability to simultaneously login to all server Voice Codecs: G.711a
Quick Start Guide. Cisco SPA232D Mobility Enhanced ATA
 Quick Start Guide Cisco SPA232D Mobility Enhanced ATA Package Contents Analog Telephone Adapter Ethernet Cable Phone Cable Power Adapter Quick Start Guide Product CD-ROM Welcome Thank you for choosing
Before Operation. Basic Operation. Operating Instructions
 PF1501 14 Before Operation Basic Operation 2 3 3 6 6 7 Connect to PC 7 Operating Instructions Set-Up... 9 Selecting Which Media to View... 9 Viewing Photos... 9 Adjust Speed of Slideshow... 10 Adjust the
Digium IP Phone User Guide. Digium Phone firmware version 2.x
 Digium IP Phone User Guide Digium Phone firmware version 2.x 2012-2016 Digium, Inc. All rights reserved. This document is the sole property of Digium, Inc. It contains proprietary information of Digium.
HT812/HT814 Firmware Release Note IMPORTANT UPGRADING NOTE
 HT812/HT814 Firmware Release Note IMPORTANT UPGRADING NOTE Once HT812/HT814 is upgraded to 1.0.3.2 or above, downgrading to 1.0.2.x firmware version or lower is not supported. Once HT812/HT814 is upgraded
Getting Started Guide
 Collaboration Endpoint Software CE8.2 JUNE 2016 For DX, MX and SX Series D15318.03 Video Systems CE8.2, JUNE 2016. 1 Thank you for choosing Cisco! Your Cisco product has been designed to give you many
ANSEL FXS / 1 PSTN. VoIP Telephone Adaptor. User Manual V1.10
 ANSEL 5518 1 FXS / 1 PSTN VoIP Telephone Adaptor User Manual V1.10 Quick Guide Step 1: Broadband (ADSL/Cable Modem) Connections for ANSEL 5518 A. Connect ANSEL 5518 WAN port to ADSL NAT Router as the following
User Addendum User Box Scan support on the Fiery E C-KM Color Server, version 1.1
 User Addendum User Box Scan support on the Fiery E 10 50-45C-KM Color Server, version 1.1 This document describes installing software for User Box scan support on the Fiery E 10 50-45C-KM Color Server,
Table of Contents. CRA-200 Analog Telephone Adapter 2 x Ethernet Port + 2 x VoIP Line. Quick Installation Guide. CRA-200 Quick Installation Guide
 CRA-200 Analog Telephone Adapter 2 x Ethernet Port + 2 x VoIP Line Quick Installation Guide Table of Contents VoIP ATA Package Contents... 2 Checklist... 2 IMPORTANT SAFETY INSTRUCTIONS... 3 Connecting
Commercial in Confidence. Operation Manual. For TCP/IP with SIP Digital (700) System The Seasons Series. Indoor Monitor
 System The Seasons Series. Indoor Monitor") Operation Manual For TCP/IP with SIP Digital (700) System The Seasons Series Indoor Monitor Remark Please follow the user manual for correct installation and testing, if there is any doubt please call
Operation Manual For TCP/IP with SIP Digital (700) System The Seasons Series Indoor Monitor Remark Please follow the user manual for correct installation and testing, if there is any doubt please call
HT801/HT802 Firmware Release Notes IMPORTANT UPGRADING NOTE
 HT801/HT802 Firmware Release Notes IMPORTANT UPGRADING NOTE Once HT801/HT802 is upgraded to 1.0.3.2 or above, downgrading to 1.0.2.x firmware version or lower is not supported. Once HT801/HT802 is upgraded
Analog Telephone Adapter Setup for Q-SYS Softphone
 Analog Telephone Adapter Setup for Q-SYS Softphone This document applies to this Cisco device: SPA232D Introduction This document covers the use of the SPA232D in the role of analog telephone adapter (ATA)
VISTA Transfer Station Setup
 Setup Setup The allows your agency to upload video evidence to its WatchGuard Video Evidence Library software from multiple VISTA cameras simultaneously. Each VISTA Transfer Station has eight slots for
S2 User Manual_V1.0
 S2 User Manual_V1.0 Document VER Firmware VER Explanation Time V1.0 2.0.2.2884 Initial issue 20170430 Table of Content Figures... 9 Tables... 11 1 Safety Instruction... 10 2 Overview... 11 3 Installation...
Treo 700P. Detailed Specifications
 Treo 700P 1. Antenna 8. Left Action Button 15. QWERTY Keyboard 22. Multi-Connector 2. Ringer On/Off Switch 9. 5-way Navigator 16. Phone Dial Pad 23. Microphone 3. Status Indicator 10. Right Action Button
VIDEO SYSTEMS GETTING STARTED GUIDE
 Cisco TelePresence Video Systems Contents Introduction User interfaces Contacts VIDEO SYSTEMS GETTING STARTED GUIDE Codec C Series Profile Series MX Series Quick Set C20 EX Series SX Series Software version
AC1200M/MS. User Manual
 AC1200M/MS User Manual Table of Contents User Manual... 1 1 Preface... 1 2 LED Indicators and Connectors... 1 2.1 LED Indicators... 1 2.2 Hardware Installation... 2 3 Voice Prompt (AC1200MS)... 2 4 User
Yealink VCS Network Deployment Solution
 Yealink VCS Network Deployment Solution Oct. 2015 V10.6 Yealink Network Deployment Solution Table of Contents Table of Contents... iii Network Requirements... 1 Bandwidth Requirements... 1 Calculating
1. Introduction P Package Contents 1.
 1 Contents 1. Introduction ------------------------------------------------------------------------------- P. 3-5 1.1 Package Contents 1.2 Tablet Overview 2. Using the Tablet for the first time ---------------------------------------------------
TT11 VoIP Router 1FXS/1FXO TA User Guide
 TT11 VoIP Router 1FXS/1FXO TA User Guide Page 1 Table of Contents: 1.0 Introduction... 3 2.0 Package Contents... 3 3.0 Summary of LED & Connector Descriptions... 4 3.1 The Front LEDs... 4 3.2 The Rear
RP-FSO522 2-Line FXO, 2-Line FXS SIP IP Gateway. Feature
 RP-FSO522 2-Line FXO, 2-Line FXS SIP IP Gateway RP-FSO522 is an 2-Line FXO plus 2-Line FXS gateway with SIP protocol IP device which allows to connect 2 Lines of analog PSTN telephone line and connect
Studio 5.5. User Manual
 Studio 5.5 User Manual 1 Table of Contents Safety Information... 3 Appearance and Key Function... 4 Introduction... 5 Call Functions... 6 Contacts... 7 Messaging... 8 Internet Browser... 9 Bluetooth...
Release Note. Software Version: Models:X1/ X2/ X2C/ X3S/ X4/ H2S/ H3/ H5. Date:
 Release Note Software Version:2.10.0 Models:X1/ X2/ X2C/ X3S/ X4/ H2S/ H3/ H5 Date:2019-1-30 1 New Features 1. Added BLF status prompt supports customization. 2. Supported AutoProvision now features. 3.