Configurations generally do a job for items that are fairly static in sizes, but if you want vast variability DriveWorksXpress is the way to go.
|
|
|
- Edith Bridges
- 5 years ago
- Views:
Transcription

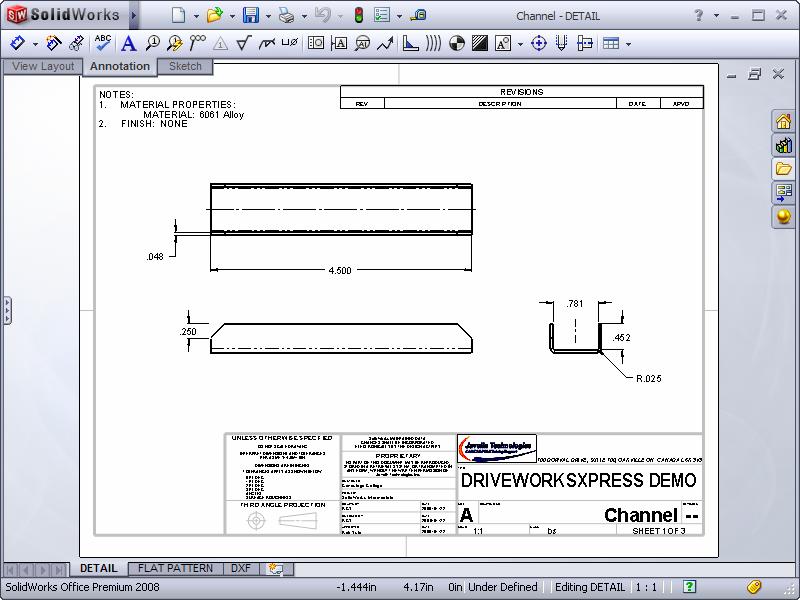
1 DriveWorksXpress A fantastic new tool for design automation included with every seat of SolidWorks 2008 is DriveWorksXpress. Many parts and assemblies you design everyday are often just repeats of another similar part, often following the same engineering rules. Configurations generally do a job for items that are fairly static in sizes, but if you want vast variability DriveWorksXpress is the way to go. In this edition of DriveWorks Tips we will illustrate how easy it is to automate the design of a part with DriveWorksXpress. The images below show the part and part drawings we wish to automate. We want to offer the customer the ability to buy the part in the following configurations: Length: Any length to 2 place decimals between 2 and 8 inches Width: Between.25 and.75 in.0625 increments. Depth: Width / Golden Ratio Thickness: If Width is less than.50 then the thickness is.024, otherwise it is.048 Corner Break: Choice of having the break or not and the value is half the Depth If you considered just the choices between the Width and Corner Break that would be 16 configurations required, however, if we introduce the length possibilities that would mean 600 X 16 for a total of 9600 configurations. Not practical for a SolidWorks part model!
2

3 Starting DriveWorksXpress Let s see how we can automate this part and drawing set with DriveWorksXpress. From the Tools menu in SolidWorks, select DriveWorksXpress and the DriveWorksXpress wizard will appear. If this is your first time running DriveWorksXpress, it will open a default database which you can see below under the Active Database heading. This is where DriveWorksXpress will store your applications you create for parts and assemblies. You can have as many databases as you wish, and each database can have tons of models controlled. We want to create a new database in a particular folder, so we will select the Create/Change Database radio button as shown above, and then click on the Next button.

4 A standard Open dialog box will allow us to browse to the folder desired, and give a name to the database. There is no restriction on these names, and could be based on product type, projects, part type, whatever you think makes sense. Once we have entered a name and selected Open, DriveWorksXpress creates the new database and moves you along in the process. If you look at the top of the DriveWorksXpress screen below you see that there a series of tabs which DriveWorksXpress will take you through. We are now at the Capture tab, which is where we will select the models we want to automate and then capture the dimensions and features in the models we want to control with rules. You can see that since we did not have a model open in SolidWorks at the time we started DriveWorksXpress the Use current open model selection is grayed out, but we can Browse for new model.

5 Click on Next, and then select the model as required. NOTE: In this example we are looking for a SolidWorks Part file, so we need to ensure we select SolidWorks Part (.sldprt) from the Files of type drop list in the Open dialogue box.

6 Capturing SolidWorks Data DriveWorksXpress will open the selected model in SolidWorks and then present you with Dimensions and Features sub-tab of the Capture tab. Since this the first time here there are no dimensions or features currently captured. Click on the Add button. DriveWorks switches us to SolidWorks and opens the DriveWorksXpress tab in the SolidWorks property manager as shown below. Activate the model dimensions by any method, in this case we right-clicked on Annotations and selected Show Feature Dimensions. We want to capture all the dimensions and features that DriveWorksXpress will control with rules, and at the same time we want to assign names to the dimensions which make more sense to us. In the example below, we click on the dimension for the Length of the part, and we see in the DriveWorksXpress property manager that the SolidWorks Selection is Part which is pretty useless. Now of course all good SolidWorks users always rename their dimension names and features to make it easy for everyone to understand, however, if they forgot, then we can give DriveWorksXpress a name for the dimension. In the New DriveWorks Name box we enter Length as the name, and click Apply.


7 DriveWorksXpress shows the captured SolidWorks dimension in the Captured Information area and the corresponding name. We will complete the capture of the rest of the dimensions we want to control in a similar manner. We said back at the beginning we wanted to give the option of having a corner break or not so we need to capture the Corner-Break feature as well. We do this in a similar fashion to capturing dimensions. Just select the feature you desire either in the feature manager, or on the part directly and give it a name. NOTE: You can not give features or dimensions a name if that name has already been used.


8 Click Apply and we see the Corner-Break feature added to our Captured Information list. Once you are finished capturing dimensions and features click on the Finish button on the DriveWorksXpress property manager. NOTE: The Help button accesses the comprehension help file which has all the information required to create a DriveWorksXpress application.


9 DriveWorksXpress returns us to the wizard and shows us all the dimensions and features we captured from our SolidWorks model. The next step in our capture process is to capture any SolidWorks file properties we want to control with our DriveWorksXpress application. Activate the Properties sub-tab, and we see a list of all the properties currently in our SolidWorks part as shown below. In this example we will just control the Description and DrawnBy properties. Select the property on the left and click on the single chevron (>) to capture the property.


10 Next we need to let DriveWorksXpress know which drawing is associated with our current part model, so we select the Drawing sub-tab. DriveWorksXpress informs us that we have no drawing currently captured, so select the Browse button Select the appropriate drawing. We are now finished capturing the information to drive our model with DriveWorksXpress. This process only takes a few minutes.

11 Creating the Input Form The next step in the DriveWorksXpress application design process is to create the input form the user will use to define new versions of the SolidWorks model and drawing. Select the Form tab in the DriveWorksXpress wizard. Here you create the various inputs required and select the type of input control that you wish. There are five input styles available: Text Box: Enter alpha-numeric information Numeric Text Box: Enter numeric information allows limits to be set Drop Down: Presents a list of selections Spin Button: Numeric selection with limits and increment value Check Box: Logical yes or no The type of control will depend on the input required. For example we will start with the selections we want to have sent to the DrawnBy property we captured earlier. This makes sense to be a Drop Down list of designers that will access the application. We will select the Drop Down list from the Type selection, and notice that the Name and Options boxes below are show in a reddish colour. This indicates an error or a missing piece of information. We will call the control Drawn By and then add a list of names in the Options area. Also note that we have the option of making the control mandatory by selecting Required option check box. This will cause the control to be red if the user does not select some choice and DriveWorksXpress will not continue.


12 Clicking on the Next button will return us to the Form tab where DriveWorksXpress keeps track of the controls as we add them. Click on the Add button to create a new control. For the Length input we will select a Numeric Text Box and make the minimum acceptable value 2 and the maximum 8, which is what we said we would allow our customers to order. Add another control for the Width, this time we will make it a Spin Button with a minimum of.250, a maximum of.750 and an increment of.0625, again to reflect our initial requirement. The last control we need is Check Box which will call Corner Break to allow the user to have the corner break feature or not on the part.


13 Our form is now complete. DriveWorksXpress lets us test the form by simply selecting the Test button. The form is presented for test. NOTE: It is a best practice to set some sort of defaults in your form, especially during this design stage as it will allow you to see if your rules you create are working correctly as you build them. Creating Rules The next step in the DriveWorksXpress automation process is to create the rules that will drive your SolidWorks models. Clicking on the Rules tab will take you to the main Rules builder page. Here we see a list of Rule Types, how many of each type there are, how many rules are missing, that is, how many you still need to define, and what set of rules (Action) you want to work on.


14 Let s start with the Dimension rules, so select the Edit Dimension Rules check box, and then click on the Next button. DriveWorksXpress will show the dimension names you created when capturing the SolidWorks dimensions, the file name they belong to, the type of rule, the current value of the rule and the formula used to create the rule. The option Show Missing Rules Only is checked, which will only show Names whose rules have not been created yet. Working in this mode lets you know when you are done not items in the list means you have assigned rules to everything. To access the specific rule, for example Length, either double-click anywhere on the row Length is in or high-light the row and click on Next.


15 This is the Rules Builder area where you define the formula for your rule. There are several drop menus to assist you in defining a rule at the top, and at the bottom it will display the value of the rule, and some helpful hints. The rule for our Length dimension is to make it equal to whatever the user enters in the Length input on the form. So we just select the Length input from the Inputs menu. You can see that DriveWorksXpress shows you in the menu what type of control it is with an icon that corresponds to those shown back on the form design tab. The resulting formula is shown as above and that current value is 5 (remember we set the default Length to 5). Clicking the Next button takes us back to our rule list and we see that the Length rule is gone from the list. Now we will create the rule for the Width, which is again is just an input form value, as shown below. Next up is the Depth rule which we said back in the beginning would be equal to the Width divided by the Golden Ratio, which is Select the Width from the inputs menu, and then add / as shown below. Notice that the result is a ridiculously long number. DriveWorksXpress rules are created using Microsoft Excel commands so we can make use of the ROUND command to make sure we only send 3 decimal places to SolidWorks. ROUND ( Width / 1.618, 3 )

 and then select the Recent menu, and then select")


16 This results in a much nicer number. At this point we realize we may want to save this formula to use again later. DriveWorksXpress has a nifty little tool for doing this called Quick Text. Select the formula and copy it (CTRL C) and then select the Recent menu, and then select Change Quick Text. Paste (CTRL V) the text you copied to the Quick Text window. Now the formula is available to be used elsewhere in the rule set easily as shown below by selecting the recent menu. The next rule we need is for the Thickness value. We said back at the beginning that we wanted the thickness to be.024 if the width was.500 or less, otherwise it should be.048. The Logic menu provides you with the basic logic commands used by DriveWorksXpress and are Excel commands.


17 The IF(,,) statement is what we need for the thickness rule. If you are new to Excel commands a good tip is to use Excel help to get information about these commands. An example is shown below on the IF statement. The formula we need is shown below which states IF the Width is less than or equal to the result is 0.025, otherwise the result is Save this rule to the Quick Text clipboard as well. The next rule for CornerBreakSize is going to be half the Depth value. A limitation of DriveWorksXpress (which is not the case in the full version DriveWorks) is that you can not have


18 intermediate variables to act as place holders. What this means is that we will have to re-use some formulas to create the rule for the CornerBreakSize dimension. If you recall, the Depth rule was the one we saved to the Quick Text clipboard, so we simply select it from the Recent menu and then complete the formula by dividing that by 2. The last rule is for the BendRadius which will have the same rule as the Thickness. Before we set that rule, let s set the rule list view to View Tree as shown below. Here we see all the rules associated with the Channel part, their type, name, rule, and if the rule is missing. To activate the rule builder here double click on the item you wish or select it and click on the Next button. Select the same rule as Depth from the Recent menu. And return to the Rule list. Next up we will create the rule for the CornerBreak feature. We said earlier that the customer will have a choice of having this feature or not, and in our input form we created a Check Box control to select this.

 IF (CornerBreak, \"Unsuppress\", \"Delete\") Now we will create the rule for the file names of the part and")

19 Once again, we select IF(,,) from the Logic menu and then complete the rule as shown below. NOTE: Because the Check Box control returns a logical value, TRUE if checked, FALSE if unchecked, you do not need to add the = TRUE to the statement. That is, both statements below have the same result. IF (CornerBreak = TRUE, "Unsuppress", "Delete") IF (CornerBreak, "Unsuppress", "Delete") Now we will create the rule for the file names of the part and drawing. From the Rule list, double click on the File Name row to open the rule builder. We want the file names to be unique for every new part and drawing created, so to do this we will append the current file name with the Length, Width and some indication of a corner or not. The result should look like: Channel X.XXX -.YYY ZZ The way DriveWorksXpress works for file names is that it always append the result of the rule to the current file name. Create the rule as shown below.
20 We want the file names to be consistent, so we have added the Excel function FIXED(,) to the Length and Width values to ensure the same number of digits appear. Since we are building a string, we use the & symbol to concatenate different strings together. The last part of the rule has an IF statement to decide if a CB for corner break is added as well. Add this rule to the Quick Text clipboard. NOTE: There are many strings and commands that are used quite often in building DriveWorksXpress applications and these should be put in the Quick Text clipboard. Some are: Suppress Unsuppress Delete & - & The final rules we need are for the Description and DrawnBy properties. DrawnBy is just the Input DrawnBy. Description is the word CHANNEL with roughly the same rule as the file name as shown below.

21 Creating New Variants Now we are ready to start cranking out new designs using our application. Select the Run tab from the DriveWorksXpress wizard, and we see our input form ready to go loaded with our default values set. Let s create on with the default values set. Simply click on Next and DriveWorksXpress will open the model, change all the values, regenerate the model, open the drawing, generate the views, rename all the files and save them. A report is generated as it goes so you can see if there were any errors created as shown below.

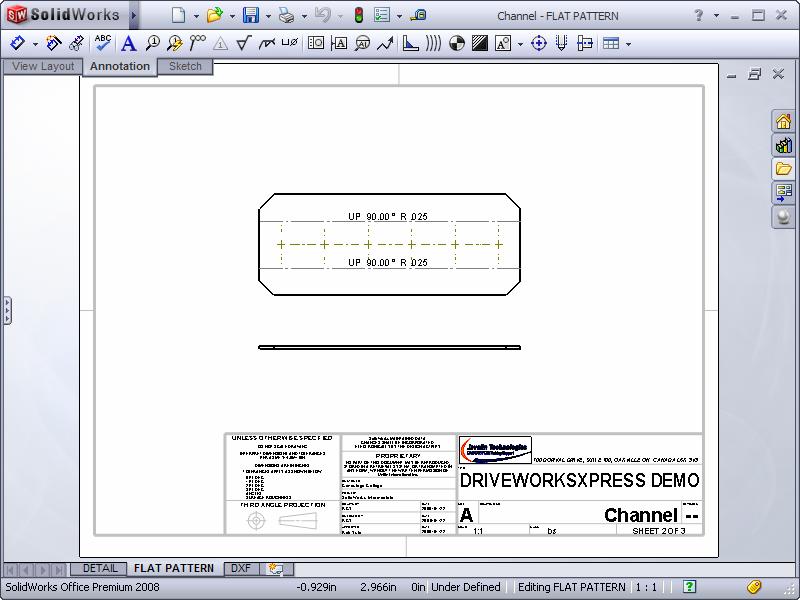
22 The resultant drawing is shown below.
23 Let s create another using the settings below. The resulting model is shown below, note that the corner break feature is removed from the feature tree.

24 Conclusion As you have seen it is very easy and quick to automate parts and drawings with DriveWorksXpress. You can start with a small project like this one, and progress towards more complex projects. Next month we will use DriveWorksXpress to automate an assembly, all the parts in the assembly and all the drawings associated with parts and assemblies. If you want to try this example out, you can download the files.
DriveWorksXpress Tutorial
 2007 Rules Based Design Automation DriveWorksXpress Tutorial DriveWorks Ltd 01/23/2007 1 DriveWorksXpress Tutorial 1. Introduction Start by installing the Models to a NEW FOLDER on your C: Drive. You should
CONVEYOR BASE TUTORIAL. An Introduction to DriveWorksXpress
 CONVEYOR BASE TUTORIAL An Introduction to DriveWorksXpress CONTENTS INTRODUCTION TO DRIVEWORKSXPRESS... 3 About the Tutorial... 3 Getting Started... 4 DRIVEWORKSXPRESS NAVIGATION BAR... 5 REGISTRATION
SCISSOR LIFT TUTORIAL. An Introduction to DriveWorksXpress
 SCISSOR LIFT TUTORIAL An Introduction to DriveWorksXpress CONTENTS INTRODUCTION TO DRIVEWORKSXPRESS... 3 About the Tutorial... 3 Getting Started... 4 DRIVEWORKSXPRESS NAVIGATION BAR... 5 REGISTRATION AND
Business Process Procedures
 Business Process Procedures 14.40 MICROSOFT EXCEL TIPS Overview These procedures document some helpful hints and tricks while using Microsoft Excel. Key Points This document will explore the following:
How do I use BatchProcess
 home news tutorial what can bp do purchase contact us TUTORIAL Written by Luke Malpass Sunday, 04 April 2010 20:20 How do I use BatchProcess Begin by downloading the required version (either 32bit or 64bit)
Designer TM for Microsoft Access
 Designer TM for Microsoft Access Application Guide 1.7.2018 This document is copyright 2009-2018 OpenGate Software. The information contained in this document is subject to change without notice. If you
Making Excel Work for Your Tribal Community
 Making Excel Work for Your Tribal Community Excel Basics: Intermediate Skills PHONE: 1-800-871-8702 EMAIL: INFO@CBC4TRIBES.ORG WEB: TRIBALINFORMATIONEXCHANGE.ORG MAKING EXCEL WORK FOR YOUR TRIBAL COMMUNITY
Dealing with the way Mail Merge changed in MS Word 2003
 Dealing with the way Mail Merge changed in MS Word 2003 Go From This: To This: The New and Improved Mail Merge Mail Merge has changed dramatically from the older versions of Word. They just forgot to tell
Mastercam X6 for SolidWorks Toolpaths
 Chapter 14 Spinning Top Mastercam X6 for SolidWorks Toolpaths A. Insert Handle in New Assembly. Step 1. Click File Menu > New, click Assembly and OK. Step 2. Click Browse in the Property Manager, Fig.
Design and Print Instruction Manual
 Diamond Design Design and Print Instruction Manual Contents Installation 1 Installing the Diamond Design Software 2-3 Installing the ORIGINAL Argox OS-214 printer drivers 4 Installing the EXCEL Argox OS-314
Some (semi-)advanced tips for LibreOffice
advanced tips for LibreOffice") Some (semi-)advanced tips for LibreOffice by Andy Pepperdine Introduction We cover several tips on special things in Writer and Calc and anything else that turns up. Although I use LibreOffice, these should
Some (semi-)advanced tips for LibreOffice by Andy Pepperdine Introduction We cover several tips on special things in Writer and Calc and anything else that turns up. Although I use LibreOffice, these should
1 Introduction to Using Excel Spreadsheets
 Survey of Math: Excel Spreadsheet Guide (for Excel 2007) Page 1 of 6 1 Introduction to Using Excel Spreadsheets This section of the guide is based on the file (a faux grade sheet created for messing with)
Excel. Dashboard Creation. Microsoft # KIRSCHNER ROAD KELOWNA, BC V1Y4N TOLL FREE:
 Microsoft Excel Dashboard Creation #280 1855 KIRSCHNER ROAD KELOWNA, BC V1Y4N7 250-861-8324 TOLL FREE: 1-877-954-8433 INFO@POWERCONCEPTS.CA WWW.POWERCONECPTS.CA Dashboard Creation Contents Process Overview...
DataSweet also has a whole host of improvements which are not covered in this document.
 Page 1 Introduction DataSweet 3.5.0 contains many new features that make DataSweet a really powerful tool for data handling in the classroom. This document only covers the new features and how they work.
FileNET Guide for AHC PageMasters
 ACADEMIC HEALTH CENTER 2 PageMasters have the permissions necessary to perform the following tasks with Site Tools: Application Requirements...3 Access FileNET...3 Login to FileNET...3 Navigate the Site...3
PATHFINDER3D Help. Updated September 26, Page 1 of 40
 PATHFINDER3D Help Updated September 26, 2012 Page 1 of 40 Contents Introduction... 4 Product Description... 4 How to use this document... 4 Terms... 4 Procedures... 5 Installing... 5 Configuring... 6 Licensing...
StatTrak Address Manager Business Edition User Manual
 StatTrak Address Manager Business Edition User Manual Overview... 2 Frequently Asked Questions... 5 Toolbar... 7 Address Listings... 9 Update Main & Details... 11 Update Individual... 12 Back Up Database...
FileNET Guide for AHC PageMasters
 PageMasters have the permissions necessary to perform the following tasks with Site Tools: ACADEMIC HEALTH CENTER 2 Application Requirements...3 Access FileNET...3 Log in to FileNET...3 Navigate the Site...3
ME009 Engineering Graphics and Design CAD 1. 1 Create a new part. Click. New Bar. 2 Click the Tutorial tab. 3 Select the Part icon. 4 Click OK.
 PART A Reference: SolidWorks CAD Student Guide 2014 2 Lesson 2: Basic Functionality Active Learning Exercises Creating a Basic Part Use SolidWorks to create the box shown at the right. The step-by-step
Getting Started With Excel
 Chapter 1 Getting Started With Excel This chapter will familiarize you with various basic features of Excel. Specific features which you need to solve a problem will be introduced as the need arises. When
INTRODUCTION TO MICROSOFT EXCEL: DATA ENTRY AND FORMULAS
 P a g e 1 INTRODUCTION TO MICROSOFT EXCEL: DATA ENTRY AND FORMULAS MARGERT E HEGGAN FREE PUBLIC LIBRARY SECTION ONE: WHAT IS MICROSOFT EXCEL MICROSOFT EXCEL is a SPREADSHEET program used for organizing
Using Microsoft Excel
 Using Microsoft Excel Formatting a spreadsheet means changing the way it looks to make it neater and more attractive. Formatting changes can include modifying number styles, text size and colours. Many
CS130 Software Tools. Fall 2010 Getting More from Office
 Software Tools Getting More from Office 1 Microsoft Office Additional Tools Most of you are skilled in using Word and Excel to do the basics, but as an university student, there are a few more advanced
Microsoft Excel XP. Intermediate
 Microsoft Excel XP Intermediate Jonathan Thomas March 2006 Contents Lesson 1: Headers and Footers...1 Lesson 2: Inserting, Viewing and Deleting Cell Comments...2 Options...2 Lesson 3: Printing Comments...3
Microsoft Office 2016 Mail Merge
 Microsoft Office 2016 Mail Merge Mail Merge Components In order to understand how mail merge works you need to examine the elements involved in the process. In any mail merge, you'll deal with three different
QDA Miner. Addendum v2.0
 QDA Miner Addendum v2.0 QDA Miner is an easy-to-use qualitative analysis software for coding, annotating, retrieving and reviewing coded data and documents such as open-ended responses, customer comments,
EXCEL ADVANCED Linda Muchow
 EXCEL ADVANCED 2016 Alexandria Technical and Community College Customized Training Technology Specialist 1601 Jefferson Street, Alexandria, MN 56308 320-762-4539 Linda Muchow lindac@alextech.edu 1 Table
Using Microsoft Excel
 About Excel Using Microsoft Excel What is a Spreadsheet? Microsoft Excel is a program that s used for creating spreadsheets. So what is a spreadsheet? Before personal computers were common, spreadsheet
3/31/2016. Spreadsheets. Spreadsheets. Spreadsheets and Data Management. Unit 3. Can be used to automatically
 MICROSOFT EXCEL and Data Management Unit 3 Thursday March 31, 2016 Allow users to perform simple and complex sorting Allow users to perform calculations quickly Organizes and presents figures that can
MicroStation Design Files
 MicroStation Design Files Module Overview This module discusses aspects of working with design files. Module Prerequisites Knowledge of MicroStation s interface Some knowledge about MicroStation design
Using Microsoft Word. Tables
 Using Microsoft Word are a useful way of arranging information on a page. In their simplest form, tables can be used to place information in lists. More complex tables can be used to arrange graphics on
Wheels and Axle. Chapter 7. Simples Machines. A. Save As. Step 1. If necessary, open your Track Assembly 15 file. B. Insert Truck Assembly.
 Chapter 7 Simples Machines Wheels and Axle A. Save As. Step 1. If necessary, open your Track Assembly 15 file. Step 2. Click File Menu > Save As. Step 3. Key-in WHEELS AND AXLE ASSEMBLY for the filename
Export a PROTECT Report to Excel (User s Guide Lesson 21 : Reports) Tips for Using Microsoft Excel and Exported Reports
 Tips for Using Microsoft Excel and Exported Reports") Export a PROTECT Report to Excel (User s Guide Lesson 21 : Reports) 1. Run a PROTECT Export report 2. Click the Export button which is at far left on the toolbar in the PROTECT report window. 3. The Export
Export a PROTECT Report to Excel (User s Guide Lesson 21 : Reports) 1. Run a PROTECT Export report 2. Click the Export button which is at far left on the toolbar in the PROTECT report window. 3. The Export
EXCEL 2013 FDLRS SUNRISE
 EXCEL 2013 FDLRS SUNRISE Goal: Participants will create a spreadsheet and graph to document student progress. Objectives: Participants will create a spreadsheet which includes basic formulas. Participants
DOING MORE WITH EXCEL: MICROSOFT OFFICE 2013
 DOING MORE WITH EXCEL: MICROSOFT OFFICE 2013 GETTING STARTED PAGE 02 Prerequisites What You Will Learn MORE TASKS IN MICROSOFT EXCEL PAGE 03 Cutting, Copying, and Pasting Data Basic Formulas Filling Data
Information System Services
 Information System Services Diocese of London, 1070 Waterloo Street, London, Ontario, N6A 3Y2 Phone:(519)433-0658, Fax:(519)433-0011, E-mail: iss@rcec.london.on.ca Excel Formatting Online Demonstration
Navigate to Success: A Guide to Microsoft Word 2016 For History Majors
 Navigate to Success: A Guide to Microsoft Word 2016 For History Majors Navigate to Success: A Guide to Microsoft Word 2016 for History Majors Navigate to Success: A Guide to Microsoft Word 2016 For History
Introduction to Microsoft Excel 2010
 Introduction to Microsoft Excel 2010 This class is designed to cover the following basics: What you can do with Excel Excel Ribbon Moving and selecting cells Formatting cells Adding Worksheets, Rows and
Creating & Using Tables
 Creating & Using Tables in Microsoft Word 2000 Created by and for: Internet and Technology Training Services Office of Information Technology What is a Table? A table is a structure that is divided into
2. create the workbook file
 2. create the workbook file Excel documents are called workbook files. A workbook can include multiple sheets of information. Excel supports two kinds of sheets for working with data: Worksheets, which
Creating Reports in Access 2007 Table of Contents GUIDE TO DESIGNING REPORTS... 3 DECIDE HOW TO LAY OUT YOUR REPORT... 3 MAKE A SKETCH OF YOUR
 Creating Reports in Access 2007 Table of Contents GUIDE TO DESIGNING REPORTS... 3 DECIDE HOW TO LAY OUT YOUR REPORT... 3 MAKE A SKETCH OF YOUR REPORT... 3 DECIDE WHICH DATA TO PUT IN EACH REPORT SECTION...
COPYRIGHTED MATERIAL. Making Excel More Efficient
 Making Excel More Efficient If you find yourself spending a major part of your day working with Excel, you can make those chores go faster and so make your overall work life more productive by making Excel
Agilent MassHunter Workstation Software Report Designer Add-in
 Agilent MassHunter Workstation Software Report Designer Add-in Quick Start Guide What is the Agilent MassHunter Workstation Software Report Designer Add-in? 2 Report Designer UI elements 3 Getting Started
SOLIDWORKS: Lesson 1 - Basics and Modeling. Introduction to Robotics
 SOLIDWORKS: Lesson 1 - Basics and Modeling Fundamentals Introduction to Robotics SolidWorks SolidWorks is a 3D solid modeling package which allows users to develop full solid models in a simulated environment
User Guide. Web Intelligence Rich Client. Business Objects 4.1
 User Guide Web Intelligence Rich Client Business Objects 4.1 2 P a g e Web Intelligence 4.1 User Guide Web Intelligence 4.1 User Guide Contents Getting Started in Web Intelligence 4.1... 5 Log into EDDIE...
QCTools. an Excel 97 AddIn. William F Lyle Copyright 1999
 QCTools an Excel 97 AddIn William F Lyle Copyright 1999 Installing QCTools as Excel 97 Add-in 1) Copy the QCTools.xla file into the Program Files\MSOffice\ Office\Library folder 2) Open an Excel spreadsheet
Using SymPrint to Make Overlays, Templates & More...
 Welcome to SymPrint SymPrint is an easy-to-use tool for creating communication overlays, worksheets, classroom activities and more using a modern toolbar and common-sense interface modeled after the programs
Computer Basics Microsoft Windows CB 200
 Computer Basics Microsoft Windows CB 200 Table of Contents Using Windows... 3 Desktop... 3 Taskbar... 4 The Start menu... 4 The Quick Launch bar... 5 The System Tray... 6 Customization... 6 How to Use
Contents. Foreword. Examples of GeoGebra Applet Construction 1 A Straight Line Graph... 1 A Quadratic Graph... 6 The Scalar Product...
 Contents Foreword ii Examples of GeoGebra Applet Construction 1 A Straight Line Graph............................... 1 A Quadratic Graph................................. 6 The Scalar Product.................................
Lab Assignment #1: Introduction to Creo ME 170
 Lab Assignment #1: Introduction to Creo ME 170 Instructor: Mike Philpott (email: mphilpot@illinois.edu) Date Due: One week from Start Day of Lab (turn in deadline 11pm night before next lab) Make sure
ABOUT THIS COURSE... 3 ABOUT THIS MANUAL... 4 LESSON 1: MANAGING LISTS... 5
 Table of Contents ABOUT THIS COURSE... 3 ABOUT THIS MANUAL... 4 LESSON 1: MANAGING LISTS... 5 TOPIC 1A: SORT A LIST... 6 Sort a list in A-Z or Z-A Order... 6 TOPIC 1B: RENUMBER A LIST... 7 Renumber a List
CPM-200 User Guide For Lighthouse for MAX
 CPM-200 User Guide For Lighthouse for MAX Contents Page Number Opening the software 2 Altering the page size & Orientation 3-4 Inserting Text 5 Editing Text 6 Inserting Graphics 7-8 Changing the Colour
A Brief Word About Your Exam
 Exam 1 Studyguide A Brief Word About Your Exam Your exam will be MONDAY, FEBRUARY 20 DURING CLASS TIME. You will have 50 minutes to complete Exam 1. If you arrive late or leave early, you forfeit any time
Table of Contents COURSE OVERVIEW... 5
 Table of Contents COURSE OVERVIEW... 5 DISCUSSION... 5 THE NEW DATABASE FORMAT... 5 COURSE TOPICS... 6 CONVENTIONS USED IN THIS MANUAL... 7 Tip Open a File... 7 LESSON 1: THE NEW INTERFACE... 8 LESSON
Chapter 2 The Design Window
 Chapter 2 Objectives Chapter 2 The Design Window Learn about Crystal sections Move objects Use Toolbars, Icons, and Menus Format fields Add Special Fields Change a Group Use the Crystal Field Explorer
NiceLabel Designer Standard User Guide
 NiceLabel Designer Standard User Guide English Edition Rev-1112 2012 Euro Plus d.o.o. All rights reserved. Euro Plus d.o.o. Poslovna cona A 2 SI-4208 Šenčur, Slovenia tel.: +386 4 280 50 00 fax: +386 4
Graded Project. Microsoft Excel
 Graded Project Microsoft Excel INTRODUCTION 1 PROJECT SCENARIO 1 CREATING THE WORKSHEET 2 GRAPHING YOUR RESULTS 4 INSPECTING YOUR COMPLETED FILE 6 PREPARING YOUR FILE FOR SUBMISSION 6 Contents iii Microsoft
Asset Arena InvestOne
 Asset Arena InvestOne 1 21 AD HOC REPORTING 21.1 OVERVIEW Ad Hoc reporting supports a range of functionality from quick querying of data to more advanced features: publishing reports with complex features
Quick Guide for Excel 2015 Data Management November 2015 Training:
 http://pfw.edu Quick Guide for Excel 2015 Data Management November 2015 Training: http://pfw.edu/training Excel 2016 Data Management AutoFill and Custom Lists AutoFill 1. Select the range that contains
Chapter 4 Feature Design Tree
 4-1 Chapter 4 Feature Design Tree Understand Feature Interactions Use the FeatureManager Design Tree Modify and Update Feature Dimensions Perform History-Based Part Modifications Change the Names of Created
Tutorial: De Novo Assembly of Paired Data
 : De Novo Assembly of Paired Data September 20, 2013 CLC bio Silkeborgvej 2 Prismet 8000 Aarhus C Denmark Telephone: +45 70 22 32 44 Fax: +45 86 20 12 22 www.clcbio.com support@clcbio.com : De Novo Assembly
Learning Worksheet Fundamentals
 1.1 LESSON 1 Learning Worksheet Fundamentals After completing this lesson, you will be able to: Create a workbook. Create a workbook from a template. Understand Microsoft Excel window elements. Select
Staff Microsoft VISIO Training. IT ESSENTIALS Creating Organisation Charts Using Visio 2013 (ST560) August 2015
 August 2015") Staff Microsoft VISIO Training IT ESSENTIALS Creating Organisation Charts Using Visio 0 (ST0) August 0 Book online at: Royalholloway.ac.uk/it/training Self-Study packs also available 9 th August 0 Table
Staff Microsoft VISIO Training IT ESSENTIALS Creating Organisation Charts Using Visio 0 (ST0) August 0 Book online at: Royalholloway.ac.uk/it/training Self-Study packs also available 9 th August 0 Table
1) Merge the cells that contain the title and center the title
 Merge the cells that contain the title and center the title") Supplies: You will need a storage location to save your spreadsheet for use in Session 2. You will need the 2 handouts pertaining to Session 1 Instructions: Follow the directions below to create a budget
Supplies: You will need a storage location to save your spreadsheet for use in Session 2. You will need the 2 handouts pertaining to Session 1 Instructions: Follow the directions below to create a budget
Open Book Format.docx. Headers and Footers. Microsoft Word Part 3 Office 2016
 Microsoft Word Part 3 Office 2016 Open Book Format.docx Headers and Footers If your document has a page number, you already have a header or footer (and can double click on it to open it). If you did not
Microsoft Word 2007 on Windows
 1 Microsoft Word 2007 on Windows Word is a very popular text formatting and editing program. It is the standard for writing papers and other documents. This tutorial and quick start guide will help you
BrainyBetty.Com presents: Mail merge I: Use mail merge for mass mailings
 BrainyBetty.Com presents: Mail merge I: Use mail merge for mass mailings Course contents Overview: Mailings en masse Lesson 1: How it works Lesson 2: Set up your recipient list Lesson 3: Perform a complete
Survey of Math: Excel Spreadsheet Guide (for Excel 2016) Page 1 of 9
 Page 1 of 9") Survey of Math: Excel Spreadsheet Guide (for Excel 2016) Page 1 of 9 Contents 1 Introduction to Using Excel Spreadsheets 2 1.1 A Serious Note About Data Security.................................... 2 1.2
Survey of Math: Excel Spreadsheet Guide (for Excel 2016) Page 1 of 9 Contents 1 Introduction to Using Excel Spreadsheets 2 1.1 A Serious Note About Data Security.................................... 2 1.2
SharePoint SITE OWNER TRAINING
 SharePoint SITE OWNER TRAINING Contents Customizing Your Site... 3 Editing Links...4 Give the site a new look...5 Changing Title, Description, or Logo...6 Remove the Getting Started Icons...6 Adding Apps
RenameMan User Guide. ExtraBit Software
 RenameMan User Guide ExtraBit Software http://www.extrabit.com Version 3.1 August, 2005 Contents Introduction... 5 What does RenameMan do?... 5 Features... 5 Quick tour of RenameMan... 5 Getting started...
GAZIANTEP UNIVERSITY INFORMATICS SECTION SEMETER
 GAZIANTEP UNIVERSITY INFORMATICS SECTION 2010-2011-2 SEMETER Microsoft Excel is located in the Microsoft Office paket. in brief Excel is spreadsheet, accounting and graphics program. WHAT CAN WE DO WITH
PHLI Instruction (734) Introduction. Lists.
 Introduction. Lists.") INTERMEDIATE EXCEL Introduction Microsoft Excel has many purposes. In addition to being an excellent data manger, Excel provides the means to perform complex analysis and evaluation of data. This brief
INTERMEDIATE EXCEL Introduction Microsoft Excel has many purposes. In addition to being an excellent data manger, Excel provides the means to perform complex analysis and evaluation of data. This brief
Using Windows 7 Explorer By Len Nasman, Bristol Village Computer Club
 By Len Nasman, Bristol Village Computer Club Understanding Windows 7 Explorer is key to taking control of your computer. If you have ever created a file and later had a hard time finding it, or if you
Excel 2007 Fundamentals
 Excel 2007 Fundamentals Introduction The aim of this document is to introduce some basic techniques for using Excel to enter data, perform calculations and produce simple charts based on that information.
Designing Adhoc Reports
 Designing Adhoc Reports Intellicus Enterprise Reporting and BI Platform Intellicus Technologies info@intellicus.com www.intellicus.com Copyright 2010 Intellicus Technologies This document and its content
Fig. 2 Mastercam 2020 Spinning Top SW 19 to MCam20 TOOLPATHS Page 13-1
 Mastercam 2020 Chapter 13 Spinning Top SOLIDWORKS 19 to Mastercam 2020 A. Open File in Mastercam 2020. Step 1. If necessary, save your Handle and Flywheel parts file in SOLIDWORKS. Step 2. In Mastercam
ECDL Module 4 REFERENCE MANUAL
 ECDL Module 4 REFERENCE MANUAL Spreadsheets Microsoft Excel XP Edition for ECDL Syllabus Four PAGE 2 - ECDL MODULE 4 (USING MICROSOFT EXCEL XP) - MANUAL 4.1 USING THE APPLICATION... 4 4.1.1 FIRST STEPS
Sample Chapters. To learn more about this book, visit the detail page at: go.microsoft.com/fwlink/?linkid= Copyright 2010 by Curtis Frye
 Sample Chapters Copyright 2010 by Curtis Frye All rights reserved. To learn more about this book, visit the detail page at: go.microsoft.com/fwlink/?linkid=191751 Chapter at a Glance Analyze data dynamically
Microsoft Office Excel 2007: Basic. Course Overview. Course Length: 1 Day. Course Overview
 Microsoft Office Excel 2007: Basic Course Length: 1 Day Course Overview This course teaches the basic functions and features of Excel 2007. After an introduction to spreadsheet terminology and Excel's
Lesson 6 Adding Graphics
 Lesson 6 Adding Graphics Inserting Graphics Images Graphics files (pictures, drawings, and other images) can be inserted into documents, or into frames within documents. They can either be embedded or
Microsoft Excel 2000 Charts
 You see graphs everywhere, in textbooks, in newspapers, magazines, and on television. The ability to create, read, and analyze graphs are essential parts of a student s education. Creating graphs by hand
Introduction to Microsoft Excel 2010
 Introduction to Microsoft Excel 2010 This class is designed to cover the following basics: What you can do with Excel Excel Ribbon Moving and selecting cells Formatting cells Adding Worksheets, Rows and
ArborCAD by CAD International. Reference Manual
 Reference Manual This application reference manual is to be read in conjunction with the RealCAD Reference Manual accessible from the HELP menu at the top of your CAD screen. Whilst the RealCAD Reference
Chapter 7. Joining Maps to Other Datasets in QGIS
 Chapter 7 Joining Maps to Other Datasets in QGIS Skills you will learn: How to join a map layer to a non-map layer in preparation for analysis, based on a common joining field shared by the two tables.
How To Do It: Software LabelDirect
 How To Do It: Software LabelDirect NOTE: These instructions are all based on LabelDirect version.3. Later versions of the software may differ in detail. Design a die cut label Q. How do I design a die
Quick Access Toolbar: Used for frequent commands and is customizable.
 http:/pfw.edu/its Quick Guide for Word 2016 Basics May 2018 Training: http://pfw.edu/training Quick Access Toolbar: Used for frequent commands and is customizable. Ribbon Group:Contains sets of related
CRM CUSTOMER RELATIONSHIP MANAGEMENT
 CRM CUSTOMER RELATIONSHIP MANAGEMENT Customer Relationship Management is identifying, developing and retaining profitable customers to build lasting relationships and long-term financial success. The agrē
Microsoft Excel Pivot Tables & Pivot Table Charts
 Microsoft Excel 2013 Pivot Tables & Pivot Table Charts A pivot table report allows you to analyze and summarize a million rows of data in Excel 2013 without entering a single formula. Pivot Tables let
Chapter 2 Autodesk Asset Locator... 3
 Contents Chapter 2 Autodesk Asset Locator....................... 3 Supported Operating Systems....................... 3 Installing Autodesk Asset Locator..................... 4 Define a Search...............................
Within the spreadsheet, columns are labeled with letters and rows are labeled with numbers.
 Excel Exercise 1: Goals: 1. Become familiar with Guidelines for spans and proportions of common spanning members (Chapter 1). 2. Become familiar with basic commands in Excel for performing simple tasks
How Smart Are Your Tables? Jeanne Aarhus Aarhus Associates, LLC
 How Smart Are Your Tables? Jeanne Aarhus Aarhus Associates, LLC AC2251-L Are you using tables in AutoCAD software to their fullest potential? Do you still manually collect data from your AutoCAD file,
Creating a Spreadsheet by Using Excel
 The Excel window...40 Viewing worksheets...41 Entering data...41 Change the cell data format...42 Select cells...42 Move or copy cells...43 Delete or clear cells...43 Enter a series...44 Find or replace
Microsoft How to Series
 Microsoft How to Series Getting Started with EXCEL 2007 A B C D E F Tabs Introduction to the Excel 2007 Interface The Excel 2007 Interface is comprised of several elements, with four main parts: Office
Tutorial 2. Building a Database and Defining Table Relationships
 Tutorial 2 Building a Database and Defining Table Relationships Microsoft Access 2010 Objectives Learn the guidelines for designing databases and setting field properties Modify the format of a field in
Importing Timberline Estimating into Prime Bid
 Importing Timberline Estimating into Prime Bid This is a four part process I. Prepare the Prime Bid Export Spreadsheet Layout II. Export the Phase Information to an.xls file & convert to.csv File III.
DOING MORE WITH EXCEL: MICROSOFT OFFICE 2010
 DOING MORE WITH EXCEL: MICROSOFT OFFICE 2010 GETTING STARTED PAGE 02 Prerequisites What You Will Learn MORE TASKS IN MICROSOFT EXCEL PAGE 03 Cutting, Copying, and Pasting Data Filling Data Across Columns
Intellicus Enterprise Reporting and BI Platform
 Designing Adhoc Reports Intellicus Enterprise Reporting and BI Platform Intellicus Technologies info@intellicus.com www.intellicus.com Designing Adhoc Reports i Copyright 2012 Intellicus Technologies This
Function. Description
 Function Check In Get / Checkout Description Checking in a file uploads the file from the user s hard drive into the vault and creates a new file version with any changes to the file that have been saved.
Database Use & Design
 Database Use & Design 1 Important Terms and Definitions Database A collection of information organized in such a way that a computer program can quickly select desired pieces of data. Field Form Primary
Using Flash Animation Basics
 Using Flash Contents Using Flash... 1 Animation Basics... 1 Exercise 1. Creating a Symbol... 2 Exercise 2. Working with Layers... 4 Exercise 3. Using the Timeline... 6 Exercise 4. Previewing an animation...