How it works on the Audio Everywhere Cloud? Summing up, required assets Assets examples Sliding Banners How it works on the
|
|
|
- Stephany Curtis
- 6 years ago
- Views:
Transcription
1
2 Contents Introduction... 4 General Options... 4 Getting to the menu... 4 How tables works?... 5 Errors display... 6 Browser validations... 6 Server validations... 6 How to access to Cloud Server... 7 Log in... 7 Forgot Password?... 7 Dashboards... 9 Main Dashboard / Home Page... 9 Company Dashboard... 9 Venue Dashboard Widgets Management Widget List Add Widget Remove Widget Widget Configuration Venues / Locations Venues List Show Venue Venue Servers & Labels Venue Servers List List Log Files Update Software Version Software Version Software Version List Mobile App Components Welcome Ad or Splash page How it works on the Audio Everywhere Cloud? Summing up, required assets Assets examples App Theme Settings
3 How it works on the Audio Everywhere Cloud? Summing up, required assets Assets examples Sliding Banners How it works on the Audio Everywhere Cloud? Text Banners Image Banners Summing up, required assets Assets examples How to show more than 6 banners Offers How it works on the Audio Everywhere Cloud? Summing up, required assets Assets examples Documents (Information tab) How it works on the Audio Everywhere Cloud? Audio Channels How it works on the Audio Everywhere Cloud? Summing up, required assets Assets examples Components Association How it works on the Audio Everywhere Cloud? Final Result Phone Main Screen / Audio Tab Dialog Screen Main Screen / Information Tab Main Screen / Offers Tab

4 Introduction If you are a customer and need a login account, send an with your name, company, and the 16 digit serial number of your Audio Everywhere server to support@audioeverywhere.com All dimensions are in pixels Width x Height. All images should be either jpg or png. Venues and Locations are the same concept; physical place where the network of servers are running. General Options This section describes some general options that you can find or use all over the Audio Everywhere Cloud. Getting to the menu Click here to get to menu 4

5 How tables works? Almost for all the tables on the Cloud System you can find general functionalities explain it below: Order: If the option is enable for the column; you can click the title on the header if you want to order the records on the table with the data in the column as the reference, you can click the same title again to change the direction of the order. You can check if the column has the order option if the title has the icon on the left; the icon will show you also the column and the direction that is been use at the moment. Records per Page: On the left on the top of the table you can find a selector with multiple options; you can change the selector if you want to see more or less records in a single page. The default value is 10. Search: Many of the tables has the search option on the right corner on the top; you can enter a text in the input and the system will filter all the records on the table that contains the text that you entered. Pagination: On the bottom of the table you can see the pagination options; on the left you will see the information of the current and the total page and the filter information; on the right you will see the pagination buttons; you can click the page number to go to that page or the next and before buttons to move between pages. Action Icons: For most of the tables the last column is the actions column; in there you can find some icons that enables multiple actions; mouse over the icons to see a message of what the action will be; click the icon and you will be redirect to a page or the icon will be executed in the same page. Configuration: In general for all the tables you can change the configuration including the records per page, the search text and the current page and the system will save your configuration for that table during your session. 5


6 Errors display For all the forms in the system you can find the same kind of display of the errors. Browser validations If you try to submit a form but the browser find an error on any of the fields, will display a message with the requirement and focus on the text; this kind of errors appears one at the time, if you have multiple errors only 1 will be display. The field could have some extra information to indicate the format or parameters required by the field. Server validations Some validations are only executed when the information arrive to the server; all those errors will be display in red at the top of the page; the error should include some information that will help you to resolve the error. 6


7 How to access to Cloud Server Log in If you already have an account then you need to enter your and your password into the log in form; and click the Sign In button. If you fail with your authentication data you will see the message Sorry, we were not able to find a user with that username and password. If your authentication is correct then you will be redirect to the home page. Forgot Password? If you have an account but you forgot your password you can click the Forgot Password? option; on the new form you need to enter your address and click the Reset button. If your is registered on the system, an will be sent with a link that you will need to click to allow the reset of your account password. The link will be valid for 24 hours only. Hi User, There was recently a request to change the password of your account. If you requested this change, please confirm the request by following the link below: 5vMiDqaTj9phe7 Please note that this link is valid only for 24 hours. If you don't want to change your password, just ignore this message. Thanks, Audio Everywhere 7


8 When you click the received link you will be redirect to the log in page and a message with the text A new password has been sent to your . In the you will find a temporal password that you can use for a 1 time access; after this log in you need to change your password to your new and desire password. Hi User, As you request we assigned to you a new password, the password is: FxWrLd-!2g40_ After you have logged in using the new password, you may change it. Go to your account using following link: Thanks, Audio Everywhere After the log in with your temporal password a new form will be presented to you for the change of your password; you need to enter your , the temporal password, your new password and the confirmation of the new password; and click the Change button. If everything is correct then you will be redirect to the log in form with the message Password has been updated successfully. After that you are enable to access to the system with your and the new password. 8

9 Dashboards Main Dashboard / Home Page When you access to the Cloud System after the log in; you will see the home page that includes the main dashboard; at this dashboard you can see information related to all the objects depending of your user and role. You can add or remove the widgets that you like to see according to your functions and use of the system. The dashboard contains 3 columns and you can change the position (but not the size) of any of the widgets. Company Dashboard From the main dashboard, when you click the name of a Company, you will be redirect to the Company Dashboard; this dashboard will include at the widgets only information or objects associated to the selected Company. You can change the configuration of the dashboard in the same way that you can do it for the main dashboard; all dashboards configurations are save it individually. At the top of the page you can see a path so you can see what dashboard you are seeing. 9


10 Venue Dashboard From the main dashboard or the company dashboard, when you click the name of a Venue, you will be redirect to the Venue Dashboard; this dashboard will include at the widgets only information or objects associated to the selected Venue. You can change the configuration of the dashboard in the same way that you can do it for the main dashboard; all dashboards configurations are save it individually. At the top of the page you can see a path so you can see what dashboard you are seeing. Widgets Management Widget List Depending of the dashboard that you are seeing and the role of your user you can add several widgets to the dashboard; following there is the list of widgets: 10

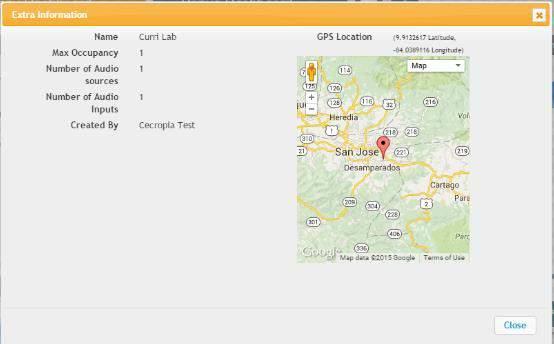
11 Companies: Shows a table with the list of companies with just the name and status; you can search and move to the company that you want to see. Venues: Shows a table with the list of venues related to the dashboard with just the name and status; you can search and move to the venue that you want to see. Venue Servers: Shows a table with the list of venue servers related to the dashboard with just the serial and status; you can search and move to the venue server that you want to see. Sliding Banners: Shows a table with the list of sliding banners related to the dashboard; you can search and move to the object that you want to see. Offers: Shows a table with the list of offers related to the dashboard; you can search and move to the object that you want to see. Documents: Shows a table with the list of documents related to the dashboard; you can search and move to the object that you want to see. App Theme Settings: Shows a table with the list of app theme settings related to the dashboard; you can search and move to the object that you want to see. Welcome Ads: Shows a table with the list of welcome ads related to the dashboard; you can search and move to the object that you want to see. Venue Serves Stats: Stats about the status of the Venue Servers related to the dashboard. Shortcuts: Shortcuts to some of the most use actions for the dashboard. Company Information: Only available for the Company Dashboard and will include many of the company information, including the logo and other properties. Employees: Only available for the Company Dashboard, shows a table with the list of Employees of the Company, you can search and move to the object that you want to see. Venue Information: Only available for the Venue Dashboard and will include many of the venue information, including the logo and other properties; also, you can see a full demo as example of the App with all the current associated components. If you click the Extra Information click on the widget a new window will be open it with all the extra information of the venue including the geo location data. 11
12 12


13 Also from the widget; you can change the logo of the venue (if it s not using the Company Logo) using the Change Logo link under the logo image. When you click the link a new window will be open it where you can select an image from your computer and crop it according to your requirement and click the Upload button. The system will upload the logo and refresh the widget. Besides of that; the widget provide an option where you can see a full example of the App with the current associated objects at the time. The demo includes the App Theme Settings to be use with the main and secondary colors; the associated Offers, Sliding Banners and Documents. App Theme Settings / Welcome Ad: Only available for the Venue Dashboard, shows you the current App Theme Settings and the Welcome Ad information associated to the venue. 13

14 Add Widget If you want to add a widget to any of the dashboards; you have to click the + icon on the top of the page: A new window will be open with the list of widgets that you can add to the dashboard; in there you can find the desire widget and click the Add button on the right; the system will add the widget to the first position available and save your configuration; after that you can change the position of the widgets. Remove Widget Almost for all the widgets (Company and Venue information widgets can t be remove from their dashboards) you can use the remove option in order to remove the widget from the dashboard in order to simplify your dashboard according to your use of the system. Mouse over the menu icon on the left of the widget title and the options will be displayed; go to the Remove option and click in there; the system will remove the widget, reposition the other widgets if there are space and save your configuration. If you want to see the widget again you can add it using the add option. 14


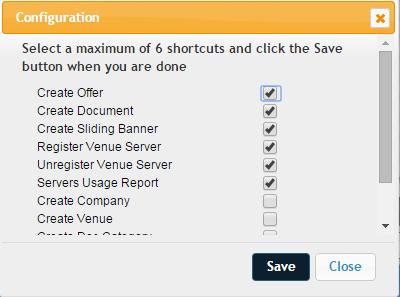
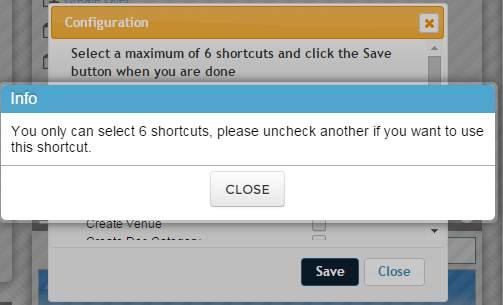
15 Widget Configuration Some of the widgets allows a configuration; mouse over the menu icon on the left of the widget title and the options will be displayed for the widget; look up for the Configuration option, if it s available you can click it and a new window will be opened with the configuration options for the current widget. Change the configuration values and click the Save button. For the Shortcuts Widget; you will find a special configuration; in there you will see the list of shortcuts available for the dashboard, select at least one or a maximum of six shortcuts and click the Save button. 15

16 16

17 Venues / Locations Venues List For all users, with this option you can see the list of the Venues that you are allow to access depending of your user Roles. Click the option on the menu a new page will be loaded with a table with the list of the Venues. The table works as is indicated at the How Tables Works? section. Table Columns Detail: Name: Name of the Venue for reference Company: Name of the related company. Company Integrator: If the Company has an Integrator will appears at this column. State: State of the Venue. Enabled: Enable or not, Venues that are not enable won t allow connection of Servers and some other functions inside the Cloud System. Actions: o Show: Open a new page with all the information of the venue, including all the associated components; check the Show Venue section for details. o Edit: For Integrator and Help Desk Users; open the page where you can change the information of the Venue, including the time zone and the logo. o Register a Venue Server: For Integrator and Help Desk Users; click to open the page where you can register a new venue server to this venue. o Venue Servers: When the venue has associated servers will show this icon, click to go to the list of those server. 17

18 o Create Venue Server User: For Admin, Help Desk and Integrators users; click to open the page when you can create a new server user for the selected venue. Show Venue From the Venues List; you can click the Show action icon and open the show page; this page includes all the information related and associated of the Venue. At this page you can see several tabs with all the information: Info Tab: Include all the Venue information; this information can be updated from the edit page of the Venue. Venue Servers: Include the list of servers registered to the venue; you can check the status and from there go to all the actions of the servers. App Theme Settings: Include the information of the App Theme Setting associated to the Venue if there is one. Welcome Ad: Include the information of the Welcome Ad associated to the Venue if there is one. Sliding Banners: Include a table with all the assigned sliding banners including the offers that works as banner; in that table you can set the order of the banners so you can choose which of them are sent to the servers considering the maximum of 6. Offers: Include a table with all the offers assigned to the venue. Documents: Include a table with all the documents assigned to the venue. Venue Server Users: Include a table with all the server users created for the venue; from there you can edit or remove those users. The users are only local and have no relationship with the system users. 18


19 If you want to change the order of the sliding banners, go to the tab and mouse over the Order column on the left; 2 icons should appears; click on them to move the banner up or down, when you are done, click the Save Order button to store your configuration and send an update to the servers with the new order. 19

20 Venue Servers & Labels Venue Servers List For all users, with this option you can see the list of the Venue Servers that you are allow to access depending of your user Roles. Click the option on the menu a new page will be loaded with a table with the list of the Venue Servers. The table works as is indicated at the How Tables Works? section. Table Columns Detail: Serial Number / Venue: Displays the serial number of the server and the venue name that belongs. Name: Name of the server if exists. PA: Displays if the server is defined as the PA of the venue; only 1 PA per venue is allow. Version/Model: Information of the server version that is running and the model if it s at the Cloud System; some older versions do not send the information of the model. Last Seen: Time ago when the server connects to the server or send a HB request. If the value is in green then the server is connected. Actions: o Show: Open a new page with all the information of the venue server. o Edit: For all users with the exception of the Admin users; open the page where you can change the information of the server, if it s connected you can also change the channels information. o List Log Files: Only when the server is connected; will show you a page where you can download the log files from the server. o Update Software Version: Only when the server is connected; will let you do an upgrade if the software version of the server if exists a new one. o Reset Venue Server: Only when the server is connected; if you click the icon you will send a request to the server of a complete restart. o Retire Server: For Admin and Help Desk users only; will unregister the server from the venue; a new registration process will be required. 20


21 List Log Files If the server is connected; from the list of servers you can click the List Log Files icon; a new page will be loaded with the list of available log files from the server; you can click the download icon on the icons column to retrieve a tar.gz file with the log; or you can delete the log in order to clean the log specific log file. Update Software Version If the server is connected; from the list of servers you can click the upgrade software icon; the system will display the current software version information and if exists a new version available. If exists you can click the Apply button; the system will send a message to the server and the upgrade process will be execute. 21

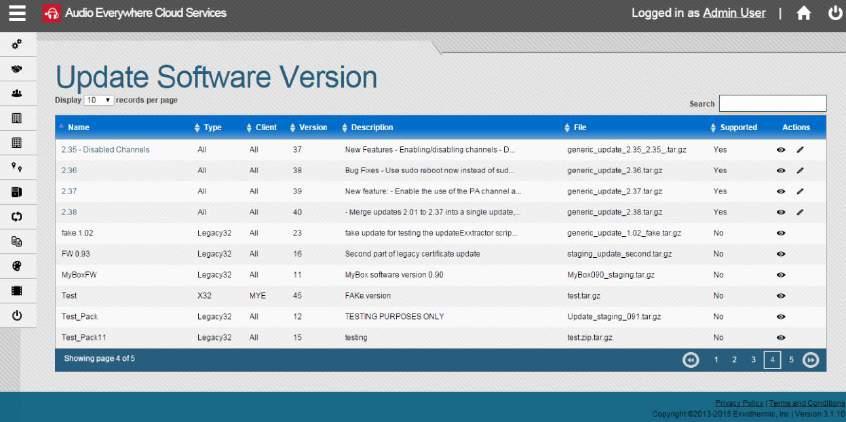
22 Software Version Software Version List For all users, with this option you can see the list of the software versions registered to the Cloud System. Click the option on the menu a new page will be loaded with a table with the list of software versions. The table works as is indicated at the How Tables Works? section. Table Columns Detail: Name: Name of the software version as a reference. Type: It s the target type of venue servers for the software version. Can be All, Legacy32, X32 or X64 depending of the server architecture. Client: Client or Affiliate; only the servers associated to the indicated client will receive the update of this software version. Version: Number of the version, generally any new version increase this version by one. Description: Short description of the software version. File: Name of the file of the software version Supported: Indicate if the software version is still supported; only supported software versions are use as an upgrade to the servers. Actions: o Show: Open a new page with all the information of the software version. o Edit: For supported versions and for Admin users only; you can click the icon and open a new page with a form where you can change the information of the software version. 22
23 23


24 Mobile App Components Welcome Ad or Splash page 1 When the User starts the application if you associate a Welcome Ad to the Venue it will be the first component to appear; for the Welcome Ad you can enable the option to skip the video and the minimum time in seconds that the User should see it. 2 1 Skip Ad: This option will let you skip the Welcome Ad and continue to the scanning screen if the option is enable and after the minimum time in seconds. 2 The Video or the Image will appears at the center of the screen. How it works on the Audio Everywhere Cloud? You can create a new Welcome Ad using the main menu on the left, go to the Welcome Ads section and click the Create Welcome Ad option. The creation page will be opened and in there you can enter and configure all the information with following detail: 24


 you can check the box Auto Generate Image for Tablets, with that option the system will generate")

25 Name: This is the name of the Welcome Ad just as a reference for the administration and will not be use by the App. Enable Skip: If you check this box the Skip Ad option will appears at the app after the seconds configurated, like the pre-roll ads in Youtube. Min skip seconds: This is the minimum number of seconds that the User should see the Welcome Ad. Type of Welcome: Can be Image of Video. Image Type If the selected type is Image, you must select at least the image for small devices. You can select an image larger than the required but never shorter, and them crop the image according to the required size (640W x 960h). As an additional option and if you don t want to create an image for a large devices (2048Wx1536h) you can check the box Auto Generate Image for Tablets, with that option the system will generate an image with the required size, with the image for small devices at the center and with a background on black that will be use for those devices. Video Type If the selected type is Video, you must select a video with the recommended requirements that will be displayed and a tool that can be use to validate those requirements is included. Any error on the selected files (images or video) should be show it to you before submit the form depending if the browser allows the validations or after as general errors on the top of the page. When everything is configured you should click the Save button; if the configuration it s ok then you must be redirected to the page when you can associate the Welcome Ad to any of the Venues that you manage. 25
 The video must satisfies following requirements (it s possible that with other format")

26 Summing up, required assets For Image Type For Video Type For phones you will need: 640x960 (WxH) For tablets you will need an image with 2048x1536 (WxH) The video must satisfies following requirements (it s possible that with other format works also but this is the validated and recommended configuration): File Format: mp4 Video Bibrate: 500 kbps Frame Rate: 30fps Audio Codec: AAC-LC Sound: Mono or Stereo Audio Bit Rate: 128kbps Assets examples Small and large welcome images 26


27 App Theme Settings The App Theme Settings is the main way to configure how the App will look; in there you can select the colors to be use, the title and the background images for the text banners between others. This need to be created and associated to the desire Venues; if you don t associate one App Theme Settings then the Venue will use the default depending of the related Affiliate. How it works on the Audio Everywhere Cloud? You can create a new App Theme Setting using the main menu on the left, go to the App Theme Settings section and click the Create App Theme Settings option At the create or edit page of an App Theme Settings you will find a live preview example of the configuration and how it will looks on the App; the example could has some differences but you can se how the colors, title and images should appear. 27


 and then crop it for the desire final image according to the standar functionalities.")
28 Name: This is only for reference on Central Server, define a significative name so you can find it later. Title: This is the title of the App, can t be longer than 20 characters and will apear on uppercase. Main Color: One of the two configurable colors of the App, you can check how the App will change on the live preview. You can enter a css hexadecimal color or click the color box on the righ and select the color. Secondary Color: The other configurable color of the App, you can check how the App will change on the live preview. You can select the color also with the color box. Enable Channel Info: If you check this box then the configurable description of the channel can be read it by the users using the icon for each of the channels. Ads Background Image: This image is shown behind the text sliding banners or when there is not banners associated to the Venue. You can select an image (640Wx280H) and then crop it for the desire final image according to the standar functionalities. As an aditional option you can check the Auto Generate Image for Tablets and the system will generate an image with the background of the main color and the required size (640Wx500h) for the tablets with the phone image at the center. Text Dialog Image: This image will be use as background for the text slidding banners at the detail screen, you can select an image and use the autogenerate option as for the Ads Background Image. Setting the images is not something that you need to do at the beginning and much less important than the title and colors. With the selected configuration you can see at the live preview how the title is applied, the main color is use in 3 sections and the secondary color for the tabs and the headers at the Information tab, besides of the ads background image; make any change at the configuration and check the example for a better reference. 28
 For tablets you will need an image with 640x500 (WxH) For phones you will need an image")

29 Summing up, required assets For the Ads Background Image For the Text Dialog Image For phones you will need an image with: 640x280 (WxH) For tablets you will need an image with 640x500 (WxH) For phones you will need an image with: 640x500 (WxH) For tablets you will need an image with 924x462 (WxH) - Remember that you can always check the option for the auto-generation of the images for the tablets. Assets examples Small and large Ads Background image 29


30 Sliding Banners The sliding banners appears at the top of the App for the main screen and let you display important information to all the users, the banners can be schedule it per day of the week and hours, and only a maximum of 6 banners including the text and image banners, and offers that works as banners will be shown to the users at a time. You can create 2 types: Image or Text; the image type will let you upload your images for both the banner and the dialog images, and for the text type you won t need to id and the images configured by the related App Theme Setting will be use, besides of the Company or Venue logo. If you have more than 6 enabled and scheduled banners you can change the order and with this select the banners that you want to see at the App; always considering that the maximum is 6 even when more than that are enabled. Two screens are related with a banner; first is the basic banner area at the main screen of the App, the second is called the dialog screen, which you get to by clicking on the first area. On the second screen is a MORE INFO button which if clicked brings you to a Website that will open inside a window on the App on ios and on a separate browser app on Android. Be aware that the sliding banner on the first page, unlike the dialog pages, do not have text overlays, if you want to include text should be right in the image. How it works on the Audio Everywhere Cloud? You can create a new Sliding banner using the main menu on the left, go to the Sliding Banners section and click the Create Sliding Banner option At the create or edit page of a Sliding Banner you will find a live preview example of the configuration and how it will looks on the App; the example could has some differences but you can se how the colors, text and images should appear. 30


31 Some properties works in a different way for Text or Image banners, we will describe each of the property and how they are use it depending of the type. Title: The name of the banner. Also shows up as text overlaying the dialog image. Remember this when picking a dialog image. Type: Text or Image, both cases are shown at the side and for the general properties only the Color is not use for the Text banners, al others are included and could works depending of the type. Text: This text appears below the dialog image for both types, and as the main message for the Text type, bacause of that is required and can t be empty when the selected type is Text. Color: It s only use for the Image type and will be background color when there are not images defined for the banner area or when exists some internet issue that will not let the Venue Server download the image. URL: The website that will be visited when clicking MORE INFO button on the dialog page, the button will appears only when a URL was entered. The website will open inside a window on the App on ios and on a separate browser app on Android. Enabled: Make sure to click this to enable the banner. Only the enabled banners are send it to the Venue Servers by the system. Schedule: Define when the banner will appear, local time. The time zome is selected from a pull down menu in the VENUE/LOCATION setup, you can select a range of dates when the banner will be enable, the days of the week, and even the hours. It s highly recommended to keep each banner for at least one hour. Text Banners The components of the text banner are spread acress several pages: The logo (150Wx150h) on the VENUE/LOCATION or COMPANY setup pages, in the Venue/Location page, one can either pick a new logo or inherit the Company logo. This logo shows up in the text banner circle, if it s provided. At the live preview you will only see a circle since the system does not know the Venue that will be using the banner. 31


32 The background and dialog images in the App Theme Settings. The first of these provides the background image for the text banner and the second shows up at the top of the TEXT dialog page. These are optional and if it s not define them the main color will be use as the background. Text Banner example without images as background from the App Theme Settings. 32


33 Image Banners For the Image type you need to select 3 (2 optional) images: Banner Image: This will be the image at the main screen for the phones and all other images can be auto-generated from this one. Dialog Image: This will be the image for the dialog page of the phones and can be auto-generated from the banner image. Tablets Dialog Image: This will be the image for the dialog of the tablets and can be auto-generated from the banner image if the dialog image is been auto-generated also; or from the dialog image if you select a specific image for that property. The live preview will show you how both, the banner and dialog images looks, and for the dialog page you can see the banner TITLE as an overlay and the TEXT under the dialog image; the MORE INFO button will appears only if you set a URL. 33
34 Summing up, required assets For Text Banners For Image Banners Logo: 150x150 (WxH) on Venues/Locations page. Text dialog background o Phones: 640x500 (WxH) on App Theme Settings o Tablets: 924x462 (WxH) on App Theme Settings Text banner background o Phones: 640x280 on App Theme Settings o Tablets: 540x500 (WxH) on App Theme Settings Banner Image (First page) o Phones: 640x280 (WxH) o Tablets: 640x500 (WxH) Dialog Image (Second Page) o Phones: 640x500 (WxH): Can be autogenerated from the banner image and is also used on the Cloud website to represent the banner image in tables. o Tablets: 924x462 (WxH) - Remember that you can always check the option for the auto-generation of the images for the tablets. - Clip art is available on the AudioEverywhere.com website: o These can be use directly and then one can add simple TEXT to expand on the meaning. This should greatly simplify the creation of scanning banner ads. - You can show no more than 6 (Banners + Banners-Offers) at a time. Assets examples Sliding banner and dialog image for Image type How to show more than 6 banners In the Cloud Server, create as many banners as you want. In the schedule section of the Cloud Server schedule no more than six to show at one time (including banner offers) They will then change over time as you have them scheduled. It is highly recommended to keep each banner scheduled for at least one hour. 34


35 Offers The offers appears on the OFFERS tab of the main screen, the amount of offers can be define by the Cloud Server and will only include the enabled and scheduled offers considering the expiration date that you set to the offer. If you set that the offer will also works as a sliding banner, then will appears at the top as a regular banner and will be count for the maximum of 6 including the text and image banners at a time. The offer can also be configured to appears at the INFORMATION tab; will appears under a category with the name OFFERS and can only refers to a pdf file. How it works on the Audio Everywhere Cloud? You can create a new Offer using the main menu on the left, go to the Offers section and click the Create Offers option At the create or edit page of a Offer you will find a live preview example of the configuration and how it will looks on the App; the example could has some differences but you can se how the colors, text and images should appear. 35


36 Title: The name of the offer at the App for the OFFERS tab and the INFORMATION tab if it s configured to appears in there. Also shows up as text overlaying the dialog image. Remember this when picking a dialog image. Text: This is a optional property and is the text appears below the dialog image. Color: It s the background color when there are not images defined for the banner area or when exists some internet issue that will not let the Venue Server download the image. Show pdf in information tab: When you check this box, the offer will appears at the INFORMATION tab also under a category with the name OFFERS, the Reference Type will change to allow only a PDF file instead of a URL or PDF and the selection of a file becomes required. If you don t check the box, then the Reference Type can be either URL or PDF, for PDF you have to select a file, but if you select URL then you can or not enter a URL. Reference Type: If the box before is uncheck then you can select PDF or URL; if select PDF then you have to select a pdf file; if select URL then you can enter or not a URL and the More INFO button at the dialog page should not appears. File: Will appears only when the Reference Type selected type is PDF and it s a required property, when you click the MORE INFO button on the dialog page the pdf file will be opened. URL: Will appears only when the Reference Type selected type is URL ant it s the website that will be visited when clicking MORE INFO button on the dialog page, the button will appears only when a URL was entered. The website will open inside a window on the App on ios and on a separate browser app on Android. Enabled: Make sure to click this to enable the offer. Only the enabled offers are send it to the Venue Servers by the system. Schedule: Define when the banner will appear, local time. The time zome is selected from a pull down menu in the VENUE/LOCATION setup, you can select a range of dates when the offer will be enable, the days of the week, and even the hours. This schedule will appears on the dialog page depending of your definition. 36
 images: Banner Image: This will be the image at the main screen for the phones on the banner area, and all other images can be autogenerated from this one.")

37 Banner Ad: If you check this box then the offer will be use as a sliding banner also, and sent it into the maximum of 6 banners. You can select 3 (2 optional) images: Banner Image: This will be the image at the main screen for the phones on the banner area, and all other images can be autogenerated from this one. Dialog Image: This will be the image for the dialog page of the phones and the thumbnail for the list under the OFFERS tab; can be auto-generated from the banner image. Tablets Dialog Image: This will be the image for the dialog of the tablets and can be auto-generated from the banner image if the dialog image is been auto-generated also; or from the dialog image if you select a specific image for that property. The live preview will show you how both, the banner and dialog images looks, and for the dialog page you can see the banner TITLE as an overlay and the TEXT under the dialog image; the MORE INFO button will appears only if you set a URL or if the reference type is PDF. In the preview you can see the offer as a sliding banner also because the Banner Ad is checked. 37


38 Summing up, required assets Banner Image (First page) o Phones: 640x280 (WxH) o Tablets: 640x500 (WxH) Dialog Image (Second Page) o Phones: 640x500 (WxH): Can be autogenerated from the banner image and is also used on the Cloud website to represent the banner image in tables. o Tablets: 924x462 (WxH) - Remember that you can always check the option for the auto-generation of the images for the tablets. - Clip art is available on the AudioEverywhere.com website: o These can be use directly and then one can add simple TEXT to expand on the meaning. This should greatly simplify the creation of scanning banner ads. Assets examples Sliding banner and dialog image. 38


39 Documents (Information tab) The documents appears on the INFORMATION tab of the main screen, the amount of documents can be define by the Cloud Server and will only include the documents that has not reach the expiration date. Multiple categories can appear if you set the documents to different categories; those categories are only define by the administrators, if you need a new one please contact to your administrator of the Cloud with you requirement. If you set at least one offer to appears at this tab then a new category with the name OFFERS appears on the App For now all the documents are a PDF file that will be opened when you click the row of the title of the document. How it works on the Audio Everywhere Cloud? You can create a new Document using the main menu on the left, go to the Documents section and click the Create Document option 39

40 Category: This is the category under which the document will appears at the INFORMATION tab on the App. The list of categories is managed by the Administrators of the Cloud System, if you need a new category please contact to the administrator and ask for your requirement. Title: Title of the document on the App and also the reference name on the list on the Cloud System; if the title is to long will be crop at the App for your consideration. File: PDF file that will be opened when you click the title on the App. This property is required since it s the reference of the objects. Expiration Date: This is the date when the documents become unavailable on the App, need to be in format mm/dd/yyyy and can be empty if you want to keep the document available for ever. 40


41 Audio Channels This sections intends to explain how to customize the channels details, including the name, images and information between others. The information icon and the option to see the additional information of a channel is a general configuration for the Venue/Location from the App Theme Settings associated. How it works on the Audio Everywhere Cloud? You can manage the channels information of a Venue Server only when it s connected. using the main menu on the left, go to the Venue Servers & Labels section and click the Venue Servers List option. The page with the list of all the servers that you are allow to see will appears: For all the Venue Servers (The green on the list) you can click on the serial number-venue or on the edit icon ( ) to go to the edit page where you can manage the channels information. 41


42 If and only if the server is connected at the bottom of the page you will the the list of the channels and all the options of administration Enable: With this option you can include or not the channel on the list of channels on the App; when the box is checked then the channel will appears available on the App; by default all channels are enabled; if you want to change disable/enable a channel you can change the value for all in the list and then you need to click the Save button. 2 Image: This is the thumbnail image and will appears on the App on the list when the channel is not selected and on the bottom of the App when the channel is been played. Required a 200Wx200H image; if you want to change the image you have to click the upload icon, a new window will be opened where you can select an image and crop it according to your requirement if it s neccesary, when you are ready click the Save button; the upload of the image will starts and the update to the server will be send at that moment and do not required to click the Save button. If you want to clean the image and leave it empty you have to click the Trash icon next to the Upload icon, click the icon and confirm to remove the image. 42


43 Large Image: This is the image that will appears on the App on 3 the list when the channel is been played. Required a 600Wx200H image; if you want to change the image you have to click the upload icon, a new window will be opened where you can select an image and crop it according to your requirement if it s neccesary, when you are ready click the Save button; the upload of the image will starts and the update to the server will be send at that moment and do not required to click the Save button again. If you want to clean the image and leave it empty you have to click the Trash icon next to the Upload icon, click the icon and confirm to remove the image. 4 Name: Will be the name of the channel on the list on the App; the channels will be ordered alphabetically at the App; this name can t have more than 13 characteres and you can include special characters in there and must appears in the same way at the App. 5 Description: Aditional description of the channel, can contains special characteres with a maximum of 100 characters. This description will be displayed when you click the information icon of a channel on the App and will be available depending of the App Theme Settings associated to the Venue. 43

44 6 Gain Level: When the volume of the channel is a little low; you can try to increase it by changing the gain level to a higher value, when you change this value you have to click the Save button at the bottom. 44
 Large Image: 600x200 (WxH) Assets examples Small")

45 Summing up, required assets Thumbnail Image: 200x200 (WxH) Large Image: 600x200 (WxH) Assets examples Small and large images If you need you can find some templates for this at 45


46 Components Association All components are associated to the Venues/Locations and all the servers in there will use the same configuration of associated Welcome Ad, App Theme Setting, Documents, Offers, and Sliding Banners. You can associate a component to multiple Venues and the Cloud server will try to send the information at that moment to all the connected servers and for the disconnected servers when they get a connection with the server all the information will be sync. How it works on the Audio Everywhere Cloud? For all components the association works in the same way; using the main menu on the left, go to any of the components section and click the option of Assign For all the cases a new page will be openened when you can find a selector with the list of all the objects of the type that are enable and that you can associate; you have to select the object that you want to associated to the Venues, the list of Companies and their Venues/Locations will be load and if the boxes on the left will be checked depending if the Venue is or not associated. When you check/uncheck the boxes depending of your requirements you have to click the Save button; the Cloud server will add or remove the associations of the Venues depending of your selection and will try to send the update to all the related Venue Servers with the new configuration. 46


47 If you don t change any of the associations and click the Save button then a message will be display including the text Nothing to sync because the syncronization with the Servers is not required. If there are changes the Cloud Server will try to update all the related servers; you will see a message indicating that the new configuration was saved and if there was any error sending the information to a Server another message will be displayed. The result of the syncronization will be display on a table at the bottom of the page with the detail per Server of the status (Success / Failed), the list of objects per component type sent and if the sync failed a descriptive message of the reason. 47

48 Final Result Phone Main Screen / Audio Tab Primary/Main Color ( App Theme Settings ) Title ( App Theme Settings ) Sliding Banners + Offers as Banners (Maximum 6) Logo from Company or Venue/Location set up. Secondary Color ( App Theme Settings ) From 600x200 Channel Art Primary/Main Color ( App Theme Settings ) From 200x200 Channel Art 48

49 Dialog Screen Banners of Offers Title overlaying the Dialog Image Banners of Offers Dialog Image Banners of Offers optional Text Tab to go to the URL from Banners of Offers, can be a PDF file for Offers. 49

50 Main Screen / Information Tab All the Documents with the Categories when there s at least 1 related Document. The Category title background comes from the App Theme Settings secondary color. The Documents under the Offers category are the offers set to be displayed at this tab. 50

51 Main Screen / Offers Tab All available Offers with the title cropped when they are too long and the detail of the expiration. 51
52 52
Introduction to Qualtrics ITSC
 Introduction to Qualtrics ITSC August 2015 Contents A. General Information... 4 B. Login... 5 New Qualtrics User... 5 Existing Qualtrics User... 7 C. Navigating Qualtrics... 9 D. Create Survey... 10 Quick
CUSTOMER PORTAL Splash Pages
 CUSTOMER PORTAL Splash Pages SPLASHPAGES In the splash page area, you can either create a custom splash page or use our editing tool and create a custom splash page using your own code. These splash pages
VNNOX Cloud-Based Publishing Service XI'AN NOVASTAR TECH CO.,L Quick Start Guide Product Version: Document Number: V6.5.0 NS
 VNNOX Cloud-Based Publishing Service XI'AN NOVASTAR TECH CO.,L Product Version: Document Number: V6.5.0 NS170100150 Copyright 2018 Xi an NovaStar Tech Co., Ltd. All Rights Reserved. No part of this document
Quantum Admin. Contents
 Quantum Admin Contents Date Created... 2 Project Title... 2 Project Mission Statement... 2 Description... 2 Overview... 2 General... 2 Security... 2 Launching Admin... 2 Themes... 3 Users... 5 Work Breakdown
Knowingo + Dashboard Manual
 Knowingo + Dashboard Manual Introduction The purpose of this manual is to provide current Knowingo + users with references and instructions on how to utilize the Knowingo + Dashboard. The contents of this
Sedao Ltd. QuickChange PROject. User Manual for QuickChange PROject version 2.1.5
 Sedao Ltd QuickChange PROject User Manual for QuickChange PROject version 2.1.5 Contents What is QuickChange PROject?... 2 Simple Artwork Creation... 5 Creating a project... 7 QuickChange PROject Template
UpLift Media A GUIDE TO USING THE UPLIFT MEDIA ADVERT CREATOR. The latest innovation brought to you by
 UpLift Media A GUIDE TO USING THE UPLIFT MEDIA ADVERT CREATOR The latest innovation brought to you by 1 UpLift Media UpLift Media 2 Uplift Media Advert Creator Welcome to the Uplift Media Advert Creator
PANOPTO: WEB MANAGEMENT INTERFACE
 Panopto's Web Management Interface offer's instructors the ability to manage and edit the recordings captured and uploaded using the Panopto desktop recorder. Access the Web Management Interface at http://panopto.nvcc.edu.
TRITON DIGITAL ON DEMAND MANAGER
 TRITON DIGITAL ON DEMAND MANAGER OnDemand Manager User Guide July 12 th, 2012 www.tritondigital.com Page 1 Content 1 INTRODUCTION 4 2 PRODUCT OVERVIEW 4 3 VIDEO ASSETS MANAGER 4 3.1 ADD/DELETE A VIDEO
Sync User Guide. Powered by Axient Anchor
 Sync Powered by Axient Anchor TABLE OF CONTENTS End... Error! Bookmark not defined. Last Revised: Wednesday, October 10, 2018... Error! Bookmark not defined. Table of Contents... 2 Getting Started... 7
User Guide. RACER Date 09/29/17
 User Guide RACER Date 09/29/17 1 Table of Contents Table of Contents... 2 RACER... 4 Home Page...5 RACER Requester... 6 Basic Information...6 Location Information...7 Change Information...8 Review and
Anchor User Guide. Presented by: Last Revised: August 07, 2017
 Anchor User Guide Presented by: Last Revised: August 07, 2017 TABLE OF CONTENTS GETTING STARTED... 1 How to Log In to the Web Portal... 1 How to Manage Account Settings... 2 How to Configure Two-Step Authentication...
User Manual. We will cover:
 User Manual New to ActiveBuilding or need a refresher? This manual contains eight sections that will teach you all that you need to know to effectively use your portal. We will cover: Page 2 5 Page 6 7
Atlona Manuals Software AMS
 AMS Atlona Manuals Software Version Information Version Release Date Notes 1 03/18 Initial release AMS 2 Welcome to Atlona! Thank you for purchasing this Atlona product. We hope you enjoy it and will take
Parallels Remote Application Server
 Parallels Remote Application Server Parallels Client for Mac User's Guide v16 Parallels International GmbH Vordergasse 59 8200 Schaffhausen Switzerland Tel: + 41 52 672 20 30 www.parallels.com Copyright
Manual for v Last updated - 4/2/ P age
 Manual for v6.1.6 Last updated - 4/2/2015 1 P age CONTENTS General Interface and Usage... 5... 5 NAVIGATION... 5 GRIDS... 6 ACTION BUTONS... 8 Overview... 8 USER ACCOUNTS... 8 Overview... 8 Setting up
Administrator Quick Guide
 1 Administrator Quick Guide Login Screen The first page employees will see when visiting their training site is the login screen. This is where employees must enter their username and password to access
Classroom Blogging. Training wiki:
 Classroom Blogging Training wiki: http://technologyintegrationshthornt.pbworks.com/create-a-blog 1. Create a Google Account Navigate to http://www.google.com and sign up for a Google account. o Use your
RIX Wiki User Guide 1
 RIX Wiki User Guide 1 Contents Logging into your Wiki... 3 Getting to know your Home Page...... 4 Wiki Control Panel... 6 Using the Wiki Control Panel Setup your Wiki... 7 Using the Wiki Control Panel
Getting Started with ShortStack
 Getting Started with ShortStack presented by SHORTSTACK Welcome to ShortStack! This guide covers our platform s five main sections: Tabs, Designer, Media, Templates, and Forms & Promos so that you can
GRS Enterprise Synchronization Tool
 GRS Enterprise Synchronization Tool Last Revised: Thursday, April 05, 2018 Page i TABLE OF CONTENTS Anchor End User Guide... Error! Bookmark not defined. Last Revised: Monday, March 12, 2018... 1 Table
Matrix 6.12 Browser Compatibility
 CarolinaMLS Matrix Version Update - 6.12 (6.11.9 included) August 21, 2015 Matrix 6.12 Browser Compatibility Matrix 6.12 is compatible with the latest browser versions supported by mainstream operating
Glogster
 Glogster http://edu.glogster.com Page 1 A Glog is like a poster, only better. Glogs allow you to create an online poster using photographs, images, graphics, video files and sound files. Glogs allow you
VNNOX Cloud-Based Publishing Service XI'AN NOVASTAR TECH CO.,L User Guide (Pro) Product Version: Document Number: V6.5.0 NS
 Product Version: Document Number: V6.5.0 NS") VNNOX Cloud-Based Publishing Service XI'AN NOVASTAR TECH CO.,L (Pro) Product Version: Document Number: V6.5.0 NS170100148 Copyright 2018 Xi an NovaStar Tech Co., Ltd. All Rights Reserved. No part of this
VNNOX Cloud-Based Publishing Service XI'AN NOVASTAR TECH CO.,L (Pro) Product Version: Document Number: V6.5.0 NS170100148 Copyright 2018 Xi an NovaStar Tech Co., Ltd. All Rights Reserved. No part of this
State Association Website User Manual. (For Website Administrators)
") State Association Website User Manual (For Website Administrators) BASICS There have been some basic changes to the layout of the new NAMSS website. Three major changes have occurred: 1. Login Process
State Association Website User Manual (For Website Administrators) BASICS There have been some basic changes to the layout of the new NAMSS website. Three major changes have occurred: 1. Login Process
User Manual Version
 Next FlipBook Maker for Windows User Manual Version 2.5.10 1 Content Cover 1 Content 2 1. Import PDF fires or images 3 2. Setting, Template, Scene and Bookmark 5 3. Publish local flipbook 19 4. Publish
Wordpress Training Manual
 The Dashboard... 2 If this is your first time logging in:... 2 How do I change my password or email address?... 3 Search Engine Optimization (SEO)... 4 SEO for Pages... 4 SEO for Images... 5 Managing Pages...
CANVAS OBSERVER GUIDE
 CANVAS OBSERVER GUIDE This work is licensed under a Creative Commons Attribution-NonCommercial-ShareAlike License Table of Contents Introduction...3 What is the Observer role?...4 How can I use Canvas
Enter your Appserv username and password to sign in to the Website
 Appserv Desktop Access Logging on from a Windows 10 Device Step 1. To sign in to the Appserv Desktop Access website, either enter the following address into the Microsoft Edge browser address bar, or click
A. Getting Started About e-access Enrolling in e-access: Authenticating your account Login... 5
 Contents A. Getting Started... 3 1. About e-access... 3 2. Enrolling in e-access:... 3 3. Authenticating your account... 5 4. Login... 5 B. Fix a Problem... 6 1. Provided the wrong email address during
Getting Started with Penn State WikiSpaces
 Getting Started with Penn State WikiSpaces About Penn State WikiSpaces Penn State WikiSpaces is a platform intended to support Penn State-associated collaboration. Wikis are websites that allow for the
Android User Guide. for version 5.3
 Android User Guide for version 5.3 Contents 1. Installation... 3 1.1. How to install Babelnet... 3 1.2. Enter Babelnet in the search field.... 3 1.3. Safety precautions when using Babelnet on your Android...
PowerSchool Parent Portal Directions
 P a g e 1 PowerSchool Parent Portal Directions If you need to create a new account OR if you need to link additional students to your account, please follow the instructions below. If you already have
Major League Baseball Club Accreditation System
 Functional Specifications User Guide System Administrator Major League Baseball Club Accreditation System Club Accreditation User Guide System Administrator - v1.4 Page 1 Date Versio n Revision History
RunClick Webinar and Video Conferencing Software. User Manual
 RunClick Webinar and Video Conferencing Software User Manual Visit RunClick.com for more details 1 Page Table of Contents Installation and Activation of RunClick Part 1: WordPress Fresh Installation Process
Intelli-Signage Signage Designer Software
 Intelli-Signage (User Manual V1.0) version: V3.0.0.0 Contents 1. Introduction... 1 2. System requirement... 1 2.1 Signage Player Software... 1 2.2... 1 3. Installation/Uninstallation of... 2 4. interface...
A Quick Introduction to the Genesis Framework for WordPress. How to Install the Genesis Framework (and a Child Theme)
") Table of Contents A Quick Introduction to the Genesis Framework for WordPress Introduction to the Genesis Framework... 5 1.1 What's a Framework?... 5 1.2 What's a Child Theme?... 5 1.3 Theme Files... 5
Table of Contents A Quick Introduction to the Genesis Framework for WordPress Introduction to the Genesis Framework... 5 1.1 What's a Framework?... 5 1.2 What's a Child Theme?... 5 1.3 Theme Files... 5
CAL 9-2: Café Soylent Green Chapter 12
 CAL 9-2: Café Soylent Green Chapter 12 This version is for those students who are using Dreamweaver CC. You will be completing the Forms Tutorial from your textbook, Chapter 12 however, you will be skipping
AURUM Metro Navigation
 AURUM Metro Navigation End User Document Version 1.0 Oct 2016 Table of Contents 1. Introduction... 3 2. Initialization... 4 2.1 Create Metro Navigation List... 4 2.1.1 Adding the Metro Navigation Web part...
SIMICART USER GUIDE SERIES
 SIMICART USER GUIDE SERIES How to Configure SimiCart Extensions HOW TO BUILD YOUR APP SimiCart Building Your App BUILDING YOUR APP 1. General App Information This will be done on Theme design tab in your
USER MANUAL. SalesPort Salesforce Customer Portal for WordPress (Lightning Mode) TABLE OF CONTENTS. Version: 3.1.0
 TABLE OF CONTENTS. Version: 3.1.0") USER MANUAL TABLE OF CONTENTS Introduction...1 Benefits of Customer Portal...1 Prerequisites...1 Installation...2 Salesforce App Installation... 2 Salesforce Lightning... 2 WordPress Manual Plug-in installation...
USER MANUAL TABLE OF CONTENTS Introduction...1 Benefits of Customer Portal...1 Prerequisites...1 Installation...2 Salesforce App Installation... 2 Salesforce Lightning... 2 WordPress Manual Plug-in installation...
Creating a Website with Wordpress
 Creating a Website with Wordpress Wordpress Fundamentals Version 1.6 Fayette County Public Schools June 28, 2013 Sow-Foong Hedman Technology Web Team Contents What is Wordpress?... 4 Overview... 4 Key
WEBSITE INSTRUCTIONS. Table of Contents
 WEBSITE INSTRUCTIONS Table of Contents 1. How to edit your website 2. Kigo Plugin 2.1. Initial Setup 2.2. Data sync 2.3. General 2.4. Property & Search Settings 2.5. Slideshow 2.6. Take me live 2.7. Advanced
Baby Signs ICI Websites
 Baby Signs ICI Websites Instructions 2011 A N G L E S O L U T I O N S B A B Y S I G N S P R O G R A M I C I S I T E S Contents Baby Signs ICI Website... 4 Registration... 4 Creating Your Website... 6 Choosing
HostPress.ca. User manual. July Version 1.0. Written by: Todd Munro. 1 P age
 HostPress.ca User manual For your new WordPress website July 2010 Version 1.0 Written by: Todd Munro 1 P age Table of Contents Introduction page 3 Getting Ready page 3 Media, Pages & Posts page 3 7 Live
VidBuilderFX. Open the VidBuilderFX app on your computer and login to your account of VidBuilderFX.
 VidBuilderFX General Walkthrough: Open the VidBuilderFX app on your computer and login to your account of VidBuilderFX. After successful login, a dialogue box will appear which asks you to connect with
Media Library Help Guide
 1 Media Library Help Guide TABLE OF CONTENTS LOGIN/REGISTER...3 DASHBOARD...4-5 NOTIFICATIONS/SETTINGS...6-7 BASIC SEARCH...8-10 CATEGORY SEARCH...11 SEARCH TIPS...12-13 QUICK SEARCH GUIDE...14 DOWNLOADING
Please note: This procedure is exactly the same for the emwave2 program as well as the emwave PRO.
 HeartCloud FAQs What is HeartCloud? HeartCloud is HeartMath s Cloud-based system that enables you to sync multiple devices and store session data from the Inner Balance, emwave2 and emwave Pro. Here you
08/10/2018. Istanbul Now Platform User Interface
 08/10/2018 Contents Contents...5 UI16... 9 Comparison of UI16 and UI15 styles... 11 Activate UI16... 15 Switch between UI16 and UI15...15 UI16 application navigator... 16 System settings for the user
Documentation for the new Self Admin
 Documentation for the new Self Admin The following documentation describes the structure of the new Self Admin site along with the purpose of each site section. The improvements that have been made to
Welcome to Cumulus Sites the easy to-use website portal of Cumulus that offers fast
 Welcome to Cumulus Sites the easy to-use website portal of Cumulus that offers fast file access and secure file distribution to anyone on the Web. Anyone can be allowed to self-serve access to a public
Vector Issue Tracker and License Manager - Administrator s Guide. Configuring and Maintaining Vector Issue Tracker and License Manager
 Vector Issue Tracker and License Manager - Administrator s Guide Configuring and Maintaining Vector Issue Tracker and License Manager Copyright Vector Networks Limited, MetaQuest Software Inc. and NetSupport
Starting Your SD41 Wordpress Blog blogs.sd41.bc.ca
 Starting Your SD41 Wordpress Blog blogs.sd41.bc.ca The web address to your blog starts with blogs.sd41.bc.ca/lastnamefirstinitial (eg. John Smith s blog is blogs.sd41.bc.ca/smithj) All work is done in
SharePoint 2010 Site Owner s Manual by Yvonne M. Harryman
 SharePoint 2010 Site Owner s Manual by Yvonne M. Harryman Chapter 9 Copyright 2012 Manning Publications Brief contents PART 1 GETTING STARTED WITH SHAREPOINT 1 1 Leveraging the power of SharePoint 3 2
LYNK SINC Server. User Guide. Hotel Smart TV Solution
 Hotel Smart TV Solution LYNK SINC Server User Guide LYNK SINC Server is a web-based solution designed to construct widgets installed on TVs in hotel rooms. LYNK SINC Server allows you to manage TVs conveniently.
P a g e 0. CIDRZ Website Manual.
 P a g e 0 2015 CIDRZ Website Manual http://cidrz.org/ Manual Contents 1. Overview... 2 Getting Started... 2 The Frontend... 2 The Backend... 2 2.0 Managing the website... 4 Adding & editing pages... 4
owncloud Android App Manual
 owncloud Android App Manual Release 2.0.0 The owncloud developers December 14, 2017 CONTENTS 1 Using the owncloud Android App 1 1.1 Getting the owncloud Android App...................................
Using the Control Panel
 Using the Control Panel Technical Manual: User Guide Creating a New Email Account 3. If prompted, select a domain from the list. Or, to change domains, click the change domain link. 4. Click the Add Mailbox
User Guide. esign Emcee is a trademark of esign Emcee. All other trademarks are the property of their respective owners.
 User Guide esign Emcee is a trademark of esign Emcee. All other trademarks are the property of their respective owners. www.esignemcee.com Copyright 2016 esign Emcee Table of Contents 1.0 esign Emcee Introduction
Ariba Supplier Self-Registration
 About this document When your company is selected as an Elia supplier, it is registered in the Elia system so that a purchase order can be issued. The first step is that you register as an Elia supplier
SPECIFICATIONS Insert Client Name
 ESSENTIAL LMS BRANDING SPECIFICATIONS Insert Client Name Creation Date: June 23, 2011 Last Updated: July 11, 2017 Version: 16.5 Page 1 Contents Branding Elements... 3 Theme Management... 3 Header Images...
Getting Started with the Aloha Community Template for Salesforce Identity
 Getting Started with the Aloha Community Template for Salesforce Identity Salesforce, Winter 18 @salesforcedocs Last updated: November 30, 2017 Copyright 2000 2017 salesforce.com, inc. All rights reserved.
CANVAS TEACHER IOS GUIDE
 CANVAS TEACHER IOS GUIDE This work is licensed under a Creative Commons Attribution-NonCommercial-ShareAlike License Table of Contents Navigation...4 How do I download the Teacher app on my ios device?...5
Pulsed Frequency TM. Plasma Software Download, Installation and User Guide
 Pulsed Frequency TM Plasma Software Download, Installation and User Guide Contents Account Registration... 3 Create an Account... 4 Download the Software... 6 Install the Software... 9 Connect PLAZOMICS
Photoshop World 2018
 Photoshop World 2018 Unlocking the Power of Lightroom CC on the Web with Rob Sylvan Learn how to leverage the cloud-based nature of Lightroom CC to share your photos in a way that will give anyone with
Getting Started Quick Start Guide
 Getting Started Quick Start Guide This guide provides tips for users new to using the Learning Environment. It discusses how to navigate the main areas and how to change your personal preferences and settings.
Getting Started for COE Faculty Websites using WordPress By David K. Whisler, David Weber and Jack Stein Last Updated 05/6/2012
 Getting Started for COE Faculty Websites using WordPress By David K. Whisler, David Weber and Jack Stein Last Updated 05/6/2012 Contents Getting a WordPress Site... 2 Basic customization of your WordPress
Hosted PBX QUICK START GUIDE. Call Recording SmartRecord V4 SP7
 Hosted PBX QUICK START GUIDE Call Recording SmartRecord V4 SP7 HOSTED PBX CALL RECORDING INTRODUCTION This guide provides information about Hosted PBX Call Recording End User Interface features, functions,
A Quick-Reference Guide. To access reddot: https://cms.hampshire.edu/cms
 Using RedDot A Quick-Reference Guide To access reddot: https://cms.hampshire.edu/cms For help: email reddot@hampshire.edu or visit http://www.hampshire.edu/computing/6433.htm Where is... Page 6 Page 8
Uncorkd User Manual v6.0 Contents
 Uncorkd User Manual v6.0 Contents Getting Started... 2 Restaurant Control Panel... 2 Logging In... 2 Preferences... 2 Categories... 5 Beverages... 7 Cocktails... 9 Food... 9 Assigning Devices to the Menu...
Strengths of Knox Manage Kiosk
 16 Kiosk Applications A kiosk application is an application that is installed on a stand-alone device, featuring a touchscreen interface that displays information, and used in public spaces or workplaces.
Microsoft Office 365 OneDrive for Business User Guide
 Microsoft Office 365 OneDrive for Business User Guide Office of Information Technology Technology Integration Group Table of Contents Page About OneDrive for Business and Office 365 2 Storing University
Workspace MDM Management Site Manual
 Workspace MDM Management Site Manual 8. Appendix (Web site ver 8.1.1) 1 1 Appendix... 3 1.1 Function list... 4 1.2 Easy Setup procedure... 8 1.3 Input method of import data... 10 1.4 Details on CSV for
Monarch Services Website Quick Guide
 January 2016 Monarch Services Website Quick Guide www.monarchscc.org Credentials Wordpress Login URL: http://www.monarchscc.org/wp-login Login name :Nancya Password: wcs9na! Hosting Login at dreamhost.com
DSS User Guide. End User Guide. - i -
 DSS User Guide End User Guide - i - DSS User Guide Table of Contents End User Guide... 1 Table of Contents... 2 Part 1: Getting Started... 1 How to Log in to the Web Portal... 1 How to Manage Account Settings...
Enrollment Operator Guide. Avigilon Access Control Manager System Version
 Enrollment Operator Guide Avigilon Access Control Manager System Version 5.12.0 2018, Avigilon Corporation. All rights reserved. AVIGILON, the AVIGILON logo, ACCESS CONTROL MANAGER, ACM, and ACM VERIFY
WEBSITE INSTRUCTIONS
 Table of Contents WEBSITE INSTRUCTIONS 1. How to edit your website 2. Kigo Plugin 2.1. Initial Setup 2.2. Data sync 2.3. General 2.4. Property & Search Settings 2.5. Slideshow 2.6. Take me live 2.7. Advanced
Login with Amazon. Customer Experience Overview for Android/Fire apps
 Login with Amazon Customer Experience Overview for Android/Fire apps Customer Experience Overview for Android/Fire apps Copyright 2017 Amazon Services, LLC or its affiliates. All rights reserved. Amazon
Project Manager User Manual
 Project Manager User Manual Overview Welcome to your new Project Manager application. The Project Managaer is implemented as a web site that interfaces to an SQL database where all of the project and time
Swiiit User Guide 09/11/2016
 Swiiit User Guide 09/11/2016 Contents Getting Started... 4 Overview of Main Tools... 5 Webpages... 6 Main pages (Sections)... 6 Rearrange Sections... 6 Subpages... 7 Change the Title of a Webpage... 8
Overview NOTE: Listing Overview. User Profile. Language Selection. Asset(s) View. Asset(s) Details. Editing Mode
 View. Asset(s) Details. Editing Mode") Overview Listing Overview User Profile Language Selection Asset(s) View Asset(s) Details Editing Mode NOTE: Some functions may not be available to all users depending on permissions granted. Some of the
Overview Listing Overview User Profile Language Selection Asset(s) View Asset(s) Details Editing Mode NOTE: Some functions may not be available to all users depending on permissions granted. Some of the
User Guide for Client Remote Access. Version 1.2
 User Guide for Client Remote Access Version 1.2 Table of Contents PAGE Introduction... 2 Microsoft Multi-Factor Authentication Introduction... 3-4 User Enrollment... 5-8 Accessing Remote Resources Windows
How to use WordPress to create a website STEP-BY-STEP INSTRUCTIONS
 How to use WordPress to create a website STEP-BY-STEP INSTRUCTIONS STEP 1:Preparing your WordPress site Go to the Dashboard for your new site Select Appearance > Themes. Make sure you have Activated the
Registering as an Elia supplier on Ariba on invitation
 Registering as an Elia supplier on Ariba on invitation About this document When an Elia buyer publishes a sourcing event and invites you to participate, you receive an invitation e-mail from Ariba, the
Vetstreet Web Builder Editor Tool User Guide v2.1. Web Builder. User Guide v2.1
 Web Builder User Guide v2.1 Contact your Account Manager at (888) 799-8387 or email support@vetstreet.com with questions. Page 1 Index... 1 The Editor Tool... 7 Forgot Your Username or Password?... 7 How
Jack s Coal Fired Pizza
 Jack s Coal Fired Pizza WORDPRESS MANUAL TABLE OF CONTENTS Login... 3 Editing Existing Pages... 4 Adding New Pages... 7 Editing/Adding Text... 8 Creating a Link... 9 Linking to a PDF... 10 Making a Link
DRX Platform Manager DRX Platform Manager
 DRX Platform Manager 1 P a g e Table of Contents DRX Platform Manager... 1 Introduction to the DRX Platform Manager... 4 Getting Started... 4 Login... 4 Platform Manager... 4 DRX Application Configuration
AvePoint Online Services for Partners 2
 AvePoint Online Services for Partners 2 User Guide Service Pack 1 Issued June 2017 Table of Contents What s New in this Guide...4 About...5 Submitting Documentation Feedback to AvePoint...6 Browser Support
Digital Signage at Montgomery College Step-by Step Instructions for Content Contributors
 Digital Signage is an important and powerful communication medium. Over the years, Montgomery College has invested in more than 100 digital displays throughout our three campuses and other locations to
The Veranda House WORDPRESS MANUAL O ROURKE HOSPITALITY MARKETING OROURKEHOSPITALITY.COM
 The Veranda House WORDPRESS MANUAL TABLE OF CONTENTS Login... 3 Editing Existing Pages... 4 Adding New Pages... 6 Editing a Room Post... 7 Editing a Packages Post... 9 Editing/Adding Text... 11 Creating
The Complete Guide to the VAVA Dash Cam Model: VA-CD001
 The Complete Guide to the VAVA Dash Cam Model: VA-CD001 1. App Overview After connecting your phone with the VAVA Wi-Fi, open the app and connect the VAVA dash cam. Tap on the play icon to access the live
UTAS CMS. Easy Edit Suite Workshop V3 UNIVERSITY OF TASMANIA. Web Services Service Delivery & Support
 Web Services Service Delivery & Support UNIVERSITY OF TASMANIA UTAS CMS Easy Edit Suite Workshop V3 Web Service, Service Delivery & Support UWCMS Easy Edit Suite Workshop: v3 Contents What is Easy Edit
Secure Guard Central Management System
 Speco Technologies, Inc. Secure Guard Central Management System Usage Information Contents 1 Overview... 7 2 Installation... 7 2.1 System Requirements... 7 2.2 System Installation... 7 2.3 Command Line
User Manual. Page-Turning ebook software for Mac and Windows platforms
 User Manual Page-Turning ebook software for Mac and Windows platforms 3D Issue is a digital publishing software solution that converts your pdfs into online or offline digital, page-turning editions. Getting
Sage Construction Central Setup Guide (Version 18.1)
") Sage 300 Construction and Real Estate Sage Construction Central Setup Guide (Version 18.1) Certified course curriculum Important Notice The course materials provided are the product of Sage. Please do
Sage 300 Construction and Real Estate Sage Construction Central Setup Guide (Version 18.1) Certified course curriculum Important Notice The course materials provided are the product of Sage. Please do
123RF Corporate+ Administrator s Guide
 123RF Corporate+ Administrator s Guide Table of Contents Welcome Message Sending Feedback Moving In Administrator s Dashboard Editing Account Details Setting Low Credits Alert Initial Customization Customize
How to migrate to Chameleon
 How to migrate to Chameleon Step 1 Sign in to the Affiliate center using your Customer Identification Number (or CID), username and password. If you have forgotten your username or password, click on the
ERP Student Manual. Contents
 ERP Student Manual Contents Logging into the ERP... 2 Common Dashlet features... 3 Calendar Dashlet... 4 Attendance Dashlet... 5 Viewing your courses information... 7 Student Information dashlet... 8 Logging
Charlotte Housing Authority Applicant Portal Overview
 Topic Charlotte Housing Authority Table of Contents Page Login Page 3 Forgot Password 4 Registering- Currently on waiting list 6-10 Home Screen 11 Wait Listing Information Basic Details 12-13 Waiting List
Navigating Your Profile
 Part 1: Profile Login Navigating Your Profile 1. Start at the Greater Kansas City Community Foundation s home page, www.growyourgiving.org. Select Nonprofit Search. 2. This is the Nonprofit Search home