ESSENTIALS GUIDE. volume four of the balfour student workbook series
|
|
|
- Rosamond Hood
- 6 years ago
- Views:
Transcription


1 ESSENTIALS GUIDE volume four of the balfour student workbook series


2 essentials guide What is StudioWorks? StudioWorks is Balfour s publishing software that gives you everything you need to plan and produce your yearbook online. You can easily manage your project, your staff and your content as well as create imaginative yearbook designs. For more detailed information, please refer to the StudioWorks User Guide & Layout Sampler. LOGGING IN In your browser go to studio.balfour.com and click StudioWorks, which is located on the Home Page under Popular Links or Plan and Create > StudioWorks > Launch StudioWorks. At the login screen, enter the following information into the three blanks: Project Number: 4 + your five-digit customer number (4 = 2014 publication). Username, Password: These were ed to you when your project was created. If you do not have them, contact your Balfour representative. You may be directed to the StudioWorks System Check for the computer you are working on. This will ensure that your system has the necessary requirements to run the program. If you do not have the current version of an item, a red X will appear next to that item. You can update the item by clicking the link if you have security privileges to do so. When your computer is ready to go, click the Proceed to StudioWorks button. Once you log in to StudioWorks, you can change your username and password. If you do, write them here, including the use of caps and lowercase. Passwords must be 6 characters or more, and not your project number or a word found in the dictionary (valid examples: tsmith, pizzaguy). My Username is My Password is one


.")

3 GETTING TO KNOW THE SCREEN To the right of the Balfour Yearbooks logo, there are eight icons that you can use to navigate to different screens within StudioWorks. Overview: A general overview of your yearbook. Pages: Manage and edit the actual pages of your book. Content: Access Balfour clip art and backgrounds, as well as upload your own images. Master List: A database of your school portraits. Maximizing/Minimizing Your Screen: To help you maximize your workspace in certain areas of the program, like the Page Editor, you can customize your screen. Under the Balfour Yearbook logo, click on the green arrow to maximize and the red arrow to minimize. You can also change the size of the menu bars that run along the top and left side of the screen by clicking and dragging the dot patterns (up/down for top menu, left/right for left menu). Planner: A monthly calendar where you can add assignments for staff members, and list deadlines and events for coverage. History: A comprehensive list of actions performed in StudioWorks, with the date, time and the user who performed each action. Setup: Project and staff information, including Project & Book, Manage Fonts, Manage Colors, and Public Upload tabs, and a User area to set up additional users and set permissions. Tech Support: A direct link to StudioWorks technical staff via your web browser. refresh log out Logging Out and Refreshing: The logout button (top right of the screen) closes the StudioWorks program. If you have not saved pages, a prompt window will ask you whether you want to save. To the left of the logout button is the refresh button, which updates the screen with any changes you may have made. two


4 essentials guide OVERVIEW The first screen you will see after logging in is the Overview screen. This is a general look at your yearbook with three main sections: Status, Activity and Notes. The Activity Area shows an overview of the recent activity. It also includes planning schedules for your yearbook. The Notes Area includes alerts, tips and other information from Balfour. Clicking on an entry will open a new Web page with more information about the topic. SETUP The Setup menu is where you can view your book specifications, as well as your staff. The Status Area shows a graphical overview of the project status including project completion, image allocation, and page and signature progress. Confirm Book Settings: On the Project and Book tab, review your book size, page count, binding type, colors specifications and other information about your project. If there is a problem with your book settings, please contact your account representative. The Page and Signature Progress graphic shows a page-by-page breakdown of page status using the same colors as the status bar. Scrolling over a page displays a tool tip with the status. Clicking on a page opens that page in the Pages Window. Moving the mouse over the Status Bar displays a tool tip with more detailed information: total pages in that status, percentage of pages in that status, and total pages in the project. The Project Completion bar gives you a high-level graphic of how you are doing. As you move through the project, the bar will change colors based on pages started, completed and published. No Color Not Started Red In Progress with Errors Green In Progress Light Blue Completed Yellow In Progress with Warnings Dark Blue Published three

 2. Highlight selected font. 3. Click on the right arrow to add to Your Collection and save. To remove fonts: 1.")

 There are three color palettes available: X Colors and Balfour Colors (see Balfour Process Mix Color Chart ), and a Custom Color RBG Mixer. To add/remove X Colors or Balfour Colors: 1.")
5 Select Fonts: On the Manage Fonts tab, you can select a collection of fonts for your yearbook. Your collection starts with a single font, to which fifty (50) fonts may be added. Select Colors: On the Manage Colors tab, you can create a collection of colors for your yearbook. Additionally, you can limit the color choices to Your Collection for other users in your yearbook project. To add fonts: ` 1. Scroll through the Available Fonts. (A preview will be visible in the Font Preview window below the list.) 2. Highlight selected font. 3. Click on the right arrow to add to Your Collection and save. To remove fonts: 1. Highlight font in Your Collection and click on left arrow and save. 2. If the font has already been used on a page, you will not be able to remove it until you delete the text or change it to another active font on any page where it has been applied. (Either click on the font in the dialog box or click the Report button at the bottom of the window to get page-by-page font useage.) There are three color palettes available: X Colors and Balfour Colors (see Balfour Process Mix Color Chart ), and a Custom Color RBG Mixer. To add/remove X Colors or Balfour Colors: 1. Select the color to add from one of the palettes. Click the right arrow and save. 2. Select the color to delete from Your Collection. Click the left arrow and save. 3. If the color has already been used on a page, you will not be able to remove it until you delete the text or object or change it to another active color on any page where it has been applied. (Either click on the color in the dialog box or click the Report button at the bottom of the window to get page-by-page color useage.) To add/remove Custom colors: 1. Create a new color by moving the RGB sliders to the desired values. 2. Name the color, click the right arrow and save. 3. To alter the color, click the left arrow while still on the Custom tab; make changes, click right arrow and save. 4. To remove a Custom color, click on either the X Colors tab or Balfour Colors tab, select the color to remove, click the left arrow and save. 5. See information above if the color has already been used on a page. Note: Always select colors from a printed sample or swatch with the RGB values. Computer monitors vary widely in their display of colors and are not reliable. four
, plus an optional password. Check the Require Password box and enter a password.")


6 essentials guide SETUP (continued) Managing Public Uploads: Check/uncheck the Enable Public Uploads checkbox to turn on/off the service for your school. Users will need your school s project number (the same one you use to login to StudioWorks), plus an optional password. Check the Require Password box and enter a password. The password can be changed at any time, as needed. Adding Users: The primary login to StudioWorks enables adviser-level permissions, allowing complete access and control. If you are working with a staff or other volunteers, you can set up multiple users and custom permissions. The Users Area shows the name and username of every person authorized to work on your project. CONTENT The Content screen shows everything that can be placed on actual yearbook pages. This is where you upload and organize photos. You can also browse templates, modules, clip art and backgrounds in this screen. There are seven sections within this part of the program: My Content, Portraits, Templates, Modules, Section Masters, Balfour Clip Art and Balfour Backgrounds. You can navigate through these sections by clicking on the section name under the Galleries tab on the left of your screen. Content may be viewed as Thumbnails or in a List window with details about each item. To add a new user: 1. Click the Add User button. 2. Enter the appropriate information for the new user and save. 3. To establish the user s Permission Level, click on the drop-down menu to select custom or pre-set Permission Level. You can assign each user a job title and permissions or select Custom and check individual permissions. *These permissions are set in this window, though they are not part of StudioWorks. Their functions are managed in StudioBalfour. five

, or into the thumbnails window.")


7 CONTENT (continued) Uploading Content: This is where your candid photos and imported stories are saved. You can add as many folders (galleries) to this section as you wish. You can also create sub-folders. Creating Folders: 1. Click the Add button at the bottom right on the Galleries tab. 2. Enter a name, and then click OK. Upload/delete images or text: 1. Select folder where you want to add the image (or text in a.txt format). 2. Drag images or text from your hard drive, USB drive, desktop or CD into the desired gallery icon (folder), or into the thumbnails window. Or, click on the Import button on the lower right to search your computer for the file(s). 3. Click Add File(s). 4. Click Upload File(s). 5. To delete a file, highlight it, and then click the Delete button on the lower right. Note: Images must be JPEG, TIFF or PNG files, in RGB format, and can be up to 8 MB each in size. Working with images in Content: 1. Double-click on the image inside of the gallery or click Edit at the bottom right of the screen. 2. Once image has been opened, you can enter description of the photo, browse to see where it has been placed in your book, or delete it. PAGES > CREATING A VIRTUAL LADDER In the Manage tab, you can create a virtual ladder, manage page information, and launch the Edit page function by double-clicking on a spread. To expand or collapse a section, click on the orange triangles to the left of the section description. six


8 essentials guide PAGES > CREATING A VIRTUAL LADDER (continued) To add a section: 1. Double-click on a section. This displays the thumbnails in that range. 2. Click the Manage tab. (Make sure that the Include Section Masters box is checked at the bottom left.) 3. Click once on the spread labeled Master. 4. Enter the section name. 5. Click Set Range to set the beginning and ending page numbers, and click OK. 6. In type pull-down menu, select the page type: Plain, Portrait or Index. Setting up Section Master Attributes: 1. Click on the Default Section Master triangle below the last page thumbnail on the left-hand side. 2. Double-click the spread labeled Master or click on the Edit tab at the top of the screen. 3. Click the Menu button > Tools > Section Definition. 4. Set defaults for Text Area, Stroke, and Folios, and click OK. PAGES > EDITING TOOLS & INSPECTORS In the Edit tab, choose a thumbnail page or spread from your ladder on the left side of your screen by double-clicking it. (These can also be opened by clicking on the page or spread in the ladder view in another window and clicking either the Edit tab or the Edit button on the bottom right of the screen.) seven

, and page status.")

9 Menus PAGES > EDITING TOOLS & INSPECTORS (continued) Editing Toolbars: Save Close Inspectors: Page Inspector Image Selection Repeat Mirror Text Flip Font Size Bold Shape Tools Underline Italic Outline Cut Object Alignment Tools Paste Redo Copy Undo Text Alignment Tools The Inspector Palette, located on the right top tab of the screen, includes four inspectors. This is where you change or modify most elements. The Page Inspector controls overall features on the page. You can check page errors and warnings using this inspector. Zoom Sticky Note Spell As You Type Tool Info This tab gives you basic information about the page or page size, page number(s), and page status. It will also indicate whether the page is black and white or color. Layers - This tab shows the layers of the page. When you first open a page, there will be two layers: the Section Master, which is locked and cannot be edited, and Layer 1, which is where all elements that you add will be placed. This part of the program functions much like layers in Adobe InDesign or Adobe Photoshop. You can make a layer invisible or lock a layer simply by selecting the layer and changing the icon next to it. (The eye icons make the layer either invisible or editable.) Names This tab lists any names that have been tagged for the index and shows on what page the names appear. Errors This tab shows warnings and errors on the page. Warnings appear next to a yellow box. These are items that the program wants to alert you to, like a Shape on gutter or Image resolution issue. A page can be published if warnings are present. Errors appear next to a red box. These are problems with the page that must be resolved before the page can be published. Examples include Unacceptable image resolution and Improper shape position for bleed. A green box means that there are no warnings or errors and the page is ready to publish. To find out what element on the page is causing a warning or error, click on the warning or error and the element causing the problem will then be selected on the page. You can correct the error or warning, or hit the Delete button at the bottom of the tab to remove the element. eight


 or vertically (Y) to a particular point on the layout. You can also manually adjust the width (W) and height (H) of objects. 4.")


10 essentials guide PAGES > EDITING TOOLS & INSPECTORS (continued) Object Inspector The Object Inspector allows you to manipulate individual objects, including boxes and other shapes. You can add fill colors, strokes and drop shadows to objects here. Remember that you must select the object that you wish to manipulate with the black arrow tool (Selection Tool) before working in the Object Inspector. To fill an object: 1. Click on the Selection Tool and select the image or object to be filled. 2. Open the Object Inspector and click on the Fill tab. 3. Select None, Solid Fill or Gradient Fill. Solid Fill: 1. Click the box to open the Color Palette and select a fill color. Gradient Fill: 1. Click the Start Color box to open the Color Palette and select starting color. 2. Click the End Color box to open the Color Palette and select ending color. 3. Use the Angle Ruler to adjust the angle of the gradient. To position an object: 1. Click on the Selection Tool and select the object to manipulate. 2. Open the Object Inspector and click on the Position tab. 3. You can manually enter values to move the object horizontally (X) or vertically (Y) to a particular point on the layout. You can also manually adjust the width (W) and height (H) of objects. 4. Scale Use the arrows or type in the values to scale an object horizontally (X) or vertically (Y). By default, an object scales proportionally. Click the connecting line to unlock proportion. 5. Rotation Use the arrows to adjust the angle of the object. 6. Skew Use the arrows to adjust the skew of the object. Text Wrapping: 1. Click the box to activate the object for text wrapping. proportionately scaled disproportionately scaled To stroke an object: 1. Click on the Selection Tool and select the object to be stroked. 2. Open the Object Inspector and click on the Stroke tab. 3. Select the type of stroke: None, Standard, Harvard or Harvard Flipped. 4. Set the weight of the stroke, 1 12 point. 5. Click the Color box to open the Color Palette and select a stroke color. 6. Choose the Cap Style: Butt, Square, or Round. 7. Choose the Join Style: Miter, Bevel, or Round. 8. Select stroke transparency. To add a drop shadow to an object: 1. Click on the Selection tool and select the object to which you want to add a drop shadow. 2. Open the Object Inspector and click on the Shadow tab. 3. Click Shadow Box to add a drop shadow to the selected object. 4. Color Click the color box to open the Color palette and select a shadow color. 5. Softness Use the slider to adjust the softness of the shadow. 6. Offset Use the arrows to adjust the horizontal (X) and vertical (Y) offset of the shadow. nine


11 To add transparency: 1. Click on the Selection Tool and select the object to adjust its transparency. 2. Open the Object Inspector. 3. Use the Slider at the bottom of the Inspector to adjust transparency Color Options: 1. Select the object and click the Color box to open Color Options. 2. Color Options include swatches of Balfour, X Colors and Custom Colors. Clicking a swatch will change the selected object s color. To set type style: Type Inspector Most object effects can be applied to text as well as to images. Text can be further manipulated using the Type Inspector to change type justification, family, size, leading, color and emphasis. The first set of buttons under the Type Inspector tab changes the horizontal alignment of the text: Left, Center, Right and Justified. The next three buttons control the vertical alignment of text within the text box: Top, Center and Bottom. 1. Highlight the text within a text box by double-clicking within the box or clicking in the box and pressing Control + A. 2. Select the font for the text in the drop-down menu. (Font names are displayed in their respective fonts, providing an example of the font.) 3. Choose the font style: Bold, Italic, Underlined, and Outlined. 4. Change Size, Leading and Character Spacing, as desired, using the respective drop-down menus. To set type style (continued): 5. Click on the box next to Color to change the color of the type. 6. To change the color of the inside of a font that has been outlined, click on the box next to Outline Fill. 7. To allow for words to be hyphenated or text-wrapped within the text box, check the box next to Hyphenation or Wrapping. 8. To change the transparency of the type, slide the ruler at the bottom of the window. In the Effects tab, you can perform six effects on an image by checking the box next to them. Note: To apply a Color Mask to an image, it must be converted to Gray Scale first. To change the Brightness, Contrast, Softening or Ghosting, either click the arrows up or down or type in the values in the respective boxes. In the Frame tab, you can specify any border you wish to place around an image. Image Inspector In this inspector you can edit individual photos, including lightening or darkening, adding masks, and cropping. ten
 There are three main areas")


12 essentials guide PAGES > EDITING TOOLS & INSPECTORS (continued) There are three main areas in the Content Pane: Original Image Galleries Browse the main Gallery: My Content, Templates, Modules, Clip Art or Backgrounds. Flip Horizontal Flip Vertical Emboss Sections Browse the subfolders in each Gallery. Content Includes thumbnail previews of the selected contents. Invert Image Grayscale Mask White Content Pane The Content Pane provides access to the content uploaded to your Galleries in the Content Window. Open the Galleries Pane by clicking the Content tab on the right side of the screen (under the Inspectors tab). Clicking the tab again will hide the Galleries. There is also a top view; click the green plus sign under the program exit icon on the top right to open the view and the red minus sign to close it. PAGES > EDITING & CREATING PAGES Creating Pages To open a page or spread for editing: 1. Click the Edit tab to activate it. 2. Click on a thumbnail in the Page Thumbnails. Clicking on one page opens a single page, clicking on the middle of the spread opens both pages. 3. Click the Maximize button (green arrow under Balfour Yearbooks logo in top left corner) to enlarge the Editor Window. eleven
. 4.")

 3.")


13 inspired photos Adding elements to a page To add an image to a page: 1. Select a Gallery. 2. Select an image. 3. Drag and drop an image or story thumbnail onto the layout or into a frame. To create a frame, select the Image tool (camera icon). 4. A dialog box will appear when an image is placed in a frame. Click Unscaled, Scaled to Fit or Cancel, as desired. 5. Click tab to show/hide Galleries. To apply a template or a module to a page: 1. Open the Content Pane. 2. In the Gallery list, select a gallery from the Templates or Modules section. 3. Select a template or module with the mouse and drag it to the page to place it. To crop an image: 1. Drop and image into an Image Area. 2. Select the Unscaled option. (You may select Scaled to Fit, but Unscaled works best for masking in most cases.) 3. Double click on the Image Area which will illuminate the image outline. This shows the areas of the image that extend beyond the Image Area. 4. Once the image is selected, use your mouse to move the image and to adjust the part of the image visible in the Image Area. Only the parts of the image in the Image Area will be visible (printable). To add text to a page: 1. Select the Text tool (with red T ) from tool bar. 2. Drag and release cursor to create a text box. 3. Type text directly into box or drag and drop.txt file into box. 4. Open Text Inspector to select type style. Note: Applying a template to a page or spread will replace anything already on that page/spread; elements on the Section Master are not replaced. To apply clip art or a backdrop: 1. Locate the desired art in the appropriate Gallery. 2. Drop the art onto the page. Note: After placing them onto your page, avoid enlarging images or clip art. This lessens the image quality. Enlargements of 125% or more will produce a Publishability warning; enlargement of 165% or more will produce an Error Warning. twelve

 blocks.")


14 essentials guide PAGES > EDITING & CREATING PAGES (continued) To apply color to clip art: 1. Drag a piece of art onto the page. 2. Select the art with the Selection Tool. 3. Open the Image Inspector > Effects tab. The Image box should be checked. 4. Click Greyscale, then Color Mask. 5. Choose a color in the Color Inspector. The art dynamically will change colors onscreen. Layout View The Layout tab shows thumbnail images of your pages in signature (16-page) blocks. Red brackets around spreads indicate when an object crosses the gutter and the pages must be treated as a spread. You can move designs from one spread to another on this screen by clicking on a spread and dragging it to another spread A window will appear asking if you wish to copy the layout or if you want to swap the pages. You can also apply templates directly to your pages on this screen. Click the green plus sign in the top right corner to open the Content window. Choose your template, and drag it onto the appropriate spread. Original Image Greyscale Colorized List View PAGES > VIEWING AS A LIST OR LAYOUT The List tab will show your pages in a list format. On this screen you can select multiple pages to open in the Editor, proof multiple pages at once and publish multiple pages. To select consecutive series of pages, click on the first page and hold the Shift key while you click on the last page in the series. To select pages in a non-consecutive order, click on the first page, hold the Control key and click on the other pages you wish to select. thirteen
 are strongly recommended. The CD should contain folders where your portraits are stored, along with an index text file (*.txt). 1.")


15 PORTRAITS To import a PSPA CD: Make sure that the CD is set up following PSPA (Professional School Photographers Association) guidelines. Large format images (800 pixels x 640 pixels) are strongly recommended. The CD should contain folders where your portraits are stored, along with an index text file (*.txt). 1. Go to the Master List and click Import. 2. An Import Portraits window will appear. Click Open PSPA File and browse to your CD drive. Select the index text file from your photographer s CD and click Open. 3. The program will display Verifying and Importing Data. The window should begin to list the names of students with a gray status bar. It looks similar to the Import Content window when uploading photos in My Content. 4. Once all of the names have been listed, the window will indicate it is ready to upload portraits. When it does, click Upload Portraits. 5. When it is finished, the window will say Portrait Upload Complete. 6. Close the window and click the Refresh button at the top right of your screen. You should now see thumbnails of your portraits. To set up portrait sections: 1. Go to the Thumbnail Previews on the Pages window. Be sure that Include Section Masters is checked. 2. Find the page range (next to the right arrow) that will contain your portrait pages. This will expand it. Click the Manage Tab, then click the spread labeled Master. It will open in the Manage tab. 3. Enter the section name. To define what pages the section will include, click Set Page Range. Type in the page numbers for the Start Page and End Page, then click OK. 4. Name the section using the teacher s last name or the grade level. 5. Change the type to Portrait. To set portrait flow settings: 1. To choose the font and size of the names of all of your portrait pages, click Section Set Up. 2. Select the font, emphasis, size and leading for your portrait names. 3. Below the font settings are the portrait group and sort settings. Select a group from the Master List under Grade, Teacher Name, or Homeroom, a depending on how the pages will be divided. 4. Select the Sort Attribute. Choose Teacher Flag, Name if you re flowing by classroom with the teacher in the first spot on the page. Choose Name if you re flowing by classroom or grade with only the students on the page. 5. The Preview column will list the students in the order they will appear on the page. At the bottom of this column, you will see the Total Portraits Selected and the Total Portrait Areas On Page. 6. If you do not have enough Image Placeholders on your page for the Total Portraits Selected, it will be indicated in this column and you will receive a page error, making the page unpublishable. fourteen


16 essentials guide PORTRAITS (continued) To make changes: 1. In the Master List, click the List view, then the Filter tab. Scroll through the groupings to select by Teacher Name or Grade, whichever applies. 2. Make corrections using the List tab in the Master List. You can change the spelling of a teacher or student s name or which group or filter they are assigned to. 3. Under the Thumbnail tab, double-click a portrait to make changes. 4. If teachers will be placed with their class, check the red apple icon in the List tab. This will label them as a teacher and will put them as the first to flow with that class. The teacher should be in the same group as the students he or she will flow with. 5. To add a student whose portrait was not included on your PSPA CD, click the Add button at the bottom right of your screen. Type the student s first and last names under the Personal tab. Then, click on the Attributes tab and enter their Teacher Name or Grade so that they will flow with the correct class. 6. Click Add and an Upload Portrait button should appear. Browse to where their photo is stored, and click Save. Note: Periodically click the Refresh button to update the changes you make. Changes may not show on the screen until you hit Refresh. To print directory proofs: A directory proof is a list of all portraits and names in a group within the Master List. Directory proofs make it easy to check students, grade designations and correct spelling of names. 1. Once portrait sections are established and the photographer s CD has been uploaded, go to the Master List. 2. Click on the Sections tab, highlight one of the sections and click on the Directory button. (This will create a PDF showing thumbnails of all of the portraits and names in that section.) 3. Print a directory proof for each teacher. (The directory can be provided to teachers for corrections. Include directions and a due date for their return.) fifteen
 3.")


 Note: After flowing, any changes in spelling or classes must be made in the Master List. Do not click on the portrait text boxes to change name spelling.")
17 To pick a portrait template: 1. Go to the Pages window and click on the first class portrait spread thumbnail to open in Edit mode. 2. Select a portrait template with enough image boxes for the number of students in each class. (You can edit any Balfour Template to customize it for your school.) 3. Group each row of portraits with its text box, if this has not already been done on the Balfour Template you chose. To do this, hold down the Shift key on your keyboard and click on each portrait box individually. Also click on the text box for that row while holding the shift key. Then click Menu > Objects > Group. 4. Do this for each row of portraits on your page(s). 5. To save your new, customized template, go to File > Save Template. Then, choose if you want to save the left page, right page or spread as a template. Type in a name for the template and click Save. 6. Now, this template can be found by going to Galleries > Templates > My Templates. To flow portraits: 1. Select all of your portrait boxes and text boxes; make sure you don t select any non-portrait elements. 2. Go to Objects and Enable for Flowing. (Your portrait boxes should turn gray with a silhouette inside them.) 3. Click Objects > Flow Portraits. (Your portraits and names should begin to appear on your page.) Note: After flowing, any changes in spelling or classes must be made in the Master List. Do not click on the portrait text boxes to change name spelling. Changes will not be saved if you do. Note: It s a good idea to leave any extra portrait boxes on the page until you re almost finished with the page. That way, if you have to add any students later in the year, you already have a spot on the page for them. You can then delete the extra boxes at the end or replace them with candid photos or clip art. sixteen

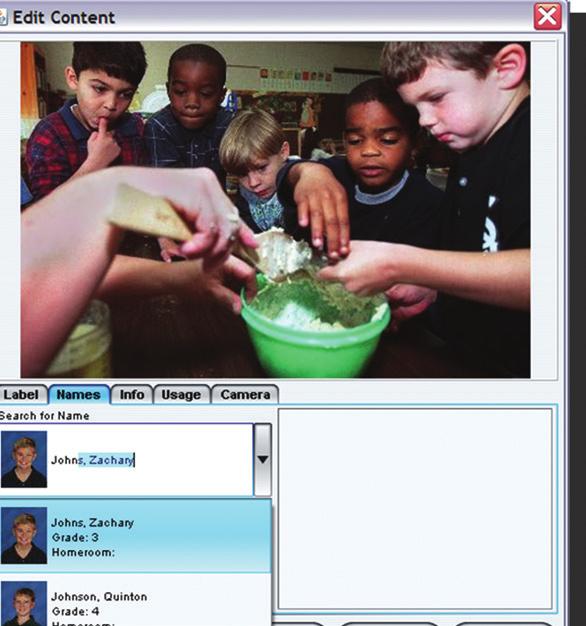
18 essentials guide CREATING AN INDEX Creating and flowing the Index should be among the final actions before publishing the yearbook: Note: Because portrait pages are dynamically linked to the Master List, final page numbers do not appear in the Master List until the portrait pages are published. For all other pages, page numbers appear in the Master List at the time the entry is marked on the page. Populate the Master List To add an entry to the Master List: 1. Click the Add button. 2. Complete the name and other fields. 3. Click the Upload Portrait button to locate and upload a portrait image. 4. Click the Add button. 5. Click Save, then Refresh. To delete an entry from the Master List: 1. Select the entry to be deleted. 2. Click the Delete button. 3. Click Yes to confirm the deletion and to delete the portrait. To merge multiple entries in the Master List: 1. Use the CTRL key to select multiple portraits. 2. Click the Merge button. 3. When the Merge Entries screen appears, select the entry into which the other selected entries will merge. 4. Click Merge to merge the selected entries.the new entry will contain the index page references for all merged entries. 5. Click Yes to confirm and complete the merge. Mark Names : StudioWorks automatically adds marked names to the Master List. While you are working on spreads, highlight every name to be indexed and click the Mark Name button. A non-printing line will appear through each name to denote its marking and inclusion in the index. Marked names and page information will be added to the Master List. Option A: To Mark a Name 1. Highlight a typed name. 2. Click the Mark Name button on the Editor toolbar. Option B: To Tag a Name 1. Double-click an image from My Content. 2. Click on the Names tab. 3. Type the name of a student or teacher found in the Master List. 4. Click Add. 5. When finished tagging names, click Save. To set up the Index: 1. In the Page Window, create your index section by opening the section master in the Manage tab. 2. Set the appropriate page range and select section type to Index. (Before proceeding, make sure your Master List has been imported and edited.) 3. Click Section Set Up to set the style and format of the index entries, leaders and page numbers. Use the drop-down menus to select: Entry Style, Font, Font Size and Hanging Indent. seventeen


. 3. Click OK and dialog box will close. 4. Click Flow.")
19 To create the index: Option A: Use a template or draw text boxes 1. Open an index page/spread by selecting the Edit tab and double-clicking the thumbnail of the page or spread. 2. Either place a template from Content > Templates > Balfour Index or draw text boxes in columns on the index spreads. (This is where the index names will be flowed. You should draw text boxes on every spread in the index section that will contain index entries.) 3. Select each text column and right click the mouse to select Enable for Flowing. 4. Once you have enabled every text area column for flowing, save and close the spread. 5. To flow the names into the index, select the Section Master for the Index from the Manage tab. Click Section Set Up. 6. Click OK and dialog box will close. 7. Click Flow. Option B: Create a page layout 1. Select the Section Master for the Index from the Manage tab. Click Section Set Up. 2. Click Create Page Layout and enter number of columns and the amount of space to be between the columns (in points). 3. Click OK and dialog box will close. 4. Click Flow. Note: Do not design the text area layouts on the index section master. You may use the Section Master for common elements to appear on each page in the index.) eighteen

 Indicates that the spread is ready to publish and does not require further adjustments or attention.")
20 SUBMITTING PAGES A major difference between creating a yearbook online and traditional projects is spread submission. You do not ship spreads to Balfour but rather Publish spreads as they are completed and ready for printing. Check Spread Status StudioWorks alerts you when a page is ready to be published in the Editor. One of three different status labels is displayed in the lower, right corner of each spread. Ready to Publish (shown in green box) Indicates that the spread is ready to publish and does not require further adjustments or attention. Ready to Publish (shown in yellow box) Indicates that the spread is ready to publish, but there could be some potential errors such as elements crossing a gutter. You should view these errors in the Page Inspector. When you click on a listed error, the element causing the errors will be highlighted. Not Ready to Publish (shown in red box) Indicates that the spread is not ready to publish because of missing elements or other errors that would cause the spread to print improperly. You should view and fix these errors in the Page Inspector. When you click on a listed error, the element causing the errors will be selected on the page. Proof Spread All pages must be proofed prior to publishing. This must be done within seven days from the date the page is published. You will receive an alert in StudioWorks if proofing has not been completed. Publish After a spread has been marked Complete and proofed, you can publish it from the Pages Window. You can publish your pages in single pages or in multiples. Mark as Complete Once you have fixed all of the errors and a page is Ready to Publish, you can mark the spread Complete in the Pages Window. MINI-ROUGH DRAFT SHEET Dallas Office: SUPPLY ORDERS: Phone: FAX: supplydesk@balfour.com Tech Support for StudioWorks : Tech Support for InDesign and BalfourTools : Balfour Yearbooks
Table of Contents. Yearbook Pro End User Guide 2
 Yearbook Pro End User Guide 2 Table of Contents 1 Introduction...5 1.1 What s new for the 2016-17 School Year?...5 1.2 Configuration and Preparation...6 1.3 Software and System Requirements...6 1.4 The
hdalbum User Designer Guide Collect Create Share Designer V 1.2
 hdalbum User Designer Guide 2017 Collect Create Share Designer V 1.2 Table of Contents Contents Welcome to the hdalbum Designer... 2 Features... 2 System Requirements... 3 Supported File Types... 3 Installing
Word 2010 Beginning. Technology Integration Center
 Word 2010 Beginning File Tab... 2 Quick Access Toolbar... 2 The Ribbon... 3 Help... 3 Opening a Document... 3 Documents from Older Versions... 4 Document Views... 4 Navigating the Document... 5 Moving
InDesign CS Basics. To learn the tools and features of InDesign CS to create publications efficiently and effectively.
 InDesign CS Basics InDesign Basics Training Objective To learn the tools and features of InDesign CS to create publications efficiently and effectively. What you can expect to learn from this class: How
IN DESIGN. A review of the overview
 IN DESIGN A review of the overview InDesign Review GETTING STARTED: Start by clicking the InDesign icon in your dock. Wait for InDesign to load. Click on Create New Document If resuming work, find your
A new clients guide to: Activating a new Studio 3.0 Account Creating a Photo Album Starting a Project Submitting a Project Publishing Tips
 Getting Started With Heritage Makers A Guide to the Heritage Studio 3.0 Drag and Drop Publishing System presented by Heritage Makers A new clients guide to: Activating a new Studio 3.0 Account Creating
Contents. Launching Word
 Using Microsoft Office 2007 Introduction to Word Handout INFORMATION TECHNOLOGY SERVICES California State University, Los Angeles Version 1.0 Winter 2009 Contents Launching Word 2007... 3 Working with
Portrait Editor. to Portrait Flow
 Portrait Editor to Portrait Flow Portrait Editor is a Walsworth program that allows you to view and edit your portrait images, names and grades based on the photo DVD supplied by your photographer. The
Yearbook Edition Software
 Yearbook Edition Software End User Guide Pixami, Inc. www.pixami.com Table of Contents 1 Introduction... 4 1.1 Configuration and Preparation... 4 1.2 Software System Requirements... 4 1.3 The Basic Steps...
Microsoft Word 2010 Basics
 1 Starting Word 2010 with XP Click the Start Button, All Programs, Microsoft Office, Microsoft Word 2010 Starting Word 2010 with 07 Click the Microsoft Office Button with the Windows flag logo Start Button,
YearbookFusion Online A Quick Start Guide
 YearbookFusion Online A Quick Start Guide Welcome to YearbookFusion Online. This guide will help you get started and plan out your yearbook process from start to end. Step 1: Launch the Application In
Microsoft Office 2000 & Microsoft Word 2000 Page 1. ***** Help Options ***** To access [? ] quickly & for specific use then
![Microsoft Office 2000 & Microsoft Word 2000 Page 1. ***** Help Options ***** To access [? ] quickly & for specific use then](/thumbs/90/104468223.jpg "Microsoft Office 2000 & Microsoft Word 2000 Page 1. ***** Help Options ***** To access [? ] quickly & for specific use then") Microsoft Office 2000 & Microsoft Word 2000 Page 1 ***** Help Options ***** Microsoft Help: Options and Search [ F1 ] Fastest way to get to Office Assistant and MS Office Help! ESC to Exit File > Help
Microsoft Office 2000 & Microsoft Word 2000 Page 1 ***** Help Options ***** Microsoft Help: Options and Search [ F1 ] Fastest way to get to Office Assistant and MS Office Help! ESC to Exit File > Help
Microsoft PowerPoint 2013 Beginning
 Microsoft PowerPoint 2013 Beginning PowerPoint Presentations on the Web... 2 Starting PowerPoint... 2 Opening a Presentation... 2 File Tab... 3 Quick Access Toolbar... 3 The Ribbon... 4 Keyboard Shortcuts...
Word Select New in the left pane. 3. Select Blank document in the Available Templates pane. 4. Click the Create button.
 Microsoft QUICK Word 2010 Source Getting Started The Word Window u v w x z Opening a Document 2. Select Open in the left pane. 3. In the Open dialog box, locate and select the file you want to open. 4.
Microsoft Office Publisher
 Microsoft Office 2007- Publisher Opening Microsoft Publisher Using the Start Menu, click on All Programs and navigate to the Microsoft Office folder. Click on Microsoft Office Publisher 2007. Choosing
Microsoft PowerPoint 2007 Beginning
 Microsoft PowerPoint 2007 Beginning Educational Technology Center PowerPoint Presentations on the Web... 2 Starting PowerPoint... 2 Opening a Presentation... 2 Microsoft Office Button... 3 Quick Access
11.1 Create Speaker Notes Print a Presentation Package a Presentation PowerPoint Tips... 44
 Contents 1 Getting Started... 1 1.1 Presentations... 1 1.2 Microsoft Office Button... 1 1.3 Ribbon... 2 1.4 Mini Toolbar... 2 1.5 Navigation... 3 1.6 Slide Views... 4 2 Customize PowerPoint... 5 2.1 Popular...
Word 2013 Quick Start Guide
 Getting Started File Tab: Click to access actions like Print, Save As, and Word Options. Ribbon: Logically organize actions onto Tabs, Groups, and Buttons to facilitate finding commands. Active Document
yearbookavenue.com The Basic Steps Program Requirements Jostens YearTech Online
 Jostens YearTech Online 2011 Quick Reference Guide Welcome to Jostens YearTech Online, the easiest way to create a year Using YearTech Online, on Jostens Yearbook Avenue, you can work on your book from
Creating. guide. quick start. Get Started! your yearbook. Let s. Easy Account Access.
 Creating your yearbook quick start guide Let s Get Started! Easy Account Access you can access your account from any computer with a broadband internet connection by visiting www.yearbookwizard.com Table
Inserting Information into PowerPoint
 LESSON 6 6.1 Inserting Information into PowerPoint After completing this lesson, you will be able to: Change the layout of a slide. Insert a clip art image. Scale an image. Insert and format a table. Insert
What can Word 2013 do?
 Mary Ann Wallner What can Word 2013 do? Provide the right tool for: Every aspect of document creation Desktop publishing Web publishing 2 Windows 7: Click Start Choose Microsoft Office > Microsoft Word
Designer Reference 1
 Designer Reference 1 Table of Contents USE OF THE DESIGNER...4 KEYBOARD SHORTCUTS...5 Shortcuts...5 Keyboard Hints...5 MENUS...7 File Menu...7 Edit Menu...8 Favorites Menu...9 Document Menu...10 Item Menu...12
Microsoft Office. Microsoft Office
 is an office suite of interrelated desktop applications, servers and services for the Microsoft Windows. It is a horizontal market software that is used in a wide range of industries. was introduced by
A QUICK TOUR OF ADOBE ILLUSTRATOR CC (2018 RELEASE)
") A QUICK TOUR OF ADOBE ILLUSTRATOR CC (2018 RELEASE) Lesson overview In this interactive demonstration of Adobe Illustrator CC (2018 release), you ll get an overview of the main features of the application.
A QUICK TOUR OF ADOBE ILLUSTRATOR CC (2018 RELEASE) Lesson overview In this interactive demonstration of Adobe Illustrator CC (2018 release), you ll get an overview of the main features of the application.
Learn more about Pages, Keynote & Numbers
 Learn more about Pages, Keynote & Numbers HCPS Instructional Technology May 2012 Adapted from Apple Help Guides CHAPTER ONE: PAGES Part 1: Get to Know Pages Opening and Creating Documents Opening a Pages
InDesign ACA Certification Test 50 terms hollymsmith TEACHER
 InDesign ACA Certification Test 50 terms hollymsmith TEACHER reccommended use: matching, test, etc You cannot rotate the graphic around its upper-left corner with the Free Transform tool. The content is
Microsoft PowerPoint 2010 Beginning
 Microsoft PowerPoint 2010 Beginning PowerPoint Presentations on the Web... 2 Starting PowerPoint... 2 Opening a Presentation... 2 File Tab... 3 Quick Access Toolbar... 3 The Ribbon... 4 Keyboard Shortcuts...
L E S S O N 2 Background
 Flight, Naperville Central High School, Naperville, Ill. No hard hat needed in the InDesign work area Once you learn the concepts of good page design, and you learn how to use InDesign, you are limited
Numbers Basics Website:
 Website: http://etc.usf.edu/te/ Numbers is Apple's new spreadsheet application. It is installed as part of the iwork suite, which also includes the word processing program Pages and the presentation program
PowerPoint 2016 Building a Presentation
 PowerPoint 2016 Building a Presentation What is PowerPoint? PowerPoint is presentation software that helps users quickly and efficiently create dynamic, professional-looking presentations through the use
Lesson 2 Quick Tour and Features
 Lesson 2 Quick Tour and Features Objectives Students will format a document page. Students will use a spell-checker. Students will copy, cut, and paste text. Students will adjust paragraph indentations.
KODAK Software User s Guide
 KODAK Create@Home Software User s Guide Table of Contents 1 Welcome to KODAK Create@Home Software Features... 1-1 Supported File Formats... 1-1 System Requirements... 1-1 Software Updates...1-2 Automatic
Getting Started with Microsoft PowerPoint 2003
 Getting Started with Microsoft PowerPoint 2003 Overview: This handout provides basic introductory information about Microsoft PowerPoint and its application in the classroom. Audience: All instructional
Chapter 4 Printing and Viewing a Presentation Using Proofing Tools I. Spell Check II. The Thesaurus... 23
 PowerPoint Level 1 Table of Contents Chapter 1 Getting Started... 7 Interacting with PowerPoint... 7 Slides... 7 I. Adding Slides... 8 II. Deleting Slides... 8 III. Cutting, Copying and Pasting Slides...
Creating. guide. quick start. Get Started! your YEARBOOK. Let s. Multi-User Functionality
 Creating your YEARBOOK quick start guide Let s Get Started! Multi-User Functionality DESIGN PAGES IN REAL TIME FOR OPTIMAL COLLABORATION. yearbooks.inter-state.com/designprograms Table of Contents System
Press-Ready Cookbook Page Guidelines
 Press-Ready Cookbook Page Guidelines table of contents These instructions are for all pages of your cookbook: Title Page, Special Pages, Table of Contents, Dividers, Recipe Pages, etc. WHAT IS PRESS-READY?
Excel Select a template category in the Office.com Templates section. 5. Click the Download button.
 Microsoft QUICK Excel 2010 Source Getting Started The Excel Window u v w z Creating a New Blank Workbook 2. Select New in the left pane. 3. Select the Blank workbook template in the Available Templates
The American University in Cairo. Academic Computing Services. Word prepared by. Soumaia Ahmed Al Ayyat
 The American University in Cairo Academic Computing Services Word 2000 prepared by Soumaia Ahmed Al Ayyat Spring 2001 Table of Contents: Opening the Word Program Creating, Opening, and Saving Documents
Beginners Guide to Snippet Master PRO
 Beginners Guide to Snippet Master PRO This document assumes that Snippet Master has been installed on your site. If not please contact the Bakas IT web team at webreg@bakasit.com.au. Initial Login Screen...
Keynote 08 Basics Website:
 Website: http://etc.usf.edu/te/ Keynote is Apple's presentation application. Keynote is installed as part of the iwork suite, which also includes the word processing program Pages and the spreadsheet program
Introduction to Microsoft Word 2008
 1. Launch Microsoft Word icon in Applications > Microsoft Office 2008 (or on the Dock). 2. When the Project Gallery opens, view some of the available Word templates by clicking to expand the Groups, and
Word 2013 Beginning. Technology Integration Center
 Word 2013 Beginning Getting Started... 2 Quick Access Toolbar... 3 The Ribbon... 3 Help... 4 Compatibility Mode... 4 Document Views... 4 Navigating the Document... 5 Moving Around in the Document... 5
Microsoft Office Word. Help. Opening a Document. Converting from Older Versions
 Microsoft Office 2007 - Word Help Click on the Microsoft Office Word Help button in the top right corner. Type the desired word in the search box and then press the Enter key. Choose the desired topic
LECTURE 08B: EXPLORING MS OFFICE WORD 2010
 LECTURE 08B: EXPLORING MS OFFICE WORD 2010 Insert Drop down This lecture is designed to prepare students for IC³ Certification STRUCTURED TASK 1. English Presentation Every student has Presentation to
Core Essentials. Publisher Diocese of St. Petersburg Office of Training
 Core Essentials Publisher 2010 Diocese of St. Petersburg Office of Training Training@dosp.org TABLE OF CONTENTS Topic One: Getting Started... 1 Workshop Objectives... 2 Topic Two: Opening and Closing Publisher...
YEARBOOK EDITION USER GUIDE. a service provided by
 YEARBOOK EDITION USER GUIDE a service provided by Pixami User Guide Table of Contents Chapter 1 Introduction... 1 Basic Steps to Creating a Yearbook...1 User Login...2 Navigation Header...2 Main Dashboard....3
14. Using Illustrator CC with Other Adobe Applications
 14. Using Illustrator CC with Other Adobe Applications Lesson overview In this lesson, you ll learn how to do the following: Place linked and embedded graphics in an Illustrator file. Place multiple images
User Manual Version 1.1 January 2015
 User Manual Version 1.1 January 2015 - 2 / 112 - V1.1 Variegator... 7 Variegator Features... 7 1. Variable elements... 7 2. Static elements... 7 3. Element Manipulation... 7 4. Document Formats... 7 5.
Fundamentals of PowerPoint 2007 Instructor: Elizabeth-Latta Brother
 Fundamentals of PowerPoint 2007 Instructor: Elizabeth-Latta Brother Getting to know PowerPoint... 1 What happens when you open PowerPoint... 1 Understanding the presentation window... 1 Customizing the
Table of Contents. Page 2 of 72. High Impact 4.0 User Manual
 Table of Contents Introduction 5 Installing High Impact email 6 Installation Location 6 Select Mail Client 6 Create a ReadyShare Account 6 Create a Default Profile 6 Outlook Configuration Message 6 Complete
Introduction to Microsoft Office PowerPoint 2010
 Introduction to Microsoft Office PowerPoint 2010 TABLE OF CONTENTS Open PowerPoint 2010... 1 About the Editing Screen... 1 Create a Title Slide... 6 Save Your Presentation... 6 Create a New Slide... 7
Microsoft Word 2010 Tutorial
 1 Microsoft Word 2010 Tutorial Microsoft Word 2010 is a word-processing program, designed to help you create professional-quality documents. With the finest documentformatting tools, Word helps you organize
Microsoft PowerPoint 2007 Tutorial
 Microsoft PowerPoint 2007 Tutorial Prepared By:- Mohammad Murtaza Khan I. T. Expert Sindh Judicial Academy Contents Getting Started... 5 Presentations... 5 Microsoft Office Button... 5 Ribbon... 6 Quick
Word Getting Started The Word Window u vw. Microsoft QUICK Source. Creating a New Blank Document. Creating a New Document from a Template
 Microsoft QUICK Source Word 2007 Getting Started The Word Window u vw x y z u Quick Access Toolbar contains shortcuts for the most commonly used tools. v Microsoft Office Button contains common file and
Keynote Basics Website:
 Keynote Basics Website: http://etc.usf.edu/te/ Keynote is Apple's presentation application. Keynote is installed as part of the iwork suite, which also includes the word processing program Pages. If you
What is Publisher, anyway?
 What is Publisher, anyway? Microsoft Publisher designed for users who need to create and personalize publications such as marketing materials, business stationery, signage, newsletters and other items
PowerPoint 2016 Basics for Mac
 1 PowerPoint 2016 Basics for Mac PowerPoint 2016 Basics for Mac Training Objective To learn the tools and features to get started using PowerPoint more efficiently and effectively. What you can expect
Intermediate/Advanced. Faculty Development Workshop FSE Faculty retreat April 18, 2012
 Intermediate/Advanced Faculty Development Workshop FSE Faculty retreat April 18, 2012 Remote Desktop Sharing Quick Reference Guide for Moderators The Moderator or a Participant may request control of another
Lehigh University Library & Technology Services
 Lehigh University Library & Technology Services Start Word Open a file called day2 Microsoft WORD 2003 Day 2 Click the Open button on the Standard Toolbar Go to the A: drive and highlight day2 and click
Sending image(s) to report Click Send Snapshot on any screen in Dolphin3D and choose the Send to Report option
 to report Click Send Snapshot on any screen in Dolphin3D and choose the Send to Report option") Dolphin 3D Reports Sending image(s) to report Click Send Snapshot on any screen in Dolphin3D and choose the Send to Report option Creating a report step by step 1. Generate the desired images in Dolphin3D
Dolphin 3D Reports Sending image(s) to report Click Send Snapshot on any screen in Dolphin3D and choose the Send to Report option Creating a report step by step 1. Generate the desired images in Dolphin3D
Query Studio Training Guide Cognos 8 February 2010 DRAFT. Arkansas Public School Computer Network 101 East Capitol, Suite 101 Little Rock, AR 72201
 Query Studio Training Guide Cognos 8 February 2010 DRAFT Arkansas Public School Computer Network 101 East Capitol, Suite 101 Little Rock, AR 72201 2 Table of Contents Accessing Cognos Query Studio... 5
Getting Started with. PowerPoint 2010
 Getting Started with 13 PowerPoint 2010 You can use PowerPoint to create presentations for almost any occasion, such as a business meeting, government forum, school project or lecture, church function,
4 TRANSFORMING OBJECTS
 4 TRANSFORMING OBJECTS Lesson overview In this lesson, you ll learn how to do the following: Add, edit, rename, and reorder artboards in an existing document. Navigate artboards. Select individual objects,
CROMWELLSTUDIOS. Content Management System Instruction Manual V1. Content Management System. V1
 Content Management System Instruction Manual V1 www.cromwellstudios.co.uk Cromwell Studios Web Services Content Management System Manual Part 1 Content Management is the system by which you can change
MICROSOFT WORD. Table of Contents. What is MSWord? Features LINC FIVE
 Table of Contents What is MSWord? MSWord is a word-processing program that allows users to insert, edit, and enhance text in a variety of formats. Word is a powerful word processor with sophisticated editing
User Guide. Chapter 6. Teacher Pages
 User Guide Chapter 6 s Table of Contents Introduction... 5 Tips for s... 6 Pitfalls... 7 Key Information... 8 I. How to add a... 8 II. How to Edit... 10 SharpSchool s WYSIWYG Editor... 11 Publish a...
ADOBE ILLUSTRATOR CS3
 ADOBE ILLUSTRATOR CS3 Chapter 2 Creating Text and Gradients Chapter 2 1 Creating type Create and Format Text Create text anywhere Select the Type Tool Click the artboard and start typing or click and drag
Microsoft Word: Steps To Success (The Bare Essentials)
") Microsoft Word: Steps To Success (The Bare Essentials) Workbook by Joyce Kirst 2005 Microsoft Word: Step to Success (The Bare Essentials) Page Contents 1 Starting Word 2 Save 3 Exit 5 Toolbars, Alignment,
Microsoft Word: Steps To Success (The Bare Essentials) Workbook by Joyce Kirst 2005 Microsoft Word: Step to Success (The Bare Essentials) Page Contents 1 Starting Word 2 Save 3 Exit 5 Toolbars, Alignment,
1 THE PNP BASIC COMPUTER ESSENTIALS e-learning (MS Powerpoint 2007)
") 1 THE PNP BASIC COMPUTER ESSENTIALS e-learning (MS Powerpoint 2007) 2 THE PNP BASIC COMPUTER ESSENTIALS e-learning (MS Powerpoint 2007) TABLE OF CONTENTS CHAPTER 1: GETTING STARTED... 4 MICROSOFT OFFICE
1 THE PNP BASIC COMPUTER ESSENTIALS e-learning (MS Powerpoint 2007) 2 THE PNP BASIC COMPUTER ESSENTIALS e-learning (MS Powerpoint 2007) TABLE OF CONTENTS CHAPTER 1: GETTING STARTED... 4 MICROSOFT OFFICE
KODAK Software User s Guide. Software Version 9.0
 KODAK Create@Home Software User s Guide Software Version 9.0 Table of Contents 1 Welcome to KODAK Create@Home Software Features... 1-1 Supported File Formats... 1-1 System Requirements... 1-1 Software
Basic Concepts 1. Starting Powerpoint 2000 (Windows) For the Basics workshop, select Template. For this workshop, select Artsy
 For the Basics workshop, select Template. For this workshop, select Artsy") 1 Starting Powerpoint 2000 (Windows) When you create a new presentation, you re prompted to choose between: Autocontent wizard Prompts you through a series of questions about the context and content of
1 Starting Powerpoint 2000 (Windows) When you create a new presentation, you re prompted to choose between: Autocontent wizard Prompts you through a series of questions about the context and content of
Introduction to Microsoft Office 2016: Word
 Introduction to Microsoft Office 2016: Word Last Updated: September 2018 Cost: $2.00 Microsoft Word is a word processing software. You can use it to type letters, reports, and other documents. This class
OU EDUCATE TRAINING MANUAL
 OU EDUCATE TRAINING MANUAL OmniUpdate Web Content Management System El Camino College Staff Development 310-660-3868 Course Topics: Section 1: OU Educate Overview and Login Section 2: The OmniUpdate Interface
MS Word 2010 An Introduction
 MS Word 2010 An Introduction Table of Contents The MS Word 2010 Environment... 1 The Word Window Frame... 1 The File Tab... 1 The Quick Access Toolbar... 4 To Customize the Quick Access Toolbar:... 4
Quick Guide for Photoshop CC Basics April 2016 Training:
 Photoshop CC Basics Creating a New File 1. Click File > New 2. Keep Default Photoshop Size selected in the Preset drop-down list. 3. Click OK. Showing Rulers 1. On the Menu bar, click View. 2. Click Rulers.
Beginning a presentation
 L E S S O N 2 Beginning a presentation Suggested teaching time 40-50 minutes Lesson objectives To learn how to create and edit title and bullet slides, you will: a b c d Select slide types by using the
Excel 2010 Level 1: The Excel Environment
 Excel 2010 Level 1: The Excel Environment Table of Contents The Excel 2010 Environment... 1 The Excel Window... 1 File Tab... 1 The Quick Access Toolbar... 4 Access the Customize the Quick Access Toolbar
4D Write. User Reference Mac OS and Windows Versions. 4D Write D SA/4D, Inc. All Rights reserved.
 4D Write User Reference Mac OS and Windows Versions 4D Write 1999-2002 4D SA/4D, Inc. All Rights reserved. 4D Write User Reference Version 6.8 for Mac OS and Windows Copyright 1999 2002 4D SA/4D, Inc.
Microsoft Office Excel
 Microsoft Office 2007 - Excel Help Click on the Microsoft Office Excel Help button in the top right corner. Type the desired word in the search box and then press the Enter key. Choose the desired topic
MS Word Professional Document Alignment
 MS Word Professional Document Alignment Table of Contents CHARACTER VS. PARAGRAPH FORMATTING...5 Character formatting...5 Paragraph Formatting...5 USING SHOW/HIDE TO REVEAL NON-PRINTING CHARACTERS...5
Part 1: Basics. Page Sorter:
 Part 1: Basics Page Sorter: The Page Sorter displays all the pages in an open file as thumbnails and automatically updates as you add content. The page sorter can do the following. Display Pages Create
Site Manager. To edit a page already in place, click on the name of the page.
 Web Page Editing Navigate to the SFHS website. The address is http://www.forsyth.k12.ga.us/sfhs/site/default.asp. (Use that link, or copy/paste it into a browser. You can also pull up Internet Explorer,
TABLE OF CONTENTS TABLE OF CONTENTS... 1 INTRODUCTION... 3 BREAK... 4 DEFINITIONS... 4 STEP BY STEP- SECTION BREAK... 6 PAGE NUMBERS...
 TABLE OF CONTENTS TABLE OF CONTENTS... 1 INTRODUCTION... 3 BREAK... 4 DEFINITIONS... 4 WHY WOULD YOU USE THIS?... 4 STEP BY STEP- PAGE BREAK... 4 ALTERNATIVE METHODS... 5 STEP BY STEP- SECTION BREAK...
Using Microsoft Word. Table of Contents
 Using Microsoft Word Table of Contents The Word Screen... 2 Document View Buttons... 2 Selecting Text... 3 Using the Arrow Keys... 3 Using the Mouse... 3 Line Spacing... 4 Paragraph Alignment... 4 Show/Hide
Exploring Microsoft Office Word 2007
 Exploring Microsoft Office Word 2007 Chapter 3: Enhancing a Document Robert Grauer, Keith Mulbery, Michelle Hulett Objectives Insert a table Format a table Sort and apply formulas to table data Convert
Adobe Indesign for Beginner - Session Structure
 Adobe Indesign for Beginner - Session Structure Hour 01 Introduction to Indesign Indesign Workspace Hide / show palettes Dock / float palettes Group / ungroup palettes Stack / unstack palettes Save / load
CHANGING VIEWS AND SCREEN MODES
 In Lightroom 4 it is possible to edit the keyboard shortcuts and assign your own shortcuts or change or replace existing shortcuts. This list is based on the default shortcuts for Lightroom 4. NAPP members
Computer Technology Study Guide for Final Exam
 Name Computer Technology Study Guide for Final Exam Multiple Choice Identify the choice that best completes the statement or answers the question. 1. Which of the following is NOT shown in the figure above?
button Double-click any tab on the Ribbon to minimize it. To expand, click the Expand the Ribbon button
 PROCEDURES LESSON 1: CREATING WD DOCUMENTS WITH HEADERS AND FOOTERS Starting Word 1 Click the Start button 2 Click All Programs 3 Click the Microsoft Office folder icon 4 Click Microsoft Word 2010 1 Click
User Guide Version 3.2.1
 User Guide Version 3.2.1 www.thephotobookclub.com.au September 2012 1 Contents Introduction... 4 1.1 PhotobookClub Cool Tools... 6 1.2 Copyright and Content... 6 1.3 Privacy Policy... 6 2.0 Downloading
Nauticom NetEditor: A How-to Guide
 Nauticom NetEditor: A How-to Guide Table of Contents 1. Getting Started 2. The Editor Full Screen Preview Search Check Spelling Clipboard: Cut, Copy, and Paste Undo / Redo Foreground Color Background Color
Quick Access Toolbar. You click on it to see these options: New, Open, Save, Save As, Print, Prepare, Send, Publish and Close.
 Opening Microsoft Word 2007 in the practical room UNIT-III 1 KNREDDY 1. Nyelvi beállítások az Office 2007-hez (Language settings for Office 2007 (not 2003)) English. 2. Double click on the Word 2007 icon
OnPoint s Guide to MimioStudio 9
 1 OnPoint s Guide to MimioStudio 9 Getting started with MimioStudio 9 Mimio Studio 9 Notebook Overview.... 2 MimioStudio 9 Notebook...... 3 MimioStudio 9 ActivityWizard.. 4 MimioStudio 9 Tools Overview......
EssEntial indesign skills Brought to you By InDesign
 10 EssEntial indesign skills Brought to you By InDesignSkills 10 Essential InDesign Skills by InDesignSkills www.indesignskills.com Copyright 2014 Illustration: Henry Rivers Contents In this ebook you
Working with PDF s. To open a recent file on the Start screen, double click on the file name.
 Working with PDF s Acrobat DC Start Screen (Home Tab) When Acrobat opens, the Acrobat Start screen (Home Tab) populates displaying a list of recently opened files. The search feature on the top of the
Publisher 2016 Foundation SAMPLE
 Publisher 2016 Foundation Publisher 2016 Foundation Microsoft Publisher 2016 Foundation - Page 2 2015 Cheltenham Group Pty. Ltd. All trademarks acknowledged. E&OE. No part of this document may be copied
A Step-by-step guide to creating a Professional PowerPoint Presentation
 Quick introduction to Microsoft PowerPoint A Step-by-step guide to creating a Professional PowerPoint Presentation Created by Cruse Control creative services Tel +44 (0) 1923 842 295 training@crusecontrol.com
On the Web sun.com/aboutsun/comm_invest STAROFFICE 8 DRAW
 STAROFFICE 8 DRAW Graphics They say a picture is worth a thousand words. Pictures are often used along with our words for good reason. They help communicate our thoughts. They give extra information that
Adding Art to Office Documents
 Adding Art to Office Documents Introduction What You ll Do Although well-illustrated documents can t make up for a lack Locate and Insert an Online Picture of content, you can capture your audiences attention