SUPPLIER PORTAL USER GUIDE
|
|
|
- Hugh Boone
- 5 years ago
- Views:
Transcription


1 SUPPLIER PORTAL USER GUIDE


2 Table of Contents SUPPLIER PORTAL USER GUIDE
3
4 o o o o o o


5 o o o o o
6 When beginning a Data Collection for a new Recipient, check your Account Preferences. New Recipients will sometime feature Additional Attribute Views that help you focus your collection efforts. Your Account Preferences page also allows you to access your Company Dictionary, manage your Brand, Manufacturer & Supplier Lists, Pre-Authorize Recipients and more. 1. Click the Gear Icon in the upper right corner of the page and select Supplier Preferences. 2. Additional Attribute Views are available in the top right panel 3. To add any View, check the box 4. Click Save Additional Views & Confirm


7 If you are involved with a Data Collection, Edgenet will typically apply a Claim Code to your account. This is a bulk item request from your Distributor or Retailer. For new users, who do not yet have products in the system, it generates New Product Requests. Any requests for products you have already loaded into the system are marked as Pending Subscriptions. To access either of these product sets, click the respective link under the Next Steps panel on the Home page. If you received a Claim Code from Edgenet, redeeming that Claim Code will generate your New Product Requests and Pending Subscriptions. 1. In Add Product Data menu, select the Claim Code option 2. Users who receive s with claim codes can launch the window


8 3. Enter the claim code (we suggest Copy & Paste, for ease and accuracy) to display the details within the Claim Code, including Data Recipient, # of Requests, # of Existing Products, and # of New Items 4. Click Redeem Claim Code to advance These items from the redeemed Claim Code are now as New Product Requests or Pending Subscriptions Tip: If you are reviewing a large number of New Product Requests, you can download this product set into an XML Smart Spreadsheet Requests When a retailer or distributor wants data on an item not currently in the system, they can request it. 1. Notification of New Product Requests appear in your Next Steps menu as New Product Requests 2. Access these requests directly by clicking the New Product Requests link in the Next Steps panel or through the Requests button on the navigation bar


9 3. Use the Recipients Filter to narrow results to specific Retailers or Distributors 4. Use the toolbar on the left of your screen to manage your new product requests. The checkmark icon represents Approve, the envelope with the crossout icon represents reject and the spreadsheet plus icon represent exporting to a smart spreadsheet


10 5. Approve new item requests only if you intend to enter the product into the system. Any data provided by the requesting recipient will be automatically added to the item record 6. If you choose to reject the New Product Request, you will be required to provide a reason for rejection, which will be delivered to the requesting recipient 7. Once approved, the Single or Bulk Item Edit Page will open, depending on the quantity selected. This allows you the option to continue entering data or to Save your progress


11 a. Tip: Most users save their progress at this point and work in Smart Spreadsheets once they have approved the Pending Subscription 8. Most approved New Product Requests automatically become Pending Subscriptions a. Note, if you have pre-authorized the recipient, the products will be subscribed to by the recipient and will be available on the products page. Pending subscriptions represent recipient requests for access to data on a product that already exists in the Supplier Portal. You can access Pending Subscriptions by clicking the link on the homepage under Next Steps>Pending subscriptions or clicking on Products in the top navigation bar and filtering by Pending under the Subscription filter. 1. Upon filtering, if the product or recipient you seek is not visible, use the Filters to narrow results. 2. Select the items you wish to update, then click the desired function from the Action Bar on the left side of the Product Grid: a. Approve has a check mark icon i. Approve Pending Subscriptions only if you want to activate the Recipient s subscription and provide that product data.


12 b. Reject has a crossed-out circle icon. Tip: For quick access to those newly approved product subscriptions and even add more products, download a Smart Spreadsheet. Select all products you wish to work on and click the Export Selected Items to Smart Spreadsheet icon. The spreadsheet with a plus sign on the Action Bar on the left of your screen. The following prompts are detailed in the Export Smart Spreadsheet section. You can enter any additional or unrequested products into the application individually, or in bulk. However, the most popular method for loading data is through our Smart Spreadsheets. All three

 from the dropdown 2. Launches the Bulk Item Edit page 3.")
13 of these options are available from the Add Product Data dropdown in the Next Steps panel on the Home page. 1. Select Add single product from the dropdown 2. Enter the Unique Product ID, Product Name, select the Recipients & click Continue 3. Launches the Single Item Edit page 4. Save your progress or continue to populate the data using Single Item Edit 1. Select Add more than one product (bulk) from the dropdown 2. Launches the Bulk Item Edit page 3. Click the Plus button to add more products, entering the Unique Product ID at minimum 4. Save your progress or continue to populate the data using Bulk Item Edit
14 Tip: You can add new or unrequested products to ANY Smart Spreadsheet! Smart Spreadsheets are our most popular tool not only for adding products, but also for manipulating, and exporting data. Now you can customize your Smart Spreadsheets even further. Add or remove Recipients, Classes, Attribute Views and even Global Data, allowing you to be as broad or as focused as you want to be. Adding products through Smart Spreadsheets offer you two paths. 1. All in One Shot a. Good for low item counts, with few product categories b. Several Required Attributes are shared across Smart Spreadsheet tabs, giving the illusion of additional work c. Item Categories can be more difficult to determine so early in the process 2. Stages, using the Global Data to begin the Item Record a. Better for large item counts, with many product categories b. Populates shared Required Attributes on subsequent Smart Spreadsheet downloads c. Categorizing items in the Bulk Item Edit page is the most efficient way d. Category Specific Smart Spreadsheets can be generated without the Global tabs
 Spreadsheet Template option. 2.")
15 *The following steps are for downloading a blank Smart Spreadsheet. If you are ready to Export your Pending Subscriptions to a Smart Spreadsheet see the Export Smart Spreadsheet section. Download 1. From the Supplier Portal Homepage, click on the Add Product Data menu and select the Download a Blank Excel (Smart) Spreadsheet Template option. 2. Next select the attribute sets to include in your Smart Spreadsheet. Simply uncheck the box to remove any of the Attribute Sets from your Smart Spreadsheet. Any or all of the following Recipient, General, Classification/Category and Special Purpose Attribute Sets can be added or removed.
16 3. To update or view your included Recipients, click the Review or Add button to the right of Recipients a. To add a Recipient, select the Recipient on the left and click the right arrow b. To remove a Recipient, select the Recipient on the right and click the left arrow c. The double arrows will Add or Remove all Recipients 4. To update or view your included Classifications, click the Review or Add button to the right of Classifications. Add or remove your desired Classes and click Continue a. To add Category Attributes, locate the product category using Search or Browse the Edgenet s Master Class Taxonomy. Then simply click the category to add it to the download b. To remove Categories, click the Blue Trash Can next to the Category*


17 *This only removes the attribute set from the Smart Spreadsheet; it does not delete your products from that class. Tip: Although each Smart Spreadsheet can accommodate up to 1000 different categories, each category will appear as a separate Excel-style tab. Be mindful that too many categories can create unnecessary clutter and confusion. 5. Next, save the Smart Spreadsheet.ZIP using a name and location that can be easily located Spreadsheets Smart Spreadsheets are not Excel files. They are XML files displayed in an Excel interface. It is important to save the file as an XML document to maintain the integrity of the system links and formatting. The tabs are color coded by data type: Yellow Tabs: Core Marketing or Global Data, as well as GDSN Data tabs are colored in. Blue Tabs: Class or Category Data Red Tabs: Recipient Data Gray Tabs: Reference Data, 3 tabs included on every Smart Spreadsheet Table of Contents (First Tab): outlines and hyperlinks each Attribute Set Reference (2 nd Last Tab): The Reference tab details each attribute within the Smart Spreadsheet, broken out by tab. In addition to formatting specifics, the Attribute Names are located in column E and column F provides the full Help Text of the Attribute.

18 Copyright (Last Tab Tip: Check the Reference tab if you have a question about the definition or format of an attribute within the spreadsheet Depending upon the Attribute Sets included, your sheet may not have all 4 colored tabs. Each Smart Spreadsheet is unique, including only the Attribute Sets selected during the export. To work in your Smart Spreadsheet: 1. Open, unzip, and extract the compressed.zip file, which contains an XML format file. This format will open and be editable in Microsoft Excel. 2. After opening the blank template, click the Enable Editing button near the top of the Excel sheet.

19 Best Practice: Save the XML Smart Spreadsheet file using a name and location that can be easily located later 3. Using the ToC, Reference tab and the tips below, populate/complete the appropriate attributes in each tab with your product data. a. Row 7 in the data tabs notes Attribute Status as Required or Optional Digital Asset Linking Tip: The fastest way to link Digital Assets is with Smart Spreadsheets. Whether it is an image, video, manual or planogram, paste/enter the entire file name, including the extension, into the respective Attribute. When uploaded, the system automatically links all the populated Digital Assets. *Digital Asset must be loaded into the system before Smart Spreadsheet upload *File names must be exact and include the extension i.e..jpg,.tif,.gif,.mp4,.mov,.wmv,.pdf, etc.
20 4. Save the XML Smart Spreadsheet file using a name and location that can be easily located later 1. Paste using the ctrl+alt+v shortcut to Paste Special and select Text or Value 2. Use the ctrl+d shortcut to Copy Down 3. Link Digital Assets by entering entire file name in representative attribute 4. Row 7 displays Attribute status as Required or Optional a. Populating Optional Attributes enhances your product data and product score 5. New/unrequested products can be added to any Smart Spreadsheet 6. Hiding & Highlighting columns can be helpful 7. Do not rearrange or Move any columns or tabs in a Smart Spreadsheet 8. Do not Delete any columns or tabs from a Smart Spreadsheet 9. Smart Spreadsheets MUST be saved as XML files 10. Close the file before uploading
21 Your Digital Asset Gallery is available from anywhere in the system using the Digital Assets button on the Navigation Bar. Digital Assets consist of images, multimedia and textual content files. In the context of your product data, this could include (but is not limited to) product images, assembly & review videos, specification pages, manuals, Material Safety Data sheets, product brochures, lifestyle & detailed product images, planograms... You get the point. Each product is required to have at least one Main Product Image. This image must be of the product on a plain while background and a minimum of 1000 pixels on one side. Other Digital Assets are Optional, but we recommend adding as many as you can, as these assets will help sell more products online. You can upload Digital Assets by selecting one at a time, many at a time or by grouping multiple assets in a ZIP file. The larger the file, take more time it will take. MAX upload size at one time is 2 GB (2,000 MB) in a ZIP file. The time this takes will depend on your upload speed/bandwidth. If your upload speed is less than 1.00 Mbps, do fewer assets at a time. While you can upload assets in the format of your choice, Edgenet recommends: Image files in JPG format Document files in PDF format (make sure your PDF files are not password protected) Video files in MP4 format Use the Basic Search and Advanced Search functions to narrow your Digital Asset results. It also shows the number of assets within the system s gallery and the accompanying Asset Grid. Assets


22 1. On the Digital Assets page, select the Upload Assets button 2. Navigate/browse to the files for upload and click Open 3. The new files will then display in your gallery 1. On the Digital Assets page, select the Digital Assets marked for deletion 2. Click the Delete Selected button a. Unlinked Digital Assets will be immediately deleted b. If you attempt to Delete a Digital Asset that is linked to a product, the system will provide a warning giving you the option to Delete, Cancel or View the linked products c. Deleting a Linked Digital Asset, only deletes the Asset file. It not Delete the Product itself Digital Assets linking functions identically on both the Single and Bulk Item Edit pages. Some feel the most efficient way to link is through Smart Spreadsheets.

23 Single Item Edit Linking: 1. From the Single Item Edit page, navigate to the Digital Assets screen 2. Select the Attribute you would like to populate/link 3. Click the image in the Digital Asset gallery to link 4. To remove the link, click the Blue Trash Can a. This only deletes the link, not the product or the asset

24 Bulk Item Edit Linking: 1. From the Bulk Item Edit page, navigate to the Digital Assets screen 2. Select the Attribute you would like to populate/link 3. Click the image in the Digital Asset gallery to link 4. To remove the link, click the Blue Trash Can a. This only deletes the link, not the product or the asset Smart Spreadsheet Linking: 1. Enter the entire file name, including the extension, into the respective Attribute
25 2. System links Product & Digital Asset upon Smart Spreadsheet upload *Digital Asset must be loaded into the system before Smart Spreadsheet upload *File names must be exact and include the extension i.e..jpg,.tif,.gif,.mp4,.mov,.wmv,.pdf, etc. See the Working with Smart Spreadsheets section for additional information. You can edit products in the application individually, in bulk or you can export products to edit in our Smart Spreadsheets. All three options are available on the Products page. Edgenet s Data Quality Engine performs 1000 s of checks and validations to ensure your product record is not only complete, but also compliant with your Recipient s data requirements. This is most apparent in the Data Quality Score. Most Recipients require a minimum score of 75, most notable exceptions include GDSN & Lowe s. If you have a product that is only being sent to Recipients who do not require a minimum Data Quality Score, it will not be displayed in your product views. The Data Quality Score is based upon checks and validations applied to the product s Global & Category Specific Data. Private Recipient Data is also checked and validated, however it does not factor in to the Score. Tip: Increase your Data Quality Score by completing optional attributes and adding additional digital assets. Spreadsheet


26 After completing your product data entry offline and uploading your Digital Assets, it is time to upload your Smart Spreadsheet. You can begin this process from your homepage or the products page through the Add Product Data menu. 1. From the Upload dialog, press Select Sheet button to upload the file back into the Supplier Portal. 2. Browse and select the appropriate Smart Spreadsheet XML file to upload from your computer. 3. Ensure that the file you are selecting is not open on your computer when uploading. 4. Upon successful upload, your uploaded products will display on the Bulk Item Edit page with the products listed in the Smart Spreadsheet. 5. Review your data, update and validate remaining data attribute fields, checking for requirements and errors. a. Showstoppers occur when products lack fundamental information, such as unique IDs. You cannot Save or Certify and Send until these showstopper errors are properly resolved. b. Critical Errors refer to missing required attributes or incorrect formatting. You can Save your progress, but the product will not reach a Data Quality score of 75, the recommended score for certifying and sending to recipients.

27 c. Warnings broadly consist of improper data entry, including spelling, punctuation, dimension, or abbreviation mistakes. While Warnings do not prevent user actions, correcting these minor errors will raise the overall product Data Quality score. 6. Once you have reached a data quality score of 75 or greater and removed all Critical Errors, then Save to secure these products within your existing catalog. 7. When finished and ready to proceed, please click Certify & Send to share product data with authorized recipients. During maintenance mode, if you want to edit single products versus many, the single item edit page is the recommended feature. From the Products page, select the item you would like to edit and click the edit icon in the left navigation panel. You may also select add a single product from the Add Product Data dropdown to add one new product at a time.


28 1. When adding a new product from the Add Single product selection, the pop-up menu will prompt you to enter essential product details, including Name, GTIN, and Authorized Recipients for the product data. 2. If you cannot locate the product s GTIN, use the Help Me Create button. 3. Using the center arrows, add or remove Retailers and Distributors from the list of recipients on the right side of the panel. Double arrows add or remove all available Recipients. 4. If you wish to view both Commerce and GDSN data, select Include GDSN. For Commerce only, leave the fields unmarked. For GDSN information only, choose GDSN Only. 5. Once these fields are complete, click Continue to proceed.

29 6. Within the single item edit page, the attributes are broken out in sections: Core Product, Additional Data, Digital Assets, Recipient, and Category attributes. Click on the progress bar to navigate between sections and complete all required attributes. 7. The Single Item Edit page features red warning signs and asterisks that identify Required Attributes, while hovering over yellow Help Text boxes can clarify the desired content and format for each data field 8. Once you complete data entry and/or product reaches a data quality score of 75 or greater, click Save. 9. Click Certify and Send to publish the item when you are satisfied with your product data. 10. If you have a similar product with only slight differences, you can create a copy of single items to start with a prepopulated item. The create copy button is located at the top right of the single item edit form. The new item will have identical attribute values and digital assets To secure the copy, the user must save the copy under a new product identifier You can use the Bulk Item Edit page to edit multiple items in one view within the portal.


30 From the Products page, select two or more products and click the Edit icon to navigate to the Bulk Item Edit page. This method enhances efficiency and improves clarity when working with larger product sets. 1. Within the Bulk Item Edit page you can view multiple items to enter or correct product data. 2. Fulfill all required attributes for each product data tab at the top. 3. To expedite the process, use the Copy Down icon, located on the Action Bar, to copy a response throughout multiple product data fields under the same column heading. 4. When the product data is complete and reaches a data quality score of 75 or above, click Save to properly secure your progress. a. Check and correct critical errors, labeled in red, or minor mistakes, labeled in yellow.


31 b. Some major errors, called Showstoppers, may prevent you from saving. Follow the prompts to resolve these issues, particularly when an item is missing a unique product ID. 5. Click Certify & Send, displayed as a thumbs up icon in the Action bar, to complete the process and share data from the selected products with your Authorized Recipients. You can export product data to edit offline for additional usability and the convenience of working in an excel (xml) document.

32 1. For existing product data sets, select the desired products from the Products or Requests tabs and click on the export icon in the left navigation bar. 2. Once selected, the export dialog box will pop-up. 3. First select if you would like to export online or offline. For product sets greater than 1000, we recommend utilizing the Offline Smart Spreadsheet function. A follow-up will be sent to notify you when the downloadable link is available to access from the Feeds History page. 4. If you selected to export Offline, in the next pop-up window click the Customize button to modify what attributes are included so that the file contains only relevant data. 5. Choose all necessary Classification Sheets to include in the Smart Spreadsheet.

.")


33 6. For products utilizing only Commerce data, de-select all fields EXCEPT Core Marketing Attributes, Additional Marketing Attributes, and Digital Assets. 7. For more information on Smart Spreadsheets, please continue reading under Download a new Blank Smart Spreadsheet (above). Product classification is the process of categorizing your product into a specific group. Each category has associated product attributes specific to its category. In order to view and edit Category specific attributes, you must first carefully classify your items. You can classify items in Smart Spreadsheets, Single item edit or Bulk item edit. In a Smart Spreadsheet, select the desired categories upon export, and populate the category tabs with the product(s) that you would like to classify in each category.


34 To classify an item in Single Item Edit, click on the No Master Classification link at the top of the Single Item Edit Page. From the Bulk Item Edit Page, click the No Master Classification link in the Category column. Clicking the No Master Classification link will display the Classification Select pop-up window, where you can search using a keyword or browse Edgenet s Master Class Taxonomy.
 Try alternative industry terms (Trimmer, Lopper, Pruner, Clipper, Cutter) Consider broader categories")

35 Helpful hints: Sort by description or product name to classify in groups Search on singular terms (Trimmer vs Trimmers) Try alternative industry terms (Trimmer, Lopper, Pruner, Clipper, Cutter) Consider broader categories and narrow search from there (i.e. adapters, connectors) Copy down category for products 1. Ensure that the Data Quality score is 75 or above. 2. Review Data Quality graph and progress bars, checking for correctness and completeness.


36 3. Fulfill all required attributes (global, category, and recipient data), then press Save. 4. Ensure there is an active subscription.


37 5. Certify & Send a. From the Bulk Item Edit page, highlight multiple items by hitting the Ctrl key and selecting products, then click the Certify and Send button to Certify in batches. b. From the Single Item Edit page, Certify a product individually by clicking the Certify and Send button from the Products page, select one or more products and click the Certify and Send icon. Data for products that are no longer manufactured are unlikely to change. Make sure the recipients have the latest data, then click Discontinue from the Action Bar. 1. Set the Discontinue dates for all selected products, provided none are currently discontinued. 2. The selected products will automatically Discontinue on the given date. 3. Data for discontinued products will continue to be sent to recipients until deletion date. To conclude the product lifecycle and terminate data transmission, select Delete. 1. Set delete dates for selected products. 2. Delete dates must be set for at least 7 days after discontinue. 3. This minimum 7-day cushion helps users avoid clerical mistakes regarding permanent product data removal. 4. The gap between Discontinue and Delete also provides ample time to notify any Retailers or Distributors connected to your product catalog system that this product data will no longer be available.
38 Active Subscriptions can be canceled to avoid sending new updates to the recipient. Discontinue and Delete will do this automatically. The prompt will require a reason for rejecting the request, which we will convey to the recipient. GDSN (Global Data Synchronization Network ) is a network of interoperable data pools. A data pool is a centralized data repository where all necessary information is managed to synchronize product data between trading partners. The GS1 Global Registry is a directory for the registration of unique catalog items and parties. GDSN data consists of logistical information about an item, including size, weight, dimensions and key shipping and receiving information. GDSN data is registered in the form of a catalog item. Catalog items can be of any packaging level, such as each, case or pallet. The data associated with catalog items is used in ordering and shipping systems to manage supply chain information with your trading partners. You can manage your GDSN alongside your Commerce/Marketing data within the Supplier Portal and utilize the GDSN interface for registering your party, items, publishing items and managing GDSN subscriptions. To enter your GDSN data, you can use any of the previously discussed methods: single item edit, bulk item edit, or Smart Spreadsheets. GDSN attributes can be found in a couple of locations within the Supplier Portal. In the Single Items Edit Core Product Data view, you can toggle to GDSN in the drop down at the top of the form. In Bulk Edit, GDSN attributes can be found in specific views under Recipient Data.


39 1. Finally, you can export GDSN attributes into a Smart Spreadsheet and import back into the system as described in the above Smart Spreadsheet sections. 2. Select appropriate GDSN views for the end point you are working with or general. For example, GDSN Mandatory for CIN. Packaging hierarchy will also need to be completed.


40 Packaging hierarchy defines how products are packaged and related to each other. Packaging hierarchy is defined through setting Trade Item Unit and relating Parents to Child items. For example, a base item is an Each item and it may have a Case parent, which may also have a Pallet parent. When designing packaging hierarchy, you must define the parent-child relationships along with the appropriate quantities. For example, there are 6 Each items in a Case; 10 Case items in a Pallet etc. You can designate packaging hierarchy through a tab within a Smart Spreadsheet or through the GDSN user interface.


41 First, you must register your GLN with the Global Registry; this is called Party registration. To do this, simply go to the GDSN tab in Supplier Portal, navigate to the Party Details page, update your account and contact information. When complete, click the Register Party button at the bottom and this will trigger a notification from Edgenet to the GS1 Global Registry to register your GLN.

42 Next, in order to receive GDSN subscriptions from your recipients you must first register your items. To register your items with the Global Registry, you can navigate to the GDSN Items page to see your full list of items. Select the items you wish to register then Choose Action as Register then click Go.


43 Finally, the last step to synchronize data with the network is to choose the items you wish to publish. 1. Within the GDSN Items page, select the Choose Action as Publish


44 2. Select the recipients to whom you wish to publish: SUPPLIER PORTAL USER GUIDE


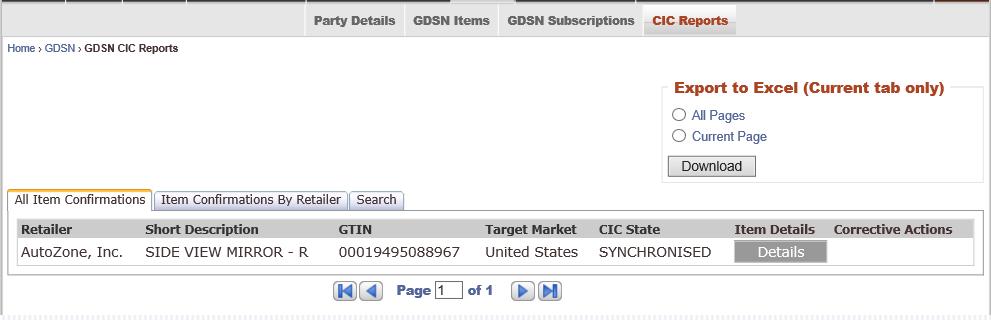
45 3. At this time, your item information will be validated against the standard GDSN validations and feedback will be provided. If updates need to be made, you will see a validation report. 4. Return to the Supplier Portal to edit your product information before submitting for publication. CIC reports can be accessed by clicking on the CIC Reports tab. These reports provide item confirmations or status by retailer. If the item has been rejected, requested corrective actions will be provided.


46
47 Home: Return to the Account Home page Products: Access the integrated system to input, edit, and manage all products Request: View, organize, and manage incoming product data requests Digital Assets: Open Digital Gallery to view and upload images, documents, and videos Feeds History: View imports and exports GDSN: Drop down menu provides instant access to GDSN functionality, without navigating through the Classic Supplier Portal* Help: Provides tips and information for users handling the Edgenet Supplier Portal In the top right header of the page, you will find the User Settings and Account Information link, pictured below as a Settings cog. The menu will direct you to several administrative functions within the site. User Admin: Manage the user profile and change password Supplier Preferences: Access Vendor and User Settings o On the Supplier Preferences page, you can manage several preferences for your user or supplier account including: Company information and Company dictionary Manage lists of MFG Name(s), Supplier Company Name(s), and MFG Brand Name(s) Manage Locations through adding Global Location Numbers
")

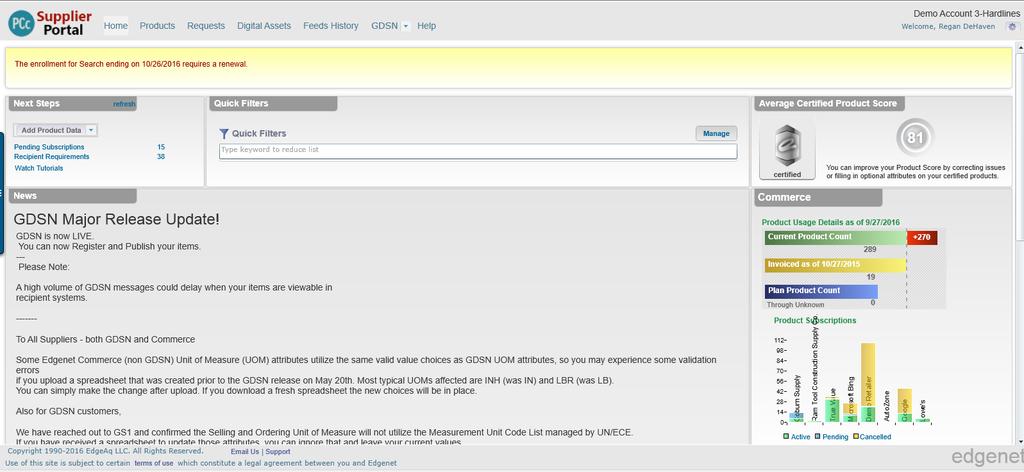
48 Manage Authorized Data recipients Manage Classification Systems Manage Additional attribute views (for individual users) Indicate Identifier to display for edit Account Admin: Dashboard manages services, billing, and users (administrators only) Navigate to Classic Version: Manage GDSN product registration and publication Help: Online support documentation, tutorials, FAQ, and videos Sign Out: Log out from Supplier Portal On the homepage, you can find product usage details for your commerce and GDSN plans.

49 Current Product Count- The number of products currently under the service. Directly under that is the number of products the user can add without incurring additional cost. Invoices to Date- The number of products at the specified date. Plan Product Count- The total number of products for which this service is available. On the right side, the graph details Active, Pending, and Cancelled Subscriptions with associated recipients.


50 The News section on your homepage will display important information or announcements, including information on Edgenet products, releases, or exciting events. The Next Steps section on your homepage displays filtered links to either Pending Subscriptions, Recipient Requirements, or New Product Requests along with counts of products for each. You can quickly chose items to work on in your Products page by clicking on the hyperlinks in this action box.


 Spreadsheet Template Directs you")

51 Within the Next Steps section, as well as from the Products page, an Add Product Data dropdown menu provide several options for methods to add product data into the portal. Add single product Add more than one product (bulk) Download a blank Excel (Smart) Spreadsheet Template Directs you to Single Item edit page Directs you to Bulk Item edit page Allows you to design and export a blank spreadsheet for data entry
 Provides a guided dialog to enter your claim code Guides you through")
 Provides a method for uploading PIES files into Edgenet system,")


52 I received an with a Claim Code Upload Smart Spreadsheet with my data Offline Smart Spreadsheet upload Upload PIES files (automotive) Provides a guided dialog to enter your claim code Guides you through uploading a spreadsheet with product data Allows for offline upload of products through a Smart Spreadsheet for large sets of product data (over 1000) Provides a method for uploading PIES files into Edgenet system, for additional editing or ability to export You can access the Feeds History page through the Homepage Navigation Bar The Feeds History Page displays all file requests in the last 60 days for both imports (PIES & XML) and exports (Excel, XML, & PIES) Type Export or Import Format File Excel, XML, or PIES type User Individual who created the original feed File Name Identifiable document title Submit Date Date and time that the feed was submitted Complete Date Date and time that the feed became available Status Pending or Complete # of Products Quantity in feed, which are labeled Successful, Failed, or Pending Download A link to the file for download
53 The filter bar allows you to easily search for products by limiting the data set through several different filter types. 1. To apply a filter, click on the desired tab, check the appropriate box, and click the Apply button. 2. To remove a filter, open the desired tab and click the Reset button. 3. To help keep track of active filters, selections appear under the Filter heading. If no filters have been applied, (None) will appear directly below the heading. 4. If no products satisfy the conditions of the set filter, the following message will appear: No products were returned based on your current filter settings. Change or clear your filter settings to display products. Filter Quick filters, available from the homepage or on the filter bar of the Products page, allow you to save frequently used filter combinations for future use. To create a quick filter 1. Create a your desired filter set on the products page. 2. Click on Quick Filter drop down 3. Select Save Current Filter set


54 To access previously saved Quick Filters 1. Click on Quick Filter dropdown and select desired Quick Filter, or 2. Click on Quick Filter on home page. The search feature allows you to search for a product or set of products based on specific attribute information, including: Product Name Internal Supplier Part # MFG Part # (OEM) GTIN- Global Trade Item Number (14-digit code: 00-UPC) UPC- Universal Product Code MFG Model # (Series) MFG Brand Name 1. Click Apply to launch filter with prescribed selections 2. Reset clears only the immediate filter 3. You can search for blank fields by selecting the box on the lower left, Check Selected Attributes for No Value


55 You can apply several different filters based on the categories below Recipient Data Quality score Certification Subscriptions Classification Under the filter bar, you will find several product grid shortcuts to make your data collection process easier or view custom to your needs.
 for export or bulk edit.")

56 From left to right Use CTRL-A to select all products on the page. Use this function if you would like to select all products on the current page view for export or bulk edit. All Selected radio buttons. Use these radio buttons to select ALL products (all pages) for export or bulk edit. The Selected radio button will be automatically populated if you have made specific selections. The number of total products and selected products is displayed next to the radio buttons for easy to view counts of your products. The products per page dropdown allows you to manage the number of products that displayed on each page of the Products page section of the portal. By clicking the grid icon, you can select which attribute columns that you would like to display on your Products page. This is custom to you and will be saved and remembered each time you log into the portal. The last section allows you to flip through your pages of products or select a specific page for viewing. You can use the arrows or type in a specific number and press the Go button.
PRODUCT CONTENT C LOUD SUPPLIER PORTAL USER GUIDE
 PRODUCT CONTENT C LOUD 2016 Table of Contents Adding Product Data...2 New Item Setup... 2 New Product Request... 2 Pending Subscriptions... 3 Single Item Edit... 4 Bulk Item Edit... 5 Export Smart Spreadsheet...
Fulfillment User Guide FULFILLMENT
 Fulfillment User Guide FULFILLMENT TABLE OF CONTENTS I. System Requirements II. Logging In III. Launchpad a. Home b. Profile c. Settings IV. Dashboard Tab a. Actionable Insights b. Open Orders V. Transactions
ECCnet ProSYNC EDI 832 Import Web Interface User Guide Version 1.0
 ECCnet ProSYNC EDI 832 Import Web Interface User Guide Version 1.0 CONTENTS FUNCTIONALITY OVERVIEW... 3 PRODUCT INFORMATION... 4 LOGGING INTO ECCNET PROSYNC EDI 832 IMPORT WEB INTERFACE... 4 LOADING AND
SPS Commerce Universal Catalog UNIVERSAL CATALOG SPS COMMERCE. Copyright SPS Commerce, Inc. All rights
 SPS Commerce 1 SPS COMMERCE UNIVERSAL CATALOG Copyright SPS Commerce, Inc. All rights 2 Table of Contents WELCOME... 3 LOGGING IN... 4 CREATING PRODUCT INFORMATION... 5 UPLOADING PRODUCT DATA IN A SPREADSHEET...
TrainingFinder Real-time Affiliate Integrated Network (TRAIN) Administrator Handbook. Version 3.2 (3/26/08) Public Health Foundation
 Administrator Handbook. Version 3.2 (3/26/08) Public Health Foundation") TrainingFinder Real-time Affiliate Integrated Network (TRAIN) Administrator Handbook Version 3.2 (3/26/08) Public Health Foundation Table of Contents About This Handbook 5 TRAIN Administrative Basics 6
TrainingFinder Real-time Affiliate Integrated Network (TRAIN) Administrator Handbook Version 3.2 (3/26/08) Public Health Foundation Table of Contents About This Handbook 5 TRAIN Administrative Basics 6
GS1 Data Source Healthcare. Web interface user manual for the healthcare sector
 Web interface user manual for the healthcare sector Release 3.1, Ratified, 14 August 2017 Document Summary Document Item Document Name Current Value GS1 Data Source Healthcare Document Date 14 August 2017
Commport Global Synchronization User Manual Version 2.3.2
 Commport Global Synchronization User Manual Version 2.3.2 User Guide Version 2.3.2 September 2009 0 Table of Contents Page 1.0 WHAT IS CGS? 2 2.0 GETTING STARTED 2 3.0 SITE ORIENTATION 2 4.0 UPLOADING
GS1 US Data Hub 3.2 Location User Guide
 GS US Data Hub 3. Location User Guide Note: This document is a compilation of individual help resources. Please see the source documents in the help center for the most current versions. Table of Contents
Supplier Reference Guide (QRG) Table of Contents
 Table of Contents") Supplier Onboarding Supplier Reference Guide (QRG) Table of Contents Supplier Checklist... 2 New Supplier Onboarding Steps... 3 Introduction... 4 Registration... 6 Certification... 16 Acceptance... 35
Supplier Onboarding Supplier Reference Guide (QRG) Table of Contents Supplier Checklist... 2 New Supplier Onboarding Steps... 3 Introduction... 4 Registration... 6 Certification... 16 Acceptance... 35
GS1Trade Sync Data Pool
 GS1Trade Sync Data Pool Data Source-Specific User Manual Version 0.43, Draft/Approved, 2016.05.17. Document Summary Document Item Document Name Current Value GS1Trade Sync Data Pool DS-Specific User Manual
CUMULUS WEB CLIENT USER ASSISTANCE 2014, CANTO GMBH. ALL RIGHTS RESERVED. Welcome!
 Cumulus is Canto s state-of-the-art Digital Asset Management solution. Cumulus makes it easy to quickly organize, find, share, and track all of your digital files: photos, logos, presentations, videos,
COMMUNITIES USER MANUAL. Satori Team
 COMMUNITIES USER MANUAL Satori Team Table of Contents Communities... 2 1. Introduction... 4 2. Roles and privileges.... 5 3. Process flow.... 6 4. Description... 8 a) Community page.... 9 b) Creating community
User Documentation. Administrator Manual.
 User Documentation Administrator Manual Proposal Software 1140 US Highway 287, Suite 400-102 Broomfield, CO 80020 USA Tel: 203.604.6597 www.proposalsoftware.com Table of Contents Open the WebPro Viewer...
User Manual. perfectionlearning.com/technical-support
 User Manual perfectionlearning.com/technical-support 1 User Manual Accessing Math X... 3 Login... 3 Forgotten Password... 3 Navigation Menu... 4 Logout... 4 Admin... 5 Creating Classes and Students...
Document control. Document version and change history. CPC User Guide v1.1 30/04/ Version Date Nature of change / comments Editors
 Product Catalogue Document control Document version and change history Version Date Nature of change / comments Editors v.1.0 13/03/18 Introducing the CPC User Guide K.Lai v.1.1 30/04/18 Updated item and
SPS COMMERCE UNIVERSAL CATALOG FOR RETAILERS
 SPS COMMERCE UNIVERSAL CATALOG FOR RETAILERS 2 Table of Contents WELCOME... 2 ITEM SEARCH... 3 CATALOGS...14 SCHEDULES...18 BASKET...34 Welcome Welcome to the SPS Commerce Universal Catalog Service. The
ConsumerTesting.com Online Applications Supplier Help Document
 ConsumerTesting.com Online Applications Supplier Help Document Online Application Help Page! of! 1 17 Online Application for Testing Help Document BEFORE STARTING... 3 ACCESSING THE ONLINE APPLICATION...
SharePoint 2010 Tutorial
 SharePoint 2010 Tutorial TABLE OF CONTENTS Introduction... 1 Basic Navigation... 2 Navigation Buttons & Bars... 3 Ribbon... 4 Library Ribbon... 6 Recycle Bin... 7 Permission Levels & Groups... 8 Create
Contents. Batch & Import Guide. Batch Overview 2. Import 157. Batch and Import: The Big Picture 2 Batch Configuration 11 Batch Entry 131
 Batch & Import Guide Last Updated: 08/10/2016 for ResearchPoint 4.91 Contents Batch Overview 2 Batch and Import: The Big Picture 2 Batch Configuration 11 Batch Entry 131 Import 157 Configure Import File
PCM - Product Content Management
 PCM - Product Content Management New Item Onboarding User Guide Ace-Help (a/k/a Servis Technology Group, Inc.) 2/13/2017 Ace Hardware s PCM New Item Onboarding User Guide provides a detailed review of
ILM Assessment Portal. Customer Guide
 ILM Assessment Portal Customer Guide 1 ILM Assessment Portal Customer Guide V1.1 This is a reference guide for the ILM Assessment Portal ( Portal ), ILM s online tool for Centre customers who use the ILM
Managing Your Website with Convert Community. My MU Health and My MU Health Nursing
 Managing Your Website with Convert Community My MU Health and My MU Health Nursing Managing Your Website with Convert Community LOGGING IN... 4 LOG IN TO CONVERT COMMUNITY... 4 LOG OFF CORRECTLY... 4 GETTING
Overview NOTE: Listing Overview. User Profile. Language Selection. Asset(s) View. Asset(s) Details. Editing Mode
 View. Asset(s) Details. Editing Mode") Overview Listing Overview User Profile Language Selection Asset(s) View Asset(s) Details Editing Mode NOTE: Some functions may not be available to all users depending on permissions granted. Some of the
Overview Listing Overview User Profile Language Selection Asset(s) View Asset(s) Details Editing Mode NOTE: Some functions may not be available to all users depending on permissions granted. Some of the
REPSPARK USER GUIDE 1
 REPSPARK USER GUIDE 1 TABLE OF CONTENTS INTRODUCTION 3 CREATING A LOGIN Creating a Username and Password 4 Reset Password 5 GETTING STARTED Editing Profile Information 4 PRODUCTS Product Availability 6
A Distributor Services Site Features and FAQ s
 A Distributor Services Site Features and FAQ s October 2015 Rev 2.12 Table of Contents Registering/Logging in Page 3 Services Available after Logging In Page 4-5 Frequently Asked Questions Page 6 Log In
MyFloridaMarketPlace. equote Training State Agencies
 MyFloridaMarketPlace equote Training State Agencies 1 What is an equote When to use an equote Benefits Creating an equote Managing equotes Awarding & Viewing Results Resources Agenda What is an equote
National Product Catalogue Publisher User Guide Part Four
 Title National Product Catalogue Publisher User Guide Part Four Version 2.30 Date December 2017 Doc type Access User Guide Restricted Use for NPC Subscribers Only GS1 Australia Document Purpose The purpose
Sourcing - How to Create a Negotiation
 Martin Baker Secure Source-To-Pay Sourcing - How to Create a Negotiation December 07 Contents To Create a Project... To Create a Negotiation... 5 Attachments... 7 Private File Archive... 7 Creating Lines,
Table of Contents. 2 P a g e A I M Q U I C K R E F E R E N C E G U I D E
 May 2017 Table of Contents Introduction... 3 Accessing the My ARKIVE Portal... 3 The Dashboard... 4 Accessing AIM... 4 Searching/Filtering Inventory... 5 Adding New Inventory. 9 Work Orders... 11 Adding
ASTRA USER GUIDE. 1. Introducing Astra Schedule. 2. Understanding the Data in Astra Schedule. Notes:
 ASTRA USER GUIDE 1. Introducing Astra Schedule Astra Schedule is the application used by Academic Space Scheduling & Utilization to schedule rooms for classes and by academic colleges, schools, and departments
Customer User Guide Commercial Online Access
 Customer User Guide Commercial Online Access Getting Started To access the customer portal, enter the following URL: nationwide.com/agclient Once you access this site, save it as a Favorite on your computer
User Guide Respond to Request for Information (RFI)
") OVERVIEW This User Guide describes how Suppliers participates in Request for Information (RFI) events related to Pre- Qualification, Category Related Qualifications, Sourcing Pre-Screenings or Communications
OVERVIEW This User Guide describes how Suppliers participates in Request for Information (RFI) events related to Pre- Qualification, Category Related Qualifications, Sourcing Pre-Screenings or Communications
EMS MASTER CALENDAR User Guide
 EMS MASTER CALENDAR User Guide V44.1 Last Updated: May 2018 EMS Software emssoftware.com/help 800.440.3994 2018 EMS Software, LLC. All Rights Reserved. Table of Contents CHAPTER 1: Introduction to the
STUDY ASSISTANT. Adding a New Study & Submitting to the Review Board. Version 10.03
 STUDY ASSISTANT Adding a New Study & Submitting to the Review Board Version 10.03 Contents Introduction... 3 Add a Study... 3 Selecting an Application... 3 1.0 General Information... 3 2.0 Add Department(s)...
End-User Reference Guide El Camino College Compton Center
 End-User Reference Guide El Camino College Compton Center OU Campus Version 10 OmniUpdate, Inc. 1320 Flynn Road, Suite 100 Camarillo, CA 93012 OmniUpdate, Inc. 1320 Flynn Road, Suite 100 Camarillo, CA
Lava New Media s CMS. Documentation Page 1
 Lava New Media s CMS Documentation 5.12.2010 Page 1 Table of Contents Logging On to the Content Management System 3 Introduction to the CMS 3 What is the page tree? 4 Editing Web Pages 5 How to use the
Expense: Process Reports
 Expense: Process Reports User Guide for Standard Edition Applies to these SAP Concur solutions: Expense Professional/Premium edition Standard edition Travel Professional/Premium edition Standard edition
BBVA Compass Spend Net Payables
 User Guide BBVA Compass Spend Net Payables User Guide Vault Services Table of Contents Introduction 2 Technical Requirements 2 Getting started 3 Sign In 3 General Navigation 4 Upload/Create Payment 5
User Guide. Avery Dennison Web Ordering Solution for Steinmart
 User Guide Avery Dennison Web Ordering Solution for Steinmart March 2012 Copyright 2012 A very Dennison The information in this document is subject to change without notice and should not be construed
Provider User Guides
 Provider User Guides Table of Contents What's New... 1 Overview of Changes:... 1 User Interface Changes... 2 Data Model Changes... 2 First Time Logging In... 5 SmartCare Basics... 9 Open a Client... 13
Page Topic 02 Log In to KidKare 02 Using the Navigation Menu 02 Change the Language
 Page Topic 02 Log In to KidKare 02 Using the Navigation Menu 02 Change the Language help.kidkare.com 03 Enroll a Child 03 Withdraw a Child 03 View Pending and Withdrawn Children 04 View Kids by Enrollment
Validoo Item Operations Manual
 Validoo Item Operations Manual Contents 1 Log of changes... 3 2 Introduction... 3 2.1 Validoo Item Operations Manual... 3 2.2 GDSN Operations Manual... 3 3 Description of publication and subscription process...
Test Information and Distribution Engine
 SC-Alt Test Information and Distribution Engine User Guide 2018 2019 Published January 14, 2019 Prepared by the American Institutes for Research Descriptions of the operation of the Test Information Distribution
Episerver CMS. Editor User Guide
 Episerver CMS Editor User Guide Episerver CMS Editor User Guide 17-2 Release date 2017-03-13 Table of Contents 3 Table of contents Table of contents 3 Introduction 11 Features, licenses and releases 11
IBM Sterling Data Synchronization Manager. User Guide. DocumentationDate:12October2012
 IBM Sterling Data Synchronization Manager User Guide DocumentationDate:12October2012 IBM Sterling Data Synchronization Manager User Guide DocumentationDate:12October2012 Note Before using this information
Guide for Researchers: Online Human Ethics Application Form
 Guide for Researchers: Online Human Ethics Application Form What is Quest Quest is our comprehensive research management system used to administer and support research activity at Victoria University.
Angus AnyWhere. Tenant Service Request User Guide J U L Y
 Angus AnyWhere Tenant Service Request User Guide J U L Y 2 0 1 7 L o g i n t o A n g u s A n y W h e r e a t : w w w. n g 1. A n g u s A n y W h e r e. c o m Angus Systems Client Support All web interfaces
Table of Contents. Introduction Technical Support Getting Started Data Synchronization General Website Settings...
 E-Commerce Table of Contents Introduction... 1 Technical Support... 1 Introduction... 1 Getting Started... 2 Data Synchronization... 2 General Website Settings... 3 Customer Groups Settings... 4 New Accounts
AiM Overview and Basic Navigation User Guide
 AiM Overview and Basic Navigation User Guide East Carolina University Department of Facilities Services Version 2.0 May 2017 1 AIM OVERVIEW AND BASIC NAVIGATION USER GUIDE Welcome to AiM! AiM, "Intelligence
Printable Documentation
 Printable Documentation The complete text of the Online Help Updated April 10, 2007 Table Of Contents Administrative... 1 Add a picture to your Agent Profile... 1 Add a bio to your agent profile... 1 Add
isupplier User Guide
 isupplier User Guide isupplier User Guide Last Update 02032017 PURCHASING DEPARTMENT MARK A. BOOKER, DIRECTOR 501 S. JUPITER ROAD GARLAND, TEXAS 75149 972-487-3009 Garland Independent School District isupplier
Network Rail Brand Hub USER GUIDE
 Network Rail Brand Hub USER GUIDE The Brand Hub Using keywords, visual thumbnails and a more upto-date online interface, the new Brand Hub will make searching, browsing and downloading images, templates
SCP Embraer Supplier Guide
 SCP Embraer Supplier Guide Revised 1 Contents Introduction... 5 Getting Started... 5 How to Log In to SCP... 5 Steps to Complete First Time Login... 6 Steps to Log-in to SCP... 7 General Navigation and
Confluence User Training Guide
 Confluence User Training Guide Below is a short overview of wikis and Confluence and a basic user training guide for completing common tasks in Confluence. This document outlines the basic features that
Guide for Researchers: Online Human Ethics Application Form
 Ethics & Integrity Research Office HUMAN RESEARCH ETHICS ONLINE APPLICATION October 2016/V1.03 Guide for Researchers: Online Human Ethics Application Form ENQUIRIES Senior Human Ethics Officer University
Course Alteration and Deletion
 Course Alteration and Deletion The proposal forms within Curriculog are based on the previous paper versions of the forms. The following general directions are for: Deletion of an Existing Course LEVEL
Welcome to the Investor Experience
 Welcome to the Investor Experience Welcome to the Black Diamond Investor Experience, a platform that allows advisors to customize how they present information to their clients. This document provides important
PlanWell 4.0 User Guide
 PlanWell 4.0 User Guide Contents Finding Planwell and Logging On 2 Planwell Access Portals 2 Document Selection 3 Build a Set 4 Most Current Set 4 Custom Packages 4 Issue Tree 5 Standard Order Process
WORDPRESS USER GUIDE HWDSB Websites
 WORDPRESS USER GUIDE HWDSB Websites Table of Contents Forward - About Wordpress... 3 1. Getting Started... 5 1.1) Log into your account... 5 1.2) About the Dashboard... 6 1.3) Internal vs. External Views...
CHEP Portfolio+Plus 1.3. User Guide V March 2010
 CHEP Portfolio+Plus 1.3 User Guide V 1.0 17 March 2010 Table of Contents Chapter 1: Introduction to Portfolio+Plus 1 1.1 Welcome... 2 1.2 Glossary... 3 1.3 Register for Portfolio+Plus... 6 1.4 Getting
Instructional Technology & Technology Enhancement Center -itec Grade Center Tutorial for Faculty
 Instructional Technology & Technology Enhancement Center -itec Grade Center Tutorial for Faculty Grade Center: Several changes have been made in new Grade Center including new icons. Note that grade center
FOUR SEASONS MARKETPLACE BUYER TRAINING
 FOUR SEASONS MARKETPLACE BUYER TRAINING Table Of Contents 1. INTRODUCTION... 2 2. LOGIN SCREEN... 3 3. FRONT PAGE... 5 3.1 LOGO PANEL... 6 3.2. SEARCH PANEL... 9 3.3 FRONT PAGE TABS... 10 3.4 CATALOGS
User Guide. Chapter 6. Teacher Pages
 User Guide Chapter 6 s Table of Contents Introduction... 5 Tips for s... 6 Pitfalls... 7 Key Information... 8 I. How to add a... 8 II. How to Edit... 10 SharpSchool s WYSIWYG Editor... 11 Publish a...
Printable Help. The complete text of the MLS Online Help
 Printable Help The complete text of the MLS Online Help Updated June 12, 2017 Table of Contents Table of Contents 2 Accessing the MLS 11 Access Edge MLS from a Mobile Device 11 Log On or Off the MLS 11
Order Entry Guide Table of Contents
 Table of Contents Introduction... 2 Home Page Features... 2 My Profile menu... 2 Personal Information option... 2 Personal Address Book option... 3 Settings and Preferences option... 3 Custom Fields option
Administrative Training Mura CMS Version 5.6
 Administrative Training Mura CMS Version 5.6 Published: March 9, 2012 Table of Contents Mura CMS Overview! 6 Dashboard!... 6 Site Manager!... 6 Drafts!... 6 Components!... 6 Categories!... 6 Content Collections:
Oracle isupplier. Supplier User Guide
 Supplier User Guide Table of Contents isupplier Application, Help and Support... 3 Registration... 3 For Help... 3 Overview... 4 User Registration... 5 Login to isupplier... 7 isupplier and Sourcing Responsibility
User Guide. Product Design. Version 2.2.2
 User Guide Product Design Version 2.2.2 Table of Contents Bridge User Guide - Table of Contents 1 TABLE OF CONTENTS... 1 INTRODUCTION... 4 Guide... 4 PRODUCTS... 5 Creating a New Product... 5 Viewing and
User Guide. Version
 User Guide Version 0.19 2-11-2008 StormPro Max User Guide Page 1 of 69 5/10/2008 Table of Contents 1. Overview... 4 1.1 Definition of StormPro Max Terms... 4 2. Accessing StormPro Max... 5 3. Navigating
Icon Directory. Action Icons. Icon Name Description
 Icon Directory The icons found on the various MasterControl pages are listed according to their general location on a given page. For instance, Action Icons usually are found in columns headed "Action".
Product Information Manager PIM. How to Create Smartsheet Single Items
 Product Information Manager PIM How to Create Smartsheet Single Items Smartsheet item information Smartsheet item is for data that is for singe items not for online IF Online use the ECOMM Item smartsheet
ReadyTalk for Marketo User Guide
 ReadyTalk for Marketo User Guide Revised 11/24/2015 Contents Configuring ReadyTalk & Marketo... 3 Setting Up Your Event in ReadyTalk... 5 Setting Up Your Event in Marketo... 7 Creating a New Program...
MaintScape Training Course Table of Contents
 MaintScape Training Course Table of Contents Table of Contents... 1 Training Course Requirements... 3 Overview and Main Modules... 3 Search Window... 4 Reports are produced from the Search Window... 6
Microsoft Office 2016 Mail Merge
 Microsoft Office 2016 Mail Merge Mail Merge Components In order to understand how mail merge works you need to examine the elements involved in the process. In any mail merge, you'll deal with three different
Batch and Import Guide
 Batch and Import Guide 06/13/2017 Blackbaud Altru 4.96 Batch and Import US 2017 Blackbaud, Inc. This publication, or any part thereof, may not be reproduced or transmitted in any form or by any means,
QuickStart Training Guide: The Accounting Review Role
 Accounting Review Role Final Approval of Expense Reports If you are an Accountant who is using ExpensAble Corporate to make final approval of employees expense reports, this information is for you. This
Membership Portal Manual
 Membership Portal Manual Table of Contents Login... 4 Contact Tab... 6 Contact Information Dropdown...6 Features on the Contact Information Dropdown... 6 Account Information Dropdown...6 Features on the
Welcome to the Vale Vendor Portal Guide
 Welcome to the Vale Vendor Portal Guide 1. Introductory 1.1 How to access? 1.2 Presenting the Portal 2. Onboarding Process 3. Negotiate Module 4. Purchase Module 5. Payment Module 1. Introductory Main
Quick Start Guide - Contents. Opening Word Locating Big Lottery Fund Templates The Word 2013 Screen... 3
 Quick Start Guide - Contents Opening Word... 1 Locating Big Lottery Fund Templates... 2 The Word 2013 Screen... 3 Things You Might Be Looking For... 4 What s New On The Ribbon... 5 The Quick Access Toolbar...
COPYRIGHT No part of this publication may be reproduced without the express written consent of GS1 Australia Ltd or GS1 New Zealand.
 Browser Template Data Maintenance Guide DISCLAIMER Every possible effort has been made to ensure that the information in this document is correct, however GS1 Australia and GS1 New Zealand expressly disclaims
2013, Active Commerce 1
 2013, Active Commerce 1 2013, Active Commerce 2 Active Commerce User Guide Terminology / Interface Login Adding Media to the Media Library Uploading an Item to the Media Library Editing the Media Meta
The guide for the Merrill Mobile catalog available for tablet-based devices. Version 3.0
 User Guide The guide for the catalog available for tablet-based devices. Version 3.0 Table of Contents General Information... 3 Setup: At a Glance...4 Current ipad and Tablet Users... 5 For ipad: Step
User Guide. Kronodoc Kronodoc Oy. Intelligent methods for process improvement and project execution
 User Guide Kronodoc 3.0 Intelligent methods for process improvement and project execution 2003 Kronodoc Oy 2 Table of Contents 1 User Guide 5 2 Information Structure in Kronodoc 6 3 Entering and Exiting
Getting Around. Welcome Quest. My Fundraising Tools
 As a registered participant of this event, you have a variety of tools at your fingertips to help you reach your goals! Your fundraising center will be the hub for managing your involvement and fundraising
INAB CAB Portal User Guide
 INAB CAB Portal User Guide CRM 2 INAB Cab Portal User Guide CRM Documentation Issue 2 June 2018 Contents 1. Login...4 1.1. Set up Portal password... 5 1.2. Login... 6 1.3. Forgot my password... 7 1.4.
Attorney Training Manual
 Attorney Training Manual Contact Information Phone Number: -855-264-2237 Email: efilingsupport@judicial.state.co.us Revised May 207 Table of Contents LOGIN / REGISTER ORGANIZATION... 2 NAVIGATION BAR...
Division of Alcoholic Beverages and Tobacco. Beer Manufacturer s Monthly Report
 Division of Alcoholic Beverages and Tobacco Beer Manufacturer s Monthly Report Logging Into EDS Log in with the user id and password provided through the EDS registration process and click on the Login
Online Requesting and Receiving. Training Manual
 Online Requesting and Receiving Training Manual 1 Table of Contents Introduction 3 Logging In.3 Creating a Profile...3 Modifying a Ship to Address...3 FOAPAL and Commodity Codes 3 Code Favorites...3 Understanding
Microsoft Windows SharePoint Services
 Microsoft Windows SharePoint Services SITE ADMIN USER TRAINING 1 Introduction What is Microsoft Windows SharePoint Services? Windows SharePoint Services (referred to generically as SharePoint) is a tool
Shopper Guide v.3: 3/23/16
 Shopper Guide v.3: 3/23/16 SMARTOCI: ADMINISTRATOR Table of Contents 1) Getting Started...4 What is smartoci?...4 Shopper Browser Versions...5 Logging in...6 Issues Logging In (smartoci Access Issues)...6
User Manual. Administrator s guide for mass managing VirtueMart products. using. VM Mass Update 1.0
 User Manual Administrator s guide for mass managing VirtueMart products using VM Mass Update 1.0 The ultimate product management solution for VirtueMart! Contents Product Overview... 3 Feature List...
SCOUT SUSPENSE TRACKER Version 10.0
 SCOUT SUSPENSE TRACKER Version 10.0 USER S MANUAL For Civilian Personnel Management Service (CPMS) HPC-COM LLC Help Desk 800-795-1902 Updated: February 2011 Table of Contents SCOUT Suspense Tracker V10.0
For EWay.com users. EWay Navigation. Accessing EWay. Logging in to EWay. Forgot Password or User ID. EWay Online Catalog Navagation B
 Reference reference guide. Accessing EWay 1. Launch your Web Browser. 2. Click in the Address fi eld. 3. Type www.eway.com. 4. Press the Enter key. Logging in to EWay 1. Enter your User ID in the fi eld
TEACHER PAGES USER MANUAL CHAPTER 6 SHARPSCHOOL. For more information, please visit: Chapter 6 Teacher Pages
 SHARPSCHOOL USER MANUAL CHAPTER 6 TEACHER PAGES For more information, please visit: www.customernet.sharpschool.com 0 TABLE OF CONTENTS 1. 2. 3. 4. 5. 6. 7. 8. 9. 10. 11. INTRODUCTION... 1 I. TEACHER PAGE
CareDx Customer Web Portal User Guide Version 3.6.3
 CareDx Customer Web Portal User Guide Version 3.6.3 Copyright Notice CareDx, Inc, 3260 Bayshore Blvd, Brisbane, CA 94005 Copyright 2015 CareDx All rights reserved. This document is protected by the copyright
PlanWell Enterprise. User Manual
 PlanWell Enterprise User Manual 1 Table of Contents Finding PlanWell and Logging On... 4 Public Projects... 5 Guest Access... 5 Login to your Account... 6 Populating Shopping Cart... 6 Most Current Set...
Goddess Purchasing Portal Quick Reference Guide. Welcome to the Goddess Purchasing Portal!
 Goddess Purchasing Portal Quick Reference Guide Welcome to the Goddess Purchasing Portal! URL http://www.goddessproductsinc.com/arkansas.html Login Password Your HSU Email Addres Welcome1 (case sensitive)
OM Marketplace. October, 2017
 OM Marketplace October, 2017 1 CONTENTS Contents Page # OM Marketplace Basics 3 About OM Marketplace 4 Login 5 User Preferences 8 Order Management 17 Place An Order 18 Quick Key 27 Upload Order 29 View
Beginner Workshop Activity Guide 2012 User Conference
 Beginner Workshop Activity Guide 2012 User Conference TUESDAY, MARCH 6 2:00PM 5:00 PM Beginner Training Workshop Attendees will learn the end user functions of OU Campus TM. They will learn how to log
e-journal Entry Quick Reference Guide Table of Contents
 Table of Contents The e-journal Process................................................................ 2 Preparing an e-journal............................................................... 3 Overview