Raspberry Pi Setup Tutorial
|
|
|
- Rebecca Barrett
- 5 years ago
- Views:
Transcription
1 Raspberry Pi Setup Tutorial The Raspberry Pi is basically a miniature linux- based computer. It has an ARM processor on it, specifically the ARM1176JZF- S 700 MHz processor. This is the main reason why we are using the Pi for CSE30! This tutorial aims at teaching you how to setup your Pi with your laptop (not the lab machines) using a direct Ethernet connection between the two. Note 1: Other slightly different methods may work, but it s not guaranteed, and you ll be on your own. Note 2: You can use your Raspberry Pi as a desktop if you have access to a monitor with HDMI input, a USB mouse, USB keyboard and a direct Ethernet connection to your home router. Follow the tutorial below to setup: started- with- raspberry- pi- lesson/ If you are satisfied with this configuration, you don t have to go through the rest of this tutorial. However, if you would like to connect to your Pi from your laptop using a direct Ethernet connection, please read on. We begin with a few important notes on how to behave with your Pi. Note 3: ONLY make or remove any connection when the Pi s power is OFF (see Step 1 below). Note 4: ONLY remove or plug- in the SD card from/to the Pi when the Pi OS (Raspbian) has been properly shut down, and the PI s power has been removed. Otherwise it is likely that the information on the card will be corrupted, and you ll have to re- load the Pi with a clean image (contents, including the OS). Also note that if the SD card is corrupted, it is likely that you will have lost any information of your own, like your programs, that were on the card. Backup early, backup often. 1. Put the correct OS image on your SD card. To do this, you will need an SD card reader on your laptop. If you don t have access to one, contact a TA or the instructor. Be sure to bring your SD card with you. If you have a SD card reader on your laptop, keep reading. Note: You have to do this step only once (initially) or if your SD card gets corrupted. 2. Burn the image onto the SD card. On the MAC OSX, you can use the ApplePiBaker app to do this, which is available for download here: pi/macosx- apple- pi- baker/ 3. Make sure you eject your SD card properly before physically removing it from the laptop s SD card reader. 4. Power off the Pi by removing its power supply connector (micro- USB), if it isn t already. 5. Remove all other connections from the Pi


2 6. Connect the Ethernet cable between the Pi and your laptop computer 7. On your laptop: Give a static IP address to the Ethernet port of your laptop, specifically use To do this on a MAC OSX, you need to go to System Preferences- > Ethernet and set the static IP as shown in the image below: For Windows users, go to the start menu and search for Network and Sharing Center, and then click on change adapter settings on the left. Right click on your Ethernet or local area connection and click properties, then scroll down to TCP/IPv4 and click properties. Fill out the IP and subnet as shown.
3 8. Plug in your SD card into the Pi and power it on by plugging its supply into the micro- USB socket. (DO NOT plug the connector into a USB socket, with or without an adapter.) 9. It will take many seconds for the Pi to finish booting to its OS (Raspbian) and then successfully coming up on the network. [Sequence of events as indicated by the Pi s LED indicators: a. Power LED (red) lights continually after power supply is plugged in. b. ACTivity LED (yellow) blinks randomly while OS boots, and actually whenever the Pi is running a program (the OS is a program). 10. After the Pi s activity light blinks for about seconds, it will be ready to connect to it remotely from another computer. 11. Connect to the Pi from your laptop using SSH. If you are a MAC user you can use the ssh command as follows: a. Open a terminal/command window on the PC. b. Enter the following command on the command line in the window: ssh pi@spispis-30xxx.local c. If you get a host name unresolved error, try ssh pi@ If you are a Windows user, download Putty and open putty.exe. Type in pi@ (the IP address of the Raspberry Pi) in the host name field and make sure the SSH bubble is clicked so it looks like the picture below:

4 a. If all is well, you will be prompted for your password. When a password is requested (almost immediately) enter: raspberry, which will be displayed as: ********* or nothing at all. b. If successful, a new line will appear in the Pi s terminal window containing the Pi s command prompt, which will include the Pi s hostname as well as other information as shown below:
5 12. If you get here, you are now talking to the Pi from your laptop via Ethernet. You can enter any Raspbian- OS command, as well as execute your own programs written for the Pi. 13. Running Raspbian- OS commands a. Enter: ls la. A list of the contents of your home directory will appear, including file/directory names, as well as other info whose definitions can be found elsewhere (enter: man ls less ; hit a space to go forward a page, the character b to go back a page, and the character q to quit the display program). b. Enter: uname a. The hostname rpi will appear along with other info. 14. Change the hostname to make it unique. (At a later point you may choose to connect to your Pi via the campus WiFi, in which case the WiFi will get confused if multiple Pis show up with the same hostname, and bad things will happen.) a. In the Pi s terminal window enter: sudo raspi-config. b. A menu will appear. Use the down/up- arrow keys to choose an option. Choose: advanced configurations. Use the tab key to highlight the select field and hit the Enter or Return, etc., key. c. Another menu will appear. Choose: A2 as in the prior step, select it, and follow the prompts to enter a new hostname, which is (GOTO the next step). d. Decide on a new hostname. It MUST be unique. It may have the form: spispis-30xxx, where XXX is the unique part of your cse30 account on ieng6. If you want to connect to your pi using the hostname on the campus wifi, you should precede the host name with spispis- 30. Be sure to give a unique hostname as directed above e. Next you should change your password using the same raspi- config tool. Make sure you write down your password somewhere and don t forget it. f. The graphical interface will ask you if you would like to reboot select Yes g. If you selected No by mistake for the above question, then explicitly reboot by typing the command sudo shutdown h now on the Pi s command line interface.
6 15. On the next boot, look at the Pi s command prompt: its new hostname (spispis-30xxx) should be part of it. 16. Want a graphical desktop interface? If you prefer to work using a graphical interface, install a remote desktop application on your laptop. I recommend CoRD for MAC OSX users. You can download it here: On windows you can use the built in Remote Desktop Connection application (search for it in the start menu). 17. Once you have ssh- ed into the Pi as described previously, Enter vncserver on the command line of your Pi. You should see the output as follows: On a mac, use CoRD to connect to the Pi with its new hostname (spispis- 30XXX). On windows use Remote Desktop Connection and connect to Pi with the same IP address used to SSH in ( ). Enter your login credentials pi and password raspberry,as before. You should be able to see the graphical interface as shown below:
 where you have given a unique name to your pi with the prefix spispis- 30. Also make sure you have changed the password from raspberry.")
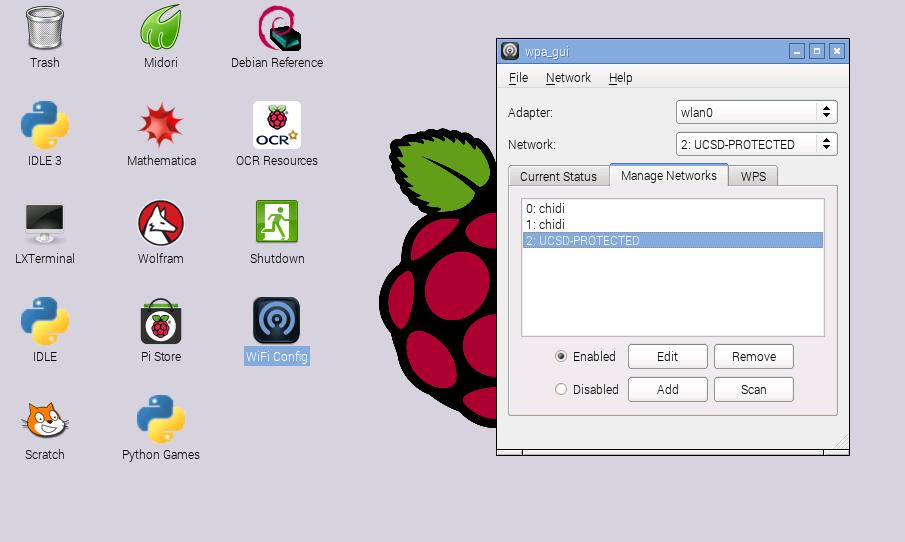
7 Now you can use the LXTerminal to program or explore connecting to your Pi over WiFi by clicking on the WiFi Config icon. 18. Configuring the WiFi on Campus Wifi. First make sure you have completed step 14(d) where you have given a unique name to your pi with the prefix spispis- 30. Also make sure you have changed the password from raspberry. Also make sure you have access to campus WiFi. If you are on a home network, you will need different configurations (see step 19). To configure the Wifi, first plug in the wifi dongle into one of the USB ports of the Pi. The power up the Pi. Connect to the Pi via remote desktop as before (following step 17). Open the WiFi Config tool on the desktop. a. Under Manage Networks, click on Scan. This should show you the different UCSD_PROTECTED stations that you can connect to. Click on the one with the best signal strength. This will allow you to configure your setting. b. Use the configuration settings in the picture below, replacing dimirza with your AD directory name and Password with your password. Click the Save button. c. Click on the Current Status tab and wait until you get a stable IP address. You may experience a cycling behavior where an IP address is obtained and then lost again. Just wait for it to stabilities. d. Shutdown using the command sudo halt at the terminal and restart your Pi e. You should now be able to remotely connect to the Pi using the hostname spispis- 30xxx.dynamic.ucsd.edu Try to remotely ssh to your Pi using this host name. From this point on you would not need the Ethernet cable as long as your Pi is connected to the Wifi network
8

9 Configurations for connecting to campus WiFi

10 WiFi configurations for home network. WiFi Access point is called chidi in this case 19. To configure the WiFi for your home network use the settings in the above picture. If you are connected on your home WiFi network, you cannot ssh into your pi using the spispis- 30xxx.dynamic.ucsd.edu host name. If you don t have an Ethernet cable, you can discover your Pi s IP. If you have a MAC, open a terminal and type ping Following that type arp a. One of the IP addresses that shows up is your Pi s and you should be able to connect to it. 20. Important: Always do a clean shutdown, power- off and remove the SD card as follows: a. On the Pi s command line enter: sudo shutdown h now. This puts the Pi s OS in a nice state to have power removed. It takes a few seconds. Wait for the Pi s terminal window to either disappear, or a message on your laptop s desktop to appear saying something about a stopped network connection. Wait 10 seconds. b. Power- off the Pi by unplugging the power cable (from micro- USB) connector. c. Wait 20 seconds (count to 20). This lets the energy stored in the Pi s electronic components dissipate to ground, making it safe to remove components/cables from the Pi. (Otherwise the SD card may be corrupted, or in an unlikely scenario, physical damage will have occurred.) d. Remove the SD card from the Pi. Make a copy of it. 21. Now you are all set to have fun programming the Pi!!
11 Acknowledgments: I would like to thank Prof. Gus Uht and Ben Martin for help with preparation of this document.
RETROPIE INSTALLATION GUIDE
 RETROPIE INSTALLATION GUIDE CONTENTS THE FOLLOWING GUIDE WILL COVER THE INSTALLATION, SETUP AND CONFIGURATION OF THE RASPBERRY PI, RASPBIAN OS AND RETROPIE Author: http://rpiarcadebuild.wordpress.com/
Lab 0: Intro to running Jupyter Notebook on a Raspberry Pi
 Lab 0: Intro to running Jupyter Notebook on a Raspberry Pi Nick Antipa, Li-Hao Yeh, based on labs by Jon Tamir and Frank Ong January 24, 2018 This lab will walk you through setting up your Raspberry Pi
Adafruit's Raspberry Pi Lesson 6. Using SSH
 Adafruit's Raspberry Pi Lesson 6. Using SSH Created by Simon Monk Last updated on 2017-08-16 01:12:07 AM UTC Guide Contents Guide Contents Overview Enabling SSH Using a blank boot file Using Raspi-Config
Sigma Tile Workshop Guide. This guide describes the initial configuration steps to get started with the Sigma Tile.
 Sigma Tile Workshop Guide This guide describes the initial configuration steps to get started with the Sigma Tile. 1 Contents Contents... 2 Chapter 1: System Requirements... 3 Chapter 2: Configure Your
Adafruit PiUART - USB Console and Power Add-on for Raspberry Pi
 Adafruit PiUART - USB Console and Power Add-on for Raspberry Pi Created by lady ada Last updated on 2017-08-29 10:20:23 PM UTC Guide Contents Guide Contents Overview Pinouts Enabling Serial Console Option
Adafruit's Raspberry Pi Lesson 1. Preparing an SD Card for your Raspberry Pi
 Adafruit's Raspberry Pi Lesson 1. Preparing an SD Card for your Raspberry Pi Created by Simon Monk Last updated on 2016-12-03 03:20:15 AM UTC Guide Contents Guide Contents Overview You Will Need Downloading
SETTING UP SSH FOR YOUR PARALLELLA: A TUTORIAL FOR STUDENTS
 SETTING UP SSH FOR YOUR PARALLELLA: A TUTORIAL FOR STUDENTS Written by Dr. Suzanne J. Matthews, CDT Zachary Ramirez, and Mr. James Beck, USMA ABOUT THIS TUTORIAL: This tutorial teaches you to access your
Rapoo E6700 Setup Instructions
 Rapoo E6700 Setup Instructions Setup Using GUI (NOOBS/Raspbian) 1. Insert SD card into Raspberry Pi. 2. Connect HDMI cable from Raspberry Pi to monitor. 3. Connect a standard USB keyboard and mouse into
RaspiDigiHamClock. Raspberry Pi Amateur Radio Digital Clock. v WA4EFH R.Grokett
 RaspiDigiHamClock Raspberry Pi Amateur Radio Digital Clock v2018-07-08 WA4EFH R.Grokett Overview Amateur Radio Operators (aka HAM Radio) use 24 hour UTC (Universal Coordinated Time) for much of their operation.
XLink Kai Raspberry Pi Beginners Tutorial
 XLink-Kai-Raspberry-Pi-Beginners-Tutorial.md XLink Kai Raspberry Pi Beginners Tutorial Hi! This tutorial will guide you through setting up XLink Kai on a Raspberry Pi to play multiplayer system link Xbox
Raspberry Pi NTP Clock Setup Guide
 Raspberry Pi NTP Clock Setup Guide Several steps are involved in getting your Raspberry Pi to operate as a NTP Clock. To begin with, you must obtain a LCD Plate (www.adafruit.com) and build it. You must
LAB #5 Intro to Linux and Python on ENGR
 LAB #5 Intro to Linux and Python on ENGR 1. Pre-Lab: In this lab, we are going to download some useful tools needed throughout your CS career. First, you need to download a secure shell (ssh) client for
Bluetooth Keyboard Setup Instructions
 Bluetooth Keyboard Setup Instructions Setup Using GUI (NOOBS/Raspbian) 1. Insert your micro SD card into the micro SD card slot on the Raspberry Pi. 2. Connect an HDMI cable from your Raspberry Pi to your
Experimental Procedure. Frequently Asked Questions (FAQ) Kit General Questions. Setting Up and Using Your Raspberry Pi Projects Kit
 Kit General Questions. Setting Up and Using Your Raspberry Pi Projects Kit") 1 of 11 9/13/2018, 2:31 PM https://www.sciencebuddies.org/science-fair-projects/project-ideas/compsci_p059/computer-science/design-your-own-video-game (http://www.sciencebuddies.org/science-fairprojects/project-ideas/compsci_p059/computer-science/design-your-own-video-game)
1 of 11 9/13/2018, 2:31 PM https://www.sciencebuddies.org/science-fair-projects/project-ideas/compsci_p059/computer-science/design-your-own-video-game (http://www.sciencebuddies.org/science-fairprojects/project-ideas/compsci_p059/computer-science/design-your-own-video-game)
Click Here to Begin OS X. Welcome to the OS X Basics Learning Module.
 OS X Welcome to the OS X Basics Learning Module. This module will teach you the basic operations of the OS X operating system, found on the Apple computers in the College of Technology computer labs. The
Spring 2017 Gabriel Kuri
 Lab 2 ECE 431L Spring 2017 Gabriel Kuri This lab is made up of two parts. Part 1 will consist of familiarizing yourself with the Raspberry Pi (RPi). It includes running Unix/Linux commands to become somewhat
Wallet Installation Guide for Staking on Raspberry PI
 Wallet Installation Guide for Staking on Raspberry PI V2.1 November 2018 CONTENTS 01. Version History... 13 02. Introduction... 3 03. Prerequisites... 13 04. Installation Steps... 6 05. Add an address
Minimizer Kiosk Instructions Pi 3 Model
 Minimizer Kiosk Instructions Pi 3 Model 1 This guide will help you set up a Minimizer Kiosk and connect it to the Internet. For assembly, make sure you have the correct tools and items. The Minimizer Kiosk
Getting started with Raspberry Pi (and WebIoPi framework)
") Getting started with Raspberry Pi (and WebIoPi framework) 1. Installing the OS on the Raspberry Pi Download the image file from the Raspberry Pi website. It ll be a zip file as shown below: Unzip the file
Getting started with Raspberry Pi (and WebIoPi framework) 1. Installing the OS on the Raspberry Pi Download the image file from the Raspberry Pi website. It ll be a zip file as shown below: Unzip the file
When the player powers up you will first see a CeeNee loading screen followed by the Orchid screen seen below.
 How to setup the CeeNee Orchid Player using a wired Ethernet connection? 1) Carefully insert the supplied SD card into the front of the CeeNee player. It will go in around a 1/2 inch and stop. 2) Connect
Adafruit's Raspberry Pi Lesson 1. Preparing an SD Card for your Raspberry Pi
 Adafruit's Raspberry Pi Lesson 1. Preparing an SD Card for your Raspberry Pi Created by Simon Monk Last updated on 2013-07-08 12:15:38 PM EDT Guide Contents Guide Contents Overview You Will Need Downloading
Introduction to Raspberry Pi 3 Model B Updates: 9/18/17 6/2/2018
 Introduction to Raspberry Pi 3 Model B Updates: 9/18/17 6/2/2018 A. Objectives 1. Learn about basics of Pi 3 embedded system 2. Learn how to operate your Pi 3 using different interfaces 3. Learn how to
IT 341 Introduction to System Administration Project I Installing Ubuntu Server on a Virtual Machine
 IT 341 Introduction to System Administration Project I Installing Ubuntu Server on a Virtual Machine Here we create a new virtual machine and install Ubuntu 16.04 LTS Server on it. In this instance, we
Gooligum Electronics 2015
 The Wombat Prototyping Board for Raspberry Pi Operation and Software Guide This prototyping board is intended to make it easy to experiment and try out ideas for building electronic devices that connect
Using Ruby and irb in CSE 341 Winter 2015
 Using Ruby and irb in CSE 341 Winter 2015 Overview This is a long version of the directions for installing Ruby. The last two homeworks will be using the Ruby language. We recommend editing your files
Manual of ET-LCD SW HAT
 ET- LCD SW HAT ET-LCD SW HAT is Board I/O that is specifically designed for connection with Board Raspberry Pi through Connector 40-PIN; this board includes LCD 16x2, SW, Buzzer, RTC DS3231 with Connector
Experiments 1 How to set up Raspberry Pi B+ The little computer you can cook into DIY tech projects
 Experiments 1 How to set up Raspberry Pi B+ The little computer you can cook into DIY tech projects The Raspberry Pi is a computer about the size of a credit card. The darling of the do-it-yourself electronics
Configuring your Laptop as a gateway/router for your Raspberry Pi
 Configuring your Laptop as a gateway/router for your Raspberry Pi The Raspberry Pi will need now and then an internet connection to get packages from the internet. Windows There are two ways to set this
O ptima S aver P i. User Guide. January 2017 Version 1.0
 O ptima S aver P i User Guide January 2017 Version 1.0 T able O f C ontents Page 1. What is OptimaSaverPi -------------------------- 2 2. Why OptimaSaverPi -------------------------- 2 3. Requirement --------------------------
Raspberry Pi 2b PART 1. Table of Contents. Step by step guide. 1. Hardware (0:05) RS Online (ex-tax prices)... 3 MSY ebay...
 RS Online (ex-tax prices)... 3 MSY ebay...") Step by step guide PART 1 Table of Contents 1. Hardware (0:05)... 3 RS Online (ex-tax prices)... 3 MSY... 4 ebay... 4 Centercom Computers... 4 2. Installing the operating system (0:21)... 5 Preparing the
Step by step guide PART 1 Table of Contents 1. Hardware (0:05)... 3 RS Online (ex-tax prices)... 3 MSY... 4 ebay... 4 Centercom Computers... 4 2. Installing the operating system (0:21)... 5 Preparing the
Microprocessor-Based Systems (E155)
") Microprocessor-Based Systems (E155) D. Harris and M. Spencer Fall 2017 Lab 4: Life of Pi Requirement 1) Set up your Raspberry Pi 2) Write an assembly-language program to sort an array of 12 signed bytes
Microprocessor-Based Systems (E155) D. Harris and M. Spencer Fall 2017 Lab 4: Life of Pi Requirement 1) Set up your Raspberry Pi 2) Write an assembly-language program to sort an array of 12 signed bytes
What this Guide Covers. Additional Info. 1. Linux based Servers. 2. Windows Servers. 3. GoldLite and Virtual Servers. 4. Other servers. 5.
 This guide is designed to assist in shutting down the Gold Servers ensuring a clean reboot of the systems. This should be done by the System Administrators with all users logged off the system and any
Super USB. User Manual. 2007, March
 Super USB User Manual 2007, March Windows98 Driver Install/Uninstall Driver Install: 1. Execute Win 98 UFD driver, then restart PC. 2. Plug Super USB into an available USB port. A new Removable Disk drive
Adafruit's Raspberry Pi Lesson 2. First Time Configuration
 Adafruit's Raspberry Pi Lesson 2. First Time Configuration Created by Simon Monk Last updated on 2013-08-30 02:30:26 PM EDT Guide Contents Guide Contents Overview Using the Whole SD Card Using the Whole
Davide Cavaliere 18 th February 2017
 Davide Cavaliere www.monocilindro.com dadez87@gmail.com 18 th February 2017 This guide explains how to set in read mode your Raspberry Pi 3, running the latest Raspbian Jessie (January 2017). This feature
Building a standalone access point using a Raspberry Pi Zero W
 Building a standalone access point using a Raspberry Pi Zero W by Barry Robinson The Raspberry Pi Zero W is a small, single board computer (SBC) that has WiFi and Bluetooth connectivity built-in. It is
Run an X-Carve CNC Machine Wirelessly with a Raspberry Pi
 Run an X-Carve CNC Machine Wirelessly with a Raspberry Pi Created by Todd Treece Last updated on 2015-08-18 01:20:14 PM EDT Guide Contents Guide Contents Setting Up the Proxy Hardware Requirements Raspberry
5inch HDMI LCD (B) User Manual
 User Manual") 5inch HDMI LCD (B) User Manual Description 5 inch Resistive Touch Screen LCD, HDMI interface, supports various systems Features 800 480 high resolution, touch control Supports Raspberry Pi, and driver
5inch HDMI LCD (B) User Manual Description 5 inch Resistive Touch Screen LCD, HDMI interface, supports various systems Features 800 480 high resolution, touch control Supports Raspberry Pi, and driver
Topics. What is a RaspberryPi? Why should I want one? What is Raspbian? What is SSH? What is FTP? What is LAMP? Making a LAMP Stack!
 Topics What is a RaspberryPi? Why should I want one? What is Raspbian? What is SSH? What is FTP? What is LAMP? Making a LAMP Stack! What is a Raspberry Pi? The Raspberry Pi is a Credit Card sized computer.
Pianoteq 6 Raspberry Pi 3 Station. By Edgar Bustamante
 Pianoteq 6 Raspberry Pi 3 Station By Edgar Bustamante 1 Contents 1 Introduction...4 2 Parts...5 2.1 Raspberry Pi 3...5 2.2 Fan/Heat Sinks...5 2.3 Digital to Analog Converter (DAC)...5 2.4 Micro SD Card
APPLICATION NOTE. Configuring LON Communications over IP using the i.lon 600
 APPLICATION NOTE Configuring LON Communications over IP using the i.lon 600 Configuring IP Network Devices Part II: Transmission of LON over IP Using the i.lon 600 Network Devices: i.lon SmartServer (System
Atlas iot. Installation guide V 1.0
 Atlas iot Installation guide V 1.0 Necessary items Before we begin have the following items readily available: SanDisk ultra micro SDHC, 16 gb card USB micro SD card reader Raspberry Pi 7 touchscreen Raspberry
RAK831 Pilot Gateway User Manual V1.0
 RAK831 Pilot Gateway User Manual V1.0 Shenzhen Rakwireless Technology Co., Ltd www.rakwireless.com info@rakwireless.com 2018 Rakwireless all rights reserved. in this document, the actual company and product
KODO Controller. Remote Access. Hutech Corporation Atlantic Ocean Dr., Unit B-17. Lake Forest, CA
 KODO Controller Remote Access Hutech Corporation 25691 Atlantic Ocean Dr., Unit B-17 Lake Forest, CA 92630 https://hutech.com 20180709 Introduction The Kodo Controller provides basic input and output via
Programming Low-Cost Hardware Using Simulink Brian McKay MathWorks Technical Marketing
 Programming Low-Cost Hardware Using Simulink Brian McKay MathWorks Technical Marketing 2014 The MathWorks, Inc. Simulink Support for Low-Cost Hardware What does that mean? Simulink supports a selection
Installing + Configuring
 Installing + Configuring Install and Recover with TFTP Introduction This document is designed to help you install the Commotion software if the Install on a Ubiquiti Device instructions did not work, or
Configuring GNS3 for CCNA Security Exam (for Windows) Software Requirements to Run GNS3
 Software Requirements to Run GNS3") Configuring GNS3 for CCNA Security Exam (for Windows) Software Requirements to Run GNS3 From Cisco s website, here are the minimum requirements for CCP 2.7 and CCP 2.8: The following info comes from many
Configuring GNS3 for CCNA Security Exam (for Windows) Software Requirements to Run GNS3 From Cisco s website, here are the minimum requirements for CCP 2.7 and CCP 2.8: The following info comes from many
Raspberry Pi 3 Model B+ and JMRI with WiFi Access Point for Pi- SPROG One and Pi-SPROG Nano raspian-stretch build
 Raspberry Pi 3 Model B+ and JMRI with WiFi Access Point for Pi- SPROG One and Pi-SPROG Nano 2018-03-13-raspian-stretch build May 2018 SPROG DCC These instructions describe the process of setting up a Raspberry
Getting Started Guide XC9010 Raspberry Pi Starter Kit
 Getting Started Guide XC9010 Raspberry Pi Starter Kit The Raspberry Pi has been designed as a computer that anyone can use. If you want to get started with a Raspberry Pi, but don t know where to start,
Features. Specifications. Hardware.
 Quick Start User Guide For CrazySwitch Home automation is "The Internet of Things". The way that all of our devices and appliances will be connected in the network and also provide us with a seamless control
Creating a Unifi Lab Network on your existing network
 Creating a Unifi Lab Network on your existing network This tutorial will outline how to add a Unifi USG-3 and Unifi Switch 8 to your existing network to create a separate subnet. This tutorial assumes
You can use the WinSCP program to load or copy (FTP) files from your computer onto the Codd server.
 files from your computer onto the Codd server.") CODD SERVER ACCESS INSTRUCTIONS OVERVIEW Codd (codd.franklin.edu) is a server that is used for many Computer Science (COMP) courses. To access the Franklin University Linux Server called Codd, an SSH connection
CODD SERVER ACCESS INSTRUCTIONS OVERVIEW Codd (codd.franklin.edu) is a server that is used for many Computer Science (COMP) courses. To access the Franklin University Linux Server called Codd, an SSH connection
Preparing SD card for Pi
 Preparing SD card for Pi Sarwan Singh Assistant Director(S) NIELIT Chandigarh Education is the kindling of a flame, not the filling of a vessel. - Socrates 1 sarwan@nielit Using NOOBS- New Out Of Box Software
USB 3.0 Docking Station
 USB 3.0 Docking Station User Manual Ver. 1.00 All brand names and trademarks are properties of their respective owners. Contents: Chapter 1: Introduction... 3 1.1 Product Introduction... 3 1.2 Features...
Getting started 7. Exploring the desktop 23
 Contents 1 2 3 Getting started 7 Introducing Raspberry Pi 8 Gathering the components 10 Setting up the SD card 12 Configuring the system 14 Logging into the console 16 Starting the desktop 18 Automating
Remote Access to Unix Machines
 Remote Access to Unix Machines Alvin R. Lebeck Department of Computer Science Department of Electrical and Computer Engineering Duke University Overview We are using OIT Linux machines for some homework
IT 341 Introduction to System Administration Project I Installing Ubuntu Server on an Virtual Machine
 IT 341 Introduction to System Administration Project I Installing Ubuntu Server on an Virtual Machine Here we create a new virtual machine and install Ubuntu 16.04 LTS Server on it. In this instance, we
Digital Free Library. Created by Kirby Griese. Last updated on :35:15 PM UTC
 Digital Free Library Created by Kirby Griese Last updated on 2018-01-04 04:35:15 PM UTC Guide Contents Guide Contents Overview Parts Needed Preparation Prepare Micro SD Card Install Apache Configure Access
MigmaWalktime TM for pedestrian detection and walk time extension
 SBC Display There are three ways to interfacing with SBC: MigmaMonitor TM, a portable computer monitor with VGA connector and touch screen. This monitor can be left in the controller cabinet. A laptop
Sound Manager 2 User Guide
 Sound Manager 2 User Guide Version 1.8.4 September 27 th, 2016 OVERVIEW 2 USER OPERATION 3-6 LOGIN SCREEN 7 OPTIONAL STEP 8-10 MAIN MENU 11 DEVICES TAB 11 ZONE TAB 12 EQ TAB 13 SOURCES TAB 14 SYSTEM TAB
Guide to your Plug Computer
 This document lives here: http://inst.eecs.berkeley.edu/~ee122/fa11/project3/guide-to-plug.pdf Guide to your Plug Computer UC Berkeley, EE 122, Fall 2011 Version 1 This document is a step-by-step guide
RFID Server Configuration
 RFID Server Configuration Introduction: The RFID Server installs on a local class C Ethernet (that is, all addresses start with 192.168.1.xxx) and in conjunction with our Dual Head Readers on Uno/Ethernet
Flash USB Drive. HwaZu Disk User Manual. Product Image File
 Flash USB Drive HwaZu Disk User Manual Product Image File Version 1.33 Table of Contents Introduction System Requirements Functions I. Install II. Formatting II-1 When Formatting II-2 Do Formatting III.
Created by Eugene Stephens 2015
 Mac OS X (10.9) Hardware Power cable - Magsafe adapter has 3 states: o Off Not plugged in, not charging o Amber Charging o Green Fully charged o NOTE: Because the port on the laptop is magnetized, small
Lab: Setting up PL-App with a Raspberry Pi
 Lab Topology Objectives Set up a Raspberry Pi board as a PL-App device Use PL-App Launcher to provision and discover PL-App devices Background Cisco Prototyping Lab is a set of hardware and software components
Minix Neo Z64A basics
 Minix Neo Z64A basics Contents Setting Up Your Neo Z64a... 2 Remote Essentials... 3 Using Your Minix Neo Z64A... 5 Setting up Wireless... 5 Changing Display Settings... 6 Setting the Time Zone... 8 Using
8.9.2 Lab: Configure an Ethernet NIC to use DHCP in Windows Vista
 8.9.2 Lab: Configure an Ethernet NIC to use DHCP in Windows Vista Introduction If Vista is not available in your classroom, you may complete this lab by viewing the figures in this document. Print and
RX300 Settings Manual General
 RX300 Settings Manual General The RX300 is provisioned by the administrator. The settings can be modified remotely from vspace Console or the RX300 device itself. In the General tab, the administrator
SOUND MANAGER 2.0 USER GUIDE SOUND MASKING PAGING AUDIO MASS NOTIFICATION REV
 SOUND MANAGER 2.0 USER GUIDE SOUND MASKING PAGING AUDIO MASS NOTIFICATION REV 3003-13-12 TABLE OF CONTENTS OVERVIEW...2 COMPATIBILITY...2 USER OPERATION...3 SPECTRA i.net S WEB-BASED ACCESS AND TUNING
OpenROV. Update Software Image From SD Card
 OpenROV Update Software Image From SD Card This guide will walk you through the steps for update your software to the latest image. The steps are for computers running Microsoft Windows or Apple OSx. Written
This is Lab Worksheet 7 - not an Assignment
 This is Lab Worksheet 7 - not an Assignment This Lab Worksheet contains some practical examples that will prepare you to complete your Assignments. You do not have to hand in this Lab Worksheet. Make sure
Practice 20 December 10, Wireless Access. Graduate course in Communications Engineering. University of Rome La Sapienza. Rome, Italy
 Practice 20 December 10, 2018 Wireless Access Graduate course in Communications Engineering University of Rome La Sapienza Rome, Italy 2018-2019 Wireless Access Networks for Raspberry Pi Wireless Access
Raspberry Pi Basic Setup
 Raspberry Pi Basic Setup Memory card preparation: Before loading the operating system on the memory card, the card should be formatted with SD Formatter, a program specifically designed for secure digital
IoTivity Development on ARTIK 530s
 Getting Started Guide Sungdong Kim SAMSUNG IoTivity Development on ARTIK 530s G E T T I N G S T A R T E D G U I D E Version 1.0, October 24, 2018 Table of Contents Summary... 3 OCF and IoTivity... 3 The
Networked Thermal Printer using Raspberry Pi and CUPS
 Networked Thermal Printer using Raspberry Pi and CUPS Created by Phillip Burgess Last updated on 2017-12-18 09:16:47 PM UTC Guide Contents Guide Contents Overview First-Time System Setup Connect and Configure
Raspberry Pi Workshop
 Raspberry Pi Workshop Resources and Materials: http://bit.ly/h8dunp Presenters Nick Yee Aexander Nunes Adriana Ieraci Agenda 10:00 Registration 10:20 Introductions and Overview 10:50 Install OS and Boot
Lab - Install Windows 7 or Vista
 Introduction In this lab, you will install the Windows 7 or Vista operating system. Recommended Equipment A computer with a blank hard disk drive Windows 7 or Vista installation DVD or USB flash drive
VP- X Pro & VP- X Sport
 VP- X Configurator Release Notes As of version 1.6 (May 13, 2013) This document updated October 31, 2013 Contents 1. Models...1 2. Updating the VP-X Pro and Sport firmware (Automatic)...1 3. Software Upgrade
USB 3.0 Mini Docking Station
 USB 3.0 Mini Docking Station User Manual Ver. 1.00 All brand names and trademarks are properties of their respective owners. Contents: Chapter 1: Introduction... 3 1.1 Product Introduction... 3 1.2 Features...
Moving to the Mac A GUIDE FOR NEW USERS OF MAC OS X. [Type here]
![Moving to the Mac A GUIDE FOR NEW USERS OF MAC OS X. [Type here]](/thumbs/90/103934001.jpg "Moving to the Mac A GUIDE FOR NEW USERS OF MAC OS X. [Type here]") [Type here] Moving to the Mac A GUIDE FOR NEW USERS OF MAC OS X This guide is aimed at those who are new to using Mac s. It assumes that you have prior knowledge of using a computer, probably a PC. The
[Type here] Moving to the Mac A GUIDE FOR NEW USERS OF MAC OS X This guide is aimed at those who are new to using Mac s. It assumes that you have prior knowledge of using a computer, probably a PC. The
IT 341 Introduction to System Administration Project I Installing Ubuntu Server on an Virtual Machine
 IT 341 Introduction to System Administration Project I Installing Ubuntu Server on an Virtual Machine Here we create a new virtual machine and install Ubuntu 12.04 LTS Server on it. In this instance, we
EECS 1710 SETTING UP A VIRTUAL MACHINE (for EECS labs)
") EECS 1710 SETTING UP A VIRTUAL MACHINE (for EECS labs) In this tutorial, we will work through the process of setting up a virtual machine on your home desktop/laptop, that reflects the working environment
EECS 1710 SETTING UP A VIRTUAL MACHINE (for EECS labs) In this tutorial, we will work through the process of setting up a virtual machine on your home desktop/laptop, that reflects the working environment
Upgrading to the Raspberry Pi 3B or Pi 3B+ 1
 Upgrading to the Raspberry Pi 3B or Pi 3B+ 1 By Sandy McCauley April 30, 2018 Part 1: Before you commit to doing this NOTE: This is NOT a KNK USA-published procedure. Any questions should be directed to
Thanks for purchasing one of the most cutting edge mini computing devices available today,
 Welcome! Thanks for purchasing one of the most cutting edge mini computing devices available today, the MK802IV LE. The MK802IV LE is a powerful quad core Linux mini computer which runs a version of Ubuntu
APPLICATION NOTE. Configuring Audio over IP- Instreamer/Extreamer
 APPLICATION NOTE Configuring Audio over IP- Instreamer/Extreamer Configuring IP Based Network Devices: Instreamer/Extreamer (Audio) & i.lon 600 (LON) Part 1: Transmission of Audio over IP Network Devices:
Lab 1: Accessing the Linux Operating System Spring 2009
 CIS 90 Linux Lab Exercise Lab 1: Accessing the Linux Operating System Spring 2009 Lab 1: Accessing the Linux Operating System This lab takes a look at UNIX through an online experience on an Ubuntu Linux
1. USB to Serial cable driver installation instructions 2. Instructions for use with Raspberry Pi 3. Instructions for use with WRT54g and similar
 TechnoFix This document contains three sections: 1. USB to Serial cable driver installation instructions 2. Instructions for use with Raspberry Pi 3. Instructions for use with WRT54g and similar Please
Home Airwaves Radio. User s Guide. January 2017
 Home Airwaves Radio User s Guide January 2017 The Home Airwaves Radio User s Guide covers hardware set-up, logging in, adding/deleting radio stations, listening capabilities, and unit configuration. This
IoTivity Development on Raspberry Pi* 3
 Getting Started Guide Rami Alshafi VTM GROUP David Kinder INTEL CORPORATION IoTivity Development on Raspberry Pi* 3 G E T T I N G S T A R T E D G U I D E Version 2, January 8, 2018 Table of Contents Summary...
Bridge Cable User s Guide
 Bridge Cable User s Guide Table of Contents Overview -------------------------------------------------------------------- 2 Driver Installation --------------------------------------------------------
Murray Bridge High School Connecting to the BYOD Network Mac OS X Version 3 Amended 2/10/2014
 Murray Bridge High School Connecting to the BYOD Network Mac OS X 10.7 10.9 Version 3 Amended 2/10/2014 Use of the Murray Bridge High School BYOD (Bring Your Own Device) facilities and network is subject
GreenEye Monitor. WiFi/Ethernet Setup
 GreenEye Monitor WiFi/Ethernet Setup Document Code: GEM-SET-WE-2 Ver 6.2 2017-10-09 Copyright Brultech Research Inc. 2017 Introduction TABLE OF CONTENTS Introduction...3 The Communication Module... 3 Start-up
Ding Dong, You've Got Mail! A Lab Activity for Teaching the Internet of Things
 Teaching Case Ding Dong, You've Got Mail! A Lab Activity for Teaching the Internet of Things Mark Frydenburg mfrydenberg@bentley.edu Computer Information Systems Department Bentley University Waltham,
NextBus transit clock for Raspberry Pi
 NextBus transit clock for Raspberry Pi Created by Phillip Burgess Last updated on 2015-03-01 04:45:04 PM EST Guide Contents Guide Contents Overview Parts and Tools Required Realistic Expectations Pi Setup
Frequently Asked Questions
 FAQs 10010410NC-RR Frequently Asked Questions Connecting Your Valet to the Internet 1 What computer operating systems does the Valet/Valet Plus support? 1 Why can t I connect my computer or device to my
This is Lab Worksheet/Installation 7
 This is Lab Worksheet/Installation 7 This Lab Worksheet/Installation contains essential installation work needed for your upcoming Assignments. You do not have to hand in this Lab Worksheet, but there
Raspberry Pi 3 Model B and JMRI with WiFi Access Point for Pi-SPROG One and Pi-SPROG Nano raspian-jessie build
 Raspberry Pi 3 Model B and JMRI with WiFi Access Point for Pi-SPROG One and Pi-SPROG Nano 2017-04-10-raspian-jessie build June 2017 SPROG DCC These instructions describe the process of setting up a Raspberry
Wireless Setup Guide (for Windows XP, Windows Vista, Windows 7, Windows 8 and Mac OSx)
") Wireless Setup Guide (for Windows XP, Windows Vista, Windows 7, Windows 8 and Mac OSx) Wireless Setup Guide The following steps will take you through the process of setting up and connecting to your wireless
Wireless Setup Guide (for Windows XP, Windows Vista, Windows 7, Windows 8 and Mac OSx) Wireless Setup Guide The following steps will take you through the process of setting up and connecting to your wireless
Klick & Show Firmware-Update Instructions (GB)
") Klick & Show Firmware-Update Instructions (GB) An update of the firmware can be useful to take the advantage of new features of Klick & Show or to fix known issues and bugs. There are up to three different
Klick & Show Firmware-Update Instructions (GB) An update of the firmware can be useful to take the advantage of new features of Klick & Show or to fix known issues and bugs. There are up to three different
QUICK START GUIDE. Section 6: MAC OSX 1. USB DRIVER INSTALLATION
 QUICK START GUIDE Section 6: MAC OSX 1. USB DRIVER INSTALLATION 61 Quick Start Guide SECTION 6: MAC OSX 1. USB INSTALLATION FOR MAC Step 1 Open up System Preferences: Step 2 Plug in the USB cable to your