DairyPlan Interface Setup Index. 3. Gateway Setup (VC3/4 equipment)
|
|
|
- Madison Jennings
- 6 years ago
- Views:
Transcription
1 DairyPlan C21 DairyPlan Interface Setup Index Page no. 3. Gateway Setup (VC3/4 equipment) 11. Multi-Port Setup using Win Multi-Port Setup using Win Vista 33. Multi-Port Setup using Win XP 51. Multi-Port Setup using Win Uno-Port Setup 67. XLon PCI Installation/Update/Removal 79. XLon USB Setup using Win Vista 85. XLon USB Setup using Win XP 3-1
2 DairyPlan C21 3-2


3 DMS21 Gateway Com Ports How to setup Dairyplan to use Gateway VC3 Com ports Requirements Dairyplan or later DMS21 Gateway with software version 0.97 or later VC4 Transceivers only When Gateway is selected for COM Port connections All Devices that connect via a COM port MUST be connected to the Gateway It is not possible to have some connected to Gateway and some to Mutli/Uno- Port Metatron 12 / Apex connection to Gateway not Possible!! VC3 Card connection to Gateway not Possible!! Com Ports
![DMS21 Gateway Com Ports Example AutoSelect Sort Gate connection 1] DPSetup / Device](/docs-images/76/74200692/images/4-4.jpg "Management / Setup VC3 Cannel Connections Com Ports 3 2 1 All Set to 16 2] Click OK")
4 DMS21 Gateway Com Ports Example AutoSelect Sort Gate connection 1] DPSetup / Device Management / Setup VC3 Cannel Connections Com Ports All Set to 16 2] Click OK 3-4 -

![Ports 3]](/docs-images/76/74200692/images/5-2.jpg "DPSetup /")


5 DMS21 Gateway Com Ports 3] DPSetup / Help / Check PC Interface 4] Click Yes 5] Click Yes 3-5 -
![DMS21 Gateway Com Ports 6] DPSetup / Device Management / Other DPNET Devices 8] Baud rates VC3 Channels 9] Baud rate depends Selection gate Program Version *(see notes) Leave blank for Parlour ID and](/docs-images/76/74200692/images/6-1.jpg "OPF 7] Select the DMS 21 gateway then click OK 10] For Sort gate set to 255 Leave blank for Parlour ID and OPF 11] Click OK We recommend using 4800 Baud where possible Program version which can set")
6 DMS21 Gateway Com Ports 6] DPSetup / Device Management / Other DPNET Devices 8] Baud rates VC3 Channels 9] Baud rate depends Selection gate Program Version *(see notes) Leave blank for Parlour ID and OPF 7] Select the DMS 21 gateway then click OK 10] For Sort gate set to 255 Leave blank for Parlour ID and OPF 11] Click OK We recommend using 4800 Baud where possible Program version which can set at 4800 Baud Rate AS3000 CWS3SSA 409 AS5000 CWT3SDW 412 Feed Select CPS3CMW 403 AutoSelect CPT3SWS
![DMS21 Gateway Com Ports 12]](/docs-images/76/74200692/images/7-1.jpg "DPSetup / Device Management /")
![DPNetinstall 13] Select the](/docs-images/76/74200692/images/7-2.jpg "Gateway 14] Re-Pin Gateway 15]")
7 DMS21 Gateway Com Ports 12] DPSetup / Device Management / DPNetinstall 13] Select the Gateway 14] Re-Pin Gateway 15] Finalize Gateway 3-7 -

8 DMS21 Gateway Com Ports Example Out of Parlour, Parlour ID, Autoselect Sort Gate 3-8 -

9 DMS21 Gateway Com Ports Settings for sort gate Finally remember to Re-pin & Finalize the Gateway see setup 12 DPSetup / Device Management / DPNetinstall 3-9 -


10 DMS21 Gateway Com Ports Changing back from Gateway to use Multi-port or Uno-port Serial Com ports DPSetup / Device Management / Setup VC3 Cannel Connections DPSetup / Device Management / Other DPNET Devices / Gateway Gateway VC3 Channel Connections set all to Zero Finally remember to Re-pin & Finalize the Gateway see setup 12 DPSetup / Device Management / DPNetinstall
11 Installation of Multi-port drivers in Windows 7 Installation of Multi-port drivers in Windows 7 (version or later dated 09/2009) Note Currently has to be done manually Remember to set jumpers! Install card into PC then power up PC and follow instruction on following pages Newer Windows Drivers supporting Win7 can be downloaded from
12 Installation of Multi-port drivers in Windows 7 When interface is installed and the PC is switched on Win 7 will search drivers but does not give you an option to browse the Dairyplan CD This means Drivers will have to be installed manually 3 Click on Device Manager 1 Click start 2 Type Device manager
13 Installation of Multi-port drivers in Windows 7 Device Manager will appear 4 Click on the arrow by Other Devices 5 Right Click on PCI Parallel Port 6 Click on Update Driver Software

 Note they are also on the UK Info DVD ( since")
 (you can")
14 Installation of Multi-port drivers in Windows 7 7 Click on Browse my computer 8 Click On Browse Browse to the driver folder on Dairyplan CD DP CD the path is \Driver\PCI\41094\Win9x_2K_XP_Vista_(Version_6515)\Win7_32bit (if using Win 7 64 bit version select Wiindows_Win7-64) Note they are also on the UK Info DVD ( since April 2011) (version or later 09/2009) Download from (note older DP5 and C21 disks do not have win7 / Vista drivers on them ) (you can use vista drive if you only have older disks) 10 Click OK
15 Installation of Multi-port drivers in Windows 7 11 Click Next 12 Click Close
16 Installation of Multi-port drivers in Windows 7 13 Right Click on PCI Serial Port 14 Click on Update Driver Software 15 Click on Browse my computer 16 Click Next

17 Installation of Multi-port drivers in Windows 7 Now there should now be four 16C95x Serial Port Devices in Other devices section 17 Click Close

")
18 Installation of Multi-port drivers in Windows 7 IMPORTANT The 4 serial ports are not always in order You MUST identify the device number or each 16C95x serial port and then in stall in each on in order starting with lowest first Otherwise your Mutli-port connection will be muddled up and you will not know which is which!! 18 Right Click on a PCI Serial Port The Click on Properties 19 Check the location look for lowest Port number (they are numbered 0, 1, 2, 3) Find the one numbered zero then install drivers for that first then repeat for this again with next lowest

19 Installation of Multi-port drivers in Windows 7 20 Right Click on PCI Serial Port 21 Click on Update Driver Software 22 Click on Browse my computer 23 Click Next
20 Installation of Multi-port drivers in Windows 7 24 Click Close 25 Repeat steps 19 to 24 for all Four 16C95x Serial Ports Remember to check Location port number item
21 Installation of Multi-port drivers in Windows 7 You can check after Installing, that they are in the correct order In this example the Com Port numbers are sequential Com 3 = Location Port 0 Com 4 = Location Port 1 Com 5 = Location Port 2 Com 6 = Location Port 3 4 Click Close Note older drivers from CDs before may not show Location as Sequential Numbers as shown here!! Making it difficult to check Tip its best to use Latest Driver


22 Installation of Multi-port drivers in Windows 7 Setting the Com Port FIFO buffers If the device manager is not already open follow steps 1 to 3 26 Click on the arrow by Ports (Com & LPT) 27 Right Click on PCI Communication Port 29 Click on FIFOs Tab 28 Click on Properties

 from step [26]")
23 Installation of Multi-port drivers in Windows 7 30 Move ALL Sliders to Left Hand side 31 Click on OK 32 Repeat for All PCI Communication Ports (all 4) from step [26]
24 Installation of Multi-port drivers in Windows


25 Installation of Multi-port drivers in Windows Vista The installation of Multi-port drivers in Windows Vista is very similar to Windows XP Remember to set jumpers! Install card into PC then power up PC and follow instruction on following pages


26 Installation of Multi-port drivers in Windows Vista 1 Click Here 2 Click Continue 3 Click Here

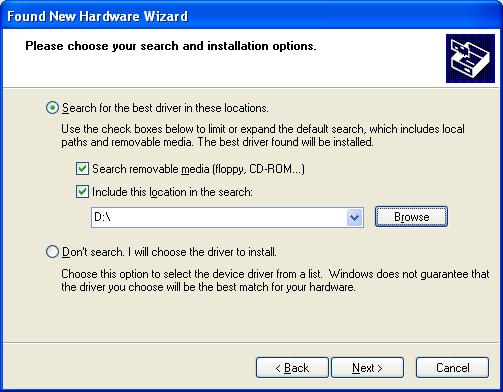
27 Installation of Multi-port drivers in Windows Vista Click Here 4 5 Click Browse If you using Technical info CD 6 browse to the folder D:\Dairyplan\Drivers\PCI\41094\Windows_Vista-32 Dairyplan CD Only has XP drivers at present
28 Installation of Multi-port drivers in Windows Vista This window is displayed as drivers are installed Click Close 7 Repeat from step [1] again for all Serial ports and the Parallel port


29 Installation of Multi-port drivers in Windows Vista Setting the Com Port FIFO buffers Open Device Manager this can be done in 2 ways Control Panel then click on System icon (as shown step by step below ) Or From the Desktop by right clicking on Computer Icon then click on properties 8 Click on start Button Then click Control Panel Click on System

30 Installation of Multi-port drivers in Windows Vista Click on Device Manager This UAC box will appear Click on Continue

")
31 Installation of Multi-port drivers in Windows Vista 13 Click on + by Ports (Com s & LPT) 14 Double Click on PCI Communication port (Com X)
 from step [14] 3-32")
32 Installation of Multi-port drivers in Windows Vista Click FIFO s Move ALL Sliders to Left Hand side 17 Click on OK Repeat for All PCI Communication Ports (usually 4) from step [14]

33 DairyPlan C21 Multi-Port Installation using Windows XP and Dairyplan C This screen should automatically appear once you ve installed the PCI card & re-started the PC 1 2 In order to install the correct driver it is necessary to specify it s location. The drivers are supplied on the Dairyplan CD (from Dairyplan version onwards)
34 DairyPlan C21 Multi-Port Installation using Windows XP and Dairyplan C We now have to tell the system where the drivers are located (normally on the C21 CD). Insert your C21 CD now. If the Dairyplan installation program appears then close it Note: Tick / un-tick boxes as shown on this page

35 DairyPlan C21 Multi-Port Installation using Windows XP and Dairyplan C The system now knows where the drivers are located
36 DairyPlan C21 Multi-Port Installation using Windows XP and Dairyplan C
37 DairyPlan C21 Multi-Port Installation using Windows XP and Dairyplan C

38 DairyPlan C21 Multi-Port Installation using Windows XP and Dairyplan C Highlight the XP driver. If there are several XP drivers listed chose the version with the highest number
39 DairyPlan C21 Multi-Port Installation using Windows XP and Dairyplan C
40 DairyPlan C21 Multi-Port Installation using Windows XP and Dairyplan C
41 DairyPlan C21 Multi-Port Installation using Windows XP and Dairyplan C

42 DairyPlan C21 Multi-Port Installation using Windows XP and Dairyplan C Once the driver installation is complete you should get a message saying so in the bottom right of your screen
43 DairyPlan C21 Multi-Port Set-up using Windows XP 1 Right click mouse button on My Computer then select Properties Select Hardware page then Device Manager Alternatively if the My Computer icon is not on the Desktop window then follow the steps below 2 Right click mouse button on My Computer then select Properties


44 DairyPlan C21 Multi-Port Set-up using Windows XP Click on the + sign next to Ports Double Click on the one of the items named PCI Communication Port (Com ) 3-44


45 DairyPlan C21 Multi-Port Set-up using Windows XP Move all 4 sliders to left then press OK. Repeat this procedure for the other 3 PCI channels. If you have TWO Multi-Port systems then switch off the PC,install the 2 nd PCI card and repeat the same installation procedure once more. If the 1 st PCI Communication Port started on Com3 up to Com6, you will notice that probably the 2 nd PCI card will be installed on Com7 up to Com10 Once you have completed this process you can now exit & start the installation of the Dairyplan program 3-45
 COM5 = Port 3 (Multi port unit) COM6 = Port 4 (Multi port unit) If you install a 2 nd PCI card then the equivalent Port in the 2 nd Multi-Port unit COM7 = Port 5 (Multi port unit) COM8 = Port 6")
46 DairyPlan C21 Multi-Port Set-up using Windows XP In this case the PCI Communication Port has its equivalent Port in the Multi- Port unit COM3 = Port 1 (Multi port unit) COM4 = Port 2 (Multi port unit) COM5 = Port 3 (Multi port unit) COM6 = Port 4 (Multi port unit) If you install a 2 nd PCI card then the equivalent Port in the 2 nd Multi-Port unit COM7 = Port 5 (Multi port unit) COM8 = Port 6 (Multi port unit) COM9 = Port 7 (Multi port unit) COM10 = Port 8 (Multi port unit) Note: Sometimes the PCI Com Ports will not be numbered successively so check the Ports in Device Manager 3-46
47 DairyPlan C21 Windows XP PCI Software Removal If you have to uninstall the drivers for whatever reason to start afresh then follow the steps below 1 Right click mouse button on My Computer then select Properties 2 Select Hardware page then Device Manager

 and uninstall.")

48 DairyPlan C21 Windows XP PCI Software Removal 5 Right click on a PCI Communications ( the order doesn t matter) and uninstall. Repeat for the other PCI Com ports Also remove the file shown here 3-48

49 DairyPlan C21 Windows XP PCI Software Removal 9 Finally remove the file shown here 3-49
50 DairyPlan C

51 Dairyplan C21 Multi-Port Installation using Windows 98SE This screen should automatically appear once you ve installed the PCI card & re-started the PC


52 Dairyplan C21 * Now insert C21 CD Multi-Port Installation using Windows 98SE Search for the driver on the C21 CD by pressing the browse key 7 E 3-51


53 Dairyplan C21 Multi-Port Installation using Windows 98SE


54 Dairyplan C21 Multi-Port Installation using Windows 98SE

55 Dairyplan C21 Multi-Port Installation using Windows 98SE

56 Dairyplan C21 Multi-Port Installation using Windows 98SE

57 Dairyplan C21 Multi-Port Installation using Windows 98SE 15 Right click mouse button on My Computer then press Properties Make a note of these settings as you will need them when you enter DPSETUP 3-56
 Ensure settings are as shown here 18 19")
58 Dairyplan C21 Multi-Port Installation using Windows 98SE 18 Double Click on the one of the items named PCI Communication Port (Com ) Ensure settings are as shown here

59 Dairyplan C21 Multi-Port Installation using Windows 98SE Move all 4 sliders to left then press OK 22 Repeat the same procedure for all PCI COM Ports apart from COM 1 to

60 Dairyplan C21 1 PCI Software Removal Right click mouse button on My Computer 2 Under certain circumstances you may need to remove the PCI software 3 4 Highlight Multifunction adaptor 3-59

61 Dairyplan C21 PCI Software Removal 5 Highlight file shown and Remove 6 Highlight file shown and Remove. Then Restart the PC 3-60


62 DairyPlan C21 UNO-Port Installation with Dairyplan C Attach the UNO-Port cable to the COM port of the PC. Then follow the steps below 2 Right click mouse button on My Computer then select Properties
63 DairyPlan C21 UNO-Port Installation with Dairyplan C Click on the + sign next to Ports 1 6 Double Click on Communications Port (Com1) 3-64


64 DairyPlan C21 UNO-Port Installation with Dairyplan C Move both sliders fully to the left as shown below


65 DairyPlan C21 UNO-Port Installation with Dairyplan C Dairyplan set-up for UNO-Port When using a Uno-Port system enter the number of units on the first cable against COM1 (on smaller installations this maybe the only cable)
 See page 6 Checking Version installed See page 9")
66 Installation & updating DPNet-A Xlon PCI drivers Guide The installation & Updating of DPNet PCI drivers in Windows Important Cannot be used with 64-Bit versions of Windows as there are 64bit Drivers! Install card into PC then power up PC and follow instruction on following pages Installing Drivers Windows 7 Drivers see page 2 Windows Vista (XP) See page 6 Checking Version installed See page 9 Uninstalling / Updating Drivers Win 7 / Vista Uninstalling / Updating See Page 10 Win XP Uninstalling / Updating See Page


67 Installation & updating DPNet-A Xlon PCI drivers Guide Windows 7 When interface is installed and the PC is switched on Win 7 will search drivers but does not give you an option to browse the Dairyplan CD This means Drivers will have to be installed manually 3 Click on Device Manager 1 Click start 2 Type Device manager


68 Installation & updating DPNet-A Xlon PCI drivers Guide Device Manager will appear 4 Click on the arrow by Other Devices 5 Right Click on PCI Parallel Port 6 Click on Update Driver Software
69 Installation & updating DPNet-A Xlon PCI drivers Guide 7 Click on Browse my computer 8 Click On Browse Important You must install Driver version These are only found on DP CD or later Note they are also on the UK Info DVD ( since April 2011) Browse to the driver folder on Dairyplan CD, the path is \Driver\DPNET\XLON-PCI (note older DP5 and C21 disks do not have good drivers on them )
70 Installation & updating DPNet-A Xlon PCI drivers Guide This window is displayed as drivers are installed 9 Click Install this driver software anyway 10 Click Close
71 Installation & updating DPNet-A Xlon PCI drivers Guide Windows Vista (XP Is Similar) 1 Click Here 2 Click Continue 3 Click Here
 V2.")
72 Installation & updating DPNet-A Xlon PCI drivers Guide Click Here 4 5 Click Browse Using Dairyplan 5.2 CD (use XP driver currently) V2.2 driver also on the UK Info DVD ( since April 2011) 6 browse to the folder \Driver\DPNET\XLON-PCI

73 Installation & updating DPNet-A Xlon PCI drivers Guide This window is displayed as drivers are installed 7 Click Install this driver software anyway 8 Click Close


74 Installation & updating DPNet-A Xlon PCI drivers Guide Check the version is at least Open Windows Device manager Right Click on Xlon PCI then click on Properties give this screen Click on Driver See Driver version Number

75 Installation & updating DPNet-A Xlon PCI drivers Guide Updating Drivers Guide To update the Xlon-PCI drivers first you must remove the old Drivers as just updating does not guarantee Windows will use the newer Driver For Windows Vista & Window 7 this can be done directly from Windows device manager For Windows XP the 3 driver files have to be manually Deleted unding Windows Explorer Windows Vista & Window 7 un-instating drivers 1] First take Backup of Dairyplan 2] Close DPProcesscontrol 3] Open Windows Device manager Right Click on Xlon PCI click on Uninstall gives this screen Important Tick the box Delete the Driver Then Click OK Finally restart PC and follow instruction for installing V2.2 Drivers
76 Installation & updating DPNet-A Xlon PCI drivers Guide Windows XPun-instating drivers 1] First take Backup of Dairyplan 2] Close DPProcesscontrol 3] Open Windows Device manager Updating Drivers Guide XP Right Click on Xlon PCI click on Uninstall gives this screen Then Click OK Then using Windows Explorer find these 3 file in the C:-Drive and Delete Them C:\Windows\System32\Driver\xlonpci2.sys C:\Windows\System32\xlonutil.dll C:\Windows\System32\xlonpp2.dll Finally restart PC and follow instruction for installing V2.2 Drivers
77 Installation & updating DPNet-A Xlon PCI drivers Guide


78 DairyPlan C21 XLON USB installation using Windows Vista Switch off PC Plug the XLON USB device in to the PC Switch PC back and insert the DairyPlan CD You need a DairyPlan 5.2 CD or later.if not then you need the UK Technical CD which also has the required drivers Then follow the steps shown


79 DairyPlan C21 2 You will need a DairyPlan 5.2 CD or later.if not then you need the UK Technical CD which also has the required drivers

80 DairyPlan C21 5 Select the boxes in red to indicate where the drivers are located


81 DairyPlan C


82 DairyPlan C21 To confirm that the XLON USB adaptor has been installed, follow the steps shown 11 Right click on My Computer If you see the XLON Lon Talk Adaptor at the bottom of the page then it has installed The software has now been installed now go to DPNetinstall to reconfigure if you have changed from XLON PCI to the USB version Check Process control to see if Milking units are communicating 3-83
83 DairyPlan C
84 DairyPlan C21 XLON USB installation using Windows XP Switch off PC Plug the XLON USB device in to the PC Switch PC back and insert the DairyPlan CD Then follow the steps shown

85 DairyPlan C
86 DairyPlan C

87 DairyPlan C
88 DairyPlan C
89 DairyPlan C
90 DairyPlan C
91 DairyPlan C
INTRODUCTION...1. Under Windows 98SE... 2 Under Windows ME... 6 Under Windows Under Windows XP...10
 CONTENTS INTRODUCTION...1 I. Install the USB-IrDA Adaptor driver... 2 Under Windows 98SE... 2 Under Windows ME... 6 Under Windows 2000... 9 Under Windows XP...10 II. Make sure the USB-IrDA Adaptor installed
INTRODUCTION...1. I. Install the driver of USB TO IRDA Adapter... 2 Under Windows 98se/Me...2 Under Windows 2000/XP...9
 CONTENT INTRODUCTION...1 I. Install the driver of USB TO IRDA Adapter... 2 Under Windows 98se/Me...2 Under Windows 2000/XP...9 II. Plug-in the USB TO IRDA Adapter to the host controller of PC... 11 III.
Introduction. 1 available USB type A (downstream) port. Windows 98, Windows ME, Windows 2000, Windows XP,
 port. Windows 98, Windows ME, Windows 2000, Windows XP,") Introduction Thank you for ordering the USB-RS232 Converter. The USB-RS232 Converter is an intelligent, stackable expansion module that connects to a PC or server via the Universal Serial Bus (USB) port,
Introduction Thank you for ordering the USB-RS232 Converter. The USB-RS232 Converter is an intelligent, stackable expansion module that connects to a PC or server via the Universal Serial Bus (USB) port,
Setting up the PC ready for BESA 11
 Setting up the PC ready for BESA 11 1 - Installing Driver. Important Note: Before you start to install the driver, please do not plug BESA 11 into the computer s USB port or else the installation will
Software Manual Virtual COM for Ethernet Driver / Configuration Tool
 Software Manual Virtual COM for Ethernet Driver / Configuration Tool Rev. 2.08 SRP-270 / SRP-275 SRP-275II / SRP-280 SRP-350 / SRP-350II SRP-350IIK SRP-350plus / 352plus SRP-350plusII / 352plusII SRP-500
Assigning COM Port Numbers to the Serial Ports of a USBto-Serial
 Assigning COM Port Numbers to the Serial Ports of a USBto-Serial Adapter A Technical Application Note from Doppler Systems May 6, 2008 1.0 Introduction USB-to-serial converters have an interesting and
RTE for WIN32. Installation Manual (Rev.7.0) Midas lab
 Midas lab") Midas lab REVISION HISTORY Date Revision Chapter Explanation of revision March 11,2000 4.0 RTE4W32 Ver.5.0 (First edition) January 10,2002 4.1 Add Windows XP support (RTE4W32 Ver.5.05) October 29,2002
Midas lab REVISION HISTORY Date Revision Chapter Explanation of revision March 11,2000 4.0 RTE4W32 Ver.5.0 (First edition) January 10,2002 4.1 Add Windows XP support (RTE4W32 Ver.5.05) October 29,2002
Cyber 1S1P PCI Quick Installation Guide
 Introducing the Cyber 1S1P PCI The Cyber 1S1P PCI high-speed serial I/O card provides one 9-pin serial port and one parallel port. Features and Benefits Conforms to PCI v2.2 Plug and Play Full support
How to Make a CD. Now there are two options to burning a CD: MP3 or CDA.
 How to Make a CD There are many different CD burning programs out there. I looked and looked for a good free CD burning program that was easy to use, and would also make MP3 CDs. The one I settled on is
Installing USB Drivers to Windows System
 1/9 Installing USB Drivers to Windows System Noptel Oy, Oulu Finland 1.3.2010 Noptel s USB devices uses USB/Serial Converters made by FTDI Ltd. The drivers for the USB Converter are provided by FTDI (http://www.ftdichip.com/).
EB020 Installation Instructions.
 EB020 Installation Instructions. Detailed below are the 3 steps needed to get up and running with the CPLD board. This 3 step process needs to be completed only once and then the drivers should all be
Bridge Cable User s Guide
 Bridge Cable User s Guide Table of Contents Overview -------------------------------------------------------------------- 2 Driver Installation --------------------------------------------------------
Section 4: Installing the ECC (Epilog Control Center)
") Section 4: Installing the ECC (Epilog Control Center) In This Section Installing the ECC The ECC (Epilog Control Center) provides Job Management features as well as laser control and laser machine configuration
Section 4: Installing the ECC (Epilog Control Center) In This Section Installing the ECC The ECC (Epilog Control Center) provides Job Management features as well as laser control and laser machine configuration
Lab - Data Migration in Windows
 Lab - Data Migration in Windows Introduction When a new computer is purchased or a new operating system is installed, it is often desirable to migrate a user s data to the new computer or OS. Windows has
CyberPro PCI 4S Quick Installation Guide
 CyberPro PCI 4S Quick Installation Guide Introducing the CyberPro PCI 4S The CyberPro PCI 4S high-speed serial I/O card provides four additional 9-pin serial ports. Features and Benefits Conforms to PCI
2EB/Atlantis/Discovery Hardware Installation Guide for Windows Vista and 7
 2EB/Atlantis/Discovery Hardware Installation Guide for Windows Vista and 7 Do these steps to install the hardware ONLY after the software has been installed. If you plug in the unit to the computer prior
12.0 Setting up the PC ready for BESA 11
 12.0 Setting up the PC ready for BESA 11 12.1 - Installing Driver. Important Note: Before you start to install the driver, please do not plug BESA 11 into the computer s USB port or else the installation
Serial Adaptor Isolated USB to TTL Device Driver - Installation Guide 1 Introduction. 2 Installing the Device Driver Software (Windows XP )
") Serial Adaptor Isolated USB to TTL Device Driver - Installation Guide 1 Introduction This installation guide describes a simple, step-by-step procedure to enable the supplied Serial Adapter to work using
Serial Adaptor Isolated USB to TTL Device Driver - Installation Guide 1 Introduction This installation guide describes a simple, step-by-step procedure to enable the supplied Serial Adapter to work using
SIIG 2-Port Serial 950-Value Quick Installation Guide
 SIIG 2-Port Serial 950-Value Quick Installation Guide Introducing the SIIG 2-Port Serial 950-Value The SIIG 2-Port Serial 950-Value high-speed serial I/O card provides two additional 9-pin serial ports.
PIN Pad: Installation
 Ascend Support Phone: 877-875-8663 Email: help@ascendrms.com Web: www.ascendrms.com PIN Pad: Installation PIN pads must be purchased from Ascend in order to function properly. To order, email sales@ascendrms.com.
INSTALLING THE PS3 XBOX READY SOFTWARE:
 INSTALLING THE PS3 XBOX READY SOFTWARE: 1. Insert the Installation CD to CD-ROM drive and execute Ready_Setup.exe NOTE: If it is the first time for the target USB disk using under this software, the software
NPort Express, NPort Server Family, Async Server Windows XP Driver Installation Guide. Second Edition, December 2001
 1 NPort Express, NPort Server Family, Async Server Windows XP Driver Installation Guide Second Edition, December 2001 Table of Contents Windows XP Driver Installation... 2 Installing the NPort Product...
CyberPro PCI 4S Quick Installation Guide
 CyberPro PCI 4S Quick Installation Guide Introducing the CyberPro PCI 4S The CyberPro PCI 4S high-speed serial I/O card provides four additional 9-pin serial ports. Features and Benefits Conforms to PCI
Dot Matrix Indicator Programming
 Dot Matrix Indicator Programming Preparation: USB Dongle and USB cable. Part No. 100-159 (see page 3 Dongle Installation Instruction ). Display Programmer V2.0 (see page 10 Display Programmer V2 Installation
CipherLab Workstation Setup (Windows 7/8/10)
") CipherLab Workstation Setup (Windows 7/8/10) These installation instructions will step you through setting up the CipherLab docking cradle and device, as well as installing the drivers and software used
CipherLab Workstation Setup (Windows 7/8/10) These installation instructions will step you through setting up the CipherLab docking cradle and device, as well as installing the drivers and software used
1 System Requirements
 START User s Guide (Use with START version 2.9.1 or higher) Click to: Review the START Main Menu Download Software View Operator History Logs Enter Operator Menu Settings Perform Operator Diagnostics 1
CyberPro PCI 2S Quick Installation Guide
 CyberPro PCI 2S Quick Installation Guide Introducing the CyberPro PCI 2S The CyberPro PCI 2S high-speed serial I/O card provides two additional 9-pin serial ports. Features and Benefits Conforms to PCI
Installing Data Translation data acquisition devices in Vista
 Installing Data Translation data acquisition devices in Vista The steps to installing drivers and data acquisition devices in the Vista 32 bit environment can be summarized as follows: A. Get the latest
GSC400 Series. GSC400 Programmer and PC Interface User Manual
 GSC400 Series GSC400 Programmer and PC Interface User Manual GSC400 Programmer and PC Interface User Manual Full Version File: GSC400 PC Interface Rev1.2.doc, August 2009 2 of 33 Amendments Issue Section
CyberSerial Dual PCI Quick Installation Guide
 CyberSerial Dual PCI Quick Installation Guide Introducing the CyberSerial Dual PCI The CyberSerial Dual PCI high-speed serial I/O card provides two additional 9-pin serial ports. Depending on the model
STOP! Read these instructions before connecting the PR3 to your Computer
 Windows 10 Installation Instructions for the PR3 NOTE: If Windows 10 installed the drivers for the PR3, these instructions are not needed. These instructions are only to be used if Windows 10 did not automatically
Instructions for Use
 Multilingual version 3.4 Lite version is intended for patient use only; Some physician features are disabled. Instructions for Use Table of Contents 1 Introduction... 1 2 Installing and Starting Software...
DeltaPix Prior ES10ZE Installation Guide
 1 Minimum System Requirements Windows XP (Service Pack 2), Windows Vista or Windows 7 with Microsoft. Both 32 and 64 bit versions of Windows will work. ".NET 3.5" (enclosed on the DeltaPix software memory
Super USB. User Manual. 2007, March
 Super USB User Manual 2007, March Windows98 Driver Install/Uninstall Driver Install: 1. Execute Win 98 UFD driver, then restart PC. 2. Plug Super USB into an available USB port. A new Removable Disk drive
Cyber 2S1P 950 PCI Quick Installation Guide
 Cyber 2S1P 950 PCI Quick Installation Guide Introducing the Cyber 2S1P 950 PCI The Cyber 2S1P 950 PCI high-speed serial I/O card provides two 9-pin serial ports and one parallel port. Key Features and
1 Connecting to RoviSys OPC90 (Turbo) Using OPC90 with DBDOC - Bailey WinCAD or Composer. Page 1
 Using OPC90 with DBDOC - Bailey WinCAD or Composer. Page 1") Table of Contents 1 Connecting to RoviSys OPC90 (Turbo)... 1 1.1 Installing RoviSys OPC90 (Turbo)... 2 1.2 Connecting RoviSys OPC90 (Turbo) to a CIU... 2 1.3 Methods of connecting CIUMon to RoviSys OPC90
Table of Contents 1 Connecting to RoviSys OPC90 (Turbo)... 1 1.1 Installing RoviSys OPC90 (Turbo)... 2 1.2 Connecting RoviSys OPC90 (Turbo) to a CIU... 2 1.3 Methods of connecting CIUMon to RoviSys OPC90
Table of Contents.
 Table of Contents http://www.advancedactuators.com 1. Items Included with the ThumbLock PCMU:... 2 2. IMPORTANT NOTE:... 2 3. Supported Operating Systems:... 2 Section 1 Installing the ThumbLock PCMU Software...
The USB-to-Serial Converter
 The USB-to-Serial Converter Older type with Prolific chipset Current type with FTDI chipset Introduction The USB Serial Converter attaches to a PC USB port and provides a serial port connector, to which
OTC 3210 Update Instructions
 OTC 3210 Update Instructions Date of Release: June 2016 New Software ID: ACAC Previous Software ID: D4A8 or 6D2B Note: Scanning Suite should already be installed on the PC. Verify Scan Tool Software Version
USER MANUAL for USB Data Link
 Driver Installation Under Win 95 OSR2.1 1.Step1: Double click "My Computer" "System Properties" "Device Manager" Step2: While installing USB Data Link Cable under Windows 95 OSR2.1 mode, make sure "Universal
1) Installing Bluetooth software for Windows (A) Place installation CD into PC and setup should launch automatically.
 Installing Bluetooth software for Windows (A) Place installation CD into PC and setup should launch automatically.") 1) Installing Bluetooth software for Windows (A) Place installation CD into PC and setup should launch automatically. If setup does not launch, use Windows Explorer to navigate to the appropriate CD- ROM
1) Installing Bluetooth software for Windows (A) Place installation CD into PC and setup should launch automatically. If setup does not launch, use Windows Explorer to navigate to the appropriate CD- ROM
USB to Serial Quick Installation Guide
 USB to Serial Quick Installation Guide Introducing the USB to Serial The USB to Serial adapter converts one USB port to multiple 9-pin (DB9) serial ports. Features and Benefits Full support for Windows-based
FILE ORGANIZATION. GETTING STARTED PAGE 02 Prerequisites What You Will Learn
 FILE ORGANIZATION GETTING STARTED PAGE 02 Prerequisites What You Will Learn PRINCIPLES OF FILE ORGANIZATION PAGE 03 Organization Trees Creating Categories FILES AND FOLDERS PAGE 05 Creating Folders Saving
Instructions for inland 8412 USB to IDE/SATA adapter.
 Instructions for inland 8412 USB to IDE/SATA adapter. 1 The included CD is ONLY used for Windows 98se. If you are running any newer system (including Vista and Mac,) then you don t need the CD. There are
Arduino IDE Friday, 26 October 2018
 Arduino IDE Friday, 26 October 2018 12:38 PM Looking Under The Hood Of The Arduino IDE FIND THE ARDUINO IDE DOWNLOAD First, jump on the internet with your favorite browser, and navigate to www.arduino.cc.
Locating Specific Files on the Technology Resource DVD
 Locating Specific Files on the Technology Resource DVD (Refers to all T4 Technology Resource DVD s that were issued from Tuesday 28/9/10 onwards) Instructions to locate the Excel file with the location
IMPORTANT INFORMATION FOR INSTALLING COMPLAY
 IMPORTANT INFORMATION FOR INSTALLING COMPLAY 3.5.48 NOTE: This page is for Microsoft Windows 98, SE, NT, 2000, and XP. See page #2 for installing Complay on a Vista P. C. See page #3 for installing Complay
Instructions for MX350 Firmware Upload
 Instructions for MX350 Firmware Upload MX350 Document AN10048 Page 1 of 39 Contents Section Description Page 1 Requirements 3 2 Install MX350 Setup Software 3 3 Download MX350 Firmware 4 4 Connect MX350
User Manual. Windows 7 / Vista / XP. iotablet Driver
 User Manual Windows 7 / Vista / XP iotablet Driver I. General Information 2 1. Overview 2 2. Pen Tablet Function 2 3. System Requirements 2 4. Driver Installation 3 5. Hardware Installation 3 6. Verifying
Cyber 2S1P 950 PCI Quick Installation Guide
 Cyber 2S1P 950 PCI Quick Installation Guide Introducing the Cyber 2S1P 950 PCI The Cyber 2S1P 950 PCI high-speed serial I/O card provides two 9-pin serial ports and one parallel port. Key Features and
Purchase and Setup instructions for SWVPS (Sept 15, 2014)
") Purchase and Setup instructions for SWVPS (Sept 15, 2014) Our team recommends a Virtual Private Server (VPS) that works well for only $18.00 a month. Because trading in the market requires a platform that
Purchase and Setup instructions for SWVPS (Sept 15, 2014) Our team recommends a Virtual Private Server (VPS) that works well for only $18.00 a month. Because trading in the market requires a platform that
CyberSerial Dual PCI Quick Installation Guide
 CyberSerial Dual PCI Quick Installation Guide Introducing the CyberSerial Dual PCI The CyberSerial Dual PCI high-speed serial I/O card provides two additional 9-pin serial ports. Features and Benefits
USB driver and Software Installation. UPS Monitoring and Management Software
 USB driver and Software Installation UPS Monitoring and Management Software LEN.MAN.SOF.143 Rev.1.00/2008 Installing USB driver and Easy-Mon X for LEONICS UPS 1. Installing and uninstalling the USB driver
HOW TO: Upgrade Windows XP to Windows 7 with Windows Easy Transfer
 HOW TO: Upgrade Windows XP to Windows 7 with Windows Easy Transfer Upgrade Windows XP to Windows 7 with Windows Easy Transfer Upgrade option for XP users like Windows Vista. In addition, if you completely
AN-77XX-XP 2K MCS77XX. Windows-2k & Windows-xp
 AN-77XX-XP 2K MCS77XX 18 th Feb 2004 i All information in this document is believed to be accurate as of the date published. All brands or product names are the property of their respective holders. MosChip
Table of Contents.
 Table of Contents 1. Items Included with the BioAxxis ThumbLock Audit Trail Software: 2 2. IMPORTANT NOTE:... 2 3. Supported Operating Systems:... 3 Section 1 Installing the BioAxxis ThumbLock AT Software...
VISTA - CTI Multi-port Serial Adapter. Install Guide
 VISTA - CTI Multi-port Serial Adapter Install Guide The information contained in this document is subject to change without notice. Connect Tech, Inc. shall not be liable for errors contained herein or
PAL Installation Instructions
 PAL Installation Instructions ADMINISTRATOR (NETWORK) INSTALLS These instructions are for PCs that are connected by a network, for the purpose of sharing PAL data and notes. PAL can be installed using
FIF-10A USB PROGRAMMING INTERFACE
 FIF-10A USB PROGRAMMING INTERFACE The FIF-10A is the Interface Unit which allows cloning of channel data to Vertex Standard transceivers, and/or re-writing of the firmware on some Vertex Standard transceivers,
Unit III: Working with Windows and Applications. Chapters 5, 7, & 8
 Unit III: Working with Windows and Applications Chapters 5, 7, & 8 Learning Objectives In this unit, you will: Launch programs and navigate the Windows task bar. Perform common windows functions. Customize
Serial PCI MODEL MAN UM
 Serial PCI Express Card USER MANUAL MODEL 160414 MAN-160414-UM-1106-04 Thank you for purchasing the MANHATTAN Serial PCI Express Card, Model 160414. Compliant with PCI Express 1.0a specifications, this
CyberSerial 2S PCI Quick Installation Guide
 Introducition CyberSerial 2S PCI Quick Installation Guide The CyberSerial 2S PCI high-speed serial I/O card provides two additional 9-pin RS-232 serial ports. Key Features and Benefits Universal PCI card
How to install the software in Windows Vista/7/ 8
 How to install the software in Windows Vista/7/ 8 For WINDOWS VISTA/ 7/8: Please note that Microsoft MSDE database (in the software CD) is not compatible with WINDOWS VISTA/7/8. You need to install Microsoft
SATA 300 PCI USER MANUAL
 SATA 300 PCI Express Card USER MANUAL MODEL 150040 MAN-150040-UM-1106-03 Thank you for purchasing the MANHATTAN SATA 300 PCI Express Card, Model 150040. With the following features, this card allows you
RoastLogger Arduino/TC4 driver installation for Windows 9/10/13 By John Hannon (JackH) at Homeroasters.org
 at Homeroasters.org") This procedure was written for the Arduino Uno board with the TC4 shield. Please check the Arduino site for software if you are using a different model. I have not tested it, but this procedure should
This procedure was written for the Arduino Uno board with the TC4 shield. Please check the Arduino site for software if you are using a different model. I have not tested it, but this procedure should
Migrating Label Formats from Legi for Windows 2.X to Legitronic Labeling Software 3.5.X
 Migrating Label Formats from Legi for Windows 2.X to Legitronic Labeling Software 3.5.X Today s powerful enterprise grade PC s come loaded with Microsoft s Windows XP Professional operating system, or
CyberSerial Dual PCIe Quick Installation Guide
 CyberSerial Dual PCIe Quick Installation Guide Introducing the CyberSerial Dual PCIe The CyberSerial Dual PCIe high-speed serial I/O card provides two additional 9-pin serial ports. Features and Benefits
DT-CONFIG SOFTWARE USER S MANUAL
 DT-CONFIG SOFTWARE USER S MANUAL CONTENTS 1. Introductions ------------------------------------------------------------------- 3 2. System Requirement and Connection ----------------------------------------
Installing HostExplorer 10 For the PC Author: Byron Watanabe
 WIN1013 July 2005 Installing HostExplorer 10 For the PC Author: Byron Watanabe Requirements Requirements... 1 Obtaining HostExplorer... 1 Preparing to install... 1 Installation... 2 HostExplorer 10.0 supports
WIRELESS N USB ADAPTER USER MANUAL
 WIRELESS N USB ADAPTER USER MANUAL MAN-525503/525534-UM-0413-01 INTRODUCTION Thank you for purchasing this Manhattan Wireless N USB Adapter. Because many netbooks and laptops (especially those more than
Interpretype Bluetooth Setup Procedure
 This information is for configuring the Interpretype to communicate using the Bluetooth Connectivity Kit. To communicate using LAN or Wi-Fi in the full featured version of our software, please refer to
USB SERIAL ADAPTOR COM PORT INSTRUCTIONS
 USB SERIAL ADAPTOR COM PORT INSTRUCTIONS No part of this work covered by the copyright hereon may be reproduced, copied, transferred or distributed in any form or by any means -- graphic, electronic, or
remember where it is, My Documents or to the Desktop are good locations. If you do not have an extract option, you can usually just COPY and PASTE the
 How do I install USB drivers? This FAQ topic covers how to install your USB drivers. Step 1: Unzipping the Drivers When you download the drivers they are in a zip file. This is a type of file which allows
Setting a Computer Up to Run Warrior. Warrior Software Version 7.0 Standard Cased Hole SCIENTIFIC DATA SYSTEMS, INC.
 SCIENTIFIC DATA SYSTEMS, INC. Warrior Software Version 7.0 Standard Cased Hole Setting a Computer Up to Run Warrior This document contains proprietary information. Copyright 2005 Scientific Data Systems,
Galileo Print Manager Installation Guide
 Galileo Print Manager Installation Guide 24 November 2003 Copyright 2003 Galileo International. All rights reserved. Information in this document is subject to change without notice. The software described
Parallel Printers Set-Up
 Parallel Printers Set-Up - 25 - Setting up a Local Parallel Printer in Windows 95/98 Left click on the START button. Go to SETTINGS, and then PRINTERS. 1. Locate and double left click on the ADD PRINTER
The next section of your course assumes that you have completed all of the manual lessons.
 Unit 10 Installing payroll, set up employees, running weekly payroll 10 Introduction The next section of your course assumes that you have completed all of the manual lessons. Note that the assignment
READ ME FIRST. Product Installation Instructions. (For use with TROY MICR / IRD 4000 series and 600 series Security Printing Solutions)
") READ ME FIRST Product Installation Instructions (For use with TROY MICR / IRD 4000 series and 600 series Security Printing Solutions) Introduction Your TROY Security Printing Solution offers value-added
READ ME FIRST Product Installation Instructions (For use with TROY MICR / IRD 4000 series and 600 series Security Printing Solutions) Introduction Your TROY Security Printing Solution offers value-added
Roger D. Secura
 Roger D. Secura rsecura@ix.netcom.com HOW TO SETUP AN AD-HOC PEER-TO-PEER NETWORK BETWEEN ONE WINDOWS XP DESKTOP COMPUTER AND ONE WINDOWS 7 LAPTOP COMPUTER USING TWO RALINK USB WIRELESS ADAPTERS NOTE:.
CyberSerial ExpressCard Quick Installation Guide
 CyberSerial ExpressCard Quick Installation Guide Introducing the CyberSerial ExpressCard The CyberSerial ExpressCard adds one high-speed serial port to an ExpressCard equipped computer. Features and Benefits
How to install or remove the ISaGRAF development platform properly
 How to install or remove the ISaGRAF development platform properly By grady_dun@icpdas.com For the ICP DAS ISaGRAF PACs and the ISaGRAF Workbench software to operate properly, it is imperative that each
Windows Key e: Press and hold down the Windows (Start) Key and tap the letter e one time. Release these keys and Windows File Explorer will open.
 Key and tap the letter e one time. Release these keys and Windows File Explorer will open.") Copyright 2009 BOSMA Enterprises Chapter 14 Windows File Explorer Key Terms Windows Key e: Press and hold down the Windows (Start) Key and tap the letter e one time. Release these keys and Windows File
Copyright 2009 BOSMA Enterprises Chapter 14 Windows File Explorer Key Terms Windows Key e: Press and hold down the Windows (Start) Key and tap the letter e one time. Release these keys and Windows File
Serial/Parallel Combo PCI
 Serial/Parallel Combo PCI Express Card USER MANUAL MODEL 160483 MAN-160483-UM-1106-04 Thank you for purchasing the MANHATTAN Serial/Parallel Combo PCI Express Card, Model 160483. Compliant with PCI Express
Windows XP Software Installation Instructions GCC Elite Series Printers
 TM Windows XP Software Installation Instructions GCC Elite Series Printers This document is intended to provide instructions for obtaining and installing the Windows XP driver software for GCC s Elite
DP Industrial PCI Serial Adapter Card Quick Installation Guide
 DP Industrial PCI Serial Adapter Card Quick Installation Guide Introduction The DP Industrial PCI Serial Adapter Card is a high-speed serial card that provides additional serial ports to your system. Key
DISCLAIMER Whilst every effort has been made
 PUBLISHED BY Gallagher Group Limited Kahikatea Drive, Private Bag 3026 Hamilton, New Zealand www.gallagherams.com Copyright Gallagher Group Limited 2011. All rights reserved. Patents Pending. MyScale Pro
RS 422/485 ComProbe. Quick Start Guide
 RS 422/485 ComProbe Quick Start Guide Copyright 2000 2010 Frontline Test Equipment, Inc. All rights reserved. You may not reproduce, transmit, or store on magnetic media any part of this publication in
UFC3212V. Version 1.0
 UFC3212V Version 1.0 Contents 1.0 USB Port Features.P.3 2.0 System Requirement.P.3 3.0 Driver Limitations..P.3 4.0 Driver Installation..P.4 5.0 1394 Features..P.9 6.0 Technical Information..P.10 7.0 How
Firmware install with Windows XP
 Firmware install with Windows XP Step 1. Go to our website www.midnitesolar.com and Left Click on Firmware. Step 2. Left Click on Download Firmware. Step 3. Read the Notes in red first and then Left Click
Procedures to Install Eye Com's ImageMouse and ImageMouse Plus using Windows XP platform
 Procedures to Install Eye Com's ImageMouse and ImageMouse Plus using Windows XP platform 8-08-2005 The ImageMouse runs on the XP platform provided it is set up using NTFS, has the latest XP service pack
AlphaBeam. Description. Requirements. for PC
 AlphaBeam for PC Description AlphaBeam is a software application you install on your computer that lets you beam text from your IR-capable AlphaSmart device to an IR-capable computer. AlphaBeam sends text
Dolphin EasyReader. Version Quick-Start Guide Software Summary Vendor Support
 Dolphin EasyReader Version 4.01 Quick-Start Guide Software Summary Vendor Support The development of this project by the AIM Consortium and the Michigan Department of Education IDEA Mandated Activities
Ambush Client Software User Guide For use with the full Range of Ambush DVRs Version 1.2
 Ambush Client Software User Guide For use with the full Range of Ambush DVRs Version 1.2 Overview This user guide will take you through the process of obtaining and archiving footage from the Ambush Technologies
Table of Contents. On-Call Advanced Diabetes Data Management Software V1.0 User s Manual
 Table of Contents Installation Instructions...2 Starting On-Call Advanced Diabetes Data Management Software...5 Main Windows...6 Patient Setup...6 Patient Info...7 Target Levels...8 Time Slot...9 Preference
B MP45 Driver installation Windows Vista, page 8 D Uninstall MP45 Driver Windows Vista, page 14
 Doc BSL 375 Driver Guide BSL Driver Guide Administrator Privileges Required 42 Aero Camino, Goleta, CA 93117 Tel (805) 685-0066 Fax (805) 685-0067 info@biopac.com www.biopac.com A MP45 Driver installation
TE100-P21 F.A.Q. A: If you are using Windows XP you will have to disable the built in firewall. But for all operating
 Q: Why doesn't PS-Utility detect my print server? A: If you are using Windows XP you will have to disable the built in firewall. But for all operating systems you have to disable any other form of firewall
CyberSerial Dual PCI Quick Installation Guide
 Introduction CyberSerial Dual PCI Quick Installation Guide The CyberSerial Dual PCI high-speed serial card provides two RS232 9-pin serial ports. Key Features and Benefits Universal PCI card design that
9/2/2016. Storage Media. Storage Media
 File Management TECH 1010 Dan Kohn University of Memphis Engineering Technology Department Last update 1/24/14 Storage Media A computer file is a named collection of stored data An executable file contains
USB485 USB to RS485 Converter Card
 USB485 USB to RS485 Converter Card User Manual Version 1.02 RMS Technologies 2533 N. Carson St. #4698, Carson City, NV 89706-0147 1-877-301-3609 www.rmsmotion.com sales@rmsmotion.com Thank you for purchasing
2. install windows vista
 2. install windows vista Windows Vista comes preloaded on many brand-new PCs. If you already have a computer with Windows Vista installed, you can go directly to Chapter 3, Move from another PC. If you