SmartSoft AES Operator s Guide
|
|
|
- Mary Mathews
- 5 years ago
- Views:
Transcription
1 SmartSoft AES Operator s Guide Part No Rev. A Physical Electronics USA, PHI, SMART-Tool, SmartSoft, MultiPak and Watcher are trademarks of ULVAC-PHI, Inc. All other trademarks are the property of their respective owners.
2 Introduction The PHI 700 AES is operated using three software packages 1. SmartSoft-AES for primary operation of the system including, sample into and extract, stage navigation, SEM Imaging, Auger Analysis and Ion Gun Control 2. Watcher for System Vacuum Control Interface 3. Multipak for post acquisition off-line data reduction and output SmartSoft-AES SmartSoft-AES is a windows based interface with five primary tabs along the top devoted to different tasks 1. System, for loading and unloading samples 2. Sample, for navigation and sample Z-Alignment 3. SEM, for adjusting and outputting SEM Images 4. AES, for acquiring Auger Surveys, Line Scans, Depth Profiles and Maps 5. Hardware, for control of the Ion Gun used for sputter cleaning the sample surface, depth profiling and charge neutralization Watcher Watcher is opened automatically when SmartSoft is started. Watcher runs in the background and is interfaced through the SmartSoft System tab. One does not typically perform any functions directly from the Watcher Window. Multipak Multipak is a Matlab based data reduction software package that runs Off-Line. It handles both PHI XPS and PHI AES data files.

3 Badger The Badger laboratory access program is used to reserve time on the PHI AES instrument and to enable the instrument at the start of your session and disable the instrument at the end of your session. It can also be used to Flag instrument problems or Shutdown access to the instrument in the event of a critical instrument problem. The Auger_SNL instrument tab in Badger is found under the SNL tab and in the subheading for Surface Analytical Lab. Once AES-SNL is enables, the SEM video monitor will turn on allowing you to locate your sample in the SEM Image.

4 Vacuum System The condition of the Vacuum system can be checked on the gauge control display in the top of the left hand electronics chassis. The top reading is the ion gauge at the upper column where the electron gun filament is located. It should always be in the low E-09 range. The Lower set shows three readings. The top of these three is the ion gauge in the main analysis chamber. When the instrument is idle, it will show in the low E-09 to low E-10 range. It may come up to mid to low E-08 during some analyses. The middle reading is a convectron gauge in the main analysis chamber and if the main chamber ion gauge reads in the listed range, the convectron gauge will read 0.0 E-0.

5 The third of this set is the convectron gauge in the intro chamber. It will read 0.0E-0 when the intro is pumped out and will read ~780 when the intro is vented to put in a sample.

6 Intro Sample This procedure describes introducing the samples into the analysis chamber. Load the samples to be analyzed onto a PHI sample holder at the sample prep counter. Click the System session tab along the top of the SmartSoft user interface. The Sample Transfer application is displayed on the top right hand side of the SmartSoft System window. Follow the Intro Sample flow. Click the Backfill V2 button. This will close the V3 Intro Pumping valve and Open the V2 valve to fill the Intro with Nitrogen gas. The convectron gauge in the intro chamber will come up to ~780 torr and the cap can be removed from the intro chamber and the sample holder mounted on the fork on the sample transfer arm. Replace the cap and click Pump V3 to pump out the sample intro. This process takes just under 5 minutes. A message in the lower left hand corner of the SmartSoft System tab will say Vacuum: pump into started and the mouse will have the hourglass icon. After three minutes, the mouse will return to the normal pointer icon and the message in the lower left corner of the System tab will display Vacuum pump intro complete.
7 Click the third button (intro sample) in the Intro Sample flow. The stage will move to the intro position. V1 will open and a message box will appear. Smoothly slide the Introduction rod into the chamber all the way to the fully inserted position. Click the OK button in the message box. The stage will move up to engage with the sample holder. Watch through the glass window in the main chamber to make sure the stage engages properly with the sample holder. A new message box will appear. Retract the sample introduction rod all the way out to the stop. When the arm is retracted, V1 will automatically close. Click OK in the message window. Sample Introduction is Complete.

8 Locating Sample Click the SEM session tab along the top of the SmartSoft user interface. Use the pull down menu in the upper right side of the SEM session tab to choose the 1kV 1nA beam file and click load. The Electron Gun Control box in the right hand electronics chassis will display the beam energy. Use the Field of View pull down menu to choose the largest field of view (5000mm)
9 You can look through the glass window in the main analysis chamber to see where you are located on the sample holder and use the X, Y map on the instrument and the X, Y map on the SEM Monitor to determine which direction to move to sample of interest. Using the mouse and clicking on a point on the image will bring that point to the center of the field of view. Using the mouse to draw a box on the image will zoom in and center that box in the field of view. To Zoom out again use the Field of View pull down menu and choose a larger size.


10 Z Align Once you have found the sample of interest, click the Sample session tab along the top of the SmartSoft user interface. Click the Z Align application along the right hand side of the Sample session window. A Z Align flow will be displayed. The first icon will move the stage back to the center of the sample holder. You typically do not want to use this button. Click the Z Align button in the Z Align flow to start the Z align process. A window will appear showing the elastic recoil energy of the primary beam.
11 For a typical sample, the introduction position will be low and the sample stage will need to be raised to bring the elastic recoil peak up to the desired setting. The proper Z height for a blank sample holder is ~ 16.5mm. Therefore you can estimate the proper Z height of your sample from ( Proper Z = 16.5 your sample thickness) Enter this number into the Z position in the display window and click Drive Z. The elastic recoil peak will move closer to the green center line. At this point fine adjustments to the Z height can be made with the keyboard up/down arrow keys, or the up/down stage tab in the display window. Move until the recoil peak centers on the green line. At this point, click the Close button in the bottom corner of the display window. For similar samples close together on a small holder, this Z position should be good for the full sample set. If the samples are different substrates or spread far apart on the large holder, it is a good idea to redo the Z Align whenever moving to a new sample.

12 Setting Electron Gun for Analysis The 1 kev 1 na beam is used to locate the sample of interest and to do the Z Align, but you cannot get meaningful AES data with only 1 kev primary electrons. The most common starting setting for AES analysis is 10 kev 10 na. Go to the SEM session tab at the top of the SmartSoft user interface. Use the pulldown menu for SEM Settings in the upper right hand corner of the window. Chose the 10kV10nA file and click load. The electron gun supply in the electronics chassis will display the chosen beam energy. Zoom in on a feature on the sample to set the focus and stigmation to get the best image.

13 Course Focus and Stigmation are located in the upper right had corner of the SEM settings window. Fine focus is done by means of a focus know on the electronics chassis just below the electron beam control.
 by clicking the Camera Icon in the SEM session.")
14 It is good practice to find a feature and focus at a higher magnification that intended for the analysis and then zoom back out to the desired magnification for the analysis. At any time you can save an SEM image to your user directory (see setting user directory in following AES Tab section) by clicking the Camera Icon in the SEM session. AES Tab The AES session tab is used to set the user directory to store the data and to set all the acquisition parameters and acquire data. User Directory Click the AES session tab at the top of the SmartSoft user interface. Click the Data Manager application tab along the right hand side of the AES session, and the Directory tab in the upper right corner of this session. Every user creates their own Main data directory under C;\Datafiles\Users. You can then create subdirectories however you wish to sort your data. Create a new directory or highlight an existing directory under the C:\Datafiles\Users data string and click the Set Acquisition Directory Icon just above the directory string list. This will set the destination directory of all data acquired during your session. Set a file name and file number by clicking the Properties button at the bottom right corner of this session. A Data Manager Properties window will open. Click the Lab Book Tab at the top of this window. Type a file

15 name and start number for your data. The file number will automatically increment for each saved file. To change the name for a new sample, return to this window between each sample. Click the Close button at the bottom of the Data Manager Properties window.
16 Survey An Auger survey is a quick, high sensitivity acquisition of Auger data over a wide energy range. A survey is used to identify elements present in the analysis area. Under the AES session tab and select the Survey application tab along the right hand side. Select Survey in the top right hand corner. Enter the Starting ev, Range, ev per step and cycle number in the setup. Check the status of Image Registration (typically this is Off for low magnification analyses. See later section for Using Image Registration). Before starting the acquisition, you must set the points or areas on the sample that you wish to survey. In the AES Session, click the Analysis Area button in the top right section of the Survey window. A list of points and areas will be displayed and the points and areas will show on the SEM image. Points and areas can be added or removed. Existing points and areas can be moved by dragging them with the mouse in the SEM image area. Clicking the mouse in an open area of the SEM image will add points while in this tab. Once all the areas of interest have been defined, click the Survey button at the top of this window and then click Survey to start the acquisition.
17

18 An Acquisition Status window will appear showing how many points/areas are being analyses, number of cycles for the full analysis, and current point and cycle of the acquisition. If left, the system will complete all the requested points and cycles and automatically save the data in the designated acquisition directory. Clicking the Abort button in the bottom of this window will stop the acquisition and no data will be saved. Clicking the Stop button in the bottom of this window will set the system to complete the current cycle being run and then stop and save the data.

19 Line Scan An Auger Line Scan is a series of data points collected along a horizontal or vertical line across an area of the sample. In the AES session click the Line Scan application tab along the right hand side. In the upper right hand portion of the line scan setup window you choose the 2 point, 3 point or window mode of acquisition and the point resolution of the line scan. In the lower portion you select the specific element energy transitions that you wish to monitor in the line scan. A full survey cannot be done in Line Scan Mode. Clicking Analysis Line along the top of the line scan setup window allows you to choose the line (Horizontal or Vertical) and position the line in the SEM Image.

20 Click the test acquire icon to open up the test acquire window where you set the position of the window, 2 point or 3 point peak and background regions to be used for each element monitored in the line scan. In 2 point mode for example, the two red lines are centered about the element peak and the two blue lines are set around the background near that peak. The width of the lines is fixed. This width is based on the detector resolution at that energy. During a test acquisition, the test point is displayed in the SEM image. You can move the test point to be acquiring from an area that contains the element of interest.


21 Maps An AES Map, like a Line Scan, steps the beam over a specific area of the sample while monitoring the peak and background of specific elemental energy transitions. The map area is defined to be what is shown in the SEM field of view. Acquisition Mode, Image Resolution, Elements monitored and Test Acquisition are the same as in Line Scan. In addition to Stop and Abort in the Acquisition Status Window, a Next Element Button also appears. Clicking the Next Element, will cause the acquisition to finish the current frame for the current element, and then move on to the next element. In the Map session, clicking the Stop Button will cause the acquisition to finish the current frame of the current element and then stop and save the data without going on to the remaining elements.
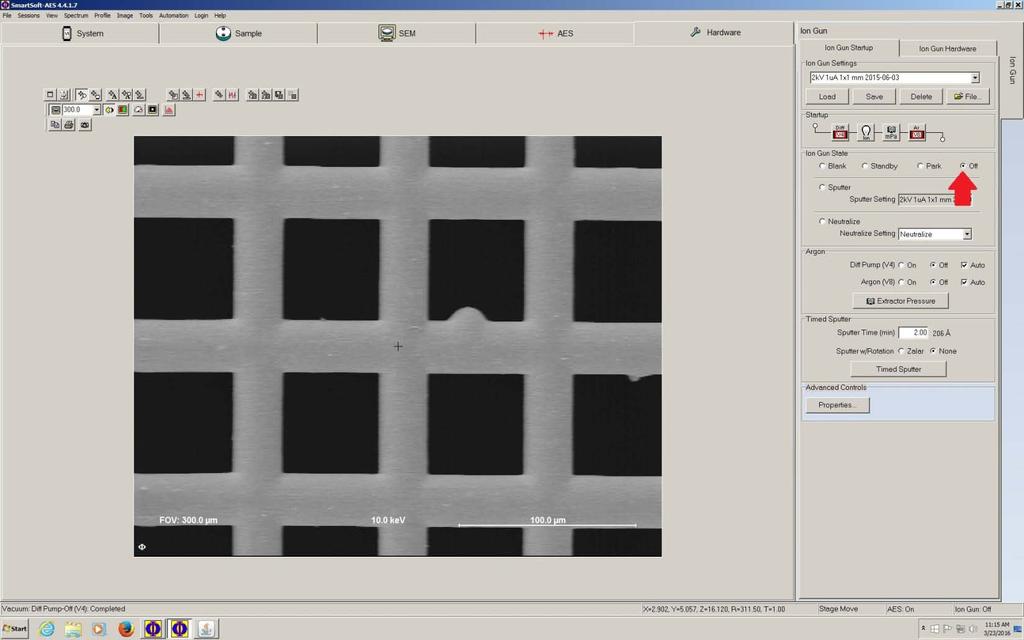
22 Ion Sputtering An Argon Ion gun can be used to sputter the surface of the sample. This can be used in a Timed Sputter to remove surface material prior to doing the next set of data acquisition, or can be used in a Depth Profile to alternate between sputtering the surface and collection Auger Data. To turn on the argon ion gun, go to the Hardware Session Tab, choose a preset ion gun file from the pull down menu and click the Standby Button. This will automatically start the differential pumping of the ion gun, open the argon gas leak, and turn on the ionizer filament. It is best to let the gun warm up for about five minutes so the filament and gas pressure are stable. Prior to sputtering, click the Blank button. You can manually sputter the surface for a set time by entering the time in the Sputter Time Field and clicking Timed Sputter. The ion gun will use the conditions of the chosen beam file and sputter the sample surface for the set amount of time. At the end of the set time, the ion gun will return to the Blank state, and further Auger Analyses can be performed. You can pause the sputtering by clicking the Timed Sputter button before the countdown reaches the end.
23 The argon beam can also be used in a Depth Profile mode, where you alternate between sputtering the sample to expose a fresh surface and acquiring data from selected elements of interest. In the AES Session tab, choose the Profile tab. Analysis Mode, Elements of Interest, Test Acquire are all set up the same as in a line scan or a multiplex. You can also import set elements from one analysis type to another such as setting up a line scan and then using the same element set in a depth profile. In addition to the analysis mode and element list, in a depth profile you set the total Sputter Time for the profile and the Sputter Interval for how long the beam sputters between each acquisition cycle. There is also a delay setting which allows the sample to stabilize after the ion gun is blanked before the Auger data acquisition begins. 2 to 3 seconds is a typical delay time. The acquiring depth profile data is displayed as electron counts versus sputter time for each element. If you are doing a 2 Point Acquisition Mode (Peak Background), due to the slope in the Auger Background spectra, a negative number may appear if the element of interest is not detected. Multipak is set to treat negative numbers as zero, so that no negative concentrations can appear.
24
25 When you are finished using the ion gun on the sample set you have loaded, the ion gun is turned off by clicking the off button in the ion gun menu under the Hardware session. This will shut down the filament, turn off the argon gas flow and stop the differential pumping of the ion gun. You then need to go back to the system tab and click the pump button in the extract sample flow chart. Image Registration When running a high kv beam file and/or a very small field of view for fine features, the acquisition area may move over time due to beam drift. Image registration saves a reference image of a feature in the field of view. During the analysis, a live image is checked against the stored reference image and the registration will automatically compensate for beam drift. In the AES session, click the Image Registration application tab along the right hand side. We typically only use the 1 point registration. Two point is really only needed if sample rotation is used during a Zalar Rotation Depth Profile. It is best if the field of view of the reference image matches the field of view of the analysis. Click the 1 button in the image registration flow chart. A double box will appear on the SEM image that defines the reference image. This can be moved or the size changed using the mouse in the SEM image. Position the box around a distinct and well defined feature in the SEM. Once positioned, click the Save Image button in the image registration flow chart. Now in any analysis setup, you can click the Image Registration On button and select the registration interval. You can click the Register Image button in the image registration flow chart to test the registration prior to starting the analysis. If you move to a new area of the sample, you either need to click the image registration Off button, or return to the Image Registration setup and redefine a reference image before starting the next analysis.

26 Shutdown / Extract Sample If the ion gun had been used during your analysis, go to the Hardware Session and in the Ion Gun Settings tab, Click the Off button to turn off the ion gun filament, close the Ar gas leak and stop the differential pumping of the gun. Go to the System Session and in the Extract Sample Flow, click the Pump Intro icon. Go to the SEM session tab and in the SEM setting tab, choose the 1keV, 1nA beam file from the pull down menu and click the Load button. Go back to the System session. If the Pump button had been clicked in the Extract Flow, make sure the message in the lower left corner indicates Pump Intro Complete. Click the Extract icon in the flow. The stage will move to the extraction position and the V1 gate valve will open and a message will appear


27 Smoothly slide the arm into the main chamber and watch that the fork slides onto the bottom of the sample holder. Click OK. The stage will drop, releasing the sample holder and the message will appear Smoothly slide the arm all the way out of the chamber. The V1 gate valve will automatically close. Click OK. Click Backfill in the Extract Sample Flow When the Intro Convectron Gauge reaches 780 torr, you can remove the cap on the intro chamber and remove your sample holder. Replace the cap on the intro chamber and click either Pump button in the Intro or Extract Sample flow. Watch the convectron gauge to make sure the system pumps down. Turn off the light in the main chamber and disable the instrument in Badger.
PHI VersaProbe III User Guide
 PHI VersaProbe III User Guide Created for Stanford NanoShared Facilities (SNSF) Juliet Jamtgaard October, 2016 This document was created for training purposes only. Screenshots are from SmartSoft- VersaProbe
Quick User Guide for XPS Analysis
 Quick User Guide for XPS Analysis Please refer to General User Guide and its table of contents to find details on how to execute the following tasks. When in doubt, discuss your procedure with Dr. Lozovyy
Operation Procedure for the DLD Axis Ultra XPS
 Operation Procedure for the DLD Axis Ultra XPS Version 2.0* Note This user handbook was a modification of the Kratos technician offered version Users are suggested to mount samples that can be analyzed
XPS1 Automated Multi-Sample Run Procedure
 XPS1 Automated Multi-Sample Run Procedure Follow the XPS Operating Procedure to load samples into the SAC chamber. Once the samples are in the SAC chamber, the following procedure can be used to automate
Bruker OminiFlex MALDI-TOF Mass Spectrometer Operation Quick Start
 Bruker OminiFlex MALDI-TOF Mass Spectrometer Operation Quick Start Sample preparation for the Bruker OminiFlex MALDI-TOF Mass Spectrometer is of crucial importance. Please take care when preparing your
JEOL CarryScope SEM Revision /07/17 Page 1 of 7. JEOL CarryScope SEM
 Page 1 of 7 JEOL CarryScope SEM The JEOL CarryScope is a compact and portable SEM that utilizes a standard tungsten filament. It is to be used for inspecting and measuring samples processed in the NRF
University of Minnesota NanoFabrication Center Standard Operating Procedure
 Equipment Name: JEOL SEM Coral Name: jeol-sem Revision Number: 4 Model: JSM-6610LV Revisionist: K. Roberts Location: Area 3 Date: 9/17/2013 1 Description The JSM-6610LV is a scanning electron microscope
SUSS SB6E BONDER SOP. October 2013
 SUSS SB6E BONDER SOP October 2013 The SUSS SB6 bonder is capable of silicon fusion, anodic, and eutectic bonding. There are two separate heads; one for anodic bonding, and another for fusion bonding. Definitions
DDX-R Quick Start Guide
 DDX-R Quick Start Guide Imaging Support 1-855-726-9995 www.scilvet.com Contents USING DDX-R... 2 Opening a Patient File... 2 Opening a New Patient File... 3 Screen Layout... 3 ACQUIRING IMAGES ON A PATIENT...
Standard Operating Procedure FEI Quanta 200 Scanning Electron Microscope
 Standard Operating Procedure FEI Quanta 200 Scanning Electron Microscope This document is intended as a guide to the operation of the FEI Quanta 200ESEM by certified users. It provides details on sample
Appendix 1: DataStudio with ScienceWorkshop Sensors Tech Tips
 Appendix 1: DataStudio with ScienceWorkshop Sensors Tech Tips Section 1: Starting an experiment 1.1 Opening a file 1. Open the File menu and select Open Activity. 2. In the Open dialog box, navigate to
Raith e_line Electron Beam Lithography
 Raith e_line Electron Beam Lithography Standard Operating Procedure 1 (For an un-patterned sample) Revision: 7.0 Last Updated: Feb.18/2015, Revised by Mohamad Rezaei Overview This document will provide
University of Minnesota Nano Fabrication Center Standard Operating Procedure
 Equipment Name: University of Minnesota Nano Fabrication Center Coral Name: hs-scope Revision Number: 1.5 Model: HS200A Revisionist: M. Fisher Location: Bay 1 Date: 9/12/2013 1 Description The Hyphenated
Residual Gas Analyzers XT Series
 Residual Gas Analyzers XT Series Extorr XT Series Residual Gas Analyzers The Extorr XT systems are ideal for gas analysis, leak detection and vacuum processing applications. These reliable, easy to use
Chromeleon-PA Analyzer User s Guide Dionex Corporation
 Chromeleon-PA Analyzer User s Guide 2003 Dionex Corporation Document No. 031964 Revision 01 October 2003 2003 by Dionex Corporation All rights reserved worldwide. Printed in the United States of America.
The Dektak XT is a 2D contact profilometer used for step height, pitch and surface roughness
 Dektak XT 2D Profilometer Operation Manual The Dektak XT is a 2D contact profilometer used for step height, pitch and surface roughness measurements. Vision 64 application software controls the system
Preparing for EBeam Write
 Preparing for EBeam Write Electron beam lithography is a time-intensive process that takes many steps to properly prepare for writing. In order to make the process as efficient and simple as possible,
Nicolet FT-IR Procedure
 Nicolet FT-IR Procedure Getting Started Jerry Hu (Lab Manager), ext. 7914 or 7940 jghu@mrl.ucsb.edu Jaya Nolt (Lab Tech), ext. 4997 jaya@mrl.ucsb.edu Materials Research Laboratory University of California,
ION MILLING USING PVD 75 SOP. January 2014 START UP
 ION MILLING USING PVD 75 SOP January 2014 START UP 1. Select the VACUUM tab at the top left of the screen. NOTE: The current vacuum found at the bottom of the screen in Torr. 2. To open the chamber press
SIMPLE TEXT LAYOUT FOR COREL DRAW. When you start Corel Draw, you will see the following welcome screen.
 SIMPLE TEXT LAYOUT FOR COREL DRAW When you start Corel Draw, you will see the following welcome screen. A. Start a new job by left clicking New Graphic. B. Place your mouse cursor over the page width box.
PANalytical Epsilon 5 XRF spectral acquisition, processing and reporting
 QSM Approval: PANalytical Epsilon 5 XRF spectral acquisition, processing and reporting 1. Introduction and Scope 1.1. This Standard Operating Procedure provides instruction for the operation, acquisition
Visual Physics Introductory Lab [Lab 0]
![Visual Physics Introductory Lab [Lab 0]](/thumbs/74/69956143.jpg "Visual Physics Introductory Lab [Lab 0]") Your Introductory Lab will guide you through the steps necessary to utilize state-of-the-art technology to acquire and graph data of mechanics experiments. Throughout Visual Physics, you will be using
Your Introductory Lab will guide you through the steps necessary to utilize state-of-the-art technology to acquire and graph data of mechanics experiments. Throughout Visual Physics, you will be using
NR-TEC S2S SURFACE TO SANDFACE DATA LOGGER
 NR-TEC S2S SURFACE TO SANDFACE DATA LOGGER INTRODUCTION RIGGING IN / OUT CONNECTING TO DEVICE TAKING A SINGLE SHOT BASIC OPERATIONS GUIDE SCHEDULING VIEW A SHOT SCHEDULE UPLOAD A NEW SHOT SCHEDULE ERASING
R4 Engine Programming Software
 R4 Engine Programming Software Description: The R4 software is a Windows TM based software package that provides the user interface for a variety of Split Second engine management products. It controls
Brief IconNMR and Topspin 3.5 User Guide for Bruker NMR Spectrometers Avance IIIHD 400MHz NMR with Autosampler in Chemistry room 93 DISCLAIMER
 DISCLAIMER Brief IconNMR and Topspin 3.5 User Guide for Bruker NMR Spectrometers Avance IIIHD 400MHz NMR with Autosampler in Chemistry room 93 This document is intended to be a brief, bare-bones user s
Profile Modeler Profile Modeler ( A SuperControl Product )
") Profile Modeler ( A SuperControl Product ) - 1 - Index Overview... 3 Terminology... 3 Launching the Application... 4 File Menu... 4 Loading a File:... 4 To Load Multiple Files:... 4 Clearing Loaded Files:...
Profile Modeler ( A SuperControl Product ) - 1 - Index Overview... 3 Terminology... 3 Launching the Application... 4 File Menu... 4 Loading a File:... 4 To Load Multiple Files:... 4 Clearing Loaded Files:...
Keynote 08 Basics Website:
 Website: http://etc.usf.edu/te/ Keynote is Apple's presentation application. Keynote is installed as part of the iwork suite, which also includes the word processing program Pages and the spreadsheet program
DATA ACQUISITION USING THE BIOPAC DATA SYSTEM
 DATA ACQUISITION USING THE BIOPAC DATA SYSTEM Acquiring Your Data: NOTE: Section A1 to A3 will be done for you before enter the lab. Therefore, the system should be set up and ready to acquire data. It
Gallios TM Quick Reference
 Gallios TM Quick Reference Purpose: The purpose of this Quick Reference is to provide a simple step by step outline of the information needed to perform various tasks on the system. We begin with basic
SolidWorks Intro Part 1b
 SolidWorks Intro Part 1b Dave Touretzky and Susan Finger 1. Create a new part We ll create a CAD model of the 2 ½ D key fob below to make on the laser cutter. Select File New Templates IPSpart If the SolidWorks
XRADIA microxct Manual
 XRADIA microxct Manual Multiscale CT Lab Table of Contents 1. Introduction and Basics 1.1 Instrument Parts 1.2 Powering up the system 1.3 Preparing your sample 2. TXM Controller 2.1 Starting up 2.2 Finding
You can also search online templates which can be picked based on background themes or based on content needs. Page eleven will explain more.
 Microsoft PowerPoint 2016 Part 1: The Basics Opening PowerPoint Double click on the PowerPoint icon on the desktop. When you first open PowerPoint you will see a list of new presentation themes. You can
Creating & Modifying Tables in Word 2003
 Creating & Modifying Tables in Word 2003 This bookl LaTonya Motley Trainer / Instructional Technology Specialist Staff Development 660-6452 Table of Contents Overview... 1 Inserting Tables... 1 Using Pre-Set
Wide Guy: Inverted Widefield Microscope
 Wide Guy: Inverted Widefield Microscope Kyle Marchuk Adam Fries Jordan Briscoe August 2017 Contents 1 Introduction 2 2 Initial Setup 3 2.1 Hardware Startup........................................... 3
ABM's High Resolution Mask Aligner Features:
 ABM's High Resolution Mask Aligner is a very versatile instrument with interchangeable light sources which allow Near-UV (405-365 nm) as well as Mid- and Deep-UV (254 nm, 220 nm) exposures in proximity
Visual Physics - Introductory Lab Lab 0
 Your Introductory Lab will guide you through the steps necessary to utilize state-of-the-art technology to acquire and graph data of mechanics experiments. Throughout Visual Physics, you will be using
Oxford ICP 2-step DRIE SOP
 Oxford ICP 2-step DRIE SOP Oxford ICP 2-step DRIE SOP Page 1 of 13 1. Scope 1.1 This document provides operating procedures for the Oxford 100 ICP 2-step DRIE. 2. Table of Contents 1. Scope... 1 2. Table
ION BEAM MILLING SYSTEM FOR TEM, SEM AND LM PREPARATION. Leica EM RES102
 ION BEAM MILLING SYSTEM FOR TEM, SEM AND LM PREPARATION Leica EM RES102 ION BEAM MILLING In recent years, ion milling has been developed into the most applicable method of sample preparation for the analysis
Contents. Launching Word
 Using Microsoft Office 2007 Introduction to Word Handout INFORMATION TECHNOLOGY SERVICES California State University, Los Angeles Version 1.0 Winter 2009 Contents Launching Word 2007... 3 Working with
Operating Procedure for Horiba Raman Microscope
 Operating Procedure for Horiba Raman Microscope SAFETY Be aware of Laser radiation at all times! Do not remove the covers of the instrument. Components are supplied with 110V electric source. Do not touch
Sciex QTrap Operational Steps for Trained Personnel
 Sciex 6500+ QTrap Operational Steps for Trained Personnel Last Updated 09172017 1. If any of the following instructions does not make sense to you or was not covered during your hand-on training, stop
MIMAKI ENGINEERING CO., LTD.
 CAMLINK Instruction manual MIMAKI ENGINEERING CO., LTD. TKB Gotenyama Building, 5-9-41, Kitashinagawa, Shinagawa-ku, Tokyo 141-0001, Japan Phone: +81-3-5420-8671 Fax: +81-3-5420-8687 URL: http://www.mimaki.co.jp/
Introduction. Using Shapes. Word 2010 Working with Shapes. Video: Working with Shapes in Word To Insert a Shape: Page 1
 Word 2010 Working with Shapes Introduction Page 1 You can add a variety of shapes to your document including arrows, callouts, squares, stars, flowchart shapes and more. Want to set your name and address
PARADIGM EBOOK NAVIGATION INTERACTIVE GUIDE
 Menu Hovering the mouse over an ebook on Bookshelf will cause a menu to appear. This menu contains two options for accessing the ebook: Opening Book to Last Viewed page and Table of Contents. Open Book
Sorting Fields Changing the Values Line Charts Scatter Graphs Charts Showing Frequency Pie Charts Bar Charts...
 Database Guide Contents Introduction... 1 What is RM Easiteach Database?... 1 The Database Toolbar... 2 Reviewing the License Agreement... 3 Using Database... 3 Starting Database... 3 Key Features... 4
3.0 Operation 3.0 OPERATION - GENERAL
 3.0 Operation 3.0 OPERATION - GENERAL The operation of the INNOV-X XRF Instruments is very simple. Power to the instrument is controlled by the ON/OFF button on the base of the pistol grip. This power
Chapter 4 Printing and Viewing a Presentation Using Proofing Tools I. Spell Check II. The Thesaurus... 23
 PowerPoint Level 1 Table of Contents Chapter 1 Getting Started... 7 Interacting with PowerPoint... 7 Slides... 7 I. Adding Slides... 8 II. Deleting Slides... 8 III. Cutting, Copying and Pasting Slides...
Equipment Overview: Safety:
 PerkinElmer Series 200 HPLC: Operating Procedure 12/2/11 R.C Equipment Overview: This document outlines the basic procedure for using the Sedex light scattering detector and the PE series 200 HPLC system
5 Setting Preferences 15 Preferences 15 Configure Chart Colors 16
 CRITERION Vantage 3 Acquire Training Manual Contents 1 Introduction 3 Collecting Data 3 2 Starting the Program 3 Logging In and Logging Out 3 Logging In 3 Logging in as an Administrator 3 Logging in as
PI3000. User Guide PASSENGER INFORMATION SYSTEM. rev 1.2
 PI3000 PASSENGER INFORMATION SYSTEM User Guide rev 1.2 PLEASE READ THIS FIRST! Insurance The security dongle has significant value and is the key to your system and your charts. It is not possible to replace
Colony Counting User Manual A D I V I S I O N O F S Y N O P T I C S L T D
 ProtoCOL Colony Counting User Manual S Y N B I O S I S A D I V I S I O N O F S Y N O P T I C S L T D All possible care has been taken in the preparation of this publication, but Synoptics Limited accepts
ME 365 EXPERIMENT 3 INTRODUCTION TO LABVIEW
 ME 365 EXPERIMENT 3 INTRODUCTION TO LABVIEW Objectives: The goal of this exercise is to introduce the Laboratory Virtual Instrument Engineering Workbench, or LabVIEW software. LabVIEW is the primary software
HKL Flamenco EBSD Data Acquisition Flow
 HKL Flamenco EBSD Data Acquisition Flow Basic steps for automatic data acquisition (e.g. orientation mapping) This is basic routine for the new operator. Feel free to experiment with different settings
SMART CLASSROOM TRAINING MANUAL
 SMART CLASSROOM TRAINING MANUAL SMART CLASSROOM TRAINING MANUAL Center for Instructional Technology Table of Contents LCD Touch Panel Using the Touch Screen...3 How to use the Computer and Laptop Options...4
1. Open PowerPoint and you will see the introductory screen that contains different themes and templates. From the selection displayed, choose Slice.
 PowerPoint Assessment ***Remember! This is a test and you cannot ask for help. This must be done completely on your own. If you have forgotten a skill, please go to my Tutorials page on my website and
Oxford DSiE Revision /25/17 Page 1 of 9. Oxford DSiE SOP
 Page 1 of 9 Oxford DSiE SOP The PlasmaPro 100 is a Inductively coupled plasma device (ICP) configured to provide effective high aspect ratio etching of 4 inch silicon wafers, and pieces when a carrier
Excel Select a template category in the Office.com Templates section. 5. Click the Download button.
 Microsoft QUICK Excel 2010 Source Getting Started The Excel Window u v w z Creating a New Blank Workbook 2. Select New in the left pane. 3. Select the Blank workbook template in the Available Templates
for High-Performance Routine Analysis
 ESCA + 105-V01/11.04 ESCA+ for High-Performance Routine Analysis - Reliable and Fast ESCA Analysis - Ease of Use - Impressive XPS Horsepower Performance - High Energy Resolution - Quantification with Industry-
4.2 NORMAL OPERATION NORMAL START UP PROCEDURE
 4.2 NORMAL OPERATION 4.2.1 NORMAL START UP PROCEDURE Kimball Physics recommends that the gun be run only in a vacuum of 10-5 torr or better for an alkali metal ion source. Poorer vacuum may result in source
ChromQuest 5.0 Quick Reference Guide
 ChromQuest 5.0 Quick Reference Guide This guide contains an overview of the ChromQuest chromatography data system, with topics organized by workflow. For more information, refer to the ChromQuest User
I. BASIC OPERATION (PREPARATION)
") 10 lcon indicators used in this manual I. BASIC OPERATION (PREPARATION) Operation direction Attention Lamp blinking Attaching the Camera Strap 11 1 2 3 1. Use a coin or similar object to slide the clasp
10 lcon indicators used in this manual I. BASIC OPERATION (PREPARATION) Operation direction Attention Lamp blinking Attaching the Camera Strap 11 1 2 3 1. Use a coin or similar object to slide the clasp
Scholastic Interactive Teaching System User s Guide
 Scholastic Interactive Teaching System User s Guide For use with READ 180 Next Generation version 2.1 or later, READ 180 Enterprise Edition version 2.1 or later, System 44 version 2.1 or later, Expert
POWERPOINT BASICS: MICROSOFT OFFICE 2010
 POWERPOINT BASICS: MICROSOFT OFFICE 2010 GETTING STARTED PAGE 02 Prerequisites What You Will Learn USING MICROSOFT POWERPOINT PAGE 03 Microsoft PowerPoint Components SIMPLE TASKS IN MICROSOFT POWERPOINT
Log into the computer using your CU Denver username and password. Log into the DIVA software using your CU and Username and the password flow
 Log into the computer using your CU Denver username and password Log into the DIVA software using your CU and Username and the password flow When DIVA opens, IF a CST Mismatch pop up box appears, then
Position Table Creation
 Position Table Creation The Position Table creation process is illustrated by following a practical example to carryout sequential ESCA analyses on each of three different sample areas. The samples are
Budget Exercise for Intermediate Excel
 Budget Exercise for Intermediate Excel Follow the directions below to create a 12 month budget exercise. Read through each individual direction before performing it, like you are following recipe instructions.
Quick Setup Instructions for the Knauer HPLC-System. Quick Setup Instructions for the Knauer HPLC-System For windows XP (using CHANCE vers. 2.
 For windows XP (using CHANCE vers. 2.0) Compiled by P. Madl Vers. 1.0 June 2011 1 / 9 1. Hardware Setup: Result 1.1. Attach RS 232 interface cable (designated as PC) to COM-port-1 of the laptop. 1.2. connect
Chromatography Software Training Materials. Contents
 Chromatography Software Training Materials This document contains information on how to build a method, start the instrument to acquire data, and then process the data using the Galaxie Program. You will
TraceFinder Analysis Quick Reference Guide
 TraceFinder Analysis Quick Reference Guide This quick reference guide describes the Analysis mode tasks assigned to the Technician role in the Thermo TraceFinder 3.0 analytical software. For detailed descriptions
LEGENDplex Data Analysis Software Version 8 User Guide
 LEGENDplex Data Analysis Software Version 8 User Guide Introduction Welcome to the user s guide for Version 8 of the LEGENDplex data analysis software for Windows based computers 1. This tutorial will
SW860 FlukeView Software
 SW860 FlukeView Software Version 2 (Windows and DOS) Users Manual PN 944520 January 1995 Rev. 1 12/95 1995 Fluke Corporation, Inc. All rights reserved. Printed in U.S.A. All product names are trademarks
PowerPoint 2016 Building a Presentation
 PowerPoint 2016 Building a Presentation What is PowerPoint? PowerPoint is presentation software that helps users quickly and efficiently create dynamic, professional-looking presentations through the use
SolidWorks 2½D Parts
 SolidWorks 2½D Parts IDeATe Laser Micro Part 1b Dave Touretzky and Susan Finger 1. Create a new part In this lab, you ll create a CAD model of the 2 ½ D key fob below to make on the laser cutter. Select
Navigating and Logging Out of Meditech
 Navigating and Logging Out of Meditech There are some basic tips when using Meditech: There are times when Meditech requires a command and it will not recognize the command if it is lower case and it expects
FEI Helios NanoLab 600 TEM specimen prep recipe Nicholas G. Rudawski (352) (office) (805) (cell) Last updated: 07/16/18
 (office) (805) (cell) Last updated: 07/16/18") FEI Helios NanoLab 600 TEM specimen prep recipe Nicholas G. Rudawski ngr@ufl.edu (352) 392 3077 (office) (805) 252-4916 (cell) Last updated: 07/16/18 This recipe is essentially a composite of several established
FEI Helios NanoLab 600 TEM specimen prep recipe Nicholas G. Rudawski ngr@ufl.edu (352) 392 3077 (office) (805) 252-4916 (cell) Last updated: 07/16/18 This recipe is essentially a composite of several established
UNIFIT - Spectrum Processing, Peak Fitting, Analysis and Presentation Software for XPS, AES, XAS and RAMAN Spectroscopy Based on WINDOWS
 UNIFIT - Spectrum Processing, Peak Fitting, Analysis and Presentation Software for XPS, AES, XAS and RAMAN Spectroscopy Based on WINDOWS UNIFIT FOR WINDOWS is an universal processing, analysis and presentation
Word 2013 Quick Start Guide
 Getting Started File Tab: Click to access actions like Print, Save As, and Word Options. Ribbon: Logically organize actions onto Tabs, Groups, and Buttons to facilitate finding commands. Active Document
Microsoft Excel 2007 Creating a XY Scatter Chart
 Microsoft Excel 2007 Creating a XY Scatter Chart Introduction This document will walk you through the process of creating a XY Scatter Chart using Microsoft Excel 2007 and using the available Excel features
Libraries. Multi-Touch. Aero Peek. Sema Foundation 10 Classes 2 nd Exam Review ICT Department 5/22/ Lesson - 15
 10 Classes 2 nd Exam Review Lesson - 15 Introduction Windows 7, previous version of the latest version (Windows 8.1) of Microsoft Windows, was produced for use on personal computers, including home and
Probe for EPMA Quick Start Instructions
 Probe for EPMA Quick Start Instructions Setting up a New Run for Quantitative Acquisition This guide is intended as a quick start and just covers the basic steps for creating a new Probe for EPMA run.
FlowNEST User s Guide. M-323 Version 6.0
 FlowNEST User s Guide M-323 Version 6.0 FLOWMASTER FlowNEST User's Guide Due to continuing product improvement, the information contained in this document is subject to change without notice. Flow International
Chapter 3. Experimental Procedure
 Chapter 3 Experimental Procedure 33 3.1 Burner Systems Startup 3.1.1 Instrumentation power up The instrumentation of the burner including the PC need to be turned on, in order to provide safe ignition
This guide will help you with many of the basics of operation for your Epson 485wi BrightLink Projector with interactive functionality.
 This guide will help you with many of the basics of operation for your Epson 485wi BrightLink Projector with interactive functionality. If you need further assistance with questions, you can refer to the
Printing for Professionals
 Océ cm5/ cm5 Printing for Professionals User s Guide Enlarge Display Operations Introduction Thank you for choosing this machine. The Océ cm5/cm5 User s Guide [Enlarge Display Operations] contains details
Bill Analyser User Guide
 Bill Analyser User Guide emobile.ie/business Contents 1.0 Basic Concepts... 3 1.1 Users and Roles... 3 Standard Users... 3 Global Users... 3 eircom User Roles... 3 Available user roles... 3 1.2 Data Structure...
Hardware Guide. AB SCIEX QTRAP 5500 System
 Hardware Guide AB SCIEX QTRAP 5500 System D1000079384 E May 2010 This document is provided to customers who have purchased AB SCIEX equipment to use in the operation of such AB SCIEX equipment. This document
Introduction to Microsoft Office PowerPoint 2010
 Introduction to Microsoft Office PowerPoint 2010 TABLE OF CONTENTS Open PowerPoint 2010... 1 About the Editing Screen... 1 Create a Title Slide... 6 Save Your Presentation... 6 Create a New Slide... 7
Microsoft Excel 2007
 Learning computers is Show ezy Microsoft Excel 2007 301 Excel screen, toolbars, views, sheets, and uses for Excel 2005-8 Steve Slisar 2005-8 COPYRIGHT: The copyright for this publication is owned by Steve
Direct Image Viewer User Tutorial
 Direct Image Viewer User Tutorial A guide to understanding the functions and features within the Direct Image Viewer to best present the data and to get the most understanding from the Direct Image logs.
Standard Operating Procedure: Stylus Profiler
 Contents Hardware Description and Principle of Operation... 1 Procedure... 1 Emergency Stop... 4 Allowed Activities... 4 Disallowed Activities... 5 What to watch out for during operation... 5 Common Troubleshooting
Introduction to operation
 Introduction to operation C 70 The status of the system is visualized in real time and shows a synoptic of both the transfer chamber and the main components of the machine sheet C 70A A number of different
Quick Start Guide to using Light Converse along with Pangolin LD2000 and BEYOND
 Quick Start Guide to using Light Converse along with Pangolin LD2000 and BEYOND First Steps Regardless of when or from whom you purchased Light Converse, we recommend you do the following steps before
Microsoft How to Series
 Microsoft How to Series Getting Started with EXCEL 2007 A B C D E F Tabs Introduction to the Excel 2007 Interface The Excel 2007 Interface is comprised of several elements, with four main parts: Office
2 Lab 2: LabVIEW and Control System Building Blocks
 2 Lab 2: LabVIEW and Control System Building Blocks 2.1 Introduction Controllers are built from mechanical or electrical building blocks. Most controllers are implemented in a program using sensors to
Getting Started with DADiSP
 Section 1: Welcome to DADiSP Getting Started with DADiSP This guide is designed to introduce you to the DADiSP environment. It gives you the opportunity to build and manipulate your own sample Worksheets
Introduction to MS Office Somy Kuriakose Principal Scientist, FRAD, CMFRI
 Introduction to MS Office Somy Kuriakose Principal Scientist, FRAD, CMFRI Email: somycmfri@gmail.com 29 Word, Excel and Power Point Microsoft Office is a productivity suite which integrates office tools
Lumitester PD-30. Control Software. Instruction Manual. Table of Contents
 Table of Contents Lumitester PD-30 Control Software Instruction Manual Thank you very much for purchasing the Lumitester PD-30. All of this Instruction Manual must be read before operation of this product
Agilent 6400 Series Triple Quadrupole LC/MS System
 Agilent 6400 Series Triple Quadrupole LC/MS System Quick Start Guide Where to find information 4 Getting Started 6 Step 1. Start the Data Acquisition software 7 Step 2. Prepare the LC modules 13 Step 3.
Working with PDF s. To open a recent file on the Start screen, double click on the file name.
 Working with PDF s Acrobat DC Start Screen (Home Tab) When Acrobat opens, the Acrobat Start screen (Home Tab) populates displaying a list of recently opened files. The search feature on the top of the
PowerPoint Basics (Office 2000 PC Version)
") PowerPoint Basics (Office 2000 PC Version) Microsoft PowerPoint is software that allows you to create custom presentations incorporating text, color, graphics, and animation. PowerPoint (PP) is available
PowerPoint Basics (Office 2000 PC Version) Microsoft PowerPoint is software that allows you to create custom presentations incorporating text, color, graphics, and animation. PowerPoint (PP) is available