THE COMPLETE ALL IN ONE ROBOT 360 NANO BOT
|
|
|
- Isabel Parrish
- 5 years ago
- Views:
Transcription


1 THE COMPLETE ALL IN ONE ROBOT 360 NANO BOT


2 LINE FOLLOWER FIVE LINE SENSORS FOR SCANNING WHITE OR BLACK LINE OBSTACLE AVOIDER TWO OBSTACLE SENSORS CAN DETECT OBSTACLES AND MEASURE DISTANCE BLUETOOTH CONTROL CONNECT A BLUETOOTH MODULE & CONTROL IT FROM AN ANDROID


3 JUST ANOTHER ARDUINO NANO CONNECT THE USB CABLE & START PROGRAMMING IT FROM ARDUINO IDE 8 2 CHARACTER LCD WITH BACKLIGHT CONTROL OPTION USING ONBOARD MICROCONTROLLER


4 EASY PLUGGABLE RECHARGEABLE BATTERY

5 INSPIRED BY 3PI ROBOT We were impressed by the features and popularity of the 3pi robot from Pololu but disappointed at the same time due to its limitations and high price tag. So, we made our own robot, something way more user friendly with a bunch of added features and options. And of course with an affordable price.
6 COMPARISON 360 Nano Bot Pololu 3PI Microcontroller Atmega 328 Atmega 328 Motor Controller TB6612FNG TB6612FNG Motors 250 RPM high torque (more controllable) 700 RPM low torque Programmer Built-in Not included, have to buy an AVR programmer separately USB to Serial Built-in Not included, have to buy separately Arduino compatibly Arduino Nano built-in, supported by Arduino IDE out of the box Not supported out of the box, but Arduino software can be modified to add support Obstacle sensor Built-in Not available Bluetooth HC-05 connector, isolated No Bluetooth module connector Battery 2S Li-ion rechargeable battery, Included in product package AAA Alkaline batteries, Have to buy separately Charger Included in product package Have to buy separately if needed LCD Battery voltage indicator 8X2 monochrome LCD with digitally controllable backlight Indicated by power LED 8X2 monochrome LCD, no backlight Measured by microcontroller. Requires writing additional code to show battery voltage on LCD Size (Diameter) 10 cm 9.42 (3π) cm Price See product page (including battery & charger) USD (BDT 8085 approximately)
7 A CLOSER LOOK

8 Ball casters: Two ball casters provide smooth movement. Having ball casters on both front and rear side prevents stumbling during both acceleration and brake Wheels: Wide wheels with grooved tires provide better grip. wheel diameter is 4 cm Power LEDs: Two power LEDs act as both power and battery level indicator. They dims when battery charge is low USB: USB mini-b port, same as Arduino Nano Line Sensors: Five TCRT-5000 infrared line sensors for scanning white or black line Microcontroller: Atmega328 running on 16 MHz, flashed with Arduino Nano bootloader Motor Driver: TB6612FNG, running on volts, controls the speed and direction of rotation of two geared DC motors USB to Serial Converter: FT232RL ic controls programming and serial communication of the microcontroller

9 ANOTHER CLOSER LOOK
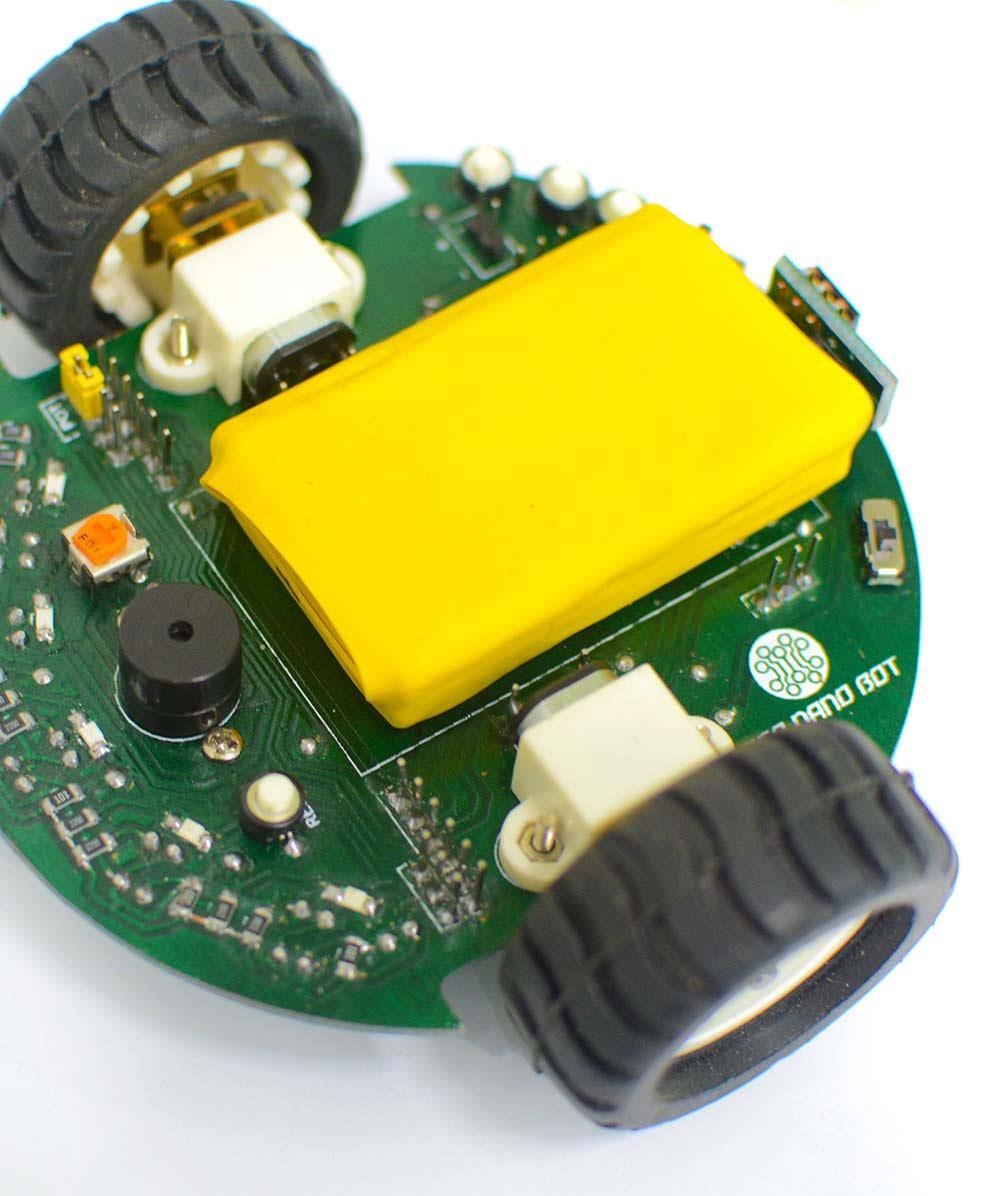
10 User LEDs: Five user LEDs, controllable from the microcontroller. They share the same microcontroller pins used for LCD. Not accessible while the shield is connected. Shield Connectors: Two sets of shield connector for attaching the shield and thus controlling LCD, obstacle sensors and optional Bluetooth module. User pot: Connected to an ADC pin of the microcontroller via pot jumper. User Buttons: Three user configurable buttons. Alternate Power Input: In case you want to use a different battery instead of the one provided with the package. Be careful about the voltage polarity if using these pins. Reset Button: To reset the atmega328 microcontroller. Buzzer: Just an audio output. Motors: High torque 250 rpm motors. Battery connector: For plugging in the 2S Li-ion battery provided with the package. Power switch: On-off switch. It s also a power selector switch for choosing power either from battery or USB port. Slide towards USB port to select USB power and you ll be able to test your program while the battery is charging. It also switches off the robot if USB cable is not connected. Slide towards battery connector to select battery power. You can run motors only on Battery power. Power LED Toggle Switch: If you don t like to keep the power LEDs always turned on or simply want to save some battery juice.


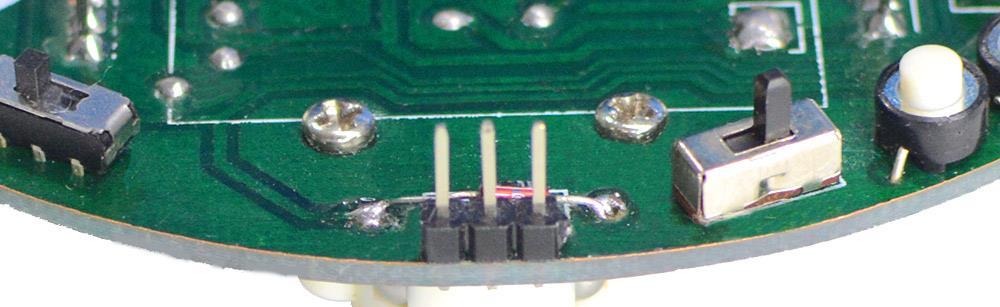
11 ACCESSING USER LEDs Connect 5 jumpers as shown by the RED LINES in the picture below to connect the 5 user LEDs to internal Arduino Nano pins 11, 12, 13, 0 & 1 from left to right. You cannot attach the shield while the 5 user LED jumpers are connected. 0 1 Putting a jumper indicated by the YELLOW line in the picture below connects the user pot to the microcontroller. The shield can be attached without removing it JUMPER DIAGRAM


12 THE SHIELD ADDS LCD, OBSTACLE SENSORS AND BLUETOOTH CONNECTOR Obstacle Sensor Switch: Obstacle sensors draw a lot of current draining the battery quickly. Switch them off when not in use. Push towards direction to turn on. Obstacle Sensors: Two TCRT-5000 based obstacle sensors can detect obstacle in front, left and right side up to 10cm distance. User can also detect obstacle distance using these. Bluetooth Connector: For directly plugging in a HC-05 bluetooth module. LCD: 8 2 character LCD connected to a shift register. The display as well as the backlight can be controlled using only 3 pins of the microcontroller.

13 Click this button for a detailed video demonstrating the components and their usage

14 CIRCUIT CONNECTIONS 360 Nano Bot has got an Arduino Nano built-in. Illustrating circuit connections using Arduino Nano for easy understanding.
 & pin 10 (in2) controls forward & reverse direction of the left motor. Pin 5 (EnA) controls left motors speed. Pin 8 (in3) & pin 7 (in4) control right motor direction.")
15 MOTOR CONTROL Now let s rotate the motors at both forward and reverse directions, at various speeds. Internal Arduino pins 9 (in1) & pin 10 (in2) controls forward & reverse direction of the left motor. Pin 5 (EnA) controls left motors speed. Pin 8 (in3) & pin 7 (in4) control right motor direction. Pin 6 (EnB) controls right motor speed. Click HERE for example code. LEFT MOTOR Arduino Pin 9 & 10 Control Direction Arduino Pin 5 Controls Speed RIGHT MOTOR Arduino Pin 8 & 7 Control Direction Arduino Pin 6 Controls Speed

16 READING LINE SENSORS The five line sensors are connected to internal Arduino Nano analog pins A7, A0, A1, A2 & A3 as shown in the picture beside. These sensors provide analog voltage output. When the robot is placed on a surface, these sensors output high voltage over white surface and low voltage over black surface. The difference of voltage output value on white & black surface is quite high (about 3 volts). Click HERE for example code. Upload the code, open Serial monitor at 9600 baud rate and you ll see readings from the sensors.

17 BUTTONS AND LCD Three button are connected in a voltage divider circuit as shown in the picture beside. Thus pressing each button will generate definite voltage at the Signal pin connected to internal Arduino Nano ADC pin A6. The LCD as well as its transistor controlled backlight is connected to the output of a shift register IC. So, by using only 3 pins of the internal Arduino Nano (digital pins 11, 12 & 13) connected to the shift register, the LCD along with the backlight can be controlled. Click HERE for example code. You ll be able to see detection of each button by the microcontroller on the LCD. You must have LiquidCrystal595 library added to your Arduino IDE for using the LCD. Download it from HERE. If you don t know how to add a zip library, this video can help. Use Arduino IDE version or later.
 is connected to Arduino analog pin A4. The pot jumper is used to connect the pot to Arduino Analog pin A4.")
18 BUZZER AND USER POTENTIOMETER A buzzer connected to internal Arduino Nano pin 4 can be used to generate an audible signal from the robot. A user pot (potentiometer) is connected to Arduino analog pin A4. The pot jumper is used to connect the pot to Arduino Analog pin A4. By removing the jumper, you can connect pin A4 to any of the 5 front LEDs using female-female jumper wire while the shield is attached and control the LED by using pin A4 as a digital pin (pin 18). Code for accessing the pot and the buzzer can be found HERE. It lets you control the buzzer by rotating the pot.
 side can be detected. Distance of the obstacle within the range can also be measured.")
19 OBSTACLE SENSORS The obstacle sensors work by the same capacitor discharge principle as our other obstacle sensor. Obstacles present at up to 10cm distance on right, left and front (large obstacle) side can be detected. Distance of the obstacle within the range can also be measured. Code for accessing the obstacle sensors can be found HERE. Presence of obstacle detected by both of the two sensors as well as obstacle distance can be viewed on LCD display. Obstacle sensors draw a lot of current from the battery and reduce run time. Slide the obstacle sensor switch towards direction (left) to turn on the obstacle sensors. Slide to the other direction (right) to turn them off when not in use and save battery juice.
20 BLUETOOTH CONNECTOR A connector for the popular HC-05 bluetooth module provides easy bluetooth add-on capability to the robot. When attached, bluetooth TX gets connected to internal Arduino Nano pin 0 and Bluetooth RX to Arduino pin1. As the bluetooth data pins and Arduino programming pins (pin0 & pin1) are the same, consider removing the bluetooth module while uploading program. Bluetooth can be used while USB is connected. Download the android app for making android controlled robot from HERE. Code for using bluetooth can be found HERE. It shows the data sent over Bluetooth on robots LCD display. Also, you can move the robot forward from your phone/tab using the app. Code for rest of the motions is left for the user to write.


21 CHARGING THE BATTERY The battery charger and a charging cable is included in the product package. You have to first connect the crocodile clips of the charging cable to the charger like the picture beside. The two batteries of the Li-ion battery pack have to be charged separately. Approximate charging time is five hours.


, connect the 2 pins of the charging cable to 2-3")

22 CHARGING THE BATTERY Connect the 2 pins of the charging cable to the 1-2 pins of the battery like the picture beside. Connect the Charger to your 220V AC wall outlet and let battery 1 charge. When battery 1 is fully charged (charger LEDs stop blinking), connect the 2 pins of the charging cable to 2-3 pins of the battery. Wait until fully charged. Charging Battery 1 There s NO + & - polarity of the charger and the charging cable. So don t worry about the polarity. Charging Battery 2
23 ALL IN ONE When you get your hands on the robot for the first time, we want you to play with it without writing any code. So, the robot is shipped with an all in one (AIO) sketch flashed inside the Atmega328 microcontroller. It lets you use all the functionalities of the robot at once, right out of the box. By selecting options from a user menu displayed on the LCD, you can make your robot follow line, avoid obstacles or run on bluetooth command from your android device. You can download the AIO firmware and the flasher (Xloader) from here for future use. Unzip the file and follow the instructions described in the next page.


24 FLASHING THE AIO FIRMWARE 1. Connect 360 Nano Bot to your PC using the USB cable. 2. Open XLoader.exe from XLoader folder. 3. Select hex file Browse to AllinOne.ino.hex that you have downloaded. 4. Select Device Duemilanove/Nano(Atmega328) 5. Select the correct COM port of your 360 Nano Bot 6. Select baud rate Hit Upload and wait for a few seconds Done! Now you have the AIO firmware loaded in your robot.


25 USING THE ROBOT WITH AIO FIRMWARE POWER ON NEXT or PREV OK / Back Line Sensor Calibration If HC-05 is already connected to the app OK / Back NEXT or PREV NEXT or PREV OK / Back OK / Back OK / Back After Bluetooth Connection

26 USING THE ROBOT WITH AIO FIRMWARE User Pot Jumper User Pot LINE FOLLOW: Turn on Robots power. A WELCOME SCREEN TECHSHOP will appear on the LCD. If you want to calibrate the line sensors, put your robot over the line and press OK/Back button. The robot will rotate over the line for a few seconds. Then MAIN MENU will appear next. Calibration data don t delete if you switch of robots power. You can skip sensor calibration by pressing Next or Prev button while in WELCOME SCREEN. Robot will use data from last calibration in this case. You must calibrate line sensors for a line follower track at least once before putting the robot on it. In the MAIN MENU there are 3 options: LINE FOLLOW, OBSTACLE AVOID AND ANDROID CONTROL. You can toggle between them using Next and Prev buttons. Go to LINE FOLLOW and Press OK/Back button to select LFR mode. If placed over a line, the robot will start following it. Press OK/Back button to go back from LFR mode. Only black line over white surface is supported by the AIO firmware. Rotate the yellow user pot to tune line sensitivity and thus improve the quality of line following. The user pot jumper must be attached.


27 USING THE ROBOT WITH AIO FIRMWARE OBSTACLE AVOID: Turn on Robots power. A WELCOME SCREEN TECHSHOP will appear on the LCD. Press Next or Prev button while in WELCOME SCREEN to go to MAIN MENU. Slide the obstacle sensor switch towards direction. In the MAIN MENU there are 3 options: LINE FOLLOW, OBSTACLE AVOID AND ANDROID CONTROL. You can toggle between them using Next and Prev buttons. Go to OBSTACLE AVOID and press OK/Back button. Obstacle avoiding program will start. Robot avoids obstacles by moving towards open area. D1 & D2 (on LCD) shows obstacle distance (not in cm). LCD backlight turns on when obstacle is detected. Press OK/Back button to exit. ANDROID CONTROL: Connect a HC-05 bluetooth module to the bluetooth connector. Turn on Robots power. A WELCOME SCREEN TECHSHOP will appear on the LCD. Press Next or Prev button while in WELCOME SCREEN to go to MAIN MENU. By pressing Next or Prev button Go to ANDROID CONTROL and press OK/Back button. The LCD will show WAITING for BT until you connect to HC-05 from an android app. Download Bluetooth RC car from play store. Pair your phones bluetooth to HC-05 (default pass:1234). Open the Bluetooth RC car app and then settings icon>>connect to car>>hc-05. Press the red Connect button and it will turn green. Robots LCD will show BT CNTRL MODE ON after it detects the android app sending data to it via bluetooth.


28 USING THE ROBOT WITH AIO FIRMWARE Android App for Bluetooth Control Click the Icon or Scan Buzzer LCD Backlight Settings Connect Button Speed Slider Forward / Backward Left / Right
 from here. SPI pins: you can use them for burning arduino bootloader.")
29 ADVANCED USAGE The header pins can be used for many other purposes if you re not using the shield. Or you can design your own custom shield for serving your specific purpose. To give you a head start, we re providing the footprint of the shield connectors. Download shield footprint (proteus file) from here. SPI pins: you can use them for burning arduino bootloader. Or upload your.hex file. Along with pins 0-3 these pins can be used to interface a SD card, graphics LCD or any SPI based device. I2C pins: for connecting compass, gyro & accelerometer, RTC, EEPROM etc. Serial pins: for connecting bluetooth, ESP-8266, GPRS, Xbee etc. Interrupt pins: for connecting rotary encoder and other interrupt based components. Can also be used for connecting SR-04 sonar sensor. Power pins: There s GND, 5V, 3.3V and battery positive output pins.


30 SAFETY WARNINGS & HANDLING PRECAUTIONS Use the robot on flat and smooth surface. Running on rough surfaces might damage the underside of your robot s PCB. Run the robot on clean surface. The ball casters will be jammed and filled with dirt if you run it on dusty / wet surface. Avoid placing the robot in a place (e.g.: a drawer filled with metal parts) where the underside of the PCB makes contact with conductive materials. This may cause short circuit while battery is connected even when the robot is powered off. It s a good practice to remove the battery from the robots body before storage. Keep the battery in a plastic bag to avoid accidental short circuit of the battery connectors. Do not run the robot when battery voltage is too low (power LEDs dim). This may cause permanent damage to the battery and it may not even recharge when charger is connected. Avoid rotating robots wheels by hand as this might damage the gears of the motors. Obstacle sensors drain battery quickly. Keep the obstacle sensors turned off (using obstacle sensor switch) if you are not using the robot for obstacle avoidance. Don t program the robot using an USBasp/AVR isp programmer as this will wipe the arduino Nano bootloader. Use the SPI pins only if you know what you are doing. This is not a toy for children. There s exposed solder leads, lithium batteries and a lot of small circuit components that should be kept out of the reach of children. We expect you to handle the robot with care.

31 PRODUCT PACKAGE 360 Nano Bot main PCB with assembled circuit components, motors, wheels, ball casters etc. 360 Nano Bot shield with LCD, obstacle sensors and bluetooth connector (no bluetooth module). 2 cell lithium ion battery pack with 3 pin female connector. Battery charger. Battery charging cable. 6 computer jumpers. WARRENTY AND REPLACEMENT Service warranty is free for lifetime. Only pay for the damaged component(s) of the robot and we ll replace it/them without any service charge (if repairable). For more information, click here. CONTACT Technical support: technicalsupport@techshopbd.com Customer care:
Sanguino TSB. Introduction: Features:
 Sanguino TSB Introduction: Atmega644 is being used as CNC machine driver for a while. In 2012, Kristian Sloth Lauszus from Denmark developed a hardware add-on of Atmega644 for the popular Arduino IDE and
TA0139 USER MANUAL ARDUINO 2 WHEEL DRIVE WIRELESS BLUETOOTH ROBOT KIT
 TA0139 USER MANUAL ARDUINO 2 WHEEL DRIVE WIRELESS BLUETOOTH ROBOT KIT I Contents Overview TA0139... 1 Getting started: Arduino 2 Wheel Drive Wireless Bluetooth Robot Kit using Arduino UNO... 1 2.1. What
AlphaBot2 robot building kit for Arduino
 AlphaBot2 robot building kit for Arduino SKU 110060864 Description This AlphaBot2 robot kit is designed to use with an Arduino compatible board UNO PLUS. It features rich common robot functions including
Freeduino USB 1.0. Arduino Compatible Development Board Starter Guide. 1. Overview
 Freeduino USB 1.0 Arduino Compatible Development Board Starter Guide 1. Overview 1 Arduino is an open source embedded development platform consisting of a simple development board based on Atmel s AVR
keyestudio Keyestudio MEGA 2560 R3 Board
 Keyestudio MEGA 2560 R3 Board Introduction: Keyestudio Mega 2560 R3 is a microcontroller board based on the ATMEGA2560-16AU, fully compatible with ARDUINO MEGA 2560 REV3. It has 54 digital input/output
USER MANUAL ARDUINO I/O EXPANSION SHIELD
 USER MANUAL ARDUINO I/O EXPANSION SHIELD Description: Sometimes Arduino Uno users run short of pins because there s a lot of projects that requires more than 20 signal pins. The only option they are left
Advance Robotics with Embedded System Design (ARESD)
") Advance Robotics with Embedded System Design (ARESD) LEARN HOW TO: Use Arduino hardware &Arduino programming for microcontroller based hobby project development Use WinAVRcross compiler formicrocontroller
Advance Robotics with Embedded System Design (ARESD) LEARN HOW TO: Use Arduino hardware &Arduino programming for microcontroller based hobby project development Use WinAVRcross compiler formicrocontroller
MegaPi Born to Motion Control
 MegaPi Born to Motion Control SKU: 10050 Weight: 130.00 Gram 1. Overview MegaPi is a main control board specially designed for makers and also an ideal option for being applied to education field and all
ROBOTLINKING THE POWER SUPPLY LEARNING KIT TUTORIAL
 ROBOTLINKING THE POWER SUPPLY LEARNING KIT TUTORIAL 1 Preface About RobotLinking RobotLinking is a technology company focused on 3D Printer, Raspberry Pi and Arduino open source community development.
Number Name Description Notes Image 0101 Resistor, 100 ohm. brown-black-browngold. ¼ watt, 5% tolerance, red-red-brown-gold. brown-black-red-gold.
 Passive Components 0101 Resistor, 100 brown-black-browngold. 690620 0102 Resistor, 220 red-red-brown-gold. 690700 0103 Resistor, 1000 brown-black-red-gold. 690865 0104 Resistor, 10k 0201 Capacitor, 1 µf,
Physics 120/220. Microcontrollers Extras. Prof. Anyes Taffard
 Physics 120/220 Microcontrollers Extras Prof. Anyes Taffard Introduction 2 There are an infinite amount of applications for the Arduino. Lots of interfaces that can be controlled with it. Extension boards
Technical Specification for Educational Robots
 Technical Specification for Educational Robots 1. Introduction The e-yantra project, sponsored by MHRD, aims to start a robotic revolution in the country through the deployment of low-cost educational
1. Introduction Packing list Parts Introduction Uno R3 Board for Arduino Specifications... 6
 Table of Contents Smart Bluetooth Robot Car Kit for Arduino 1. Introduction...4 1.1 Packing list...5 2. Parts Introduction...6 2.1 Uno R3 Board for Arduino...6 2.1.1 Specifications... 6 2.2 HC-SR04 Ultrasonic
ARDUINO MEGA 2560 REV3 Code: A000067
 ARDUINO MEGA 2560 REV3 Code: A000067 The MEGA 2560 is designed for more complex projects. With 54 digital I/O pins, 16 analog inputs and a larger space for your sketch it is the recommended board for 3D
8051 Intermidiate Development Board. Product Manual. Contents. 1) Overview 2) Features 3) Using the board 4) Troubleshooting and getting help
 Overview 2) Features 3) Using the board 4) Troubleshooting and getting help") 8051 Intermidiate Development Board Product Manual Contents 1) Overview 2) Features 3) Using the board 4) Troubleshooting and getting help 1. Overview 2. Features The board is built on a high quality FR-4(1.6
8051 Intermidiate Development Board Product Manual Contents 1) Overview 2) Features 3) Using the board 4) Troubleshooting and getting help 1. Overview 2. Features The board is built on a high quality FR-4(1.6
ARDUINO LEONARDO ETH Code: A000022
 ARDUINO LEONARDO ETH Code: A000022 All the fun of a Leonardo, plus an Ethernet port to extend your project to the IoT world. You can control sensors and actuators via the internet as a client or server.
AMRobot. Educational mini-robot platform
 AMRobot Educational mini-robot platform Producer: AMEX Research Corporation Technologies Modlińska Str. 1, PL 15-066 Bialystok (Poland) Tel.: +48 602723295, Fax: +48 856530703 e-mail: amexinfo@amex.pl
How-To #3: Make and Use a Motor Controller Shield
 How-To #3: Make and Use a Motor Controller Shield The Arduino single-board computer can be used to control servos and motors. But sometimes more current is required than the Arduino can provide, either
BLD04A Brushless DC Motor Driver
 BLD04A Brushless DC Motor Driver User s Manual V1.1 MAY 2011 Information contained in this publication regarding device applications and the like is intended through suggestion only and may be superseded
Goal: We want to build an autonomous vehicle (robot)
") Goal: We want to build an autonomous vehicle (robot) This means it will have to think for itself, its going to need a brain Our robot s brain will be a tiny computer called a microcontroller Specifically
Goal: We want to build an autonomous vehicle (robot) This means it will have to think for itself, its going to need a brain Our robot s brain will be a tiny computer called a microcontroller Specifically
3 pyro output datalogger altimeter with an ATmega 328 microcontroller Kit assembly instructions
 3 pyro output datalogger altimeter with an ATmega 328 microcontroller Kit assembly instructions Version date Author Comments 1.0 29/05/2013 Boris du Reau Initial version Rocket Type Micro-max Model Mid
Energy Management System. Operation and Installation Manual
 Energy Management System Operation and Installation Manual AA Portable Power Corp 825 S 19 TH Street, Richmond, CA 94804 www.batteryspace.com Table of Contents 1 Introduction 3 2. Packing List 5 3. Specifications
RFID: Read and Display V2010. Version 1.1. Sept Cytron Technologies Sdn. Bhd.
 PR8-B RFID: Read and Display V2010 Version 1.1 Sept 2010 Cytron Technologies Sdn. Bhd. Information contained in this publication regarding device applications and the like is intended through suggestion
Arduino Uno. Arduino Uno R3 Front. Arduino Uno R2 Front
 Arduino Uno Arduino Uno R3 Front Arduino Uno R2 Front Arduino Uno SMD Arduino Uno R3 Back Arduino Uno Front Arduino Uno Back Overview The Arduino Uno is a microcontroller board based on the ATmega328 (datasheet).
ARDUINO MEGA ADK REV3 Code: A000069
 ARDUINO MEGA ADK REV3 Code: A000069 OVERVIEW The Arduino MEGA ADK is a microcontroller board based on the ATmega2560. It has a USB host interface to connect with Android based phones, based on the MAX3421e
AVR Intermediate Development Board. Product Manual. Contents. 1) Overview 2) Features 3) Using the board 4) Troubleshooting and getting help
 Overview 2) Features 3) Using the board 4) Troubleshooting and getting help") AVR Intermediate Development Board Product Manual Contents 1) Overview 2) Features 3) Using the board 4) Troubleshooting and getting help 1. Overview 2. Features The board is built on a high quality FR-4(1.6
AVR Intermediate Development Board Product Manual Contents 1) Overview 2) Features 3) Using the board 4) Troubleshooting and getting help 1. Overview 2. Features The board is built on a high quality FR-4(1.6
Arduino ADK Rev.3 Board A000069
 Arduino ADK Rev.3 Board A000069 Overview The Arduino ADK is a microcontroller board based on the ATmega2560 (datasheet). It has a USB host interface to connect with Android based phones, based on the MAX3421e
Bitty Rover. Recommended Age: 12 and up Difficulty Level: 3/5 (Soldering Required, programming, connecting wires, small parts choking hazard)
") Bitty Rover Bitty Rover V2.3 Assembly Instructions Recommended Age: 12 and up Difficulty Level: 3/5 (Soldering Required, programming, connecting wires, small parts choking hazard) www.rabbitrobots.com
Bitty Rover Bitty Rover V2.3 Assembly Instructions Recommended Age: 12 and up Difficulty Level: 3/5 (Soldering Required, programming, connecting wires, small parts choking hazard) www.rabbitrobots.com
ARDUINO MINI 05 Code: A000087
 ARDUINO MINI 05 Code: A000087 The Arduino Mini is a very compact version of the Arduino Nano without an on board USB to Serial connection The Arduino Mini 05 is a small microcontroller board originally
Arduino Smart Robot Car Kit User Guide
 User Guide V1.0 04.2017 UCTRONIC Table of Contents 1. Introduction...3 2. Assembly...4 2.1 Arduino Uno R3...4 2.2 HC-SR04 Ultrasonic Sensor Module with Bracket / Holder...5 2.3 L293D Motor Drive Expansion
LPC2148 DEV BOARD. User Manual.
 LPC2148 DEV BOARD User Manual www.coineltech.com www.coineltech.com Designed by CoiNel Technology Solutions LLP No-816, 2 nd Floor, 4 th B Cross, 9 th A Main, RPC Layout, Vijaynagar, Bangalore-560040 State:
Quick Guide WARNING: CHOKING HAZARD - Small parts. Not for children under 3 years old. mbot is an educational robot kit for beginners to get hands-on
 MAKER WORKS TECHNOLOGY INC Technical support: support@makeblock.cc www.makeblock.cc Great tool for beginners to learn graphical programming, electronics and robotics. :@Makeblock : @Makeblock : +Makeblock
AMEX Mini Robot The mini robot educational platform (Rev. 1.0)
") AMEX Mini Robot The mini robot educational platform (Rev. 1.0) Producer: AMEX Research Corporation Technologies Elektronowa Str. 6, PL 15-692 Bialystok (Poland) Tel.: +48 602723295, Fax: +48 856530703
AMEX Mini Robot The mini robot educational platform (Rev. 1.0) Producer: AMEX Research Corporation Technologies Elektronowa Str. 6, PL 15-692 Bialystok (Poland) Tel.: +48 602723295, Fax: +48 856530703
User Guide v1.0. v1.0 Oct 1, This guide is only available in English Ce manuel est seulement disponible en Anglais
 ROVER ShiELD User Guide v1.0 v1.0 Oct 1, 2014 This guide is only available in English Ce manuel est seulement disponible en Anglais Description The DFRobotShop Rover Shield is the ideal all in one shield
ARDUINO UNO REV3 Code: A000066
 ARDUINO UNO REV3 Code: A000066 The UNO is the best board to get started with electronics and coding. If this is your first experience tinkering with the platform, the UNO is the most robust board you can
HUB-ee BMD-S Arduino Proto Shield V1.0
 HUB-ee BMD-S Arduino Proto Shield V1.0 User guide and assembly instructions Document Version 1.0 Introduction 2 Schematic 3 Quick user guide 4 Assembly 5 1) DIP Switches 5 2) Micro-MaTch Connector Headers
GIE 8051 Professional Kit. User Manual
 GIE 8051 Professional Kit User Manual www.gie.com.my Page 1 of 9 Content Overview...3 Features...3 Function Block...4 Jumper Setting...4 Hardware Connection...5 Required Software...5 Install CH340 Driver
VEX ARM Cortex -based Microcontroller and VEXnet Joystick User Guide
 1. VEX ARM Cortex -based Microcontroller and VEXnet Joystick Pairing Procedure: a. The Joystick must first be paired to the VEX ARM Cortex -based Microcontroller before they will work using VEXnet Keys.
ARDUINO UNO REV3 SMD Code: A The board everybody gets started with, based on the ATmega328 (SMD).
.") ARDUINO UNO REV3 SMD Code: A000073 The board everybody gets started with, based on the ATmega328 (SMD). The Arduino Uno SMD R3 is a microcontroller board based on the ATmega328. It has 14 digital input/output
ARDUINO UNO REV3 SMD Code: A000073 The board everybody gets started with, based on the ATmega328 (SMD). The Arduino Uno SMD R3 is a microcontroller board based on the ATmega328. It has 14 digital input/output
ANTUMBRA KLIK MANUAL
 ANTUMBRA KLIK MANUAL TABLE OF CONTENTS 01. INSTALLATION 4 02. FRONT 5 03. STEPS PAGE 6 04. MENU 8 05. EUCLIDEAN MODE 10 06. PLAYMODE MENU 11 07. LAST STEP MENU 12 08. RANDOM AMOUNT 13 09. SOFTWARE MODIFICATIONS
Schematic Diagram: R2,R3,R4,R7 are ¼ Watt; R5,R6 are 220 Ohm ½ Watt (or two 470 Ohm ¼ Watt in parallel)
") Nano DDS VFO Rev_2 Assembly Manual Farrukh Zia, K2ZIA, 2016_0130 Featured in ARRL QST March 2016 Issue Nano DDS VFO is a modification of the original VFO design in Arduino Projects for Amateur Radio by
Nano DDS VFO Rev_2 Assembly Manual Farrukh Zia, K2ZIA, 2016_0130 Featured in ARRL QST March 2016 Issue Nano DDS VFO is a modification of the original VFO design in Arduino Projects for Amateur Radio by
ARDUINO PRIMO. Code: A000135
 ARDUINO PRIMO Code: A000135 Primo combines the processing power from the Nordic nrf52 processor, an Espressif ESP8266 for WiFi, as well as several onboard sensors and a battery charger. The nrf52 includes
User Manual XPIN Clip
 User Manual XPIN Clip 1. XPIN CLIP XPIN is standalone device used to read a screen lock code using Bruteforce method. XPIN clip can read Passcode (in ios devices) as well as PIN / PIN Backup and character
AVR 40 Pin Rapid Robot controller board
 AVR 40 Pin Rapid Robot controller board User Manual Robokits India http://www.robokits.org info@robokits.org - 1 - Thank you for purchasing the AVR 40 Pin Rapid Robot controller board. This unit has been
CORTEX Microcontroller and Joystick User Guide
 This is a User Guide for using the VEX CORTEX Microcontroller and VEX Joystick. Refer to the VEX Wiki (http://www.vexforum.com/wiki/index.php/vex_cortex_microcontroller) for updates to this document. 1.
Arduino Smart Bluetooth Robot Car Kit User Guide
 Arduino Smart Bluetooth Robot Car Kit User Guide UCTRONICS Table of Contents 1. Introduction... 4 1.1 Packing list... 5 2. Assembly... 6 2.1 Arduino Uno R3... 6 2.1.1 Specifications... 6 2.2 HC-SR04 Ultrasonic
Thursday, September 15, electronic components
 electronic components a desktop computer relatively complex inside: screen (CRT) disk drive backup battery power supply connectors for: keyboard printer n more! Thursday, September 15, 2011 integrated
Breeze Board. Type A. User Manual.
 Breeze Board Type A User Manual www.dizzy.co.za Contents Introduction... 3 Overview Top... 4 Overview Bottom... 5 Getting Started (Amicus Compiler)... 6 Power Circuitry... 7 USB... 8 Microcontroller...
Alessandra de Vitis. Arduino
 Alessandra de Vitis Arduino Arduino types Alessandra de Vitis 2 Interfacing Interfacing represents the link between devices that operate with different physical quantities. Interface board or simply or
ON4AKH Antenna Rotator controller Version 1.0
 ON4AKH Antenna Rotator controller Version 1.0 1. Some construction tips The project consists out of 3 boards. The 1 st board is the main board containing the PIC micro controller and the H-bridge components
Robotics Adventure Book Scouter manual STEM 1
 Robotics Robotics Adventure Book Scouter Manual Robotics Adventure Book Scouter manual STEM 1 A word with our Scouters: This activity is designed around a space exploration theme. Your Scouts will learn
IFC-MD15A Interface Free Controller Brush Motor Card
 IFC-MD15A Interface Free Controller Brush Motor Card User s Manual V1.0 Oct 2008 Information contained in this publication regarding device applications and the like is intended through suggestion only
HUB-ee BMD-S Arduino Proto Shield V1.1
 HUB-ee BMD-S Arduino Proto Shield V1.1 User guide and assembly instructions Document Version 0.5 Introduction & Board Guide 2 Schematic 3 Quick User Guide 4 Assembly Guide 6 Kit Contents 7 1) Diodes and
Autonomous, Surveillance Fire Extinguisher Robotic Vehicle with Obstacle Detection and Bypass using Arduino Microcontroller
 Autonomous, Surveillance Fire Extinguisher Robotic Vehicle with Obstacle Detection and Bypass using Arduino Microcontroller Sumanta Chatterjee Asst. Professor JIS College of Engineering Kalyani, WB, India
ARDUINO LEONARDO WITH HEADERS Code: A000057
 ARDUINO LEONARDO WITH HEADERS Code: A000057 Similar to an Arduino UNO, can be recognized by computer as a mouse or keyboard. The Arduino Leonardo is a microcontroller board based on the ATmega32u4 (datasheet).
AlaMode User Manual Revision
 AlaMode User Manual Revision 1.0 www.wyolum.com info@wyolum.com 1 Introduction The AlaMode is an integrated Arduino compatible board. It is designed as versatile, general purpose data acquisition and control
Features. Warnings and Precautions READ BEFORE OPERATING EQUIPMENT SAVE THESE INSTRUCTIONS
 SENTA Warnings and Precautions READ BEFORE OPERATING EQUIPMENT SAVE THESE INSTRUCTIONS To prevent damage to your radio or possible injury to you or others, read these safety precautions and instructions
ARDUINO MICRO WITHOUT HEADERS Code: A000093
 ARDUINO MICRO WITHOUT HEADERS Code: A000093 Arduino Micro is the smallest board of the family, easy to integrate it in everyday objects to make them interactive. The Micro is based on the ATmega32U4 microcontroller
GIE 8051 Mini Kit. User Manual
 GIE 8051 Mini Kit User Manual www.gie.com.my Page 1 of 8 Content Features...3 Function Block...3 Development Setup...4 Jumper selection...4 Required Software...5 Install PL-2303 Driver (USB to Serial port)...5
Page 1 / 14. Dear Makerspace User,
 Dear Makerspace User, This list will give you an overview of all the parts that can be bought at the Student Project House Makerspace Electronics Shop. To easily find the correct part we sorted them in
Rhino Robot Control Board [RKI-1550]
![Rhino Robot Control Board [RKI-1550]](/thumbs/75/72064296.jpg "Rhino Robot Control Board [RKI-1550]") Rhino Robot Control Board [RKI-1550] Users Manual Robokits India info@robokits.co.in http://www.robokitsworld.com Page 1 The Rhino Robot control board is versatile and expandable platform for robotics.
Rhino Robot Control Board [RKI-1550] Users Manual Robokits India info@robokits.co.in http://www.robokitsworld.com Page 1 The Rhino Robot control board is versatile and expandable platform for robotics.
logic table of contents: squarebot logic subsystem 7.1 parts & assembly concepts to understand 7 subsystems interfaces 7 logic subsystem inventory 7
 logic table of contents: squarebot logic subsystem 7.1 parts & assembly concepts to understand 7 subsystems interfaces 7 logic subsystem inventory 7 7 1 The Vex Micro Controller coordinates the flow of
BrewTroller Phoenix. Owners Manual. Updated - March 14, 2016 BREWTROLLER PHOENIX 1
 BrewTroller Phoenix Owners Manual Updated - March 14, 2016 BREWTROLLER PHOENIX 1 2016 BrewTroller All Rights Reserved. Product warranty or service will not be extended if: (1) the product is repaired,
AUDIO AMPLIFIER PROJECT
 Intro to Electronics 110 - Audio Amplifier Project AUDIO AMPLIFIER PROJECT In this project, you will learn how to master a device by studying all the parts and building it with a partner. Our test subject:
RC Tractor Guy Controller V2.1 Assembly Guide
 RC Tractor Guy Controller V. Assembly Guide Features 0 Push button inputs Dual axis thumb sticks with built-in push button Rotary encoders with built-in push button MCU Socket to suit Meduino Mega 560
Pridgen Vermeer Robotics ATmega128 Revision 0
 Features: 6x 8-bit I/O Ports 4x A/D Inputs 6x PWM Headers 2x RS 232 Terminals Power Bus LCD Header (4-bit mode) Smart Power Connecter Power Switch Header Power LED Debug LED Note: Some pins have multiple
Self Sustaining Arduino
 Description This document is a tutorial for creating a self sustaining Arduino board, by harnessing solar energy. It would be incorporated with a rechargeable 9V battery. What makes this unique is that
Figure 26 CC Debugger Interface
 Figure 26 CC Debugger Interface Once the CC Debugger is set up with the status indicator LED showing green, you are ready to either read or write a hex file from the board, or to start debugging a project
Simple Instructions for 808 HD Car Key Micro Camera (#16)
") 808 #16 Manual R2 1 of 6 Simple Instructions for 808 HD Car Key Micro Camera (#16) Thank you for your purchase of our 808 Car Key Micro-camera (#16). If this is the first time you are using a product of
808 #16 Manual R2 1 of 6 Simple Instructions for 808 HD Car Key Micro Camera (#16) Thank you for your purchase of our 808 Car Key Micro-camera (#16). If this is the first time you are using a product of
Intel Galileo gen 2 Board
 Intel Galileo gen 2 Board The Arduino Intel Galileo board is a microcontroller board based on the Intel Quark SoC X1000, a 32- bit Intel Pentium -class system on a chip (SoC). It is the first board based
ARDUINO BOARD LINE UP
 Technical Specifications Pinout Diagrams Technical Comparison Board Name Processor Operating/Input Voltage CPU Speed Analog In/Out Digital IO/PWM USB UART 101 Intel Curie 3.3 V/ 7-12V 32MHz 6/0 14/4 Regular
Hardware Overview and Features
 Hardware Overview and Features Don t snap apart your LilyPad ProtoSnap Plus until you're ready to use the pieces in a project. If you leave the pieces attached to the board, you'll be able to prototype
AVR Peripheral Board. Campus Component Pvt. Ltd.
 AVR Peripheral Board Campus Component Pvt. Ltd. DISCLAIMER Information furnished is believed to be accurate and reliable at the time of publication. However, Campus Component Pvt. Ltd. assumes no responsibility
527F CNC. Retrofit controller for machines made by Fadal Machining Centers. Installation and set-up manual Calmotion LLC
 527F CNC Retrofit controller for machines made by Fadal Machining Centers Installation and set-up manual 2008-2018 Calmotion LLC Calmotion LLC 7536 San Fernando Road Sun Valley, CA 91352 www.calmotion.com
The Diabetic Breathalyzer. Group 13 Jon Brown Christine Sleppy Noah Spenser Edert Geffrard
 The Diabetic Breathalyzer Group 13 Jon Brown Christine Sleppy Noah Spenser Edert Geffrard EE EE EE EE Project Motivation 29.1 million Americans have diabetes Proper management of this disease requires
Chapter 7 Building robot with MicroCamp kit
 MicroCamp : ATmega8 Activity Kit Manual l 63 Chapter 7 Building robot with MicroCamp kit This chapter focus learning the applications of the MICROCAMP microcontroller. The building of a robot integrates
FOOTBALLER ROBOT KIT C-9893
 FOOTBALLER ROBOT KIT C-9893 NOTE: This kit is recommended for children aged 14 years, always accompanied by an adult www.cebekit.com - info@cebekit.com Contents Multi-Channel I/R Remote Control Box: 1.
Digital Pins and Constants
 Lesson Lesson : Digital Pins and Constants Digital Pins and Constants The Big Idea: This lesson is the first step toward learning to connect the Arduino to its surrounding world. You will connect lights
IS-S0108 Single Switch Solution
 IS-S0108 Single Switch Solution IS-S0108 Single Switch Solution Revision D NKK SWITCHES 7850 E. Gelding Drive Scottsdale, AZ 85260 Toll Free 1-877-2BUYNKK (877-228-9655) Phone 480-991-0942 Fax 480-998-1435
Adafruit Metro Mini. Created by lady ada. Last updated on :12:28 PM UTC
 Adafruit Metro Mini Created by lady ada Last updated on 2018-01-24 08:12:28 PM UTC Guide Contents Guide Contents Overview Pinouts USB & Serial converter Microcontroller & Crystal LEDs Power Pins & Regulators
IDUINO for maker s life. User Manual. For IDUINO Mega2560 Board(ST1026)
") User Manual For IDUINO Mega2560 Board(ST1026) 1.Overview 1.1 what is Arduino? Arduino is an open-source prototyping platform based on easy-to-use hardware and software. Arduino boards are able to read
User Manual For IDUINO Mega2560 Board(ST1026) 1.Overview 1.1 what is Arduino? Arduino is an open-source prototyping platform based on easy-to-use hardware and software. Arduino boards are able to read
DFRobot CurieNano A mini Genuino/Arduino 101 Board SKU: DFR0453
 DFRobot CurieNano A mini Genuino/Arduino 101 Board SKU: DFR0453 From Robot Wiki Contents 1 Introduction 2 Specification 3 Board Overview 4 Tutorial o 4.1 Requirements o 4.2 Install Arduino/Genuino 101
OpenSprinkler v2.1u Build Instructions
 OpenSprinkler v2.1u Build Instructions (Note: all images below are 'clickable', in order for you to see the full-resolution details. ) Part 0: Parts Check Part 1: Soldering Part 2: Testing Part 3: Enclosure
IFC-OC04 Interface Free Controller Output Card
 IFC-OC04 Interface Free Controller Output Card User s Manual V1.1 Apr 2008 Information contained in this publication regarding device applications and the like is intended through suggestion only and may
OpenSprinkler v2.2u Build Instructions
 OpenSprinkler v2.2u Build Instructions (Note: all images below are 'clickable', in order for you to see the full-resolution details. ) Part 0: Parts Check Part 1: Soldering Part 2: Testing Part 3: Enclosure
Phi -1 shield Documentation. Table of content
 Phi -1 shield Documentation Last reviewed on 01/03/11 John Liu Table of content 1. Introduction: 2 2. List of functions: 2 3. List of possible projects: 2 4. Parts list: 3 5. Shield pin usage: 3 6. List
INTRODUCTION HARDWARE
 Project Kit Table of Contents INTRODUCTION... 3 HARDWARE... 3 Hardware built-in micro:bit:... 3 Hardware included in this kit:... 4 CODE... 5 Pseudo Code:... 5 Coding Tools:... 5 Running Programs:... 8
Blue Point Engineering
 Blue Point Engineering SV203 Interface Overview Overview Sensors Light Sensor Motion Sensor Joystick Computer USB PORT Technical Pointing the Way to Solutions! T http://www.bpesolutions.com Animatronic
Lesson 5 Arduino Prototype Development Platforms. Chapter-8 L05: "Internet of Things ", Raj Kamal, Publs.: McGraw-Hill Education
 Lesson 5 Arduino Prototype Development Platforms 1 Arduino Boards, Modules And Shields Popular AVR MCU based products Each board has clear markings on the connection pins, sockets and in-circuit connections
RedBoard Hookup Guide
 Page 1 of 11 RedBoard Hookup Guide CONTRIBUTORS: JIMB0 Introduction The Redboard is an Arduino-compatible development platform that enables quick-and-easy project prototyping. It can interact with real-world
Doc: page 1 of 8
 Minicon Reference Manual Revision: February 9, 2009 Note: This document applies to REV C of the board. 215 E Main Suite D Pullman, WA 99163 (509) 334 6306 Voice and Fax Overview The Minicon board is a
uarm Conveyor User Manual V1.0.0
 uarm Conveyor User Manual V1.0.0 Part Lists Hardware: 1. Conveyor Belt * 1 2. 12V Power Adapter * 1 3. Screwdriver * 1 4. Seeed Grove Sensor Cable * 4 5. LCD * 1 6. USB Type C Cord * 2 7. USB Cable * 1
527F CNC. Retrofit controller for machines made by Fadal Machining Centers. Installation and set-up manual Calmotion LLC
 527F CNC Retrofit controller for machines made by Fadal Machining Centers Installation and set-up manual 2008-2018 Calmotion LLC Calmotion LLC 7536 San Fernando Road Sun Valley, CA 91352 www.calmotion.com
Zero2Go. User Manual (revision 1.03) Wide Input Range Power Supply for Your Raspberry Pi. Copyright 2017 UUGear s.r.o. All rights reserved.
 Wide Input Range Power Supply for Your Raspberry Pi. Copyright 2017 UUGear s.r.o. All rights reserved.") Zero2Go Wide Input Range Power Supply for Your Raspberry Pi User Manual (revision 1.03) Copyright 2017 UUGear s.r.o. All rights reserved. Table of Content Product Overview... 1 Product Details... 3 Package
Zero2Go Wide Input Range Power Supply for Your Raspberry Pi User Manual (revision 1.03) Copyright 2017 UUGear s.r.o. All rights reserved. Table of Content Product Overview... 1 Product Details... 3 Package
Bill of Materials: Turn Off the Lights Reminder PART NO
 Turn Off the Lights Reminder PART NO. 2209650 Have you ever woke up early in the morning to find out that the kids (or adults) in your home forgot to turn off the lights? I've had that happen a number
Please review this guide fully before use. For any questions not answered in this guide, please contact WARNING Battery warning
 Please review this guide fully before use. For any questions not answered in this guide, please contact Support@Komando.com WARNING THIS DEVICE SHOULD NOT BE ADJUSTED BY THE DRIVER WHILE DRIVING. Battery
ROTOR CONTROL DXA. de K4JRG. User s Manual
 de K4JRG User s Manual , K4JRG User s Manual V1.05, Rev F4 JR Engineering, Corp 3521 SW 140 th Ave Miami, FL 33175 Phone 786.270.1610, x210 Fax 786.270.1609 email: k4jrg@k4jrg.org Table of Contents Welcome!...
Simple Instructions for 808 HD Car Key Micro Camera (#16)
") Simple Instructions for 808 HD Car Key Micro Camera (#16) Thank you for your purchase of our 808 Car Key Micro-camera (#16). If this is the first time you are using a product of this kind, please follow
Simple Instructions for 808 HD Car Key Micro Camera (#16) Thank you for your purchase of our 808 Car Key Micro-camera (#16). If this is the first time you are using a product of this kind, please follow
International Journal of Artificial Intelligence and Applications (IJAIA), Vol.9, No.3, May Bashir Ahmad
, Vol.9, No.3, May Bashir Ahmad") OUTDOOR MOBILE ROBOTIC ASSISTANT MICRO-CONTROLLER MODULE (ARDUINO), FIRMWARE AND INFRARED SENSOR CIRCUIT DESIGN AND IMPLEMENTATION, OPERATING PRINCIPLE AND USAGE OF PIRMOTION SENSOR Bashir Ahmad Faculty
OUTDOOR MOBILE ROBOTIC ASSISTANT MICRO-CONTROLLER MODULE (ARDUINO), FIRMWARE AND INFRARED SENSOR CIRCUIT DESIGN AND IMPLEMENTATION, OPERATING PRINCIPLE AND USAGE OF PIRMOTION SENSOR Bashir Ahmad Faculty
Arduino Uno. Power & Interface. Arduino Part 1. Introductory Medical Device Prototyping. Digital I/O Pins. Reset Button. USB Interface.
 Introductory Medical Device Prototyping Arduino Part 1, http://saliterman.umn.edu/ Department of Biomedical Engineering, University of Minnesota Arduino Uno Power & Interface Reset Button USB Interface