US Version USER GUIDE COMPUTER SCIENCE SCIENCE TECHNOLOGY ENGINEERING MATH. LEGOeducation.com/MINDSTORMS
|
|
|
- Lee Knight
- 6 years ago
- Views:
Transcription


1 US Version USER GUIDE πr COMPUTER SCIENCE SCIENCE TECHNOLOGY ENGINEERING MATH LEGOeducation.com/MINDSTORMS


2 TABLE OF CONTENTS INTRODUCTION + Welcome How to Use This Guide Help... 5 EV3 TECHNOLOGY + Overview EV3 Brick... 7 Overview... 7 Installing Batteries Turning On the EV3 Brick EV3 Motors Large Motor Medium Motor EV3 Sensors Color Sensor Gyro Sensor Touch Sensor Ultrasonic Sensor Infrared Sensor and Remote Infrared Beacon Temperature Sensor Connecting Sensors and Motors Connecting the EV3 Brick to Your Computer USB Cable Wireless Bluetooth Wireless Wi-Fi Connecting the EV3 Brick to Other Devices Making a Bluetooth Connection to Your ipad Making a Bluetooth Connection to Your Android Tablet Making a Bluetooth Connection to Your Chromebook EV3 Brick Interface Run Recent File Navigation Brick Apps Settings EV3 SOFTWARE + Minimum System Requirements Installing the Software Lobby Project Properties and Structure Robot Educator Programming Programming Blocks and Palettes Data Logging Hardware Page Content Editor Tools EV3 PROGRAMMING APP + Minimum System Requirements Installing the Programming App Lobby Robot Educator Programming Programming Blocks and Palettes Hardware Page TROUBLESHOOTING + Updating the EV3 Software Automatic Firmware Update Forced Restart of the EV3 Brick USEFUL INFORMATION + Sound File List Image File List Brick Program App Assets List Element List


3 INTRODUCTION Welcome LEARNING POWERED BY LEGO MINDSTORMS EDUCATION Since the beginning of this century, LEGO MINDSTORMS Education has led the way in STEM (Science, Technology, Engineering, and Math) Education, inspiring users to engage in fun, hands-on learning. The combination of LEGO building systems with the LEGO MINDSTORMS Education EV3 technology is now offering even more ways to learn about robotics and teach the principles of programming, physical science, and mathematics. The heart of LEGO MINDSTORMS Education is the EV3 Brick, the programmable intelligent brick that controls motors and sensors, as well as providing wireless communication. Choose what motors and sensors you wish to use and build your robot just like you want it to be. To provide the interface between you and the EV3 Brick, we have developed the LEGO MINDSTORMS Education EV3 Software and EV3 Programming App. The EV3 Software for Windows and Macintosh gives you easy access to content, programming, data logging, digital workbooks, and more, while the EV3 Programming App gives you many of the same features on a Chromebook or tablet. Follow the integrated Robot Educator tutorials and you ll be creating, programming, and running your robot before you know it. The intuitive, icon-based Programming Environment is full of challenging possibilities, and the EV3 Software s data logging environment provides a powerful tool for scientific experimentation. LEGO Education offers a growing number of EV3-based curriculum packages developed by experienced educators. We are committed to responsive customer support, professional development, and continuing education for teachers using MINDSTORMS robotics in their classrooms. Want to work like real scientists and engineers? Enter the LEGO Education-supported FIRST LEGO League and World Robot Olympiad and gain invaluable knowledge, life skills, and increased self-confidence! We hope you enjoy the journey! 3
4 INTRODUCTION How to Use This Guide In this guide, we will tell you about everything you need to get started with LEGO MINDSTORMS Education EV3 Technology. From the EV3 Brick, sensors, and motors, to the LEGO MINDSTORMS Education EV3 Software and EV3 Programming App, this guide provides a reference to all the required elements involved in teaching robotics. EV3 TECHNOLOGY We start off by introducing you to the programmable intelligent EV3 Brick. Then we take you through the various motors and sensors that you can connect to the EV3 Brick to transform it into your very own robot, ready to perform any task. Next, we show you how to connect your EV3 Brick to a computer, tablet, or Chromebook, and then explain the various functions and settings available in the EV3 Brick Interface. EV3 SOFTWARE In the next chapter, we introduce you to the EV3 Software, including the installation process and various screens, tutorials, and tools. EV3 PROGRAMMING APP In this chapter, we introduce you to the various features and functions of the EV3 Programming App. TROUBLESHOOTING In this chapter, we show you how to keep your EV3 technology in top shape, from updating your firmware and software to resetting your EV3 Brick. USEFUL INFORMATION In the final chapter, we list all the fun sounds and images that you can incorporate into your programs, either via the EV3 Software and EV3 Programming App or directly from the EV3 Brick Interface. Lastly, we ve provided a visual overview of every LEGO element included with the LEGO MINDSTORMS Education EV3 Core Set. NOTES Throughout this User Guide, we ve placed hexagon-shaped notes to help expand on information provided on certain pages: + Gray: A handy hint or tip + Red: A warning that will help you avoid running into potential problems + Blue: A notification to let you know that one or more features are not supported in the EV3 Programming App NOTE: A notification to let you know that one or more features are not supported in the EV3 Programming App. NOTE: A handy hint or tip. NOTE: A warning that will help you avoid running into potential problems. 4
5 INTRODUCTION Help EV3 SOFTWARE HELP The EV3 Software includes comprehensive, structured help documentation, as well as context-sensitive information about objects that you select within the application. Access the EV3 Software Help and Context Help under the EV3 Software Help menu. This is the first place to look if you need help or more information on how to use the EV3 Software. The EV3 Software Help provides guidance on how to best use and program with sensors and motors. This information is useful, whether you are programming with the EV3 Software or the EV3 Programming App. The EV3 Software Lobby also includes a series of Quick Start videos that introduce the main features of the EV3 Software. EV3 PROGRAMMING APP HELP The EV3 Programming App Help provides you with an overview of the various icons, buttons, and areas included on each of the app s screens. Context-sensitive help is also available wherever you see a question mark icon: for example, when you re setting programming block modes and parameters. We ve also included a Quick Start Video tutorial that shows you how to connect the EV3 Brick to your device, navigate the various programming blocks, create a basic program, and then run it on the EV3 Brick. Additional information, along with program examples of how to use the various sensors and motors, is also available in the EV3 Software Help. NOTE: Some of the program examples in the EV3 Software Help include programming blocks that are not available in the EV3 Programming App. 5

6 EV3 TECHNOLOGY Overview Large Motor + Lets you program precise and powerful robotic action. Medium Motor + Maintains precision, while trading some power for compact size and faster response. EV3 Brick + Serves as the control center and power station for your robot. Ultrasonic Sensor + Uses reflected sound waves to measure distance between the sensor and any objects in its path. Color Sensor + Recognizes seven different colors and measures light intensity. Gyro Sensor + Measures how fast and how far your robot is turning. Rechargeable Battery + Economical, environmentally friendly, and convenient power source for your robot. Touch Sensor + Recognizes three conditions touched, bumped, and released. 6

7 EV3 TECHNOLOGY EV3 Brick Overview The Display shows you what is going on inside the EV3 Brick and enables you to use the Brick Interface. It also allows you to add text and numerical or graphic responses into your programming or experiments. For example, you might want to program the Display to show a happy face (or a sad face) for a comparison response or to display a number that is the result of a mathematical calculation (learn more about using the Display Block in the EV3 Software Help). The Brick Buttons allow you to navigate inside the EV3 Brick Interface. They can also be used as programmable activators. For example, you might program a robot to raise its arms if the Up button is pressed or to lower them if the Down button is pressed (for more information, see Using the Brick Buttons in the EV3 Software Help). Brick Name Wireless Connection Status icons (from the left) USB connection established to another device Bluetooth enabled but not connected or visible to other Bluetooth devices Bluetooth enabled and visible to other Bluetooth devices Battery level Bluetooth enabled and your EV3 Brick is connected to another Bluetooth device Bluetooth enabled and visible and your EV3 Brick is connected to another Bluetooth device Wi-Fi enabled but not connected to a network Wi-Fi enabled and connected to a network Brick Buttons 1. Back This button is used to reverse actions, to abort a running program, and to shut down the EV3 Brick. 2. Center Pressing the Center button says OK to various questions to shut down, to select desired settings, or to select blocks in the Brick Program App. You would, for example, press this button to select a checkbox. 3. Left, Right, Up, Down These four buttons are used to navigate through the contents of the EV3 Brick. 7

8 EV3 TECHNOLOGY EV3 Brick The Brick Status Light that surrounds the Brick Buttons tells you the current status of the EV3 Brick. It can be green, orange, or red and can pulse. Brick Status Light codes are the following: + Red = Startup, Updating, Shutdown + Red pulsing = Busy + Orange = Alert, Ready + Orange pulsing = Alert, Running + Green = Ready + Green pulsing = Running Program TECHNICAL SPECIFICATIONS FOR THE EV3 BRICK + Operating System LINUX MHz ARM9 controller + Flash Memory 16 MB + RAM 64 MB + Brick Screen Resolution 178x128/Black and White + USB 2.0 Communication to Host PC Up to 480 Mbit/sec + USB 1.1 Host communication Up to 12 Mbit/sec + Micro SD card Supports SDHC, Version 2.0, Max 32 GB + Motor and Sensor Ports + Connectors RJ12 + Support Auto ID + Power 6 AA batteries/ rechargeable You can also program the Brick Status Light to show different colors and to pulse when different conditions are met (learn more about using the Brick Status Light Block in the EV3 Software Help). Brick Status Light Red Brick Status Light Orange Brick Status Light Green 8


.")
9 EV3 TECHNOLOGY EV3 Brick PC Port The Mini-USB PC Port, located next to the D port, is used to connect the EV3 Brick to a computer. Input Ports Input Ports 1, 2, 3, and 4 are used to connect sensors to the EV3 Brick. Output Ports Output Ports A, B, C, and D are used to connect motors to the EV3 Brick. Speaker All sounds from the EV3 Brick come through this speaker including any sound effects used in programming your robots. When the quality of the sound is important to you, try to leave the speaker uncovered while designing your robot. Check out the cool sound files that can be programmed within the EV3 Software (learn more about using the Sound Block in the EV3 Software Help). USB Host Port The USB Host Port can be used to add a USB Wi-Fi dongle for connecting to a wireless network, or to connect up to four EV3 Bricks together (daisy chain). SD Card Port The SD Card Port increases the available memory for your EV3 Brick with an SD card (maximum 32 GB not included). 9


10 EV3 TECHNOLOGY EV3 Brick Installing Batteries With LEGO MINDSTORMS Education EV3, you have the choice of using normal AA batteries or the EV3 Rechargeable Battery pack included in the LEGO MINDSTORMS Education EV3 Core Set. If you experiment with both, you will find that each option has characteristics to consider when constructing your robots. For instance, six AA batteries weigh more than the Rechargeable Battery, and the EV3 Brick with the Rechargeable Battery installed is slightly larger than the EV3 Brick with six AA batteries. The EV3 Rechargeable Battery is a convenient and economical alternative to using AA batteries. It can be recharged while inbuilt in a model, saving you the trouble of disassembling and reassembling a robot to replace batteries. EV3 Rechargeable Battery To install the Rechargeable Battery on the EV3 Brick, remove the battery cover on the back of the EV3 Brick by pressing the two plastic tabs on the side. If there are batteries in the EV3 Brick, remove them. Insert the Rechargeable Battery in the slots that held the battery cover in place and snap the battery in place. The battery cover is not used If it is your first use of the battery or if the battery is completely drained, let the battery and the EV3 Brick charge together for minimum twenty minutes. 7.4V Rechargeable Using the enclosed power adaptor cord, connect the Rechargeable Battery to a wall outlet. Make sure to keep the transformer cord and battery where they will not be tripped over or get wet. When you plug the uncharged battery into a wall socket, a red indicator light will be lit. When charging is complete, the red light will go out and the green light will be illuminated. The recharging process will generally take three to four hours. If you use the EV3 Brick while the battery is charging, it will take longer. Before you start to use the Rechargeable Battery for the first time, it is recommended that it is fully charged


11 EV3 TECHNOLOGY EV3 Brick The EV3 Brick requires six AA/LR6 batteries if the EV3 Rechargeable Battery is not used. Alkaline or rechargeable Lithium Ion AA batteries are recommended. The AA batteries option is a good choice when a little more weight is desirable in your robot. 1 2 To install the AA batteries, remove the battery cover on the back of the EV3 Brick by pressing the two plastic tabs on the side. After you have inserted the six AA batteries, attach the battery cover again. SOME IMPORTANT INFORMATION ABOUT BATTERIES: + Never use different kinds of batteries together (including mixing old and new). + Remove batteries from the EV3 Brick when not in use. + Never use damaged batteries. + Use the correct battery charger under the supervision of an adult. + Never attempt to recharge batteries that are not rechargeable. 3 4 AA, 1.5V x 6 Note: If your batteries are weak, the Brick Status Light may stay red after you press the Start button, while the Display continues to say Starting. POWER-SAVING PRACTICES + Remove batteries between use. Remember to keep each set of batteries in its own storage container so they can be used together. + Reduce Volume. + Adjust Sleep Setting. + Turn off Bluetooth and Wi-Fi when not in use. + Avoid unnecessary wear on the motors. Low Battery Power Indicator 11
12 EV3 TECHNOLOGY EV3 Brick Turning On the EV3 Brick To turn on the EV3 Brick, press the Center button. After you press the button, the Brick Status Light will turn red and the Starting screen will be displayed. When the light changes to green, your EV3 Brick is ready. To turn the EV3 Brick off, press the Back button until you see the Shut Down screen. The Abort X will already be selected. Use the Right button to select the Accept check mark, then press the Center button for OK. Your EV3 Brick is now turned off. If you press OK while the X is selected, you will return to the Run Recent screen. Starting screen Shut Down screen 12

13 EV3 TECHNOLOGY EV3 Motors Large Motor The Large Motor is a powerful smart motor. It has a built-in Rotation Sensor with 1-degree resolution for precise control. The Large Motor is optimized to be the driving base on your robots. By using the Move Steering or Move Tank Programming Block, the Large Motors will coordinate the action simultaneously. Large Motor Medium Motor The Medium Motor also includes a built-in Rotation Sensor (with 1-degree resolution), but it is smaller and lighter than the Large Motor. That means it is able to respond more quickly than the Large Motor. The Medium Motor can be programmed to turn on or off, control its power level, or to run for a specified amount of time or rotations. COMPARE THE TWO MOTORS: + The Large Motor runs at rpm, with a running torque of 20 Ncm and a stall torque of 40 Ncm (slower, but stronger). + The Medium Motor runs at rpm, with a running torque of 8 Ncm and a stall torque of 12 Ncm (faster, but less powerful). + Both motors are Auto ID supported. Medium Motor For more information on using the Rotation Sensor in your programming, see Using the Motor Rotation Sensor in the EV3 Software Help. 13


 to 100 (very light). This means your robot might be programmed to set off an alarm when the sun rises in the morning, or stop action if the lights go out.")
14 EV3 TECHNOLOGY EV3 Sensors Color Sensor The Color Sensor is a digital sensor that can detect the color or intensity of light that enters the small window on the face of the sensor. This sensor can be used in three different modes: Color Mode, Reflected Light Intensity Mode, and Ambient Light Intensity Mode. Color Sensor In Color Mode, the Color Sensor recognizes seven colors black, blue, green, yellow, red, white, and brown plus No Color. This ability to differentiate between colors means your robot might be programmed to sort colored balls or blocks, speak the names of colors as they are detected, or stop action when it sees red. In Reflected Light Intensity Mode, the Color Sensor measures the intensity of light reflected back from a red light emitting lamp. The sensor uses a scale of 0 (very dark) to 100 (very light). This means your robot might be programmed to move around on a white surface until a black line is detected, or to interpret a color-coded identification card. Color Mode In Ambient Light Intensity Mode, the Color Sensor measures the strength of light that enters the window from its environment, such as sunlight or the beam of a flashlight. The sensor uses a scale of 0 (very dark) to 100 (very light). This means your robot might be programmed to set off an alarm when the sun rises in the morning, or stop action if the lights go out. The sample rate of the Color Sensor is 1 khz. For the best accuracy, when in Color Mode or Reflected Light Intensity Mode, the sensor must be held at a right angle, close to but not touching the surface it is examining. Reflected Light Intensity Mode For more information, see Using the Color Sensor in the EV3 Software Help. Ambient Light Intensity Mode 14

15 EV3 TECHNOLOGY EV3 Sensors Gyro Sensor The Gyro Sensor is a digital sensor that detects rotational motion on a single axis. If you rotate the Gyro Sensor in the direction of the arrows on the case of the sensor, the sensor can detect the rate of rotation in degrees per second. (The sensor can measure a maximum rate of spin of 440 degrees per second.) You can then use the rotation rate to detect, for example, when a part of your robot is turning, or when your robot is falling over. In addition, the Gyro Sensor keeps track of the total rotation angle in degrees. You can use this rotation angle to detect, for example, how far your robot has turned. This feature means you are able to program turns (on the axis the Gyro Sensor is measuring) with an accuracy of +/- 3 degrees for a 90-degree turn. Note: The sensor must be completely motionless while being plugged into the EV3 Brick. If the Gyro Sensor is attached to a robot, the robot should be held motionless in its starting position as the Gyro Sensor is plugged into the EV3 Brick. Gyro Sensor 90...º º Single axis rotation CONNECTING THE GYRO SENSOR On the EV3 Brick, go to the Brick App screen (third tab) and use the Center button to select Port View. Using a flat black Connector Cable, connect the Gyro Sensor to the EV3 Brick on Port 2. Make sure to hold the sensor very still while you do this. On the EV3 Brick display, the Port View app should show a 0 reading in the second small bottom window from the left, which is the window representing input values from Port 2. Still without moving the sensor, observe the display for a few seconds. It should continue to display 0 for Port 2 with the Gyro Sensor. In case the Gyro Sensor readings do not constantly display 0 during the connection process, unplug the sensor and repeat the procedure. Brick App screen When the screen consistently displays 0 for a few seconds, experiment with rotating the sensor and observe how the angle reading changes. Remember, the Gyro Sensor measures the angle of change on only one axis. For more information, see Using the Gyro Sensor in the EV3 Software Help. Port View with Gyro Sensor 15
16 EV3 TECHNOLOGY EV3 Sensors Touch Sensor The Touch Sensor is an analog sensor that can detect when the sensor s red button has been pressed and when it is released. That means the Touch Sensor can be programmed to action using three conditions pressed, released, or bumped (both pressed and released). Touch Sensor Using input from the Touch Sensor, a robot can be programmed to see the world as a blind person might, reaching a hand out and responding when it touches something (pressed). You might build a robot with a Touch Sensor pressed against the surface beneath it. You might then program the robot to respond (Stop!) when your robot is about to drive off the edge of a table (when the sensor is released). A fighting robot might be programmed to keep pushing forward against its challenger until the challenger retreats. That pair of actions pressed, then released would constitute bumped. Pressed For more information, see Using the Touch Sensor in the EV3 Software Help. Released Bumped 16

17 EV3 TECHNOLOGY EV3 Sensors Ultrasonic Sensor The Ultrasonic Sensor is a digital sensor that can measure the distance to an object in front of it. It does this by sending out high-frequency sound waves and measuring how long it takes the sound to reflect back to the sensor. The sound frequency is too high for you to hear. Ultrasonic Sensor 250cm / 99inch Distance to an object can be measured in either inches or centimeters. This allows you to program your robot to stop a certain distance from a wall. When using centimeter units, the detectable distance is between 3 and 250 centimeters (with an accuracy of +/- 1 centimeters). When using inch units, the measurable distance is between 1 and 99 inches (with an accuracy of +/ inches). A value of 255 centimeters or 100 inches means the sensor is not able to detect any object in front of it. Detectable distance A steady light around the sensor eyes tells you that the sensor is in Measure Mode. A blinking light tells you that it is in Presence Mode. In Presence Mode, this sensor can detect another Ultrasonic Sensor operating nearby. When listening for presence, the sensor detects sound signals but does not send them. The Ultrasonic Sensor can help your robots avoid furniture, track a moving target, detect an intruder in your room, or ping with increasing volume or frequency as an object gets closer to the sensor. For more information, see Using the Ultrasonic Sensor in the EV3 Software Help. NOTE: Since the Ultrasonic Sensor depends on reflection of the sound waves it may be ineffective at detecting surfaces that are textured or objects that are rounded. It is also possible for an object to be too small for the Ultrasonic Sensor to detect it. 17
18 EV3 TECHNOLOGY EV3 Sensors Infrared Sensor and Remote Infrared Beacon The Infrared Sensor is a digital sensor that can detect infrared light reflected from solid objects. It can also detect infrared light signals sent from the Remote Infrared Beacon. Infrared Sensor The Infrared Sensor can be used in three different modes: Proximity Mode, Beacon Mode, and Remote Mode. 70cm / 27inch PROXIMITY MODE In Proximity Mode, the Infrared Sensor uses the light waves reflected back from an object to estimate the distance between the sensor and that object. It reports the distance using values between 0 (very close) to 100 (far away), not as a specific number of centimeters or inches. The sensor can detect objects up to 70 cm away, depending on the size and shape of the object. For more information, see Using the Infrared Sensor Proximity Mode in the EV3 Software Help. Proximity Mode BEACON MODE Choose one of the Remote Infrared Beacon s four channels from the red Channel Selector. The Infrared Sensor will detect a beacon signal matching the channel that you specify in your program up to a distance of approximately 200 cm in the direction it is facing. 200cm / 79inch Once detected, the sensor can estimate the general direction (heading) of and the distance (proximity) to the beacon. With this information, you can program a robot to play hide-and-seek, using the Remote Infrared Beacon as the target of its search. The heading will be a value of between -25 and 25, with 0 indicating that the beacon is directly in front of the Infrared Sensor. The proximity will be values between 0 and 100. Beacon Mode For more information, see Using the Infrared Sensor Beacon Mode in the EV3 Software Help. 18


 1 = Button 1 2 = Button 2 3 = Button 3 4 = Button 4 5 = Both Button 1 and Button 3 6 = Both Button 1")
19 EV3 TECHNOLOGY EV3 Sensors The Remote Infrared Beacon is a separate device that can be handheld or built into another LEGO model. It requires two AAA alkaline batteries. To turn the Remote Infrared Beacon on, press the big Beacon Mode button on the top of the device. A green LED Indicator will turn on, indicating the device is active and transmitting continuously. Another press on the Beacon Mode button will turn it off (after one hour of inactivity, the beacon will automatically turn itself off). Remote Infrared Beacon REMOTE MODE You can also use the Remote Infrared Beacon as a remote control for your robot. When in Remote Mode, the Infrared Sensor can detect which button (or combination of buttons) on the beacon is pressed. There are a total of eleven possible button combinations: 0 = No button (and Beacon Mode is off) 1 = Button 1 2 = Button 2 3 = Button 3 4 = Button 4 5 = Both Button 1 and Button 3 6 = Both Button 1 and Button 4 7 = Both Button 2 and Button 3 8 = Both Button 2 and Button 4 9 = Beacon Mode is on 10 = Both Button 1 and Button 2 11 = Both Button 3 and Button 4 Remote Mode For more information, see Using the Infrared Sensor Remote Mode in the EV3 Software Help. NOTE: The Infrared Sensor and Remote Infrared Beacon are not part of the LEGO MINDSTORMS Education EV3 Core Set but can be acquired as accessories. 19
 and Fahrenheit (-4 F to 248 F) with an accuracy of 0.1 C.")

20 EV3 TECHNOLOGY EV3 Sensors Temperature Sensor The Temperature Sensor is a digital sensor that measures the temperature at the tip of its metal probe. The sensor measures in Celsius (-20 C to 120 C) and Fahrenheit (-4 F to 248 F) with an accuracy of 0.1 C. Temperature Sensor The Temperature Sensor is most commonly used to collect data for heat-related data logging projects. With a 50 cm long Connector Cable and a 6.4 cm metal probe, the sensor makes it easy to measure hot liquids away from the EV3 Brick and other electronics. For more information, see Using the Temperature Sensor in the EV3 Software Help. NOTE: The Temperature Sensor is not supported in the EV3 Programming App. NOTE: The Temperature Sensor is not part of the LEGO MINDSTORMS Education EV3 Core Set but can be acquired as accessory. 20

21 EV3 TECHNOLOGY Connecting Sensors and Motors In order to function, motors and sensors must be connected to the EV3 Brick. Using the flat black Connector Cables, link sensors to the EV3 Brick using Input ports 1, 2, 3, and 4. If you create programs while the EV3 Brick is disconnected from your device, the software will assign sensors to the following default ports: + Port 1: Touch Sensor + Port 2: Gyro Sensor/Temperature Sensor + Port 3: Color Sensor + Port 4: Ultrasonic Sensor/Infrared Sensor Connecting Sensors Note: The Temperature Sensor is not supported in the EV3 Programming App. If the EV3 Brick is connected to your device while you program, the EV3 Software/Programming App will automatically identify which port is being used for each sensor and motor. Using the flat black Connector Cables, link motors to the EV3 Brick using Output ports A, B, C, and D. As with the sensors, if the EV3 Brick is not connected when you are writing a program, each motor will be assigned to the following default ports: Connecting Motors + Port A: Medium Motor + Port B & C: Two Large Motors + Port D: Large Motor If the EV3 Brick is connected to your device while you are programming, the EV3 Software/Programming App will automatically assign the correct port in your programs. NOTE: The software cannot distinguish between two or more identical sensors or motors. 21
. Plug the USB end into your computer.")
22 EV3 TECHNOLOGY Connecting the EV3 Brick to Your Computer Connect the EV3 Brick to your computer by USB cable or wirelessly using either Bluetooth or Wi-Fi. USB Cable Using the USB cable, plug the Mini-USB end into the EV3 Brick s PC port (located next to Port D). Plug the USB end into your computer. USB cable connection 22

23 EV3 TECHNOLOGY Connecting the EV3 Brick to Your Computer Wireless Bluetooth If your computer is not Bluetooth-enabled, you will need a Bluetooth USB dongle for your computer. Making a Bluetooth connection to the computer Before you can make a Bluetooth connection between the EV3 Brick and the computer running the EV3 Software, you will need to enable Bluetooth on the EV3 Brick. Directions for this can be found on page 38. Once you have enabled Bluetooth on the EV3 Brick, it can now be connected to the computer and EV3 Software. Wireless connection 1. First, confirm that the EV3 Brick is turned on. 2. Open a new or existing program in the EV3 Software (see the EV3 Software chapter on page 42 for directions on how to do this). 3. Go to the Hardware Page at the lower right of the screen expand the window if collapsed (learn more about the Hardware Page on page 51). 4. Click on the Available Bricks tab. If your EV3 Brick is not already listed, click the Refresh button to locate the EV3 Brick and check the Bluetooth box that will appear. 5. Accept the connection on your EV3 Brick manually, then enter the passkey and press the Center button for OK. The default is Repeat this in the EV3 Software. 6. The connection is now established and a <> symbol is shown at the top left of the EV3 Brick Display (next to the Bluetooth icon) to confirm the connection. To disconnect the EV3 Brick from the computer, click on the Disconnect button next to the Refresh button in the Hardware Page. More information about Bluetooth settings on the EV3 Brick can be found on page
24 EV3 TECHNOLOGY Connecting the EV3 Brick to Your Computer Wireless Wi-Fi In order to connect the EV3 Brick to your computer, you first need a Wi-Fi USB dongle. Contact your local LEGO Education provider for a list of compatible dongles or go to the official LEGO MINDSTORMS Education website ( To begin the setup, you must have access to a wireless network and know the network name (SSID) and password. If the EV3 Software is open, close it and insert your Wi-Fi dongle into the EV3 Brick using the USB Host port. Before you can connect the EV3 Brick to a network, you will need to enable Wi-Fi on the EV3 Brick. Directions for this can be found on page 40. Settings screen NOTE: The EV3 Brick only supports the following network encryption modes: None and WPA2. NOTE: Because of keyboard limitations, the password for the network must be made up of numbers, capital letters, and lowercase letters. You will not be able to use some symbols, such as the # sign, or letters and symbols from non-latin alphabets. 24
25 EV3 TECHNOLOGY Connecting the EV3 Brick to Your Computer Connecting the EV3 Brick to a network After selecting Wi-Fi on the Settings screen, use the Up and Down buttons to select Connections and press the Center button for OK. The EV3 Brick will now search for and list available Wi-Fi networks. Using the Up and Down buttons for navigation, find your network on the list. If the EV3 Brick is not already connected to your network (indicated by a check mark), select your network using the Center button. In the Network dialog box that appears, select Connect and press OK with the Center button. You will now be asked to enter the encryption type and the network password using the Left, Right, Up, and Down buttons to navigate (upper and lower cases do matter here). Network list Connect to network Once you have entered the correct password, press the check mark for OK. You will now be connected to the network. If the EV3 Brick does not find your network, it may be hidden. To connect to a hidden network, select Add hidden. You will then be asked to enter the name, encryption type, and password for the hidden network you wish to add (upper and lower cases do matter here). Once done, the EV3 Brick will be connected to the hidden network and it will be included in the network list. Network password Add hidden network NOTE: After connecting to a password-protected network, the EV3 Brick will remember the password for future connections. Known networks are indicated in the list with an *. 25
, or select Wireless Setup from the Tools Menu.")
26 EV3 TECHNOLOGY Connecting the EV3 Brick to Your Computer Making a Wi-Fi connection from the computer to the EV3 Brick Using the USB cable, connect the EV3 Brick to the computer. Open a new or existing program within the EV3 Software. Access the Wireless Setup tool in the Hardware Page (at the bottom right of the screen), or select Wireless Setup from the Tools Menu. The computer will display a list of detected networks. Select the network you want to connect to and click Connect to configure the connection. To add a network that is not broadcasting its Network Name (SSID), click Add. Wireless Setup tool To edit the settings of a previously configured network, click Edit. Click OK to establish a Wi-Fi connection. Once the connection is established, you can unplug the USB cable. 26
27 EV3 TECHNOLOGY Connecting the EV3 Brick to Other Devices Making a Bluetooth Connection to Your ipad To download and run programs that you create in the EV3 Programming App, connect the ipad to the EV3 Brick via Bluetooth using the following steps (to view an animation of the connection process, watch the Quick Start Video in the Lobby Menu of the EV3 Programming App): 1. Confirm that the EV3 Brick is turned on. 2. Enable Bluetooth on the EV3 Brick and enable the iphone/ipad/ ipod setting (see page 38 for further details). 3. Make sure Bluetooth is enabled on the ipad, and open a new or existing program in the EV3 Programming App. 4. Tap the No Device Connected icon at the top right corner. 5. Tap the Connect button. 6. Select the EV3 Brick you want to connect to from the list of available bricks. 7. Accept the connection on your EV3 Brick manually, then enter the passkey and press the Center button for OK. The default is Enter the same passkey in the EV3 Programming App. 8. The connection is now established and a <> symbol is shown at the top left of the EV3 Brick Display (next to the Bluetooth icon) to confirm the connection. No Device Connected icon To disconnect the EV3 Brick from the ipad, go to the Hardware Page and tap the Disconnect button. See page 61 for further details. More information about Bluetooth settings on the EV3 Brick can be found on page 38. Accept the connection on your EV3 Brick NOTE: For a full list of supported devices go to: 27
28 EV3 TECHNOLOGY Connecting the EV3 Brick to Other Devices Making a Bluetooth Connection to Your Android Tablet To download and run programs that you create in the EV3 Programming App, connect the Android tablet to the EV3 Brick via Bluetooth using the following steps (to view an animation of the connection process, watch the Quick Start Video in the Lobby Menu of the EV3 Programming App): 1. Confirm that the EV3 Brick is turned on. 2. Enable Bluetooth on the EV3 Brick and ensure the iphone/ipad/ ipod setting is unchecked (see page 38 for further details). 3. Make sure Bluetooth is enabled on the tablet, and open a new or existing program in the EV3 Programming App. 4. Tap the No Device Connected icon at the top right corner. 5. Tap the Connect button. 6. Select the EV3 Brick you want to connect to from the list of available bricks. 7. Accept the connection on your EV3 Brick manually, then enter the passkey and press the Center button for OK. The default is Enter the same passkey in the EV3 Programming App. 8. The connection is now established and a <> symbol is shown at the top left of the EV3 Brick Display (next to the Bluetooth icon) to confirm the connection. No Device Connected icon To disconnect the EV3 Brick from the Android tablet, go to the Hardware Page and tap the Disconnect button. See page 61 for further details. Accept the connection on your EV3 Brick More information about Bluetooth settings on the EV3 Brick can be found on page 38. NOTE: For a full list of supported devices go to: 28
29 EV3 TECHNOLOGY Connecting the EV3 Brick to Other Devices Making a Bluetooth Connection to Your Chromebook To download and run programs that you create in the EV3 Programming App, connect the Chromebook to the EV3 Brick via Bluetooth using the following steps (to view an animation of the connection process, watch the Quick Start Video by accessing Teacher Support in the Lobby Menu of the EV3 Programming App): 1. Confirm that the EV3 Brick is turned on. 2. Enable Bluetooth on the EV3 Brick and ensure the iphone/ ipad/ipod setting is unchecked (see page 38 for further details). 3. Click the status area in the lower right corner of the Chromebook and click the Bluetooth icon. If Bluetooth is off, select Enable Bluetooth. Your Chromebook will now start searching for devices. 4. Select the EV3 Brick you want to connect to from the list of available devices. It may take some time for the Chromebook to find the EV3 Brick. 5. Accept the connection on your EV3 Brick manually, then enter the passkey shown on the Chromebook and press the Center button for OK. The default is Open a new or existing program in the EV3 Programming App. 7. Click the No Device Connected icon at the top right corner. 8. Click the Connect button. 9. Select the EV3 Brick you want to connect to from the list of available bricks. 10. The connection is now established and a <> symbol is shown at the top left of the EV3 Brick Display (next to the Bluetooth icon) to confirm the connection. No Device Connected icon Accept the connection on your EV3 Brick To disconnect the EV3 Brick from the Chromebook, go to the Hardware Page and click the Disconnect button. See page 61 for further details. More information about Bluetooth settings on the EV3 Brick can be found on page 38. NOTE: For a full list of supported devices go to: 29
30 EV3 TECHNOLOGY EV3 Brick Interface The EV3 Brick is the control center for bringing your robots to life. Using the Display and the Brick Buttons, the EV3 Brick Interface contains four basic screens that give you access to an amazing array of functions unique to the EV3 Brick. It can be something as simple as starting and stopping a program, or something as complicated as writing the program itself. Run Recent This screen will be blank until you begin to download and run programs. It is the most recently run programs that will be displayed on this screen. The program at the top of the list which is selected by default is the latest program run. Run Recent screen File Navigation This screen is where you will access and manage all the files on your EV3 Brick, including files stored on a SD Card. Files are organized in project folders, which in addition to the actual program files also contain sounds and images used in each project. In the File Navigator, files can be moved or deleted. Programs created using the Brick Program and Brick Datalog apps are stored separately in the BrkProg_SAVE and BrkDL_SAVE folders. File Navigation screen Open folder in File Navigation 30
31 EV3 TECHNOLOGY EV3 Brick Interface Brick Apps The EV3 Brick comes with five brick applications preinstalled and ready to use. In addition, you can also make your own apps in the EV3 Software. Once downloaded to the EV3 Brick, the homemade apps will be displayed here. The five preinstalled apps are the following: PORT VIEW On the first screen in the Port View, you will see, at a glance, which ports have sensors or motors attached. Use the EV3 Brick Buttons to navigate to one of the occupied ports and you will see the current readings returned from the sensor or motor. Attach some sensors and motors and experiment with the different settings. Press the Center button to see or change the current settings for the attached motors and sensors. Press the Back button to get back to the Brick Apps main screen. Brick Apps screen MOTOR CONTROL Control the forward and reverse movement of any motor connected to one of the four output ports. There are two different modes. In one mode, you will be able to control motors connected to Port A (using the Up and Down buttons) and to Port D (using the Left and Right buttons). In the other mode, it is motors connected to Port B (using the Up and Down buttons) and Port C (using the Left and Right buttons) that you control. Use the Center button to toggle between the two modes. Press the Back button to get back to the Brick Apps main screen. Port View app Motor Control app 31
32 EV3 TECHNOLOGY EV3 Brick Interface IR CONTROL Control the forward and reverse motion of any motor connected to one of the four output ports using the Remote Infrared Beacon as remote control and the Infrared Sensor as receiver (the Infrared Sensor must be connected to Port 4 in the EV3 Brick). There are two different modes. In one mode, you will be using Channels 1 and 2 on the Remote Infrared Beacon. On Channel 1, you will be able to control motors connected to Port B (using Buttons 1 and 2 on the Remote Infrared Beacon) and to Port C (using Buttons 3 and 4 on the Remote Infrared Beacon). On Channel 2, you will be able to control motors connected to Port A (using Buttons 1 and 2) and to Port D (using Buttons 3 and 4). In the other mode, you can control your motors in the exact same way by using Channels 3 and 4 on the Remote Infrared Beacon instead. Use the Center button to toggle between the two modes. Press the Back button to get back to the Brick Apps main screen. IR Control app NOTE: The Remote IR Beacon and Infrared Sensor are not part of the LEGO MINDSTORMS Education EV3 Core Set but can be acquired as accessories. 32


33 EV3 TECHNOLOGY EV3 Brick Interface BRICK PROGRAM The EV3 Brick comes with an on-brick programming application similar to the Programming Canvas on the EV3 Software and EV3 Programming App. These instructions provide the basic information you will need to get started. Create program Open up your Brick Program App. The Start screen provides you with a Start and a Loop block that are connected via a Sequence Wire. The vertical broken Add Block line in the middle indicates that you can add more blocks to your program. Press the Up button to add a new block from the Block Palette. In the Block Palette, you can choose which new block to add by navigating using the Left, Right, Up, and Down buttons. Navigating farther up, additional blocks will show. Navigating all the way down will take you back to your program. Generally, there are two types of blocks Action and Wait. The Action Block Indicator is a small arrow at the top right on the block. The Wait Block Indicator is a small hourglass. In total, there are six different Action blocks and eleven different Wait blocks to choose from. When you find the block you want, navigate to it and press the Center button. You will be taken back to your program. In your program, you can navigate between the blocks using the Left and Right buttons. Press the Center button to change the settings of the highlighted block (always the block in the middle of the screen) or to add a new block when the Sequence Wire is highlighted and the Add Block line is visible. On each programming block, you can change one setting using the Up and Down buttons. For example, on the Action Move Steering block, you can change the direction of your robot s path. When you have chosen the setting you want, press the Center button. Start screen New block added Block Palette Adjust block setting Full Block Palette 33

34 EV3 TECHNOLOGY EV3 Brick Interface Delete blocks If you want to delete a block from a program, highlight the block you want to delete and press the Up button to go to the Block Palette. In the Block Palette, navigate to the trashcan on the far left and press the Center button. The block is now deleted. Run program To run your program, use the Left button to navigate to the Start block at the very beginning of the program. Press the Center button and your program will run. Save and open program To save your program, navigate to the Save icon on the far left of your program. When clicking on the Save icon, you will be asked to name your program or accept the default name. Once you are done, click OK and your program is now saved in the BrkProg_SAVE folder that can be accessed from the File Navigation screen (see page 30). Delete block You can also open any existing EV3 Brick Program by clicking on the Open icon located above the Save icon. Use the Up and Down buttons to toggle between those two icons. Run program Save program 34
35 EV3 TECHNOLOGY EV3 Brick Interface BRICK DATALOG The EV3 Brick comes with a simple-to-use, on-brick data logging application. These instructions provide you with the basic information you will need to get started. Main screen When you open the EV3 Brick Datalog app, you will see to the left a Graph Area. If a sensor or motor is connected to the EV3 Brick, a graph will show live readings from one of the sensors like an oscilloscope (if a motor is connected, it is readings from the in-build rotation sensor). To the right of the graph, the following numbers are displayed (from the top): actual reading, duration, highest reading, lowest reading, and average reading. Duration will only be shown when running an experiment not when in Oscilloscope Mode. Main screen Underneath, a small window will indicate what port the values are currently read from (Input Port 1, 2, 3, or 4, or Output Port A, B, C, or D). To change the port, use the Left and Right buttons to click through the available ports. NOTE: Only ports with a sensor or motor connected will be displayed! 35
36 EV3 TECHNOLOGY EV3 Brick Interface Set up and run experiment If you wish to set up and run an experiment, start by clicking on the Brick Datalog Settings button in the bottom right corner symbolized by a wrench. Use the Down and Right buttons to navigate to it and the Center button to click OK. You can now decide the sample rate of your experiment, ranging from one sample per minute to a thousand samples per second. Use the Up and Down buttons to highlight Rate, then use the Left and Right buttons to select the sample rate you wish to use for your experiment. Next, you can choose what sensor to use for your experiment. Highlight Sensor Setup and click OK with the Center button. Sample rate Sensor setup You will now get a list of sensors connected to your EV3 Brick. Use the Up and Down buttons to highlight the sensor you want to use. When a sensor is highlighted, use the Left and Right buttons to select sensor mode (for example, if the Color Sensor should measure color or ambient light). Once you have found the correct sensor mode, use the Center button to click OK and you will be taken back to the Settings screen. On the Settings screen, click the check mark button and you are now back at the main EV3 Brick Datalog screen. To run your experiment, select and click on the Record button (next to the Settings button with the wrench). Run experiment A live graph will now show the incoming values from the selected sensor. To the right you can see the statistics of your experiment, including duration. The flashing Record button and pulsing green EV3 Brick Buttons Light indicate that your experiment is running. To stop your experiment, click the Center button. When stopping your experiment, you will be asked to name your experiment or accept the default name. Once you are done, click OK and your experiment is now saved in the BrkDL_SAVE folder that can be accessed from the File Navigation screen (see page 30). NOTE: The live graph is not supported when logging data at higher rates than ten samples per seconds. The incoming values will then only be shown as numbers. 36
37 EV3 TECHNOLOGY EV3 Brick Interface Settings This screen will enable you to see and adjust various general settings on the EV3 Brick. VOLUME There may be occasions when you will want to adjust the volume of the sound coming from the EV3 Brick Speaker. To change the speaker volume, go to the Settings screen. As the top menu, Volume will already be highlighted. Press the Center button. Use the Right and Left buttons to change the volume setting, which can be intervals from 0% to 100%. Press the Center button to accept. This will return you to the Settings screen. Settings screen SLEEP To change the amount of inactive time that passes before the EV3 Brick goes into Sleep Mode, go to the Settings screen and navigate to the Sleep menu using the Down button. Press the Center button. Use the Right and Left buttons to select a lower or higher time period, which can be intervals from 2 minutes to never. Press the Center button to accept. This will return you to the Settings screen. Adjust volume Adjust sleep 37
38 EV3 TECHNOLOGY EV3 Brick Interface BLUETOOTH This is where Bluetooth is enabled on the EV3 Brick, and where you can choose some specific privacy and Apple ios settings. Here you can also connect to other Bluetooth devices such as another EV3 Brick. When you select Bluetooth on the Settings page, there are four options presented Connections, Visibility, Bluetooth, and iphone/ ipad/ipod. To go back to the main Settings screen, press the Down button until the check mark at the bottom of the screen is highlighted, then press the Center button for OK. Bluetooth It is here that you enable standard Bluetooth on the EV3 Brick. Using the Up and Down buttons, select the word Bluetooth, then press the Center button for OK. A check mark will appear in the Bluetooth box. Bluetooth is now enabled on your EV3 Brick, and a Bluetooth icon will be shown in the top left of the EV3 Brick Display. Enable Bluetooth Note: This setting will not allow you to connect to an ios device. For this, you will also need to select the iphone/ipad/ipod setting (see below)! To disable Bluetooth, repeat the above procedure, this time unchecking the Bluetooth box. iphone/ipad/ipod Select this setting if you want to connect your EV3 Brick to Apple ios devices iphones, ipads, and ipods using Bluetooth (make sure Bluetooth is enabled on your ios device). This setting must also be enabled when connecting to the EV3 Programming App on an ipad. Note: Using this setting will prevent your EV3 Brick from connecting to other non-ios Bluetooth devices, including computers, Chromebooks, Android devices, and other EV3 Bricks! You cannot enable both standard Bluetooth and Bluetooth communication for ios devices at the same time. To enable and disable Bluetooth communication for ios devices, use the Up and Down buttons to select iphone/ipad/ipod and then press the Center button for OK. A Bluetooth icon will be shown on the top left of the EV3 Brick Display. NOTE: Your EV3 Brick will run more efficiently if you disable the Bluetooth setting when it is not in use. 38
39 EV3 TECHNOLOGY EV3 Brick Interface Connections This option allows you to discover and choose other available Bluetooth devices (make sure Bluetooth is enabled). If you click on Connections, you will be taken to a Favorites screen, where the devices you trust are displayed and identified with a check mark. No passkeys are needed for your trusted devices. Using the check boxes, you can manage which devices you wish to have as Favorites. If you then click on Search, the EV3 Brick will scan the area for all detectable Bluetooth-emitting devices including other EV3 Bricks. Your favorite devices will be shown with an asterisk * symbol. Use the Up and Down buttons to select the device on the list you wish to connect to. Press the Center button for OK. If you choose to connect to a device not yet marked as a Favorite, you will be asked to enter the passkey to establish the connection. Once the other device verifies the passkey, you are automatically connected to the device. Favorites list Visibility If the Visibility setting is selected, other Bluetooth devices (including other EV3 Bricks) will be able to discover and connect to your EV3 Brick. If Visibility is unchecked, the EV3 Brick will not respond to search commands from other Bluetooth devices. Device list 39
40 EV3 TECHNOLOGY EV3 Brick Interface WI-FI This is where you enable Wi-Fi communication on the EV3 Brick and connect to a wireless network. After selecting Wi-Fi on the Settings screen, use the Up and Down buttons to select the word WiFi and press the Center button for OK. A check mark will appear in the WiFi box. Wi-Fi is now enabled on your EV3 Brick, and a Wi-Fi icon will be shown at the top left of the EV3 Brick Display. To go back to the main Settings screen, press the Down button until the check mark at the bottom of the screen is highlighted, then press the Center button for OK. For information on how to connect your EV3 Brick to a wireless network, see the Connecting the EV3 Brick to Your Computer section on page 24. Enable Wi-Fi Note: Wi-Fi connectivity to the EV3 Brick is not supported in the EV3 Programming App. BRICK NAME This menu allows you to view and change the name of the EV3 Brick. Go to the Settings screen and navigate to the Brick Name menu using the Down button. Press the Center button. The current EV3 Brick name is displayed. To change it, use the Up, Down, Left, and Right brick buttons to enter the new name. Finally, highlight the Enter key on the display keyboard and press the Center button to save the new EV3 Brick name. Brick Name Note: The Brick Name feature requires firmware V1.07 or above. BRICK INFO When you need to know the current technical specifications of your EV3 Brick, such as hardware and firmware version and EV3 Brick OS build, this is where you will find that information. This is also where you can find out how much free memory you have available. Brick Info 40
41 EV3 SOFTWARE MINIMUM SYSTEM REQUIREMENTS Go to LEGOeducation.com/EV3TechSpecs While building robots is fun, the heart of robotics is bringing them to life making them move and accomplish tasks. You will find the LEGO MINDSTORMS Education EV3 Software to be: + A visual and intuitive introduction to programming + A helpful and comprehensive data logging tool + A digital workbook where instructions are given and findings documented + A natural opportunity to inspire and show interest in the fields of science, technology, engineering, and mathematics. Installing the Software Once you have confirmed that your computer meets the minimum system requirements, you are ready to install the software. Close all other programs, then double-click on the installation file in the EV3 Software application folder. Installation will now begin. TEACHER AND STUDENT EDITION During the installation process you will be asked to select either the Teacher or Student Edition of the EV3 Software. On Macintosh, Teacher Edition can be selected when choosing Customized installation. In the Teacher Edition you will find additional information and resources that can be useful in a classroom setting and in other teaching situations. You will also have extended Content Editor capabilities to access, create, and manage content used for teaching: for example, by making programs inaccessible to students. It is recommended that all educators install the Teacher Edition. 41
42 EV3 SOFTWARE Lobby Every time you open the EV3 Software, you will automatically start out in the Lobby area. The Lobby makes it easy to locate and work with the software and gives you access to everything you need. In the Lobby you will find the following options and resources: 1. Lobby Tab This button always returns you to the Lobby. 2. Activity Overview Here you can access, organize, and preview content and get started with a project. + Teacher s Support, with getting started lesson plan, creative assessment tool and LEGO element overview + Quick Start resources such as a small introduction video and the EV3 User Guide + File management, where you can start a new project or open an existing one + Robot Educator, with forty-eight step-by-step tutorials that explain how to use the EV3 Software and Hardware + Building instructions for Core Set and Expansion Set Models 3. View This button takes you back to the Activity Overview. 4. Search Find projects with specific content using different filter options 5. Community Instant access to the LEGO Education community. Post, share and discuss ideas or activities with other community members Lobby overview 42
43 EV3 SOFTWARE Project Properties and Structure When you open a new program or experiment, it will automatically create a project folder file. All programs, experiments, images, sounds, videos, instructions, and other assets that are used within a project will automatically be stored in this project folder. This makes it easy to store your project and share it with others. Project, Program and Experiment tabs Each project will be displayed in the form of a tab at the top of the screen. Underneath, you will see tabs for the Programs and Experiments that belong to the selected Project. You can add a new Project, Program, or Experiment by clicking on the + button to the right of the other tabs. Clicking on an X will close the tab. PROJECT PROPERTIES PAGE If you click on the tab with the wrench to the far left of the Program and Experiment tabs, you will be taken to the Project Properties page. This page gives you an orderly display for the project that is currently selected, including all programs and experiments, images, sound, and other assets. Here you can describe your project with text, images, and video that will determine how the project shows up in the Lobby. In the Teacher version of the EV3 Software, the Project Properties page also allows you to restrict access to selected programs and other assets in your project. 43

44 EV3 SOFTWARE Project Properties and Structure Project Properties displayed include: 1. Project Description Give your project a title, describe it, and insert any images and video you would like to appear in the Lobby when the project is previewed. 2. Project Content Overview Here you will find all assets included in the project: for example, programs, experiments, images, sounds, and My Blocks. 3. Daisy-Chain Mode This check box enables the Daisy-Chain Mode, so you can program up to four connected EV3 Bricks Project Properties page 44

45 EV3 SOFTWARE Robot Educator Robot Educator is the name of both the basic robot and the tutorials you will find in the EV3 Software. The Robot Educator learning tool is designed to take you through the essentials of programming, data logging, and hardware. Robot Educator consists of forty-eight tutorials divided into the following categories: Basics, Beyond Basics, Hardware, Data Logging, and Tools. Each tutorial is structured in the following way: + Understanding the objective + Build and program your robot + Test it + Modify it In the Robot Educator section in the Lobby, you can also find all related building instructions and a Teacher s Guide (only available in the Teacher version of the EV3 Software). Robot Educator 45

46 EV3 SOFTWARE Programming Without a program, a robot is just a statue. It may be a cool statue, but it s still a statue. When you program a robot you give it abilities to move, to follow lines, to avoid objects, to make mathematical calculations, and much more. The EV3 Software has an intuitive, graphics-based format that users from 10 to 100 years of age can quickly learn and successfully use. The EV3 Programming Environment consists of the following main areas: 1. Programming Canvas Lay out your program here. 2. Programming Palettes Find the building blocks for your program here. 3. Hardware Page Establish and manage your communication with the EV3 Brick here and see what motors and sensors are connected where. This is also where you download programs to the EV3 Brick. 4. Content Editor A digital workbook integrated into the software. Get instructions or document your project using text, images, and videos. 5. Programming Toolbar Find basic tools for working with your program here. Learn more about these tools in the EV3 Software Help Programming Environment 46


47 EV3 SOFTWARE Programming Blocks and Palettes All the programming blocks that are used for controlling your robot are located in Programming Palettes at the bottom of the Programming Environment underneath the Programming Canvas. The programming blocks are divided into categories according to type and nature, making it easy to find the block you need. To learn more about the EV3 Programming Environment and see how you can get started with your first program, see the Programming and Programming Overview videos in the Quick Start section of the Lobby. You can also find more information about how to program in the EV3 Software Help. ACTION BLOCKS (In order from left to right) + Medium Motor + Large Motor + Move Steering + Move Tank + Display + Sound + Brick Status Light FLOW BLOCKS (In order from left to right) + Start + Wait + Loop + Switch + Loop Interrupt SENSOR BLOCKS (In order from left to right) + Brick Buttons + Color Sensor + Gyro Sensor + Infrared Sensor + Motor Rotation + Temperature Sensor + Timer + Touch Sensor + Ultrasonic Sensor + Energy Meter + NXT Sound Sensor 47


48 EV3 SOFTWARE Programming Blocks and Palettes DATA BLOCKS (In order from left to right) + Variable + Constant + Array Operations + Logic Operations + Math + Round + Compare + Range + Text + Random ADVANCED BLOCKS (In order from left to right) + File Access + Data Logging + Messaging + Bluetooth Connection + Keep Awake + Raw Sensor Value + Unregulated Motor + Invert Motor + Stop Program + Comment MY BLOCKS When you are repeatedly using the same segment of a program in many programs, that is a good time to create a My Block. Once your My Block is created, you can simply insert that single block into future programs within the same project. 48

49 EV3 SOFTWARE Data Logging To data log is to collect information for analysis. For example, a weatherperson might collect temperature readings throughout the day, and then analyze it for a report on the evening news. Or a zookeeper might collect data on where visitors are spending their time at the zoo. The EV3 Software cannot only record data, it can help you to organize and analyze it. The EV3 Data Logging environment consists of the following main areas: 1. Graph Area This is where you see and analyze your data plots. 2. Configuration Panel Here you set up your experiment, manage your dataset, and get access to Dataset Calculation and Graph Programming, special data logging functionalities. 3. Hardware Page Establish and manage your communication with the EV3 Brick here and see what sensors are connected where. This is also where you download experiments to the EV3 Brick and upload data to the software. 4. Content Editor A digital workbook integrated into the software. Get instructions or document your project using text, images, and videos. 5. Data Logging Toolbar Find basic tools for working with your graph and experiment here. Learn more about these tools in the EV3 Software Help Data Logging environment 49
50 EV3 SOFTWARE Data Logging Configuration Panel In the Configuration Panel, you will find four different tabs that will help you prepare, manage, and analyze your experiments. Some of the tabs are dynamic: they will automatically be shown when relevant. You will always be able to switch between tabs manually. Experiment Configuration panel EXPERIMENT CONFIGURATION Here you set up your experiment by selecting the sample duration and rate and choosing what sensors to collect data from. For each sensor, you also have to select sensor mode, since most sensors can provide different types of data. Dataset Table panel DATASET TABLE In addition to displaying the collected data in the graph area, a dataset will be shown in the Dataset Table. Here you can also rename the dataset, delete or hide it, and change plot style and color of the graphs. Dataset Calculation panel DATASET CALCULATION Here you can manipulate datasets and graphs by doing various calculations using numbers, functions, and other datasets. The output result will be displayed as both graph and dataset values. Graph Programming panel GRAPH PROGRAMMING By dividing your graph area in different zones, you can enable your sensor input to trigger or activate an output: for example, a motor or a sound from the EV3 Brick when the sensor values reach a certain level or threshold. To learn more about the EV3 data logging environment and see how you can get started with your first experiment, see the Data Logging and Data Logging Overview videos in the Quick Start section of the Lobby. You can also find more information about how to data log in the EV3 Software Help. 50
51 EV3 SOFTWARE Hardware Page The Hardware Page provides a range of information about your EV3 Brick. It is always located in the lower right-hand corner when working with both Programs and Experiments and can be collapsed when needed using the Expand/Collapse tab. Even when collapsed, the Hardware Page Controller will be visible, allowing you to download your program or experiment The different Hardware Page Controller buttons have the following functionality: 1. Download Downloads the Program or Experiment to the EV3 Brick 2. Download and Run Downloads the Program or Experiment to the EV3 Brick and runs it immediately 3. Download and Run Selected Downloads only the highlighted blocks to the EV3 Brick and runs them immediately 4. Upload Uploads your collected datasets from the EV3 Brick to your Experiment Hardware Page Controllers The EV3 text in the small window at the top will turn red when an EV3 Brick is connected to your computer. 51


52 EV3 SOFTWARE Hardware Page BRICK INFORMATION The Brick Information tab displays important information about the EV3 Brick that is currently connected, such as EV3 Brick name, battery level, firmware version, connection type, and memory bar. It also gives you access to the Memory Browser and Wireless Setup tools. PORT VIEW The Port View tab displays information about the sensors and motors connected to the EV3 Brick. When your EV3 Brick is connected to the computer, this information is automatically identified and you will be able to see the live values. If your EV3 Brick is not connected, you can still set up the Port View tab manually. Select a port, then select the appropriate sensor or motor from the list. Brick Information tab AVAILABLE BRICKS The Available Bricks tab shows the EV3 Bricks that are currently available for connection. You are able to choose which EV3 Brick you want to connect to and the type of communication. Also, you can disconnect an existing EV3 Brick connection. Port View tab You can find more information about how to use the Hardware Page in the EV3 Software Help. Available Bricks tab 52
53 EV3 SOFTWARE Content Editor The Content Editor offers a convenient way for users to document the purpose, process, and analysis of their projects. You can include text, images, videos, sound effects, and even building instructions. It is also a convenient, paperless way for educators to monitor and evaluate student projects. Content Editor is also the place where already-made content for example, Robot Educator tutorials and purchased LEGO Education activity packs is displayed and used. Each page can be customized with different layouts and can automatically perform a range of actions, such as opening specific programs or highlighting a particular programming block. The Content Editor is located in the top right corner of the EV3 Software and is available whether you are working with a Program or an Experiment. You open the Content Editor using the large button with the book icon. Once open, you will be able to see whatever content has been made for the project: for example, a Robot Educator tutorial. The Content Editor consists of the following main areas and features: 1. Open/Close Content Editor Here you open and close the Content Editor. 2. Edit/View Mode Allows you to view or edit your pages. 3. Page Navigation Go to the next or previous page. 4. Teacher/Student Toggle Switch between the Student Page and Teacher Notes while viewing the content. This functionality is only available in the Teacher version of the EV3 Software. 5. Page Title Add a title to your page. 6. Page Area This is where the main content is shown and edited. 7. Media Icons Select what content type you wish to add to the page area. 8. Page Thumbnails Go to a specific page using the thumbnail images. In the Teacher version of the EV3 Software, Teacher Notes will also be available. 9. Add/Delete Page When adding a page, you get to choose from fourteen different templates. 10. Page Setup Make special settings for each page, such as format, page action, and navigation to the next page. You can find more information about how to use the Content Editor in the EV3 Software Help Content Editor 53
54 EV3 SOFTWARE Tools In the top menu bar of the EV3 Software you will find a number of small Tools that can add extra functionality and support to your EV3 Software experience. You can learn more about most of the Tools in the EV3 Software Help. SOUND EDITOR Create your own sound effects or customize one from our selection of official EV3 Sound files. The sounds can then be used for programming your robot by use of the Sound Programming Block. IMAGE EDITOR Make creative use of the EV3 Brick Display by designing original images or customizing existing images. The images can then be used for programming your robot by the use of the Display Programming Block. MY BLOCK BUILDER Sometimes you make a great miniprogram that you want to use again in another project or program. My Block Builder helps you take this miniprogram and create a unique My Block where you define the name, icon, and parameters that are relevant for you. My Blocks will automatically be archived in the My Block Programming Palette. FIRMWARE UPDATE Periodically, updated firmware will become available for your EV3 Brick. We recommend that you install new versions as they become available. This tool will tell you if there is a new firmware version available and help you update it on your EV3 Brick. WIRELESS SETUP In case you wish your EV3 Software to communicate with your EV3 Brick using Wi-Fi, this tool will help set up the wireless connection. To do so, you will need to acquire a Wi-Fi USB dongle for the EV3 Brick and enable Wi-Fi communication on the EV3 Brick. BLOCK IMPORT Add new blocks to your Programming Palettes. This can be new LEGO Programming Blocks or blocks developed by other manufacturers: for example, in relation to a third-party sensor. These Blocks first need to be downloaded to your computer then you can import them into your EV3 Software using this tool. 54
55 EV3 SOFTWARE Tools MEMORY BROWSER It is easy to lose track of what you have stored on your EV3 Brick. The Memory Browser provides an overview of memory use on your EV3 Brick (including an SD card if you have it inserted). You can use the Memory Browser to transfer programs, sounds, graphics, and other files between your EV3 Brick and a computer, and copy and delete files that are already on your EV3 Brick. DOWNLOAD AS APP Advanced users may enjoy the challenge of creating applications for generic tasks on the EV3 Brick. An EV3 Brick app is made as a normal EV3 program, but when downloaded to the EV3 Brick using this tool, it will show up as a new app in the Brick Apps screen, together with the default apps such as Brick Programming and Port View. IMPORT BRICK PROGRAM This tool will enable you to import a program made in the Brick Program App on the EV3 Brick to the EV3 Software Programming Environment. Your program can then be further refined using the full functionality of the EV3 Software. DATA LOG FILE MANAGER Use this tool to view, manage, and import datasets created by an experiment into your EV3 Software. This is used when collecting data remotely on the EV3 Brick. The Data Log File Manager can import datasets from the EV3 Brick, an SD card, or your computer. REMOVE VALUES FROM DATASET When collecting data from your sensors, you may later wish to remove certain values from a dataset. This might be done to narrow the range of sensor values you wish to further analyze or because your dataset contains sporadically invalid values generated by a sensor returning a default value when a real value cannot be measured. CREATE DATA LOGGING PROGRAM If you have an experiment that you would like to integrate into a program, this tool will help you. Rather than collecting data at the same place all the time, you may wish to program a robot to collect data from different areas in a room. This tool will transform your experiment into a Data Logging Programming Block on the Programming Canvas. You can now build your program. EXPORT DATASETS If you wish to work further with your dataset in another software tool (for example, Microsoft Excel), you can export any EV3 dataset to a comma-separated value (CSV) file format and save it on your computer. The CSV file can then be opened from within the chosen software. Make sure the software supports the CSV file format. 55
56 EV3 PROGRAMMING APP MINIMUM SYSTEM REQUIREMENTS Go to LEGOeducation.com/EV3TechSpecs The LEGO MINDSTORMS Education EV3 Programming App is a great way to learn about programming with the EV3 Brick on Chromebooks or tablets. Using the same look and feel as the EV3 Software, though without the data logging and Content Editor features, the Programming App focuses on helping students master programming robots in an environment that they will find intuitive and fun to use. Installing the Programming App Once you have confirmed that your Chromebook or tablet meets the minimum system requirements, open the App Store, Google Play, or Chrome Web Store on your device and then download and install the free app: LEGO MINDSTORMS Education EV3 Programming. Unlike the EV3 Software, the Programming App does not have separate Teacher & Student Editions. 56

57 EV3 PROGRAMMING APP Lobby The Lobby is where you start each time you open the Programming App. The Lobby makes it easy to create programs, open saved programs that you previously created, view tutorials, and access other resources that will help you familiarize yourself with the Programming App. In the Lobby you will find the following options and resources: 1. Help View an overlay showing the key components of the Lobby. 2. My Programs Tab Create a new program or load previously created programs. You can also delete and duplicate programs, as well as share them (see below for further details). Note: Tap the program name to modify it. 3. Robot Educator Tab Access six helpful tutorials that guide you through the basics of the EV3, from building simple modules to performing complex tasks using the robot s various sensors. 4. Expand Increases the size of the lower pane to view more programs/tutorials at once. 5. Select (available from My Programs Tab) Select programs for deletion or duplication. 6. Share (available from My Programs Tab) Share your programs via compatible apps installed on your device, such as . Note: Select Desktop if you want to export your program in a format that is compatible with the EV3 Software on your computer. Chromebooks support an import feature. 7. Menu Tap this icon to view the following options: + Help View the Quick Start Video and EV3 User Guide. + Teacher Support View helpful documentation to get you started teaching with the EV3 Programming App. + Terms of Use View the LEGO Group Privacy Policy, Cookie Policy, Terms of Use, and Support Information. + Languages Choose the language that you would like the Programming App to be displayed in. Note: The Chromebook Lobby Menu items vary slightly Lobby overview (exact appearance may vary per device) 57

58 EV3 PROGRAMMING APP Robot Educator The Robot Educator Tab contains six tutorials that will help you learn how to build your robot and program the various motors and sensors needed to carry out a series of challenging tasks. The tutorials included with Robot Educator: 1. Curved Move 2. Move Object 3. Stop at Object 4. Stop at Angle 5. Stop at Line 6. Follow a Line Each tutorial includes the following five steps: + Objective A description of the task to be completed + Build It Building instructions for the module(s) required for the task + Animation An animation of the robot completing the task + Test It A sample program for completing the task + Modify It A supplementary Modify It task requiring students to modify the robot or program Note: The Chromebook Robot Educator runs in the web browser and is slightly different from the tablet version. Students using the Chromebook version of the EV3 Programming App will need to recreate the Test It sample program themselves. Robot Educator (exact appearance may vary per device) 58
59 EV3 PROGRAMMING APP Programming Like the EV3 Software, the Programming App features an intuitive graphical interface that users of almost any age can quickly learn. The Programming Environment consists of the following main areas: 1. Programming Canvas Create your program here using the various programming blocks. 2. Programming Palettes Find the building blocks for your program here. 3. Port View View the sensors and motors connected to your EV3 Brick. Tap to open the Hardware Page and view more detailed information (see the Hardware Page section on page 61). The EV3 Brick name is also shown above the Port View. 4. Resize and Center Resize the Programming Canvas to show all objects that you have placed on it. 5. Download Download the active program to your EV3 Brick. Note: This will not be displayed if no EV3 Brick is connected. 6. Run Download the active program to the EV3 Brick and run it. Note: The time taken to download a program will depend on the number of images and sounds it includes. 7. Program Name Identifies the currently open program. 8. Undo/Redo Undo or redo the previously executed command. 9. Help View an overlay showing the key components of the Programming Environment. 10. Lobby Return to the Lobby Programming Environment (exact appearance may vary per device) 59

 + Medium Motor + Large Motor + Move Steering + Move Tank + Display + Sound + Brick")

60 EV3 PROGRAMMING APP Programming Blocks and Palettes Programming blocks are the interface between you and your robot. Located in the Programming Palettes area below the Programming Canvas, the blocks are divided into categories according to their type and nature to make it easy to find the block you need. ACTION BLOCKS (In order from left to right) + Medium Motor + Large Motor + Move Steering + Move Tank + Display + Sound + Brick Status Light FLOW BLOCKS (In order from left to right) + Start + Wait + Loop + Switch COMMENT BOXES When you create a program, it can be helpful to add Comment Boxes to describe what your program does. Use green Comment Boxes for Action Blocks, orange for Flow Block comments, and purple for general comments about the program. 60

61 EV3 PROGRAMMING APP Hardware Page Tapping anywhere in the Port View (visible from the Programming Environment) will display the Hardware Page. The Hardware Page consists of the following main areas: 1. Brick Information This area shows a range of information about the currently connected EV3 Brick, including the brick name, battery level, firmware version, and free/used memory space. Here you can also rename the EV3 Brick, disconnect the EV3 Brick, and connect to other available EV3 Bricks. 2. Brick Port Information A graphical representation of the EV3 Brick also shows which sensors and motors are connected to the EV3 Brick s ports. Tap a sensor to change its mode or tap a motor to change the displayed value, including current speed, rotations, and degrees turned. Here you can also reset attached motors and Gyro Sensors. 3. Download Download the active program to your EV3 Brick. Note: This will not be displayed if no EV3 Brick is connected. 4. Run Download the active program to the EV3 Brick and run it. Note: The time taken to download a program will depend on the number of images and sounds it includes. 5. Program Name Identifies the currently open program. 6. Help View an overlay showing the key components of the Hardware Page. 7. Back Return to the Programming Environment Hardware Page 61
62 TROUBLESHOOTING Updating the EV3 Software Under the Help menu in the EV3 Software, click Check for Software Updates to check for the latest version of the EV3 Software (Internet connection required). If an update is available and you choose to install it, you will be taken to a website where you can download the update to your local drive. To install the update, ensure that you first close the EV3 Software and then run the downloaded update file. You can also have the EV3 Software periodically check for updates by clicking the Automatically check for software updates checkbox. 62

63 TROUBLESHOOTING Automatic Firmware Update Firmware is the software that is inside the EV3 Brick. Without its firmware, the EV3 Brick will not work. Occasionally, the LEGOGroup may release new versions of the firmware that add enhanced functions or fix software bugs. To update the firmware, you need a USB connection from your computer to your EV3 Brick. Your computer must also be connected to the Internet. 1. Turn your EV3 Brick on and connect it to your computer. 2. Select Firmware Update in the Tools menu. 3. Click the Check button to see if new firmware updates are available. 4. Select the most recent firmware version from the Available firmware files. 5. If you want to use a firmware version located on your computer instead, use the Browse button to find and select the correct firmware file. 6. Click the Download button to download the new firmware to your EV3 Brick. The progress bars at the bottom of the Firmware Update dialog box will show you how the firmware update is proceeding. Once complete, your EV3 Brick will restart itself. Firmware Update tool FORCED FIRMWARE UPDATE If you need to update your firmware manually, follow the steps below. (Note: the EV3 Brick still requires a USB connection to your computer) 1. Make sure your EV3 Brick is turned off. 2. Hold down the Back, Center, and Right buttons on the EV3 Brick. 3. When the screen says Updating, release the buttons. If the manual firmware update does not make your EV3 Brick work the first time, repeat the manual update process. NOTE: NOTE: Firmware updates are not supported in the EV3 Programming App and must be carried out via the EV3 Software. Updating firmware will delete all existing files and projects in the EV3 Brick memory! NOTE: Check your EV3 Brick batteries before repeating manual firmware updates. The problem may simply be due to worn-down batteries! 63
64 TROUBLESHOOTING Forced Restart of the EV3 Brick If your EV3 Brick suddenly stops working and cannot be shut down through the normal process, you will need to reset your EV3 Brick. Resetting the EV3 Brick does not delete existing files and projects from previous sessions in the EV3 Brick memory. Files and projects from the existing session will be lost. 1. Make sure that the EV3 Brick is turned on. 2. Hold down the Back, Center, and Left buttons on the EV3 Brick. 3. When the screen goes blank, release the Back button. 4. When the screen says Starting, release the Center and Left buttons. NOTE: Check your EV3 Brick batteries before reinstalling firmware. Problems may simply be due to worndown batteries! 64
65 USEFUL INFORMATION Sound File List ANIMALS COLORS Cat purr Dog whine Snake hiss Black White Dog bark 1 Elephant call Snake rattle Blue Yellow Dog bark 2 Insect buzz 1 T-rex roar Brown Dog growl Insect buzz 2 Green Dog sniff Insect chirp Red 65
66 USEFUL INFORMATION Sound File List COMMUNICATION EXPRESSIONS Bravo Goodbye Okay Boing Kung fu Smack EV3 Hello Okey-dokey Boo Laughing 1 Sneezing Fantastic Hi Sorry Cheering Laughing 2 Snoring Game over LEGO Thank you Crunching Magic wand Uh-oh Go MINDSTORMS Yes Crying Ouch Good job Morning Fanfare Shouting Good No 66
67 USEFUL INFORMATION Sound File List INFORMATION MECHANICAL Activate Error Start Air release Blip 4 Motor stop Analyze Flashing Stop Airbrake Horn 1 Ratchet Backwards Forward Touch Backing alert Horn 2 Sonar Color Left Turn Blip 1 Laser Tick tack Detected Object Up Blip 2 Motor idle Walk Down Right Blip 3 Motor start Error alarm Searching 67
68 USEFUL INFORMATION Sound File List MOVEMENTS NUMBERS Arm 1 Servo 1 Speed down Eight One Three Arm 2 Servo 2 Speed idle Five Seven Two Arm 3 Servo 3 Speed up Four Six Zero Arm 4 Servo 4 Speeding Nine Ten Drop load Slide load Lift load Snap 68
69 USEFUL INFORMATION Sound File List SYSTEM Click Overpower Confirm Power down Connect Ready Download Start up General alert 69


70 USEFUL INFORMATION Image File List EXPRESSIONS EYES Big smile Sad Angry Dizzy Neutral Tired left Heart large Sick Awake Down Nuclear Tired middle Heart small Smile Black eye Evil Pinch left Tired right Mouth 1 open Swearing Bottom left Hurt Pinch middle Toxic Mouth 1 shut Talking Bottom right Knocked out Pinch right Up Mouth 2 open Wink Crazy 1 Love Sleeping Winking Mouth 2 shut ZZZ Crazy 2 Middle left Tear Disappointed Middle right 70


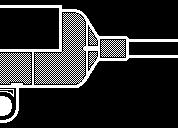


71 USEFUL INFORMATION Image File List INFORMATION LEGO Accept No go Thumbs down Color sensor IR sensor Sound sensor Backward Question mark Thumbs up EV3 icon Large motor Temp. sensor Decline Right Warning EV3 LEGO Touch sensor Forward Stop 1 Gyro sensor Medium motor US sensor Left Stop 2 IR beacon MINDSTORMS 71


72 USEFUL INFORMATION Image File List OBJECTS PROGRESS Bomb Lightning Bar 0 Dial 2 Hourglass 0 Timer 4 Boom Night Bar 1 Dial 3 Hourglass 1 Water level 0 Fire Pirate Bar 2 Dial 4 Hourglass 2 Water level 1 Flowers Snow Bar 3 Dots 0 Timer 0 Water level 2 Forest Target Bar 4 Dots 1 Timer 1 Water level 3 Light off Dial 0 Dots 2 Timer 2 Light on Dial 1 Dots 3 Timer 3 72
73 USEFUL INFORMATION Image File List SYSTEM Accept 1 Dot empty Slider 0 Slider 6 Accept 2 Dot full Slider 1 Slider 7 Alert EV3 small Slider 2 Slider 8 Box Busy 0 Slider 3 Decline 1 Busy 1 Slider 4 Decline 2 Play Slider 5 73


74 USEFUL INFORMATION Brick Program App Assets List SOUNDS IMAGES 1. Hello 7. Object 1. Neutral 7. Question mark 2. Goodbye 8. Ouch 2. Pinch right 8. Warning 3. Fanfare 9. Blip 3 3. Awake 9. Stop 1 4. Error alarm 10. Arm 1 4. Hurt 10. Pirate 5. Start 11. Snap 5. Accept 11. Boom 6. Stop 12. Laser 6. Decline 12. EV3 icon 74


75 USEFUL INFORMATION Element List 10x Bushing, ½-module, yellow x Connector peg with friction, 3-module, blue x Axle, 3-module, gray x Axle, 10-module, black x Bushing, 1-module, gray x Connector peg with friction, 2-module, black x Connector peg, 2-module, gray x Connector peg with axle, 2-module, beige x Connector peg, 3-module, beige x Connector peg with friction/axle, 2-module, blue x Connector peg with bushing, 3-module, red x Axle with stud, 3-module,dark beige x Axle with stop, 4-module, dark gray x Axle with stop, 8-module, dark gray x Axle, 2-module, red x Axle, 4-module, black x Axle, 5-module, gray x Axle, 6-module, black x Axle, 7-module, gray x Axle, 8-module, black x Axle, 12-module, black x Pointer, 3-module, white x T-Beam, 3x3-module, black x Beam with crosshole, 2-module, black x Beam, 3-module, black x Axle, 9-module, gray


76 USEFUL INFORMATION 4x Beam, 3-module, green x Beam, 3-module, red x Beam, 5-module, gray x Beam, 7-module, gray x Angular beam, 4x4-module, white x Double angular beam, 3x7-module, white x Beam, 3-module, blue x Beam, 3-module, yellow x Beam, 9-module, gray x Angular beam, 3x7-module, gray x Frame, 5x7-module, gray x Angular beam, 2x4-module, red x Beam, 11-module, gray x Angular beam, 4x6-module, black x Frame, 5x11-module, gray x Angular beam, 3x5-module, gray x Beam, 13-module, gray x Angular beam, 3x5-module, white x Beam, 15-module, white


77 USEFUL INFORMATION 4x Double connector peg, 3-module, gray x Double cross block, 3-module, black x ½ triangle beam, 5x3-module, gray x Angular block, 6 (90º), black x Double connector peg, 3x3-module, gray x Angular connector peg, 3x3-module, gray x Cross block, 2-module, gray x Cross block fork, 2x2-module, black x Cross block, 2x2-module, black x Cross beam, 2x1-module, red x 3-spoke angular block, 3x120º, gray x Tube, 2-module, gray x Bushing/axle extender, 2-module, red x Rubber beam with crossholes, 2-module, black x Gear, 8-tooth, dark gray x Bevel gear, 12-tooth, beige x Gear, 16-tooth, gray x Cross block, 3-module, dark gray x Connector peg with handle, 3-module, black x Angular block 1, 0º, black x Gear, 24-tooth, dark gray x Cross block, 3x2-module, gray x ½ beam, 4-module, black x Angular block 2, 180º, black


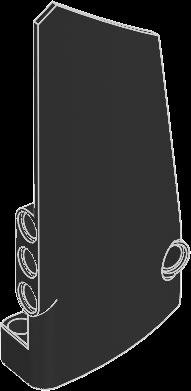


78 USEFUL INFORMATION 2x Gear, 40-tooth, gray x Turntable bottom, 28-tooth, gray x Tire, 30.4x4 mm, black x Right curved panel, 3x5-module, black x Double bevel gear, 12-tooth, black x Turntable top, 28-tooth, black x Hub, 24x4 mm, dark gray x Double bevel gear, 20-tooth, black x Sprocket, 40.7x15 mm, black x Steel Ball, silver metalic x Right curved panel, 5x11-module, black x Double bevel gear, 36-tooth, black x Ball bearing, dark gray x Worm gear, gray x Hub, 43.2x26 mm, gray x Track, 5x1,5-module, black x Left curved panel, 5x11-module, black x Gear, 4-tooth, black x Low profile tire, 56x28 mm, black x Left curved panel, 3x5-module, black


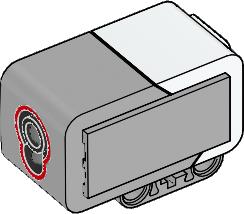


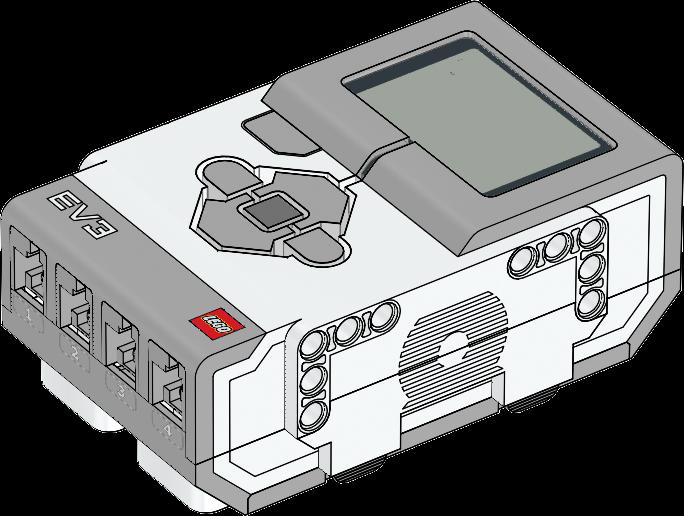

79 USEFUL INFORMATION 1x Color Sensor x EV3 Brick x Touch Sensor x Rechargeable Battery x Ultrasonic Sensor x Large Motor x Gyro Sensor x Medium Motor


80 USEFUL INFORMATION 25 cm / 10 in. 4x Cable, 25 cm / 10 in cm / 14 in. 1x USB Cable x Cable, 35 cm / 14 in cm / 20 in. 1x Cable, 50 cm / 20 in ipad, iphone and ipod touch are trademarks of Apple Inc., registered in the U.S. and other countries. 80
Computer science Science Technology Engineering Math. LEGOeducation.com/MINDSTORMS
 User Guide πr Computer science Science Technology Engineering Math LEGOeducation.com/MINDSTORMS Table of Contents Introduction + Welcome... 3 EV3 Technology + overview.... 4 + EV3 Brick.... 5 Overview...
TABLE OF CONTENTS. LEGO.com/mindstorms. Introduction + Welcome... 3
 User Guide TABLE OF CONTENTS Introduction + Welcome... 3 Technology + Overview... 4 + Brick... 5 Overview... 5 Installing Batteries... 8 Turning On the Brick... 9 + Motors... 10 Large Motor... 10 Medium
US Version USER GUIDE COMPUTER SCIENCE SCIENCE TECHNOLOGY ENGINEERING MATH. LEGOeducation.com/MINDSTORMS
 US Version 1.3.4 USER GUIDE πr COMPUTER SCIENCE SCIENCE TECHNOLOGY ENGINEERING MATH LEGOeducation.com/MINDSTORMS TABLE OF CONTENTS INTRODUCTION + Welcome... 3 EV3 TECHNOLOGY + Overview... 4 + EV3 Brick...
school robotics On the path to success with Brault & Bouthillier Education
 On the path to success with school robotics Robotics has been used in schools as a teaching tool for several years now. And right from the start, has always believed this innovative project could motivate,
EV3 Programming Workshop for FLL Coaches
 EV3 Programming Workshop for FLL Coaches Tony Ayad 2017 Outline This workshop is intended for FLL coaches who are interested in learning about Mindstorms EV3 programming language. Programming EV3 Controller
WIFI BABY MONITOR. User Guide
 WIFI BABY MONITOR User Guide PNMWIFIAC What s inside Welcome!... 2 Getting started... 3 Tour of the system... 9 Everyday use...13 Motion detection...14 Sound detection...14 Auto-record time...15 Battery
Panoramic Talking Camera
 Panoramic Talking Camera IPC2201 home8alarm.com 1-844-800-6482 support@home8alarm.com 1 Table of Contents Chapter 1. Introduction... 1 1.1 System Requirement... 1 Chapter 2. Hardware Overview... 2 Chapter
Robotics Study Material School Level 1 Semester 2
 Robotics Study Material School Level 1 Semester 2 Contents UNIT-3... 4 NXT-PROGRAMMING... 4 CHAPTER-1... 5 NXT- PROGRAMMING... 5 CHAPTER-2... 6 NXT-BRICK PROGRAMMING... 6 A. Multiple choice questions:...
GENERAL SET-UP & APP PAIRING/SYNCING FEATURES BATTERY ACCOUNT & DEVICE SETTINGS PRIVACY WARRANTY GENERAL SET-UP & APP ANDROID
 ANDROID GENERAL SET-UP & APP PAIRING/SYNCING FEATURES BATTERY ACCOUNT & DEVICE SETTINGS PRIVACY WARRANTY GENERAL SET-UP & APP WHICH PHONES ARE COMPATIBLE WITH MY SMARTWATCH? Wear OS by Google works with
SMART WI-FI BABY MONITOR. User Guide
 SMART WI-FI BABY MONITOR User Guide PNMAL2 What s inside Welcome!... 2 Getting started... 3 Tour of the system... 10 Everyday use...14 Alexa...15 Lullabies...15 Motion detection...16 Sound detection...16
Networking the printer
 Networking the printer General networking Networking overview A network is a collection of devices such as computers, printers, Ethernet hubs, wireless access points, and routers connected together for
LME Software Block Quick Reference 1. Common Palette
 LME Software Block Quick Reference Common Palette Move Block Use this block to set your robot to go forwards or backwards in a straight line or to turn by following a curve. Define how far your robot will
If you get stuck at any point, please let us know! We love talking to our customers! You can reach us at the number below:
 Thank you for purchasing the HomeMinder Remote Video and Temperature Monitoring System. We wrote these instructions so you can get the most out of your HomeMinder, regardless of your technical knowledge.
Introduction to Robotics using Lego Mindstorms EV3
 Introduction to Robotics using Lego Mindstorms EV3 Facebook.com/roboticsgateway @roboticsgateway Robotics using EV3 Are we ready to go Roboticists? Does each group have at least one laptop? Do you have
1. Introduction P Package Contents 1.
 1 Contents 1. Introduction ------------------------------------------------------------------------------- P. 3-5 1.1 Package Contents 1.2 Tablet Overview 2. Using the Tablet for the first time ---------------------------------------------------
Simpli.Fi. App for wifi DK series cameras OWNER'S MANUAL. APP DSE Simpli.Fi for Wi-Fi DK series cameras. Product description. Download DSE Simpli.
 Page: 1 Simpli.Fi App for wifi DK series cameras Product description Simpli.Fi is THE app to control all our WIFI hidden cameras to investigate Series DK. Our investigation for cameras are IP cameras to
GENERAL SET-UP & APP GENERAL SET-UP & APP PAIRING/SYNCING FEATURES BATTERY ACCOUNT & DEVICE SETTINGS PRIVACY WARRANTY. For IOS:
 For IOS: GENERAL SET-UP & APP PAIRING/SYNCING FEATURES BATTERY ACCOUNT & DEVICE SETTINGS PRIVACY WARRANTY GENERAL SET-UP & APP WHICH PHONES ARE COMPATIBLE WITH MY SMARTWATCH? Wear OS by Google works with
Some call it a robot. EV3 Programming APP Available March Locally operated globally connected. Freecall:
 Some call it a robot We call it a MOTIVATOR EV3 Programming APP Available March 2015 Computer science Science Technology Engineering Maths Locally operated globally connected Freecall: 1800 684 068 www.mooreed.com.au
Features: (no need for QR Code)
") The Capp-Sure series brings a revolution in surveillance. Utilising a range of high-quality IP Wireless cameras, Capp-Sure provides stunning video clarity and optional Talk-Back audio over internet via
The Capp-Sure series brings a revolution in surveillance. Utilising a range of high-quality IP Wireless cameras, Capp-Sure provides stunning video clarity and optional Talk-Back audio over internet via
1. Introduction P Package Contents 1.
 1 Contents 1. Introduction ------------------------------------------------------------------------------- P. 3-5 1.1 Package Contents 1.2 Tablet Overview 2. Using the Tablet for the first time ---------------------------------------------------
Quick Start Guide. Getting Started. Controls and Connections. Before you begin, please make sure that you have the following available:
 Quick Start Guide Getting Started Before you begin, please make sure that you have the following available: A computer network with 2.4GHz WiFi or Ethernet One of the following devices: An Apple iphone,
Part A: Monitoring the Rotational Sensors of the Motor
 LEGO MINDSTORMS NXT Lab 1 This lab session is an introduction to the use of motors and rotational sensors for the Lego Mindstorm NXT. The first few parts of this exercise will introduce the use of the
Ward s Single Probes. When All You Need is One
 Ward s Single Probes When All You Need is One INTRODUCTION The Ward s Single Probes platform was designed for the classroom with ever-changing needs in mind. Users can select from three different operational
You've got an amazing new keyboard. Now learn how to get more out of it!
 You've got an amazing new keyboard. Now learn how to get more out of it! WHAT DO YOU WANT TO DO? ABOUT THE KEYBOARD FIRST-TIME SETUP ADD MORE DEVICES SELECT DEVICES SWAPPING DEVICES MULTIPLE KEY LAYOUTS
ABOUT THE KEYBOARD KEYBOARD K480 TOP
 ABOUT THE KEYBOARD You aren t limited to a single device, so why should your keyboard be? A new standard for wireless convenience and versatility, the Logitech Bluetooth Multi-Device Keyboard K480 connects
Quick guide to connectivity and the ReSound Smart 3D app
 Quick guide to connectivity and the ReSound Smart 3D app Content Compatibility: Hearing aids and mobile devices...4 Get started with your iphone, ipad or ipod touch...6 Pair with your ReSound Smart Hearing
WI-FI GARAGE DOOR CONTROLLER WITH CAMERA USER MANUAL
 WI-FI GARAGE DOOR CONTROLLER WITH CAMERA USER MANUAL Contents Introduction 4 Product Features 5 Garage Door Controller LED Indicators 6 What s Included 7 Wi-Fi Requirements 8 Mobile Device Requirements
battery icon in the bottom right corner of the display screen.
 ATTENTION: This handbook contains important information regarding the safe and correct use of your tablet. Please be sure to read the following in order to maximize your enjoyment of the device and to
Getting Started Guide
 Getting Started Guide 1860 38th St. Boulder, CO 80301 www.modrobotics.com 1. Make Your First Robot The Dimbot Uses a clear Flashlight Action block, black Distance Sense block, and a blueish-gray Battery
Android (A1000) Y4 Classrooms: User Guide
 Y4 Classrooms: User Guide") Android (A1000) Y4 Classrooms: User Guide Provided by the SDUSD Ed Tech Team i21 2014 Teachers - Version 3.25.2014 Table of Contents Basic Functionality... Navigation Tips... Taking a Screenshot... Finding
Android (A1000) Y4 Classrooms: User Guide Provided by the SDUSD Ed Tech Team i21 2014 Teachers - Version 3.25.2014 Table of Contents Basic Functionality... Navigation Tips... Taking a Screenshot... Finding
Version /13/2014. User Manual. mydlink Home Smart Plug DSP-W215
 Version 2.00 08/13/2014 User Manual mydlink Home Smart Plug DSP-W215 Preface D-Link reserves the right to revise this publication and to make changes in the content hereof without obligation to notify
Electronic data system application end user manual
 The MalariaCare Toolkit Tools for maintaining high-quality malaria case management services Electronic data system application end user manual Download all the MalariaCare tools from: www.malariacare.org/resources/toolkit.
Label Printer QL-810W/820NWB. Quick Setup Guide (English)
") Label Printer QL-810W/820NWB Quick Setup Guide (English) Label Printer QL-810W/820NWB Printed in China D00RPG001 Quick Setup Guide (English) Available Manuals Product Safety Guide This guide provides safety
Label Printer QL-810W/820NWB Quick Setup Guide (English) Label Printer QL-810W/820NWB Printed in China D00RPG001 Quick Setup Guide (English) Available Manuals Product Safety Guide This guide provides safety
Unit 03 Tutorial 3: Sensors: Touch Sensor Brighton H.S Engineering By: Matthew Jourden
 Unit 03 Tutorial 3: Sensors: Touch Sensor Brighton H.S Engineering By: Matthew Jourden Robots have a variety of sensors that help the machine sense the world around it. We will be looking at four different
Table of Contents. Taking a First Look 2 Intelligent Remote Control 2 Before You Start 4
 Table of Contents Taking a First Look 2 Intelligent Remote Control 2 Before You Start 4 Getting Started 6 Activating the Remote Control 6 Defining the Brands of Your Devices 7 Working with the Home Panel
Table of Contents. Introduction 2 1. Intelligent Remote Control 2 2. Charging the Remote Control 3
 Table of Contents Introduction 2 1. Intelligent Remote Control 2 2. Charging the Remote Control 3 Getting Started 6 1. Activating the Remote Control 6 2. Selecting a Device 7 3. Operating a Device 8 4.
Quick start Guide POCKET TV
 Quick start Guide POCKET TV SAFETY WARNING Exposure -Do not place the Pocket TV or remotes on an unstable surface. -Keep all electronics away from direct exposure to the sun and other sources of heat.
COPYRIGHTED MATERIAL. Introducing LEGO CHAPTER. Did you get a box that looks like the one shown in Figure 1-1?
 CHAPTER 1 Introducing LEGO MINDSTORMS EV3 Did you get a box that looks like the one shown in Figure 1-1? COPYRIGHTED MATERIAL Figure 1-1: The LEGO MINDSTORMS EV3 set, item number 31313 1 2 Exploring LEGO
Technical D1.2.3_ Wireless T. Wireless T. Wireless T. Wireless T. Bluetooth. Bluetooth. Wireless T.
 Bluetooth Funny Touch Bluetooth Funny Touch Touc Technical support tec-support@makeblock.com www.makeblock.com @Makeblock @Makeblock @Makeblock Bluetooth Funny Touch Bluetooth Bluetooth D1.2.3_7.40.4826
ProntoPro Intelligent Remote Control. User Guide
 ProntoPro Intelligent Remote Control User Guide Table of Content Taking a First Look... 3 Intelligent Remote Control... 3 Before You Start... 5 Getting Started... 7 Activating the Remote Control... 7 Defining
WELCOME. For customer support or any inquiries, please visit our web site at or contact us at
 WELCOME Congratulations on purchasing the GBF Smart Four Wire Intercom System. Our factory engineers were the first to enable multiple security cameras being monitored through a smart mobile device and
1. Charging. 2. In-app Setup. 3. Physical Installation. 4. Features. 5. Troubleshooting
 Spotlight Cam Smart Security at Every Corner of Your Home Your new Spotlight Cam lets you extend the Ring of Security around your entire property. Now, you ll always be the first to know when someone s
Firmware version Operation may differ from other firmware versions
 Firmware version 4.8.52 Operation may differ from other firmware versions Welcome to Bowers & Wilkins and Thank you for choosing Bowers & Wilkins. When John Bowers first established our company he did
Tech Tips. BeeBots. WeDo
 Tech Tips Teachers, especially classroom teachers who are implementing a robotics unit in their classroom, may not have much troubleshooting experience and may not have ready access to tech support. As
Point of View SmartTV-500 Center - Android 4.2. General notices for use...2 Disclaimer...2 Box Contents...2
 Point of View SmartTV-500 Center - Android 4.2 English Table of Contents General notices for use...2 Disclaimer...2 Box Contents...2 1.0 Product basics...3 1.1 Buttons and connections... 3 1.2 Connecting
Help Guide. Getting started
 Use this manual if you encounter any problems, or have any questions. This Help Guide is also available as a PDF, which can be downloaded here. Getting started What you can do with the BLUETOOTH function
Project from Real-Time Systems Lego Mindstorms EV3
 Project from Real-Time Systems March 13, 2017 Lego Mindstorms manufactured by LEGO, http://mindstorms.lego.com extension of LEGO Technic line history: RCX, 1998 NXT, 2006; NXT 2.0, 2009 EV3, 2013 why LEGO?
Embedded Computer. User Manual
 Embedded Computer User Manual Safety defended: Properly maintain your system to guarantee its service life and reduce the damage risk. It should avoid the humidity and extreme temperature when using. Avoid
linkzone User ManUal
 LINKZONE User Manual Getting to Know Your Mobile Hotspot Power key WPS key LED indicator USB jack LED Description Part Power key WPS key LED indicators Charging / USB Port Reset Reboot Description Hold
Help Guide. Getting started. Use this manual if you encounter any problems, or have any questions. What you can do with the BLUETOOTH function
 Top Use this manual if you encounter any problems, or have any questions. Getting started What you can do with the BLUETOOTH function About voice guidance Supplied accessories Checking the package contents
ROBOLAB Reference Guide
 ROBOLAB Reference Guide Version 1.2 2 Preface: Getting Help with ROBOLAB ROBOLAB is a growing application for which users can receive support in many different ways. Embedded in ROBOLAB are context help
aaxa TECHNOLOGIES User Guide
 aaxa TECHNOLOGIES User Guide Caution! WARNING: Please use this product as instructed. Misuse may cause injury or death. DO NOT use while driving DO NOT expose to water or wet surfaces. Electric shock may
HOME SECURITY KIT. USER MANUAL SMART PROTECTION WITH THE ALL-IN-ONE SOLUTION. SMART WINDOW SENSOR SMART POWER SOCKET SMART MOTION SENSOR SMART IP CAM
 HOME SECURITY KIT. SMART PROTECTION WITH THE ALL-IN-ONE SOLUTION. SMART WINDOW SENSOR SMART POWER SOCKET SMART IP CAM SMART MOTION SENSOR USER MANUAL SL-900100/900111 HOME SECURITY KIT A/B SHORT INSTRUCTION
Phorus PS1 Speaker Owner s Manual
 Phorus PS1 Speaker Owner s Manual Table of Contents Table of Contents i Safety Information - Warnings and Cautions 1 System Requirements 2 What s Included 3 Overview 4 Holding And Charging Your Android
Magnetic base Indicator light Microphone Camera lens Micro SD card slot Infrared light Front Side Pivot connector Built-in speakers
 Niro USER MANUAL Contents Introduction 4 Product Features 5 Niro LED Indicators 6 What s Included 7 Wi-Fi Requirements 8 Mobile Device Requirements 8 Garage Door Opener Requirements 8 Download the Momentum
Smart Security at Every Corner of Your Home
 Spotlight Cam Smart Security at Every Corner of Your Home Your new Spotlight Cam lets you extend the Ring of Security around your entire property. Now, you ll always be the first to know when someone s
DataHub: FAQs/Troubleshooting
 On the Ward s DataHub... = Select key = On/Off and ESC key = Scroll key 1. How do I pair my DataHub with a Windows computer? 2. How do I pair my DataHub with an Apple Macintosh (Mac) computer? 3. How do
Help Guide. Getting started. Use this manual if you encounter any problems, or have any questions. What you can do with the Bluetooth function
 Use this manual if you encounter any problems, or have any questions. Getting started What you can do with the Bluetooth function About voice guidance Supplied accessories Checking the package contents
Renewable Energy. Getting Started With the LEGO Energy Meter
 Renewable Energy Getting Started With the LEGO Energy Meter de LEGO Group. 2010 The LEGO Group. 1 Table of Contents 1. Energy Meter Overview... 3 2. Attaching the Energy Storage... 3 3. Charging and discharging
Introduction. MyAir5 User Guide
 User Guide Introduction... 3 Mode Page... 4 Zones Page... 10 Plans Page... 13 Setup Page... 17 Constant Zones... 19 Android Tablet... 20 Smart Phone Control Quick Setup Guide... 21 Network Troubleshooting...
Quick Start. MyAir4 User Manual. This section will give you a brief description about each of the buttons found on the home screen.
 User Manual Quick Start... 3 HOME... 4 SIMPLE TIMER... 4 AIR CON... 5 ZONES... 6 PROGRAMS... 7 HELP... 11 SETTINGS... 12 MyZone - (optional feature)... 15 Constant Zones... 17 Android Tablet... 18 Smart
Quick Install Guide. Model: PLC-223W, PLC-233W
 Quick Install Guide Model: PLC-223W, PLC-233W This installation guide provides basic instructions for installing the PLC-213W/ PLC-223W/PLC-233W indoor wireless IP camera on your network. By following
iminicam 1080p Wireless Spy Camera User Manual
 iminicam 1080p Wireless Spy Camera User Manual imini Spy Camera User Manual Introduction Thank you for choosing the imini Spy Camera. Experience cutting edge technology and enjoy the security that the
IPad Wireless Two Switch #1167
 IPad Wireless Two Switch #1167 USER S GUIDE 50 Broadway Hawthorne, NY 10532 Tel. 914.747.3070 / Fax 914.747.3480 Toll Free 800.832.8697 www.enablingdevices.com Connect to your devices! Our ipad Wireless
EV3 SOFTWARE. Lobby. Lobby overview
 EV3 SOFTWARE Lobby Every time you open the EV3 Software, you will automatically start out in the Lobby area. The Lobby makes it easy to locate and work with the software and gives you access to everything
Key Features: Be notified of incoming calls, texts, , calendar and social media events with vibration and LED light
 Product Overview Congratulations on your purchase of the MARTIAN WATCH! MARTIAN provides you with connectivity to your voice-command-enabled smartphone or tablet via Bluetooth wireless technology. Key
Help Guide. Getting started. Use this manual if you encounter any problems, or have any questions. What you can do with the Bluetooth function
 Use this manual if you encounter any problems, or have any questions. Getting started What you can do with the Bluetooth function About voice guidance Supplied accessories Checking the package contents
Android (A7-40) Y5 Classrooms: User Guide
 Y5 Classrooms: User Guide") Android (A7-40) Y5 Classrooms: User Guide Provided by the SDUSD Ed Tech Team i21 2015 Teachers - Version 1.20.2015 Table of Contents Basic Functionality... Navigation Tips... Taking a Screenshot... Finding
Android (A7-40) Y5 Classrooms: User Guide Provided by the SDUSD Ed Tech Team i21 2015 Teachers - Version 1.20.2015 Table of Contents Basic Functionality... Navigation Tips... Taking a Screenshot... Finding
SMART WI-FI CAMERA START GUIDE
 SMART WI-FI CAMERA START GUIDE Thank you for purchasing your MERKURY smart home product. Get started using your new devices by downloading Geeni, one convenient app that manages everything straight from
Do not place or mount Ocli 1 in an area where it will be exposed to water. Ocli 1 is designed for indoor use.
 1 Manual: Ocli 1 with Observeye Viewer App for Android Setting Up Ocli 1 Live Viewing with Ocli 1 Recording Video and Taking Snapshots Using Advanced Features Setting Up Ocli 1 Place or Mount the Camera
1. Notes. 2. Accessories. 3. Main Functions
 Contents 1. Notes... 2 2. Accessories... 2 3. Main Functions... 2 4. Appearance And Buttons... 3 5. MID Hardware Parameters... 4 6. MID Use And Preparation... 4 7. Keys Functions... 4 8. Start-up And Shutdown...
Help Guide. Getting started. Use this manual if you encounter any problems, or have any questions. What you can do with the BLUETOOTH function
 Use this manual if you encounter any problems, or have any questions. Getting started What you can do with the BLUETOOTH function About voice guidance Supplied accessories Checking the package contents
NETWORK THE HOME 10 FOLDERS APPS
 NID-7006 NAXA NID Tablet User s Guide Table of Contents GETTING STARTED 4 CONNECTING TO A WIRELESS NETWORK 4 USING THE TOUCHSCREEN 4 USING THE HOME SCREENS 5 USING THE NAVIGATION ICONS 6 USING THE ALL
ZTE MOBILE HOTSPOT QUICK START GUIDE
 ZTE MOBILE HOTSPOT QUICK START GUIDE INTRODUCTION Thank you for choosing Consumer Cellular! We know you re excited to use your new ZTE Mobile Hotspot, and this short guide will help you get familiar with
Lenovo Yoga S730-13IWL
 Lenovo Yoga S730-13IWL User Guide Read the safety notices and important tips in the included manuals before using your computer. Notes Before using the product, be sure to read Lenovo Safety and General
i wonder, therefore i am. Welcome to the Wonder League! This packet includes everything you need to know about Dash, Dot, and how to get started!
 1 2 3 4 5 6 7 8 9 * 0 # 8 i wonder, therefore i am. Welcome to the Wonder League! This packet includes everything you need to know about Dash, Dot, and how to get started! Setting up your robots Setting
NEULOG WIFI COMMUNICATION MODULE GUIDE
 NeuLog WiFi communication module WIFI-201 The WiFi module is without a doubt one of the most advanced and innovative elements that NeuLog has to offer. Data collection and analysis with NeuLog sensors
mbot v1.1 - Blue (Bluetooth Version)
") mbot v1.1 - Blue (Bluetooth Version) SKU 110090103 What is mbot? mbot is an all-in-one solution to enjoy the hands-on experience of programming, electronics, and robotics. What is mbot? mbot is an all-in-one
mbot v1.1 - Blue (Bluetooth Version) SKU 110090103 What is mbot? mbot is an all-in-one solution to enjoy the hands-on experience of programming, electronics, and robotics. What is mbot? mbot is an all-in-one
DV5-2. SC-DV5_Main.jpg. SC-DV5_Main.jpg. SC-DV5_Main.jpg
 DV5-2 SC-DV5_Main.jpg SC-DV5_Main.jpg SC-DV5_Main.jpg Overview Camera: Overview -screen Display: The DV5-2 body camera is an advanced recording system with many options and features available. Please review
Catalogue. Assembling... 1 Unpack Charge the Battery Install the Memory Card Product Basics Buttons and Connections...
 Catalogue Assembling... 1 Unpack... 1 Charge the Battery... 1 Install the Memory Card... 1 1 Product Basics... 2 1.1 Buttons and Connections... 2 1.2 Start Up and Shut Down... 2 2 Introduction of Google
USER'S MANUAL TAC-90012
 USER'S MANUAL TAC-90012 www.facebook.com/denverelectronics Before connecting, operating o r adjusting t his p roduct, please read t his u ser's m anual c arefully and c ompletely. Table of Contents Table
Introducing Cubelets. What do they do?
 Introducing Cubelets What do they do? Cubelets 6 Box Cubelets Six Box Battery Cubelet Drive Cubelet Battery Cubelet Drive Cubelet Distance Cubelet brick adapters Distance Cubelet Brightness Cubelet Brightness
RECO Smart Cam. Quick Start Guide
 RECO Smart Cam Quick Start Guide E11074 / Revised Edition V2 / November 2015 NOTE: The screenshots in this Quick Start Guide are for reference only. 2 Hardware Micro USB port MicroSD card slot GPS port
ROBOLAB Tutorial MAE 1170, Fall 2009
 ROBOLAB Tutorial MAE 1170, Fall 2009 (I) Starting Out We will be using ROBOLAB 2.5, a GUI-based programming system, to program robots built using the Lego Mindstorms Kit. The brain of the robot is a microprocessor
Snap PT. Quick Start Guide
 Snap PT Quick Start Guide 1 Getting to know your Snap PT The Snap PT is a smart WiFi Pan & Tilt IP camera with a built-in rechargeable battery. The battery lasts several hours, giving you flexibility to
USING REFLECTOR 2, REFLECTOR DIRECTOR AND REFLECTOR STUDENT IN THE CLASSROOM
 R R USING REFLECTOR 2, REFLECTOR DIRECTOR AND REFLECTOR STUDENT IN THE CLASSROOM ABOUT THIS GUIDE This guide explains several important components of Reflector 2 in the classroom, including: Accessing
What Is a Program? Pre-Quiz
 What Is a Program? What Is a Program? Pre-Quiz 1. What is a program? 2. What is an algorithm? Give an example. 2 What Is a Program? Pre-Quiz Answers 1. What is a program? A program is a sequence of instructions
DELORME. inreach. User Manual. for smartphones and mobile devices
 DELORME inreach User Manual for smartphones and mobile devices for Earthmate PN-60w WARNING: Messaging, tracking and SOS functions require an active Iridium satellite subscription. Always test your device
User What s inside Guide
 BABY MONITOR SYSTEM User Guide PNMSA2 IB 01 What s inside Welcome!... 2 Getting Started... 3 Tour of the System...15 EveryDay Use...17 Alexa... 17 Lullabies... 17 Motion detection...18 Sound detection...18
User manual MODEL: STB266. For ongoing product improvement, this manual will be modified without prior notice.
 User manual In order to ease users to select video programs, other logos and/or trademarks may appear on the Cloud TV Box. All other logos and/or trademarks are the property of their respective owners.
Jabra FREEWAY. User manual.
 Jabra FREEWAY User manual www.jabra.com CONTENTS THANK YOU...2 ABOUT YOUR...2 WHAT YOUR SPEAKERPHONE CAN DO...3 GETTING STARTED...4 CHARGE YOUR SPEAKERPHONE...4 TURNING YOUR SPEAKERPHONE ON AND OFF...5
Table of Contents. Manual Overview
 Table of Contents Manual Overview D-Link reserves the right to revise this publication and to make changes in the content hereof without obligation to notify any person or organization of such revisions
the Slate 2+ QUICK START GUIDE
 the Slate 2+ QUICK START GUIDE 1 TABLE OF CONTENTS 3 INTRODUCTION 4 TECHNICAL DIAGRAM 5 BEFORE USING THE SLATE 6 THE SLATE ON TABLET / MOBILE 7 THE SLATE ON DESKTOP 8 THE MAGNETIC INDICATOR 9 THE GRAPHIC
The Lego Mindstorms Ev3 Discovery Book Full Color A Beginners Guide To Building And Programming Robots
 The Lego Mindstorms Ev3 Discovery Book Full Color A Beginners Guide To Building And Programming Robots THE LEGO MINDSTORMS EV3 DISCOVERY BOOK FULL COLOR A BEGINNERS GUIDE TO BUILDING AND PROGRAMMING ROBOTS
USER GUIDE. BuWizz brick 2.0. ios & Android app. Table of Contents. 1. Introduction Compatibility Do this first 3
 USER GUIDE BuWizz brick 2.0 ios & Android app Table of Contents 1. Introduction 2 2. Compatibility 3 3. Do this first 3 4. BuWizz app installation 4 5. Connecting BuWizz 4 6. BuWizz 2.0 LED status 5 7.
Help Guide. Getting started. Use this manual if you encounter any problems, or have any questions. What you can do with the BLUETOOTH function
 Use this manual if you encounter any problems, or have any questions. Getting started What you can do with the BLUETOOTH function About voice guidance Supplied accessories Checking the package contents
USER MANUAL Bluetooth Wireless Stereo Headphones with Headset Functionality
 USER MANUAL Bluetooth Wireless Stereo Headphones with Headset Functionality Model: AF36 PACKAGE CONTENTS EN Bluetooth Wireless Stereo Headphones with Headset Functionality Wave Stereo Bluetooth Wireless
INSTRUCTIONS. Product Description. J-Pad Access Device for ipad, iphone and ipod. Pack Contents Carefully check the contents of the box, which are:
 INSTRUCTIONS J-Pad Access Device for ipad, iphone and ipod Pack Contents Carefully check the contents of the box, which are: J-Pad unit USB charging cable These instructions J-Pad is a highly intuitive
Portable Digital Video Recorder
 Page: 1 Portable Digital Video Recorder Compression H264 D1 enables over 80 hours of recording on SD card to 32 GB. Recording on Micro SD card or SD card capacity up to 32 GB. Insensitivity to vibration
User Manual. Wireless IP Camera
 User Manual Wireless IP Camera Introduction Hi. Thank you for purchasing the AUKEY VT-CM1 Wireless Security IP Camera. Please read this user manual carefully and keep it in a safe place for future reference.