Painting Tiling Foliage Textures
|
|
|
- Brianne Lamb
- 6 years ago
- Views:
Transcription
1

2 Painting Tiling Foliage Textures Jungle 3D can do many things. One of our favorites is to paint tiling textures of foliage. These dimensional foliage textures can create highly realistic and detailed forest canopies that follow the form and contour of a terrain model. Ever seen an aerial view of a forest canopy? Not only does the canopy have an irregular dimensional form, the canopy also flows with the contour of the underlying geography. If the geography is rolling hills, then the forest canopy rise and fall to follow it. This tutorial uses a similar approach to painting foliage textures. You'll learn how to use Jungle 3D to paint foliage canopies you map to actual terrain models.. Conceptually, it's somewhat different than painting individual trees. Here, you're painting foliage canopies as seen from above rather than from the side. You're still painting foliage growth patterns, but they characterize the overall environment of your scene, not just a tree. (If you re running on Windows, be sure to open the file Properties window and remove the "Read Only" setting for any files you copy from the CD.) 1) Open a New file at 512 x 512 pixels or larger (Cmd + N or Ctrl + N) 2) When the New Picture window appears, click on the Paper Color swatch to open the Color Picker. 3) Select a very dark version of the foliage color. This establishes the default paper color for the layer and prevents halos or white bands around the edges. If the dark background is distracting, close the layer eye. 4) Copy the Citrus or Berries nozzle library from the CD onto your hard drive. If you don t own Jungle 3D, download the Extras file linked from the web page.
 Choose the Citrus, Berries or Extras library and choose the SM_ (small) version of the nozzle. 7) Click on the Secondary color icon found on the Color palette.")
 Display the Controls (Cmd-Ctrl + 5), Tools (Cmd-Ctrl + 1), Objects (Cmd- Ctrl + 4) and Brushes (Cmd-Ctrl + 2) palettes as well. 9) Create a new Foliage Layer. 10) Load the Texture brush library.")
3 5) Select the Load Library command found at the bottom of the Nozzle Popup on the Art Materials palette as shown below left. 6) Choose the Citrus, Berries or Extras library and choose the SM_ (small) version of the nozzle. 7) Click on the Secondary color icon found on the Color palette. Set the color to black (Cmd or Ctrl + 3 opens the Art Materials palette.). 8) Display the Controls (Cmd-Ctrl + 5), Tools (Cmd-Ctrl + 1), Objects (Cmd- Ctrl + 4) and Brushes (Cmd-Ctrl + 2) palettes as well. 9) Create a new Foliage Layer. 10) Load the Texture brush library. Select the Textures Brush (or use the Extras Tutorial Brushes). Adjust the Grain setting to 30% on the Controls palette. 11) Painter 6 & 7 can paint tiling brush strokes on a layer. If you want your texture to tile as a seamless pattern, make the new Foliage Layer active

4 and select the Define Pattern command on the Art Materials: Pattern pull-down menu. 12) To provide some context, Define Pattern makes your brush stroke tile from one side of the layer to the other. Setting Grain to 30% makes the nozzle paint with darkened foliage. Define Pattern allows you to paint a seamless foliage texture. Being seamless, the texture can be scaled within 3D application to fit the model. 13) The Grain setting uses the secondary color to control the tint of the nozzle application. When the secondary color is black, a low grain setting makes the nozzle spray with darker foliage. Adjusting the Grain upwards lightens the nozzle s application. That means you can apply dimensional shading to the foliage simply by adjusting the Grain setting from dark to light. Three passes are made with the nozzle. Each uses a different Grain setting. The first pass paints the bottom most foliage, which is fully shaded. The second pass paints the middle section of foliage, where some light gets through. The final pass paints the canopy, which is in direct light. 14) The trick is to be sparing. If you make a mistake, don t hesitate to use Undo (Cmd/Ctrl+Z) or Select All (Cmd Ctrl+A) and Delete to clear the layer. 15) Start by painting the underneath foliage. Make sure to run your strokes off of the edge. You want the foliage to appear as a natural sequence of growth depicted as it would appear if you were looking straight down from above.

 When you ve finished painting the bottom layer of leaves, move the Grain slider to 70% and begin painting the mid-level foliage.")
5 If you are painting the texture as a seamless pattern, try to maintain a randomized pattern of growth. Diagonal strokes work well, but it still takes some getting used to. The tendency is to concentrate strokes near the edges. Unfortunately, that will creates a box like tiling pattern. Similarly, don t fill the layer with foliage. The gaps between the foliage add to the realism. They allow light passes through to the ground below. 16) When you ve finished painting the bottom layer of leaves, move the Grain slider to 70% and begin painting the mid-level foliage. 17) Apply the mid-level leaves less densely, almost as though you are highlighting the surface of the previous application. Leave occasional gaps so portions of the bottom foliage remain visible. 18) Once you ve finished the middle section, move the Grain slider up to 100% and paint the topmost foliage canopy. 19) That s it! You should have three distinct applications of nozzle foliage so that the varying darkness reflects the vertical depth of the foliage. 20) Okay, this is where you add seasoning. For example, I ve found adjusting color can produce a more realistic result in a render.
 If you really want to push the dimensional form of the texture, try using the Apply Surface Texture filter. Adjust the settings as shown on the example below.")
6 21) Similarly, I ve found that Bryce tends to soften 2D textures, so Sharpening helps too. 22) If you really want to push the dimensional form of the texture, try using the Apply Surface Texture filter. Adjust the settings as shown on the example below. Be sure you choose Foliage Layer Mask in the menu at the top, where it says Using.
 Click the Save Selection button on the Objects: Mask palette, then choose OK to save the selection as an alpha channel.")

7 23) When you are done seasoning the image, choose Drop and Select from the pull down Layer menu. Once the layer is dropped, you should see the marching ants shown above. 24) Click the Save Selection button on the Objects: Mask palette, then choose OK to save the selection as an alpha channel. (You can also use the Save Selection command at the bottom of the Select menu.) 25) That s it. You re done, at least as far as Painter is concerned. Name the file Canopy and save it in the file format your 3D application prefers. Be sure to use a format that preserves the alpha channel (.tif,.psd, etc.) 26) Close Painter and launch Bryce or the 3D application of your choice. You re ready to apply the foliage canopy as a tiling terrain texture map. * If you are using Bryce and want to see how the textures are applied, continue with the tutorial. Experienced 3D modelers and artists working with other applications may want to skip to step 42 to see how the textures and models work together in a scene. Otherwise you're done.


 Use the Lower and Smoothing controls along with the Mounds, Dampen and Equalize tools to edit the terrain model.")
 The two examples below demonstrate the modification.")
8 27) From this point the tutorial uses Bryce, but the principles apply to most 3D programs. 28) Create a Terrain model. You will need to lessen the vertical dimensions and smooth out any sharp angles since they distort the texture and destroy the illusion. 29) The problem with the default terrain is the angles are too severe. If you map the texture to this type of terrain, the sharp angles and vertical surfaces will radically distort the image and destroy the illusion or realism. So you need to minimize vertical surfaces and lessen the sharp angles. 30) Use the Edit Object command from the Objects pull down menu (Cmd/Ctrl+E) to access the terrain editor. You can also click on the E next to the model. 31) Use the Lower and Smoothing controls along with the Mounds, Dampen and Equalize tools to edit the terrain model. You can also create a new model that better suits the requirements for the model using the New and Fractal controls. Either way, you want a model with modest angles and semi-flattened contours. 32) The two examples below demonstrate the modification. Though an actual canopy would have steeper characteristics, vertical dimensions in the model tend to distort the image. To correct for that problem, dimensional shading was applied to the 2D painted foliage. Here, the 3D modeling simply augments the illusion and allows the modeler to apply 3D lighting characteristics to a terrain that follows the contour of the underlying ground.
 Select \"2D Picture\" from the top of box A.")
 Click in one of the little squares. That opens the Pictures window.")
 Once the Canopy image is loaded, click on the to close the Pictures window.")
9 33) Though always subtle, the 3D shading effect becomes evident when the texture is mapped to the model. To do that, select Edit Material from the Objects pull-down menu. This opens the Materials Composer. 34) Select "2D Picture" from the top of box A. 35) At the bottom of box A, select Object Top from the pull-down menu. This setting makes the image apply once, as it appears in the painting. 36) Click in one of the little squares. That opens the Pictures window. 37) Once the Pictures window is open, click on one of the gray squares then select Load and open the "Canopy" file. 38) Once the Canopy image is loaded, click on the to close the Pictures window. 39) Now move the blue Transparency, Diffuse Color and Ambient Color icons into column A as shown at left. 40) When you ve completed the various adjustments. Click on the at the bottom of the Materials window to accept the changes. 41) The foliage texture is now mapped to the terrain model.
 Take one of the terrains and move it so that it s slightly higher than other.")
 44) What you re doing is separating the foliage canopy from the ground, just the same as foliage grows in nature.")
 Change the camera angle so that your POV (point of view) is roughly 45 degrees above the terrain and render the image. The example shown here uses the Berroes or Olive nozzle.")
10 42) Here are some tricks to augment the illusion of a dimensional canopy of foliage. Use the Copy and Paste commands to make a duplicate of the terrain model. 43) Take one of the terrains and move it so that it s slightly higher than other. (In the side view example at right, the bottom ground model, has been flattened a bit more than the canopy model.) 44) What you re doing is separating the foliage canopy from the ground, just the same as foliage grows in nature. 45) Select the lower terrain, return to the Materials composer and apply one of the ground textures. Click on the. 46) Change the camera angle so that your POV (point of view) is roughly 45 degrees above the terrain and render the image. The example shown here uses the Berroes or Olive nozzle. By keeping the terrain relatively close to the ground, the texture map applies more as brush rather than trees. 47) For a more complex, tree like foliage, you can use three or more terrain models. The example at left has an Infinite Ground at the bottom and two identical terrain models above. One terrain has been rotated to hide that it s a copy.

 Notice how the two layers create a layered canopy effect? You can also see how the layered painting design works to augment dimension.")

11 48) The render at right shows the whole image. The small image below depicts a more oblique POV taken from a larger render. It also uses different aspect ratio that the image at right. The bottom image uses the same aspect ratio but has the foreground as the point of focus. 49) Notice how the two layers create a layered canopy effect? You can also see how the layered painting design works to augment dimension. This style does require an elevated POV, but otherwise it works very well. The stuff below is the ground and the shadows the canopy casts on it. That s why the mask is so important. It gives you a real look both above and below the canopy. 50) Because the texture map is a tiling image, it can be scaled on a terrain or ground using the Frequency setting at the top of column A in the Materials Composer. Have Fun!

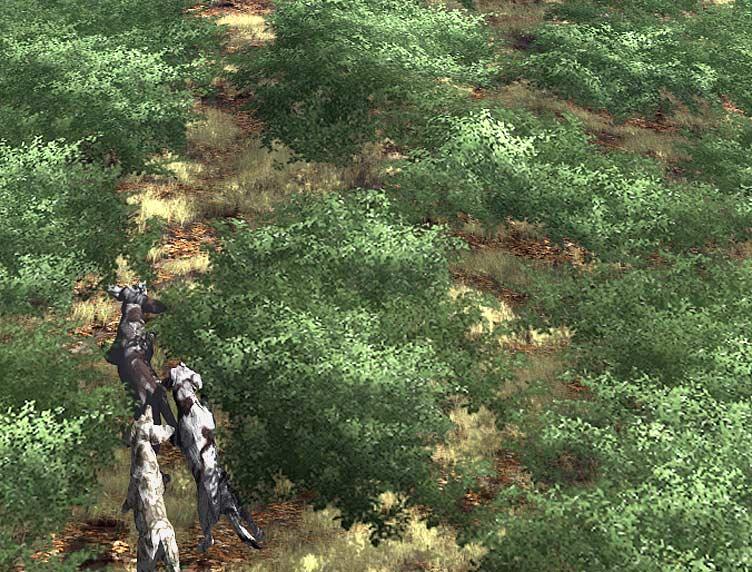
12 Here are some tricks we used in the hunting dogs image. We used 5 mostly identical terrain models. Four models have foliage textures painted the same way this tutorial describes. The bottom model uses a simple Bryce texture. The biggest problem with the result is that I painted the textures way too small. The foliage textures are only 500x500 pixels, so when the camera is moved in, the begin to pixelate. Painting larger textures using bigger nozzles solves that problem. The mapping possibilities and variations using tiling foliage textures are challenging. They re also expansive. If you discover something new, send us an and we ll share it with others. Painting Tiling Texture Maps is the third tutorial in the Jungle 3D series. It compliments the Painting Trees and Painting Shadows so be sure to read those as well. Try the Painting QTVR Panorama and Turkey Club tutorials also. Best of painting. 2002, Digarts Software All Rights Reserved Worldwide. You are permitted to make one print copy of this tutorial. No part of this tutorial shall otherwise be reproduced or transmitted in any form including, but not limited to electronic, mechanical photocopying, recording or by any other means without prior written permission of DigArts Software. This document may not be used in a commercial enterprise or fee based instruction without prior written permission of DigArts Software. DigArts Software makes no warranty or representation with respect to this tutorial, the images, or the files including their quality or fitness for a particular purpose. The materials are provided on an "AS IS" basis. DigArts Software will not be liable for direct, indirect, special, incidental or consequential damages or costs arising out of the use or inability to use the tutorial or software included with the tutorial, even if advised of the possibility of such damages. DigArts tm and Jungle 3D tm are trademarks of DigArts Software. Painter tm and Bryce tm are trademarks of Corel Corporation. Windows tm is a trademark of Microsoft Corporation. Apple tm is a trademark of Apple Computer.
Painting Tree Shadows
 Painting Tree Shadows Painting Tree Shadows is the second in the series of Jungle 3D tutorials. It compliments the Painting Trees with Jungle 3D tutorial, so be sure to read that one as well. You can get
Pen Tool, Fill Layers, Color Range, Levels Adjustments, Magic Wand tool, and shadowing techniques
 Creating a superhero using the pen tool Topics covered: Pen Tool, Fill Layers, Color Range, Levels Adjustments, Magic Wand tool, and shadowing techniques Getting Started 1. Reset your work environment
LEVEL 1 ANIMATION ACADEMY2010
 1 Textures add more realism to an environment and characters. There are many 2D painting programs that can be used to create textures, such as Adobe Photoshop and Corel Painter. Many artists use photographs
SNOWFLAKES PHOTO BORDER - PHOTOSHOP CS6 / CC
 Photo Effects: Snowflakes Photo Border (Photoshop CS6 / CC) SNOWFLAKES PHOTO BORDER - PHOTOSHOP CS6 / CC In this Photoshop tutorial, we ll learn how to create a simple and fun snowflakes photo border,
3. Let s say that we are unsure about what kind of
 Class Objectives Creating/mixing gradients Loading and using custom brushes Applying/modifying layer styles (drop shadow, glow, pattern overlay, stroke, etc.) Using transformations rotate, perspective,
Step 1: Create A New Photoshop Document
 Snowflakes Photo Border In this Photoshop tutorial, we ll learn how to create a simple snowflakes photo border, which can be a fun finishing touch for photos of family and friends during the holidays,
3D & 2D TREES. Andy Simmons Andy Simmons
 Hopefully this tutorial will give you an insight into how I create 3d and draw trees. There are four parts all dealing with trees. Amorphium, Bryce and Photoshop. I have had many requests for this tutorial,
Quick Start Tutorial
 Tutorial Tutorial: Build an Apple Welcome to Design 3D CX 7. This is a quick tutorial to get you started. In this tutorial you ll learn how to import an Adobe Illustrator file, Lathe it into a 3D object,
Texture Mapping. Images from 3D Creative Magazine
 Texture Mapping Images from 3D Creative Magazine Contents Introduction Definitions Light And Colour Surface Attributes Surface Attributes: Colour Surface Attributes: Shininess Surface Attributes: Specularity
New and Changed Features in PSE 15 are highlighted in Yellow Photoshop Elements 14 & 15 Training part 1
 New and Changed Features in PSE 15 are highlighted in Yellow Photoshop Elements 14 & 15 Training part 1 Introduction and Tour 01 Using the Training 1:44 02 PSE 14 Welcome Screen 2:45 PSE 15-01 Welcome
Sports Jersey Mania, Part 1 By Joel Day
 Sports Jersey Mania, Part 1 By Joel Day This tutorial will walk you through creating a photo rendering of a basketball jersey. I developed this process using a variety of different techniques, including
Autodesk Fusion 360: Render. Overview
 Overview Rendering is the process of generating an image by combining geometry, camera, texture, lighting and shading (also called materials) information using a computer program. Before an image can be
In this lesson, you ll learn how to:
 LESSON 5: ADVANCED DRAWING TECHNIQUES OBJECTIVES In this lesson, you ll learn how to: apply gradient fills modify graphics by smoothing, straightening, and optimizing understand the difference between
2. Drag and drop the cloud image onto your desktop to be used later in the tutorial.
 Do the following tutorial. You will use the Earth Map image and Photo image below. 1. Copy the Earth Map image and paste it into photoshop. Open photoshop. Go to menu/file/new. Name it lastname-earth.
LIGHTING - 1. Note. Lights. Ambient occlusion
 Note LIGHTING - 1 The creation and use of lights varies greatly between the default Blender renderer and the Cycles renderer. This section refers only to simple lighting in the default renderer. Lights
Shadow Casting in World Builder. A step to step tutorial on how to reach decent results on the creation of shadows
 Shadow Casting in World Builder A step to step tutorial on how to reach decent results on the creation of shadows Tutorial on shadow casting in World Builder 3.* Introduction Creating decent shadows in
Using Masks for Illustration Effects
 These instructions were written for Photoshop CS4 but things should work the same or similarly in most recent versions Photoshop. 1. To download the files you ll use in this exercise please visit: http:///goodies.html
Add Photo Mounts To A Photo With Photoshop Part 1
 Add Photo Mounts To A Photo With Photoshop Part 1 Written by Steve Patterson. In this Photoshop Effects tutorial, we ll learn how to create and add simplephoto mounts to an image, a nice finishing touch
Paint/Draw Tools. Foreground color. Free-form select. Select. Eraser/Color Eraser. Fill Color. Color Picker. Magnify. Pencil. Brush.
 Paint/Draw Tools There are two types of draw programs. Bitmap (Paint) Uses pixels mapped to a grid More suitable for photo-realistic images Not easily scalable loses sharpness if resized File sizes are
Making Your First Character
 Create a new canvas on Photoshop (File > New) and set this to 32 x 32 pixels select a transparent background. Remember to set up your preferences under Edit > Preferences > Guides, Grid & Slices Also remember
ADOBE PHOTOSHOP Using Masks for Illustration Effects
 ADOBE PHOTOSHOP Using Masks for Illustration Effects PS PREVIEW OVERVIEW In this exercise, you ll see a more illustrative use of Photoshop. You ll combine existing photos with digital art created from
What is the Deal with Color?
 What is the Deal with Color? What is the Deal with Color? Beginning from the beginning Our First Moves Diffuse Object Colors Specular Lighting Transparency Paint on Image Those sliders and things Diffuse
Photoshop tutorial: Final Product in Photoshop:
 Disclaimer: There are many, many ways to approach web design. This tutorial is neither the most cutting-edge nor most efficient. Instead, this tutorial is set-up to show you as many functions in Photoshop
9 Using Appearance Attributes, Styles, and Effects
 9 Using Appearance Attributes, Styles, and Effects You can alter the look of an object without changing its structure using appearance attributes fills, strokes, effects, transparency, blending modes,
Tip: Shift/Control/Alt- will reset entire Photoshop program in case someone has changed settings.
 Adobe Photoshop CS2 Class 1 Tip: Shift/Control/Alt- will reset entire Photoshop program in case someone has changed settings. Create New File: 1. Click on File/New 2. Choose setting below Resolution: Higher
Adobe photoshop Using Masks for Illustration Effects
 Adobe photoshop Using Masks for Illustration Effects PS Preview Overview In this exercise you ll see a more illustrative use of Photoshop. You ll combine existing photos with digital art created from scratch
The original image. Let s get started! The final result.
 Vertical Photo Panels Effect In this Photoshop tutorial, we ll learn how to create the illusion that a single photo is being displayed as a series of vertical panels. It may look complicated, but as we
COPYRIGHTS AND TRADEMARKS
 COPYRIGHTS AND TRADEMARKS AUTODESK PIXLR for Tablets 2015 Autodesk, Inc. All Rights Reserved. Except as otherwise permitted by Autodesk, Inc., this publication, or parts thereof, may not be reproduced
GIMP WEB 2.0 ICONS. GIMP is all about IT (Images and Text) OPEN GIMP
 OPEN GIMP") GIMP WEB 2.0 ICONS WEB 2.0 ICONS: STICKY NOTE Web 2.0 Icons: Sticky Note GIMP is all about IT (Images and Text) OPEN GIMP Step 1: To begin a new GIMP project, from the Menu Bar, select File New. At the
GIMP WEB 2.0 ICONS WEB 2.0 ICONS: STICKY NOTE Web 2.0 Icons: Sticky Note GIMP is all about IT (Images and Text) OPEN GIMP Step 1: To begin a new GIMP project, from the Menu Bar, select File New. At the
Tutorial: Getting Started - Terrain
 Tutorial: Getting Started - Terrain Overview This tutorial teaches you how to apply materials to the terrain, modify the terrain height, and use the vegetation tool to paint trees onto the terrain. * This
RICE DMC SHORT COURSE. Creating a Digital Illustration in Photoshop (Advanced)
") RICE DMC SHORT COURSE Creating a Digital Illustration in Photoshop (Advanced) 1.Filter>Render>Clouds 2.Filter>Distort>Shear Image> Adjustments>Hue and Saturation Add Layer Style 3D>New 3D Layer from File
RICE DMC SHORT COURSE Creating a Digital Illustration in Photoshop (Advanced) 1.Filter>Render>Clouds 2.Filter>Distort>Shear Image> Adjustments>Hue and Saturation Add Layer Style 3D>New 3D Layer from File
9 ADVANCED LAYERING. Lesson overview
 9 ADVANCED LAYERING Lesson overview In this lesson, you ll learn how to do the following: Import a layer from another file. Clip a layer. Create and edit an adjustment layer. Use Vanishing Point 3D effects
Photoshop Fundamentals
 Lesson 3 Photoshop Fundamentals Photoshop Fundamentals How to Navigate your Document Zooming in and out To zoom in and out on your Photoshop document, hold down the Command key (Ctrl on Win) and press
12 APPLYING EFFECTS. Lesson overview
 12 APPLYING EFFECTS Lesson overview In this lesson, you ll learn how to do the following: Use various effects like Pathfinder, Distort & Transform, Offset Path, and Drop Shadow effects. Use Warp effects
Photography by Christina Sizemore. Mudbox Hotkeys
 Digital Sculpting with Mudbox FIG 2.12 Digital Images Are Composed of a Pixel Grid. Each Pixel Stores Information Like Color and Transparency. Mudbox Uses Digital Images as Stencils and Stamps and Creates
HOW TO. In this section, you will find. miscellaneous handouts that explain. HOW TO do various things.
 In this section, you will find miscellaneous handouts that explain do various things. 140 SAVING Introduction Every time you do something, you should save it on the DESKTOP. Click Save and then click on
Introduction to Digital Modelling and Animation in Design week 4 Textures
 Introduction to Digital Modelling and Animation in Design week 4 Textures Thaleia Deniozou - - - - - - - - - - - - - - - - - - - - - - - - - - - - - - - - - - - - - - - - - - - - - - - - - - - - - - -
Creating a Title in Photoshop
 Creating Titles in Photoshop Even if your editing package includes a great titler, there might still be times when you want to craft titles in a paint program or image editor. For example, there might
HAPPY HOLIDAYS PHOTO BORDER
 HAPPY HOLIDAYS PHOTO BORDER In this Photoshop tutorial, we ll learn how to create a simple and fun Happy Holidays winter photo border! Photoshop ships with some great snowflake shapes that we can use in
12 APPLYING EFFECTS. Lesson overview
 12 APPLYING EFFECTS Lesson overview In this lesson, you ll learn how to do the following: Use various effects, such as Pathfinder, Scribble, and Drop Shadow. Use Warp effects to distort type. Create three-dimensional
Education and Training CUFMEM14A. Exercise 2. Create, Manipulate and Incorporate 2D Graphics
 Education and Training CUFMEM14A Exercise 2 Create, Manipulate and Incorporate 2D Graphics Menu Exercise 2 Exercise 2a: Scarecrow Exercise - Painting and Drawing Tools... 3 Exercise 2b: Scarecrow Exercise
Ambient Occlusion Pass
 Ambient Occlusion Pass (Soft Shadows in the Nooks and Crannies to Replicate Photorealistic Lighting) In this tutorial we are going to go over some advanced lighting techniques for an Ambient Occlusion
The Background layer now filled with black.
 GOLD PLATED TEXT In this Photoshop text effects tutorial, we re going to learn how to turn text into gold using Photoshop s Layer Styles. We ll even throw in some sparkles at the end to make our gold letters
Illustrator Tutorial: How to create a stipple texture By Jason McConnell on Dec,
 Illustrator Tutorial: How to create a stipple texture By Jason McConnell on Dec, 19 2014 Have you ever wanted to add a stippled airbrush effect to your artwork in Illustrator? You might think you have
Making an Aquarium in Google SketchUp
 Making an Aquarium in Google SketchUp If you are a decent 3D modeler, you could design an aquarium filled with 3D models of sea plants, coral, and fish. To save time, you could even find most of these
Property of: Entrada Interactive. PBR Workflow. Working within a PBR-based environment
 Property of: Entrada Interactive PBR Workflow Working within a PBR-based environment Ryan Manning 8/24/2014 MISCREATED PBR WORKFLOW CryDocs on Physically Based Shading/Rendering: http://docs.cryengine.com/display/sdkdoc4/physically+based+rendering
animation, and what interface elements the Flash editor contains to help you create and control your animation.
 e r ch02.fm Page 43 Wednesday, November 15, 2000 8:52 AM c h a p t 2 Animating the Page IN THIS CHAPTER Timelines and Frames Movement Tweening Shape Tweening Fading Recap Advanced Projects You have totally
Visualization Insider A Little Background Information
 Visualization Insider A Little Background Information Visualization Insider 2 Creating Backgrounds for 3D Scenes Backgrounds are a critical part of just about every type of 3D scene. Although they are
Create a Swirly Lollipop Using the Spiral Tool Philip Christie on Jun 13th 2012 with 12 Comments
 Advertise Here Create a Swirly Lollipop Using the Spiral Tool Philip Christie on Jun 13th 2012 with 12 Comments Tutorial Details Program: Adobe Illustrator CS5 Difficulty: Beginner Es timated Completion
FLAMINGO CHEAT SHEET FOR ES 305 CLASS 5 Pages of Fresh Flamingo Goodness
 FLAMINGO CHEAT SHEET FOR ES 305 CLASS 5 Pages of Fresh Flamingo Goodness *Keep this PDF with you at all times it will help you to maneuver the vast and confusing ocean that is the Flamingo Materials Editor!
3D Space is one of the most rewarding areas
 Lesson 8 206 3D Space Add a new dimension to your animations. In This Lesson 207 enabling layers for 3D 208 moving and rotating layers in 3D space 210 multiplaning effects 212 3D motion paths 213 multiple
GIMP WEB 2.0 ICONS. GIMP is all about IT (Images and Text) OPEN GIMP
 OPEN GIMP") GIMP WEB 2.0 ICONS or WEB 2.0 ICONS: MEMO Web 2.0 Icons: Memo GIMP is all about IT (Images and Text) OPEN GIMP Step 1: To begin a new GIMP project, from the Menu Bar, select File New. At the Create a New
GIMP WEB 2.0 ICONS or WEB 2.0 ICONS: MEMO Web 2.0 Icons: Memo GIMP is all about IT (Images and Text) OPEN GIMP Step 1: To begin a new GIMP project, from the Menu Bar, select File New. At the Create a New
Modeling a Fluted Column in Google SketchUp
 Architectural columns in ancient Greece, Rome, and even China used flutes - vertical grooves cut along the outside of the cylinder. If you want to create a model of an ancient temple, or perhaps one of
Tutorial: Making your First Level
 Tutorial: Making your First Level This tutorial walks you through the steps to making your first level, including placing objects, modifying the terrain, painting the terrain and placing vegetation. At
Note: Photoshop tutorial is spread over two pages. Click on 2 (top or bottom) to go to the second page.
 to go to the second page.") Introduction During the course of this Photoshop tutorial we're going through 9 major steps to create a glass ball. The main goal of this tutorial is that you get an idea how to approach this. It's not
Introduction During the course of this Photoshop tutorial we're going through 9 major steps to create a glass ball. The main goal of this tutorial is that you get an idea how to approach this. It's not
Worn And Torn Text In Photoshop
 Worn And Torn Text In Photoshop Written by Steve Patterson. In this Photoshop text effects tutorial, we re going to learn how to create a worn and torn effect with our text. Here s the effect we re going
Fantasy Cartography with Adobe Photoshop: Adapted for Gimp
 Fantasy Cartography with Adobe Photoshop: Adapted for Gimp By Megan Wiseman 2010 This is a written tutorial, adapted for Gimp 2.6.8, based on Butch Curry s video tutorial series Fantasy Cartography with
Text Tricks Text # 1 Fill Text with an image
 Text Tricks Text # 1 Fill Text with an image (save as Image_Text_1.jpg) Make sure that the picture is bigger than the text. Open the image you want to put in the text. Click on CTRL+A to select it all.
In this exercise you will be creating the graphics for the index page of a Website for children about reptiles.
 LESSON 2: CREATING AND MANIPULATING IMAGES OBJECTIVES By the end of this lesson, you will be able to: create and import graphics use the text tool attach text to a path create shapes create curved and
BRYCE 5 Mini Tutorial
 BRYCE 5 Mini Tutorial How to create Panoramic Caverns by David Brinnen January 2006 HTML Version by Hans-Rudolf Wernli Cavern (above) and Pano-Cavern (below) > Start up Bryce, select «Create» and click
INTRODUCTION and TOOLS TUTORIAL
 Adobe Photoshop cs2 INTRODUCTION and TOOLS TUTORIAL OBJECTIVE - This tutorial is designed to introduce you to some of the frequently used tools and actions in Photoshop. All samples used will be found
ENGL 323: Writing for New Media Repurposing Content for the Web Part Two
 ENGL 323: Writing for New Media Repurposing Content for the Web Part Two Dr. Michael Little michaellittle@kings.edu Hafey-Marian 418 x5917 Using Color to Establish Visual Hierarchies Color is useful in
PHOTOSHOP New File. To create a new file, select File > New and a dialog box will open.
 PHOTOSHOP 101 1. New File To create a new file, select File > New and a dialog box will open. Here you re presented with a lot of options to choose from. You can change the type of file you ll work with.
Turn your movie file into the homework folder on the server called Lights, Camera, Action.
 CS32 W11 Homework 3: Due MONDAY, APRIL 18 Now let s put the ball in a world of your making and have some fun. Create a simple AND WE MEAN SIMPLE environment for one of your ball bounces. You will assign
USING THE PHOTOSHOP TOOLBOX
 IN THIS CHAPTER USING THE PHOTOSHOP TOOLBOX Using the Options Bar 44 Using the Selection Tools 45 Using the Crop and Slice Tools 46 Using the Retouching Tools 46 Using the Painting Tools 49 Using the Drawing
Creating Digital Illustrations for Your Research Workshop III Basic Illustration Demo
 Creating Digital Illustrations for Your Research Workshop III Basic Illustration Demo Final Figure Size exclusion chromatography (SEC) is used primarily for the analysis of large molecules such as proteins
Lesson 03: We will add water and will set the placing conditions for the material. WorldBuilder 3.5. for. About Digital Element Tutorials:
 Lesson 03: We will add water and will set the placing conditions for the material for WorldBuilder 3.5 About Digital Element Tutorials: This tutorial is available both in.pdf format and in Qarbon format,
Create a Cool Vector Robot Character in Illustrator
 Create a Cool Vector Robot Character in Illustrator In this tutorial, we will use various tools and techniques to create a simple vector robot character and learn the basic of Adobe Illustrated. With this
Useful Photoshop Keyboard Shortcuts
 Page 1 of 10 Useful Photoshop Keyboard Shortcuts By; Marty Kesselman Rev: August 13, 2013 Many of these shortcuts work with Elements as well as Photoshop CS. The title says Useful ; I mean I use them and
There are many kinds of surface shaders, from those that affect basic surface color, to ones that apply bitmap textures and displacement.
 mental ray Overview Mental ray is a powerful renderer which is based on a scene description language. You can use it as a standalone renderer, or even better, integrated with 3D applications. In 3D applications,
Step 1: Open A New Photoshop Document
 Create A Fragmented Tiles Text Effect In this Photoshop text effects tutorial, we re going to learn how to create a fragmented tiles effect using Photoshop s Tiles filter. Here s the effect we re going
MODELING EYES ESTIMATED TIME REQUIRED
 MODELING EYES This tutorial will teach you how to model a pair of realistic-looking eyes and insert them into the head of a character. ESTIMATED TIME REQUIRED 30 Minutes LEARNING GOALS In this tutorial,
Chapter 5- Setting Up a World
 Chapter 5- Setting Up a World Using Color, Stars and Mist You ve created a nice scene for your lighthouse, but we re missing a really nice background. Depending on which release of Blender you re running,
Animating the Page IN THIS CHAPTER. Timelines and Frames
 e r ch02.fm Page 41 Friday, September 17, 1999 10:45 AM c h a p t 2 Animating the Page IN THIS CHAPTER Timelines and Frames Movement Tweening Shape Tweening Fading Recap Advanced Projects You have totally
FreeForm 3D Displacer User Manual. freeform created by mettle.com
 FreeForm 3D Displacer User Manual freeform created by mettle.com Contents 3 Installation 4 Controls 6 Controls - cont d 8 Support 9 Application FreeForm 3D Displacer The FreeForm 3D Displacer plugin for
Working with the BCC Bump Map Generator
 Working with the BCC Bump Map Generator Bump mapping is used to create three dimensional detail on an image based on the luminance information in the image. The luminance value of each pixel of the image
Advanced Special Effects
 Adobe Illustrator Advanced Special Effects AI exercise preview exercise overview The object is to create a poster with a unified color scheme by compositing artwork drawn in Illustrator with various effects
v All Rights Reserved Orange_Box 3D Map Generator - Terrain 1
 v 1.3 2018 All Rights Reserved Orange_Box www.the-orange-box.com 3D Map Generator - Terrain 1 3D Map Generator - Terrain Plugin for Photoshop CC-2014 + newer Features 3D map from every heightmap possible
critical theory Computer Science
 Art/Science Shading, Materials, Collaboration Textures Example title Artists In the recommend real world, two the main following: factors determine the appearance of a surface: basic understanding what
O Hailey: Chapter 3 Bonus Materials
 O Hailey: Chapter 3 Bonus Materials Maya s Toon Line For those familiar with toon lines in Maya, you may skip ahead past this section. Those not familiar might find it useful to understand the basics of
Computer learning Center at Ewing. Course Notes - Using Picasa
 1st January 2014 Computer learning Center at Ewing Course Notes - Using Picasa These course notes describe the content of the Using Picasa course. The course notes are based on Picasa 3. This course material
2. If a window pops up that asks if you want to customize your color settings, click No.
 Practice Activity: Adobe Photoshop 7.0 ATTENTION! Before doing this practice activity you must have all of the following materials saved to your USB: runningshoe.gif basketballshoe.gif soccershoe.gif baseballshoe.gif
Chapter 4- Materials and Textures
 Chapter 4- Materials and Textures Materials and textures are what change your model from being gray to brilliant. You can add color, make things glow, become transparent like glass or make them look like
How to draw and create shapes
 Adobe Flash Professional Guide How to draw and create shapes You can add artwork to your Adobe Flash Professional documents in two ways: You can import images or draw original artwork in Flash by using
System Configuration and 3D in Photoshop CS5
 CHAPTER 1 System Configuration and 3D in Photoshop CS5 The Adobe Photoshop application works closely with your computer s hardware profile to use its capabilities most efficiently. This smart relationship
To get a copy of this image you right click on the image with your mouse and you will get a menu. Scroll down the menu and select "Save Image As".
 The most popular lesson I teach is editing photographs. Everyone wants to put his or her brother's head on a monkey or something similar. This is also a lesson about "emphasis". You can cause more individuals
Interface. 2. Interface Photoshop CS/ImageReady CS for the Web H O T
 2. Interface Photoshop CS/ImageReady CS for the Web H O T 2. Interface The Welcome Screen Interface Overview Using the Toolbox Using Palettes Using the Options Bar Creating a Tool Preset Resetting Tools
Render methods, Compositing, Post-process and NPR in NX Render
 Render methods, Compositing, Post-process and NPR in NX Render Overview What makes a good rendered image Render methods in NX Render Foregrounds and backgrounds Post-processing effects Compositing models
Visual Perception. Visual contrast
 TEXTURE Visual Perception Our perception of the visual shape, size, color, and texture of things is affected by the optical environment in which we see them and the relationships we can discern between
Introduction to PowerPoint 2007
 Introduction to PowerPoint 2007 PowerPoint is one of the programs included in the Microsoft Office suite. It s used to create presentations, also called slide shows, that are typically displayed via a
How to Use a Push Modifier: Creating a Blanket and Adjusting Clothing Fit
 How to Use a Push Modifier: Creating a Blanket and Adjusting Clothing Fit Copyright 2017 by Rich Schafermeyer (RGcincy on Daz Forums) This is a tutorial on using a push modifier so that a primitive plane
To build shapes from scratch, use the tools are the far right of the top tool bar. These
 3D GAME STUDIO TUTORIAL EXERCISE #5 USE MED TO SKIN AND ANIMATE A CUBE REVISED 11/21/06 This tutorial covers basic model skinning and animation in MED the 3DGS model editor. This exercise was prepared
Think about film & lighting
 Quiz 3: Textures Camera and Lighting for Animation Hand back Quiz 2 Amy Gooch CS 395: Intro to Animation Summer 2004 Think about film & lighting Reality! Cameras & Viewpoint Lighting in animation Same
Quick Guide for Photoshop CC Basics April 2016 Training:
 Photoshop CC Basics Creating a New File 1. Click File > New 2. Keep Default Photoshop Size selected in the Preset drop-down list. 3. Click OK. Showing Rulers 1. On the Menu bar, click View. 2. Click Rulers.
Esrefoglu Pattern, in Google SketchUp
 One of my favorite geometry books is Islamic Geometry Patterns by Eric Broug. The book contains instructions on 19 beautiful patterns found throughout the Middle East and Asia, and Eric s main tools are
Objectives Learn how GMS uses rasters to support all kinds of digital elevation models and how rasters can be used for interpolation in GMS.
 v. 9.1 GMS 9.1 Tutorial Using rasters for interpolation and visualization in GMS Objectives Learn how GMS uses rasters to support all kinds of digital elevation models and how rasters can be used for interpolation
Change Background- Using Photoshop 6.0 (up through CS2)
") Change Background- Using Photoshop 6.0 (up through CS2) This Tutorial shows how to use one photograph, in this example the photo of the Livery, as a background for a different photograph, the Cowboy. To
Change Background- Using Photoshop 6.0 (up through CS2) This Tutorial shows how to use one photograph, in this example the photo of the Livery, as a background for a different photograph, the Cowboy. To
Pd Iray Shader Kit 2 - User s Guide
 Pd Iray Shader Kit 2 - User s Guide Introduction Pd Iray Shader Kit 2 is a do-it-yourself shader kit for Iray rendering. All of the shader presets are based off the Daz Iray Uber Base. You can create 1000's
3D Massing Graphics Using Sketchup and Photoshop
 3D Massing Graphics Using Sketchup and Photoshop 1 Download the City of Toronto Context Massing Model This document shows you how to generate a finished rendering using Trimble s Sketchu p Pro and Adobe
Low Poly Game Plants
 Low Poly Game Plants In this tutorial we are going to create some very simple low poly plants like the kind you find in video games all over the place. If you don t need to know the photoshop steps, or