Tutorial: Getting Started - Terrain
|
|
|
- Lawrence Greer
- 5 years ago
- Views:
Transcription
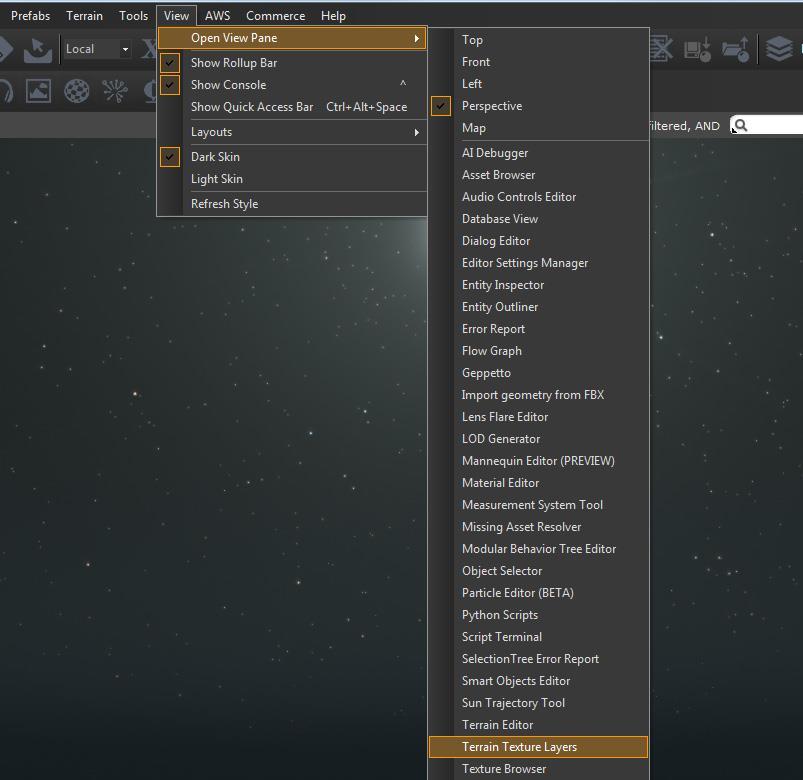
1 Tutorial: Getting Started - Terrain Overview This tutorial teaches you how to apply materials to the terrain, modify the terrain height, and use the vegetation tool to paint trees onto the terrain. * This tutorial requires you use the SamplesProject supplied with the Lumberyard. Terrain Painting Now that you have the basics of the scene built with brushes, it's time to start building the surrounding terrain environment. To begin, you'll need to open two new editors, the Terrain Textures Layers and the Material Editor. 1. Open the Terrain Texture Layers editor. From the Editor toolbar, select the Terrain Textures icon or, from the main menu bar, select View / Open View Pane / Terrain Texture Layers. Editor Toolbar
2 Main Menu
3 The Terrain Texture Layers editor is used to define all the materials that are used to paint on the level's terrain mesh. The Terrain Texture Layers editor has the following areas: 1. Layer Tasks - Add, delete, and reorder layers in the Layer List 2. Layer Info - Information about the selected layer, including the layer size and surface type count 3. Layer Texture - Low-detail texture swatch; displays color information for the surface texture; displays far away textures 4. Options - Options related to the Layer List 5. Layer List - Layer textures available for painting onto the terrain (e.g. dirt, grass, rocks)


4 2. Open the Material Editor: From the Editor toolbar, you can select the Material Editor Dialog icon or, from the main menu bar, select View / Open View Pane / Material Editor. Editor Toolbar Main Menu

5 The Material Editor has the following areas: 1. Editor toolbar - Tool list for applying, deleting, saving, and creating materials 2. Material preview - Display for the selected material's appearance 3. Material folder directory - Folder tree to navigate through the materials available for use in the level 4. Material properties and settings - Parameters that define the material's appearance With these two editors open, you can now assign materials to your terrain mesh. 3. In the Terrain Texture Layers editor, in the Layer Tasks area, click Add Layer twice to add two new layers.


6 4. In the first new layer, double-click on the text NewLayer and rename it grass. 5. In the second new layer, double-click on the text NewLayer and rename it dirt. 6. Select the grass layer; it becomes highlighted orange.

7 7. Go back to the Material Editor and select the material gs_grass_01 located in the Material Editor's directory path materials/gettingstartedmaterials/gs_grass_ In the Terrain Texture Layers editor, the grass layer should still be selected. In the Layer Tasks area, choose Assign Material. 9. Next, select the dirt layer. Switch back to the Material Editor and select the Getting Started Material gs_ground_01.

8 10. Switch to the Terrain Texture Layers editor. With the dirt layer still selected, choose Assign Material in the Layer Tasks area. Note: In each of the terrain material layers is a small material preview box. This material preview box displays the assigned layer texture, not the material assigned from the material editor. For this tutorial, we are using the default grey.dds file, so both the grass and dirt layers appear with the grey layer texture.

9 11. Close Material Editor and Terrain Texture Editors, You are now ready to paint grass and dirt textures onto the terrain. In the Rollup Bar, select the Terrain tab, and then choose the Layer Painter button. This opens Lumberyard's terrain layer painting tools: 12. In the Layer Painter window, at the bottom, there is a list of the terrain materials that you have created: grass and dirt. Select grass. 13. Just above, there is the Vertex Coloring box with a Color box (default is white). Click on the color box and change the RGB color to 145, 180, 75 for a neighborly grass-green color. Click OK.
10 14. Click the Flood button at the bottom of the Layer Painter tool. The terrain is now covered in the grass texture and looks similar to this: 15. With the entire terrain now painted with the grass texture, you can paint some dirt into the scene around the perimeter of the street. Select the dirt material at the bottom of the Layer Painter tool. 16. Adjust the color box to a brown tone: RGB 115, 95, 50. Click OK. 17. In the Brush Settings box, set the Radius to 5 and the Hardness to 0.5.
11 18. Place your mouse in the Perspective Viewport (where your lovely town is displayed) and left click and drag to paint the dirt texture around the perimeter of the street. Do as little or as much as you like. When you are finished, you will have a town similar to the following: Terrain Height With the terrain now painted, we can move onto manipulating the height of the terrain with the Modify Terrain brush tools. 1. From the same Terrain tool tab in the Rollup Bar, choose the Modify button. This displays the Modify Terrain tools.

12 2. The Modify Terrain tool features the following: Brush Settings Flatten: Flatten the terrain to the designated height setting Smooth: Soften the terrain down to a smoother surface Rise/Lower: Raise or lower the terrain based on brush size settings Pick Height: Find and set heights based on existing terrain geometry Outside Radius: Set how big your brush is when painting Inside Radius: Set how round or flat the brush is in relation to the outside radius setting Hardness: Soften or harden the outer brush settings Height: Sets brush height Noise Settings Scale: Strength of the noise effect; higher value produces more noise Frequency: How often the effect is applied
13 3. Select the Rise/Lower button, set the Outside Radius = 25, Inside Radius = 1, Hardness = 0.25 and Height = 3. These settings help you create some gentle hills around your neighborhood. 4. In the Perspective Viewport, navigate towards the outer perimeter of the terrain map and left click to paint on the terrain. Experiment with holding and clicking along the terrain to manipulate the terrain to different heights. Build some larger hills of different sizes and shapes. 5. Adjust the brush settings so the Inside Radius = 20, Hardness = 1 and Height = 1. Paint again on the terrain. Notice how the terrain rises up more straight and rigid. 6. Choose the Smooth tool, set the Outside Radius = 25 and Hardness = 0.2. Paint with the smooth brush over the last area of terrain you created. Notice the smoothing of the terrain. 7. Select the Pick Height tool and click on a high point on the terrain. Notice the Height setting in the tool adjusts to the height selected. Select a point on the terrain where the height hasn't been changed. The height setting in the Modify Terrain tool changes to 32. Notice that this tool doesn't change your terrain, but simply adjust the settings for the next step. 8. Select the Flatten tool, set Outside Radius = 25, Inside Radius = 0 and Hardness = 1. Paint with the flatten tool over the area you just smoothed. The terrain should now flatten to the same height as the rest of the default terrain height. 9. Using these tools, create a range of high and long hills in the distant background from the neighborhood block area you created. 10. Adjust your brush settings to create smaller rolling hills closer to the neighborhood block. Use the Smooth tool to soften where you like. With a few minutes' work, you have something like this:
14 Terrain Vegetation With the Vegetation tool, you can paint 3d mesh objects like trees, shrubs, and grasses onto the terrain. Various settings help you to build beautiful organic environments using any type of 3d models you define. In the previous steps, you textured and modified your terrain. Now it's time to add some trees using the Vegetation tool. 1. In the Rollup Bar, on the Terrain tab, choose the Vegetation button.


15 2. In the Vegetation tool, you can modify the following settings: Toolbar - (Set of small icons) Displays tools to create, modify, and organize vegetation types Brush Radius - Sets the size of the brush used to paint vegetation into the level Paint Objects - Enables you to paint in the level Objects - Lists vegetation objects that have been created Table of attributes - List the attributes that can be modified for each vegetation object


16 3. In the New Category dialog, enter Trees. Click OK. 4. In the Objects list, select the Trees category you just created. 5. In the tool list, click the icon. 6. In the Preview dialog, choose the Objects folder from the left side.

17 7. Open the folder StyleTown. 8. Open Natural, then Vegetation. In the list of.cgf files, use Ctrl+click to select the following files: tree_01, tree_02, tree_04, and tree_06. Click Open. 9. You could paint trees into the environment now, but every tree would appear with the default brush settings, which provides no variation on the size, rotation, or spread of the trees.
 - Rotates the tree randomly Density = 50 - Defines the density of the trees Sprite Distance = 50 - Defines distance from the camera view")
18 10. Select the first tree on the list and change the following settings in the attributes list. Do this for each of the trees in your list. +- Size Var = Randomizes the tree's size Random Rotation = On (checked) - Rotates the tree randomly Density = 50 - Defines the density of the trees Sprite Distance = 50 - Defines distance from the camera view that vegetation transitions from a mesh to a sprite of that object.

19 11. Select the Trees group name and then adjust the Brush Radius to 50 (this size is appropriate for filling the terrain space quickly). 12. Select the Paint Objects button, then place your cursor in the Perspective Viewport and click to paint your trees. Depending on the tree density you want, you can click once and place a random group of trees, or you can click and drag through the space and paint them along a path. Adjust the Brush Radius and the Density settings to change the number of trees painted. Your neighborhood scene should look something like the following image. 13. Save your file. Congratulations, you've created your first level environment with a small neighborhood between rolling hills, amidst a lush green forest.
20 Related tasks and tutorials Move onto the next tutorial in the Getting Started tutorial series: Tutorial: Lighting We d love to hear from you! Head to our Tutorial Discussion forum to share any feedback you have, including what you do or don t like about our tutorials or new content you d like to see in the near future.
Tutorial: Making your First Level
 Tutorial: Making your First Level This tutorial walks you through the steps to making your first level, including placing objects, modifying the terrain, painting the terrain and placing vegetation. At
Amazon Lumberyard Editor. Getting Started Guide Version 1.8
 Amazon Lumberyard Editor Getting Started Guide Amazon Lumberyard Editor Copyright Table of Contents Introduction to Lumberyard Editor... 1 Running Lumberyard Setup Assistant... 3 Using the Project Configurator...
Tutorial: Importing static mesh (FBX)
") Tutorial: Importing static mesh (FBX) This tutorial walks you through the steps needed to import a static mesh and its materials from an FBX file. At the end of the tutorial you will have new mesh and
Tutorial: Importing static mesh (FBX) This tutorial walks you through the steps needed to import a static mesh and its materials from an FBX file. At the end of the tutorial you will have new mesh and
Lumberyard. Getting Started Guide Version 1.9
 Lumberyard Getting Started Guide Lumberyard: Getting Started Guide Copyright 2017 Amazon Web Services, Inc. and/or its affiliates. All rights reserved. Amazon's trademarks and trade dress may not be used
Tutorial: Modify UI 01 How to Load a UI Canvas Using Flow Graph
 Tutorial: Modify UI 01 How to Load a UI Canvas Using Flow Graph This tutorial is the first tutorial in the Creating an Options Menu tutorial series and walks you through the steps to load a canvas using
Tutorial: Working with Lighting through Components
 Tutorial: Working with Lighting through Components With a populated scene we can begin layering in light sources to add realism and light to our level. For this we will need to use an environmental probe
Tutorial: Understanding the Lumberyard Interface
 Tutorial: Understanding the Lumberyard Interface This tutorial walks you through a basic overview of the Interface. Along the way we will create our first level, generate terrain, navigate within the editor,
Tutorial: Getting Started - Flow Graph scripting
 Tutorial: Getting Started - Flow Graph scripting Overview This tutorial introduces the concept of game play scripting using the Flow Graph editor. You will set up Flow Graph scripts that do five things:
Tutorial: How to Load a UI Canvas from Lua
 Tutorial: How to Load a UI Canvas from Lua This tutorial walks you through the steps to load a UI canvas from a Lua script, including creating a Lua script file, adding the script to your level, and displaying
Tutorial: How to Create and Assign Materials from the Material Editor
 Tutorial: How to Create and Assign Materials from the Material Editor This tutorial walks you through the steps to create and assign a new material to an object in the Lumberyard Editor. To do this we
Tutorial: Importing Height Maps and Mega-Terrain from World Machine
 Tutorial: Importing Height Maps and Mega-Terrain from World Machine In this tutorial you will learn how to quickly create a new terrain, using World Machine to generate a Height Map, and Mega-Terrain texture.
Tutorial: Options Menu Layout
 Tutorial: Options Menu Layout This tutorial walks you through the steps to add a window title and avatar selection section, including adding the window title, adding the user profile section, configuring
Tutorial: Introduction to Flow Graph
 Tutorial: Introduction to Flow Graph This tutorial introduces you to Flow Graph, including its core concepts, the Flow Graph editor and how to use it to create game logic. At the end of this tutorial,
Modeling Level Design
 Summary This tutorial has introduced you to several of the tools you can use to make a low-polygon model with editable poly functionality. These tools can be adapted to the task of modeling any low-polygon
In this tutorial, you will create the model of a chair, as shown in the image below, using the extended primitives and modifiers.
 Office Chair In this tutorial, you will create the model of a chair, as shown in the image below, using the extended primitives and modifiers. Creating the Project Folder Create a new project folder with
Polygon Modeling Basics Chapter 1 - Vertices
 Polygon Modeling Basics Chapter 1 - Vertices In this tutorial we will cover the basic tools necessary for Polygon Modeling using the Vertex sub-object selection. It is less of a how to tutorial and more
Tutorial: Adding Sounds for a One-Shot Weapon
 Tutorial: Adding Sounds for a One-Shot Weapon This tutorial will expand on the previous tutorial to show how to setup audio for the cannon and will tie together methods of implementing sounds into Lumberyard
Working with the Dope Sheet Editor to speed up animation and reverse time.
 Bouncing a Ball Page 1 of 2 Tutorial Bouncing a Ball A bouncing ball is a common first project for new animators. This classic example is an excellent tool for explaining basic animation processes in 3ds
1st Point. 2nd Point. hold shift & drag along Y. Splines
 Splines STEP 1: open 3DS Max _ from the Command Panel under the Create tab click on Shapes (note: shapes are really Splines) _ under Object Type click on Ellipse STEP 2: Expand the Keyboard Entry tab type
Tutorial 2: Terrain and Dynamic City Layouts
 Tutorial 2: Terrain and Dynamic City Layouts Table of Contents Tutorial 2: Terrain and dynamic city layouts................................... 3 2 Tutorial 2: Terrain and dynamic city layouts Download
Tutorial: Accessing Maya tools
 Tutorial: Accessing Maya tools This tutorial walks you through the steps needed to access the Maya Lumberyard Tools for exporting art assets from Maya to Lumberyard. At the end of the tutorial, you will
Tutorial 1. Creating a Database
 Tutorial 1 Creating a Database Microsoft Access 2010 Objectives Learn basic database concepts and terms Explore the Microsoft Access window and Backstage view Create a blank database Create and save a
Tutorial: Character creation basics
 Tutorial: Character creation basics This tutorial walks you through the steps needed to understand the basics of creating a character, including how to create a character definition file, an attachments
 Page 1 of 10 Creating Cigarette Smoke In this tutorial, you use a particle system to create a stream of cigarette smoke trailing from an ashtray. The animation relies on space warps to affect the movement
UDK Basics Maya Export/UDK Import/Viewport and placing content
 UDK Basics Maya Export/UDK Import/Viewport and placing content By Sarah Taylor http://sarahtaylor3d.weebly.com In this tutorial I will explain some of the problems you need to look out for when transferring
1. Move your mouse to the location you wish text to appear in the document. 2. Click the mouse. The insertion point appears.
 Word 2010 Text Basics Introduction Page 1 It is important to know how to perform basic tasks with text when working in a word processing application. In this lesson you will learn the basics of working
Create a Rubber Duck. This tutorial shows you how to. Create simple surfaces. Rebuild a surface. Edit surface control points. Draw and project curves
 Page 1 of 24 Create a Rubber Duck This exercise focuses on the free form, squishy aspect. Unlike the flashlight model, the exact size and placement of the objects is not critical. The overall form is the
Textures and UV Mapping in Blender
 Textures and UV Mapping in Blender Categories : Uncategorised Date : 21st November 2017 1 / 25 (See below for an introduction to UV maps and unwrapping) Jim s Notes regarding Blender objects, the UV Editor
Lesson 03: We will add water and will set the placing conditions for the material. WorldBuilder 3.5. for. About Digital Element Tutorials:
 Lesson 03: We will add water and will set the placing conditions for the material for WorldBuilder 3.5 About Digital Element Tutorials: This tutorial is available both in.pdf format and in Qarbon format,
This is the opening view of blender.
 This is the opening view of blender. Note that interacting with Blender is a little different from other programs that you may be used to. For example, left clicking won t select objects on the scene,
Tutorial: Importing Animations into Geppetto
 Tutorial: Importing Animations into Geppetto This tutorial walks you through the steps needed to import animations with Geppetto, including setting up the.chrparams file, the Skeleton List, and importing
DrawPlus X8. Quick Start Guide. Simple steps for getting started with your drawing.
 DrawPlus X8 Quick Start Guide Simple steps for getting started with your drawing. In this guide, we will refer to specific tools, toolbars and tabs. Use this visual reference to help locate them on the
 Page 1 of 8 Tutorial Modeling a Bishop In this lesson you will model a bishop for the chess set. As with the rook, the base of the bishop has already been created. You will add the miter on top of the
SCENE FILE MANIPULATION SCENE FILE MANIPULATION GETTING STARTED MODELING ANIMATION MATERIALS + MAPPING RENDERING. Saving Files. Save.
 SCENE FILE MANIPULATION SCENE FILE MANIPULATION There are several things you can do with a scene file in 3ds Max. You can save a file, save a file temporarily and retrieve it, and combine scene files.
A Guide to Autodesk Maya 2015
 A Guide to Autodesk Maya 2015 Written by Mitchell Youngerman Table of Contents Layout of Toolbars...pg 1 Creating Objects...pg 2 Selecting & Deselecting Objects...pg 3 Changing Perspective... pg 4 Transforming
Painting Tiling Foliage Textures
 Painting Tiling Foliage Textures Jungle 3D can do many things. One of our favorites is to paint tiling textures of foliage. These dimensional foliage textures can create highly realistic and detailed forest
Mosaic Tutorial: Advanced Workflow
 Mosaic Tutorial: Advanced Workflow This tutorial demonstrates how to mosaic two scenes with different color variations. You will learn how to: Reorder the display of the input scenes Achieve a consistent
SNOWFLAKES PHOTO BORDER - PHOTOSHOP CS6 / CC
 Photo Effects: Snowflakes Photo Border (Photoshop CS6 / CC) SNOWFLAKES PHOTO BORDER - PHOTOSHOP CS6 / CC In this Photoshop tutorial, we ll learn how to create a simple and fun snowflakes photo border,
NURBS Sailboat on Ocean (Modeling/Animation)
") Course: 3D Design Title: NURBS Sailboat Blender: Version 2.6X Level: Beginning Author; Neal Hirsig (nhirsig@tufts.edu) (April 2013) NURBS Sailboat on Ocean (Modeling/Animation) The objective of this PDF
Course: 3D Design Title: NURBS Sailboat Blender: Version 2.6X Level: Beginning Author; Neal Hirsig (nhirsig@tufts.edu) (April 2013) NURBS Sailboat on Ocean (Modeling/Animation) The objective of this PDF
Import / Object modes: 5 Layers for organising your scene are available at the top of the screen.
 LUMION 1 VS LUMION 2 SCENES - In Lumion 2, the sky, clouds, fog, material settings, ambient shadows and reflections have been overhauled, so don't expect your Lumion 1 scenes to look identical when you
Mastering Truspace 7
 How to move your Truespace models in Dark Basic Pro by Vickie Eagle Welcome Dark Basic Users to the Vickie Eagle Truspace Tutorials, In this first tutorial we are going to build some basic landscape models
Or select Reset button under the application button (3ds Max symbol top left of screen)
") 3ds Max Notes 1. Starting 3ds Max file Open 3ds Max If Welcome to 3ds Max menu appears then select New Empty Scene Or select Reset button under the application button (3ds Max symbol top left of screen)
3ds Max Notes 1. Starting 3ds Max file Open 3ds Max If Welcome to 3ds Max menu appears then select New Empty Scene Or select Reset button under the application button (3ds Max symbol top left of screen)
EasySkin 1.0 Skin Toolset for Autodesk 3ds Max
 EasySkin 1.0 Skin Toolset for Autodesk 3ds Max Installation instructions: Launch the Installer and accept the license agreement. Choose the correct 3dsmax version. The installer autodetects the version
EXERCISE 2: GETTING STARTED WITH FUSION
 Document Updated: May, 2010 Fusion v2.8 Introduction In this exercise, you ll be using the fully-prepared example data to explore the basics of FUSION. Prerequisites Successful completion of Exercise 1
Lesson 1: Creating T- Spline Forms. In Samples section of your Data Panel, browse to: Fusion 101 Training > 03 Sculpt > 03_Sculpting_Introduction.
 3.1: Sculpting Sculpting in Fusion 360 allows for the intuitive freeform creation of organic solid bodies and surfaces by leveraging the T- Splines technology. In the Sculpt Workspace, you can rapidly
A Guide to Processing Photos into 3D Models Using Agisoft PhotoScan
 A Guide to Processing Photos into 3D Models Using Agisoft PhotoScan Samantha T. Porter University of Minnesota, Twin Cities Fall 2015 Index 1) Automatically masking a black background / Importing Images.
3D Modeling Course Outline
 3D Modeling Course Outline Points Possible Course Hours Course Overview 4 Lab 1: Start the Course Identify computer requirements. Learn how to move through the course. Switch between windows. Lab 2: Set
MatterHackers. How to make a 3D model using Google Earth. Written By: Ryan Lutz. How to make a 3D model using Google Earth data
 MatterHackers How to make a 3D model using Google Earth data Written By: Ryan Lutz 2017 matterhackers.dozuki.com Page 1 of 20 INTRODUCTION EDIT 7/25/17: Sadly, Sketchup has changed the map service they
move object resize object create a sphere create light source camera left view camera view animation tracks
 Computer Graphics & Animation: CS Day @ SIUC This session explores computer graphics and animation using software that will let you create, display and animate 3D Objects. Basically we will create a 3
Autodesk Fusion 360 Training: The Future of Making Things Attendee Guide
 Autodesk Fusion 360 Training: The Future of Making Things Attendee Guide Abstract After completing this workshop, you will have a basic understanding of editing 3D models using Autodesk Fusion 360 TM to
Using Blending Modes for Simple Color Correction
 Using Blending Modes for Simple Color Correction In a previous lesson, you were introduced to blending modes using the Brush Tool. Blending modes are also a powerful feature of the Layers Panel and can
Autodesk Moldflow Insight AMI Getting Started Tutorial
 Autodesk Moldflow Insight 2012 AMI Getting Started Tutorial Revision 1, 30 March 2012. This document contains Autodesk and third-party software license agreements/notices and/or additional terms and conditions
Step 1: Create A New Photoshop Document
 Snowflakes Photo Border In this Photoshop tutorial, we ll learn how to create a simple snowflakes photo border, which can be a fun finishing touch for photos of family and friends during the holidays,
3D Massing Graphics Using Sketchup and Photoshop
 3D Massing Graphics Using Sketchup and Photoshop 1 Download the City of Toronto Context Massing Model This document shows you how to generate a finished rendering using Trimble s Sketchu p Pro and Adobe
1 Pages updated for Forest Pack Getting Started Pages updated for Forest Pack Release Notes 9
 Table of Contents 1 Pages updated for Forest Pack 4.3 8 2 Getting Started 9 2.1 Pages updated for Forest Pack 4.3 9 2.2 Release Notes 9 2.3 Tutorials and Reference 9 2.4 HQ Plants models 10 2.5 Lite &
To build shapes from scratch, use the tools are the far right of the top tool bar. These
 3D GAME STUDIO TUTORIAL EXERCISE #5 USE MED TO SKIN AND ANIMATE A CUBE REVISED 11/21/06 This tutorial covers basic model skinning and animation in MED the 3DGS model editor. This exercise was prepared
Quick Crash Scene Tutorial
 Quick Crash Scene Tutorial With Crash Zone or Crime Zone, even new users can create a quick crash scene diagram in less than 10 minutes! In this tutorial we ll show how to use Crash Zone s unique features
Tangents. In this tutorial we are going to take a look at how tangents can affect an animation.
 Tangents In this tutorial we are going to take a look at how tangents can affect an animation. One of the 12 Principles of Animation is called Slow In and Slow Out. This refers to the spacing of the in
Visualizing Development
 I N T R O D U C T I O N Visualizing Development You will build something like this by the end of this tutorial This tutorial will be the final step in our downtown redevelopment endeavor. We will use a
VisualART 2018 Quick Start Guide MecSoft Corporation
 2 Table of Contents About this Guide 3 1 About... the ART Module 3 2 Using this... Guide 3 3 Useful... Tips 4 Getting Ready 5 1 Running... VisualCAD 5 2 About... the VisualCAD Display 5 3 Launching...
9 Using Appearance Attributes, Styles, and Effects
 9 Using Appearance Attributes, Styles, and Effects You can alter the look of an object without changing its structure using appearance attributes fills, strokes, effects, transparency, blending modes,
Creating a T-Spline using a Reference Image
 1 / 17 Goals Learn how to create a T-Spline using a Reference Image. 1. Insert an image into the workspace using Attach Canvas. 2. Use Calibrate to set the proper scale for the reference image. 3. Invoke
Lesson 17 Shell, Reorder, and Insert Mode
 Lesson 17 Shell, Reorder, and Insert Mode Figure 17.1 Oil Sink OBJECTIVES Master the use of the Shell Tool Reorder features Insert a feature at a specific point in the design order Create a Hole Pattern
Exit: These control how the object exits the slide. For example, with the Fade animation the object will simply fade away.
 PowerPoint 2013 Animating Text and Objects Introduction In PowerPoint, you can animate text and objects such as clip art, shapes, and pictures. Animation or movement on the slide can be used to draw the
Excel window. This will open the Tools menu. Select. from this list, Figure 3. This will launch a window that
 Getting Started with the Superpave Calculator worksheet. The worksheet containing the Superpave macros must be copied onto the computer. The user can place the worksheet in any desired directory or folder.
Modeling a Fluted Column in Google SketchUp
 Architectural columns in ancient Greece, Rome, and even China used flutes - vertical grooves cut along the outside of the cylinder. If you want to create a model of an ancient temple, or perhaps one of
CGS 3220 Lecture 13 Polygonal Character Modeling
 CGS 3220 Lecture 13 Polygonal Character Modeling Introduction to Computer Aided Modeling Instructor: Brent Rossen Overview Box modeling Polygon proxy Mirroring Polygonal components Topology editing Procedural
How to...create a Video VBOX Gauge in Inkscape. So you want to create your own gauge? How about a transparent background for those text elements?
 BASIC GAUGE CREATION The Video VBox setup software is capable of using many different image formats for gauge backgrounds, static images, or logos, including Bitmaps, JPEGs, or PNG s. When the software
Hardware and Software minimum specifications
 Introduction Unreal Engine 4 is the latest version of the Unreal games development software produced by Epic Games. This software is responsible for titles such as Unreal Tournament, Gears of War and Deus
Building level Rail embankments and correcting heights with XML. (V1.0) (Tangram)
 (Tangram)") Building level Rail embankments and correcting heights with XML. (V1.0) (Tangram) 1 This tutorial has been created to illustrate a few techniques in providing raised level embankments for railway lines
Building level Rail embankments and correcting heights with XML. (V1.0) (Tangram) 1 This tutorial has been created to illustrate a few techniques in providing raised level embankments for railway lines
Animation Basics. Learning Objectives
 Animation Basics Learning Objectives After completing this chapter, you will be able to: Work with the time slider Understand animation playback controls Understand animation and time controls Morph compound
1 Tutorials About the Tutorial Exercises
 1 Tutorials About the Tutorial Exercises..............................................2 Getting Started........................................................3 Exercise 1: Animating a 3D Model Using Keyframes............................3
Sliding and Rotating Objects. Appendix 1: Author s Notes
 AnimationWorks User Guide AnimationWORKS Introduction Camera Paths Cameras Moving Objects Moving Object Paths Sliding and Rotating Objects Light Objects Class Visibility Objects Transparency Objects Appendix
Animation: A Moving Experience
 11/30/2005-3:00 pm - 4:30 pm Room:N. Hemispheres (Salon A4) (Dolphin) Walt Disney World Swan and Dolphin Resort Orlando, Florida Animation: A Moving Experience Ted Boardman - tbdesign DV34-1 If you'd like
Tutorial 15: Publish web scenes
 Tutorial 15: Publish web scenes Table of Contents....................................... 3 2 In this tutorial: Part 1: Export CityEngine scene to Web Scene (.3ws) Part 2: Preview Web Scene locally Part
Photography by Christina Sizemore. Mudbox Hotkeys
 Digital Sculpting with Mudbox FIG 2.12 Digital Images Are Composed of a Pixel Grid. Each Pixel Stores Information Like Color and Transparency. Mudbox Uses Digital Images as Stencils and Stamps and Creates
Autodesk Fusion 360: Render. Overview
 Overview Rendering is the process of generating an image by combining geometry, camera, texture, lighting and shading (also called materials) information using a computer program. Before an image can be
ADD A 3-D PIE CHART TO THE WORKBOOK
 ADD A 3-D PIE CHART TO THE WORKBOOK A pie chart is an easy way to show the relationship of items to the whole. In this exercise, you will be creating a Pie Chart that will show the relationship between
Creating T-Spline Forms
 1 / 28 Goals 1. Create a T-Spline Primitive Form 2. Create a T-Spline Revolve Form 3. Create a T-Spline Sweep Form 4. Create a T-Spline Loft Form 2 / 28 Instructions Step 1: Go to the Sculpt workspace
Spira Mirabilis. Finding the Spiral tool. Your first spiral
 Spira Mirabilis Finding the Spiral tool The Spiral tool is part of ShapeWizards suite called MagicBox (the other tools in the suite are Pursuit, Shell, Sphere). You can install all these tools at once
Animated Modifiers (Morphing Teapot) Richard J Lapidus
 Richard J Lapidus") Animated Modifiers (Morphing Teapot) Richard J Lapidus Learning Objectives After completing this chapter, you will be able to: Add and adjust a wide range of modifiers. Work in both object and world space
Animated Modifiers (Morphing Teapot) Richard J Lapidus Learning Objectives After completing this chapter, you will be able to: Add and adjust a wide range of modifiers. Work in both object and world space
Tutorial 4: Texture Mapping Techniques
 Tutorial 4: Texture Mapping Techniques Completion time 40 minutes In the previous tutorial we learned how to create materials, and how to assign texture maps to those materials. In this tutorial we will
Chapter 15: Penguin - Point Editing and Blending
 This tutorial demonstrates point-editing techniques including moving and scaling control points and adding knots to surfaces to increase control. In addition, you will use blends to create smooth transitions
3 AXIS STANDARD CAD. BobCAD-CAM Version 28 Training Workbook 3 Axis Standard CAD
 3 AXIS STANDARD CAD This tutorial explains how to create the CAD model for the Mill 3 Axis Standard demonstration file. The design process includes using the Shape Library and other wireframe functions
Creative Sewing Machines Workbook based on BERNINA Embroidery Software V8
 V8 Lesson 49 Using an Object for a Carving Stamp Edited for V8.1 update. We will start by using Corel to find and save an image. On your desktop there should be 4 Corel icons. I have grouped mine together
Beginners Guide Maya. To be used next to Learning Maya 5 Foundation. 15 juni 2005 Clara Coepijn Raoul Franker
 Beginners Guide Maya To be used next to Learning Maya 5 Foundation 15 juni 2005 Clara Coepijn 0928283 Raoul Franker 1202596 Index Index 1 Introduction 2 The Interface 3 Main Shortcuts 4 Building a Character
You will learn how to do the following:
 Tutorial: How to Interact with UI Using Lua This tutorial walks you through the steps to interact with UI using Lua, including loading and unloading UI canvases, listening to and handling UI events, working
CS Multimedia and Communications REMEMBER TO BRING YOUR MEMORY STICK TO EVERY LAB! Lab 02: Introduction to Photoshop Part 1
 CS 1033 Multimedia and Communications REMEMBER TO BRING YOUR MEMORY STICK TO EVERY LAB! Lab 02: Introduction to Photoshop Part 1 Upon completion of this lab, you should be able to: Open, create new, save
Tutorial: Camera basics
 Tutorial: Camera basics This tutorial walks you through the steps to learn camera basics in Lumberyard, including creating a first person camera, a third person camera, and tracking and dynamic zooming.
An Animated Scene. Pick a color for the street. Then use the Paint can to fill the lower part of the page with grass.
 An Animated Scene In this project, you create a simple animated scene with graphics, a bit of text, a simple animation and some music. Click on the Steps below and be creative! Remember: if you must leave
AUTODESK FUSION 360 Designing a RC Car Body
 AUTODESK FUSION 360 Designing a RC Car Body Abstract This project explores how to use the sculpting tools available in Autodesk Fusion 360 Ultimate to design the body of a RC car. John Helfen john.helfen@autodesk.com
Education and Training CUFMEM14A. Exercise 2. Create, Manipulate and Incorporate 2D Graphics
 Education and Training CUFMEM14A Exercise 2 Create, Manipulate and Incorporate 2D Graphics Menu Exercise 2 Exercise 2a: Scarecrow Exercise - Painting and Drawing Tools... 3 Exercise 2b: Scarecrow Exercise
RICE DMC SHORT COURSE. Creating a Digital Illustration in Photoshop (Advanced)
") RICE DMC SHORT COURSE Creating a Digital Illustration in Photoshop (Advanced) 1.Filter>Render>Clouds 2.Filter>Distort>Shear Image> Adjustments>Hue and Saturation Add Layer Style 3D>New 3D Layer from File
RICE DMC SHORT COURSE Creating a Digital Illustration in Photoshop (Advanced) 1.Filter>Render>Clouds 2.Filter>Distort>Shear Image> Adjustments>Hue and Saturation Add Layer Style 3D>New 3D Layer from File
Using Blender to Produce a Trainz Asset - Step 2-2 Add Materials and Texture (Continued)
") Apply Texture First, deselect everything in the 3D Editor Viewport by pressing the AKEY. When vertices, edges or faces are selected they appear orange. This key is also a toggle. Try pressing the AKEY
Apply Texture First, deselect everything in the 3D Editor Viewport by pressing the AKEY. When vertices, edges or faces are selected they appear orange. This key is also a toggle. Try pressing the AKEY
CRYENGINE Getting Started Guide. Document Version 1.0.2
 CRYENGINE 5.3 - Getting Started Guide Document Version 1.0.2 Table of Contents CHAPTER 1: INTRODUCTION... 4 CHAPTER 2: SYSTEM REQUIREMENTS... 5 CHAPTER 3: MANAGING CRYENGINE... 7 CREATING A CRYENGINE ACCOUNT...
Tutorial 1: Essential skills
 Table of Contents.......................................... 3 2 Download items Tutorial data Tutorial PDF Set up a new project Create a new project and scene First, you'll create a new CityEngine project.
SketchUp. SketchUp. Google SketchUp. Using SketchUp. The Tool Set
 Google Google is a 3D Modelling program which specialises in making computer generated representations of real-world objects, especially architectural, mechanical and building components, such as windows,
User InterfaceChapter1:
 Chapter 1 User InterfaceChapter1: In this chapter you will learn about several aspects of the User Interface. You will learn about the overall layout of the UI, and then about the details of each element.
POINT CLOUD PROCESSING
 POINT CLOUD PROCESSING August 19-20 Northern California Bentley Bash 2011 UC Berkeley Berkeley, CA Taught by: Mike Lazear Point Cloud Processing Point Cloud Processing N O R T H E R N C A L I F O R N I
Adobe Encore DVD Tutorial:
 Adobe Encore DVD Tutorial: Here is a simple tutorial for creating DVDs which will play Dolby Digital audio: 1. Plan the DVD project. Think through your DVD project. Decide how many audio tracks you want