Getting Started. Extruding Features. Convert to feature class
|
|
|
- Annice Cunningham
- 5 years ago
- Views:
Transcription

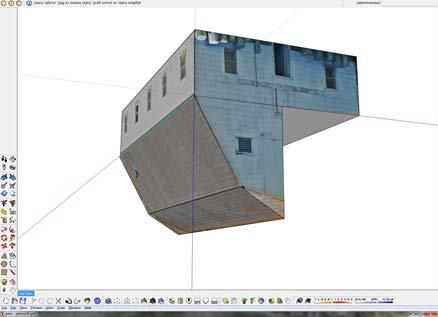
1 A Method Store for Advanced Survey and Modeling Technologies Mon, 01 Apr :29: en-us hourly Wed, 09 May :01: Matt T Getting Started Open ArcScene Add your polygon data from shapefile, geodatabase, or SDE connection Right Click on the layer in the Table of Contents -> Select = Properties (very last option) Extruding Features Select Extrusion tab on the Layer Properties Menu Check the box and then either extrude feature by a set value or pre-determined expression. (You can also select and/or construct attribute expressions using the Expression Builder button) Visually inspect extruded features in the Dataframe and ensure they look to be correct. Convert to feature class In ArcToolbox > 3D Analyst Tools > Conversion > Layer 3D to Feature Class is the tool we will use to convert the extruded features to a Multipatch feature class. Input the corresponding Feature layer to be converted into a Multipatch, put it in a familiar directory for output.


2 Convert to Collada Again in the ArcToolbox > Conversion > To Collada > Multipatch to Collada tool is what we will use to output a file in a format Google Sketchup will recognize.
 In Sketchup > File > Import Navigate to where you just exported the Collada file from ArcScene and make sure your file type is COLLADA in the drop down menu Select > Options Here you will want to")

3 Import to Sketchup Open Google Sketchup and choose a template that is in the same units as your projection in ArcScene (i.e. meters, Feet and Inches, etc.) In Sketchup > File > Import Navigate to where you just exported the Collada file from ArcScene and make sure your file type is COLLADA in the drop down menu Select > Options Here you will want to decide if you want to merge coplanar faces typically for texturing the outsides of builds you do want to merge Rendering tasks Perform all necessary rendering tasks. Be sure to group all elements before saving. Returning to ArcScene Getting the model back into ArcScene is almost the exact opposite first we want to export our finished model in Sketchup by Selecting File > Export > 3D Model Name the File something relevant and save it in a familiar directory as a COLLADA.dae file Add an empty or populated multipatch feature class into ArcScene or ArcGlobe. Begin a 3D edit session by clicking the 3D Editor drop-down and click Start Editing. Click the Edit Placement tool on the 3D Editor toolbar. Click the multipatch feature in the Create Features window. The Insert tool will appear in the Construction Tools window. Select the Insert tool under Construction Tools. Click the desired location of the multipatch model in the 3D view. When prompted, navigate to the location of the supported 3D model file on disk. Select the model and click Open.


4 ***Note you will add the same model over and over again with ever click until you deselect the Insert Tool The Result By following these steps you can bring your model back and forth between the two programs. Original model in ArcGIS Post-Sketchup Model ]]> Wed, 11 May :59: snowball Continue reading ]]> Match Photo Photography Things to remember: Photos need to be taken at 45 degree angles of the corners of the structure to be modeled. Measure a section of the object to help with scaling. Do not crop photos, resize or warp. Barrel distortion can be used to correct straight lines that are bent away from the center of the image. Avoid images that have been stitched, such as panoramas. If possible try to avoid photos with excessive foreground features. These will make the modeling


5 process difficult. Telephoto lens photos or images with only one vanishing point viewable are not recommended either. This image is taken from a boom lift, but conveys the 45 degree corner photo shot. Model Creation using Match Photo 1. Take pictures of each corner and side of the object, making sure to have overlap between images. If necessary, multiple images might need to be taken of a side to capture the whole area.

6 2. Go to Camera > Match New Photo. In the Select background image file dialog box navigate to the first photo (this can be any corner shot) in your series of photos of your object and select it. 3. Click Open, and the photo will be placed in the main drawing area in a scene specific to Match Photo. This is where you will calibrate the scene to match the photo. 4. Select the origin axes and place it at a location where three axes might intersect. The origin will depend on the type of photo that you take. Photos can be taken indoors and corners of walls/ceilings/floors meet can be used for the origin. Of if you are looking down at the object, then using a top corner axes is more beneficial. The type of origin used will affect the grid style in the Match Photo tool, in the Match Photo dialog box select the grid style that matches the photo you are using. For the image below I have selected the middle grid style, denoting the origin axes at the top corner of the barn. 5. Now the vanishing bars (the red and green dashed bars) need to be place to determine the vanishing point of the image. Select the end bar grips ( )on each bar and place the bar on a line that represents a parallel line to each red and green axis line. Axis bars should be placed along the


7 longest feature available in the photo. Zoom in to place each bar as accurately as possible. 6. The work area needs to be scaled, so adjust the grid spacing to a number that can be matched to a feature with a known size in the photo. Select the blue axis and adjust up or down to match the grid to the feature with the known size. In the image below the grid spacing is set to 8 inches and the grid is scaled to match the barn siding which is 8 inches wide. 7. Select Done in the Match Photo dialog box and begin drawing with the pencil tool. Always start at the origin and trace one side of the object. Do not rotate the scene, if you do, then returning to the Match Photo scene is done by simply clicking the Scene Tab at the top of the drawing window. Below is a traced side with the image projected. To project the image on to a surface, simply right click on a surface and select Project Photo.


8 8. Using the Push/Pull tool easily starts the modeling process.

9

10 Special Items to Note: Due to a natural curvature in photographs caused by lenses, it s impossible to match the perspective perfectly. To best combat the natural curvature in a photo, arrange your vanishing bars so that they are as long as possible. This arrangement creates a more accurate average of the perspective. Matching a cropped photo isn t supported. Remember to model portions of the geometry not seen in the picture. ]]> Mon, 11 Apr :06: snowball Continue reading ]]> Taste of Unity Navigation: in the scene left click: pan right click: zoom alt + left: orbit around center in the game uses WASD controls W: forward A: left S: backwards D: right mouse: moves your view
 3.")
11 Importing a SketchUp model into Unity Unity provides users a free version of the development application for personal and commercial use. Some features are not available on the free Unity package. 1. Register, double click on the Unity Icon. Select Internet activation and follow the directions. 2. Open Unity, load Islands.unity (File > Open scene, Unity should automatically locate the file) 3. Basics of Unity: Main Editor Window Every Unity project contains an Assets folder. The contents of this folder are presented in the Project View. This is where you store all the assets that make up your game, like scenes, scripts, 3D models, textures, audio files, and Prefabs. If you right-click on any asset in the Project View, you can choose Reveal in Finder (Reveal in Explorer on Windows) to actually see the asset itself in your file system. Important Note: You should never move project assets around using the OS since this will break any metadata associated with the asset. Always use the Project View to organize your assets. Scene View This is where you will build the game, create interactions and set controls. Use the mouse and alt

12 button to move around. Game View This gives you a rendered game version of your scene and lets you test the interactions and controls. To navigate around, press the play button and use the WASD keys and mouse. 1. In scene view, fly to a spot on the beach near the bridge. In the project window, select Create > Folder and create a new folder, name it SU. Now right click on the SU folder and select Show in Folder. Note where the folder is, you will save your model in SketchUp to this folder. This is the Assests folder. 2. Minimize Unity and open SketchUp. 3. Select Get Models icon, search for beach chair and download. Place model at the center of the scene on the axis. 4. File > Export > 3D model Change drop down list to 3DS File, select option, check that Export two-sided faces As materials and Export texture maps Favor Preserving texture coordinates are selected, click OK, name the file beach_chair and then Export to the SU folder created in Unity (see step #4). 5. In Unity, expand the SU folder in the Projects view. Select the beach chair and drag it to the scene, try to place it on the beach. Now translate and scale the beach chair so that it is located correctly and appropriately sized. Transform Tool When the hand icon is selected this will allow you to navigate around the scene. Selecting the other icons will let you translate, rotate or scale an 1. Test the scene, select the play icon to switch to game mode. Navigate to the beach chair and have a seat. 2. Switch to SketchUp and change the chair s texture. Re-export the model to the Unity Assets folder. Now switch back to Unity, the beach chair will now show the changes made in SketchUp. ]]> 0
SketchUp + Google Earth LEARNING GUIDE by Jordan Martin. Source (images): Architecture
: Architecture") SketchUp + Google Earth LEARNING GUIDE by Jordan Martin Source (images): www.sketchup.com Part 1: Getting Started with SketchUp GETTING STARTED: Throughout this manual users will learn different tools
SketchUp + Google Earth LEARNING GUIDE by Jordan Martin Source (images): www.sketchup.com Part 1: Getting Started with SketchUp GETTING STARTED: Throughout this manual users will learn different tools
SketchUp. SketchUp. Google SketchUp. Using SketchUp. The Tool Set
 Google Google is a 3D Modelling program which specialises in making computer generated representations of real-world objects, especially architectural, mechanical and building components, such as windows,
GETTING STARTED TABLE OF CONTENTS
 Sketchup Tutorial GETTING STARTED Sketchup is a 3D modeling program that can be used to create 3D objects in a 2D environment. Whether you plan to model for 3D printing or for other purposes, Sketchup
Getting Started with ShowcaseChapter1:
 Chapter 1 Getting Started with ShowcaseChapter1: In this chapter, you learn the purpose of Autodesk Showcase, about its interface, and how to import geometry and adjust imported geometry. Objectives After
Using Google SketchUp
 Using Google SketchUp Mike Bailey mjb@cs.oregonstate.edu http://cs.oregonstate.edu/~mjb/sketchup What is Google SketchUp? Google SketchUp is a program which lets you sketch in 3D. It is excellent for creating
In this exercise, you will convert labels into geodatabase annotation so you can edit the text features.
 Instructions: Use the provided data stored in a USB. For the report: 1. Start a new word document. 2. Follow an exercise step as given below. 3. Describe what you did in that step in the word document
Using Google SketchUp
 Using Google SketchUp Mike Bailey mjb@cs.oregonstate.edu http://cs.oregonstate.edu/~mjb/sketchup What is Google SketchUp? Google SketchUp is a program which lets you sketch in 3D. It is excellent for creating
SketchUp Tool Basics
 SketchUp Tool Basics Open SketchUp Click the Start Button Click All Programs Open SketchUp Scroll Down to the SketchUp 2013 folder Click on the folder to open. Click on SketchUp. Set Up SketchUp (look
SolidWorks Intro Part 1b
 SolidWorks Intro Part 1b Dave Touretzky and Susan Finger 1. Create a new part We ll create a CAD model of the 2 ½ D key fob below to make on the laser cutter. Select File New Templates IPSpart If the SolidWorks
Explore some of the new functionality in ArcMap 10
 Explore some of the new functionality in ArcMap 10 Scenario In this exercise, imagine you are a GIS analyst working for Old Dominion University. Construction will begin shortly on renovation of the new
4. If you are prompted to enable hardware acceleration to improve performance, click
 Exercise 1a: Creating new points ArcGIS 10 Complexity: Beginner Data Requirement: ArcGIS Tutorial Data Setup About creating new points In this exercise, you will use an aerial photograph to create a new
Introduction Make a plan with tool Rectangle Measurements Toolbar Enter Return Measurements Toolbar Measure Protractor
 Introduction Open SketchUp, and an empty file appears. You are looking at the red-green plane, and the blue axis (vertical) is pointing toward you. By default, you are in the Line tool, as indicated by
Visualizing Development
 I N T R O D U C T I O N Visualizing Development You will build something like this by the end of this tutorial This tutorial will be the final step in our downtown redevelopment endeavor. We will use a
This is the opening view of blender.
 This is the opening view of blender. Note that interacting with Blender is a little different from other programs that you may be used to. For example, left clicking won t select objects on the scene,
Answer the following general questions: 1. What happens when you right click on an icon on your desktop? When you left double click on an icon?
 Name: Date: June 27th, 2011 GIS Boot Camps For Educators Practical: Explore ArcGIS 10 Desktop Tools and functionality Day_1 Lecture 1 Sources: o ArcGIS Desktop help o ESRI website o Getting to Know ArcGIS
COPYRIGHTED MATERIAL. Introduction to 3D Data: Modeling with ArcGIS 3D Analyst and Google Earth CHAPTER 1
 CHAPTER 1 Introduction to 3D Data: Modeling with ArcGIS 3D Analyst and Google Earth Introduction to 3D Data is a self - study tutorial workbook that teaches you how to create data and maps with ESRI s
To familiarize of 3ds Max user interface and adapt a workflow based on preferences of navigating Autodesk 3D Max.
 Job No: 01 Duration: 8H Job Title: User interface overview Objective: To familiarize of 3ds Max user interface and adapt a workflow based on preferences of navigating Autodesk 3D Max. Students should be
SolidWorks 2½D Parts
 SolidWorks 2½D Parts IDeATe Laser Micro Part 1b Dave Touretzky and Susan Finger 1. Create a new part In this lab, you ll create a CAD model of the 2 ½ D key fob below to make on the laser cutter. Select
Schematics in ArcMap Tutorial
 Schematics in ArcMap Tutorial Copyright 1995-2010 Esri All rights reserved. Table of Contents Introducing Schematics in ArcMap Tutorial........................ 3 Exercise 1: Getting familiar with Schematics
Table of Contents. 1. Prepare Data for Input. CVEN 2012 Intro Geomatics Final Project Help Using ArcGIS
 Table of Contents 1. Prepare Data for Input... 1 2. ArcMap Preliminaries... 2 3. Adding the Point Data... 2 4. Set Map Units... 3 5. Styling Point Data: Symbology... 4 6. Styling Point Data: Labels...
CAD Tutorial 23: Exploded View
 CAD TUTORIAL 23: Exploded View CAD Tutorial 23: Exploded View Level of Difficulty Time Approximately 30 35 minutes Starter Activity It s a Race!!! Who can build a Cube the quickest: - Pupils out of Card?
13. Albums & Multi-Image Printing
 13. Albums & Multi-Image Printing The Album function is a flexible layout and printing tool that can be used in a number of ways: Two kinds of albums: At left we used automatic mode to print a collection
User manual Horus Movie Player 1
 User manual Horus Movie Player 1 REVISION HISTORY DATE VERSION AUTHOR October 2013 1.0 Bijwoordbeeld tekst en techniek User manual Horus Movie Player 2 1 WORKING WITH THE INSPECTION AND SURVEY SUITE 5
Press the Plus + key to zoom in. Press the Minus - key to zoom out. Scroll the mouse wheel away from you to zoom in; towards you to zoom out.
 Navigate Around the Map Interactive maps provide many choices for displaying information, searching for more details, and moving around the map. Most navigation uses the mouse, but at times you may also
11 EDITING VIDEO. Lesson overview
 11 EDITING VIDEO Lesson overview In this lesson, you ll learn how to do the following: Create a video timeline in Photoshop. Add media to a video group in the Timeline panel. Add motion to still images.
Geographical Information Systems Institute. Center for Geographic Analysis, Harvard University. LAB EXERCISE 1: Basic Mapping in ArcMap
 Harvard University Introduction to ArcMap Geographical Information Systems Institute Center for Geographic Analysis, Harvard University LAB EXERCISE 1: Basic Mapping in ArcMap Individual files (lab instructions,
Lab 3: Digitizing in ArcMap
 Lab 3: Digitizing in ArcMap What You ll Learn: In this Lab you ll be introduced to basic digitizing techniques using ArcMap. You should read Chapter 4 in the GIS Fundamentals textbook before starting this
Lesson 8 : How to Create a Distance from a Water Layer
 Created By: Lane Carter Advisor: Paul Evangelista Date: July 2011 Software: ArcGIS 10 Lesson 8 : How to Create a Distance from a Water Layer Background This tutorial will cover the basic processes involved
A Guide to Autodesk Maya 2015
 A Guide to Autodesk Maya 2015 Written by Mitchell Youngerman Table of Contents Layout of Toolbars...pg 1 Creating Objects...pg 2 Selecting & Deselecting Objects...pg 3 Changing Perspective... pg 4 Transforming
Google SketchUp. and SketchUp Pro 7. The book you need to succeed! CD-ROM Included! Kelly L. Murdock. Master SketchUp Pro 7 s tools and features
 CD-ROM Included! Free version of Google SketchUp 7 Trial version of Google SketchUp Pro 7 Chapter example files from the book Kelly L. Murdock Google SketchUp and SketchUp Pro 7 Master SketchUp Pro 7 s
Drawing shapes and lines
 Fine F Fi i Handmade H d d Ch Chocolates l Hours Mon Sat 10am 6pm In this demonstration of Adobe Illustrator CS6, you will be introduced to new and exciting application features, like gradients on a stroke
Lab 6: Transforming Spatial Data
 Lab 6: Transforming Spatial Data Objectives: The primary objectives of this lab are to georeference a raster dataset and to create GIS data by digitizing features from an image as a backdrop. Specifics:
Digital City: Introduction to 3D modeling
 Digital City: Introduction to 3D modeling Weixuan Li, 2017 PART I: Install SketchUp and Introduction 1. Download SketchUp Download SketchUp from their official website: https://www.sketchup.com Go to the
Photocopiable/digital resources may only be copied by the purchasing institution on a single site and for their own use ZigZag Education, 2013
 SketchUp Level of Difficulty Time Approximately 15 20 minutes Photocopiable/digital resources may only be copied by the purchasing institution on a single site and for their own use ZigZag Education, 2013
SILVACO. An Intuitive Front-End to Effective and Efficient Schematic Capture Design INSIDE. Introduction. Concepts of Scholar Schematic Capture
 TCAD Driven CAD A Journal for CAD/CAE Engineers Introduction In our previous publication ("Scholar: An Enhanced Multi-Platform Schematic Capture", Simulation Standard, Vol.10, Number 9, September 1999)
A Study of Angles & Curves
 A Study of Angles & Curves Method 1: Cutting Quilt Shapes/Using the Shapes Tools Open BERNINA CutWork Software. Make sure that Create New is selected. Click Next. Place a dot in front of New Graphic. Select
ArcGIS Pro Editing. Jennifer Cadkin & Phil Sanchez
 ArcGIS Pro Editing Jennifer Cadkin & Phil Sanchez ArcGIS Pro Editing Overview Provides tools that allow you to maintain, update, and create new data - Modifying geometry, drawing new features - Entering
Get started with SketchUp!
 Get started with SketchUp! SketchUp is a popular design program you can download for free from the SketchUp website: www.sketchup.com. If you haven t used SketchUp before, these instructions will get you
Designing Simple Buildings
 Designing Simple Buildings Contents Introduction 2 1. Pitched-roof Buildings 5 2. Flat-roof Buildings 25 3. Adding Doors and Windows 27 9. Windmill Sequence 45 10. Drawing Round Towers 49 11. Drawing Polygonal
LESSON 2 MODELING BASICS
 LESSON 2 MODELING BASICS In this lesson we ll start to model a multi-story office building from scratch. We ll construct the base grid, create the two towers and place slabs between the stories. Also we
ArcGIS Pro Editing: An Introduction. Jennifer Cadkin & Phil Sanchez
 ArcGIS Pro Editing: An Introduction Jennifer Cadkin & Phil Sanchez See Us Here WORKSHOP ArcGIS Pro Editing: An Introduction LOCATION SDCC - Ballroom 20 D TIME FRAME Thursday 10:00 11:00 ArcGIS Pro: 3D
Visualization with ArcGlobe. Brady Hoak
 Visualization with ArcGlobe Brady Hoak Contents What is ArcGlobe? 3D Mapping and ArcGlobe Displaying data in ArcGlobe ArcGlobe tools Tips for constructing ArcGlobe documents New at ArcGIS 9.3 ArcGIS integration
Google LayOut 2 Help. Contents
 Contents Contents... 1 Welcome to LayOut... 9 What's New in this Release?... 10 Learning LayOut... 12 Technical Support... 14 Welcome to the LayOut Getting Started Guide... 15 Introduction to the LayOut
Controlling the Drawing Display
 Controlling the Drawing Display In This Chapter 8 AutoCAD provides many ways to display views of your drawing. As you edit your drawing, you can control the drawing display and move quickly to different
How to draw and create shapes
 Adobe Flash Professional Guide How to draw and create shapes You can add artwork to your Adobe Flash Professional documents in two ways: You can import images or draw original artwork in Flash by using
Mosaic Tutorial: Advanced Workflow
 Mosaic Tutorial: Advanced Workflow This tutorial demonstrates how to mosaic two scenes with different color variations. You will learn how to: Reorder the display of the input scenes Achieve a consistent
Critical Essentials. Overview. Objectives. Recommended Prior Skills. Upon completion of these topics, you should be able to:
 Critical Essentials Visualizing spaces in three dimensions is critical to the success of the design of architectural spaces. The interplay of light, color, and space are critical concepts to master. Traditional
solidthinking Inspired Tutorials 2009 solidthinking, Inc. for Mac
 solidthinking Inspired Tutorials 2009 solidthinking, Inc. for Mac Table of Contents Quick Start Tutorials 3 Tutorial 11: Simple... Bridge 4 Tutorial 22: Desk... 12 Tutorial 33: Bookcase... 35 2 1 Quick
Designer Reference 1
 Designer Reference 1 Table of Contents USE OF THE DESIGNER...4 KEYBOARD SHORTCUTS...5 Shortcuts...5 Keyboard Hints...5 MENUS...7 File Menu...7 Edit Menu...8 Favorites Menu...9 Document Menu...10 Item Menu...12
The purpose of this tutorial is to introduce you to the Construct 2 program. First, you will be told where the software is located on the computer
 Learning Targets: Students will be introduced to industry recognized game development software Students will learn how to navigate within the software Students will learn the basics on how to use Construct
Highways by Exor MapCapture User Guide V4.5
 Highways by Exor MapCapture User Guide V4.5 The world s leading highways asset management system This page intentionally blank Quality Assurance Statement Quality Assurance Statement File: Prepared by:
for ArcSketch Version 1.1 ArcSketch is a sample extension to ArcGIS. It works with ArcGIS 9.1
 ArcSketch User Guide for ArcSketch Version 1.1 ArcSketch is a sample extension to ArcGIS. It works with ArcGIS 9.1 ArcSketch allows the user to quickly create, or sketch, features in ArcMap using easy-to-use
4 TRANSFORMING OBJECTS
 4 TRANSFORMING OBJECTS Lesson overview In this lesson, you ll learn how to do the following: Add, edit, rename, and reorder artboards in an existing document. Navigate artboards. Select individual objects,
3D Modeler Creating Custom myhouse Symbols
 3D Modeler Creating Custom myhouse Symbols myhouse includes a large number of predrawn symbols. For most designs and floorplans, these should be sufficient. For plans that require that special table, bed,
123D Catch - Tutorial
 123D Catch - Tutorial Autodesk s 123D Catch software (formerly Project Photofly) is based on photogrammetry. Photogrammetry is a process which derives geometric properties of an object from a series of
Microsoft Word
 OBJECTS: Shapes (part 1) Shapes and the Drawing Tools Basic shapes can be used to graphically represent information or categories. The NOTE: Please read the Objects (add-on) document before continuing.
When you tag an object as static batched, then Unity will group that object in with other objects that share the same material.
 http://gmv.cast.uark.edu A Method Store for Advanced Survey and Modeling Technologies Mon, 01 Apr 2013 03:29:18 +0000 en-us hourly 1 http://wordpress.org/?v=3.5.1 http://gmv.cast.uark.edu/modeling/software-visualization/unity-software-visualization/workflow-unitysoftware-visualization/unity-pro-vs-unity-indie/
Viewing and using your catalogue in the Library module, and exporting photos once done.
 Intro to Lightroom PH2-POD2-IL Adobe Photoshop Lightroom offers a complete environment for digital photography, from raw capture to creative output. Start with the Library module where you import images
Integrating CAD Data with ArcGIS
 Integrating CAD Data with ArcGIS Agenda An Overview of CAD Drawings CAD Data Structure in ArcGIS Visualization Georeferencing Data Conversion ArcGIS for AutoCAD Q & A CAD Drawings - Overview Widely used
THE HONG KONG POLYTECHNIC UNIVERSITY DEPARTMENT OF LAND SURVEYING & GEO-INFORMATICS LSGI521 PRINCIPLES OF GIS
 THE HONG KONG POLYTECHNIC UNIVERSITY DEPARTMENT OF LAND SURVEYING & GEO-INFORMATICS LSGI521 PRINCIPLES OF GIS Student name: Student ID: Table of Content Working with files, folders, various software and
What s New to Version 3.0
 SU Animate 3.0 Guide What s New to Version 3.0... 2 Install... 3 Cameras, Curves & Paths... 4 Use a Camera path to create a simple walk thru effect... 6 Animating Objects with Target Groups... 6 Using
Dashboard Instructions
 Dashboard Instructions The instructions below provide a brief overview of some of the tools available to you as you navigate the COMPASS performance dashboard. The dashboard was created to provide Communities
Mn/DOT MnCMAT Crash Analysis Application Help
 Mn/DOT MnCMAT Crash Analysis Application Contents Login... 5 User Login Dialog... 5 Login... 5 Request Access Dialog... 5 Forgotten Password Dialog... 6 Create/Open Project... 7 Create/Open Project Dialog...
solidthinking User Interface
 Lesson 1 solidthinking User Interface This lesson introduces you to the solidthinking interface. The functions described represent the tools necessary for effectively managing the modeling of a project.
solidthinking Environment...1 Modeling Views...5 Console...13 Selecting Objects...15 Working Modes...19 World Browser...25 Construction Tree...
 Copyright 1993-2009 solidthinking, Inc. All rights reserved. solidthinking and renderthinking are trademarks of solidthinking, Inc. All other trademarks or service marks are the property of their respective
I CALCULATIONS WITHIN AN ATTRIBUTE TABLE
 Geology & Geophysics REU GPS/GIS 1-day workshop handout #4: Working with data in ArcGIS You will create a raster DEM by interpolating contour data, create a shaded relief image, and pull data out of the
L E S S O N 2 Background
 Flight, Naperville Central High School, Naperville, Ill. No hard hat needed in the InDesign work area Once you learn the concepts of good page design, and you learn how to use InDesign, you are limited
SketchUp Help. 1 of 15 8/29/09 10:00 AM
 SketchUp Help Creating your first model It will take some time to master SketchUp as with any new software. However, following is a project to help you better learn the tools and concepts covered in this
The Villa Savoye ( ), Poisy, Paris.
, Poisy, Paris.") Learning SketchUp Villa Savoye This tutorial will involve modeling the Villa Savoye by Le Corbusier Files needed to complete this tutorial are available in Mr. Cochran s Web Site The Villa Savoye (1929-1931),
Learning SketchUp Villa Savoye This tutorial will involve modeling the Villa Savoye by Le Corbusier Files needed to complete this tutorial are available in Mr. Cochran s Web Site The Villa Savoye (1929-1931),
Blender for Trainz > Table of Contents > Blender Tools > 3D Editor > Edit Mode > Edge Intersect VTX Last updated: October 16, 2015
 Edge Intersect VTX Access: Keyboard shortcut: Mode: Panel: Menu: W-KEY > TinyCAD > VTX AUTO 3D Editor: Edit mode None None Add-on: tinycad Edge Tools http://wiki.blender.org/index.php/extensions:2.6/py/scripts/modeling/mesh_tinycad
Flair Geometry Editor Part I. Beginners FLUKA Course
 Flair Geometry Editor Part I Beginners FLUKA Course Starting the Geometry Editor Click on icon or from Menu View Geometry Editor or with [F4] shortcut Either start flair with option -g 2 Geometry editor
Full Screen Layout. Main Menu Property-specific Options. Object Tools ( t ) Outliner. Object Properties ( n ) Properties Buttons
 Outliner. Object Properties ( n ) Properties Buttons") Object Tools ( t ) Full Screen Layout Main Menu Property-specific Options Object Properties ( n ) Properties Buttons Outliner 1 Animation Controls The Create and Add Menus 2 The Coordinate and Viewing
Object Tools ( t ) Full Screen Layout Main Menu Property-specific Options Object Properties ( n ) Properties Buttons Outliner 1 Animation Controls The Create and Add Menus 2 The Coordinate and Viewing
A QUICK TOUR OF ADOBE ILLUSTRATOR CC (2018 RELEASE)
") A QUICK TOUR OF ADOBE ILLUSTRATOR CC (2018 RELEASE) Lesson overview In this interactive demonstration of Adobe Illustrator CC (2018 release), you ll get an overview of the main features of the application.
A QUICK TOUR OF ADOBE ILLUSTRATOR CC (2018 RELEASE) Lesson overview In this interactive demonstration of Adobe Illustrator CC (2018 release), you ll get an overview of the main features of the application.
Google SketchUp INTRODUCTION WORKSHOPS
 INTRODUCTION WORKSHOPS Outcomes: -A basic understanding of SketchUp uses and outcomes -Why you would use it for project development -A basic understanding of workspace -Basic ability to use/ get satrted
Exercise Guide. Published: August MecSoft Corpotation
 VisualCAD Exercise Guide Published: August 2018 MecSoft Corpotation Copyright 1998-2018 VisualCAD 2018 Exercise Guide by Mecsoft Corporation User Notes: Contents 2 Table of Contents About this Guide 4
3D Digital Design. SketchUp
 3D Digital Design SketchUp 1 Overview of 3D Digital Design Skills A few basic skills in a design program will go a long way: 1. Orien
Pictometry for ArcGIS Desktop Local Guide For ArcGIS Desktop Version 10
 Pictometry for ArcGIS Desktop Local Guide For ArcGIS Desktop Version 10 September 2013 Copyright 2010-2013 Pictometry International Corp. All rights reserved. No part of this publication may be reproduced,
Beaumont Middle School Design Project April May 2014 Carl Lee and Craig Schroeder
 Beaumont Middle School Design Project April May 2014 Carl Lee and Craig Schroeder 1 2 SketchUp 1. SketchUp is free, and you can download it from the website www.sketchup.com. For some K12 use, see www.sketchup.com/3dfor/k12-education.
SketchUp Starting Up The first thing you must do is select a template.
 SketchUp Starting Up The first thing you must do is select a template. While there are many different ones to choose from the only real difference in them is that some have a coloured floor and a horizon
1.1: Introduction to Fusion 360
 .: Introduction to Fusion 360 Fusion 360 is a cloud- based CAD/CAM tool for collaborative product development. The tools in Fusion enable exploration and iteration on product ideas and collaboration within
Textures and UV Mapping in Blender
 Textures and UV Mapping in Blender Categories : Uncategorised Date : 21st November 2017 1 / 25 (See below for an introduction to UV maps and unwrapping) Jim s Notes regarding Blender objects, the UV Editor
3ds Max Cottage Step 1. Always start out by setting up units: We re going with this setup as we will round everything off to one inch.
 3ds Max Cottage Step 1 Always start out by setting up units: We re going with this setup as we will round everything off to one inch. File/Import the CAD drawing Be sure Files of Type is set to all formats
ArcGIS. for Desktop. Tips and Shortcuts 10.1
 ArcGIS 10.1 for Desktop Tips and Shortcuts Map Navigation Refresh and redraw the display. F5 Suspend the map s drawing. F9 Zoom in and out. Center map. Roll the mouse wheel backward and forward. Hold down
CHAPTER 1 COPYRIGHTED MATERIAL. Finding Your Way in the Inventor Interface
 CHAPTER 1 Finding Your Way in the Inventor Interface COPYRIGHTED MATERIAL Understanding Inventor s interface behavior Opening existing files Creating new files Modifying the look and feel of Inventor Managing
BASICS OF PIXLR EDITOR
 BASICS OF PIXLR EDITOR Pixlr is a website which you can edit your images professionally. It is a cloud cased system and founded in Sweden. It is similar to Photoshop (but it s free to use online) and you
Draw Guide. Chapter 7 Working with 3D Objects
 Draw Guide Chapter 7 Working with 3D Objects Copyright This document is Copyright 2011 2014 by the LibreOffice Documentation Team. Contributors are listed below. You may distribute or modify it under the
Luana Valentini InternetGIS course
 Google SketchUp - A brief introduction - Luana Valentini InternetGIS course - 2011 Create 3D models and share them with the world Google SketchUp is software that allows you to create 3D models of anything
Blender Notes. Introduction to Digital Modelling and Animation in Design Blender Tutorial - week 1 The Blender Interface and Basic Shapes
 Blender Notes Introduction to Digital Modelling and Animation in Design Blender Tutorial - week 1 The Blender Interface and Basic Shapes Introduction Blender is a powerful modeling, animation and rendering
A Basic Guide to Modeling Landscapes in Google SketchUp
 DYNASCAPE SOFTWARE INC. A Basic Guide to Modeling Landscapes in Google SketchUp A DS Sketch 3D User Guide Volume 2 This guide will take you through the steps of creating a 3D model of a landscape in Google
MET 107 Drawing Tool (Shapes) Notes Day 3
 Notes Day 3") MET 107 Drawing Tool (Shapes) Notes Day 3 Shapes: (Insert Tab Shapes) Example: Select on the rounded rectangle Then use the mouse to position the upper left corner and produce the size by dragging out
MET 107 Drawing Tool (Shapes) Notes Day 3 Shapes: (Insert Tab Shapes) Example: Select on the rounded rectangle Then use the mouse to position the upper left corner and produce the size by dragging out
User Guide pdoc Signer for Apple ipad
 User Guide pdoc Signer for Apple ipad Version 1.4 July 18, 2017 Copyright 2017 Topaz Systems Inc. All rights reserved. For Topaz Systems, Inc. trademarks and patents, visit www.topazsystems.com/legal.
START>PROGRAMS>ARCGIS>
 Department of Urban Studies and Planning Spring 2006 Department of Architecture Site and Urban Systems Planning 11.304J / 4.255J GIS EXERCISE 2 Objectives: To generate the following maps using ArcGIS Software:
An ESRI Technical Paper May 2007 Techniques for Consuming 3D Textured Objects in ArcGlobe and ArcScene
 An ESRI Technical Paper May 2007 Techniques for Consuming 3D Textured Objects in ArcGlobe and ArcScene ESRI 380 New York St., Redlands, CA 92373-8100 USA TEL 909-793-2853 FAX 909-793-5953 E-MAIL info@esri.com
Exercise 1: Getting to know ArcGIS
 The Scenario You are working for the California Visitor s Commission. You have been asked to prepare a map of California for several dignitaries from out of the country. Your map will need to include enough
Introduction to GIS 2011
 Introduction to GIS 2011 Digital Elevation Models CREATING A TIN SURFACE FROM CONTOUR LINES 1. Start ArcCatalog from either Desktop or Start Menu. 2. In ArcCatalog, create a new folder dem under your c:\introgis_2011
3D Design with 123D Design
 3D Design with 123D Design Introduction: 3D Design involves thinking and creating in 3 dimensions. x, y and z axis Working with 123D Design 123D Design is a 3D design software package from Autodesk. A
Adding Objects Creating Shapes Adding. Text Printing and Exporting Getting Started Creating a. Creating Shapes Adding Text Printing and Exporting
 Getting Started Creating a Workspace Pages, Masters and Guides Adding Objects Creating Shapes Adding Text Printing and Exporting Getting Started Creating a Workspace Pages, Masters and Guides Adding Objects
A Guide to Processing Photos into 3D Models Using Agisoft PhotoScan
 A Guide to Processing Photos into 3D Models Using Agisoft PhotoScan Samantha T. Porter University of Minnesota, Twin Cities Fall 2015 Index 1) Automatically masking a black background / Importing Images.
SCENE FILE MANIPULATION SCENE FILE MANIPULATION GETTING STARTED MODELING ANIMATION MATERIALS + MAPPING RENDERING. Saving Files. Save.
 SCENE FILE MANIPULATION SCENE FILE MANIPULATION There are several things you can do with a scene file in 3ds Max. You can save a file, save a file temporarily and retrieve it, and combine scene files.
Getting Started. In This Chapter
 Getting Started In This Chapter 2 This chapter introduces concepts and procedures that help you get started with AutoCAD. You learn how to open, close, and manage your drawings. You also learn about the