Notes 2 My Notes and Thoughts Blender Rigify. Categories : Uncategorised. Date : 19th November / 43
|
|
|
- Bernadette McCarthy
- 6 years ago
- Views:
Transcription
1 Blender Rigify Categories : Uncategorised Date : 19th November / 43
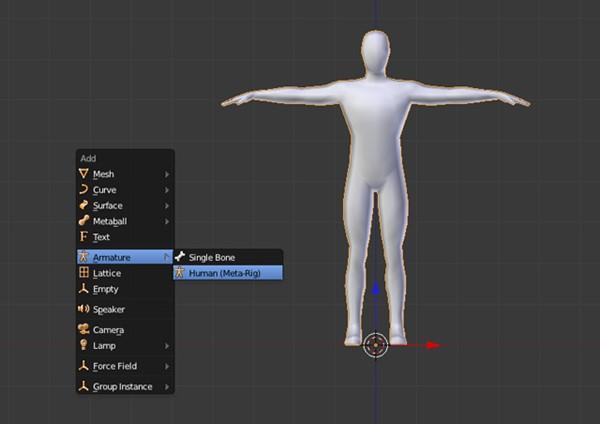
2 Rigify is an incredibly useful tool for getting characters rigged in a jiffy. Instead of spending days setting up a rig by hand, adding constraints, scripts and controllers, it makes the entire process a five-minute affair. Rigify is actually a plug-in, but it s distributed with the latest releases of Blender. (I m using version 2.56.) Before you can use it, you need to enable it by selecting File > User Preferences > Add-Ons and locating Rigify in the list. Click the check mark. Next, add the meta-rig (the default initial rig you will use to create your own custom set-up) via Add > Armature > Human (Meta-Rig). Position and scale this to match your character. Enter Edit mode, and tweak the proportions further until all the bones line up with your mesh. Remember to use X-Axis Mirror in the Armature tools panel. Go back to Object mode, and locate the Rigify Buttons panel in Armature Properties. Click Generate to create your final rig and discard the meta-rig. Parent your mesh to your generated rig and select With Automatic Weights in the popup. The last (optional) step is to run a UI script to add a nice interface to the rig. Open the Blender Text Editor, and select rig_ui.py from the data list. Press Run Script in the header, and look in the info panel [N] in the 3D view. You ll have a nice list of context-sensitive controls for bones. WR From Create an Animation Walk Cycle in Blender using Rigify by Karan Shah28 Sep 2012 Difficulty:BeginnerLength:MediumLanguages: Walk CycleAnimation3D3D AnimationBlenderCharacter RigHuman ModelRigify In our latest Blender tutorial from Karan Shah, you ll learn how to generate a character rig using Blender s Rigify add-on, and how to skin the character using weight painting for precise control 2 / 43
. You can use any other biped model as well.")
3 over mesh deformation. Finally Karan will walk you through the process of creating an animation walk cycle using keyframing and the dopesheet. Step 1 Open a new file and import the base model (File > Import). You can use any other biped model as well. With the model selected, press Alt+G to clear its location, so that it s placed at the center. Make sure the center of the model (orange dot) is at the bottom of the mesh. If not, Press TAB to get into edit mode and select all vertices with the A key and then Press G and move the vertices up, so that the center point is at the base of the mesh. Press TAB to get out of edit mode. Step 2 3 / 43

4 Next we will enable the Rigify add-on. In the File menu select User Preferences. Select the Add-on Tab and in the search box type Rigify and check the tick box to enable it. You may press the Save as default button, so that Blender remembers the setting. You can now close the User Preferences Window. 4 / 43

5 Step 3 Make sure the 3D cursor is at the center point (bottom) of the mesh. If not, then select the object and press Shift+C and then select cursor to selected. Press Shift+A and select Armature, and now you will notice that there is a new item called Human Meta-Rig. Click on it and you will have a Human Rig. 5 / 43
6 6 / 43

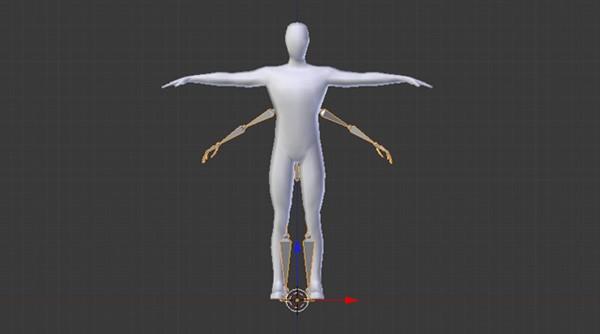
7 Step 4 With the Human Rig selected, go to the Armature Properties and in the Display Panel, check XRay. This will enable us to see the armature through the mesh. Step 5 7 / 43
8 With the Meta-Rig selected, press TAB to enter into edit mode. Scale the rig to match the mesh. Press. (period) to make the 3D cursor the pivot point for rotation and scale, and then Scale the bones. Press, (comma) to make the Median Point the center of rotations / scale. Step 6 Press T to bring out the Tool Shelf and in the Armature Options, check X axis mirror. This way any editing done on one side will be mirrored to the other. 8 / 43

9 Step 7 Select and move the bone tips to match the mesh. 9 / 43

10 Check from the Top view as well. 10 / 43

11 Adjust the leg bones 11 / 43
12 Match the bones from the side view. Make sure to keep the knee bone a bit bent forward, i.e. don t make the leg bones in a straight line. Once done, Save the file. 12 / 43
13 Step 8 Press TAB to get out of edit mode. In the Armature Properties, under Rigify buttons, click on Generate to build the Rig. 13 / 43

14 After a few seconds the new Rig setup is generated. 14 / 43
15 Step 9 Now we don t need the previous meta-rig, so move it to another layer. Select the meta-rig and press M and then select the layer in which you want to dump that meta-rig. 15 / 43

16 Step 10 Now we will skin the mesh to the Armature. Select the Mesh first, and then the Generated Rig and press Ctrl+P and select Automatic weight. The mesh is now skinned to the new Armature Setup. 16 / 43

17 Press Ctrl+Tab or switch to Pose mode and play with the controllers. 17 / 43

18 Step 11 You can find the deforming bones in the third to last Bone layer (see image). SHIFT+Left click to select it along with other layers. Shift+Left click again to make the bones under this layer invisible. 18 / 43

19 Make sure you are in Pose mode. Now select the Mesh object and Press Ctrl+Tab to enter into weight paint mode. Select the bones you would like to adjust the weight for by Right-clicking. Press T to bring out the tool shelf and under the Options panel, check X Mirror. This will mirror the weight painting for the left/right bones. 19 / 43

20 Step 12 You can adjust the weight amount with the slider in the Tool Shelf. You can also adjust the other brush settings. 20 / 43

21 Select the bones and adjust the weight. Do this for any bone you find if the deformation is wrong. To rotate and move, use the controller bones and to adjust the weight paint, select the deforming bones. Check the weight painting for all major bones including the fingers. Painting with a higher weight value means that the vertices will be affected more with the movement of the bone. Similarly painting with a lower value means vertices with be less affected by the bone. Save the file. 21 / 43

22 Step 13 Press Ctrl+TAB to exit Weight painting mode. Select the Armature and then Hold Shift+Left Mouse Button on the deforming bones layer to hide them. 22 / 43

23 Step 14 In Pose mode, select any leg control. Press N to open up the properties shelf. In the Rig Main Properties, Slide up the FK/IK to full. This will enable IK controls for the legs. Do that same for the other leg too. 23 / 43
24 You can also toggle on/off the display of the bones layers with the shortcut on the Rig Layer Panel. Hide the bones you are not using. See my settings for an example. You can also turn off X-ray. We can now start animating. 24 / 43

25 Step 15 Animation In the Screen Layout Menu, choose Animation. These are presets made for different layouts, best suited for a particular task. 25 / 43

26 Step 16 You will see that the screen has an extra window for the Dope sheet (Top Left). This is where we can see and manipulate the keyframes. In the Dopesheet window, choose Action Editor Mode. Dope sheet mode will show the keyframes of all objects and Armature bones, where as the Action editor shows keyframes of a particular action of the armature. 26 / 43

27 Step 17 Click on the Record Button. This will automatically add keyframe to the selected object whenever it is Moved, Rotated or Scaled. 27 / 43

28 Step 18 Move the mouse over the 3D view and press 3 on the numpad to get into the side view. Make sure you are in Ortho view mode and not in Perspective. Press 5 on the numpad to toggle off/on perspective view. Also make sure you are at the First Frame. Press Shift+Left Arrow to get to the first frame. Select the Left Foot bone controller and move it forward. You will notice that a keyframe is automatically created in the Dopesheet/ Action Editor at the first frame mark. 28 / 43

29 Achieve the following pose at the first frame. To move a bone, select it and then press G, and R to rotate. To move the whole torso, use the Torso bone. 29 / 43
30 Step 19 Now pose the arms. The arms swing oppose to the legs. i.e. if right legs is forwards, then left hand will be forward. Remember we are still at frame 1. Step 20 Twist the hip bone with the flow of the legs. 30 / 43


31 Rotate the shoulders with the flow of arms. The shoulder and hips will rotate opposite to each other. We have completed the First Keyframe for the walkcycle. 31 / 43
32 Select the head and in the Bone Properties, Uncheck Inherit Rotation. This will prevent the head from inheriting the rotation from the lower bones. Move the torso or chest and you will get the idea. Step 21 Press A to select all bones. Although the keyframes are added to the bones which are changed, you can also add a key frame to all bones. Select all the bones with the A key and then Press I and select LocRot. 32 / 43

33 Click on the Copy Pose button on the header of the 3D view. 33 / 43
.")
34 Step 22 Drag the Timeline marker to frame number 21. You can see all the places in the image, where you can see the current frame number. You can also Press Shift+Up arrow to jump 10 frames at a time. Save the file. Step 23 On the 21st frame click on the Last button Flip Paste. This will flip-paste or invert-paste the pose we copied, and will also insert the keyframes to the selected bones (all). Go to first frame (shift+left arrow) and then press the play button to preview the animation. The keyboard shortcut to play the animation is Alt+A. To stop, press the Stop button or Alt+A again. 34 / 43

35 Step 24 Go to frame 11. Pull up the torso, move the foot up. In short, have a pose similar to the one in the image. Now go to frame 1 and press play or press Alt+A to preview the animation. We now have a half step completed. 35 / 43

36 Step 25 Now go to frame 11 where we have a keyframe. Select all bones with the A key and click on the Copy pose button. 36 / 43

37 Step 26 Drag the timeline to frame 31 and click on the flip-paste button, as we want the pose to be inverted. 37 / 43

38 Step 27 Now the cycle will end with the pose the same as the first pose, so we will copy that from frame one and then paste as is on frame 41. So go to frame one and select all the bones and copy the pose and paste it on frame 41. OR you can select the 1st keyframe in the dopesheet summery, and the press Shift+D to make a duplicate. Go to frame 41 and Left-click to confirm its position. 38 / 43


39 Press Play and preview the complete walk cycle. Step 28 To preview the animation in a loop, Type 40 in the End frame limit box. We are having the last 39 / 43

40 keyframe on frame number 41, and this one is the same as the First frame. So in order to see a perfect loop, we will end the cycle at the 40th frame. So that it will go to frame one right after frame 40. Step 29 Now we will tweak the motion just a little bit in between the main key frames. Go to frame 4 and rotate the foot so that it rests completely on the ground. Also pull down the main torso bone a bit. Do the same for the other foot and torso on frame 24. You can copy and Flip-Paste the pose from frame / 43

41 Step 30 To make it walk faster, you can move the key frames closer to each other. Alternatively, go to frame 1, with the timeline on frame 1, in the dopesheet editor. Press A to select all keyframes. Press S to Scale, move the mouse towards the left and then Left-click to confirm. I have reduced the walk cycle from 41 to 28 frames, and so the End Frame to preview the animation is 27. The walk cycle is now ready for export. Of course you can add more details. 41 / 43

42 In the Dopesheet editor, You can name this action as Walk, or anything you like. Drag the header of the dopesheet window, with the middle mouse button if you don t see the name box. And finally Save the file. 42 / 43

43 From 43 / 43 Powered by TCPDF (
CHAPTER 6 Character Animation: Hands On by Ryan Dale Character Animation: Discussion Ryan Dale
 CHAPTER 6 Character Animation Character Animation: Hands On by Ryan Dale Character Animation: Discussion Based on Waiting by Zoltan Miklosi, used with permission Ryan Dale Grad student by day, Blenderhead
Walk Cycle with Symbols
 Walk Cycle with Symbols STEP 1 Assuming you have your character all rigged and ready to go, double click on the character to get into the master symbol to see all the layers that make up all of the character
Bforartists Reference Manual - Copyright - This page is under Public Domain. Editors
 Editors Introduction...2 Hidden menus...2 The Header menu...2 Flip to Top...2 Collapse Menus...2 Hide Editortype menu...3 Maximize Area - Tile Area...3 The editor type menu...3 Area Options...3 Split area...3
https://blenderzen.com/
 Blender Shortcut Keys Cheat Sheet Blender is a vast multi-purpose program designed to do some very complex things. Luckily for us the creators of Blender simplified the interface and squeezed most commands
Beginners Guide Maya. To be used next to Learning Maya 5 Foundation. 15 juni 2005 Clara Coepijn Raoul Franker
 Beginners Guide Maya To be used next to Learning Maya 5 Foundation 15 juni 2005 Clara Coepijn 0928283 Raoul Franker 1202596 Index Index 1 Introduction 2 The Interface 3 Main Shortcuts 4 Building a Character
Week 5: Assignment: Animation
 Animating a Tennis Ball This tutorial will teach you the main principles of animation, specifically how to animate a tennis ball being fired from a cannon and bouncing off a wall to a stop. We would recommend
Keyframing an IK Skeleton Maya 2012
 2002-2012 Michael O'Rourke Keyframing an IK Skeleton Maya 2012 (This tutorial assumes you have done the Creating an Inverse Kinematic Skeleton tutorial in this set) Concepts Once you have built an Inverse
3D Modeling Course Outline
 3D Modeling Course Outline Points Possible Course Hours Course Overview 4 Lab 1: Start the Course Identify computer requirements. Learn how to move through the course. Switch between windows. Lab 2: Set
Object Manipulation and Basic Animation
 Object Manipulation and Basic Animation By Immer Baldos This document is a tutorial on basic modeling and animation using Blender version 2.49b. The goals are to create a Windmill using blender s built-in
2.2 - Layouts. Bforartists Reference Manual - Copyright - This page is Public Domain
 2.2 - Layouts Introduction...2 Switching Layouts...2 Standard Layouts...3 3D View full...3 Animation...3 Compositing...3 Default...4 Motion Tracking...4 Scripting...4 UV Editing...5 Video Editing...5 Game
Learning Autodesk Maya The Modeling & Animation Handbook. Free Models From Turbo Squid Value US $ Official Autodesk Training Guide
 Free Models From Turbo Squid Value US $239.00 Official Autodesk Training Guide Learning Autodesk Maya 2008 The Modeling & Animation Handbook A hands-on introduction to key tools and techniques in Autodesk
Maya Muscle Advanced Techniques
 Maya Muscle Advanced Techniques 10 The Maya Muscle Advanced Techniques tutorials assume that you have a basic familiarity with the main tools and features of Maya, as well as basic Maya rigging knowledge.
When you move an (unparented and unrotated) item in Layout, generally your mouse movements have the following effects:
 item in Layout, generally your mouse movements have the following effects:") Translate Group Move (default keyboard shortcut T) When you move an (unparented and unrotated) item in Layout, generally your mouse movements have the following effects: Movement Move Left/Right LMB Up/Down
Translate Group Move (default keyboard shortcut T) When you move an (unparented and unrotated) item in Layout, generally your mouse movements have the following effects: Movement Move Left/Right LMB Up/Down
About this document. Introduction. Where does Life Forms fit? Prev Menu Next Back p. 2
 Prev Menu Next Back p. 2 About this document This document explains how to use Life Forms Studio with LightWave 5.5-6.5. It also contains short examples of how to use LightWave and Life Forms together.
Detailed Table of content. 3D View by tools - Header. 3D View by tools - Header detailed
 3D View by tools - Header Detailed Table of content...1 Introduction...16 Header...16 All Modes - View Menu...17 All Modes - Navigation Menu...24 All Modes, all Object types - Show / Hide...29 Object Mode
Animator Friendly Rigging Part 3b
 Animator Friendly Rigging Part 3b Creating animation rigs which solve problems, are fun to use, and don t cause nervous breakdowns. - 1- CONTENTS Biped Arms... 6 Why Are Arms Important?... 7 Requirements
This lesson introduces Blender, covering the tools and concepts necessary to set up a minimal scene in virtual 3D space.
 3D Modeling with Blender: 01. Blender Basics Overview This lesson introduces Blender, covering the tools and concepts necessary to set up a minimal scene in virtual 3D space. Concepts Covered Blender s
Animator Friendly Rigging Part 2b
 Animator Friendly Rigging Part 2b Creating animation rigs which solve problems, are fun to use, and don t cause nervous breakdowns. - 1- CONTENTS Review The Requirements... 5 Torso Animation Rig Requirements...
BONE CONTROLLER ASSET VERSION 0.1 REV 1
 Foreword Thank you for purchasing the Bone Controller! I m an independent developer and your feedback and support really means a lot to me. Please don t ever hesitate to contact me if you have a question,
Chapter 5. Creating Special Effects Delmar, Cengage Learning
 Chapter 5 Creating Special Effects 2011 Delmar, Cengage Learning Chapter 5 Lessons 1. Create a mask effect 2. Add sound 3. Add video 4. Create an animated navigation bar 5. Create character animations
THE SETUP MACHINE FOR GAMES
 THE SETUP MACHINE FOR GAMES USERS MANUAL Maya Versions: 2011-2014 Rig Design: Raf Anzovin Programming: Brian Kendall and Tagore Smith Documentation: Morgan Robinson Beta Testing: Alex M. Lehmann, George
LBTools - Biped Helper - Guide
 LBTools - Biped Helper - Guide Author: Lorne Brooks Biped Helper is an interface designed to be used in conjunction with the main Biped panel. It is intended to provide quick access tools and functionality
Presets are the heart of Genoma. They can be added to so you can build up a library of reusable rig parts or even complete rigs to suit your
 Genoma 1 Genoma 1 Presets Presets are the heart of Genoma. They can be added to so you can build up a library of reusable rig parts or even complete rigs to suit your needs. Opening the Genoma Presets
Basic Blender Commands This is just a partial list of Blender commands. Please visit the Blender.org website for more details.
 Basic Key Commands Basic Blender Commands This is just a partial list of Blender commands. Please visit the Blender.org website for more details. TAB key- Toggles between edit mode (vertex editing) and
Chapter 9- Animation Basics
 Timing, Moving, Rotating and Scaling Now that we know how to make stuff and make it look good, it s time to figure out how to move it around in your scene. Another name for an animation is Interpolation
Textures and UV Mapping in Blender
 Textures and UV Mapping in Blender Categories : Uncategorised Date : 21st November 2017 1 / 25 (See below for an introduction to UV maps and unwrapping) Jim s Notes regarding Blender objects, the UV Editor
Adobe Animate Basics
 Adobe Animate Basics What is Adobe Animate? Adobe Animate, formerly known as Adobe Flash, is a multimedia authoring and computer animation program. Animate can be used to design vector graphics and animation,
Very Animation Version 1.0.7
 Version 1.0.7 1 / 43 Introduction Thank you for purchasing "". This asset is an editor extension for editing animation. It is characterized by direct editing of animation of Mecanim Humanoid which is usually
Creating a 3D Characters Movement
 Creating a 3D Characters Movement Getting Characters and Animations Introduction to Mixamo Before we can start to work with a 3D characters we have to get them first. A great place to get 3D characters
Blender Notes. Introduction to Digital Modelling and Animation in Design Blender Tutorial - week 1 The Blender Interface and Basic Shapes
 Blender Notes Introduction to Digital Modelling and Animation in Design Blender Tutorial - week 1 The Blender Interface and Basic Shapes Introduction Blender is a powerful modeling, animation and rendering
Platformer Tutorial 8 - Adding Mr.Green and Character Animation. Last month. Character FX
 Last month Things became a lot more dangerous as traps and deadly particles were added. It just wouldn t be the same without Mr.Green so he s making his debut this month. As this has always been the plan,
Autodesk Maya 2019 BASICS GUIDE
 Kelly L. Murdock Autodesk Maya 2019 BASICS GUIDE SDC P U B L I C AT I O N S Better Textbooks. Lower Prices. www.sdcpublications.com ACCESS CODE UNIQUE CODE INSIDE Powered by TCPDF (www.tcpdf.org) Visit
Creating animation rigs that solve problems, are fun to use, and don t cause nervous breakdowns.
 Animator Friendly Rigging Creating animation rigs that solve problems, are fun to use, and don t cause nervous breakdowns. - 1- CONTENTS Finishing The Rig... 6 Matching Controls... 7 Matching the position
Getting Started with Crazy Talk 6
 Getting Started with Crazy Talk 6 Crazy Talk 6 is an application that generates talking characters from an image or photo, as well as facial animation for video. Importing an Image Launch Crazy Talk and
alexallright.com This documentation is still under development! Allright Rig 2.0
 Allright Rig 2.0 Allright Rig is a plug-in for Unreal Engine 4 that allows you to create character rigs and work with character animation in editor. The main goal is to create a possibility of creation
Keys for selecting tools
 Keys for selecting tools Use these shortcuts in the Tools panel. In most cases, you can momentarily switch tools by holding down the keyboard shortcut for the tool. Selection tool V V Rotation tool W W
THE SETUP MACHINE 3 !!!!!!!!!!! !!!!! USERS MANUAL
 THE SETUP MACHINE 3 USERS MANUAL Maya Versions: Maya 2014 and up Rig Construction: Raf Anzovin Programming: Connie Hildreth Documentation/Beta Testing: Morgan Robinson & Raf Anzovin Copyright 2005-2020
How to start your Texture Box Project!
 How to start your Texture Box Project! Shapes, naming surfaces, and textures. Lightwave 11.5 Part One: Create Your Shape Choose Start, Programs, New Tek, Lightwave and Modelor (the orange one). 1.In one
FACT-BVH Tutorial. Part I: Setting up the model. In Life Forms. In ElectricImage. 6. Open a New Animation. 7. Import the Fact model
 Prev Menu Next Back p. 15 FACT-BVH Tutorial The FACT-BVH method allows you to bring custom models from your ElectricImage project into Life Forms for animation. The motion data can then be exported and
Basic Blender Commands This is just a partial list of Blender commands. Please visit the Blender.org website for more details.
 Basic Key Commands Basic Blender Commands This is just a partial list of Blender commands. Please visit the Blender.org website for more details. TAB key- Toggles between edit mode (vertex editing) and
REMEMBER TO BRING YOUR MEMORY STICK TO EVERY LAB!
 CS 1033 Multimedia and Communications Lab 8: Animation with Video Timeline REMEMBER TO BRING YOUR MEMORY STICK TO EVERY LAB! LAB #8 - Exercise 1 Objectives: Upon completion of Exercise 1 you should be
Gwenview User Manual. Aurélien Gâteau Christopher Martin Henry de Valence
 Aurélien Gâteau Christopher Martin Henry de Valence 2 Contents 1 Introduction 5 1.1 What is Gwenview..................................... 5 2 The Interface 6 2.1 Start Page..........................................
Transforming Objects and Components
 4 Transforming Objects and Components Arrow selection Lasso selection Paint selection Move Rotate Scale Universal Manipulator Soft Modification Show Manipulator Last tool used Figure 4.1 Maya s manipulation
Tangents. In this tutorial we are going to take a look at how tangents can affect an animation.
 Tangents In this tutorial we are going to take a look at how tangents can affect an animation. One of the 12 Principles of Animation is called Slow In and Slow Out. This refers to the spacing of the in
Animation Basics. Learning Objectives
 Animation Basics Learning Objectives After completing this chapter, you will be able to: Work with the time slider Understand animation playback controls Understand animation and time controls Morph compound
Tutorial 3: Using the Waveform Viewer Introduces the basics of using the waveform viewer. Read Tutorial SIMPLIS Tutorials SIMPLIS provide a range of t
 Tutorials Introductory Tutorials These tutorials are designed to give new users a basic understanding of how to use SIMetrix and SIMetrix/SIMPLIS. Tutorial 1: Getting Started Guides you through getting
Automatic Rigging/Skinning Script. Maya Python Scripting Master Thesis
 Automatic Rigging/Skinning Script Maya Python Scripting Master Thesis Rahul Lakakwar i7834921 MSc CAVE, Bournemouth University 21-Aug-2009 Thanks to: Jon Macey Adam Vanner NCCA Bournemouth & All students
V4A4HipHopMagic 2008, 2014 Elisa Griffin, all rights reserved
 V4A4HipHopMagic 2008, 2014 Elisa Griffin, all rights reserved Welcome to V4A4HipHopMagic!* This program is a free-standing application. To use the pose information in Poser you must own the Victoria 4
Mixamo Maya-Auto-Control-Rig
 Mixamo Maya-Auto-Control-Rig The Maya-Auto-Control-Rig is a tool designed for animators to automatically rig a character for Maya and help animate it using keyframing or external sources of animation data.
Importing and Applying Motion. Ingredients. Pre-production Issues. SIGGRAPH-02 Course 28: Motion Capture: Pipeline, Applications, and Use
 Importing and Applying Motion SIGGRAPH-02 Course 28: Motion Capture: Pipeline, Applications, and Use Importing Acclaim Skeleton Creating a Simple Model Importing Acclaim Motion SIGGRAPH-02 Course 28: Motion
Maya Lesson 8 Notes - Animated Adjustable Desk Lamp
 Maya Lesson 8 Notes - Animated Adjustable Desk Lamp To Model the Lamp: 1. Research: Google images - adjustable desk lamp. 2. Print several images of lamps for ideas to model. 3. Make a sketch of the lamp
Split the 3D Editor Viewport
 Split the 3D Editor Viewport To create two viewports where there was previously one (the 3D Editor Viewport), click on the cross hatch in the upper right hand corner of the 3D Editor Viewport. When the
This is the opening view of blender.
 This is the opening view of blender. Note that interacting with Blender is a little different from other programs that you may be used to. For example, left clicking won t select objects on the scene,
LightWave 8 Layout Menus
 LightWave 8 Layout Menus compiled by Robin Wood Tool Key Placement About LightWave 3D About OpenGL Add Plug-ins Utilities > Plugins Add to Position Modify > Translate Add to Rotation Modify > Rotate Add
Open Blender and click anywhere to remove the Splash Screen.
 Photo Detail Modelling the 3D Industrial Building Open Blender and click anywhere to remove the Splash Screen. Click on the File Menu and select "Save as". Save the Blender file as Industrial_Building01.blend
What's New in VCarve Pro 8.5
 What's New in VCarve Pro 8.5 A quick start guide for VCarve Pro upgraders Copyright Vectric Ltd. Document V.1.0 Contents CONTENTS... 2 OVERVIEW... 3 ENHANCED & EXTENDED DRAWING TOOLS... 4 NEW TOOLPATH
Blender Lesson Ceramic Bowl
 Blender Lesson Ceramic Bowl This lesson is going to show you how to create a ceramic looking bowl using the free program Blender. You will learn how to change the view, add, delete, scale and edit objects
Introduction Where does Life Forms fit?
 Prev Menu Next Back p. 3 About this Document Motion data from Life Forms can be brought into Maya. Find out how to do this here. There are 3 sections in this tutorial: The Introduction section gives you
Toon Boom Harmony Essentials V15.0
 Essentials Toon Boom Harmony Essentials V15.0 Keyboard Shortcuts Guide TOON BOOM ANIMATION INC. 4200 Saint-Laurent, Suite 1020 Montreal, Quebec, Canada H2W 2R2 +1 514 278 8666 contact@toonboom.com toonboom.com
Chapter 18- Relative Vertex (Shape) Keys
 Keys") Chapter 18- Relative Vertex (Shape) Keys Creating Mesh Shape Keys We ve discussed deforming a mesh with an armature, but what if you want to deform a mesh in other ways like have it flatten, move a mouth,
Chapter 18- Relative Vertex (Shape) Keys Creating Mesh Shape Keys We ve discussed deforming a mesh with an armature, but what if you want to deform a mesh in other ways like have it flatten, move a mouth,
LightWave 8 Layout Menus
 LightWave 8 Layout Menus compiled by Robin Wood Tool Placement Key About LightWave 3D Top Menu Group > Help About OpenGL Top Menu Group > Help Add Plug-ins Utilities > Plugins Add to Position Modify >
Legal Notices. Toon Boom Animation Inc Saint-Laurent, Suite 1020 Montreal, Quebec, Canada H2W 2R2. Tel: Fax:
 Storyboard Pro 5.5 Keyboard Shortcuts Guide Legal Notices Toon Boom Animation Inc. 4200 Saint-Laurent, Suite 1020 Montreal, Quebec, Canada H2W 2R2 Tel: +1 514 278 8666 Fax: +1 514 278 2666 toonboom.com
Introduction to Maya
 1 M CO PY RI GH TE D MA TE RI AL Introduction to Maya aya is a powerful 3D modeling, animation, effects, and rendering solution that has been used in everything from product design to feature films. In
Graphical Editors used at CSC/Nada earlier. Main competitors. What is Maya? What is Maya? An Introduction to Maya. Maya
 DH2640 Grafik och interaktionsprogrammering DH2323 Datorgrafik och interaktion NA8740 Datorgrafik och användargränssnitt An Introduction to Maya original slides by Gustav Taxén Lars Kjelldahl lassekj@csc.kth.se
Rigging Half-Life 2 Bones
 Rigging Half-Life 2 Bones You have the bone in position with your model but of course the bone is not properly fits with your model size. In order to fix it: Resize or Move your model until its fits the
Introduction to Unreal Engine Blueprints for Beginners. By Chaven R Yenketswamy
 Introduction to Unreal Engine Blueprints for Beginners By Chaven R Yenketswamy Introduction My first two tutorials covered creating and painting 3D objects for inclusion in your Unreal Project. In this
THE SETUP MACHINE 2 !!!!!!!!!!! !!!!! USERS MANUAL
 THE SETUP MACHINE 2 USERS MANUAL Maya Versions: Maya 5.0-2014 Rig Construction: Raf Anzovin Programming: Morgan Robinson Documentation: Raf Anzovin, Steve Anzovin & Morgan Robinson Copyright 2005-2015
3D Space is one of the most rewarding areas
 Lesson 8 206 3D Space Add a new dimension to your animations. In This Lesson 207 enabling layers for 3D 208 moving and rotating layers in 3D space 210 multiplaning effects 212 3D motion paths 213 multiple
Animation: A Moving Experience
 11/30/2005-3:00 pm - 4:30 pm Room:N. Hemispheres (Salon A4) (Dolphin) Walt Disney World Swan and Dolphin Resort Orlando, Florida Animation: A Moving Experience Ted Boardman - tbdesign DV34-1 If you'd like
Toon Boom Harmony Essentials 16.0
 Essentials Toon Boom Harmony Essentials 16.0 Keyboard Shortcuts TOON BOOM ANIMATION INC. 4200 Saint-Laurent, Suite 1020 Montreal, Quebec, Canada H2W 2R2 +1 514 278 8666 contact@toonboom.com toonboom.com
Virtual Production for the Real World Using Autodesk MotionBuilder 2013
 Virtual Production for the Real World Using Autodesk MotionBuilder 2013 Daryl Obert Autodesk Hein Beute- Xsens DG3148 This class will give attendees a firm understanding of the concepts and workflows involved
SketchUp Tool Basics
 SketchUp Tool Basics Open SketchUp Click the Start Button Click All Programs Open SketchUp Scroll Down to the SketchUp 2013 folder Click on the folder to open. Click on SketchUp. Set Up SketchUp (look
Chapter 1- The Blender Interface
 Chapter 1- The Blender Interface The Blender Screen Years ago, when I first looked at Blender and read some tutorials I thought that this looked easy and made sense. After taking the program for a test
Animatron Tutorial. Ronald Bourret
 Animatron Tutorial Ronald Bourret http://www.rpbourret.com Table of Contents License... 2 Lesson 1: Getting Started... 3 1.1 Creating an Animatron account... 3 1.2 Animatron screen... 3 Lesson 2: Drawing...
Modify Group. Joint Move. (default keyboard shortcut Ctrl J)
") Modify Group Joint Move (default keyboard shortcut Ctrl J) Joint Mover draws lines along each bone and puts a cross hair at the base of the child bone(s), which is usually coincident with the tip of the
Modify Group Joint Move (default keyboard shortcut Ctrl J) Joint Mover draws lines along each bone and puts a cross hair at the base of the child bone(s), which is usually coincident with the tip of the
Now that you have reviewed cameras, lights and objects in the Layout section, it s time to discuss animation.
 Animating Click here to expand Table of Contents Keyframing Navigating a Scene Playing a Scene Creating Keyframes Creating and Modifying Keys Automatically Auto Key: Off Auto Key: Modifed Auto Key: All
Keynote 08 Basics Website:
 Website: http://etc.usf.edu/te/ Keynote is Apple's presentation application. Keynote is installed as part of the iwork suite, which also includes the word processing program Pages and the spreadsheet program
The Blender Quick Start Guide
 The Blender Quick Start Guide by Darrin Lile Blender Foundation Certified Trainer It takes time and practice to learn and internalize Blender s workflow. But given the right guidance, anyone can quickly
Blender Character Modeling A companion book to the Blender Character Creation Series on Youtube
 Blender Character Modeling A companion book to the Blender Character Creation Series on Youtube https://www.youtube.com/user/darrinlile Darrin Lile Blender Foundation Certified Trainer 2017, Darrin Lile.
The Alice Scene Editor
 Facilitation Guide The Alice Scene Editor ( http://www.alice.org/resources/lessons/building-a-scene/ ) Summary This facilitation guide is intended to guide the instructor through the introduction of the
Reference Image. Source:
 Mesh Modeling By Immer Baldos This document is a tutorial on mesh modeling using Blender version 2.49b. The goal is to create a model of an elevator. This tutorial will tackle creating the elevator cart,
CGS 3220 Lecture 13 Polygonal Character Modeling
 CGS 3220 Lecture 13 Polygonal Character Modeling Introduction to Computer Aided Modeling Instructor: Brent Rossen Overview Box modeling Polygon proxy Mirroring Polygonal components Topology editing Procedural
First Animated Model Yellow Submarine
 Course: 3D Design Title: First Animated Model Yellow Submarine Blender: Version 2.6X Level: Beginning Author; Neal Hirsig (May 2012) First Animated Model Yellow Submarine Most of you are perhaps too young
Basics of Design p. 2 Approaching Design as an Artist p. 4 Knowing Your Character p. 4 Making Decisions p. 4 Categories of Design p.
 Basics of Design p. 2 Approaching Design as an Artist p. 4 Knowing Your Character p. 4 Making Decisions p. 4 Categories of Design p. 6 Realistic Designs p. 6 Stylized Designs p. 7 Designing a Character
Autodesk Navisworks Freedom Quick Reference Guide
 WP CAD 00074 March 2012 Guide by Andy Davis Autodesk Navisworks Freedom Quick Reference Guide Quick Reference Guide to Autodesk Navisworks Freedom Opening a Model To open a model, click on the Application
This view is called User Persp - perspective. It's good for rendering, but not for editing. Ortho will be better.
 Create a crate simple placeable in Blender. In this tutorial I'll show you, how to create and texture a simple placeable, without animations. Let's start. First thing is always to have an idea, how you
User Manual. Page-Turning ebook software for Mac and Windows platforms
 User Manual Page-Turning ebook software for Mac and Windows platforms 3D Issue is a digital publishing software solution that converts your pdfs into online or offline digital, page-turning editions. Getting
HYPERSTUDIO TOOLS. THE GRAPHIC TOOL Use this tool to select graphics to edit. SPRAY PAINT CAN Scatter lots of tiny dots with this tool.
 THE BROWSE TOOL Us it to go through the stack and click on buttons THE BUTTON TOOL Use this tool to select buttons to edit.. RECTANGLE TOOL This tool lets you capture a rectangular area to copy, cut, move,
REMEMBER TO BRING YOUR MEMORY STICK TO EVERY LAB!
 CS 1033 Multimedia and Communications Lab 07: Introduction to Animation using Photoshop REMEMBER TO BRING YOUR MEMORY STICK TO EVERY LAB! LAB #7 - Exercise 1 Objectives: Upon completion of Exercise 1 you
Sliding and Rotating Objects. Appendix 1: Author s Notes
 AnimationWorks User Guide AnimationWORKS Introduction Camera Paths Cameras Moving Objects Moving Object Paths Sliding and Rotating Objects Light Objects Class Visibility Objects Transparency Objects Appendix
The playhead, shown as a vertical red beam, passes each frame when a movie plays back, much like movie fi lm passing in front of a projector bulb.
 The project: AIRPLANE I will show you a completed version of this project.. Introducing keyframes and the Timeline One of the most important panels in the Flash workspace is the Timeline, which is where
Maya 2014 Introduction to Maya
 Maya 2014 Introduction to Maya Maya is an incredibly powerful animation software that can be used to create almost anything you can imagine. The purpose of this document is to help you become familiar
3.3.1 Editors - Animation
 3.3.1 Editors - Animation Timeline Editor...2 Timeline Elements...3 Time Cursor...3 Keyframes...3 Markers...3 Adjusting the View...4 Timeline Area...4 Timeline Header...4 View Menu...4 Marker Menu...5
Toon Boom Harmony 14.0 Essentials Edition Keyboard Shortcuts
 Toon Boom Harmony 14.0 Essentials Edition Keyboard Shortcuts Legal Notices Toon Boom Animation Inc. 4200 Saint-Laurent, Suite 1020 Montreal, Quebec, Canada H2W 2R2 Tel: +1 514 278 8666 Fax: +1 514 278
1. In Maya, ensure that the fbx plug in is loaded (Windows/SettingsPreferences/Plug-in Manager)
") Motion Builder Basic Rigging: Constraints V1 by Deborah R. Fowler and Jennifer McSpadden In Maya: **Make sure you are in the Animation menu context. Rigging Using Constraints 1. In Maya, ensure that the
Motion Builder Basic Rigging: Constraints V1 by Deborah R. Fowler and Jennifer McSpadden In Maya: **Make sure you are in the Animation menu context. Rigging Using Constraints 1. In Maya, ensure that the
Photography by Christina Sizemore. Mudbox Hotkeys
 Digital Sculpting with Mudbox FIG 2.12 Digital Images Are Composed of a Pixel Grid. Each Pixel Stores Information Like Color and Transparency. Mudbox Uses Digital Images as Stencils and Stamps and Creates
Basic Shortcut Keys & Charts for Blender 3rd Ed.
 Basic Shortcut Keys & Charts for Blender 3rd Ed. A KatsBits tutorial By Ken Beyer Copyright 2017 KatsBits All Rights Reserved. This material is protected under International Copyright. No part of this
User Manual Version 1.1 January 2015
 User Manual Version 1.1 January 2015 - 2 / 112 - V1.1 Variegator... 7 Variegator Features... 7 1. Variable elements... 7 2. Static elements... 7 3. Element Manipulation... 7 4. Document Formats... 7 5.
Adobe Flash CS4 Part 4: Interactivity
 CALIFORNIA STATE UNIVERSITY, LOS ANGELES INFORMATION TECHNOLOGY SERVICES Adobe Flash CS4 Part 4: Interactivity Fall 2010, Version 1.0 Table of Contents Introduction... 2 Downloading the Data Files... 2
Working with the Dope Sheet Editor to speed up animation and reverse time.
 Bouncing a Ball Page 1 of 2 Tutorial Bouncing a Ball A bouncing ball is a common first project for new animators. This classic example is an excellent tool for explaining basic animation processes in 3ds