User s Manual ROAM Smartphone Winch Command
|
|
|
- Della Owen
- 5 years ago
- Views:
Transcription


1 User s Manual ROAM Smartphone Winch Command


 locking the device or (b) swiping to lock the ROAM app control screen. 2.")
2 1. General Safety Information The ROAM system uses the Wi-Fi network created by the ROAM box to communicate between the winch and your smart device. While ROAM has been painstakingly developed to be reliable, it can only be as reliable as your smart device s capabilities. Please read and understand this guide to get the most out of ROAM. Before using ROAM, Superwinch recommends reading and understanding all manuals that have been supplied with your winch. 1. Use ROAM as you would any winch controller: with extreme caution. 2. Always have a view of the entire winching area or rely on a guide who does. 3. Swiping to the right, left or up on the ROAM app control screen will lockout any winching commands. Do this any and every time when not in use. Misuse or abuse of this equipment could result in injury to the user or others and/or damage to property. 1. Never leave a connected smart device unattended without (a) locking the device or (b) swiping to lock the ROAM app control screen. 2. Always use the passcode lock on your phone to prevent others from controlling your winch. 3. ROAM has a built in defense against other users attempting to access the ROAM Wi-Fi and only the first connected device can control the winch. 4. Always insure your smart device has enough battery power to complete the winching operation. 5. Always disconnect the Roam unit from the winch (via the socket) when not in use. 6. Always put your smart device in airplane mode and turn on Wi-Fi. This will insure an uninterrupted winching session. Any incoming call/text/notification will interrupt winching operation. 7. Always stop winching if ROAM encounters potentially unsafe Amperage and/or temperature operating ranges (either onscreen (red) and/or via the smart devices vibration). Pay attention to these warnings and if encountered, stop winching operation and review. Winching control will be brought to a stop whenever: 1. Wi-Fi network communication is interrupted. 2. App is quit or smart device reverts to home screen/other app. 3. Swipe Lock is activated. 4. Incoming call/text (depending on settings) received. These safety features are engineered into the system to protect personnel and equipment and should never be changed, taken out or bypassed.

3 2. Installation Instructions A. Hardware Figure 1, ROAM The ROAM control box should be installed in a safe place. Under hood or in a protected structure is ideal. Use the mounting holes to secure the ROAM control box. ROAM is designed to be used intermittently, that is, after use, the ROAM socket harness should be disconnected from the winch. This will cut power to the board and WiFi module, preventing unintended winch communication. B. Wiring FIGURE 2


4 C. Disconnect Existing winch wiring at vehicle battery. Mount ROAM unit using the 4 mounting holes and the hardware provided. Select a flat mounting location that will reasonably protect the ROAM unit from debris, water, direct heat, and physical damage. Suggested location is high in the engine compartment, near the battery within range of the supplied negative battery cable and harnesses, while maintaining access to the LED viewing window and the reset button access rubber plug. D. Negative Battery Cables For winches with 2 AWG power cables, attach winch negative battery cable removed from battery to right side of ROAM unit. Connect supplied negative battery cable to left side of ROAM unit, and connect to Battery Negative. For winches with 6 AWG or smaller power cables, such as TERRA ATV winches, use supplied wiring Adapters. Slide adapters onto ROAM unit connections points, and use supplied hardware for connecting power cables. Attach winch negative battery cable to right side of ROAM unit. Connect supplied negative battery cable to left side of ROAM unit, and connect to Battery Negative. F. Power Harness E. Temperature Sensor Insert band clamp through temperature sensor slot on temperature sensor harness assembly. Route band clamp around motor. For winches with solenoid boxes on the motor, route band clamp under box and around motor case. Do not contact motor terminals, ground bolts, or decals. Sensor must sit directly on metal motor case. Do not force band clamp. Tighten band clamp to secure temperature sensor to motor case. Route temperature sensor harness with battery power cables and up to ROAM unit. Plug temperature sensor harness plug into socket on left side of ROAM unit. Be sure that locking fingers on plug are secure. Plug power harness plug into ROAM unit on left side. Be sure that locking fingers on plug are secure. Reconnect winch Red Battery Positive cable to Battery. Check all cables and harnesses and secure away from moving components, heat, and sharp edges. You are now ready to power the ROAM unit.

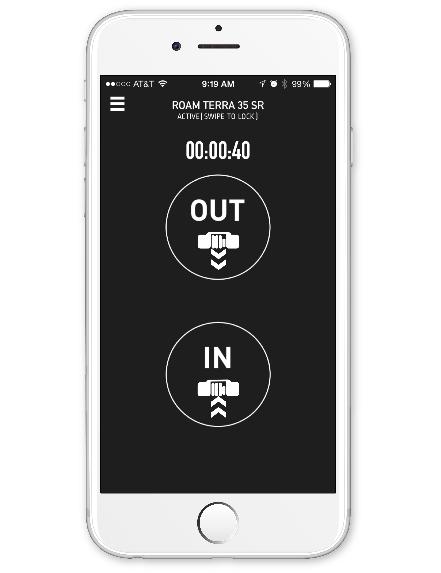
5 Plug the Power Harness into the winch socket for the handheld controller. The red LED visible on the ROAM unit should illuminate, and the WIFI signal should be active within 20 seconds. Refer to the Software APP for proper configuration. G. Software Download the ROAM app, a free download from the Apple ios App Store and/or the Google Play store. The app is compatible with Apple devices running ios 6.0 and later and devices running Google s Android 4.3 and later. If the ROAM app fails to launch, delete and re-download and install the ROAM app. Pairing ROAM with your device ROAM works via Wi-Fi. ios users will need to open the Wi-Fi settings (settings app> Wi-Fi) and select the ROAMXXXX network. The password for the WiFi network is ROAMPASS. Insure you are connected to the Wi-Fi network and proceed. If you cannot connect to the Wi-Fi network, access the reset button on the ROAM unit. Simply remove the Plug and insert any blunt object to press and hold the reset button (we ve designed it so a pen works great). Hold the button down for 5 seconds, wait a moment and reattempt to log onto the Wi-Fi network. Once connected to the ROAM Wi-Fi network, open the app and follow the onscreen instructions. 3. Operating Instructions App Menu Elapsed Time Winch Out (press and hold) Winch In (press and hold) To lock ROAM app to prevent unintended winching commands, simple swipe left or right from this screen to bring up the Locked screen. To unlock, simply swipe again.
6 4. Troubleshooting Chart Symptom Possible Cause(s) Corrective Actions Phone won t connect to Wi-Fi Network PCB time-out, Wi-Fi not enabled on device Insure Wi-Fi is enabled. Remove plug on ROAM box and insert pen to push button for 5 seconds. Connection is Negative Temperature displayed in app Unconnected harness reset Insure Temperature Harness is correctly seated in the ROAM control box App won t open Bad installation from App Store Delete app and reinstall I don t remember Passcode to Wi-Fi Late night/lack of sleep/short term memory issues Enter ROAMPASS (case sensitive) App frozen Software bug Force quit app and restart History taking a long time to load First time connecting/long interval between downloads The first download can take a while, however subsequent downloads should be much App isn t able to connect to winch Wi-Fi not connected faster Open Settings and insure the ROAM Wi-Fi network is selected and has a check mark. App isn t responsive Software time out Restart app; Attempt. If still unresponsive, restart device and/or resetting ROAM. Remove plug on ROAM box and insert pen to push button for 5 seconds. Superwinch Customer Service: Phone: o North America: o UK +44 (0) o All Other: o Global: info@superwinch.com Online Manuals/Parts o Superwinch Inc., 359 Lake Road, Dayville, CT U.S.A.
HOME SECURITY KIT. USER MANUAL SMART PROTECTION WITH THE ALL-IN-ONE SOLUTION. SMART WINDOW SENSOR SMART POWER SOCKET SMART MOTION SENSOR SMART IP CAM
 HOME SECURITY KIT. SMART PROTECTION WITH THE ALL-IN-ONE SOLUTION. SMART WINDOW SENSOR SMART POWER SOCKET SMART IP CAM SMART MOTION SENSOR USER MANUAL SL-900100/900111 HOME SECURITY KIT A/B SHORT INSTRUCTION
Tablet PA752C. User Manual
 Tablet PA752C User Manual User Manual Notice Before operating the device, please read the safety precautions and user s guide carefully to ensure safe and proper usage. The descriptions in this user s
FHOTON WI-FI MODULE Owner's Manual
 FHOTON WI-FI MODULE Owner's Manual BEFORE GETTING STARTED Read and follow safety instructions. Refer to product data plate(s) for additional operating instructions and specifications. ATTENTION IMPORTANT
GENERAL SET-UP & APP GENERAL SET-UP & APP PAIRING/SYNCING FEATURES BATTERY ACCOUNT & DEVICE SETTINGS PRIVACY WARRANTY. For IOS:
 For IOS: GENERAL SET-UP & APP PAIRING/SYNCING FEATURES BATTERY ACCOUNT & DEVICE SETTINGS PRIVACY WARRANTY GENERAL SET-UP & APP WHICH PHONES ARE COMPATIBLE WITH MY SMARTWATCH? Wear OS by Google works with
DASHLINK DL-200 Installation Guide
 DASHLINK DL-200 Installation Guide Electronic Logging Device (ELD) DL-200 CONTACT P: 1.888.305.8777 Ext. 1 E: support@bigroad.com CONTENTS Required Materials 01 Adding A New Truck 02 Installing Your DashLink
Verify that Wi-Fi option is turned on. Swipe down from the top of the screen once by using two fingers, or twice using one finger. Tap > Wi-Fi.
 Troubleshooting I can't find an email using the BlackBerry Device Search app The BlackBerry Device Search app only searches email that is in the BlackBerry Hub. To learn how to add email accounts to the
CHAPTER 3B: ELECTRONIC POWER STEERING
 Electronic Power Steering CHAPTER 3B: ELECTRONIC POWER STEERING NOTE: The basic steering system, such as the tie rod ends, drag links axles, etc., is covered in Chapter 3A: Steering. In 2012, Cub Cadet
WiFi dashcam Roadview 16GB
 WiFi dashcam Roadview 16GB EAN: 8719326008493 Thank you for buying our product. Before using the product, we suggest you refer to this user manual in order to get the best possible user experience. 1 1.
ANDROID PRIVACY & SECURITY GUIDE ANDROID DEVICE SETTINGS
 ANDROID PRIVACY & SECURITY GUIDE WESNET The Women s Services Network Smartphones store a lot of personal information, including email or social media accounts, reminders and notes, the number of steps
Q U I C K S T A R T G U I D E
 QUICKSTART GUIDE 2 Top 4 5 6 3 13 14 18 19 16 17 12 1 20 7 8 9 10 15 Left Side Front Right Side Back 11 Bottom 1 Power Button 2 Earphone Connector 3 Front-Facing Camera 4 Speaker 5 Ambient Light Sensor
Whisper-Ride
 11/16/2007 LR (1) CAUTION: Before you begin any of the installation procedures on page 3, read and follow the warnings and safety instructions on this page. WARNING! THIS IS NOT A TOY! WARNING! CHILDREN
Intel NUC Kit NUC6CAYS User Guide
 Intel NUC Kit NUC6CAYS User Guide Regulatory Model NUC6CAY 1 Before You Begin CAUTIONS The steps in this guide assume you re familiar with computer terminology and with the safety practices and regulatory
User manual. tel.+ (48)
") ilock User manual system User manual contact@ilocksystems.com www.ilocksystems.com tel.+ (48) 61 669 06 87 e-mail: contact@ilocksystems.com www.ilocksystems.com technical support: support@ilocksystems.com
ilock User manual system User manual contact@ilocksystems.com www.ilocksystems.com tel.+ (48) 61 669 06 87 e-mail: contact@ilocksystems.com www.ilocksystems.com technical support: support@ilocksystems.com
INTRODUCTION CRASH SENSOR. WELCOME TO ICEDOT! This User s Guide will help you set up your Crash Sensor as well as create an ICEdot profile.
 CRASH SENSOR INTRODUCTION WELCOME TO ICEDOT! This User s Guide will help you set up your Crash Sensor as well as create an ICEdot profile. Your ICEdot Crash Sensor, when used properly, will mount onto
Welcome to Fetch. Welcome 3. Connect Fetch to your home Wi-Fi 4. Tips to improve Wi-Fi in your home 8. Can t connect to Wi-Fi 10
 Wi-Fi User Guide Welcome to Fetch Welcome 3 Connect Fetch to your home Wi-Fi 4 Tips to improve Wi-Fi in your home 8 Can t connect to Wi-Fi 10 Advanced Wi-Fi troubleshooting 1 Welcome This guide will help
Replacing the Power Supply
 APPENDIX B This appendix includes information on how to replace the power supply for the Cisco AS550XM universal gateway and contains the following sections: Safety Recommendations, page B-1 Required Tools
Garage Door Control Button. What s inside: Quickstart Guide Model No. WGO x Garage Door Control Button
 Add-On Device Quickstart Guide 1 Garage Door Control Button Quickstart Guide Model No. WGO2001 What s inside: 1x Garage Door Control Button 1x Power Adapter 2x U-fork Wires Mounting Accessories and Double-sided
Devices that must be present to control the Wi-Fi Hub.
 HV1600 Wi-Fi Hub Instruction Manual (Upgrade Fan Kit). For this Wi-Fi Hub Upgrade Kit to be compatible with your HV1600 fan it must meet the following criteria. The HV1600 serial number must be SN: 12244
BEAT 2.0 USER MANUAL
 BEAT 2.0 USER MANUAL FCC ID: 2ADLJBEAT20 The device complies with part 15 of the FCC Rules. Operation is subject to the following two conditions: (1) This device may not cause harmful interference, and
Do not place or mount Ocli 1 in an area where it will be exposed to water. Ocli 1 is designed for indoor use.
 1 Manual: Ocli 1 with Observeye Viewer App for Android Setting Up Ocli 1 Live Viewing with Ocli 1 Recording Video and Taking Snapshots Using Advanced Features Setting Up Ocli 1 Place or Mount the Camera
Bluetooth Lock Boxes User Guide
 Bluetooth Lock Boxes User Guide BATTERY Q: What type of battery is used in a Master Lock Bluetooth Lock Box? A: Master Lock Bluetooth Lock Boxes come installed with a C123A lithium battery. For optimal
INSTALLATION INSTRUCTIONS
 TT-40 9/0 INSTALLATION INSTRUCTIONS Original Issue Date: 9/0 Model: Automatic Transfer Switches Equipped with the Programmable Controller Market: ATS Subject: External Battery Supply Module Kit GM69-KP
How To Install: C4000 EMV Upgrade Kit
 How To Install: C4000 EMV Upgrade Kit IMPORTANT: Before proceeding with installation please verify you have the current card reader bezel in the kit. Correct bezel will have a small eject pin hole below
1. Introduction P Package Contents 1.
 1 Contents 1. Introduction ------------------------------------------------------------------------------- P. 3-5 1.1 Package Contents 1.2 Tablet Overview 2. Using the Tablet for the first time ---------------------------------------------------
Label Printer QL-810W/820NWB. Quick Setup Guide (English)
") Label Printer QL-810W/820NWB Quick Setup Guide (English) Label Printer QL-810W/820NWB Printed in China D00RPG001 Quick Setup Guide (English) Available Manuals Product Safety Guide This guide provides safety
Label Printer QL-810W/820NWB Quick Setup Guide (English) Label Printer QL-810W/820NWB Printed in China D00RPG001 Quick Setup Guide (English) Available Manuals Product Safety Guide This guide provides safety
ATTENTION: All students MUST create a new Apple ID during setup to use with their WSU ipad.
 Setting Up Your WSU Apple ipad Mini Page 1 of 7 Your ipad Mini should be plugged in and ready to setup. ATTENTION: All students MUST create a new Apple ID during setup to use with their WSU ipad. If you
InControl INCONTROL OVERVIEW
 INCONTROL OVERVIEW InControl uses smartphone and in-vehicle mobile technology, to remotely connect the vehicle to a number of services and convenience features. Note: For further information, access the
QL-1110NWB. Applications for Use with Computers. Applications for Use with Mobile Devices. Quick Setup Guide (English) NOTE
 NOTE") D00ZC6001 QL-1110NWB Quick Setup Guide (English) Thank you for purchasing the QL-1110NWB Label Printer! Read the Product Safety Guide first, then read this Quick Setup Guide for the correct setup procedure.
D00ZC6001 QL-1110NWB Quick Setup Guide (English) Thank you for purchasing the QL-1110NWB Label Printer! Read the Product Safety Guide first, then read this Quick Setup Guide for the correct setup procedure.
Frequently Asked Questions
 Frequently Asked Questions Why can I not make calls?... 2 Why can t I use some of the calling features?... 2 My phone is locked and I can t use any of the functions. How can I unlock it?... 2 Why is my
Tile Plow Installation O Connell
 NOTE: Indented items indicate parts included in an assembly listed above Part Name/Description Part Number Quantity Tile Plow Kit O Connell System 4100471 1 Hex head cap screw 3/8-16 x 3 2002003-38300
An iphone is easy to maintain and isn t likely to give you much trouble
 An iphone is easy to maintain and isn t likely to give you much trouble In this chapter, you learn how to keep an iphone in top shape and what to do should problems happen. Topics include the following:
Note: All of PXC data is available on the PX3 support page. Simply visit Support page > Choose a Product > select "PX3." QS Rule.
 QUICK SETUP GUIDE Raritan PXC Thank you for purchasing the PXC intelligent power distribution unit (PDU). The intended use of PXC is distribution of power to information technology equipment such as computers
The Indoor+Outdoor Security Starter Kit Quickstart Guide
 What s inside: The Indoor+Outdoor Security Starter Kit Quickstart Guide 1x Security Shuttle 1x Mini Cube HD camera 1x Mini outdoor Full HD camera 2x Door + Window sensors 1x Keychain remote 2x Power adapters
User Manual. Smart Lock. Please read this manual before operating your Smart Lock, and keep it for further reference. 40
 User Manual Smart Lock Please read this manual before operating your Smart Lock, and keep it for further reference. 40 I. Introduction Thank you for choosing the AKASO Smart Lock. The new Smart Lock uses
Document Number: /4/2012
 Copyright 2012 icontrol Networks, Inc. All rights reserved. No reproduction in whole or in part without prior written approval. icontrol Networks, icontrol, and icontrol logo design are pending trademarks
Quick Start Guide.
 Quick Start Guide www.c-me.de Specifications: Size: 130 x65x24mm folded Weight: 150g WiFi: 2.4 GHz Image Sensor: 1/2.3 CMOS Video: 1080P 30 fps* Photo: 8MP* Format: JPG/MP4 (MPEG-4 AVC/H.264) Battery:
Written By: Andrew Bookholt
 Replace a dead logic board in your iphone 4 Verizon. Written By: Andrew Bookholt ifixit CC BY-NC-SA www.ifixit.com Page 1 of 17 INTRODUCTION Use this guide to replace your iphone's logic board. TOOLS:
GM3x-HF Installation Guide for GM Class II Radios with XM Tuner
 Courtesy of:discountcarstereo.com Driving without distraction is a necessity for a safer driving experience GM3x-HF Installation Guide for GM Class II Radios with XM Tuner Created July 19, 2016 Revised:
WARNING!!!!!!!!! IMPORTANT INFORMATION: READ BEFORE INSTALLATION!
 V_Net Relay Module Installation Instructions: Part Number: 230-VM-RELAY WARNING!!!!!!!!! IMPORTANT INFORMATION: READ BEFORE INSTALLATION! The relay outputs of the 230-VM-RELAY module may turn on when not
Parts List: Assembly Instructions:
 My Ride SERVICE MANUAl MyRide ASSEMBLY GUIDE 1.1 ASSEMBLY INSTRUCTIONS ASSEMBLING THE MYRIDE Parts List: Heavy Plate Stabilizer Fin - Right Stabilizer Fin - Left Stabilizer Fin - Large Middle Power Cord
Courtesy of:discountcarstereo.com. For illustration purposes only BKRCD-HF
 Courtesy of:discountcarstereo.com For illustration purposes only BKRCD-HF Hands-Free, Audio Streaming Installation Guide for Becker Radios with CD Changer Created June 30, 2016 Revised: December 26, 2017
SP-1101W / SP-2101W with EdiLife Quick Installation Guide
 SP-1101W / SP-2101W with EdiLife Quick Installation Guide 08-2018 / v1.0 CONTENTS I Introduction... 1 II Smart Plug Setup... 2 II-1 Package Contents... 2 II-2 Hardware Installation... 3 III EdiLife App
DynoWare EX+ Upgrade Installation Guide for Motorcycle Dynamometers.
 1993-2002 Dynojet Research, Inc. All Rights Reserved. for Motorcycle Dynamometers. This manual is copyrighted by Dynojet Research, Inc., hereafter referred to as Dynojet, and all rights are reserved. This
HomeTroller Zee S2 Getting Started Guide
 HomeTroller Zee S2 Getting Started Guide Congratulations on your purchase! Your HomeTroller Zee S2 is ready to put you in control of your home. Please take a few minutes to read through this guide to familiarize
PC9/P9 CPU Card Replacement
 Introduction These instructions explain how to replace the CPU card in the PC9 Industrial PC or the P9 PowerStation. They include steps for disassembling the unit, removing the old CPU card, installing
MBCD-HF. Quick Start Bluetooth Installation Guide for Select Mercedes with Changer. Courtesy of:discountcarstereo.com
 Courtesy of:discountcarstereo.com MBCD-HF Quick Start Bluetooth Installation Guide for Select 1994-98 Mercedes with Changer Created September 3, 2016 Revised: March 24, 2019 Introduction: Safety comes
An iphone is easy to maintain and isn t likely to give you much trouble
 An iphone is easy to maintain and isn t likely to give you much trouble In this chapter, you learn how to keep an iphone in top shape and what to do should problems happen. Topics include the following:
User Guide. Intel NUC 7 Home, a Mini PC with Windows 10 NUC7i5BNKP. Intel NUC 7 Enthusiast, a Mini PC with Windows 10 NUC7i7BNKQ
 Intel NUC 7 Home, a Mini PC with Windows 10 NUC7i5BNKP Intel NUC 7 Enthusiast, a Mini PC with Windows 10 NUC7i7BNKQ User Guide 1 Before You Begin CAUTION The steps in this guide assume you re familiar
Package Content. QSG booklet. Warranty, legal & safety booklet. USB cable. Charger. Warranty ARCHOS 11,31
 Table of contents Package contents... 2 Getting started... 3 Description of the device... 4 Through the wizard... 6 Connecting to a WiFi network... 7 The Android TM interface... 8 Getting familiar with
MOTION DRIVER GUIDE April 17, 2019
 MOTION DRIVER GUIDE April 17, 2019 Contents Getting Started... 3 Enrolling... 3 Installing the Application... 4 Mounting Your Mobile Device... 4 Launching the Application... 4 App Version Updates... 5
FDS / FDS-R / FDS-PS
 FDS / FDS-R / FDS-PS USER MANUAL For use with 120V 60Hz input. Output is 120V 60Hz at 5amps 600W MAX. switched. ETL LISTED Conforms to UL STD 1241 3091594 79-15167-00 REV. A www.fiberstars.com Page 1 of
TO IMAGINE DEVICE SETUP AND VIDLINK APP INSTALLATION GUIDE
 TO IMAGINE DEVICE SETUP AND VIDLINK APP INSTALLATION GUIDE 2 / DEVICE SETUP AND APP INSTALLATION GUIDE VidLink is the future of video entertainment, providing you with fiber-fast buffer free streaming
79 Backup and Reset DRAFT FOR INTERNAL USE ONLY. Factory Data Reset
 Backup and Reset Back up your data to Google servers. You can also reset your device to its factory defaults. Backup and Restore Samsung Account Enable backup of your information to Samsung servers. 2.
Smart Security at Every Corner of Your Home
 Spotlight Cam Smart Security at Every Corner of Your Home Your new Spotlight Cam lets you extend the Ring of Security around your entire property. Now, you ll always be the first to know when someone s
GENERAL SET-UP & APP PAIRING/SYNCING FEATURES BATTERY ACCOUNT & DEVICE SETTINGS PRIVACY WARRANTY GENERAL SET-UP & APP ANDROID
 ANDROID GENERAL SET-UP & APP PAIRING/SYNCING FEATURES BATTERY ACCOUNT & DEVICE SETTINGS PRIVACY WARRANTY GENERAL SET-UP & APP WHICH PHONES ARE COMPATIBLE WITH MY SMARTWATCH? Wear OS by Google works with
Know your device. SPen Front camera. Camera. Power key. Volume keys. Recent apps Home key Back key USB/Charger port
 Know your device SPen Front camera Power key Camera Volume keys Recent apps Home key Back key USB/Charger port 1 2 S Pen The S Pen enables fast, accurate, and precise input while providing a natural writing
Smart AC application MIM-H03UN. Multi Wi-Fi kit. user & installation manual. imagine the possibilities. Thank you for purchasing this Samsung product.
 Smart AC application MIM-H03UN Multi Wi-Fi kit user & installation manual imagine the possibilities Thank you for purchasing this Samsung product. This product is the Smart Air conditioner which supports
Installation Instructions
 Installation Instructions Phones, Navigation These Installation Instructions supersede those dated February 2004. Page 1 of 9 March 2004 Accessory Development Changes to this revision are identified by
FHD Driving Recorder E272S/S272W. Quick Start Guide
 FHD Driving Recorder E272S/S272W Quick Start Guide 400-8401-030 www.polaroidcarcam.com 1 Introduction 1.1 Package Contents The package contains the following items. In case there is any missing or damaged
User Guide for NUC7CJYSAL. Intel NUC 7 Essential, a Mini PC with Windows 10 NUC7CJYSAL. User Guide
 Intel NUC 7 Essential, a Mini PC with Windows 10 NUC7CJYSAL User Guide 1 Before You Begin CAUTIONS The steps in this guide assume you re familiar with computer terminology and with the safety practices
Smart Security at Every Corner of Your Home
 Spotlight Cam Wired Smart Security at Every Corner of Your Home Your new Spotlight Cam lets you extend the Ring of Security around your entire property. Now, you ll always be the first to know when someone
1. In-app Setup. 2. Physical Installation. 3. Features. 4. Troubleshooting
 Spotlight Cam Wired Smart Security at Every Corner of Your Home Your new Spotlight Cam lets you extend the Ring of Security around your entire property. Now, you ll always be the first to know when someone
Quick Installation and Setup Guide
 Quick Installation and Setup Guide Before you Begin This process involves mounting cameras and running cables through the vehicle interior. It is helpful to have some familiarity with installing automotive
MicroBloggingMD (MBMD) Support Documentation
 Support Documentation") MicroBloggingMD (MBMD) Support Documentation Contents Index MBMD Mobile Device Installation 2 ios 2 Android 5 MBMD Configuration and Setup 8 MBMD Home Screen 11 MBMD Troubleshooting Matrix 12 Mobile Device
MicroBloggingMD (MBMD) Support Documentation Contents Index MBMD Mobile Device Installation 2 ios 2 Android 5 MBMD Configuration and Setup 8 MBMD Home Screen 11 MBMD Troubleshooting Matrix 12 Mobile Device
Intel NUC 7 Home, a Mini PC with Windows 10 NUC7i3BNHXF. Intel NUC 7 Home, a Mini PC with Windows 10 NUC7i5BNHXF
 Intel NUC 7 Home, a Mini PC with Windows 10 NUC7i3BNHXF Intel NUC 7 Home, a Mini PC with Windows 10 NUC7i5BNHXF Intel NUC 7 Enthusiast, a Mini PC with Windows 10 NUC7i7BNHXG User Guide 1 Before You Begin
User Guide for NUC7i3DNHNC. Intel NUC7 Business, a Mini PC with Windows 10 NUC7i3DNHNC. User Guide
 Intel NUC7 Business, a Mini PC with Windows 10 NUC7i3DNHNC User Guide 1 Before You Begin CAUTIONS The steps in this guide assume you re familiar with computer terminology and with the safety practices
iphone 4 Verizon Earpiece Speaker Replacement
 iphone 4 Verizon Earpiece Speaker Replacement Replace a blown-out earpiece speaker in your iphone 4 Verizon. Written By: Andrew Bookholt ifixit CC BY-NC-SA www.ifixit.com Page 1 of 18 INTRODUCTION Use
SEG-X3 Smart Gateway. Quick Start Guide
 SEG-X3 Smart Gateway Quick Start Guide 1. Introduction The SEG-X3 Smart Gateway acts as a central platform for your smart home system. It allows you to add ZigBee devices into the system while at the same
When Not in Use: Remove the batteries if this device is to be left unattended or unused for a long period of time.
 HUB USER GUIDE Safety Instructions You must keep safety in mind while using this device. Keep these and any other instructions for future reference. Observe Warnings: Carefully follow all warnings on the
WiFi Smart Converter User Manual WiFi Smart Plug SH330W
 WiFi Smart Converter User Manual WiFi Smart Plug SH330W About This Guide This guide provides a brief introduction to Smart Plug and the Smart Life app, as well as regulatory information. Please note that
iphone 4 Verizon Headphone Jack Cable Replacement
 iphone 4 Verizon Headphone Jack Cable Replacement Replace a broken headphone jack cable that contains the upper microphone as well as the electronic portions of the volume buttons and silent switch on
Using the SHARP touchscreen
 Click a menu link to jump straight to that section: SHARP touchscreen essentials Accessing & saving files Annotation with SHARP touchscreens Connecting other devices SHARP touchscreens with Adobe Troubleshooting
Snap. Quick Start Guide SD-H2304
 Snap Quick Start Guide SD-H2304 1 Getting to Know Your Snap Snap is a true wireless IP camera with a built-in rechargeable battery. You can install your Snap anywhere in your home without any complicated
EO-BG930. User Manual. English (EU). 07/2016. Rev.1.0.
. 07/2016. Rev.1.0.") EO-BG930 User Manual English (EU). 07/2016. Rev.1.0 www.samsung.com Table of Contents Read me first Getting started 4 Package contents 5 Device layout 6 Indicator light 7 Charging the battery 8 Checking
EO-BG930 User Manual English (EU). 07/2016. Rev.1.0 www.samsung.com Table of Contents Read me first Getting started 4 Package contents 5 Device layout 6 Indicator light 7 Charging the battery 8 Checking
Installation And Testing Guide
 Model: CARLINK-SMS2 Installation And Testing Guide ENGLISH / INGLÉS Quick Reference Install Guide 1 GLOBAL SMARTPHONE INTERFACE Visit www.omegacarlink.com/sms/ and download the device setup utility. It
itech Training Courses iphone 5S LCD Assembly Replacement Guide
 itech Training Courses iphone 5S LCD Assembly Replacement Guide 2014 icracked, Inc. All rights reserved. ios, all Apple product names, and Apple logos are trademark property of Apple, Inc. The content
Magnetic base Indicator light Microphone Camera lens Micro SD card slot Infrared light Front Side Pivot connector Built-in speakers
 Niro USER MANUAL Contents Introduction 4 Product Features 5 Niro LED Indicators 6 What s Included 7 Wi-Fi Requirements 8 Mobile Device Requirements 8 Garage Door Opener Requirements 8 Download the Momentum
Vasco Traveler 7 USER MANUAL ENGLISH
 Vasco Traveler 7 USER MANUAL ENGLISH Copyright 2018 Vasco Electronics LLC www.vasco-electronics.com Table of contents 1. Operation of the device 4 1.1 Function keys 4 1.2 Battery charging 5 1.3 Memory
Wi-Fi Configuration Steps
 Operation Manual for Airveda Otomate This manual walks through the steps required to set up your Airveda monitor with Wi-Fi so that it can send data to the server which can be viewed on your app. One monitor
The Smart Prime 6 Frequently Asked Questions. The Smart Prime 6 handset
 The Smart Prime 6 handset How do I answer a call? When you receive a call, touch Slide the icon right to answer the call; Slide the icon left to reject the call; Slide the icon up to reject the call by
User Manual Revised 1-July-2015
 User Manual Revised 1-July-2015 LIMITED WARRANTY AND LIMITATION OF LIABILITY The use of the Auguscope is subject at all times to Augury's standard Management Platform Terms of Use, which can be viewed
Panoramic Talking Camera
 Panoramic Talking Camera IPC2201 home8alarm.com 1-844-800-6482 support@home8alarm.com 1 Table of Contents Chapter 1. Introduction... 1 1.1 System Requirement... 1 Chapter 2. Hardware Overview... 2 Chapter
Tile Plow Installation Gold Digger
 NOTE: Indented items indicate parts included in an assembly listed above Part Name/Description Part Number Quantity Tile Plow Kit Soil Max System 4100470 1 Hex head cap screw - M10 x 75mm 2002007-10075
Upgrading LVDS Cables Instruction Sheet
 Upgrading LVDS Cables Instruction Sheet INTRODUCTION Use the following instructions to replace the LVDS cables in CP2000-M/MR projectors. The new cables are slightly longer in length and allow for better
WIRELESS BLUETOOTH AUDIO TO ANY CAR RADIO MAKE THE CONNECTION
 ISFM23 WIRELESS BLUETOOTH AUDIO TO ANY CAR RADIO MAKE THE CONNECTION Smartphones and Bluetooth media devices TranzItTM BLU 98.2 98.3 98.4 Perfect for ANDROID 1. Introduction Thank you for choosing the
Q. Can I use LED bulbs? A. Yes as long as the bulbs are dimmable variants and compatible.
 Q. Does the dimmer & socket have a standby power consumption? A. The device (dimmers & sockets) has a standby power consumption of approx. 0.5W per gang. This is because the in-built radio receiver requires
Smart Business Security System Quick Start Guide
 Smart Business Security System Quick Start Guide 1 Getting to know your Business Security System The Zmodo Business Security System provides a full-featured monitoring solution to cover your entire business
1. Charging. 2. In-app Setup. 3. Physical Installation. 4. Features. 5. Troubleshooting
 Spotlight Cam Smart Security at Every Corner of Your Home Your new Spotlight Cam lets you extend the Ring of Security around your entire property. Now, you ll always be the first to know when someone s
Disconnect the battery to ensure there will be no shorted wires during the installation procedure.
 The round-style headunit receiver radio features Bluetooth technology allowing music to wirelessly stream from your compatible Bluetooth-enabled device. Control the audio from a distance -- all from your
MOBILE CONNECTOR - GEN 2 OWNER'S MANUAL
 MOBILE CONNECTOR - GEN 2 OWNER'S MANUAL UNITED STATES Contents Safety Information... 2 Save These Important Safety Instructions... 2 Warnings...2 Cautions...3 General Information... 4 Mobile Connector
To connect the AC adapter:
 Replacing the AC Adapter Replacing the AC Adapter 3 Plug the power cord into a wall outlet. The power indicator turns on. To connect the AC adapter: Connect the power cord to the AC adapter. Power indicator
1. Operating Conditions
 OWNER S MANUAL Overview 1) Operating conditions 2) Articles in the box 3) Charging 4) App setup 5) Wearing the device 6) Cleaning the device 7) Screen operation 8) Device operation a) Time/date interface
KM-4800w. Installation Guide
 KM-4800w Installation Guide TABLE OF CONTENTS page 1 Installation Requirements 2 2 Unpacking 3 2. 1 Unpacking 3 2. 2 Confirmation of Accessories 5 3 Leveling the Machine 7 4 Setup of the Roll Deck 9 5
MT-150. RENOGY 150A Peak High Precision Watt Meter and Power Analyzer E. Philadelphia St., Ontario CA Version: 1.
 MT-150 RENOGY 150A Peak High Precision Watt Meter and Power Analyzer 0 2775 E. Philadelphia St., Ontario CA 91761 1-800-330-8678 Version: 1.1 Important Safety Instructions Please save these instructions.
WI-FI GARAGE DOOR CONTROLLER WITH CAMERA USER MANUAL
 WI-FI GARAGE DOOR CONTROLLER WITH CAMERA USER MANUAL Contents Introduction 4 Product Features 5 Garage Door Controller LED Indicators 6 What s Included 7 Wi-Fi Requirements 8 Mobile Device Requirements
WiFi Smart Control Reference Guide
 TEMPUR-Ergo Premier WiFi Smart Control Reference Guide Patents pending 2018 Tempur-Pedic Management, LLC. All Rights Reserved. 10003-PC-B204-01 Rev 17/11/06 TEMPUR-Ergo Premier Table of Contents COMMONLY
Voltson Smart Wi-Fi Outlet
 Voltson Smart Wi-Fi Outlet Model No.: ESW01-USA Questions or Concerns? (855) 686-3835 1 support@etekcity.com Thank You. Thank you for purchasing the Voltson Smart Wi-Fi Outlet by Etekcity. We are dedicated
Follow this Quick Guide to start using your Deeper START
 Follow this Quick Guide to start using your Deeper START Thank you for purchasing a new Deeper START smart fishfinder. We hope you enjoy it. These instructions will enable you to prepare your device and
SOLAR Basic. Operating instructions for electronic high-security locks
 SOLAR Basic Operating instructions for electronic high-security locks Gebäude Sicherheitstechnik Vertriebs GmbH, 34123 Kassel Solar-Basic (DE, EN, FR)-17000000 Rev. 1.3 / 01-2015 Table of contents General
WELCOME. For customer support or any inquiries, please visit our web site at or contact us at
 WELCOME Congratulations on purchasing the GBF Smart Four Wire Intercom System. Our factory engineers were the first to enable multiple security cameras being monitored through a smart mobile device and