Pivot Full Manual. The All-in-One Smart Hub Solution
|
|
|
- Johnathan Glenn
- 5 years ago
- Views:
Transcription

1 Pivot Full Manual The All-in-One Smart Hub Solution
2 Table of Contents Getting Started...3 Overview... 3 What s in the box... 3 Pivot... 3 Door & Window Sensors... 6 Zmodo App... 6 Zmodo Web App... 6 Setup...7 Minimum Requirements... 7 Technical Specifications... 7 Placing your Pivot... 8 Setting up your Pivot... 9 Using the App: Overview Navigating the app People Events Discovery Basic Features Live Video Playback Alerts Bluetooth speaker Configuring window / door sensors Viewing Temperature and Humidity Advanced Features Updating the firmware Scheduling Sharing your device Sharing Moments Support & Troubleshooting Setup Using the Pivot Security & Privacy... 33
3 Getting Started Overview This guide describes the hardware and software features of your Zmodo Pivot. This guide covers the full setup procedure and describes the major features of your Pivot. At the end of the guide, you will find basic troubleshooting tips. For more, updated information, please visit Note: The instructions and screenshots in this quick guide are provided for the Zmodo app ver and Pivot ver What s in the box Included in your packaging is a Pivot, two sets of door / window sensors, a 5ft micro USB power adapter, and a quick guide. Pivot Pivot is an all-in-one home monitoring solution. The main features include: a 1080p HD camera with 135 field of view, 350 of camera rotation for a full 360 view, smart motion detection, hub for connecting smart accessories, 2-way audio, temperature and humidity sensors, Bluetooth speaker, and much more.

4 Touch Pad. Use the Touch Pad to access quick controls for the Pivot. Doubletap rapidly to enable Bluetooth configuration. Press and hold the Touch Pad for 10 seconds to reset the Pivot. Status Ring. The Status Ring will indicate the current status of your Pivot. If it s solid green, your Pivot is starting up. If it s blinking green, your Pivot is ready to be configured to a network. If it s blinking blue, your Pivot is attempting to connect to a WiFi network and if it s solid blue, your Pivot is successfully connected. IR Light. The infrared light allows you to see up to 30 feet away in the dark. Microphone. The microphone will pick up sound from the surrounding environment. You can hear what s happening from the mobile and web app. Camera. 1080p HD camera with 135 o diagonal field-of-view. Light sensor. Automatically triggers night vision when the room is dark. You can deactivate the automatic night vision from the Pivot settings.

5 Temperature & humidity sensor. Pivot measures and records temperature and humidity readings of the surrounding environment. Check readings from the mobile and web app. Plug-in for future accessories. A rechargeable battery add-on will be available in the future. Speaker. 32dB speaker. Speak into your phone from the mobile app for two-way audio, or connect your Bluetooth music device to listen to music from the Pivot. Smart motion detection algorithms: Pivot uses microwave arrays to detect motion from anywhere in the room, even when the camera isn t pointed in that direction. Smart motion detection algorithms factor in common motion in the room so that you only receive alerts when a new and significant motion event takes place. This means that you won t receive annoying false alerts when you re in the same room as your Pivot. Once motion is detected, Pivot will automatically determine whether it s most beneficial to capture the motion detected in the field of view of the camera, or if it should rotate to capture video of the entire room. Note: After initial installation, your Pivot may not rotate or send motion detection alerts because you ve been in the room the entire time. To trigger a new or significant motion event, try leaving the room for at least 10 minutes, then enter the room and move for at least 40 seconds.
6 Door & Window Sensors Pivot is a hub for connecting and controlling other Zmodo smart accessories. It includes two door and window sensors that can be connected to your Pivot. When a door or window is opened, Pivot can automatically turn to see what happened. Set up the included sensors by removing the plastic tab and configuring the sensors in the Pivot settings menu. When Pivot detects an opened window or door, it will rotate to a preset location set in the Preset Setting menu. Zmodo App View and control your Pivot through the free Zmodo app. Sign up for a free account to: View live video and rotate the Pivot Review alerts and recorded footage View temperature and humidity readings Set schedules to determine when the camera is on or off Set schedules to determine when you receive notifications Share your Pivot with family and set specific permissions Share and post moments for your friends to see Zmodo Web App You can also view and control your Pivot from any device by using the web app. Just type user.zmodo.com into the address bar on your web browser and log in using your Zmodo account information.
7 Setup Minimum Requirements 2.4GHz WPA/WPA2 password-protected WiFi network o If you have a dual-band router, make sure that the 2.4GHz and 5GHz signals are broadcasting on a different SSID. Your network cannot be hidden. o You will need to make sure that you have a strong WiFi signal where you want to install your Pivot. o Pivot cannot connect to an SSID with any space(s) in it. You can replace the space by entering your router s settings. For example, My Router is not allowed, but My_Router is allowed. (mobile viewing & setup) iphone, ipad, or ipod touch (v.7.0 or newer) or Android TM (v.4.0 or newer) mobile device for the Zmodo mobile app. o If you cannot download the app from the App Store or Google Play TM, please visit the download page in the Zmodo Pivot support at (web viewing) Internet Explorer, Safari, Chrome TM, Firefox o Log in to the web app at user.zmodo.com with your Zmodo account to view your devices on a web browser. Technical Specifications Camera 1080p HD color 135 o field of view 4x digital zoom 2.1mm lens Night-vision up to 32 feet, automatic IR-cut (can be disabled in app) Rotation 350 o pan Automatic rotation when motion is detected Manual rotation control from mobile app Sensors 360 o motion sensor Temperature & humidity sensors Audio Two-way audio with built-in mic Bluetooth speaker
8 Recording 16GB internal storage Cloud recording (subscription required) Hub Connects Zmodo door and window sensors (up to 32) Future smart home capabilities coming soon Power DC 5V 2A power supply Micro USB connector Battery pack add-on (coming soon) Dimensions 75mm diameter, 135mm height Placing your Pivot Before setup, you ll want to find a suitable location to use your Pivot. In order to make the most of your Pivot s 360 o motion detection and surveillance features, we recommend that you place your Pivot on a flat surface in the middle of your room, or in a location where most of your room is visible, including doors and entryways. Follow the tips below to find the ideal location for your Pivot: 1) Check your WiFi signal strength. In order to make sure that your Pivot s connection is as stable as possible, make sure that the WiFi signal is very strong at the location of your Pivot. 2) Check for nearby power outlets. The Pivot was designed to be simple to install. No mounting or drilling is required, just place the Pivot on a flat surface near a wall outlet and you re done. 3) Make sure your Pivot is high enough. Make sure your Pivot is high enough to capture the entire room. Do not place your Pivot on the floor. 4) Place your Pivot in view of your doors, windows, and other entryways. Your Pivot will be able to turn towards your doors, windows, and other entryways when they re opened. Make sure that your doors and entryways are in the line of sight of your Pivot. 5) Place your Pivot near the center of the room. You can place your Pivot on a coffee table, kitchen bar, side table, etc.
 Connect your Android TM or ios smartphone to the 2.4GHz WPA/WPA2 WiFi network that you want your Pivot to connect to.")

9 Setting up your Pivot Follow the instructions below to help configure your Pivot for initial use. For updated instructions and troubleshooting guides, please visit 1) Connect your Android TM or ios smartphone to the 2.4GHz WPA/WPA2 WiFi network that you want your Pivot to connect to. Refer to the previous sections in the manual for minimum requirements and instructions for placement. 2) Download and install the Zmodo app from Google Play TM or the App Store. Launch the app and sign up for a free Zmodo account. You can also download the app from the Documents, Software, & Downloads section of the Pivot support page. 3) Press the Add Device (+) option to begin adding your Pivot. Log in to your Zmodo account and select the Add Device (+) option in the upper right corner. 4) Tap Zink to add your Pivot. This will initiate the Zink setup process.

 Select Tap here to begin setup.")

10 5) Power on your Pivot and tap the check mark to proceed. If you are setting up multiple Pivots, then you can tap the + or - to adjust the number of devices that you will be connecting. Tap the check mark to proceed. 6) Select Tap here to begin setup. Carefully read the on-screen instructions and select Tap here to begin setup to go to the WiFi settings page on your smartphone. 7) Select the network named ZMD_SAP and connect to it. Your Pivot will broadcast a WiFi network during setup.

 If you see this screen, the app will connect your Pivot to your WiFi network This may take a few minutes.")
11 8) Enter the name and password of the WiFi network that your Pivot will connect to. Return to the Zmodo app page and you will see the following screen. Enter the SSID and password for your WiFi network. Note: The WiFi name and password are case-sensitive. 9) If you see this screen, the app will connect your Pivot to your WiFi network This may take a few minutes. Once it s completed, please skip to step 13. If you do not see this screen, please proceed to step ) If this app interface appears, please press Tap here to select WiFi.
12 11) Select the WiFi network that your Pivot will connect to, and connect to it. Return to the Zmodo app once your smartphone is connected to the WiFi network. 12) If you see this screen, the app will connect your Pivot to your WiFi network This may take a few minutes. 13) Name your Pivot and set a password for it. Tap the check mark to proceed. Note: The password provides an additional layer of security for your device. You will not need to use it when accessing your device from the Zmodo app. It is not required, but is highly recommended.


13 13) Your Pivot has been successfully configured! You will be able to access your Pivot from the Device List in the Zmodo app. Using the App: Overview Navigating the app The Home Screen in the Zmodo app provides easy access to all of your devices, settings, friends, events, and more.

14 1. Main Menu. Open to main menu to access cloud service features, shop for new devices, arrange your smart home, change your account settings, and view support / live chat. 2. Add Device. Tap to add new devices. All WiFi products purchased after 7/4/2016 use the Zink connection method. If you have a Beam, you will be able to use the Automatic connection method to connect your WiFi devices. For all NVR kits and legacy products, you will need to use the Wireless Device and Smart kit connection method. 3. Notification Modes. The app features three modes to quickly toggle notifications sent to your smartphone. The devices will continue to save alerts in the app that you can access at a later time. Away mode: Activates notifications according to the alert schedules that you set (by default, notifications are always on). Home mode: Disables all notifications. Sleep mode: Disables notifications for devices that are assigned to the bedroom room type. 4. Organization. Tap to organize devices by Room / Device / Function. Room: You can group your devices by rooms in your home. In order to create a room, you need to select the type of room and name it.
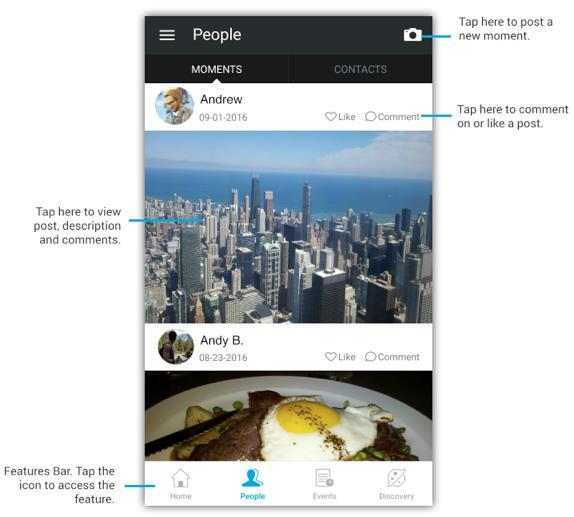
15 Then you will be prompted to select the devices that are in the room from your Device List. Device: This will display all of your devices on the Device List. Function: This will organize all of your devices by function (for example, Live video, motion detection, sensors, etc.) 5. Device List. Scroll through your devices by swiping left and right on the Home Screen or by tapping the name of your device in the list. You can also tap the preview image to change the image. 6. Device Tiles. Each device that is configured or shared to your account will have specific options, notifications, alerts, etc. Select the tile to view alerts, access temperature and humidity readings, toggle notifications, set notification schedules, and access the Device Settings to adjust settings specific to your device. 7. Features Bar. Tap the icon to access the main app features (see following pages for details).

16 People Friend other Zmodo users and share your posts, pictures, and news with them. Share your devices with friends and family so that they can access it too, and control what permissions you want to allow them to have. In order to add a friend, just search for their nickname, phone number, or that they used to register their Zmodo account with.
17

18 Events View the Logs page to view a compiled list of alerts from all of your devices. When you take a snapshot or record a video clip from your Pivot s live feed or playback, the recorded clip or snapshot will appear in your Event Gallery.

19

20 Discovery Discovery features Zmodo devices from restaurants, shops, pet stores, etc. View exciting demos like Tails from the Foster Kittens Kitten Cam, and check in on your favorite restaurants to see if they re busy.

21 Basic Features Live Video In order to access the live video feed of your Pivot, tap anywhere on the preview in your Device Tile.

22 Playback You can access the Playback mode from your Pivot s Live View page. Tap here to view footage from a different day. Scroll through footage. Tap and drag the playback ribbon to select a time to begin playback.

23 Expand playback ribbon. Pinch-to-zoom to expand and view more specific time stamps. Color-coded footage. Yellow sections indicate footage recorded while motion was detected, blue footage indicates regular footage. Alerts You can access your Pivot s alerts by tapping the Motion tile. See the image below for instructions on navigating the Alerts page. View the image below to help navigate the Detailed Alert page:
 Rapidly double-tap the Touch Pad found on the top of your Pivot. You will hear Pairing through the speakers.")
24 Bluetooth speaker You can connect your smartphone or Bluetooth enabled music player to your Pivot for music using the Bluetooth speaker function. Please follow the instructions below to configure your Bluetooth function: 1) Rapidly double-tap the Touch Pad found on the top of your Pivot. You will hear Pairing through the speakers. 2) Enable the Bluetooth function on your smartphone or music player. Follow specific instructions for your device.
 You will hear Connected when it is successfully configured. Once configured, Pivot will play audio from your smartphone or music player.")
25 3) Scan for available Bluetooth devices using your smartphone or music player. You should see Pivot on the list of available Bluetooth devices. Select it. 4) You will hear Connected when it is successfully configured. Once configured, Pivot will play audio from your smartphone or music player. Configuring window / door sensors Pivot is a hub for connecting and controlling other Zmodo smart accessories. It includes two door and window sensors that can be connected to your Pivot. When a door or window is opened, Pivot can automatically turn to see what happened. When Pivot detects an opened window or door, it will rotate to a preset location set in the Preset Setting menu. Pivot can support up to 32 smart accessories. Follow the instructions below to set up your door or window sensors, and repeat for each sensor. IMPORTANT: When configuring your sensors, your smartphone will need to be connected to the same WiFi network as your Pivot. Configuring your door / window sensor: 1) Remove the plastic tab from your door / window sensor. The plastic tab will activate the battery for your sensor. 2) Enter the Accessories option under the Pivot s settings menu. Access the Pivot s device settings by tapping the Device Settings tile, and select Accessories. 3) Press the (+) icon to add a new accessory. Press the button on the larger piece of your door / window sensor when prompted, and follow the instructions for naming your sensor.

26 4) Find a suitable location for your door / window sensor. Find a location close to your Pivot, within the Pivot s field of view for optimal performance. 5) Install the door / window sensor. Place one piece of the door or window sensor on the frame of the door or window, and place the corresponding piece on the movable part of the door or window. IMPORTANT: When closed, the distance between the two sensors should be no greater than 2cm. 6) Repeat for other accessories. You will receive alerts when your door or window is opened under your Pivot s alerts page.
 Press the (+) to add a new preset. 3) Name the preset. For example: Front door was opened.")
27 Configuring a Preset for your door / window sensor: 1) Enter the Preset Setting option under the Pivot s settings menu. Access the Pivot s device settings by tapping the Device Settings tile, and select Preset Setting. 2) Press the (+) to add a new preset. 3) Name the preset. For example: Front door was opened. Or Window was opened. 4) Select the accessory to configure. Select which accessory you would like to pair with this preset. 5) Use the live video feed to rotate your Pivot to the desired preset location. Rotate your Pivot toward the door or window, using the live video preview as a guide. 6) Press Save once you re finished. Repeat these instructions for any other accessory. Viewing Temperature and Humidity Pivot will automatically record temperature and humidity readings. In order to access detailed readings, tap on the temperature and humidity readings from your Pivot s Device Tile.
28 Advanced Features Updating the firmware Updating your Pivot: You can update your Pivot s firmware using the mobile app, from anywhere at any time. The Zmodo app automatically sends important updates to the notifications bar on top of your device list. Pull down on your device list in the Home Screen to refresh your notifications. If an update is available, a message will appear in your notifications bar. You can also follow the instructions below to update your Pivot: 1) Access the General settings for your Pivot. Access the Pivot s device settings by tapping the Device Settings tile and select the... on the upper right corner. 2) Press Device Version to check for available updates. If an update is available, the app will notify you and prompt you to update your Pivot. Updating your mobile app: We are constantly updating the mobile app to ensure that your user experience is the best that it can possibly be. In order to check for app updates, follow the instructions below: 1) Access the app s main menu. Access the main menu by tapping the hamburger icon on the upper left corner. 2) Enter the System Settings menu. 3) Press Check update to see if there are any updates available.
29 Scheduling You can customize schedules to tailor your Pivot to your needs. Schedule silent periods for notifications on your phone when you re sleeping or at work, and schedule blind periods to disable your camera. Follow the instructions below to configure schedules: 1) Access the Pivot s device settings. Access the Pivot s device settings by tapping the Device Settings tile. Select Notification Settings or Camera Schedule to configure a schedule for your Pivot. 2) Enable the schedule by tapping the switch. Green means that scheduling is enabled, grey means that scheduling is disabled. 3) Press the (+) icon to add a silent period. This will open a page to configure when your Pivot s notifications or camera will be disabled. 4) Choose a start time for your silent period. Your Pivot s notifications or camera will be disabled beginning at this selected time. 5) Choose an end time for your silent period. Your Pivot s notifications or camera will be enabled at this selected time. 6) Select the days on which you would like to apply this schedule. (Optional) Edit and delete any scheduled silent periods. Press the edit option on the upper-right corner to clear any silent periods from a day. Sharing your device You can share your devices quickly and easily with friends and family to allow them to view and control your Pivot. Sharing Management allows you to adjust user permissions for each specific user. Follow the instructions below to share your device: NOTE: Your friend or family member will need a Zmodo account. They can register for a free account by downloading the mobile app. 1) Add your friend or family member as a friend in your Zmodo account. Enter the People feature from your Home Screen, and press the (+) on the upper right hand corner to add a new friend. 2) Access the Sharing Management option in your Pivot s device settings. Access the Pivot s device settings by tapping the Device Settings tile, and select Sharing Management. 3) Press the (+) icon to share your Pivot with a friend. Select the friend(s) that you would like to share your Pivot with.
30 4) Write a custom note for your friend(s) and set the device permissions that you would like to grant them access to. 5) Wait for a response. Once your friend(s) accept your invitation, you can adjust permissions from the Sharing Management menu. Sharing Moments You can post your favorite moments to share with your friends. Post pictures of captured moments from your phone s albums or your Zmodo Gallery, and like or comment on posts from your friends and family. To post a moment: Enter the People page from the Home Screen and tap on the camera icon from the upper right hand corner. Choose an image from your phone s album or Zmodo Gallery. To view moments: Enter the People page from the Home Screen and select Moments. You will be able to view a timeline of moments and like or comment on your friend s posts.
31 Support & Troubleshooting The following portion of the manual will address some troubleshooting tips and frequently asked questions. For more comprehensive and updated support information, please visit the Pivot s support page at Find the Pivot under the list of available devices to access the Pivot support page. We also offer a friendly, U.S.-based customer support team of product experts who would love to help you. You can contact the dedicated Smart Devices support team at: Phone: Service Hours: Mon-Fri 8:00am 8:00pm CST customerservice@zmodo.com Setup [Q] Do I need a mobile phone to set up my Pivot? [A] Yes. The setup is done through a mobile app that you will need to download onto your ios (v.7.0 and up) or Android TM (v.4.0 and up) mobile device. The Zmodo app can be downloaded from Google Play TM or the App Store TM. [Q] How can I improve my WiFi signal? [A] If you are having trouble setting up your Pivot, you may not have a strong WiFi signal at the place of installation. In order to improve your signal strength, you can: 1) Purchase a Beam wireless repeater. A wireless repeater will repeat the wireless signal from your router over a greater distance. Install a Beam close to your Zmodo device and connect the Zmodo device to this repeater during the configuration process. 2) Move your wireless router closer to your Zmodo device. Find a suitable location for your router that s closer to your device. 3) Upgrade your wireless router. Ugprading your router and internet could prepare your home for future smart, connected products. [Q] I am having trouble connecting my Pivot to the WiFi [A] Please make sure that your devices meet the minimum requirements:
32 1) You have a strong WiFi signal at the location where you are installing your Pivot. 2) Your router is broadcasting a 2.4GHz WPA/WPA2 passwordprotected WiFi network. Note: If you have a dual-band router, make sure that the 2.4GHz signal is broadcasting with a different SSID than your 5GHz signal. For example, you can set your 2.4GHz signal to be Home WiFi and your 5GHz signal to be Home WiFi_5GHz. 3) You are using an ios (v.7.0 and up) or Android TM (v.4.0 and up) smart mobile device for setup. Using the Pivot [Q] How can I view and control my Pivot? [A] You can view and control your Pivot from the Zmodo app on your ios or Android TM mobile device, or you can access the Pivot from any web browser on a computer by logging in to user.zmodo.com with your Zmodo user account. [Q] Is there a way to view a larger image of the Pivot s live feed? [A] You can rotate your phone to view the live feed in landscape orientation, or you can pinch and zoom while in live view to view closer details. If you d like to see in more detail, you can also log in to user.zmodo.com with your Zmodo user account to view your Pivot from a computer. [Q] The motion detection doesn t seem to be working? [A] In order to drastically reduce false alerts, Pivot uses a smart algorithm to determine when motion detected is of importance or not. The smart motion detection algorithms ensure that you receive useful information from your Pivot so that you have the best user experience possible. Some types of motion that the smart algorithms eliminate are: Motion detected when you re constantly in the room. If you re in the same room as your Pivot for a long period of time, Pivot will be able to sense your presence and it will not trigger a new motion alert. The motion detection algorithms will help eliminate alerts caused by negligible objects like shadows. For more information on motion detection, please visit the support page. [Q] Can the Pivot follow you as you move? [A] As of now, the Pivot cannot track movement. The Pivot can detect motion using two methods. If motion is detected using the camera s video feed, then the Pivot will stand still and capture the motion that is in the Pivot s field-of-view. If
33 the motion is detected using the microwave array built around its body, the Pivot will rotate because the motion captured was outside of it s field-of-view. Security & Privacy Security is and has always been our priority. We spare no effort to protect your privacy and security. Encrypted Communication To protect your privacy, Zmodo apps and the Pivot connect to the Zmodo servers using bank-level AES 256-bit encryption and Transport Layer Security (TLS). All video and pictures are secured with AES 256-bit symmetric-key encryption. Only the customer can decrypt and view the video through approved clients (our mobile and web apps) with their account credentials. The Pivot also has perfect forward secrecy, using 2048-bit RSA private keys for key exchange with the Zmodo servers. We also employ other security measures to protect private data, such as secure HTTP access (HTTPS) using TLS/SSL, and more. Security of connected devices is an ever-changing environment, and Zmodo is committed to staying at the forefront. By owning a Pivot, you can be assured that your device will stay secure and updated. Secure Servers Zmodo uses our own servers for storing your information and processing your video. We utilize state-of-the-art electronic surveillance systems to protect our servers. Our data center and servers are located in Illinois, USA. Zmodo s server room is safeguarded by a 24/7 video surveillance system and has back-up power in case of emergencies. Access to the server room is highly restricted. Access to the servers are highly restricted as well. Enhanced Privacy Protection Keeping your data private and protecting your account from unauthorized access are paramount at Zmodo. If you are interested in how your personal information is collected and protected, please see our complete privacy policy. We have strict policies and technical barriers in place to prevent unauthorized access to your video data. A very select number of employees (senior engineering leadership) have the ability to access video data only when legally required or requested by you for technical support. We provide optional sharing function to Zmodo device owners. You're always in control over who has access to your Zmodo device content. You can decide to share your content with friends and family, or the general public, through various sharing settings. Or, your content can remain private as it is by default.
34 Password and Account Account passwords are not stored directly on our servers. Zmodo follows best practices and uses a non-reversible function to protect your password. Best Practices Advice Always install the latest versions of our app and device firmware and keep your web browser and Flash plug-in updated. If you believe one of your devices with the Zmodo App installed has been compromised, resetting your Zmodo password will immediately log your account out on all devices. In order to assist us with keeping your account safe and secure, please do not give out your account password to anyone. Responsible Disclosure Policy Any reports about security vulnerabilities are welcomed. If you are a security researcher and believe you have found security vulnerability, we would like to hear about it immediately. Before making any information public, we DO ask you to give us a reasonable amount of time to respond to your report. Please DO NOT access or modify user data without permission of the account owner and DO act in good faith not to degrade the performance of our services (including denial of service). If you comply with those requests, we will not take legal action against you. To contact us directly to report vulnerability, us at support@zmodo.com.
Pivot FAQ. General FAQs
 General FAQs Q: How can I reach the technical support? A: Live Chat (24/7): Available on the Zmodo website (www.zmodo.com) and through the Zmodo app (through People Contacts Zmodo Support) Dedicated Pivot
Snap PT. Quick Start Guide
 Snap PT Quick Start Guide 1 Getting to know your Snap PT The Snap PT is a smart WiFi Pan & Tilt IP camera with a built-in rechargeable battery. The battery lasts several hours, giving you flexibility to
Pivot. Quick Start Guide. Connect with Beam ZM-SH86B001-WA VER-Z3
 Pivot Quick Start Guide Connect with Beam ZM-SH86B001-WA VER-Z3 1 Getting to know your Pivot 1 2 3 5 4 6 7 8 1 Touch Pad 2 Status Ring 3 IR (Infrared) LED 4 Microphone 5 HD Camera 6 Light Sensor 7 Power
EZCam Quick Start Guide. Connect with Beam VER-Z3
 EZCam Quick Start Guide Connect with Beam VER-Z3 1 Getting to know your camera 1 2 3 4 5 6 1 Status Light 2 Light Sensor 3 HD Camera 4 Microphone 5 Power Port 6 Speaker What s in the box: EZCam Quick Start
Magnetic base Indicator light Microphone Camera lens Micro SD card slot Infrared light Front Side Pivot connector Built-in speakers
 Niro USER MANUAL Contents Introduction 4 Product Features 5 Niro LED Indicators 6 What s Included 7 Wi-Fi Requirements 8 Mobile Device Requirements 8 Garage Door Opener Requirements 8 Download the Momentum
WI-FI GARAGE DOOR CONTROLLER WITH CAMERA USER MANUAL
 WI-FI GARAGE DOOR CONTROLLER WITH CAMERA USER MANUAL Contents Introduction 4 Product Features 5 Garage Door Controller LED Indicators 6 What s Included 7 Wi-Fi Requirements 8 Mobile Device Requirements
HD WiFi Outdoor Camera. Quick Start Guide. Connect with Beam VER-Z3
 HD WiFi Outdoor Camera Quick Start Guide Connect with Beam VER-Z3 1 Mobile Setup This quick start guide will help you configure your WiFi camera kit for initial use. Before performing any permanent installation,
Introduction. See page #6 for device requirements.
 W-FI CAMERA USER MANUAL Contents Introduction 4 Camera LED Indicators 5 Wi-Fi Requirements 6 Mobile Device Requirements 6 Download the Momentum App 7 Create an Account 8 Setup 10 Pairing 10 Connecting
1080p HD Outdoor WiFi IP Camera
 1080p HD Outdoor WiFi IP Camera Quick Start Guide Connect with Beam VER-Z3 1 Mobile Setup This quick start guide will help you configure your WiFi camera for initial use. Please plug in and complete this
Introduction. Built-in speaker. Infrared lights. Camera lens. Reset button. Indicator light. Micro- USB port for power supply.
 Axel USER MANUAL Contents Introduction 4 LED Indicators 5 What s Included 6 Wi-Fi Requirements 7 Mobile Device Requirements 7 Download the Momentum App 8 Pairing 9 Pairing additional Momentum Devices 11
Snap. Quick Start Guide SD-H2304
 Snap Quick Start Guide SD-H2304 1 Getting to Know Your Snap Snap is a true wireless IP camera with a built-in rechargeable battery. You can install your Snap anywhere in your home without any complicated
Beam Quick Start Guide
 Beam Quick Start Guide 1 Getting to know your Beam Beam is a Smart WiFi Range Extender with smart hub features. You can use the Beam to connect Zmodo smart accessories to build your smart home. Once you
HD WiFi Indoor / Outdoor Camera Kit. Quick Start Guide
 HD WiFi Indoor / Outdoor Camera Kit Quick Start Guide 1 Mobile Setup This quick start guide will help you configure your WiFi camera kit for initial use. Note: Please download and install App and connect
Greet Pro. Quick Start Guide
 Greet Pro Quick Start Guide 1 Getting to know your Greet Pro The Greet Pro allows you to answer your door from any location. The Greet Pro is powered by your home's existing mechanical doorbell chime.
QUICK GUIDE. Instruction Manual. UFO Camera
 QUICK GUIDE Instruction Manual UFO Camera Contents 1. Things to Note before Getting Started 3 1.1 High-speed WiFi Internet Connection 3 1.2 SSID and Password 3 1.3 Operating System Requirements 3 2. Get
Panoramic Talking Camera
 Panoramic Talking Camera IPC2201 home8alarm.com 1-844-800-6482 support@home8alarm.com 1 Table of Contents Chapter 1. Introduction... 1 1.1 System Requirement... 1 Chapter 2. Hardware Overview... 2 Chapter
User What s inside Guide
 BABY MONITOR SYSTEM User Guide PNMSA2 IB 01 What s inside Welcome!... 2 Getting Started... 3 Tour of the System...15 EveryDay Use...17 Alexa... 17 Lullabies... 17 Motion detection...18 Sound detection...18
1. Search for ibaby Care in the App Store under phone apps, or in Google Play for all Android devices.
 M6 port diagrams Status Light DC Power Camera ID USB Port Reset Button DC Power: 5V DC, 2A power adapter (Use official ibaby brand power adapter only) Status Light: Displays 3 unique patterns to show different
WIFI BABY MONITOR. User Guide
 WIFI BABY MONITOR User Guide PNMWIFIAC What s inside Welcome!... 2 Getting started... 3 Tour of the system... 9 Everyday use...13 Motion detection...14 Sound detection...14 Auto-record time...15 Battery
SMART WI-FI BABY MONITOR. User Guide
 SMART WI-FI BABY MONITOR User Guide PNMAL2 What s inside Welcome!... 2 Getting started... 3 Tour of the system... 10 Everyday use...14 Alexa...15 Lullabies...15 Motion detection...16 Sound detection...16
Introduction. Package Checklist. Minimum System Requirements. Registering Your Product. More Help
 Introduction Keep a watch on your family, pet, home or office 24/7, even when you re not there. Creative Live! Cam IP SmartHD gives you a live update on your phone, wherever you are. Get activity alerts,
Product Features. LED Light. LED Indicator light. Camera Lens. Microphone. IR LEDs. PIR Sensor. Reset button. Micro-SD card slot. Speaker.
 Aria USER MANUAL Contents Introduction 4 Product Features 5 LED Indicators 6 What s Included 7 Wi-Fi Requirements 8 Mobile Device Requirements 8 Installation Requirements 9 Aria Installation 10 App Setup
HD WiFi Indoor / Outdoor Camera Guide
 HD WiFi Indoor / Outdoor Camera Guide Connectwith Beam VER-Z2C 1 Mobile Setup Before you perform any permanent installation, make sure you complete the mobile setup to configure your camera or camera kit.
IP116 Plus HD WiFi Camera
 IP116 Plus HD WiFi Camera Instruction Manual 1 Introduction Thank you for choosing the IP116 Plus HD WiFi Camera. We understand that whenever we purchase something new, we want to enjoy it as soon as possible.
PRODUCT OBJECTIVES. Stream live videos and receive alerts in moment with advance features of AmbiCam.
 PRODUCT OBJECTIVES Keeping in mind the need of technology and a proper surveillance activities for the safety of the society and economy, AmbiCam here have come up with its very new product call AmbiCam
HOME SECURITY KIT. USER MANUAL SMART PROTECTION WITH THE ALL-IN-ONE SOLUTION. SMART WINDOW SENSOR SMART POWER SOCKET SMART MOTION SENSOR SMART IP CAM
 HOME SECURITY KIT. SMART PROTECTION WITH THE ALL-IN-ONE SOLUTION. SMART WINDOW SENSOR SMART POWER SOCKET SMART IP CAM SMART MOTION SENSOR USER MANUAL SL-900100/900111 HOME SECURITY KIT A/B SHORT INSTRUCTION
AwoX CamLIGHT Wireless HD Video Camera & LED Light. User Guide
 AwoX CamLIGHT Wireless HD Video Camera & LED Light User Guide EN www.awox.com Contents Introduction... 3 Getting started... 5 Using your CamLIGHT... 8 Sharing cameras... 11 CamLIGHT settings... 12 Troubleshooting...
SMART WI-FI CAMERA START GUIDE
 SMART WI-FI CAMERA START GUIDE Thank you for purchasing your MERKURY smart home product. Get started using your new devices by downloading Geeni, one convenient app that manages everything straight from
The Indoor+Outdoor Security Starter Kit Quickstart Guide
 What s inside: The Indoor+Outdoor Security Starter Kit Quickstart Guide 1x Security Shuttle 1x Mini Cube HD camera 1x Mini outdoor Full HD camera 2x Door + Window sensors 1x Keychain remote 2x Power adapters
Features: (no need for QR Code)
") The Capp-Sure series brings a revolution in surveillance. Utilising a range of high-quality IP Wireless cameras, Capp-Sure provides stunning video clarity and optional Talk-Back audio over internet via
The Capp-Sure series brings a revolution in surveillance. Utilising a range of high-quality IP Wireless cameras, Capp-Sure provides stunning video clarity and optional Talk-Back audio over internet via
User Manual. Wireless IP Camera
 User Manual Wireless IP Camera Introduction Hi. Thank you for purchasing the AUKEY VT-CM1 Wireless Security IP Camera. Please read this user manual carefully and keep it in a safe place for future reference.
Mini WiFi Camera. Setup Manual
 Mini WiFi Camera Setup Manual 1 Getting to know your camera This mini WiFi camera features 1080p HD resolution, 140 wide-angle lens and two-way audio. It is also compatible with Google Assistant and Amazon
QUICK START GUIDE QT IP CAMERA & NVR BUNDLE ENGLISH
 QUICK START GUIDE QT IP CAMERA & NVR BUNDLE ENGLISH Table of Contents Welcome What s Included...3 Understanding your NVR...4 Get Connected Registration...5 Connect Your Cameras...5 Connect NVR to Display...6
Ctdigi.com. Instruction manual. Production by S & W Technology Labs
 Ctdigi.com Instruction manual Production by S & W Technology Labs I. Install app II. Guard camera Guard camera Introduction Accessory Sensor Scenario Guard 360 Introduction - Catalog - Install app Scenario
Luma Surveillance Mobile App. Owner s Guide. Version
 Luma Surveillance Mobile App Owner s Guide Version 180503-1035 Getting Started The Luma Surveillance app allows you to view live and recorded video from your system. With internet access, you can review
SmartCam N1. Quick Start Guide
 SmartCam N Quick Start Guide SmartCam N Overview Thank you for purchasing the SmartCam N. To get you started with your SmartCam, please follow the steps below.. Place your camera near your router inside
Content. Basic FAQ... 2 Subscription FAQ... 8 Technical FAQ...11
 Content Basic FAQ... 2 Subscription FAQ... 8 Technical FAQ...11 1 GV-OPAL Cameras FAQ Basic FAQ 1. Who will be able to access the videos of GV-OPAL S1? To access the camera image, you will need the mygvcloud
HD Pan/Tilt Wi-Fi Camera NC450
 HD Pan/Tilt Wi-Fi Camera NC450 Highlights 720P HD Image Delivers superb image quality in high definition, enhancing visual clarity experience. Pan / Tilt See up to 360 degrees horizontally and 150 degrees
LeFun IP Camera Quick Install Guide
 LeFun IP Camera Quick Install Guide Website: www.lefunsmart.com E-mail: support@lefunsmart.com Catalog 1. Introduction... 2 1.1. Thank you for Choosing LeFun IP Camera... 2 1.2. Introducing LeFun IP Camera...2
User Guide LC4. Before using this product, please read the guide carefully to avoid any damage to the product.
 User Guide LC4 Before using this product, please read the guide carefully to avoid any damage to the product. 1. Product Description 1.1 Packing list IP Camera User Manual Before using this product, please
Smart Business Security System Quick Start Guide
 Smart Business Security System Quick Start Guide 1 Getting to know your Business Security System The Zmodo Business Security System provides a full-featured monitoring solution to cover your entire business
Chapter 1 Introduction of the Camera 4. Chapter 2 Install Reolink App System Requirement Install the App 5
 Content Chapter 1 Introduction of the Camera 4 Chapter 2 Install Reolink App 5 2.1 System Requirement 5 2.2 Install the App 5 Chapter 3 Device Management 7 3.1 Add New Device 7 3.2 Modify Camera Login
User Guide. VIVOCloud. Cloud Monitoring Application for ipad, ipod, iphone R R. and Android phones and tablets. Rev. 1.0
 User Guide VIVOCloud Cloud Monitoring Application for ipad, ipod, iphone R R and Android phones and tablets R Rev. 1.0 R About this Document Rev. 1.0: Initial release. I. Requirements 1-1. The prerequisites
spoe NVR system Quick Start Guide
 spoe NVR system Quick Start Guide 1 HDD Installation If your system does not include a pre-installed HDD, you can purchase your own and follow the steps below for installation. Make sure you purchase a
ALIBI Witness 2.0 v3 Smartphone App for Apple ios Mobile Devices User Guide
 ALIBI Witness 2.0 v3 Smartphone App for Apple ios Mobile Devices User Guide ALIBI Witness 2.0 v3 is a free application (app) for Apple ios (requires ios 7.0 or later). This app is compatible with iphone,
CONTROL4 INTEGRATION WITH THE SHADE STORE MOTORS CONTROL4 INTEGRATION OVERVIEW:
 CONTROL4 INTEGRATION WITH THE SHADE STORE MOTORS CONTROL4 INTEGRATION OVERVIEW: Take your motorized window treatment experience to the next level by integrating them into your Savant smart home control
1. Product Description
 1. Product Description Hardware Description Note: The magnetic base can stick to any metal surface as per below diagram. This allows for better and more solid placement of the camera. 2. Installation 2.1
MODEL SUB Manual
 MODEL SUB Manual 020818 Table of Contents Welcome... 4 Guide to Features... 5. WiFi Mode...6 Setup... 6 Creating a Zone... 9 Selecting Speaker or Speakers for a Zone... 10 All Zones Page... 11 Zone Player
OUTDOOR SECURITY CAMERA WITH LED FLOODLIGHT
 OUTDOOR SECURITY CAMERA WITH LED FLOODLIGHT Wifi Security Camera With LED Floodlight Features 20W with 1600 Lumens Indoor and Outdoor Wifi IP Camera with LED flood light Passive IR and Motion sensor Support
Arlo Baby 1080p HD Monitoring Camera. The Next Best Thing to Being There. Features. View Anywhere, Anytime. Music Player. Smart Alerts.
 The Next Best Thing to Being There. Arlo Baby is an all-in-one smart baby monitoring camera designed with you and your baby in mind. Get a good night sleep and peace-of-mind knowing you ll never miss a
C6B SEAMLESSLY CONNECT TO YOUR HOME, YOUR OFFICE, YOUR STORE. AND COMMUNICATE WITH YOUR FAMILY AND PETS.
 C6B SEAMLESSLY CONNECT TO YOUR HOME, YOUR OFFICE, YOUR STORE. AND COMMUNICATE WITH YOUR FAMILY AND PETS. With the C6B you always enjoy peace of mind. The C6B is a Wi-Fi camera that lets you control your
Quick Install Guide. Model: PLC-223W, PLC-233W
 Quick Install Guide Model: PLC-223W, PLC-233W This installation guide provides basic instructions for installing the PLC-213W/ PLC-223W/PLC-233W indoor wireless IP camera on your network. By following
Mini Plus SEAMLESSLY CONNECT TO YOUR HOME, YOUR OFFICE, YOUR STORE. AND COMMUNICATE WITH YOUR FAMILY AND PETS.
 Mini Plus SEAMLESSLY CONNECT TO YOUR HOME, YOUR OFFICE, YOUR STORE. AND COMMUNICATE WITH YOUR FAMILY AND PETS. With the Mini Plus you always enjoy peace of mind. The Mini Plus is a Wi-Fi camera that lets
C6T SEAMLESSLY CONNECT TO YOUR HOME, YOUR OFFICE, YOUR STORE. AND COMMUNICATE WITH YOUR FAMILY AND PETS.
 C6T SEAMLESSLY CONNECT TO YOUR HOME, YOUR OFFICE, YOUR STORE. AND COMMUNICATE WITH YOUR FAMILY AND PETS. With the C6T you always enjoy peace of mind. The C6T is a Wi-Fi camera that lets you control your
Instruction Manual. Wi-Fi Full HD 1080p IP Concealed Junction Box Hidden Camera. V 1.3
 Instruction Manual Wi-Fi Full HD 1080p IP Concealed Junction Box Hidden Camera After Sales Support techsupport@123anfang.com www.yooseecamera.com V 1.3 Hardware Installation 1. Connect the power supply
SCAN LEARN MORE. iw4 Start Guide Visit our website for additional help and how-to videos
 SCAN LEARN MORE iw4 Start Guide Visit our website for additional help and how-to videos www.ihomeaudio.com/support/airplay/ Overview Controls Power Alarm Reset Button - Press to On the iw4 speaker system
THE SHADE STORE MOTORS WITH AMAZON ALEXA
 THE SHADE STORE MOTORS WITH AMAZON ALEXA ABOUT THE SKILL: The Shade Store s motorized window treatments can be voice controlled easily through Amazon Alexa. Simple commands allow you to raise and lower
Wi-Fi Baby Camera Pan & Tilt Cloud Camera
 Wi-Fi Baby Camera Pan & Tilt Cloud Camera Quick Install Guide DCS-850L Please save this guide for future reference. Read these instructions before using your camera. Do not manually adjust the angle of
Cassia Hub Bluetooth Router. ios & ANDROID APPLICATION GUIDE
 Cassia Hub Bluetooth Router ios & ANDROID APPLICATION GUIDE Items Included. Cassia Hub (). Power Adapter (). User Guide () Product Inputs / Controls. LED indicator. USB. Ethernet. Power (VDC) GETTING STARTED
Do not place or mount Ocli 1 in an area where it will be exposed to water. Ocli 1 is designed for indoor use.
 1 Manual: Ocli 1 with Observeye Viewer App for Android Setting Up Ocli 1 Live Viewing with Ocli 1 Recording Video and Taking Snapshots Using Advanced Features Setting Up Ocli 1 Place or Mount the Camera
Mi Home Security Camera Connection Guide. (ios)
") Mi Home Security Camera Connection Guide (ios) 1. Navigate to the APP Store with your iphone and search for Mi Home, or scan the QR code below to download and install Mi Home APP. 2. Plug in the Mi Home
Mi Home Security Camera Connection Guide (ios) 1. Navigate to the APP Store with your iphone and search for Mi Home, or scan the QR code below to download and install Mi Home APP. 2. Plug in the Mi Home
Cloud IP Camera Note:
 Version:V2.0 Cloud IP Camera User s Manual Note: To protect your privacy, please change the initial password after login. Please keep your user name and password safely. Contents 1. Introduction... 2 1.1
Arlo Q Arlo Q and. User Manual. NETGEAR, Inc. 350 East Plumeria Drive. March 2018 San Jose, CA 95134, USA
 Arlo Q Arlo Q and User Manual NETGEAR, Inc. 350 East Plumeria Drive March 2018 San Jose, CA 95134, USA 202-11598-09 Support For product updates and web support, visit http://www.arlo.com/en-us/support/.
Arlo Baby 1080p HD Monitoring Camera. The Next Best Thing to Being There. Features. Music Player. View Anywhere, Anytime. Smart Alerts.
 The Next Best Thing to Being There. Arlo Baby is an all-in-one smart baby monitoring camera designed with you and your baby in mind. Get a good night sleep and peace-of-mind knowing you ll never miss a
Quick Install Guide. For Covert IP Camera Series. Model: PLC-128PW, PLC-129PW
 Quick Install Guide For Covert IP Camera Series Model: PLC-128PW, PLC-129PW This installation guide provides basic instructions for installing the PLC-128PW and PLC-129PW covert IP camera on your network.
IPC 112N. High Definition Capture Cam. Smart Security Wi-Fi Cam. User Manual
 IPC 112N High Definition Capture Cam Smart Security Wi-Fi Cam User Manual 2009-2018 Sakar International, Inc. All rights reserved. Windows and the Windows logo are registered trademarks of Microsoft Corporation.
Toucan Surveillance Kit Camera & Smart Socket. User s Manual Model: TSK100KU
 Toucan Surveillance Kit Camera & Smart Socket User s Manual Model: TSK100KU Table of Contents 1. Key Features... 3 2. What Is Included... 6 3. Toucan Camera & Socket Installation... 8 4. Getting The Kuna
ELAN INTEGRATION WITH THE SHADE STORE MOTORS ELAN INTEGRATION OVERVIEW:
 ELAN INTEGRATION WITH THE SHADE STORE MOTORS ELAN INTEGRATION OVERVIEW: Take your motorized window treatment experience to the next level by integrating them into your ELAN smart home control system. The
KB Door Bell Camera Setup Guide
 Knowledge Base Text: Jimmy Wang KB Door Bell Camera Setup Guide Key Features: Replacing to the existing doorbell button, no extra wire needed * 2.1MP 1080P Full HD @30fps with audio 180 panoramic view
Camera TEIA USER GUIDE
 Camera TEIA USER GUIDE 2 WELCOME! This guide includes all the information to make the most out of your Smart SPC Teia camera. EN GET AN SPC ACCOUNT Free advantages just one click away. Before going on
Smart Wireless Camera Instructions
 Smart Wireless Camera Instructions Dear customer, welcome to use our product, if you don t like this camera and want to return it to us, in order to protect your privacy and delete the video history from
ProHome IPC App. Operating Manual. easy to operate using the "ProHomeIPC" app from Olympia en
 ProHome IPC App easy to operate using the "ProHomeIPC" app from Olympia Operating Manual 11.2016 en General Information... 5 Installing the ProHomeIPC App... 5 Connecting the Smartphone/Tablet PC to the
Product Manual for Floodlight Cam
 Product Manual for Floodlight Cam 1. Product Introduction Product Name : Floodlight Camera Combo 1) Product description: The security camera is the best choice for people who looking for a security camera
Quick Start Guide HGWIP-811
 TM TM Quick Start Guide HGWIP-811 GIVES PEACE OF MIND WHEREVER YOU ARE Welcome Thank you for choosing HOMEGUARD. Getting starting is easy. ELDERLY Relatives 2 CHILDREN Sleeping/playing PETS Monitoring
Swivl User Guide. C Series Robot
 C Series Robot Swivl Swivl Robot Swivl App Swivl Cloud Our robot follows you with great quality audio. Now it has twice the speed of response, a simpler Lightning interface and multi-channel audio so you
GV-Eye Mobile App. Contents
 GV-Eye Mobile App. Contents 1.1 Specifications... 2 1.2 Supported GV-IP Devices and Software... 3 1.2.1 Supported Products for Connection... 3 1.2.2 Supported Products for Enabling Monitoring... 4 1.2.3
Hip Smarthome - Systems User Manual
 Hip Smarthome - Systems User Manual Contents 1. Hip SmartHub Connection / Setup... 3 1.1. Setup Guide... 3 2. Hip SmartTV Connection / Setup... 5 2.1. Setup Guide... 5 3. Hip SmartMusic Connection / Setup...
HD Pan/Tilt Wi-Fi Camera
 HD Pan/Tilt Wi-Fi Camera See up to 360 degrees horizontally and 150 degrees vertically Night Vision Motion Detection Micro SD Card Slot Highlights Stay Connected and Secure Anywhere. Anytime Access. The
Wireless IP Bird Box Camera
 Wireless IP Bird Box Camera Model: 4901-18 Operation and Installation Manual 1 WELCOME... 3 PRODUCT OVERVIEW... 4 HARDWARE INSTALLATION... 4 Attach the External Power Adapter... 4 SMARTPHONE OR TABLET
Saviour App User Manual. User Manual to use app. This documents describe the Saviour app functionalities for end user.
 Saviour App User Manual User Manual to use app This documents describe the Saviour app functionalities for end user. Introduction This document describes the Saviour app to use Saviour Indoor, Outdoor
Arlo Pro 2 Wire-Free HD Security Camera System. User Manual. NETGEAR, Inc. 350 East Plumeria Drive. October 2017 San Jose, CA 95134, USA
 Arlo Pro 2 Wire-Free HD Security Camera System User Manual NETGEAR, Inc. 350 East Plumeria Drive October 2017 San Jose, CA 95134, USA 202-11802-03 Support For product updates and web support, visit http://www.arlo.com/en-us/support/.
1. Install the DANALE app. 2. Create an account
 USER S MANUAL EN 1. Install the DANALE app For Android users On your Google Play Store, search for Danale and then install the app on your phone. For ios users Please open your App Store, search for Danale
Arlo Baby 1080p HD Monitoring Camera. The Next Best Thing to Being There. Features. Music Player. View Anywhere, Anytime. Smart Alerts.
 The Next Best Thing to Being There. Arlo Baby is an all-in-one smart baby monitoring camera designed with you and your baby in mind. Get a good night sleep and peace-of-mind knowing you ll never miss a
1. Introduction Overview Product Information... 3
 1. Introduction... 3 1.1 Overview... 3 1.2 Product Information... 3 2. Device Connection... 3 2.1 Connection Diagram... 3 2.2 Wi-Fi Setting... 4 2.2.1 Set up WiFi by Mobile Phone... 4 2.2.2 WPS/QSS One
User Guide DUAL CONNECT BABY MONITOR. with Wi-Fi viewing and dedicated parent unit
 DUAL CONNECT BABY MONITOR with Wi-Fi viewing and dedicated parent unit User Guide PNMDUAL5 What s inside Getting Started... 2 Tour of the system... 10 Everyday use...14 Cameras (Parent Monitor only)...15
Quick Start Guide. Getting Started. Controls and Connections. Before you begin, please make sure that you have the following available:
 Quick Start Guide Getting Started Before you begin, please make sure that you have the following available: A computer network with 2.4GHz WiFi or Ethernet One of the following devices: An Apple iphone,
DCS-8000LH. HW Version FW Version App Name App Version. A1 V Mydlink Lite V3.8.0
 DCS-8000LH HW Version FW Version App Name App Version A1 V1.00.05 Mydlink Lite V3.8.0 Contents Q1: How to setup DCS-8000LH using mydlink Lite App?... 2 Q2: How to setup Motion detection?... 7 Q3: How to
MicroBot Push User Guide
 MicroBot Push User Guide Troubleshooting 24 My Microbot App does not detect my MicroBot Push 24 MicroBot Push keeps disconnecting 25 MicroBot Push is not updating 25 Getting Started 2 Meet MicroBot Push
Swivl User Guide. C Series Robot
 C Series Robot Swivl Swivl Robot Swivl App Swivl Cloud Swivl robot follows you with great quality audio. Now it has twice the speed of response, a simpler Lightning interface and multi-channel audio tracks
QUICK START GUIDE. Welcome to the Amcrest Family! LET US KNOW WHAT YOU THINK. Simple. Reliable. Secure. WI-FI CAMERA INITIAL SETUP
 LET US KNOW WHAT YOU THINK We sincerely thank you for your business and are committed to ensuring your full satisfaction. If you are not entirely satisfied for whatever reason, please reach out to us and
ORB / SPHERA Manual
 ORB / SPHERA Manual 020818 2 Table of Contents Welcome... 4 Guide to Features... 5 Top Panel... 5 Rear Panel... 6 WiFi Mode...7 Setup... 7 Creating a Zone... 10 Selecting Speaker or Speakers for a Zone...
1. Introduction P Package Contents 1.
 1 Contents 1. Introduction ------------------------------------------------------------------------------- P. 3-5 1.1 Package Contents 1.2 Tablet Overview 2. Using the Tablet for the first time ---------------------------------------------------
QUICK SETUP GUIDE WNVR201 SERIES. Specifically Designed for Tablets. Specifically Designed for Smart Phones.
 QUICK SETUP GUIDE WNVR201 SERIES www.nightowlsp.com Specifically Designed for Smart Phones Specifically Designed for Tablets RESET LAN1 LAN2 LAN3 LAN4 WAN What s in the Box Package Contents Disclaimer:
Product Highlights. Features. DCS-2802KT Wi-Fi Battery Camera Kit. Smart Home, Made Brilliant. Compact Design, Simple Setup. Versatile Feature Set
 DCS-2802KT Wi-Fi Battery Camera Kit Product Highlights High Definition Clarity 1080p Full HD quality video Motion Detection Receive motion alert notifications and record video clips Cloud Recording Automatically
Carkuda (VTG500X) User Manual
 User Manual") Carkuda (VTG500X) User Manual Contents Carkuda Concepts Quick Start Installing Carkuda Mirror Using Carkuda Mirror Using Carkuda Smartphone App Technical Specifications Packing List FAQs Revision History
Carkuda (VTG500X) User Manual Contents Carkuda Concepts Quick Start Installing Carkuda Mirror Using Carkuda Mirror Using Carkuda Smartphone App Technical Specifications Packing List FAQs Revision History
Quick Start Guide HGWIP-818
 TM TM Quick Start Guide HGWIP-818 GIVES PEACE OF MIND WHEREVER YOU ARE ELDERLY Relatives CHILDREN Sleeping/playing PETS Monitoring HOME Surveillance Welcome Thank you for choosing HOMEGUARD. Getting starting
Version: DSD0221EN01. Quick Start Guide
 Version: DSD0221EN01 Quick Start Guide Table of Contents Quick Installation Guide... 1 What s in the Box... 1 Quick Start Guide... 2 Notes for Installation... 2 Operation Steps for ios Device... 3 Live
Limited Edition Product Overview
 Limited Edition Product Overview INTRODUCTION REDEFINING LUXURY beléci is built with impeccable craftsmanship and is designed to meet the 21st century mobile security challenges with its built-in CodeTel
DSH-C130. FAQ Ver.1.1
 DSH-C130 FAQ Ver.1.1 June 23th, 2017 Contents Q1: Where do I get the Omma app or software?... 2 Q2: How to setup DSH-C310 using Omna App?... 3 Q3: What is the difference between the Omna app and the Home
THE SHADE STORE APP SETUP INSTRUCTIONS
 SETUP INSTRUCTIONS ABOUT THE APP: The Shade Store app allows for control of your motorized window treatments through your smartphone/tablet. The app allows for: Individual and group control Scene control