Monitoring system R-SeeNet USER GUIDE
|
|
|
- Edmund Thompson
- 6 years ago
- Views:
Transcription


1 Monitoring system R-SeeNet USER GUIDE
2 Contents 1 Description monitoring system Introduction Hardware requirements Distribution R-SeeNet Installation monitoring system Description of the web interface Menu View mode Edit mode Device list Selected Devices Device status System information Traffic GPRS status Signal Strength Latency Packet loss System Availability Report Report menu Export data Hourly status Daily status Latency Packet Loss Availability Signal strength Add device Remove device Options Login to the system Information about program Databases Description of the databases Backup database Restore database...25 ii
3 Picture Fig. 1: Progress installation...2 Fig. 2: Progress installation...2 Fig. 3: Progress installation...3 Fig. 4: Progress installation...3 Fig. 5: Progress installation...4 Fig. 6: Progress installation...4 Fig. 7: Progress installation...5 Fig. 8: Progress installation...5 Fig. 9: Progress installation...6 Fig. 10: Progress installation...6 Fig. 11: Progress installation...7 Fig. 12: Progress installation...7 Fig. 13: Progress installation...8 Fig. 14: Progress installation...9 Fig. 15: Header...10 Fig. 16: Header after login...10 Fig. 17: Ping...11 Fig. 18: Device list...11 Fig. 19: Device list after login...12 Fig. 20: Header after select devices...13 Fig. 21: Selected Devices...13 Fig. 22: System information...14 Fig. 23: System information after login...14 Fig. 24: Traffic...15 Fig. 25: Cell information...15 Fig. 26: Signal strength...16 Fig. 27: Graph of signal strength...16 Fig. 28: Latency...17 Fig. 29: Packet loss...17 Fig. 30: System availability...17 Fig. 31: Calendar...18 Fig. 32: Export data...19 Fig. 33: Hourly status...19 Fig. 34: Graph of average latency...20 Fig. 35: Table of average latency...20 Fig. 36: Routers with latency higher then specific value...20 Fig. 37: Average packet loss...21 Fig. 38: Routers with availability lower then specific value...21 Fig. 39: Network Availability...21 Fig. 40: Routers with availability lower then specific value...22 iii
4 Fig. 41: Signal strength...22 Fig. 42: Routers with signal strength higher then specific value...22 Fig. 43: Add device...23 Fig. 44: Example a CSV file...23 Fig. 45: Remove device...23 Fig. 46: Options...24 Fig. 47: Login to the system...24 Fig. 48: Information about RSeeNet...24 Fig. 49: The location of backup database...25 iv
5 Symbols used Attention notice on possible problems, which can arise in specific cases. Information, notice information, which contains useful advice or special interest. v
6 1 Description monitoring system 1.1 Introduction R-SeeNet is the monitoring system of routers, which allows monitoring of the GSM, GPRS, UMTS routers company Conel. The monitoring system R-SeeNet has two separate parts. The first program provides reading the statistics from routers. This program runs as a service and using SNMP protocol for reading statistics from the router and stored in a MySQL database. Database monitoring system consists of two main tables. Table Devices that is contains the data about individual routers. Stats table that is contains the individual data in a single reading taken one router. Reading period can be selected when installing the R-SeeNet and must be chosen with regard to the number of routers. The second part is a web browser used to display read and calculated data. 1.2 Hardware requirements Hardware requirements for the computer on which the R-SeeNet depends on the number of monitored routers. For the current number to 1000 routers, is ordinary office PC with 2 to 4 GB memory and processor Intel Core I5. For larger numbers of monitored routers is recommended server computer with at least 2 processors, 10GB of memory and large and fast disks due to frequent access to the database. 1.3 Distribution R-SeeNet Monitoring System R-SeeNet comes in versions for Windows and Linux. If Linux distribution is R-SeeNet supplied with CentOS server distribution. 1


7 2 Installation monitoring system After starting the installation menu will appear with the choice of language installation guide. For the next step of the installation, press "OK" button. Fig. 1: Progress installation Next page is the Welcome wizard window with information about the R-SeeNet version. To continue installation, click "Next." To cancel the installation on this or other steps is "Cancel" button. Fig. 2: Progress installation 2

8 The next step is to choose a location for the installation of R-SeeNet. If the default in the root directory, a new location can be selected using the "Browse". For the next step of the installation you click Next. Fig. 3: Progress installation In the next step of the installation is ready to run. Start installation, pressing "Install" button. Use the "Back" button can return to the previous steps. Fig. 4: Progress installation 3


9 Now, the program R-SeeNet installed. In the middle of the window you can see the installation process. Fig. 5: Progress installation The next steps will be installed the XAMPP which includes Apache, PHP and MySQL packages needed to run the R-SeeNet. Language selection confirm with "OK". Fig. 6: Progress installation The program RSeeNet supports MySQL from versions 5.x.x, PHP from version 5.x.x and Apache from version 2.x.x 4

10 Next page is the Welcome wizard window installation with information about the version of XAMPP, which will be installed. To continue installation, click "Next." Fig. 7: Progress installation The next step is to choose a location for installation of XAMPP. XAMPP is a program to be installed in the same directory as R-SeeNet. If you changed the default location to install the R-SeeNet need to change this setting here using the "Browse". For the next step of the installation you click "Next." Fig. 8: Progress installation 5


11 In this step you can set several properties. Use the check box XAMPP DESKTOP can enable a shortcut on the desktop and using the box XAMPP Start menu can be allowed to create a shortcut in the Start menu. It is also necessary in the SERVICE SECTION choose to install Apache and MySQL as a service. If these options are not checked-r SeeNet not work correctly. Now the program is ready to install XAMPP. To start the installation, press Install. Fig. 9: Progress installation Now, the program R-SeeNet installed. In the middle of the window you can see the installation process. Fig. 10: Progress installation 6

12 After successful installation of XAMPP it is shown this window. To complete the installation of XAMPP and additional step of installing the R-SeeNet need to press the Finish button. Fig. 11: Progress installation It is also possible to run XAMPP. To complete the installation and run the program is not necessary to run, before Apache and MySQL running as a service. Fig. 12: Progress installation 7

13 After successfully installing XAMPP, settings have only a few basic parameters of the R-SeeNet. Backup time Time of backup database monitoring system. Number of attempts Number of attempts reading router. Monitoring period Period of reading router. Timeout - Time for a monitoring system waits for a response from reading router. Start delay - Delay start reading the routers after start the monitoring system. Read location - If this option is checked, R-SeeNet reads position settings in the router. Default community This community is default community, when add new router. Timezone Local time zone. Ping length Number of sent ping messages when you invoke ping from a monitoring system. Fig. 13: Progress installation 8
14 To complete the installation of R-SeeNet press Finish button. Fig. 14: Progress installation 9
15 3 Description of the web interface To access the system to display the results of monitoring routers use a web interface that can be accessed by entering the IP addresses or domain names of computers on which the surveillance system installed. 3.1 Menu Menu of the monitoring system is in header of web pages. In the upper right corner is information about the current system version. In addition, the menu is divided into three parts. In the first "status" option is to display information about the monitored routers. The configuration of the "Configuration" is used for editing, adding and deleting monitored routers. In the administration of the "Administration" can log on or log off the system and find information about the R-SeeNet View mode In basic mode, after running the monitoring system is available Device List option displays a list of monitored routers. Next option report shows statistics about the monitored routers. The configuration of this mode is not accessed any no choice. In the administration section is made available in this mode, the option to login Login and choice of informing on the current version About. Fig. 15: Header Edit mode Options for editing the list of monitored routers are available after login into the system. Add Device used to add a router or a list of routers. Remove Device used to removing the router from the list. Options used to setting the monitoring system. Logout used to exit the edit mode. Fig. 16: Header after login 3.2 Device list List of monitored routers can cause the status menu item Device List, or after start the monitoring system. :. - The first column contains an identifier of the router. Router sequence number added. Description - Gives a description of the router that is specified by the user, when inserting router in the list or can be changed later in the Device status. Hostname - Specifies the IP address of the router. After moving the mouse on the IP address of the router displays date and time last readout router. After pressing the IP address of the router displays statistics for the selected router (Device Status). The background is colored according to access the router: o Green - The router was readout in the last round. 10


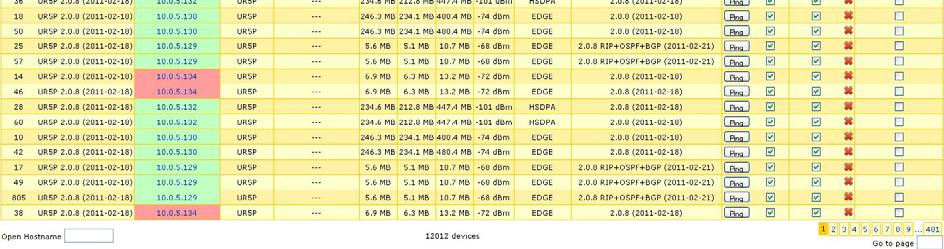
16 o o Orange - The router could not be read only in the last round of reading. Red - The router could not be read in several last rounds of reading. Device - Specifies the type of router. Location - Specifies the location of the router. This location is specified when inserting router in the list or can be changed later in the Device status. If in the options checked read location from device monitoring system reads the position set in the router. Tx Specifies total size of transmit data. Rx - Specifies total size of received data Total Specifies the size of total data Level - Specifies the signal quality of the currently selected cell. Data service - Specifies the type of transmission technology using the router communicates. Firmware - Specifies the current firmware version loaded in the router. Ping - After clicking this button starts the ping to the router. After the ping result is displayed in a new window. Fig. 17: Ping Enabled If the checkbox is checked, enabled retrieving information from the router via SNMP. Auto update - Enables automatic updating of router configuration. Automatic configuration of routers does not update the program itself R-SeeNet. It only enables or disables the configuration file download from a computer with a monitoring system. The update must be set in the configuration automatically update itself router. Fig. 18: Device list 11

17 After login, in the table shows a few new columns to allow editing and removing routers from the list. Enabled - This item is not only informative, but can be switched on and off reading the statistics from the router using the check box. Auto update - This item is not only informational purposes, can be switched on and off the automatic update configuration using the check box. Remove - This column has not description. After pressing the red cross remove the router from the list surveillance system. Device selection - This item is used to change the properties or deleting multiple routers at once. Routers that require the mass change of the properties are selected using the checkboxes in the list and add them using the Checked. To add all routers to the list, use the button All. Fig. 19: Device list after login On one page of the Device List can display 25 routers. To navigate between pages serve pagination in the lower right corner. To view other sites use the page number. Another option is to write the page number in the "Go to page ". Sort routers can be in all types of records. Sort by a particular column can press on his name. Sorting in reverse order can be turned on pressing on the column title. Records can be filtered by criteria (description, device, location, data service, and firmware). First, specify the criterion by which to filter into the box below the name of the column. Filter on by pressing the filter. If we want to produce detailed statistics on a router can use the already described procedure selected press the router's IP address or IP address entered in the Open Hostname box located in the lower left corner of the page and view the statistics by pressing the enter Selected Devices Page Selected Devices used to change the properties of multiple routers or delete them. First you must add a router as described in the Device column selection in Section 4.2. If the routers successfully added appears in the header page, the link to edit these routers 12

18 with information about the number (see Fig.6). Page for editing features Devices Selected works by pressing this link. Fig. 20: Header after select devices On the left of the page Selected device is a table with a list of selected routers and their basic properties. On the right side you can find options for changing the properties of routers with the following items. Change description to Change description selections routers. Change community to Change password for SNMP attempt to the selections routers Change location to Change location selections routers. Enable/Disable monitoring If this checkbox is check, monitoring router is allowed. Enable/Disable AutoUpdate - If this checkbox is check, auto update of configuration is allowed. Remove device Remove selections routers from list of routers. Clear selection Clear list of selected devices after change properties. Suddenly, you can only change one property routers. Fig. 21: Selected Devices 13


19 3.3 Device status Device Status page displays information and statistics on the selected router. Device status page can be accessed at the IP router to the selected Device List or enter router IP addresses selected in the Host name on the Device Status page System information This table displays system information about router. IP Address Specifies IP address of router. After press this IP address, you will be redirected to the web interface of the selected router. Use button Ping can cause Ping to the router like in the Device list. PLNM - Specifies the code operator. Data service - Specifies the transmission technology used by the router. Device Specifies model of router. After pressing the button refresh, type of router deletes from the database and reading at the next re-reads. Firmware Specifies firmware version loaded in the router. MAC address Specifies router MAC address Update configuration Specifies last configuration update. Description Specifies user defined router description. Location Specifies user defined router location. Enabled - If the checkbox is checked, enabled retrieving information from the router via SNMP Fig. 22: System information After login into the monitoring system may Description and Location are modified using a text box. New item the Community informs the SNMP password for SNMP access to the router. This password can be changed using a text box. And the last parameter Enabled, you can switch after logging. Fig. 23: System information after login 14


20 3.3.2 Traffic This table shows the statistics of traffic and number of the PPP connection establishment. Traffic Specifies period for which data are displayed. Total data Specifies size of transmitted data for the period. Received - Specifies the size of received data. Sent Specifies the size of total data. Connections Specifies number of PPP connection establishment for the period If the build number of the PPP connection in the period is 0, it means that the router in a period not lost the PPP connection. Fig. 24: Traffic GPRS status This table shows information about selected cell and audible neighbor cells. Cell information - Current Cell Information about current selected cell. Neighbor cells Information about audible neighbor cells. Cell ID Specifies cell ID. Channel Specifies channel. Signal strength Specifies signal strength. Uptime Specifies time of PPP connection. Fig. 25: Cell information Signal Strength Table Signal Strength shows the statistics of signal strengths in different time periods (today, yesterday, this week, this and last month). The second table shows the information about minimum and maximum signal strength with time when the strength of the signal occurred. Signal Strength Specifies period for which data are displayed. Average Specifies average signal strength. 15

21 Minimum Specifies minimum signal strength. Maximum Specifies maximum signal strength. Cells Specifies number of switching between cells. After you place your cursor on the number of cells shows cells between which the router is switched. Services Number of services indicates how many times the router is switched between different technologies. After you place your cursor on the number shows a transmission technology that used the router used for the period. Number of switching between the cells has only informative character. Switching is possible between neighboring cells. If a large number of switching, it means that a badly placed antenna router. For routers ER 75i, UR5i, UR5, the number of switching between the cells may differently value from the actual value recorded in the router. Since the monitoring system detects if a cell is changed between two reading routers. Therefore, if a router in between 2 readout will change cell to another and back to the original switch, monitoring system does not register. Fig. 26: Signal strength You can also view a graph of the signal strength for a period of time by pressing the image graph in a cell with the name of the selected period. Fig. 27: Graph of signal strength Latency Table latency shows the statistics of access time in different time periods (today, yesterday, this week, this and last month). The second table shows the information about minimum and maximum latency with time when the latency occurred. Signal Strength - Specifies period for which data are displayed. Average Specifies average latency. Minimum Specifies minimum latency. 16


22 Maximum Specifies Maximum latency. Latency is determined from latency a request, which a core of monitoring system sends on router. Fig. 28: Latency You can also view a graph of the latency for a period of time by pressing the image graph in a cell with the name of the selected period Packet loss Table Packet Loss shows the statistics of lost packets for a certain period. The value of the packet loss rate is the ratio of lost packets to all the all packets, which core of monitoring system sent to the router. Fig. 29: Packet loss You can also view a graph of the packet loss for a period of time by pressing the image graph in a cell with the name of the selected period System Availability Table System Availability displays statistics on the availability of routers for some time. Availability value is determined based on the time of router connected to the network, which is reading from the router. The value is calculated as the ratio of time from when the router is connected to the network to actual time of the interval. If the router is connected for longer than from midnight, available calculated as 100%. If the router fails to read, it is available as to the time when router is a successful readout. Availability calculates of the new reading time, when router connected to the network. Fig. 30: System availability You can also view a graph of the system availability for a period of time by pressing the image graph in a cell with the name of the selected period. 17

23 3.4 Report Report page displays statistics for all routers in the monitoring system over user selected period Report menu Statistics can be viewed for individual day, week or month. Month Month can be selected using M in the blue box at the bottom left corner of the calendar. Week Week can by selected using number of week in the first column calendar. Day Day can by selected using number of day in green box in calendar. Use the symbol < and > can browses the calendar for month. Use the symbol << and >> can browses the calendar for year. Fig. 31: Calendar In the data source can be selected for what routers the statistics shows. All devices - The statistics are displayed for all routers. Selected device Statistics are displayed only for selected routers in the list Selected devices. You can also choose to restrict the criteria for the table of routers that this criterion in a selected period do not. Latency - The table shows routers with latency longer than the specified latency Packet loss The table shows routers with packet loss bigger then the specified packet loss. Availability The table shows routers with availability smaller then restrictive availability. Signal strength The table shows routers with Signal strength smaller then restrictive signal strength Export data The statistics for the selected period can be exported to a file in PDF or CSV format. You can choose between three different types of exports. Export report - Exports statistics and tables of routers unsuitable limits specified in the same view as a web page into a file in pdf format. Export summary data - Exports only the statistics to a file in pdf format. 18
24 Export daily report - Export statistics for the current day and clock settings in Options. Export list of diverging device - Export the list of routers unsuitable limits specified in a file in CSV format. Export state of devices Export the list of routers and state of routers in a CSV format. Format of CSV file: Description, Hostname, Location, Data service, Signal strength, Cell id, Services cells. The items are described in the Device status section. Items From and To indicate the period for which statistics on exports. Fig. 32: Export data Hourly status Information in the hourly status section display average statistics for the selected period. Online Network Access Routers - Displays the minimal and maximal number of online routers. Network availability Average availability for selected period. Network Average Latency Average latency for selected period. Network Average packet loss Average packet loss for selected period. Fig. 33: Hourly status Daily status Daily status section displays statistics for the selected period. Statistics are represented by the graph of the values of individual items in the selected time period. Average Packet loss Displays the statistics of average packet loss of monitored routers for selected periods. Average Latency Displays the statistics of average latency of monitored routers for selected periods Network Availability Displays the statistics of availability of monitored routers for selected periods. Routers online Displays number of online routers for selected period. 19


25 Example graph with latency: Fig. 34: Graph of average latency Latency Statistics of Latency you see a table with average values latency for each day of month back. Next you see a table with the IP address of the router with latency higher then specific value in the selected time period. Maximum number of records in tables routers unfulfilled criterion is 30 all records can be get by Exporting to CSV file (the export list of diverging devices). Fig. 35: Table of average latency Fig. 36: Routers with latency higher then specific value 20


26 3.4.6 Packet Loss Statistics of Packet loss you see a table with average values Packet loss for each day of month back. Next you see a table with the IP address of the router with packet loss higher then specific value in the selected time period. Maximum number of records in tables routers unfulfilled criterion is 30 all records can be get by Exporting to CSV file (the export list of diverging devices). Fig. 37: Average packet loss Fig. 38: Routers with availability lower then specific value Availability Statistics of Availability you see a table with average values availability for each day of month back. Next you see a table with the IP address of the router with availability lower then specific value in the selected time period. Maximum number of records in tables routers unfulfilled criterion is 30 all records can be get by Exporting to CSV file (the export list of diverging devices). Fig. 39: Network Availability 21

. Fig. 41: Signal strength Fig.")
27 Fig. 40: Routers with availability lower then specific value Signal strength Statistics of Availability you see a table with average values signal strength for each day of month back. The value of signal strength rate is the ratio of lost router with signal strength smaller then specific value to all routers. Next you see a table with the IP address of the router with availability lower then specific value in the selected time period. Maximum number of records in tables routers unfulfilled criterion is 30 all records can be get by Exporting to CSV file (the export list of diverging devices). Fig. 41: Signal strength Fig. 42: Routers with signal strength higher then specific value 3.5 Add device Add Router to a monitoring system can be in two ways. Manually filling and submitting the form by clicking the Add Device. Individual items have the following meanings. Hostname IP address of the new router. Description Description of the new router. Community Password for SNMP attempt to the new router. Location Location of the new router. Another way to add new routers into the monitoring system is to import a list of routers from a CSV file. Select the CSV file contains columns with the IP address, a description of the router and the router location. In addition to the community box to fill the password for SNMP access to the router and select the type of separator used in csv format in a item Delimiter. 22


28 Fig. 43: Add device Example csv file for import three routers. Fig. 44: Example a CSV file 3.6 Remove device Use the Remove Device option can be removed router from the surveillance system. Fill IP address of removed router in the Hostname and press the Remove Device. Fig. 45: Remove device 3.7 Options On the Options pages you can set the technical characteristics of the monitoring system. Default community - You set the password when entering the new default router. Timezone - Setting local time shifting. Read Location from device If this box is checked, system read location from router. Number of echo reguest to send Number of ping messages is sent when you invoke ping the Device list. Daily report generate from xx to xx hour Setting the time of generation daily report, which can be downloaded from the page Report. 23
29 Save the settings by pressing the Save button. Fig. 46: Options 3.8 Login to the system To access all functions of the monitoring system is required after login. Registration form can be accessed via the Login link in the administration of the menu. Fig. 47: Login to the system After logging in, make all functions of the monitoring system. To log out, use logout link in the administration menu. 3.9 Information about program The page "About" on the left displays information about the version RSeeNet, type of license and used the license number. There is visible information about the current state of the core RseeNet. The right of the page you can find information about the company Conel. Fig. 48: Information about RSeeNet 24

30 4 Databases 4.1 Description of the databases Monitoring System database contains 5 tables. Table devices containing information on individual stations and monitored the last states. In the table day statistics are kept of each router in one day. Next stats table contains statistics for each router Reading data during one monitoring cycle. Summary information of a monitoring cycle is stored in the table summary. Routers that were unavailable in one monitoring cycle are stored in the table fails. 4.2 Backup database Database monitoring system is backed up daily at the hour designated by the installation process. Backups are stored in the directory at the XAMPP install monitoring system (See Figure 48). Directory name is in the form YYYYMMDD. (year, month, day). Backup from the previous day deletes, when creating a new backup. Every first day of the month create a monthly backup directory in the form YYYYMM (year, month), which is held to the first day of next month. To successfully create a backup monitoring system database must contain at least one router. Fig. 49: The location of backup database 4.3 Restore database Before restoring the database it is necessary to stop the MySQL service and snmomonsvc service. Backup to be restored should be moved to the directory XAMPP\mysql\data\ snmpmon. 25
User module. Guest Configuration APPLICATION NOTE
 User module Guest Configuration APPLICATION NOTE USED SYMBOLS Used symbols Danger important notice, which may have an influence on the user s safety or the function of the device. Attention notice on possible
1. Header There is an application icon, application title (RS-MGR2), minimize button, maximize button, and close button.
, minimize button, maximize button, and close button.") Section 1. Main screen After logging in, the Main screen is displayed. The Main screen consists of 4 parts: 1. Header 2. Top menu 3. System Configuration screen 4. Map screen NOTE: You need one RS-MGR2
Section 1. Main screen After logging in, the Main screen is displayed. The Main screen consists of 4 parts: 1. Header 2. Top menu 3. System Configuration screen 4. Map screen NOTE: You need one RS-MGR2
Using the Prime Performance Manager Web Interface
 3 CHAPTER Using the Prime Performance Manager Web Interface The following topics provide information about using the Cisco Prime Performance Manager web interface: Accessing the Prime Performance Manager
Clock Comms User guide
 Clock Comms User guide Table of Contents Clock Comms...4 Getting Started... 5 Installing... 6 Setup - Welcome... 8 Setup - License Agreement... 9 Setup - Select Destination Location... 11 Setup - Start
Layout and display. STILOG IST, all rights reserved
 2 Table of Contents I. Main Window... 1 1. DEFINITION... 1 2. LIST OF WINDOW ELEMENTS... 1 Quick Access Bar... 1 Menu Bar... 1 Windows... 2 Status bar... 2 Pop-up menu... 4 II. Menu Bar... 5 1. DEFINITION...
IMS Client Operation Guide Version V1.1 Date
 Version V1.1 Date 2015-10-20 About This Document About This Document About This User Manual Please note the following points before using this user manual: This user manual is intended for persons who
Accessing Data from the Web Interface
 5 CHAPTER This chapter provides information about accessing Prime Performance Manager data from Prime Performance Manager web interface. This chapter contains: Supported Browsers, page 5-1 Accessing Prime
Additional Information
 Additional Information Additional Information feeds section 14 of the HUD Report. Section 14 provides a place to communicate any other information that might be relevant to the administration and performance
Acronis Monitoring Service
 Acronis Monitoring Service PRODUCT DOCUMENTATION Table of contents 1 About the Acronis Monitoring Service...4 2 Software Requirements...4 3 Understanding basic concepts...5 4 Getting started...7 4.1 Setting
Getting Around the Member Pages
 Getting Around the Member Pages This document provides guidance on how to use the Member Pages on the Assistance League of Minneapolis/St. Paul website. It cover the most frequent tasks: Signing in Using
User Guide. Global Ethernet Services - Performance Report
 Global Ethernet Services - Performance Report User Guide Contents: Service Overview... 3 Service Features... 3 Access the Ethernet Performance Report... 4 Characteristics of the Performance Report... 6
NETWORK PRINT MONITOR User Guide
 NETWORK PRINT MONITOR User Guide Legal Notes Unauthorized reproduction of all or part of this guide is prohibited. The information in this guide is subject to change for improvement without notice. We
SolarPower Pro. User s Manual. Management Software for Solar Inverter
 SolarPower Pro User s Manual Management Software for Solar Inverter Table of Contents 1. SolarPower Pro Overview... 2 1.1. Introduction... 2 1.2. Structure... 2 1.3. Features... 3 2. SolarPower Pro Install
VoiceBlast User Manual
 VoiceBlast User Manual Voice Blast System Voice blast application is made for automated calling system which will record the callee channel's audio and with third party tool it will convert to text and
CLIQ Web Manager. User Manual. The global leader in door opening solutions V 6.1
 CLIQ Web Manager User Manual V 6.1 The global leader in door opening solutions Program version: 6.1 Document number: ST-003478 Date published: 2016-03-31 Language: en-gb Table of contents 1 Overview...9
Licensing the Application CHAPTER
 CHAPTER 5 Licensing Application, Configuring E-mail, Cisco.com, Proxy Settings, RCP, SCP Settings, Security, Backup, Authentication Settings and Idle Timeout Settings, Browser and Server Security Mode
MRD-310 MRD G Cellular Modem / Router Web configuration reference guide. Web configuration reference guide
 Web configuration reference guide 6623-3201 MRD-310 MRD-330 Westermo Teleindustri AB 2008 3G Cellular Modem / Router Web configuration reference guide www.westermo.com Table of Contents 1 Basic Configuration...
KMnet Viewer. User Guide
 KMnet Viewer User Guide Legal Notes Unauthorized reproduction of all or part of this guide is prohibited. The information in this guide is subject to change for improvement without notice. We cannot be
Smart Access Control System Software User Manual (Client Version)
") Disclaimer Information in this document is subject to change without notice. Companies, names, and data used in examples herein are fictitious unless otherwise noted. No part of this document may be reproduced
Disclaimer Information in this document is subject to change without notice. Companies, names, and data used in examples herein are fictitious unless otherwise noted. No part of this document may be reproduced
SLS-ENVR4 Network Video Recorder V2.1 Quick Setup Guide
 SLS-ENVR4 Network Video Recorder V2.1 Quick Setup Guide The SLS-ENVR4 series NVR is an intelligent and compact appliance that provides a network interface to monitor, record and playback video from up
Legal Notes. Regarding Trademarks KYOCERA MITA Corporation
 Legal Notes Unauthorized reproduction of all or part of this guide is prohibited. The information in this guide is subject to change without notice. We cannot be held liable for any problems arising from
KYOCERA Net Viewer User Guide
 KYOCERA Net Viewer User Guide Legal Notes Unauthorized reproduction of all or part of this guide is prohibited. The information in this guide is subject to change without notice. We cannot be held liable
RONA e-billing User Guide
 RONA e-billing Contractor Self-Service Portal User Guide RONA e-billing User Guide 2015-03-10 Table of Contents Welcome to RONA e-billing What is RONA e-billing?... i RONA e-billing system requirements...
Reporting Guide V7.0. iprism Web Security
 V7.0 iprism Web Security 800-782-3762 www.edgewave.com 2001 2012 EdgeWave. All rights reserved. The EdgeWave logo, iprism and iguard are trademarks of EdgeWave Inc. All other trademarks and registered
MIDIAX ONLINE BACKUP INSTALLATION
 MIDIAX ONLINE BACKUP INSTALLATION http://midiax.com/backup/onlinebackup.htm Online Backup & Recovery Manager is a tool for configuring automatic file and folder backups for storage in the cloud. After
Performance Management Reporting User Guide for EPMR
 Performance Management Reporting User Guide for EPMR January, 2015 2015 by Cox Communications. All rights reserved. No part of this document may be reproduced or transmitted in any form or by any means,
Epson Device Admin User s Guide NPD EN
 Epson Device Admin User s Guide NPD5817-00 EN About this Manual About this Manual Marks and Symbols! Caution: Instructions that must be followed carefully to avoid bodily injury. c Important: Instructions
myreports User Guide A31003-P3010-U
 myreports User Guide A31003-P3010-U107-17-7619 Our Quality and Environmental Management Systems are implemented according to the requirements of the ISO9001 and ISO14001 standards and are certified by
FileCruiser. Administrator Portal Guide
 FileCruiser Administrator Portal Guide Contents Administrator Portal Guide Contents Login to the Administration Portal 1 Home 2 Capacity Overview 2 Menu Features 3 OU Space/Team Space/Personal Space Usage
LOREX CLIENT Remote Agent Software
 LOREX CLIENT Remote Agent Software Instruction Manual English Version 1.0 MODEL: L500 Series www.lorexcctv.com Copyright 2006 LOREX Technology Inc. Table of Contents Table of Contents About the Lorex Client...
HTTP Errors User Guide
 Version 3.8 Published: 2016-03-28 Copyright 2016, Cisco Systems, Inc. Americas Headquarters Cisco Systems, Inc. 170 West Tasman Drive San Jose, CA 95134-1706 USA http://www.cisco.com Tel: 408 526-4000
RMS Monitoring Software System Operation
 System Operation 2016 ROTRONIC AG Bassersdorf Switzerland Contents Contents... 2 1 Overview... 3 1.1 System Requirements... 3 1.1.1 Browser... 3 2 System Login... 4 3 Data Views... 5 3.1 Alarm Symbols...
Introduction to Cognos
 Introduction to Cognos User Handbook 7800 E Orchard Road, Suite 280 Greenwood Village, CO 80111 Table of Contents... 3 Logging In To the Portal... 3 Understanding IBM Cognos Connection... 4 The IBM Cognos
QTrail, 6 Glamis Close Hemel Hempstead, Hertfordshire HP2 7QB Tel: 00 (44) Fax: 00 (44)
 Fax: 00 (44)") GPRS QTRAIL Vehicle Tracking System User Manual QTrail, 6 Glamis Close Hemel Hempstead, Hertfordshire HP2 7QB Tel: 00 (44) 1442 232434 Fax: 00 (44) 1442 232366 Email: enquiries@qtrail.com QTrail 2005 Every
GPRS QTRAIL Vehicle Tracking System User Manual QTrail, 6 Glamis Close Hemel Hempstead, Hertfordshire HP2 7QB Tel: 00 (44) 1442 232434 Fax: 00 (44) 1442 232366 Email: enquiries@qtrail.com QTrail 2005 Every
Version 4.1 June Xerox Device Agent (XDA) Lite User Guide
 Lite User Guide") Version 4.1 June 2013 Xerox Device Agent (XDA) Lite User Guide 2008-2013 Xerox Corporation. All rights reserved. Xerox and Xerox and Design are trademarks of Xerox Corporation in the US and/or other countries.
Version 4.1 June 2013 Xerox Device Agent (XDA) Lite User Guide 2008-2013 Xerox Corporation. All rights reserved. Xerox and Xerox and Design are trademarks of Xerox Corporation in the US and/or other countries.
SLS-ENVR2016 Network Video Recorder V2.2.2 Quick Setup Guide
 SLS-ENVR2016 Network Video Recorder V2.2.2 Quick Setup Guide The SLS-ENVR2016 series NVR is an intelligent and compact appliance that provides a network interface to monitor, record and playback video
Network Management Software ALLNET Zone Controller
 Network Management Software ALLNET Zone Controller For ALL0558N / ALL02850N / ALL02860ND / ALL02880ND User Manual v1.0 Table of Contents 1. Installation & Un-installation... 4 1.1. Install NMS Suite...
Peplink SD Switch User Manual. Published on October 25th, 2018
 Peplink SD Switch User Manual Published on October 25th, 2018 1 Table of Contents Switch Layout 4 Specifications 5 Hardware Overview 6 Quick Start Functions 7 Reset Switch 7 Connect Ethernet 7 Connect
Akixi Call Reporting Guide
 Akixi Call Reporting Guide Contents 1.0 Introduction... 3 1.1 How to Logon... 3 2.0 User Interface... 3 3.0 Reports... 5 3.1 Running Reports... 5 3.2 Refreshing Reports... 5 3.3 Printing... 5 3.4 Export...
CITO2 Installation & User Instructions
 CITO2 Installation & User Instructions DD 56107 Stoneridge Electronics Ltd 1. Installation...4 1.1. System Requirements...4 1.2. Installing CITO2...4 1.3. Uninstalling CITO2...4 2. Starting and closing
Call Reporter Pro Software
 Call Reporter Pro Software Call Management Features User Guide Version 1.05 Date & Issue: Issue 1 June 2017 www.usbcallrecord.com This guide is Copyright Intelligent Recording Limited 2017 Introduction
User Guide. Pharos Control Software
 User Guide Pharos Control Software 1910012155 REV 2.0.1 April 2017 COPYRIGHT & TRADEMARKS Specifications are subject to change without notice. is a registered trademark of TP-Link Technologies Co., Ltd.
C H A P T E R Reports Note Cisco Prime Network Control System Configuration Guide OL
 CHAPTER 14 The Cisco NCS reporting is necessary to monitor the system and network health as well as troubleshoot problems. A number of reports can be generated to run on an immediate and scheduled basis.
ZENworks Reporting System Reference. January 2017
 ZENworks Reporting System Reference January 2017 Legal Notices For information about legal notices, trademarks, disclaimers, warranties, export and other use restrictions, U.S. Government rights, patent
Welcome to Selector2GO Help
 Welcome to Selector2GO Help World Headquarters 445 Hamilton Avenue, 7th floor, White Plains, New York 10601 United States of America Support: +1 914 259 4900 support@rcsworks.com 2004-2018. All Rights
OPS Webportal User Guide - Reporting v.2.1
 OPS Webportal User Guide - Reporting v.2.1 Contents OPS Reporting... 3 OPS Web Portal... 4 Running Reports... 5 Report Navigation... 5 Group (Client) Selection... 6 Reporting Period... 7 Downloading the
New User Orientation PARTICIPANT WORKBOOK
 New User Orientation PARTICIPANT WORKBOOK INTEGRATED SOFTWARE SERIES New User Orientation PARTICIPANT WORKBOOK Version 2.0 Copyright 2005 2009. Interactive Financial Solutions, Inc. All Rights Reserved.
Cisco Unified Operating System Administration Web Interface for Cisco Emergency Responder
 Cisco Unified Operating System Administration Web Interface for Cisco Emergency Responder These topics describe the Cisco Unified Operating System (OS) Administration web interface for Cisco Emergency
Business Online Banking User Guide
 Business Online Banking User Guide Table of Contents Contents Overview... 2 Logging In... 2 Additional Login Information... 5 Home/Dashboard... 6 Top Line Tool Bar... 6 Bulletins... 7 Dashboard... 8 Accounts...
nfax 5.0 OceanFax User s Guide
 nfax 5.0 OceanFax User s Guide 1 Table of Contents 1. FAXVIEW GUIDE... 1 1.1 FaxView Login and Exit... 1 1.1.1 FaxView Client Login... 1 1.1.2 WebFax Client... 2 1.1.3 FaxView Exit... 3 2.2 FaxView Over
jraven Quick Start Guide
 jraven Quick Start Guide Version 1.0 9/15/2010 Overview, Install, Starting the Application and Setup... 3 Overview:... 3 INSTALL / SETUP... 3 How to install jraven... 4 Migrating Data - jraven MIGRATION
Wise Technologies Ltd.,
 User manual Wise Timetable online system Wise Technologies Ltd., In front of you is a short document for all the users and administrators of Wise Timetable, describing the important part of the whole system:
POWER VISION INSTRUCTION MANUAL
 NETWORK ANALYSIS SOFTWARE POWER VISION INSTRUCTION MANUAL (M98135801-03-11B) CIRCUTOR S.A. INDEX 1.- POWER VISION SOFTWARE INSTALLATION... 4 2.- INTRODUCTION TO POWER VISION... 12 3.- COMMUNICATIONS...
Network Camera. Application Guide 1.8 Before operating the unit, please read this manual thoroughly and retain it for future reference.
 A-EAK-100-18 (1) Network Camera Application Guide 1.8 Before operating the unit, please read this manual thoroughly and retain it for future reference. 2012 Sony Corporation Table of Contents Overview
Quick Start Guide (V1.03) UD.6L0201B1064A01
 UD.6L0201B1064A01") ivms-4200 PCNVR Quick Start Guide (V1.03) UD.6L0201B1064A01 Thank you for purchasing our product. If there is any question or request, please do not hesitate to contact the dealer. This manual applies
ivms-4200 PCNVR Quick Start Guide (V1.03) UD.6L0201B1064A01 Thank you for purchasing our product. If there is any question or request, please do not hesitate to contact the dealer. This manual applies
User s Guide. (Virtual Terminal Edition)
") User s Guide (Virtual Terminal Edition) Table of Contents Home Page... 4 Receivables Summary... 4 Past 30 Day Payment Summary... 4 Last 10 Customer Transactions... 4 View Payment Information... 4 Customers
User s Guide (Virtual Terminal Edition) Table of Contents Home Page... 4 Receivables Summary... 4 Past 30 Day Payment Summary... 4 Last 10 Customer Transactions... 4 View Payment Information... 4 Customers
SLS-ENVR16 Network Video Recorder V2.1 Quick Setup Guide
 SLS-ENVR16 Network Video Recorder V2.1 Quick Setup Guide The SLS-ENVR16 series NVR is an intelligent and compact appliance that provides a network interface to monitor, record and playback video from up
Easy Time Control Training Manual
 Easy Time Control Training Manual Copyright 2008, Trinity Enterprise Solutions Inc Easy Time Control Training Manual Table of Contents Preface...iii Module 1...5 Getting Started...5 1.1. Opening the System...6
Event Manager Instructor Start-Up Guide
 Event Manager Instructor Start-Up Guide Table of Contents Introduction... 3 What s Included in This Guide... 3 Learning Computer Terms... 3 What Is a Brower?... 3 What Is the Address Bar?... 4 What Is
Intro to Aeries.Net July 12, Terms Used in Aeries.Net. 2. Logon to Aeries.Net
 Intro to Aeries.Net July 12, 2013 1. Terms Used in Aeries.Net 2. Logon to Aeries.Net 3. Aeries.Net Home Page Current Version of Aeries.Net Utilizing the Navigation Tree Accessing Programs From the Navigation
Atlona Manuals Software AMS
 AMS Atlona Manuals Software Version Information Version Release Date Notes 1 03/18 Initial release AMS 2 Welcome to Atlona! Thank you for purchasing this Atlona product. We hope you enjoy it and will take
TMJ Insight Portal. Table of contents
 TMJ Insight Portal Table of contents TMJ Insight... 1 Table of contents... 1 Purpose... 2 General information... 2 Help/documentation... 4 Reports... 8 Scheduled runs... 12 Archive... 13 Admin... 14 Scheduling:...
KioskWatch Remote Users Guide
 KioskWatch Remote Users Guide KIOSK WATCH REMOTE: Prerequisite: NetStop license Preface Kioskwatch remote is a new service available to our NetStop customers. With this new service, kiosk operators can
Astra Schedule User Guide Scheduler
 Astra Schedule User Guide 7.5.12 Scheduler 1 P a g e ASTRA SCHEDULE USER GUIDE 7.5.12... 1 LOGGING INTO ASTRA SCHEDULE... 3 LOGIN CREDENTIALS... 3 WORKING WITH CALENDARS... 4 CHOOSING A CALENDAR AND FILTER...
TOF-Watch SX Monitor
 TOF-Watch SX Monitor User manual Version 1.2 Organon (Ireland) Ltd. Drynam Road Swords Co. Dublin Ireland Contents General information... 3 Getting started... 3 File Window... 7 File Menu... 10 File Open
ADVANCED GroupWise 7.0
 ADVANCED GroupWise 7.0 Distributed by the Administrative Technology User Support Department under the Direction of Dr. Russell Clukey, Executive Director, Support Services. Feel free to contact the AT
iview (v2.0) User Guide Version 1.0
 User Guide Version 1.0") iview (v2.0) User Guide Version 1.0 Updated 5/1/2008 Overview This user guide provides an overview of setting up, configuring and running the iview Operator Console (v2.0). General Support If you have
iview (v2.0) User Guide Version 1.0 Updated 5/1/2008 Overview This user guide provides an overview of setting up, configuring and running the iview Operator Console (v2.0). General Support If you have
User Manual MPPTracker
 User Manual MPPTracker Management Software for Solar Charge Controller Version: 1.0 Table of Contents 1. MPPTracker Overview... 1 1.1. Introduction... 1 1.2. Features... 1 2. MPPTracker Install and Uninstall...
Perceptive Data Transfer
 Perceptive Data Transfer User Guide Version: 6.5.x Written by: Product Knowledge, R&D Date: September 2016 2015 Lexmark International Technology, S.A. All rights reserved. Lexmark is a trademark of Lexmark
DOC UDG1000 Online Help. Software Manual. 05/2013, Edition 1
 DOC026.53.80364 UDG1000 Online Help Software Manual 05/2013, Edition 1 Table of Contents Section 1 Product overview...3 Section 2 Basic steps...5 Section 3 Installation...7 3.1 PC requirements...7 3.2
Backup Recording Viewer for NS
 Backup Recording Viewer for NS Installation and Operation Manual Version 1.0 Poltys, Inc. 3300 N. Main Street, Suite D, Anderson, SC 29621-4128 +1 864 642 6103, sales@poltys.com www.poltys.com 2013 Poltys,
DSS User Guide. End User Guide. - i -
 DSS User Guide End User Guide - i - DSS User Guide Table of Contents End User Guide... 1 Table of Contents... 2 Part 1: Getting Started... 1 How to Log in to the Web Portal... 1 How to Manage Account Settings...
Welcome to Shopfront. Your distributor will supply your user name, password, and the website address for your login page.
 User Guide Table of Contents Login... 3 Choose a Location... 4 Home Page... 5 Header Bar... 6 My Catalog... 6 Menu Bar... 7 My Profile... 8 Contact Us... 9 Change Location... 10 Shopping Lists... 11 Quick
D-WEB. Administration Manual
 D-WEB Administration Manual Table of Contents User Management Accessing User Management... 1 Overview of the User Management Page... 1 Creating a New Group... 2 Changing Group Permissions... 2 Renaming
PIVOT CMS CLIENT SOFTWARE USER MANUAL
 PIVOT CMS CLIENT SOFTWARE USER MANUAL 1 CMS USER GUIDE 1.1 PC REQUIREMENT Recommended PC Requirement OS CPU VGA RAM HDD Graphics Card OS CPU VGA RAM HDD Windows Vista, 7 or higher Intel Core2Quad Q9400
Log into your portal and then select the Banner 9 badge. Application Navigator: How to access Banner forms (now called pages.)
") Navigation Banner 9 Log into your portal and then select the Banner 9 badge. This will bring you to the Application Navigator. Application Navigator: How to access Banner forms (now called pages.) Menu
Navigation Banner 9 Log into your portal and then select the Banner 9 badge. This will bring you to the Application Navigator. Application Navigator: How to access Banner forms (now called pages.) Menu
User Manual PDUTracker
 User Manual PDUTracker Management Software for PDU Table of Contents 1. Overview... 1 1.1. Introduction... 1 1.2. Features... 1 2. Install and Uninstall... 1 2.1. System Requirement... 1 2.2. Software
ViewPower. User s Manual. Management Software for Uninterruptible Power Supply Systems
 ViewPower User s Manual Management Software for Uninterruptible Power Supply Systems Table of Contents 1. ViewPower Overview...2 1.1. Introduction...2 1.2. Structure...2 1.3. Applications...2 1.4. Features...3
AFN-QueueGuide
 011602 2002 Blackbaud, Inc. This publication, or any part thereof, may not be reproduced or transmitted in any form or by any means, electronic, or mechanical, including photocopying, recording, storage
airhaul Nexus sb3010
 u n w i r i n g o u r w o r l d TM airhaul Nexus sb3010 User Configuration Guide Version 1.3 Copyright smartbridges Pte Ltd. All Rights Reserved. About This Document This Software Configuration Guide is
VERSION ASSET TRACKING SYSTEM USER MANUAL STARTER EDITION
 VERSION 4.20.3 ASSET TRACKING SYSTEM USER MANUAL STARTER EDITION ATS USER MANUAL- STARTER EDITION TABLE OF CONTENTS ATS User Manual- Starter Edition... 2 Table of Contents... 2 Quick Start Overview...
Marquette University Time and Attendance
 2016 Marquette University Time and Attendance TM01 Student Employee Time and Attendance This guide helps you learn the most commonly used student employee functions in EmpCenter Time and Attendance. The
Centralised monitoring software. (version v2.35) Program installation and configuration
 Program installation and configuration") Centralised monitoring software (version v2.35) Program installation and configuration The purpose of the document This document describes the installation and configuration process of program package
Centralised monitoring software (version v2.35) Program installation and configuration The purpose of the document This document describes the installation and configuration process of program package
User Guide. General Navigation
 User Guide General Navigation Table of Contents INTRODUCTION 2 TECHNICAL REQUIREMENTS 3 Screen Display for Laptop 3 Screen Display for Desktop PC 3 NAVIGATION 4 Contact Us 4 Log Out 4 Menu > Sub Menu Display
Desktop & Laptop Edition
 Desktop & Laptop Edition USER MANUAL For Mac OS X Copyright Notice & Proprietary Information Redstor Limited, 2016. All rights reserved. Trademarks - Mac, Leopard, Snow Leopard, Lion and Mountain Lion
Remote Access System for STAM-2 Monitoring Station STAM-VIEW
 Remote Access System for STAM-2 Monitoring Station STAM-VIEW Installation Manual stam-view_i_en 10/11 SATEL sp. z o.o. ul. Schuberta 79 80-172 Gdańsk POLAND tel. + 48 58 320 94 00 info@satel.pl www.satel.eu
ZENworks 2017 Audit Management Reference. December 2016
 ZENworks 2017 Audit Management Reference December 2016 Legal Notice For information about legal notices, trademarks, disclaimers, warranties, export and other use restrictions, U.S. Government rights,
Cisco Unified Operating System Administration Web Interface
 Cisco Unified Operating System Administration Web Interface ServerGroup, page 1 Hardware, page 2 Network Configuration, page 3 Software Packages, page 4 System, page 5 IP Preferences, page 6 Ethernet Configuration,
User Manual. MPPTracker. Management Software for Solar Charge Controller. Version: 1.2
 User Manual MPPTracker Management Software for Solar Charge Controller Version: 1.2 Table of Contents 1. MPPTracker Overview... 1 1.1. Introduction... 1 1.2. Features... 1 2. MPPTracker Install and Uninstall...
D-Link Central WiFiManager Configuration Guide
 Table of Contents D-Link Central WiFiManager Configuration Guide Introduction... 3 System Requirements... 3 Access Point Requirement... 3 Latest CWM Modules... 3 Scenario 1 - Basic Setup... 4 1.1. Install
Managing GSS Devices from the GUI
 CHAPTER 1 This chapter describes how to configure and manage your Global Site Selector Manager (GSSM) and Global Site Selector (GSS) devices from the primary GSSM graphical user interface. It includes
Boomerang System Administrator Manual
 Boomerang System Administrator Manual SG001-0003-01-B2.doc Page 1 of 43 Table of Contents INTRODUCTION...4 BOOMERANG CLIENT...5 FILE...6 3.1. Logout...... 6 3.2. Exit... 6 VIEW...7 4.1. Sensors events
Accessing Data from the Web Interface
 11 CHAPTER This chapter provides information about accessing Cisco Mobile Wireless Transport Manager (MWTM) data from the MWTM web interface by using a web browser. This chapter contains: Supported Browsers,
My Sysco Reporting Job Aid for CMU Customers. My Sysco Reporting. For CMU Customers (Serviced by Program Sales)
") My Sysco Reporting For CMU Customers (Serviced by Program Sales) 1 Accessing My Sysco Reporting... 2 Logging In... 2 The Reporting Dashboard... 3 My Sysco Reporting Process... 6 Generating a Report...
My Sysco Reporting For CMU Customers (Serviced by Program Sales) 1 Accessing My Sysco Reporting... 2 Logging In... 2 The Reporting Dashboard... 3 My Sysco Reporting Process... 6 Generating a Report...
25Live. Training Manual. 25Live
 25Live Training Manual 25Live 25live@mail.montclair.edu 25Live Table of Contents Contents 25Live Training 25Live Training Manual Manual OVERVIEW The 25Live Dashboard 25Live Home Calendar 25Live Availability
GUIDE FOR STUDENTS AND PARENTS. An orange ring means you have an assignment.
 Odyssey Quick Start Launch Pad and Assignments below Portfolio and Reports on page 2 FAQs on page 5 For Parents on page 8 GUIDE FOR STUDENTS AND PARENTS Launch Pad and Assignments This icon opens your
AvePoint Online Services for Partners 2
 AvePoint Online Services for Partners 2 User Guide Service Pack 1 Issued June 2017 Table of Contents What s New in this Guide...4 About...5 Submitting Documentation Feedback to AvePoint...6 Browser Support
Tellus EVV Introduction and Dashboard TRAINING REFERENCE GUIDE
 Tellus EVV Introduction and Dashboard TRAINING REFERENCE GUIDE REV: 03/18 Sponsored by Centric Consulting, LLC, and the State of Florida, AHCA TELLUS EVV System Training Reference Guide Table of Contents
InfraSuite Device Master
 Delta Electronics, Inc. InfraSuite Device Master User s Manual Model: EMS4000 Doc. Version: v1.0 Content 1. Introduction... 5 1.1 System Architecture... 5 2. Software Installation... 7 2.1 Presentation
User s Guide. Valvova Oy
 User s Guide Valvova Oy June 21, 2017 CONTENTS Contents 1 Timeline 2 1.1 Program startup......................................... 3 1.2 Calendar............................................. 3 1.3 Go to