AV KVM Over Fiber Matrix Switcher
|
|
|
- Shannon Powell
- 5 years ago
- Views:
Transcription
1 AV KVM Over Fiber Matrix Switcher User Manual Version 2017 V1
2 Contents Contents WELCOME 1 ABOUT THIS MANUAL 1 CAUTIONS AND NOTES 1 COPYRIGHT 1 TRADEMARKS 2 DISCLAIMER 2 INTRODUCTION 3 MATRIX DEVICE 3 FRONT PANEL 3 REAR PANEL 5 SET IP ADDRESS 7 OPTIC TRANSFER UNIT 8 SETUP 10 SOFTWARE 11 LOGIN 11 OVERVIEW 12 DASHBOARD 12 SETTINGS 13 SWITCH 13 KVM 15 SET KVM CHANNEL 15 OSD 16 PREVIEW OF CURRENT STATUS 21 SCENE 21 SAVE 21 PREVIEW 22 RECALL 23 RENAME 23 DELETE 23
3 Contents PORT CONFIGURATION 23 CONFIGURE PORTS 24 RENAME THE PORT 25 KVM STATUS 25 AUDIO CONFIGURATION 26 RESOLUTION 26 ALARM 29 USERS 30 ADD A USER 30 AUTHORITIES 31 EDIT 34 DELETE 34 BACKUP AND RESTORE 35 BACKUP 35 RESTORE 36 UPGRADE 38 FACTORY CONFIGURATION 38 RUNNING RATE 39 SINGLE FIBER MODE 39 FACTORY CONFIG 40 LICENSE 41 APPENDIX 42 GLOSSARY 42
4 Welcome Welcome About This Manual This Manual is applicable to AVCLink (AV KVM Over Fiber Matrix Switcher). Thank you for choosing DigiBird, please read this manual carefully before using the product. All pictures in this manual are only for reference, information in this document is subject to change without notice. Cautions and Notes The following symbols are used in this manual: Notes Cautions Warnings The necessary hints, additions and explanations to help you to understand the content of the manual more clearly. This symbol indicates best practice information to show recommended and appropriate manner to use this product efficiently. The important operating instruction that should be followed to avoid any potential damage to hardware or property, data loss, or personal injury. The following spellings are used in this manual: Spelling <key> <key + key> <key, key> [Menu item] Description Description of a key on the keyboard Press keys simultaneously Press keys successively Description of a menu item in the software Copyright All rights reserved by DigiBird, No portion of this manual may be reproduced in any manner without the prior written consent of DigiBird. 1
5 Welcome Trademarks All trademark and trade names mentioned in this document are acknowledged to be the property of their respective owners. Disclaimer While every precaution has been taken during preparation of this manual, the manufacturer assumes no liability for errors or omissions. The manufacturer assumes no liability for damages resulting from the use of the information contained herein. The manufacturer reserves the right to change specifications, functions, or circuitry of the product without notice. The manufacturer cannot accept liability for damage due to misuse of the product or due to any other circumstances outside the manufacturer s control (whether environmental or installation related). The manufacturer shall not be liable for any loss, damage, or injury arising directly, indirectly, incidentally, or consequently from the use of this product. 2
6 Introduction Introduction DB-AVCLink is a powerful KVM matrix switcher, which completely transmits audio, video and KVM signal via fiber optical or twist pair without losses and latency, widely used in application of utility, security, government, and financial industry, etc. DB-AVCLink consists of Matrix Device and Optic Transfer Unit. The chassis sizes are 8U and 26U; and the Optic Transfer Unit means Transmitter and Receiver. Matrix Device Front Panel 8U chassis (160x ports) The front panel of the 8U chassis is shown as below. You are able to change the IP address via the front panel,see Set IP Address for details. 26U chassis (576x ports) The Front Panel of 26U chassis is shown as below. You are able to change the IP address via the front panel,see Set IP Address for details. 3
7 4 Introduction
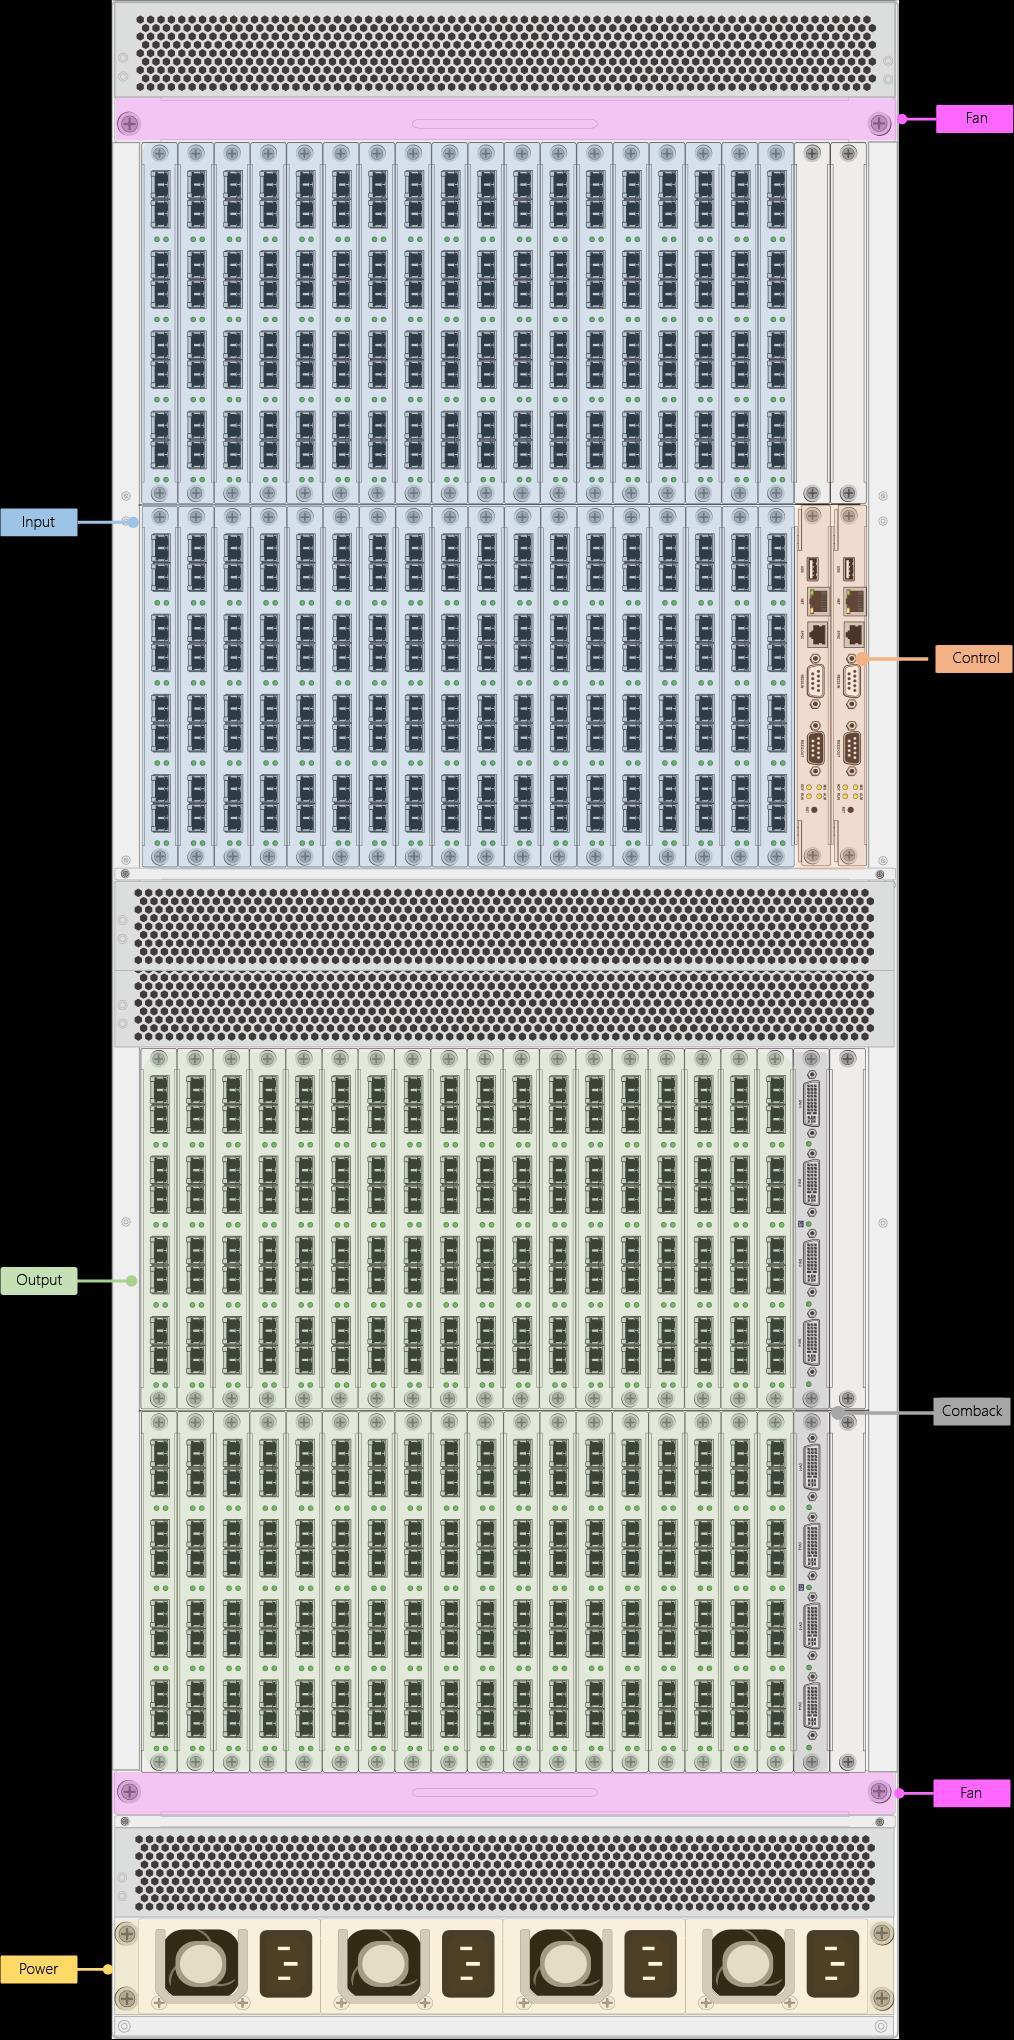
8 Introduction Rear Panel The rear panel consists of below main slots: Input / Output Port Input Slot Output Slot CMC Slot Control Slot Power Slot Fan Slot Mixed dual-optical I/O ports, which can be defined to be input when connected with the transmitter/ Tx or to be output when connected with the receiver/rx. The slot to populate the input card, that includes eight (8x) pairs of dual-optical ports to be connected with the transmitter/tx. The slot to populate the output card, that includes eight (8x) pairs of dual-optical ports to be connected with the receiver/rx. The Confidence Monitoring Slot to populate the CMC (Confidence Monitoring Card) card for local monitoring. Slot for control board. There are two control board to ensure the system running as normal.populated with Dual Control cards for backup. The slot for the PSU (Power Supply Unit). The slot for the cooling fans with auto adjustment feature. Please tighten the screws when insert the card into the slot. 8U chassis (160x ports) The 8U chassis includes twenty (20x) I/O slots (no matter input or output), two (2x) control slots, one (1x) CMC slot, and two (2x) PSU slots. 5
 output slots, two (2x) control slots, one (1x) CMC slot, and two (2x) PSU")
9 Introduction 26U chassis (576x ports) The 26U chassis includes thirty-six (36x) input slots, thirty-six (36x) output slots, two (2x) control slots, one (1x) CMC slot, and two (2x) PSU slots. 6

10 Introduction Set IP address Operation OSD 7
 RUN indicator: illuminate when operating normally.")
11 Introduction Indicators POWER IR RUN Power indicator. IR indicator. (Reserved for future use.) RUN indicator: illuminate when operating normally. Optic Transfer Unit 8


12 Introduction Front Panel DVI Transmitter Rear Panel Front Panel DVI Receiver Rear Panel Front Panel HDMI Transmitter Rear Panel Front Panel HDMI Receiver Rear Panel Front Panel 4K HDMI Transmitter Rear Panel Front Panel 4K HDMI Receiver Rear Panel Front Panel DP Transmitter Rear Panel Front Panel 4K DP Transmitter Rear Panel Front Panel VGA Transmitter Rear Panel 9


 2.")

13 Introduction Front Panel SDI Transmitter Rear Panel Front Panel SDI Receiver Rear Panel Setup For the first time, users are recommended to test your matrix prior to install for your project. This will assist you to avoid any cabling problems, and start to integrate with your system more efficiently. Setup of the matrix 1. Install the I/O cards (usually be populated well by DigiBird) 2. Connect RX and TX to the I/O ports 3. Connect keyboard, mouse, and monitor to the RX 4. Connect sources (server, DVD, computer, media player, workstation ) to the TX 5. Connect the matrix to the power supply 6. Connect the control computer to the control card via RJ45 or RS232 port. 10


14 Software Darwin AVCLink Control System is a web-based software platform. This manual is based on an 8U Matrix. The connection diagram is shown as below. Login You should open the Browser, such as chrome, to visit the Darwin AVCLink Control System. The control computer and the Matrix must be in the same LAN network under the same domain. Open the Chrome and input the IP of the Matrix, then press the <Enter> key. The default IP address of the Matrix is You can change the IP address through the push buttons on the front panel, see Set IP address for details. You can input the user name and password in the Login page. The default user name is admin, the password is 123, which can be changed after login. 11

15 Overview Dashboard The dashboard is shown as below when you login successfully. 1 Scene If you save a configuration as a scene, the scene will be listed here. You can recall, rename, delete, or preview a scene under right-click menu. 2 Toolbar The toolbar includes some function buttons, you can enter the dashboard, logout, save scenes, refresh system, preview configuration, and search ports through the filter. 3 Input /Output Ports Here lists all the Input /Output ports you set, and the system will automatically detect the available ports. 4 Switching Relations In this area, system will display the input and output ports that you selected. 5 Execution Area Click the [OK] button to confirm, system will execute switching and KVM operation. Click the [Cancel] button to abandon. Tool bar details: 12
![Settings Click the icon in the toolbar to enter the settings. The [Settings] includes: Config, user management, backup, alarm, system upgrade, and device license etc.](/docs-images/92/109860948/images/16-0.jpg "The 8U s port property supports custom-defined. When the matrix you use is an 8U chassis, you can see the [Unconfigured ports] in the middle of the page.")
16 Settings Click the icon in the toolbar to enter the settings. The [Settings] includes: Config, user management, backup, alarm, system upgrade, and device license etc. The 8U s port property supports custom-defined. When the matrix you use is an 8U chassis, you can see the [Unconfigured ports] in the middle of the page. The unconfigured ports are not connected to the sources or monitors and can be preconfigured as input or output, see Configure Ports for details. Switch Switching a video resource to any display(s). The operation is as follows: Select an input signal in the [Input ports] list. 13
17 Select any output port(s) in the [output ports] list which you want to switch to. You can also select all output ports by clicking [Select all] button on the upper right corner of the [Output ports] list. (To cancel a selected port, click the port again.) Click [Cancel] to abandon your selection. Click [OK] to enable the switching. 14
18 KVM Set KVM channel If you want to use the keyboard and mouse (referred as KM hereafter) to switch and control all resources, you should connect the keyboard and mouse to the RX through the USB cable, connect the resources to the TX through the USB cable as well. Then you are able to setup via this software: Select an input port, then the selected output ports will be listed on the right. In the [Output ports] list, click the icon of an output port which you want to use KVM via. The [Switching Relations] list will show the output ports you selected. 15
![Click [OK] button, then you can control the selected resource that connected to the TX by the KM.](/docs-images/92/109860948/images/19-0.jpg "OSD Press <Ctrl + Shift + Alt + I> keys on the keyboard that connected to the RX to enable the OSD. You are able to switch any resource or enable the KVM.")
19 Click [OK] button, then you can control the selected resource that connected to the TX by the KM. OSD Press <Ctrl + Shift + Alt + I> keys on the keyboard that connected to the RX to enable the OSD. You are able to switch any resource or enable the KVM. 1 Login Press <Ctrl + Shift + Alt + I> on the keyboard to enable OSD. 16
![Input username and password (Default username: admin; password: 123). Press <Enter> key to move the curser to [OK] button, and press <Enter> key again to login.](/docs-images/92/109860948/images/20-0.jpg "2 Switch You will enter the [SOURCES] interface after you login.")
20 Input username and password (Default username: admin; password: 123). Press <Enter> key to move the curser to [OK] button, and press <Enter> key again to login. 2 Switch You will enter the [SOURCES] interface after you login. The [SOURCES] interface will list all ports online and offline, the gray highlighted means that offline and the white one means that on line. 17

21 Press < >< >< >< > keys to move the curser, then press <Enter> key again to select one port. There are three options: press <1> key to enable KVM; press <2> key to switch the rsource; press <3> key to cancel. 3 Quick switch You can press <Esc> key to return upper menu. Press < >< > keys to the [QUICK_SET] option > press <Enter> key to enter the menu. 18
22 Input the number of the input port. For example: if you input 01-1, the front 01 means the sequence number of slot, the 1 means the sequence number of the port (01-1 means the first port on the #1 input card, each card has 8x ports). Press <Enter> key, the curser will move to below options: [KVM] to enable KVM to the source; [VIDEO] to display the source; [CANCEL] to adandon the operations. Use < >< > keys to select, then press <Enter> key to confirm. 19
![4 Device info Press <Esc> key to return the menu bar > select [DEV_INFO] option> press <Enter> key.](/docs-images/92/109860948/images/23-1.jpg "The [DEV_INFO] interface will show you the output resolution, resolution mode, audio mode, serial number, and the mac address.")
23 4 Device info Press <Esc> key to return the menu bar > select [DEV_INFO] option> press <Enter> key. The [DEV_INFO] interface will show you the output resolution, resolution mode, audio mode, serial number, and the mac address. 5 Help Press <Esc> key to return the menu bar > select [HELP] option > press <Enter> key. The [Help] interface will show you the shortcut of OSD operation. Enter OSD: <Ctrl + Shift + Alt + I> Quit OSD: <Ctrl + Esc> 20
![Move Curser: < >< >< >< > Enter/quit function screen: <Enter>/<Esc> Preview of current status Click [Preview] button to enter the preview interface.](/docs-images/92/109860948/images/24-0.jpg "You can check the current switching and KVM status.")
24 Move Curser: < >< >< >< > Enter/quit function screen: <Enter>/<Esc> Preview of current status Click [Preview] button to enter the preview interface. You can check the current switching and KVM status. Scene You can configure some frequently-used switching relationships and save them as scenes that you want to enable only by on-click operation. Save Click [Save Scene] button. 21
![Input Scene ID and Scene Name in the [Save Scene] window, then click [OK] button to](/docs-images/92/109860948/images/25-2.jpg "confirm.")

25 Input Scene ID and Scene Name in the [Save Scene] window, then click [OK] button to confirm. If you want to save the current configuration and cover that already saved, just need to set the same Scene ID. Preview You can preview the scene before recalling it to avoid misoperation. Right click the scene > choose [Preview the Scene]. 22
![Recall Right click the scene > choose [Recall the Scene] > click](/docs-images/92/109860948/images/26-0.jpg "[OK] button to recall.")
![Rename Right click the scene > choose [Rename] > input the Scene](/docs-images/92/109860948/images/26-2.jpg "Name > click [OK] button to rename.")
![Delete Right click the scene > choose [Delete the Scene] > click](/docs-images/92/109860948/images/26-3.jpg "[OK] button to delete.")
26 Recall Right click the scene > choose [Recall the Scene] > click [OK] button to recall. Rename Right click the scene > choose [Rename] > input the Scene Name > click [OK] button to rename. Delete Right click the scene > choose [Delete the Scene] > click [OK] button to delete. Port Configuration Enter the settings to configure the property, audio mode, name and resolution of input and output ports. 23

27 Configure ports The matrix supports mixed I/O ports (except the 26U model), which can be defined to be input or output automatically according connection with TX (input) or RX (output). For example: set some unconfigured ports to be input ports: Select one or more unconfigured ports. Click the circle and drag to the left area. The selected ports will be assigned as input. (The input ports should be connected to TX later.) 24
![The 26U model does NOT support mixed I/O ports, the [Unconfigured Port] is not applicable and it will show fixed input and](/docs-images/92/109860948/images/28-0.jpg "output lists.")
![You can drag the pre-configured ports back to [Unconfigured ports] area, but the ports that have connected to the TX/RX can](/docs-images/92/109860948/images/28-4.jpg "NOT be moved.")
28 The 26U model does NOT support mixed I/O ports, the [Unconfigured Port] is not applicable and it will show fixed input and output lists. You can drag the pre-configured ports back to [Unconfigured ports] area, but the ports that have connected to the TX/RX can NOT be moved. Rename the Port Select a port > double-click in the middle area > input the name > click on the blank area or press <ENTER> key to save. KVM status Click button of a port, then you will see the KM connection status. 25


29 Audio configuration The RX/Tx support audio channel. You can select embedded or separated audio channel for HDMI or SDI version: The icon means embedded audio, and the means separated audio. If you want to set multiple ports at once, you can select more ports > click button > select the audio mode in the pop-up window > click [OK] to confirm the operation. Resolution Set the Resolution Select the output ports that you want to change the resolution > click button > to select resolution. 26


30 The system support two resolution modes: Inherit and Custom. Inherit means the output resolution will be the same with that of input. Custom means to set a firmed or customized output resolution no matter how the input resolution is. If you select the Custom option, you can choose a resolution in the drop down list. You can add a resolution if cannot find in this list. See Custom Resolution for details. 27


31 Custom resolution To add a custom resolution. Click the [Custom Resolution] button, then you will see the built-in resolutions list. Click [add] button > fill in data in the pop-up window > click [OK] button to save. You can modify or delete the resolutions that you added, but can NOT change the builtin resolution. 28


32 Alarm The system will provide alarm in abnormal situation for trouble-shooting. For example, if the I/O port connected to the wrong TX/RX, the software will alarm you and guide how to solve the problem. 1 The alarm in dashboard The wrong connected port will be highlighted with pink and it shows the detail information in the toolbar. 2 The alarm in settings There will be an alarm message at the bottom, on which you can click the [Click here to config] button to solve the problem. The system will correct the properties of the port according to TX/RX info. 29
33 3 Alarm log You are able to check or filter the alarm log in the menu of [Alarm]. Users You can add more users and setup different authorities. Add a user Click [Users] in the menu bar. Click button to open the [add new user] window. Fill in the user info > click [OK] button to confirm. 30
![The added user information will be shown in the list. Authorities You can distribute different authorities for different account. 1. Select one account > click button to open the [Authority] window.](/docs-images/92/109860948/images/34-0.jpg "Menu authorities Click [Menu] button to set the software operating rights.")
34 The added user information will be shown in the list. Authorities You can distribute different authorities for different account. 1. Select one account > click button to open the [Authority] window. Menu authorities Click [Menu] button to set the software operating rights. For example, if you want to prohibit the Config and Users function for the user account, you should operate as follows: Set the [Home Page] and [Setup Menus] to be Enable > Set the [Config] and [Users] to be Disable > Click [Save] button to confirm. 31
![Input Source authorities Click [AVCLink] button to set the input source](/docs-images/92/109860948/images/35-0.jpg "authorities.")
![For example, if you do not want the user account to operate the [1-2] and [1-6]](/docs-images/92/109860948/images/35-1.jpg "input source, you should operate as follows: Set the [Input ports] to be Enable")
35 Input Source authorities Click [AVCLink] button to set the input source authorities. For example, if you do not want the user account to operate the [1-2] and [1-6] input source, you should operate as follows: Set the [Input ports] to be Enable > Set the [1-2] and [1-6] to be Disable > Click [Save] button to confirm. 1 32


![when the [Setup Menu] is Disable. 2.](/docs-images/92/109860948/images/36-2.jpg "Using the user account to login, you will see the differences between admin and user : there is no the [Users] option in")
36 The explanation of three levels are as follows: Enable Disable Inherit The user will be permitted to user have this authority. The user will be NOT permitted to have this authority. The permission will be decided by the status of the upper level or menu. For example, the status of [Users] is Inherit, so it will be Enable when the [Setup Menu] is Enable, and will be Disable when the [Setup Menu] is Disable. 2. Using the user account to login, you will see the differences between admin and user : there is no the [Users] option in the menu bar on the dashboard, and the user can t operate the [1-2] and [1-6] resources. The menu bar of admin The menu bar of user The [input ports] area of admin The [input ports] area of user 33

37 Edit Choose an account. Click button. Fill in the new information in the pop-up window. Click [OK] button to confirm. Delete Choose an account. Click button. Click [OK] button in the pop-up window to confirm. 34


38 Backup and Restore You can save the system configuration as backup file to the Matrix or PC in case of losing the configuration. The backup can be restored at any time. Backup Click the [Backup] button in the menu bar. Click button to backup the hardware and software configuration, and the backup file will be stored in the matrix. 35

39 Select a backup file in the list, then click button to download it to PC. The AVCLink is able to backup data every day automatically and keep for 7 net days one time. The data on the 1 st day will be displaced on the 8 th day. Restore 1. Restore the Matrix configurations. Select a backup > click button. 36

![file that already stored before > click [Upload] button to restore the](/docs-images/92/109860948/images/40-2.jpg "configuration. 3.")
40 2. Restore the PC configurations. Click button > click [Please choose a file] button in the pop-up window > select a file that already stored before > click [Upload] button to restore the configuration. 3. The restore process The screen will display a processing page when the system restoring. It is about 2 minutes to complete. 37
![Upgrade Select and upload the upgrade file to complete. The user is able to request the latest firmware from your sales or contact our team at sales@digibirdtech.com. Enter the settings > click the [System Upgrade] button in the menu bar.](/docs-images/92/109860948/images/41-0.jpg "Click [Please choose a file] button to add a file. Click [Upload & Upgrade] button to confirm upgrading. Do NOT power off when do the upgrading.")
41 Upgrade Select and upload the upgrade file to complete. The user is able to request the latest firmware from your sales or contact our team at Enter the settings > click the [System Upgrade] button in the menu bar. Click [Please choose a file] button to add a file. Click [Upload & Upgrade] button to confirm upgrading. Do NOT power off when do the upgrading. Factory Configuration You can set the Factory Configuration if need, including Running Rate (Only the 4K device), Single Fiber Mode (When there is no need of KVM function),default configuration (Eliminate all user configurations). 38
 signal via 2x pcs single mode fiber cables.")

42 Running Rate If your Optic Transfer Unit support 4K, you can set the running rate to be 6.4G (Supports 4K) or 3.2G (Supports 1080P). Single Fiber Mode Each I/O card consists of 8x dual optical ports to transmit video and KM (control) signal via 2x pcs single mode fiber cables. If you don t need to use KM feature, you are able to use the dual optical ports to transmit 2x video signals in which one is input and the other is output, hence to make the I/O quantity double. Operation as follows: 1 Select the ports which you want to change to be single mode; 2 Click [OK] button at the bottom of the page. 39
![3 Click [OK] button in the pop-up window to confirm.](/docs-images/92/109860948/images/43-0.jpg "The system will restart and eliminate all the configurations you set before.")
![4 After the system restart, you can see the configured single ports with single mode in the [Input Ports]](/docs-images/92/109860948/images/43-2.jpg "and [Output Ports] list.")
43 3 Click [OK] button in the pop-up window to confirm. The system will restart and eliminate all the configurations you set before. 4 After the system restart, you can see the configured single ports with single mode in the [Input Ports] and [Output Ports] list. Factory config You can reset the factory settings: 1 Click [Reset Data] button in the [Factory Config] page. 2 Click the [OK] button in the pop-up window to confirm. 40

44 License For renew your license, please contact your sales or contact our team 41
45 Appendix Appendix Glossary The following terms are commonly used in this manual or in video and KVM technology. Term Optic Transfer Unit Fiber Cable RX TX Explanation Means the transmitter (TX) and receiver (RX) to connect with the matrix input and output. Single-mode or multi-mode fiber cables. The Receiver connected to the monitor, keyboard, mouse and Matrix. The Transmitter connected to the source (video, audio and USB) and Matrix. KVM OSD DisplayPort Keyboard, Video and Mouse. The On-Screen-Display control method to operate the device. A VESA standardized interface for an all-digital transmission of audio and video data. It is differentiated between the DisplayPort standards 1.1 and 1.2. The signals have LVDS level. DVI Digital video standard, introduced by the Digital Display Working Group. Single Link and Dual Link standard are distinguished. The signals have TMDS level. HDMI An interface for an all-digital transmission of audio and video data. It is differentiated between the HDMI standards 1.0 to 1.4a. The signals have TMDS level. RCA (Cinch) A non-standard plug connection for transmission of electrical audio and video signals, especially with coaxial cables. VGA Video Graphics Array (VGA) is a computer graphics standard with a typical resolution of 640 x 480 pixels and up to 262,144 colors. It can be seen as a follower of the graphics standards MDA, CGA and EGA.
46 DigiBird Technology Co., Ltd Web:
Matrix KVM over IP. KV-900x. User s Guide. Copyright 2008 Beacon Computer Inc. All rights reserved. Version
 Matrix KVM over IP KV-900x User s Guide Copyright 2008 Beacon Computer Inc. All rights reserved. Version 1.05 www.avextender.com 2008/11/27 1 Table of Contents 1. INTRODUCTION...3 2. UNPACKING CHECKLIST...4
POWER. allows users to interface a third party control system with the devices on a VN Matrix network.
 The Extron VNM Enterprise Controller 00 is a dedicated control device for managing large VN-Matrix systems. The controller allows users to view, manage, and dynamically control multiple VN-Matrix systems
User Manual. ServSwitch TC. Model: ACX1004 ACX1008
 User Manual Edition: 2011-01-19 ServSwitch TC Model: ACX1004 ACX1008 Black Box Deutschland GmbH Ludwigstrasse 45 b 85399 Hallbergmoos techsupp@black-box.de www.blackbox.de Tel. +49 811 5541 0 Fax +49 811
HP Video Over Ethernet. User Guide
 HP Video Over Ethernet User Guide 2016 HP Development Company, L.P. The information contained herein is subject to change without notice. The only warranties for HP products and services are set forth
TH800DS CONTROLLER MANUAL
 TH800DS CONTROLLER MANUAL 1 Introduction 3 1.1 Overview 3 1.2 Features 4 1.3 Specifications 4 1.4 Panel 5 1.4.1 Front Panel 5 1.4.2 Rear Panel 6 2 Hardware Installation 7 3 Accessing the Device 8 3.1 Before
Amcrest HDCVI DVR Quick Start Guide
 Amcrest HDCVI DVR Quick Start Guide Version 2.0.0 Welcome Thank you for purchasing our Amcrest HDCVI DVR! This quick start guide will help you become familiar with our DVR in a very short time. Before
Installation Considerations: Included: Not Included:
 Installation Considerations: See the Setup Guide for any details related to the steps in this guide; such as power requirements, rack mounting considerations, and other more in-depth instructions. The
GAMING MONITOR. OSD Sidekick
 GAMING MONITOR OSD Sidekick Copyright OSD Sidekick Installation Guide 2018 GIGA-BYTE TECHNOLOGY CO., LTD. All rights reserved. The trademarks mentioned in this manual are legally registered to their respective
Network Video Decoder Quick Start Guide
 Network Video Decoder Quick Start Guide V3.4.0 Table of Contents 1 FRONT PANEL/REAR PANEL/INSTALLATION... 1 1.1 Check Unpacked Device... 1 1.2 Front panel... 1 1.2.1 1/4-channel 4K High Definition &1/4-channel
Manual Version: V1.00. Video Decoder Quick Guide
 Manual Version: V1.00 Video Decoder Quick Guide Thank you for purchasing our product. If there are any questions, or requests, please do not hesitate to contact the dealer. Copyright Copyright 2016 Zhejiang
JZTEK DVR Operation Manual
 Dear Valued Client, JZTEK DVR Operation Manual Thank you for your trust about JZTEK! If you re satisfied with this JZTEK product, we would sincerely appreciate providing your positive review and feedback
DIGITAL VIDEO RECORDER
 DIGITAL VIDEO RECORDER Quick Start Guide V1.0.0 Foreword Welcome Thank you for purchasing our Digital Video Recorder (DVR). This Quick Start Guide (hereinafter referred to be "the Guide") will help you
JZTEK DVR Operation Manual
 Dear Valued Client, JZTEK DVR Operation Manual Thank you for your trust about JZTEK! If you re satisfied with this JZTEK product, we would sincerely appreciate providing your positive review and feedback
A0. HD 4 Channel and 8 Channel Digital Video Recorder Quick Start Guide
 8200-1368-01 A0 HD 4 Channel and 8 Channel Digital Video Recorder Quick Start Guide Notice Please read this manual thoroughly and save it for future use before attempting to connect or operate this unit.
AST2500 ibmc Configuration Guide
 AST2500 ibmc Configuration Guide Version 1.0b Copyright Copyright 2017 MITAC COMPUTING TECHNOLOGY CORPORATION. All rights reserved. No part of this manual may be reproduced or translated without prior
Amcrest Eco HDCVI DVR Quick Start Guide
 Amcrest Eco HDCVI DVR Quick Start Guide Version 1.0.1 Revised August 13th, 2015 Welcome Thank you for purchasing our Amcrest Eco HDCVI DVR! This quick start guide will help you become familiar with our
SDV-FTX/FRX. Ultra-HDMI (4K/60) over Fiber extender OPERATION MANUAL
 over Fiber extender OPERATION MANUAL") SDV-FTX/FRX Ultra-HDMI (4K/60) over Fiber extender OPERATION MANUAL DISCLAIMERS The information in this manual has been carefully checked and is believed to be accurate. CYP (UK) Ltd assumes no responsibility
SDV-FTX/FRX Ultra-HDMI (4K/60) over Fiber extender OPERATION MANUAL DISCLAIMERS The information in this manual has been carefully checked and is believed to be accurate. CYP (UK) Ltd assumes no responsibility
F Series Indoor Fixed IP Camera. Quick Start Guide
 F Series Indoor Fixed IP Camera Quick Start Guide Welcome Thank you for purchasing our IP camera! Before install and use the IP camera, please read the following section carefully. Please keep this start
Keyboard User s Manual
 Keyboard User s Manual Version 1.0.0 1 Table of Contents 1 Features and Specifications... 7 1.1 Features... 7 1.2 Front Panel... 7 1.3 Rear Panel... 9 1.3.1 NKB1000 Series... 9 1.3.2 KB1000 Series... 9
KV-901T & AV-901R User s Guide
 KV-901T & AV-901R User s Guide Copyright 2011 Beacon Extender Inc. All rights reserved. Version 5.0 1. Introduction The KV-901T/AV-901R is a solution of Audio/Video extension over IP Ethernet LAN. The
HD Analog Recorder. Quick Start Guide CJ-HDR104. Model No. CJ-HDR108. Version 1.0.2
 HD Analog Recorder Quick Start Guide Model No. CJ-HDR104 CJ-HDR108 Version 1.0.2 Table of Contents 1 Hardware Installation and Connection... 1 1.1 Check Unpacked DVR... 1 1.2 About Front Panel and Rear
SaviSign Manager User Manual
 SaviSign Manager User Manual Digital Signage Management Software For The P100 Signage Player For use with Windows 7 or Higher Easy-to-use, powerful software Perfect for crafting digital signage displays!
ORION XC CATx DVI Matrix Switch
 ORION XC CATx DVI Matrix Switch 10707 Stancliff Road Houston, Texas 77099 Phone: (281) 933-7673 www.rose.com LIMITED WARRANTY Rose Electronics warrants the Orion XC to be in good working order for one
Server Appliance for Atlona Management System
 Server Appliance for Atlona Management System Installation Guide The Atlona is a hardware dedicated to running. Use the -HW to run the software with a local display, or anywhere on a network PC. The Atlona
REACH HD Encoder ENC1200
 REACH HD Encoder ENC1200 V1.5 2012-01 Copyright Shenzhen Reach IT Co., Ltd. Shenzhen Reach IT Co., Ltd. provides full technical supports for the customers. If you have any inquiries, please contact the
DSC-N114_Network_Video_Recorder
 DSC-N114_Network_Video_Recorder Quick Start Guide 8200-1116-05 Regulatory information FCC information FCC compliance: This equipment has been tested and found to comply with the limits for a digital device,
USER MANUAL SNMP-RC210 SNMP WEB MANAGEMENT CARD. bxterra.com
 USER MANUAL SNMP-RC210 SNMP WEB MANAGEMENT CARD bxterra.com TABLE OF CONTENTS INTRODUCTION... INSTALLATION... SNMP MANAGER GUI... SNMP MANAGER FUNCTIONS MENU... SETTINGS... ONLINE UPGRADE... SYSTEM MANAGER...
CONTENTS. Xiamen RGBlink Science & Technology Co., Ltd. Ph: / 45
 D6 Quick Start Internal 4:4:4 processing HDR compliance HDMI 2.0 / DP 1.2/ HDMI 1.4/ Dual Link DVI inputs compatible 12G/6G/3G/HD/SD SDI inputs compatible HDMI 2.0 output 12G/6G/3G/HD/SD SDI outputs EDID
ClientCube 2 with Secure KVM or Secure KM Switch Quick Start Guide
 ClientCube 2 with Secure KVM or Secure KM Switch Quick Start Guide About ClientCube 2 with Secure KVM or Secure KM Switch Package contents and documentation The list below shows the contents of a ClientCube
Installation Considerations: Included: Not Included:
 Installation Considerations: See the Setup Guide for any details related to the steps in this guide; such as power requirements, rack mounting considerations, and other more in-depth instructions. The
HDR-8X8-Plus. User Manual. HDMI 4K 8x8 Switch Matrix Connect up to eight different HDMI video sources to eight different outputs.
 HDR-8X8-Plus User Manual HDMI 4K 8x8 Switch Matrix Connect up to eight different HDMI video sources to eight different outputs. Made in U.S.A. www.smartavi.com 1-800-AVI-2131 1 Table of Contents What s
EH6000H series EH6108H + /EH6216H + Quick User Guide
 EH6000H series EH6108H + /EH6216H + Quick User Guide COPYRIGHT COPYRIGHT 2011 AVer Information Inc. All rights reserved. No part of this document may be reproduced or transmitted in any form, or by any
Getting Started With SEL-3555 RTAC
 Getting Started With SEL-3555 RTAC What You Will Need Required Items: SEL-3555 RTAC Microsoft Windows PC a ACSELERATOR RTAC SEL-5033 Software CD Power cable(s) Ethernet cable 1/8-in slotted screwdriver
GV-IP Decoder Box Plus User s Manual
 GV-IP Decoder Box Plus User s Manual Before attempting to connect or operate this product, please read these instructions carefully and save this manual for future use. DBPV10-UM-A 2015 GeoVision, Inc.
Dominion KX III User Station
 Dominion KX III User Station Quick Setup Guide Thank you for purchasing Raritan's Dominion KX III User Station, a high-performance appliance dedicated to access Raritan's enterprise-class Dominion KX III
IWH3216 Touch/Touch II
 IWH3216 Touch/Touch II 16CH Embedded Hybrid DVR Quick User Guide COPYRIGHT 2012 AVer Information Inc. All rights reserved. No part of this document may be reproduced or transmitted in any form, or by any
DATA PROJECTOR XJ-H1650/XJ-H1750 XJ-ST145/XJ-ST155
 DATA PROJECTOR XJ-H1650/XJ-H1750 XJ-ST145/XJ-ST155 E Data Projector Wireless Function Guide Be sure to read the precautions in the Setup Guide that comes with the Data Projector. Be sure to keep all user
DATA PROJECTOR XJ-H1650/XJ-H1750/XJ-H2650 XJ-ST145/XJ-ST155
 DATA PROJECTOR XJ-H1650/XJ-H1750/XJ-H2650 XJ-ST145/XJ-ST155 E Data Projector Wireless Function Guide Be sure to read the precautions in the Quick Start Guide that comes with the Data Projector. Be sure
VENUS X3 Quick Start
 VIEWSIZE THE WORLD VENUS X3 Quick Start Scalable videowall processing for large videowall with up to 8 displays or more Card frame videowall processing system available with 6 slots Integrates easily into
Central Management System
 Central Management System For E5016 User s Manual V1.1.0.0 COPYRIGHT 2013 AVer Information Inc. All rights reserved. All rights of this object belong to AVer Information Inc. Reproduced or transmitted
JZTEK DVR Operation Manual
 JZTEK DVR Operation Manual Dear Valued Client, Windows10 version Thank you for your trust about JZTEK! If you re satisfied with this JZTEK product, we would sincerely appreciate providing your positive
Using GIGABYTE Mini-PC for the First Time
 Congratulations on your purchase of the GIGABYTE Mini-PC. This manual will help you to get started with setting up your Mini-PC. The final product configuration depends on the model at the point of your
Digital Display Wall Application Management Software
 VWAS6.0 日常使用手册 Digital Display Wall Application Management Software VWAS6.0/VCMS/VEMS User Manual Copyright Statement This manual is the copyright property of VTRON. Without prior written approval from
ID
 CATLOG 1. Use notice... 1 1.1 the recommended procedure in the first using... 1 1.2 Button description... 2 2. User Management... 3 2.1 User Registration... 3 2.1.1 Fingerprint registration... 4 2.1.2
Chapter 3 Operating instructions
 Chapter 3 Operating instructions Summary This chapter describes the how to control and navigate through the TVR 30 s menus and options. Content Control interfaces 10 Controlling the TVR 30 10 Front panel
SECURE KVM SWITCHES EDID CONFIGURATION GUIDE SS2P, SS4P, SS8P, SS16P SERIES 24/7 TECHNICAL SUPPORT AT OR VISIT BLACKBOX.
 EDID CONFIGURATION GUIDE SS2P, SS4P, SS8P, SS16P SERIES SECURE KVM SWITCHES 24/7 AT OR VISIT BLACKBOX.COM CONSOLE IN-4 IN-3 DP OUT DP DP IN-2 DP IN-1 DP IN-4 IN-3 IN-2 IN-1 12VDC2.0A DP OUT DP DP DP 12VDC2.0A
SPECIFICATIONS ARE SUBJECT TO CHANGE WITHOUT PRIOR NOTICE. THE INFORMATION CONTAINED HEREIN IS TO BE CONSIDERED FOR REFERENCE ONLY.
 COPYRIGHT 2010 by AVerMedia Information, Inc. All right reserved. Reproduction without permission is prohibited. No part of this document may be reproduced or transmitted in any form, or by any means without
PTZ Optics IP Joystick Controller Model Number: PT-JOY
 PTZ Optics IP Joystick Controller Model Number: PT-JOY Joystick Keyboard Installation & Operation Manual Please check PTZOPTICS.com for the most up to date version of this document Table of Contents 1.
Manual Version: V1.15. Video Management Software Guard Station User Manual
 Manual Version: V1.15 Video Management Software Guard Station User Manual Thank you for purchasing our product. If there are any questions, or requests, please do not hesitate to contact the dealer. Disclaimer
RemoteManager Software
 RMS RemoteManager Software User Manual Contents of this user manual are protected under copyrights and computer program laws. Functions or configurations are subject to be changed or modified without prior
RS-1260 Digital Signage Player
 RS-1260 Digital Signage Player User Manual V1.3 Legal Notice and Disclaimer Thank you for choosing RapidSignage products. This user manual provides a description of the Player relevant guidelines for key
AVG-UHD4K-44. Features
 Features The AVG-UHD4K-44 4x4 HDMI Matrix Switcher is a professional 4x4 HDMI Matrix Switcher that is capable of receiving up to 4 HDMI 2.0 & HDCP 2.2 compliant signals and outputting 4 HDMI 1.4 & HDCP
1. NVR Connection Diagram Wizard Setup Access System Using Mobile Device Access System Using PC Client Software 5
 1 1. NVR Connection Diagram 2 2. Wizard Setup 3 3. Access System Using Mobile Device 4 4. Access System Using PC Client Software 5 5. Access System Using Internet Explorer 8 6. Recording Setup 9 Motion
CH-1529TX/RX HDCP 2.2 & HDMI2.0 Extender with OAR / Audio Insertion
 CH-1529TX/RX HDCP 2.2 & HDMI2.0 Extender with OAR / Audio Insertion Operation Manual DISCLAIMERS The information in this manual has been carefully checked and is believed to be accurate. Cypress Technology
User Manual. Contents 1 WELCOME Features Installation Requirements Software Installation Software Operation...
 CMS User Manual Contents 1 WELCOME... 3 1.1Features... 3 1.2Installation Requirements... 3 1.3 Software Installation...4 2 Software Operation... 5 2.1 Menu bar... 6 2.2 Camera list tree... 7 2.3 Camera
USB Server User Manual
 1 Copyright Notice Copyright Incorporated 2009. All rights reserved. Disclaimer Incorporated shall not be liable for technical or editorial errors or omissions contained herein; nor for incidental or consequential
Quick Start Guide 4/8/16-CH DVR.
 Quick Start Guide 4/8/16-CH DVR 1. Install Hard Drive &DVD Writer 1.1 Install Hard Drive Notice: 1. Support two SATA hard drives. Please use the hard drive the manufacturers recommend specially for security
DX System Operating Guide
 DX System Operating Guide Supported by: Technology Corporation Rackit Technology Corporation 274 Madison Avenue, New York, NY 10016 Tel: (212) 679-0050 Fax: (212) 679-0040 1. 8 0 0. 6 3 6. 3 4 3 4 w International
(DS / DS-14202)
") 8-Port / 16-Port USB and PS/2 Combo-KVM Switch User s Manual (DS-13202 / DS-14202) Index 1. INTRODUCTION... 4 2. SPECIFICATIONS... 5 3. SYSTEM REQUIREMENTS... 6 4. INSTALLATION... 6 4.1. FRONT VIEW...
8-Port / 16-Port USB and PS/2 Combo-KVM Switch User s Manual (DS-13202 / DS-14202) Index 1. INTRODUCTION... 4 2. SPECIFICATIONS... 5 3. SYSTEM REQUIREMENTS... 6 4. INSTALLATION... 6 4.1. FRONT VIEW...
truvision DVR 31 Quick Start Guide
 truvision DVR 31 Quick Start Guide Content Contact information 1 Package contents 1 Installation environment 1 Setting up the DVR 31 1 Connecting the devices 2 Turning on the DVR 31 2 Operating the DVR
VGA Recorder Install Guide
 Install Guide Lite Standard Lecture Recorder Pro www.epiphan.com 8 April 2010 Firmware Version 3.7.7 Thank you for choosing Epiphan! At Epiphan, product function and quality are our top priority. We make
The Vision of Security
 Quick Start Guide GV-SNVR System The Vision of Security Thank you for purchasing GV-SNVR. This guide is designed to assist the new user in getting immediate results from the GV-SNVR. For advanced information
Dominion KX III User Station
 Dominion KX III User Station Quick Setup Guide Thank you for purchasing Raritan's Dominion KX III User Station, a high-performance appliance dedicated to access Raritan's enterprise-class Dominion KX III
Software User Guide. DB-VRC Series 4K Video Wall Controller 11-AUG
 Software User Guide DB-VRC Series 4K Video Wall Controller 11-AUG-2016 www.digibirdtech.com 1 Introduction... 6 1.1 About this Guide... 6 1.2 About the DB-VRC SERIES Video Wall Controller... 6 1.3 Key
EZ-iVMS Client Software. Quick Start Guide
 EZ-iVMS Client Software Quick Start Guide Notices The information in this documentation is subject to change without notice and does not represent any commitment. Liability whatsoever for incorrect data
AST2500 ibmc Configuration Guide
 AST2500 ibmc Configuration Guide Version 1.0 Copyright Copyright 2017 MITAC COMPUTING TECHNOLOGY CORPORATION. All rights reserved. No part of this manual may be reproduced or translated without prior written
User manual. P4K-HUL4E1 4K UHD HDMI & USB Over IP Extender P4K-HUL4E1-P 4K UDH HDMI & USB Over IP Extender with PoE
 User manual P4K-HUL4E1 4K UHD HDMI & USB Over IP Extender P4K-HUL4E1-P 4K UDH HDMI & USB Over IP Extender with PoE P4K-HRSUL4E1 / P4K- LHRSU1E4 P4K-HRSUL4E1-P/ P4K-LHRSU1E4-P Partilink Technology Co.,
Magnetek Material Handling IMPULSE LINK 4.1 Basic Instruction Manual
 Magnetek Material Handling IMPULSE LINK 4.1 Basic Instruction Manual February 2006 Part Number: 140-10350 Copyright 2006 Magnetek Material Handling 2005 MAGNETEK MATERIAL HANDLING All rights reserved.
Quick Setup & Getting Started
 Quick Setup & Getting Started HP Compaq Business PC Copyright 2007 Hewlett-Packard Development Company, L.P. The information contained herein is subject to change without notice. Microsoft, Windows, and
PTZOptics IP Joystick Controller
 Page1 PTZOptics IP Joystick Controller Second Generation IP Joystick Controller Installation & Operation Manual Please visit www.ptzoptics.com for the most up to date version of this manual Page2 Table
Network Video Server Quick Start Guide
 Network Video Server Quick Start Guide Version 1.0.0 Table of Contents 1 Hardware Installation and Connection... 1 1.1 Check Unpacked Device... 1 1.2 About Front Panel and Rear Panel... 1 1.3 After Remove
4K DisplayPort Single Display KVM over IP Extender
 1 4K DisplayPort Single Display KVM over IP Extender KE9950 / KE9952 The KE9950 / KE9952 4K DisplayPort Single Display KVM over IP Extender consists of a high performance IP-based transmitter (KE9950T
The Avocent HMX Advanced Manager. Installer/User Guide
 The Avocent HMX Advanced Manager Installer/User Guide Technical Support Site If you encounter any installation or operational issues with your product, check the pertinent section of this manual to see
VK2-ENCODER. Installation Guide
 VK2-ENCODER Installation Guide This page is intentionally left blank 1. Product Description This manual applies to the VIP Kit2 Camera VK2-ENCODER The VK2-ENCODER supports the network service for an existing
User Manual of ivms ivms-4200 Client Software. User Manual UD07013B
 ivms-4200 Client Software User Manual 1 UD07013B User Manual COPYRIGHT 2017 Hangzhou Hikvision Digital Technology Co., Ltd. ALL RIGHTS RESERVED. Any and all information, including, among others, wordings,
USER GUIDE. K-Router Plus Online User Guide. Version P/N: Rev 1
 KRAMER ELECTRONICS LTD. USER GUIDE K-Router Plus Online User Guide Version 2.0.28 P/N: 2900-300247 Rev 1 Contents 1 Introduction 1 2 Downloading and Installing K-Router Plus 2 3 Defining K-Router Plus
HD IPCameras User's Mannual
 Thank you for purchasing our products, if you have any questions or need, please feel free to contact us. This manual applies to IPC-XXX series of network cameras. This manual may contain technical inaccuracies
Why KVM over IP? Leading the World in KVM Innovations
 Why KVM over IP? In addition to the unlimited distances offered by a networked solution, utilizing over IP technology for video, audio, and control data distribution and extension offers boundless flexibility
SmartWatch Eco/Eco Compact
 SmartWatch Eco/Eco Compact Digital Video Recorders SmartWatch Eco SmartWatch Eco Compact Quick User Guide Index Box Contents...3 Front Panel Controls...4-5 SmartWatch Eco Compact...4 SmartWatch Eco...5
Management Software AT-S79. User s Guide. For use with the AT-GS950/16 and AT-GS950/24 Smart Switches. Version Rev.
 Management Software AT-S79 User s Guide For use with the AT-GS950/16 and AT-GS950/24 Smart Switches Version 1.0.0 613-000207 Rev. A Copyright 2005 Allied Telesyn, Inc. All rights reserved. No part of this
Manual Version: V1.00. Video Decoder User Manual
 Manual Version: V1.00 Video Decoder User Manual Thank you for purchasing our product. If there are any questions, or requests, please do not hesitate to contact the dealer. Copyright Copyright 2016 Zhejiang
Instructions for AltaScribe
 Instructions for AltaScribe Terms of Use Unless otherwise stated, the content of this documentation and software associated with it are copyrighted materials of NetMed. They are intended for the internal,
DS-7200HWI-SH Series DVR. Technical Specification
 DS-7200HWI-SH Series DVR Technical Specification Notices The information in this documentation is subject to change without notice and does not represent any commitment on behalf of HIKVISION. HIKVISION
VX6s XI'AN NOVASTAR TECH CO., LTD. All-in-One Video Controller. Specifications. Document Version: V Document Number: NS
 VX6s All-in-One Video Controller Document Version: V1.0.0 Document Number: NS160100264 Copyright 2018 Xi an NovaStar Tech Co., Ltd. All Rights Reserved. No part of this document may be copied, reproduced,
QUICK START GUIDE. Multi Display Controller
 Multi Display Controller QUICK START GUIDE Thank you for purchasing the Datapath Fx4-SDI multi display controller. The aim of this document is to quickly guide you through the process of initial setup.
Habanero BMC Configuration Guide
 Habanero BMC Configuration Guide Version 1.0 Copyright Copyright 2015 MiTAC International Corporation. All rights reserved. No part of this manual may be reproduced or translated without prior written
Version March 7, 2012
 PCAM Installer User's Manual Version 3.0.6 March 7, 2012 GPI360, Inc. IT121107-1 1 GPI360 Inc. PCAM Installer User s Manual Document Part Number: IT121107-1 Document Version: 3.0.6 Revised: April 13, 2012
AVerMedia IWH3216 Touch Quick Installation Guide
 AVerMedia IWH3216 Touch Quick Installation Guide NOTICE SPECIFICATIONS ARE SUBJECT TO CHANGE WITHOUT PRIOR NOTICE. THE INFORMATION CONTAINED HEREIN IS TO BE CONSIDERED FOR REFERENCE ONLY. WARNING TO REDUCE
* SATA cable and SATA power cable are included in the HDVR. Contents. Hard Disk Installation. Hardware Connection. Caution
 Contents Hard Disk Installation Caution Step 3: Please align the screw holes on the HDD with those on the HDVR case and secure them with the given screws. Hardware Connection Before installing the HDD,
AHD MOBILE DVR User Manual (MR9504) ~ 1 ~
 ~ 1 ~") AHD MOBILE DVR User Manual () ~ 1 ~ Catalogue Chapter 1 Overview... 1 Chapter 2 Quick setup... 1 1.Device Installation... 1 2.User Login... 1 3.Set up the System time... 2 4.Set up cameras... 3 5.Wizard...
AHD MOBILE DVR User Manual () ~ 1 ~ Catalogue Chapter 1 Overview... 1 Chapter 2 Quick setup... 1 1.Device Installation... 1 2.User Login... 1 3.Set up the System time... 2 4.Set up cameras... 3 5.Wizard...
CSW-HDBT300M. Multi-Input Switcher to HDMI with HDBaseT up to 330ft Transmitter & Receiver. Operation Manual
 CSW-HDBT300M Multi-Input Switcher to HDMI with HDBaseT up to 330ft Transmitter & Receiver Operation Manual 1.Introduction This machine is a high performance presentation scaler and switcher. It accepts
DMS Local. User Manual. For Projector Management V 1.01
 DMS Local User Manual For Projector Management V 1.01 2 Copyright Copyright Copyright 2018 BenQ Corporation. All rights reserved. No part of this publication may be reproduced, transmitted, transcribed,
Orion XTender. Installation and Operation Manual. Modular CATx/Fiber Extender 2/4/6/21-Card Chassis Stancliff Road Houston, Texas 77099
 Orion XTender Modular CATx/Fiber Extender 2/4/6/21-Card Chassis Installation and Operation Manual 10707 Stancliff Road Houston, Texas 77099 Phone: (281) 933-7673 techsupport@rose.com LIMITED WARRANTY Rose
Operating Instructions. Windows. Video Wall Adjustment & Calibration Software. Video Wall Manager Ver. 1.8
 Operating Instructions Video Wall Adjustment & Calibration Software Windows Video Wall Manager Ver. 1.8 Thank you for purchasing this Panasonic product. Before using this software, please read the instructions
Horizon Launcher Configuration Guide
 Horizon Launcher Configuration Guide Windows NT and Windows 2000 are registered trademarks of Microsoft Corporation. All other product or company names are trademarks or registered trademarks of their
Avocent HMX High Performance KVM Extender System, Next Generation, and the Avocent HMX Advanced Manager Release Notes
 VERTIV Extender System, Next Generation, and the Release Notes VERSION 4.7, June 15, 2018 Release Notes Section Outline 1 Upgrade Instructions 2 Package Version Information 3 Features, Enhancements and
QUICK SETUP GUIDE. MasterConsole Digital. Package Contents. MCD Structure Diagrams
 QUICK SETUP GUIDE MasterConsole Digital Thank you for purchasing the MasterConsole Digital (MCD) KVM switch or MCD-LED KVM combination switch and drawer. MCD is the most user-friendly 1U KVM switch for
8380 RPC Return Path Combiner. User s Guide
 8380 RPC Return Path Combiner User s Guide Notice Every effort was made to ensure that the information in this manual was accurate at the time of printing. However, information is subject to change without
Point of View SmartTV-500 Center - Android 4.2. General notices for use...2 Disclaimer...2 Box Contents...2
 Point of View SmartTV-500 Center - Android 4.2 English Table of Contents General notices for use...2 Disclaimer...2 Box Contents...2 1.0 Product basics...3 1.1 Buttons and connections... 3 1.2 Connecting
MasterConsole Digital (MCD and MCD-LED17 Series) User Guide
 User Guide") MasterConsole Digital (MCD and MCD-LED17 Series) User Guide Release 1.0.0 Copyright 2017 Raritan, Inc. MCD-0A-v1.0.0-E April 2017 255-20-0007-00 This document contains proprietary information that is protected
MasterConsole Digital (MCD and MCD-LED17 Series) User Guide Release 1.0.0 Copyright 2017 Raritan, Inc. MCD-0A-v1.0.0-E April 2017 255-20-0007-00 This document contains proprietary information that is protected