Table of Contents. iii
|
|
|
- Silas Bishop
- 6 years ago
- Views:
Transcription
1 The Print Shop 2.0
2
3 Table of Contents How do I Getting Started... 3 How do I Understand Print Shop tabs... 3 Preview a page... 5 View the image tray... 5 Show/hide page preview and image tray... 5 Move to the next or previous page... 5 Show rulers, guides, margins, or page folds... 5 Change the zoom level... 6 Fit project to window... 6 Set preferences... 6 Managing Your Projects and Images... 9 Available in The Print Shop 2.0 Deluxe and Professional Projects Images To save the project with a new name: To save the project with the existing name: To manually copy The Print Shop 2.0 user database for saving, backup, or transfer to another machine, follow the steps below, depending on your operating system Windows Vista Windows XP To delete a project: Designing Your Project How do I Add a headline Add a text box Add a linked text box Align text Add more space before a line of text Add more space between lines Resize a text box Rotate text Delete a text box or headline Arrange text boxes with other text and graphics Horizontally or vertically align text boxes Group text boxes Rotate text boxes Horizontally or vertically flip text boxes Change the opacity Create a drop shadow Add a frame Blur text Work with fonts How do I Add a shape Change the outline of a shape Fill a shape or outline with color Add a text box to a shape Edit shape text Delete a shape Add a line iii
4 The Print Shop 2.0 Change the color of a line Adjust line thickness Change line arrowheads Delete a line Arrange shapes with text and graphics Horizontally or vertically align shapes Group shapes Rotate shapes Horizontally or vertically flip shapes Change the opacity Create a drop shadow Add a frame Blur a shape How do I Import an image Search for an image Tag a favorite image Add an image to the tray Edit an image Opening the Image Editor Using the Image Editor Save an image View information about an image Work with XAML/vector images How do I Change the calendar's start date Show/hide grid lines Change the grid line color Show/hide previous/next months Add holidays Change day titles Change the number alignment Printing and Exporting Your Projects To preview a project: To configure print alignment settings: To view existing print values: To print a project: How do I Import vcards Add mail merge fields to your project Print using mail merge Index iv
5 Welcome to The Print Shop 2.0! Welcome to The Print Shop 2.0, a fun and easy way to create impressive print projects! With over 18 project types to choose from, the handy wizard walks you through the first steps of creating your project. Then use the integrated photo and clip art editing tools and animated greetings (featuring your personal photos and videos) to exercise your creativity and customize your project any way you want to. To learn how to start creating your own personalized projects, click a link below. How do I... Create a project from scratch Create a project from a template Create a project from an existing one Import a project Launch Smilebox 1
6
7 Getting Started Navigating The Print Shop 2.0 Moving around The Print Shop 2.0 is simple! Click a link below for details. How do I... Understand The Print Shop 2.0 tabs Work within The Print Shop 2.0 main window o Preview a page o View the image tray o Show/hide page preview and image tray o Move to the next or previous page o Show rulers, guides, margins, or page folds o Change the zoom level o Fit project to window Set preferences Understand Print Shop tabs The tabs on the left side of the screen are described below: 3


8 The Print Shop 2.0 The tabs on the top of the screen are described below: 4

9 Getting Started Preview a page To preview a page in a project, click Page Preview, and click the page you'd like to see. This toggles off and on with Image Tray. View the image tray To view the image tray, click Image Tray at the bottom of the screen. This toggles off and on with Page Preview. Show/hide page preview and image tray To show/hide page preview and image tray, click the Show/Hide icon in the bottom right of the screen. Move to the next or previous page To move to the next or previous page, click the right or left arrow at the bottom of the screen. Show rulers, guides, margins, or page folds To show rulers, guides, margins, or page folds, click the View Options icon at the bottom of the screen, and click to select/deselect the options you want. 5

10 The Print Shop 2.0 Change the zoom level To change the zoom level, click the Zoom drop-down box at the bottom of the screen, and select a level. Fit project to window To fit the project to the main window, click the Fit Project to Window icon at the bottom of the screen. Set preferences Within the Preferences dialog, you can set your measurement units and duplex printing settings. To set your measurement units to millimeters: 1. Select Help > Preferences. 2. Select millimeters under the Measurement section. 3. Click OK. Click here for instructions on duplex printing. 6
11 Getting Started Help and Support If you have questions and need technical support, visit The Print Shop 2.0 web site at 7
12
13 Managing Your Projects and Images Creating a Project from Scratch To create a new project from scratch: 1. From The Print Shop 2.0 home page, click Create from Scratch or Project Wizard. 2. Click a project type (for example, Invitations) from the navigation bar on the left. 3. Select the blank icon from the main window, and click Next. 4. Choose your Paper Size from the drop-down list on the top left of the Design Desk. Note that the list of available paper sizes and layout styles changes, depending upon the project type you select. 5. Choose either Portrait or Landscape as your Layout Style. (Note that some project types don't a 6. Type a Project Name, and click Next. 7. Now you can customize your project and add text, shapes, and images, just to name a few! Creating a Project from a Template To create a project from a template: 1. From The Print Shop 2.0 home page, click Create from Ready-made Template. 2. Select one of the following: Click the project you'd like to open from the Project Gallery. Search for a project by selecting one of the following search criteria, and click Go. 9


14 The Print Shop You can mouse over the project icon and do one of the following: From the Project Gallery, you can hover over the project icon and select one of the following actions: You can change the preview size by clicking the following icons: 4. Customize the project. 5. Click Save, and select Save as. 6. Type a new name for the project, and click Save. Creating a New Project from an Existing Project 10
15 Managing Your Projects and Images To create a project from an existing project (or to update an existing project): 1. From The Print Shop 2.0 home page, do one of the following: Click Open My Projects, and select a project from the Project Gallery. Choose one of the following: o In Open a Recent Project, select a project from the list. Select a project that's close to the new project you want to create. For example, if you'd like to create a personalized birthday card, you may want to open another birthday card you've already made. o Import a project. 3. Customize the project. 4. To save the project, do one of the following: To save the project with a new name (and keep the existing project as it was), click Save, and select Save as. Browse to select a new location for the file (if desired), and type a new File name. To save the changes you made to the existing project, click Save, and select Save. Project Types You can choose from an assortment of different types of projects, including: Banners Business cards Calendars CD/DVD Certificates Envelopes Greeting cards Invitations Label sheets Letterheads Newsletters Photo albums Postcards Signs 11

16 The Print Shop 2.0 Stickers Importing a Project Projects created using The Print Shop 2.0 but not saved in The Print Shop 2.0 database can be imported and saved in The Print Shop 2.0 database. Once you save them to your database, they display in the Project Gallery. Note that the imported project will include all the shapes, images, and text but will not import fonts you don't already have installed on your computer. To import a project: 1. From The Print Shop 2.0 home page, click Open My Projects. 2. Click Import Project. 3. Browse to the Print Shop file you'd like to import, and click Open. 4. Make changes to the project, if desired. 5. To save the project, do one of the following: To save the project with a new name, click Save, and select Save as. Type a new name for the project. To save the project with the existing name, click Save, and select Save. 12
17 Managing Your Projects and Images Tagging a Project or Image Available in The Print Shop 2.0 Deluxe and Professional In The Print Shop 2.0 there are two separate galleries for projects and two separate galleries for images. Projects Print Shop Project Gallery (files are stored in the online server on the internet) My Projects Gallery (files are stored locally on your PC) Images Print Shop Images Gallery (files are stored in the online server on the internet) My Images Gallery (files are stored locally on your PC) The Print Shop 2.0 handles tags differently, depending upon whether the file is stored locally or on the internet. Projects found in the Print Shop Galleries already posses a collection of tags. These tags are used when you perform a search. So, for example, if there is a picture of Benjamin Franklin in the gallery, some of the tags might be for Benjamin, Franklin, Independence, Philadelphia, etc. You can see these tags by selecting Image Info. 13

18 The Print Shop

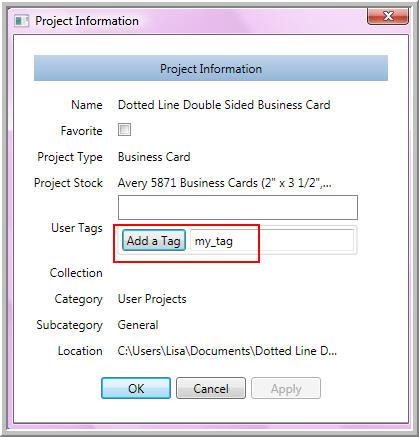
19 Managing Your Projects and Images With images or projects from the Print Shop gallery, you do not have the ability to add, remove, or change any of these tags; they remain unchanged, allowing you or anyone else using The Print Shop 2.0 to search on any of them. However, if you have downloaded or imported an image or project into The Print Shop 2.0, it will be saved within the My Images Gallery (or the My Projects Gallery). You can add, edit, and delete tags from these local Images. To do this, click Add a Tag, Remove controls within this dialog. 15

20 The Print Shop
21 Managing Your Projects and Images You can search on any of these tags. Saving a Project To save the project with a new name: 1. Click Save, and select Save as. 2. Pick a file type. Besides saving your project as a Print Shop project, you can save it as an XPS, JPG, or PDF. To save the project with the existing name: 1. Click Save. 2. Select Save. To manually copy The Print Shop 2.0 user database for saving, backup, or transfer to another machine, follow the steps below, depending on your operating system. Windows Vista 1. Open the Control Panel. 2. From the Classic view, select Folder Options. 3. Select the View tab. 4. Click to select the Show hidden files and folders checkbox within the Hidden Files and Folders section. 5. Click Apply. 6. Click OK. 7. Open Windows Explorer. 8. Browse to C:\Users\<user name>\appdata\local\the Print Shop\The Print Shop 2.0 Professional. 9. Copy the userdata.psdb file. This is the file that contains all your images from My Images Gallery and projects from My Projects Gallery. 17
22 The Print Shop If you are transferring to a new PC, copy this file over into the same directory on your new PC. Your projects and images will appear in The Print Shop 2.0 on your new PC. Windows XP 1. Open the Control Panel. 2. From the Classic view, select Folder Options. 3. Select the View tab. 4. Click to select the Show hidden files and folders checkbox within the Hidden Files and Folders section. 5. Click Apply. 6. Click OK. 7. Open Windows Explorer. 8. Browse to C:\Documents and Settings\<user name>\local Settings\Application Data\The Print Shop\The Print Shop 2.0 Professional. 9. Copy the userdata.psdb file. This is the file that contains all your images from My Images Gallery and projects from My Projects Gallery. 10. If you are transferring to a new PC, copy this file over into the same directory on your new PC. Your projects and images will appear in The Print Shop 2.0 on your new PC. Deleting a Project To delete a project: 1. Click My Projects. 2. Mouse over the project you'd like to delete, and click Actions > Delete. This deletes the project from The Print Shop 2.0 application. Note that The Print Shop 2.0 pre-loaded projects cannot be deleted. 18
 by browsing to the")
23 Managing Your Projects and Images 3. Next, you need to delete the project from your hard drive (or wherever you saved it) by browsing to the appropriate place, finding the file, and deleting it from there. 19
24
25 Designing Your Project Customizing a Project Once you've selected a project type and named your project using the Project Creation Wizard, you can transform and personalize it any way you want. From The Print Shop 2.0 main window, you can: Change your layout to add a background, arrange objects on the page, or create different layers Add text to your project. You can also add mail merge fields for printing. Work with shapes to add lines, arrows, and predefined shapes to your project Customize the days and months in your calendar. Add images, either from your own files or choose from a variety graphics Launching Smilebox Smilebox is a free online service that lets you create and share multimedia designs, such as digital scrapbooks, slideshows, greeting cards, photo albums and postcards. You can personalize them with photos, video, and music. To open Smilebox, click Launch Smilebox from The Print Shop 2.0 home page. 21
26 The Print Shop 2.0 Working with Text You can add text to any project and format it by changing the font, spacing, and the way it's arranged on the page. You can also add features like drop shadows and frames and other special effects. If you'd like to create one project, such as a holiday card, and send it out to different people, you can add mail merge fields to your text so each card is personalized with a name from your electronic address book. Click a task below for detailed instructions. How do I... Work with text objects o Add a headline o Add a text box o Add a linked text box o Resize a text box o Rotate text o Delete a text box or headline Work with fonts Work with alignment and spacing o Align text o Add more space before a line of text o Add more space between lines Arrange text boxes o Arrange text boxes with other text and graphics o Horizontally or vertically align text boxes o Group text boxes o Rotate text boxes o Horizontally or vertically flip text boxes Work with styles o Change the opacity o Create a drop shadow o Add a frame o Blur text Add mail merge fields Add a headline You can add a pre-formatted headline and then change the text to whatever you want. 22
27 Designing Your Project Note that the text in a headline must be uniform. In other words, you can't change the font in the middle of the text. To add a headline: 1. From the Text tab, click Headlines, and select the style you'd like. The sample headline displays in a box on the page. 2. To resize the headline, click to select an edge of the headline box. Drag it to draw the headline to the size that you want. 3. To change the text in the headline, double-click the text, make your changes, and then click outside the headline box to see your changes. Add a text box Create a text box to add text to your project. When you determine the size of your text box, remember that the text you add fills the entire box. To add a text box: 1. From the Text tab, click Text Box, and select Add Text Box from the drop-down list. 2. Click on the page where you want to start a corner of the text box, and then drag until the text box is the size that you want. 3. To add text to the text box, double-click inside the text box, and then type or paste the text. Add a linked text box You can add multiple text boxes and link them so the text flows from one box to another. This is especially helpful when you have multiple pages in your project. To add a linked text box: 1. If your project does not have a text box, add one to your project. 2. Click to select the text box. 3. Select Text Box > Add Linked Text Box. 4. Click on the page where you want to start a corner of the new text box, and then drag until the text box is the size that you want. The text from the first box will now flow into the new text box if the boundaries of the first box are too small to contain all the text. Align text If you have multiple pages in your project and want text to flow between the pages, select Text Box > Add Linked Text Box to Page. Select the page you'd like the new text box to display, and draw the new text box. 23

28 The Print Shop 2.0 Horizontal alignment determines the appearance and orientation of the edges of the paragraph; it can be left-aligned, right-aligned, centered, or justified (aligned evenly along the left and right margins). For example, in a paragraph that is left-aligned (the most common alignment), the left edge of the paragraph is flush with the left margin. To align text: 1. From the Text tab, double-click to select the text. 2. In the Alignment and Spacing group, click one of the following: Add more space before a line of text To add more space before a line of text: 1. Double-click the text in a text box, and select the Text tab. 2. Select Padding from the Alignment and Spacing group, and move the slider bar from Less to More, stopping when you have the spacing you like. Add more space between lines To add more space between lines of text in a text box: 1. Double-click the text in a text box, and select the Text tab. 2. Select Spacing from the Alignment and Spacing group, and select from one of the following: 24

29 Designing Your Project Resize a text box To resize a text box, click to select the box, and drag the blue line to make the box larger or smaller. Rotate text You can rotate the text in a text box or headline to any angle...even upside down! To rotate text: 1. Click to select the text box. 2. Click to select the top handle of the text box, and rotate the box. Delete a text box or headline To delete a text box or headline: 1. Click to select the text box. 2. Press the Del key on your keyboard. Arrange text boxes with other text and graphics When you add more than one text box, image, or shape to a page in your project, they automatically stack in individual layers as you add them. You see the stacking order when objects overlap the top object covers a portion of the objects beneath it. In the example below, a text box and two shapes (a box and a heart) have been added to a project. 25
30 The Print Shop 2.0 You can move individual text boxes, images, and shapes in a stack. For example, you can move objects up or down within a stack one layer at a time, or you can move them to the top or bottom of a stack in one move. You can overlap objects to create different effects. See how the example has been arranged by bringing the text box to the front (we also made the font size smaller so it would fit inside the heart): To arrange text boxes with other text and graphics: 1. Add all your text and graphic elements onto the page. 2. Select the text box (or other element) you'd like to arrange. 3. From either the Text, Images, Shapes, or Calendar tab, select Arrange. 4. Select one of the following: 26
31 Designing Your Project Horizontally or vertically align text boxes Another way to arrange text boxes with other objects is to align the sides, middles, or top or bottom edges. For example, take these three objects: You can align them horizontally to the left: Or vertically to the center: When you align objects relative to each other by their edges, one of the objects remains stationary. For example, selecting Horizontal Align Left aligns the left edges of all selected objects with the left edge of the left-most object. To align text boxes to other text and graphics: 1. Add all your text and graphic elements onto the page. 2. Select the elements you'd like to align. 3. From either the Text, Images, Shapes, or Calendar tab, select Align. 4. Select one of the following: 27
32 The Print Shop 2.0 Group text boxes To work faster, you can group text boxes and other objects. Grouping lets you flip, rotate, move, or resize all objects at the same time as though they were a single object. For example, the three objects below: Can be grouped as one object: 28

33 Designing Your Project To group text boxes and other objects: 1. Add all your text and graphic elements onto the page. 2. Select the elements you'd like to group; to select more than one object, press the Ctrl key while you click to select. 3. From either the Text, Shapes, or Calendar tab, select Arrange > Group > Group. (To separate the objects, select Arrange > Group > Ungroup.) Rotate text boxes You can change the position of text boxes and other objects by rotating them. To rotate a text box: 1. Click to select the text box. 2. Drag the rotation handle in the direction you want to rotate the text. 29
34 The Print Shop 2.0 Horizontally or vertically flip text boxes You can change the position of text boxes or other objects by reversing (flipping) them. To flip a text box: 1. Click to select the text box. 2. Select Arrange > Flip > Flip Vertical or Flip Horizontal. Change the opacity Opacity refers to the amount of transparency a layer has. For instance, if a layer s opacity is set to 100%, then that layer is completely opaque (in other words, you can t see through it). If a layer s opacity is set to 50%, then it is see-through, or moderately transparent, and layers behind it can show through. On the other end of the scale, if a layer s opacity is set to 0%, then that layer is completely transparent (that is, invisible). To change the opacity of the text in a text box: 1. Click the text box to select it. 2. Select Styles > Opacity, and move the slider bar to the left to reduce the opacity or to the right to increase it. Create a drop shadow A drop shadow is a visual effect that looks like the shadow of an object, giving the impression that the object is raised above the objects behind it. 30
35 Designing Your Project To add a drop shadow to the text in a text box: 1. Click to select the text box. 2. Select Styles > Drop Shadow, and choose any of the following: Add a frame To change the color of the shadow, select Color. Enter your color values (e.g., RGC), or click to select a color from the palette, and click OK. To change the direction of the shadow, select Direction, and select from the choices provided. To change the depth of the shadow, move the slider bar left or right to decrease or increase the shadow. To blur the shadow, select Blur, and move the slider bar left or right to decrease or increase the shadow. You can add a line around your text box to make it stand out. To add a frame: 31
36 The Print Shop Click to select the text box. 2. Select Styles > Frame, and choose any of the following: To change the color of the frame, select any of the following: o To select a basic color, select a color from the color palette o To select a custom color, select Pick a Color. You can then enter color values or select a color from the grid. o To select a pixel-level color, click Eye Dropper. The tool selects the pixel-level color of a specified point on the design desk. The selected color will be loaded into the color picker. o To add gradient color, select Gradient. You can then select a color and adjust Blur text o the range of colors and points. To fill a shape with a picture, select Image. You can then select a picture from the gallery. To change the thickness of the frame, move the slider bar left to decrease the thickness and right to increase it. To delete the frame, click Remove. Available in The Print Shop 2.0 Deluxe and Professional To blur the text within a text box: 1. Click to select the text box. 2. Select Styles > Blur, and move the slider bar to the right to increase the blurriness and to the left to decrease it. Work with fonts Select the text in your project and choose one or more of the following: 32

37 Designing Your Project Working with Shapes and Lines Work with shapes and lines to add colors, text, and arrows. How do I... Work with shapes o Add a shape o Change the outline of a shape o Fill a shape with color o Add a text box to a shape o Edit shape text o Delete a shape 33
38 The Print Shop 2.0 Work with lines o Add a line o Change the color of a line o Adjust line thickness o Change line arrows o Delete a line Arrange shapes o Arrange shapes with text and graphics o Horizontally or vertically align shapes o Group shapes o Rotate shapes o Horizontally or vertically flip shapes Work with styles o Change the opacity o Create a drop shadow o Add a frame o Blur a shape Add a shape To add a shape to your project: 1. Select the Shapes tab. 2. Click to select the shape you want from the Shape Gallery. The shape is placed on your page. Change the outline of a shape To change the outline of a shape: 1. Click to select the shape. 2. Click Edit Shape Outline to open the Shape Editor. 34

39 Designing Your Project 1. Edit the shape. 2. Click Save. Fill a shape or outline with color To fill a shape with color: 1. Click to select the shape. 2. Click Fill (or Outline), and select one of the following: o o o o o To select a basic color, select a color from the color palette To select a custom color, select Pick a Color. You can then enter color values or select a color from the grid. To select a pixel-level color, click Eye Dropper. The tool selects the pixel-level color of a specified point on the design desk. The selected color will be loaded into the color picker. To add gradient color, select Gradient. You can then select a color and adjust the range of colors and points. To fill a shape with a picture, select Picture. You can then select a picture from the gallery. Add a text box to a shape To add a text box to a shape: 1. Select the Text tab. 35
40 The Print Shop Click Text Box, and select Add Text Box from the drop-down list. 3. Click on the shape, and then click the left mouse button as you drag it to draw the text box to the size that you want. 4. To add text to the text box, double-click inside the text box, and then type or paste text. Edit shape text To edit text within a shape, select the shape, and click Edit Text. Delete a shape To delete a shape: 1. Click to select the shape. 2. Press the Del key on your keyboard. Add a line To add a line, click Insert Line. Change the color of a line To change the color of the line: 1. Click Line Objects > Color. To select a basic color, click the right arrow and select a color palette. To select a custom color, select Pick a Color. You can then enter color values or select a color from the grid. To select a pixel-level color, click Eye Dropper. The tool selects the pixel-level color of a specified point on the design desk. The selected color will be loaded into the color picker. Adjust line thickness To change the thickness of the line, move the slider bar left to decrease the thickness and to the right to increase it. 36
41 Designing Your Project Change line arrowheads To adjust the arrowhead(s) of the line: 1. Click to select the line. 2. Choose any of the following: Delete a line To delete a line: To have arrowheads at the beginning or end of the line (or both), select an option from the Show at drop-down box. You can also choose not to have an arrowhead. To adjust the angle and/or length of the line, use the slider bars. To have an open arrowhead (not filled), click to deselect the Closed checkbox. 1. Click to select the line. 2. Press the Del key on your keyboard. Arrange shapes with text and graphics When you add more than one shape, text box, or image to a page in your project, they automatically stack in individual layers as you add them. You see the stacking order when objects overlap the top object covers a portion of the objects beneath it. In the example below, a text box and two shapes (a box and a heart) have been added to a project. You can move individual text boxes, images, and shapes in a stack. For example, you can move objects up or down within a stack one layer at a time, or you can move them to the top or bottom of a stack in one move. You can overlap objects to create different effects. See how the example has been arranged by bringing the text box to the front (we also made the font size smaller so it would fit inside the heart): 37

42 The Print Shop 2.0 To arrange shapes with text and graphics: 1. Add all your text and graphic elements onto the page. 2. Select the shape (or other element) you'd like to arrange. 3. From either the Text, Images, Shapes, or Calendar tab, select Arrange. 4. Select one of the following: Horizontally or vertically align shapes Another way to arrange shapes with other objects is to align the sides, middles, or top or bottom edges. For example, take these three objects: You can align them horizontally to the left: 38


43 Designing Your Project Or vertically to the center: When you align objects relative to each other by their edges, one of the objects remains stationary. For example, selecting Horizontal Align Left aligns the left edges of all selected objects with the left edge of the left-most object. To align shapes to other text and graphics: 1. Add all your text and graphic elements onto the page. 2. Select the elements you'd like to align. 3. From either the Text, Images, Shapes, or Calendar tab, select Arrange > Align. 4. Select one of the following: Group shapes To work faster, you can group text boxes and other objects. Grouping lets you flip, rotate, move, or resize all objects at the same time as though they were a single object. For example, the three objects below: 39
44 The Print Shop 2.0 Can be grouped as one object: To group shapes and other objects: 1. Add all your text and graphic elements onto the page. 2. Select the elements you'd like to group; to select more than one element, press the Ctrl key while you click to select the object. 3. From either the Text, Shapes, or Calendar tab, select Arrange > Group > Group. (To separate the objects, select Group > Ungroup.) Rotate shapes You can change the position of shapes and other objects by rotating them. 40
 them. To flip a shape: 1. Click to select the shape. 2.")
45 Designing Your Project To rotate a shape: 1. Click to select the shape. 2. Drag the rotation handle in the direction you want to rotate the shape. Horizontally or vertically flip shapes You can change the position of shapes or other objects by reversing (flipping) them. To flip a shape: 1. Click to select the shape. 2. Select Arrange > Flip > Flip Vertical or Flip Horizontal. Change the opacity Opacity refers to the amount of transparency a layer has. For instance, if a layer s opacity is set to 100%, then that layer is completely opaque (in other words, you can t see through it). If a layer s opacity is set to 50%, then it is see-through, or moderately transparent, and layers behind it can show through. On the other end of the scale, if a layer s opacity is set to 0%, then that layer is completely transparent (that is, invisible). To change the opacity of a shape: 1. Click the shape to select it. 2. Select Styles > Opacity, and move the slider bar to the left to reduce the opacity or to the right to increase it. 41
46 The Print Shop 2.0 Create a drop shadow A drop shadow is a visual effect that looks like the shadow of an object, giving the impression that the object is raised above the objects behind it. To add a drop shadow to a shape: 1. Click to select the shape. 2. Select Styles > Drop Shadow, and choose any of the following: 42
47 Designing Your Project Add a frame To change the color of the shadow, select Color. Enter your color values (e.g., RGC), or click to select a color from the palette, and click OK. To change the direction of the shadow, select Direction, and select from the choices provided. To change the depth of the shadow, move the slider bar left or right to decrease or increase the shadow. To blur the shadow, select Blur, and move the slider bar left or right to decrease or increase the shadow. You can add a line around your shape to make it stand out. To add a frame: 1. Click to select the shape. 2. Select Styles > Frame, and choose any of the following: To change the color of the frame, select any of the following: o To select a basic color, select a color from the color palette o To select a custom color, select Pick a Color. You can then enter color values or select a color from the grid. o To select a pixel-level color, click Eye Dropper. The tool selects the pixel-level color of a specified point on the design desk. The selected color will be loaded into the color picker. Blur a shape Available in The Print Shop 2.0 Deluxe and Professional o To add gradient color, select Gradient. You can then select a color and adjust the range of colors and points. o To fill a shape with a picture, select Image. You can then select a picture from the gallery. To change the thickness of the frame, move the slider bar left to decrease the thickness and right to increase it. To delete the frame, click Remove. Available in The Print Shop 2.0 Deluxe and Professional To blur a shape: 1. Click to select the shape. 2. Select Styles > Blur, and move the slider bar to the right to increase the blurriness and to the left to decrease it. 43
48 The Print Shop 2.0 Working with Images You can add images to your project by importing your own or choosing from a variety of available images in the Image Gallery. How do I... Import an image Search for an image Tag favorite images Add an image to the tray Edit an image Work with XAML/vector images Save an image View information about an image Import an image To import an image: 1. Select the Image Gallery tab. 2. Select the My Images tab. 3. Click Import, and browse to the folder containing the image. 4. Select the image you want, and click Open. The image is imported into your My Images tab. Search for an image To search for an image: 1. Select the Image Gallery tab. 2. Select either the My Images or Print Shop Images tab. 3. You can search by one of the following: 44

49 Designing Your Project 4. Click the image to add it to your project. Tag a favorite image To tag a favorite image so you can locate it more quickly: 1. Select the Image Gallery tab. 2. Hover over the image you'd like to tag, and select Actions. 45
50 The Print Shop Select Make Favorite. The image is now tagged with a star. 46

51 Designing Your Project Add an image to the tray To add an image to the image tray: 1. Select the Image Gallery tab. 2. Hover over the image you'd like to add to the tray, and select Actions. 47

52 The Print Shop Select Add to Tray. The image is now added to the image tray. Edit an image Available in The Print Shop 2.0 Deluxe and Professional Once you've added an image to your project, you can use the Image Editor to crop, rotate, apply special effects, and correct colors. You can also edit images from the Print Shop Images tab, save the changes with a new name, and add it to the My Images tab to use in future projects. Opening the Image Editor To edit an image from within your project, double-click the image to open it in the Image Editor. To edit an image from the Image Gallery: 1. Hover over the image you'd like to edit, and select Actions. 2. Select Edit a Copy. 48

53 Designing Your Project Using the Image Editor Save an image To save an image: 1. Select the Image Gallery tab. 2. Hover over the image you'd like to save, and select Actions. 49
54 The Print Shop Select Save to Disk. 4. Browse to select a location to save the file, and click Save. View information about an image To view information about an image: 1. Select the Image Gallery tab. 2. Hover over the image, and select Actions. 50

55 Designing Your Project 3. Select Image Info. Information about the image is displayed. 51

56 The Print Shop Click OK to close the box. Work with XAML/vector images Available in The Print Shop 2.0 Deluxe and Professional Below are some guidelines/limitations for working with XAML/vector images in The Print Shop 2.0: When you edit a vector image, The Print Shop 2.0 will launch the XAML Image Editor. Within this editor, you can change the colors of vector 52

57 Designing Your Project images; however, you won't be able to change the background. When accessing XAML/vector images in the gallery, the Save to Disk option is not available. This option is only available when saving raster images. 53

58 The Print Shop 2.0 Working with Calendar Information When creating a calendar, you can customize the start date and day/month formats in the Calendar tab. How do I... Change the calendar's start date Customize months o Show/hide grid lines o Change the grid line color o Show/hide previous/next months o Add holidays Customize days o Change day titles o Change the number alignment 54

59 Designing Your Project Arrange items Work with styles Change the calendar's start date To change a calendar's start date: 1. Select the Calendar tab. 2. Click the Calendar icon under Change the Start Date. 3. Select a start date. Use the right and left arrows to scroll through the months. Show/hide grid lines The default on a new calendar is to show the grid lines. To hide the grid lines: 1. Select the Calendar tab. 2. Under Customize All Months, click to deselect the Show grid lines checkbox. To show grid lines, click the select the Show grid lines checkbox. 55


60 The Print Shop 2.0 Change the grid line color To change the color of the grid lines: 1. Select the Calendar tab. 2. Under Customize All Months, click to select the Color icon. 3. Choose one of the following: To select a basic color, select a color from the color palette To select a custom color, select Pick a Color. You can then enter color values or select a color from the grid. 56

61 Designing Your Project To select a pixel-level color, click Eye Dropper. The tool selects the pixel-level color of a specified point on the design desk. The selected color will be loaded into the color picker. Available in The Print Shop 2.0 Deluxe and Professional Show/hide previous/next months The default on a new calendar is to not show the previous and next months at the bottom of the screen. To show the previous and next month: 1. Select the Calendar tab. 2. Under Customize All Months, click to select the Show previous/next months checkbox. To hide the previous/next months, click to deselect the checkbox. 57


62 The Print Shop 2.0 Add holidays To add US or Canadian holidays to a calendar: 1. Select the Calendar tab. 2. Under Customize All Months, click the arrow next to Add Holidays. 3. Select either Canadian Holidays or US Holidays. The standard holidays are added to the calendar. 58

63 Designing Your Project Change day titles You can change the day titles to long names (e.g., Monday, Tuesday, Wednesday), short names (e.g., Mon, Tue, Wed) or shortest names (e.g., Mo, Tu, We). The default for a new calendar is long names. To change the day titles: 1. Select the Calendar tab. 2. Under Customize All Days, click the arrow next to Day Titles. 59

64 The Print Shop Select a title from the list. Change the number alignment You can change the way the day numbers are aligned in the cells; for example, they can either be aligned with the top left, top center, top right. The default is to be aligned with the top left of the cell. To change the number alignment: 1. Select the Calendar tab. 2. Under Customize All Days, click a box in the alignment grid. 60

65 Designing Your Project 61
66

67 Printing and Exporting Your Projects Previewing a Project To preview a project: 1. From The Print Shop 2.0 main window, click Print, and select Print Preview. 2. From the Print Preview window, you can: 3. If you have mail merge set up, you will be presented with previews for each contact in the mail merge. Click the Previous and Next buttons to view each contact in the mail merge. 63

68 The Print Shop
69 Printing and Exporting Your Projects Configuring Print Alignment Settings You can adjust the size and location of your printed labels and business cards to allow for slight variances in printer advancement when printing. Sometimes the text or graphics on the label is misaligned by the time it reaches the bottom of the page. To configure print alignment settings: 1. Turn on your printer and load it with the correct paper. 2. With your project open in the main window, select Print > Print Alignment > Define Values. 3. Click to select the printer you'd like to use from the list, and click Next. 4. From the Paper Size drop-down box, select Letter or A4, and click Next. 5. Click Print a Test Page if you'd like to see the current settings. 6. If you need to adjust the alignment settings, keep these guidelines in mind: The test page has a single vertical line, labeled "A", and a single horizontal line, labeled B. These lines are rendered at specific locations on the printed page, and reflect the default measurements and locations if no alignment adjustments are made. After printing the test page, measure each distance specified on the final screen of the wizard, and enter these values in the appropriate text box. Once you've entered all the values, click Finish, and the alignment values for the selected printer are stored in the database. Now, whenever you print a label project on the same printer, The Print Shop 2.0 will automatically adjust the scale and offset to match the measurements you've entered. To view existing print values: 1. With your project open in the main window, select Print > Print Alignment > View Existing Values. 2. Select the printer from the Available Printers box, and view the values on the right-side of the screen. 3. To delete the values you've configured for a printer, click Delete. The custom configuration returns to the printer's default settings. Note that if you choose to delete custom print alignment settings, you cannot undo it and must re-enter the values. 4. Click Close. 65
70 The Print Shop 2.0 Printing a Project To print a project: 1. Click the Print icon from the toolbar, and select Print. 2. Select the printer and preferences, and click Print. 3. If the paper size you've selected is larger than letter, the following screen displays: 66

71 Printing and Exporting Your Projects 4. Select the option you'd like, and click OK. There are many projects within The Print Shop 2.0 that benefit (or even require) duplex printing. Click here for the most common scenarios and instructions for setting up your printer for duplex printing. In addition to sending your project to the printer, you can preview your print project, adjust the size and location of print output for printing labels and business cards, and configure mail merge. Preview my print project Set print alignment Use mail merge Using Mail Merge 67
72 The Print Shop 2.0 Available in The Print Shop 2.0 Deluxe and Professional Use mail merge when you want to create a set of projects that are essentially the same but where each project contains unique elements. For example, you can create one holiday card and the address and greeting line will be different in each card. Using mail merge, you can create: A set of labels or envelopes where the return address is the same on all the labels or envelopes, but the destination address is unique on each one. A set of invitations where the basic content is the same but each one contains information that is specific to the individual recipient, such as name, address, or some other piece of personal data. Creating each envelope or invitation individually would take hours. That's where mail merge comes in. Using mail merge, all you have to do is create one project that contains the information that is the same in each version. Then you just add some placeholders for the information that is unique to each version. The mail merge feature within The Print Shop 2. 0 lets you import electronic business card (vcard) files into your project and supports many fields. Note that the Headlines feature in The Print Shop 2.0 does not support mail merge. There are five steps to using mail merge: 1. Create your project. 2. Import one or more vcards. 3. Select the contacts (people) you'd like to include in the mail merge. 4. Add the mail merge fields to your project. 5. Choose Print > Print from the application toolbar to print the project. How do I... Import vcards Add mail merge fields to your project Print using mail merge Import vcards Most mail applications, such as Microsoft Outlook, let you export your contact information to the vcard format. Refer to the documentation that comes with your mail application for instructions on how to do this. 68
73 Printing and Exporting Your Projects To import vcards into The Print Shop 2.0: 1. From The Print Shop 2.0 main window, select Print > Configure Mail Merge. 2. Click Import, and browse to the directory that contains your vcard (*.vcf) files. All the cards in the directory are loaded into Print Shop. Note that The Print Shop 2.0 does not permanently store your vcard files. It does, however, remember the last directory used to import your vcards 3. Either click to select the files you'd like to use in your mail merge or click Check All to select al To see the vcard data fields, right-click on a listed card, and select View vcard Fields. Click Close when done viewing the information. 3. Click to select the Use selected cards when printing/exporting box. 4. Click Done. Add mail merge fields to your project After you've imported your vcards and selected those cards that you'd like to use in your mail merge, you need to tell The Print Shop 2.0 where to place the data within your project. To add mail merge fields to your project: 1. From within a text box (or text box within a shape), click where you want to insert the mail merge field. 2. Scroll down to the Mail Merge area on the left side of the screen, select the appropriate mail merge field, and click Insert. The field will display surrounded by double braces as shown in the example below: 69
74 The Print Shop Complete your message, and save your project. Print using mail merge Once you have all your mail merge fields included in your project, do the following: 1. Select Print > Print (you can also perform the mail merge from within Print Preview). 2. Select the appropriate printer and your preferences, and click Print. 3. The Print Shop 2.0 creates versions of your project for each mail merge contact you have selected. The text substitution is performed during the printing process, replacing the field names with vcard data values. Notes: Mail merge doesn't filter vcard data, so if you have more than one vcard for the same person, it will print both of them. Any editing, organizing, or filtering of vcards must be done in your electronic mail application. The format of the mail merge fields will be the same as the rest of your text; if you try to change the format, the mail merge function won't work. 70
75 Index A Actions... 18, 44 Add Holidays Add Linked Text Box Add Text Box... 22, 33 Align... 22, 33 Alignment Arrange... 22, 33 B Blur... 22, 33 Browse C Calendar... 21, 33, 54 Select Calendar icon Calendar Information Canadian Holidays Change Start Date Color... 21, 33, 54 Configure Mail Merge Configuring Print Alignment Settings Creating... 9, 10 New Project Project... 9 Customizing Project D Day Titles Define Values Deleting Project Depth Drop shadow... 22, 33 E Edit Shape Outline Eye Dropper... 21, 33, 54 F Fill Fit Project... 3 Flip Horizontal... 22, 33 Flip Vertical... 21, 22, 33 G Gradient... 21, 33 Group... 22, 33 H Headlines Hide icon... 3 Horizontal Align Left I Image Editor Image Gallery Image Tray... 3 Images... 21, 33, 44 Import Project Import vcards Importing... 12, 44 Project L Launch Smilebox Layout Style... 9 Line Color Lines M Mail merge My Images N Navigating... 3 The Print Shop New Project Creating O Open Recent Project Open My Projects... 10, 12 P Page Preview... 3 Paper Size Previewing Project Print... 63, 65, 66, 68 Project Test Page Print Alignment Print Preview Print Shop Images Project... 9, 12, 17, 18, 21, 63, 66 Creating... 9 Customizing Deleting Importing Previewing Printing Saving Project Creation Wizard using Project Gallery... 9, 10, 12 Project Name... 9 Project Types Project Wizard
76 The Print Shop 2.0 S Saving Project Shape Gallery Shapes... 21, 33 Show/hide grid lines Show/hide page preview... 3 Smilebox Launching Spacing Start Date Change Support... 7 T Tagging Test Page Print Text... 21, 33 Select Text Box... 22, 33 The Print Shop Navigating... 3 U Ungroup... 22, 33 US Holidays Using Mail Merge V VCards filtering Vector images View vcard Fields X XAML images Z Zoom
Microsoft Word 2010 Tutorial
 1 Microsoft Word 2010 Tutorial Microsoft Word 2010 is a word-processing program, designed to help you create professional-quality documents. With the finest documentformatting tools, Word helps you organize
Sending image(s) to report Click Send Snapshot on any screen in Dolphin3D and choose the Send to Report option
 to report Click Send Snapshot on any screen in Dolphin3D and choose the Send to Report option") Dolphin 3D Reports Sending image(s) to report Click Send Snapshot on any screen in Dolphin3D and choose the Send to Report option Creating a report step by step 1. Generate the desired images in Dolphin3D
Dolphin 3D Reports Sending image(s) to report Click Send Snapshot on any screen in Dolphin3D and choose the Send to Report option Creating a report step by step 1. Generate the desired images in Dolphin3D
Microsoft Office Training Skills 2010
 Microsoft Office Training Skills 2010 Lesson 5 Working with pages, Tables, Shapes and Securing Documents Adding Page color Add color to the background of one or several pages in the document. 1. Click
Designer Reference 1
 Designer Reference 1 Table of Contents USE OF THE DESIGNER...4 KEYBOARD SHORTCUTS...5 Shortcuts...5 Keyboard Hints...5 MENUS...7 File Menu...7 Edit Menu...8 Favorites Menu...9 Document Menu...10 Item Menu...12
Publisher 2007 Creating Flyers and Brochures
 MS Publisher 2007 User Guide Publisher 2007 Creating Flyers and Brochures THE NATURE OF DESKTOP PUBLISHING - INTRODUCTION Publisher is a desktop publishing program. You can create publications that
Publisher 2007 Creating Flyers and Brochures
 MS Publisher 2007 User Guide Publisher 2007 Creating Flyers and Brochures THE NATURE OF DESKTOP PUBLISHING - INTRODUCTION Publisher is a desktop publishing program. You can create publications that use
KODAK Software User s Guide. Software Version 9.0
 KODAK Create@Home Software User s Guide Software Version 9.0 Table of Contents 1 Welcome to KODAK Create@Home Software Features... 1-1 Supported File Formats... 1-1 System Requirements... 1-1 Software
KODAK Software User s Guide
 KODAK Create@Home Software User s Guide Table of Contents 1 Welcome to KODAK Create@Home Software Features... 1-1 Supported File Formats... 1-1 System Requirements... 1-1 Software Updates...1-2 Automatic
User Guide. DrawAnywhere.com: User Guide
 DrawAnywhere.com: User Guide DrawAnywhere.com is an online diagramming & flow charting application with the look & feel of a desktop application! User Guide http://www.drawanywhere.com August, 2007 Table
On the Web sun.com/aboutsun/comm_invest STAROFFICE 8 DRAW
 STAROFFICE 8 DRAW Graphics They say a picture is worth a thousand words. Pictures are often used along with our words for good reason. They help communicate our thoughts. They give extra information that
Using SymPrint to Make Overlays, Templates & More...
 Welcome to SymPrint SymPrint is an easy-to-use tool for creating communication overlays, worksheets, classroom activities and more using a modern toolbar and common-sense interface modeled after the programs
Microsoft Publisher 2010 Tecumseh District Library
 1 Microsoft Publisher 2010 Tecumseh District Library by Anne Keller, Teen Services Librarian 2 Microsoft Publisher 2010 Microsoft Publisher is a powerful desktop publishing program that can create posters,
ALBUM CREATION WIZARD
 INTRODUCTION Welcome to DigiBookShelf 2005 Professional! This tutorial will help you quickly start enjoying the wide variety of program features by covering the following topics: Import Photos Get photos
The American University in Cairo. Academic Computing Services. Word prepared by. Soumaia Ahmed Al Ayyat
 The American University in Cairo Academic Computing Services Word 2000 prepared by Soumaia Ahmed Al Ayyat Spring 2001 Table of Contents: Opening the Word Program Creating, Opening, and Saving Documents
BeLight Software. Printfolio. Getting Started Guide
 BeLight Software Printfolio Getting Started Guide Version 1 November 2010 (C) 2010 BeLight Software, Ltd. All rights reserved. BeLight Software, Ltd. reserves the right to improve, enhance and revise its
USER MANUAL. User Manual-3.0
 USER MANUAL User Manual-3.0 Greeting Card Xpress User Manual CONTENTS 1. Hello 1.1 Introduction 1.2 System Requirements MAC System Windows System 2. Opening the Tool Box Getting Started 2.1 Registration
iphoto 06 Basics Website:
 iphoto 06 Basics Website: http://etc.usf.edu/te/ iphoto is the photo management application included with ilife 06. In addition to letting you import, organize and share your photos, iphoto includes a
What can Word 2013 do?
 Mary Ann Wallner What can Word 2013 do? Provide the right tool for: Every aspect of document creation Desktop publishing Web publishing 2 Windows 7: Click Start Choose Microsoft Office > Microsoft Word
Reference Services Division Presents. Microsoft Word 2
 Reference Services Division Presents Microsoft Word 2 This handout covers the latest Microsoft Word 2010. This handout includes instructions for the tasks we will be covering in class. Basic Tasks Review
BASIC MICROSOFT POWERPOINT
 BASIC MICROSOFT POWERPOINT PART ONE PHONE: 504-838-1144 IT Training Team Jefferson Parish Library EMAIL: jpltrain@jplibrary.net In this class you will learn to: Launch, close, and interact with Microsoft
MICROSOFT WORD 2010 BASICS
 MICROSOFT WORD 2010 BASICS Word 2010 is a word processing program that allows you to create various types of documents such as letters, papers, flyers, and faxes. The Ribbon contains all of the commands
Microsoft Word 2010 Basics
 1 Starting Word 2010 with XP Click the Start Button, All Programs, Microsoft Office, Microsoft Word 2010 Starting Word 2010 with 07 Click the Microsoft Office Button with the Windows flag logo Start Button,
hdalbum User Designer Guide Collect Create Share Designer V 1.2
 hdalbum User Designer Guide 2017 Collect Create Share Designer V 1.2 Table of Contents Contents Welcome to the hdalbum Designer... 2 Features... 2 System Requirements... 3 Supported File Types... 3 Installing
VHSE - COMPUTERISED OFFICE MANAGEMENT MODULE III - Communication and Publishing Art - PageMaker
 INTRODUCTION : It is one Adobe PageMaker 7.0 software is the ideal page layout program for business, education, and small- and home-office professionals who want to create high-quality publications such
New York City College of Technology. Microsoft Word Contact Information:
 New York City College of Technology Microsoft Word 2016 Contact Information: 718-254-8565 ITEC@citytech.cuny.edu Opening Word 2016 Begin by clicking on the bottom left corner icon on the desktop. From
Using Microsoft Word. Paragraph Formatting. Displaying Hidden Characters
 Using Microsoft Word Paragraph Formatting Every time you press the full-stop key in a document, you are telling Word that you are finishing one sentence and starting a new one. Similarly, if you press
Create and print labels for a mass mailing
 Create and print labels for a mass mailing 1. On the Tools menu, point to Letters and Mailings, and then click Mail Merge Wizard. 2. Under Select document type, click Labels. The active document becomes
Picasa Basics Website:
 Website: http://etc.usf.edu/te/ Picasa is a free photo management program from Google that can be used to organize and manage all of the images you have stored on your computer. Picasa also allows you
Microsoft Word 2011 Tutorial
 Microsoft Word 2011 Tutorial GETTING STARTED Microsoft Word is one of the most popular word processing programs supported by both Mac and PC platforms. Microsoft Word can be used to create documents, brochures,
Chapter 25. Build Creations with Your Photos
 Chapter 25 Build Creations with Your Photos 2 How to Do Everything with Photoshop Elements How to Create a slide show to show off your images Post your images in web pages Build cards, calendars, and postcards
[Not for Circulation] This document provides a variety of shortcuts for working in PowerPoint 2007.
![[Not for Circulation] This document provides a variety of shortcuts for working in PowerPoint 2007.](/thumbs/72/67772637.jpg "[Not for Circulation] This document provides a variety of shortcuts for working in PowerPoint 2007.") PowerPoint Shortcuts This document provides a variety of shortcuts for working in PowerPoint 2007. Using Slides from Other Presentations To add a slide from an existing presentation to the current presentation,
PowerPoint Shortcuts This document provides a variety of shortcuts for working in PowerPoint 2007. Using Slides from Other Presentations To add a slide from an existing presentation to the current presentation,
Creating Reports in Access 2007 Table of Contents GUIDE TO DESIGNING REPORTS... 3 DECIDE HOW TO LAY OUT YOUR REPORT... 3 MAKE A SKETCH OF YOUR
 Creating Reports in Access 2007 Table of Contents GUIDE TO DESIGNING REPORTS... 3 DECIDE HOW TO LAY OUT YOUR REPORT... 3 MAKE A SKETCH OF YOUR REPORT... 3 DECIDE WHICH DATA TO PUT IN EACH REPORT SECTION...
Understanding Word Processing
 Understanding Word Processing 3.0 Introduction In this chapter you are going to learn how to create a simple memo or note or a complex and complicated multi column business document using word processing
Word 2013 Quick Start Guide
 Getting Started File Tab: Click to access actions like Print, Save As, and Word Options. Ribbon: Logically organize actions onto Tabs, Groups, and Buttons to facilitate finding commands. Active Document
Publisher 2007 vs 2013
 Publisher 2007 vs 2013 A Complete Overview for Connect Users 1 What you see when you start Publisher 2007... 2 What you see when you start Publisher 2013... 2 What your Publication screen looked like in
Getting Started with. PowerPoint 2010
 Getting Started with 13 PowerPoint 2010 You can use PowerPoint to create presentations for almost any occasion, such as a business meeting, government forum, school project or lecture, church function,
What s New in My Memories Suite 9?
 What s New in My Memories Suite 9? New Project Types Social Media - Facebook, Instagram, Pinterest, Twitter, Google Plus Print Products - Canvas, Metal, Posters, Mug, Mousepad, Water Bottle Photos Enhancements
Numbers Basics Website:
 Website: http://etc.usf.edu/te/ Numbers is Apple's new spreadsheet application. It is installed as part of the iwork suite, which also includes the word processing program Pages and the presentation program
MAKING TABLES WITH WORD BASIC INSTRUCTIONS. Setting the Page Orientation. Inserting the Basic Table. Daily Schedule
 MAKING TABLES WITH WORD BASIC INSTRUCTIONS Setting the Page Orientation Once in word, decide if you want your paper to print vertically (the normal way, called portrait) or horizontally (called landscape)
Learn more about Pages, Keynote & Numbers
 Learn more about Pages, Keynote & Numbers HCPS Instructional Technology May 2012 Adapted from Apple Help Guides CHAPTER ONE: PAGES Part 1: Get to Know Pages Opening and Creating Documents Opening a Pages
MS Word 2010 An Introduction
 MS Word 2010 An Introduction Table of Contents The MS Word 2010 Environment... 1 The Word Window Frame... 1 The File Tab... 1 The Quick Access Toolbar... 4 To Customize the Quick Access Toolbar:... 4
San Pedro Junior College. WORD PROCESSING (Microsoft Word 2016) Week 4-7
 Week 4-7") WORD PROCESSING (Microsoft Word 2016) Week 4-7 Creating a New Document In Word, there are several ways to create new document, open existing documents, and save documents: Click the File menu tab and then
WORD PROCESSING (Microsoft Word 2016) Week 4-7 Creating a New Document In Word, there are several ways to create new document, open existing documents, and save documents: Click the File menu tab and then
Introduction to Microsoft Publisher 2007 Wells County Public Library Class
 Introduction to Microsoft Publisher 2007 Wells County Public Library Class What is Microsoft Publisher? Publisher is a desktop publishing program that helps you create professional-looking publications
Inserting Information into PowerPoint
 LESSON 6 6.1 Inserting Information into PowerPoint After completing this lesson, you will be able to: Change the layout of a slide. Insert a clip art image. Scale an image. Insert and format a table. Insert
Introduction to Microsoft Publisher
 Class Description This is an introduction to Microsoft Publisher, with a focus on choosing a template and modifying it to meet your needs. Class Length One and one half (1½) hours Introduction to Microsoft
Quick Access Toolbar. You click on it to see these options: New, Open, Save, Save As, Print, Prepare, Send, Publish and Close.
 Opening Microsoft Word 2007 in the practical room UNIT-III 1 KNREDDY 1. Nyelvi beállítások az Office 2007-hez (Language settings for Office 2007 (not 2003)) English. 2. Double click on the Word 2007 icon
Getting Started Guide. Chapter 11 Graphics, the Gallery, and Fontwork
 Getting Started Guide Chapter 11 Graphics, the Gallery, and Fontwork Copyright This document is Copyright 2005 2008 by its contributors as listed in the section titled Authors. You may distribute it and/or
To learn how to use Focus in Pix:
 Welcome To learn how to use Focus in Pix: Step-by-step guide Visit www.focusinpix.com/quick-guide for a quick overview of Focus in Pix software. You will also find many tips and tutorials on our site.
Keynote 08 Basics Website:
 Website: http://etc.usf.edu/te/ Keynote is Apple's presentation application. Keynote is installed as part of the iwork suite, which also includes the word processing program Pages and the spreadsheet program
Computer learning Center at Ewing. Course Notes - Using Picasa
 1st January 2014 Computer learning Center at Ewing Course Notes - Using Picasa These course notes describe the content of the Using Picasa course. The course notes are based on Picasa 3. This course material
Week 5 Creating a Calendar. About Tables. Making a Calendar From a Table Template. Week 5 Word 2010
 Week 5 Creating a Calendar About Tables Tables are a good way to organize information. They can consist of only a few cells, or many cells that cover several pages. You can arrange boxes or cells vertically
Word 2010 Beginning. Technology Integration Center
 Word 2010 Beginning File Tab... 2 Quick Access Toolbar... 2 The Ribbon... 3 Help... 3 Opening a Document... 3 Documents from Older Versions... 4 Document Views... 4 Navigating the Document... 5 Moving
Quick Start Guide - Contents. Opening Word Locating Big Lottery Fund Templates The Word 2013 Screen... 3
 Quick Start Guide - Contents Opening Word... 1 Locating Big Lottery Fund Templates... 2 The Word 2013 Screen... 3 Things You Might Be Looking For... 4 What s New On The Ribbon... 5 The Quick Access Toolbar...
How to Create Greeting Cards using LibreOffice Draw
 by Len Nasman, Bristol Village Ohio Computer Club If you want to create your own greeting cards, but you do not want to spend a lot of money on special software, you are in luck. It turns out that with
Yearbook Edition Software
 Yearbook Edition Software End User Guide Pixami, Inc. www.pixami.com Table of Contents 1 Introduction... 4 1.1 Configuration and Preparation... 4 1.2 Software System Requirements... 4 1.3 The Basic Steps...
PUBLISHER 2016 LINDA MUCHOW ALEXANDRIA TECHNICAL AND COMMUNITY COLLEGE 1601 JEFFERSON STREET, ALEXANDRIA, MN 56308
 PUBLISHER 2016 LINDA MUCHOW 320-762-4539 LINDAC@ALEXTECH.EDU ALEXANDRIA TECHNICAL AND COMMUNITY COLLEGE 1601 JEFFERSON STREET, ALEXANDRIA, MN 56308 Table of Contents Publisher Environment... 3 Rulers...
Instructional Booklet Mary Ann Wallner
 Instructional Booklet Mary Ann Wallner Microsoft Word Contents Basic Microsoft Word Instructions... 5 Show or hide formatting marks... 5 Change page margins... 5 Revise words underlined in red, green,
MyMemories Suite v4 User Guide
 MyMemories Suite v4 User Guide 1 MyMemories Suite v4 User Guide 20130129 MyMemories Suite digital scrapbooking software is a fun and creative way to keep and share memories, whether you have a Mac or PC.
MICROSOFT WORD XP INTERMEDIATE
 MICROSOFT WORD XP INTERMEDIATE Starting Word Click the start button, move the pointer to All Programs. Move the pointer to Microsoft Office and then select Microsoft Word and click the application or click
PowerPoint 2010 Level 1 Computer Training Solutions Student Guide Version Revision Date Course Length
 Level 1 Computer Training Solutions Version 1.2 Revision Date Course Length 2012-Feb-16 6 hours Table of Contents Quick Reference... 3 Frequently Used Commands... 3 Manitoba ehealth Learning Management
Real Estate Flyer. Projects 1
 Projects 1 PagePlus provides a wide selection of design templates, which you can use as starting points for your own publications. In this project, we ll start with a real estate flyer template and customize
My Memories Suite. User Guide. 1 My Memories Suite 2 User Guide
 My Memories Suite User Guide 1 My Memories Suite 2 User Guide 20091221 There are software applications made for creating slides shows, and others designed for photo editing professionals. Many have features
PrintMaster 2012 User Guide
 PrintMaster 2012 User Guide Unleash your imagination with PrintMaster 2012, the quintessential toolkit for creating thousands of amazing projects photo greeting cards, family newsletters, scrapbook pages
PowerPoint Instructions
 PowerPoint Instructions Exercise 1: Type and Format Text and Fix a List 1. Open the PowerPoint Practice file. To add a company name to slide 1, click the slide 1 thumbnail if it's not selected. On the
build a digital portfolio in WebPlus X4
 How to build a digital portfolio in WebPlus X4 Get started Open Serif WebPlus and select Start New Site from the Startup Wizard. WebPlus will open a blank website for you. Take a few moments to familiarise
Contents. Launching Word
 Using Microsoft Office 2007 Introduction to Word Handout INFORMATION TECHNOLOGY SERVICES California State University, Los Angeles Version 1.0 Winter 2009 Contents Launching Word 2007... 3 Working with
Microsoft Publisher 2013 Foundation. Publisher 2013 Foundation SAMPLE
 Microsoft Publisher 2013 Foundation Publisher 2013 Foundation Microsoft Publisher 2013 Foundation - Page 2 2013 Cheltenham Group Pty. Ltd. All trademarks acknowledged. E&OE. No part of this document may
Microsoft Office Word 2010
 Microsoft Office Word 2010 Content Microsoft Office... 0 A. Word Basics... 4 1.Getting Started with Word... 4 Introduction... 4 Getting to know Word 2010... 4 The Ribbon... 4 Backstage view... 7 The Quick
Word 2013 Beginning. Technology Integration Center
 Word 2013 Beginning Getting Started... 2 Quick Access Toolbar... 3 The Ribbon... 3 Help... 4 Compatibility Mode... 4 Document Views... 4 Navigating the Document... 5 Moving Around in the Document... 5
Using the Web in Mathematics Foundations Course An Introduction to Microsoft PowerPoint Sarah L. Mabrouk, Framingham State College
 Using the Web in Mathematics Foundations Course An Introduction to Microsoft PowerPoint Sarah L. Mabrouk, Framingham State College Overview: MS PowerPoint is powerful presentation software that enables
Using Graphics. Digital Camera. Auto Shapes
 AutoShape Using Graphics Internet The following graphic elements are available to enhance your presentation Clip Art AutoShapes Fill effects Shadow effects 3D effects Digital Camera WordArt Digital Camera
Creating a Flyer. Open Microsoft Publisher. You will see the list of Popular Publication Types. Click the Blank Page Sizes.
 Creating a Flyer Open Microsoft Publisher. You will see the list of Popular Publication Types. Click the Blank Page Sizes. Double click on Letter (Portrait) 8.56 x 11 to open up a Blank Page. Go to File
Adding Objects Creating Shapes Adding. Text Printing and Exporting Getting Started Creating a. Creating Shapes Adding Text Printing and Exporting
 Getting Started Creating a Workspace Pages, Masters and Guides Adding Objects Creating Shapes Adding Text Printing and Exporting Getting Started Creating a Workspace Pages, Masters and Guides Adding Objects
Beginning Paint 3D A Step by Step Tutorial. By Len Nasman
 A Step by Step Tutorial By Len Nasman Table of Contents Introduction... 3 The Paint 3D User Interface...4 Creating 2D Shapes...5 Drawing Lines with Paint 3D...6 Straight Lines...6 Multi-Point Curves...6
Gloucester County Library System. Microsoft 2010 PowerPoint
 Gloucester County Library System Microsoft 2010 PowerPoint PowerPoint 2010 is a presentation software that allows you to create dynamic slide presentations that may include animation, narration, images,
Org Chart Designer Pro
 Org Chart Designer Pro User Guide Version 3.73 Last updated: Feb 12, 2016 Table of Contents Editor overview How to add from template File save format Format colors Update line thickness and line pattern
POWERPOINT 2003 OVERVIEW DISCLAIMER:
 DISCLAIMER: POWERPOINT 2003 This reference guide is meant for experienced Microsoft Office users. It provides a list of quick tips and shortcuts for familiar features. This guide does NOT replace training
Center for Faculty Development and Support Creating Powerful and Accessible Presentation
 Creating Powerful and Accessible Presentation PowerPoint 2007 Windows Tutorial Contents Create a New Document... 3 Navigate in the Normal View (default view)... 3 Input and Manipulate Text in a Slide...
11.1 Create Speaker Notes Print a Presentation Package a Presentation PowerPoint Tips... 44
 Contents 1 Getting Started... 1 1.1 Presentations... 1 1.2 Microsoft Office Button... 1 1.3 Ribbon... 2 1.4 Mini Toolbar... 2 1.5 Navigation... 3 1.6 Slide Views... 4 2 Customize PowerPoint... 5 2.1 Popular...
Labels and Envelopes in Word 2013
 Labels and Envelopes in Word 2013 Labels... 2 Labels - A Blank Page... 2 Selecting the Label Type... 2 Creating the Label Document... 2 Labels - A Page of the Same... 3 Printing to a Specific Label on
button Double-click any tab on the Ribbon to minimize it. To expand, click the Expand the Ribbon button
 PROCEDURES LESSON 1: CREATING WD DOCUMENTS WITH HEADERS AND FOOTERS Starting Word 1 Click the Start button 2 Click All Programs 3 Click the Microsoft Office folder icon 4 Click Microsoft Word 2010 1 Click
Corel Ventura 8 Introduction
 Corel Ventura 8 Introduction Training Manual A! ANZAI 1998 Anzai! Inc. Corel Ventura 8 Introduction Table of Contents Section 1, Introduction...1 What Is Corel Ventura?...2 Course Objectives...3 How to
1 THE PNP BASIC COMPUTER ESSENTIALS e-learning (MS Powerpoint 2007)
") 1 THE PNP BASIC COMPUTER ESSENTIALS e-learning (MS Powerpoint 2007) 2 THE PNP BASIC COMPUTER ESSENTIALS e-learning (MS Powerpoint 2007) TABLE OF CONTENTS CHAPTER 1: GETTING STARTED... 4 MICROSOFT OFFICE
1 THE PNP BASIC COMPUTER ESSENTIALS e-learning (MS Powerpoint 2007) 2 THE PNP BASIC COMPUTER ESSENTIALS e-learning (MS Powerpoint 2007) TABLE OF CONTENTS CHAPTER 1: GETTING STARTED... 4 MICROSOFT OFFICE
Appleworks 6.0 Word Processing
 Appleworks 6.0 Word Processing AppleWorks 6.0 Starting Points What s New in AppleWorks 6.0 AppleWorks 6.0 is a versatile and powerful program that integrates the best of everything you need - word processing,
Microsoft Access II 1.) Opening a Saved Database Music Click the Options Enable this Content Click OK. *
 Opening a Saved Database Music Click the Options Enable this Content Click OK. *") Microsoft Access II 1.) Opening a Saved Database Open the Music database saved on your computer s hard drive. *I added more songs and records to the Songs and Artist tables. Click the Options button next
Microsoft Access II 1.) Opening a Saved Database Open the Music database saved on your computer s hard drive. *I added more songs and records to the Songs and Artist tables. Click the Options button next
Excel Select a template category in the Office.com Templates section. 5. Click the Download button.
 Microsoft QUICK Excel 2010 Source Getting Started The Excel Window u v w z Creating a New Blank Workbook 2. Select New in the left pane. 3. Select the Blank workbook template in the Available Templates
LinkMotion and CorelDraw 9, 10, 11, 12, X3, X4, X5, X6, X7 and X8:
 LinkMotion and CorelDraw 9, 10, 11, 12, X3, X4, X5, X6, X7 and X8: After you install LinkMotion software and set up all settings launch CorelDraw software. Important notes: Solustan s LinkMotion driver
Microsoft Office PowerPoint 2013 Courses 24 Hours
 Microsoft Office PowerPoint 2013 Courses 24 Hours COURSE OUTLINES FOUNDATION LEVEL COURSE OUTLINE Using PowerPoint 2013 Opening PowerPoint 2013 Opening a Presentation Navigating between Slides Using the
Chapter 4 Printing and Viewing a Presentation Using Proofing Tools I. Spell Check II. The Thesaurus... 23
 PowerPoint Level 1 Table of Contents Chapter 1 Getting Started... 7 Interacting with PowerPoint... 7 Slides... 7 I. Adding Slides... 8 II. Deleting Slides... 8 III. Cutting, Copying and Pasting Slides...
Creating Web Pages with SeaMonkey Composer
 1 of 26 6/13/2011 11:26 PM Creating Web Pages with SeaMonkey Composer SeaMonkey Composer lets you create your own web pages and publish them on the web. You don't have to know HTML to use Composer; it
PowerPoint 2016 Building a Presentation
 PowerPoint 2016 Building a Presentation What is PowerPoint? PowerPoint is presentation software that helps users quickly and efficiently create dynamic, professional-looking presentations through the use
Content provided in partnership with Que, from the book Show Me Microsoft Office Access 2003 by Steve JohnsonÃÃ
 ,PSURYLQJWKH$SSHDUDQFHRI )RUPVDQGHSRUWV Content provided in partnership with Que, from the book Show Me Microsoft Office Access 00 by Steve JohnsonÃÃ Introduction The objects in a database most on display
Publisher 2016 Foundation SAMPLE
 Publisher 2016 Foundation Publisher 2016 Foundation Microsoft Publisher 2016 Foundation - Page 2 2015 Cheltenham Group Pty. Ltd. All trademarks acknowledged. E&OE. No part of this document may be copied
User Manual-5.0 USER MANUAL 1.0
 User Manual-5.0 USER MANUAL 1.0 DgFlick Solutions Pvt. Ltd., Telephone: US +1-732-543-7676, India +91 22 2968 68 68. w w w. d g f l i c k. c o m s u p p o r t @ d g f l i c k. c o m Page 1 of 66 User Manual
Publisher 2010 Foundation. Publisher 2010 Foundation Level SAMPLE
 Publisher 2010 Foundation Publisher 2010 Foundation Level Microsoft Publisher 2010 Foundation - Page 2 1995-2012 Cheltenham Courseware Pty. Ltd. All trademarks acknowledged. E&OE. No part of this document
Fundamentals of PowerPoint 2007 Instructor: Elizabeth-Latta Brother
 Fundamentals of PowerPoint 2007 Instructor: Elizabeth-Latta Brother Getting to know PowerPoint... 1 What happens when you open PowerPoint... 1 Understanding the presentation window... 1 Customizing the
Word Tutorial 3. Creating a Multiple- Page Report COMPREHENSIVE
 Word Tutorial 3 Creating a Multiple- Page Report COMPREHENSIVE Objectives Format headings with Quick Styles Insert a manual page break Create and edit a table Sort rows in a table Modify a table s structure
Spring Semester Study Guide
 Spring Semester Study Guide 1. When you create a table in Datasheet view, Access automatically adds a field called ID as the first field in the table. 2. To undo the most recent change to a table structure,
Publisher 2016 Foundation. North American Edition SAMPLE
 Publisher 2016 Foundation Publisher 2016 Foundation North American Edition Microsoft Publisher 2016 Foundation - Page 2 2015 Cheltenham Group Pty. Ltd. All trademarks acknowledged. E&OE. No part of this
Excel 2003 Tutorial II
 This tutorial was adapted from a tutorial by see its complete version at http://www.fgcu.edu/support/office2000/excel/index.html Excel 2003 Tutorial II Charts Chart Wizard Chart toolbar Resizing a chart