User Guide AcuStudio 8 Enterprise Edition
|
|
|
- Frank Maxwell
- 6 years ago
- Views:
Transcription
1 User Guide AcuStudio 8 Enterprise Edition 2
2 Downloading and Installing AcuConsole (AcuStudio-AcuConference) The installer for can be downloaded from: To remove the water mark in the recording, you have to register the License Key (available from ServiceDesk or your School IT/eLearning Support Team) before using the application. Help and Support If you need assistance to set up the audio and/or video devices and register the software on your office computer, please contact the School IT/eLearning Support Team. 3
3 Welcome AcuLearn Version 8.0 AcuLearn version 8 is a major breakthrough in design and functionalities. The focus of version 8 is to address the market s need for MOOC, Flip Classroom and High Quality video production. There are many innovative designs that will address the users need in video production. AcuConference AcuConference is perhaps the most scalable video conference system in the world. AcuConference is OEM to many telecommunication operators to provide high quality Internet conference services. These services are used by enterprises, military, education, healthcare and government institutions. The key strength is not only in its architectural design to ensure high availability and scalability, but in its ability to transmit high quality video and audio with minimum delay. AcuStudio Recording/live webcast AcuStudio is an easy to use and fast video studio recording tool. This software will empower its users to create high quality video content quickly without professional assistance. Organizations can also deploy schedule the recording on the NTU video server for unattended recording of meeting rooms or lecture halls. Key features of AcuStudio: - Record up to 3 devices at the same time - Auto detect the point of focus by putting the important video channel into big view - Record from microphone and/or audio from video playback like YouTube - Edit slide within video - Single video playback Good for YouTube, Coursera and mobile device - HLS Live Streaming Supports HTML 5 - SCORM 2 - Support hot plug-in of devices 4
4 - Multi-language Close Caption - Reorder and Delete - OCR - Auto-indexing using motion detection During recording, you can also live webcast it. Viewers are able to view the live recording on their PCs with browsers, IOS and Android mobile devices that supports HTML 5. The recorded video can be edited with the tool sets in AcuStudio. Users can trim a portion of the video, re-order the indexes, and replace the document video before publishing to the network. AcuStudio is specifically designed to address the needs for video content production in schedule mode such as lecture halls or self production. It is an excellent tool for MOOC and Flip Classroom because AcuStudio provides the entire necessary tool set its user to create video content with ease. Convert/ Upload Convert/ Upload is a utility that provides a convenient way to: convert media files to AcuStudio format (acmx) and upload them upload multiple acmx files 5
5 Recommended Requirements This section lists the recommended requirements for hardware and software. AcuConference and AcuStudio (Recommended) Windows Vista and above Office XP and above CPU: Intel i5 RAM: 4 GB Network: Ethernet/ Wifi n and above Ear piece with microphone Web-Cam that supports at least 320X240 format and above If video source is analog, hardware capture card is required 6
6 Table of Contents AcuStudio 8 Guide Getting Started 8 Installation and Registration 8 Startup Mode 10 Main Menu 10 Settings 112 AcuStudio Menu 13 Limit Gain: 13 Enable OCR on secondary video: 13 Watermark: 143 AcuStudio Interactive: 143 Add devices on motion detect: 14 Select Start from AcuStudio Interactive Menu. 154 AV Wizard 154 Test Profile 176 Summary 187 Recording 198 Start/Pause/Resume Recording 198 Full Screen PowerPoint 198 During Record 20 Record Preview 20 Annotations 210 Live Webcast 221 Publish History 232 Dual Monitor (Extended Screen) 243 Convert/ Upload 24 Settings 25 Converting and uploading media files 26 Upload multiple acmx files 31 Opening/Previewing Recordings 35 Editing Recordings 35 Append recording 35 Edit Slide 36 Video Trim 38 Edit Title, Content and Notes 37 Change Index Picture 39 Web Editing Remove index picture 39 Web Editing Skip Over Time 40 Closed Caption 40 Publish Recordings 43 Learning Management System 42 7
7 Getting Started Installation and Registration The installer for AcuConsole can be downloaded from: To remove the water mark in the recording, you have to register the License Key (available from your School IT/eLearning Support Team) before using the application. After you have installed AcuConsole (AcuStudio + AcuConference + Converter + Batch uploader) software, select Register, enter your license key (must be connected to Internet). 8

8 If you want to install AcuConsole to another computer, you need to connect the Internet and uninstall the program. This will release the license key. Registration will remove AcuLearn Logo from your video recording. The software is fully functional without having to register too. If you need assistance to set up the audio and/or video devices and register the software on your office computer, please contact the School IT/eLearning Support Team. 9

9 Startup Mode AcuStudio can be set in 2 modes. When AcuStudio is installed in lecture halls and controlled remotely, set it to Schedule Mode by clicking on Start under Schedule. When AcuStudio is used for desktop style recording, set it to Interactive Mode. The Settings menu will correspond to the respective modes. Default setting is Interactive Mode. 10
10 Main Menu 11
11 Settings There are common settings and specific setting for AcuConference, AcuStudio and Convert/ Upload. Select Settings Enter the server and proxy information as required by the system. NTU users can login to AcuConsole using the following server settings and their NTU network account ID and Password as shown in the screenshot below. 12

12 AcuStudio Menu AcuStudio General: Click on AcuStudio Settings and select General Recording tab: Limit Gain: When checked, the amplification of the audio will be limited. This will prevent the unwanted background noise to be amplified and sudden loudness when the speaker speaks again. However in the case of where many speakers will be using the system, as in a lecture theatre, the gain should not be limited. For example, if a lecturer speaks very loudly and holds the microphone close to his mouth, the amplification is reduced. The next lecturer speaks softly with the microphone further from his mouth; he will be too soft if the gain limit is enabled. Uncheck Limit Gain when AcuStudio is set in lecture hall and many lecturers are expected to use it. Check Limit Gain if we are expecting single speaker in a noisy environment. Enable OCR on secondary video: If checked, AcuStudio will do an OCR on the secondary video device. Note: OCR is done on a best effort basis. The main purpose is for better indexing and searching for related content 13

13 Watermark: If checked, you can embed an image (eg Company logo) in the videos. Browse to the required image file; choose the position, % width as compared to the video and opacity. AcuStudio Interactive: Select Settings under AcuStudio Interactive. Add devices on motion detect: When checked, the video will appear once AcuStudio detects movements. Example: If you set to record 3 devices, the initial recording will capture the camera s video. The visualizer and document will be captured only when AcuStudio detects change in the image of the visualizer camera and/or document screen. 14

14 Select Start from AcuStudio Interactive Menu. Enable Record: Record video according to settings. Enable Webcast: Webcast your video according to settings. You can select either one or both options. AV Wizard Select the number of devices that will be recorded. AcuStudio supports up to maximum of 3 devices. These devices can be video and/ or monitor screen. 15

15 Select the sources for audio and video. Note that audio can be configured to record audio from both video playback (Movie, YouTube etc) and microphone. If you have selected to record mic + speaker, it is advisable not to place your microphone too near the speaker. If your microphone picks up audio from the speakers, the sound quality will be affected (Echo effect). 16


16 For each device, you can select the capture size and color space. Some hardware support certain fps based on certain color space e.g. 30 fps is supported on MJPG for 1280X720. You may need to fix the setting based on your hardware specifications. For document settings, you can also choose enable or disable motion detect if the device is connected to a document camera. If motion detect is selected and motion detected, AcuStudio will move the channel to big video view. You can choose the standard template for HD or FHD or customize the profile to your preference. Please note the warning below for certain older devices cannot playback high quality video. Test Profile As mentioned above, understanding the settings of webcam and the relationship between color space, fps and source size can be perplexing. AcuStudio can help you do that job. By clicking on the Test Profile button, the system will run through a series of test on your available hardware color space, fps, source size and CPU. If your profile selection is higher than your hardware capabilities, AcuStudio will automatically configure a more suitable profile for you. If your profile selection is lower than your hardware capabilities, AcuStudio will use your desired profile and no changes will be made. The recommended profile for typical lecture video recording is as follows: 17
17 Summary After choosing the AV profile, a summary of your selection is shown. If you are satisfied with your selections/settings, click Finish to exit the wizard, otherwise click Back to change your selections/settings. 18

18 Recording Start/Pause/Resume Recording To start recording, click on Start under AcuStudio - Interactive or press the shortcut key (Default F6). If you have selected to record 3 devices, your recording user interface will similar to the picture below. Full Screen PowerPoint If you would like to record and display full screen PowerPoint with the video panel display on the left, you need to open the PPT using the PPT button and select your PPT slide. If you open your PPT using your monitor desktop and go to full screen view, the PPT display will overlay your left video panel. You will not be able to see your video panel unless you have extended screen. In which case, your local video panel will be displayed on the extended screen. 19

19 During Record Once you have clicked on the Record button, AcuStudio will display the production output video on the bottom left corner. Notice that there are different layouts below the output video display. If you choose Auto layout, the big video channel view will display according to motion detection as follows: Slide/ Screen: Any motion detected on Slide/ Screen plus 18 seconds cool down Document Camera: Any motion detected on camera plus 18 seconds cool down After cool down period, the video of the presenter will take the big video channel. If you have turned off Motion Detect on the presenter webcam, the video of the presenter will never take the big video channel. Document Camera motion detection will take priority over Slide/ Screen. Cool down period starts once no further motion is detected. Record Preview If you are recording 3 devices with high quality video settings, you may notice very high CPU utilization. This is perfectly normal. When CPU reaches 85% over 10 seconds during recording session, the recording preview fps will be reduced to conserve CPU. This will not affect final video production fps. However, if CPU exceeds 95% within 2 minutes on recording, AcuStudio will stop automatically and you need to select lower quality settings or reduce the number of devices to be recorded. 20


20 Annotations Annotation Tools are available while you are recording. Click on the annotation tool button and select your tools. Close the Annotation Tools window to clear annotations on the screen. If you have selected to record in full screen mode, the annotation tools are accessible on the top middle of the screen. This tab is auto-hide. When your mouse cursor is at the top middle, the tab will drop down as below. 21


21 Live Webcast If you have selected to webcast, AcuStudio will prompt to select webcast session prior to the start of recording. When your account is created, a default webcast room will be created for you. You can create your own webcast room with different description and link external URL to your webcast room. This is useful for embedding 3 rd party web chat to your webcast. Accessing Webcast In order to invite the participants to your webcast, you can Copy Link and the URL to them. Alternatively, you may also inform your participants to access through: video serverip.com/search and enter your userid in the author field. The participants will see: 22
 Double click on the content to launch online view (2)")
 (5) If you are company administrator, you can select to see the publish content of")
22 Publish History You can access all your publish content by click on Publish History button. There are a couple of things you can do here: (1) Double click on the content to launch online view (2) Copy Link Web access link (3) Delete content (4) Download your content from the server to local file (Editing purpose) (5) If you are company administrator, you can select to see the publish content of your company. 23

23 Dual Monitor (Extended Screen) When you are connected to another monitor and set it to Extended Screen, AcuStudio will automatically make use of that extended screen to display the output video when your desktop application goes into full screen such as browsers and PowerPoint. This will allow you to see your recording output when the primary monitor shows the full screen application. If you have chosen to record in Full Screen mode, the recorded output will always be displayed in the Extended Screen. Extended Screen Primary Screen 24

24 Convert/ Upload Convert/ Upload is an utility program that provides a convenient way to: convert media files to AcuStudio format (acmx) and upload them upload multiple acmx files Settings Select Settings under Convert/ Upload. NTU users can login to AcuConsole using the following server settings and their NTU network account ID and Password as shown in the screenshot below. 25
25 26
26 Converting and uploading media files From the main menu, select Convert/ Upload Click on Convert/ Upload tab and select the folder that you want the converted files to be saved Select Import Media Files and click Next Select Add File to select and convert media files or Add Dir to convert all media files in that folder. Click Next 27
27 Select the profile that you want to encode and whether you want to convert or convert and also upload to the NTU video server. *The converted file is saved as acmx in Documents\AcuStudio\autosave (can be configured in Settings for Batch Upload) 28


28 If you have chosen to Convert and Publish to Network, you will be prompted to login to AcuConsole. Enter the required information and determine who can access this recording. After that, just click Start to convert and upload 29


29 After the conversion/uploading has completed, you can click on the file to view the converted file in AcuStudio player: 30

30 Upload multiple acmx files Select Batch upload acmx files and click Next Select Add File to select acmx files or Add Dir to convert all acmx files in that folder. Click Next 31
31 Log in to the AcuConsole and click Next : Enter the desired information. If the Title is left blank, the file name will be used. If you enter something, the Title will be what you have entered with the file name appended. Select If available, use original publish setting if you want to make use of the publish setting that is already in the acmx files (Those that have been published before with the information saved and schedule recordings files). The existing content will be replaced if it has been published before. Click Next 32
32 Fill in the information and select the NTULearn course sites and content area where the recording is to be published to. Please note the following: - Studio ID Leave it blank - Expiration Date You can choose to include an expiration date. This is for information only. The recording will not be deleted or make unavailable to viewers. However, please note that all course and content materials will only be kept up to 2 years only. - Publish Notes Check to include the Notes that you have added. If you have recorded a PowerPoint slide show, this is the Speaker s notes that you have created in PowerPoint 33
33 Click OK to start uploading the acmx files to the video server. 34


34 Opening/Previewing Recordings Recordings are saved as acmx files. Browse to the file that you want to open. Click on Preview OR double click on any slide to commence playback: 35

35 Editing Recordings You can edit as follows: - Append recording - Edit Slide - Video Trim - Edit Title, Content, Note and Chapter - Change Index Picture - Web editing remove index picture - Closed Caption Append recording Simply click on the record button to append to current recording. You can use this function to include welcome note or ending comment to the current recording. Once you have appended a recording, you can move your new recording by right clicking on that video. Note: In order to append a new recording to an existing acmx file, the profile must be exactly the same, otherwise the Append Recording menu will be disabled. 36

36 Edit Slide It is common to rectify your slide after video production. To do that, right click on the slide you want to edit and select Edit Slide. You will be brought to the recording user interface. Click on PPT button and select your new slide. Click on the record button. The original video will playback while it replace the old slide with the new one. Note the Original tab on the bottom left. The animations of the slide will also playback to provide you with a guide on the animation timings. If the slide to be replaced is static page, you may stop the recording after 3seconds. You do not need to wait for the entire playback to stop. Note: AcuStudio will take the new slide and replace the old slide entirely. 37
 represents the position of playback of the entire length of video.")

37 Video Trim Video Trim removes unwanted portions of the video. Go to Preview window and select Trim tab. The top section (blue rectangle) represents the position of playback of the entire length of video. The bottom blue bar shows the length of the current selection. Click on the Mark in and Mark out to select the section to be trimmed. You can increase the accuracy by zooming in on the current section by clicking on the magnifying glass on the right. Edit Title, Content and Notes On the bottom right of the Preview window, select the respective tabs and edit the text accordingly. 38

38 Change Index Picture For non PowerPoint presentation, AcuStudio will automatically determine when and where to place a new index. This is done using motion detection on the document. Sometimes the index picture capture may not be ideal and you can click on the camera button to select a new index picture to replace the default index. Web Editing Remove index picture Administrator and content author can remove index picture in the table of slides (TOS) during playback. In order to access this feature, the user has to login to NTU video server, BlackBoard or Moodle to verify his role. Alternatively, the user can also access the content from Publish History to remove index picture. When you mouse over the index, it will display an X on its top right corner. If you want to remove that index, simply click on X and confirm. Once you have removed an index, the only way to recover the index is to upload the original acmx file again. 39


39 Web Editing Skip Over Time Schedule recording will automatically skip to the time when audio is detected. With this feature, the viewers will view the playback when the presenter switches on the microphone. However, if you want to manually set the start playback time, you can access the content and click on marker tab M. Enter the Start Time and End Time of the segment you want to skip over and click on Apply. 40


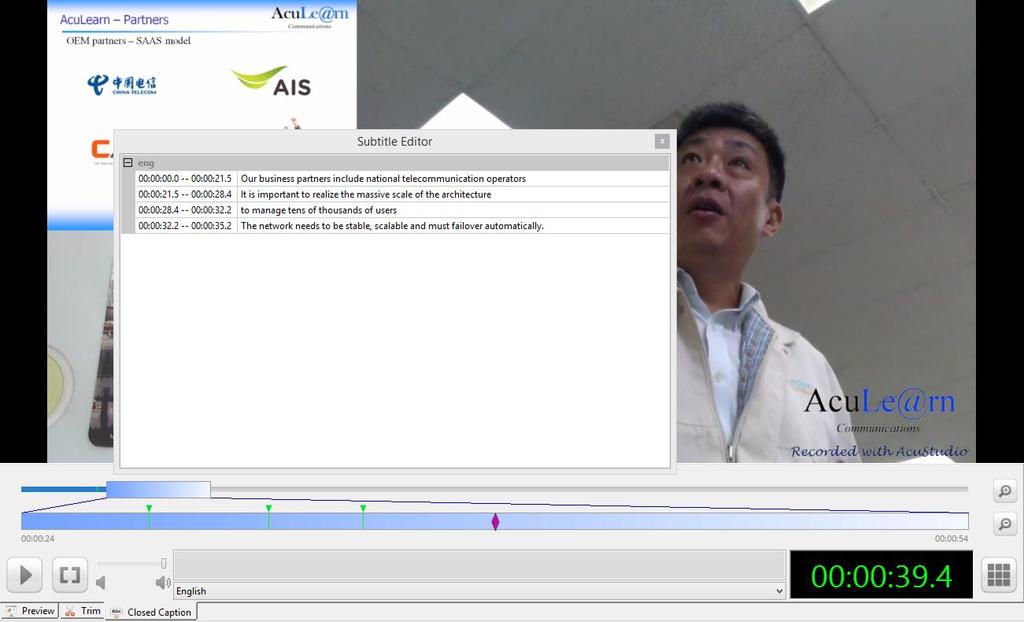
40 Closed Caption Select Closed Caption tab Select Language Enter Text Note: Enter Insert new line Text When you enter text, the playback will pause and continue after you hit Enter key Edit Closed Caption by clicking on the []. 41
41 42


42 Publish Recordings Recordings can be published to Content Distribution Network, i.e. NTU video server and AcuStream, local hard as HTML file, mp4 video or SCORM package. Publishing to NTULearn Course Site NTU users can login to AcuConsole using the following server settings and their NTU network account ID and Password as shown in the screenshot below. 43
43 Fill in the information and select the NTULearn course sites and content area where the recording is to be published to. Please note the following: - Studio ID Leave it blank - Expiration Date You can choose to include an expiration date. This is for information only. The recording will not be deleted or make unavailable to viewers. However, please note that all course and content materials will only be kept up to 2 years only. - Publish Notes Check to include the Notes that you have added. If you have recorded a PowerPoint slide show, this is the Speaker s notes that you have created in PowerPoint Click OK to publish the recording. 44
User Guide. Version 8.0 1
 User Guide AcuStudio 8 Version 8.0 1 AcuConference AcuStudio AcuManager AcuStream Copyright The content is copyrighted material of Aculearn Pte Ltd. All rights reserved. No part of this publication may
Panopto. End-User Guide
 Panopto End-User Guide Table of Contents INTRODUCTION... 3 PROVISIONING A COURSE... 3 LOGGING IN... 7 NAVIGATION... 8 PREPARING TO RECORD... 9 CREATING A SIMPLE RECORDING (AUDIO AND VIDEO ONLY)... 10 CREATING
Panopto Focus- Lecture Capture, Instructions
 Table of Contents Installation... 2 Media Standards... 3 Folder Quotas... 3 Logging Into the Recorder Application... 4 The Recorder Application... 5 The Basics... 5 Using Hotkeys... 5 Settings Menu...
Tech Day Camtasia. What is Camtasia Studio?
 Tech Day 2008 Camtasia What is Camtasia Studio? Camtasia Studio is a video-based screen capturing software program. It is analogous to using a video camera to record your screen. However, unlike using
Orientation to Collaborate 11 Farnoush Zadeh, Instructional Designer
 Orientation to Collaborate 11 Farnoush Zadeh, Instructional Designer Continuing & Distance Education St. Francis Xavier University ! Provide a brief introduction to the Collaborate platform How to get
UICapture Training Macintosh. Macintosh Panopto Recorder: Login
 UICapture Training Macintosh Before You Begin 1. (For individuals working on their own) If you do not have Panopto installed on your Mac, download and install it from the ITS Software Downloads page or
UICapture Training Macintosh. EXERCISE One - Macintosh Panopto Recorder: Login
 UICapture Training Macintosh Before You Begin 1. Make sure that you have a microphone connected to your machine before you start Panopto. 2. Open the folder on your computer s desktop called ICON Overview
Blackboard Collaborate Classroom in D2L Brightspace Daylight Experience
 Blackboard Collaborate Classroom in D2L Brightspace Daylight Experience Moderators Guide University Information Technology Services Learning Technology, Training, Audiovisual, and Outreach Copyright 2018
Orientation to Collaborate 11 Farnoush Zadeh, Instructional Designer
 Orientation to Collaborate 11 Farnoush Zadeh, Instructional Designer Continuing & Distance Education St. Francis Xavier University ! Provide a brief introduction to the Collaborate platform How to get
UICapture Training Windows. EXERCISE One - Windows Panopto Recorder: Login
 UICapture Training Windows Before You Begin 1. Make sure that you have a microphone connected to your machine before you start Panopto. 2. Open the folder on your computer s desktop called ICON Overview
litecam HD GUIDE For litecam HD Version 5.0 Contents
 1 litecam HD GUIDE For litecam HD Version 5.0 Contents 2 TABLE OF CONTENTS SYSTEM REQUIREMENTS 4 LITECAM HD INSTALLATION GUIDE 5 litecam HD installation Procedure... 5 - Installation... 5 - Activation...
USER GUIDE. For litecam HD Version 4.8. November 5 th, 2013.
 1 USER GUIDE For litecam HD Version 4.8 November 5 th, 2013. 2 Contents TABLE OF CONTENTS SYSTEM REQUIREMENTS 4 GUIDE TIP 5 LITECAM HD INSTALLATION GUIDE 9 litecam HD installation Procedure... 9 - Installation...
Getting Started with Adobe Connect
 Contents Getting Started with Adobe Connect... 2 Starting a Meeting with Adobe Connect... 5 How to Record Your Adobe Connect Session... 12 Additional Adobe Connect Resources... 16 Adobe Connect Mobile
CyberLink. U Webinar. User's Guide
 CyberLink U Webinar User's Guide Copyright and Disclaimer All rights reserved. To the extent allowed by law, U Webinar IS PROVIDED AS IS, WITHOUT WARRANTY OF ANY KIND, EITHER EXPRESS OR IMPLIED, INCLUDING
ADOBE CONNECT GUIDE FOR INSTRUCTORS
 Setting up a Class ADOBE CONNECT GUIDE FOR INSTRUCTORS When you set up your Acrobat Connect account, Adobe sends you an e-mail message that includes your meeting URL along with other information about
Desktop Client USER GUIDE. Version 2. Strategic Vision, Inc.
 Desktop Client USER GUIDE Version 2 Strategic Vision, Inc. Table of Contents Welcome Desktop Client Interface................... Audio and Webcam Settings................. Tool Overview........................
Panopto Help Guide for KUMC Users
 Panopto Help Guide for KUMC Users Table of Contents Obtaining the Panopto Applications... 3 PC/Mac Application... 3 Mobile Apps... 3 Recording with the PC Application... 5 Recording with the Mobile Apps...
Creators Basic Guide to Using UICapture (Windows)
") Creators Basic Guide to Using UICapture (Windows) All of the University of Iowa General Assignment Classrooms (GAC) are equipped with the recording software known as Panopto Recorder on Windows and Mac.
Creators Basic Guide to Using UICapture (Windows) All of the University of Iowa General Assignment Classrooms (GAC) are equipped with the recording software known as Panopto Recorder on Windows and Mac.
UICapture Windows Training Session. EXERCISE ONE - Windows Panopto Recorder: Login
 UICapture Windows Training Session Today s Session 1. UICapture Overview (PowerPoint) 2. Exercise (Hands On) 3. Individual Work Time Before You Begin 1. Plug in your microphone headset. 2. In a browser,
GOM Cam User Guide. Please visit our website (cam.gomlab.com) regularly to check out our. latest update.
 regularly to check out our. latest update.") GOM Cam User Guide Please visit our website (cam.gomlab.com) regularly to check out our latest update. From screen recording to webcam video and gameplay recording GOM Cam allows you to record anything
GOM Cam User Guide Please visit our website (cam.gomlab.com) regularly to check out our latest update. From screen recording to webcam video and gameplay recording GOM Cam allows you to record anything
MeetingPlaza Version 8.0
 MeetingPlaza Version 8.0 Reference manual for Chairperson or Administrator, Lecturer (For License Package) NTT-IT Corporation July, 2016 MeetingPlaza is a registered trademark of NTT-IT Corporation. The
MediaServer WebStudio user manual
 MediaServer WebStudio user manual This documentation provides information regarding how to use the web-based camera and screen recorder included in MediaServer (since version 6.4.0). 1 Table of contents
ECHO Personal Capture
 1 ECHO Personal Capture Introduction to Lecture Capture Lecture capture technology allows instructors to create audio/video recordings of classroom lectures or presentations. With lecture capture, instructors
What is Adobe Connect Pro? Setting up a Meeting. Using Adobe Connect Pro
 What is Adobe Connect Pro? Adobe Acrobat Connect Pro is a Flash based application that allows you to have real-time, multi-point meetings and class sessions that participants can access through a web browser.
Make Your Pictures Come to Life with Photo Story 3
 Page 1 of 6 Click Here to Install Silverlight United States Change All Microsoft Sites Search Microsoft.com Submit Windows Media Home For Home Windows Media Player Music & Video Cool Devices For Professionals
Ecamm Live for Facebook User Guide
 Ecamm Live for Facebook User Guide Ecamm Live is a Facebook Live streaming app for Mac. Use the app to broadcast camera video, pre-recorded video, Skype video calls, or your Mac s screen, along with an
MyMediasite Blackboard Tool User Guide
 MyMediasite Blackboard Tool User Guide Purpose & Outcomes: This document is intended to walk faculty through the process of getting started with the MyMediasite tool within Blackboard. If you wish to use
Creators Basic Guide to Using UICapture (Mac)
") Creators Basic Guide to Using UICapture (Mac) Download the software from http://helpdesk.its.uiowa.edu/software/signin.htm After downloading the software and setting up an account with your local IT support,
Creators Basic Guide to Using UICapture (Mac) Download the software from http://helpdesk.its.uiowa.edu/software/signin.htm After downloading the software and setting up an account with your local IT support,
Echo360 Personal Capture
 ACCC-ITL GUIDE Echo360 Personal Capture User Manual - Mac accc.uic.edu/service/lecture-capture Table of Contents Installation...2 Configuration...4 Recording...6 Editing...7 Publishing...9 ECHO360 PERSONAL
11talk video lesson User Manual
 talk video lesson User Manual . Video Lecture devices (Personal) Preparation before installation ) Requirements: Laptop or desktop PC with USB ports ) Drivers to install: Webcam / Headsets USB type ) Warning:
Panopto Quick Start (Faculty)
") Enabling Panopto in D2L Authorize your course to use D2L/Panopto integration. Login to D2L, open the Content section, Add a module, call it something like Recordings or Videos Then, click Add Existing
Enabling Panopto in D2L Authorize your course to use D2L/Panopto integration. Login to D2L, open the Content section, Add a module, call it something like Recordings or Videos Then, click Add Existing
Blackboard Collaborate for Students
 Blackboard Collaborate for Students Participants Guide University Information Technology Services Training, Outreach, Learning Technologies and Video Production Copyright 2014 KSU Department of University
A User s Guide to the Cure4Kids Web Conferencing System
 An online collaboration tool used in Cure4Kids An online medical education initiative of the International Outreach Program St. Jude Children's Research Hospital Memphis, Tennessee www.stjude.org 26 August
TECHSMITH RELAY Santa Ana College Distance Education, Cesar Chavez Building Room A-101, (714) ,
 ,") TECHSMITH RELAY Santa Ana College Distance Education, Cesar Chavez Building Room A-101, (714) 564-6725, DistEd@sac.edu Techsmith Relay is a simple video creation program that allows users to record video
TECHSMITH RELAY Santa Ana College Distance Education, Cesar Chavez Building Room A-101, (714) 564-6725, DistEd@sac.edu Techsmith Relay is a simple video creation program that allows users to record video
Version 2.0. Campus 2.0 Student s Guide
 Campus 2.0 Student s Guide Version 2.0 Campus 2.0 Student s Guide Error! No text of specified style in document. i Important Notice Copyright 2008 Tegrity, Inc. Disclaimer 2008 Tegrity, Inc. all rights
Gecata by Movavi 5. Recording desktop. Recording with webcam Capture videos of the games you play. Record video of your full desktop.
 Gecata by Movavi 5 Don't know where to start? Read these tutorials: Recording gameplay Recording desktop Recording with webcam Capture videos of the games you play. Record video of your full desktop. Add
Intel Unite Solution. Small Business User Guide
 Intel Unite Solution Small Business User Guide March 2017 Legal Disclaimers & Copyrights All information provided here is subject to change without notice. Contact your Intel representative to obtain the
A Host and Presenter s Guide to the Cure4kids Web Conferencing System
 A Host and Presenter s Guide to the Cure4kids Web Conferencing System An online collaboration tool used in Cure4Kids An online medical education initiative of the International Outreach Program St. Jude
Meeting Host Guide. Getting Stated with Adobe Connect 9.3. Adobe Connect is a web conferencing platform for web meetings, elearning, and webinars.
 Meeting Host Guide Getting Stated with Adobe Connect 9.3 Adobe Connect is a web conferencing platform for web meetings, elearning, and webinars. Adobe Connect Services support is available 24/7 at 1-800-
Central Management Software. Cam Viewer 3 Lite. User Manual
 Central Management Software Cam Viewer 3 Lite User Manual Version 1.0.0 Table of Contents 1. System Requirement...4 2. Software Installation...5 3. Configuration Wizard...9 3.1 Channel...10 3.1.1 Adding
Camtasia Studio 5.0 PART I. The Basics
 Camtasia Studio 5.0 Techsmith s Camtasia Studio software is a video screenshot creation utility that makes it easy to create video tutorials of an on screen action. This handout is designed to get you
For Organizers (Hosts) at OSU
 at OSU") Adobe Connect Pro 8.2 Overview For Organizers (Hosts) at OSU Getting Started 1. Access Adobe Connect Pro Central via this URL: http://oregonstate.adobeconnect.com 2. Login using your email address and
Adobe Connect Pro 8.2 Overview For Organizers (Hosts) at OSU Getting Started 1. Access Adobe Connect Pro Central via this URL: http://oregonstate.adobeconnect.com 2. Login using your email address and
CAPTURE. USER GUIDE v1
 CAPTURE USER GUIDE v1 INTRODUCTION About The Logitech Capture app makes creating content with your webcam as easy as lights, camera, Capture. Start recording high-quality videos the second you plug in
SI Training for Online Sessions
 SI Training for Online Sessions WebEx Follow the instructions below to schedule, conduct, and record online SI sessions. Logging In 1. Open a web browser and go to https://tamucc.webex.com, click Log In
Creating Interactive Video with Camtasia
 Creating Interactive Video with Camtasia Audio SCORM Quizzes PowerPoint and Screen Shots v1.2: 2009 Page 1 Camtasia Studio 6.0.2 http://www.techsmith.com/camtasia.asp (free trial download) Table of Contents
CEF MEDIA ROOM USER MANUAL
 CEF MEDIA ROOM USER MANUAL Table of Contents 1) Introduction to the Media Room... 1 2) Booking the Media Room... 1 3) Getting Help... 1 4) Pre-Recording Session To Dos... 1 5) Media Room Equipment... 2
USER MANUAL. Infoshare Web Conferencing
 USER MANUAL Infoshare Web Conferencing Table of Contents Contents Table of Contents... 1 What is Infoshare?... 3 Infoshare Control Panel and Key Functions... 3 1. Launching Infoshare... 4 2. Meeting Types...
Collaborate Ultra: The Recordings List
 Collaborate Ultra: The Recordings List If at least one session in the virtual room has been recorded and processed (and not yet deleted), the Blackboard Collaborate page in a course or organization should
New Features. Importing Resources
 CyberLink StreamAuthor 4 is a powerful tool for creating compelling media-rich presentations using video, audio, PowerPoint slides, and other supplementary documents. It allows users to capture live videos
Introduction to Kaltura
 Introduction to Kaltura The Kaltura media content management system allows users to record, stream, and manage multimedia files. This industry-leading enterprise system offers many robust tools. This guide
Unified Meeting 5 User Guide for Windows
 Unified Meeting 5 User Guide for Windows Unified Meeting 5 is a web based tool that puts you in complete control of all aspects of your meeting including scheduling, managing and securing your meetings.
Welcome & Introduction
 Welcome & Introduction Welcome to ebeam Interactive Suite 3. Overview ebeam Interactive Suite 3 allows you to create lessons with provided resources and enhances curriculum delivery with dynamic annotation
Adobe Connect: Overview
 Adobe Connect: Overview Table of Contents Table of Contents... 1 Overview of Adobe Connect... 2 Recommended Use... 2 Roles and Privileges... 2 Menu Bar... 3 Prepare Room and Upload Content... 4 Create
NVMS User Manual. Version 2.1.0
 NVMS-1000 User Manual Version 2.1.0 Contents 1 Software Introduction... 1 1.1 Summary... 1 1.2 Operation Environment... 1 1.3 Install and Uninstall... 2 1.3.1 Install the Software... 2 1.3.2 Uninstall
PowerPoint 2016 Part II
 PowerPoint 2016 Part II Animations In PowerPoint, any object, shape, image, etc. on a slide can be animated. Animations are a good way to add some attention grabbers to a presentation, but they can also
Recording narrated Powerpoint presentations
 Recording narrated Powerpoint presentations You will need a microphone to connect to your computer. There are three types. Most laptops and all Imacs have internal microphones built in. Some microphones
NVMS User Manual
 NVMS-1000 User Manual Contents 1 Software Introduction...1 1.1 Summary... 1 1.2 Operation Environment... 1 1.3 Install and Uninstall... 2 1.3.1 Install the Software... 2 1.3.2 Uninstall the Software...
Blackboard Collaborate for Faculty
 New York City College of Technology Instructional Technology & Technology Enhancement Center -- itec Blackboard Collaborate for Faculty Contact Information: 718-254-8565 ITEC@citytech.cuny.edu System Requirements:
Webcaster Frequently Asked Questions
 FAQs Webcaster Frequently Asked Questions Getting Started At a minimum, what do I need to start a live webcast? A live webcast requires a live audio/video source. This could be a webcam, an external video
Quick Start Guide (V1.03) UD.6L0201B1064A01
 UD.6L0201B1064A01") ivms-4200 PCNVR Quick Start Guide (V1.03) UD.6L0201B1064A01 Thank you for purchasing our product. If there is any question or request, please do not hesitate to contact the dealer. This manual applies
ivms-4200 PCNVR Quick Start Guide (V1.03) UD.6L0201B1064A01 Thank you for purchasing our product. If there is any question or request, please do not hesitate to contact the dealer. This manual applies
Law Technology Team (LTT) Offices: OM Hours: 8:30am 5:30pm Panopto D2L Guide
 Offices: OM Hours: 8:30am 5:30pm Panopto D2L Guide") Panopto D2L Guide For additional training, please contact FITS@depaul.edu OR https://support.panopto.com Contents Adding Panopto to your D2L course... 2 Downloading and Installing Panopto Recorder... 3
Panopto D2L Guide For additional training, please contact FITS@depaul.edu OR https://support.panopto.com Contents Adding Panopto to your D2L course... 2 Downloading and Installing Panopto Recorder... 3
UICapture Macintosh Training Session
 UICapture Macintosh Training Session Today s Session 1. UICapture Overview (PowerPoint) 2. Exercise (Hands On) 3. Individual Work Time Before You Begin 1. (For individuals working on their own) If you
APPENDIX J: Guide to Getting Started with Elluminate
 Section 1: What is Elluminate? Elluminate is a real- time training, demonstration and collaboration environment that enables the delivery of live, online learning, training, coaching, mentoring and meeting.
HP WEBCAM HD USER GUIDE
 HP WEBCAM HD USER GUIDE Copyright 2012 Hewlett-Packard Development Company, L.P. Microsoft, Windows, and Windows Vista are U.S. registered trademarks of Microsoft Corporation. AMD and Athlon are trademarks
NVMS User Manual
 NVMS-1000 User Manual Contents 1 Software Introduction...1 1.1 Summary... 1 1.2 Operation Environment... 1 1.3 Install and Uninstall... 2 1.3.1 Install the Software... 2 1.3.2 Uninstall the Software...
How To: Panopto Tutorial for Faculty & Staff
 How To: Panopto Tutorial for Faculty & Staff Information Technology Help Desk Colorado Mesa University 8/22/2016 CMU Help Desk: 970-248-2111 or http://whd.coloradomesa.edu Page 0 Table of Contents What
Recording with Panopto for Windows
 Recording with Panopto for Windows Overview Panopto for Windows allows a lot of flexibility in how and what you can record. A presenter may wish to record alone (with one computer), with a videographer
ESME Online Introduction to the Adobe Connect Platform
 ESME Online Introduction to the Adobe Connect Platform The ESME Online Webinars will be presented via the Adobe Connect platform. Adobe Connect is essentially a web conferencing system which replicates
Lead Your e-classes Session v8.2
 Lead Your e-classes Session v8.2 (NEW version 8.2) For e-classes leaders using the new Saba Meeting v8.2, effective July 14, 2014. Before leading an e-classes v8.2 session for the first time, you need
CAMTASIA RELAY TUTORIAL Santa Ana College Distance Education, Cesar Chavez Building Room A-101, (714) ,
 ,") CAMTASIA RELAY TUTORIAL Santa Ana College Distance Education, Cesar Chavez Building Room A-101, (714) 564-6725, DistEd@sac.edu Camtasia Relay is a simple video creation program that allows users to record
CAMTASIA RELAY TUTORIAL Santa Ana College Distance Education, Cesar Chavez Building Room A-101, (714) 564-6725, DistEd@sac.edu Camtasia Relay is a simple video creation program that allows users to record
CALL MANAGER DOWNLOAD AND SETUP
 CALL MANAGER W I N D O W S U S E R G U I D E Call Manager, our meeting and collaboration application enhances the way you communicate by making meetings convenient and easy to manage. It improves your
Beginner Level. Adobe Connect Pro
 Adobe Connect Pro Topic Page Number Overview 2 Prerequisite Terms 2 System Requirements 4 Logging into an Adobe Connect meeting 5 The Meeting Room 6 Meeting Preflight 8 Working in an Adobe Connect meeting
Wimba Pronto. Version 2.0. User Guide
 Wimba Pronto Version 2.0 User Guide Wimba Pronto 2.0 User Guide Welcome to Wimba Pronto 1 What's New in Wimba Pronto 2.0 2 Getting Started 3 Wimba Pronto System Requirements 3 Creating a New Wimba Pronto
Microsoft Office 2007
 Microsoft Office 2007 Adding Slide Transitions Transition Sound Transitions Transition Speed Apply to All A slide transition is the way one slide changes to the next in Slide Show view. Animations Tab:
icms Pro USER s MANUAL Ver 1.0
 icms Pro USER s MANUAL Ver 1.0 Contents Target Audience for this Document... 5 Copyright, Trademarks and Important Information... 5 Copyright... 5 Disclaimer... 5 Introduction... 6 Tabs... 6 Panes... 7
Get Started in Web Conference Classes: During the Semester
 Get Started in Web Conference Classes: During the Semester Online classroom etiquette Log in to your WebEx class Change views, go full-screen Chat tool Class presentations Need help? 1-877-348-6503 or
Unified Meeting 5 User Guide for MAC
 Unified Meeting 5 User Guide for MAC Unified Meeting 5, a meeting and collaboration application enhances the way you communicate by making meetings convenient and easy to manage. It improves your meeting
Swivl User Guide. C Series Robot
 C Series Robot Swivl Swivl Robot Swivl App Swivl Cloud Swivl robot follows you with great quality audio. Now it has twice the speed of response, a simpler Lightning interface and multi-channel audio tracks
CyberLink. StreamAuthor 4. User's Guide
 CyberLink StreamAuthor 4 User's Guide Copyright and Disclaimer CyberLink reserves all rights to this publication. No part of this publication may be reproduced, duplicated, saved or transmitted without
Advanced and Customized Net Conference With Cisco WebEx Meeting Center Participant Quick Tips
 Advanced and Customized Net Conference With Cisco WebEx Meeting Center Participant Quick Tips Participant Quick Tips for WebEx Meeting Center provides tips that you can use to effectively join and participate
Steps to View Online Lectures
 Steps to View Online Lectures Panopto recordings can be viewed on a multitude of operating systems such as Windows XP, Windows Vista, and Mac OS X (Intel Only) Panopto is also compatible with most major
Wimba Pronto. Version 2.1. User Guide
 Wimba Pronto Version 2.1 User Guide Wimba Pronto 2.1 User Guide Welcome to Wimba Pronto 1 What's New in Wimba Pronto? 2 Getting Started 3 Wimba Pronto System Requirements 3 Creating a New Wimba Pronto
WebEx Faculty Guide Hosting a Meeting
 WebEx Faculty Guide Hosting a Meeting Table of Contents WebEx Additional Features and Resources... 1 Creating a New WebEx Conference... 2 Accessing a WebEx Conference Session... 4 WebEx Audio... 5 Web
Man Met Capture Kaltura CaptureSpace Desktop Recording
 Man Met Capture Kaltura CaptureSpace Desktop Recording User Guide for Staff September 2018 Kaltura Capture Space Desktop Recording user guide for staff 1 Contents 1 CaptureSpace for Desktop Recording software...
Contents A. COLLABORATE INTRODUCTION... 1 B. SYSTEM REQUIREMENTS... 1 C. CANVAS COLLABORATE... 2 D. SETTING OF AUDIO (COMPULSORY)...
...") Contents A. COLLABORATE INTRODUCTION... B. SYSTEM REQUIREMENTS... I. OPERATING SYSTEM... II. BROWSER... III. JAVA APPLICATION... C. CANVAS COLLABORATE... I. CREATING COLLABORATE SESSION... II. JOINING
Contents A. COLLABORATE INTRODUCTION... B. SYSTEM REQUIREMENTS... I. OPERATING SYSTEM... II. BROWSER... III. JAVA APPLICATION... C. CANVAS COLLABORATE... I. CREATING COLLABORATE SESSION... II. JOINING
Training Handout Tegrity Campus 2.0
 Training Handout Tegrity Campus 2.0 Tegrity Campus 2.0 is a user-friendly video, audio, and screen capturing platform for replay by students. Tegrity is accessible anywhere via Blackboard s course management
Customized Net Conference with Cisco WebEx Training Center
 Customized Net Conference with Cisco WebEx Training Center This Quick Start User Guide for Customized Net Conference with Cisco WebEx Training Center details how to access the Cisco WebEx Training Center
Running Effective Meetings
 Running Effective Meetings www.clickmeeting.com In this guide... You ll learn how organize your online meeting space, set up camera and voice, share your presentation and manage attendees. Contents Launch
How To: Panopto Tutorial for Students
 How To: Panopto Tutorial for Students Information Technology Help Desk Colorado Mesa University 8/22/2016 CMU Help Desk: 970-248-2111 or http://whd.coloradomesa.edu Page 0 Table of Contents Table of Contents...
Troubleshooting. Cisco WebEx Meetings Server User Guide Release 2.7 1
 Participants List Displays Multiple Entries for the Same User, page 2 Internet Explorer Browser Not Supported, page 2 404 Page Not Found Error Encountered, page 2 Cannot Start or Join Meeting, page 3 SSO
How To: Panopto Tutorial for Faculty & Staff
 How To: Panopto Tutorial for Faculty & Staff Information Technology Help Desk Colorado Mesa University 8/22/2016 CMU Help Desk: 970-248-2111 or http://whd.coloradomesa.edu Page 0 Table of Contents What
Central Management Software for NVR-915 / NVR-1615 CV5-M256
 Central Management Software for NVR-915 / NVR-1615 Table of Contents Chapter 1. Main Console... 4 1.1 Tool Bar... 4 1.2 NVR List... 5 1.3 Division List... 7 1.4 Group List... 9 1.5 PTZ Panel...11 1.6 Operation
Camtasia... 3 What is Camtasia and how do I download it?... 4 How do I record a video in Camtasia?... 6 How do I edit video and audio in
 CAMTASIA Table of Contents... 3 What is and how do I download it?... 4 How do I record a video in?... 6 How do I edit video and audio in?...14 How do I apply effects in?...19 How do I use a Green Screen
UICapture Windows Training Session. EXERCISE ONE - Windows Panopto Recorder: Login
 UICapture Windows Training Session Today s Session 1. UICapture Overview (PowerPoint) 2. Exercise (Hands On) 3. Individual Work Time Before You Begin 1. (For individuals working on their own) If you do
Scholastic Interactive Teaching System User s Guide
 Scholastic Interactive Teaching System User s Guide For use with READ 180 Next Generation version 2.1 or later, READ 180 Enterprise Edition version 2.1 or later, System 44 version 2.1 or later, Expert
CyberLink. StreamAuthor 3. User s Guide
 CyberLink StreamAuthor 3 User s Guide Copyright and Disclaimer All rights reserved. No part of this publication may be reproduced, stored in a retrieval system, or transmitted in any form or by any means
Wimba Classroom Version 6.1 Room Administrator Guide
 Wimba Classroom Version 6.1 Room Administrator Guide Wimba Classroom 6.1 Room Administrator Guide 1 Administration Tools 2 Room Management 3 Creating a New Room (RoomCreators Only) 3 Setting up a Room
TRIDENT - CMS Plus. 64CH Central Management System Software
 TRIDENT - CMS Plus 64CH Central Management System Software Please read instructions thoroughly before operation and retain it for future reference. For video demonstration about CMS Lite operation, please
Impatica and PowerPoint for Blackboard
 Impatica and PowerPoint for Blackboard Impatica is a software program which allows for the delivery of fully narrated and highly animated PowerPoint content over the Internet, plug-in free and even at
Adobe Captivate Level 1
 Information Technology Services Kennesaw State University Adobe Captivate Level 1 Presented by Technology Outreach in collaboration with The Multimedia Development Group (MDG) Copyright 2007 Information