ECHO Personal Capture
|
|
|
- Georgiana Mathews
- 6 years ago
- Views:
Transcription
1 1 ECHO Personal Capture Introduction to Lecture Capture Lecture capture technology allows instructors to create audio/video recordings of classroom lectures or presentations. With lecture capture, instructors can record their presentations (both audio and video) including any material that gets projected onto the classroom's screen. The ECHO 360 classrooms offer this capability. ECHO Personal Capture allows you to record a lecture or other resources outside of the classroom. Use Personal Capture to record a lecture for future presentation or create short audio and video resources for your class. Personal Capture is supported on both PC and Mac. Downloading the software First, you will need to access the online request form located at: and fill out the information for requesting an Echo Personal Capture account. Once the account process has been completed, you can then login to the Echo Active Learning Platform site at: Click on the link Log In via Institution; select University of San Francisco out of the dropdown menu to pick an institution and click Log In. You will be redirected to the myusf login page; enter your USF username and password and click Login to Access your Echo account page.


2 2 Once logged in, click on the gear icon in the upper right side of the page and select Downloads. In the Downloads area, click on the link for the software installer to download and install the Echo Personal Capture software on your Mac or PC. Setting up your Computer for ECHO Personal Capture Setting up Your Mac for Audio and Video Video Camera If you are using a Macbook Pro or imac, the Facetime video camera will be selected by default. If you have a Mac Mini or a Mac Pro, plug in a USB web cam of your choice. You can also use any USB web cam on a MacBook Pro if you need an external video camera feed. Display Resolution ECHO Personal Capture works best when your screen resolution is at 1024x768; to adjust your display to this resolution, open up the System Preferences through the Apple apple menu and select Displays. In the Displays control panel select the Display tab and select 1024x768 in the list to set the resolution.


3 3 Audio If you are using a Macbook Pro or an imac the internal microphone will be selected by default. If you have a Mac Mini or Mac Pro, plug in a USB microphone of your choice. You can also use a USB microphone on a MacBook Pro or imac if you need an external audio pickup. Next, open up the System Preferences through the Apple apple menu and select SOUND. In the Sound control panel select the INPUT tab and make sure that the microphone you want to use for the recording is selected. You can also adjust the gain or sensitivity of the microphone through the Input volume slider.close the System Preferences to finish. Setting up Your PC for Audio and Video Video Camera Many PC laptops and some desktops have built-in webcams which are ready to be used. If not, you can connect an external USB video camera to your computer, which should be detected automatically and ready for use. Display Resolution


4 4 ECHO Personal Capture works best when your screen resolution is at 1024x768; to adjust your display to this resolution, right click on the desktop and select Screen Resolution. In the Displays control panel select the Display tab and select 1024x768 in the list to set the resolution. Click Apply to finish. On Windows 10, right click on the desktop and select Display settings. In the display settings, click on the link Advanced display settings.


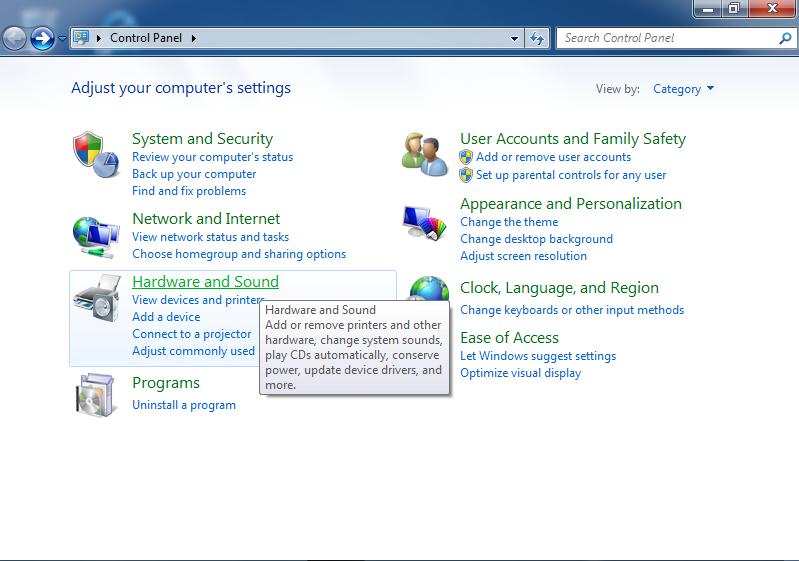
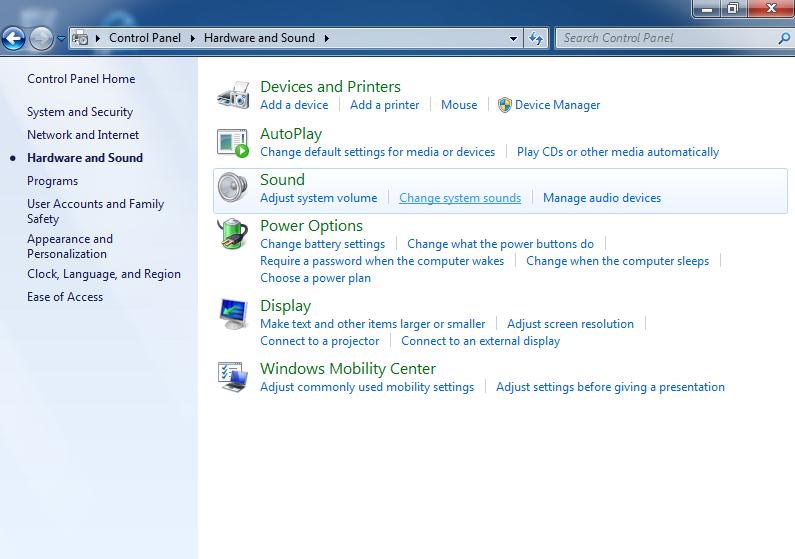
5 5 In the Advanced Display settings, select 1024x768 in the Resolution menu and click Apply to finish. Audio Many PC laptops have built-in microphones which are ready for use. If you do not have a built-in microphone, you can connect an external USB microphone. To make sure that the USB microphone is selected for use by the PC, click on the Windows 7 button and select CONTROL PANEL. For Windows 10 users, you need to right click on the Windows 10 button in the lower left corner of the screen and select Control Panel. Windows 10 Windows 7 In the Control Panel window, click on HARDWARE AND SOUND and then SOUND to open the Sound control panel.

6 6


7 7 In the Sound control panel select the RECORDING tab; select the external microphone you wish to use and click on the SET DEFAULT menu and select USE AS DEFAULT. Next click Properties and select the Levels tab. Here you can adjust the gain or sensitivity of the microphone through the slider controls.click OK to finish.


8 8 Using ECHO Personal Capture on the Mac Configure Personal Capture Open ECHO Personal Capture and select START RECORDING. On the Mac you will see a preview screen of the desktop capture and the selected devices for video and audio. If the audio and video devices selected do not match the ones you wish to use, click on the CONFIGURE button.


: If you choose to record yourself as part of the recording, you can select a")

9 9 In the Audio/Video Settings window You can configure the following: Audio: Select the microphone input for recording your voice. Video (Left): The screen select becomes important if you have more than one monitor attached to your computer. You need to select which monitor will be the one that Personal Capture will record. Video (Right): If you choose to record yourself as part of the recording, you can select a webcam that you have connected to your computer (built-in or USB) You can then click Save to finish the setup. Recording with Personal Capture for Mac After finishing the setup begin recording by clicking on Start Recording. There will be a countdown to prepare you for the session and then the recording will begin.


10 10 During the recording session everything displayed on the screen and audio from the microphone is captured. It is recommended that you rehearse what you want to record to provide the best results and to minimize the times you need to re-record. If you need to pause the recording for any reason click on the ECHO Personal capture menu at the top of the screen and select Pause Recording. To resume, click on the same Echo menu and select Resume Recording. When you are finished, click on the ECHO Personal Capture menu and select Stop Recording. Editing your Recording Now that you have finished recording you can do some basic trimming of the recording to remove any unneeded portions. To do this, click and drag the selection cursors to match the area you would like to trim. Next, place the play cursor near the beginning of the selection and click the Play button to check that portion. Click the Trim tool to then remove the selection. You can always undo the trim by clicking Clear Cuts or apply the changes by clicking Apply Edits.


11 11 Managing your Recordings You can manage your recordings in the My Recordings window. Single click on any recording to perform the following actions: Delete the selected recording View/edit the selected recording Publish the selected recording Publishing Your Personal Capture Now you are ready to publish your ECHO for distribution. The Publish Recording button, can be found at the bottom of the recording list or Edit Recording window. Click on Publish Recording and you will be asked to login to your Echo360 account. Click login to continue.


12 12 A web browser window will open and ask you to enter your USF address. Click Submit to continue. If you have not logged into Personal Capture recently, you will be redirected to the myusf login page to enter your USF username and password to login. You will then see a dialog box asking to open the Echo Personal Capture app to complete the login. Once back in the Personal Capture app, click Publish again to start the process. Each user will need to have a course created by the ECHO administrator to be able to publish their recordings. Select the course you would like the published ECHO to be associated with or select Personal Library. If you are a student using Echo Personal Capture, the only choice will be Personal Library. Click Next to continue.

13 13 Finally, confirm the name for the published recording and click Publish. The time it takes to publish will depend on the length of the recording. The recording list will show the progress. *Note that the Echo server still needs to process the uploaded recording; you will receive an notification when the published recording is ready for viewing.


14 14 Using ECHO Personal Capture on the PC Configure Personal Capture Open Echo Personal Capture and on the left side of the window are the configuration settings for the microphone, desktop to capture and webcam to select. Recording With Echo Personal Capture for PC Once you have the microphone and webcam configured, you can begin recording your screen. Click on the Record button and wait for the 5 second countdown;


15 15 Echo Personal Capture will then minimize to the taskbar and recording will begin of your screen display and your voice through the microphone. You can pause the recording by right clicking on the Echo Personal Capture icon in the taskbar and selecting Pause. Once paused, the command to resume will show in the right click menu. When you are finished, right click on the ECHO Personal Capture icon in the taskbar and select Stop. You will be brought back to the main Personal Capture window with your new recording showing in the Recordings section.


16 16 Hover your cursor over the right hand side of the listed recording will reveal the options to manage the recording. Delete recording Clicking the X button will permanently delete the recording from your computer. Edit Recording Here you can trim unwanted portions of the recording from the final product by clicking on the pencil icon to Edit. In the Editor, move the play cursor to the place you would like to begin the cut and play the recording from that point to make sure you have the right portion to trim.


17 17 Next move the trim cursors to select the area to be trimmed and click Make cut to trim the portion. Use the trim cursors to trim portions at the beginning, end or within the recording. You can click Clear cuts to re-select the portions to trim or Cancel/Home to cancel all changes and return to the Home window. If you are satisfied with the trims, click Apply edits to finish. Publish Recording When you are finished with the editing of the recording, you then need to publish it to make it available to your audience. Place your cursor over your edited recording and click on the icon to Publish. There will be a dialog box to login to your Echo360 account. Click OK to continue. A web browser window will open and ask you to enter your USF address. Click submit to continue.


18 18 If you have not logged into Personal Capture recently, you will be re-directed to the myusf login page to enter your USF username and password to login. You will return to the Echo Personal Capture app where you can now click the icon to Publish. The publishing window allows you to title or re-title your recording. The Upload To menu allows you to choose where you would like to upload your recording, either to your Echo Personal Library or to a course that ITS can create for you when the account is created.
19 19 Once you have titled and selected a desitnation for your recording, click Upload to begin publishing. After Echo Personal Capture finishes uploading, the recording listing will show it as published. *Note that the Echo server still needs to process the uploaded recording; you will receive an notification when the published recording is ready for viewing. Viewing and Sharing ECHO Recordings The for the published recording will confirm that the video is ready for viewing; to obtain the link to share the video click on the Echo360 logo to login to the Echo360 Active Learning Platform site. Login through the link Log in via Institution. and click on the Library link at the top of the page to access your recording.


20 20 Once in your Library, single click on the published content you wish to share to view the recording. Once in the View window, click on the Sharing tab to access the Public Links area. Click on the button Add Public Link in the Public Links area.
21 21 ALP will generate a link that you can click on to copy and send via to share the recording. Remember that this link is a public link, requiring no login to view. Finally, you can also generate an embed code similar to YouTube to actually embed the recording on a web page. Click on Embed to show the code for the recording. In the Embed window, click on the Copy button to copy the code that can then be pasted into any web page that allows HTML editing, like a Canvas page.
 Echo360 Personal Capture Echo360 Personal Capture allows you to create recordings in your office. Simply install the software on your computer and you can record what you see on the screen plus audio,
Panopto. End-User Guide
 Panopto End-User Guide Table of Contents INTRODUCTION... 3 PROVISIONING A COURSE... 3 LOGGING IN... 7 NAVIGATION... 8 PREPARING TO RECORD... 9 CREATING A SIMPLE RECORDING (AUDIO AND VIDEO ONLY)... 10 CREATING
 Echo360 Personal Capture Echo360 Personal Capture allows you to create recordings in your office. Simply install the software on your computer and you can record what you see on the screen plus audio,
PowerPoint - Presentation Recordings
 PowerPoint - Presentation Recordings The most common way instructors publish lectures, or lecture materials, to an online course is with PowerPoint. PowerPoint is easy, efficient, and most instructors
KUMC Camtasia Relay 4 Quick Start Guide (12/06/12)
") KUMC Camtasia Relay 4 Quick Start Guide (12/06/12) Overview You can use Camtasia Relay (CR) to record your computer screen and audio. Your recording is automatically uploaded to the CR server where it
KUMC Camtasia Relay 4 Quick Start Guide (12/06/12) Overview You can use Camtasia Relay (CR) to record your computer screen and audio. Your recording is automatically uploaded to the CR server where it
the Virtual Classroom Camtasia Relay Virtual.Cumbria.ac.uk
 the Virtual Classroom Camtasia Relay Virtual.Cumbria.ac.uk This guide is intended for staff and covers the general and practical use of Camtasia Relay. Please look for our other related guides which you
Introduction to Kaltura
 Introduction to Kaltura The Kaltura media content management system allows users to record, stream, and manage multimedia files. This industry-leading enterprise system offers many robust tools. This guide
Tegrity Recording and Proctoring
 Tegrity Recording and Proctoring Introduction The Tegrity software can be used as classroom video/screen capture recordings to be uploaded to a secure cloud. The video is segmented into chapters for easy
Quickstart Guide to Setup your Zoom Account To start, visit the USF Zoom site:
 1 Quickstart Guide to Setup your Zoom Account To start, visit the USF Zoom site: http://usfca.zoom.us Click on the link Download Zoom on the upper right side of the page and then click on the link for
Instructor Panopto Reference Guide
 Overview: Panopto is a YouTube-like service which allows both you and your students to securely record, edit, store and share videos within an NLU secured online environment. Referencing this guide you
Quickstart Guide to Setup your Zoom Account To start, visit the USF Zoom site:
 1 Quickstart Guide to Setup your Zoom Account To start, visit the USF Zoom site: http://usfca.zoom.us Click on the link Download Zoom on the upper right side of the page and then click on the link for
TECHSMITH RELAY Santa Ana College Distance Education, Cesar Chavez Building Room A-101, (714) ,
 ,") TECHSMITH RELAY Santa Ana College Distance Education, Cesar Chavez Building Room A-101, (714) 564-6725, DistEd@sac.edu Techsmith Relay is a simple video creation program that allows users to record video
TECHSMITH RELAY Santa Ana College Distance Education, Cesar Chavez Building Room A-101, (714) 564-6725, DistEd@sac.edu Techsmith Relay is a simple video creation program that allows users to record video
Creating a Recording in Canvas Embedding a Recording in Canvas To embed a recording into a discussion
 Table of Contents What is Kaltura... 3 Things to Remember... 3 My Media... 3 To access My Media... 3 Upload Media... 4 To perform a media upload... 4 Viewing Videos... 6 Add New List Options... 6 Media
Getting started with Panopto Instructors
 What is Panopto? Panopto is a video content management system for uploading, managing and sharing recorded lectures, flipped classroom videos, campus events, and more. It comes with built-in video analytics,
UICapture Training Macintosh. Macintosh Panopto Recorder: Login
 UICapture Training Macintosh Before You Begin 1. (For individuals working on their own) If you do not have Panopto installed on your Mac, download and install it from the ITS Software Downloads page or
Man Met Capture Kaltura CaptureSpace Desktop Recording
 Man Met Capture Kaltura CaptureSpace Desktop Recording User Guide for Staff September 2018 Kaltura Capture Space Desktop Recording user guide for staff 1 Contents 1 CaptureSpace for Desktop Recording software...
MyMediasite Blackboard Tool User Guide
 MyMediasite Blackboard Tool User Guide Purpose & Outcomes: This document is intended to walk faculty through the process of getting started with the MyMediasite tool within Blackboard. If you wish to use
Creators Basic Guide to Using UICapture (Windows)
") Creators Basic Guide to Using UICapture (Windows) All of the University of Iowa General Assignment Classrooms (GAC) are equipped with the recording software known as Panopto Recorder on Windows and Mac.
Creators Basic Guide to Using UICapture (Windows) All of the University of Iowa General Assignment Classrooms (GAC) are equipped with the recording software known as Panopto Recorder on Windows and Mac.
Panopto. Student Guide for Creating a Presentation on the Macintosh Computer. University Information Technology Services
 Panopto Student Guide for Creating a Presentation on the Macintosh Computer University Information Technology Services Training, Outreach, Learning Technologies and Video Productions 1 Copyright 2014 KSU
Setting Up a Zoom Classroom
 These instructions were created for use in a classroom situation where: 1. Students are present in the room and one or more students are joining remotely 2. The classroom is equipped with a tech pack (computer
MU Video CaptureSpace FAQ
 MU Video CaptureSpace FAQ MU Video CaptureSpace Frequently Asked Questions What is MU Video CaptureSpace? MU Video CaptureSpace is a desktop application that allows users to easily record content. From
Version 2.0. Campus 2.0 Student s Guide
 Campus 2.0 Student s Guide Version 2.0 Campus 2.0 Student s Guide Error! No text of specified style in document. i Important Notice Copyright 2008 Tegrity, Inc. Disclaimer 2008 Tegrity, Inc. all rights
UICapture Windows Training Session. EXERCISE ONE - Windows Panopto Recorder: Login
 UICapture Windows Training Session Today s Session 1. UICapture Overview (PowerPoint) 2. Exercise (Hands On) 3. Individual Work Time Before You Begin 1. Plug in your microphone headset. 2. In a browser,
UICapture Training Macintosh. EXERCISE One - Macintosh Panopto Recorder: Login
 UICapture Training Macintosh Before You Begin 1. Make sure that you have a microphone connected to your machine before you start Panopto. 2. Open the folder on your computer s desktop called ICON Overview
5. Click the Start Meeting button. You will enter your personal meeting room and an Audio and Video Connection window will appear.
 WebEx Personal Meeting Rooms for Faculty/Staff Introduction Personal Meeting Rooms are available to anyone who has a WebEx host account. Personal Meeting Rooms are available at all times and can be accessed
Using VStream PCap Outside of Victoria
 Information Technology Services Using VStream PCap Outside of Victoria This How-To academic guide provides step by step instructions on recording, editing and publishing recorded content via the VStream
Getting started with Panopto Instructors
 Getting started with Panopto Instructors What is Panopto? Panopto is a video content management system for uploading, managing and sharing recorded lectures, flipped classroom videos, campus events, and
How To: Panopto Tutorial for Students
 How To: Panopto Tutorial for Students Information Technology Help Desk Colorado Mesa University 8/22/2016 CMU Help Desk: 970-248-2111 or http://whd.coloradomesa.edu Page 0 Table of Contents Table of Contents...
Creators Basic Guide to Using UICapture (Mac)
") Creators Basic Guide to Using UICapture (Mac) Download the software from http://helpdesk.its.uiowa.edu/software/signin.htm After downloading the software and setting up an account with your local IT support,
Creators Basic Guide to Using UICapture (Mac) Download the software from http://helpdesk.its.uiowa.edu/software/signin.htm After downloading the software and setting up an account with your local IT support,
TABLE OF CONTENTS. Revised 9/2018
 TABLE OF CONTENTS Revised GETTING STARTED WITH YOUR VIDEO PROJECT - OVERVIEW OF THE FINAL CUT PRO X INTERFACE - CREATING A PROJECT 3 - IMPORTING YOUR MEDIA FILES 5 - TRANSFERRING FOOTAGE FROM CANON AND
Panopto Focus- Lecture Capture, Instructions
 Table of Contents Installation... 2 Media Standards... 3 Folder Quotas... 3 Logging Into the Recorder Application... 4 The Recorder Application... 5 The Basics... 5 Using Hotkeys... 5 Settings Menu...
Echo360 Personal Capture
 ACCC-ITL GUIDE Echo360 Personal Capture User Manual - Mac accc.uic.edu/service/lecture-capture Table of Contents Installation...2 Configuration...4 Recording...6 Editing...7 Publishing...9 ECHO360 PERSONAL
Personal Capture Software
 Personal Capture Software Staff Guide ReCap Team recap@ncl.ac.uk ReCap Personal Capture Software Windows To get the ReCap Personal Capture software installed onto your computer please contact the ReCap
Use the Preferred Browser USE FIREFOX ON MAC & PC. If you do not have Firefox on your computer or laptop, please download Firefox by clicking here.
 Working In Mediasite (Part 2) Now that you ve completed Part 1, which included registering Mediasite, Downloading and Installation of the Mediasite Recorder, you re ready to proceed to Part 2 of the tutorial
Here s how to add new content to My Media and then place it in a Blackboard course using Mashups.
 Kaltura My Media allows instructors to easily upload or link to videos, record with a webcam, record the desktop using the screen recorder and enhance videos with in-video quizzes. A Mashup is a combination
How To Create and Post a Video in an Assignment
 elearning Training Material Golden Gate University How To Create and Post a Video in an Assignment Introduction Kaltura Video for Moodle allows students to: Upload videos to the course to share with the
JCCC Virtual Labs. Click the link for more information on installing on that device type. Windows PC/laptop Apple imac or MacBook ipad Android Linux
 JCCC Virtual Labs Revision 9/21/2017 http://ats.web. Welcome to the JCCC Virtual Lab Environment. This system allows students to access campus software titles on their personal computers from almost anywhere.
How To Create and Post a Video in a Discussion
 elearning Training Material Golden Gate University How To Create and Post a Video in a Discussion Introduction Kaltura Video for Moodle allows students to: Upload videos to the course Discussion to share
Guide to creating a PowerPoint presentation with audio (Mac) and uploading to Moodle
 and uploading to Moodle") Guide to creating a PowerPoint presentation with audio (Mac) and uploading to Moodle This is a guide to creating an audio enhanced PowerPoint presentation using the Mac version. The PowerPoint programme
Guide to creating a PowerPoint presentation with audio (Mac) and uploading to Moodle This is a guide to creating an audio enhanced PowerPoint presentation using the Mac version. The PowerPoint programme
UICapture Training Windows. EXERCISE One - Windows Panopto Recorder: Login
 UICapture Training Windows Before You Begin 1. Make sure that you have a microphone connected to your machine before you start Panopto. 2. Open the folder on your computer s desktop called ICON Overview
Record with CaptureSpace Lite
 Record with CaptureSpace Lite 1. Open the downloaded Kaltura CaptureSpace Desktop Recorder application OR go to kaltura.uwec.edu, login, and select Add New on the top right. 2. Select CaptureSpace Lite
GETTING STARTED WITH YOUR VIDEO PROJECT
 TABLE OF CONTENTS Revised 9/2017 GETTING STARTED WITH YOUR VIDEO PROJECT - OVERVIEW OF THE FINAL CUT PRO X INTERFACE 2 - CREATING A PROJECT 3 - IMPORTING YOUR MEDIA FILES 5 - TRANSFERRING FOOTAGE FROM
For Windows Microsoft Corporation. All rights reserved.
 For Windows 1 About Skype for Business... 4 Skype for Business Window... 5 Audio... 6 Set up your audio device... 6 Make a call... 6 Answer a call... 7 Use audio call controls... 7 Check voicemail... 8
Blackboard Learn Kaltura Media
 Last Updated: 05/18/2017 Blackboard Learn Kaltura Media Kaltura CaptureSpace The Kaltura Building Block allows instructors to add powerful media tools to Blackboard, combing the best features of presentation
User Tutorial. Uploading Evidence: STARTALK LFO Conference Edition
 User Tutorial Uploading Evidence: STARTALK LFO Conference Edition 2 Student Tutorial: Uploading Evidence to STARTALK LinguaFolio Online Conference Edition This tutorial provides users with the information
Panopto Getting Started- Permissions and Access Using Panopto to Record or Upload Sharing Panopto Recordings Accessing Panopto from ilearn Tools
 Panopto Panopto is the Marist version of Youtube. It enables professors and students of Marist to record and upload recordings through the ilearn system and have more control over who has access to them.
How To: Panopto Tutorial for Faculty & Staff
 How To: Panopto Tutorial for Faculty & Staff Information Technology Help Desk Colorado Mesa University 8/22/2016 CMU Help Desk: 970-248-2111 or http://whd.coloradomesa.edu Page 0 Table of Contents What
How To: Panopto Tutorial for Students
 How To: Panopto Tutorial for Students Information Technology Help Desk Colorado Mesa University 10/20/2017 CMU Help Desk: 970-248-2111 or http://whd.coloradomesa.edu Page 0 Table of Contents Table of Contents...
Law Technology Team (LTT) Offices: OM Hours: 8:30am 5:30pm Panopto D2L Guide
 Offices: OM Hours: 8:30am 5:30pm Panopto D2L Guide") Panopto D2L Guide For additional training, please contact FITS@depaul.edu OR https://support.panopto.com Contents Adding Panopto to your D2L course... 2 Downloading and Installing Panopto Recorder... 3
Panopto D2L Guide For additional training, please contact FITS@depaul.edu OR https://support.panopto.com Contents Adding Panopto to your D2L course... 2 Downloading and Installing Panopto Recorder... 3
Essentials for Teaching Faculty
 Essentials for Teaching Faculty Table of Contents Panopto Access... 3 Panopto Recorder... 3 Recording... 3 Recording Options... 5 Capture PowerPoint Presentations... 5 Capture Primary Screen... 6 Capture
Panopto Help Guide for KUMC Users
 Panopto Help Guide for KUMC Users Table of Contents Obtaining the Panopto Applications... 3 PC/Mac Application... 3 Mobile Apps... 3 Recording with the PC Application... 5 Recording with the Mobile Apps...
Publishing with Adobe Presenter 10 (Detailed)
") Publishing with Adobe Presenter 10 (Detailed) Open PowerPoint Find PowerPoint and open it by clicking its icon. The PowerPoint icon may be found in one of the following locations: 1. Desktop 2. Start Menu
Publishing with Adobe Presenter 10 (Detailed) Open PowerPoint Find PowerPoint and open it by clicking its icon. The PowerPoint icon may be found in one of the following locations: 1. Desktop 2. Start Menu
PANOPTO: Using Panopto in Canvas (Faculty)
") PANOPTO: Using Panopto in Canvas (Faculty) Panopto is a service that allows you to record and store video and audio (podcast) recordings and link them to your Canvas courses. Panopto recordings and webcasts
PANOPTO: Using Panopto in Canvas (Faculty) Panopto is a service that allows you to record and store video and audio (podcast) recordings and link them to your Canvas courses. Panopto recordings and webcasts
Tech Day Camtasia. What is Camtasia Studio?
 Tech Day 2008 Camtasia What is Camtasia Studio? Camtasia Studio is a video-based screen capturing software program. It is analogous to using a video camera to record your screen. However, unlike using
NYSESLAT Speaking Audio Recorder Download/Upload Instructions
 New York State English As A Second Language Achievement Test NYSESLAT Speaking Audio Recorder Download/Upload Instructions Speaking Field Test 2018 Field test edition copyright 2018 by the New York State
How To: Panopto Tutorial for Faculty & Staff
 How To: Panopto Tutorial for Faculty & Staff Information Technology Help Desk Colorado Mesa University 8/22/2016 CMU Help Desk: 970-248-2111 or http://whd.coloradomesa.edu Page 0 Table of Contents What
Additional documentation is available via the Zoom online knowledge base:
 Guide to Using Zoom Additional documentation is available via the Zoom online knowledge base: https://support.zoom.us/home. Creating a Zoom Meeting What You Need To Create a Meeting A zoom account. You
USING PANOPTO ON A WINDOWS MACHINE
 USING PANOPTO ON A WINDOWS MACHINE Recording and posting a Panopto video on Blackboard requires the following steps: STEP 1: Connecting Panopto to Your Blackboard Course STEP 2: Installing Panopto Recorder
Getting Started with Panopto (Windows and OSX)
") Table of Contents Setting up Panopto in Blackboard... 2 Setting up Panopto... 6 For Windows... 8 For OSX:... 11 Removing Panopto RSS Feeds in Blackboard... 14 Creating Placeholders for Future Lectures...
Table of Contents Setting up Panopto in Blackboard... 2 Setting up Panopto... 6 For Windows... 8 For OSX:... 11 Removing Panopto RSS Feeds in Blackboard... 14 Creating Placeholders for Future Lectures...
Creating a Recording Using Panopto
 Creating a Recording Using Panopto Table of Contents Accessing Panopto... 2 Panopto Recording Screen... 3 Recording a PowerPoint Presentation... 3 Recording Your Desktop... 4 Manage Recordings... 5 Viewing/Managing
The Sales Rep s Guide to Using Drive
 The Sales Rep s Guide to Using Drive Table of Contents Activate Drive 2 Add Media 2 Copy from Library 2 Record Media 3 Upload File 3 Send Videos 3 Edit Metadata 4 Edit Chapters & Slide Timings 4 Add/Edit
Adobe Connect: Overview
 Adobe Connect: Overview Table of Contents Table of Contents... 1 Overview of Adobe Connect... 2 Recommended Use... 2 Roles and Privileges... 2 Menu Bar... 3 Prepare Room and Upload Content... 4 Create
Working with Screencast-O-Matic (SOM)
") Working with Screencast-O-Matic (SOM) Screencast-O-Matic (SOM) is a fast and easy browser-based screen capture and editing program used to create and share screen recordings. PREPARATIONS There are a few
Working with Screencast-O-Matic (SOM) Screencast-O-Matic (SOM) is a fast and easy browser-based screen capture and editing program used to create and share screen recordings. PREPARATIONS There are a few
Voyant Connect User Guide
 Voyant Connect User Guide WELCOME TO VOYANT CONNECT 3 INSTALLING VOYANT CONNECT 3 MAC INSTALLATION 3 WINDOWS INSTALLATION 4 LOGGING IN 4 WINDOWS FIRST LOGIN 6 MAKING YOUR CLIENT USEFUL 6 ADDING CONTACTS
Getting Started with Ensemble
 Getting Started with Ensemble Ensemble Video is an in-house video server like YouTube and was designed for publishing and sharing large media files, such as audio and video files. It can be used to share
Creating Interactive Video with Camtasia
 Creating Interactive Video with Camtasia Audio SCORM Quizzes PowerPoint and Screen Shots v1.2: 2009 Page 1 Camtasia Studio 6.0.2 http://www.techsmith.com/camtasia.asp (free trial download) Table of Contents
Collaborate Ultra. Presenter Guide for D2L Brightspace. University Information Technology Services
 Collaborate Ultra Presenter Guide for D2L Brightspace University Information Technology Services Learning Technologies, Training & Audiovisual Outreach Copyright 2017 KSU Division of University Information
UNIFIED MEETING 5 DOWNLOAD AND SETUP
 UNIFIED MEETING 5 M A C U S E R G U I D E Unified Meeting 5, our meeting and collaboration application enhances the way you communicate by making meetings convenient and easy to manage. It improves your
SECTION 1 - File Conversion (RECOMMENDED METHOD)
") INSERTING YOUTUBE VIDEOS ON WEBSITE This is the desired method of inserting a YouTube Video. Students are able to access it from their school account. If you are inserting the video for use from your teacher
INSERTING YOUTUBE VIDEOS ON WEBSITE This is the desired method of inserting a YouTube Video. Students are able to access it from their school account. If you are inserting the video for use from your teacher
Getting View Client File
 Getting View Client File 1. Launch Internet Explorer 2. At address bar enter this URL https://viewvdi.tp.edu.sg/ and press [Enter]. 3. Please click on More information and click on Go on to the webpage
VoiceThread Training
 VoiceThread Training Contents Introduction... 2 Objectives... 2 Connecting to VoiceThread Initially... 2 Creating a VoiceThread Presentation... 4 Accessing Existing VoiceThread Presentations... 5 Sharing
Student Tutorial. Uploading Evidence
 Student Tutorial Uploading Evidence Student Tutorial: Uploading Evidence to LinguaFolio Online 2 This tutorial provides students with the information they need to upload evidence on LinguaFolio Online.
Updated 8/31/2018 with new recorder. Developed by Ken Silvestri, CFE Instructional Designer
 Updated 8/31/2018 with new recorder Developed by Ken Silvestri, CFE Instructional Designer INTRODUCTION TO TECHSMITH RELAY Techsmith Relay is a lecture capture tool that records what appears on a designated
Kaltura App Things to Remember... 3 Downloading the App My Media... 4
 Table of Contents Kaltura App... 3 Things to Remember... 3 Downloading the App... 3 My Media... 4 To access My Media from the MediaSpace mobile app... 4 Actions List... 6 To publish a video... 7 To delete
ClassHub for Teachers. A User Guide for the Classroom
 ClassHub for Teachers A User Guide for the Classroom Table of Contents CLASSHUB TEACHER... My Class Settings... Class List... Using Views and Screen Peek... Actions... MIRRORING... Mirroring Actions...
umapps Using umapps 6/14/2017 Brought to you by: umtech & The Center for Teaching & Learning
 umapps Using umapps Center for Teaching and Learning (CTL) 100 Administration Bldg., Memphis, TN 38152 Phone: 901.678.8888 Email: itstrainers@memphis.edu Center for Teaching and Learning Website 6/14/2017
Teaching and Learning Applications. PCAP - Creating Screencasts and Welcome Videos
 The following document provides an overview of the Echo360 Personal Capture software (PCAP) a major component of the ilecture system. Did you know that PCAP allows you to pause your recordings for those
UICapture Windows Training Session. EXERCISE ONE - Windows Panopto Recorder: Login
 UICapture Windows Training Session Today s Session 1. UICapture Overview (PowerPoint) 2. Exercise (Hands On) 3. Individual Work Time Before You Begin 1. (For individuals working on their own) If you do
UICapture Macintosh Training Session
 UICapture Macintosh Training Session Today s Session 1. UICapture Overview (PowerPoint) 2. Exercise (Hands On) 3. Individual Work Time Before You Begin 1. (For individuals working on their own) If you
Login to Blackboard on the Development System. STEP 1: Connect Blackboard to Echo 360 Lecture Capture
 Login to Blackboard on the Development System Log into our DEV system at https://fsulearndev.ferris.edu/ with your MyFSU username and password. You should have courses there. If you have trouble with your
Getting Started with Adobe Connect
 Contents Getting Started with Adobe Connect... 2 Starting a Meeting with Adobe Connect... 5 How to Record Your Adobe Connect Session... 12 Additional Adobe Connect Resources... 16 Adobe Connect Mobile
WIC Seminar Room Guide for Instructors & Group Leaders. Contents. Contact Information
 WIC Seminar Room Guide for Instructors & Group Leaders Contents Contact Information... 1 WIC Seminar Room Reservations... 2 Seminar Room Layout... 2 Brief Overview... 2 Facilities... 2 Equipment... 3 Computers...
Using Adobe Acrobat College. How to Host a Meeting - User s Guide
 Note: For the purpose of consistency between the Hunter College written and web documentation and the Adobe Connect pro Software terminology, we will use meeting to represent a virtual class session, host
Canvas Conferencing Tool
 Canvas Conferencing Tool Contents Web Conferencing in Canvas... 2 Invite Course Members... 4 Select Individual Members... 4 Starting a Conference... 5 Conference Layout... 5 View Conference Tools... 6
QUICK GUIDE. Classroom Technology. Start. Locate the Touch Panel on the lectern (If the screen is black, firmly touch the screen to activate)
") Classroom Technology QUICK GUIDE 1 Start Locate the Touch Panel on the lectern (If the screen is black, firmly touch the screen to activate) Select a Source Select the source that you would like to display
Classroom Technology QUICK GUIDE 1 Start Locate the Touch Panel on the lectern (If the screen is black, firmly touch the screen to activate) Select a Source Select the source that you would like to display
HPE MyRoom Audio / Video Quick Reference Guide
 HPE MyRoom Audio / Video Quick Reference Guide Toolbar Click Call button icon on right side of toolbar Contact clicks Accept Call Chat room Call button is replaced with Microphone, Speaker, and Web Camera
PowerPoint 2016 Advanced for Mac
 1 PowerPoint 2016 Advanced for Mac PowerPoint 2016 Advanced Training Objective To learn advanced features of PowerPoint 2016 in order tom create more elaborate presentations. What you can expect to learn
Creating narrated presentations using Slideboom (for Mac Office 2011) and embedding it to D2L s (10.3) Content area
 and embedding it to D2L s (10.3) Content area") Creating narrated presentations using Slideboom (for Mac Office 2011) and embedding it to D2L s (10.3) Content area SlideBoom creates narrated presentations which can be viewed in Desire2Learn. Slideboom
Creating narrated presentations using Slideboom (for Mac Office 2011) and embedding it to D2L s (10.3) Content area SlideBoom creates narrated presentations which can be viewed in Desire2Learn. Slideboom
Mediasite Desktop Recorder (MDR)
") Mediasite Desktop Recorder (MDR) Install Mediasite Desktop Recorder You will download Mediasite Desktop Recorder (MDR) from My Mediasite https://mediasite.ecu.edu/ms/mymediasite and install it on your
Mediasite Desktop Recorder (MDR) Install Mediasite Desktop Recorder You will download Mediasite Desktop Recorder (MDR) from My Mediasite https://mediasite.ecu.edu/ms/mymediasite and install it on your
Podcast: Recording, Editing and Sharing
 Podcast: Recording, Editing and Sharing Eamonn Fitzgerald & Kris Harte, Educational Technology, ITD. Session Outline 1. Introduction 2. Recording Considerations 3. Review 1. Introduction Pedagogical Rationale
eclicker Host 2 Product Overview For additional information and help:
 eclicker Host 2 Product Overview For additional information and help: support@eclicker.com Compatible with the iphone, ipod touch, and ipad running ios 5.0+. Apple, the Apple logo, iphone, and ipod touch
Useful Google Apps for Teaching and Learning
 Useful Google Apps for Teaching and Learning Centre for Development of Teaching and Learning (CDTL) National University of Singapore email: edtech@groups.nus.edu.sg Table of Contents About the Workshop...
QUICK GUIDE. Classroom Technology. Start. Locate the Touch Panel on the lectern (If the screen is black, firmly touch the screen to activate)
") Classroom Technology QUICK GUIDE 1 Start Locate the Touch Panel on the lectern (If the screen is black, firmly touch the screen to activate) Select a Source Select the source that you would like to display
Classroom Technology QUICK GUIDE 1 Start Locate the Touch Panel on the lectern (If the screen is black, firmly touch the screen to activate) Select a Source Select the source that you would like to display
Recording Candidate Presentations
 1 Recording Candidate Presentations 1. In the History Center (SO 5074), open Firefox on the computer. Log on to http://mediaspace.kennesaw.edu using your KSU netid and password by clicking the Guest button
PANOPTO: WEB MANAGEMENT INTERFACE
 Panopto's Web Management Interface offer's instructors the ability to manage and edit the recordings captured and uploaded using the Panopto desktop recorder. Access the Web Management Interface at http://panopto.nvcc.edu.
BYU-Idaho Online Knowledgebase
 STUDENT GUIDES Table of Contents Introduction...4 I-Learn Introduction (Video)...5 A Successful Start in Pathway (Video)...6 Student Communication...7 How Do I Set My Time Zone?...8 How Do I Exclude Some
Convert VHS to Digital or DVD using Roxio Video Capture
 Convert VHS to Digital or DVD using Roxio Video Capture 1. Plug in USB to VHS Convert. in the patch panel. 2. On the computer, click the Roxio Video Capture icon This window will appear: 3. Press the Power
UV_Connect. Start Guide for Participants.
 1. Navigate to URL_http://agora.uv.es/loquesea in your favorite web browser. (default url: http://agora.uv.es/pruebas) 2. Log in with your Adobe Connect username and password. If you don t know your password,
CommPortal Communicator Desktop End User Guide 19 Feb 2014
 End User Guide 19 Feb 2014 Integra Hosted Voice Service PC Communicator Desktop End User Guide 19 Feb 2014 21 Feb 20134 End User Guide Contents 1 Introduction... 1-1 1.1 Using this End User Guide... 1-2
USING REFLECTOR 2, REFLECTOR DIRECTOR AND REFLECTOR STUDENT IN THE CLASSROOM
 R R USING REFLECTOR 2, REFLECTOR DIRECTOR AND REFLECTOR STUDENT IN THE CLASSROOM ABOUT THIS GUIDE This guide explains several important components of Reflector 2 in the classroom, including: Accessing