MIDISynth-Circuit User Guide
|
|
|
- Oswin Barnett
- 5 years ago
- Views:
Transcription

1 MIDISynth-Circuit User Guide
2 Table of Contents 1 Overview Requirements Limitations Installation License File Setup MIDI Device MIDI Port Controller MIDI Port Rescan Show All MIDI MIDI In MIDI Dirty MIDI Thru General Double Click Action Skin Performance Automation Show Vals Show Val Show Envelope Track PC Write Global (VST/AU only) Ignore Session Patch Show Multi Macro/Mod OSC Enable OSC OSC Lemur Tablet IP Address Lemur Port OSC Receive Port Connection Status Storage Load Save... 9
3 2.4.3 Auto-Save Operation Main Controls Synth 1 & Single Macro/Mod Session Macro Mod V-Macros Perform Sub Controls XY Controls Custom Parameter Assign Randomise Morph Patch Management Load/Save Single Sysex Load/Save Sysex Bank Load/Save Sysex Folder Load/Save Bank Store Store To Init Fetch Upload Name/Genre/Category Patch Audition Host Control Selecting Patches from Host Selecting Session Setup from Host Performance Control Automation None Target Perform Automation and Ableton Live Happy Accidents... 28
4 5.3.3 Default Map Standalone Editor Lemur Script Troubleshooting... 32

5 1 Overview MIDISynth-Circuit is a VST/AU for Windows and OSX that allows you complete control of your Novation Circuit from inside your favourite DAW, or as a standalone application. As well as providing detailed control of both synth engines, session, and drums, the editor can be used for storing and retrieving patches/patch banks and for performance via a supplied Lemur template. 1.1 Requirements Windows 7+ OSX Circuit firmware 1.4 or later Novation Windows Driver for Windows - See section 8. Connection to Circuit via USB Screen supporting resolution of 1500x550 (zoom available for VST and standalone) 1.2 Limitations It is not currently possible to zoom the AU version this will be released in a future update. 1.3 Installation Click on the installer and follow the instructions License File The first time you run the editor you will be asked to provide the location of your license file. Use the search dialog to locate the file and restart the editor to finalise installation.

6 2 Setup Click on the FULL button to bring up setup options in the lower portion of the editor. 2.1 MIDI Device MIDI Port The MIDI port of the Circuit is auto-selected if detected at startup. If you are lucky enough to have more than one Circuit then use this to select a different MIDI port Controller MIDI Port The controller MIDI port can be used to select a MIDI device that can be used for controlling the V- Macro controls (see 3.1.6) and the custom controls (see 3.2.2). Additionally, all MIDI from this port will be routed through to Circuit so you can route an external keyboard or controller to Circuit Rescan Rescan connected MIDI devices Show All MIDI Enable this option to show all MIDI ports on the computer MIDI In Enabling this option will processing incoming MIDI data from the controller and update the GUI appropriately (turning the knobs on Circuit or automation data). Depending on the state of the MIDI Sets Dirty flag, this will also set the edit buffer as dirty MIDI Dirty Enabling this option will cause incoming MIDI (turning the knobs on Circuit or automation data) to mark the current edit buffer as dirty and flag that the user needs to save it when moving away from the patch.
7 2.1.7 MIDI Thru Select this to process note in information from the DAW this should be selected when a host sequencer (e.g. Live) is being used to send MIDI note information rather than using the Circuit onboard sequencer. 2.2 General Double Click Action Determines what happens when a control is double-clicked: Off: No action Zero/Centre: Control is set to 0 or centred if it is bipolar Default: Control is set to the Novation default Patch: Control is set to the value when the patch was loaded Skin Change the look of the App Performance Automation Selection mode of operation for the performance controls (None, Target. Perform) see section Show Vals Enabling this option will show the current value underneath each control. The user can click on this to manually enter a value Show Val Enabling this option will show the value of the currently moving control in the top left hand corner of the screen Show Envelope Enabling this option will show a graphical representation of envelopes in the appropriate panels Track PC Determines whether the synth editor should follow program change (patch selection) on Circuit Write Global (VST/AU only) If enabled, changes to patches made with the STORE button will also be written to the global patch file (shared with the standalone program). Note: If this is not enabled then changes to patches in the VST/AU will only be saved with your project set.


8 2.2.9 Ignore Session Patch Does not load patch content or drum patch specified in sessions Show Multi Macro/Mod Enable this to show a bank of macros and mods on the main window. 2.3 OSC OSC configuration is only required if you intend to use the provided Lemur template or if you wish to use the OSC connection to provide other remote control Enable OSC Enable/disable OSC processing OSC Toggle showing of the OSC parameters Lemur Tablet IP Address The IP address of the table that you wish to connect to. If you are not sure what this is you can find it by going into the More Settings section on Lemur Lemur Port This should generally be left at If you re sending OSC to some other device that uses a different port, you can select that here.
9 2.3.5 OSC Receive Port The port on which to receive OSC. This can also be configured on the tablet under More Settings, along with your computer s IP address Connection Status There is an indicator in the top right corner of the Lemur template which will turn green when an incoming signal is received, indicating that the Lemur IP Address and port are setup correctly. There is an indicator to the right of the OSC Receive Port entry box that will flash green upon receiving data from Lemur, and additionally once per second to indicate that the port is correctly setup on Lemur. 2.4 Storage Load This will load a state previously stored with the SAVE button Save When saving, the following information is stored: Setup data Patch data Extended patch data Session data XY control assignments (global) Performance control data Custom parameter assignments Colour assignments Please note all state is automatically saved with the host data when running VST/AU, so LOAD/SAVE are convenience functions rather than necessities Auto-Save When running standalone auto-save actions are performed under the following conditions: (this auto-save will automatically be loaded the next time the editor starts up) Setup options are updated A patch is saved A session is saved Performance controls are updated, including setting range XY controls are updated, including setting range Colours are changed

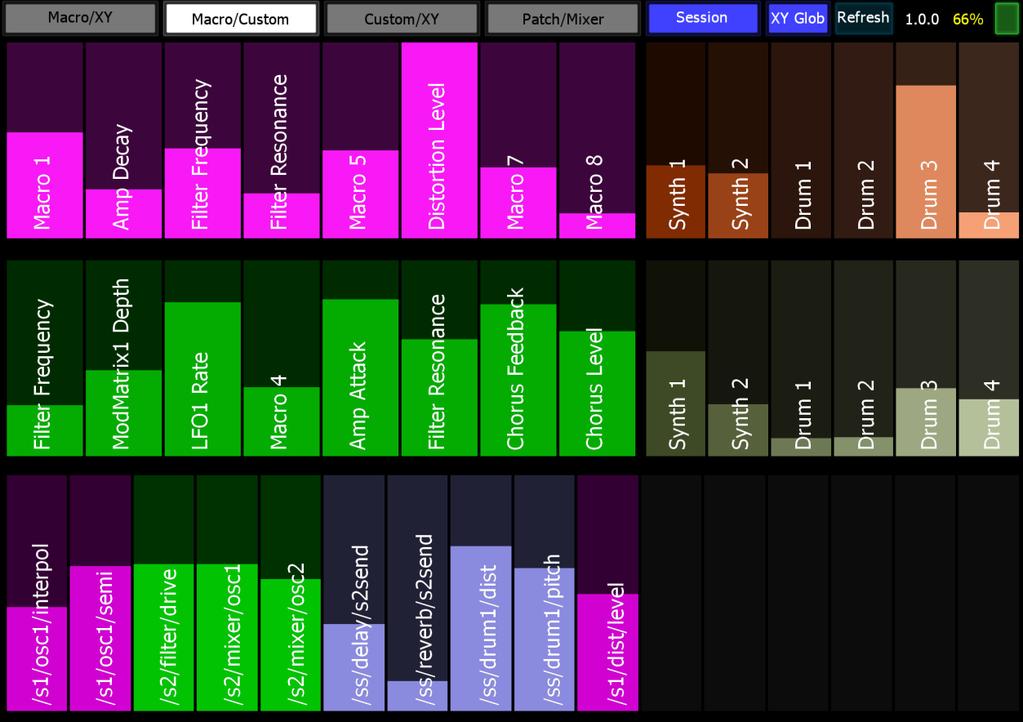
10 3 Operation 3.1 Main Controls The top portion of the screen is filled with the main synth controls, covering Synth 1, Synth 2, and Session. Both sets of synth engine controls are completely independent and have no influence over each other. Which controls are currently in view can be controlled by the selector down the left-hand side. When Synth 1 or Synth 2 is selected, it is possible to switch the view between synth controls, macro controls, and mod assignments Synth 1 & 2 Holding SHIFT whilst moving a control will allow for fine grained control. Holding down SHIFT and selecting SYNTH1 or SYNTH2 will bring up a colour selection allowing the colour of the synth controls to be changed.


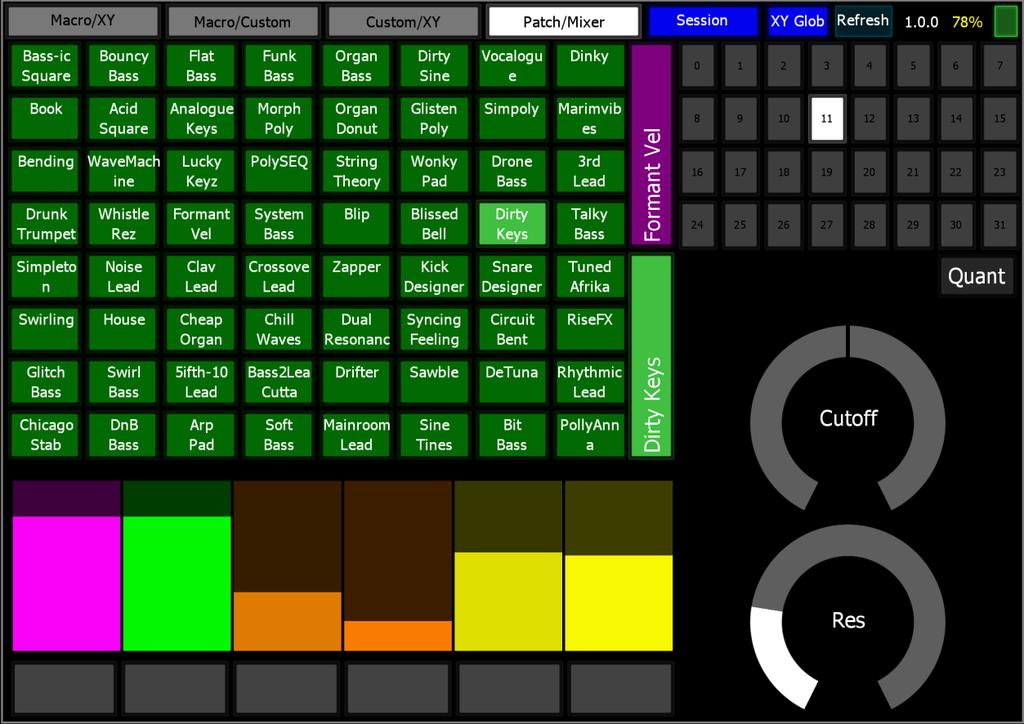
11 Sections that have been edited (i.e. are different from the current loaded patch), will be marked with an * Section Controls Each section can be individually copied to a copy buffer via the COPY button and pasted to a different patch using the PASTE button. Toggling the A/B switch will toggle between your current (edited) settings and those of the patch when it was loaded. Note: When A/B is enabled (i.e. using the loaded patch settings rather than the edited settings), the COPY and SAVE buttons will operate on the patch settings, not the edited settings Section Presets Up to 10 presets can be saved and recalled for use in other patches think of this as a favourites menu. Pressing SAVE will bring up a menu showing any existing entries. Choose an existing entry to overwrite or an empty slot to create a new preset. Clicking on an empty slot, or SHIFT-clicking on an existing slot will allow you to name the preset. CMD/CTRL-clicking on an existing slot will delete the preset.


12 Section Headers Each section header responds to a number of key combinations to perform actions on that section: SHIFT Randomise the section using the current randomisation settings (see section 3.2.3). CMD/CTRL Initialise the section to default values SHIFT + CMD/CTRL Reset the section to the values when the patch was loaded Single Macro/Mod A single macro or mod panel can be shown on the main screen by using the MACRO and MOD buttons on the mixer section Session Whilst it is not possible to get session state or upload session state to Circuit, 32 presets are provided to allow you to store different session setups. These can be sent to Circuit at any time via the use of Program Change messages (see section 4.2).
. 3.1.3.1 Store Store the current edit buffer at the currently selected slot.")
13 Session banks can be loaded/saved independently of the rest of the editor state by using the LOAD BANK/SAVE BANK buttons. If you wish to save the sessions as part of an overall setup, then use the LOAD/SAVE buttons in the setup section (see 2.4) Store Store the current edit buffer at the currently selected slot. SHIFT-click to rename the session Store To Pressing STORE TO will allow a different patch slot to be selected and the current edit buffer will be stored to that slot. SHIFT-click to rename the session Init Init will initialise the edit buffer to a clean state (default parameter assignments as defined by Novation). This will not store the patch in a slot unless the STORE button is pressed. Holding SHIFT and pressing INIT will initialise all 32 slots in the editor. NOTE: This will overwrite all patches currently loaded in the editor Session Patches In much the same way that patches can be associated with sessions on Circuit, it is possible to assign patches to the session settings so they can be made when loading a session. Two modes are supported: Patch - The patch contents are stored with the session when they are assigned. These are a complete copy of the patch and will not be affected by any changes later made to that patch in the editor. Prog Loads the specified patch currently stored on Circuit (not in the editor) Patch loading for synths and drums can be skipped when changing sessions by holding down SHIFT when making the selection Macro

, and the start, end and depth of each parameter can be controlled.")
14 Hold SHIFT and press PASTE to paste the currently copied macro to all 64 patches Naming Macros can be named for display on Lemur. If only a single destination is provided for a macro, it will automatically be named to that destination. In all other circumstances, it will be set to Macro n Mod V-Macros Up to 8 virtual macros can be defined per patch. Each virtual macro can be set to control up to 4 parameters on Circuit (selected via buttons A-D), and the start, end and depth of each parameter can be controlled. The virtual macros operate like the built-in circuit macros with two differences: 1) Any control on Circuit can be used as a destination 2) V-Macros only operate whilst the editor is running Using the LEARN button, each V-Macro can be MIDI learnt to a controller assigned to the Controller MIDI port (see 2.1.2). Engage learn and then move the control on your MIDI controller to assign. SHIFT-click LEARN to remove the assignment.

15 3.1.7 Perform Perform mode is primarily designed for touch screen users but can be used by anyone wishing to provide a simple view for performance control of the Circuit rather than patch editing and management. This mode consists of: Access to all 16 macros Access to 16 user-defined control mappings Access to 8 V-Macro controls Access to 4 user-defined XY controls Access to Session morphing Custom control morphing Mixer and Delay/Reverb sends Snapshot and Autoreset functions Patch & session loading


16 Zooming Performance Controls Pressing the SELECT button will allow you to select which controls are on display. If no controls are highlighted then all controls are displayed. Pressing SELECT again will display the controls you have selected Setting Range of Performance Controls Pressing the RANGE button will superimpose range sliders on the mapped custom and XY controls allowing you to set the minimum and maximum %age value of the control Morphing Enabling the MORPH button will add two morph sliders to the display the left slider will morph between two custom parameter banks (see section ) and the right slider will morph between two specified session presets.

17 Pressing the EXCLUDE button under the left morph control will change the SELECT buttons under the custom sliders into EXCLUDE buttons. It is then possible to define custom controls that are excluded from the morph operation Custom Banks Up to 16 banks of custom parameter values can be stored and retrieved. It is also possible to morph between two banks. Press the BANKS button to bring up the controls for storing banks which operate in a similar way to other banking controls Selecting Main View It is possible to rotate through three view modes for the Performance Mode, accessible from the top control button: All: Shows all sliders and XY controls Slider: Shows all sliders XY: Shows XY controls Selecting Slider View XY Controls Pressing the XY GLOBAL button will toggle between viewing the global XY controls and those that have been assigned to a patch. It is possible to select which patch controls are used for the XY controls via the selection button underneath Mixer Pressing the MIXER button will switch to mixer view. From here you can control the level, pan, delay, reverb and mute for each channel, the master filter/resonance, and whether FX is enabled or disabled. Mutes operate as the do for the rest of performance mode and are documented in section Snap(shot) Engaging snapshot using the SNAP button will take a snapshot of the current performance controls: macros, custom controls, XY controls, channel levels, delay sends, reverb sends, mute states, master filter. You are then free to change any of these controls and have them all reset back to their value when you engaged snapshot by another press of the button.
18 Auto(reset) Engaging Autoreset via the AUTO button will reset each supported control (macros, custom controls, XY controls) to a specified value when the control is released. The reset value for each control can be set by SHIFT clicking the control for macros and custom controls, and SHIFT-CMD/CTRL clicking on the XY for XY controls. Touch-screen users: The reset values are set with a long-press of the AUTO button. Any controls being operated at this point will have their values updated Mutes The six buttons across the top can be used to mute each channel on Circuit. When muting the appropriate button will flash red. Please note this is a soft mute is it s not possible to directly control the mutes. Instead, the channel volume is set to 0 for mute and then reset to its current level when unmuted. Due to technical limitations, it is not possible to get the current volume levels from Circuit so there are defaulted to 100 at startup. These values are updated under the following circumstances: Changing the level sliders in the Session page Loading an editor Session Moving the controls on Circuit Note: changing any volume level either in the editor or in performance mode will disable the mute Patch & Session Selection Synth patches can be loaded by SHIFT clicking the SYNTH 1 and SYNTH 2 buttons. Sessions can be loaded by clicking the SESSION button. When loading a session, holding down the SHIFT key will skip the loading of the synth patches and drum patches that are associated with that session. Touch-screen users: To load synth patches hold down the SELECT button and then press SYNTH 1 or SYNTH Sub Controls Click on the FULL button to bring up setup options. Which sub-controls are currently in view can be controlled by the selector down the left-hand side

19 3.2.1 XY Controls Four XY controls are provided for easy control of multiple parameters at the same time. The XY controls are freely assignable to any parameter of the synth and aren t restricted to controlling the same synth section, e.g. one axis can control a Synth 1 parameter whilst the other access can control a Session parameter. Clicking the Map button will highlight the parameter controls and these can then be assigned by clicking on the appropriate control. Its name will then appear in the XY control to show it has been assigned. The XY controls will only operate when two controls have been assigned. To remap a control simply hit the Map button and select another control. To unmap a control, hold SHIFT and press the appropriate Map button. Holding down SHIFT when moving the XY will fix the control at horizontal movement only and holding down CMD/CTRL will fix it at vertical. To invert the output value for an axis, hold CTRL/CMD and click on the Map button. To pick a random destination for the axis, hold SHIFT & CTRL/CMD and click on the Map button. To copy a set of XY controls from patch to patch or to/from the global settings click on the COPY button to the left of the XY controls. Then select the destination and press PASTE. See section 5 for details of how these controls operate with respect to host automation Global XY Controls It is possible to store a set of XY definitions for each patch as some controls may be more appropriate for certain patches compared to others. It is also possible to defined a set of global XY controls that are always available. To enter global XY control mode, click on the XY button whilst already in XY sub-mode. The button will change colour and you can now define a set of global XY controls. Pressing the button allows easily toggling between the two modes.

20 3.2.2 Custom Parameter Assign 16 parameters can be freely assigned to any parameter on the synth and these will then be available on the Lemur template or via other OSC interfaces. Mapping is similar for the XY controls hit the Map button underneath a slider to enter map mode and then select the destination control. CMD/CTRL clicking the button will toggle the operation between normal and inverted. Remapping and unmapping follow the same process as for the XY controls. Using the LEARN button, each custom assignment can be MIDI learnt to a controller assigned to the Controller MIDI port (see 2.1.2). Engage learn and then move the control on your MIDI controller to assign. SHIFT-click LEARN to remove the assignment. See section 5 for details of how these controls operate with respect to host automation Randomise Three randomisation algorithms are provided for discovering new sounds. Several parameters are provided for each randomisation mode to tailor how mild or extreme the randomisation is, and sections or individual parameters can be excluded to further increase control Common Controls These controls are available in all random modes. Dials Only enabling this will disable all dropdowns from randomisation Exclude Allows individual controls to be excluded from the randomisation Random Randomise with the current settings The button matrix can be used to provide high level exclusion of sections of the synth Absolute An absolute value will be set for the parameter between its min and max value. Range this determines the max upper value a random value will be chosen between 0 and this %age of its max value Affinity whether the value tends to favour min (-ve) or max(+ve) values.

21 Relative This randomiser will generate random values based on the current values in the synth. Range the maximum movement as a %age of range (i.e. max min values) that the value can move Noise how often (%age) the range is ignored to pick a random value. Negative values still obey the max of 50% of range, positive values set the range to be 100% Clip affects behaviour when the new value would be outside of the min/max range. When clipping is on, they are fixed to min/max values. When disabled, they will bounce back from the min/max difference by the appropriate amount. Direction sets direction of value change to down, up, or both Patch The new value will be picked between min and max values when the minimum is taken from the first patch specific and the maximum is taken from the second. Patch Select 1 the first patch number to use Affinity whether the value tends to favour patch 1 (-ve) or patch 2 (+ve) Patch Select 2 the second patch number to use Noise how often (%age) the affinity is ignored to pick a completely random value. Negative values still obey the bounds of min/max from patch 1 and 2, positive values will pick a value from min to max of the parameter Exclude Pressing the EXCLUDE button will enter exclude mode where each control or section be individually excluded from the randomisation. Controls highlighted in blue are included. To toggle the inclusion/exclusion of a control, simply click on it.
22 3.2.4 Morph It is possible to morph between 2 patches using the controls provided. Noise How often (%age) the min/max values of the patches are ignored to pick a random value. Negative values still obey the bounds of min/max from patch 1 and 2, positive values will pick a value from min to max of the parameter. Patch Select 1 the first patch number to use Morph bar Left is fully patch 1, right is fully patch 2 in-between is where the magic can happen Patch Select 2 the second patch number to use Dials Only enabling this will disable all dropdowns from morphing Exclude Allows individual controls to be excluded from the morph (see section )

23 3.3 Patch Management Patch management is available either in reduced form along the top of the screen, or in a more complete form when in FULL mode Load/Save Single Sysex Load/save a single sysex patch that is compatible with Novation Components and other versions of Circuit editor Load/Save Sysex Bank Load/save the entire patch bank that is compatible with Novation Components and other versions of Circuit editor Load/Save Sysex Folder When saving each patch is saves as a separate sysex file in the standard format to facilitate more granular patch management. When loading a folder can be specified with any number (up to 64) patches in it. Each patch will be loaded to the patch slot indicated in the filename of the patch Load/Save Bank Saving in this format will save additional information that cannot be stored in the Circuit sysex patches. This information consists of: XY control assignments (patch) Macro names These buttons will load/save the patch state independently of the rest of the editor state. If you wish to save the sessions as part of an overall setup, then use the LOAD/SAVE buttons in the setup section (see 2.4) Store Store the current edit buffer at the currently selected slot. The button will turn red when there are un-stored changes. SHIFT-click to rename the patch.
24 3.3.6 Store To Pressing STORE TO will allow a different patch slot to be selected and the current edit buffer will be stored to that slot. SHIFT-click to rename the patch Init Init will initialise the edit buffer to a clean state (default parameter assignments as defined by Novation). This will not store the patch in a slot unless the STORE button is pressed. Holding SHIFT and pressing INIT will initialise all 64 slots in the editor. NOTE: This will overwrite all patches currently loaded in the editor Fetch Fetch will fetch the current patch contents of the selected synth and update the edit buffer. This will not store the patch in a slot unless the STORE button is pressed. Holding SHIFT and pressing FETCH will fetch all 64 patches from circuit and update the patch slots in the editor. NOTE: This will overwrite all patches currently loaded in the editor Upload Allows patches to be uploaded to the Circuit for off-line access, and uploads the current editor buffer as it stands. You can select which patch slot to upload to on the Circuit by the dropdown selector underneath. Holding SHIFT and pressing UPLOAD will upload all 64 patches to the Circuit. NOTE: This will overwrite all patches currently on Circuit Name/Genre/Category The genre and category can be set via the dropdowns available along the top of the screen.

25 3.4 Patch Audition Patch Audition provides a convenient way to audition patches from your hard drive and build them into banks for uploading to Circuit. Using the browser on the left you can navigate to locations on your system where Circuit patches are stored. Selecting a patch will load it into the edit buffer on Circuit so it can be auditioned immediately. Use the >> button to transfer the patch to the highlighted slot on the right of the screen. The patch will be replaced with the new patch. Patches on the right can be dragged from one position to another to swap the two patches around for easy patch bank organisation. Additionally, selecting any patch on the right will upload the patch to the edit buffer on Circuit so it can be auditioned.
26 4 Host Control If MIDI THRU is enabled in setup then the following information is sent from the host to Circuit: Note information CC (controller) information Program Change information 4.1 Selecting Patches from Host It is possible to select the current patch playing on Synth 1 or Synth 2 from those loaded into the editor. To do this, send a Program Change message for Bank 1 (normal program changes messages to switch patches on circuit are Bank 0 depending on how your host numbers these banks you may need to select bank 1 or bank 2) on MIDI channels 1 or 2 with a program of 0-63 (or 1-64) for the patch to be loaded. 4.2 Selecting Session Setup from Host It is possible to select the current session setup from those loaded into the editor. Please note this is different to loading actual sessions on Circuit and merely a way to send a defined session setup in the editor to Circuit. To do this, send a Program Change message for Bank 1 (normal program changes messages to switch patches on circuit are Bank 0 depending on how your host numbers these banks you may need to select bank 1 or bank 2) on MIDI channel 16 with a program of 0-31 (or 1-32) for the session settings to be loaded.
27 5 Performance Control Automation The performance controls are a collective name for the 4 XY controllers and the 16 freely assignable controls. When it comes to automation of these parameters three different modes are available which can be chosen in the setup section. 5.1 None In this mode neither the operation of the performance control or the target control is added to the host automation. Any existing automation for these controls will not be processed. 5.2 Target When in this mode, automation is recorded for the target parameter, i.e. the control that is at the end of the XY/custom control. Any existing automation will playback as normal. This is the default mode and recommended for hosts that support all VST parameters. 5.3 Perform In this mode automation is recorded for the performance control itself and not for the target parameter. Existing automation will be played back for these controls which will then control the target parameters. The main purpose of this mode is to provide flexibility in Ableton Live Automation and Ableton Live Ableton Live only allows 128 parameters of a VST to be visible in Live at any time. The Circuit editor has over 700, meaning that you need to choose a set of parameters to automate. Please note this does not mean you cannot control all parameters from the UI or assign MIDI controllers to them, it just means that you cannot automate more than 128 parameters. Whilst you can create a new mapping for each project or create your own default device mapping for the VST, neither of these offers an ideal solution, especially to adding a new parameter to automate on the fly. Allowing you to automate the performance controls gives you up to 24 easily configurable parameters per project. Just make sure that the 24 performance controls are in your set of 128 parameters available in Live and you re ready to go assign the other 104 to your most commonly used controls and you have the best of both worlds.
28 5.3.2 Happy Accidents The bonus of this mode is that you can easily change the target of automation and keep all the recorded data. Want to see how your filter sweep sounds when controlling filter distortion instead? Or how does the decay automation you ve set up sound when controlling the LFO rate instead? Default Map With the 128 limit in mind, the parameters that will appear by default when you drop the plugin in are geared towards performance. You can change these my creating your own default if you wish ( but when using Live it is advised to keep the 24 performance controls somewhere in the map so you can take advantage of the dynamic assignment. Section Controls Number Notes Performance Custom Controls 16 Performance XY 8 Session Drum 20 Session Reverb 2 Decay, Damp Session Delay 2 Time, Feedback Session SideChain 4 Decay, Depth * 2 Session Sends 12 Session Mixer 6 Synth 1-2, Drums 1-4 Session Filter 2 Synth Macro Position 16* Synth Filter 6* Drive, Frequency, Res Synth Distortion 2* Level Synth Chorus 6* Feedback, Mod Depth, Level Synth Envelope 12* Attack, Decay, Release Synth EQ 6* Lo/Mid/Hi Gain Synth Mixer 6* OSC1/2, Ring Morph Morph Bar 1 Reserved Reserved 1 *These are the doubled value as they are mapped for each synth engine.
29 6 Standalone Editor The standalone version of the editor operates in the same way as the VST/AU versions but does not require a host to run in and can be used as a standalone application.

30 7 Lemur Script The supplied Lemur script is performance orientated and not intended for detailed patch design. This may be extended in the future, but current areas of functionality are: Macro control for Synth 1 & 2 Delay sends Reverb Sends XY Control Custom Parameter Control Mixer Control Patch Selection Session Switching Global Filter Control
31
32 8 Troubleshooting MIDI settings on Circuit Ensure that your Circuit is configured to receive and send MIDI see the MIDI I/O section on page 61 of the user guide. Try on mains as well as battery With our other versions of the Circuit editor we ve had reports of people having different experiences when using battery power vs. mains power. Windows driver installed Failure to recognise Circuit when running on windows is often down to not having the latest Windows driver installed. Please not this is different to having the latest firmware installed on Circuit. It is recommended that: You have Circuit connected whilst installing the driver You reboot the computer after installing the driver This driver can sometimes be tricky to install. If you are still seeing issues after performing the above process then please repeat.
MIDISynth-Circuit Tablet/Phone User Guide
 MIDISynth-Circuit Tablet/Phone 1.2.9 User Guide http://sigabort.co/midisynth_circuit_ios.html http://sigabort.co/midisynth_circuit_android.html Table of Contents 1 Overview... 4 1.1 Requirements... 4 1.1.1
MIDISynth-Control 1.0.6
 MIDISynth-Control 1.0.6 https://itunes.apple.com/us/app/midisynth-control/id1366849280 http://www.sigabort.co/msc_android_demo.html Table of Contents 1 Overview... 4 1.1 Requirements... 4 1.1.1 ios...
Circuit Editor PRO Read Me.
 EDITOR PRO READ ME Circuit Editor PRO Read Me. This document will guide you through editing patches and creating patches for your circuit. It will not be going into details of synthesizer patch design,
MIDISynth TB User Guide
 MIDISynth TB-3 1.1.0 User Guide http://sigabort.co/midisynth.html http://forum.sigabort.co/index.php?board=29.0 m4l@sigabort.co.uk All software tested again Ableton Live 9.5 and Max 7.1. Table of Contents
Digitakt OS 1.07 Release Information
 Digitakt OS 1.07 Release Information Elektron Music Machines March 9, 2018 How to upgrade: Upgrading from within the OS Select SYSTEM in the SETTINGS menu, and then select OS UPGRADE. Send the SysEx firmware
Prophet '08 PlugSE Editor
 Prophet '08 PlugSE Editor SoundTower PlugSE for Prophet 08 Synthesizer VST (PC/Mac) AudioUnits (Mac) SoundEditor, PlugSE, and ipad Products Reach Inside... SoundTower Inc. 2012 www.soundtower.com Special
Digitakt OS 1.06 Release Information
 Digitakt OS 1.06 Release Information Elektron Music Machines February 12, 2018 How to upgrade: Upgrading from within the OS Select SYSTEM in the SETTINGS menu, and then select OS UPGRADE. Send the SysEx
LiveProfessor 2. User Manual. Rev audiostrom.com
 LiveProfessor 2 User Manual Rev 1.0 - audiostrom.com Contents Introduction 4 System Requirements 4 License files 4 First Run 5 Installing Plugins Plugin Manager Audio Settings MIDI Inputs 7 Replacing A
User Manual. Drum Machine
 User Manual Drum Machine Overview Interface Overview Interface 1 Nithonat s interface is split into three parts: Internal sequencer Responsible for editing patterns in Int.Seq. mode. Internal sequencer
Inear Display AMALGAME
 Inear Display AMALGAME User Guide Version 1.1 Table Of Contents Introduction 3 Overview 4 Installation and First Launch 5 Interface Overview 6 Loading and Saving Presets 7 Effects 8 XY Pad 9 Sequences
Digitakt OS 1.10 Release Information
 Digitakt OS 1.10 Release Information Elektron Music Machines June 29, 2018 How to upgrade: Upgrading from within the OS Select SYSTEM in the SETTINGS menu, and then select OS UPGRADE. Send the SysEx firmware
User Manual. for ArcTrax UWP version
 User Manual for ArcTrax UWP version 1.0.3.0 Table of Contents 1 Overview... 2 1.1 Introduction... 2 1.2 Structure... 2 2 Panel Reference... 3 2.1 Overview... 3 2.2 Controls... 4 2.3 Oscillator... 5 2.4
KURZWEIL Artis PlugSE
 KURZWEIL Artis PlugSE SoundTower PlugSE for KURZWEIL Artis Stage Piano VST (PC/Mac) AudioUnits (Mac) SoundEditor, PlugSE, and ipad Products Reach Inside... SoundTower Inc. 2014 www.soundtower.com Special
DROP-X. Drag & Drop - Beat Repeat Sampler USER MANUAL. VST / AU / AAX Plugin Mac OSX / WIN 32 / 64 bit
 DROP-X Drag & Drop - Beat Repeat Sampler VST / AU / AAX Plugin Mac OSX / WIN 32 / 64 bit USER MANUAL BEAT SKILLZ 10 SOUND BANKS - OVER 250 PRESETS Features: DropX is a very easy to use Drag & Drop Sampler
User Guide FFFA
 User Guide FFFA001508-02 www.focusrite.com Contents INTRODUCTION... 3 About this User Guide...3 SYSTEM REQUIREMENTS........................................................ 4 SOFTWARE INSTALLATION... 4
OS 4.1 AND AUTOMAP UNIVERSAL 2.0
 OS 4.1 AND AUTOMAP UNIVERSAL 2.0 Rev-02 ReMOTE SL USER GUIDE FOR ReMOTE SL OS 4.1 AND AUTOMAP UNIVERSAL 2.0 CONTENTS 1 INTRO 2 REGISTRATION 3 HARDWARE OVERVIEW 3.1 FRONT PANEL OVERVIEW 3.2 REAR PANEL CONNECTIONS
Maize Sampler 2 Documentation
 Maize Sampler 2 Documentation Copyright (C) 1995-2014 Maizesoft 1 Introduction Have you ever dreamed publishing your samples as a VST and Audio Unit virtual instrument? With Maize Sampler 2, this is easy
MainStage 2. Exploring MainStage
 MainStage 2 Exploring MainStage KKApple Inc. Copyright 2011 Apple Inc. All rights reserved. Your rights to the software are governed by the accompanying software license agreement. The owner or authorized
OPERATION MANUAL VST / AU
 OPERATION MANUAL VST / AU This manual is under construction. If you want to help to improve it contact: info@audiorealism.se Introduction AudioRealism Bass Line 3 (ABL3) is an emulation of a classic pattern
Aeolian Meditation. User Manual. All that we see or seem is but a dream within a dream. - Edgar Allan Poe
 Aeolian Meditation User Manual All that we see or seem is but a dream within a dream. - Edgar Allan Poe The ultimate soundscape generator. Pure and meditative or an alien landscape. Ocean waves or an industrial
HALion 4. Version history Known issues & solutions. Januar 2013 Steinberg Media Technologies GmbH
 HALion 4 Version history Known issues & solutions Januar 2013 Steinberg Media Technologies GmbH Table of contents About... 3 HALion 4.5.4... 4 Issues resolved... 4 HALion 4.5.3... 5 Improvements... 5 Issues
User Manual v1.5.
 User Manual v1.5 www.directsynth.com 1 Introduction Thank you for choosing our product, we wish you lot of fun using it. What is EMX? The EMX, also known as «Electribe MX» is a hardware audio workstation
Equator Quick Start Guide. Beta v.0.9.4
 Equator Quick Start Guide Beta v.0.9.4 June 2015 Contents About 3 Support and feedback 3 1. Getting Started 4 1.1 Installation 4 1.2 Layout 4 1.3 Top Panel 5 1.4 Interacting with Equator 6 2. Synth Panel
Version 4 Software. Version 4 - Supplement. Issue A, August 2007 for Version 4.0+ Software. D5 V4 Supp 1-1
 Version 4 - Supplement Issue A, August 2007 for Version 4.0+ Software D5 V4 Supp 1-1 D5 V4 Supp 1-2 Contents 1.0 Introduction... 1-4 1.1 Hardware Configuration Options... 1-4 1.2 Audio Sync Options...
Editor/Plug-In Editor Manual
 Editor/Plug-In Editor Manual E Table of Contents Introduction... 1 Main features...1 Please note before use...1 M50 Editor and M50 Plug-In Editor operating requirements...1 Installation... Installation
User Guide FFFA
 User Guide FFFA001508-01 www.focusrite.com Contents Introduction... 3 About this User Guide...3 System Requirements........................................................ 4 Software Installation... 4
MOX6/MOX8 Editor VST Owner s Manual
 MOX6/MOX8 Editor VST Owner s Manual Contents What is the MOX6/MOX8 Editor VST?...2 Data Structure of the MOX6/MOX8 Editor VST...3 Starting the MOX6/MOX8 Editor VST...4 An Example of MOX6/MOX8 Editor VST
TriplePlay Release Notes
 TriplePlay Release Notes Last Update: 2013 08 20 (mc) Release: Win 1.1.3204 / Mac 1.1.3204 / C 2.07 / R 1.76 Definitions Standalone This refers to the TriplePlay application running by itself and not as
TouchMix. Self-Guided Tour WELCOME TO TOUCHMIX! CHAPTER. 1. Navigation. 2. Simple & Advanced Mode. 3. Presets. 4. Scenes 5. FX. 6. Wizards. 7.
 TouchMix Self-Guided Tour WELCOME TO TOUCHMIX! This guide will introduce you to many commonly used features of TouchMix. Click on a chapter title below, or follow the guide from start to finish for the
Axiom DirectLink for Reason and Record User Guide
 User Guide Legal Notices This guide is copyrighted 2010 by Avid Technology, Inc., with all rights reserved. Under copyright laws, this guide may not be duplicated in whole or in part without the written
Midi Madness 3. Owner s Manual V3.0.2-RC1
 Midi Madness 3 Owner s Manual V3.0.2-RC1 Table of Contents Table of Contents... 2 Introduction... 3 Installation... 3 Registering... 4 Probability Concept... 4 Using Midi Madness... 6 The User Interface
INTRODUCTION 3 GETTING STARTED 5
 REFERENCE MANUAL INTRODUCTION 3 OVERVIEW 3 INSTALLATION / ACTIVATION 3 NAVIGATION 4 GETTING STARTED 5 XY MORPHING 5 MODES 5 MAKING A SOUND 6 SOURCE TAB 6 FILTER TAB 6 ENV TAB 7 SHAPE TAB 7 LFO TAB 8 FX
JX-3P. PLUG-OUT Software Synthesizer Owner s Manual Roland Corporation 01
 JX-3P PLUG-OUT Software Synthesizer Owner s Manual 2018 Roland Corporation 01 Introduction When using the JX-3P for the first time, you must specify the MIDI Input/Output setting in the Setting window
Sub Phatty Editor Manual
 Sub Phatty Editor Manual OVERVIEW & FEATURES The Sub Phatty Plugin and Standalone Editor controls preset library management, preset sharing, realtime editing, and host DAW integration. Powerful HIDDEN
Appendix 1: Upgrading the system software
 THE APPENDICES A.1 THE APPENDICES Appendix 1: Upgrading the system software Infection Music strongly recommends that you read through this section before you attempt to perform any kind of software upgrade.
Bass Station II. Librarian User Guide FFFA
 Bass Station II Librarian User Guide FFFA001154-01 CONTENTS Introduction...3 Operating System Compatibility...3 Installation Mac/Windows...3 The Bass Station II Librarian...3 Overview... 3 Transferring
User Manual V
 By User Manual V1.0 http://polyversemusic.com/support support@polyversemusic.com Gatekeeper User Manual Table of Contents Getting Started 4 Installation 4 Presets 5 With or Without MIDI? 5 Ableton Live
MOOG SUB 37 - FIRMWARE UPDATE UPDATE INSTRUCTIONS FOR WINDOWS (Skip to the next section for Mac OSX instructions)
") MOOG SUB 37 - FIRMWARE UPDATE 1.2.0 WHAT YOU WILL NEED A computer A program for sending MIDI SysEx data to your Sub 37. We recommend Bome SendSX for Windows, or SysEx Librarian for Macintosh. DOWNLOAD
MOOG SUB 37 - FIRMWARE UPDATE 1.2.0 WHAT YOU WILL NEED A computer A program for sending MIDI SysEx data to your Sub 37. We recommend Bome SendSX for Windows, or SysEx Librarian for Macintosh. DOWNLOAD
User Manual v1.1.
 User Manual v1.1 www.directsynth.com 1 Introduction Thank you for choosing our product, we wish you lot of fun using it. What is ESX? The ESX, also known as «Electribe SX» is a hardware audio workstation
1 Introduction. 1.1 About PitchFunk 1 INTRODUCTION 2
 PitchFunk Contents 1 Introduction 2 1.1 About PitchFunk......................... 2 1.2 System Requirements....................... 3 1.2.1 Windows.......................... 3 1.2.2 Mac OS..........................
SH-2. PLUG-OUT Software Synthesizer Owner s Manual
 SH-2 PLUG-OUT Software Synthesizer Owner s Manual Copyright 2014 ROLAND CORPORATION All rights reserved. No part of this publication may be reproduced in any form without the written permission of ROLAND
MIDI HARMONISER PLUGIN
 Obelisk by FrozenPlain 1 MIDI HARMONISER PLUGIN www.frozenplain.com Obelisk by FrozenPlain 2 1 - WHAT IS OBELISK? Obelisk is a MIDI plugin instrument. Rather than produce audio, it produces MIDI. Obelisk
Owner s Manual. Mac OS X 10.7, OS X 10.8 or higher is recommended** Windows 7 or higher 4 GB of RAM At least 3 GB of free drive space
 Owner s Manual System Requirements: Mac OS X 10.7, OS X 10.8 or higher is recommended** Windows 7 or higher 4 GB of RAM At least 3 GB of free drive space **All new Native Instruments software requires
Sounds of the Delta Kontakt instrument.
 Sounds of the Delta Kontakt instrument. INDEX 1...How to Install/Load presets. 2...Overview of instrument. 3...Sequencer 4...Effects section and controls. 5...Credits. Thank you for buying our latest Kontakt
Bass Station II v4.14 New Features User Guide
 Bass Station II v4.14 New Features User Guide New Features: AFX Mode Fixed-Duration Sustain Envelopes Envelope Retrigger Count Glide Divergence Extended Sub-Oscillator Tuning 1 CONTENTS AFX Mode... 3 Overlays...
Minimum Requirements. Installation & Release Notes. 1 Axe-Edit 3.0 Getting Started Axe-Edit 3.0 Getting Started. Mac Minimum Requirements
 Welcome to Axe-Edit 3.0, the official software editor for the Fractal Audio Systems Axe-Fx II. Re-written from the ground up, version 3.0 is stable, reliable, and easily able to keep pace with future updates.
HALion 6 HALion Sonic (SE) 3
 3") HALion 6 HALion Sonic (SE) 3 Version history June 2017 Steinberg Media Technologies GmbH HALion 6.0.10 / HALion Sonic (SE) 3.0.10 Improvements & issues resolved The following lists all resolved issues
HALion 6 HALion Sonic (SE) 3 Version history June 2017 Steinberg Media Technologies GmbH HALion 6.0.10 / HALion Sonic (SE) 3.0.10 Improvements & issues resolved The following lists all resolved issues
MOTIF XS Editor VST Owner s Manual
 MOTIF XS Editor VST Owner s Manual Contents What is the MOTIF XS Editor VST?...2 Data Structure of the MOTIF XS Editor VST...3 Starting the MOTIF XS Editor VST...4 An Example of MOTIF XS Editor VST in
Accusonus Inc. Lexington, Massachusetts USA
 The information in this document is subject to change without notice and does not represent a commitment on the part of Accusonus Inc. The software described by this document is subject to a License Agreement
DPC- 8EZ Operation Manual Firmware revision 1.00 January 2014
 Disaster Area Designs www.disasterareadesigns.com DPC- 8EZ Operation Manual Firmware revision 1.00 January 2014 Thank you for purchasing the Disaster Area DPC- 8EZ Pedal Controller. The DPC- 8EZ is a compact
DER OTO. With this firmware revision, you can use your Biscuit as a standard one (Revision 1.2) or as Der OTO.
 or as Der OTO.") User Manual Rev 2.3 February 2012 1 DER OTO PRESENTATION Der OTO is the new Biscuit firmware (revision 2) and turns your Biscuit into a monophonic synth. You can play Der OTO with a standard MIDI keyboard,
User Manual Rev 2.3 February 2012 1 DER OTO PRESENTATION Der OTO is the new Biscuit firmware (revision 2) and turns your Biscuit into a monophonic synth. You can play Der OTO with a standard MIDI keyboard,
User Guide. English. Manual Version 1.0
 User Guide English Manual Version 1.0 Table of Contents (Click a chapter/section to skip to it.) Introduction... 5 Box Contents... 5 Support... 5 About This User Guide... 5 Initial Setup... 6 1. Software/Driver
StepPolyArp Unit. Step Polyphonic Arpeggiator / Sequencer App & Audio Unit MIDI effect for ios
 StepPolyArp Unit Step Polyphonic Arpeggiator / Sequencer App & Audio Unit MIDI effect for ios Presentation... 1 Application setup... 2 MIDI connections between ios applications... 2 MIDI over WiFi on macos...
Installation & User Guide
 Installation & User Guide Contents Vintage Organs: Introduction 3 Install: MPC Live & MPC X 4 Install: MPC Software Expansion Browser 7 Install: MPC Ren/Studio Controller Mode 9 Usage: Playing Instruments
TB-303. Software Bass Line Owner s Manual Roland Corporation 01
 TB-303 Software Bass Line Owner s Manual 2019 Roland Corporation 01 Introduction For details on the settings for the DAW software that you re using, refer to the DAW s help or manuals. About Trademarks
Axiom. User Guide. English
 Axiom User Guide Table of Contents.......................................................................... 3 Introduction...................................................................... 3 What
QuantiChord. MIDI Chord Quantizer App & Audio Unit MIDI effect for ios
 QuantiChord MIDI Chord Quantizer App & Audio Unit MIDI effect for ios Presentation... 1 Application setup... 2 MIDI connections between ios applications... 2 MIDI over WiFi on macos... 3 MIDI over USB
Worlde TUNA MINI MIDI Controller User s Manual
 HANGZHOU WORLDE DIGITAL PIANO CO.,LTD WEBSITE: WWW.WORLDE.COM.CN EMAIL:SALES@WORLDE.COM.CN TEL:86 571 88730848 Worlde TUNA MINI MIDI Controller User s Manual -1- Contents 1. INTRODUCTION... 3 2. FEATURES...
COPYRIGHT AND LEGAL NOTICES
 English Novation A division of Focusrite Audio Engineering Ltd. Windsor House, Turnpike Road, Cressex Business Park, High Wycombe, Bucks, HP12 3FX. United Kingdom Tel: +44 1494 462246 Fax: +44 1494 459920
User Guide. Manual Version 1.0
 User Guide Manual Version 1.0 Table of Contents Introduction... 3 System Requirements and Product Support... 3 Installation... 3 Windows... 3 Mac OS X... 3 Quick Start... 4 Operation... 5 Global Controls...
DPC- 8EZ Operation Manual Firmware revision 1.05 May 2014
 Disaster Area Designs www.disasterareadesigns.com DPC- 8EZ Operation Manual Firmware revision 1.05 May 2014 Thank you for purchasing the Disaster Area DPC- 8EZ Pedal Controller. The DPC- 8EZ is a compact
GEIGER COUNTER PRO WAVESHAPING DISTORTION WORKSTATION
 GEIGER COUNTER PRO WAVESHAPING DISTORTION WORKSTATION SAMPLES: This knob controls the sample rate of the GCP s processor. Higher sample rates yield crystal clear tones or subtle robotic harmonics, while
Table of Contents GETTING STARTED...4 RECORDING...11 PLAYING BACK...14
 USER GUIDE Table of Contents GETTING STARTED...4 Main Window Essentials...5 Operation Modes...7 Setup...8 RECORDING...11 Tracks... 11 > Track Names... 11 > Adding Tracks... 11 > Master Bus... 11 > Track
Colourform by FrozenPlain 1 Version 2.0 ATMOSPHERIC SOUNDS BLENDED WITH COLOUR CREATED BY SAM WINDELL
 Colourform by FrozenPlain 1 ATMOSPHERIC SOUNDS BLENDED WITH COLOUR CREATED BY SAM WINDELL WWW.FROZENPLAIN.COM Colourform by FrozenPlain 2 1 - COLOURFORM MANUAL This manual explains the features of the
Workshop. Automation ÂØÒňΠMV-8000
 ÂØÒňΠMV-8000 Workshop Automation 2006 Roland Corporation U.S. All rights reserved. No part of this publication may be reproduced in any form without the written permission of Roland Corporation U.S.
USER S GUIDE TC FX II. Renowned M2000 Reverb Algorithms. Plug-in for Mackie Digital Mixers
 USER S GUIDE TC FX II Renowned M2000 Reverb Algorithms Plug-in for Mackie Digital Mixers Iconography This icon identifies a description of how to perform an action with the mouse. This icon identifies
MPC Essentials Release Notes
 MPC Essentials Release Notes About Akai Professional is continually updating and enhancing MPC Essentials. This document lists the new features, fixes and improvements made to your MPC Essentials software.
Installation & User Guide
 Installation & User Guide Contents The Piano Suite: Introduction 3 Install: MPC Live & MPC X 4 Install: MPC Software Expansion Browser 7 Install: MPC Ren/Studio Controller Mode 9 Usage: Playing Instruments
VST-AU Pulse Editor User Manual. Windows XP, Vista, Windows 7 OSX 10.5, 10.6
 VST-AU Pulse Editor 2.1.0 User Manual Windows XP, Vista, Windows 7 OSX 10.5, 10.6 VST-AU Pulse Editor 2.1.0 User Manual Table of Contents» Introduction» Installation» MIDI Setup» Working with the VST-AU
User Guide English. Manual Version 1.0
 User Guide English Manual Version 1.0 Table of Contents Welcome to the MPC... 5 System Requirements and Product Support... 5 About This Manual... 6 Important Notes... 7 Installation... 7 MPC Hardware Overview...
CZ PATCH LIBRARY MANUAL
 CZ PATCH LIBRARY MANUAL Firmware Version 2.2 CONNECTION Connect the CZPL as follows: USB POWER If using the USB cord for power, connect to an appropriate USB compliant (5V) power source. POWER If using
BeatMaker 3 User Manual. Revision:
 BeatMaker 3 User Manual Revision: 3.0.10 What s new in version 3.0.10 of this manual - Updated section Quick Start Guide: 1.3 Transport toolbar - Added section Performance View: 2.7 Select mode - Updated
Emote 1.0 Users Manual
 Emote 1.0 Users Manual Part No: 141318 Rev A 2018 Eventide Inc., One Alsan Way, Little Ferry, NJ, 07643 USA 1 Table of Contents Introduction... 3 Downloading the Installer... 3 Making Sure Your H9000 Hardware
Inear Display Lancinantes
 Inear Display Lancinantes User Guide Version 1.0 Table Of Contents Introduction 3 Overview 4 Installation and First Launch 5 Interface Overview 6 Loading and Saving Presets 7 Notes Module 8 Mixer Module
This manual explains how to use the GeoMIDI software with the ControlDAW MIDI controller.
 1.1 GeoMIDI GeoMIDI MIDI mapping software provides an interface for changing the MIDI assignments of the ControlDAW s buttons, knobs, and sliders. Each slider, button or knob can send out a variety of
Expressive E, Touché SE, "Lié" and associated logos are registered trademarks of Expressive SAS.
 USER MANUAL The information in this document is subject to change without notice and does not represent a commitment on the part of Expressive SAS. Expressive E, Touché SE, "Lié" and associated logos are
INSTALLATION. UNDERSCORE is a sample library for Native Instruments Kontakt 5.3 and later. It will NOT work with the free Kontakt Player.
 INSTALLATION UNDERSCORE is a sample library for Native Instruments Kontakt 5.3 and later. It will NOT work with the free Kontakt Player. Before loading any of the instruments in the Instruments folder,
vst-ch4_a.qxd 10/7/02 4:58 PM Page 90
 vst-ch4_a.qxd 10/7/02 4:58 PM Page 90 4 Meet your hosts This chapter describes the installation and basic use of VST Instruments within two of the main MIDI + audio sequencers, Steinberg s Cubase VST and
Manual addendum written by Nadine Raihani, Cornelius Lejeune Manual version: 1.3 (09/2008) Software version: 2.0.4
 Software version: 2.0.4") MANUAL ADDENDUM The information in this document is subject to change without notice and does not represent a commitment on the part of NATIVE INSTRUMENTS GmbH. The software described by this document
MANUAL ADDENDUM The information in this document is subject to change without notice and does not represent a commitment on the part of NATIVE INSTRUMENTS GmbH. The software described by this document
Setting Up the US-428 to Work with MOTU Digital Performer
 Setting Up the US-428 to Work with MOTU Digital Performer The US-428 is supported in Digital Performer v2.7 and later. Before setting up the US-428 to work with Digital Performer, please install the US-428
Eventide Inc. One Alsan Way Little Ferry, NJ
 Copyright 2017, Eventide Inc. P/N: 141254, Rev 4 Eventide is a registered trademark of Eventide Inc. AAX and Pro Tools are trademarks of Avid Technology. Names and logos are used with permission. Audio
MANUAL September 23, 2015
 MANUAL September 23, 2015 INTRODUCTION Addictive Trigger - Intelligent Drum Replacement Addictive Trigger is a combination of a very competent "Trig" engine and the acclaimed Addictive Drums engine and
USER GUIDE. Version Copyright Loopmasters. All rights reserved.
 1 USER GUIDE Version 1.4.1 Copyright 2008-2017 Loopmasters. All rights reserved. 2 CONTENTS Introduction...3 Requirements... 4 Installation...5 Loopcloud Overview... 6 Loopcloud Browser...7 Finding Sounds...
Revision and Quality Control: Cristina Bachmann, Marion Bröer, Heiko Bischoff, Sabine Pfeifer The information in this document is subject to change
 MIDI Devices Revision and Quality Control: Cristina Bachmann, Marion Bröer, Heiko Bischoff, Sabine Pfeifer The information in this document is subject to change without notice and does not represent a
FaderPort 8 8-channel Production Controller
 FaderPort 8 8-channel Production Controller www.presonus.com English Table of Contents 1 Overview 1 1.1 Introduction 1 1.2 About this manual 1 1.3 FaderPort 8 Features 2 1.4 Studio One Artist Features
VirtualDJ Remote - User Guide 1
 VirtualDJ Remote - User Guide 1 Table of Contents VIRTUALDJ REMOTE APPLICATION... 3 SETUP... 4 TABLET VIEW... 5 RHYTHM WAVE & DECK INFO DISPLAY... 6 BASIC DECK CONTROLS... 6 ADVANCED DECK CONTROLS... 7
HATS USER GUIDE 2016/05/02
 HATS USER GUIDE 2016/05/02 Table of Contents 1. Hats...3 1.1 Specifications...3 1.2 Installation...3 1.3 Registration...4 2. Parameters...4 3. Loading External Samples...6 4. Settings...6 4.1 Settings...6
Installing energyxt2.5. Mac. Double-click energyxt2.5 disk image file. Drag the energyxt2.5 folder to your "Applica- tions" folder / your desktop.
 ENGLISH 2 Getting started Windows Installing energyxt2.5 Mac Linux Double-click the setup file and follow the on- screen instructions. i. i. Double-click energyxt2.5 disk image file. Drag the energyxt2.5
MOTIF XF Editor Owner s Manual
 MOTIF XF Editor Owner s Manual Contents What is the MOTIF XF Editor?...2 Studio Manager...2 Studio Connections...2 About Open Plug-in Technology...3 Data Structure of the MOTIF XF Editor...4 Starting the
Console Script Manual
 Console Script Manual Impact Soundworks Designed by Nabeel Ansari, Mario Kruselj, and Dickie Chapin INTRODUCTION Console is a modular effects rack that takes full advantage of updates and improvements
GETTING STARTED. Welcome To Trilian!
 GETTING STARTED Welcome To Trilian! GETTING STARTED Quickstart This Quick Start provides an overview of the essential things you will need to know in order to get started using Trilian. Trilian is a software
LIQUID FOOT+ SERIES MIDI FOOT CONTROLLERS. FIRMWARE PLATFORM V6.00beta. This documentation will be updated
 LIQUID FOOT+ SERIES MIDI FOOT CONTROLLERS FIRMWARE PLATFORM V6.00beta This documentation will be updated REV 1.0 - NOV 3, 2018 Table of Contents V6.00 BETA FIRMWARE INSTALLATION NOTES... 3 V6.00 System
INTRODUCTION 3 MIDI SEQUENCERS 5 AUDIO CONTROLLERS/FX 13 INSTRUMENTS 18 CONTROLLER LAYOUTS 27
 REFERENCE MANUAL INTRODUCTION 3 OVERVIEW 3 INSTALLATION / ACTIVATION 4 NAVIGATION 4 MIDI SEQUENCERS 5 4PLAY 5 ISO ARP 6 RADAR 7 RIPKORD 9 CHORD SECTION 9 ARP SECTION 10 RIPPLE 11 AUDIO CONTROLLERS/FX 13
nativekontrol PXT-Live Plus User Manual Version 1.0.8
 nativekontrol PXT-Live Plus User Manual Version 1.0.8 1 CHANGES IN THIS VERSION 2 GENERAL OVERVIEW 3 SETUP 3.1 Live Settings 3.2 UserPlusPreferences 4 GLOBAL CONTROLS 4.1 Touch Strip 5 PLUS MATRIX MODES
Pro Tools. Automation & Control Surface Manual. Version: 1.0
 Pro Tools Automation & Control Surface Manual Version: 1.0 Contents Control 2802 Fader Automation Page 3 Automation Overview Page 3 Automation Setup Page 3 Recording & Editing Automation Data Page 4 Automation
Slow by FrozenPlain 1 Version 1.0 AMBIENT PADS AND SOUNDSCAPES
 Slow by FrozenPlain 1 AMBIENT PADS AND SOUNDSCAPES WWW.FROZENPLAIN.COM Slow by FrozenPlain 2 1 - WHAT IS SLOW? Slow is a library of ambient pads and soundscapes. It features a finely picked selection of
AUDIO VIDEO MEDIA CONTROLLERS. EuCon Application Setup Guide. Document Revision: K
 EuCon Application Setup Guide Document Revision: K MC Control, MC Mix, MC Transport, Studio Monitor Express, Studio Monitor Pro, EuControl, EuCon and EuCon Powered are trademarks of Euphonix Inc. All other
FRONT PANEL OVERVIEW...1 REAR PANEL OVERVIEW...3 HOOKUP DIAGRAM...4 DISPLAYING INFORMATION...6
 TABLE OF CONTENTS FRONT PANEL OVERVIEW...1 REAR PANEL OVERVIEW...3 HOOKUP DIAGRAM...4 DISPLAYING INFORMATION...6 OCTAVE AND TRANSPOSITION...6 NOTE...6 NOTE AFTERTOUCH (Channel Pressure)...6 CONTROL CHANGE...6
Please read this manual carefully before you use the unit and save it for future reference.
 ANDROID STEREO RECEIVER Please read this manual carefully before you use the unit and save it for future reference. Installation Precaution: 1. This unit is designed for using a 12V negative ground system
Table of Contents. Presets. The Organ. Expert Settings. Arp... Tempo. MIDI... Global Preferences. Audio Unit, Inter-App Audio, Audiobus, Ableton Link.
 Owner s Manual Table of Contents Presets. The Organ. Expert Settings. Arp... FX. Tempo. MIDI... Global Preferences. Audio Unit, Inter-App Audio, Audiobus, Ableton Link. 3 6 10 18 20 22 23 26 28 First Edition,