THESYS User Manual 1
|
|
|
- Clement McCoy
- 6 years ago
- Views:
Transcription

1 THESYS User Manual 1
2 Table of contents About this Manual 5 What is Thesys? 5 Installation and Authorization 5 Installation 5 WINDOWS 32bit 6 WINDOWS 64bit 6 macos 6 Uninstalling 7 Authorization 7 Getting Started 8 Setting up Thesys 8 Getting Some Sound 8 Loading Presets 9 Routing to Another Instrument 9 MIDI File Drag and Drop 10 Host Integration 10 Cubase 10 Ableton Live 11 Studio One 12 ProTools 13 Sonar 14 Logic X 15 Logic AU Workaround 15 FL Studio 18 Control Section 20 Global Controls 20 Logo/About Screen 20 Open Manual 20 MIDI Activity Indicators 20 MIDI IN/MIDI OUT transposition 20 Transpose Mode 21 Synthesizer/MIDI Settings toggle switch 21 Sequencer Settings 21 Trigger By 21 Trigger Mode 22 Loop 22 Tempo Division Unit 22 Swing Amount 22 Action Section 23 2
3 Gate Time 23 Velo Gate 24 Looper 24 Slow Down 24 Retrigger 25 Half Speed 25 Manual Step 25 Mute 25 Start/Stop Button 26 Pattern Sequencer 26 on/off 26 Loop Bar 26 Pattern Change Speed 27 Pattern Select 27 Number of Repeats 27 Keyboard Control Section 28 Keyboard Control Quantization Value 29 Pattern Select 29 Action Section (Keys) 29 Pitch Transposition 29 Sequencer Section 30 Sequencer Preset 30 Preset vs. Pattern 30 Global Sequencer Controls 30 Global Shift 30 Copy & Paste 31 Random 31 Pattern Edit Selector 31 Common Controls and Functions 32 General Editing Features 32 Step Direction and Interval 33 Step Shift Control 33 Copy and Paste 34 Reset, Random and Mutate 34 Loop Bar 35 Global Sequencer Controls 35 Pitch 36 Root Key Set 36 Scale Selector 37 Recording Input Mode 37 Note Name Display 38 Lock 38 Velocity 38 Sequencer Area 38 Mute 38 Gate Time 39 Performance 39 Octave 40
4 Bend 40 Chord Roll 41 Random 41 Modulation 42 Internal Modulation 42 MIDI CC number 43 On/Off Button 43 MIDI Value 43 Built-in Synthesizer 44 Synthesizer Preset Manager 44 On/Off 44 Oscillator Settings 45 Level 45 Pan 45 Waveform 45 Detune 45 Volume Envelope 45 Filter 46 Cutoff 46 Reso(nance) 46 Peak 46 Attack 46 Decay 46 Sustain 46 Release 47 Delay 47 Delay L(eft) Delay R(ight) 47 Feedback 47 Mix 47 Appendix 48 Scales 48 Chords 50 Impressum 57
5 About this Manual This manual includes a detailed reference guide as well as a Getting Started tutorial to help you start laying down patterns right away. If you have a question that is not answered in the manual, please go to the Sugar Bytes Support Forum. What is Thesys? Thesys is an extremely powerful and intuitive MIDI sequencer, giving you control over just about all aspects of your favorite MIDI devices. Use Thesys to create varied and organic bass lines, screaming leads, pulsating chords, and organic pad sounds in the studio or on stage. Sequence and send patterns of just about any MIDI data you want, not just pitch and velocity. For example, you can include things like Program Change, Portamento, Aftertouch, and any other MIDI CC in your sequences. For live musicians, Thesys provides an extremely versatile palette of performance options which can be triggered right from your MIDI keyboard: you can transpose, manipulate, twist up, mutate, and mangle your patterns without even getting near your computer. Thesys is a plugin which can be used with any major Windows or OS X VST or AU host. This includes Cubase, Logic, Kore, and Ableton Live, among others. No other MIDI sequencer plugin offers you the ease and power of Thesys. It is 100% MIDI compliant and therefore provides the ultimate MIDI sequencing solution. Installation and Authorization Installation Download (requires login) the latest version here. The standalone version and the manual will be installed into: Windows: macos: C:\Program Files\Sugar Bytes\Thesys /Applications/Sugar Bytes/Thesys Presets will be installed into Documents\Sugar Bytes\Thesys. Do not move the Thesys presets after installation! 5
6 Default installation paths WINDOWS 32bit VST AAX C:\Program Files\Steinberg\Vstplugins C:\Program Files \Common Files\Avid\Audio\Plug-Ins WINDOWS 64bit Note that in C:\Program Files are all 64bit Plug-ins and in C:\Program Files (x86) are all 32bit Plug-ins. Make sure you have installed the correct version (32bit/64bit). You can check if your DAW is running in 64bit or 32bit when you open the task manager while your DAW is running and it will give you a clear info about it. Default installation paths for the 32bit flavor: VST AAX C:\Program Files (x86)\steinberg\vstplugins C:\Program Files (x86)\common Files\Avid\Audio\Plug-Ins Default installation paths for the 64bit flavor: VST AAX C:\Program Files\Common Files\Steinberg\VST2 C:\Program Files\Common Files\Avid\Audio\Plug-Ins macos The Audio Unit, the VST Plugin and the AAX Plugin will be automatically installed into the correct folders. Our plugins are universal binaries that include 32bit and 64bit. Depending on your host the correct variant will be loaded/ used. AAX is supported for Pro Tools and higher. (It s not selected by default in the installer) Default installation paths: VST AU AAX /Library/Audio/Plug-Ins/VST/ /Library/Audio/Plug-Ins/Components/ /Library/Application Support/Avid/Audio/Plug-Ins 6
7 Uninstalling In order to uninstall Thesys, please take the following steps: Windows: Uninstall Thesys under Control Panel/AddRemove Software. macos: Here is the way to delete everything regarding Thesys /Applications/Sugar Bytes/Thesys /Library/Audio/Plug-Ins/VST/Thesys.vst /Library/Audio/Plug-Ins/Components/Thesys.component /Library/Audio/Plug-Ins/Components/Thesys MidiFX.component /Library/Application Support/Avid/Audio/Plug-Ins/Thesys.aaxplugin ~/Documents/Sugar Bytes/Thesys ~/Library/Preferences/com.sugar-bytes.Thesys.plist ~ means: /Users/YOURLOGINNAME (your home folder) (Please note that since OSX 10.7.x the library folder is a hidden folder. Therefore please use the "Go To Folder" menu and then enter ~/Library.) Authorization The serial number is requested for installation. If the serial number validation fails, the plugin will show that in the Thesys settings page. 7
8 Getting Started This section will show you how to get a few sounds out of Thesys to give a feel for how things work. All of the functions mentioned in this section are described in detail in the sections in this manual which then follow. Thesys is a plugin, which means it will only work within a host environment. After installation, you should be able to find Thesys in the VST (Windows & macos) and Audio Unit (macos only) folders in the host application you are using. While the VST standard allows full functionality of MIDI sequencers like Thesys "out of the box," the Audio Unit (AU) format requires a workaround which is described below. Even without the workaround, you should be able to produce sound from Thesys using its internal synthesizer. If have a choice between AU and VST formats when using Ableton Live on macos, for example it will be easiest for you to use the VST version. To begin with, this is exactly what we will do. Setting up Thesys Getting Some Sound In this example, we'll get Thesys going using Ableton Live (macos) as our host. Insert or drag the Thesys VST onto a MIDI channel. If you do not know how to do this, please consult your host application manual. To start with, make sure the outputs of the MIDI channel are routed like any other software instrument so that you can hear the audio on your speakers or headphones in your studio. The first time you open an instance of Thesys in your host, the Default preset will be shown. Click on the Start button in the lower right corner. The sequencer engine begins to run, but you won't hear any sound because the Default preset's Velocity sequencer is filled with 0 values. Draw or click in the Velocity sequencer area and you'll hear some 16th notes. Create a more melodic pattern by changing the values in the Pitch Sequencer. You may want to slow the step speed down by selecting eighth notes instead of sixteenth notes with the Tempo Selector in the Sequencer Settings section. In the Default preset, the Sequencers' loop lengths are all set to 8 steps. To keep things all synced up, in the Sequencer Settings section, set the "Loop" toggle to global. This just means that all the different sequencers will all have Loop lengths which will be identical to that of the Pitch sequencer at the very top. Grab the right-hand edge of the Loop Bar and drag it out towards the right to create a longer loop (try 16 steps, for example). For the additional steps, you'll have to draw in some Velocity Sequencer steps in order to get sound for the whole length of your pattern. 8
9 Now try playing with the Gate Time Sequencer. By default, each step is set to a value of 1.0, meaning that the note will be "on" for the duration of the step. To understand how the Gate Sequencer works, slide a few steps way up to the maximum of 4.0. If there are consecutive steps with this value, you'll hear overlapping notes, because steps will be triggered while the gate is still "open" for previous notes. This works with the internal synth as well as any other polyphonic synth being driven by Thesys. Pull some other steps way down and notice the short impulse-like sounds which result. Using intermediate values closer to 1.0 will give your lines more variety and make them sound more organic. Once you've tweaked your pattern a bit, try out some Actions: With the sequencer engine running, click on the Looper in the Action Section. Adjust the length of the Looper with the Steps knob. Try Half Speed, Mute, and the other Actions to get a feel of the some of the performance possibilities. Loading Presets At the top of the Thesys Window (to the right of the Thesys logo), you'll see the current preset name. Click on the name to open the preset chooser to choose a preset from within one of the preset categories. The folder containing the presets is located in your Applications folder under Sugar Bytes. The Sugar Bytes folder will have an Thesys folder where you'll find "Content." This is where the presets are located. Once you load a preset from this folder, you will not have to re-point Thesys to find any other presets; it will open automatically to this folder when you click on "Load Preset" in the Preset Manager at the top of the Thesys window. To the left and right of the Preset Manager are arrows allowing you to step through presets consecutively. Routing to Another Instrument The fun with Thesys really begins when you start using its MIDI output to drive other instruments. The first thing we'll do is turn off the internal synthesizer. To do this, open the synth by clicking on the Loudspeaker icon just to the right of the Velocity Sequencer to toggle to the Synthesizer section. Just under the Sugar Bytes logo in the top right area, click on the on/off switch to turn the Synthesizer off. Create another MIDI channel in Live and then insert your favorite soft synth. In this case, we're using Sugar Bytes' own Unique.In the MIDI channel where Unique (or the synth of your choosing) is plugged in, set the "MIDI From" drop down to the channel containing Thesys. In the Post/Pre FX drop down menu just below, also choose Thesys. You should now be hearing your pattern being played! You can open other MIDI channels with other soft synths (or samplers) and set similarly. This way you can achieve layers of sounds, all triggered by Thesys. 9

10 Midi File Drag and Drop The Midi data generated by Thesys can be saved to a Midi File. Just drag and drop the «Hand/Note» Icon to a Midi track in your sequencer or to your desktop and the file will be created. Use the control below to set the length of the Midi file. The maximum length is 64 bars. Since the file will be written on the fly, Thesys will not produce sound while the file is generated. We recommend to use this feature rather than the Logic AU workaround. Host Integration Cubase In order to route the midi output of Thesys to other virtual instruments go to devices->vst Instruments. Then choose Thesys and in a further instance the synth you want to control. Choose Thesys as midi input in the MIDI track for your synth (here Cyclop) 10

11 Ableton Live The workaround with Live is quite simple. Your setup should look like this. In the receiving track of your target instrument make sure to select Thesys twice as input. 11


12 Studio One Create an Instrument track and load Thesys as insert on that track. In order to route the midi output of Thesys to other virtual instruments choose the synth you want to control in a further Instrument Track. Then set up Thesys as midi input and activate record in the Instrument Track for your synth (here Unique). 12

.")

13 ProTools In order to connect Thesys to another instrument in Pro Tools, create an Instrument track and load Thesys as insert on that track. Now create the target instrument track and load the target instrument (here Unique). Choose Thesys in the Instrument-Input menu and activate Record on the target track. If you only want to hear the sound of the synth of your target instrument please deactivate the internal synthesizer here: 13


14 Sonar Insert Thesys as a Soft Synth. Make sure to activate the Midi output option in the Insert Soft Synth Options Box. Route the midi output from Thesys to any other synth. 14


.")
15 Logic X Choose Thesys as an MIDI FX-Instrument from the MIDI FX dialogue of a Software Instrument track. If you are using an older version of Logic than LogicX as a host, you won't be able to directly trigger external synths. The AU format does not send and receive MIDI data "out of the box," but we have created a workaround to bring bliss to Logic users as well. Once you've installed Thesys, just follow this step-by-step procedure. Logic AU Workaround Once you have completed the steps in this workaround, we recommend saving the Logic file as a template so that you start new projects right away without repeating the workaround. Open Audio-MIDI-Setup (by default in the Applications folder on your hard disk). At the top of the Audio MIDI Setup window, you have a choice between Audio Devices and MIDI Devices; choose MIDI Devices. You will now see a window of icons representing the various real or virtual MIDI connections to your computer. Double-click on the IAC Driver icon to open the IAC Driver Properties window. 15

16 Make sure "Device is Online" is checked. You may then need to click on the "More Information" arrow to open the rest of the window. Compare the settings in this illustration to make sure your system is set up in the same way. Now open Logic. To keep things easy, it might be best to open an empty project with no audio tracks. Create a Software Instrument Track and insert Thesys (choose under I/O AU Instruments/Sugar Bytes/Thesys Stereo). Quickly make a sequence (or just raise the Velocity Sequence step levels well above zero: see "Setting Up Thesys" above for details. Insert a second Software Instrument Track and insert the software synthesizer of your choice. In Logic's "Window" menu, open the Environment. You should now see what looks like a mixer, including the two tracks you just created. In the Environment window local menu bar, click on "New" and select "Physical Input." This should be near the bottom of the list of elements in the "New" menu. If you plan to record the Thesys MIDI Output, also create a «Sequencer Input». From now on you have to make sure that the Thesys-Track is not selected, otherwise it will send MIDI to itself. You could create two IAC Busses, one for the Thesys-Synth connection and one for the Thesys-Sequencer-Input connection. Then you only have to switch beween both busses in the Thesys about screen in order to record the midisignal or send it to the synth directly. In order to fix the timing issues brought in by the IAC Driver, you should move the track to the right position (or use Track-Delay) and quantize the MIDI notes. 16

17 Click on the small arrow-like icon of your IAC-Bus at the top right, (below "SUM") on the Physical Input module and drag a wire connection to the channel containing the soft synth you inserted. Now open the Thesys interface from the channel where it is inserted. If it is not already open, you can do this by double-clicking on "Thesys" label in the blue I/O slot in the channel stip. Click on the Thesys or Sugar Bytes logo in the upper right or left corner of the Thesys window. In the About screen that appears, you'll see the item "Audio Unit MIDI Out Port." Click on "Host," which appears just underneath and choose IAC Driver IAC Bus 1. Click on anywhere inside the About screen to close it. Now start Thesys (click on the start button). You should hear your synth! Repeat the procedure to have more Thesys connections! The IAC Driver Support is also available in the VST Plugin to support alternative connections in other host applications. 17
 To control Thesys")


18 FL Studio Plugin Thesys in the mixer section of your audio track (here it is insert1) To control Thesys via midi you have to setup a midi out channel. Go to Channels->Add one->more... Doubleclick on MIDI Out to setup a midi out channel. Make sure to setup the correct input and output port in the Thesys midi section of 18

19 Thesys. 19

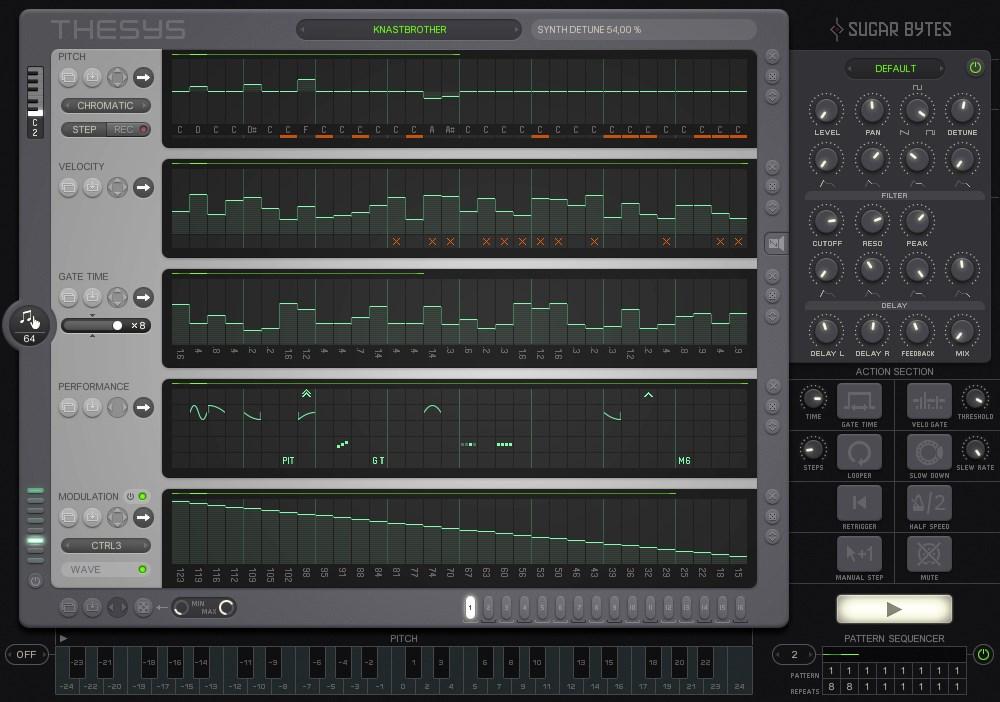
20 Control Section Global Controls The Global Controls section consists of all parameter controls in the dark area located outside of the main Sequencer window. Logo/About Screen Click on the Sugar Bytes or Thesys logos in the upper left and right-hand corners of the interface in order to enter or check your serial number or find out which version of Thesys you are using. The About screen also contains the IAC MIDI driver selector (for macos versions only). Controllermaps which contain the MIDI controllers assigned to Thesys, can be loaded and saved here. The Ignore Program Change Option allows you to filter incoming Program Changes to avoid unwanted preset changes in Thesys. Open Manual Clicking on the Open Manual button automatically opens the Thesys manual which was installed with the software. The manual is located within the Thesys application folder and can be copied or moved elsewhere. Keep in mind, however, that the manual cannot be automatically opened with the Open Manual button if it is moved from the original location. MIDI Activity Indicators The MIDI Activity Indicators light up when MIDI is either received by or transmitted from Thesys. MIDI IN/MIDI OUT transposition Just under the MIDI Activity Indicators, the Transposition controls allow you to transpose incoming MIDI notes as well as the MIDI notes transmitted by Thesys. MIDI IN transposition is useful for setting up your controller keyboard for pattern selection and action triggering. Click and drag to change values. 20
 up or down.")
21 The MIDI OUT octave transposition moves the outgoing MIDI notes up or down up to two octaves. Underneath the octave transposition control, step transposition allows you to move pitches up to 12 half-steps (semi-tones) up or down. Transpose Mode The Transpose Mode switch toggles between ROOT KEY and IN SCALE and determines if incoming MIDI notes transpose the pitch sequence by just moving the root key chromatically (set by the Root Key Control) or are forced into the closest possible note on the scale (determined by the Scale Control). Synthesizer/MIDI Settings toggle switch Click on the speaker icon (on the right edge of the Pitch Sequencer) to toggle between Synthesizer controls and Sequencer Global Settings panel. Sequencer Settings Trigger By The Trigger By switch toggles between the Pattern Keys and Pitch Keys as input triggers. In other words, you can set Thesys into motion with either the pitch keys or the pattern keys on your external MIDI keyboard. The keyboard mapping of the pitch keys and pattern keys is shown at the lower edge of Thesys in the Keyboard Control Section (see below: "Keyboard Control Section"). You can also trigger Thesys by simply clicking on the keys. 21
22 Trigger Mode This three-state toggle switch determines how Thesys responds to a trigger signal. The first option is Host. This means that Thesys is slaved to the host clock and will start when the host clock is started. Note On triggers (starts) Thesys as soon as a note is played. Thesys continues to play as long as the note is held. Note Toggle toggles (starts and stops) Thesys with any incoming MIDI note. The first note starts the sequencer and the next incoming note stops it. Loop This setting determines if all sequencers have individual Loop Bars (Individual), or if they share the same loop bar (Global). When Global is chosen, the loop from the Pitch Sequencer is used as the Global Loop. Tempo Division Unit Choose between ten different note values to determine the step rate. The quarter note will advance the sequencer one step per (quarter note) beat; an eighth note rate is twice as fast and a half note half as fast. The default setting is the eighth note. This means that at a clock speed of 120 BPM, the step speed will be at an eighth note pace, or at 240 steps per minute. Setting at the half note value (also at 120 BPM) would then result in a rate of 60 steps per minute. Thesys can run in triplet divisions as well. Swing Amount This slider determines the amount of swing which varies from completely straight (even) at the far left, to a dotted rhythm (75%/25% relationship) at the far right. Pulling the slider to the half-way point results in a ternary (triplet) swing. 22
 Section correspond to those in the Action (Key) Section, found along the lower edge of the Thesys GUI.")
23 Action Section The Action Section is a fast and intuitive way to "mutate" your patterns, either on stage or in the studio. All of the functions in the Action (Button) Section correspond to those in the Action (Key) Section, found along the lower edge of the Thesys GUI. The main difference is that the Action Key Section shows a keyboard map allowing you to "play" the actions on your MIDI keyboard controller, while the Action Button Section gives you mouse and MIDI CC control. In addition, the Action Section provides four additional parameter adjustment knobs corresponding to certain Actions (see below). Each action button (and key) behaves as a "push-on" switch. In other words, the particular Action is only active as long as a button or key is pushed or played. When the button or key is released, the Action stops and the sequence continues as usual. Gate Time The Gate Time button immediately forces the gate time (length) to a single, uniform value for all steps. If this button is not activated, then the gate time of each step is determined by the height of that step in the Gate Time Sequencer. When you click on the Gate Time Button (or play the corresponding key on your MIDI keyboard controller), then the gate times of all the steps will be exactly the same as long as you push the button (or hold down the key). The Gate Time value is set with the Time knob to the left of the Gate Time button. Extremely short gate times (staccato) can be created by turning the knob completely to the left. Legato gate times resulting in a connected melodic line are achieved by turning the knob to the right of the center position. 23
24 Velo Gate When pushed, the Velo(city) Gate Action only triggers notes which are higher than the velocity set at the Threshold knob to the right of the Velo Gate. Notes with a velocity setting (determined by the Velocity Sequencer) below the threshold value will not be triggered and the step will be "empty," behaving as if there was no velocity trigger at all. This is a good way of thinning out and "relaxing" your pattern for a while. Looper As its name implies, this Action loops a section of a sequence. The length of the loop (in steps) is set by the Steps knob. When the Looper is activated, the Loop cycle begins on whichever (Pitch) step happens to be active at that time. Once the number of steps is reached, the loop begins again. This continues until the Looper button (or key) is released. Upon release, the sequence continues where it would have been if the Looper had not been activated. In other words, instead of just finishing the loop and continuing forward in the sequence, releasing the Looper brings the sequence position right back in step. This can be very useful for jumping in and out of melodic riffs or harmonic progressions without missing a beat. Slow Down Think of the Slow Down Action as a handbrake for your sequence. When activated, it progressively slows the speed of the sequence down. The rate of slowing is set with the Slew Rate knob. Turn the knob to the left for a very gradual and long "decelerando" and turn to the right for quicker slow downs. 24
25 Retrigger Use the Retrigger Action to retrigger all the sequencers at once. Retrigger forces all the sequencers back to their first step while maintaining the step speed. When you release Retrigger, the sequences continue where they would have been if they had not been retriggered. This behavior is similar to that of the Looper Action. Half Speed As its name implies, Half Speed doubles the length of time between each step for all sequencers and creates a half-tempo feeling. Manual Step This action button overrides the clock and triggers the sequencer one step at a time. Activate the button to stop the sequence; you can then manually move forward in the sequence using the Pattern Keys and the Pitch Keys one step at a time. Mute The Mute Action mutes all notes, without stopping the sequencer. This is the same as sending a series of zeroes from the velocity sequencer. As with Looper and Retrigger, the sequencers continue to run when Mute is activated. 25
26 Start/Stop Button The Stop/Start Button turns the internal sequencer clock on and off. When lit, it indicates that either the internal or the host clock is running and the sequencers are on. Pattern Sequencer This module is the top-level sequencer which determines which pattern will be played and how long that pattern will be played. A pattern consists of all sequences (Pitch, Velocity, Gate Time, Performance, Modulation) and their settings. The Pattern Sequencer plays up to 16 different patterns in any order. In addition, each pattern can be repeated up to 16 times before moving on to the next one. You can think of each pattern as a kind of snapshot of all the sequences visible in the Thesys window at any one time. on/off When off, the currently displayed pattern will simply be looped continuously, without switching to another pattern. When activated, the Pattern Sequencer steps through the patterns determined by Pattern Sequencer Parameters: Loop Bar Determines the total length of the Pattern Sequencer sequence. As with any step sequencer, after playing the last step in its sequence, the Sequencer will loop back to the beginning and continue playing through the pattern steps in order. The Pattern Length bar can be extended to the left or right and moved from the center, depending on the position of the mouse pointer. 26
27 Pattern Change Speed The note value input of the Pattern Speed Control determines how long a pattern is played before either repeating (see "Number of Repeats" below) or moving on to the next Pattern. Setting this value to a quarter note (one beat per change) will result in extremely frequent Pattern changes (at BPM=120, this would be twice per second!). In most cases, you will probably set this to at least a whole note (four beats per change) or more. The maximum value is four whole notes = 16 beats. Pattern Select Pattern Select determines which Pattern is played on that particular step. Patterns can be played and repeated in any order. This makes it possible to set up repeating song structure elements (refrains, bridges, choruses, breaks, etc.) in your performances or productions. Number of Repeats You can repeat a Pattern step up to 16 times. With a low Pattern Change Speed (see above) and a large number of repetitions, Patterns can be made to run a long time before moving on to the next Pattern step. 27
28 Keyboard Control Section The Keyboard Control Section offers you extensive live-performance-oriented control over Thesys. Here you can select a Pattern, trigger an Action, or transpose sequences up or down by hitting the corresponding key on your MIDI keyboard/controller. The keys can also be triggered by clicking on them with your mouse. Note that the Keyboard Control Section is split into three distinct key ranges, each with a different function: Pattern Select, Action Section, and Pitch. There are two keyboard mappings available. Select the keyboard mode with the triangle icon above the keyboard. The standard mapping offers all Patterns and Actions and a +/- 12 seminote transpostion zone. The extended Pitch range offers transposing by +/-24 seminotes. Pattern- and Action Keys are still available, 2 octaves below the standard mapping. You can shift these control keys up or down your keyboard, depending on the MIDI In transpose control in the Global MIDI Settings section of Thesys. You might consider routing a dedicated keyboard through an unused MIDI channel into Thesys so that playing notes (melodies, chords) on your master keyboard don't affect the control aspects of Thesys. 28
29 Keyboard Control Quantization Value Here you can choose a quantization value for Keyboard Control input. For example, if you want to trigger the Looper, but make sure it starts right on the beat, choose the quarter note symbol. Or, if you want to transpose your sequence at the beginning of the measure and don't want to miss a beat, set the value to whole notes. Pattern Select Each of the sixteen keys in this range corresponds to one of the sixteen Patterns. Play the corresponding key on your MIDI controller to trigger or change Patterns. As with all the other keys on the Keyboard Control Section, you can also click them with your mouse. Pattern Select should not be confused with the Pattern Edit Selector (see above) which is for editing patterns, not selecting them to play. Action Section (Keys) The Action Section of the keyboard shows the keyboard mapping of the Action Keys on your MIDI controller/keyboard. For a detailed description of each Action, see the Action Section description above. Pitch Transposition In addition to selecting Patterns, triggering Actions, and Transposing, the keyboard can also be used to start or stop the sequencer. You can use the Pitch Transposition keys (hit C3 or "0" to start/stop without transposition) or the Pattern Select keys to do this depending on the setting of the "Triggered By" switch in the Global MIDI Settings section (see above). 29
30 Sequencer Section Sequencer Preset The Sequencer Preset Manager located at the very top of the Sequencer area of Thesys. Here you can load, save, and step through presets (using the arrow buttons). Each preset can contain up to 16 different patterns. In addition, a preset contains MIDI Settings and Action Section knob settings (Time, Threshold, Steps, and Slew Rate). All other parameters are stored in individual Patterns within the preset. Note that the Synthesizer Section has its own Preset Manager for loading Synthesizer presets (see below) and works independently from the Sequencer Preset Manager. Preset vs. Pattern It is important to be clear on the difference between Sequencer Presets and Patterns. While Presets represent the highest level of the "parameter hierarchy," you can change practically all parameters of the Sequencer Section by changing Patterns. This is because each Pattern contains the information stored in the five sequencers: Pitch, Velocity, Gate Time, Performance, and Modulation (see above: "Pattern Sequencer"). In addition, a Pattern contains the root key, scale, sequencer play direction, master tempo settings, modulation CC assignments, and the swing factor. All of these parameters can change when changing from one pattern to another (either by manually keying the change or by using the Pattern Sequencer). This gives you an immense amount of real-time control and expressive possibility over your music. Global Sequencer Controls Global Shift The Global Shift button moves the steps located within the corresponding sequencer's Loop either left, right, up, or down (for changing Loop length, see below). 30
31 Copy & Paste The Copy button copies the entire sequence. After copying, choose another preset slot, then press the paste button. Random The Random button creates a complete random situation. The Min/Max controls define the randomize amount. If Max is set lower than Min, so values will be created within the difference. Pattern Edit Selector All the information contained in the five sequencers can be stored as a Pattern. Up to sixteen Patterns can be stored in a single preset. The Pattern Edit Selector allows you to edit each of these patterns individually. Click on the Pattern you wish to edit (the Pattern Edit Selector button for that Pattern turns blue) and make the desired changes. When you finished editing, click on the Pattern Edit Select Button again. Once you have created different Patterns, you can trigger them automatically with the Pattern Sequencer (see below). You can also trigger different Patterns manually by clicking on the Pattern Select on the Keyboard Control Layout (at the bottom of the Keyboard) or by playing the corresponding keys on your MIDI keyboard. Use the Pattern Edit Selector only for editing patterns, not for triggering them (because of the toggle-editing behavior). For Pattern triggering, use the Pattern Select keys in the Keyboard Control Section by either clicking on them or using your MIDI keyboard controller (see above: "Keyboard Control Section"). 31
32 Common Controls and Functions General Editing Features A number of editing features have been implemented for the sequencer areas: Click and drag on a step to create or change a value. Alternatively, you can use your mouse scrollwheel to change values in individual steps. Shift-click on a step to edit for finer adjustments. Cmd-click (OS X) or Ctrl-click (Windows) a step to create a straight line across all other steps. Alt-click and drag a step to move the whole sequence up or down. Rightclick a step to assign a CC via MIDI Learn The performance section features advanced mousing modes as well: Click on a step or step area to create or change a value. Right-click to delete steps. Right-click and drag to delete consecutive steps. Shift-click and move an active step to spread (copy) that value with the mouse. Alt + left click to increase a step value; alt + right click to decrease the value. Shift-Rightclick a step to assign a CC via MIDI Learn 32
33 Step Direction and Interval Clicking on the Step Direction and Interval control opens up a drop-down menu with the following choices: Forward: Plays the sequence from left to right. This is the default setting. Backward: Plays the sequence from right to left. Random: Plays the steps in a random order. Each 2nd: Plays every other step. For sequences with an even number of steps, only steps 1, 3, 5... etc. will be played. For sequences with an odd number of steps, the first run through the sequence will be as above (1, 3, 5... etc.), but on the first repeat, steps 2, 4, 6... will be played. Each 3rd: Same as Each 2nd, but instead one out of every three steps will be played. Each 4th: Same as Each 2nd and Each 3rd, but instead one out of every four steps will be played.note that if the Loop switch in the Sequencer Settings section is set to Global, only the Pitch Sequencer gives you a choice of direction and interval, since in this case, the Pitch Sequencer (and its Loop) act as a "Master Sequencer" for all the other sequencers. If you desire individual Step Direction and Interval control for each sequencer, then set the Loop switch to "Individual." Step Shift Control The Step Shift Control moves the steps in the looped area one step forward (right), back (left), up, or down. In the performance sequencer, you may only move the sequence forward (right) or back (left). 33
34 Copy and Paste Copies the steps in the looped area (as determined by the sequencer's Loop Bar (see below). Use the Sequence Length Bar as a way of selecting the part of the sequence you want to copy. Then, move the bar to the area of the sequence where you would like to paste the copied part of the sequence. This can be very useful in duplicating short riffs or patterns within the entire sequence. A nice feature makes it easier to copy and paste several sequences at once: The Pitch Sequencer, the Performance Sequencer and the Velocity, Gate Time, and Modulation Sequencers work on individual "Copy & Paste Layers." This makes it possible: 1)to copy and paste the contents of Velocity, Gate Time and Modulation sequencers between each other; 2)to copy and paste the Pitch, Performance and Velocity OR Gate Time OR Modulation sequencers at once. Therefore just set the loop bar to define the sequence range you like to copy, then hit copy in the Pitch sequencer, in the Performance sequencer, and the Velocity Sequencer. Then move the loop bar to the desired paste position and hit paste in Pitch, performance and Velocity. You will now see that each sequencer content has been copied on its individual "Copy & Paste Layer." Reset, Random and Mutate Reset (x) sets the Sequencer to its default value. Random (dice) creates a completely randomized situation. Mutate (arrows) changes existing values. 34
35 Loop Bar The Sequence Loop bar is at the top of each of the five sequencers. It determines both the length of the sequence in steps and the beginning and start steps. The Loop Bar also serves as the selection to be copied and then pasted within any given sequence (see "Copy & Paste" above). Click and drag at the beginning or end of the bar to shorten or lengthen either end. Click and drag in the middle of the bar to move the entire bar without changing its length. In the Global Settings, you can choose between individual Loop Bars for each sequencer, or a shared Loop Bar for all sequencers. With the "Individual" setting in the Global Settings (Loop), rich patterns can be built quickly by staggering the lengths of the different sequencers. For example, you could have a five-step pitch sequence playing along with a seven-step gate sequence and an eleven-step performance sequence; together, they would result in a quasi non-repeating overall pattern. In addition, the "Individual" setting makes it possible to have one sequencer running forwards, another backwards, and yet another in random mode or skipping every other step, for example. Global Sequencer Controls The four Global Sequencer Controls are at the bottom left of the Sequencer window, just above the Pattern Select of the Keyboard Control Section. The Copy & Paste buttons work just the individual sequencer Copy & Paste buttons (see above), except that the copying and pasting is for the all of the entire sequences, not just the looped areas. In addition, you can copy and paste between presets and even different instances of Thesys. To Shift button moves all the sequences either one step to the left or one step to the right each time you click on the corresponding arrow. For real adventure, click the Global Random button! 35
36 Pitch The Pitch Sequencer is the heart of any step sequencer, providing the pitch information for the synth or sampler being played. Each sequencer step gives you 12 increments of pitch increase or decrease with respect to the root key. In a standard chromatic tone framework (12 half-steps in an octave), this means that you have a two-octave range (+/- 1 octave), which corresponds to the range in most standard step sequencers. However, if you set the Mode to Major, for example, then an octave will be covered in seven steps, not twelve. In this case, if your root key is C3, the highest note (without octave transposition) on each step will be 12 scale steps above C3, or A4. Similarly, counting 12 scale steps below C3, you arrive at E1. Pentatonic (5-note) scales provide even more reach, because fewer scale steps (only five in this case) are required per octave. Root Key Set The Root Key Set control establishes the root key of the Pitch Sequencer. This corresponds to the middle line along the window. It is also the note value of all the steps when the sequencer is reset (Reset button to the right of the various sequencers). Think of the root key as the key you want to play in. Used with the Scale Selector (see below), the root key can help you quickly build tonal sequences that automatically confine themselves to a particular scale, based on a particular root key for that scale. 36
37 Scale Selector The Scale Selector gives you a broad choice of automatic scaling of the Pitch Sequencer. If you do not want to be confined to a particular scale or mode, choose "Chromatic" and the Pitch Sequencer will behave like any normal pitch sequencer module. However, if you are building a pattern in, say, D minor, then setting the Root Key to "D" and the Scale Selector to "minor" will make sure that all the steps in the Pitch Sequencer will be part of a D minor scale. In addition to major and minor scales, there is very large number of other scales. Experimenting with the different scale types can yield unexpected and interesting results. Recording Input Mode Although the standard way of building patterns is drawing on the various sequencers with your computer mouse, you might find it easier to use one of the recording input modes for creating pitch sequences which uses the MIDI notes produced by your MIDI keyboard/controller to record into the pitch sequencer. The Recording Input Mode gives you a choice between Live and Step recording: When the Record button is activated in Live mode, the pitches will be recorded in real time when you set Thesys in motion. In this case, each note you play will be quantized to the clock rate (BPM x note value = step rate). Depending on the length set in the Pitch Sequencer, the pattern will continue repeating and will record any incoming MIDI notes overwriting notes which were recorded on previous passes until you press Record again to stop the recording process or until the sequencer clock is stopped. In Step mode, each each time you play a note, Thesys records that note on the current step, advances to the next step, and then waits for you to play the next note. This is very useful for building complex patterns that may be difficult to play in real time. 37

38 Note Name Display Below each step is a Note Name Display which shows the note name of each step. Lock Under the Note Name Display, the red Lock buttons let you lock each individual step to prevent any further changes affected by the pitchkeys. Just click on along the bar under the step(s) you would like to lock and a small red bar appears. Right click on the buttons to unlock them. Velocity The Velocity sequencer provides the gate signal that triggers each step in the Pitch sequencer. The height of each step (amount of velocity) determines how loud the triggered note on that step will be played. If you are using Thesys to trigger an external synth, make sure that the external instrument or its preset also reacts to different velocities if you want this to be effective. Sequencer Area The Velocity Sequencer default step value is 0 (on a scale of 0 to 127), which represents the lowest possible position of each step, producing no trigger on that step (no sound). Click and drag on each step to raise or lower velocity. Click and drag along multiple steps to create velocity curves along consecutive steps. Mute Each Velocity Sequencer step has its own mute button represented by the dark area below the step. When clicked, a red "x" indicates that a step is muted. This is equivalent to setting the step to 0 velocity and is a handy way to quickly develop rhythms in your patterns. 38

39 Gate Time The Gate Time Sequencer determines the length of the individual notes. You can think of Gate Time as being the length of time that a key is "held down" on a keyboard. The gate time values of each step are displayed below the corresponding step. A value of 1 (in the middle of the step) means that a note is held for the entire value of the step time, or 100% of the step time. Lower values (less than 1) turn the gate off before the next step is triggered while higher values can make a single note play up to the length of four steps (value of 4.0). The Gate Time Multiplier Fader allows to divide and multiply the gate times by up to 8 times. That way a note can be as long as a whole sequence (32steps) or so short that is can be used as a dead note. Gate Time also depends on the amplitude envelope of the sound being triggered. If you are using the internal synthesizer, the Sustain level should be all the way up (to the right) in order to completely control the length of the triggered sound with the Gate Time Sequencer. Varying gate times is a great way to introduce quite a bit of variety in your patterns. Depending on the settings of the synth you are triggering, you can use Gate Time to vary between extremely short note "impulses" to long, overlapping note "clouds". In musical terms, this means you can go from staccato to legato (and even layered, if your synth is polyphonic). Performance The Performance Sequencer is actually five sequencers in one: Octave, Bend, Chord, Roll, and Random, arranged in rows. The Performance Sequencer is the key to making your patterns vibrant and interesting by introducing quite a bit of variety in the way they are played. 39


40 Octave The Octave row shifts the pitch up or down one or two octaves. Click on a step to open the octave shift palette and then click again to choose. Right-click to reset any step. Bend Clicking on a step in the Bend row opens a palette of twenty different pitch bend shapes and directions to choose from. This ranges from a simple bend up or down to multibends, which can create interesting pitch modulation effects (vibrato) over individual or multiple steps. Chord 40
41 A click on a step in the Chord row opens the Chord Palette with a vast choice of chord types and inversions (see Appendix 1 for a list of the chords available). The chord is based on the current note in the pitch sequencer. In other words, if the pitch sequencer shows note C on a step with a minor chord on it, the resulting chord will be C minor. Roll The Roll row provides a choice of 18 different articulation patterns for each step. The first row of patterns on the palette repeat the note within a three or four note subdivision. The second row performs the same rhythm, but instead of repeating notes, each successive note of the roll is transposed up the next scale step (depending on the scale set in the pitch sequencer). The third row of the palette behaves exactly the same except that the successive step repetitions are transposed down to the next scale step (also determined by the scale set in the pitch sequencer). Random The Random sub-sequencer lets you randomize any of the following parameters: Pitch, Velocity, Trigger, Gate Time, Octave, Pitch Bend, Chord Major, Chord Minor, and Roll on any step(s) you choose. Any of the eight Modulation Track parameters may also be randomized. Used sparingly, the Random row can spice up your sequences without making them go completely berserk. 41
42 Modulation The Modulation Sequencer allows you to modulate any available MIDI CC parameter. For example, you can send pan, filter cutoff, or even program change information to your external synthesizer. In addition, if you are just using the Built-in Synthesizer, you can also modulate a number of synth parameters as well. The Modulation Sequencer consists of eight Modulation Tracks. These are selected by clicking on the column of eight buttons located just to the left of the Modulation Sequencer controls with the first track at the bottom and the eighth track at the top. Each Track can have its own Loop settings (length, start, and end) and Play Direction. It is assigned to both an internal (Built-in Synthesizer) modulation target and an external MIDI CC number. The modulator select buttons light up in relation to the data they play back. Each modulation track can be deactivated independently. Use the All Modulators Off Button below the modulations selectors to deactivate all modulators with one click. Internal Modulation Each of the tracks is pre-assigned to a specific modulation target parameter in the builtin Synthesizer. If you click on the Modulation Track 1 (the lowest of the column of buttons to the left of the Modulation Sequencer), you'll see the internal assignment indicates "Level." Just to the right of that, a button can be clicked on (green) or off (dark grey) to activate or disactivate internal modulation for that track. The pre-assigned internal modulation parameters are: Level, Pan, Wave, Detune, Cutoff, Reso, Peak, and Delay Mix. 42

43 MIDI CC number Just above the Internal Modulation indicator is the external MIDI CC chooser. Click to open a drop down menu containing all of the MIDI CC numbers with Aftertouch and Program Change located in the last menu. The MIDI CC Modulation is organized in the same way as Internal Modulation, except that you can assign the different MIDI CC targets however you want to the eight Modulation Tracks. Note that each Modulation Track contains the sequencer information (Loop parameters, direction, and values) for both the Internal Modulation AND the external MIDI CC data transmission. In other words, each track shares the same data for both internal and external modulation. In general, this should not make any difference because in most cases, you'll either be using the (internally modulated) built-in Synthesizer OR the Thesys to drive an external synthesizer. On/Off Button Turn internal modulation of the built-in synthesizer on or off with the green indicatorbutton. MIDI Value The MIDI values of each step are indicated at the bottom of each step of the Modulation Sequencer. 43

44 Built-in Synthesizer Thesys is designed to be the ultimate MIDI sequencer used within a host environment. The MIDI output is typically used to drive a software synthesizer or sampler plugged into your host alongside Thesys, or even external hardware you might want to control as well. However, when building patterns, at first you may not want to set up MIDI routing to a software instrument, but just need to get a general idea of how your pattern will sound. This is why we have created a simple built-in synthesizer. To access the synthesizer controls, click on the loudspeaker icon along the upper edge of the Sequencer Section. This toggles to the synthesizer controls. These controls will be familiar to anyone having some experience with hardware or software synthesizers. Synthesizer Preset Manager Located just under the Sugar Bytes logo, the Synthesizer Preset Manager works the same as the Sequencer Preset Manager. Simply click on the name of the preset to open the Preset Chooser in order to load or save a preset. On/Off The Oscillator On/Off button is located in the upper right corner of the Synthesizer Control Area and activates or deactivates the internal synthesizer. 44

45 Oscillator Settings Level Sets the volume level of the synthesizer output. Pan Determines the position (panorama) in a left-right stereo field. Waveform The Waveform knob morphs between triangle, square, and narrow square wave forms. Detune The synthesizer oscillators generate two voices simultaneously; the Detune controls the frequency spread between the voices on a scale from 0 to 100%. When set in the middle, there is no detuning, when turned to the right or left, the voices are detuned with regards to one another, creating a thicker sound. Volume Envelope The volume envelope can be formed using the classic parameters Attack time, Decay time, Sustain level, and Release time. 45

46 Filter The built-in synthesizer also has a low pass filter module. The filter envelope determines the amount of time between the cutoff and the peak value. Envelope output 0 represents the cutoff value, envelope output 1 represents the peak value. This feature ensures that filter modulation always occurs within the valid cutoff range to avoid clipping. If cutoff and peak (which usually is the envelope amount) would be just added, you would easily get above the valid cutoff range and so clipping would occur. One way to think of these values is that cutoff is the minimum frequency and peak is the maximum frequency, and the envelope modulates the output between these two values. Cutoff Determines the overall cutoff frequency of the filter. It is the base value of the filter envelope, with Peak being the highest possible value. Reso(nance) Resonance sets the amount of Q or resonance of the cutoff frequency. Setting this control completely to the left will produce a very smooth, non-resonant sounding filter effect. As Resonance increases, the cutoff frequency becomes more pronounced, eventually becoming self-resonating (whistling sound). Peak Peak is the upper frequency cutoff limit as determined by the filter envelope. Attack The length of time required to reach the Peak frequency, as set by the Peak parameter. Decay The amount of time to fall back from the Peak frequency. Sustain The frequency held (between Peak and Cutoff) after Decay time and before Release. 46
Midi Madness 3. Owner s Manual V3.0.2-RC1
 Midi Madness 3 Owner s Manual V3.0.2-RC1 Table of Contents Table of Contents... 2 Introduction... 3 Installation... 3 Registering... 4 Probability Concept... 4 Using Midi Madness... 6 The User Interface
User Manual V
 By User Manual V1.0 http://polyversemusic.com/support support@polyversemusic.com Gatekeeper User Manual Table of Contents Getting Started 4 Installation 4 Presets 5 With or Without MIDI? 5 Ableton Live
User Guide. Manual Version 1.0
 User Guide Manual Version 1.0 Table of Contents Introduction... 3 System Requirements and Product Support... 3 Installation... 3 Windows... 3 Mac OS X... 3 Quick Start... 4 Operation... 5 Global Controls...
OPERATION MANUAL VST / AU
 OPERATION MANUAL VST / AU This manual is under construction. If you want to help to improve it contact: info@audiorealism.se Introduction AudioRealism Bass Line 3 (ABL3) is an emulation of a classic pattern
Push. Figure A4.1 Push.
 Push Figure A4.1 Push. Push is a hardware controller designed by Ableton and Akai to drive Live s Session View. Simply connect the Push unit using the provided USB cable to your computer and off you go.
MINIBIT USER GUIDE. v1.6
 MINIBIT USER GUIDE v1.6 MINIBIT...3 INSTALLATION...3 REGISTRATION...4 PARAMETERS...5 MAIN...5 STEP SEQUENCER...6 CUSTOM WAVEFORMS...7 FEATURES...8 MIDI LEARN...8 RANDOMIZER...8 GLOBAL VOLUME BOOST...8
MIDI HARMONISER PLUGIN
 Obelisk by FrozenPlain 1 MIDI HARMONISER PLUGIN www.frozenplain.com Obelisk by FrozenPlain 2 1 - WHAT IS OBELISK? Obelisk is a MIDI plugin instrument. Rather than produce audio, it produces MIDI. Obelisk
Kameleono. User Guide Ver 2.1
 Kameleono Ver 2.1 Table of Contents Overview...4 MIDI Processing Chart...5 Kameleono Inputs...5 Kameleono Core...5 Kameleono Output...5 Getting Started...6 Installing...6 Manual installation on Windows...6
Inear Display AMALGAME
 Inear Display AMALGAME User Guide Version 1.1 Table Of Contents Introduction 3 Overview 4 Installation and First Launch 5 Interface Overview 6 Loading and Saving Presets 7 Effects 8 XY Pad 9 Sequences
Instascale. MIDI Processor Plug-in. Manual
 Instascale MIDI Processor Plug-in Manual website: waproduction.com email: info@waproduction.com Version 1.0.0 released in June 2018. Copyright 2018 - waproduction.com This document is created in 05/15/2018.
Effectrix. User Manual
 Effectrix User Manual Table of contents What Is Effectrix 4 Installation 5 Windows 32bit 5 Windows 64bit 5 macos 6 Uninstalling 7 Authorization 7 Effectrix structure 8 The Header 8 Global Presets 8 About
StepPolyArp Unit. Step Polyphonic Arpeggiator / Sequencer App & Audio Unit MIDI effect for ios
 StepPolyArp Unit Step Polyphonic Arpeggiator / Sequencer App & Audio Unit MIDI effect for ios Presentation... 1 Application setup... 2 MIDI connections between ios applications... 2 MIDI over WiFi on macos...
FRONT PANEL OVERVIEW...1 REAR PANEL OVERVIEW...3 HOOKUP DIAGRAM...4 DISPLAYING INFORMATION...6
 TABLE OF CONTENTS FRONT PANEL OVERVIEW...1 REAR PANEL OVERVIEW...3 HOOKUP DIAGRAM...4 DISPLAYING INFORMATION...6 OCTAVE AND TRANSPOSITION...6 NOTE...6 NOTE AFTERTOUCH (Channel Pressure)...6 CONTROL CHANGE...6
Workshop. Automation ÂØÒňΠMV-8000
 ÂØÒňΠMV-8000 Workshop Automation 2006 Roland Corporation U.S. All rights reserved. No part of this publication may be reproduced in any form without the written permission of Roland Corporation U.S.
Inear Display Lancinantes
 Inear Display Lancinantes User Guide Version 1.0 Table Of Contents Introduction 3 Overview 4 Installation and First Launch 5 Interface Overview 6 Loading and Saving Presets 7 Notes Module 8 Mixer Module
User Guide Version 1.0.0
 obotic ean C R E A T I V E User Guide Version 1.0.0 Contents Introduction... 3 Getting Started... 4 Loading a Combinator Patch... 5 The Front Panel... 6 On/Off... 6 The Display... 6 Reset... 7 Keys...
INSTALLATION. UNDERSCORE is a sample library for Native Instruments Kontakt 5.3 and later. It will NOT work with the free Kontakt Player.
 INSTALLATION UNDERSCORE is a sample library for Native Instruments Kontakt 5.3 and later. It will NOT work with the free Kontakt Player. Before loading any of the instruments in the Instruments folder,
CV.OCD USER MANUAL. CV.OCD has four assignable continuous analog CV outputs and twelve assignable gate/trigger outputs. MIDI-TO-CV
 six4pix.com/cvocd CV.OCD USER MANUAL Introduction CV.OCD is a device which converts MIDI signals to the Control Voltage (CV) and Trigger/Gate signals which are used to control traditional analog synthesizers.
User Guide. English. Manual Version 1.0
 User Guide English Manual Version 1.0 Table of Contents (Click a chapter/section to skip to it.) Introduction... 5 Box Contents... 5 Support... 5 About This User Guide... 5 Initial Setup... 6 1. Software/Driver
J74 Volca Control - Instructions and FAQ
 J74 Volca Control - Instructions and FAQ http://www.fabriziopoce.com/vc_faq.html [1] - What do I need to make use of the VolcaControl devices (VKeys, VBeats, VBass)? You need the Volca unit or units, a
Prophet '08 PlugSE Editor
 Prophet '08 PlugSE Editor SoundTower PlugSE for Prophet 08 Synthesizer VST (PC/Mac) AudioUnits (Mac) SoundEditor, PlugSE, and ipad Products Reach Inside... SoundTower Inc. 2012 www.soundtower.com Special
Worlde TUNA MINI MIDI Controller User s Manual
 HANGZHOU WORLDE DIGITAL PIANO CO.,LTD WEBSITE: WWW.WORLDE.COM.CN EMAIL:SALES@WORLDE.COM.CN TEL:86 571 88730848 Worlde TUNA MINI MIDI Controller User s Manual -1- Contents 1. INTRODUCTION... 3 2. FEATURES...
PULSE. Table of Contents
 Table of Contents WELCOME... 4 INSTALLATION & SETUP... 4 OVERVIEW... 4 USER INTERFACE... 5 SECTION 1 - EXPORT & EDIT... 6 SECTION 2 - SEQUENCER & CONTROL... 7 SECTION 3 - PRESETS... 8 SECTION 4 - SETTINGS
BeatMaker 3 User Manual. Revision:
 BeatMaker 3 User Manual Revision: 3.0.10 What s new in version 3.0.10 of this manual - Updated section Quick Start Guide: 1.3 Transport toolbar - Added section Performance View: 2.7 Select mode - Updated
Eventide Inc. One Alsan Way Little Ferry, NJ
 Copyright 2017, Eventide Inc. P/N: 141254, Rev 4 Eventide is a registered trademark of Eventide Inc. AAX and Pro Tools are trademarks of Avid Technology. Names and logos are used with permission. Audio
and close the various Traktor Panels. Setup: click on the setup icon to open the setup dialog. Close: clicking this icon will close TRAKTOR DJ Studio.
 Welcome... TRAKTOR DJ Studio 2 Quick Reference...to TRAKTOR DJ Studio 2, the latest and most advanced version of the software that changed the way DJs think about computers. We ve introduced a number of
PSP Rhythm User s Manual
 PSP Rhythm User s Manual Introduction pg. 02 Main Menu pg. 03 Button Icon Legend pg. 03 User Interface pg. 04 Pattern View pg. 05 Track View pg. 07 Wave View pg. 09 Effects View pg. 11 Song View pg. 14
Scythe Synthesizer for iphone
 Scythe Synthesizer for iphone http://www.bitmaskstudio.com/ https://twitter.com/bitmaskstudio Scythe is a polyphonic wavetable synthesizer which can load custom sounds and has a Wavetable Creator tool.
What s needed is a reasonably priced, versatile, low-hp module that can effectively bridge the gap between MIDI and CV.enter, the Mutant Brain!
 The Mutant Brain 16 output MIDI to trigger, gate, polyphonic cv and more Thank you for your interest in/purchase of the Mutant Brain. We would like to thank you for considering a place for the Mutant Brain
Sounds of the Delta Kontakt instrument.
 Sounds of the Delta Kontakt instrument. INDEX 1...How to Install/Load presets. 2...Overview of instrument. 3...Sequencer 4...Effects section and controls. 5...Credits. Thank you for buying our latest Kontakt
MainStage 2. Exploring MainStage
 MainStage 2 Exploring MainStage KKApple Inc. Copyright 2011 Apple Inc. All rights reserved. Your rights to the software are governed by the accompanying software license agreement. The owner or authorized
Accusonus Inc. Lexington, Massachusetts USA
 The information in this document is subject to change without notice and does not represent a commitment on the part of Accusonus Inc. The software described by this document is subject to a License Agreement
Chaos Culture. MIDI Modulators / Multiclip Note preview 1.6. Edited by Jason Cowling
 Chaos Culture Introduction... 2 Important stuff... 2 Setup... 3 Editing clips... 4 Using the editor... 5 Modulators... 8 Settings... 9 Work$ow settings... 10 Performance... 13 Future updates... 13 1.8.99
Sub Phatty Editor Manual
 Sub Phatty Editor Manual OVERVIEW & FEATURES The Sub Phatty Plugin and Standalone Editor controls preset library management, preset sharing, realtime editing, and host DAW integration. Powerful HIDDEN
User Manual v1.5.
 User Manual v1.5 www.directsynth.com 1 Introduction Thank you for choosing our product, we wish you lot of fun using it. What is EMX? The EMX, also known as «Electribe MX» is a hardware audio workstation
Frame Editor 2 Manual
 Chaos Culture Frame Editor 2 Manual Setup... 2 Editing clips... 2 Editing basics... 4 Managing colors... 6 Using effects... 7 Descriptions of the effects... 9 Fixed velocity... 9 Random velocity... 9 Rotate...
Using Impact LX with Reason
 Using Impact LX with Reason Applicable to Impact LX25, 49, 61 & 88 www.nektartech.com www.nektartech.com Using Impact LX with Reason Reason Integration Setup and Configuration The Impact LX Reason Integration
DROP-X. Drag & Drop - Beat Repeat Sampler USER MANUAL. VST / AU / AAX Plugin Mac OSX / WIN 32 / 64 bit
 DROP-X Drag & Drop - Beat Repeat Sampler VST / AU / AAX Plugin Mac OSX / WIN 32 / 64 bit USER MANUAL BEAT SKILLZ 10 SOUND BANKS - OVER 250 PRESETS Features: DropX is a very easy to use Drag & Drop Sampler
QuantiChord. MIDI Chord Quantizer App & Audio Unit MIDI effect for ios
 QuantiChord MIDI Chord Quantizer App & Audio Unit MIDI effect for ios Presentation... 1 Application setup... 2 MIDI connections between ios applications... 2 MIDI over WiFi on macos... 3 MIDI over USB
Procussion operation manual Basic Operation 15 BASIC OPERATION
 Basic Operation 15 BASIC OPERATION 16 Main Controls 17 BASIC OPERATION MAIN CONTROLS MIDI ACTIVITY EDIT MENU SELECT CURSOR CONTROL VOLUME CONTROL I/O MASTER EDIT ENTER C01 Vol127 Pan=K CURSOR DATA VOLUME
Contents. Overview...3. Song Editor Clip Editor Browser and Rytmik Cloud Keyboard Controls Support Information...
 User Manual Contents Overview...3 Song Editor...4 Clip Library...4 Song Playback...4 Tracks...5 Export...5 Clip Editor...6 Note Sequence...6 Instrument...7 Instrument Effects...7 Tempo Setting...8 Other
FPDJ. Baltazar Ortiz, Angus MacMullen, Elena Byun
 Overview FPDJ Baltazar Ortiz, Angus MacMullen, Elena Byun As electronic music becomes increasingly prevalent, many listeners wonder how to make their own music. While there is software that allows musicians
User Manual. Drum Machine
 User Manual Drum Machine Overview Interface Overview Interface 1 Nithonat s interface is split into three parts: Internal sequencer Responsible for editing patterns in Int.Seq. mode. Internal sequencer
MintySynth Software Manual v. 4.2
 MintySynth Software Manual v. 4.2 mintysynth.com info@mintysynth.com Contents Introduction I. Demo Song and Live Mode a. Demo Song b. Tempo c. Swing d. Waveform e. Duration f. Envelope II. III. IV. Photocell
Portable Music Studio
 Everything you need, all in one. いつでも どこでも 作曲 Instruction Manual (08-2018) Portable Music Studio 1 Contents Features... 3 Basic Controls...4 - Menus and saving.. 5 Pattern Mode... 6 Global Pattern Settings...7
Groove Agent 4. Version history Known issues & solutions. Januar 2015 Steinberg Media Technologies GmbH
 Groove Agent 4 Version history Known issues & solutions Januar 2015 Steinberg Media Technologies GmbH Table of contents Table of contents... 2 About... 3 Groove Agent 4.2.0... 4 New features... 4 Last
LiveProfessor 2. User Manual. Rev audiostrom.com
 LiveProfessor 2 User Manual Rev 1.0 - audiostrom.com Contents Introduction 4 System Requirements 4 License files 4 First Run 5 Installing Plugins Plugin Manager Audio Settings MIDI Inputs 7 Replacing A
User Manual v1.1.
 User Manual v1.1 www.directsynth.com 1 Introduction Thank you for choosing our product, we wish you lot of fun using it. What is ESX? The ESX, also known as «Electribe SX» is a hardware audio workstation
Eventide Inc. One Alsan Way Little Ferry, NJ
 Copyright 2015, Eventide Inc. P/N: 141259, Rev 2 Eventide is a registered trademark of Eventide Inc. AAX and Pro Tools are trademarks of Avid Technology. Names and logos are used with permission. Audio
RHIZOME HOST USER GUIDE V 2.1
 o RHIZOME HOST USER GUIDE V 2.1 1. INTRODUCTION... 5 2. UNIT WORKFLOW... 6 2.1. Displays... 6 2.2. Matrix Edit... 6 2.3. Transport bar... 7 2.4. Common function buttons... 8 2.5. Left zone white printed
Manual for the TimeFreezer instrument. Introduction - The Idea of Time Freezing
 Introduction - The Idea of Time Freezing Infinite sound... Did you ever want to stop a sound just like a snapshot, so that it stays forever, without looping effects and without sounding like a synthesizer?
User Manual. for ArcTrax UWP version
 User Manual for ArcTrax UWP version 1.0.3.0 Table of Contents 1 Overview... 2 1.1 Introduction... 2 1.2 Structure... 2 2 Panel Reference... 3 2.1 Overview... 3 2.2 Controls... 4 2.3 Oscillator... 5 2.4
INTRODUCTION 3 GETTING STARTED 5
 REFERENCE MANUAL INTRODUCTION 3 OVERVIEW 3 INSTALLATION / ACTIVATION 3 NAVIGATION 4 GETTING STARTED 5 XY MORPHING 5 MODES 5 MAKING A SOUND 6 SOURCE TAB 6 FILTER TAB 6 ENV TAB 7 SHAPE TAB 7 LFO TAB 8 FX
User Manual. Bass Line
 User Manual Bass Line Overview Overview After loading the plug-in into the host application, the Phoscyon Graphic Interface will appear: 1 Graphical user interface 1 Overview Phoscyon s interface is split
Chaos Culture. Multiclip Editor / Multiclip Note preview 1.5. Edited by Jason Cowling
 Chaos Culture Introduction... 2 Important stuff... 2 Setup... 3 Editing clips... 4 Using the editor... 5 Settings... 9 Workflow settings... 10 Performance... 13 Future updates... 13 Editor 1.6.61 / Note
An Intelligent Musical Instrument. By David Zicarelli, Joel Chadabe, John Offenhartz, and Antony Widoff
 M An Intelligent Musical Instrument By David Zicarelli, Joel Chadabe, John Offenhartz, and Antony Widoff Version 2.7 Manual by Richard Lainhart, Joel Chadabe, and David Zicarelli Cycling 74 379A Clementina
nativekontrol PXT-Live Plus User Manual Version 1.0.8
 nativekontrol PXT-Live Plus User Manual Version 1.0.8 1 CHANGES IN THIS VERSION 2 GENERAL OVERVIEW 3 SETUP 3.1 Live Settings 3.2 UserPlusPreferences 4 GLOBAL CONTROLS 4.1 Touch Strip 5 PLUS MATRIX MODES
KARMA Motif Using the Remote Mode S70/S90 XS
 KARMA Motif Using the Remote Mode S70/S90 XS Revision 07-Oct-2014 by Stephen Kay www.karma-lab.com Overview Note: the use of S90 XS in this document refers to either an S70 XS or an S90 XS. The information
QUICK-START GUIDE ROLAND DJ-808
 QUICK-START GUIDE ROLAND DJ-808 Installation and Setup The Roland DJ-808 requires drivers for both Windows and MacOS operating systems. IMPORTANT NOTE: Please ensure you have the latest available drivers
User Guide English. Manual Version 1.8
 User Guide English Manual Version 1.8 Table of Contents Welcome to the MPC... 12 System Requirements and Product Support... 12 About This User Guide... 13 Important Notes... 14 Installation... 14 Windows...
MOX6/MOX8 Editor VST Owner s Manual
 MOX6/MOX8 Editor VST Owner s Manual Contents What is the MOX6/MOX8 Editor VST?...2 Data Structure of the MOX6/MOX8 Editor VST...3 Starting the MOX6/MOX8 Editor VST...4 An Example of MOX6/MOX8 Editor VST
Aeolian Meditation. User Manual. All that we see or seem is but a dream within a dream. - Edgar Allan Poe
 Aeolian Meditation User Manual All that we see or seem is but a dream within a dream. - Edgar Allan Poe The ultimate soundscape generator. Pure and meditative or an alien landscape. Ocean waves or an industrial
Autodafe. OSCar for Kontakt V1.0
 Autodafe OSCar for Kontakt V1.0 MAIN SYNTHESIZER WINDOW 2 ARPEGGIATOR WINDOW 8 GLIDE - UNISONO WINDOW 9 INSTALLATION 10 COPYRIGHT INFO 12 Main Synthesizer Window GENERAL INFO Autodafe OSCar is a recreation
HALion 4. Version history Known issues & solutions. Januar 2013 Steinberg Media Technologies GmbH
 HALion 4 Version history Known issues & solutions Januar 2013 Steinberg Media Technologies GmbH Table of contents About... 3 HALion 4.5.4... 4 Issues resolved... 4 HALion 4.5.3... 5 Improvements... 5 Issues
x0xb0x Bassline Synthesizer ( Sokkos OS ) User Manual
 User Manual") x0xb0x Bassline Synthesizer ( Sokkos OS 1.9.1 ) User Manual Contents Synthesizer Section 1. Knobs, buttons & LED s 1.1 Function knob 1.2 Bank knob 1.3 Tempo knob & LED 1.4 Bank LED s 1.5 Buttons & LED
x0xb0x Bassline Synthesizer ( Sokkos OS 1.9.1 ) User Manual Contents Synthesizer Section 1. Knobs, buttons & LED s 1.1 Function knob 1.2 Bank knob 1.3 Tempo knob & LED 1.4 Bank LED s 1.5 Buttons & LED
PSQ-1684 Operation Manual
 PSQ-1684 Operation Manual Version 3.0.0 1 Table of Contents Table of Contents Introduction Quick Start Main Clock Section Run Sync & Rate Shuffle Reset CV Reset CV Run Chaining PSQs Pulse Section Generator
MPC Essentials Release Notes
 MPC Essentials Release Notes About Akai Professional is continually updating and enhancing MPC Essentials. This document lists the new features, fixes and improvements made to your MPC Essentials software.
Using The Akai MPC With Ableton Live
 Using The Akai MPC With Ableton Live Written By Andy Avgousti (MPC-Tutor) Copyright Andy Avgousti 2012 Published by MPC-Samples.com 2012 All rights reserved. No part of this book, nor any of its associated
Axiom DirectLink for Reason and Record User Guide
 User Guide Legal Notices This guide is copyrighted 2010 by Avid Technology, Inc., with all rights reserved. Under copyright laws, this guide may not be duplicated in whole or in part without the written
User Guide English. Manual Version 1.0
 User Guide English Manual Version 1.0 Table of Contents Welcome to the MPC... 5 System Requirements and Product Support... 5 About This Manual... 6 Important Notes... 7 Installation... 7 MPC Hardware Overview...
Using Nektar Impact LX with Reaper
 www.nektartech.com www.nektartech.com Using Nektar Impact LX with Reaper Reaper Integration Installation and Setup The Impact LX Reaper Integration is compatible with Reaper 4.59 or later. We recommend
Firmware Version 1.60 User s Guide
 MZ-X500 EN MZ-X300 Firmware Version 1.60 User s Guide MZX500/300-160-E-1A 1 Updates Provided by Firmware Version 1.10 Firmware changes provided by Version 1.0X are those described below. Addition of a
Using Nektar Impact LX with Cubase & Nuendo
 www.nektartech.com www.nektartech.com Using Nektar Impact LX with Cubase & Nuendo Cubase Integration Installation and Setup The Impact LX Cubase Integration is compatible with Cubase 5, 6, 6.5, 7 and 8,
TRAKTOR DJ Studio 2 Quick Reference. Welcome... The TRAKTOR Panels
 Welcome... TRAKTOR DJ Studio 2 Quick Reference...to TRAKTOR DJ Studio 2, the latest and most advanced version of the software that changed the way DJs think about computers. We ve introduced a number of
Welcome Installation Authorization The T-Pain Engine: Quick Start Interface Sound Check... 10
 CONTENTS Welcome... 5 Installation... 5 Authorization... 6 The T-Pain Engine: Quick Start... 8 Interface... 8 Sound Check... 10 The T-Pain Engine: First Steps... 11 Beat... 11 Vocals... 14 FX... 15 Mixdown...
MANUAL September 23, 2015
 MANUAL September 23, 2015 INTRODUCTION Addictive Trigger - Intelligent Drum Replacement Addictive Trigger is a combination of a very competent "Trig" engine and the acclaimed Addictive Drums engine and
Sonarworks Reference 4 Headphone Edition User Manual VERSION 1 (SEPTEMBER 2017)
") Sonarworks Reference 4 Headphone Edition User Manual VERSION 1 (SEPTEMBER 2017) 1 Table of Contents 1. Product Overview.... 3 What is Sonarworks Reference system?... 3 1 Headphone plugin.... 3 2 Systemwide...
Sonarworks Reference 4 Headphone Edition User Manual VERSION 1 (SEPTEMBER 2017) 1 Table of Contents 1. Product Overview.... 3 What is Sonarworks Reference system?... 3 1 Headphone plugin.... 3 2 Systemwide...
Manual written by Alessio Santini and Simone Fabbri. Manual Version 1.0 (10/2013) Product Version 1.0 (10/2013)
 Product Version 1.0 (10/2013)") Manual written by Alessio Santini and Simone Fabbri. Manual Version 1.0 (10/2013) Product Version 1.0 (10/2013) www.k-devices.com - sales@k-devices.com K-Devices, 2013. All rights reserved. Index 1.This
Manual written by Alessio Santini and Simone Fabbri. Manual Version 1.0 (10/2013) Product Version 1.0 (10/2013) www.k-devices.com - sales@k-devices.com K-Devices, 2013. All rights reserved. Index 1.This
KARMA Motif Getting Started
 KARMA Motif Getting Started Revision 07-Oct-2014 by Stephen Kay www.karma-lab.com Prerequisites Please perform the steps in the Installation and First Launch tutorial before beginning this one. Note: the
Q170 MIDI Gates. Q170 MIDI Gates Specifications. Aug 23, 2018
 Aug 23, 2018 The MIDI Gates module produces gate signals from a stream of MIDI messages, either from a keyboard, a DAW or any MIDI source. Each of the 8 outputs can be programmed for one or more MIDI note
User Guide. English ( 3 16 ) Appendix English ( )
 Appendix English ( )") User Guide English ( 3 16 ) Appendix English ( 17 19 ) USB SUSTAIN C17 POWER ON OFF User Guide (English) Box Contents Oxygen 25 USB Cable Ableton Live Lite Software Download Card Quickstart Guide Safety
User Guide English ( 3 16 ) Appendix English ( 17 19 ) USB SUSTAIN C17 POWER ON OFF User Guide (English) Box Contents Oxygen 25 USB Cable Ableton Live Lite Software Download Card Quickstart Guide Safety
LITTLE MIDI MACHINE v3.0
 LITTLE MIDI MACHINE v3.0 Welcome to Little MIDI Machine! This little app will let you turn your ipad into a vintage analog-style step sequencer so that you can use your ipad to control your hardware synthesizers
Bitbox User s Manual
 Bitbox User s Manual Welcome to bitbox. Bitbox is a very useful tool for capturing and playing back samples. This manual will walk you through all of the features of bitbox. If you want to start playing
SH-2. PLUG-OUT Software Synthesizer Owner s Manual
 SH-2 PLUG-OUT Software Synthesizer Owner s Manual Copyright 2014 ROLAND CORPORATION All rights reserved. No part of this publication may be reproduced in any form without the written permission of ROLAND
INTRODUCTION 3 MIDI SEQUENCERS 5 AUDIO CONTROLLERS/FX 13 INSTRUMENTS 18 CONTROLLER LAYOUTS 27
 REFERENCE MANUAL INTRODUCTION 3 OVERVIEW 3 INSTALLATION / ACTIVATION 4 NAVIGATION 4 MIDI SEQUENCERS 5 4PLAY 5 ISO ARP 6 RADAR 7 RIPKORD 9 CHORD SECTION 9 ARP SECTION 10 RIPPLE 11 AUDIO CONTROLLERS/FX 13
Accusonus Inc. Lexington, Massachusetts USA
 The information in this document is subject to change without notice and does not represent a commitment on the part of Accusonus Inc. The software described by this document is subject to a License Agreement
Meta-Gest. A flexible and adaptable performance environment created in Max/MSP for real-time audio processing.
 Meta-Gest A flexible and adaptable performance environment created in Max/MSP for real-time audio processing. Konrad Kaczmarek November 2007 Meta-Gest: A flexible and adaptable performance environment
Impro-Visor. Jazz Improvisation Advisor. Tutorial. Last Revised: 5 June 2006 Currently 62 Steps. Bob Keller. Harvey Mudd College
 Impro-Visor Jazz Improvisation Advisor Tutorial Last Revised: 5 June 2006 Currently 62 Steps Bob Keller Harvey Mudd College Computer Science Department This brief tutorial will take you through some of
User Manual. Manual Sections. Download a PDF version of the manual here: carbon-manual.pdf
 CARBON User Manual Download a PDF version of the manual here: carbon-manual.pdf Manual Sections Introduction Precautions Getting Started User Interface Sequencer Song Mode Arpeggiator Loading and Saving
EM-1 Main Features. EasyStart CONTENTS
 EasyStart EM-1 Main Features Pattern performance with emphasis on realtime operation All functions are right on the surface, with no menus or pages to slow you down! Familiar 16-step key interface to build
MOTIF XS Editor VST Owner s Manual
 MOTIF XS Editor VST Owner s Manual Contents What is the MOTIF XS Editor VST?...2 Data Structure of the MOTIF XS Editor VST...3 Starting the MOTIF XS Editor VST...4 An Example of MOTIF XS Editor VST in
MOTIF XF Editor Owner s Manual
 MOTIF XF Editor Owner s Manual Contents What is the MOTIF XF Editor?...2 Studio Manager...2 Studio Connections...2 About Open Plug-in Technology...3 Data Structure of the MOTIF XF Editor...4 Starting the
Main Features. 8 Assignable Knobs Deliver Real-time Control of Your Musical Software
 Table of Contents Main Features... 3 Preparation... 4 Using a Wireless Connection... 4 Using a USB Connection... 5 Software setup... 6 Functions and Operation of Controls... 7 Keyboard... 8 Touchpad...
ver 1.61 User Manual
 ver 1.61 User Manual Contents Overview...3 Song Editor...4 Clip Library...4 Song Playback...4 Tracks...5 Export...5 Clip Editor...6 Note Sequence...6 Instrument...7 Instrument Effects...7 Drawsynth...9
QUICK-START GUIDE RELOOP MIXON4
 QUICK-START GUIDE RELOOP MIXON4 Installation and Setup The Reloop MIXON4 is a class compliant USB plug and play device for Mac, however requires drivers for Windows. You will find these on Reloop s website.
Introduction: -The Beat Kangz
 Introduction: Thank you for choosing Beat Thang Virtual as part of your creative process. As artists ourselves, we know how important this decision is. We understand that you have many products to choose
Xequence MIDI Workstation Quickstart Guide
 Xequence MIDI Workstation Quickstart Guide 2017 Seven Systems Cross-Platform Media Limited iphone and ipad are trademarks of Apple Inc., registered in the U.S. and other countries. Contents Introduction
Manual addendum written by Nadine Raihani, Cornelius Lejeune Manual version: 1.3 (09/2008) Software version: 2.0.4
 Software version: 2.0.4") MANUAL ADDENDUM The information in this document is subject to change without notice and does not represent a commitment on the part of NATIVE INSTRUMENTS GmbH. The software described by this document
MANUAL ADDENDUM The information in this document is subject to change without notice and does not represent a commitment on the part of NATIVE INSTRUMENTS GmbH. The software described by this document
MCompressor. Presets button. Left arrow button. Right arrow button. Randomize button. Save button. Panic button. Settings button
 MCompressor Presets button Presets button shows a window with all available presets. A preset can be loaded from the preset window by double-clicking on it, using the arrow buttons or by using a combination
It also lets you make the best possible use of existing sound libraries you have.
 Version 1.5 Introduction BigKick is designed to make kick drum design fast, easy and enjoyable. It has a carefully selected set of features to help you get results quickly. And, unlike many other tools,