Vessel Reporting and Performance Monitoring System
|
|
|
- Megan Simmons
- 6 years ago
- Views:
Transcription
1 Vessel Reporting and Performance Monitoring System
2 Documentation: Vessel Reporting and Performance Monitoring System Company Name : Thome Document ID : ORN/ /Th/001 Dated : 08th Mar 2011 S.No Description Revision Date Revised By Approved By
3 Table of contents Table of contents... 3 Objective... 4 Technologies... 5 Overview of working cycle of the system:... 7 Ship Side Application... 8 Installation Procedure... 8 Others Folder Sharing between the Host Machine and VMWARE...22 Opening the application...25 Using the system: View CP Norms: Full Away Report Submission Message...31 Management Review Section...31 Fair Weather Sea Performance Report...32 Fair Weather Data Analysis Graph Voyage Performance Report Defect Reporting Section Sending and Receiving Data To and from the Shore...37 Sending Receiving Editing Data / Reports...44 Some important aspects re Reports, Exports, System Backup, System Updates, Uninstalling, troubleshooting (errors)... 45
4 Objective Vessel reporting system is intended for use onboard ships managed by Thome Ship Management for the purpose of at Sea and in Port reporting. The reports exported by the ships will be received on the shore system and will be utilized for monitoring and analysis of the performance of a vessel with the Charter Party Norms.
5 Technologies Technologies used: ASP.net, MS SQL, IIS, Jscript, HTML Ship side application: The application to be installed on all the vessels will be a web-based application developed using ASP.net, MS SQL, IIS, Jscript, HTML. This application is installed on a ship using VMWARE. It will run on any system as an operating environment and has the ability to be used on a network. The application will be provided to a ship on a Pen Drive. Any update/upgrade in the application can then be sent on the ships in form of small patches, which can be installed in the similar fashion as the parent application was installed. Shore Side Application: The shore side application is a web based system, which will be installed and configured on the companies Intranet. This module is an online application, which can be accessed by the company staff from multiple locations. The application can also be accessed from the Internet providing remote accessibility to the entire voyage related information and reports. Following are the basic system requirements for hosting Vessel Performance System s Shore Application: Main Installation System 1 Microsoft Windows 2000, Windows 2003, Windows XP, or higher (Service Pack 2 required) 2.Net Framework 3.5 with SP 1 3 Pentium III processor or higher MHz CPU or higher MB RAM or greater 6 Screen resolution of 1024 x 768 or higher 7 Swap file of 1 GB or more (or twice the RAM, whichever is higher) MB free disk space available for software 9 Microsoft Internet Explorer 5.0 SP1 or higher 10 Java Virtual Machine Note: Manual installation may be necessary if running Windows 2003 or Windows XP. In the final release of Windows 2003 Server (all versions) and Windows XP (since SP1a); there is NO integrated Microsoft Java Virtual Machine. IIS Common files NetBIOS (over TCP/IP) protocol support Database Considerations 1 Microsoft SQL Server (version 7 or 2000) or MSDE for the data repository. Resource: Microsoft's requirements for SQL are available at: Target Systems / Other systems using the application should have:
6 1 Server Service enabled 2 NetBIOS (over TCP/IP) protocol support 3 Operator rights to the IIS servers reported 4 IE 5.0 SP1 or higher.
7 Overview of working cycle of the system: The Shore generates the C/P Norms and forwards to the Ship. The CP Norms are to be embedded in the ship s application before sending the Pen drive to the ship. This step can be performed by the shore office or by Orion Marine Concepts. Thereafter incase any updates are received same would be from the id; thome@nauserver.com Ship staff will install the VM ware player by following the installation steps provided in this manual. The cycle of the system is on leg to leg basis begins at a Departure port Full Away report and ends at the Departure of the Next port, i.e. Leg complete. This process is explained in detail in the process flow section. The first report required to be filled and exported is the Full away report for the other reports to become active. Thereafter the subsequent reports need to be filled and exported as per the required sequence. Each Sand and Receive generates a ZIP file depending on the method of sending selected (in your case the method is Manual for sending and receiving), please be guided as per the sending & receiving section instructions.

8 Ship Side Application The Flow Process of this System: Receive the Vessel Performance Management System on a Thumb/Pen Drive. Installation Procedure Installing the VM Ware and the Software from the Thumb Drive; IMPORTANT ; please ensure the Installation Computer is scanned and clear of any Virus. For the complete program approximate free HARD DISK space of 8 GB is necessary and MINIMUM 1 GB RAM is required. Please take a printout of this document and keep the same handy during installation of the application. Step 1; Insert the Thumb Drive into the USB Port, once recognized and ready, Open the drive to access the contents. Following Files exist in the Thumb Drive.

9 Step 2; INSTALLATION A; Double click on the above Setup File to start the Installation; Approx time for full installation is around 5 10 Minutes.

10 Instead of above if the below screen shows a message as highlighted underneath NOT ENOUGH SPACE, WAITING FOR 30 Secs Close the DOS window. Please Request Office for the METHOD FOR INSTALLATION B, along with the details of the other Drive Name on which the sufficient space exists, (in most cases this would be D Drive ).


11 Step 3; Once the installation reaches 100% automatically the installation of the Player will run you through the below screens; Click on Next to Continue
12 Click on Next to Continue Please ensure the CHECKBOX are UNCHECKED before clicking on Next on the FOLLOWING SCREENS.

13


14 Please ensure the below CHECKBOX are CHECKED before clicking on Next Button ======================================================= Click on Continue

15 Click on Restart Now Step 4; Once the computer restarts, please locate the below icon to run the VMWare and proceed further. Note; This process is similar to the starting process of any computer, bears the screens from WINDOWS Starting now and others. Once started the window, which opens, is of similar scenario of any Windows screen. It s like operating a second Windows on your Computer. The Icon will look like this; The above can also be accessed from Start All Programs VMware VMware Player.

16 Step; 5 The below screen appears for License agreement; Check the first option on top; Yes, I Accept the terms in the license agreement. And click OK

17 Step 6; Next will be the below screen to appear, Please select the highlighted option; OPEN A VIRTUAL MACHINE


18 Step 7; This will open the Browser window; Select the Path (C: \ NAU Folder) and the below File Windows XP Professional; i.e. Once open is clicked after selecting the above file the application will be installed and then you will see the following screen: Select I copied it option and click on OK.


19 The above screen will appear if the application will find some sharable hardware on the Host operating system, you need to put a check mark on the Do not show this hint again and click on OK. Incase of this message; Simply click on the X to close this pop up, this has no meaning.

20 Click on remind me later button and your installation is complete. You will see the Similar windows desktop screen.
21 Powering Off the VMWARE Player; Click on Start Shut Down As in the case of a normal computer.

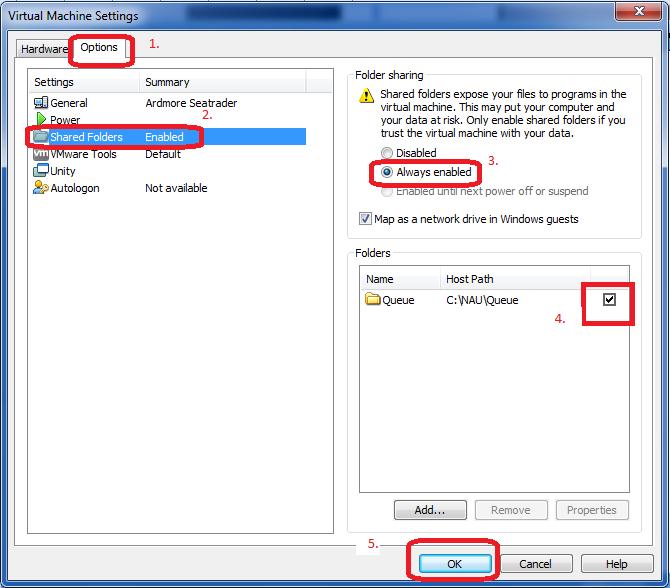
22 NEXT START UP Next time when you open the VMWARE Player from the You will find this window; Others Folder Sharing between the Host Machine and VMWARE A folder named QUEUE has been pr-configured for sharing between the VMWARE and the Host Machine. It resides in the Local machine s C:\Drive\NAU folder. To confirm the Folder Sharing is on;

23
24

25 Application on the LAN network: The ship may choose to allow this application to be visible on the internal network, for the same please follow instructions given inside the folder; How to share on network on the VMWARE DESKTOP drive. Opening the application Open Fire Fox from the desktop or by clicking on Start>Programs>Fire Fox. This will open the browser and following login screen will appear: Now, type in the username and password Regular Users; User Name; Thome Password; Thome Administrator; User Name; ADMIN1 Password; ADMIN1 ((ADMIN1 (numeric one)) Once you have entered the correct user name and password, click on login and you will see the main application screen:
26 Proceed to report as necessary, below is an overview of the Reporting flow chart: The definition of one cycle for the purpose of this system is Departure from one Port to Departure of the next Port. For e.g.; incase a vessel is on a voyage from Fujairah -- >> Japan, intends to Bunker at Singapore > This will entail two legs > Leg 1; between Fujairah to Singapore and Leg 2; Singapore to Japan. For a vessel proceeding from Port A to Port B; the reporting will commence at Full away of the Port A and the leg is completed at the departure from Port B. At the time of Departure from Port B the User will require to fill Two reports at the Port B; Leg Complete after which the system will activate the subsequent Full Away report for Port B, from which the new leg commences. Port A; Full away Report Daily/Noon Report Daily Cargo Heating Report Port B; EOSP / Arrival Report Berthing Report 12 Hr Load Discharge Updates. Departure and Cargo Information; 1. Departure Time Sheet, 2. Additional Information, 3. Cargo Information Leg Complete Full Away Report (New Leg Commences)
27 Using the system: View CP Norms: Click on the left menu Sea & Port Reports tab and then a drop down will open, again click on Sear and Port Reports link to view the CP norms screen. At the bottom of this screen, there is a button Download in Excel on clicking this button you can download and save the CP norms data on your hard drive for future use like printing etc.

28 Full Away Report To use / fill the FullAway Report, click on the Sea Reports tab on the top menu and it will expand and show all the Sea report links. Now click on the Full Away tab and the full away form will open.
29 You can now key in the required data in this form and click on submit button to insert the records. Once you have submitted the full away report, you will be able to use the other reports as well. NOTE: Remember, that you cannot fill the noon and other reports till you have not filled the Full Away report.
30 Noon Report You can open the Noon Report form by clicking on the Sea Reports tab and then clicking the noon Report link, as we did in case of Full Away" report. Now, you can type the data in the Noon Report and click on submit.


31 Submission Message Whenever you submit any report you will get a success message on the top of the form. You need to fill up the other reports in the same manner as we have filled the above two reports. Management Review Section This section contains the various analysis and graphs, which are generated by taking data from various reports for management review purpose. Click on the Management Review tab on the left menu to expand this section:

32 Fair Weather Sea Performance Report

33 Fair Weather Data Analysis Graph

34 Voyage Performance Report


35 Defect Reporting Section The Shore Office creates Defect List Categories; The Ship utilizes the same for reporting Defects; The Departments are manually fed in by the Ship Staff and are utilized for Filtering Search in the Defect List / Manage Dry Dock and Archive Sections.

36 The items reported through this can be marked as Dry Dock items by the Ship Staff, but will not be moved to the Manage Dry Dock List unless the Shore confirms the same (Under DRY DOCK CONFIRMED SECTION as in the above case same is NO ).
37 Sending and Receiving Data To and from the Shore Once all reports that are required to be filled on a given day are submitted, you will have to synchronize the system to send the reports to the shore. VERY IMPORTANT; PLEASE DO NOT CHANGE THE NAMES OF THE FILES RECEIVED OR SENT. ALL NAMES ARE AUTO GENERATED BY THE SYSTEM, RENAMING WILL CAUSE LOSS IN DATA. A. INCOMING FROM Shore; All files received from the SHORE are Prefixed with SHORE_SHIP NAME_UNIQUE NUMBER_CONSECUTIVE NUMBER; e.g. Shore_LPGC Gas Soechi_022111_13, B. OUTGOING FROM SHIP; All Files OUTGOING FROM SHIP are Prefixed with SHIP_SHIP NAME_UNIQUE NUMBER_CONSECUTIVE NUMBER. E.g.; Ship_LPGC Gas Soechi_022111_25, REPEAT PLEASE DO NOT // DO NOT RENAME THE FILES Click on the red Send and Receive or ( synchronizer incase of earlier version) button on the left menu and then click on Send and Receive button.


38 Sending Step 1 Step 2 Following screen will open: Now, click on the Send and Receive button and the Process will start Step 3 Step 4 Step 5 Step 6 The process generated an OUTGOING ZIP FILE on the same page. As shown above. Click on the same and save it at a convenient location (Incase Sharing is enabled on the VM Ware machine, the folder in LOCAL C drive can be utilized.) for sending ashore to the system address; (The Connection Settings link on this screen keeps the default connection as Manual. These must be changed only on Company Instructions.)


39 Step 7 Step 8 Step 9 ; thome@nauserver.com Proceed to use the system as required to fill and complete other reports or log out as the case maybe. After completing the reports next time, on the next Click of Send and Receive, with the above download link in place the system will prompt a warning as under; Step 10 Read Warning Step 11 Enter any Ref Sub Step 12 Step 13; click Note; Once the file is moved to Archive / sent items folder, you can click SEND & RECEIVE Again to generate a fresh outgoing file for Down Load. This process is described underneath.

.")
40 Resending Files from the Sent Items Section Select the sent items section and click on the send again link under the ACTION Header. This will generate a fresh download link, which can be downloaded and sent as per normal procedure. Step 4; Click Here Step 3; Click here Step 1; Select Sent ITEMS Step 2; Choose the File to resend. It may be any file in the SENT ITEMS LIST Received from the System; Incase your vessel receives an as under (PLEASE IGNORE THE ADDRESSESS). This is an automatic , please act accordingly, as in this case the file # 31 is missing, therefore same is required to be fwd again. File number is highlighted in the above picture (Ship_LPG GAS _14.Zip)


41 Receiving The s will be received from the same id with attachment. Please save the same at any preferred location and then transfer on the VM Ware at a preferred location, desktop or anywhere (incase shared folder option is available onto to your local Desktop shared folder) and then Go to Send and Receive Section; Upload the received file. Step 1 Step 2 Step 3; Click onbrowse and select the file recvd from Shore. Step 5; Click on Upload. Step 4; Select the File from the Saved Location. Step 6; Message confirms upload. Step 7; Click on Send & Receive to Process the File and List to Show.


42 Step 8; Confirm File Received and Listed. Step 9; Select Inbox to Confirm the file in the List.
43 Leg Complete Once all reports are filled and submitted and the voyage has ended, you will have to fill the Leg Completion Report. The link for this report is in the top menu. See fig below: Note: A new Leg can be created only when the Leg Complete report is filled and submitted. Once the above report is submitted, you can create a new Full Away report and re-start the process.

44 Editing Data / Reports Each Report has a Manage button /link on the top, on clicking on the link you will be able to see the list of all those reports which have been filled earlier. To edit any of the old reports just click on the Edit link in the list and you will be able to make changes in the report and then re-submit it. On next sync session the changes will get updated in the shore system. Important Note; Incase a Noon Report is edited for any change in Distance or Steaming Time the EOSP Report also must be re submitted to update the required fields on the Shore System.
45 Edit screen fig on next page; Some important aspects re Reports, Exports, System Backup, System Updates, Uninstalling, troubleshooting (errors) 1. Sea and Port Reports; There may be circumstances where the vessel does not require certain Port reports (in case of transits etc.), for e.g.; Bunker or Idle or any other, in such cases, once all the necessary reports are filled in the Leg complete may be filled and exported to start a new cycle. However the Sea reports; Full Away Noon EOSP are critical and must be completed for all passages.


46 2. Multiple Anchoring; for these cases the anchoring Data in the Port reports must be filled for the first anchored time along with the details and anchor aweigh for the last. 3. Daily Noon Report and EOSP report; Special Instructions; these are required to be checked and filled only incase the charterers provide the vessel with any special instructions towards speed and/or bunkers. 4. EOSP report; Below shown are the two important sections of the EOSP report; a. First section is for the data from Last Noon Report, for e.g. incase the EOSP time is 1400 Hrs, this report will bear the data for the time 1200 Hrs to 1400 Hrs, for the two hour period. b. Second section is for the data from departure Last port, i.e. consolidated data from departure last Port till EOSP.
47 5. Critical Information within the Reports; The Full away, Noon and EOSP reports bear data which carries out analysis on the shore side, therefore all the sections must be completely with accurate data along with decimal places as necessary. For e.g.; the Noon report, following must be completed; 6. Error Log; Incase of any errors generated in the system, please refresh the page/logout and try again incase the error persists. Please forward a screen shot to support@orionmarineconcepts.com. 7. The System Updates are received as normal INCOMING ZIP Files; UNLESS OTHERWISE INFORMED. They form a listing in the ADMIN SYSTEM UPDATES SECTION automatically. 8. To uninstall the VM WARE and the application; Please simply go to START CONTROL PANEL ADD/REMOVE PROGRAMS SELECT VM WARE and Click on remove. Additionally please delete the FOLDER NAMED NAU IN THE C & D Drive. 9. Only Incase the website (the Login page) does not open and says UNABLE TO CONNECT or THE BROWSER KEEPS WAITING & LOGIN PAGE DOESNOT OPEN. Please check following; on the VM ware Desktop (The same can also be accessed from Start Control Panel Administrative Tools Same Shortcut as above) Double click and the below window will open,


48 Locate the three items as shown under and for each do a STOP SERVICE and RESTART the SERVICE as shown on the above figure. 1. IIS ADMIN; 2. SQL EXPRESS; 3. WORLD WIDE WEB PUBLISHING; Once done please close the window and open the Fire fox and login. 10. Powering Off/Resetting and Common issues with the VM Ware; VM ware started and stops responding at the below page Loading Your Personal settings


49 In this case please POWER OFF or RESET the VM Ware as shown under and then restart as usual. 11. We recommend a weekly backup of the system; same can be done within the system itself; Clicking the Backup button will generate a file as under, please note the same file is overwritten each time you click on the Backup. EOD
SC-T35/SC-T45/SC-T46/SC-T47 ViewSonic Device Manager User Guide
 SC-T35/SC-T45/SC-T46/SC-T47 ViewSonic Device Manager User Guide Copyright and Trademark Statements 2014 ViewSonic Computer Corp. All rights reserved. This document contains proprietary information that
User s Manual CONTENT. Nano NAS Server for USB storages. 1. Product Information Product Specifications System requirements..
 CONTENT Nano NAS Server for USB storages 1. Product Information...1 2. Product Specifications.2 3. System requirements..3 4. Product Connecting. 4 5. Configuring DN-7023....5 6. Setting... 9 7. Note..
Toolbar User Guide. Release 17.0
 Toolbar User Guide Release 17.0 2012 by Cox Communications. All rights reserved. No part of this document may be reproduced or transmitted in any form or by any means, electronic, mechanical, photocopying,
NovaBACKUP CMon v19.0
 June 2017 NovaBACKUP CMon v19.0 User Manual Features and specifications are subject to change without notice. The information provided herein is provided for informational and planning purposes only. 2017
Getting Started With Outlook Express For Windows 2000/XP Author Marcie Matsuo Revised by Darren Kato
 WIN9X015 November 2005 Getting Started With Outlook Express For Windows 2000/XP Author Marcie Matsuo Revised by Darren Kato Introduction...1 What is Outlook Express...1 Requirements...2 Where do I get
Full User Manual and Quick Start Guide
 Full User Manual and Quick Start Guide 2 W hile every precaution has been taken in the preparation of this manual, we assume no responsibility for errors or omissions. Neither, is any liability assumed
3M Clean-Trace Hygiene Monitoring and Management System
 User Manual Supplement Number: TB. 378178 Effective Date: November 2018 Supersedes: (New) Technology Platform: 3M Clean-Trace Hygiene Monitoring and Management System Originating Location: St. Paul, MN
WLAN MIERUZZO BASIC SOFTWARE
 DK-5000 Series WLAN MIERUZZO BASIC SOFTWARE USER S MANUAL DK-5005A, DK-5010A, DK-5030A DK-5005B, DK-5010B, DK-5030B DK-5005C, DK-5010C, DK-5030C DK-5005D, DK-5010D, DK-5030D This manual was last revised
PHRED Installation Guide
 PHRED Installation Guide ColdFusion Version 10, SQL Server Database January 27, 2014 PHRED Installation Guide Page 1 Table of Contents Application Environment... 3 Application Tailoring... 4 Web Server
Installing Switched-On Schoolhouse 2007
 1 Installation & Setup Installing Switched-On Schoolhouse 2007 Switched-On Schoolhouse 2007 (SOS) is easy to install on your computer because most of the installation components install themselves. Before
AT&T Core Mobility Integrated Dispatch Console User Guide. Installation Guide. AT&T Integrated Dispatch Console 3.0
 Installation Guide AT&T Integrated Dispatch Console 3.0 October 2016 Table of Content 1. Introduction... 3 1.1. Purpose and Scope... 3 1.2. Terms and Definitions... 3 1.3. About this Manual... 5 1.4. What
BCPro Installation Instructions Code No. LIT Software Release 3.0 Issued September 2017
 Code No. LIT-12011910 Software Release 3.0 Issued September 2017 Welcome...2 Summary of Changes...2 Related Documentation...2 Installation Overview...2 Prerequisite Software Checklist for Installation
Upgrading from Call Center Reporting to Reporting for Call Center
 Upgrading from Call Center Reporting to Reporting for Call Center www.nortelnetworks.com 2003 Nortel Networks i Table of Contents Table of Contents Change History...1 How to use this guide...2 Introduction...
Data Manager Installation and Update Instructions
 Data Manager Installation and Update Instructions These instructions describe how to update or install Data Manager desktop software from YSI s website. Failure to follow these instructions may cause you
Release Notes Life Technologies Attune NxT Software v2.3
 Release Notes Life Technologies Attune NxT Software v2.3 In the following pages you will find instructions describing: New software features Known software/system issues with troubleshooting guidance Software
Installing Intellicus DotNet Client on Windows. Version: 16.0
 Installing Intellicus DotNet Client on Windows Version: 16.0 Copyright 2015 Intellicus Technologies This document and its content is copyrighted material of Intellicus Technologies. The content may not
Network Management Utility
 4343-7705-02 Network Management Utility Foreword Welcome Network Management Utility is utility software that provides central control over printers, copiers, and other devices on a network. With Network
Juris Suite Citrix Installation Guide
 Juris Suite Citrix Installation Guide Table of Contents Introduction... 2 Planning and Preparation... 2 Installation... 2 Hardware and Software Requirements... 3 Backup Existing Juris Databases... 5 Server
Business Insights Dashboard
 Business Insights Dashboard Sage 500 ERP 2000-2013 Sage Software, Inc. All rights reserved. Sage, the Sage logos, and the Sage product and service names mentioned herein are registered trademarks or trademarks
GRS Enterprise Synchronization Tool
 GRS Enterprise Synchronization Tool Last Revised: Thursday, April 05, 2018 Page i TABLE OF CONTENTS Anchor End User Guide... Error! Bookmark not defined. Last Revised: Monday, March 12, 2018... 1 Table
OASIS Mobile Installation Guide
 OASIS Mobile Installation Guide Table of Contents I. Preparation... 1 A. Verify System Requirements... 1 B. Uninstall Java... 3 C. Configure Internet Explorer... 3 II. Install OASIS Mobile... 5 III. Install
Frequently Asked Questions and other helpful information
 Frequently Asked Questions and other helpful information FAQ How do I chart? To create a chart, left click on the Chart toolbar button in the upper left corner of your CQG screen. A chart appears. In the
GP-N100 Utility Software Manual
 System Requirements En Thank you for your purchase of a GP-N100. This manual describes how to use the GP-N100 Utility to download the latest assisted GPS data from Nikon servers to your GP-N100. To ensure
InventoryControl Quick Start Guide
 InventoryControl Quick Start Guide Copyright 2013 Wasp Barcode Technologies 1400 10 th St. Plano, TX 75074 All Rights Reserved STATEMENTS IN THIS DOCUMENT REGARDING THIRD PARTY PRODUCTS OR SERVICES ARE
KYOCERA Net Admin Installation Guide
 KYOCERA Net Admin Guide Legal Notes Unauthorized reproduction of all or part of this guide is prohibited. The information in this guide is subject to change without notice. We cannot be held liable for
USB2.0 IDE & LANDISK External Enclosure
 USB2.0 IDE & LANDISK External Enclosure CONTENT User s Manual 1. Product Information.....................1 2. Product Specifications....................2 3. System requirements....................3 4.
Reporting for Contact Center Setup and Operations Guide. BCM Contact Center
 Reporting for Contact Center Setup and Operations Guide BCM Contact Center Document Number: Document Status: Standard Document Version: 05.01 Date: September 2006 Copyright 2005 2006 Nortel Networks, All
VDI Users Guide. Mac OS X
 Mac OS X VDI Users Guide NOTICE: Access to electronic resources at Moraine Park Technical College is restricted to employees, students, or other individuals authorized by the College. By connecting to
Sync User Guide. Powered by Axient Anchor
 Sync Powered by Axient Anchor TABLE OF CONTENTS End... Error! Bookmark not defined. Last Revised: Wednesday, October 10, 2018... Error! Bookmark not defined. Table of Contents... 2 Getting Started... 7
Copyright and Legal Disclaimers
 Copyright and Legal Disclaimers User Manual for DiConnect Lite Copyright 2012 by DiCentral Corporation All rights reserved. This document and all content that is contained, embedded and linked to this
PropertyBoss Upgrade
 Installation Guide EMC128-2013 1998-2013 PropertyBoss Solutions. Introduction This document covers 2 upgrade scenarios. Please determine which is required before beginning. Note: The Release version or
Anchor User Guide. Presented by: Last Revised: August 07, 2017
 Anchor User Guide Presented by: Last Revised: August 07, 2017 TABLE OF CONTENTS GETTING STARTED... 1 How to Log In to the Web Portal... 1 How to Manage Account Settings... 2 How to Configure Two-Step Authentication...
Scanner Installation Procedures for edeposit
 Scanner Installation Procedures for edeposit Great Things Happen! Scanner Installation Procedures for edeposit Table of Contents Getting Started Minimum System Requirements...........................1
Magic Card Professional
 Magic Card Professional User Manual Table of Contents System Requirements... 2 1. Installation... 3 2. Magic Card Settings... 5 2.1 Set Protection... 6 2.2 Set Parameters... 8 2.3 Password... 10 2.4 CMOS
Perceptive TransForm E-Forms Manager 8.x. Installation and Configuration Guide March 1, 2012
 Perceptive TransForm E-Forms Manager 8.x Installation and Configuration Guide March 1, 2012 Table of Contents 1 Introduction... 3 1.1 Intended Audience... 3 1.2 Related Resources and Documentation... 3
Digital Voice Softphone User Guide Version 2.0. Digital Voice Softphone User Guide Version 2.0
 Digital Voice Softphone User Guide 1 TABLE OF CONTENTS 1. Set-up... 3 1.1. Using the Digital Voice Softphone... 3 1.2. Digital Voice Softphone Set-up... 3 1.3. System Requirements... 4 1.4. Installing
SecureGuard VMS. SecureGuard All-In-One Quick Install Guide V. 2.5
 SecureGuard VMS Quick Install Guide V. 2.5 9/30/2018 2 Table of Contents Purpose... 3 Installation... 3 Setup... 4 Startup & Live View... 26 3 Purpose This is a step-by-step guide to installing the current
3M Molecular Detection System Software Upgrade/Installation Instructions
 User Manual Supplement Number: TB.342837.03 Effective Date: March 2018 Supersedes: TB.342837.02 Technology Platform: 3M Molecular Detection System Originating Location: St. Paul, MN 3M Molecular Detection
DSS User Guide. End User Guide. - i -
 DSS User Guide End User Guide - i - DSS User Guide Table of Contents End User Guide... 1 Table of Contents... 2 Part 1: Getting Started... 1 How to Log in to the Web Portal... 1 How to Manage Account Settings...
User Addendum User Box Scan support on the Fiery E C-KM Color Server, version 1.1
 User Addendum User Box Scan support on the Fiery E 10 50-45C-KM Color Server, version 1.1 This document describes installing software for User Box scan support on the Fiery E 10 50-45C-KM Color Server,
The following links are to self-extracting Zip files on our web site which contain all the installation files:
 AssetGen Professional Download and Installation Instructions 1.0 Platform Requirements The platform requirements are: - Windows 7 or greater. 2GB RAM (4GB recommended for 64 bit systems). - Microsoft.Net
WA1827 Cloud Programming Workshop. Classroom Setup Guide. Web Age Solutions Inc. Copyright Web Age Solutions Inc. 1
 WA1827 Cloud Programming Workshop Classroom Setup Guide Web Age Solutions Inc. Copyright Web Age Solutions Inc. 1 Table of Contents Part 1 - Minimum Hardware Requirements...3 Part 2 - Minimum Software
License Manager Client
 License Manager Client Operations Guide NEC NEC Corporation of America November 2010 NDA-30899, Revision 6 Liability Disclaimer NEC Corporation of America reserves the right to change the specifications,
NVMS1000. User Manual
 NVMS1000 User Manual Contents 1 Software Introduction... 1 1.1 Summary... 1 1.2 Operation Environment... 1 1.3 Install and Uninstall... 2 1.3.1 Install the Software... 2 1.3.2 Uninstall the Software...
Configuring and Managing WAAS Print Services
 13 CHAPTER This chapter describes how to configure and manage the WAAS print services feature that allows Edge WAEs to function as print servers in your branch offices. Note Throughout this chapter, the
Business Connect Secure Remote Access Service (SRAS) Customer Information Package
 Customer Information Package") Business Connect Secure Remote Access Service (SRAS) Customer Information Package Table of Contents 1.0 Introduction... 1 1.1 Overview... 1 1.2 Scope and Audience... 1 1.3 Design Deliverables... 1 1.4
Business Connect Secure Remote Access Service (SRAS) Customer Information Package Table of Contents 1.0 Introduction... 1 1.1 Overview... 1 1.2 Scope and Audience... 1 1.3 Design Deliverables... 1 1.4
9936A LogWare III. User s Guide. Revision
 9936A LogWare III User s Guide Revision 850701 Table of Contents 1 Introduction...1 1.1 Symbols Used... 1 1.2 Conventions... 1 1.3 What is LogWare?... 1 1.4 License Agreement... 2 1.5 Requirements...
To open AOL System Information Click Start, select All Programs or Programs, select AOL or America Online, and then click AOL System Information.
 AOL Toolbar Check the system requirements for AOL toolbar Computers that fail to meet the minimum system requirements may experience this issue. Open AOL System Information to check whether it meets the
Upgrading from Call Center Reporting to
 Upgrading from Call Center Reporting to Reporting for Call Center Upgrade Document Reporting for Call Center Release 2.2.1xx Document Number: 200-0400-110 Document Status: Standard Document Version: 3.02
Installing IPM on Windows
 CHAPTER 5 This chapter describes how to install the IPM server software on Windows NT, Windows 2000 Professional, or Windows 2000 Server system, and how to install the IPM client software on a Windows
Assistant User Guide
 mydatavo Assistant User Guide 1 2 3 4 5 6 7 8 9 10 11 12 13 14 15 16 17 18 19 20 21 22 Table Of Contents Features...ii Introduction...1 1. Installing mydatavo Assistant...1 1 System Requirements... 1 1.2
Secure Single Sign On with FingerTec OFIS
 Secure Single Sign On with FingerTec OFIS User Guide CONTENTS 3 1 INTRODUCTION Welcome to OFIS Gateway 4-11 2 INSTALLATION & SETUP Registering Your OFIS Gateway Installing & Setting Up Your OFIS Gateway
Getting Started With the Cisco PAM Desktop Software
 CHAPTER 3 Getting Started With the Cisco PAM Desktop Software This chapter describes how to install the Cisco PAM desktop client software, log on to Cisco PAM, and begin configuring access control features
1. ECI Hosted Clients Installing Release 6.3 for the First Time (ECI Hosted) Upgrading to Release 6.3SP2 (ECI Hosted)
 Upgrading to Release 6.3SP2 (ECI Hosted)") 1. ECI Hosted Clients........................................................................................... 2 1.1 Installing Release 6.3 for the First Time (ECI Hosted)...........................................................
1. ECI Hosted Clients........................................................................................... 2 1.1 Installing Release 6.3 for the First Time (ECI Hosted)...........................................................
TABLE OF CONTENTS 1. SYSTEM REQUIREMENTS INSTALLATION ACCOUNT MANAGEMENT RAZER CORTEX GENERAL SETTINGS...
 Welcome to Razer Cortex, the nerve center of your entire gaming experience. From effortlessly finding the best deals on your games to launching and boosting them for peak pc performance while backing up
REGISTRATION RANDOMIZATION USER S MANUAL v 2.1
 REGISTRATION RANDOMIZATION USER S MANUAL v 2.1 Cancer Center Systems Management Office Table of Contents Minimum System Requirements... 3 Installation Instructions for the Remote Registration Application...
Silk Performance Manager Installation and Setup Help
 Silk Performance Manager 18.5 Installation and Setup Help Micro Focus The Lawn 22-30 Old Bath Road Newbury, Berkshire RG14 1QN UK http://www.microfocus.com Copyright 2004-2017 Micro Focus. All rights reserved.
Calendar & Buttons Dashboard Menu Features My Profile My Favorites Watch List Adding a New Request...
 remitview User Guide 1 TABLE OF CONTENTS INTRODUCTION... 3 Calendar & Buttons... 3 GETTING STARTED.... 5 Dashboard.... 7 Menu Features... 8 PROFILE.... 10 My Profile... 10 My Favorites... 12 Watch List...
FileMaker. Mobile 7. User s Guide. For Windows, Mac, Palm OS, and Pocket PC. Companion for Palm OS and Pocket PC
 For Windows, Mac, Palm OS, and Pocket PC FileMaker Mobile 7 Companion for Palm OS and Pocket PC User s Guide 2000-2004 FileMaker, Inc. All Rights Reserved. FileMaker, Inc. 5201 Patrick Henry Drive Santa
Getting Started Guide. Version:
 Getting Started Guide Version: 1.2.2. Table of Contents Before You Start... 3 Installing the Remote Deposit application for use with Windows Vista/Windows7... 4 Running Programs in Microsoft Windows Vista/Windows7...
Automation Anywhere Enterprise 10 LTS
 Automation Anywhere Enterprise 10 LTS Document Version: 1.3 Installation Guide Date of Publication: 15 th November, 2016 Update(s) to this document edition: Table of Contents 1. Client Prerequisites Processor
Juris Suite Installation Guide
 Juris Suite Installation Guide Table of Contents Introduction... 2 Planning and Preparation... 2 Installation... 2 Contact... 4 Backup Existing Juris Databases... 5 Server Installation... 6 Installing
Ocularis. Installation & Licensing Guide
 Ocularis Installation & Licensing Guide On-Net Surveillance Systems, Inc. One Blue Hill Plaza, 7 th Floor, PO Box 1555 Pearl River, NY 10965 Phone: (845) 732-7900 Fax: (845) 732-7999 Web: www.onssi.com
Viewer Software. Installation Guide
 Installation Guide November 2010 2010 Fluke Corporation. All rights reserved. Specifications are subject to change without notice. All product names are trademarks of their respective companies. Table
Programming Manual KX-TVA50 KX-TVA200. Voice Processing System. Model No.
 Programming Manual Voice Processing System KX-TVA50 KX-TVA200 Model No. Thank you for purchasing a Panasonic Voice Processing System. Please read this manual carefully before using this product and save
Chapter A1: Setting up BankLink Practice, BankLink Notes and BankLink Notes Online
 Chapter A1: Setting up BankLink Practice, BankLink Notes and BankLink Notes Online This chapter is aimed at BankLink Administrators This chapter covers setting up BankLink Practice and BankLink Notes Online
PrintSuperVision.net Features and Installation
 Features and Installation INTRODUCTION FEATURES ACCESS LEVELS REAL-TIME STATUS PrintSuperVision 2.0 (.net) is a powerful, easy-to-use web-based application for monitoring, reporting data, and managing
Super USB. User Manual. 2007, March
 Super USB User Manual 2007, March Windows98 Driver Install/Uninstall Driver Install: 1. Execute Win 98 UFD driver, then restart PC. 2. Plug Super USB into an available USB port. A new Removable Disk drive
HR-Lite Database & Web Service Setup Guide
 HR-Lite Database & Web Service Setup Guide Version: 1.00 HR21 Limited All rights reserved. No part of this document may be reproduced or transmitted in any form or by any means, electronic or mechanical,
9936A LogWare III. User s Guide. Revision
 9936A LogWare III User s Guide Revision 680301 Table of Contents 1 Introduction... 1 1.1 Symbols Used...1 1.2 Conventions...1 1.3 What is LogWare?...1 1.4 License Agreement...2 1.5 Requirements...2 1.6
KnowledgeSync V6.0 Implementation Guide
 KnowledgeSync V6.0 Implementation Guide Pre-Installllatiion Confiiguratiion Welcome to KnowledgeSync! Welcome KnowledgeSync Active Alerts, the industry s leading Business Activity Monitoring (BAM) technology.
nfax 5.0 OceanFax User s Guide
 nfax 5.0 OceanFax User s Guide 1 Table of Contents 1. FAXVIEW GUIDE... 1 1.1 FaxView Login and Exit... 1 1.1.1 FaxView Client Login... 1 1.1.2 WebFax Client... 2 1.1.3 FaxView Exit... 3 2.2 FaxView Over
High Availability Enabling SSL Database Migration Auto Backup and Auto Update Mail Server and Proxy Settings Support...
 Quick Start Guide Table of Contents Overview... 4 Deployment... 4 System Requirements... 4 Installation... 6 Working with AD360... 8 Starting AD360... 8 Launching AD360 client... 9 Stopping AD360... 9
PhotoKeeper User s Manual
 PhotoKeeper User s Manual 20071226 20080404 Table of Contents CONGRATULATIONS on your purchase of a Polaroid PhotoKeeper. Please read carefully and follow all instructions in the manual and those marked
TROVIS-VIEW 4 Software TROVIS Operating Instructions EB 6661 EN. Electronics from SAMSON
 TROVIS-VIEW 4 Software TROVIS 6661 Operating Instructions Electronics from SAMSON EB 6661 EN Edition January 2015 Definition of signal words DANGER! Hazardous situations which, if not avoided, will result
DTVaultLock User s Manual
 DTVaultLock User s Manual DTVaultLock is a DataTraveler Vault tool that enables you to create and access a user defined password-protected area called a Privacy Zone, on your DataTraveler Vault drive.
EvaluNet XT v1.2. Setup Guide
 2 EvaluNet XT v1.2 Setup Guide Table of Contents 1 INTRODUCTION 2 1.1 HOW IS EVALUNET XT STRUCTURED? 2 1.2 SYSTEM REQUIREMENTS 2 1.3 NETWORK SETUP DETAILS 2 1.4 PEER-TO-PEER NETWORKS 3 1.5 LINUX SETUP
CITO2 Installation & User Instructions
 CITO2 Installation & User Instructions DD 56107 Stoneridge Electronics Ltd 1. Installation...4 1.1. System Requirements...4 1.2. Installing CITO2...4 1.3. Uninstalling CITO2...4 2. Starting and closing
TABLE OF CONTENTS 1. SYSTEM REQUIREMENTS INSTALLATION ACCOUNT MANAGEMENT RAZER CORTEX GENERAL SETTINGS...
 Welcome to Razer Cortex, the nerve center of your entire gaming experience. From effortlessly finding the best deals on your games to launching and boosting them for peak pc performance while backing up
Installation and Setup Guide
 Installation and Setup Guide to Diana SUNDE VDI Cloud Computing Terminal 1 1 Hardware Configuration of Host PC (Server)----------------------------------------------------3 2 The Installation of vpoint
N2KExtractor. Maretron Data Extraction Software User s Manual
 N2KExtractor Maretron Data Extraction Software User s Manual Revision 3.1.6 Copyright 2017 Maretron, LLP All Rights Reserved Maretron, LLP 9014 N. 23rd Ave #10 Phoenix, AZ 85021-7850 http://www.maretron.com
KNOXPLANS for New Users
 KNOXPLANS for New Users Welcome to KnoxPlans The City of Knoxville recommends that KnoxPlans (aka ProjectDox ) run on PC operating systems up to and including Windows 7 32-bit (Windows XP, Windows Vista,
Nextiva Drive The Setup Process Mobility & Storage Option
 Nextiva Drive The Setup Process The Setup Process Adding Users 1. Login to your account and click on the Account icon at the top of the page (this is only visible to the administrator). 2. Click Create
LiveNX Upgrade Guide from v5.1.2 to v Windows
 LIVEACTION, INC. LiveNX Upgrade Guide from v5.1.2 to v5.1.3 - Windows UPGRADE LiveAction, Inc. 3500 Copyright WEST BAYSHORE 2016 LiveAction, ROAD Inc. All rights reserved. LiveAction, LiveNX, LiveUX, the
Configuration Guide for Microsoft Internet Connection Sharing
 Configuration Guide for Microsoft Internet Connection Sharing HUB INTERNET HOST CLIENTS Copyright 2002 Hughes Network Systems, Inc., a wholly owned subsidiary of Hughes Electronics Corporation. All rights
Technology Services Group Procedures. IH Anywhere guide. 0 P a g e
 VDI Pilot Technology Services Group Procedures IH Anywhere guide 0 P a g e Installation Disable Apple Security Table of Contents IH Anywhere for Apple OSX (MAC)...2 1. Installation...2 Disable Apple Security...8
NVMS User Manual
 NVMS-1000 User Manual Contents 1 Software Introduction...1 1.1 Summary... 1 1.2 Operation Environment... 1 1.3 Install and Uninstall... 2 1.3.1 Install the Software... 2 1.3.2 Uninstall the Software...
Inmagic Content Server Enterprise Inmagic Content Server Standard Version 1.3 Installation Notes
 Inmagic Content Server Enterprise Inmagic Content Server Standard Version 1.3 Installation Notes Thank you for purchasing Inmagic Content Server. Content Server is an enterprise-wide scalable content management
GOBENCH IQ Release v
 GOBENCH IQ Release v1.2.3.3 2018-06-11 New Add-Ons / Features / Enhancements in GOBENCH IQ v1.2.3.3 GOBENCH IQ v1.2.3.3 contains several new features and enhancements ** New version of the comparison Excel
Mascot Insight Installation and setup guide
 Mascot Insight Installation and setup guide System requirements These are the system requirements for a Mascot Insight server. On the client side, Mascot Insight can be accessed from most web browsers.
MyDataZone User s Manual
 MyDataZone User s Manual MyDataZone is a DataTraveler Secure tool that enables you to create and access a user defined password-protected area called a Privacy Zone, on your DataTraveler Secure drive.
AnySite. Australia. Install Guide. AnySite v9.1 Install Guide
 AnySite Australia Install Guide AnySite v9.1 Install Guide TABLE OF CONTENTS Chapter 1: Introduction... 4 Product Inventory Chapter 2: Before You Begin... 6 Permissions System Requirements Default Install
SQL Data Export for PS/PSS
 Version 3.0.6 USER MANUAL (M98232701-03-18A) CIRCUTOR, SA INDEX 1.- SQL DATA EXPORT SOFTWARE INSTALLATION... 3 1.1.- ENABLE REMOTE CONNECTIONS OF THE SQL SERVER... 15 1.2.- UNINSTALL SQL SERVER... 17 2.-
QuickTest Professional 10
 QuickTest Professional 10 Course Setup Instructions Important Note: This training runs under the following operating systems: Windows 2000 Professional (with SP4) Windows XP (with SP2 or SP3) Windows Vista,
Installing and Setting Up the Snap-on EPC. Rev.1.6 (12 Apr 2012) PN EN
 PN EN") Installing and Setting Up the Snap-on EPC Rev.1.6 (12 Apr 2012) PN 275-0800-EN Table of Contents 1. Introduction... 3 2. Minimum Requirements... 4 3. Installing the Snap-on EPC... 6 4. Licensing the Snap-on
Installing and Setting Up the Snap-on EPC Rev.1.6 (12 Apr 2012) PN 275-0800-EN Table of Contents 1. Introduction... 3 2. Minimum Requirements... 4 3. Installing the Snap-on EPC... 6 4. Licensing the Snap-on
SAP GUI 7.30 for Windows Computer
 SAP GUI 7.30 for Windows Computer Student and Faculty Installation Instructions Table of Contents Caution:... 2 System Requirements:... 2 System Memory (RAM) requirements:... 2 Disk Space requirements:...
Sun VirtualBox Installation Tutorial
 Sun VirtualBox Installation Tutorial Installing Linux Mint 5 LTS Guest OS By Dennis Berry Welcome to the world of virtualization and Linux. This tutorial is intended to help users who are new to the world
 Trend Micro Incorporated reserves the right to make changes to this document and to the product described herein without notice. Before installing and using the product, review the readme files, release
Print Audit 6. Print Audit 6 Documentation Apr :07. Version: Date:
 Print Audit 6 Version: Date: 37 21-Apr-2015 23:07 Table of Contents Browse Documents:..................................................... 3 Database Documentation.................................................