CUMULUS WEB CLIENT USER ASSISTANCE 2017, CANTO GMBH. ALL RIGHTS RESERVED. Welcome!
|
|
|
- Marjorie Little
- 5 years ago
- Views:
Transcription
1 Cumulus is Canto s state-of-the-art Digital Asset Management solution. Cumulus makes it easy to quickly organize, find, share, and track all of your digital files: photos, logos, presentations, videos, as well as PDF, Office, or InDesign documents anything digital, on any platform. The Cumulus Web Client with its modern and easy-to-use interface makes it even more easy to organize your files and collaborate with others. Cumulus Web Client
2 WELCOME! Welcome! This user assistance introduces you to Cumulus Web Client and is intended to show you your way around. It provides following main topics: Look and Feel gives an overview on the main elements of the Cumulus Web Client. How-Tos provides short instructions on how to achieve different tasks with the Cumulus Web Client. Troubleshooting and FAQs is an evolving collection of questions and relies on your input.
3 Using this User Assistance WELCOME! The purpose of this user assistance is to provide an overview of the key features and explain the basic usage of Cumulus Web Client. When you select the Help icon, this page opens. The user assistance contains the latest updates and allows you to provide feedback or ask questions. Find what you are looking for Missing the description for a specific feature? Type the words you are looking for in the Search field at the top. Browsing what is available? Let the links in the Contents panel to the left guide you to the information. Find an item via index? Select the Index icon next to the Contents icon. A list of topics is displayed. Reading on paper Prefer reading a paper document? Select the Print icon in the top right corner and have the current topic printed. Tell us what you think We are committed to providing you with high quality documentation and you can help us to continually improve the documentation that we offer by telling us what you think. We appreciate all types of feedback and look forward to hearing from you. Write to us by selecting the icon in the top right corner.
4 WELCOME! Understanding conventions used Instructional steps are identified by numbers: 1. This would be the first step (and could be the last as well). 2. This would the next step (and could be the last as well). To differentiate user interface items buttons, menus, text fields, etc. from surrounding text, those items are displayed in bold. For example: Select Open. This example means to click or tap the Open button. Another example: Select File > Open to open a file. This means to select first the File menu, then the Open item. Copyrights Copyright 2017, Canto GmbH. All rights reserved. Canto, the Canto logo, the Cumulus logo, and Cumulus are registered trademarks of Canto, registered in the U.S. and other countries. Apple, Mac, Macintosh and QuickTime are registered trademarks of Apple Computer, Inc., registered in the U.S. and other countries. Microsoft, Windows and Windows NT are either trademarks or registered trademarks of the Microsoft Corporation in the U.S. and other countries.
5 WELCOME! Other third-party product and company names mentioned in this document are trademarks or registered trademarks of their respective holders. CWC-1100-H-Z-1

6 LOOK AND FEEL Look and Feel This section provides an overview of the main elements of the Cumulus Web Client The Dashboard 2 The Header 3 The Main Menu The Toolbox (not depicted above)
7 LOOK AND FEEL The Basket (not depicted above) The Container Tree (not depicted above) NOTE: Taking Advantage of Standard Browser Capabilities The Cumulus Web Client supports standard browser capabilities such as working with multiple tabs, bookmarking pages or sending links via . This makes working with the Web Client even more easier. For details, see Take Advantage of the Browser s Capabilities.

8 The Dashboard LOOK AND FEEL The Dashboard is the main entrance to the content and the functionality of Cumulus. It is personalized and provides news and information about activities, changes and relevant tasks. The Dashboard is the first page that is displayed after a successful login (and the selection of a catalog, if applicable), but can be evoked anytime by clicking the Cumulus logo icon on the left side of the header. From the Dashboard, you can navigate to:
9 LOOK AND FEEL Content Provides a starting point for retrieving any file or container from the current catalog. Displays all containers and files on the top-most level of the catalog s container hierarchy. Files shown on this level are not, or not yet, assigned to a container. If all files in the catalog are neatly assigned to containers, there are only containers to be displayed here. (Same as from the main menu.) Your uploads Provides an overview on the files you have uploaded to the current catalog (if any). (Same as from the main menu.) Furthermore, the Dashboard provides information on following topics: Your recent activities A list of files (5 at the most) you have downloaded, checked out / checked in or commented recently. Your recent uploads A list of files (5 at the most) you have uploaded recently Recent activities A list of files (5 at the most) that have been downloaded, checked out / checked in or commented by any Cumulus user (including yourself).
10 The Header LOOK AND FEEL The header is displayed on every Web Client page and provides access to global functions. It may contain the following elements: Cumulus icon Click this icon to switch to the Dashboard. Upload Drag files you want to add to the catalog from the desktop onto this button, or click this button to open a file browser for selecting files to upload. Basket The Basket is a temporary or intermediate repository which is especially useful to collect files from different locations within the catalog hierarchy. Drag items (files or containers) from within the Web Client onto this icon to add the files to the Basket. Files added to the Basket remain there until you explicitly remove them. Click this button to get the contents of your basket displayed. The number of files contained in the basket (if any) is displayed on the button. Notifications All kind of messages from Cumulus, e.g on successful or failed downloads. clicking the button opens the messages for reading. The number of available messages is displayed on the button Browse
11 LOOK AND FEEL Click this button to open a container browser just below the header that allows you to navigate through the container hierarchy, to open any container, and to get basic information on the selected container, such as description and the number of contained files. Clicking the button again hides the container browser. The search field Type a search term into the field and hit Enter or click on the magnifying glass icon to find matching files or containers anywhere in the current catalog. The Customized Search icon ( ) The customized search icon is displayed only if an administrator has defined customized search criteria that fit with the currently open catalog! Click this icon to open the customized search area just below the header. Depending on administrative settings, this area contains different search criteria that help you to find files in the currently open catalog. Each search criterion offers either an input field or a list of options to select from. Options Clicking this button offers the following possibilities: Switching to an other catalog (only if you have access to more than one catalogs), Changing the file view and the container view in order to display different sets of metadata for files (on overview pages as well as on details pages) or containers (on details pages only). Available only if an administrator has enabled this feature. to log out from the Cumulus Web Client.
12 The Main Menu LOOK AND FEEL The main menu is displayed on the left side of every Web Client page, either as icons with tags, or as a strip of icons only, depending on the context. The main menu provides the following entries: Container Tree Toggles the display of the Container Tree on and off. Content Provides a starting point for retrieving any file or container from the current catalog. Displays all containers and files on the top-most level of the catalog s container hierarchy. Files shown on this level are not, or not yet, assigned to a container. If all files in the catalog are neatly assigned to containers, there are only containers to be displayed here. Your uploads
13 LOOK AND FEEL Provides an overview on the files you have uploaded to the current catalog (if any). Workflows Provides an overview on the workflows available for the catalog you are currently working with. Clicking on any workflow name displays the files in this workflow that are currently assigned to you, ordered by their workflow states or tasks (one tab for each task). From here, you can promote files to the next possible state in the workflow by clicking on the respective entry in the toolbox. This entry is available only if the catalog contains workflows. Your collections Provides an overview on the collections you have access to, either because you have created them yourself, or because other Cumulus users have shared them with you. The collections overview page provides several tabs: one tab for all collections, and one tab for each collection type available (download, upload, shared and private collections). NOTE: Depending on the configuration of your Cumulus system, there may be more entries available! Help Opens the Web Client user assistance this file in a separate browser tab. Optional: predefined searches In order to facilitate working with the Cumulus Web Client, administrators can define searches, e.g to quickly find the most used files from a catalog, or the most recent uploads, or whatever. Such predefined searches will show up with their icons and names just below the Your collections entry.

14 The Toolbox LOOK AND FEEL The Toolbox is displayed on the right side of all pages that show files or containers, e.g. overview pages or the details pages or edit modes of files and containers. The Toolbox offers different functions needed to work with items in the catalog, e.g. to create containers, to view and to edit metadata of files and containers, to create collections, to download files or share them with others, etc. Which functions are available depends on the context, that is, the page that is currently displayed, whether there are items selected on that page or not, and, last but not least, on your user permissions. The toolbox can be minimized if it is not needed. Clicking or tapping the tiny icon that appears as the last entry shrinks the toolbox to a nice row of icons sticking to the edge of the browser window, thus freeing screen space for the display of your items. And clicking that icon again expands the toolbox to its full beauty. Note that the toolbox expands temporarily, if you let rest the mouse pointer for a moment on the condensed row of icons.
15 The Basket LOOK AND FEEL The basket is a temporary repository for files which is especially handy if you want to edit a couple of somehow associated file. You can put files into the basket from anywhere in the catalogs container hierarchy, and you can work with these files as usual. The content of your basket is kept even if you stop working with the Web Client and resume your work later on.
16 The Container Tree LOOK AND FEEL The container tree is a means to browse through and navigate in the container hierarchy of a catalog. It is displayed on the left side. Clicking on the Container Tree icon toggles the display of the container tree on and off. Clicking the triangle icon left to a container name expands or collapses the display of the container s sub structure. The Search field on top of the Container Tree lets you easily find what you are looking for. Type at least 3 characters, and the displayed container are reduced to those that contain the respective string in their names (plus the respective parent containers, if any). A single click on a container name opens it in details view, revealing the contained files and containers, if any. A double click performs a search for all files inside this container and its subcontainers. You can as well use keyboard shortcuts: macos Windows Move focus in container hierarchy up/down arrows up/down arrows Expand/collapse subcontainers of container right/left arrow right/left arrow with focus Open details view of container with focus Enter Enter Find all files in container with focus and its subcontainers Alt + Cmd - Enter Alt + Ctrl + Enter
17 How-Tos This section provides short instructions on how to achieve different tasks with the Cumulus Web Client. NOTE: You may not be able to perform all tasks described in this guide. Which tasks you are actually allowed to perform depends on your user permissions which are defined by the Cumulus Administrator. NOTE: For Cumulus Web Client to work properly, cookies must be enabled in your browser! Take Advantage of the Browser s Capabilities The Cumulus Web Client supports standard browser capabilities which makes working with the Web Client even more easier. For example, you can use multiple tabs or browser windows simultaneously, e.g. to view or edit items from a search result while the search result page remains untouched on its original tab bookmark any page (e.g. a search result, or the details of an interesting item) and thus quickly return to this page using the bookmark links to interesting content directly to other Cumulus users (recipients which are currently not logged into Cumulus, would be prompted to login first and subsequently get the respective page displayed) update a search result by just refreshing/reloading the page
18 Working with Multiple Tabs The common way to perform an action is to click an icon, a menu option or a toolbox entry. To perform the action in a new tab, simply right-click the respective item and select Open (Link) in New Tab. You can open a new tab for any action that would result in a new page displayed within the Web Client. This includes opening the basket, displaying any overview page, including the Content, Your uploads, or Your collections pages, as well as viewing and editing items. On the other hand, actions that would be performed immediately (e.g. deleting items), as well as actions that require your input in the first instance (e.g. creating containers or collections) can not be performed in a new tab.
19 Paging Through Files The Cumulus Web Client provides overview pages that present all files of a catalog, or in a container, or the files belonging to a keyword, a search result, a collection, or that are contained in the basket. Any single file in any of these contexts can be opened in details view, or in edit mode, or in a preview. Whenever you open a file, the details page (or the edit mode, or the preview) shows controls that allow to quickly navigate to the next, previous, first or last file in the given context. The context may be e.g., the basket, a collection, a search result, or all files of a catalog or container, etc. If a file is open in edit mode and you have changed a value, you will be prompted to save (or discard) your changes before you can navigate further on. So, it is very convenient to browse through a number of files one after the other, by just navigating to the next, previous, first or last file, without being forced to constantly return to an overview page in between. Of course you can anytime return to the environment (the overview page) from which you have started. To do so, just hit the browser's back button Instead of clicking controls, you can as well use keyboard shortcuts: macos Windows Next file Alt + right arrow Ctrl + right arrow Previous File Alt + left arrow Ctrl + left arrow Last file Alt + Shift - right arrow Ctrl +Shift - right arrow First file Alt + Shift - left arrow Ctrl + Shift - left arrow
20 Upload Files and Add Them to a Catalog Uploading files to Cumulus instantly adds them to the currently open catalog. Files can be uploaded via drag & drop, or by using the Upload button. Uploading Files with the Upload Button To do so: 1. Click the Upload button in the header of the Web Client. A file browser is displayed 2. Navigate to and select the files you want to upload, then click Open. 3. Depending on the administrative settings, the upload process is either started immediately, or the Add information window is displayed additionally. Here you can enter metadata information that will be added to all uploaded files during this cataloging process. If there are mandatory fields, they must be filled in before you can proceed. 4. Click Apply even if you did not enter any information. The upload process is started. To abort the upload process click Cancel. The progress of the upload is indicated in the Upload button. If you clicked the Upload button on a container overview page, the uploaded files will additionally be assigned to that container. As soon as the upload is finished, the files are displayed under Your Uploads.
21 Upload Files Via Drag & Drop To upload files you can drop them either onto the Upload button, or onto any container that is currently visible. Dragging files onto the Upload button adds them to the catalog and assigns them to the currently open container. Dragging files onto any container adds them to the catalog and additionally assigns them to that container. To add files via drag & drop: 1. Drag the files you want to upload into the Web Client window. The upload button and all visible containers are highlighted, indicating where you can drop the files. 2. Drop the files either onto the Upload button, or onto the container to which you want to assign them. Depending on the administrative settings, the upload process is either started immediately, or the Add information window is displayed additionally. Here you can enter metadata information that will be added to all uploaded files during the cataloging process. If there are mandatory fields, they must be filled in before you can proceed. 3. Click Apply even if you did not enter any information. The upload process is started. To abort the upload process click Cancel. The progress of the upload is indicated in the Upload button. As soon as the upload is finished, the files are displayed under Your Uploads.
22 NOTE: Depending on administrative settings, a Prefiller window may be displayed during the upload of files to a catalog, allowing for adding, removing or modifying certain metadata values. If uploaded files are implicitly assigned to a category because they were dragged on a category name, this is indicated on the Prefiller window. However, such category assignments are not considered as Prefiller actions and can not be controlled via the Prefiller.
23 Find Items in a Catalog There are several ways to find files and containers in the currently open catalog. Finding Items via the Search Field Finding Files via Customized Search Finding Items via Predefined Searches NOTE: Search Result and Related Files A search result never contains files that are alternates (of a master file) or variants (of a source file), but only master files, source files and of course, files that have no relations at all. For more information on a file s relation see Understanding Relations and Use Relations.
24 Finding Items via the Search Field The most simple way to find items in a catalog is to use the Search field in the header of the Web Client (Quicksearch). By default, the search is performed in the metadata fields Name, Document Text, Notes, Keywords, and Categories, and in the category field Category Name (can be changed by an administrator). To use the Search field to find items in the currently open catalog: 1. Enter a search term a name, a number... into the Search field and press Enter to start the search. NOTE: Searching with an empty search field finds all items in a catalog, regardless of their location in the container hierarchy. How to search more precisely There are several ways to control the search result: Two or more terms are automatically combined with AND. Entering Canto Cumulus will result in all items that contain Canto and Cumulus in the supported metadata fields. Two or more terms enclosed in double quotation marks ( ) are handled as one single search term. Entering Canto Cumulus will result in all items that contain the phrase Canto Cumulus (i.e. the words Canto and Cumulus separated by a space) in the supported metadata fields.
25 Two or more terms separated with two pipes ( ) are combined with OR. Entering Canto Cumulus will result in all items that contain either Canto, or Cumulus, or both in the supported metadata fields. Prepending a term with a minus symbol (-) searches for items that don t contain that term. Entering Cumulus -Cloud will result in all items that contain Cumulus, but do not contain Cloud in the supported metadata fields. While entering a search term, a list can be displayed that offers previously used search terms matching your input (if any), and matching queries saved at the Cumulus Server (if any). How to use previously used search terms The Web Client keeps a history of search term you have used so far. As soon as you start entering a search term all matching entries from your search history are displayed and can be used. 1. Select an entry from the list of previously used search terms. The search is performed immediately How to use queries saved at the Cumulus Server Queries are more or less complex searches that can combine multiple search criteria, operators and values in various ways. Such queries are composed by users or administrators employing the Cumulus Desktop Client. They are saved under arbitrary names at the Cumulus Server. They can be shared so that other users can access them.
26 As soon as you start entering a search term all shared queries with matching names saved at the Cumulus Server are displayed and can be used: 1. Select an entry from the list of saved queries. The search is performed immediately. If the selected query contains placeholders, you are prompted to enter appropriate values before the query is executed. IMPORTANT! Saved Queries and Quicksearch Work Different Be aware that saved queries work different than the Quicksearch! With a saved query, you select the name of a query, NOT the term to be searched for. Also the range of searched metadata field is not restricted to certain default fields as with the simple Quicksearch. Therefore, searching e.g. for the term Jpeg or using a saved query called Jpeg can produce completely different results. NOTE: Keep in mind that searching with an empty Search field is different from clicking Content on the dashboard or in the main menu. The latter results in the display of the items on the top-most level of the container hierarchy as a starting point for retrieving more content from the catalog.
27 Finding Files via Customized Search The customized search icon is available only if an administrator has defined search criteria that fit with the currently open catalog. With the customized search, the following boundary conditions apply: Only files can be found, not containers! A customized search can be performed using one or multiple of the available search criteria. A customized search usually is performed as an IS-search. That means that only files will be found that match exactly the entered search term. (However, there is an exception: a customized search in a multi-select vocabulary field is performed as a Contains-search.) Multiple search criteria are combined with AND. That means that only files will be found that comply with all entered search terms. To find files via customized search: 1. Click or tap the customized search icon ( ) in the header. The customized search area is displayed, containing all available search criteria. 2. Select a search criterion. Enter a search term, or select a value from a drop-down list. The search criterion is highlighted. 3. Select more search criteria, if desired. You can use as many search criteria as you need. NOTE: Multiple search criteria are combined with AND.
28 4. Click or tap the search icon ( ) to start the search. The search result is displayed. NOTE: Searching with no search criterion selected finds all files in a catalog. To de-select a search criterion, delete the entered term or select no value from the drop-down list. To de-select all selected search criteria at once, click/tap the reset icon ( ). Clearing several or all search criteria does not affect the previous search result. To refresh the search result, click or tap the search icon ( ) again. To close the customized search area, use the close icon, or click/tap the customized search icon again, or open the container browser.
29 Finding Items via Predefined Searches If you have access to searches predefined by an administrator, they are displayed as search entries in the main menu, just below the Your Collections entry. Click on any of these entries to perform the search and find the respective items. BACKGROUND INFO: Predefined Searches vs. Saved Queries Predefined Searches is a Web Client-only feature, whereas saved queries are available at the Cumulus Desktop Client as well. Technically, however, they basically work the same way. TIP: View/Edit Items in New Tabs To keep a search result as it is on its original browser tab, view or edit any item from that search result in a separate tab. To do so, select the respective item, right-click View or Edit in the tool box and select Open (Link) in New Tab.
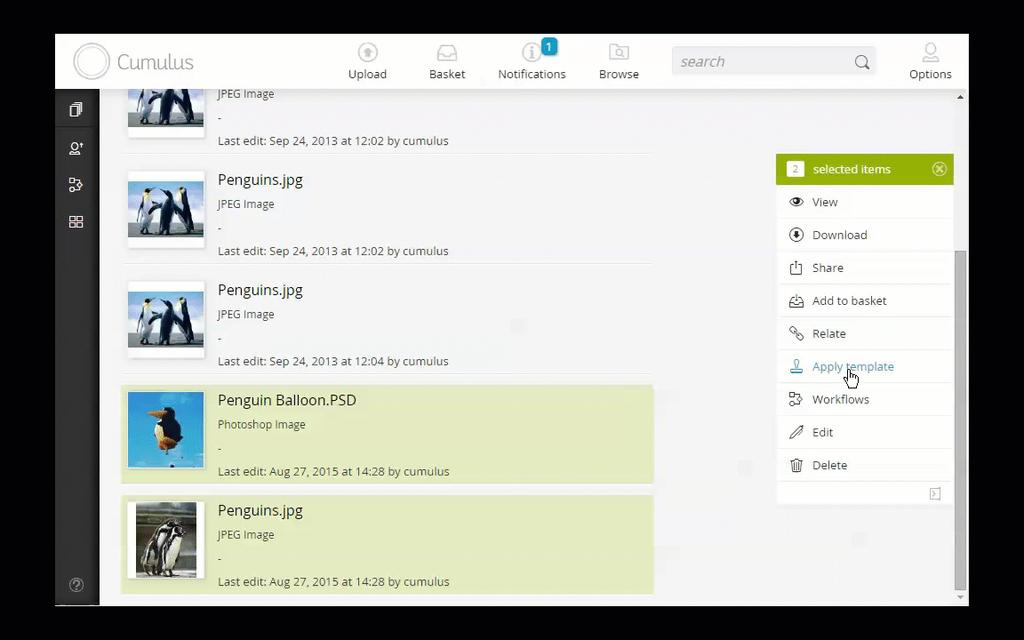
30 Select or Deselect Items On overview pages, you an select single items (files and/or containers), all currently loaded items, or multiple files in a row. Likewise, you can cancel the selection of single items, or you can cancel all selections at once. Select Single Items, or All Items on a Page, or Multiple Files in a Row To select a single item (a file or a container) on an overview page: 1. Click anywhere on a file or container except on the respective thumbnail. Selected items are highlighted. You can select as many items as you want. The number of selected items is displayed in the selection entry on top of the toolbox. The the toolbox is adapted to the selection. NOTE: Clicking the thumbnail of a container opens the container and shows its content. Clicking the thumbnail of a file opens the details view, displaying the file s metadata. Instead of selecting single items (files and/or containers), you can select all items that are currently loaded on a page. To select all items on a page: 1. Click the Select entry in the toolbox ( ).
31 All items loaded on the page are selected. The number of selected items is displayed in the Selection entry (e.g., ). If you subsequently increase the number of items, e.g. by scrolling down the page, these newly loaded items are initially not selected, but can be added to the selection by clicking the Select entry again. Hovering the mouse pointer over the Select entry changes its appearance to display the total number of selectable files and to offer the select function again ( ) To select multiple files in an row: 1. Click anywhere on the first of the files you want to select (except on the respective thumbnail), then shift-click on the last file. The respective files are selected. You can add single files to the selection by clicking on them, or expand the selection by shift-clicking on a not yet selected file. The number of selected items is displayed in the selection box. See how it works! (Selecting all loaded files; scroll to load more files; select them, too; de-select all and select them again.)

32
33 Deselect Single Items or All Items on a Page To cancel the selection of a single item: 1. Click anywhere on the selected item except on the respective thumbnail. The selection of the item is cancelled. To cancel all current selections at once: 1. Click the cancel icon in the Selection entry ( / ). All selections are cancelled.
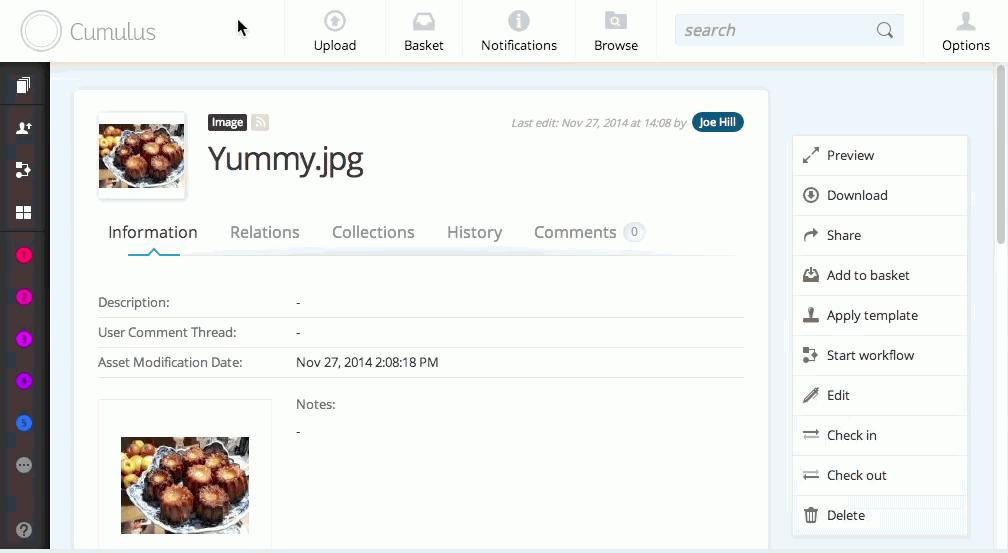
34 View and Preview Files Files can be viewed and previewed. Viewing means that a details page containing various metadata information about the file is displayed. Previewing means, that a bigger graphical representation of the file is displayed, allowing e.g. to examine details of an image, or to browse and read a PDF file. The file's preview is also the place to enter comments on the file. To view the details page of a file: 1. On any overview page, click the thumbnail of a file you want to view, OR select the file, then click View in the toolbox. The details view of the file is displayed. The details page provides several tabs for different kind of metadata: Information classic metadata, such as file name, creation date, keywords, thumbnail, and many more. What exactly is displayed has been specified by an administrator. Additionally, the administrator may have allowed you tho select a n different file view providing a different set of metadata information via the Options button in the header. Relations an overview of the relations of the file to other files Collections an overview of the collections the file belongs to History an overview on all available versions of the file (if any) Comments a chronological overview on all comments on a file
35 To preview of a file: 1. On the details page of a file, click Preview in the toolbox, OR click the thumbnail. A preview of the file is displayed. In files containing multiple pages, you can scroll page by page or jump to the first, the last, or any other page using the respective controls that are displayed at the head of the preview. For the preview of video files, an appropriate player is used which provides usual controls (play/pause, stop, volume control, timeline, full screen, etc). Comments belonging to a file can also be displayed and edited on the file s preview. See Use Comments for details.
36 Zooming and Panning You can zoom into the preview of a file to make details visible. To zoom in or out, use the zooming controls in the upper left corner of the preview, OR use the Plus ( + ) and Minus ( - ) keys on your keyboard, OR use the mouse wheel, OR pinch the screen with two fingers (ipad) Also you can pan your zoomed image to make any part of it visible in the browser window. To pan an image, use the arrow keys on your keyboard, OR use your mouse to drag it around, OR tap on the image and use your finger to drag it around (ipad).
37 BACKGROUND INFO: Limitations of the Zooming Function In order to prevent the risk of performance issues, the maximum size of a displayed image is limited to 4000 x 4000 pixels by default. For larger images, Cumulus creates preview images with 4000 pixels on the long edge which are used instead of the original image files. However, the indication of the zoom factor (next to the zooming icons) always relates to the size of the original file. That means, even if you have reached the highest possible zoom level, the indicated factor may well be far below 100%, if the original image is very large. On the other hand, it is not possible to zoom an image beyond its actual/physical size, or 100%. That means that if the actual size of an image is smaller than, or fits the preview area in your browser window, no zooming controls are available.
38 Rate Files Files can be rated with one to five stars. To rate a file: 1. Select the file you want to rate. 2. From the toolbox, select Edit. The file information is displayed in Edit mode. 3. Navigate to the Rating section (scroll down if necessary) and click the appropriate number of stars. The file is rated accordingly. Hint: Clicking the star icon of a one star rating removes the rating completely.
39 Label Files Files can be labelled with different colors. To label a file: 1. Select the file you want to label. 2. From the toolbox, select Edit. The file information is displayed in Edit mode. 3. Navigate to the Label section (scroll down if necessary) and select the desired label from the drop-down list. The file is labeled accordingly.
40 Add Keywords to Files Files can have as many keywords as necessary. To add a keyword to a file: 1. Select the file to which you want to add a keyword. 2. From the toolbox, select Edit. The file information is displayed in Edit mode. 3. Navigate to the Keyword section (scroll down if necessary) and click Add keyword. 4. Start to type the desired keyword. If the string you enter matches already existing keywords, a list of proposals is displayed. Select an entry from that list, or finish typing the keyword and press Enter. If you enter a string as yet unknown, a new keyword is created automatically. 5. From the toolbox, select Save. The keyword is added to the file. In Edit mode, you can remove a keyword from a file by clicking the remove icon (the small x) next to the keyword you want to remove.
41 Use Workflows A catalog may contain workflows that can be attached to files. A workflow consists of a sequence of tasks, or workflow states, and the activities that lead from one state to the next. If you attach a workflow to a file, the file is promoted to the first state or task of that workflow, and it is assigned to a user who is responsible for the task. As a Cumulus user, you can get an overview on your workflow assignments that is, on the tasks you have to achieve via the Workflows item in the main menu (see The Main Menu). Clicking this item provides an entry for every workflow available in the currently open catalog. Select a workflow to see the files in this workflow that are assigned to you. If you are responsible for more than one task within a workflow, every task gets its own tab displaying the related files. As the responsible user, you can also promote the file to the next task, or workflow state. Every task in a workflow includes an assignment to a user. Whether this user is the same as in the previous task or a different one, and whether the new user is assigned automatically or manually depends on the definition of the workflow. As a Workflow Administrator that is, as a user with the additional Workflow Administrator permissions, you can also remove workflows from files. If you remove a workflow from a file, the respective status information and user assignments are deleted. You can re-start the workflow on the file again. Start a Workflow for a File Promote Workflow State Remove Workflow
42 Start a Workflow for a File Starting a workflow for a file promotes the file to the first (initial) state of the workflow. Furthermore, a user is assigned who is responsible for the file during this state. Depending on the workflow definition, the user is assigned either automatically, or manually by the user who starts the workflow. To attach a workflow to a file: 1. Select the file(s) you want to attach to a workflow. 2. From the toolbox, select Workflows. The Manage Workflows window is displayed, showing a list of available workflows. 3. On the desired workflow, click Start. 4. Additionally, you may have to select a user to whom the file will be assigned in the first workflow state. 5. If there are multiple workflows available, you must close the Manage Workflow window with Close. The workflow is attached to the selected file(s). The files will be displayed in the Workflow overview of the user to whom it is assigned. Additionally, the newly assigned user will be notified via . If your initial selection contained files that were already attached to the workflow, they remain unchanged.
43 NOTE: The Workflow entry is only displayed if the open catalog contains at least one workflow, you have the permission to start the workflow, there is at least one workflow that is not already attached to the selected file.
44 Promote Workflow State If you are assigned to a file in a certain workflow state and have achieved the respective task, you can promote the file to the next task, or workflow state. To promote a file to the next task: 1. Select the file you want to promote in the workflow overview. In the toolbox, the activities are displayed that will promote the file to a following state in the workflow. 2. Select the appropriate activity. 3. Depending on the workflow definition, you may additionally have to select a user to whom the file will be assigned for the next task. The file is promoted to the next task. If the file remains assigned to you, it will be displayed in your Workflow overview, on the tab for the appropriate task. If the new workflow state includes an assignment to a different user, it will be displayed in that user s Workflow overview.
45 Remove Workflow Removing a workflow from files is only possible for users that are Workflow Administrators! To remove a workflow: 1. Select the file(s) from which you want to remove a workflow. 2. From the toolbox, select Workflows. The Manage Workflows window is displayed, showing a list of workflows that can be removed or attached to the selected file(s). If your selection contains files attached to a certain workflow as well as files not attached to that workflow, you can either remove the workflow from the affected files, or attach the workflow to files that are not yet attached to it. 3. On the workflow you want to remove, click Remove. Confirm the removal with OK. 4. If there are more multiple available, you must close the Manage Workflow window with Close. The workflow is removed from the selected file(s). The respective status information and user assignments are deleted. You can re-start the workflow on the file again.
46 Use Comments Cumulus users can comment on files. A comment can apply to a file in general, or it can refer to a specific detail in the file, e.g. an area of a picture. Additionally, it is possible within a comment to mention Cumulus users that will be notified about the comment by . Display a File s Comments Add a Comment to a File Reply to a Comment Edit a Comment Delete Comments Notify Cumulus Users About a Comment
47 Display a File s Comments Comments can be viewed on the Comments tab of a file s profile, or on the preview of a file. On the Comments tab To view all comments of a file on the Comments tab: 1. Open a file in its details view and select the Comments tab. An overview page shows all existing comments that belong to the file in chronological order (newest first). If there are comments on specific details of a file (mark ups), a thumbnail of the respective area is displayed to the left of the comment. On the Preview of a File To view all comments of a file on the file s preview: 1. Open a preview of a file. 2. If the comments are not displayed, click the comments icon in the upper right corner. A column with all existing comments belonging to the file is displayed on the right side. The comments are presented in chronological order (newest first). If there are
48 comments on specific details of a file (mark ups), the respective regions are marked and numbered. The same numbers are displayed next to the corresponding comments. A comment and the replies to it constitute a thread. If there is a new reply to an older comment, the whole thread is regarded as new and displayed on top of older threads. You can add a new comment or reply to an already existing comment.
49 Add a Comment to a File You can add general comments to a file on the Comments tab, and you can add general comments as well as comments to specific areas of a file on the file s preview. With multi-page files, you can add comments to specific areas on any page of the file. On the Comments tab To add a comment to a file on the Comments tab: 1. Open a file in its details view and select the Comments tab. 2. Enter your comment, then click Post comment. Your comment is saved and is immediately available to other users. On the Preview of a File To add a general comment to a file, or a comment to a specific region on the file s preview: 1. Open a preview of a file. 2. If the comments are not displayed, click the comments icon in the upper right corner. The comments column is displayed to the right side. 3. Enter your comment into the Add your comment field. OR
50 Select one of the comment tools ( sticky note, rectangle, or polygon tool) and place a respective marker wherever it is suitable on the image preview, then enter your comment 4. Click Post comment. Your comment is saved and is immediately available to other users.
51 Polygon comments: See how it works!

52 Rectangle comments: See how it works!
53 Reply to a Comment You can reply to existing comments on the Comments tab or on the file s preview. On the Comments tab To reply to a comment on the Comments tab: 1. Open a file in its details view and select the Comments tab. 2. On the comment you want to reply to, click Reply. An entry field is displayed. 3. Enter your reply and click Post reply. Your reply is saved together with the original comment and is immediately available to other users. On the Preview of a File To reply to a comment on the file s preview: 1. Open a preview of a file. 2. If the comments are not displayed, click the comments icon in the upper right corner. The comments column is displayed to the right side. 3. Click the icon next to the comment you want to reply to. Enter your reply into the Add a reply field.
54 4. Click Post reply. Your reply is saved together with the original comment and is immediately available to other users.
55 Edit a Comment You can edit your own comments (but not comments of other users) on the Comments tab or on the file s preview. NOTE: Specific users may have the permissions to edit comments of other users. On the Comments tab On the comments tab, you can edit the text of a comment. To edit a the text of a comment on the Comments tab: 1. Open a file in its details view and select the Comments tab. 2. On the comment that you want to edit, click the menu icon and select Edit. The comment is displayed in edit mode. 3. Edit the comment as desired, and click Save. The modified comment is saved and is immediately available to other users. On the Preview of a File On a file s preview, you can edit the text of a comment as well as the size, shape and position of any marker on the preview To edit a comment on the file s preview: 1. Open a preview of a file.
56 2. If the comments are not displayed, click the comments icon in the upper right corner. The comments column is displayed to the right side. 3. On the comment that you want to edit, click the menu icon and select Edit. The comment text and the marker on the preview are displayed in edit mode. 4. Edit the comment text as desired. AND/OR Drag the marker to a different position. AND/OR Use the handles (little circles) at the corners of activated rectangles or polygons to resize or reshape them. 5. Click Save. The modified comment is saved and is immediately available to other users.
57 Delete Comments You can delete your own comments (but not comments of other users) on the Comments tab or on the file s preview. If you delete a comment that has replies, the whole thread is deleted (i.e. the original comment including all replies). NOTE: Specific users may have the permissions to delete comments of other users. On the Comments tab To delete a comment on the Comments tab: 1. Open a file in its details view and select the Comments tab. 2. On the comment that you want to delete, click the menu icon and select Delete. A confirmation dialog is displayed. 3. Click Delete to confirm the deletion of the comment. The comment is deleted and is no longer available to other users. On the Preview of a File To delete a comment on the file s preview: 1. Open a preview of a file.
58 2. If the comments are not displayed, click the comments icon in the upper right corner. The comments column is displayed to the right side. 3. On the comment that you want to delete, click the menu icon and select Delete. A confirmation dialog is displayed. 4. Click Delete to confirm the deletion of the comment. The comment is deleted and is no longer available to other users.
59 Notify Cumulus Users About a Comment While composing, editing or replying to a comment, you can mention other Cumulus users that you want to notify. These users will receive an containing the text of your comment and a link to it so that they can immediately reply or react. NOTE: Notifying only works with Cumulus users that have an active login and a valid address known to Cumulus. To notify Cumulus users about your comment: 1. For each Cumulus user you want to notify, enter character followed by the respective Cumulus user name. While typing, all matching user names are displayed. 2. Click on the appropriate name in the list of proposals. The user name is replaced by the user s full name, if known to Cumulus. The s are sent as soon as you post your comment. See how it works!
60
61 Use Relations Relations are a means to structure and organize the files contained in a catalog. For more information, see Understanding Relations or watch the video tutorial Using Custom Asset Relations. Display a File s Relations Create Relations to a File Remove Relations of a File
62 Display a File s Relations To view the relations of a file: 1. Open a file in its details view and select the Relations tab. An overview page shows which types of relations the file has an how many files are related. If applicable, links to more detailed views are provided. 2. Follow any of these links to get detailed information on which files are related.
63 Create Relations to a File You can relate any file in a catalog to any other file, either as alternate or as variant. To relate files: 1. Select the files you want to relate. 2. From the toolbox, select Relate. The Create Relations window is displayed. 3. From the drop-down list, select the relation type you want to create. 4. From the previously selected files, choose one to represent this group, i.e. the one that will be the master of the alternates or the source of the variants. 5. Click Create. The files are related. NOTE: Keep in mind that all files that are set to be related to a master (of alternates) or a source (of variants) are no longer displayed in the catalog. From now on, they can be retrieved only via the Relations tab of the master or source file. IMPORTANT! Don t create nested relations (e.g., by relating a master or a source file as an alternate to a further file)! See how it works!
64
65 Remove Relations of a File You can remove relations of the type variant or alternate from a file. To remove such relations: 1. Open the file from which you want to remove the relations in details view, then open the Relations tab. 2. Open the details of the relation type that you want to remove (Alternate or Variant). All files that are variants or alternates of the initially selected file are displayed. 3. Select one or multiple files. From the toolbox, select Remove relation. The Remove Relations window is displayed, listing all files that no longer will be related to the initially selected file. 4. Click Remove. The files are no longer related. Files that have been alternates or variants are again displayed in the catalog.
66 Edit Metadata Edit Metadata of a File or Container Edit Metadata of Multiple Files Apply a Metadata Template
67 Edit Metadata of a File or Container Certain metadata of files and container can be edited. Usually, not all metadata fields are user editable. Editable fields have a gray background when the item is displayed in edit mode. To edit metadata of a container or a file: 1. Select or open the container or file the metadata of which you want to edit. 2. From the toolbox, select Edit. The metadata of the item are displayed. Editable fields have a gray background. Active fields turn yellow. 3. Make your edits. 4. From the toolbox, select Save. Your edits are saved. The item s metadata is displayed in view mode.
68 Edit Metadata of Multiple Files Instead of editing the metadata of just one file, you can edit metadata for multiple files at once. To edit metadata of multiple files: 1. Select the files the metadata of which you want to edit. 2. From the toolbox, select Edit. The metadata of the files are displayed. If a field contains different content for different files, the string multiple values is displayed. Fields that can be edited have a gray background and a check box in front of them. 3. Activate the check boxes of the fields that you want to edit. Additional information on the fields may be displayed, e.g. whether a field is mandatory. 4. Make your edits. If you want to discard your edits, just deactivate the check box. If you edit a field that already contains a value for at least one file, you must decide how to handle existing values. Depending on the type of the field, you can either: replace the existing value, insert the new value only if the field is empty insert the new value before or after the existing one add the new value to the existing one remove specific parts of an existing value, e.g. selected keywords clear the existing value.
69 NOTE: Use the Replace and the Clear options with caution! These options delete all existing values and cannot be undone. 5. From the toolbox, select Save. The information from the fields with activated check boxes is saved with the metadata of the initially selected files. The current metadata of these files are displayed in view mode, and you can check your changes. TIP: Working even faster Instead of first activating a check box and then editing the respective field, you can just start editing a field. The check box is then activated automatically.
70 Apply a Metadata Template With metadata templates, you can assign plenty of predefined metadata to one or multiple files at once in a convenient way. To apply a template: 1. Select the file(s) to which you want to apply predefined metadata. 2. From the toolbox, select Apply template. The Apply Metadata Template window is displayed. 3. Select the template you want to use. 4. Click Apply. The selected template is applied immediately. NOTE: Metadata templates must be configured by the Cumulus Administrator.
71 Use Collections Display the Collections Containing a Given File Create a Private Collection Share Files With Cumulus Users Share Files With External Users Add Files to an Existing Collection Create an Upload Collection Delete Collections
72 Display the Collections Containing a Given File To view the collections a file belongs to: 1. Open a file in its details view and select the Collections tab. An overview page shows all collections to which the file belongs.
73 Create a Private Collection You can create a private collection from any selection of files you have made. A private collection can only be seen and used by its creator. To create a private collection: 1. Select the files. 2. From the toolbox, select Share. The Share files via collections window is displayed. 3. Click Create a collection for personal use. The properties of the new collection are displayed in edit mode. 4. You can modify the name of the collection add a description 5. From the toolbox, select Create. A collection is created containing the files you have selected. The new collection is listed under Your Collections.
74 Share Files With Cumulus Users You can share files with other Cumulus users. To share files with Cumulus users: 1. Select the files you want to share. 2. From the toolbox, select Share. The Share files via collections window is displayed. 3. Click Create a collection and share it with Cumulus users. The properties of the new collection are displayed in edit mode. 4. You can modify the name of the collection (100 characters maximum) add a description decide whether you want your selection to be shared with all Cumulus users, or with selected users only. 5. From the toolbox, select Create. A collection is created containing the files you have selected. The collection is immediately shared with the users you have specified. The new collection is listed under Your Collections.
75 Share Files With External Users You can share files with anybody by sending them a collection link. To send a collection link: 1. Select the files you want to share. 2. From the toolbox, select Share. The Share files via collections window is displayed. 3. Click Create a collection and send a link to selected recipients. The properties of the new collection are displayed in edit mode. 4. You can change the name of the collection, e.g. to something more meaningful (100 characters maximum). 5. Enter the recipients addresses (To), and a Subject text. 6. Additionally, you can add a message Text modify the Embargo Date and the Expiration Date require a Password define the Permissions the recipients have on the files in the collection 7. From the toolbox, select Send. A collection is created containing the files you have selected. An is sent to each of the recipients you have specified, providing a link for opening the collection in Cumulus Portals.
76 The new collection is listed under Your Collections.
77 Add Files to an Existing Collection You can add files to any existing private, shared or download collection. However, you can t add files to an upload collection. To add files to a collection: 1. Select the files. 2. From the toolbox, select Share. The Share files via collections window is displayed. 3. Click Add files to an existing collection. The Add file to collection window is displayed. 4. Select the collection to which you want to add the selected files 5. Click OK. The files are added to the selected collection.
78 Create an Upload Collection You can create an upload collection and send an upload link to any address. When a recipient clicks the link, a landing page is opened in the recipient s Web browser that allows to upload files. Uploaded files are added to the current catalog and gathered in the upload collection you have created. To create an upload link: 1. In the main menu, click on the Your Collections icon to open the collections overview page. 2. In the toolbox of the collections overview page, click Create upload collection. The properties of the collection are displayed in edit mode. 3. You can change the collection s name, e.g. to something more meaningful (100 characters maximum). 4. Enter the recipients addresses (To), and a Subject text. 5. Additionally, you can add a message Text modify the Embargo Date and the Expiration Date require a Password define the Permissions the recipients have on the files they have uploaded 6. From the toolbox, select Send. An empty collection is created. An is sent to each of the recipients you have specified, providing a link that allows uploading files via Cumulus Portals or Sites.
79 The new collection is listed under Your Collections. As the recipients use the link to upload files, this collection will be filled over the time. As the creator of an upload collection, you will receive a notification each time someone uploads files via to this collection Sites.
80 Delete Collections You can easily delete any collection that you own (that you have created). Deleting a collection does not modify or delete the file(s) assigned to that collection. To delete a collection: 1. Open the Your collections overview. 2. Select the collection(s) that you want to delete, or open a collection. 3. From the toolbox, select Delete. A confirmation window is displayed. 4. Click Delete. The selected collections are deleted. NOTE: Be careful when deleting a shared collection, because this may affect the work of others.
81 Download Files You can download a single file or multiple files. You can also select containers to download all files belonging to them at once. To download files and containers: 1. Select the items you want to download. 2. From the toolbox, select Download. The Download window is displayed If the selection includes containers, specify whether you want to download just the files belonging directly to the selected containers, or all files from all subcontainers as well. 3. Select an option that is applied to the files you want to download (e.g., Convert and compress, or Create ZIP, or Copy Original Asset, or Crop Image, etc). 4. Click Start download. 5. Only if the selected option implies cropping: A preview for each image contained in your initial selection is displayed allowing for final adjustments. Depending on the settings defined by an administrator, use your mouse to: modify size and position of the cropping area, OR modify the position of the cropping area, OR freely draw a cropping area
82 Additionally, the administrator may have enabled that you can specify the output size, i.e. the dimensions of the resulting image, by entering appropriate values for width and height (in pixels). The files are downloaded immediately.
83 Work With Containers Create a Container Add Files to a Container Delete Container Remove Files from a Container Navigate in Container Hierarchies
84 Create a Container You can create containers as you need them on any content overview page (All, Containers or Files) as well as on any open container. A new container is always created within (as a child of) the currently open container. To create a container: 1. From the toolbox, select Create Container. The properties of the container are displayed in edit mode. 2. In the Name field, enter a name for the new container 3. From the toolbox, select Create. The new, initially empty container is created. You can now start adding files to the new container.
85 Add Files to a Container Any file in Cumulus can be added to as many containers as needed. Adding a file to a container does not modify the file in any way. To add a file to a container: 1. Drag the file on any container visible on the current page, e.g. in the container browsertree. The file is added to the container.

86 See how it works!
87 Files can also be added to a container that is not visible on the current page: 1. Select the file you want to add to a container. 2. From the toolbox, select Edit. The file information is displayed in Edit mode. 3. Navigate to the Containers section (scroll down if necessary) and click Assign file to a container. 4. Start to type the name of the desired container. As soon as you start typing, all matching container names are displayed (up to 10). Select the appropriate name in the list of proposals. 5. From the toolbox, select Save. The file is added to the container. NOTE: Files can be assigned to a container already during the upload. See Upload Files and Add Them to a Catalog.
88 Delete Container You can easily delete container. Deleting a container does not modify or delete the file(s) assigned to that container. To delete a container: 1. Select the container(s) that you want to delete, or open a container. 2. From the toolbox, select Delete. A confirmation window is displayed. 3. Click Delete. The selected containers are deleted.
89 Remove Files from a Container Files can be easily removed from a container. Removing a file from a container does not modify or delete the file itself. To remove a file from a container: 1. Open the container from which you want to remove files. 2. Select the files you want to remove from the container. 3. From the toolbox, select Remove. OR 1. Select the file you want to remove from a container. 2. From the toolbox, select Edit. The file information is displayed in Edit mode. 3. Navigate to the Containers section (scroll down if necessary) and click the remove icon of any container from which you want to remove the file. The file is removed from the Container.
90 Navigate in Container Hierarchies Containers can be deeply nested into other containers, thus forming complex container hierarchies. With the container browsertree and the breadcrumb navigation, Cumulus Web Client provides two efficient means to navigate easily in container hierarchies. Container BrowserTree To browse for containers: 1. In the headermain menu, click the container tree entry or iconbrowse to show the container browsertree. The container browser is displayed. If you are currently working within a container, this container is already selected. If the current container has subcontainers, they are displayed in a column to the right. If it has a parent container, the containers of the superior level are displayed in an column to the left, the parent container is marked. You can: Click the triangle icon to the left of a container name to toggle the display of its sub containers. Click on anya container name to select it.get information about it and to see its sub-containers and the containers of the superior level(s). CDouble click a container name to open it in details view. s icon, or double click its name, to open it.
91 Use the keyboard shortcut Alt+Strg+Enter (Win)/Alt-Cmd-Enter (Mac) to display all files in the selected container and its sub containers. Breadcrumb Navigation With breadcrumb navigation, you can easily navigate from any container through all hierarchy levels down to the basic or Content level of a catalog. In the heading of any container open in view mode, the containing or parent container s name is displayed. Clicking on the name of the parent container opens a list of all containers in which form the hierarchy from the Content level up to the current container the breadcrumbs. Clicking on any container name in this list immediately opens the respective container. Breadcrumb navigation also works with the display of containers to which a file is assigned to on the file s Information tab (view mode only). Clicking on the name of any container opens a list of the respective parent containers. Clicking on any container in this list immediately opens it.
92 Use Filters In any file overview, you can use filters to narrow down the number of displayed files in order to just get what you need. To do so, either enter a string to be used as filter criterium, or choose from several pre-defined filters. You can combine filters as you need to. To apply a string as filter: 1. Enter a string in the search field of the Filter bar, and press Enter. By default, the search for the filter string is performed in the record fields Name, Document Text, Notes, Keywords, and Categories. The filtered result shows all files for which the filter string is contained in any one of these fields. To apply a predefined filter 1. If necessary, expand the Filter bar with the triangle icon. 2. Click the Choose filter field for the filter you want to apply and select a value from the drop-down. 3. Some filters have a multi-level structure, i.e. after the first value is set, a new dropdown list is displayed with further filtering options. Continue to select filter values until you get what you want. Only such file are displayed that match the selected filter criteria.
93 Set filters can be easily cancelled. To cancel a filter: 1. Click the minus-icon to the left side of the set filter value.
94 Manage Filters You can configure which filters are displayed in the Web Client. To manage filters: 1. If necessary, expand the Filter bar with the triangle icon. 2. Click Manage filters. The Filter list is displayed. 3. Activate the filters that you want to be displayed in the Filter bar, or deactivate the filters that you don t want to be displayed. 4. Click OK. In the filter bar, the filter are displayed accordingly.
95 Put Files Into the Basket The basket is a temporary storage space for files. To add files to the basket: 1. Select the file(s) you want to add. 2. From the toolbox, select Add to basket, OR drag the selected file(s) onto the basket icon in the header. The files are added to the basket. You can also add all files in a container to the basket at once. 1. Select the container(s). 2. From the toolbox, select Add to basket, OR drag the selected container(s) onto the basket icon in the header. 3. Select whether you want to add just the files that belong to the selected containers, or also the files belonging to any subcontainers of the selected containers. The files that belong to the containers are added to the basket.
96 NOTE: The Basket just contains plain list of files. Container structures are not reflected in the Basket! However, you can check the container assignment of each file via it s details view.
97 Checking Out and Checking In a File If the catalog you are working with supports file versioning, you can check out files for editing them, and check in new version of files. Additionally, you can undo the check out of files. To check out a file: 1. Select the file you want to check out and open it s details view. 2. In the toolbox, select Check out. The checked out file is downloaded to your browser s default download location. Depending on the browser settings, you may instead be asked whether you want to open the file or download it. For checked out files, the respective entry in the toolbox reads Undo check out. To check in a new version of a file: 1. Select the file for which you want to check in a new version and open its details view. 2. In the toolbox, select Check in. You are prompted to select the file you want to check in. 3. Select the appropriate file and optionally add a comment, then click Check in.
98 The file is uploaded and added to the catalog as the current version of the initial selected file. See also Manage Versions of Files. NOTE: A new version can be a completely different file, e.g. a PDF file as the last of several versions representing processing steps of a Word file or InDesign document. To undo the check out of a file: 1. Select the file for which you want to undo the check out and open its details view. 2. In the toolbox, select Undo check out. The check out of the file is canceled. NOTE: File Versioning and the Usage of a Video Cloud Checking in a new version of a video file that has been published to a Video Cloud will not affect the published file! You must explicitly remove the old video file from the Video Cloud, and upload/publish the new one to have the new version available in the Video Cloud. Therefore, a new version of a video in the Video Cloud will always come with a completely new embed code and video link.
99 Manage Versions of Files If the catalog you are working with supports file versioning, you can store, edit and manage different versions of files. (See also Checking Out and Checking In a File.) To manage versions of files: 1. In the details view of a file, select the History tab. An overview on all versions of the file is displayed.
100 NOTE: Different versions of a file may have different file names and file types (e.g., a PDF file as the final version of a Word or InDesign document). Therefore, the respective file name is displayed for each version of a file. 2. Click the tools icon next to a version to select an action you can perform on this version. Which actions are available depends on your user permissions. They usu-
101 ally comprise Preview, Download, Delete, and for previous versions Make current. NOTE: The actions offered in the toolbox are always performed on the current version only!
102 Subscribe to a File In order to get a notification if a file s metadata has changed, you can subscribe to individual files. Which modifications exactly will cause a notification (e.g. workflow state, rating, version change, etc) depends on the settings defined by an administrator. Notifications are delivered via . An is sent to you whenever any of the defined metadata fields of a subscribed file is modified. The subscription state of a file is indicated by an icon located above the name of the file. The icon is displayed in gray ( )if you are not subscribed to the file, and in blue ( ) if you are. As soon as the cursor hovers over the icon, it expands showing the currently possible action (Subscribe or Unsubscribe). To subscribe (or unsubscribe) to a file: 1. In the details view of a file, click the subscription icon. The subscription / unsubscription takes immediate effect. This function is only available if the catalog you are working with is configured to support subscriptions! See how it works!
103
CUMULUS WEB CLIENT USER ASSISTANCE 2015, CANTO GMBH. ALL RIGHTS RESERVED. Welcome!
 Cumulus is Canto s state-of-the-art Digital Asset Management solution. Cumulus makes it easy to quickly organize, find, share, and track all of your digital files: photos, logos, presentations, videos,
CUMULUS WEB CLIENT USER ASSISTANCE 2014, CANTO GMBH. ALL RIGHTS RESERVED. Welcome!
 Cumulus is Canto s state-of-the-art Digital Asset Management solution. Cumulus makes it easy to quickly organize, find, share, and track all of your digital files: photos, logos, presentations, videos,
Welcome to Cumulus Sites the easy to-use website portal of Cumulus that offers fast
 Welcome to Cumulus Sites the easy to-use website portal of Cumulus that offers fast file access and secure file distribution to anyone on the Web. Anyone can be allowed to self-serve access to a public
CUMULUS PORTALS USER ASSISTANCE
 Cumulus is Canto s state-of-the-art Digital Asset Management solution. Cumulus makes it easy to quickly organize, find, share, and track all of your digital files: photos, logos, presentations, videos,
CUMULUS PORTALS USER ASSISTANCE
 Cumulus is Canto s state-of-the-art Digital Asset Management solution. Cumulus makes it easy to quickly organize, find, share, and track all of your digital files: photos, logos, presentations, videos,
Cumulus InDesign Client
 When working with Adobe InDesign you can access assets cataloged in Cumulus via native InDesign panels provided by the Cumulus InDesign Client. Which assets are available to you depends based on your permissions
CUMULUS PORTALS USER ASSISTANCE
 Cumulus is Canto s state-of-the-art Digital Asset Management solution. Cumulus makes it easy to quickly organize, find, share, and track all of your digital files: photos, logos, presentations, videos,
Parish . User Manual
 Parish Email User Manual Table of Contents LOGGING IN TO PARISH EMAIL... 3 GETTING STARTED... 3 GENERAL OVERVIEW OF THE USER INTERFACE... 3 TERMINATE THE SESSION... 4 EMAIL... 4 MESSAGES LIST... 4 Open
Cumulus InDesign Client
 When working with Adobe InDesign you can access assets cataloged in Cumulus via native InDesign panels provided by the Cumulus InDesign Client. Which assets are available to you depends based on your permissions
CUMULUS PORTALS USER ASSISTANCE
 Cumulus is Canto s state-of-the-art Digital Asset Management solution. Cumulus makes it easy to quickly organize, find, share, and track all of your digital files: photos, logos, presentations, videos,
MerlinX Extension. For Adobe Creative Cloud Applications. MerlinOne Inc. 17 Whitney Road Quincy, MA T (617)
") MerlinX Extension For Adobe Creative Cloud Applications 17 Whitney Road Quincy, MA 02169 T (617) 328-6645 http://www.merlinone.com Table of Contents Table of Contents 1 Introduction 3 Installing the Extension
MerlinX Extension For Adobe Creative Cloud Applications 17 Whitney Road Quincy, MA 02169 T (617) 328-6645 http://www.merlinone.com Table of Contents Table of Contents 1 Introduction 3 Installing the Extension
Working with PDF s. To open a recent file on the Start screen, double click on the file name.
 Working with PDF s Acrobat DC Start Screen (Home Tab) When Acrobat opens, the Acrobat Start screen (Home Tab) populates displaying a list of recently opened files. The search feature on the top of the
Getting Started with XMF Remote
 Getting Started with XMF Remote Remote R9.5 Contents Introduction......................................................... 5 How to Login........................................................ 6 The
Horizon Launcher Configuration Guide
 Horizon Launcher Configuration Guide Windows NT and Windows 2000 are registered trademarks of Microsoft Corporation. All other product or company names are trademarks or registered trademarks of their
End User Guide. 2.1 Getting Started Toolbar Right-click Contextual Menu Navigation Panels... 2
 TABLE OF CONTENTS 1 OVERVIEW...1 2 WEB VIEWER DEMO ON DESKTOP...1 2.1 Getting Started... 1 2.1.1 Toolbar... 1 2.1.2 Right-click Contextual Menu... 2 2.1.3 Navigation Panels... 2 2.1.4 Floating Toolbar...
Adobe Acrobat Reader 4.05
 Adobe Acrobat Reader 4.05 1. Installing Adobe Acrobat Reader 4.05 If you already have Adobe Acrobat Reader installed on your computer, please ensure that it is version 4.05 and that it is Adobe Acrobat
COPYRIGHTED MATERIAL. Using Adobe Bridge. Lesson 1
 Lesson Using Adobe Bridge What you ll learn in this lesson: Navigating Adobe Bridge Using folders in Bridge Making a Favorite Creating metadata Using automated tools Adobe Bridge is the command center
How to Use Internet Explorer 9
 How to Use Internet Explorer 9 The Basics: 1. The Address Bar is located at the very top of your open webpage. This is where you will type in the address of the website you d like to visit. For example,
SMART Meeting Pro PE 4.1 software
 Help us make this document better smarttech.com/feedback/170973 SMART Meeting Pro PE 4.1 software USER S GUIDE Product registration If you register your SMART product, we ll notify you of new features
GraphWorX64 Productivity Tips
 Description: Overview of the most important productivity tools in GraphWorX64 General Requirement: Basic knowledge of GraphWorX64. Introduction GraphWorX64 has a very powerful development environment in
Interface. 2. Interface Photoshop CS/ImageReady CS for the Web H O T
 2. Interface Photoshop CS/ImageReady CS for the Web H O T 2. Interface The Welcome Screen Interface Overview Using the Toolbox Using Palettes Using the Options Bar Creating a Tool Preset Resetting Tools
Press the Plus + key to zoom in. Press the Minus - key to zoom out. Scroll the mouse wheel away from you to zoom in; towards you to zoom out.
 Navigate Around the Map Interactive maps provide many choices for displaying information, searching for more details, and moving around the map. Most navigation uses the mouse, but at times you may also
Using Online Help. About the built-in help features Using Help Using the How To window Using other assistance features
 Using Online Help About the built-in help features Using Help Using the How To window Using other assistance features About the built-in help features Adobe Reader 6.0 offers many built-in features to
Software User s Manual
 1 About the manual 2 Navigating the manual 2 3 Opening the control panel 3 Control panel overview 4 Control panel settings 5 Calibrating the interactive pen display 6 Adjusting frequency and tracking (VGA
How to Edit Your Website
 How to Edit Your Website A guide to using your Content Management System Overview 2 Accessing the CMS 2 Choosing Your Language 2 Resetting Your Password 3 Sites 4 Favorites 4 Pages 5 Creating Pages 5 Managing
Inspiration Quick Start Tutorial
 Inspiration Quick Start Tutorial 1 Inspiration Quick Start Tutorial This tutorial is a great starting point for learning how to use Inspiration. Please plan on about 45 minutes from start to finish. If
HBS Training - IT Solutions. PlanWeb. Intermediate
 HBS Training - IT Solutions PlanWeb Intermediate CONTENTS Logging on to the system...3 The PlanWeb Window...5 The Tool Bar...6 The Status Bar...6 The Map Window...6 The Information Window...7 Changing
Space Details. Available Pages. Confluence Help Description: Last Modifier (Mod. Date): ljparkhi (Aug 14, 2008)
: ljparkhi (Aug 14, 2008)") Space Details Key: confhelp Name: Confluence Help Description: Creator (Creation Date): ljparkhi (Aug 14, 2008) Last Modifier (Mod. Date): ljparkhi (Aug 14, 2008) Available Pages Quickstart Guide Working
Space Details Key: confhelp Name: Confluence Help Description: Creator (Creation Date): ljparkhi (Aug 14, 2008) Last Modifier (Mod. Date): ljparkhi (Aug 14, 2008) Available Pages Quickstart Guide Working
Work Smart: Windows 7 New Features
 About Windows 7 New Features The Windows 7 operating system offers several new features to help you work faster and more efficiently, and enable you to access the files, folders, programs, and applications
SMART Meeting Pro 4.2 personal license USER S GUIDE
 smarttech.com/docfeedback/170973 SMART Meeting Pro 4.2 personal license USER S GUIDE Product registration If you register your SMART product, we ll notify you of new features and software upgrades. Register
Vizit Essential for SharePoint 2013 Version 6.x User Manual
 Vizit Essential for SharePoint 2013 Version 6.x User Manual 1 Vizit Essential... 3 Deployment Options... 3 SharePoint 2013 Document Libraries... 3 SharePoint 2013 Search Results... 4 Vizit Essential Pop-Up
FileMaker, Inc. All Rights Reserved. Document Version 2.0 FileMaker, Inc Patrick Henry Drive Santa Clara, California FileMaker
 User s Guide 2003-2004 FileMaker, Inc. All Rights Reserved. Document Version 2.0 FileMaker, Inc. 5201 Patrick Henry Drive Santa Clara, California 95054 FileMaker is a trademark of FileMaker, Inc., registered
EMC Documentum Media WorkSpace
 EMC Documentum Media WorkSpace Version 6.5 SP2 User Guide EMC Corporation Corporate Headquarters: Hopkinton, MA 01748 9103 1 508 435 1000 www.emc.com EMC believes the information in this publication is
Cumulus Sites 8.6. Administrator Guide
 Cumulus Sites 8.6 Administrator Guide Copyright 2012, Canto GmbH. All rights reserved. Canto, the Canto logo, the Cumulus logo, and Cumulus are registered trademarks of Canto, registered in the U.S. and
MindManager Server User Guide
 MindManager Server User Guide Table of Contents What is MindManager Server?... 1 Create a map in 7 easy steps... 2 Begin a new map:... 2 Enter your main idea:... 2 Add supporting ideas:... 2 Add other
LionMail. for Administrative Assistants
 LionMail for Administrative Assistants If you directly manage email on behalf of others or just send and receive dozens (or hundreds!) of messages a day in your role as an administrative assistant, this
GreenFolders User Manual
 GreenFolders User Manual Welcome! Welcome to GreenFolders the Electronic Records Management Solution. GreenFolders allows you to store and retrieve files with many easy-to-use features for working with
Oracle Cloud. Content and Experience Cloud Android Mobile Help E
 Oracle Cloud Content and Experience Cloud Android Mobile Help E82091-01 Februrary 2017 Oracle Cloud Content and Experience Cloud Android Mobile Help, E82091-01 Copyright 2017, Oracle and/or its affiliates.
PowerPoint 2016 Building a Presentation
 PowerPoint 2016 Building a Presentation What is PowerPoint? PowerPoint is presentation software that helps users quickly and efficiently create dynamic, professional-looking presentations through the use
Menu Symbols. Menu Symbol. Key on Keyboard
 Menu Symbols Menu Symbol Key on Keyboard Command/Apple Key (like Control on a PC) Also written as Cmd Option (like Alt on a PC) Shift Control (Control-click = Right-click) Tab Return Enter (on Number Pad)
Episerver CMS. Editor User Guide
 Episerver CMS Editor User Guide Episerver CMS Editor User Guide 17-2 Release date 2017-03-13 Table of Contents 3 Table of contents Table of contents 3 Introduction 11 Features, licenses and releases 11
HBS Training - IT Solutions. PlanWeb. Introduction
 HBS Training - IT Solutions PlanWeb Introduction CONTENTS Logging on to the system...3 The PlanWeb Window...5 The Tool Bar...6 The Status Bar...6 The Map Window...6 The Information Window...7 Changing
Cumulus 11.0 Release Notes
 The Cumulus version 11.0 is a major release with new features and bug fixes that improves all Cumulus products, including Workgroup, Enterprise,, and. With this release, Canto s Cumulus is now more efficient
How to Use Voicethread
 How to Use Voicethread October 13, 2016 Julie K. Marsh Coordinator for Distance Education and Instructional Design Need Help? Contact Julie at 804-627-5308 or send an email to julie_marsh@bshsi.org Contents
A Guide to Quark Author Web Edition 2015
 A Guide to Quark Author Web Edition 2015 CONTENTS Contents Getting Started...4 About Quark Author - Web Edition...4 Smart documents...4 Introduction to the Quark Author - Web Edition User Guide...4 Quark
Using Help Contents Index Back 1
 Using Online Help Using Help Contents Index Back 1 Using Online Help About the built-in help features Adobe Reader 6.0 offers many built-in features to assist you while you work, including the Help window
TRAINING GUIDE. Mobile for Administrators Part 3 - GIS
 TRAINING GUIDE Mobile for Administrators Part 3 - GIS Mobile for Administrators - GIS One of the critical components of mobile is GIS, and it can also be the most complex. The mobile GIS maps are designed
Table of Contents. Revu ipad. v3.6. Navigation. Document Manager. File Access. Markups. Signature Tool. Field Verification Measurements
 Table of Contents Navigation Document Manager File Access Markups Signature Tool Field Verification Measurements Editing Properties Tool Sets & the Tool Chest Markups List Forms Studio Sessions Studio
User Help. Fabasoft Cloud
 User Help Fabasoft Cloud Copyright Fabasoft R&D GmbH, Linz, Austria, 2019. All rights reserved. All hardware and software names used are registered trade names and/or registered trademarks of the respective
Introduction to 9.0. Introduction to 9.0. Getting Started Guide. Powering collaborative online communities.
 Introduction to 9.0 Introduction to 9.0 Getting Started Guide Powering collaborative online communities. TABLE OF CONTENTS About FirstClass...3 Connecting to your FirstClass server...3 FirstClass window
Piktochart 101 Create your first infographic in 15 minutes
 Piktochart 101 Create your first infographic in 15 minutes TABLE OF CONTENTS 01 Getting Started 5 Steps to Creating Your First Infographic in 15 Minutes 1.1 Pick a Template 1.2 Click Create and Start Adding
A new clients guide to: Activating a new Studio 3.0 Account Creating a Photo Album Starting a Project Submitting a Project Publishing Tips
 Getting Started With Heritage Makers A Guide to the Heritage Studio 3.0 Drag and Drop Publishing System presented by Heritage Makers A new clients guide to: Activating a new Studio 3.0 Account Creating
User Guide. Product: GreenFolders. Version: 3.8
 User Guide Product: GreenFolders Version: 3.8 Release Date: October 2014 GreenFolders 3.8 User Guide Introduction Table of Contents 1 Introduction... 6 2 General Information... 7 2.1 Login Procedure...
End-User Reference Guide Troy University OU Campus Version 10
 End-User Reference Guide Troy University OU Campus Version 10 omniupdate.com Table of Contents Table of Contents... 2 Introduction... 3 Logging In... 4 Navigating in OU Campus... 6 Dashboard... 6 Content...
ORGANIZING YOUR ARTWORK WITH LAYERS
 9 ORGANIZING YOUR ARTWORK WITH LAYERS Lesson overview In this lesson, you ll learn how to do the following: Work with the Layers panel. Create, rearrange, and lock layers and sublayers. Move objects between
QromaTag for Mac. User Guide. v1.0.5
 QromaTag for Mac User Guide v1.0.5 About QromaTag v1 QromaTag for Mac is a new way to create and embed industry standard photo metadata into your digital images using Natural Language Tagging. Unlike traditional
Work Smart: Microsoft Office 2010 User Interface
 About the Office 2010 User Interface You can use this guide to learn how to use the new features of the Microsoft Office Ribbon. Topics in this guide include: What s New in the Office 2010 User Interface
RWT Network System Installation Guide
 RWT Network System Installation Guide Copyright 2003, Talking Fingers, Inc. Page 1 of 48 This document is Copyright 2003 by Talking Fingers, Inc. All rights are reserved. This document may not be copied
Roxen Content Provider
 Roxen Content Provider Generation 3 Templates Purpose This workbook is designed to provide a training and reference tool for placing University of Alaska information on the World Wide Web (WWW) using the
CreateASite Beginner s Guide
 Contents Getting Started... 3 Access the CreateASite Control Panel... 3 Select a Category/Subcategory... 4 Select a Template... 6 Change the Site Template... 10 Change Colours... 12 Change Fonts... 13
Photoshop World 2018
 Photoshop World 2018 Unlocking the Power of Lightroom CC on the Web with Rob Sylvan Learn how to leverage the cloud-based nature of Lightroom CC to share your photos in a way that will give anyone with
Chapter 1 : Getting Started with Integrity... Chapter 2 : Interface Layout... Chapter 3 : Navigation... Chapter 4 : Printing...
 .0 User s Manual Table of Contents Chapter : Getting Started with Integrity... Chapter : Interface Layout... Chapter : Navigation... Chapter : Printing... Chapter : Quick Search and Results Pane... Results
Copyright 2018 MakeUseOf. All Rights Reserved.
 15 Power User Tips for Tabs in Firefox 57 Quantum Written by Lori Kaufman Published March 2018. Read the original article here: https://www.makeuseof.com/tag/firefox-tabs-tips/ This ebook is the intellectual
How to Edit Your Website
 How to Edit Your Website A guide to using your Content Management System Overview 2 Accessing the CMS 2 Choosing Your Language 2 Resetting Your Password 3 Sites 4 Favorites 4 Pages 5 Creating Pages 5 Managing
Microsoft Word 2010 Part 1: Introduction to Word
 CALIFORNIA STATE UNIVERSITY, LOS ANGELES INFORMATION TECHNOLOGY SERVICES Microsoft Word 2010 Part 1: Introduction to Word Summer 2011, Version 1.0 Table of Contents Introduction...3 Starting the Program...3
2016 TRTA Content Managers Resource Guide How to update and edit your local unit website. Roy Varney, TRTA Multimedia Specialist
 2016 TRTA Content Managers Resource Guide How to update and edit your local unit website. Roy Varney, TRTA Multimedia Specialist Table of Contents Introduction... 1 Basic information... 1 - How to log
Microsoft PowerPoint 2013 Beginning
 Microsoft PowerPoint 2013 Beginning PowerPoint Presentations on the Web... 2 Starting PowerPoint... 2 Opening a Presentation... 2 File Tab... 3 Quick Access Toolbar... 3 The Ribbon... 4 Keyboard Shortcuts...
1.1: Introduction to Fusion 360
 .: Introduction to Fusion 360 Fusion 360 is a cloud- based CAD/CAM tool for collaborative product development. The tools in Fusion enable exploration and iteration on product ideas and collaboration within
Content Author's Reference and Cookbook
 Sitecore CMS 7.0 Content Author's Reference and Cookbook Rev. 130425 Sitecore CMS 7.0 Content Author's Reference and Cookbook A Conceptual Overview and Practical Guide to Using Sitecore Table of Contents
Introduction. Creating an Account. Prezi.com Getting Started
 Introduction offers a way to create presentations that engage the audience in an interesting and non-traditional way. It is a virtual whiteboard that transforms presentations from monologues into conversation:
GETTING STARTED 8 December 2016
 GETTING STARTED 8 December 2016 About Platform... 4 Browser support... 5 Registration Registering as a Teacher... 6 Registering as a Student... 6 Registering as School... 6 Registering as Municipality
Preferences Table of Contents
 Preferences Table of Contents My Profile... 2 Quick Profile Maintenance... 2 My Names... 3 My Addresses... 3 My E-Mail Addresses... 4 Personal Photo and Logo Maintenance... 4 My Documents... 6 My Phone
04 - CODES... 1 CODES AND CODING IN MAXQDA... 1 THE CODE SYSTEM The Code System Toolbar... 3 CREATE A NEW CODE... 4
 04 - Codes Contents 04 - CODES... 1 CODES AND CODING IN MAXQDA... 1 THE CODE SYSTEM... 1 The Code System Toolbar... 3 CREATE A NEW CODE... 4 Add Codes at the Highest Level of your Code System... 4 Creating
MICROSOFT POWERPOINT 2016 Quick Reference Guide
 MICROSOFT POWERPOINT 2016 Quick Reference Guide PowerPoint What is it? What s new in PowerPoint 2016? PowerPoint is a computer program that allows you to create, edit and produce slide show presentations.
Guide to User Interface 4.3
 Datatel Colleague Guide to User Interface 4.3 Release 18 June 24, 2011 For corrections and clarifications to this manual, see AnswerNet page 1926.37. Guide to User Interface 4.3 All Rights Reserved The
The viewer makes it easy to view and collaborate on virtually any file, including Microsoft Office documents, PDFs, CAD drawings, and image files.
 Parts of this functionality will only be available in INTERAXO Pro. Introduction The viewer provides users with the capability to load a wide variety of document types online using a web browser. Documents
SAS Mobile BI 8.1 for Windows 10: Help
 SAS Mobile BI 8.1 for Windows 10: Help Welcome Getting Started How Do I Use the App? Check out the new features. View the videos: SAS Mobile BI for Windows playlist on YouTube Use JAWS software? See the
Using Adobe Photoshop
 Using Adobe Photoshop 2 In this section we ll look at some essential things you need to know in order to use Photoshop effectively. First of all, we ll take a look at customising Photoshop s settings and
SharePoint: Fundamentals
 SharePoint: Fundamentals This class will introduce you to SharePoint and cover components available to end users in a typical SharePoint site. To access SharePoint, you will need to log into Office 365.
Page Topic 02 Log In to KidKare 02 Using the Navigation Menu 02 Change the Language
 Page Topic 02 Log In to KidKare 02 Using the Navigation Menu 02 Change the Language help.kidkare.com 03 Enroll a Child 03 Withdraw a Child 03 View Pending and Withdrawn Children 04 View Kids by Enrollment
MindSphere. Fleet Manager. Introduction to "Fleet Manager" 1. User interface for "Fleet Manager" 2. User rights in "Fleet Manager" 3.
 Introduction to "Fleet Manager" 1 User interface for "Fleet Manager" 2 MindSphere User rights in "Fleet Manager" 3 Asset navigation 4 Using extensions 5 System Manual V1801.K0507 V1801.K0214 Legal information
IBM TRIRIGA Application Platform Version 3.2. Graphics User Guide. Copyright IBM Corp i
 IBM TRIRIGA Application Platform Version 3.2 Graphics User Guide Copyright IBM Corp. 2011 i Note Before using this information and the product it supports, read the information in Notices on page 31. This
Mac Edition For KillerKeys Pro software version 1.4 and later
 KillerKeys Pro User Guide Mac Edition For KillerKeys Pro software version 1.4 and later 1 Introduction... 3 1.1 System Requirements... 3 1.2 Installation... 3 1.3 Launching the KillerKeys Program... 3
User Documentation. Studywiz Learning Environment. Student's Guide
 User Documentation Studywiz Learning Environment Student's Guide Studywiz Learning Environment Student's Guide Contents 1 Introduction 4 1.1 Studywiz 4 1.2 The Studywiz Student s Guide 4 2 What s New
IBM TRIRIGA Application Platform Version 3.3. Graphics User Guide. Copyright IBM Corp i
 IBM TRIRIGA Application Platform Version 3.3 Graphics User Guide Copyright IBM Corp. 2011 i Note Before using this information and the product it supports, read the information in Notices on page 33. This
Touring the Mac. S e s s i o n 1 : G e t t i n g Familiar With The Mac
 Touring the Mac S e s s i o n 1 : G e t t i n g Familiar With The Mac Touring_the_Mac_Session-1_Sep-28-2010 1 A Map of Your Mac (Chapter 1) After turning on your computer, the screen that appears on your
SAS Mobile BI 8.15 for Android: Help
 SAS Mobile BI 8.15 for Android: Help Welcome Getting Started How Do I Use the App? Check out the new features. View the videos: SAS Mobile BI for Android playlist on YouTube Use TalkBack? Learn the specialized
IMAGE STUDIO LITE. Tutorial Guide Featuring Image Studio Analysis Software Version 3.1
 IMAGE STUDIO LITE Tutorial Guide Featuring Image Studio Analysis Software Version 3.1 Notice The information contained in this document is subject to change without notice. LI-COR MAKES NO WARRANTY OF
Center for Faculty Development and Support Making Documents Accessible
 Center for Faculty Development and Support Making Documents Accessible in Word 2007 Tutorial CONTENTS Create a New Document and Set Up a Document Map... 3 Apply Styles... 4 Modify Styles... 5 Use Table
TABLE OF CONTENTS CHAPTER
 TABLE OF CONTENTS CHAPTER 1...1 A QUICK OVERVIEW OF THE MICROSOFT EXCHANGE CLIENT...1 BASIC CONCEPTS AND FEATURES...1 STARTING THE MICROSOFT EXCHANGE CLIENT...1 SETTING OPTIONS FOR YOUR MESSAGES...3 LOOKING
Introduction to Moodle
 Introduction to Moodle Preparing for a Moodle Staff Development Session... 2 Logging in to Moodle... 2 Adding an image to your profile... 4 Navigate to and within a course... 6 Content of the basic template
Office 365: . Accessing and Logging In. Mail
 Office 365: Email This class will introduce you to Office 365 and cover the email components found in Outlook on the Web. For more information about the Microsoft Outlook desktop client, register for a
1 Interface Fundamentals
 1 Interface Fundamentals Windows The Media Composer interface is focused on three primary windows: the Composer, the Timeline and the Project. The Composer window contains the source and record monitors
SAP Engineering Control Center 5.1
 Application Help Document Version: 20.0 2018-06-22 CUSTOMER Typographical Conventions Format Example Description Words or characters that are quoted from the screen display. These include field names,
ELO. ELO Dropzone. Document Management and Archiving Software. September ELO Digital Office GmbH.
 ELO Document Management and Archiving Software ELO Dropzone September 2017 ELO Digital Office GmbH http://www.elo.com Copyright 2017 ELO Digital Office GmbH All rights reserved [06.10.2017-10:21 - en -
Beginning a presentation
 L E S S O N 2 Beginning a presentation Suggested teaching time 40-50 minutes Lesson objectives To learn how to create and edit title and bullet slides, you will: a b c d Select slide types by using the
Bucknell University Digital Collections. LUNA Insight User Guide February 2006
 Bucknell University Digital Collections LUNA Insight User Guide February 2006 User Guide - Table of Contents Topic Page Number Installing Insight. 2-4 Connecting to Insight 5 Opening Collections. 6 Main
Interface. 2. Interface Illustrator CS H O T
 2. Interface Illustrator CS H O T 2. Interface The Welcome Screen The Illustrator Workspace The Toolbox Keyboard Shortcuts Palette Control Setting Preferences no exercise files Illustrator CS H O T Illustrator
SharePoint: Fundamentals
 SharePoint: Fundamentals This class will introduce you to SharePoint and cover components available to end users in a typical SharePoint site. To access SharePoint, you will need to log into Office 365.
File Cabinet Manager
 Tool Box File Cabinet Manager Java File Cabinet Manager Password Protection Website Statistics Image Tool Image Tool - Resize Image Tool - Crop Image Tool - Transparent Form Processor Manager Form Processor