viewon 2 - Graphical Components How To
|
|
|
- Edith Shepherd
- 6 years ago
- Views:
Transcription


1 ewon Application User Guide Content You Select, We Connect AUG 007/ Rev 1.1 viewon 2 - Graphical Components How To This guide will explain in a few steps how to use the graphical components proposed by viewon 2.
2 Table of Contents 1. Hardware and software requirements...3 Hardware requirements...3 Software requirements...3 ewon Firmware Version Button...6 Check Box...11 Toggle Button...13 Combo Box...16 Combo box using the Send Command action...17 Combo box using the Send Measure action...18 Combo box using the Load View action...19 List...20 List using the Send Command action...21 List using the Send Measure action...22 List using the Load View action Number Editor...25 Slider...28 Alarm Summary...30 Alarm History...33 Menu Bar...36 Trends...40 Real time trend...40 Historical trend...45 Revisions...47
3 1. Hardware and software requirements Hardware requirements In order to follow this guide you will need: 1 ewon with viewon capabilities (for example : ewon 4001, ewon 4101, ewon 4005, etc.) Software requirements ewon configuration software: The ewon is configured through its web server. So all you need is a standard Web Browser software like Internet Exploreri or Firefoxii. Additionally we suggest you to download the ebuddy software on our website : support.ewon.biz. This utility shows you the list of all the ewons on your network and allows to change the default IP address of an ewon to match your LAN IP address range. With ebuddy you can also easily upgrade the firmware of your ewon (if required). Other programming software: viewon 2 Software. ewon Firmware Version To be able to follow this guide your ewon needs a firmware version 5.4 or higher. A simple way to upgrade the ewon firmware, is to use ebuddy, the ewon software companion. Page 3/47

4 2. Graphical Component In the viewon interface, you can create a Graphical Component instead of drawing an object yourself. There are 11 graphical components : In opposition to the objects that you create yourself, the Graphical Components cannot be completely customized. You will not be able to customize a graphical component like any other object. As a result, the Graph properties are used to modify only a few aspects of your object. As you can see in the following picture only the Geometry (the position of the object), the ID and the Display (the opacity of the object) tabs are available for a graphical component. The Graph resources are useless as no gradient can be added to a graphical component. We will see later that some aspects are configurable in the Graphical Component properties section. Page 4/47
5 Page 5/47
6 Button The Button allows you to send a value to your Tag. Select Button, the context box will close. With the mouse, click on your View and do a click and drag movement to make the Button appear. Of course you can magnify the Button afterwards or decrease it in size either with the mouse or in the Graph properties. Page 6/47
, in Button data/label field you")


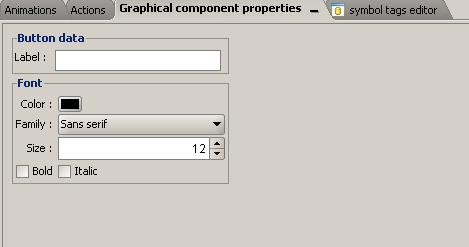
7 In the Graphical Component properties section (in the third part of the screen), in Button data/label field you will be able to add a text on your object. For example Hello. It is possible to change the font color, the font size, etc. Instead of a fixed text, you can use a Text on State. In the Animations context, select Text on State. Page 7/47

8 In the Properties section, choose the Tag that you want to link to the object (Boolean Tags). In the Tag values field, choose a text that you want to see each time the value of the Tag is 1 and a text you want to see when the value of the Tag is 0. ex: value 1 text : on value 0 text : off In this case each time the value of the tag is 1, on will appear on your object and when the value is 0, then off replaces the other text. If you want to be able to click on your Button, you will have to add an action on your graphical component. Let us choose a Send Command action. Page 8/47
9 Choose a Tag to write (Boolean Tags), then a value when the Button is selected. Finally type a confirmation message, if needed (this message will appear each time you click on the Button, asking a confirmation). When you click on your Button, the value 1 will be sent to the Tag linked to the Send Command action. Be aware that the Return to initial value is not handled by the ewon and must remain disabled. Hereunder an example of a confirmation message: If you do not want a confirmation message to pop up, do not write anything in the Confirmation Message field. Page 9/47
10 For further information on how to use an Animation or an Action, please refer to the AUG EN ( Page 10/47

11 Check Box With the Check box, you will be able to draw a check box in the easiest way. The process is the same as the Button one. Select Check Box, the context box will close. With the mouse, click on your View to make the Check Box appear. In the Graphical Component properties section (in the third part of the screen), in the Text/Label field, you will be able to add a text next to your object. For example Heating ON. It is possible to change the font color, the size, etc. For the Check Box to work, you will have to add an action to your object: an Action command (only the Send Command action is possible). Page 11/47
12 Let us see how to add an action on your Check box. Be aware that only the Send Command action is available. Choose a Tag to write, then a value when the Check box is selected and a value when it is not selected. In our example, when selected, the value 1 is sent to the Tag. On the other hand, when the Check box is not selected, the value 0 is sent to the same Tag. Finally type a confirmation message, if needed (this message will appear each time you click on the Check Box, asking a confirmation). Hereunder an example of a confirmation message: If you do not want a confirmation message to pop up, do not write anything in the Confirmation Message field. For further information on how to use an Animation or an Action, please refer to the AUG EN pdf file ( Page 12/47

, in the Text/Label field, you can add a text on your object.")
13 Toggle Button The Toggle button allows you to send a value to your Tag. Select Toggle button, the context box will close. With the mouse, click on your View to make the Toggle Button appear. Just like the Button, you will be able to add a text on this object. Be aware that for the graphical components, the Graph resources do not work as you cannot change the color of the object. In the Graphical Component properties section (in the third part of the screen), in the Text/Label field, you can add a text on your object. For example Heating. It is possible to change the font color, the size, etc. Page 13/47
14 As for most of the graphical components, you can only apply a Send Command action and a Text on State animation. In the Animations context, select Text on State and choose the Tag (only a Boolean one)you want to link to the object in the Properties section. In this case, you click on the Toggle Button, set on will appear instead of Heating and set off will appear when you click again. Let us see how to add an action on your Toggle Button. Be aware that only the Send Command action is available. Page 14/47
15 As you can see in the following picture, the procedure is the same as for a Check Box. Choose a Tag to write, then a value when the Toggle button is selected and a value when it is not selected. Finally type a confirmation message, if needed (this message will appear each time you click on the Toggle button, asking a confirmation). Hereunder an example of a confirmation message: If you do not want a confirmation message to pop up, do not write anything in the Confirmation Message field. For further information on how to use an Animation or an Action, please refer to the AUG EN pdf file( Page 15/47
16 Combo Box The Combo box gives you the opportunity to create a kind of menu. By using this Combo box, you will be able to see the different Views that you have created or send a predefined values to a Tag. Select Combo box, the context box will close. With the mouse, click on your View to make the Combo box appear. For this graphical component, you do not have the possibility to add any animation. Only actions are available (Load view, Send Command and Send Measure). Unlike the other graphical components, you will not be able to write a text directly on your Combo box. The text will be added through the action that you will link to the object. Page 16/47

17 You can change the font color, the size etc. of the default text Items in the Graphical Component properties section. Combo box using the Send Command action Page 17/47
18 In this case, the Combo box will look like this: This action allows to set a state of a Tag. So if you select on, the value 1 will be sent to the Tag linked to the Combo box. If you click on off, the value 0 will be sent to the Tag. If your write a Confirmation message in the provided field, then, a pop-up window will open to ask a confirmation before changing the status. Be aware that the Return to initial value field must remain disabled. Combo box using the Send Measure action This action will allow to set a value of a Tag. Only analog Tags are taken into account for the Send Measure action. The Return to initial value is not used by the ewon, so it must remain disabled. As for the other actions for graphical components, you can insert a Confirmation message. Finally, define the values to send to the linked Tag. To do so, click on the button on the right bottom corner of the screen. Your Combo box will look like this: Page 18/47

19 So if you click on start, the value 10 will be sent to the linked Tag, when you click on slow, the value 20 will be sent to the Tag and so on. Combo box using the Load View action Thanks to this action,you will be able to link your Views to your Combo box. Under the Properties section (in Actions/Load View) you will see all the Views of your project. All you have to do is check the Views you would like to add to the combo box. In the Text section, you can name your Views. Thanks to the Load View action, you will be able to see your Views by clicking on each of them: So, if you click on focusing for example, the View (exercice1) linked to it will open. Be aware that when you choose a View, your current view will be replaced by the new one. Page 19/47

20 List The List is very similar to the Combo box. It gives you the opportunity to create a kind of menu that will allow you to see by a click the different views you have created or send predefined values to the Tag. Select List, the context box will close. With the mouse, click on your View to make the List appear. For this graphical component, you do not have the possibility to add any animation. Only actions are available (Load view, Send Command and Send Measure)In the Graphical Component properties section, you will be able to customize your List : choose the background color, the opacity, the font, the color of the text, etc. Page 20/47


21 List using the Send Command action According to the above example, if you select on, the value 1 will be sent to the Tag linked to the List. If you click on off, the value 0 will be sent to the Tag. If your write a Confirmation message in the provided field, then, a popup window will open to ask a confirmation before changing the status. Be aware that the Return to initial value field must remain disabled. Page 21/47
22 Your List will look like this: So, when on is selected the value 1 is sent to the Tag and when off is selected, the value 0 is sent to the Tag. List using the Send Measure action Only analog Tags are taken into account for the Send Measure action. The Return to initial value is not used by the ewon, so it must remain disabled. As for the other actions for graphical components, you can insert a confirmation message. Finally, define the values to send to the Tag. To do so, click on the button on the right bottom corner of the screen. So if you click on start, the value 10 will be sent to the linked Tag, when you click on slow, the value 20 will be sent to the Tag and so on. Page 22/47
 you will see all the Views of your project.")

23 List using the Load View action Thanks to this action,you will be able to link your Views to your List. Under the Properties section (in Actions/Load View) you will see all the Views of your project. All you have to do is check the Views you would like to add to the combo box. In the Text section, you can name your Views. Thanks to the Load View action, you will be able to see your Views by clicking on them. Page 23/47
24 Your List will look like this: So, if you click on focusing, the View (exercice1) linked to it will open and so on. Be aware that when you choose a View, your current view will be replaced by the new one. Page 24/47

25 Number Editor The Number editor allows you to send a value to a Tag, only by clicking on the little darts. Select Number editor, the context box will close. With the mouse, click on your View to make the Number editor appear. For this graphical component, you do not have the possibility to add any animation. In the Graphical Component properties section, you will have to choose a minimum value, a maximum value, an initial value and a step size (you will be able to choose the maths table you want to use (1,2,3,4,5,6,... / 2,4,6,8,10,.../3,6,9,12,18,...) Once again, you can choose the background color, the text color, etc. Page 25/47
26 Here is an example of a customized Number editor : When you click on the upper dart, the value will increase by 1 if the Step size is 1 (55,56,57,58,...); by 2 if the Step size is 2 (2,4,6,8,10, etc.). For the Number editor to work, do not forget to add the Send measure action. If not, you will not be able to click on the darts to send the value to the Tag. Choose the Tag (only analog ones are taken into account) you want to link to your Number editor and insert a confirmation message if needed. Page 26/47
27 Hereunder an example of a confirmation message: If you do not want a confirmation message to pop up, do not write anything in the Confirmation Message field. The Return to initial value is not used by the ewon, so it must remain disabled. Page 27/47

28 Slider The Slider allows you to send a value to a Tag only by moving the cursor. Select the Slider, the combo box will close. With the mouse, click on your View to make the Slider appear. For this graphical component, you do not have the possibility to add any animation. In the Graphical Component properties section (Numeric data), you will have to choose a minimum value and a maximum value. In the Ticks section, you will have to choose if you want to insert ticks (check the Display ticks), if so, select a major tick spacing and a minor one and finally, choose a direction (horizontal or vertical) in the Display section and if you want the labels to be displayed or not. The only available action is the Send measure one. In this case, just link a Tag (only analog one are taken into account) to your Slider. The Slider will move according to the value of the Tag. Besides, you can send a value to the linked Tag by moving the slider. Page 28/47


29 The Return to initial value is not used by the ewon, so it must remain disabled. Finally, insert a confirmation message if needed. Hereunder an example of a confirmation message: If you do not want a confirmation message to pop up, do not write anything in the Confirmation Message field. Page 29/47

30 Alarm Summary The Alarm Summary will give you the opportunity to have an overview of the alarm states of your Tags in real time. Select the Alarm Summary, the combo box will close. With the mouse, click on your View to make the Alarm Summary appear. In the Graphical Component properties section, you can configure your Alarm Summary table. Just like the other graphical components, you can choose the font color, the font size etc. But you will be also able to choose the size of the columns. Page 30/47

.")
31 Be aware that for the Alarm Summary, there is no animation and no action. This graphical component is autonomous, no need to link Tags to it. Once the project has been exported in the ewon, the Alarm Summary is displayed on the ewon web page. Here is the kind of table you will see: The first column (ACK) of the table can be used to acknowledge an alarm simply by checking the check box NOTE To display the Alarm Summary list, the user must have special access rights in your ewon (FTP server access and ewon Files access). Be also aware that the Alarm Summary cannot be tested through the Animation Test as it works in real time, linked to the alarm states of the Tags. Page 31/47

32 Page 32/47
33 Alarm History The Alarm History will give you the opportunity to have an overview of the alarm states of your Tags for a certain period of time that you can define. Select the Alarm History, the combo box will close. With the mouse, click on your View to make the Alarm History appear. In the Graphical Component properties section, you can configure your Alarm History table. Just like the other graphical components, you can choose the font color, its size etc. But you will be able to choose the size of the columns as well. Do not forget to select the time range you want to see on your table. Page 33/47


34 Be aware that for the Alarm History, there is no animation and no action. This graphical component is autonomous, no need to link Tags to it. Once the project has been exported in the ewon, the Alarm History is displayed on the ewon web page. Here is the kind of table you will see: IMPORTANT Be aware that if you select a long range of time (7 days, for instance), the page may take a lot of time to download (depending on the frequency of alarm changes). Page 34/47
35 NOTE If, while configuring your Alarm History, you asked to display the last 24 hours and later you would like to see the last hour only, then this last hour will be simply added to the 24 hours already displayed. The already displayed alarms will not be deleted from the screen. NOTE To display the Alarm History list, the user must have special access rights in your ewon (FTP server access and ewon Files access). Be also aware that the Alarm History cannot be tested through the Animation Test as it works in real time, linked to the alarm states of the Tags. Page 35/47

36 Menu Bar With this graphical component, you will be able to create a menu bar by yourself. Select the Menu Bar, the combo box will close. With the mouse, click on your View to make the Menu Bar appear. In the Graphical Component properties section, you can add menus and item menus only by clicking on the + on the right bottom of the screen. It works like a tree. Select the main menu called Menu Bar by default and then, click on +, you are able to add a menu. Then, if you click on this menu, you will be able to add an item menu. Of course, you can name all the menus and item menus as you please. All you have to do is select a menu and double-click, now you can write in the small field and press the ENTER key. Page 36/47
.")

37 Here is an example of the result: For this graphical component, only actions are available. Actions can be applied to the item menus (not to the main Menu). Choose an item and ask to Load view, for instance. You can choose a pop-up dialog. In the View section, click on... to select which View you want to display. Finally, insert a confirmation message if needed. Page 37/47

 to send to the Tag.")

38 Do the same with the other Views you want to add in the menu bar. The other action you can use is the Send Command action. Here, choose a Tag and a value (0/1) to send to the Tag. This action is available for Boolean Tags only. In the following example, the value 0 will be sent to the Tag buton when you click on a menu item. Page 38/47
39 You can also specify a Tag in the Authorization Level field. This will allow to enable or disable the Menu item depending on the value of the authorization Tag. The authorization level is not taken into account. Page 39/47

40 Trends The Trends give you the opportunity to see the evolution of your Tags in the form of a graph. Real time trend The Real time trend the values of the linked Tags in real time. Those values will not be recorded. They only stay in your Browser memory. So, if you close your web page, the real time graph will start from the beginning again. To configure the Real time trend, you will need to fill the General and the Display settings. In the Start section of the General part, choose Real time. Check the Interpolation if you want each points to be linked. And insert a Data Refresh period (the period when a new point is taken), a Buffer points number (the number of the displayed points) and a Maximum displayable time. In the Display section, you can choose a time axis, the cursors, etc. Page 40/47
.")

41 Choose a Displayed time zone (the duration of visible part of the graph), the Display time graduation needs to be checked. The Horodates define the time display (ex: 12:30:45 or 12:30). The Cursor section needs to be checked so that you can see the horodates when you click on a point of the graph. If you check the Curves, then the properties of your curve will be displayed when you open your web page. In the Grid section, you can configure the aspect of your grid. The Values give you the opportunity to format the display of the cursor. Page 41/47
, select a Tag that you want to link to the Trends, choose a Label (for instance, C,")

42 To define the Tags that you want to display on the trend must use the Animations. Be aware that the States animation is of no use. In the Animations section(trend curves/ Measures), select a Tag that you want to link to the Trends, choose a Label (for instance, C, this label will not appear on the graph, but in the properties of the graph), choose a Minimum and a Maximum, the color, the dashes, the interpolation, the color for the invalid state, etc. Pay attention, if you do not choose an interpolation, you may not see your graph. Page 42/47

 to shift from the Real time log to the Historical log, play, pause, select a new time zone, display a")
43 If needed, you can display another curve in your Trend graph. Just click on add animations and proceed as explained above. Once you have done this, export the project to the ewon and your Trends will be displayed in your web page. Once you are on this page, you will see the curves corresponding to the tags you chose before. Thanks to the tool bar, you will be able (from the left to the right) to shift from the Real time log to the Historical log, play, pause, select a new time zone, display a cursor, zoom in, zoom out, display a new duration, zoom only a period of time and display the properties of the curves. To open those properties, just click on the last icon of the menu bar. Page 43/47

.")
44 The Properties allow you to customize your graph. In Style tab, you can change the color, the dashes, the thickness, the interpolation of the curves. The blue dart helps you switch from one curve to another and the yellow dart sets the previous settings back. To close the information, just click on the same icon again (on the menu bar). Please bear in mind that each time the tool bar is used, the graph stops. You have to click on play for it to go on. Page 44/47


45 NOTE For all this to work, the Tag has to be able to read the Historical Logging. So, make sure the Historical logging is checked in your Tag setup (in the ewon). Historical trend The Historical trend displays the curves of the Tag linked to the Trends. It will display for a period of time defined by the user the values of the linked Tags in the form of a graph. The historical data are retrieved from the ewon. So, it is very important to activate the Historical Logging in the ewon for those Tags. The configuration of the Historical trend is similar to the Real Time trend. The only difference is that you will have to choose History in the Graphical component properties: Page 45/47

46 Be aware that the Maximum displayable time is taken into account for the maximum duration of the Historical trend. The selected time zone should be lower than the Maximum displayable time. So if you select more than one hour when viewing your graph on the ewon web page, you will have the following message: NOTE For the Historical trend to work, you have to activate the Historical Logging (in the ewon) BEFORE importing the Tags in viewon 2. Page 46/47
47 Revisions Revision Level Date Description First release User rights for Alarm History i Microsoft, Internet Explorer, Windows and Windows XP are either registered trademarks or trademarks of Microsoft Corporation ii Firefox is a trademark of the Mozilla Foundation Document build number: 175 Note concerning the warranty and the rights of ownership: The information contained in this document is subject to modification without notice. The vendor and the authors of this manual are not liable for the errors it may contain, nor for their eventual consequences. No liability or warranty, explicit or implicit, is made concerning quality, the accuracy and the correctness of the information contained in this document. In no case the manufacturer's responsibility could be called for direct, indirect, accidental or other damage occurring from any defect of the product or errors coming from this document. The product names are mentioned in this manual for information purposes only. The trade marks and the product names or marks contained in this document are the property of their respective owners. This document contains materials protected by the International Copyright Laws. All reproduction rights are reserved. No part of this handbook can be reproduced, transmitted or copied in any way without written consent from the manufacturer and/or the authors of this handbook ewon sa, Member of ACT'L Group. Subject to change without notice. Page 47/47
viewon 2 - Objects, Animations and Actions How To
 ewon Application User Guide Content You Select, We Connect AUG 006 / Rev 1.0 viewon 2 - Objects, Animations and Actions How To This guide will explain you how to create and customize objects and give you
S7-200 PPI Monomaster Remote connection How To
 ewon Application User Guide AUG 017 / Rev 1.0 You Select, We Connect S7-200 PPI Monomaster Remote connection How To Content The purpose of this guide is to explain in a few steps how to configure your
How to reach a device behind the ewon Cosy 131 from a PC on the remote site
 How to reach a device behind the ewon Cosy 131 from a PC on the remote site Initial situation: You already have an existing remote access to your machine LAN (ewon LAN) using ewon Cosy 131 and our Talk2M
ewon Geolocation support.ewon.biz Application User Guide
 Application User Guide AUG 061 / Rev. 1.0 ewon Geolocation Discover how to set up the geolocation feature of your ewons and retrieve the information in ecatcher. support.ewon.biz Table of Contents 1. Geolocation
Flexy - OPCUA IOServer
 Flexy - OPCUA IOServer 1. Introduction This info applies to ewon Flexy devices. Since firmware 13.0s0, the Flexy integrates a new IO Server called OPCUA. This IOServer allows ewon to act as an OPCUA client
viewon 4 support.ewon.biz Application User Guide This AUG explains how to use the viewon 4 software and what is possible to do with it.
 Application User Guide AUG 005 / Rev. 1.1 support.ewon.biz viewon 4 This AUG explains how to use the viewon 4 software and what is possible to do with it. Table of Contents 1. Hardware and software requirements...
Create a backup of an ewon
 Create a backup of an ewon Knowledge Base Everything explained in this document is also available as a hands-on video that shows you step by step how to perform a backup with ebuddy. The best option to
Polling Data from a BACNET/IP device
 Application User Guide AUG 071 / Rev. 1.2 Polling Data from a BACNET/IP device How to use the BACNET IO Server to poll data from a BACNET/IP device support.ewon.biz Table of Contents 1. Objective... 3
ebuddy support.ewon.biz Application User Guide
 Application User Guide AUG 063 / Rev. 1.1 ebuddy Learn all there is to know regarding the ebuddy software: change ewon's IP address, perform upgrade firmware or recovery... support.ewon.biz Table of Contents
Access Omron PLCs through an existing Talk2M connection
 ewon Application User Guide AUG 041 / Rev 1.1 Access Omron PLCs through an existing Talk2M connection Contents This short guide explains how to access an Omron PLC remotely through Talk2M and a pre-configured
Polling Data Registers from Siemens PLC Series S7-300, S7-400 & S7-1200
 Application User guide AUG 048 / Rev. 1.0 Polling Data Registers from Siemens PLC Series S7-300, S7-400 & S7-1200 This short guide explains how to poll data registers from a Siemens Device. support.ewon.biz
ecatcher 4 - New Features
 ewon Application User Guide AUG 052 / Rev 1.0 ecatcher 4 - New Features P Contents This document gives an overview of the new features of ecatcher 4 and explains briefly how to use them. Table of Contents
Flexy&Cosy131 - WAN Fallback
 Flexy&Cosy131 - WAN Fallback PRE-RELEASE INFORMATION 1. Introduction This info applies to ewon Cosy131 and Flexy devices. Since firmware 12.3s0PR ewon integrates a new WAN Fallback feature. The goal of
March 2006, rev 1.3. User manual
 March 2006, rev 1.3 User manual Note concerning the warranty and the rights of ownership The information contained in this document is subject to modification without notice. The vendor and the authors
Cosy DI config. 1. Introduction. Knowledge Base KB EN / Rev. 1.1
 Cosy 131 - DI config 1. Introduction This info applies to ewon COSY131 devices. Since firmware 13.0s0, a wizard called Di Config is available. This wizard allows to configure the use of the Digital Inputs
Access Mistubishi PLCs through an existing Talk2M connection
 ewon Application User Guide AUG 044 / Rev 1.0 Access Mistubishi PLCs through an existing Talk2M connection Contents This short guide explains how to access an Mistubishi PLC remotely through Talk2M and
Talk2M Pro - Remote Connection Quick Start
 ewon Application User Guide AUG 026 / Rev 2.0 Talk2M Pro - Remote Connection Quick Start Content This document is a Quick Start Guide explaining how to connect to ewons through Talk2M Pro in order to access
How to configure the DataMailBox Connector for esync
 Knowledge Base How to configure the DataMailBox Connector for esync 1. Introduction Talk2M provides to Talk2M users a new service called "DataMailbox". This service consists in aggregating the ewon Historical
efive 25 Installation Guide
 ewon Installation Guide IG 012 / Rev 1.3 efive 25 Installation Guide Contents This short guide explains how to install the efive 25 Firewall and to get started with the embedded configuration web site.
ewon Flexy JAVA J2SE Toolkit User Guide
 Application User Guide ewon Flexy JAVA J2SE Toolkit User Guide AUG 072 / Rev. 1.0 This document describes how to install the JAVA development environment on your PC, how to create and how to debug a JAVA
ewon Flexy 2 Serial Ports Ext. Card FLA 3301
 Installation Guide IG 016 / Rev. 1.2 FLA 3301 This Installation Guide explains how to install the 2 Serial Ports Extension Card FLA 3301. support.ewon.biz Table of Contents 1. Product Summary... 3 2. Safety,
ewon Flexy PSTN Extension Card FLA 3501
 Installation Guide IG 021 / Rev. 1.2 FLA 3501 This installation guide explains how to install the FLA 3501. support.ewon.biz Table of Contents 1. Product Summary... 3 2. Safety, Environmental & Regulatory
ewon Flexy PSTN Extension Card FLA P3501 Installation Guide
 ewon Installation Guide IG 021 / Rev 1.0 ewon Flexy PSTN Extension Card FLA P3501 Contents Installation Guide This installation guide explains how to install the ewon Flexy PSTN Extension Card FLA 3501.
Multi-NVR Manager. Quick Start Configuration Usage
 Multi-NVR Manager Quick Start Configuration Usage 2014. All rights are reserved. No portion of this document may be reproduced without permission. All trademarks and brand names mentioned in this publication
Exhibitor Software User s Manual. Exhibitor Software V
 Exhibitor Software User s Manual Exhibitor Software V1.0.1 090908 1 Contents 1. Exhibitor Software 2. Installation 3. Using Exhibitor Program 3.1 Starting the Program 3.2 Logging in to the Program 3.3
Quick Start Guide for Administrators and Operators Cyber Advanced Warning System
 NSS Labs Quick Start Guide for Administrators and Operators Cyber Advanced Warning System Introduction to the Cyber Advanced Warning System and RiskViewer... 1 Activating Your Account... 2 Adding a New
Keynote 08 Basics Website:
 Website: http://etc.usf.edu/te/ Keynote is Apple's presentation application. Keynote is installed as part of the iwork suite, which also includes the word processing program Pages and the spreadsheet program
GIS DATA SUBMISSION USER GUIDE. Innovation and Networks Executive Agency
 Innovation and Networks Executive Agency GIS DATA SUBMISSION USER GUIDE Innovation and Networks Executive Agency (INEA) W910 Chaussée de Wavre 910 B-1049 Brussels, Belgium Tel: +32 (0)2 29 95252 Fax: +32
Guide to Mapping Website (Public) December 2016 GC_236594
 December 2016 GC_236594") Guide to Mapping Website (Public) December 2016 GC_236594 Table of Contents Guide to Mapping Website (Public)... 1 December 2016... 1 Quick Start... 3 Map Layers... 4 How do I?... 5 Draw on the Map...
Guide to Mapping Website (Public) December 2016 GC_236594 Table of Contents Guide to Mapping Website (Public)... 1 December 2016... 1 Quick Start... 3 Map Layers... 4 How do I?... 5 Draw on the Map...
Avigilon Gateway Web Client User Guide. Version 6.10
 Avigilon Gateway Web Client User Guide Version 6.10 2006-2018, Avigilon Corporation. All rights reserved. AVIGILON, the AVIGILON logo, AVIGILON CONTROL CENTER, ACC, and TRUSTED SECURITY SOLUTIONS. are
FactoryLink 7. Version 7.0. Client Builder Reference Manual
 FactoryLink 7 Version 7.0 Client Builder Reference Manual Copyright 2000 United States Data Corporation. All rights reserved. NOTICE: The information contained in this document (and other media provided
POWERSTUDIO USER MANUAL 3 / 4
 ENERGY MANAGEMENT SOFTWARE POWERSTUDIO (Standard, SCADA, Deluxe) Version 4.0 USER MANUAL 3 / 4 (M98232001-03-13A) 2 User Manual DISCLAIMER CIRCUTOR, SA reserves the right to make modifications to the device
Text box. Command button. 1. Click the tool for the control you choose to draw in this case, the text box.
 Visual Basic Concepts Hello, Visual Basic See Also There are three main steps to creating an application in Visual Basic: 1. Create the interface. 2. Set properties. 3. Write code. To see how this is done,
Vertisee Help Interface and Tools VERTISEE HELP. Interface and Tools. McElhanney Consulting Services Ltd Page 1
 VERTISEE HELP Interface and Tools McElhanney Consulting Services Ltd. 2016 Page 1 Contents Browser Interface... 3 Bookmark Tool... 4 Basemap... 5 Coordinate Display Tool... 6 Edit Tool... 7 Find Coordinates
TurboCAD Pro V21 - Drawing Template
 TurboCAD Pro V21 - Drawing Template Create Reusable Drawing Templates Including ANSI A, B, C and D Size Sheets Donald B. Cheke 1 Copyright 2014 Donald B. Cheke TurboCAD is a registered trademark of IMSI/Design.
Local Playback Software. User Manual UD04164B
 Local Playback Software User Manual UD04164B User Manual COPYRIGHT 2017 Hangzhou Hikvision Digital Technology Co., Ltd. ALL RIGHTS RESERVED. Any and all information, including, among others, wordings,
Many of your assessments will require submission as a word document (.doc).
.") WORD HOW TO CREATE A WORD DOCUMENT Many of your assessments will require submission as a word document (.doc). 1. To open Microsoft Word, left click once on the blue window in the bottom left hand corner
WORD HOW TO CREATE A WORD DOCUMENT Many of your assessments will require submission as a word document (.doc). 1. To open Microsoft Word, left click once on the blue window in the bottom left hand corner
Microsoft Office Word 2016 for Windows
 Microsoft Office Word 2016 for Windows Working with Graphics University Information Technology Services Learning Technologies, Training & Audiovisual Outreach Copyright 2016 KSU Division of University
ewon Flexy 8DI-4AI-2DO Ext. Card FLX 3402
 Installation Guide IG 018 / Rev. 1.1 FLX 3402 This installation guide explains how to install the 8DI-4AI-2DO Extension Card FLX 3402. support.ewon.biz Table of Contents 1. Introduction... 3 2. Safety,
Ctrack Online User Guide
 Fleetstar Online A Guide to Winter Maintenance Reporting v1.1 Ctrack Online User Guide Title: Ctrack Online Quickstart Guide Date: 18/07/2013 Version: 1.0 Table of Contents 1. Ctrack Online Introduction...
Microsoft Office Word 2016 for Mac
 Microsoft Office Word 2016 for Mac Working with Graphics University Information Technology Services Learning Technologies, Training & Audiovisual Outreach Copyright 2016 KSU Division of University Information
IHS Enerdeq Browser Release Notes Version 2.4.3
 IHS > Decision Support Tool IHS Enerdeq Browser Release Notes Version 2.4.3 August 14 th, 2014 2014 IHS. All Rights Reserved. All trademarks belong to IHS or it s affiliated and subsidiary companies, all
GE Fanuc Automation. CIMPLICITY HMI Plant Edition. Trend and XY Chart. CIMPLICITY Monitoring and Control Products.
 GE Fanuc Automation CIMPLICITY Monitoring and Control Products CIMPLICITY HMI Plant Edition Trend and XY Chart Operation Manual GFK-1260H July 2001 Following is a list of documentation icons: GFL-005 Warning
Animating Layers with Timelines
 Animating Layers with Timelines Dynamic HTML, or DHTML, refers to the combination of HTML with a scripting language that allows you to change style or positioning properties of HTML elements. Timelines,
OnCOR Silverlight Viewer Guide
 Getting Around There are many ways to move around the map! The simplest option is to use your mouse in the map area. If you hold the left button down, then click and drag, you can pan the map to a new
Navigator Software User s Manual. User Manual. Navigator Software. Monarch Instrument Rev 0.98 May Page 1 of 17
 User Manual Navigator Software Monarch Instrument Rev 0.98 May 2006 Page 1 of 17 Contents 1. NAVIGATOR SOFTWARE 2. INSTALLATION 3. USING NAVIGATOR SOFTWARE 3.1 STARTING THE PROGRAM 3.2 SYSTEM SET UP 3.3
Dell Precision Optimizer Owner's Manual
 Dell Precision Optimizer Owner's Manual Notes, cautions, and warnings NOTE: A NOTE indicates important information that helps you make better use of your computer. CAUTION: A CAUTION indicates either potential
Profile Modeler Profile Modeler ( A SuperControl Product )
") Profile Modeler ( A SuperControl Product ) - 1 - Index Overview... 3 Terminology... 3 Launching the Application... 4 File Menu... 4 Loading a File:... 4 To Load Multiple Files:... 4 Clearing Loaded Files:...
Profile Modeler ( A SuperControl Product ) - 1 - Index Overview... 3 Terminology... 3 Launching the Application... 4 File Menu... 4 Loading a File:... 4 To Load Multiple Files:... 4 Clearing Loaded Files:...
GIS DATA SUBMISSION USER GUIDE. Innovation and Networks Executive Agency
 Innovation and Networks Executive Agency GIS DATA SUBMISSION USER GUIDE Innovation and Networks Executive Agency (INEA) W910 Chaussée de Wavre 910 B-1049 Brussels, Belgium Tel: +32 (0)2 29 95252 Fax: +32
SmartChart User Guide
 SmartChart User Guide This chapter will cover all the features the SmartCharts have to offer. When the username and passwords are inputted and the Submit button is pressed, the SmartCharts will load. The
Microsoft Office Word 2013
 Microsoft Office Word 2013 Working with Graphics University Information Technology Services Training, Outreach & Learning Technologies Copyright 2014 KSU Department of University Information Technology
Precise for BW. User Guide. Version x
 Precise for BW User Guide Version 9.8.0.x 2 Precise for BW User Guide Copyright 2018 Precise Software Solutions, Inc. All rights reserved. Precise for BW User Guide version 9.8.0.x Document release version
Chapter 1 : Getting Started with Integrity... Chapter 2 : Interface Layout... Chapter 3 : Navigation... Chapter 4 : Printing...
 .0 User s Manual Table of Contents Chapter : Getting Started with Integrity... Chapter : Interface Layout... Chapter : Navigation... Chapter : Printing... Chapter : Quick Search and Results Pane... Results
Quick Guide for Photoshop CC Basics April 2016 Training:
 Photoshop CC Basics Creating a New File 1. Click File > New 2. Keep Default Photoshop Size selected in the Preset drop-down list. 3. Click OK. Showing Rulers 1. On the Menu bar, click View. 2. Click Rulers.
VisualPST 2.4. Visual object report editor for PowerSchool. Copyright Park Bench Software, LLC All Rights Reserved
 VisualPST 2.4 Visual object report editor for PowerSchool Copyright 2004-2015 Park Bench Software, LLC All Rights Reserved www.parkbenchsoftware.com This software is not free - if you use it, you must
V-BOX Cloud Configuration
 V-BOX Cloud Configuration Website: http://www.we-con.com.cn/en Technical Support: support@we-con.com.cn Skype: fcwkkj Phone: 86-591-87868869 QQ: 1043098682 Technical forum: http://wecon.freeforums.net/
IntraMaps End User Manual
 IntraMaps End User Manual For IntraMaps Version 8 Date: 6 th July 2014 Contents Introduction... 4 What is IntraMaps?... 4 Application... 5 Main Toolbar... 6 View... 7 Original View:... 7 Pan:... 7 Zoom
TurboCAD Pro V Drawing Template
 TurboCAD Pro V19.1 - Drawing Template Create Reusable Drawing Templates Including ANSI A, B, C and D Size Sheets Using 64-bit version of TurboCAD Donald B. Cheke 1 Copyright 2012 Donald B. Cheke TurboCAD
Chapter 6 Formatting Graphic Objects
 Impress Guide Chapter 6 OpenOffice.org Copyright This document is Copyright 2007 by its contributors as listed in the section titled Authors. You can distribute it and/or modify it under the terms of either
AEMLog users guide V User Guide - Advanced Engine Management 2205 West 126 th st Hawthorne CA,
 AEMLog users guide V 1.00 User Guide - Advanced Engine Management 2205 West 126 th st Hawthorne CA, 90250 310-484-2322 INTRODUCTION...2 DOCUMENTATION...2 INSTALLING AEMLOG...4 TRANSFERRING DATA TO AND
User s Guide. Valvova Oy
 User s Guide Valvova Oy June 21, 2017 CONTENTS Contents 1 Timeline 2 1.1 Program startup......................................... 3 1.2 Calendar............................................. 3 1.3 Go to
User Guide. Kronodoc Kronodoc Oy. Intelligent methods for process improvement and project execution
 User Guide Kronodoc 3.0 Intelligent methods for process improvement and project execution 2003 Kronodoc Oy 2 Table of Contents 1 User Guide 5 2 Information Structure in Kronodoc 6 3 Entering and Exiting
ivms320 Platform User Manual
 ivms320 Platform User Manual Version: 9.1.8.5 Table of Contents Chapter 1 Overview... 4 1.1. Description... 4 1.2. Installation... 4 1.3. Uninstallation... 10 1.4. Log in... 13 1.4.1. First Login... 13
Aimetis Motion Tracker. 1.1 User Guide
 Aimetis Motion Tracker 1 User Guide Contents Contents Introduction...3 Installation... 4 Requirements... 4 Install Motion Tracker... 4 Open Motion Tracker... 4 Add a license... 4... 6 Configure Motion
N2KExtractor. Maretron Data Extraction Software User s Manual
 N2KExtractor Maretron Data Extraction Software User s Manual Revision 3.1.6 Copyright 2017 Maretron, LLP All Rights Reserved Maretron, LLP 9014 N. 23rd Ave #10 Phoenix, AZ 85021-7850 http://www.maretron.com
Real Monitor and Real Monitor Viewer
 Real Monitor and Real Monitor Viewer This chapter describes Real Monitor and Real Monitor Viewer, two related applications which allow you to collect and review data about your system. These applications
Operation manual. Ver /05/30.
 Operation manual Ver. 1.0.5.5 2016/05/30 www.blueeyestech.com Operation manual BlueEyes DDS Editor Thank you for using the product of BlueEyes Technology. The manual will introduce the product of BlueEyes
Product and company names appearing in this document are trademarks of each respective company or organization.
 . CMS_beta LEGAL INFORMATION Reproduction, transfer, distribution or storage of part or all of the contents in this document in any form without the prior written permission of the company is prohibited.
User Interface Guide
 User Interface Guide 1 Contents Overview... 3 Tabmenu... 4 Design modes... 4 Tool groups... 5 Design function groups... 5 Main menu... 6 Toolbars... 7 Drawing area... 9 Status bar... 11 Coordinate box...
TI-SmartView Emulator Software for the TI-84 Plus Family (Windows and Macintosh )
") TI-SmartView Emulator Software for the TI-84 Plus Family (Windows and Macintosh ) Important Information Texas Instruments makes no warranty, either express or implied, including but not limited to any
TI-SmartView Emulator Software for the TI-84 Plus Family (Windows and Macintosh ) Important Information Texas Instruments makes no warranty, either express or implied, including but not limited to any
TexGraf4 GRAPHICS PROGRAM FOR UTEXAS4. Stephen G. Wright. May Shinoak Software Austin, Texas
 TexGraf4 GRAPHICS PROGRAM FOR UTEXAS4 By Stephen G. Wright May 1999 Shinoak Software Austin, Texas Copyright 1999, 2007 by Stephen G. Wright - All Rights Reserved i TABLE OF CONTENTS Page LIST OF TABLES...v
IT Services Financial Services. IT Services Financial Services.
 eledgers IT Services Financial Services IT Services Financial Services http://finserv.uchicago.edu Table of Contents Logging into eledgers... 3 17BThe eledgers Workspace... 4 Basic Search using Custom
IMAGE STUDIO LITE. Tutorial Guide Featuring Image Studio Analysis Software Version 3.1
 IMAGE STUDIO LITE Tutorial Guide Featuring Image Studio Analysis Software Version 3.1 Notice The information contained in this document is subject to change without notice. LI-COR MAKES NO WARRANTY OF
NETWORK PRINT MONITOR User Guide
 NETWORK PRINT MONITOR User Guide Legal Notes Unauthorized reproduction of all or part of this guide is prohibited. The information in this guide is subject to change for improvement without notice. We
The Preparing for Success Online Mapping Tool
 The Preparing for Success Online Mapping Tool Baker Polito Administration The Executive Office of Housing and Economic Development and MassGIS Questions & Comments? Please contact MassWorks@state.ma.us
Page 1 of 16 CONTENTS:
 Page 1 of 16 CONTENTS: HOME-BOX -- (PG.2) o PROPERTY OWNERSHIP o ADDRESS SEARCH o I WANT TO AERIAL IMAGERY AND BASE MAPS -- (PG.2) o IMAGERY WITH LABELS ON/OFF o TOPOGRAPHY ON/OFF o TRANSPARENCY ZOOM IN
AX-PECO. User Manual Version People counting application ENGLISH
 AX-PECO User Manual Version 3.2.0 People counting application ENGLISH Copyright 2016 Visual Tools, S.A. All rights reserved. Trademark is the registered trademark of Visual Tools, S.A. Product and company
Center for Faculty Development and Support Making Documents Accessible
 Center for Faculty Development and Support Making Documents Accessible in Word 2007 Tutorial CONTENTS Create a New Document and Set Up a Document Map... 3 Apply Styles... 4 Modify Styles... 5 Use Table
IBM Rational Rhapsody Gateway Add On. Tagger Manual
 Tagger Manual Rhapsody IBM Rational Rhapsody Gateway Add On Tagger Manual License Agreement No part of this publication may be reproduced, transmitted, stored in a retrieval system, nor translated into
RITIS Training Module 9 Script
 RITIS Training Module 9 Script Welcome to the Regional Integrated Information System or RITIS Module 09 CBT. To begin, select the start button or press Shift+N on your keyboard. This training module will
Central Management Software for NVR-915 / NVR-1615 CV5-M256
 Central Management Software for NVR-915 / NVR-1615 Table of Contents Chapter 1. Main Console... 4 1.1 Tool Bar... 4 1.2 NVR List... 5 1.3 Division List... 7 1.4 Group List... 9 1.5 PTZ Panel...11 1.6 Operation
Capstone Appendix. A guide to your lab computer software
 Capstone Appendix A guide to your lab computer software Important Notes Many of the Images will look slightly different from what you will see in lab. This is because each lab setup is different and so
IHS > Decision Support Tool. IHS Enerdeq Browser Version 2.5 Release Notes
 IHS > Decision Support Tool IHS Enerdeq Browser Version 2.5 Release Notes December 10, 2014 December 6, 2014 2014 IHS. For internal use only. No portion of this publication may be reproduced, reused, or
Galaxie Photodiode Array Software
 Varian, Inc. 2700 Mitchell Drive Walnut Creek, CA 94598-1675/USA Galaxie Photodiode Array Software User s Guide Varian, Inc. 2002-2006 03-914950-00:6 Table of Contents Introduction... 3 General... 3 PDA
User Guide. Avery Dennison Web Ordering Solution for Steinmart
 User Guide Avery Dennison Web Ordering Solution for Steinmart March 2012 Copyright 2012 A very Dennison The information in this document is subject to change without notice and should not be construed
Desktop Studio: Charts. Version: 7.3
 Desktop Studio: Charts Version: 7.3 Copyright 2015 Intellicus Technologies This document and its content is copyrighted material of Intellicus Technologies. The content may not be copied or derived from,
Supervision and control XML-based from Windows Vista to Windows CE
 Supervision and control XML-based from Windows Vista to Windows CE Tutorial : Getting Started with Movicon 11 Cod. DOCS 11 TUT-E Build 1010 TABLE OF CONTENTS Table Of Contents 1. GETTING STARTED WITH MOVICON...
SALTO GRAPHICAL MAPPING MANUAL. Version 1.0
 SALTO GRAPHICAL MAPPING MANUAL Version 1.0 Historic of changes Version Status Date Author Change description 1.0 Official 28/11/2012 Aitor Apalategi First version of the manual 2 INDEX 1. Introduction...
Lab 2: Conservation of Momentum
 3 Lab 2: Conservation of Momentum I. Before you come to lab... II. Background III. Introduction A. This lab will give you an opportunity to explore the conservation of momentum in an interesting physical
3. Software Operation
 3. Software Operation Limitation of Liability Michigan Instruments, Inc. warrants that the PneuView software will conform to the published specifications and documentation, provided that it is used on
RITIS Training Module 10 Script. To return to the Florida Analytics main page, select Florida Analytics Tools in the upper left corner of the page.
 RITIS Training Module 10 Script Welcome to the Regional Integrated Transportation Information System or RITIS Module 10 CBT. To begin, select the start button or press Shift+N on your keyboard. To return
 Designer Manual Web-N Server. (Push Alarm Message for Smartphone) N-Designer Ver. :..3 Create Date: 08.0. 04 Revision Date: e-mail:lbhsb@naver.com 네트란 http://www.netran.co.kr How to setup push-alarm-message
Viewer. Release gns-mbh.com
 Viewer Release 2.2.1 gns-mbh.com February 18, 2016 CONTENTS 1 Import Data 3 2 Handle Views 5 3 Control Model Data 9 3.1 Camera Control................................. 9 3.2 Handle Model Data................................
Technical Documentation Version 7.3 Output
 Technical Documentation Version 7.3 Output These documents are copyrighted by the Regents of the University of Colorado. No part of this document may be reproduced, stored in a retrieval system, or transmitted
Expression Design Lab Exercises
 Expression Design Lab Exercises Creating Images with Expression Design 2 Beaches Around the World (Part 1: Beaches Around the World Series) Information in this document, including URL and other Internet
WinView. Getting Started Guide
 WinView Getting Started Guide Version 4.3.12 June 2006 Copyright 2006 Mincom Limited All rights reserved. No part of this document may be reproduced, transferred, sold or otherwise disposed of without
AEMLog Users Guide. Version 1.01
 AEMLog Users Guide Version 1.01 INTRODUCTION...2 DOCUMENTATION...2 INSTALLING AEMLOG...4 AEMLOG QUICK REFERENCE...5 THE MAIN GRAPH SCREEN...5 MENU COMMANDS...6 File Menu...6 Graph Menu...7 Analysis Menu...8
Design Tool for AXIS Perimeter Defender. User Manual
 User Manual About this Document This manual is intended for administrators and users of Design Tool for AXIS Perimeter Defender. It includes instructions for using and managing the product on your network.
Classic Apps Editor Best Practices
 Classic Apps Editor Best Practices Blackboard Web Community Manager Trademark Notice Blackboard, the Blackboard logos, and the unique trade dress of Blackboard are the trademarks, service marks, trade
Climate-Smart New Orleans
 Climate-Smart New Orleans Table of Contents GETTING THERE... 2 Accessing the site... 2 Logging into the site... 2 Navigating the Map... 2 Zoom & Pan... 2 Change the map background... 3 Interacting in the