Lesson Plan. Course Title: Digital and Interactive Media. Session Title: Introduction to Publishing Layouts
|
|
|
- Darrell Adams
- 6 years ago
- Views:
Transcription
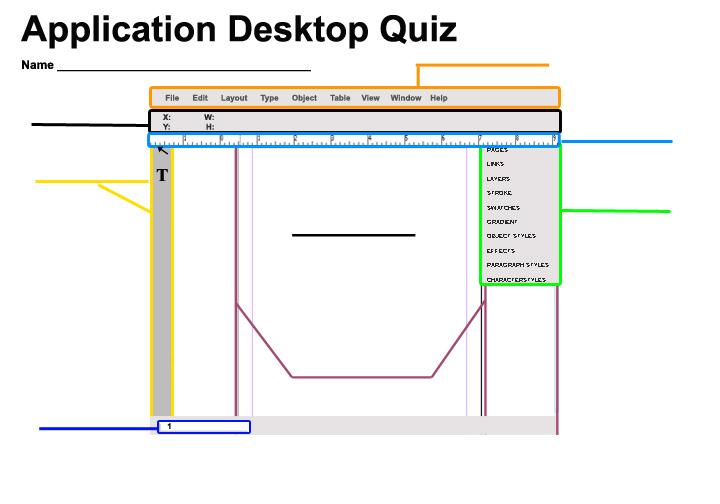
1 Lesson Plan Course Title: Digital and Interactive Media Lesson Duration: 24 Hours Session Title: Introduction to Publishing Layouts Performance Objective: Upon completion of this assignment, the student will be able to understand the basics of page layouts and create business cards and posters. Specific Objectives: Students will be able to Identify the steps needed to complete tasks Construct a product with the help of their teacher Demonstrate publishing layouts skills by creating products as individuals or in a team Preparation TEKS Correlations: (c) (1)(D) Employ effective verbal and nonverbal communication skills; (1)(F) Demonstrate leadership skills and function effectively as a team member; (1)(I) Demonstrate planning and time-management skills such as project management and storyboarding; (5)(B) Identify and use perspective such as backgrounds, light, shades, shadows, and scale to capture a focal point and create depth; (5)(C) Identify and use principles of proportion, balance, variety, emphasis, harmony, symmetry, unity, and repetition in type, color, size, line thickness, shape, and space; (5)(E) Identify and use typography; (5)(F) Identify and use color theory. Instructor/Trainer References: Content developer knowledge Instructional Aids: How Do I student notes How Do I teacher notes How Do I Product Practice Class Ad Activity Application Desktop Student Notes Application Desktop Quiz Application Desktop Quiz Answer Key Product Service Creation IT: D&I Media Publishing Layout Introduction Plan 1
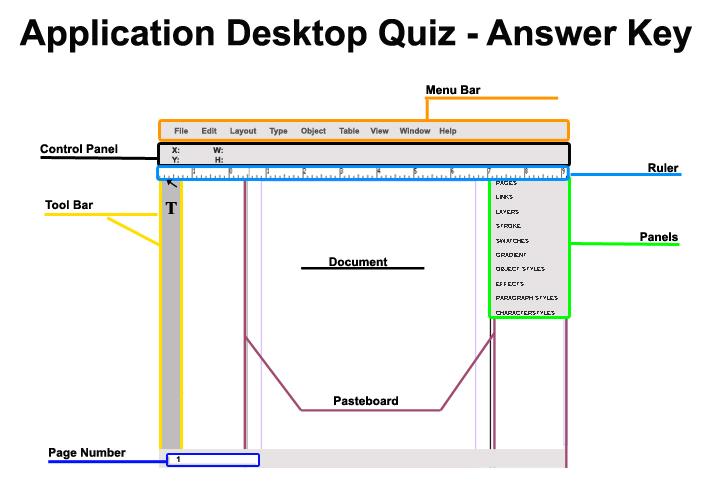
2 Logo Planning Sheet and Rubric Business Card Planning Sheet and Rubric Poster Planning Sheet and Rubric Presentation Planning Sheet and Rubric TLCHS.jpg Squares.gif EndProduct.indd Materials Needed: Cardstock for business cards Paper for posters (posters can be set up as letter size or movie poster size) Equipment Needed: Computers with a professional publishing layout and graphic editor applications Color printer Learner The student will need to know How to use professional publishing layouts and graphic editors The basic design principles Introduction MI Introduction (LSI Quadrant I): Introduction to Publishing Layouts: Teacher will begin by leading a discussion with the students: Has anyone here ever looked at or purchased a magazine, a yearbook, business card, or poster? What software do you think they used to create these items? What would they use a text document for? (Answer: Typing the text) Why do you think they used a professional graphic editor? (Answer: Creating graphics) Why do you think they used a professional page layout application? (Answer: To create the layout for the publication) What do you think layout means? (Answer: A layout is a design plan that determines where the text and graphics will be placed on a page) Outline MI Outline (LSI Quadrant II): Instructor Notes: Teacher will begin by giving the students the Application Desktop Student Notes. Then go over the Application Desktop. There will be a quiz over the Application Desktop. How Do I notes _Student version and while giving the students the answers showing them how to do The Application Desktop Quiz Answer Key has the correct answers for the Application Desktop Quiz. Some answers may change depending on your version of your professional page layout IT: D&I Media Publishing Layout Introduction Plan 2
3 the steps. This should be counted as a daily grade. Teacher will give the Application Desktop Quiz. This should be counted as a quiz grade. Teacher will lead the class in the How Do I Product Practice. application. You can have the students follow along with you on their computers. Application Desktop Quiz Answer Key has the correct answers for the quiz. Count this as a daily grade. The end design is available in EndProduct.indd. Students will now complete the Class Ad Activity on their own. Count this as a quiz grade. Students will begin working on their product creation project under the Informal Assessment. Their products will be the Formal Assessment. The teacher will need to monitor students progress to ensure that they are staying on task with the various parts of the project that need to be completed. The products can be counted as major grades. Application 3 IT: D & I Media Business Card Planning Sheet
4 MI Guided Practice (LSI Quadrant III): The teacher will lead the class in the How Do I Product Practice. This should be counted as a daily grade. The end design is available in EndProduct.indd. MI Independent Practice (LSI Quadrant III): Students will now complete the Class Ad Activity on their own. This should be counted as a quiz grade. Summary MI Review (LSI Quadrants I and IV): The teacher will have the students complete a brief journal explaining the following: What is a professional publishing layout application used for? Name two situations where it would be appropriate to use a professional publishing layout application. List three skills the students have learned from this lesson. Evaluation MI Informal Assessment (LSI Quadrant III): Students will begin working on their product creation project. The teacher will need to monitor students progress to ensure that they are staying on task with the various parts of the project that need to be completed. The students can work individually or in groups to create an original product or service. The students will need to pitch their ideas to secure donations from investors for their product or service (community volunteers, principals, or other teachers can be the investors for their products). This is similar to 4 IT: D & I Media Business Card Planning Sheet
5 what aspiring entrepreneurs try to accomplish on one of today s top reality television shows. The students will present their product or service to the investors with the help of posters advertising their product or service and business cards. MI Formal Assessment (LSI Quadrant III, IV): The final products of the product creation project will be business cards, a poster, and a presentation of the student s idea. 1. Go over project with students (Product Service Creation Handout) 2. Discuss the creation of logos (Logo Planning Sheet and Rubric). The logo planning sheet should be done individually. The work can be done together after each student has come up with his/her own idea for a logo. Extension MI Extension/Enrichment (LSI Quadrant IV): Students can create posters for theatre productions, organizations within the school, or upcoming events. 5 IT: D & I Media Business Card Planning Sheet
6 Icon MI Teaching Strategies Verbal/ Linguistic Logical/ Mathematical Visual/Spatial Musical/ Rhythmic Bodily/ Kinesthetic Intrapersonal Interpersonal Lecture, discussion, journal writing, cooperative learning, word origins Problem solving, number games, critical thinking, classifying and organizing, Socratic questioning Mind-mapping, reflective time, graphic organizers, color-coding systems, drawings, designs, video, DVD, charts, maps Use music, compose songs or raps, use musical language or metaphors Use manipulatives, hand signals, pantomime, real life situations, puzzles and board games, activities, roleplaying, action problems Reflective teaching, interviews, reflective listening, KWL charts Cooperative learning, roleplaying, group brainstorming, cross-cultural interactions Personal Development Strategies Reading, highlighting, outlining, teaching others, reciting information Organizing material logically, explaining things sequentially, finding patterns, developing systems, outlining, charting, graphing, analyzing information Developing graphic organizers, mindmapping, charting, graphing, organizing with color, mental imagery (drawing in the mind s eye) Creating rhythms out of words, creating rhythms with instruments, playing an instrument, putting words to existing songs Moving while learning, pacing while reciting, acting out scripts of material, designing games, moving fingers under words while reading Reflecting on personal meaning of information, studying in quiet settings, imagining experiments, visualizing information, journaling Studying in a group, discussing information, using flash cards with other, teaching others Naturalist Existentialist Natural objects as manipulatives and as background for learning Socratic questions, real life situations, global problems/questions Connecting with nature, forming study groups with like-minded people Considering personal relationship to larger context 6 IT: D & I Media Business Card Planning Sheet
7 Name: Business Card Planning Sheet and Rubric When creating a business card, you want to carry over the tone of your logo and product. Design elements, such as borders, should continue using the colors and fonts of the logo. You will also want to put your logo and contact information on your business card. Fill out the following information: Title of the Company: Address: Company Phone #: City, State, Zip: Company Address: Fax #: Company Web Site: 7 IT: D & I Media Business Card Planning Sheet
8 Tips for creating your business card: - When you insert an address, it either needs to be all on one line or the street address should be on one line and the city, state, and zip should be on the 2 nd line - Phone numbers and web sites should all be on one line - All hyphens should be removed except for phone numbers - Include the logo on your business card - Look at some examples of business cards for ideas Sketch out your business card design below: Objective Points Logo is included 15 Design elements of the logo are carried through 20 the rest of the design All text is easy to read 20 Publishing layout business card template is 6 used All information is included on the business card 14 (2 pts each) Business card is well designed 25 Spelling and grammar (-2 pts each) Total 100 8
9 Class Ad Activity Now it s your turn! Pick your favorite class and create a letter size ad for it. When creating the ad, make sure you follow the design principles discussed previously: proportion, balance, variety, emphasis, harmony, symmetry, unity, and repetition. You need to know the major units of the class. You need to have the following elements: - A heading of the class name - A frame you changed the shape of (it can be a text frame or object) - Two different colored fonts - Graphics - Your school logo - A list in a two-column text box of the units of the class Objective Points All the requirements have been followed 48 Design elements have been followed 20 Heading is class name 7 Poster is 8.5x11 5 Poster is well designed 20 Spelling and grammar -2 pts each Total 100 9
10 Name: In My Professional Layout Application How Do I? 1. Create a new file? 2. Change page size? 3. Create columns for pages? 4. Create columns in text boxes? 5. Change the margins? 6. Define picas? 7. Create a textbox? 10
11 8. Link textboxes? 9. Fix overset text? 10. Insert text from document files? 11. Insert pictures? 12. Spell check? 13. Turn off hyphens? 14. Wrap text around a picture? 15. Change the shape of a textbox? 11
12 16. Create layers for my layout? 17. Put an object on a layer? 18. Move objects between layers? 19. Create more pages for my publication? 20. Zoom out to see the entire page using my keyboard? 21. Use templates? 22. Hide and lock layers? 23. Add strokes to objects? 12
13 24. Change font and font size? 25. Change font color for stroke and fill? 26. Move an object in the frame? 27. Create and remove guides? 28. Duplicate objects? 29. Resize an object using the frame? 13
14 In My Professional Layout Application How Do I? 1. Create a new file? a. File > New b. In the Welcome menu, click Document under Create New 2. Change page size? a. Choose a Page Size from the drop down menu b. Type in a specific page size into Width and Height 3. Create columns for pages? a. Change the number of columns on the New Document dialogue box 4. Create columns in text boxes? a. Object > Text Frame Options > Change the number of columns 5. Change the margins? a. Type in the Top margin and the rest will update automatically. You can type in inches by putting in the number and following it with either in or 6. Define picas? a. Picas are units of measurement. One pica equals 12 points. There are 6 picas per one inch. 7. Create a textbox? a. Click on the Text tool and draw your textbox where you want it. 8. Link textboxes? a. Linking textboxes means connecting textboxes, so when you run out of room in one textbox, it will automatically go into the next textbox. To link textboxes, create both textboxes, then click on the outside portion of the textbox, then click inside the textbox you want it to go into. 9. Fix overset text? a. Overset text is text that cannot fit inside the current text frame; it is indicated by a red plus sign. To fix this, you can either make the textbox bigger or thread the overset text into another textbox. To do this, click on the red plus sign, then click inside the text box you want it to go into. 10. Insert text from document files? a. File > Place > Browse for the file > Your mouse is now a loaded icon, and you click where you want the text to go 11. Insert pictures? a. File > Place > Browse for the file > Click where you want the picture to go 12. Spell check? a. Edit > Spelling > Check Spelling 13. Turn off hyphens? a. Select the textbox > Window > Types and Tools > Paragraph > Uncheck the Hyphenate box 14
15 14. Wrap text around a picture? a. Window > Text Wrap > Select the object you want to wrap text around > Choose Wrap around bounding box or Wrap around object shape 15. Change the shape of a textbox? a. Choose the Direct Selection tool > Select the text box > Select a corner > Move the corner into the shape you want 16. Create layers for my layout? a. Windows > Layers > Select the New Layer button 17. Put an object on a layer? a. Select the layer then insert the object 18. Move objects between layers? a. Open the layers palette > on the far right side of the layer is a square; when you select the square, you can see what layer it is on because a filled-in square appears on the layer. To switch the layer the object is on, click on the square and move it to the layer you want it on. 19. Create more pages for my publication? a. Open the Pages palette (Window > Pages) > Click on the new pages button 20. Zoom out to see the entire page using my keyboard? a. Click Ctrl + zero 21. Use templates? a. File New > Document from Template> Choose your template b. In the Welcome Dialogue box > Click From Template under Create New 22. Hide and lock layers? a. To Hide a layer: Open the Layers palette > Choose the layer you want to hide > Click on the eye b. To Lock a Layer: Open the Layers palette > Choose the layer you want to lock > Click on the second box and a lock will appear. 23. Add strokes to objects? a. Select the object you want to add a stroke to > choose the Stroke panel > Change the size of the stroke > On the toolbar, change the color of the stroke by double clicking on the stroke color box and choosing a color 24. Change font and font size? a. Select the text > Go to the Application Bar > Click the font drop down box and change the font and font size b. Window > Type and Tables > Character > you can change the font, font size, font style, and more in this panel 25. Change font color for stroke and fill? a. To select the fill color: Select the text you want to change the color > double click the Font color > Choose the color you want 15
16 b. To select the stroke color around the font: Select the text you want to change > double click the stroke color > Choose the color you want 26. Move an object in the frame? a. Select the Direct Selection tool > Click the object you want to move > Drag the object to where you want to move it 27. Create and remove guides? a. Show the rulers (Ctrl+R) > Use the Selection tool > Click and hold on the ruler > Drag a guide where you want it b. To remove guides > Right click on the ruler > Delete all Guides 28. Duplicate objects? a. Select the object you want > hold down Alt + Click and drag the object to create a new one b. Edit > Duplicate 29. Resize an object using the frame? a. Using the Selection tool, change the size of the frame > Right click on the frame > Select Fitting > Fit Content to Frame. 16
17 How Do I? Product Practice 1. Create a new file. (File > New) 2. Change the margins to ¼ in. 3. Insert two layers > one named Graphics and one named Text. To name the layers, double-click on the layer and re-name it in the Layers Options dialog box. 4. Click on the Graphics layer > Insert the TLCHS logo in the bottom right corner. Resize the logo by using the Selection tool > Right-clicking > Fitting > Fit Content to Frame. Make it smaller to make it fit better on the page. 5. Make sure the Graphics layer is selected > Insert a rectangle on the left side of the page 66p x 12p. Change the filler color (C: 87; M: 39; Y: 100; K: 40). 6. Use the Add Anchor Point tool to add a point on the right side midway down the page at X: 12p Y: 33p. 7. Using the Direct Selection tool > click one time on the point > move the point to X:18p 8. Click on the Convert Anchor Point tool > click on the anchor point you just created > Drag up toward the top of the document until the right side is curved out. 9. Make sure the Graphics layer is selected > Insert the Squares.gif file. Using the Control Bar in the Width box, change the size to 15p, and Height 15p. Change the location to X: 7p6.5, and Y: 9p > Right-click > Fitting > Fit Content to Frame 17
18 10. Select the Text layer > Create a text box in the upper right corner of the document > Type in letters DIM > Change the font size to 150 pt > Change the font to Garamond > Change the Tracking to 200 > Right align the text > Right-click on the text > Fitting > Fit Frame to Content. 11. Make sure the text layer is selected > Create a text box and type Join Digital and Interactive Media > Change the size to 40pt > change the font to Garamond > change the color to white > using the control panel, X: 9p8.4; Y: 46p; W: 16p4.8; H: 14p5 12. With the Text layer selected > create a textbox > type in You will learn: > change the font to Adobe Garamond > Change the font size to 49pt > change the position to X: 29p5; Y: 18p; > Right-click > Fitting > Fit Frame to Content 13. With the Text layer selected > create a textbox > with the textbox selected, click Object > Text Frame Options > Change the number of columns to two > change the font to Garamond > Change the font size to 35pt > change the position to X: 34p; Y: 26p; > change the size to W: 31p5.6; H: 10p; 14. With the Text layer selected > Create a textbox > Type Talk to your Counselor today! > change the font to Garamond > Change the size to 60pt > Change the position to X: 35p; Y: 43p; > change the size to W: 28p; H: 16p; > Change the rotation angle to 26º. 18
19 19
20 20
21 Name: Logo Planning Sheet and Rubric 1. Name 3 logos without looking them up on the computer. 2. What are some things these logos have in common (e.g., they are simple in design and multicolored, etc.)? 3. Write a 1-2 sentence description of your product or service. 4. Write down 3-5 keywords from your description that describe your product or service (stay away from word like awesome and amazing). 5. Think of who you think will buy your product or service. How old are they? What other things might these people purchase? Why? 6. Now thinking of the people you believe would buy your product, what tone would be appropriate for your product or service? Fun, serious, professional, or something else? 7. What colors would help convey the tone you believe your product should have? 8. From the colors listed above, pick a couple that you would like to use in your logo. These colors will be used for your text and graphics of your logo, so make sure they are contrasting but pleasing together. 9. Thinking of the tone you want to convey, what kind of font would work on your logo? 21
22 10. Use the area below to sketch out a rough draft of your logo. 11. Get together with your team and look at all the logos. As a group, pick out your favorite logo or combine several logos together. 12. Use a graphic editor to create your logo. Tips for creating your logo: - Keep it simple - Make sure the font you use can be read big or small - If using a graphic editor, make sure the resolution is set to at least 300 ppi. - You can make your logo smaller, but when you make a bitmapped logo bigger, it becomes pixelated and blurry. - Don t use more than three colors, and make sure they are contrasting colors. Objective Points Logo is 10 x 10 at 300ppi 15 No more than 3 colors are being used 15 Colors are contrasting 20 Logo conveys the tone of the product 10 Font is well chosen 15 Logo is well designed 25 Spelling and grammar (-2 pts each) Total
23 Name: Poster Planning Sheet and Rubric When creating a poster, you want to give customers information quickly because most people do not stop to read posters. They see them while passing by in cars or on foot. 1. What is the one thing you want people to know about your product or service? 2. Brainstorm within your groups and find ways to make the one item stand out. Some examples would be to make the picture/text the largest item on the poster, make the text bold, or create contrasting color. 3. Now think of two or three other items you want your potential investors to know about your product or service (i.e. where to buy your product or service). Brainstorm how to put these items on the poster without detracting from the focal point above. Tips for creating your poster: - Be sure to include your logo on the poster - Use the colors from the logo in the other design elements of your poster - Make sure you continue to convey the tone of your product on your poster 23
24 Sketch out your poster design below: Objective Points Logo is included 10 Design elements of the logo are carried through 15 the rest of the design All text is easy to read 15 Pertinent information is included 15 Poster is 2 x3 10 Focal point is well defined 15 Poster is well designed 20 Spelling and grammar (-2 pts each) Total
25 Presentation Planning Sheet and Rubric Introduction Why our products are great Why is our work the best possible product? What makes it great? Why should the judges pick our work over others? Discuss the target audience Who are our target audiences? What makes them our target audiences? Why we chose our design Give a basic description of the product: What does it do? Who does it help? Why should the investors choose our product / company to help? What makes it special? How does the product fit the personality of the target audience? Or help the target audience? Conclusion Conclude with a statement about why your team feels this product is best. Take questions from the audience 25
26 Preparation Divide the speaking parts evenly. For each part, choose the person who is the most knowledgeable about the topic or the person whose speaking ability best suits the part. For example, the graphic designer or the lead technologist may be the most knowledgeable about the graphics or layout. For the introduction and conclusion, choose the person who has the best persuasive or sales abilities and a person who is most likeable. Sometimes the client will buy from the person they can most relate to, so everyone in the group should put on his/her best personality. You want the client to like you and to like your product. Clients will often not buy a product from someone they do not like or cannot relate to. Have a master sheet that lists 1) order of topics and 2) who is speaking about each topic. Make notecards for each speaker to use during the presentation. Practice your presentation. Work on your timing, and be sure your transitions between speakers are smooth. Objective Points Everyone participates in the presentation 25 Information is accurate 15 Each member dresses professionally 20 Presentation is well thought out and thorough 25 Q&A answered correctly 15 Total 100 professionally for the presentation. Dress Be prepared for questions at the end of your presentation. 26
27 Service / Product Creation Your mission is to get in a team and create an original product or service. It can be a futuristic device or a hair dressing/babysitting service. (You ll fix Mom s hair for her big night out and then stay and watch the kids while she s gone). Now to get your business off the ground, you need to find investors to give you money for your business. Investors are people who give money to businesses in exchange for part ownership of the business. To convince the investors to give you money, you will need to present your product or service to them. You will create a logo for the product, a poster to showcase it, and business cards for your group. Objective Service / Product Description Due Date Logo Planning Sheet Logo Business Card Planning Sheet Business Cards for your group Poster Planning Sheet Poster Presentation Planning Sheet Presentation 27

28 28
Lesson Plan. Course Title: Digital Interactive Media Session Title: Master Pages
 Lesson Plan Course Title: Digital Interactive Media Session Title: Master Pages Lesson Duration: 7.5-8 hours. Lesson length is subjective and will vary from instructor to instructor. Performance Objective:
Lesson Plan. Course Title: Principles of Information Technology Session Title: Intro to Databases Lesson Duration: Varies dependent upon instructor
 Lesson Plan Course Title: Principles of Information Technology Session Title: Intro to Databases Lesson Duration: Varies dependent upon instructor Performance Objective: Upon completion of this lesson,
Lesson Plan. Course Title: Web Technologies
 Lesson Plan Course Title: Web Technologies Lesson Duration: 2 hours Session Title: Website Forms / Data Acquisition (NOTE: This lesson should follow the HTML Scripting Lesson) Performance Objective: Upon
Lesson Plan. Session Title: Cutting Edge Technology
 Lesson Plan Course Title: Principles of Information Technology Lesson Duration: 7 hours Session Title: Cutting Edge Technology Performance Objective: Upon completion of this assignment, the student will
Lesson Plan. Upon completion of this assignment, the student will be able to build a small network and identify the different types of hackers.
 Lesson Plan Course Title: Principles of IT Session Title: Networks and Hackers Lesson Duration: Lesson length is subjective and will vary from instructor to instructor. Performance Objective: Upon completion
L E S S O N 2 Background
 Flight, Naperville Central High School, Naperville, Ill. No hard hat needed in the InDesign work area Once you learn the concepts of good page design, and you learn how to use InDesign, you are limited
Presented by Dr. Mariah Judd February 15, 2013
 Presented by Dr. Mariah Judd juddm@iupui.edu February 15, 2013 » What are the first things you notice? Color Pictures Title Figures Section titles Bullets.text » Brain storm ideas for what you want your
VHSE - COMPUTERISED OFFICE MANAGEMENT MODULE III - Communication and Publishing Art - PageMaker
 INTRODUCTION : It is one Adobe PageMaker 7.0 software is the ideal page layout program for business, education, and small- and home-office professionals who want to create high-quality publications such
A Step-by-step guide to creating a Professional PowerPoint Presentation
 Quick introduction to Microsoft PowerPoint A Step-by-step guide to creating a Professional PowerPoint Presentation Created by Cruse Control creative services Tel +44 (0) 1923 842 295 training@crusecontrol.com
Adobe Illustrator CS Design Professional GETTING STARTED WITH ILLUSTRATOR
 Adobe Illustrator CS Design Professional GETTING STARTED WITH ILLUSTRATOR Chapter Lessons Create a new document Explore the Illustrator window Create basic shapes Apply fill and stroke colors to objects
Poster-making 101 for 1 PowerPoint slide
 Poster-making 101 for 1 PowerPoint slide Essential information for preparing a poster for the poster printer 1. Poster size: You will be creating a single large slide in PowerPoint. 2. Before adding any
TECHNOEzine. Student Workbook
 TECHNOEzine For Microsoft Word 2010 Student Workbook TECHNOeBooks Project-based Computer Curriculum ebooks www.bepublishing.com Copyright 1993 2010. TechnoKids Inc. in partnership with B.E. Publishing,
You can also search online templates which can be picked based on background themes or based on content needs. Page eleven will explain more.
 Microsoft PowerPoint 2016 Part 1: The Basics Opening PowerPoint Double click on the PowerPoint icon on the desktop. When you first open PowerPoint you will see a list of new presentation themes. You can
Parashar Technologies PageMaker 7.0
 PageMaker 7.0 INTRODUCTION PageMaker 7.0 is one of the best and popular Desktop Publishing Designing Program developed by Adobe Corporation in USA. It is specially used in page designing. Today is popular
DOING MORE WITH WORD: MICROSOFT OFFICE 2013
 DOING MORE WITH WORD: MICROSOFT OFFICE 2013 GETTING STARTED PAGE 02 Prerequisites What You Will Learn USING MICROSOFT WORD PAGE 03 Viewing Toolbars Adding and Removing Buttons MORE TASKS IN MICROSOFT WORD
MICROSOFT WORD. Table of Contents. What is MSWord? Features LINC FIVE
 Table of Contents What is MSWord? MSWord is a word-processing program that allows users to insert, edit, and enhance text in a variety of formats. Word is a powerful word processor with sophisticated editing
01 - Basics - Toolbars, Options and Panels
 InDesign Manual 01 - Basics - Toolbars, Options and Panels 2017 1st edition This InDesign Manual is one of an introductory series specially written for the Arts and Humanities Students at UEA by the Media
Getting Started with Microsoft PowerPoint 2003
 Getting Started with Microsoft PowerPoint 2003 Overview: This handout provides basic introductory information about Microsoft PowerPoint and its application in the classroom. Audience: All instructional
Designing and Creating an Academic Poster using PowerPoint
 Designing and Creating an Academic Poster using PowerPoint About your poster and the presentation Poster presentations are used at professional conferences to communicate information about your project
Chesterfield High School. OCR Nationals Level 3 Unit 7: Desktop Publishing. Unit 7
 Chesterfield High School OCR Nationals Level 3 Unit 7: Desktop Publishing Unit 7 Learning Outcomes By completing this unit candidates will develop a thorough knowledge and understanding of planning, drafting,
DOING MORE WITH WORD: MICROSOFT OFFICE 2010
 DOING MORE WITH WORD: MICROSOFT OFFICE 2010 GETTING STARTED PAGE 02 Prerequisites What You Will Learn USING MICROSOFT WORD PAGE 03 Viewing Toolbars Adding and Removing Buttons MORE TASKS IN MICROSOFT WORD
USING POWERPOINT IN THE CLASSROOM LESSON 1 POWERPOINT BASICS
 USING POWERPOINT IN THE CLASSROOM LESSON 1 POWERPOINT BASICS Objectives Start PowerPoint. Open an existing presentation. Save a presentation. Navigate through a presentation, and use the menus and toolbars.
bold: text format that makes letters look fatter and darker; used to make important words stand out
 acceptable use: a set of policies that state what you are expected to do and not do while using information, websites, or programs; these rules and policies are created to protect the users of the products
Computer Applications Info Processing
 Lesson 2: Modify the Structure and Appearance of Text Microsoft Word 2016 IN THIS CHAPTER, YOU WILL LEARN HOW TO: Apply styles to text. Change a document s theme. Manually change the look of characters
Grade: 7 Lesson name: Creating a School News Letter Microsoft Word 2007
 Grade: 7 Lesson name: Creating a School News Letter Microsoft Word 2007 1. Open Microsoft Word 2007. Word will start up as a blank document. 2. Change the margins by clicking the Page Layout tab and clicking
Using PowerPoint in Effective Presentations
 Using PowerPoint in Effective Presentations MS PowerPoint Date: 26th of February 2014 Time: 14:00-16:00 p.m. Room: E1.17/E1.18 Science East 1 Introduction Session Facilitators Name: Education: Accenture
DTP with MS Publisher
 DTP with MS Publisher ICT Curriculum Team 2004 Getting Going Basics desktop publishing a system for producing printed materials that consists of a PERSONAL COMPUTER or COMPUTER workstation, a high-resolution
Adobe InDesign CS6 Tutorial
 Adobe InDesign CS6 Tutorial Adobe InDesign CS6 is a page-layout software that takes print publishing and page design beyond current boundaries. InDesign is a desktop publishing program that incorporates
Microsoft PowerPoint 2016 Basics Unit 9 Final Review - Student Notes Directions: Fill in the blanks.
 Directions: Fill in the blanks. 1. PowerPoint Window Layout 2. File Tab When clicked, opens - automatically opens the Info option by default Holds the following options: - Info - New - Open - Save - Save
Tactile and Advanced Computer Graphics Module 7. Introduction to Illustrator
 Tactile and Advanced Computer Graphics Module 7 Introduction to Illustrator Module #7 Introduction to Illustrator Tactile and Advanced Computer Graphics Module 7 Introduction to Illustrator Summary Goal(s):
Title bar: The top most bar in Word window that usually displays the document and software names.
 1 MICROSOFT WORD Table of Contents LINC ONE Hiding Standard toolbar, Formatting toolbar, and Status bar: To hide the Standard toolbar, click View Toolbars on the Menu bar. Check off Standard. To hide the
11.1 Create Speaker Notes Print a Presentation Package a Presentation PowerPoint Tips... 44
 Contents 1 Getting Started... 1 1.1 Presentations... 1 1.2 Microsoft Office Button... 1 1.3 Ribbon... 2 1.4 Mini Toolbar... 2 1.5 Navigation... 3 1.6 Slide Views... 4 2 Customize PowerPoint... 5 2.1 Popular...
Detailed Table of Contents
 Detailed Table of Contents INTRODUCTION...1 I.1 THE OBJECTIVES OF THIS TEXT...1 I.2 WHY LibreOffice?...1 I.3 WHAT IS SPECIAL ABOUT THIS TEXT?...1 I.4 THE STATUS OF COMPUTING IN SCHOOLS...2 I.5 TEACHING
Microsoft Word 2010 Lesson Plan
 Microsoft Word 2010 Lesson Plan Objective: This class is a brief introduction to Word 2010. It consists of 2 one and one-half hour sessions. By the end of this class you should be able to create a simple
What can Word 2013 do?
 Mary Ann Wallner What can Word 2013 do? Provide the right tool for: Every aspect of document creation Desktop publishing Web publishing 2 Windows 7: Click Start Choose Microsoft Office > Microsoft Word
Lesson 1 Introduction to PowerPoint
 Lesson 1 Introduction to PowerPoint What It Is-- Presentation tool that allows you to view slides Can include text, graphics, animation, sound, video, charts, and transitions Can create handouts, speaker
The Fundamentals. Document Basics
 3 The Fundamentals Opening a Program... 3 Similarities in All Programs... 3 It's On Now What?...4 Making things easier to see.. 4 Adjusting Text Size.....4 My Computer. 4 Control Panel... 5 Accessibility
Using StarImpress. A brief introduction
 Using StarImpress A brief introduction What is Impress? Impress is the open source (free) alternative to PowerPoint You can Impress for the same things you would do in PowerPoint Create a lesson with handouts
Microsoft Excel 2010 Basic
 Microsoft Excel 2010 Basic Introduction to MS Excel 2010 Microsoft Excel 2010 is a spreadsheet software in the new Microsoft 2010 Office Suite. Excel allows you to store, manipulate and analyze data in
Microsoft Office. Microsoft Office
 is an office suite of interrelated desktop applications, servers and services for the Microsoft Windows. It is a horizontal market software that is used in a wide range of industries. was introduced by
Word 2013 Quick Start Guide
 Getting Started File Tab: Click to access actions like Print, Save As, and Word Options. Ribbon: Logically organize actions onto Tabs, Groups, and Buttons to facilitate finding commands. Active Document
Faculty Development Seminar Series Constructing Posters in PowerPoint 2003 Using a Template
 2008-2009 Faculty Development Seminar Series Constructing Posters in PowerPoint 2003 Using a Template Office of Medical Education Research and Development Michigan State University College of Human Medicine
On the Web sun.com/aboutsun/comm_invest STAROFFICE 8 DRAW
 STAROFFICE 8 DRAW Graphics They say a picture is worth a thousand words. Pictures are often used along with our words for good reason. They help communicate our thoughts. They give extra information that
DOING MORE WITH WORD: MICROSOFT OFFICE 2007
 DOING MORE WITH WORD: MICROSOFT OFFICE 2007 GETTING STARTED PAGE 02 Prerequisites What You Will Learn USING MICROSOFT WORD PAGE 03 Viewing Toolbars Adding and Removing Buttons MORE TASKS IN MICROSOFT WORD
SAMPLE PAGES. Syllabus coverage chart. viii Syllabus coverage chart
 viii Syllabus coverage chart Syllabus coverage chart The chart below shows how each Unit and Topic relates to the ICT syllabus and the Computer Studies syllabus. Computer Unit 11.1 Computer Fundamentals
This guide will show you how to create a basic multi-media PowerPoint presentation containing text, graphics, charts, and audio/video elements.
 This guide will show you how to create a basic multi-media PowerPoint presentation containing text, graphics, charts, and audio/video elements. Before starting the steps outlined in this guide, it is recommended
IN DESIGN. A review of the overview
 IN DESIGN A review of the overview InDesign Review GETTING STARTED: Start by clicking the InDesign icon in your dock. Wait for InDesign to load. Click on Create New Document If resuming work, find your
a child-friendly word processor for children to write documents
 Table of Contents Get Started... 1 Quick Start... 2 Classes and Users... 3 Clicker Explorer... 4 Ribbon... 6 Write Documents... 7 Document Tools... 8 Type with a Keyboard... 12 Write with a Clicker Set...
Prezi Quick Guide: Make a Prezi in minutes
 Prezi Quick Guide: Make a Prezi in minutes by Billy Meinke Updated Feb 2016 by Gina Iijima Welcome! This short guide will have you making functional and effective Prezis in no time. Prezi is a dynamic
PowerPoint 101 at Pickerington Public Library
 PowerPoint 101 at Pickerington Public Library Introduction to PowerPoint 2010 Edition PowerPoint Basics: Get to Know the Layout 1) The Ribbon: Formatting in Tabs and Groups Tabs: Home: Text formatting
Keynote Basics Website:
 Keynote Basics Website: http://etc.usf.edu/te/ Keynote is Apple's presentation application. Keynote is installed as part of the iwork suite, which also includes the word processing program Pages. If you
Word 2010 Beginning. Technology Integration Center
 Word 2010 Beginning File Tab... 2 Quick Access Toolbar... 2 The Ribbon... 3 Help... 3 Opening a Document... 3 Documents from Older Versions... 4 Document Views... 4 Navigating the Document... 5 Moving
SETTING UP A. chapter
 1-4283-1960-3_03_Rev2.qxd 5/18/07 8:24 PM Page 1 chapter 3 SETTING UP A DOCUMENT 1. Create a new document. 2. Create master pages. 3. Apply master pages to document pages. 4. Place text and thread text.
The insertion point will appear inside the text box. This is where you can begin typing.
 BBT9 Activity 3 Text Boxes 1 The Text Box What is the purpose of a text box? It is a tool typically used to enhance a graphic presentation. Text boxes give you control over the position of a block of text
Microsoft PowerPoint 2007 Tutorial
 Microsoft PowerPoint 2007 Tutorial Prepared By:- Mohammad Murtaza Khan I. T. Expert Sindh Judicial Academy Contents Getting Started... 5 Presentations... 5 Microsoft Office Button... 5 Ribbon... 6 Quick
Microsoft Word
 OBJECTS: Shapes (part 1) Shapes and the Drawing Tools Basic shapes can be used to graphically represent information or categories. The NOTE: Please read the Objects (add-on) document before continuing.
Welcome. Microsoft PowerPoint 2010 Fundamentals Workshop. Faculty and Staff Development Program
 Faculty and Staff Development Program Welcome Microsoft PowerPoint 2010 Fundamentals Workshop Computing Services and Systems Development Phone: 412-624-HELP (4357) Last Updated: 04/19/13 Technology Help
Publisher 2007 Creating Flyers and Brochures
 MS Publisher 2007 User Guide Publisher 2007 Creating Flyers and Brochures THE NATURE OF DESKTOP PUBLISHING - INTRODUCTION Publisher is a desktop publishing program. You can create publications that
Publisher 2007 Creating Flyers and Brochures
 MS Publisher 2007 User Guide Publisher 2007 Creating Flyers and Brochures THE NATURE OF DESKTOP PUBLISHING - INTRODUCTION Publisher is a desktop publishing program. You can create publications that use
Developing successful posters using Microsoft PowerPoint
 Developing successful posters using Microsoft PowerPoint PRESENTED BY ACADEMIC TECHNOLOGY SERVICES University of San Diego Goals of a successful poster A poster is a visual presentation of your research,
InDesign - Basic Spring Indesign. Setup a new document
 1/ 5 Indesign Desktop Publication software. It can be used to create posters, flyers, portfolios, books, presentation slides and etc... Tutorials: https://helpx.adobe.com/indesign/how-to/create-print-postcard-design.html?set=indesign--get-started
Contents. Launching Word
 Using Microsoft Office 2007 Introduction to Word Handout INFORMATION TECHNOLOGY SERVICES California State University, Los Angeles Version 1.0 Winter 2009 Contents Launching Word 2007... 3 Working with
Chapter 1. Getting to Know Illustrator
 Chapter 1 Getting to Know Illustrator Exploring the Illustrator Workspace The arrangement of windows and panels that you see on your monitor is called the workspace. The Illustrator workspace features
Getting started. (The path to the file is: Adobe Illustrator 8.0 application folder > Training > Tutorial > AI_03 > 03_b.ai.)
") Back to Contents Tutorial ADOBE ILLUSTRATOR 8.0 Working with Type Tai Chi ASIAN STUDIES PROGRAM One of the most powerful features of the Adobe Illustrator program is the ability to use type as a graphic
Back to Contents Tutorial ADOBE ILLUSTRATOR 8.0 Working with Type Tai Chi ASIAN STUDIES PROGRAM One of the most powerful features of the Adobe Illustrator program is the ability to use type as a graphic
Beginning a presentation
 L E S S O N 2 Beginning a presentation Suggested teaching time 40-50 minutes Lesson objectives To learn how to create and edit title and bullet slides, you will: a b c d Select slide types by using the
Using the Web in Mathematics Foundations Course An Introduction to Microsoft PowerPoint Sarah L. Mabrouk, Framingham State College
 Using the Web in Mathematics Foundations Course An Introduction to Microsoft PowerPoint Sarah L. Mabrouk, Framingham State College Overview: MS PowerPoint is powerful presentation software that enables
Power Point Tutorial
 Power Point Tutorial Creating presentations using Power Point '97 Introduction Power Point is a very powerful tool for the creation of linear presentations that contain images, sounds, animations and transitions.
Introduction To Inkscape Creating Custom Graphics For Websites, Displays & Lessons
 Introduction To Inkscape Creating Custom Graphics For Websites, Displays & Lessons The Inkscape Program Inkscape is a free, but very powerful vector graphics program. Available for all computer formats
Basic Microsoft Word
 (Demonstrated using Windows XP) An Introduction to Word Processing Adapted from Taskstream Word Tutorial (2005) < http://www.taskstream.com > Updated 4/05 by Dr. Bruce Ostertag What can Microsoft Word
Co. Cavan VEC Programme Module for Word Processing Leading to Level 4 FETAC Certificate in Word Processing 4N1123
 Co. Cavan VEC Programme Module for Word Processing Leading to Level 4 FETAC Certificate in May 2012/June 2012 1 Introduction This programme module may be delivered as a standalone module leading to certification
WORD XP/2002 USER GUIDE. Task- Formatting a Document in Word 2002
 University of Arizona Information Commons Training Page 1 of 21 WORD XP/2002 USER GUIDE Task- Formatting a Document in Word 2002 OBJECTIVES: At the end of this course students will have a basic understanding
Keynote 08 Basics Website:
 Website: http://etc.usf.edu/te/ Keynote is Apple's presentation application. Keynote is installed as part of the iwork suite, which also includes the word processing program Pages and the spreadsheet program
LESSON PLAN FOR INFORMATION & COMMUNICATION TECHNOLOGY (ICT) PRATOMSUKSA 2
 PRATOMSUKSA 2") LESSON PLAN FOR INFORMATION & COMMUNICATION TECHNOLOGY (ICT) PRATOMSUKSA 2 CHAPTER SUBCHAPTER WEEK LEARNING OBJECTIVES POSSIBLE TEACHING ACTIVITIES POSSIBLE LEARNER ACTIVITIES LEARNING OUTCOMES KEY VOCABULARY
LESSON PLAN FOR INFORMATION & COMMUNICATION TECHNOLOGY (ICT) PRATOMSUKSA 2 CHAPTER SUBCHAPTER WEEK LEARNING OBJECTIVES POSSIBLE TEACHING ACTIVITIES POSSIBLE LEARNER ACTIVITIES LEARNING OUTCOMES KEY VOCABULARY
The American University in Cairo. Academic Computing Services. Word prepared by. Soumaia Ahmed Al Ayyat
 The American University in Cairo Academic Computing Services Word 2000 prepared by Soumaia Ahmed Al Ayyat Spring 2001 Table of Contents: Opening the Word Program Creating, Opening, and Saving Documents
ECDL Full Course Content
 ECDL Full Course Content Module 1 1. Getting Started 1.1. Computer Terms 1.2. Computer Hardware 1.3. Computer Accessories 1.4. Memory and Storage 1.5. Computer Software 2. Using Information Technology
Microsoft Word 2010 Basics
 1 Starting Word 2010 with XP Click the Start Button, All Programs, Microsoft Office, Microsoft Word 2010 Starting Word 2010 with 07 Click the Microsoft Office Button with the Windows flag logo Start Button,
Create a new document: Save your document regularly! The Big Picture: File>New
 Create a new document: File>New 1. On the menu bar, click File, then New. (Note: From now on, this will be indicated using the following notation style: File>New.) 2. Type in the dimensions for the publication
Graphic Design (Including Yearbook and Newspaper)
") Graphic Design (Including Yearbook and Newspaper) Classes provide photographic instruction plus emphasizing hands-on graphic design industry skills. Using imac computers with digital SLR and bridge cameras,
Graphic Design (Including Yearbook and Newspaper) Classes provide photographic instruction plus emphasizing hands-on graphic design industry skills. Using imac computers with digital SLR and bridge cameras,
Develop great research posters using Microsoft PowerPoint
 www.qps.qut.edu.au Develop great research posters using Microsoft PowerPoint A step-by-step guide QUT PRINTING SERVICES A step-by-step guide This step-by-step guide will assist you to understand the purpose
OnPoint s Guide to MimioStudio 9
 1 OnPoint s Guide to MimioStudio 9 Getting started with MimioStudio 9 Mimio Studio 9 Notebook Overview.... 2 MimioStudio 9 Notebook...... 3 MimioStudio 9 ActivityWizard.. 4 MimioStudio 9 Tools Overview......
Step-by. A Very Warm Welcome to the Exciting World of Computers. Let s get Started It s easy with my Step- Instructions
 A Very Warm Welcome to the Exciting World of Computers Let s get Started It s easy with my Step- by-step Instructions This lesson is all about getting to know your Main Menu Bar at the top of your screen.
Basic Concepts. Launching MultiAd Creator. To Create an Alias. file://c:\documents and Settings\Gary Horrie\Local Settings\Temp\~hh81F9.
 Page 1 of 71 This section describes several common tasks that you'll need to know in order to use Creator successfully. Examples include launching Creator and opening, saving and closing Creator documents.
Intermediate Word by Alan Weaver
 Intermediate Word by Alan Weaver Outline/Table of Contents Introduction... 1 Set default font... 2 Create Random Text... 2 Download a special font... 2 Create/Modify a Style... 3 Widows/Orphans... 3 Table
How to use the ruler, grid, guides, and the Align panel
 How to use the ruler, grid, guides, and the Align panel Much of your job as a page designer is to place text and graphics on the page in a pleasing, organized way. Although you can do much of this placing
PowerPoint 2002 Manual
 PowerPoint 2002 Manual Internet and Technology Training Services Miami-Dade County Public Schools Contents How to Design Your Presentation...3 PowerPoint Templates...6 Formatting Your Slide Show...7 Creating
Introduction. Getting Started. Selecting a Template. 1 of 1
 1 of 1 Introduction Visual materials are one of the most effective means of communicating a message. They can give a presentation a professional quality. Visuals help a speaker to be well prepared, organized,
ESSENTIAL LibreOffice Tutorials for Teachers
 ESSENTIAL LibreOffice Tutorials for Teachers by Bernard John Poole Associate Professor Emeritus University of Pittsburgh at Johnstown Johnstown, PA, USA Copyright Bernard John Poole, 2016 All rights reserved
Introduction to Microsoft Word 2010
 CDU Short Courses Introduction to Microsoft Word 2010 A 2 day course delivered by Charles Darwin University. COURSE INFORMATION This course focuses on basic document production using Microsoft Word 2010
MS Word Basics. Groups within Tabs
 MS Word Basics Instructor: Bev Alderman L e t s G e t S t a r t e d! Open and close MS Word Open Word from the desktop of your computer by Clicking on the Start>All programs>microsoft Office >Word 2010
FrontPage 98 Quick Guide. Copyright 2000 Peter Pappas. edteck press All rights reserved.
 Master web design skills with Microsoft FrontPage 98. This step-by-step guide uses over 40 full color close-up screen shots to clearly explain the fast and easy way to design a web site. Use edteck s QuickGuide
Microsoft Word 2016 LEVEL 1
 TECH TUTOR ONE-ON-ONE COMPUTER HELP COMPUTER CLASSES Microsoft Word 2016 LEVEL 1 kcls.org/techtutor Microsoft Word 2016 Level 1 Manual Rev 11/2017 instruction@kcls.org Microsoft Word 2016 Level 1 Welcome
DIGITAL PRINT DESIGN (568 )
") DESCRIPTION Create and produce digital print projects that communicates and promotes graphic communication. Develop knowledge and skills relative to the graphic design & printing industries. Includes:
DESCRIPTION Create and produce digital print projects that communicates and promotes graphic communication. Develop knowledge and skills relative to the graphic design & printing industries. Includes:
PowerPoint 2010 Introduction. 4/18/2011 Archdiocese of Chicago Mike Riley
 PowerPoint 2010 Introduction 4/18/2011 Archdiocese of Chicago Mike Riley i VIDEO TUTORIALS AVAILABLE Almost 100,000 video tutorials are available from VTC. The available tutorials include Windows 7, GroupWise
HTML/CSS Lesson Plans
 HTML/CSS Lesson Plans Course Outline 8 lessons x 1 hour Class size: 15-25 students Age: 10-12 years Requirements Computer for each student (or pair) and a classroom projector Pencil and paper Internet
GRAPHIC WEB DESIGNER PROGRAM
 NH132 Illustrator Level 1 24Total Hours COURSE TITLE: Illustrator Level 1 COURSE OVERVIEW: This course covers the fundamentals of Illustrator, which is used primarily to work with vector-based graphics.
Introduction to MS Office Somy Kuriakose Principal Scientist, FRAD, CMFRI
 Introduction to MS Office Somy Kuriakose Principal Scientist, FRAD, CMFRI Email: somycmfri@gmail.com 29 Word, Excel and Power Point Microsoft Office is a productivity suite which integrates office tools
Developing a Power Point Presentation
 Load Power Point 1 Select Blank Presentation (figure 1) 2 Select New Slide (figure 2) First slide is the title page. Select First Box as shown in figure 2. Figure 1 Figure 2 3 Add Title and Subtitle (figure
Contents. I. Starting a New Presentation Try it! II. Choosing a Theme III. Tailoring the theme IV Background Styles...
 Contents PowerPoint 2007... 2 I. Starting a New Presentation... 4... 4 II. Choosing a Theme... 4... 4 III. Tailoring the theme... 5 IV Background Styles... 5... 5 V. Add slides, pick layouts... 6... 6
PowerPoint Basics (Office 2000 PC Version)
") PowerPoint Basics (Office 2000 PC Version) Microsoft PowerPoint is software that allows you to create custom presentations incorporating text, color, graphics, and animation. PowerPoint (PP) is available
PowerPoint Basics (Office 2000 PC Version) Microsoft PowerPoint is software that allows you to create custom presentations incorporating text, color, graphics, and animation. PowerPoint (PP) is available
Introduction to MS Word XP 2002: An Overview
 Introduction to MS Word XP 2002: An Overview Sources Used: http://www.fgcu.edu/support/office2000/word/files.html Florida Gulf Coast University Technology Skills Orientation Word 2000 Tutorial The Computer