Proxis Restaurant Point Of Sale System: R-System
|
|
|
- Dylan Franklin
- 5 years ago
- Views:
Transcription
1


2 Proxis Restaurant Point Of Sale System: R-System Proxis R-System provides you the most cost-effective POS solutions from fast-service restaurants to full service restaurants and food service chain stores. R-System is consists of three software applications: R-CORPORATE - RESTAURANT CHAIN MANAGEMENT R-CORPORATE is used by corporate office of chain stores to manage inventory items, receive purchase requests from each individual restaurants, place orders, manage menu items, create promotions, generate performance reports of each restaurant and so on. R-OFFICE - RESTAURANT MANAGEMENT R-OFFICE is used by managers of each restaurant to manage inventory, table setting, menu items, reports, employee timesheets, discounts and promotions and purchase requests. Proxis Restaurant - RESTAURANT POINT OF SALE Proxis Restaurant is the Point Of Sale application installed on the POS terminals in each restaurant. Single Location Restaurant Setup: 1-R-Corporate 2-R-Office 3-Proxis Restaurant Chain / Multi-Location Restaurants Setup: 1-R-Corporate 2-Proxis Restaurant 3-R-Office Page 1
3 System Requirements Hardware Computer Processor with minimal frequency of 500MHz. Intel, AMD CPU recommended. Minimal memory of 128MB RAM. 512 MB RAM recommended. 20MB available hard disk space. Video card minimal resolution of 800x600 pixels with 32bit color. 1024x768 pixels recommended. Ports: 2 serial, 3 USB ports Microsoft WePOS, Windows 2000 Pro, XP Home/Pro, Vista Receipt Printer Recomanded Receipt Printers: Bixolon 350plus, Epson TMT88 IV, SNBC2002NP, HP A794 and Star TSP-143U. We support these printers using either their Windows drivers or OPOS drivers. Other Receipt Printers: Bixolon Series, Epson TM88II or III; Mecury TM200; Itchta; Star TSP , SNBC or any other Epson compatible printers. We only support these printers using their Windows drivers. Kitchen Printer: SAMSUNG Bixolon, SNBC, or Epson U22O Network Version or Epson compatible printers. Other Hardware Uniforce R-System supports most major brands of cash drawers; MSR swipers and MICR readers (MagTek recommanded); PinPad; Barcode scanners; POS Scales; Pole displays and touchscreens. Page 2

4 Setting Up Proxis Restaurant / System Config Open System Setting Window: Click on the setting icon in the top main menu: to open the setting window. Base Setting: Station Setup Station ID is used to identify each POS terminal in R-System. If "Admin required for setting" is checked, only users with Admin rights can modify these settings, otherwise, any user with Admin or Manager rights can make changes in the setting. Menu Buttons Here you can customize the size, color and font of the menu item button display. The menu Page 3
5 button background color, however, is edited in the R-Corp when you edit the Menu Items or Menu Items Catagories. Load menus after application starting Choose this option will load the menus automatically after you log in Proxis Restaurant. Use Memory Data Choose this option to load menus from the memory of your terminal station instead of the database. This will increase the speed of operation but will require more memory of your POS station computer. Show cash changes After process the payment, the system can remind the operator the cash change of the last transaction. Cash Register Style Choose this option will let you enter the currency amount without the decimal point: enter 9999 for $ Full screen after starting application After you login Proxis Restaurant, the application will occupy the whole screen until you exit Proxis Restaurant. Default Ticket Lookup There are two views available for ticket lookup: Table Map and Ticket List. Table Map will display the open Eat-in tickets over a table layout. Ticket List will list all open tickets for Pick-up, Delivery and Eat-in tickets. Authorizations and Ticket Access Authorize Item Removal Cancel Sale Receipt Required Passwords required for new ticket: when checked, every time a ticket is created, the system will pomp for the login/password. Passwords required for Finishing Transaction: when checked, every time an opened ticket is closed, the system will pomp for the login/password. Manager Authorization required for discounts: when checked, any on-the-fly discount requires manager to authorize. However, predefined discounts do not need manager authorization. Display Tickets for all login Sales: Pick-up and Delivery tickets have order list on the right side which can be default to display only orders created by the current login sales/server or all sales/server. Show Shift Selector After Login Select this box to enable the shift login and logout. Tax Account Options to charge tax on price before or after discount. Automaticlly close ticket after full payment Without selecting this option, you have to click "Close" button on the screen to close the ticket Page 4

6 after the full payment is received. Selecting this option will automatically close the ticket if the ticket is paid in full. Calculate Tax Amount in the ticket Specially for fast service restaurants, some states does not require tax for the pick-up order. Please consult with your accountant and then finish this setting based on your state regulations. Setting Up Receipt, Order and Report Printing: The options on this setting screen allow you to set up all the printing related preferences. This setting screen is divided into 3 groups. Top group is where to setup the receipt printing and cash drawer; The middle group is where to setup the order post printer(usually Kitchen printers); The bottom group is where to setup a separate report printer other than the receipt printer. Receipt Printing Use Receipt Printer Check this box will print receipt automatically each time a payment is processed. Font Control Page 5

7 Choose this option will let you preview the receipt before you actually print it. Header Setting Select the format and information you want to be printed on the receipt. Receipt Printer and Cash Drawer Driver Setting Proxis Restaurant prints receipts using either the "Command" method that requires the printers windows driver being installed or "OPOS" method that requires the printers OPOS driver being installed. There are advantage and disadvantage of either method, please consult your POS vendor or technician to select the best method for your restaurant. In general Command method prints faster and OPOS method has better control over formatting and cash drawer. Extra Copy For Customer Signiture Print an extra copy for customer signature on all credit card payments. Print Customer Address On Receipt Choose this option to print the address on Receipt and Kitchen Order. Post Order Printers Setting In R-Office and R-Corp application, you can set up different printers alias for different purposes. Such as Kitchen Printer, Main Printer, Reception Printer and so on. Here we let you to connect a local or network printer to this alias so Proxis Restaurant knows on which printer it can send the print job to. Report Printers Setting The balance reports can be printed from either the receipt printer or a dedicated report printer you select here. Setting Up Payment Processor To use the integrated credit and debit card processing methods, first of all, you need to set up the credit card processing methods in the Store Settings as shown below. Uniforce R-System has two payment processors that are directly integrated into the software: PPI and X-Charge. PPI payment gateway are completely integrated with Uniforce R-System, no additional software Page 6
8 needs to be installed; X-Charge, however, requires you to install the X-Charge server which is free of charge to all Uniforce R-System customers. Besides these two free of charge payment processors, the merchant can also choose PC Charge which requires you purchase a PC Charge Lic. and install the PC Charge server. You can call Uniforce support to get detail information on the PC Charge integration. Setting Up Working Day Page 7

9 Here you can set up the starting and ending time of your business day. In the above example, the business working day starts from 9:30AM and ends at 2:30AM the following day. For example, any sales between 9:30 AM Monday and 2:30 AM Tuesday will be counted as the Monday's total sales. Setting Up Menu Item Page 8
10 Add new menus from the bottom part of the window such as Lunch and Dinner, and specify the starting and ending time for each menu. Select menu name for each menu item from the item list at the top. To set the menu item display language, choose it from the drop down list of Item Name Language. Setting Up Other Devices: Page 9

11 Use Pole Display This option lets you choose the port number that your pole display is connected to. Use Cash Drawer Check the box to use the cash drawer that is connected. Check the box next to the payment type to open the drawer when payment is made in this payment type in the Proxis Restaurant system. Use POS Scale Connect a POS scale to Proxis Restaurant. You can use the scales OPOS driver or Config the serial port communication to get the weight from the scale. Page 10

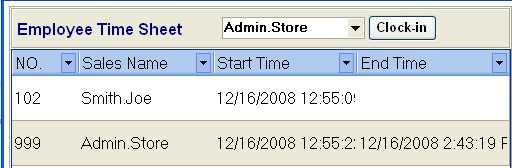
12 Login and Timesheet As soon as the Proxis Restaurant is launched, you will see the login screen on the left and the timesheet on the right. Log in There are two types of logins, Shift Login and Login. You have to enable the shift login in the settings to use that function. When choose Shift Login, the user will be asked to count the bills and coins in the cash drawer to log the starting cash amount and when exit the POS, the user will be asked to count the bills and coins to report the ending cash amount as well. Regular login will bypass this window. Page 11


13 To login, first type in the username, then type in the password. You can either use the keypad below the login box on double click the input box to bring up a pop-up onscreen keyboard: Employee Timesheet To clock in, select an employee who has not clock in yet from the drop down and then type in the password. After clock in, the employee's name will be listed below with the clock in time, shows as Start Time. To clock out, highlight the employee in the list, click clock out and then type in the password, after clock out, you will see the clock out time, End Time, in the list. Page 12
14 Page 13
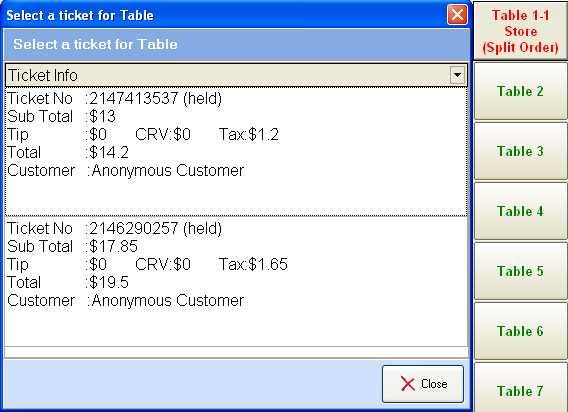
15 Tickets/Transactions Different Types Of Tickets In Proxis Restaurant, there are three types of tickets: Pick-up ticket, Delivery Ticket, and Eat-in Ticket. As their names indicate, each type is for a specific type of transactions in a full service restaurant. In R-Office and R-Corp, you can activate or deactivate certain types of the tickets. For detail instructions on how to use each ticket, please go to the How-to section in this user guide. Ticket/Order View Window Click in the top menu to open the Ticket View window. This window displays all types of tickets currently in the system. You will notice that the items on this view are in three different colors: yellow indicates an active ticket that has not been paid yet; blue indicates an active order that is partially paid; and green indicates an active order that is paid in full. Closed tickets will not be displayed in this window. For Eat-in tickets you will also see number of people sitting on that table. Also, click on the "Table Map" button will display the full table layouts: Page 14
16 For detail instructions on how to work on all 3 types of tickets, please go to the section How To Work With Tickets. Page 15

17 Query Tickets Click on the top main menu to open the query screen. Query By Ticket Number To query a ticket by ticket No. Simply type in any digits of any part of the ticket number and click on "Force Search". For example, type in "01" and click "Force Search" will return all the tickets that contain "01" in its ticket number. Query By Other Fields Also, you can type in or select the search criteria and click "Query" to display all the matching results. Here is the sample result for the the following search criteria: Date From: 11/18/2008 To: 11/19/2008 and Total >= $20.00: Page 16


18 Customers Customer Browser Click in the top main menu to open the customer browser screen. Here you can type in part of the customer name or id to lookup that customer, click on "New" and "Edit" button at the bottom of the screen to add a new customer and update a current customer. Customer Search and Quick lookup On each type of tickets, you can click button to open the customer search screen: Here you can type in part of the phone number or name, when you are typing, the system will automaticlly filter the customer list until you find the customer. Page 17
19 Page 18

20 Daily Reports Click in the top main menu to open the daily report screen. Only users with Admin or Manager rights have access to these reports. Daily Balance Of Each Category Page 19

21 Here you can put in the starting date (1/16/2008) and ending date (1/16/2008) to see the summary sales of each menu category. Daily Balance Of Each Item This is a similar report as above but list sales by each menu item instead of each category. Refund History Refund History reports the list of refunds and the notes attached to each refund. Payment Breakdown Payment Breakdown reports the payment received breaking down into all payment methods. Tip Report Page 20


22 This report list the tips for each sales/waitress in a select period. Tip Adjustment This is the report used to perform tip adjustment at the end of day. Page 21
, the starting cash amount is $16.35, ending cash amount is $20.")
23 Shift Report The shift report show the shift number, date, starting and ending time, station id, starting and ending cash amount, projected ending cash balance, all received payment amounts and the cash drawer status. The above example shows the cash drawer is not balanced (Drawer Balanced: N), the starting cash amount is $16.35, ending cash amount is $20.07, however the projected ending cash amount is $ There are two function buttons at the bottom of the report screen: Check-out, which is used by the manager to force check-out a shift; and Receipt, which prints the shift report from the receipt printer. Page 22

24 Order Summary Screen Click on in the top main menu to open the ticket/order summary screen: This window displays all types of tickets currently in the system. Click on each item will bring up that ticket. Click on ticket list. Click on Table Map will bring up a table layout window. will scroll up and down in that How To Read The Displayed Message Color of the Ticket Icon: You will notice that the items on this view are in three different colors: yellow indicates an active ticket that has not been paid yet; blue indicates an active order that is partially paid; and green indicates an active order that is paid in full. Closed tickets will not be displayed in this window. Information for Delivery and Pick-up ticket: Ticket Number Ticket Amount Customer Name Information for Eat-in ticket: Page 23
25 Table Number Ticket Number Number of Customers sitting on that table Ticket Amount Page 24

26 Pick Up Ticket Click in the top main manu to open the Pick Up Ticket screen. Function Layout of a Ticket Screen On the Right: Order List The Pick-Up Order List screen displays the list of all pick-up tickets with summary information for each ticket such as the server, order id and total amount. They are also color coded: green indicates the ticket is paid in full, yellow idicates no payment has been received yet and light blue indicates there is still remaining balance on that ticket. Page 25

27 In the middle Menu The menu occupies the complete right side of the ticket screen, on top you can select the category, at the bottom, you can click << or >> to move the menu items or "Click to select category" to load items in a category to the current screen: Page 26

28 Ticket List Ticket List is located at the far right of the screen, it is also color coded. Please click here to find out what each color tells you. On the Left: Item List Area To add an item to the item list, simply click the menu item at right. Another way to add an item is to scan the item barcode. When an item's being added to the list, you may see a pop-up window if the item: Does not have a price, the pop-up window asks you to input a unit price. Has to be weighted since it is sell by weight, the pop-up will ask you to get weight from the POS scale or input a weight: Page 27

29 Each record in the list shows the name, price, quantity, and the total amount of this item. It also indicates if this item comes from main menu or from a side order menu. At the bottom of the item list, you can find the modifier list on the left and item list function buttons on the right. The modifier list will display all the modifiers for the current selected item. The item functions buttons, from left to right are, move current item up, move current item down, refrest the item list, undo the unsaved changes, remove item from the list. Item Modifier Function Area There are six function buttons in this area: Note/Modifier; Order/Modifier; Promotion ; Discount; Side Order ; Item Detail. Modifiers, Promotions and Side Order can all be defined in the R-Office or Corp-Office application. Note can be added anytime as long as the ticket remains open. Please refer to the specific topics: Modifiers/Notes; Side Orders; Promotions for detail. While the Note/Modifiers is used to modify a single item, Order/Modifier is used to modify the current whole order with Pick Up dates and Special Instructions, also using Oder/Modifier a deposit can be applied to the current order while the remaining balance can be charged when the oder is picked up or delivered later. Please refer to the specific topic: Order/Modifier for detail instructions. While Promotion is used to apply predefined discounts based on the preset conditions set in the R-Corp, Discount is used to apply discounts on-the-fly. Another major difference between Promotion and Discount is that Promotion is not subject to the limits of the server on the ticket, but discount can not exceed the discount limit set in R-corp or R-Office for the server on the current ticket. Ticket Summary Area Right below the item list, you can find the summary area. For Pick-up tickets, you can find Customer and Sales selection button, for Delivery Ticket, you can select Delivery Driver, and for Eat-in Ticket, you can add number of customers on the table and select talbe number for the ticket. Other information displayed in these area are Sub Toal, Tax, Tip, Total, Paid Amount and Due Amount and so on. At the bottom: Page 28
30 Ticket Action Buttons Buttons on the left side are the payment buttons. On the right, you can find functions buttons that Print Receipt, Post Order, Save/Hold, Close or Create new ticket. The detail of these functions can be found at the links below: Payments Ticket Function Buttons Page 29

31 Delivery Ticket Click in the top main manu to open the Pick Up Ticket screen. Function Layout of a Ticket Screen On the Right: Menu The menu occupies the complete right side of the ticket screen, on top you can select the category, at the bottom, you can click << or >> to move the menu items or "Click to select category" to load items in a category to the current screen: Ticket List Ticket List is located at the far right of the screen, it is also color coded. Please click here to find out Page 30

32 what each color tells you. On the Left: Item List Area To add an item to the item list, simply click the menu item at right. Another way to add an item is to scan the item barcode. Each record in the list show the name, price, quantity, and the total amount of this item. It also indicates if this item comes from main menu or from a side order menu. At the bottom of the item list, you can find the modifier list on the left and item list function buttons on the right. The modifier list will display all the modifiers for the current selected item. The item functions buttons, from left to right are, move current item up, move current item down, refrest the item list, undo the unsaved changes, remove item from the list. Item Modifier Function Area There are six function buttons in this area: Note/Modifier; Order/Modifier; Promotion ; Discount; Side Page 31
33 Order ; Item Detail. Modifiers, Promotions and Side Order can all be defined in the R-Office or Corp-Office application. Note can be added anytime as long as the ticket remains open. Please refer to the specific topics: Modifiers/Notes; Side Orders; Promotions for detail. While the Note/Modifiers is used to modify a single item, Order/Modifier is used to modify the current whole order with Pick Up dates and Special Instructions, also using Oder/Modifier a deposit can be applied to the current order while the remaining balance can be charged when the oder is picked up or delivered later. Please refer to the specific topic: Order/Modifier for detail instructions. While Promotion is used to apply predefined discounts based on the preset conditions set in the R-Corp, Discount is used to apply discounts on-the-fly. Another major difference between Promotion and Discount is that Promotion is not subject to the limits of the server on the ticket, but discount can not exceed the discount limit set in R-corp or R-Office for the server on the current ticket. Ticket Summary Area Right below the item list, you can find the summary area. For Pick-up tickets, you can find Customer and Sales selection button, for Delivery Ticket, you can select Delivery Driver, and for Eat-in Ticket, you can add number of customers on the table and select talbe number for the ticket. Other information displayed in these area are Sub Toal, Tax, Tip, Total, Paid Amount and Due Amount and so on. At the bottom: Ticket Action Buttons Buttons on the left side are the payment buttons. On the right, you can find functions buttons that Print Receipt, Post Order, Save/Hold, Close or Create new ticket. The detail of these functions can be found at the links below: Payments Ticket Function Buttons Page 32

34 Eat-in Ticket Click in the top main manu to open the Eat-inTicket screen. Function Layout of a Ticket Screen On the Right: Menu The menu occupies the complete right side of the ticket screen, on top you can select the category, at the bottom, you can click << or >> to move the menu items or "Click to select category" to load items in a category to the current screen: Table List Page 33

35 Table List is located at the far right of the screen, it is also color coded, red indicates the table is occupied and once it is occupied, it also shows how many of the customers sitting on the table: The above example shows 4 customers sitting on table 1 and 1 sitting on table 2. On the Left: Item List Area To add an item to the item list, simply click the menu item at right. Another way to add an item is to scan the item barcode. Page 34
36 Each record in the list show the name, price, quantity, and the total amount of this item. It also indicates if this item comes from main menu or from a side order menu. At the bottom of the item list, you can find the modifier list on the left and item list function buttons on the right. The modifier list will display all the modifiers for the current selected item. The item functions buttons, from left to right are, move current item up, move current item down, refrest the item list, undo the unsaved changes, remove item from the list. Item Modifier Function Area There are six function buttons in this area: Note/Modifier; Order/Modifier; Promotion ; Discount; Side Order ; Item Detail. Modifiers, Promotions and Side Order can all be defined in the R-Office or Corp-Office application. Note can be added anytime as long as the ticket remains open. Please refer to the specific topics: Modifiers/Notes; Side Orders; Promotions for detail. While the Note/Modifiers is used to modify a single item, Order/Modifier is used to modify the current whole order with Pick Up dates and Special Instructions, also using Oder/Modifier a deposit can be applied to the current order while the remaining balance can be charged when the oder is picked up or delivered later. Please refer to the specific topic: Order/Modifier for detail instructions. While Promotion is used to apply predefined discounts based on the preset conditions set in the R-Corp, Discount is used to apply discounts on-the-fly. Another major difference between Promotion and Discount is that Promotion is not subject to the limits of the server on the ticket, but discount can not exceed the discount limit set in R-corp or R-Office for the server on the current ticket. Ticket Summary Area Right below the item list, you can find the summary area. For Pick-up tickets, you can find Customer and Sales selection button, for Delivery Ticket, you can select Delivery Driver, and for Eat-in Ticket, you can add number of customers on the table and select talbe number for the ticket. Other information displayed in these area are Sub Toal, Tax, Tip, Total, Paid Amount and Due Amount and so on. At the bottom: Ticket Action Buttons Buttons on the left side are the payment buttons. On the right, you can find functions buttons that Print Receipt, Post Order, Save/Hold, Close or Create new ticket. The detail of these functions can be found at the links below: Payments Ticket Function Buttons Page 35

37 Modifiers/Notes Set up Modifiers Modifiers can be defined in the R-Office and/or R-Corp applications. Notes are added at run time and do not need to be pre-difined. Add Modifiers and Notes to the ticket Modifiers and Notes can be added to each item. Modifiers are actually predefined notes. Adding Modifiers is initialized by the system automaticlly for those items with the predifined modifiers. In the following example, Menu Item Plain S (3) has two prefefined modifier groups: Cooking Level and Extras. When this item is added to the ticket, the Modifiers Window will pop up in modifier view automaticlly with the two modifier groups already loaded, the operator can then select modifiers from each group before closing this window and return to the ticket.: To change the modifiers or add new modifiers or notes, simply click the button on top of the ticket and the mofifiers/note window will open in the note view and you can add/change/delete modifiers or notes. You can open the Modifier view from the Note view by clicking the button on the top right corner: Page 36

38 When posting order, the modifiers and notes will be listed under the item: Page 37

39 Order/Modifier Add Order Modifier Order modifier is used to schedule pick up date and time and charge deposit for a pick up ticket. First, select a scheduled pick up date and time, then set the warning days and add special instructions. Warning days is for the system to remind the server in advance of the pick up dates. If deposit is required, enter the deposit amount before click the payment methods to process the payment. Look up tickets with order modifier First, go to ticket query, you will see the warning button at the bottom of the screen blinking if there are any orders 爉 odified with warning days meet the criteria. Click on it will list all those tickets on screen Page 38


40 . Click on a ticket to look at the detail of the ticket and then Reopen it to send the ticket to the Pick-up order screen where you can complete the order with the remaining payment when the customer picks up the order: Page 39

41 Promotion Same as modifiers and side orders, Promotions are also created in the R-Office and/or R-Corp applications. To use a promotion, select the items that you want to apply promotion to by check the check boxes: Then click the Promotion button on top of the ticket: Here, you can either scan the promotion code or select an active promotion from the drop down list. Then click "Ok" to apply the promotion. Page 40

42 Side Orders Side Orders are also created in the R-Office and/or R-Corp applications for each item. Add Side Orders to a menu item Click on the button on top of the ticket to open the Side Order menu: Adding the side orders by clicking on the side menu items, close the menu by clicking the "Ok" button. Side orders will be displayed under the main item when posting the order: Page 41

43 Menus Menu Category and Menu Item Menu category and item can be created in R-Office and/or R-Corp. In Proxis Restaurant, however, you can select menu categories to display and select the display positions for each menu item. Menu Setting in Proxis Restaurant In the Settings, Base Setting, you can select menu button size, font, font color, photo display option and so on: In Menu Item Setting, you can choose categories to be loaded for menus during a day: Page 42

44 Use Menu Load menu: On each type of ticket, the menu will be loaded into the right side of the screen. Click to load the menu into the screen. Re-position menu items: to reposition the menu items, click : Page 43

45 In the window above, simply choose the items from the left and put them into the positions on the right. For example, I am going to put everything left in the left window to Row #4 Column 3 and Row # 5 on the menu, after you save the setting, here is the new look of the menu: Page 44


46 Select Current Category: this can be done by click "Select Category" button and then choose a category for display: Page 45

47 Process Payment Payment function buttons are displayed at the bottom of the ticket: Credit Card and Debit Card To use the integrated credit and debit card processing methods, first of all, you need to set up the credit card processing methods in the Store Settings as shown below. To process a payment using credit card or debit card, click either Credit Card or Debit Card button, you will see a pop up window for you to swipe the card: Page 46


48 Cash For cash payment, click on the Cash button, you will see a pop up window as shown below for you to enter the received amount: Click on "SHOW CHANGE" will display the change amount: Page 47


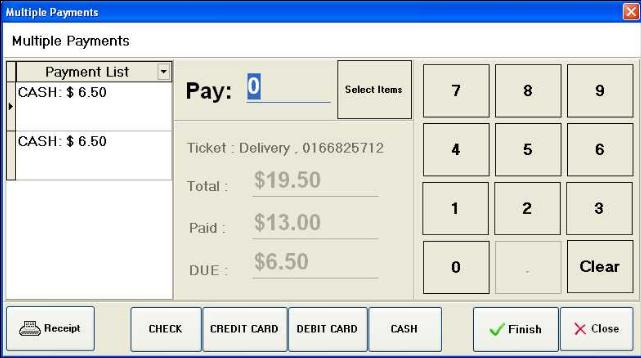
49 Click on "ENTER/OPEN DRAW" will open the cash draw and finish the transaction. If you make a mistake, click 'CLEAR" or click "Back To Ticket" button to correct the mistake. When the transaction is finished, the system will create a new ticket and the change amount for the last transaction will be displayed again in case you forget: A receipt will also be printed at this time. Multiple Payments Multiple Payments is used to either process a payment using multiple payment methods or divide the payment among customers. For each payment, you can just type in the amount in "Pay:" or select the items for this payment. Page 48
50 Page 49
51 Ticket Functions Function buttons are located at the bottom right of the tickets. Save/Hold Use this function to hold a ticker without any other actions such as post order or process payments. Also use this function to save a modification on an open ticket. Post Order Use this function to post the ticket order to the parties who need to know about the new ticket or the modification on an old ticket. For example, when order is posted, the kitechen printer will print the order on the kitchen printer. Post Order will automaticlly save the ticket. Receipt Use this function to reprint the receipt. The receipt will be printed automaticlly when the payment is processed. Use this function only when you want to reprint a receipt. New Click this function button will create a new ticket. A new ticket will be automaticlly created as soon as you finish the payment for an old ticket. Use this function only if you are on an old ticket and want to create a new one. Close Use this function button to close an old ticket. However, to close a ticket, the ticket has to be paid in all. Closed ticket will be removed from the ticket list on the right side of each type of ticket window and the order view window. You can also set the system to close the ticket automaticlly as soon as the ticket is paid in full by going to the setting--> base and choose the option: Automaticlly close ticket after full payment Split Order To split order, the server needs to select the items to be added to the sub orders: Page 50


52 Split Order works differently on Pick Up/Delivery Ticket or on Eat-in Ticket. After you split either a pick up or delivery ticket, the original ticket will be replaced with the new ones in the ticket/order list panel: The original order #4: After split it into 2 orders #4 and #5:. When split an eat-in ticket, since splited orders still share the same table, when you click on the table, a pop up window will ask the server to choose the sub order to work with, select to sub order will place it in the ticket window: Page 51
53 Page 52

54 Void, Cancel and Refund What's the difference and when to use Here is the general guidline to use these functions: To void a ticket if there is no payment processed on the ticket yet or the ticket is created by a mistake and the order has never been processed. To Refund if the ticket is partially paid or totally paid, the order has been at least partially processed, or a reverse payment transaction has been involved and reasons need to be provided for the refund. To Cancel a ticket if the ticket has not been saved yet. Void To void a ticket, click ticket query button on the top menu bar to open the query window. Query the ticket out, then select the ticket and click the void button at the bottom of the query window: A pop up will ask you for the manager's username and code: After the right password is entered, you will be asked again to confirm the Void action: Page 53


55 After you void a ticket, the state of the ticket will be changed to "Void" and the color of the record will be changed to grey. The second ticket in the below example is voided. Refund To start a refund transaction, query the ticket first, choose the ticket and then click the refund buttom at the bottom or the query ticket window, you will be asked to enter a manager employee number and password to authorize the refund transaction: After the authorization, finish the refund by filling in the fields in the form: Amount, Reason before you click a payment method to refund: Page 54

56 When refund to credit card or debit card, the refund total amount can not exceed the total amount of original ticket. Such restriction, however, does not apply to cash refund. Cancel To cancel, open a ticket and delete the items from the item list. Cancel may or may not require authorization. To require authorization before cancel, please set up in R-Office or R-Corp. Page 55
57 Re-Open a ticket As soon as a ticket is closed, you can not make modifications on that ticket unless you re-open it. There are restrictions on re-opening a ticket: first, the ticket has to be closed first. Second, the ticket has to be created on the current day. Third, the ticket can only be re-opened by manager users. And last, for eat-in tickets, a closed ticket can not be re-opened if there are existing tickets open on the same table. However, you can assign an available table for the re-open ticket. To re-open a ticket, first, query the ticket first, select the ticket before you click on button at the bottom of the query window. As soon as you re-open the ticket, the ticket will be accessible in the ticket window. For example, a "Pick-up" ticket will be listed in the Pick Up ticket window. Page 56

58 Close Ticket, View Detail and Clean up Tickets Close Ticket and View Ticket Detail To close a ticket, select an open ticket first from the ticket list, then click on the button at the bottom of the window to close the ticket. An open ticket has three payment states: Not Paid; Paid Partially and Paid All. To view ticket detail, simply click Review window: button to open the ticket in a Ticket Clean up Tickets Click on button will list all the open tickets for the admin or manager user to perform actions on, such as refund, void or close ticket. Page 57
Envision Credit Card Processing
 A Guide for Processing Transactions with Envision's Credit Card Module I Table of Contents Part I Credit Card Processing Setup 1 Part II Credit Card Processing 2 1 Entering Tips... 3 2 Processing the Credit
AFTER HOURS EMERGENCY POS SUPPORT ext 126 Press 4 when prompted
 AFTER HOURS EMERGENCY POS SUPPORT 519-442-3153 ext 126 Press 4 when prompted TEC REGISTER POS Operations Manual A complete guide to the operations of the point-of-sale (POS) unit. Calendar Club of Canada
ALPHA POS S ERVICES. Hospitality POS Quick Reference Guide
 ALPHA POS S ERVICES Hospitality POS Quick Reference Guide Table of Contents Opening Day Procedures...................... Page 3 Staff Operations........................... Page 3 Settling Transactions.........................
Once you click on the Enterprise Icon found on your desktop you will be asked for your password. This Default Code Is
 Once you click on the Enterprise Icon found on your desktop you will be asked for your password. This Default Code Is You should now see the main screen which is called the main screen or menu screen.
Bartender s Guide for MicroSale
 Bartender s Guide for MicroSale All components on the guest check or tab are recorded by the POS, such as modifiers, keyboard modifiers, discounts, item voids, check void or tax exempt. Depending on your
10 Steps to Getting Started with Restaurant Pro Express
 One Blue Hill Plaza, 16th Floor, PO Box 1546 Pearl River, NY 10965 1-800-PC-AMERICA, 1-800-722-6374 (Voice) 845-920-0800 (Fax) 845-920-0880 10 Steps to Getting Started with Restaurant Pro Express Your
User Guide Mobile Point-of-Sale (mpos), Version 2.0
, Version 2.0") User Guide Mobile Point-of-Sale (mpos), Version 2.0 Contents Overview... 1 Features... 1 Getting Started... 2 Login... 3 First Time Login/Password Reset... 3 Setting Security Questions... 4 Password Expiring...
User Guide Mobile Point-of-Sale (mpos), Version 2.0 Contents Overview... 1 Features... 1 Getting Started... 2 Login... 3 First Time Login/Password Reset... 3 Setting Security Questions... 4 Password Expiring...
CR6X CASH REGISTER QUICK START MANUAL
 CR6X CASH REGISTER QUICK START MANUAL 1. KEY FUNCTIONS KEY Description Shift the key functions. Use to advance the receipt paper continuously until the key is released. [SHIFT] + [#2] to feed journal paper
Gift Card Instructions Daxko Spectrum
 Gift Cards Gift card are good to use for a variety of reason: 1. You can track the declining balance on them. 2. You can recharge them; treat it as a cash card. The cards can be attached to a recipient.
(612) (612) (After Hours Support) 6436 Penn Avenue South Richfield, MN Focus. Quick Reference Guide
 (612) (After Hours Support) 6436 Penn Avenue South Richfield, MN Focus. Quick Reference Guide") (612) 861-5277 (612) 240-9722 (After Hours Support) 6436 Penn Avenue South Richfield, MN 55423 Focus Quick Reference Guide FOCUS GUIDE For the times you feel like this: www.focuspos.com/manual (612) 861-5277
(612) 861-5277 (612) 240-9722 (After Hours Support) 6436 Penn Avenue South Richfield, MN 55423 Focus Quick Reference Guide FOCUS GUIDE For the times you feel like this: www.focuspos.com/manual (612) 861-5277
Configuring and Personalizing Your Receipts
 One Blue Hill Plaza, 16 th Floor, PO Box 1546 Pearl River, NY 10965 1-800-PC-AMERICA, 1-800-722-6374 (Voice) 845-920-0800 (Fax) 845-920-0880 Configuring and Personalizing Your Receipts CRE/RPE is very
STX & ios Devices. Setting up and using STX iphone, ipad, ipod touch
 STX & ios Devices Setting up and using STX iphone, ipad, ipod touch STX for ios provides more flexibility and efficiency for you and your staff. With all the most often used features of STX desktop built-in,
Server Manual. Document version 1.0. Copyright Posera Page 1
 Server Manual Document version 1.0 Copyright 2015 2017 Posera Page 1 Contents Clock In... 4 Clock Out... 7 Change Job Skill... 8 Printing a Time Card... 10 Entering Your Information... 11 Navigating the
Actinic Epos Release Notes
 Actinic Epos 3.10 Release Notes Actinic Software Limited Date: 16th October 2009 Version: 1.0.3 Actinic EPOS version 3 Release Notes Revision History Revision Date Author Comments 0.1 20/05/2008 Peter
Configuring CoCard for EBT Processing
 One Blue Hill Plaza, 16th Floor, PO Box 1546 Pearl River, NY 10965 1-800-PC-AMERICA, 1-800-722-6374 (Voice) 845-920-0800 (Fax) 845-920-0880 Configuring CoCard for EBT Processing The following documentation
Sterling Virtual Terminal. User Guide
 Sterling Virtual Terminal User Guide Version 3.1.00 August 2015 Chapter 1: Getting started Table of Contents USER GUIDE... 1 CHAPTER 1: GETTING STARTED... 5 SYSTEM REQUIREMENTS... 5 STERLING VIRTUAL TERMINAL
REVONU Restaurant POS SIMPLE MANUAL
 REVONU Restaurant POS SIMPLE MANUAL VERSION 1.0 ALL RIGHTS RESERVED Table of Contents CHAPTER 1. GETTING STARTED... 4 Database Sync & Update... 4 Program Run & Login... 5 Main Program... 6 Beginning Balance...
Premium POS Pizza Order Entry Module. Introduction and Tutorial
 Premium POS Pizza Order Entry Module Introduction and Tutorial Overview The premium POS Pizza module is a replacement for the standard order-entry module. The standard module will still continue to be
XERA POS User Manual
 2 XERA POS User Manual Copyright 1997 2017 Aldelo, LP. All Rights Reserved. 3 XERA POS User Manual PUBLISHED BY Aldelo, LP 6800 Koll Center Parkway, Suite 310 Pleasanton, CA 94566 Copyright 1997-2017 by
Setup for X-Charge XpressLink in Regit POS
 Setup for X-Charge XpressLink in Regit POS After installing X-Charge XpressLink: 1 - Open Regit Office 2 - Select Setup off the top line menu 3 - Select Charge Card Setup off the drop down menu 4 - Select
Q: The barcode on the item is not scanning or the product is not found, what should I do to complete the transaction for my customer?
 FAQ s Q: The barcode on the item is not scanning or the product is not found, what should I do to complete the transaction for my customer? First, scan the Scrubs and Beyond sticker ticket. If the sticker
POS Register Instructions
 POS Register Instructions Updated April 29, 2016 Prepared by Tina Leinbaugh I. Daily Start-Up... 1 A. Receipt Printer ON... 1 B. The Screen should be ON... 1 C. Turn the Computer ON... 1 II. Start of Shift...
Utility Cashier System
 Utility Cashier System CASHIER MANUAL July 29, 2012 Version 1.2 1 System Account Overview Logging into Utili.Ca$h Logging Out of Utili.Ca$h Changing your Utili.Ca$h Password Cashier Daily Processes Cash
User Guide. Full Service and Bar. Covers all aspects of your full service business
 User Guide Full Service and Bar Covers all aspects of your full service business Point of Sale User Guide Table of Contents Chapter 1: Staff Usage... 6 Staff Clock in/out... 6 Opening an Audit For Server...
SellerDeck Epos Release Notes
 SellerDeck Epos 2013 Release Notes SellerDeck Limited Date: 18th December 2012 Version: 1.0.6 SellerDeck EPOS version 3 Release Notes Revision History Revision Date Author Comments 0.1 20/05/2008 Peter
XERA POS User Manual
 II XERA POS User Manual III XERA POS User Manual PUBLISHED BY Aldelo, LP 6800 Koll Center Parkway, Suite 310 Pleasanton, CA 94566 Copyright 1997-2017 by Aldelo, LP All rights reserved. No part of the contents
POS E-HORS E-HORS POINT OF SALES EHORS VERSION 3 1
 E-HORS POINT OF SALES EHORS VERSION 3 1 POS INSTRUCTIONS 1. Type this address onto your browser local.palmhotel.my:9280/pos 2. Log on using your Username & Password then click the log in button. If you
Invoice 13 Pro Outline
 Invoice 13 Pro Outline Invoice 13 Pro is a feature rich productivity tool for the small business or company from 1 to 30 users. It is notjust an Invoicing software. It is in fact an Invoicing, Accounts
MaxGalaxy Hardware Manual
 MaxGalaxy Hardware Manual Getting Started... 2 MaxGalaxy Requirements... 2 Installs Software/ Hardware... 3 Peripheral Service/ Certificate Application... 3 Hardware... 3 Installation Guides... 4 Installing
Table Service Daily Steps for Cashiers
 Table Service Daily Steps for Cashiers Process Sales Tasks This section provides information on processing sales from the Process Sales screen. Tasks Select menu items Steps Option 1: (single course meal)
2016 Autosoft, Inc. All rights reserved.
 Copyright 2016 Autosoft, Inc. All rights reserved. The information in this document is subject to change without notice. No part of this document may be reproduced, stored in a retrieval system, or transmitted
Installation & Setup Guide. Version 1.0
 Installation & Setup Guide Version 1.0 EL8040-02 This manual contains reference information about software products from Epicor. The software described in this manual and the manual itself are furnished
Food & Beverage Enhancing the Dining Experience: Floor Management 201
 Food & Beverage Enhancing the Dining Experience: Floor Management 201 Webinar Topics Introduction... 3 Managers Menu... 4 Use This ID and Select Employee Buttons... 5 Quick Transfer... 7 Reporting from
SmartReceipt Troubleshooting Guide
 SmartReceipt Troubleshooting Guide Version 1.5 September 2014 Contents Section 1: Sub Shop 2000... 1.1 I Can t Identify My Receipt Printer Name... 1.2 Cash Drawer Kick is Delayed... 1.3 Cash Drawer is
Some of the new features in the upcoming
 02/08/06 System Some of the new features in the upcoming 7.5.11 Expanded report numbers Each CounterPoint report and journal is identified by a 4-digit report number, (from 0001 to 9999) to help you track
Wells Fargo Merchant Services. Wells Fargo Mobile Merchant User Guide for Apple ipad Version 3.2
 Wells Fargo Merchant Services Wells Fargo Mobile Merchant User Guide for Apple ipad Version 3.2 Table of Contents Overview...3 Key Features...3 Download Wells Fargo...4 Mobile Merchant...4 Demo Mode...4
One Blue Hill Plaza, 16 th Floor, PO Box 1546 Pearl River, NY PC-AMERICA, (Voice) (Fax)
 (Fax)") Setup Screen One Blue Hill Plaza, 16 th Floor, PO Box 1546 Pearl River, NY 10965 1-800-PC-AMERICA, 1-800-722-6374 (Voice) 845-920-0800 (Fax) 845-920-0880 The Setup Screen is one of the most important parts
Setup Screen One Blue Hill Plaza, 16 th Floor, PO Box 1546 Pearl River, NY 10965 1-800-PC-AMERICA, 1-800-722-6374 (Voice) 845-920-0800 (Fax) 845-920-0880 The Setup Screen is one of the most important parts
INI POS (RESTAURANT) User Manual
 User Manual") IN I POS S OLUTION INI POS (RESTAURANT) User Manual 2017 Ver. INI Solutions #340-17 Fawcett Rd., Coquitlam, BC V3K 6V2 Phone 604-628-8772 Fax 604-461-6707 1 TABLE OF CONTENTS 1. Getting Started 2. How
IN I POS S OLUTION INI POS (RESTAURANT) User Manual 2017 Ver. INI Solutions #340-17 Fawcett Rd., Coquitlam, BC V3K 6V2 Phone 604-628-8772 Fax 604-461-6707 1 TABLE OF CONTENTS 1. Getting Started 2. How
Payment Terminal. Installation Guide. For QuickBooks Pro, Premier, Enterprise and Account Versions
 www.ptsetup.com Installation Guide For QuickBooks Pro, Premier, Enterprise and Account Versions Payment Terminal Contents Contents... 2 Conventions... 2 Equipment... 3 Pre Installation and Requirements...
CR35(B) CASH REGISTER QUICK START MANUAL
 CASH REGISTER QUICK START MANUAL") CR35(B) CASH REGISTER QUICK START MANUAL 1 KEYBOARD 1.1 Keyboard Layout 1.2 Basic Key Functions -Use to feed the paper through the receipt printer. -Clerk login or change operation mode. -Use with a numerical
CR35(B) CASH REGISTER QUICK START MANUAL 1 KEYBOARD 1.1 Keyboard Layout 1.2 Basic Key Functions -Use to feed the paper through the receipt printer. -Clerk login or change operation mode. -Use with a numerical
HP RP5800 Installation Guide
 HP RP5800 Installation Guide One Blue Hill Plaza, 16th Floor, PO Box 1546 Pearl River, NY 10965 1-800-PC-AMERICA, 1-800-722-6374 (Voice) 845-920-0800 (Fax) 845-920-0880 This document provides step-by-step
Maintenance OVERVIEW. 2 STARTUP 3 GETTING STARTED / SYSTEM BACKUPS. 4 SYSTEM USERS.. 5
 Maintenance Getting Started Security General Maintenance OVERVIEW. 2 STARTUP 3 GETTING STARTED / SYSTEM BACKUPS. 4 SYSTEM USERS.. 5 PREFERENCES 6 STATION. 9 ORGANIZATION ( CHARITY )... 9 SESSION. 10 SESSION
Inventory Module & Wireless Device. User Quick Start Guide
 Inventory Module & Wireless Device User Quick Start Guide Published on: 3/14/2007 Copyright and Disclaimer Copyright 2007 Pace Systems Group, Inc., 1902 2 nd Avenue North, Jacksonville Beach, Florida,
Tables Screen. Table State Buttons: Changes the state of the selected table to one of the following: Table Open. Table Reserved Needs Bussing
 Task 1: Log on to POS 1. Select the point of service icon. 2. Choose your Name. 3. Select Keyboard on the Login screen. 4. Enter your Password. 5. Select Enter on the Keyboard screen. Task 2: Open a Serving
Table of Contents: ipayment for Android
 for Android Tablets Table of Contents: Two-Factor Authentication... 3 Card reader... 4 Bluetooth Card reader... 5 Receipt Printer... 6 Logging in to ipayment MobilePay... 7 Demo Mode... 7 Reset Password...
User s Guide. (Virtual Terminal Edition)
") User s Guide (Virtual Terminal Edition) Table of Contents Home Page... 4 Receivables Summary... 4 Past 30 Day Payment Summary... 4 Last 10 Customer Transactions... 4 View Payment Information... 4 Customers
User s Guide (Virtual Terminal Edition) Table of Contents Home Page... 4 Receivables Summary... 4 Past 30 Day Payment Summary... 4 Last 10 Customer Transactions... 4 View Payment Information... 4 Customers
Guide to Silver Back Office
 For Version 4.4 CONTENTS INTRODUCTION...7 LOGGING INTO SILVER BACK OFFICE...8 MY STORE...9 ACTIVITY SUMMARY...9 SALES DASHBOARD... 10 CUSTOMER DASHBOARD... 11 COMPANY INFORMATION... 12 ENTERING YOUR COMPANY
GUIDE TO SILVER BACK OFFICE FOR NCR SILVER PRO RESTAURANT
 GUIDE TO SILVER BACK OFFICE FOR NCR SILVER PRO RESTAURANT CONTENTS INTRODUCTION... 7 LOGGING INTO SILVER BACK OFFICE... 8 MY STORE... 9 ACTIVITY SUMMARY... 9 SALES DASHBOARD... 10 CUSTOMER DASHBOARD...
Sienna Database System is the ONLY Small Games of Chance reporting software that has 0 EVER been approved by the PA Dept.
 Sienna Database System is the ONLY Small Games of Chance reporting software that has 0 EVER been approved by the PA Dept. of Rev EVERY YEAR TABLE OF CONTENTS *SELECT ITEM TO JUMP TO DESIRED PAGE* NEW CATEGORY..
Express365 Accounting User Manual
 Express365 Accounting User Manual August 05 Latest Update: 9 th October 08 P a g e 46 For information about customer support, please visit our homepage at http://www.express365.com.my on the World Wide
Welcome to our online Web Help for the Activity Fund Accounting System software.
 Welcome to our online Web Help for the Activity Fund Accounting System software. Version 1.2 LOCAL GOVERNMENT CORPORATION ALL RIGHTS RESERVED 2010-2018 REV. 02/06/2018 Portions copyright 1988 - Acucorp,
Baby Signs ICI Websites
 Baby Signs ICI Websites Instructions 2011 A N G L E S O L U T I O N S B A B Y S I G N S P R O G R A M I C I S I T E S Contents Baby Signs ICI Website... 4 Registration... 4 Creating Your Website... 6 Choosing
Restaurant Pro Express Mobile v1.0
 One Blue Hill Plaza, 16th Floor, PO Box 1546 Pearl River, NY 10965 1-800-PC-AMERICA, 1-800-722-6374 (Voice) 845-920-0800 (Fax) 845-920-0880 Restaurant Pro Express Mobile v1.0 Quick Start Guide Last Updated:
ecashiering Table Of Contents
 ecashiering Table Of Contents Overview... 2 Logging in to ecashiering... 2 ecashiering Tab... 3 Payment Management... 3 Digital Delivery Account Managment... 7 Patient Pay Online Tab... 8 Account Summary...
INVENTORY TRACKING (IT) MASTER MANUAL
 MASTER MANUAL") Page 1 of 43 P O S i T - Integrated POS System - With Inventory Tracking - For Networked Multi Retail Stores - IT Master Version. 2.0 INVENTORY TRACKING (IT) MASTER MANUAL Contents Page Page 2 of 43 1.
Page 1 of 43 P O S i T - Integrated POS System - With Inventory Tracking - For Networked Multi Retail Stores - IT Master Version. 2.0 INVENTORY TRACKING (IT) MASTER MANUAL Contents Page Page 2 of 43 1.
Table of Contents SYSTEM SETUP...4
 Table of Contents SYSTEM SETUP...4 SET AUTOFIRE...4 BAR POURING...5 CASH DRAWER SETUP...6 COIN DISPENSER SETUP...6 DINE IN SETUP...7 DRIVE THRU SETUP...8 EXCEPTIONS...9 FAST LINE...9 INVOICES...10 MAG
Administrator Manual. Version 10
 Administrator Manual Version 10 Table of Contents Administrator Option Screen 3 Sales Screen 6 Search Sales for finding past sales 7 Pay Account for Paying outstanding accounts 10 Paid in or Out Petty
Configuring Chase Paymentech / NetConnect EBT Processing
 One Blue Hill Plaza, 16th Floor, PO Box 1546 Pearl River, NY 10965 1-800-PC-AMERICA, 1-800-722-6374 (Voice) 845-920-0800 (Fax) 845-920-0880 Configuring Chase Paymentech / NetConnect EBT Processing The
Furniture Wizard Security Introduction
 Furniture Wizard Security Introduction In this section, we will introduce you to the new security features of Furniture Wizard. Furniture Wizard s security will allow you to set permissions for different
Accounts Receivable. Billing Functions. Establishing House Accounts
 18 The billing functionality in FTD Mercury allows you to set up an automated billing system, complete with aging cycles, finance charges, and statements for your customers. You can bill your customers
Customer Instructions BookScanner2 App
 Customer Instructions BookScanner2 App 2 022017 BookScanner2 App TABLET Set Up You have been provided with a point-of-sale system comprising of a tablet, Bluetooth scanner, Bluetooth printer, credit card
STEVE KARAS & ASSOCIATES. Fast POS Software USERS MANUEL
 STEVE KARAS & ASSOCIATES Fast POS Software USERS MANUEL F A S T P O S S O F T W A R E USERS MANUEL Steve Karas & Associates 3341 E. Turquoise Phoenix AZ 85028 Phone 602.494.9090 Fax 602.494.9134 2 Table
SmartReceipt Installation Guide v1.8
 SmartReceipt Installation Guide v1.8 For use with Sub Shop 2000 February 2015 You have Sub Shop 2000 POS Installation Requirements You have one of the following Epson Receipt Printer Models - Epson TM-T88III
Sage Mobile Payments User's Guide
 Sage Mobile Payments User's Guide Last Modified: 8/4/2014 Contents 1 Activating Sage Mobile Payments 2 Using the System 2 Login 2 Multi user Login 2 First-time Login 3 Default Settings 3 Retrieving Your
VISIT:
 Welcome TO VISIT: http://www.touchbistro.com/onebox Please use this page to record important details about TouchBistro and your hardware. Notes: Wi-Fi Name: AirPort Name: AirPort Password: Thermal Printer
Electronic Receipts. Printing, Saving and Retrieving Electronic Receipts INTRODUCTION CONTENTS
 Electronic Receipts Printing, Saving and Retrieving Electronic Receipts INTRODUCTION CU*Answers is pleased to introduce its first-ever integrated electronic receipt system. This booklet describes the CU*BASE
ShipRite s Account Receivable Instructions
 ShipRite s Account Receivable Instructions Setting up a new account Click on the POS button Enter the existing customer s PHONE number here. If they are in the database, their information will appear at
Nexsure Training Manual - Accounting. Chapter 7
 Nexsure Training Manual - Accounting Vendor Entries In This Chapter Vendor Entries at the Organization and Territory Level Vendor Entity Definition Disbursements to Vendors Line Item Distribution Receiving
Sales Station Mobile User Guide
 Sales Station Mobile User Guide Doubleknot, Inc. 20665 Fourth Street, Suite 103 Saratoga, California 95070 Telephone: (408) 971-9120 Email: doubleknot@doubleknot.com SSM-OPS-UG-1.0 2016 Doubleknot, Inc.
ROAMpay TM. X4 User's Guide
 ROAMpay TM X4 User's Guide Last Modified: 06/14/2013 Contents 1 Activating ROAMpay X4 2 Using the System 2 Login 2 First-time Login 2 Default Settings 3 Retrieving Your Password 3 Online Sales 4 Saved
for iphone for iphone
 for iphone for iphone Table of Contents: Two-Factor Authentication...3 Overview...4 Card reader...4 Bluetooth Card reader...5 Receipt Printer...6 Logging in to ipayment MobilePay...7 Demo Mode...7 Reset
CONVERGE MOBILE User Guide - ios
 How to take payments with the Converge Mobile app? CONVERGE MOBILE User Guide - ios Version 1.6 CONTACT 4576 Yonge Street, Suite 200, Toronto, ON M2N 6N4, Canada DOWNLOAD APP Store Google Play 2017 Elavon
DEALER RESOURCE CENTER TUTORIAL
 DEALER RESOURCE CENTER TUTORIAL Please review the General System Requirements and Navigation rules below before proceeding. System Requirements Internet Access is required; the faster, the better. It is
ELECTRONIC CASH REGISTER SE-S6000 SE-C6000 DEALER'S MANUAL. Version 1.0 March Canada
 Casio SE-S6000 SE-C6000 dealer CA Ver Manual ELECTRONIC CASH REGISTER SE-S6000 SE-C6000 DEALER'S MANUAL Version 1.0 March 2010 Di CI Canada Introduction & Contents This manual is intended to be used as
Earo Scan Pos Version 7 User Manual Point of Sale
 Earo Scan Pos Version 7 User Manual Point of Sale Profectus Capital (Pty) Ltd 12 Chasewater Str, New Redruth, Alberton, 1450 Tel : 011 869 2954 accounts@profectuscapital.co.za WORKING WITH THE TOUCH POS
Machine Options User Manual Version 6.4
 Machine Options User Manual Version 6.4 Machine Options TABLE OF CONTENTS Machine Options User Manual V 6.4 Introduction... 4 Purpose... 4 Machine Options Overview... 4 Basic Setup and Notes on Machine
User guide. July 2018
 User guide 1 Table of Contents System settings Employees Tee sheet and green fees Customer tab Orders tab and shopping cart Product tab Marketing tab Reporting tab 3 5 9 18 21 31 39 41 2 System settings
Paydiant Processing Configuration and Usage in CRE and RPE
 One Blue Hill Plaza, 16 th Floor, PO Box 1546 Pearl River, NY 10965 1-800-PC-AMERICA, 1-800-722-6374 (Voice) 845-920-0800 (Fax) 845-920-0880 Paydiant Processing Configuration and Usage in CRE and RPE Cash
Transactions: Transaction List
 Transactions Transactions: Transaction List Purpose The Transaction List allows you to view transactions for selected dates; create new transactions; open, edit or delete existing transactions; open client
Created March Double click the Office Manager icon on the desktop to launch the back office application.
 Created March 2009 This application note shows how to set up Star Micronics printers for guest check and kitchen ticket printing from Inborne Technology s Point of Success Premium and Standard Software.
Portico VT. User Guide FOR HEARTLAND MERCHANT USERS APRIL 2015 V2.8
 Portico VT User Guide FOR HEARTLAND MERCHANT USERS APRIL 2015 V2.8 Notice THE INFORMATION CONTAINED HEREIN IS PROVIDED TO RECIPIENT "AS IS" WITHOUT WARRANTY OF ANY KIND, EXPRESS OR IMPLIED, INCLUDING BUT
Chase Mobile Checkout PLUS Mobile Application User Guide. Grow your business whenever and wherever you want!
 SM Chase Mobile Checkout PLUS Mobile Application User Guide Grow your business whenever and wherever you want! 1 Contents Welcome to Chase Mobile Checkout PLUS 3 Updating Your Account Profile 25 Getting
Table of Contents General Information Table Maintenance Top Ten Reports
 Table of Contents General Information 1 Windows Print Manager 1 Print Button for Documents 1 Print Spooling 1 Print Spool Buttons 2 Report Destination 2 Single document 3 All Documents 3 Delete 3 Clear
TRACS Enterprise Manual
 TRACS Enterprise Manual Table of Contents Welcome to NAPA TRACS... 1 What's New in NAPA TRACS... 1 Registering your NAPA TRACS Application... 2 Backing Up NAPA TRACS... 2 Online Updates... 2 Chapter 1
CASH MANAGEMENT HOW-TO
 Vision Municipal Solutions CASH MANAGEMENT How-To Guide Contents Set-Up... 4 Changing Your Default Period... 4 How to Change Your Default Period... 4 Payment Centers... 4 Adding a Payment Center... 4 Drawers...
PayFirst Salon User Guide:
 PayFirst Salon User Guide: This user guide will outline basic system functionality such as: Logging into System Back Office Setup Setting up Employees Menu Setup Retail Product Setup Creating Package Setup
m360 creating invoices for tepsa products
 m360 creating invoices for tepsa products 1. In m360, Quick Search to search the member. 2. After m360 has located the correct member, click on the member s ACCOUNTING tab. 3. Click ADD INVOICE. 4. If
USER S GUIDE Last Modified: 04/08/2013 1
 USER S GUIDE Last Modified: 04/08/2013 1 Contents 1 Welcome 1 Activating ROAMpay X4 2 Using the System 2 Login 2 First-time Login 2 Default Settings 3 Retrieving Your Password 3 Online Sales 4 Saved Item
ProcessNow Terminal User Guide
 ProcessNow Terminal User Guide Table of Contents Product Overview ProcessNow Terminal... 3 Initial Setup Welcome Emails... 3 ProcessNow Initial Setup Instructions... 4 Initial Setup - USB - 8006L1 Card
Getting Started With the Cisco PAM Desktop Software
 CHAPTER 3 Getting Started With the Cisco PAM Desktop Software This chapter describes how to install the Cisco PAM desktop client software, log on to Cisco PAM, and begin configuring access control features
HP RP7 Installation Guide
 HP RP7 Installation Guide One Blue Hill Plaza, 16th Floor, PO Box 1546 Pearl River, NY 10965 1-800-PC-AMERICA, 1-800-722-6374 (Voice) 845-920-0800 (Fax) 845-920-0880 1 P a g e This document provides step-by-step
Intuit-HP Retail Solution
 Intuit-HP Retail Solution Intuit and HP have teamed up to bring you a Solution that is designed specifically for single or multi-store retailers. More sophisticated than a cash register and more durable
User Guide. Accept EFTPOS, Visa and Mastercard payments on the go with Kiwibank QuickPay.
 User Guide Accept EFTPOS, Visa and Mastercard payments on the go with Kiwibank QuickPay. Kiwibank QuickPay terms and conditions apply. Kiwibank QuickPay is only available for business banking purposes.
HeadMaster: Lunch Management. Thursday 3 05/28/15 Rm: Victory Park 1 1:40pm 2:50pm
 HeadMaster: Lunch Management Thursday 3 05/28/15 Rm: Victory Park 1 1:40pm 2:50pm 1 Copyright Copyright 2015 ACS Technologies Group, Inc. All rights reserved. Reproduction of any part of this publication
Retail Application Quick Reference Guide
 Retail Application Quick Reference Guide VeriFone VX 520 Series Color Key Required Merchant Input on Point of Sale Required Cardholder Input on Point of Sale or External PIN Pad Optional Merchant Prompts
Merchant Dashboard User Guide
 Merchant Dashboard User Guide February 10, 2015 Contents Dashboard... 3 Transactions... 5 Items... 7 Users... 9 Reports... 10 Account Settings... 11 2 Dashboard On the Dashboard page, you can get summaries
PRW Product Registration and Warranty. User Guide
 PRW Product Registration and Warranty User Guide June 2016 1 Table of Contents PRW User Guide TABLE OF CONTENTS A. Getting Started in PRW 4-9 1. Screen Layout 4 2. System Navigation 8 3. System Requirements
User Guide. mpos Readers RP350x & RP457c Mobile Payment Acceptance User Guide for Android
 mpos Readers RP350x & RP457c Mobile Payment Acceptance User Guide for Android Disclosure Statements Confidential Notice The information contained herein is the property of Total System Services, Inc. (TSYS
CONVERGE MOBILE User Guide - Android
 How to take payments with the Converge Mobile app? CONVERGE MOBILE User Guide - Android Version 2.0 CONTACT Two Concourse Parkway, Suite 800 Atlanta, GA 30328 DOWNLOAD Google Play APP Store 2017 Elavon
uite 401, CFM building, 23 Lang Ha, Hanoi, Vietnam POS ios V1.7 USER GUID E 2015 SmartOSC and X-POS for ios
 uite 401, CFM building, 23 Lang Ha, Hanoi, Vietnam - 84.4 3514 9883 - info@smartosc.com -POS ios V1.7 USER GUID E 2015 SmartOSC and X-POS for ios Table of Contents About X-POS for ios... 5 Main features...