Installation and Getting Started Guide
|
|
|
- Marsha Bailey
- 5 years ago
- Views:
Transcription

1 Installation and Getting Started Guide Metrics Win4156 Version Copyright , Metrics Technology, Inc. All rights reserved.
2 Table of Contents Installing the Win4156 Software... 4 Obtain a Codeword... 4 Important Note for Customers upgrading... 4 Procedure to Upgrade Win4156 from 4.0 to Procedure to Install Win4156 (new installation) Metrics Codewords Software Codeword Information Entry of the Codeword Serial Number Introductory Information Goal of This Manual Chapter 1- Win4156 Getting Started Guide Introduction Topics Covered What is Metrics Win4156 Software? Overview of Metrics Win4156 Software Determining Software Version Updating the Metrics Win4156 Software Support Chapter 2- Selecting Instruments Introduction Topics Covered: Selecting an Instrument Driver Configuring the Instrument Polling an Instrument Chapter 3- Creating Measurements Introduction Topics Covered Create a Sweep Measurement Create a Spot Measurement Creating a Time-Based Measurement Chapter 4- Executing Measurements Introduction Topics Covered Measurement Remote Control The Data Window The Data Window Edit the DataView Sync the DataView with Microsoft Excel Chapter 5- Plotting Data Introduction Topics Covered Creating a Plot Installation and Getting Started 2
3 Editing a Plot Chapter 6- Extracting Data Introduction Topics Covered The Transform Editor Defining a Transform Sharing Data Between Transforms Chapter 7- Saving Data Introduction Topics Covered Where is the Data? Saving a Project Installation and Getting Started 3
4 Installation and Configuration Installing the Win4156 Software Note: Do not install the USB Security Key until after the Metrics Win4156 Software is installed and the PC is restarted. The security key requires special drivers that are installed with Win4156. Windows Hardware Manager should detect the USB Security Key as Safenet USB SuperPro/UltraPro and install the driver automatically. The installation program for the Metrics Win4156 software installs all components necessary to run Metrics Win4156. You can download the auto-extracting archive MTW EXE from the Metrics Technology website under Downloads link. Be sure to save the install file to your local hard disk before running the installation. Running the installation from the website will cause an installation error. You will need a valid customer login to enter the Software Downloads area. NOTE: You should also download the latest available hot fix release which can be found in the same software list and designated MTW HFXX.EXE where the XX is the version of the hot fix. Hot fixes contain resolutions to any reported issues and some enhancements that have been added since the initial release of Metrics Win It is only necessary to apply the latest hot fix to your system since all updates are contained in the latest build. Save the hot fix file to your local computer and you can install it after the base Metrics Win4156 installation is complete. Obtain a Codeword This codeword is obtained by registering your software with Metrics Technology. Please visit our website at to register your software and obtain the codeword. Important Note for Customers upgrading The Metrics Win4156 setup program requires that you backup and uninstall the previous version. To do this, please perform the following steps: DO NOT LEAVE YOUR BACKUP ARCHIVE IN THE METRICS DIRECTORY! COPY THE BACKUP.ZIP FILE TO A DIFFERENT LOCATION LIKE A USB DRIVE. Installation and Getting Started 4
5 1. Go to the File Menu and select Backup 2. Enter the name of the backup ZIP archive in the W4156 directory (i.e. C:\METRICS\W4156\backup.zip) 3. Allow the backup utility to complete then copy the.zip file to another drive location. After upgrading, some of the functions of the software will require that older projects or features be modified. A brief list of the modifications are: Metrics Win4156 files are now be stored in the windows file system. Existing tests should be opened and then saved in the Metrics\ics\projects directory. Procedure to Upgrade Win4156 from 4.0 to Insert the Metrics Win4156 install CD into the CD-ROM drive of your computer. 2. The CD-ROM should automatically start the Setup.exe installation program. If the installation does not start automatically then select right click on the CD drive icon in Windows Explorer and then select "explore". Select the Setup.exe application icon to start the installation program manually. 3. Click Next button on the "Welcome" panel. Installation and Getting Started 5
6 4. Read the "Software License Agreement" and click the I agree to the terms in the License Agreement button to agree to the terms. Then click Next. Installation and Getting Started 6
7 5. Choose "destination location" for installation and click the Next button. NOTE: It is recommended to select the default C:\Metrics\ as the location to maintain compatibility with previous versions of the software backups. 6. Click the Install button to begin the Metrics Win4156 installation. Installation and Getting Started 7


8 7. The Safenet Sentinel Pro driver installation will now be started to install the security license components. 8. Select Modify setup type and click the Next button. 9. Click Next to start select the custom installation. Installation and Getting Started 8
9 10. Click Install to start the Sentinel Driver installation. 11. Allow the installation to complete. Installation and Getting Started 9
10 Then click Finish to continue with the Metrics Win4156 installation. 12. Allow the Metrics Win4156 installation to complete. Installation and Getting Started 10
11 Then click Finish to complete the installation. 13. After the installation is finished, re-start the computer. 14. Connect the USB Security Key to the USB port of your computer. The Windows Hardware Manager should detect the USB device as Safenet USB SuperPro/UltraPro and should automatically install the driver for the device. Note: It is recommended the security plug be connected directly to the computer instead of through a USB hub or keyboard port if possible. Installation and Getting Started 11

12 Procedure to Install Win4156 (new installation) 1. Insert the Metrics Win4156 install CD into the CD-ROM drive of your computer. 2. The CD-ROM should automatically start the Setup.exe installation program. If the installation does not start automatically then select right click on the CD drive icon in Windows Explorer and then select "explore". Select the Setup.exe application icon to start the installation program manually. The installation will check for any prerequisites and start the Prerequisites Wizard to install the necessary software. Please note installation of some of these software components requires acceptance of the 3 rd Party license agreements displayed during installation. Installation of some components can take some time so you should allow more time for installation if these components are not already installed on your workstation PC. 3. Click Next button on the "Welcome" panel. Installation and Getting Started 12


13 4. Click Next button on the "Prerequisites" panel. Installation and Getting Started 13


14 5. Click I have read and accept the license terms then click the Install button on the "Microsoft.NET Framework" panel. 6. Click Finish to continue. 7. Click I have read and accept the license terms then click the Install button on the " Microsoft Visual C Redistributable " panel. Installation and Getting Started 14
15 8. Click Finish to continue. 9. Click Next button on the "Welcome" panel. Installation and Getting Started 15

16 10. Read the "Software License Agreement" and click the I agree to the terms in the License Agreement button to agree to the terms. Then click Next. Installation and Getting Started 16

17 11. Choose "destination location" for installation and click the Next button. Note: It is recommended to select the default C:\Metrics\ as the location to maintain compatibility with previous versions of the software backups. 12. Click the Install button to begin the Metrics Win4156 installation. Installation and Getting Started 17


18 13. The Safenet Sentinel Pro driver installation will now be started to install the security license components. 14. Read the "Software License Agreement" and click the I agree to the terms in the License Agreement button to agree to the terms. Then click Next. 15. Select "Complete" setup type and click the Next button. Installation and Getting Started 18


19 16. Click Install to start the Sentinel Driver installation. 17. Allow the installation to complete. Installation and Getting Started 19

20 Then click Finish to continue with the Metrics Win4156 installation. 18. Allow the Metrics Win4156 installation to complete. Installation and Getting Started 20

21 Then click Finish to complete the installation. 19. After the installation is finished, re-start the computer. 20. Connect the USB Security Key to the USB port of your computer. The Windows Hardware Manager should detect the USB device as Safenet USB SuperPro/UltraPro and should automatically install the driver for the device. Note: It is recommended the security plug be connected directly to the computer instead of through a USB hub or keyboard port if possible. Installation and Getting Started 21
22 Metrics Codewords Metrics Technology software products use a combination of a hardware Security Key and Codeword. The unique combination of a Codeword and Security Key allows the software product to be run on a any workstation PC. Software Codeword Information There will be a codeword for each software component ordered. This information is made up of two (2) parts, the Registration Information and Codeword Information. We encourage all customers to register their software with Metrics Technology. Only registered users will receive technical support for their products. Customer ID The Customer ID is a number that has the form IAXXXXXA. Where the X is a number. Variations include IHXXXXA, MHXXXXXA, and MKXXXXXA. This number must match the number on the Security Key. Product Desc This is the Product Description. This will be the name of the product, such as Metrics Win4156 or Metrics Win4156. Product ID The The product ID is MTW4145 should be entered in the ID field Version This is the version of the software i.e Note: The version number and the codeword are matched. Thus, customers who have not purchased an upgrade will not be able to run it without purchasing the correct codeword. Codeword Serial Example Codeword AWRZI-XXC6Z-HK3EM-1RHU0-GUJ8A-UPX0R Installation and Getting Started 22

23 Note: It is recommended that you cut and paste the codeword from the registration sent from Metrics Technology Customer Service. If typing the codeword from the keyboard be careful not to transpose letters or numbers. The letter I can be confused for the number 1 and the letter O can be mistaken for the number 0. Entry of the Codeword Serial Number The software Codeword Serial number can be manually entered in Win4156. To Enter the Win4156 Codeword Serial number: 2. Open the Win4156 program. In Win4156 select the menu item Help» Codeword to open the Software License Codeword window. 3. Enter the Win4156 Codeword Serial number supplied on the product registration certificate. 4. Click the OK button. Installation and Getting Started 23

24 Win4156 Installation & Getting Started Guide Metrics Win4156 Version Copyright , Metrics Technology, Inc. All rights reserved. Installation and Getting Started 24
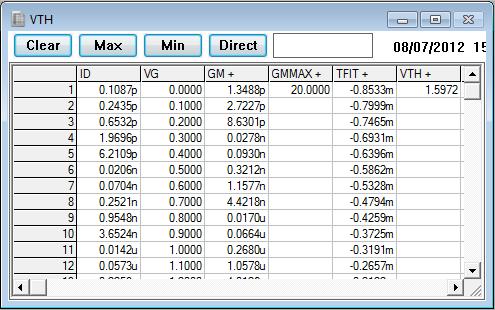
25 Introductory Information Goal of This Manual The goal of this manual is provide a process for the user to be able to create a test and analyze the data with Metrics Win4156. A test setup will be created that measures the Threshold Voltage of a MOSFET device. The measured data will then be plotted and the Vth value will be extracted. Installation and Getting Started 25
26 Chapter 1- Win4156 Getting Started Guide Introduction The first Chapter of the Self-Paced Guide introduces the Metrics Win4156 software. This Chapter also provides important information on software versions and support. Please note that each Chapter builds upon the information presented in the previous Chapters. It is recommended that the Guide is followed in the order presented. Topics Covered What is Metrics Win4156 Software? Overview of Metrics Win4156 Software Updating Versions Support Installation and Getting Started 26
27 What is Metrics Win4156 Software? The Metrics Win4156 Software is an application designed for semiconductor characterization applications. Measurements for different technologies can be created in a matter of minutes without programming. It is based on the industry standard Metrics Win4156 software and provides driver for the HP4156A/B. Metrics Win4156 Controls: Semiconductor Parameter Analyzers o HP 4156A o HP 4156B Overview of Metrics Win4156 Software Metrics Win4156 Software allows provides an environment for the collection of data in three steps: Setup, Execute, and Analyze. The Setup of a Measurement typically takes no more than 1-2 minutes. Win4156 supports several measurement modes to accommodate most testing methods. The Analysis tools in Win4156 include plotting and data extraction. Once the functions are created, they can be saved with the data. The advantage of Win4156 is that once a test is created and saved it can be reopened and used again, including the analysis. Installation and Getting Started 27

28 Determining Software Version The software version and build date are very important when requesting support. Without this information it is impossible to provide efficient service. Please be prepared to provide this information when seeking support. To determine the software version: 1. Open the Metrics Win4156 Software. 2. Click the Help menu item. 3. Click the About item. Installation and Getting Started 28
29 Updating the Metrics Win4156 Software Please keep your software up to date by downloading and installing the Metrics Technology Hot Fixes. Your software will remind you monthly with a simple reminder message to check for updated Hot Fixes. Often the issues addressed in the updates are ones that you may just now be encountering. Metrics Technology provides Service Patches to registered customers. Once a patch has been created and verified by Metrics Technology, it is placed on our web site ( The patch can be downloaded from the web site. Please note the patches are very large and will take time to download depending upon your connection speed. If you have not registered your software, please do so now to become eligible for software updates and support. Support Metrics Technology provides technical support to customers for one year after the purchase of the Metrics Win4156 software. This support period includes a ninety day period when telephone support is available. The remainder of the year s support is provided by . Please refer to the Metrics Technology website for options available to extend the support period. All customers who request support must have registered their copy of Win4156 with Metrics Technology. The form is provided as part of the software package or you can visit the Metrics Technology web site and select the support link to access the registration forms. Support is available from Metrics Technology Contact Metrics Technology by: Reviewing our web site. Logging in to your account at the Metrics Technology website and submitting a support request. To receive Technical Support services you will need: Registration Number (Customer ID) Version and Hot Fix Number Complete description of issue, including any error messages Installation and Getting Started 29
30 Chapter 2- Selecting Instruments Introduction The Module introduces the Metrics Win4156 (Control Software for HP4156A/B/C) measurement engine and demonstrates how to create measurements with it. Topics Covered: Selecting an Instrument Configuring the Instrument Polling an Instrument Installation and Getting Started 30

31 Selecting an Instrument Driver Before creating a measurement, Win4156 must know what instrument is being used. This is accomplished by configuring Win4156. Once an instrument has been configured, Win4156 will remember this configuration. The only time Win4156 must be reconfigured is when the instrument is changed or the ICS40.INI file is erased. 1. Click the Select Instrument button. 2. Highlight the instrument to be added and click the Connect button. Installation and Getting Started 31
32 Configuring the Instrument After the Instrument driver is selected, it must be configured. 1. Highlight the instrument to be configured and click the Config button. 2. Enter the GPIB address. Polling an Instrument To confirm that the instrument and Win4156 are communicating properly, poll the instrument. Installation and Getting Started 32

33 1. Click the Poll button. 2. Click the OK button to close the Configuration window. 3. Click the OK button to close the Instruments window. Installation and Getting Started 33
34 Chapter 3- Creating Measurements Introduction The Module introduces the Metrics Win4156 (Interactive Characterization Software) measurement engine and demonstrates how to create measurements with it. Special demonstration drivers have been created to allow the development to be independent of the instrument. For details about the instrument drivers provided with Metrics Win4156, please refer to the Metrics Win4156 documentation. The steps to creating a test method will be covered. Topics Covered Creating a Sweep Measurement Creating a Spot Measurement Creating a Time-Based Measurement Installation and Getting Started 34
35 Create a Sweep Measurement The following example demonstrates how to create a sweep measurement using Win4156. This example uses the demonstration driver within Win4156. To Create a Sweep: 1. Open the setup editor. The Setup Editor is the place in Win4156 where the measurement is configured. It can be opened by clicking the Setup Editor button. 2. Click New to create a new setup Installation and Getting Started 35
36 3. Name the Measurement Setup Each measurement must have a unique name. Before the measurement can be created, it must be given a name. To name the measurement: a. Entering a name then click the OK button. 4. Select Source Units The source units correspond to the outputs of the instrument you are using. Metrics Win4156 provides a graphical way to document the connections for later reference. To add a source unit: a. Click on the Sources button to open the Source Units window. b. Highlight the specific unit. c. Click the blue box beside the device lead in the Setup Editor. Installation and Getting Started 36
37 To remove a source unit: a. Highlight the attached unit. b. Click the blue box beside the device lead in the Setup Editor. c. Click the Yes button when asked if "Do you really want to remove the source". Note: The graphic is merely a representation of the device. The software does not expect behaviors from the data. Thus, the pin-out does not have to exactly match, rather it is only for reference. Installation and Getting Started 37
. 3. Click the blue box beside the device lead in the Setup Editor. 4. Select the sweep timing (see note below). 5. Select the Source Mode.")
38 5. Configure Source Units. In this example we are creating a sweep source, so we must configure the source unit properly. To setup a sweep source: 1. Select the stimulus type. 2. Select the values to be measured (see note below). 3. Click the blue box beside the device lead in the Setup Editor. 4. Select the sweep timing (see note below). 5. Select the Source Mode. In this case we want it to be Sweep. 6. Setup the sweep parameters. Note: Most SMU's can only measure the signal that is not being sourced. Therefore in this case we have selected the Stimulus to be Voltage resulting in the Current being measured. The values returned for Voltage in this case would be the calculated voltage steps. The opposite is true when the Stimulus mode is set to Current. The Sweep Time parameters are to control the rate of the sweep. Please note that these inputs vary for different instruments. Installation and Getting Started 38
39 Create a Spot Measurement In this example we will create a spot (or single point) measurement. Most of the steps are the same or similar to creating a sweep measurement. The first step is to open the setup editor. The setup editor can be opened by clicking the Setup Editor button. To Create a Spot Measurement: 1. Open the setup editor. The Setup Editor is the place in Win4156 where the measurement is configured. It can be opened by clicking the Setup Editor button. Installation and Getting Started 39
40 2. Name the Measurement Setup. Each measurement must have a unique name. Before the measurement can be created, it must be given a name. To name the measurement: a. Click the New button and type in a name. b. Click the OK button after entering the name. c. Select Source Units. The source units correspond to the outputs of the instrument you are using. Metrics Win4156 provides a graphical way to document the connections for later reference. To add a source unit: a. Click on the Source Units button to open the Source Units window. b. Highlight the specific unit. c. Click the blue box beside the device lead in the Setup Editor. Installation and Getting Started 40

41 To remove a source unit: a. Highlight the specific unit. b. Click the blue box beside the device lead in the Setup Editor. c. Click the Yes button. Note: The graphic is merely a representation of the device. The software does not expect behaviors from the data. Thus, the pin-out does not have to exactly match, rather it is only for reference. Installation and Getting Started 41
. 3. Select the Source Mode. In this case we want it to be Const. 4. Setup the source bias.")
42 3. Configure Source Units. In this example we are creating a spot source, so we must configure the source unit properly. To setup a spot source: 1. Select the stimulus type. 2. Select the values to be measured (see note below). 3. Select the Source Mode. In this case we want it to be Const. 4. Setup the source bias. Note: Most SMU's can only measure the signal that is not being sourced. Therefore in this case we have selected the Stimulus to be Voltage resulting in the Current being measured. The values returned for Voltage in this case would be the calculated voltage steps. The opposite is true when the Stimulus mode is set to Current. Please note that these inputs vary for different instruments. Installation and Getting Started 42
43 Creating a Time-Based Measurement In this example we will create a time-based measurement. Most of the steps are the same or similar to creating a spot measurement. The first step is to open the setup editor. To Create a Time-Based Measurement: 1. Open the setup editor. The Setup Editor is the place in Win4156 where the measurement is configured. It can be opened by clicking the Setup Editor button. Installation and Getting Started 43


44 2. Name the Measurement Setup. Each measurement must have a unique name. Before the measurement can be created, it must be given a name. To name the measurement: a. Click the New button and type in a name. b. Click the OK button after entering the name. c. Select Source Units. The source units correspond to the outputs of the instrument you are using. Metrics Win4156 provides a graphical way to document the connects for later reference. To add a source unit: Installation and Getting Started 44
45 a. Click on the Source Units button to open the Source Units window. b. Highlight the specific unit. c. Click the blue box beside the device lead in the Setup Editor. To remove a source unit: a. Highlight the specific unit. b. Click the blue box beside the device lead in the Setup Editor. c. Click the Yes button. Note: The graphic is merely a representation of the device. The software does not expect behaviors from the data. Thus, the pinout does not have to exactly match, rather it is only for reference. Installation and Getting Started 45
46 3. Configure Source Units. In this example we are creating a time stimulus source, so we must configure the source unit properly. To setup a time stimulus source: a. Select the stimulus type. b. Select the values to be measured (see note below). c. Select the Time Bias and Compliance. Note: Most SMU's can only measure the signal that is not being sourced. Therefore in this case we have selected the Stimulus to be Voltage resulting in the Current being measured. The values returned for Voltage in this case would be the calculated voltage steps. The opposite is true when the Stimulus mode is set to Current. Please note that these inputs vary for different instruments. Installation and Getting Started 46

47 4. Set Time Parameters. We must specify the time interval that the measurements will be made. To setup the time parameters: a. Select the Time Units. b. Select the sampling type. c. Enter the Wait time. d. Enter the Start, Stop, and Step values. Select the Comply to Stop, option if desired. Installation and Getting Started 47

48 5. Set Measurement Mode. We must specify the measurement mode as Time Meas. To setup the measurement mode: a. Select the Setup. b. Select the TIME MEAS mode. Installation and Getting Started 48
49 Chapter 4- Executing Measurements Introduction This Module details the execution of the measurement using Win4156. Note: When creating new tests it is necessary that the data be measured before the analysis is created. Topics Covered Measurement Remote Control The Date Window Installation and Getting Started 49

50 Measurement Remote Control Metrics Win4156 contains a tool named the Measurement Remote Control. This control is activated by clicking the Measure button on the Win4156 toolbar. This toolbar contains buttons to begin the measurement as well as menus to select the measurement and mode. Note: The remote control window can be moved anywhere on the desktop. The Measurement Remote Control has four sections. Installation and Getting Started 50
51 Section 1: Measurement Menu This pull-down menu allows the selection of a specific test to be executed. Section 2: Execute Buttons This section contains the buttons that will start the measurement. Several modes of measurement are available and the buttons correspond to the selected mode. Section 3: Measurement Mode Menu This pull-down menu allows the selection of the measurement mode. Most measurements are made in standard mode, however Win4156 does support several specialized measurement modes which require this to be modified. Section 4: Stop Button This button allows the user to stop the measurement. Installation and Getting Started 51


52 The Data Window When a new setup is created the spreadsheet is automatically created when a test setup is created. It will begin as a minimized window in the lower left corner of the Win4156 window. To view the data simply double-click the window that has the same name as the test setup. The Data window automatically returns the measured data and displays it. When parameters are extracted the values are also displayed. Note: Win4156 has a feature named "Enable DataView". To enable or disable this feature select Workspace from the Options menu. Installation and Getting Started 52

53 Edit the DataView This feature allows the user to select that only data vectors that are chosen be displayed. It also allows the reordering of the data vectors as they appear in the data window. The default behavior is for the DataView to be disabled which displays all vectors for a chosen setup. Installation and Getting Started 53

54 Sync the DataView with Microsoft Excel This feature allows the user to automatically synchronize all DataViews with a Microsoft Excel workbook. The default behavior is for the DataView to be disabled which displays all vectors for each setup in separate tabs of the workbook. Note: Win4156 has a feature named "Enable DataView". To enable or disable this feature select Workspace from the Options menu. Note: Win4156 has a feature named "Sync dataview". To enable or disable this feature select Workspace from the Options menu. While the "Sync DataView" is selected all data will be automatically synced to the Excel spreadsheet. You can create user defined macros to perform further analysis to create custom reports and save out to the file system in.xls format. Notice that not only the measured data vectors are synced but also any transforms that have been setup for the raw data. Installation and Getting Started 54

55 Installation and Getting Started 55
56 Chapter 5- Plotting Data Introduction This Module introduces the plotting tool of the Win4156 software. The plotting tool allows for the graphical analysis of data measured with Win4156. Topics Covered Creating a Plot Editing a Plot Installation and Getting Started 56

57 Creating a Plot The Metrics Win4156 software uses a custom plot tool to display plots and provide analysis features like read-out cursors and line fits. To create a new plot: 1. Click the Plot button on the toolbar. 2. Configure the plot. 3. Click the Done button and the plot will be created. Installation and Getting Started 57

58 Note: The plot is made from whatever data window is currently active. The name of the plot in the Window title is the setup name followed by a dash and a number. Multiple plots can be created from the same data set, the number will just increase. Installation and Getting Started 58

59 Editing a Plot The plot window contains the editing tools for the plot. 1. The Axis button reveals the tools to change the axis from linear to logarithmic and to auto scale the plot. 2. The Cursors button allows the addition and control of cursors on the plot. 3. The Fits button allows the application of curve fits related to the cursors. 4. The Opts button presents several options for adding notes to the plot, overlaying plots, zooming features, and setup changes. These functions are discussed in great detail within the Win4156 Reference Manual. Installation and Getting Started 59
60 Chapter 6- Extracting Data Introduction After executing a measurement, Win4156 can extract parameters. Once the procedures are defined, each time the measurement is run the calculations are performed automatically. This Module demonstrates how to extract parameters from the raw data using the Transform Editor within Win4156. Topics Covered The Transform Editor Defining a Transform Sharing Data Between Transforms Installation and Getting Started 60

61 The Transform Editor Calculations are created within the Transform Editor. To open the editor, click the "Transform Editor" button on the Win4156 toolbar. The Transform Editor contains several areas: 1. Transform Entry Box The location to enter the transform. 2. Defined Transform List A list of all transforms defined for this setup. Installation and Getting Started 61
62 3. Function List A predefined functions available for the calculation of parameters. 4. Vector List A list of the measured and calculated data vectors. 5. Constant List A list of constants that can be used in calculations. 6. Edit Constant Button Allows constants to be defined and edited. 7. Action Buttons Controls for the saving of transforms, deleting of transforms, and exiting the Transform Editor. Installation and Getting Started 62
 2. Click the Save button to save the new calculation. 3.")
63 Defining a Transform Calculations are created within the Transform Editor. To open the editor click the "Transform Editor" button on the Win4156 toolbar. To create a calculation: 1. Enter the calculation in the "Transform" box. The calculation must be in the form result=function(vector) 2. Click the Save button to save the new calculation. 3. Once all calculations have been saved, click the Done button. Installation and Getting Started 63
 measures the resistance from 0-1 Volts and the second (TEST1) from 1.1-2 Volts the data can be merged to form a full sweep from 0-2 Volts.")
64 Sharing Data Between Transforms Data vectors from one setup can be shared with another setup in the same project file. For instance, if one setup (TEST2) measures the resistance from 0-1 Volts and the second (TEST1) from Volts the data can be merged to form a full sweep from 0-2 Volts. To Share Data: We must first create two different setups with TEST2 being the sweep from 0-1 Volts and TEST1 being the sweep from 1.1 to 2 Volts. 1. Open the Transform Editor and make sure the setup name is TEST2. 2. Create a new Transform as shown above. 3. Click the Save button. Installation and Getting Started 64


65 The use of the transform result=setup name vector name allows the data to be moved from one setup to another. After applying the transform result=setup name vector name the data to be from TEST1 is displayed in the data window for TEST2. Installation and Getting Started 65
66 Chapter 7- Saving Data Introduction Metrics Win4156 version saves the data within the standard Windows File System. This Module covers the data. Where it is stored, how it is stored, and how to retrieve it are covered. Topics Covered Where is the Data? Saving a Project Installation and Getting Started 66

67 Where is the Data? Metrics Win4156 version allows the data to be stored anywhere within the windows file system. Note: If you want the Win4156 Backup utility to save the data, make sure it is saved within the Metrics\ics\projects directory. Saving a Project The project is a collection of the test method(s) and the data. To save the data simply select File >> Save As and select the directory and filename or to save the currently open project simply select the Save toolbar icon. Installation and Getting Started 67
Installation and Getting Started Guide
 Installation and Getting Started Guide Metrics Win4145 Version 4.2 Copyright 1999-2017, Metrics Technology, Inc. All rights reserved. Table of Contents Installing the Win4145 Software... 4 Obtain a Codeword...
Installation and Getting Started Guide
 Installation and Getting Started Guide Metrics ICV Version 4.1.0 Copyright 1999-2015, Metrics Technology, Inc. All rights reserved. Table of Contents Installing the ICV Software... 4 Obtain a Codeword...
Software Migration Guide Metrics ICS Version 4.2
 Software Migration Guide Metrics ICS Version 4.2 Copyright 1999-2017, Metrics Technology, Inc. All rights reserved. Table of Contents Introduction... 3 Changes to Metrics ICS version 4.2... 4 General User
METRICS WIN4145. How Win4145 Stores Information. Project Files. The Win4145 Initialization File. Data and Plot Windows.
 METRICS WIN4145 REFERENCE GUIDE CONTENTS CHAPTER 1: A QUICK TOUR OF WIN4145 How Win4145 Stores Information Project Files The Win4145 Initialization File Data and Plot Windows The Menu Bars The Toolbar
Getting Started: Creating and Executing a Test Setup. Step 1: Cable the Hardware Connections. Step 2: Connect the HP4145 Instrument Driver
 METRICS TECHNOLOGY WIN4145 GETTING STARTED GUIDE CONTENTS Getting Started: Creating and Executing a Test Setup Step 1: Cable the Hardware Connections Step 2: Connect the HP4145 Instrument Driver Step 3:
Metrics Tutorial. Table of Contents. 1. Introduction
 Metrics Tutorial Table of Contents 1. Introduction 2. The Set-Up Editor 3. The Project File Manager 4. Data Windows 5. Plot Windows 6. Exporting and Importing Data 7. Linking Metrics and Excel 1. Introduction
USB Instruments EasyLogger for PS40M10 "Swordfish" Help
 USB Instruments EasyLogger for PS40M10 "Swordfish" Help I EasyLogger for PS40M10 Help Table of Contents Part I Introduction 3 1 Welcome to... EasyLogger for PS40M10 3 2 EasyLogger... Features 4 Part II
Basics of Keithley Interactive Test Environment
 Basics of Keithley Interactive Test Environment 0 Launching KITE Power Up and Log On ACTION 1. From Power-up: disconnect DUTs, stay clear of SMU output connectors/probes Log-on: KIUSER (no password) or
Chapter A2: BankLink Books clients
 Chapter A2: BankLink Books clients This chapter is aimed at BankLink Administrators This Chapter covers the options available for processing in BankLink Books. The BankLink Service Agreement permits you
PCLaw Installation and Upgrade Guide
 PCLaw Installation and Upgrade Guide Version 14.1 2015 LexisNexis. All rights reserved. Copyright and trademark LexisNexis, Lexis, and the Knowledge Burst logo are registered trademarks of Reed Elsevier
Upgrade Procedures from Version 9 to Version 12
 Upgrade Procedures from Version 9 to Before this type of installation is performed the user must backup all the wells and logs in their database. The Hardware Key does have to be reprogrammed when a major
Chapter 1: A Quick Tour of ICS Chapter The Setup Editor 26
 Chapter 1: A Quick Tour of ICS 5 What is ICS SOFTWARE? How ICS Stores Information Test Setups The Test Setup/Project File Relationship Test Setup Applications The Setup Editor Project Files Creating Project
2009 Davis Instruments Corp. All rights reserved. Information in this document is subject to change without notice.
 FCC Part 15 Class B Registration Warning This equipment has been tested and found to comply with the limits for a Class B digital device, pursuant to Part 15 of the FCC Rules. These limits are designed
Lasso Continuous Data Protection Lasso CDP Client Guide August 2005, Version Lasso CDP Client Guide Page 1 of All Rights Reserved.
 Lasso CDP Client Guide August 2005, Version 1.6.8 Lasso CDP Client Guide Page 1 of 32 Copyright Copyright 2005 Lasso Logic, LLC. All Rights Reserved. No part of this publication may be reproduced, stored
DesignPro Tools for Xerox Elixir Technologies Corporation. All rights reserved.
 Follow the Crop Marks DesignPro Tools for Xerox Getting Started Guide C 1998-2008 Elixir Technologies Corporation. All rights reserved. Elixir Technologies Corporation 721 East Main Street Ventura, CA
Instructions to Upgrade Your UME-36 Pro
 Instructions to Upgrade Your UME-36 Pro 1. HTTP Upgrade Instructions 2. Application Upgrade Instructions using USB Disk Drive or SD Card 3. Application Upgrade Instructions using PC with data cable 4.
Agilent MassHunter Workstation Software Offline Qualitative and Quantitative Analysis
 Agilent MassHunter Workstation Software Offline Qualitative and Quantitative Analysis Installation Guide Step 1. Remove Older Versions of MassHunter and Microsoft Excel Software 2 Step 2. Install Microsoft
Tach Facts V3.0 Software
 Tach Facts V3.0 Software Download runs from your Auto Meter Playback Tach with Tach-Facts Software. Instr. No. 2650-978 Tach Facts provides complete race analysis on your personal computer. Introduction
Impossible Solutions, Inc. JDF Ticket Creator & DP2 to Indigo scripts Reference Manual Rev
 Impossible Solutions, Inc. JDF Ticket Creator & DP2 to Indigo scripts Reference Manual Rev. 06.29.09 Overview: This reference manual will cover two separate applications that work together to produce a
Navigator Software User s Manual. User Manual. Navigator Software. Monarch Instrument Rev 0.98 May Page 1 of 17
 User Manual Navigator Software Monarch Instrument Rev 0.98 May 2006 Page 1 of 17 Contents 1. NAVIGATOR SOFTWARE 2. INSTALLATION 3. USING NAVIGATOR SOFTWARE 3.1 STARTING THE PROGRAM 3.2 SYSTEM SET UP 3.3
METREL ES Manager. Instruction manual Version METREL
 METREL ES Manager Instruction manual Version 1.1 2015 METREL Table of Contents Table of Contents 1 Welcome to Metrel ES Manager Help... 4 2 Introduction to Metrel ES Manager... 5 2.1 What is Metrel ES
CAMPAGNE. Fundraising software solutions
 CAMPAGNE a s s o c i a t e s Fundraising software solutions Copyright 2002, Campagne Associates, Ltd. All rights reserved Information in this manual is subject to change without notice and does not represent
Exhibitor Software User s Manual. Exhibitor Software V
 Exhibitor Software User s Manual Exhibitor Software V1.0.1 090908 1 Contents 1. Exhibitor Software 2. Installation 3. Using Exhibitor Program 3.1 Starting the Program 3.2 Logging in to the Program 3.3
Professional Edition on a Server for Network Access & On Thin-Client Workstations Using Client Deployment 5
 Addendum to the Microsoft Business Solutions for Analytics FRx 6.7 Installation and Configuration Guide FRx 6.7 Solomon Installation Copyright and Trademarks Copyright 2002 Great Plains Software, Inc.
Fluke Metrology Software
 Fluke Metrology Software Version 7 MET/CAL 5500/CAL Getting Started Guide P/N 1275404 July 1999 Rev. 2, 9/04 1996-2004Fluke Corporation, All rights reserved. Printed in U.S.A. All product names are trademarks
Delphi Workstation Setup Instructions. June 3, 1009
 Delphi 9.5.2 Workstation Setup Instructions June 3, 1009 Copyright 2009 Newmarket International, Inc. All rights reserved. The information in this document is confidential and proprietary to Newmarket
Sage Fixed Assets Single User. Installation guide
 Single User Installation guide Last updated January 15, 2019 2019 The Sage Group plc or its licensors. All rights reserved. Sage, Sage logos, and Sage product and service names mentioned herein are the
Batch Eligibility Long Term Care claims
 DXC Technology Provider Electronic Solutions software lets Connecticut Medical Assistance Program providers verify patient s eligibility and submit and correct claims for services all electronically. The
3M Molecular Detection System Software Upgrade/Installation Instructions
 User Manual Supplement Number: TB.342837.03 Effective Date: March 2018 Supersedes: TB.342837.02 Technology Platform: 3M Molecular Detection System Originating Location: St. Paul, MN 3M Molecular Detection
Sage Fixed Assets Single User
 Single User 2018.0 Installation guide October 2017 Last updated October 17, 2017 2017 The Sage Group plc or its licensors. All rights reserved. Sage, Sage logos, and Sage product and service names mentioned
Welcome to Helper 9 Installation Instructions
 Welcome to Helper 9 Installation Instructions Table of Contents How to Install the Helper Software... 1 How to Run the Helper Transfer Utility... 7 Setting up the Helper Server Software.... 9 Setting up
Access PayrollSE v5.50a
 Access PayrollSE v5.50a Installation Instructions for Windows Contents Introduction... 3 System Requirements... 3 Microsoft Visual C++ 2005 redistributable... 3 Microsoft.NET Framework 4... 3 Other considerations...
Upgrade Procedures from Version 11 to 2015
 Upgrade Procedures from Version 11 to 2015 Before this type of installation is performed the user must backup all the wells and logs in their database. The Hardware Key does have to be reprogrammed when
T E KLYNX BACKTRACK V E R S I O N 6 I N S T A L L A T I O N G U I D E
 BACKTRACK 6 T E K LY NX VERSION I N S T A L L A T I O N G U I D E Note Installation Guide The information in this manual is not binding and may be modified without prior notice. Supply of the software
Workstation Configuration
 Workstation Configuration December 12, 2017 - Version 9.4 - - - - - - - - - - - - - - - - - - - - - - - - - - - - - - - - - - - - - - - - - - - - - - - - - - - - - - - - - - - - - - - - - - - - - - - -
SAFARI General Instructions
 SAFARI General Instructions Open Excel. Click on the Data Tab. Click on From Other Sources. Select From Miscrosoft Query. Select the Database you would like to pull from: Insert your Reflections Password
Data Acquisition with CP-2002/2003 Micro-GC Control
 Varian Analytical Instruments 2700 Mitchell Drive Walnut Creek, CA 94598 Star Chromatography Workstation Version 6 Data Acquisition with CP-2002/2003 Micro-GC Control Operation Manual Varian, Inc. 2002
Chapter 11. GP-Viewer EX. Otasuke GP-EX! Chapter 11 GP-Viewer EX GP-Viewer EX Set Up GP-Viewer EX and Set Security Function 11-3
 Chapter 11 GP-Viewer EX GP-Viewer EX 11-1 Set Up GP-Viewer EX and Set Security Function 11-3 Set IP Address/License on GP Unit 11-5 Install GP-Viewer EX 11-6 Start GP-Viewer EX 11-8 11-0 GP-Viewer EX GP-Viewer
HR-Lite Database & Web Service Setup Guide
 HR-Lite Database & Web Service Setup Guide Version: 1.00 HR21 Limited All rights reserved. No part of this document may be reproduced or transmitted in any form or by any means, electronic or mechanical,
Introduction to the. Managed XP Service (For Students) Mark Morley Bob Booth December 2004 AP-Win7. University of Sheffield.
 Mark Morley Bob Booth December 2004 AP-Win7. University of Sheffield.") Introduction to the Managed XP Service (For Students) Mark Morley Bob Booth December 2004 AP-Win7 Contents University of Sheffield 1. INTRODUCTION... 4 2. USING A MANAGED SERVICE MACHINE... 5 2.1 LOGGING
Introduction to the Managed XP Service (For Students) Mark Morley Bob Booth December 2004 AP-Win7 Contents University of Sheffield 1. INTRODUCTION... 4 2. USING A MANAGED SERVICE MACHINE... 5 2.1 LOGGING
Workstation Configuration Guide
 Workstation Configuration Guide August 13, 2018 Version 9.6.134.78 For the most recent version of this document, visit our documentation website. Table of Contents 1 Workstation configuration 4 1.1 Considerations
AEMLog Users Guide. Version 1.01
 AEMLog Users Guide Version 1.01 INTRODUCTION...2 DOCUMENTATION...2 INSTALLING AEMLOG...4 AEMLOG QUICK REFERENCE...5 THE MAIN GRAPH SCREEN...5 MENU COMMANDS...6 File Menu...6 Graph Menu...7 Analysis Menu...8
MoCo SMS Suite User s Manual
 MoCo SMS Suite User s Manual - 1 - Chapter 1: Setting & Starting Up MoCo... 5 1.1 Hardware Setup... 5 1.1.1 USB GSM modem... 5 1.1.2 USB GSM Modem Driver Installation for Win2000/Win2003... 6 1.1.3 USB
NVMS User Manual. Version 2.1.0
 NVMS-1000 User Manual Version 2.1.0 Contents 1 Software Introduction... 1 1.1 Summary... 1 1.2 Operation Environment... 1 1.3 Install and Uninstall... 2 1.3.1 Install the Software... 2 1.3.2 Uninstall
PropertyBoss Upgrade
 Installation Guide EMC128-2013 1998-2013 PropertyBoss Solutions. Introduction This document covers 2 upgrade scenarios. Please determine which is required before beginning. Note: The Release version or
SafeNet Authentication Manager
 SafeNet Authentication Manager Version 8.0 Rev A User s Guide Copyright 2010 SafeNet, Inc. All rights reserved. All attempts have been made to make the information in this document complete and accurate.
C75/J75 Simple Image Quality Adjustment (SIQA) v2.0 Software Installation Instructions
 v2.0 Software Installation Instructions") C75/J75 Simple Image Quality Adjustment (SIQA) v2.0 Software Installation Instructions Introduction This document support the install of the software for using the new application, called SIQA (Simple
C75/J75 Simple Image Quality Adjustment (SIQA) v2.0 Software Installation Instructions Introduction This document support the install of the software for using the new application, called SIQA (Simple
Table of Contents. On-Call Advanced Diabetes Data Management Software V1.0 User s Manual
 Table of Contents Installation Instructions...2 Starting On-Call Advanced Diabetes Data Management Software...5 Main Windows...6 Patient Setup...6 Patient Info...7 Target Levels...8 Time Slot...9 Preference
QSalesData User Guide
 QSalesData User Guide Updated: 11/10/11 Installing the QSalesData Software... 2 Licensing the QSalesData Product... 3 Build QSalesData fields in ACT Step 2 of Install Checklist... 4 Adding the QB Data
Comfort Optimizer Installation Instructions
 Congratulations on choosing the best all around load calculation program available. Along with this instruction manual should be the installation CD. Before we can install the Comfort Optimizer, we have
Note: Act Today provide this KB article as a courtesy however accept no responsibility for content or the recipient performing these steps
 Note: Act Today provide this KB article as a courtesy however accept no responsibility for content or the recipient performing these steps How To Download and Apply Sage ACT! 2011 Premium Service Pack
Software User's Guide
 Software User's Guide Brother QL-series The contents of this guide and the specifications of this product are subject to change without notice. Brother reserves the right to make changes without notice
EFI Fiery Utilities Technical Reference. Part Number: , Rev. 1.0
 EFI Fiery Utilities Technical Reference Part Number: 59308805, Rev. 1.0 15 March 2008 CONTENTS 3 CONTENTS INTRODUCTION 5 Terminology and conventions 6 About this document 7 About Help 7 Preparing for installation
Sage Fixed Assets Network
 Network 2018.0 Installation guide October 2017 Last updated October 17, 2017 2017 The Sage Group plc or its licensors. All rights reserved. Sage, Sage logos, and Sage product and service names mentioned
InventoryControl Quick Start Guide
 InventoryControl Quick Start Guide Copyright 2013 Wasp Barcode Technologies 1400 10 th St. Plano, TX 75074 All Rights Reserved STATEMENTS IN THIS DOCUMENT REGARDING THIRD PARTY PRODUCTS OR SERVICES ARE
Software User's Guide
 Software User's Guide The contents of this guide and the specifications of this product are subject to change without notice. Brother reserves the right to make changes without notice in the specifications
Workstation Configuration
 Workstation Configuration December 15, 2017 - Version 9.3 - - - - - - - - - - - - - - - - - - - - - - - - - - - - - - - - - - - - - - - - - - - - - - - - - - - - - - - - - - - - - - - - - - - - - - - -
Contents. User's Guide
 Contents i User's Guide ii Contents No part of this document may be reproduced or transmitted in any form or by any means, electronic or mechanical, for any purpose, without prior written permission from
SartoCollect v1.0 - Installation and Run-time Instructions
 SartoCollect v1.0 - Installation and Run-time Instructions Thank-you for your recent purchase of SartoCollect. The SartoCollect software is designed to connect your instrument directly with an Excel workbook,
For the SIA Features of GigaView. Introduction. Initial Dialog Bar
 For the SIA-3000 Features of GigaView One button solution for multiple DataCom compliant standards jitter testing. Comprehensive and versatile jitter analysis software enables users to quickly understand
Remote Access Synchronization DL Parent
 Remote Access Synchronization DL Parent 205 Distance Learning Features Switched-On Schoolhouse 2008 School Edition has two optional distance learning features available: SOS Remote Access and SOS Synchronization.
ChromQuest 4.2 Chromatography Data System
 ChromQuest 4.2 Chromatography Data System Installation Guide CHROM-97200 Revision A April 2005 2006 Thermo Electron Corporation. All rights reserved. Surveyor is a registered trademark and ChromQuest is
Abstract. XV Sync Installation Guide & User Manual. Abstract Abstract
 Apteryx Inc. 313 S. High St. Suite 200 Akron, OH 44308 330-376-0889 voice 330-376-0788 fax sales@apteryx.com www.apteryx.com XV Sync Installation Guide & User Manual Abstract Abstract Abstract This document
Sage Fixed Assets Network. Installation guide
 Network Installation guide Last updated January 15, 2019 2019 The Sage Group plc or its licensors. All rights reserved. Sage, Sage logos, and Sage product and service names mentioned herein are the trademarks
Fiery X3eTY2 65C-KM Color Server. Utilities
 Fiery X3eTY2 65C-KM Color Server Utilities 2006 Electronics for Imaging, Inc. The information in this publication is covered under Legal Notices for this product. 45060846 14 November 2006 CONTENTS 3 CONTENTS
Abila MIP DrillPoint Reports. Installation Guide
 Abila MIP DrillPoint Reports This is a publication of Abila, Inc. Version 16.1 2015 Abila, Inc. and its affiliated entities. All rights reserved. Abila, the Abila logos, and the Abila product and service
UNICORN Administration and Technical Manual
 UNICORN 7.0.2 Administration and Technical Manual Table of Contents Table of Contents 1 Introduction... 1.1 Administrator functions overview... 1.2 Network terms and concepts... 1.3 Network environment...
Quick Start Guide for Windows
 for Windows The Eudora 5.1 User Manual for Windows is on the Eudora CD included in the product box. If you prefer a printed and bound copy, you can purchase one from www.eudora.com or call 1-800-2-EUDORA
OLI Engine in Aspen Hysys
 OLI Engine in Aspen Hysys This document applies to all versions of Aspen Hysys V7.3 to V8.8 The OLI Engine in Aspen Hysys includes OLI physical property databanks and OLI licensing and security components
Junxure Code Upgrade Instructions
 Junxure Code Upgrade Instructions If at any time you run into an issue with the following process, call or email Junxure Support (866-586-9873, opt 1 or support@junxure.com) and we will assist you with
User Manual & Quick-Start Guide
 User Manual & Quick-Start Guide Version 2 2002-2008 Promethean Software Corporation. All rights reserved. Table of Contents Introduction... 5 Quick-Start Guide... 5 o Installing TurboLaw... 5 o Configuring
Single User Installation Guide
 Single User Installation Guide Copyright 1998-2005, E-Z Data, Inc. All Rights Reserved. No part of this documentation may be copied, reproduced, or translated in any form without the prior written consent
Installation Guide. Installation Instructions for Models: DI-148 Series DI-158 Series DI-710 Series DI-715B Series DI-718B(x) Series.
 Series.") Installation Guide Installation Instructions for Models: DI-148 Series DI-158 Series DI-710 Series DI-715B Series DI-718B(x) Series Revision G M-101030 Hardware and Software Installation Guide DI-148,
Installation Guide Installation Instructions for Models: DI-148 Series DI-158 Series DI-710 Series DI-715B Series DI-718B(x) Series Revision G M-101030 Hardware and Software Installation Guide DI-148,
Administrator s Guide LV2015-AG-EN
 Administrator s Guide LV2015-AG-EN-090915 The information in this manual is not binding and may be modified without prior notice. Supply of the software described in this manual is subject to a user license.
TEKLYNX BACKTRACK I N S T A L L A T I O N G U I D E
 TEKLYNX BACKTRACK I N S T A L L A T I O N G U I D E Note Installation Guide The information in this manual is not binding and may be modified without prior notice. Supply of the software described in this
Personal Directory PC Utility Reference Guide
 Introduction The PC Utility provides a fast, easy way to create or modify a for an M3904 or M3905 Series Digital Telephone. You can enter names and numbers into a file on your PC, and download (Program)
Quick-Start Guide READ ME FIRST. Installation Instructions for TROY Font Memory Card Kits
 READ ME FIRST Installation Instructions for TROY Font Memory Card Kits (For use with Hewlett-Packard LaserJet 2420, 2430, 4250, 4350, and 9050 Printers) IMPORTANT: Before installing the TROY Font Memory
TOSHIBA GA Printing from Windows
 TOSHIBA GA-1211 Printing from Windows 2008 Electronics for Imaging, Inc. The information in this publication is covered under Legal Notices for this product. 45075925 24 October 2008 CONTENTS 3 CONTENTS
Workstation Setup Instructions Release 9.5
 Workstation Setup Instructions Release 9.5 Copyright 2007 Newmarket International, Inc. All rights reserved. The information in this document is confidential and proprietary to Newmarket International,
Installing Switched-On Schoolhouse 2007
 1 Installation & Setup Installing Switched-On Schoolhouse 2007 Switched-On Schoolhouse 2007 (SOS) is easy to install on your computer because most of the installation components install themselves. Before
Quick Start. Chapter. In This Chapter:
 Chapter Quick Start In This Chapter: Getting to Know Windows.... - Installation of irectsoft 6.... - Getting Started.... -8 Welcome to irectsoft00.... - Begin Editing a Program.... -4 Establish the Communication
jraven Quick Start Guide
 jraven Quick Start Guide Version 1.0 9/15/2010 Overview, Install, Starting the Application and Setup... 3 Overview:... 3 INSTALL / SETUP... 3 How to install jraven... 4 Migrating Data - jraven MIGRATION
Employee Web Services. Installation Guide
 Employee Web Services This is a publication of Abila, Inc. Version 2017.x 2016 Abila, Inc. and its affiliated entities. All rights reserved. Abila, the Abila logos, and the Abila product and service names
EzyChart 6 Quick Start Guide Contents
 EzyChart 6 Quick Start Guide Contents Introduction... 2 Part 1: Installing EzyChart 6... 2 Part 2: Registering EzyChart 6... 5 Part 3: Data Service Setup... 6 Part 4: Opening Charts... 6 Part 5: Help for
IT Essentials v6.0 Windows 10 Software Labs
 IT Essentials v6.0 Windows 10 Software Labs 5.2.1.7 Install Windows 10... 1 5.2.1.10 Check for Updates in Windows 10... 10 5.2.4.7 Create a Partition in Windows 10... 16 6.1.1.5 Task Manager in Windows
Q-Lab Software OPERATION MANUAL
 Q-Lab Software OPERATION MANUAL Trilithic Company Profile Trilithic is a privately held manufacturer founded in 1986 as an engineering and assembly company that built and designed customer-directed products
PhotoPDF User Guide. PhotoPDF. Photo to PDF Converter
 PhotoPDF Photo to PDF Converter PhotoPDF is a batch-processing tool to convert photos into PDF file. PhotoPDF provides three modes of conversion: Batch Convert, Photos Merge and Thumbnail Page. PhotoPDF
Q-Stress 4.6 Software Installation & Upgrade
 Q-Stress 4.6 Software Installation & Upgrade REF 70-00260-03-ENG Rev A1 Contents Scope 1 Software Installation 3 Software Upgrade 5 Configure Operating System Parameters 7 Stress Application Configuration
Veritas System Recovery 18 Management Solution Administrator's Guide
 Veritas System Recovery 18 Management Solution Administrator's Guide Documentation version: 18 Legal Notice Copyright 2018 Veritas Technologies LLC. All rights reserved. Veritas and the Veritas Logo are
1) Installing Bluetooth software for Windows (A) Place installation CD into PC and setup should launch automatically.
 Installing Bluetooth software for Windows (A) Place installation CD into PC and setup should launch automatically.") 1) Installing Bluetooth software for Windows (A) Place installation CD into PC and setup should launch automatically. If setup does not launch, use Windows Explorer to navigate to the appropriate CD- ROM
1) Installing Bluetooth software for Windows (A) Place installation CD into PC and setup should launch automatically. If setup does not launch, use Windows Explorer to navigate to the appropriate CD- ROM
Full User Manual and Quick Start Guide
 Full User Manual and Quick Start Guide 2 W hile every precaution has been taken in the preparation of this manual, we assume no responsibility for errors or omissions. Neither, is any liability assumed
Software User's Guide
 Software User's Guide The contents of this guide and the specifications of this product are subject to change without notice. Brother reserves the right to make changes without notice in the specifications
Getting Started with Eudora For the Macintosh Using Eudora 6.1 Keith Roberts
 MAC1021 July 2004 Getting Started with Eudora For the Macintosh Using Eudora 6.1 Keith Roberts INTRODUCTION... 1 REQUIREMENTS... 2 ISSUES... 2 EUDORA MODES... 3 SPONSORED MODE... 3 PAID MODE... 3 LIGHT
Remote Deposit Service
 Remote Deposit Service Start Up Guide *Screen shots are shown for illustrative purposes only and may vary based on the version of Windows you are currently using. Step 1: Confirm your PC meets system
Sage Fixed Assets Network Installation Guide
 Network 2017.0 Installation Guide This is a publication of Sage Software, Inc. Copyright 2016 Sage Software, Inc. All rights reserved. Sage, the Sage logos, and the Sage product and service names mentioned
N2KExtractor. NMEA 2000 Data Extractor Software. User s Manual
 N2KExtractor NMEA 2000 Data Extractor Software User s Manual Revision 1.0.0 Copyright 2012 Maretron, LLP All Rights Reserved Maretron, LLP 9014 N. 23 rd Ave #10 Phoenix, AZ 85021-7850 http://www.maretron.com
User Guide 701P Wide Format Solution Wide Format Scan Service
 User Guide 701P44865 6204 Wide Format Solution Wide Format Scan Service Xerox Corporation Global Knowledge & Language Services 800 Phillips Road Bldg. 845-17S Webster, NY 14580 Copyright 2006 Xerox Corporation.
Thank you for purchasing Qwizdom Remotes.
 Thank you for purchasing Qwizdom Remotes. Now that you ve received your set, you re probably thinking, What do I do now? We have prepared this quick-start guide to help you get up and running with your
Quick Start Guide 0514US
 Quick Start Guide Copyright Wasp Barcode Technologies 2014 No part of this publication may be reproduced or transmitted in any form or by any means without the written permission of Wasp Barcode Technologies.
Installation / Migration Guide for Windows 2000/2003 Servers
 & Installation / Migration Guide for Windows 2000/2003 Servers Ebix, Inc. Corporate Headquarters Concourse Parkway, Suite 3200 Atlanta, GA 30328 USA Phone: 678-281-2020 Fax: 678-281-2019 E-mail: info@ebix