Thank you for purchasing Qwizdom Remotes.
|
|
|
- James Elliott
- 5 years ago
- Views:
Transcription


1
2 Thank you for purchasing Qwizdom Remotes. Now that you ve received your set, you re probably thinking, What do I do now? We have prepared this quick-start guide to help you get up and running with your remotes as soon as possible. Over the next few pages, Qwizdom will take you through a step-by-step process, from installing the software to running a presentation. Minimum System Requirements Windows XP Service Pack 2, Vista, or later Microsoft PowerPoint 2003 or later (registered version) Microsoft Excel 2003 or later (registered version) Microsoft.NET Framework 3.5 (included in installer) Microsoft.NET Framework 3.5 SP1 (included in installer) Intel Pentium 233-MHZ or faster processor (Pentium III recommended) 1G of RAM 5 GB of disk space CD-ROM drive Open USB Port
3 Table of Contents 1 Checking the Remote Set 2 Installing Qwizdom Connect 3 Opening Connect / Connect Toolbar 4 Setting Up Remotes 5 Installing State Standards 6 Creating Classes 7 Importing Activities from Connect Online 8 Creating New Activities 9 Presenting Activities 10 Reporting 11 Help and Support


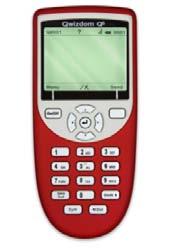

4 1 CHECKING THE REMOTE SET You should have the following items: Q6i or Q7 Instructor Device Qwizdom Remotes rt/qwizdomconnect/#downloads USB Host Connect Software Link Batteries, Screws, and Screwdriver


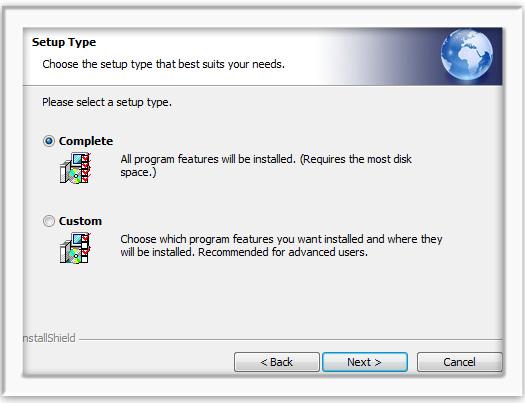
5 2 INSTALLING QWIZDOM CONNECT After downloading Connect, right-click the.zip file, and select Extract all. Open and run setup.exe. (If you are replacing an older version of Connect, first uninstall the program through the computer s Control Panel.) The installer will check if your computer meets the minimum requirements, and automatically installs necessary components if required. Follow the steps to install the software:
6
7 Installing the USB Host 1. The USB Host is located in the back compartment of the Q7RF Tablet or in the front pocket of the remote bag. 2. Plug the USB Host into an available USB port on the computer. 3. The computer will automatically detect and configure the new hardware device. This may take a few minutes to complete. 4. The host will flash green when ready for communication.

8 3 OPENING CONNECT To open Connect, double-click the Connect shortcut icon on your desktop. 1. File menu - set preferences, change password, and download state standards. 2. Qwizdom Online menu - allows login to Connect Online to access premade activities and the media library. To acquire login information, register at 3. Programs menu - displays the 4 programs within the software suite. 4. Remotes menu - provides access to remote configuration settings. 5. Help menu - provides access to user guide and software updates.
. 3. Select only the remote types you will be using. 4. Select your preferred configuration. Use Fixed Set unless the remotes are participant-owned.")
9 4 SETTING UP REMOTES If setting up remotes for the first time we recommend the following steps. Note: You will only have to do this once. 1. Click the Remotes menu in the Connect toolbar. 2. Type in the number of remotes in your set(s). 3. Select only the remote types you will be using. 4. Select your preferred configuration. Use Fixed Set unless the remotes are participant-owned. Click OK. If you have older Qwizdom Response hardware, received in 2011 or earlier, click the Assign button. Read the dialog box, and click OK. NOTE: This step can also be useful for troubleshooting purposes if you find that the remotes do not connect during future use.

10 Remotes received in 2011 or earlier need to be set up once, prior to use, with computer-assigned ID numbers. Newer remotes, received in 2012 or later, already come with pre-assigned numbers, matching their affixed stickers, so do not require any user action. 1. In the Remote Assignment window, check Auto-Increment Remote Number to assign numbers in the order in which remotes are turned on. 2. Click Detect then Start. 3. The Session ID field will automatically populate (if your host is plugged in). This is your host s unique 6-digit identifier. 4. Begin turning on your remotes. When a remote connects with the host, its assigned ID number will appear on the remote s display. 5. If your remotes do not connect, they are not configured with the correct Session ID. Please refer to the full user guide on how to change Session IDs. 6. Click Stop when all remotes have been assigned. Your remotes will turn off automatically.


11 5 INSTALLING STATE STANDARDS 1. Click the File menu and select Preferences. 2. Click the Standards tab. 3. Select your state in the drop-down, and if desired, check Use Common Core standards if available. 4. Click Download State Standards then OK and Close once standards have successfully downloaded. 5. Exit the software and reopen to complete the download. This allows attachment and tracking of standards to activities presented in the software. STEP1 STEP 2 STEP 3


12 6 CREATING CLASSES STEP 1: Click the Participants tab. STEP 2: Click the Participant Wizard icon (top left). STEP 3: Participant Wizard window will appear. STEP 4: Select a template. Select Create New Participant List, enter a class name, or click Import to upload an existing class list. For details on importing a class list see the Qwizdom Connect User Guide, found at Click Next. Click Educational, then Next.


13 STEP 5: Customize Template. STEP 6: Enter student information. The Participant Field Selection window appears. To add from the Available Fields box, select an item, then click the right blue arrow to move this item to the Selected Fields box. The default items in the Selected Fields box are required and cannot be removed. Click Next to begin entering student information. Enter Participant ID, First Name, and Last Name. The Participant ID number can be used for student login. The Participant ID number needs to be numeric. It cannot include symbols or alphanumeric sequences. The Remote number will auto-generate, but can be overridden. Click Finish and the list will appear under My Classes.

14 7 IMPORTING ACTIVITIES FROM CONNECT ONLINE STEP 1: Log on to Qwizdom Online. STEP 2: Click on the online tab. Enter username and password in Qwizdom Online menu located on top toolbar of Connect. To acquire login information, register at Click the Connect Online tab. Go to the Browse menu and select Collections. Select Subject, Grade, and Package. There are two categories of content: Basic Content (labeled Curriculum ) available to anyone with a Connect License. Premium Content (titled ReadySet and/or has green flag icon) requires an annual subscription.
 to expand tree.")


15 STEP 3: Preview Content STEP 4: Download Content Click on the (+) to expand tree. Select an activity or group of activities and then click Preview. Prior to downloading, all lessons may be previewed regardless of licensing. You can download an entire package, or a single activity. Highlight the title and click Download. Your package or lesson will be in the Content tab.
16 8 CREATING NEW ACTIVITIES 1. Click the Content tab. 2. Click Add Live Editor Activity in the toolbar. 3. Enter a name for your new activity and click OK. 4. The new activity title is added to the content tree and a single blank slide appears. 5. Click the Edit activity icon in the toolbar to access the editing section and begin creating the slide set. To learn more about creating custom activities please see the full user guide located at

17 9 PRESENTING ACTIVITIES To begin the presentation, click Presentation Setup. The Presentation Settings window will open. 1. Using the drop-down menus, set the Participant List and specify a location to save the results file. Choose Qwizdom Connect to access class lists created in Connect. 2. Click the Login Tab. If your USB host is connected you will see a 6-digit Session ID. (If this is blank or you see QVR only, close presentation setup, check the USB host is connected, and reopen the presentation setup screen.) 3. Click OK.

18 For further information on building and importing participant lists, presenting with Qwizdom games, QVR (Qwizdom Virtual Remote), and in-presentation graphs, please see the full user guide. You are now ready to start asking questions! Using Connect Live Editor's inbuilt features, presentations can be customized with images and different styles, as shown below. 1. Ask participants to turn on their remotes. 2. Use the right/left directional arrows or scroll on your instructor device to navigate through the slides. 3. To display response graphs to students, press the [3] button on your Q6i or the icon on the Q7. Press again to hide the graph. 4. When the presentation has finished, the remotes will automatically switch off. Your report file will now be created if you chose to save results. For a detailed overview of the Q6i and Q7 instructor devices, please see the remote index cards available on the Support tab of our website. For more information on graphs and reporting, consult the user guide.
19 THE FEEDBACK INDICATOR The feedback indicator will appear when your presentation starts. You can drag it to a preferred on-screen location. You can use your mouse to activate each function. Alternatively, you can use the Q6i instructor commands, shown in brackets. 1 Close Session & Change Display Settings: Right-click to end session or select additional display settings. 2 Response Feedback: The percentage of participants who have responded. Click to change to a numeric value. 3 Repose Question: Click this to repose the question to the remotes. ( Press [4] on Q6i and press on the Q7 ) 4 Pick a Participant: A random participant number appears on-screen. Names appear if using a participant list. ( Press [1] on the Q6i and on the Q7 ) 5 Show Public Graph: A graph of the results will be displayed on-screen. ( Press [3] on the Q6i and on the Q7 ) 6 Show Game: When in Game mode, pressing this button brings up the game screens and animations. See Presenting with Learning Games. ( Varies depending on selected game. )


 icon on the")
20 PRESENTING WITH LEARNING GAMES To begin the presentation, click Presentation. Use the Present As drop-down to select from the list of games. The game introduction will play, followed by your Connect presentation. Game play and scoring varies by each game type. To view game progress after each question: Q6i - press the right arrow key and then the appropriate number button, listed on the LCD screen, or the game (joystick) icon on the response indicator. Q7 - press the Show button or the game (joystick) icon on the response indicator.


21 10 REPORTING STEP 1: Click on the Results tab. STEP 2: Click on an activity. If Auto Save to Results Manager was chosen in the Presentation Setup window, click on the Results tab.» Alternatively, opening a.qrx file directly will also bring up the reporting wizard. Open the [+] plus sign next to the class list used in the presentation. The most recent results will be in the last position under this class list. Click on the activity to view the Score Report.

22 STEP 3: Click on the Reporting Wizard to view additional reports. Reports in left column are class-wide reports. Reports in right column are individual student reports.» Use the drop-down menu on right to select particular student. Standards-based reports will be active if the activity had standards attached. Choose the report to view, then click Generate.» Any report can be exported to an Excel file or printed out.» Question Summary Reports (with/without answer) will generate the same Flash-based graphs available in presentation. (Excel is a registered trademark of the Microsoft Corporation in the United States and/or other countries.)

23 Report Examples Reports from left to right: Standards Report, Question Summary, Participant/Class Comparison.
24 11 HELP AND SUPPORT Go to ( for full user guides, video tutorials, software updates, and more useful information on using Qwizdom products. If you need further assistance Support: Common Qwizdom Terminology Host: The USB device used to communicate with your Qwizdom remotes. Participant ID: Participant ID is the student s unique identification number. We recommend using a school/district ID number, if one is available. Session ID: The unique 6-digit number assigned to your Host. This is the number which should be entered into the remotes..qrx: The file format of results / report files..qpl: The file format for Qwizdom participant lists.
Thank you for purchasing Qwizdom Remotes.
 Thank you for purchasing Qwizdom Remotes. Now that you ve received your set, you re probably thinking, What do I do now? We have prepared this quick-start guide to help you get up and running with your
Thank you for purchasing Qwizdom Remotes.
 Thank you for purchasing Qwizdom Remotes. We have prepared this quick start guide to help you get up and running with your remotes as soon as possible. Over the next few pages, Qwizdom will take you through
Qwizdom Training Guide Q6 / Q7
 Qwizdom Training Guide Q6 / Q7 2011 - Qwizdom Inc. Contents General Information 1 HID Host 1 Connect Overview 1 Remote Configuration 2 Installing State Standards 2 Creating Classes 3 Creating a Participant
OptionPower 3.2. for Office 2007 STARTUP GUIDE. Interactive Audience Response Systems
 OptionPower for Office 2007 3.2 STARTUP GUIDE Interactive Audience Response Systems OptionPower for Office 2007 3.2 STARTUP GUIDE 2008 Option Technologies Interactive This document is the copyrighted and
Empowering Intelligent Interaction. Mactionpoint Quick Reference
 Empowering Intelligent Interaction Mactionpoint Quick Reference 2010 Table of Contents Managing Presentations Marking up a Keynote presentation Using a Mac PowerPoint in Keynote Creating a Paper-Based
Activate Oktopus Software. Register Oktopus Blend License. 1. After installing the software and opening it, an activation window will appear.
 Activate Oktopus Software 1. After installing the software and opening it, an activation window will appear. 2. Type the 16 character product key into the box and click OK. 3. If there is an active internet
Connect User Guide Copyright 2010
 Connect User Guide Copyright 2010 I Qwizdom Connect User Guide Table of Contents Part I Introduction 4 Part II Getting Started 4 1 Notice... 4 2 Installing Qwizdom... Connect 5 3 Hardware Setup... 6 Part
Table of Contents. Contents
 Table of Contents Contents Table of Contents... 1 QOMO ARS Overview... 4 Part 1: Software... 5 Software Overview... 5 System Requirements... 5 Installation... 5 Using the QClick Software... 6 1.1 User...
CPS FOR POWERPOINT 5 - PC USER S GUIDE
 CPS for PowerPoint CPS FOR POWERPOINT 5 - PC USER S GUIDE Changing the face of Education 1 Table of Contents Table of Contents Table of Contents... 2 Chapter 1: Getting Started... 4 CPS for PowerPoint
QOMO HiteVision,LLC.
 Page 17 of 43 User s Manual Part 1. QRF300 ARS overview The QRF300 Audience Response System (QRF300 ARS) is an easy-to-use RF response system that obtains immediate feedback from each participant (up to
User s Guide. Know Your USA
 User s Guide Children's Technology Review Editor's Choice Award "If you are looking for clean, affordable geography practice, this is a good choice. or 4.4 As featured in their Back to School technology
Login: Quick Guide for Qualtrics May 2018 Training:
 Qualtrics Basics Creating a New Qualtrics Account Note: Anyone with a Purdue career account can create a Qualtrics account. 1. In a Web browser, navigate to purdue.qualtrics.com. 2. Enter your Purdue Career
Blackboard Learn: Basics
 Blackboard Learn: Basics This document includes the following topics: 1. Log in Page 2 2. Find Your Courses Page 2 3. View Course Content Page 3 4. Add a Folder Page 3 5. Add a File Page 5 6. Add a Web
TestAnyTime User Manual (Imaging) English Version
 English Version") TestAnyTime User Manual (Imaging) English Version 1 User Manual Notes & Notices Thank you for choosing TestAnyTime. This quick start guide will teach you the basics and have you up & running in a few minutes.
TestAnyTime User Manual (Imaging) English Version 1 User Manual Notes & Notices Thank you for choosing TestAnyTime. This quick start guide will teach you the basics and have you up & running in a few minutes.
Installing and Setting Up the Snap-on EPC. Rev.1.6 (12 Apr 2012) PN EN
 PN EN") Installing and Setting Up the Snap-on EPC Rev.1.6 (12 Apr 2012) PN 275-0800-EN Table of Contents 1. Introduction... 3 2. Minimum Requirements... 4 3. Installing the Snap-on EPC... 6 4. Licensing the Snap-on
Installing and Setting Up the Snap-on EPC Rev.1.6 (12 Apr 2012) PN 275-0800-EN Table of Contents 1. Introduction... 3 2. Minimum Requirements... 4 3. Installing the Snap-on EPC... 6 4. Licensing the Snap-on
PowerPoint Creating Presentations 25
 Contents Contents 3 PowerPoint 00 7 What is PowerPoint? 8 PowerPoint Requirements 9 New and Improved Features 0 Installing PowerPoint 00 Starting PowerPoint 00 3 Exploring the Ribbon 4 003 Commands in
KYOCERA Net Admin Installation Guide
 KYOCERA Net Admin Guide Legal Notes Unauthorized reproduction of all or part of this guide is prohibited. The information in this guide is subject to change without notice. We cannot be held liable for
Discovering Computers & Microsoft Office Office 2010 and Windows 7: Essential Concepts and Skills
 Discovering Computers & Microsoft Office 2010 Office 2010 and Windows 7: Essential Concepts and Skills Objectives Perform basic mouse operations Start Windows and log on to the computer Identify the objects
Interwrite Response v. 6 with PRS or CPS Pulse
 Interwrite Response v. 6 with PRS or CPS Pulse What is PRS/Response?... 2 How PRS/Response Works... 2 Using the PRS/Response Clicker... 2 Using the CPS Pulse/Response Clicker... 3 Response Software...
Table of Contents.
 Table of Contents 1. Items Included with the BioAxxis ThumbLock Audit Trail Software: 2 2. IMPORTANT NOTE:... 2 3. Supported Operating Systems:... 3 Section 1 Installing the BioAxxis ThumbLock AT Software...
Quick Start Guide. Laplink Software, Inc. Quick Start Guide. w w w. l a p l i n k. c o m / s u p p o r t MN-LLG-EN-14 (REV. 01/08)
") 1 Quick Start Guide Laplink Software, Inc. For technical support issues or questions, please visit: www.laplink.com/support For other inquiries, please see contact details below: E-mail: CustomerService@laplink.com
1 Quick Start Guide Laplink Software, Inc. For technical support issues or questions, please visit: www.laplink.com/support For other inquiries, please see contact details below: E-mail: CustomerService@laplink.com
Table of Contents. Copyright 2009 All Rights Reserved by QOMO HiteVision. 2
 Table of Contents Part 1. QRF300 ARS Overview... 4 Part 2. Hardware & System Installation Illustration... 5 2.1 Student keypad... 5 2.1.1 Specifications... 5 2.1.2 Illustration... 5 2.2 Instructor keypad...
* Note: parents with multiple children in a school/district, each child will have a unique student login.
 Dear Parents: Our school has chosen to use Compass Learning Odyssey, a Web-based curriculum, to enhance and continue your student s educational experience at home. Customize assignments have been created
Getting Started with TurningPoint
 Getting Started with TurningPoint The process to create interactive presentations with TurningPoint is very simple. You can successfully build, deliver, and save the results of an interactive presentation
Introduction. Paradigm Publishing. SNAP for Microsoft Office SNAP for Our Digital World. System Requirements
 Introduction Paradigm Publishing Paradigm understands the needs of today s educators and exceeds the demand by offering the latest technological advancements for coursework settings. With the success of
Copyright Autodesk, Inc.
 Customer and Administration Building, Ditzingen, Germany - Design by Barkow Leibinger Architects Copyright 2003-2008 Autodesk, Inc. Table of Contents 1 Introduction... 3 What is Facility Manager?... 3
User Guide. (Network Version) 2008 Certiport, Inc. certiprep 1
 2008 Certiport, Inc. certiprep 1") User Guide (Network Version) 2008 Certiport, Inc. certiprep 1 Table of Contents I. GETTING STARTED 3 INTRODUCTION 3 IMPORTANT INFORMATION 3 SYSTEM REQUIREMENTS 4 INSTALLATION 4 Basic Installation Network
User Guide (Network Version) 2008 Certiport, Inc. certiprep 1 Table of Contents I. GETTING STARTED 3 INTRODUCTION 3 IMPORTANT INFORMATION 3 SYSTEM REQUIREMENTS 4 INSTALLATION 4 Basic Installation Network
QuickTest Professional 10
 QuickTest Professional 10 Course Setup Instructions Important Note: This training runs under the following operating systems: Windows 2000 Professional (with SP4) Windows XP (with SP2 or SP3) Windows Vista,
STUDENT HELP & WALKTHROUGH
 STUDENT HELP & WALKTHROUGH 2015 Jones & Bartlett Learning, LLC, An Ascend Learning Company Contents What are the browser and system requirements for running Navigate 2? 3 Why does Navigate 2 run a System
Blackboard Collaborate for Students
 New York City College of Technology Blackboard Collaborate for Students Contact Information: 718-254-8565 ITEC@citytech.cuny.edu System Requirements: Windows XP (32 bit), Windows Vista (32 or 64 bit) or
Classroom Performance System (CPS) Clickers Instructions I. CPS procedures if you choose to use all the options
 Clickers Instructions I. CPS procedures if you choose to use all the options") Classroom Performance System (CPS) Clickers Instructions I CPS procedures if you choose to use all the options Before class Download software to your computer One-time activity Create your folder on local
Classroom Performance System (CPS) Clickers Instructions I CPS procedures if you choose to use all the options Before class Download software to your computer One-time activity Create your folder on local
Note: You must already be enrolled and issued with a Username and Password
 Diploma of Management and Diploma of International Business Student Login: Note: You must already be enrolled and issued with a Username and Password www.hs.edu Start here Select your course Enter Username
For ClassPad 300 PLUS. ClassPad Manager. Version 2.2 (PROGRAM-LINK TM ) User s Guide.
 User s Guide.") For ClassPad 300 PLUS E ClassPad Manager Version 2.2 (PROGRAM-LINK TM ) User s Guide RJA510188-4 http://world.casio.com/edu/ http://classpad.net/ Note Display examples shown in this User s Guide are intended
For ClassPad 300 PLUS E ClassPad Manager Version 2.2 (PROGRAM-LINK TM ) User s Guide RJA510188-4 http://world.casio.com/edu/ http://classpad.net/ Note Display examples shown in this User s Guide are intended
Table of Contents Lesson 1: Introduction to the New Interface... 2 Lesson 2: Prepare to Work with Office
 Table of Contents Lesson 1: Introduction to the New Interface... 2 Exercise 1: The New Elements... 3 Exercise 2: Use the Office Button and Quick Access Toolbar... 4 The Office Button... 4 The Quick Access
Meeting Host Guide. Getting Stated with Adobe Connect 9.3. Adobe Connect is a web conferencing platform for web meetings, elearning, and webinars.
 Meeting Host Guide Getting Stated with Adobe Connect 9.3 Adobe Connect is a web conferencing platform for web meetings, elearning, and webinars. Adobe Connect Services support is available 24/7 at 1-800-
IMPORTANT INFORMATION FOR INSTALLING COMPLAY
 IMPORTANT INFORMATION FOR INSTALLING COMPLAY 3.5.48 NOTE: This page is for Microsoft Windows 98, SE, NT, 2000, and XP. See page #2 for installing Complay on a Vista P. C. See page #3 for installing Complay
Spectrometer Visible Light Spectrometer V4.4
 Visible Light Spectrometer V4.4 Table of Contents Package Contents...3 Trademarks...4 Manual Driver and Application installation...5 Manual Application Installation...6 First Start of the Application...8
QUICKBOOKS PRO 2008 INSTALLING QUICKBOOKS PRO AND STUDENT DATA FILES
 QUICKBOOKS PRO 2008 INSTALLING QUICKBOOKS PRO AND STUDENT DATA FILES Installing QuickBooks Pro 2008 Software Before installing the software, verify that your computer meets the following minimum system
CollabNet SourceForge Office Plug-in
 CollabNet SourceForge Office Plug-in Introduction CollabNet SourceForge Office Plug-in is developed using Microsoft Windows.NET application that allows users to browse and edit the contents of their SourceForge
CLICKERS: A TOUCH OF CLASS
 CLICKERS: A TOUCH OF CLASS Part 1 of 4: Installing CPS (Clicker Software) 1. Insert the CPS Installation CD into your CD-ROM drive or download the file from: http://cid.vcc.ca/p1-dl/instructions/clickers/cps.5.40.1143.0.exe.
Introducing Office
 Contents Contents 1 2 Introducing Office 2007 9 Microsoft Office 2007 10 Ribbon Technology 11 What s Needed 12 Installing Office 2007 13 Start an Application 14 The Application Window 15 Live Preview 16
500 Series Installation Guide
 500 Series Installation Guide Revision 1.9 September, 2010 Disclaimer: The specifications in this document are subject to change without notice. All trademarks mentioned in this document are the property
FX Tools Software Package - FX CommPro N2 User s Guide
 User s Guide FX CommPro N2 Issue Date September 25, 2008 FX Tools Software Package - FX CommPro N2 User s Guide FX Tools Software Package FX CommPro N2... 3 Introduction...3 Installation... 4 Installing
Introducing Office
 Contents Contents Introducing Office 0 7 Microsoft Office 0 8 Ribbon Technology 9 What s Needed 0 Installing Office 0 Start an Application Application Start 4 The Application Window 5 Your SkyDrive 6 Live
GUIDE FOR STUDENTS AND PARENTS. An orange ring means you have an assignment.
 Odyssey Quick Start Launch Pad and Assignments below Portfolio and Reports on page 2 FAQs on page 5 For Parents on page 8 GUIDE FOR STUDENTS AND PARENTS Launch Pad and Assignments This icon opens your
ArcGIS Online Tutorial
 ArcGIS Online Tutorial ArcGIS Online allows users to make interactive maps or applications and easily share them with others. The University of Minnesota has an organizational account that can be logged
GUIDE FOR STUDENTS AND PARENTS. An orange ring means you have an assignment.
 Odyssey Quick Start Launch Pad and Assignments below Portfolio and Reports on page 2 FAQs on page 5 For Parents on page 7 GUIDE FOR STUDENTS AND PARENTS Launch Pad and Assignments This icon opens your
FileMaker. Mobile 7. User s Guide. For Windows, Mac, Palm OS, and Pocket PC. Companion for Palm OS and Pocket PC
 For Windows, Mac, Palm OS, and Pocket PC FileMaker Mobile 7 Companion for Palm OS and Pocket PC User s Guide 2000-2004 FileMaker, Inc. All Rights Reserved. FileMaker, Inc. 5201 Patrick Henry Drive Santa
CHAPTER 1 GETTING STARTED
 CHAPTER 1 GETTING STARTED Configuration Requirements This design of experiment software package is written for the Windows 2000, XP and Vista environment. The following system requirements are necessary
Switched-On Schoolhouse 2014 User Guide Reports & Application Functions
 Switched-On Schoolhouse 2014 User Guide Reports & Application Functions MMVI Alpha Omega Publications, Inc. Switched-On Schoolhouse 2014, Switched-On Schoolhouse. Switched-On, and their logos are registered
Introducing Office
 Contents Contents 1 Introducing Office 01 9 Microsoft Office 01 10 Ribbon Technology 11 What s Needed 1 Installing Office 01 1 Start an Application 14 Application Start 16 The Application Window 17 Your
Book Xpress Quick Startup Guide
 Book Xpress Installation Windows 1) Insert the installation DVD and click on Note: System requirements: Pentium 4, 2.8 GHz Processor and above 1 GB RAM + 1 GB free disk space CD/DVD- ROM drive Microsoft
irespond Quick Reference Guide
 irespond Quick Reference Guide Contact irespond customer support at (888) 325-6565 x6 or email support@irespond.com if you need assistance. Rev 7.0.6.0 TABLE OF CONTENTS SOFTWARE INSTALLATION... 2 HARDWARE
SAM 2010 Instructor Manual
 SAM 2010 Instructor Manual 2011 Course Technology. 20 Channel Center Street. Boston, MA 02210. SAM 2010 Contents SAM 2010 Instructor Manual 1 Using This Manual... 1 2 Introduction to SAM 2010... 1 2.1
Installing and Setting Up the Snap-on EPC. Rev.1.10 (10 Oct 2013) PN EN
 PN EN") Installing and Setting Up the Snap-on EPC Rev.1.10 (10 Oct 2013) PN 275-0800-EN Table of Contents 1. Introduction... 3 2. Minimum Requirements... 4 3. Installing the Snap-on EPC... 6 4. Licensing the Snap-on
Installing and Setting Up the Snap-on EPC Rev.1.10 (10 Oct 2013) PN 275-0800-EN Table of Contents 1. Introduction... 3 2. Minimum Requirements... 4 3. Installing the Snap-on EPC... 6 4. Licensing the Snap-on
Introduction. Paradigm Publishing. SNAP for Microsoft Office SNAP for Our Digital World
 Introduction Paradigm Publishing Paradigm understands the needs of today s educators and exceeds the demand by offering the latest technological advancements for coursework settings. With the success of
To complete this activity, you will need the following files:
 CHAPTER 1 Windows XP More Skills 12 Move Data Between Windows You can open several application windows at the same time; they do not need to be files created by the same program. Having more than one window
QUICKBOOKS PRO 2009 INSTALLING QUICKBOOKS PRO AND STUDENT DATA FILES
 QUICKBOOKS PRO 2009 INSTALLING QUICKBOOKS PRO AND STUDENT DATA FILES Installing QuickBooks Pro 2009 Software Before installing the software, verify that your computer meets the following minimum system
Requirements Instructions Configuring Cat ET to use the Wireless CA3 Radio... 12
 Getting Started Table of Contents INTRODUCTION... 2 PC, COMMUNICATION HARDWARE, AND CABLE REQUIREMENTS... 3 SETTING UP THE COMMUNICATION ADAPTER 3... 5 Requirements... 5 Configuring Cat Electronic Technician
DISCLAIMER Whilst every effort has been made
 PUBLISHED BY Gallagher Group Limited Kahikatea Drive, Private Bag 3026 Hamilton, New Zealand www.gallagherams.com Copyright Gallagher Group Limited 2011. All rights reserved. Patents Pending. MyScale Pro
Odyssey Quick Start. Quick Links: Launch Pad and Assignments Portfolio and Reports FAQs For Parents GUIDE FOR STUDENTS AND PARENTS
 Odyssey Quick Start GUIDE FOR STUDENTS AND PARENTS Quick Links: Launch Pad and Assignments Portfolio and Reports FAQs For Parents Launch Pad and Assignments Click here to open your portfolio. Click this
Gamco Installation Guide for Worksheet Magic Plus. Version 4.5 WINDOWS and MAC OS X
 Gamco Installation Guide for Worksheet Magic Plus Version 4.5 WINDOWS and MAC OS X Dear Educator, Thank you for purchasing a Gamco product. Our programs succeed in classrooms and computer labs because
Enter your Appserv username and password to sign in to the Website
 Appserv Desktop Access Logging on from a Windows 10 Device Step 1. To sign in to the Appserv Desktop Access website, either enter the following address into the Microsoft Edge browser address bar, or click
SMART Classroom Suite 2011
 SMART Classroom Suite 2011 Windows operating systems System administrator s guide Trademark notice SMART Board, SMART Classroom Suite, SMART Notebook, SMART Response, SMART Sync, SMART Document Camera,
HP Travel Phone User s Guide
 HP Travel Phone User s Guide Version 1.0 Copyright 2007 Hewlett-Packard Development Company, L.P. The information contained herein is subject to change without notice. The only warranties for HP products
Getting Started With the Cisco PAM Desktop Software
 CHAPTER 3 Getting Started With the Cisco PAM Desktop Software This chapter describes how to install the Cisco PAM desktop client software, log on to Cisco PAM, and begin configuring access control features
Adobe Connect: Overview
 Adobe Connect: Overview Table of Contents Table of Contents... 1 Overview of Adobe Connect... 2 Recommended Use... 2 Roles and Privileges... 2 Menu Bar... 3 Prepare Room and Upload Content... 4 Create
KV-SS090. Operating Instructions. Instant Scanning Software. Model No.
 Operating Instructions Instant Scanning Software Model No. KV-SS090 Thank you for purchasing this Panasonic product. Please read this manual carefully before using this product and save this manual for
One-Click Meeting User s Guide
 One-Click Meeting User s Guide Table of Contents About this Guide 2 What is One-Click 2 System Requirements 2 Setting up a One-Click Meeting 2 About the One-Click Meeting Setup Wizard 3 Audio Conference
EasyMP Multi PC Projection Operation Guide
 EasyMP Multi PC Projection Operation Guide Contents 2 About EasyMP Multi PC Projection Meeting Styles Proposed by EasyMP Multi PC Projection........ 5 Holding Meetings Using Multiple Images................................
Introducing Office
 1 2 Contents Contents Introducing Office 2010 9 Microsoft Office 2010 10 Ribbon Technology 11 What s Needed 12 Installing Office 2010 13 Start an Application 14 The Application Window 15 Live Preview 16
Table of Contents.
 Table of Contents http://www.advancedactuators.com 1. Items Included with the ThumbLock PCMU:... 2 2. IMPORTANT NOTE:... 2 3. Supported Operating Systems:... 2 Section 1 Installing the ThumbLock PCMU Software...
MimioClassroom User Guide
 MimioClassroom User Guide for Windows gkpglobalsolutions.com Mimio LLC. All rights reserved. Revised 10/21/2010. No part of this document or the software may be reproduced or transmitted in any form or
JPRO Fleet Service Portal User s Guide
 JPRO Fleet Service Portal User s Guide 1 System Requirements Supported Operating Systems Windows 2000 Windows XP Hardware Requirements Minimum: 128 MB RAM, 2 GB HD, Pentium II, 1024 x 768 monitor Recommended:
irespond Quick Reference Guide
 irespond Quick Reference Guide Contact irespond customer support at (888) 325-6565 x6 or email support@irespond.com if you need assistance. Rev 6.7.1 CONTENTS Software Installation... 3 Hardware Setup...
Microsoft Office 2013 (or Office) is a collection of software programs.
 is a collection of software programs.") 1 Microsoft Office 2013 (or Office) is a collection of software programs. Program Function Word - enables you to create documents such as letters and reports Excel - lets you work with numbers to prepare
1 Microsoft Office 2013 (or Office) is a collection of software programs. Program Function Word - enables you to create documents such as letters and reports Excel - lets you work with numbers to prepare
Welcome to PDQ Deploy
 Getting Started Contents Welcome to PDQ Deploy.......... 1 PDQ Deploy Overview......... 2 Licensing.................... 3 PDQ Deploy Product Feature Comparison.................. 4 Product Requirements.........
Workstation Configuration Guide
 Workstation Configuration Guide August 13, 2018 Version 9.6.134.78 For the most recent version of this document, visit our documentation website. Table of Contents 1 Workstation configuration 4 1.1 Considerations
Table of Contents. Chapter 1 Introduction Features System Diagram... 2
 inex Standard Table of Contents Chapter 1 Introduction... 1 1.1 Features... 1 1.2 System Diagram... 2 Chapter 2 Installation... 5 2.1 Product Information... 5 Package Contents... 5 System Requirements...
User Manual. perfectionlearning.com/technical-support
 User Manual perfectionlearning.com/technical-support 1 User Manual Accessing Math X... 3 Login... 3 Forgotten Password... 3 Navigation Menu... 4 Logout... 4 Admin... 5 Creating Classes and Students...
Help us make this document better smarttech.com/docfeedback/ SMART Ink 3.1 USER S GUIDE FOR WINDOWS OPERATING SYSTEMS
 Help us make this document better smarttech.com/docfeedback/170830 SMART Ink 3.1 USER S GUIDE F WINDOWS OPERATING SYSTEMS Trademark notice SMART Ink, SMART Notebook, SMART Meeting Pro, Pen ID, smarttech,
FrontPage 2000: Advanced
 FrontPage 2000: Advanced Course specifications Course number: 074951 Software version number: 2000 Course length: 1 day Hardware/software required to run this course A PC with a 75 MHz Pentium or higher
Teacher Manual. Teacher Manual Knowledge Adventure, Inc. All rights reserved
 Teacher Manual Under the copyright laws, neither the documentation nor the software may be copied, photocopied, reproduced, translate, or reduced to any electronic medium or machine readable form, in whole
umapps Using umapps 6/14/2017 Brought to you by: umtech & The Center for Teaching & Learning
 umapps Using umapps Center for Teaching and Learning (CTL) 100 Administration Bldg., Memphis, TN 38152 Phone: 901.678.8888 Email: itstrainers@memphis.edu Center for Teaching and Learning Website 6/14/2017
User Guide 701P Wide Format Solution Wide Format Scan Service
 User Guide 701P44865 6204 Wide Format Solution Wide Format Scan Service Xerox Corporation Global Knowledge & Language Services 800 Phillips Road Bldg. 845-17S Webster, NY 14580 Copyright 2006 Xerox Corporation.
RUNNING GMETRIX. MOS 2010 Practice Tests Online Action Learning Software. Quick-start guide for learndirect customers
 Running GMetrix MOS 2010 Online Action Learning Software v1.0 (October 2012) learndirect edition PAGE 1 RUNNING GMETRIX MOS 2010 Practice Tests Online Action Learning Software Quick-start guide for learndirect
MW-260 Mobile Printer
 Software Guide MW-260 Mobile Printer Before using this printer, be sure to read this User's Guide. We suggest that you keep this manual in a handy place for future reference. Microsoft, Windows, Windows
For ClassPad 300. ClassPad Manager. (ProgramLink) Limited Version. User s Guide. RJA
 Limited Version. User s Guide. RJA") For ClassPad 300 E ClassPad Manager (ProgramLink) Limited Version User s Guide RJA510188-4 http://world.casio.com/edu_e/ Note Display examples shown in this User s Guide are intended for illustrative purposes
For ClassPad 300 E ClassPad Manager (ProgramLink) Limited Version User s Guide RJA510188-4 http://world.casio.com/edu_e/ Note Display examples shown in this User s Guide are intended for illustrative purposes
TrainingCenter Getting Started Guide
 TrainingCenter Getting Started Guide This guide introduces you to TrainingCenter and provides basic information about using its many features. For more information about using these features, refer to
Activating Your Account
 Welcome to CINCH Science for Texas, your digital platform containing Glencoe/McGraw-Hill s Science content. A complete user s guide can be found in the CINCH platform. This is intended as a training resource.
Social Media Managers Course - Navigation Guide
 Defense Information School Strength Through Truth Social Media Managers Course - Navigation Guide Log In Visit dinfos-lms.goaclc.com and enter your username and password. Click the Login Button. Note:
Welcome to PDQ Deploy
 Getting Started Contents Welcome to PDQ Deploy.......... 1 PDQ Deploy Overview......... 2 Licensing.................... 3 PDQ Deploy Product Feature Comparison.................. 4 Product Requirements.........
MindView Online - Quick Start Guide
 MindView Online - Quick Start Guide Overview MindView Online is an online concept mapping program that allows users to organize their thoughts visually to create, share, and export mind maps to Microsoft
Panopto Getting Started- Permissions and Access Using Panopto to Record or Upload Sharing Panopto Recordings Accessing Panopto from ilearn Tools
 Panopto Panopto is the Marist version of Youtube. It enables professors and students of Marist to record and upload recordings through the ilearn system and have more control over who has access to them.
Examplify Student Guide
 Syracuse University COLLEGE OF LAW Examplify Student Guide 2018 Information Technology and Support Services Suite 215 Dineen Hall lawhelp@law.syr.edu 315-443-9561 1 The College of Law requires students
Widgets for SAP BusinessObjects Business Intelligence Platform User Guide SAP BusinessObjects Business Intelligence platform 4.1 Support Package 2
 Widgets for SAP BusinessObjects Business Intelligence Platform User Guide SAP BusinessObjects Business Intelligence platform 4.1 Support Package 2 Copyright 2013 SAP AG or an SAP affiliate company. All
Getting Started SPU Online Courses
 Getting Started SPU Online Courses Welcome to SPU Online Courses. This document will guide you through the navigation, features, and functionality of your online course. It is divided into five sections:
Adobe Dreamweaver CS5 Tutorial
 Adobe Dreamweaver CS5 Tutorial GETTING STARTED This tutorial focuses on the basic steps involved in creating an attractive, functional website. In using this tutorial you will learn to design a site layout,
Access PayrollSE v5.50a
 Access PayrollSE v5.50a Installation Instructions for Windows Contents Introduction... 3 System Requirements... 3 Microsoft Visual C++ 2005 redistributable... 3 Microsoft.NET Framework 4... 3 Other considerations...
2014 Securexam User Guide
 2014 Securexam User Guide For candidates planning to write the 2014 UFE or regional evaluations Chartered Professional Accountants of Canada, CPA Canada, CPA are trademarks and/or certification marks of