Introduction What is MIT App Inventor?
|
|
|
- Buddy Wright
- 5 years ago
- Views:
Transcription

1
2 Table of Contents Introduction What is MIT App Inventor? Arduino (From Arduino Website) Turn On and OFF an LED (Hello World) Creating Android App Connecting Bluetooth and programming Arduino Control LED by Speech recognition Task Control a Servo Motor Arduino code for servo control Control Multiple Servo Motors Arduino Code Multiple servo RGB Color Slider Activity starter Complete program for the RGB Slider Arduino Program for RGB Slider Common anode Arduino program Common Cathode Arduino program RGB Color Picker Arduino Program Temperature data into Android Arduino Program for Temperature Android Remote control Robot Arduino Program for Android remote Control the same robot by speech recognition How to import aia files to MIT app inventor Contact and app inventor files.
3
4
5 Introduction What is MIT App Inventor? MIT App Inventor is an innovative beginner s introduction to programming and app creation that transforms the complex language of text-based coding into visual, drag-anddrop building blocks. The simple graphical interface grants even an inexperienced novice the ability to create a basic, fully functional app within an hour or less.
6 Arduino (From Arduino Website) Arduino is an open-source prototyping platform based on easy-to-use hardware and software. Arduino boards are able to read inputs - light on a sensor, a finger on a button, or a Twitter message - and turn it into an output - activating a motor, turning on an LED, publishing something online. You can tell your board what to do by sending a set of instructions to the microcontroller on the board. To do so you use the Arduino programming language (based onwiring), and the Arduino Software (IDE),based on Processing. Over the years Arduino has been the brain of thousands of projects, from everyday objects to complex scientific instruments. A worldwide community of makers - students, hobbyists, artists, programmers, and professionals - has gathered around this open-source platform, their contributions have added up to an incredible amount of accessible knowledge that can be of great help to novices and experts alike. Arduino was born at the Ivrea Interaction Design Institute as an easy tool for fast prototyping, aimed at students without a background in electronics and programming. As soon as it reached a wider community, the Arduino board started changing to adapt to new needs and challenges, differentiating its offer from simple 8-bit boards to products for IoT applications, wearable, 3D printing, and embedded environments. All Arduino boards are completely open-source, empowering users to build them independently and eventually adapt them to their particular needs. The software, too, is open-source, and it is growing through the contributions of users worldwide.
7

8 Turn On and OFF an LED (Hello World) Before starting to go inside this chapter, firstly you need to install Arduino Ide from the website arduio.cc Download the latest Arduino software and install it on your laptop or PC, without Arduino IDE you cannot program your Arduino board. Things you need for this tutorial are 1) Arduino board 2) LED and Android phone to control the LED connected to Arduino. First we create android app to control the LED, to do this you should have a Gmail account or you can create a new account it s really easy and most of people will have an existing Gmail account. The following step-by-step picture tutorial will guide you to create your first android app that connects to your Arduino. 1) Go to the website when you enter for the first time you will be required to login with your Gmail id and password. 2) MIT appinventor will ask to use your Gmail account click allow and check remember this approval for the next 30 days. 3) When you logged into MIT app inventor development environment for the first time, there won t be any projects, you will be greeted with an empty window. Click on the start new project to create your first android app.
 When you click ok after naming your app, you will be moved to a main screen to make your app, the screen that appears on your window is called as Designer, where you need to design user interface")

9 4) Name your new project as LED_CTRL or whatever name you would like for your first app and click ok to enter into the main screen. 5) When you click ok after naming your app, you will be moved to a main screen to make your app, the screen that appears on your window is called as Designer, where you need to design user interface like buttons, widget, text pane, label this window act as a controller and there is also another window where you need to program the graphical codes to make your function to work. On the left side you can see palette, the palette which contains interface, layout, Media, Drawing and Animation, Sensors, Social, Connectivity etc., To create your user interface on the main screen you need to pick buttons and your required stuffs from the palette. Click Layout on the left side below palette, Pick Table Arrangement and drop into the Viewer.


10 On the left side of the table properties, change columns and rows to 3 and also change the width to fill parent from automatic. Pick Listpicker from User Interface and drop into first row in the Viewer screen. This used to connect to your Bluetooth device. When you click this button it will display available Bluetooth devices.

11 Select ListPicker from the Components List Go to list picker properties and change the text to Bluetooth and you can also upload an image file to the list picker. Click on the None tab below Image and upload your Bluetooth picture to set it to Listpicker.


12 Click the upload file and browse to the image you want to use for the ListPicker, if the Viewer Screen displays the Image for the ListPicker in larger size you need to alter the height and width of the ListPicker by going to the properties for the Listpicker. Next pick a button and drop into second row of the Viewer screen and add another button to the same row. Click on the first button and go the button properties and change the name of the button to ON do the same for the second button by changing the name of the button to OFF.


13 Change button color by changing the background color from properties of the appropriate button. Pick and place Label from user interface and place into the 3 rd row of Viewer Screen. Go to properties and remove the Text label and leave this as empty, this label will later on used for indicating whether our app has connected to an Bluetooth or not.


14 We have almost completed User Interface for our first Android app, we also need some Non-visible components to make this app, the first one is the clock which can pick and placed from the sensor palette It provides the instant in time using the internal clock on the phone. It can fire a timer at regularly set intervals and perform time calculations, manipulations, and conversions. We are using clock to cause activities to occur at a preset interval.


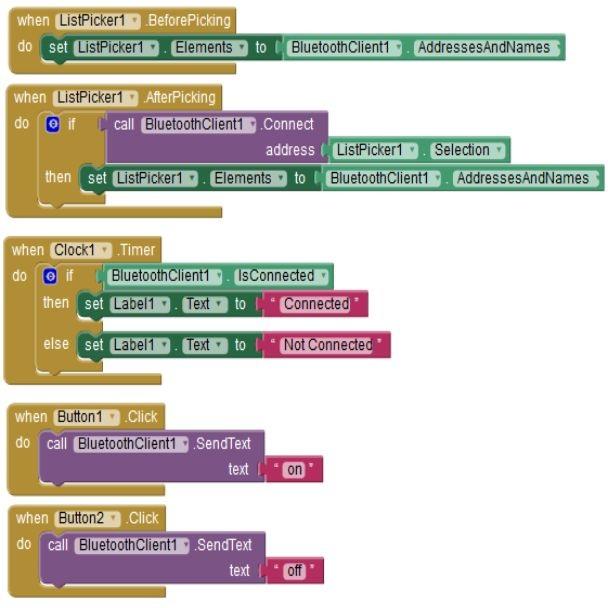
15 Last step in this tutorial pick Bluetooth client form the connectivity palette and place it inside the Viewer screen. The Bluetooth client component which allows us to connect to other device and make us to send and receive data s between Bluetooth devices. We have completed the user interface design for the first app, now this design requires program to run behind this and do certain functions, In app inventor we connect different blocks to make a program and it s easy for any new user who s having lot of enthusiasm for learning, let s move to programming. Click on the blocks to get into programming mode. Click ListPicker1 and select when.listpicker1.beforepicking block and place into programming window.


16 After placing the first block and scroll down in the list picker blocks and select set.listpicker1.element to Now you may familiarize with blocks and how to pick and place into programming window, complete the blocks programming by going into different blocks associated with different functions and place it on the programming window. Go to Bluetooth client and pick Bluetooth client address and names and complete the first block. The first block which explains, when you click the list picker button, it should display the available Bluetooth devices that are already connected to your device previously. Now complete the second block by going to the different components and pick and place the required block into programming window.


17 If then block can be pick from the built in functions. Second block which explains, when you pick a Bluetooth device from the available list the current device that you picked should be used as a current device and Bluetooth address will be stored and the app will communicate with the selected device. The third block which is placed inside a timer, this block will assign Connected text to Text Label on the third row if the Bluetooth device is connected if the device is not


18 connected Text label will display message as Not Connected. Complete the block by using the above screen shot. Text string block can be added from Text in built function We have already seen how to add If then block from controls, in the above program for screen shot we have added If then else block, which is not available in the controls, we need to place usual if then block and click on the blue icon on the if then block and place the else function to the block. And we are just few steps away from completing our app. You need to create a control task for the two button we created in the Viewer screen. Complete the code for button

19 using the screenshot below. When you press the first button it will send on and for the second button it is off. We connect to a Bluetooth device attached to Arduino, when Arduino receive these two string we have to program based on these string and make a decision to turn On and Off an LED. Here s the complete block for the First program to control an LED connected to an Arduino. Check your block with this block and make sure you have not made any mistake when connecting the blocks.
20


21 Creating Android App Convert your block into android app. Click build and select app (save.apk to my computer). Attach the app to your and send the address which your android device registered to and download the app to your mobile and install it. Make sure you have enabled installation of apps from unknown sources, this can be done from your settings. You need to add HC-05 or HC-06 or whatever model you are using to your android device, connect your Bluetooth device VCC to 5v and Gnd to Ground of Arduino, go to your Bluetooth and turn on your Bluetooth and search for devices, connect to your Bluetooth device using default password, most Bluetooth devices will be 1234 or 0000.
22

23 Connecting Bluetooth and programming Arduino Now connect your Bluetooth device to Arduino board, connection as follows Connect your LED to 13 th pin of Arduino, if you don t want to connect an LED still you can do this project, by default an LED is connected to the 13 th pin of Arduino. Connect TX of Bluetooth to 10 th pin and RX of Bluetooth to 11 th pin. You can also connect it to the available TX and RX pins that is 0 and 1, when you connect to these two pins you cannot connect your Arduino to your PC or Laptop. // code begin here #include <SoftwareSerial.h> SoftwareSerial BT(10, 11); //TX, RX respectively String state; // string to store incoming message from bluetooth void setup() { BT.begin(9600);// bluetooth serial communication will take place on pin 10 and 11 Serial.begin(9600); // serial communication to check the data on serial monitor } pinmode(13, OUTPUT); // LED connected to 13th pin // // void loop() { while (BT.available()){ //Check if there is an available byte to read delay(10); //Delay added to make thing stable
; if(state == on ) // if the received string is on, turn on led connected to the pin 13 { digitalwrite(13, HIGH); } else if(state == off ) // if the received string is off, turn off led")
24 char c = BT.read(); //Conduct a serial read state += c; //build the string- either On or off } if (state.length() > 0) { Serial.println(state); if(state == on ) // if the received string is on, turn on led connected to the pin 13 { digitalwrite(13, HIGH); } else if(state == off ) // if the received string is off, turn off led connected to the pin 13 { digitalwrite(13, LOW); } state = ;}} //Reset the variable // code ends here Upload the above program to Arduino and connect your app and turn on and off the led connected to your Arduino, you can also check the Arduino serial monitor for incoming data.

25 Control LED by Speech recognition In the previous chapter we have seen how to control an LED connected to Arduino by creating an android app, in this chapter we will see how to control the same LED and the same setup and program that we used in the previous chapter by speech recognition, this app is very simple, all the android phone comes with Google inbuilt speech recognition engine, it need to connect to internet to work properly, when you speak something to your mobile phone it recognize your speech and convert it to text, we simply transfer the text to the Bluetooth device and match the text with predefined text in Arduino, if the text send from our android mobile matches then Arduino executes certain task associated with the text. Steps to create android app in MIT app inventor 1) Go to and create new project and name the project to your wish. 2) Pick label from user interface and place into Viewer screen, This will be used for displaying Bluetooth connectivity, if the Bluetooth is connected, connected text will be displayed if the Bluetooth is not connected, not connected text will display in the label. Go to properties of the label and change the width to fill parent and delete the text


 Pick another horizontal arrangement table and from layout, this table will add a space")
26 3) Pick and place horizontal arrangement from layout and change the properties of width to fill parent. 4) Pick list picker from user interface and place into the horizontal arrangement box, and change the list picker properties width to fill parent and change the text to Bluetooth, you can also add an image to the list picker. 5) Pick another horizontal arrangement table and from layout, this table will add a space between the Bluetooth picker and button which will look good instead of the button immediately follows the Bluetooth picker.


27 6) Pick one more horizontal arrangement and place it below the previous arrangement and change the properties of the present horizontal arrangement width to fill parent, pick a button from user interface and place into the horizontal arrangement. Change the button properties width to fill parent and change the text to press to talk, add an image to the button, you can use a google talk icon to make it more presentable and attractive. 7) Add a label below press to talk button, this label will be used to display the result from speech recognition edit the properties of label and remove the default text associated with this label and change the width to fill parent and make the text align to centre.


28 8) For the final finishing stage we need to pick and place non visible components to the Viewer, we need to place clock, Bluetooth client, and speech recognizer, pick clock from the sensor palette, Bluetooth client from connectivity palette and speech recognizer from Media palette. After completing everything in the Designer section it s time to program using blocks, click on the blocks on the top right hand side and move to programming section, we have already discussed about programming section in last chapter, let s directly dive into coding and see whatever the blocks need to be pick and place to make this app to work.


29 First place the block functions for before picking the listpicker what should happen in the program. When you place this function, when you press the list picker button it will display available Bluetooth device that has already connected to your Android mobile. Now, place the block for the second function, what should the app do after connecting to a Bluetooth device This function will set the address of the Bluetooth device that we selected mostly we select the HC-05 or HC-06 Bluetooth device connected to Arduino. All the block that is associated with speech recognizer can be find the speech recognizer block. Click on the speech recognizer to get the blocks and choose the blocks by following the screenshot for the program.


30 Now, we place the third block which will set the text label 1 to connect if the Bluetooth device has successfully connected else it will set to not connected. Now we will move on the main program, we added a button in the viewer, when someone press that button it should open Google speech recognizer and start listening to you and convert your speech to text. Add the above blocks to start the speech recognizer and get the text. Now we got the text, it should be stored into label 2 and before storing to label 2, previous text that occupied in the label 2 should clear. Make the block by following below screenshot to do that. This block will help us to empty the text that previously occupied in label 2. Now we will add blocks for sending the converted speech to text character as a Bluetooth message and also display the text in label 2. Above block will send the result as string to the Bluetooth device connected to Arduino, we have already programmed Arduino, so if the text matches to it then Arduino will execute appropriate function that is associated with the text.

31 Complete program for the speech recognition has given in the above screenshot, that can be used to verify whether you have programmed without any errors or not. Upload the same Arduino program to your Arduino board and start talking to your app, when you say ON the led on the Arduino will goes on and when you say OFF led on the Arduino side will goes off, check this app with your Android device. Refer Connecting Bluetooth and programming Arduino
32 Task Combine both the app speech recognition and button control into one app and play with your android Arduino.
33
34 Control a Servo Motor In this chapter you will create an app for controlling the servo motor and also program Arduino to receive commands from android mobile and angle the servo motor to the position that is assigned by the android app. You need a servo motor and Arduino board with Bluetooth module, use any of the servo motor that is available in the market, some motors draws more power and Arduino cannot supply enough power to run the servo motor, in such cases you should connect an external power supply to your Arduino this will make the Arduino board to work smoother during the operation, if you are not supplied with external power Arduino may frequently reset when running in laptop or PC USB power. 1) Click on start new project and name your new project as servocontrol or any other you would like for your android app. 2) Pick label from user interface and place it in Viewer screen, change the properties of label width to fill parent, and text align to centre. 3) Pick horizontal arrangement from layout and place it below Text label-1 and change the properties of horizontal arrangement width to fill parent 4) Pick another horizontal arrangement and place it below previous one. This will be used for spacing. 5) Pick label from user interface and place it below previous horizontal arrangement we added for spacing.
 Pick and place a button from user interface and place it inside the horizontal arrangement that created newly, add another 4 buttons to the same horizontal arrangement.")
35 6) Add another horizontal arrangement below Text label 2 and change its properties width to fill parent. 7) Pick and place a button from user interface and place it inside the horizontal arrangement that created newly, add another 4 buttons to the same horizontal arrangement. 8) Change the button properties from text for button to 0 for the first button, 45 for the second button, 90 for the third button, 135 for the fourth button and 180 for the last button. 9) Pick slider from user interface and place it in Viewer screen below the buttons that have created in the previous step. Change the slider properties Max value to 180 and Min value to 0. 10) Pick and place invisible components, Bluetooth client and clock into Viewer screen. Designer part is over and the programming part is left over, click on the blocks on the upper right side of the App inventor window. Complete the first 3 blocks which has repeated in the first 2 chapters, if you have skipped these chapters and directly launched into this chapter, please go through first or second chapter to make sure how this code works and what you should do to complete the below code given in the screen shot.


36 Above code will connect to the Bluetooth device that is already paired with your android phone and if the device is connected then label 1 text changes to connected else label 1 will display as not connected. Function related to slider block can be find in the slider check the image below to know how to access blocks related to slider. Drag and drop the below screenshot for the blocks in the blocks window of Mit app inventor, this block will send the number when you change the slider position in your android app, and the current slider position will be display on your label 2. Round function will be new to you and this function is introduce in this chapter, the round

37 function help us to round a number all the number will be presented as a whole number. This block is available in the built in math block. Complete the below block for sending numbers when each button is pressed, we have created five buttons in the Viewer screen and each button has assigned a number, when we press a button the number assigned to the number should send to the connected Bluetooth device. Block to give number input can be find in the math built in function.

38 Arduino code for servo control In this section we will know how to connect the servo motor and Bluetooth to your Arduino. Connect your Bluetooth TX pin to the 10 th pin of Arduino and RX pin to the 11 th pin of Arduino, most of the servo motor comes with 3 wires and check for your servo motor wire specification with the manufacturer sometime servo motor comes with different wire colors, connect the servo signal wire to the 9 th pin of Arduino. If your Arduino board reset frequently when you connecting your app, this might be due to low power from the Arduino side, to eliminate this error you can supply external power supply to your Arduino which can make things stable. Write the below code and all the explanation for this code is given as a comment next to each line of Arduino program, try to type the code and know what each code represents and this code can be co relate with the android program. Don t copy and paste without understanding what is actually happening inside the code. Arduino program for servo motor:
39 // code begins #include <SoftwareSerial.h> // TX RX software library for bluetooth #include <Servo.h> // servo library Servo myservo; // servo name int bluetoothtx = 10; // bluetooth tx to 10 pin int bluetoothrx = 11; // bluetooth rx to 11 pin SoftwareSerial bluetooth(bluetoothtx, bluetoothrx); void setup() { myservo.attach(9); // attach servo signal wire to pin 9 //Setup usb serial connection to computer Serial.begin(9600); } //Setup Bluetooth serial connection to android bluetooth.begin(9600); void loop() { //Read from bluetooth and write to usb serial if(bluetooth.available()> 0 ) // receive number from bluetooth { int servopos = bluetooth.read(); // save the received number to servopos Serial.println(servopos); // serial print servopos current number received from bluetooth myservo.write(servopos); // roate the servo the angle received from the android app } } // code ends here.
40 Control Multiple Servo Motors In this chapter we will know how to control many servo motors, this chapter will resemble everything what we did in the previous chapter for controlling a single servo motor, in this chapter we will concentrating on creating six slider to control six servo motor connected on the Arduino side. All the codes are same for android app, on the Arduino side there will be plenty of change in the programming. It s very easy to control a single servo motor the reason is Arduino can easily accept 8bit number, when we created a single servo slider we assigned the data value from 0 to 180 and it falls below 255(8 bit) so it becomes easy for us, when we want to control more servo we need to assign number more than 255 so it more than 8 bit, and still we don t have problem on android app side it just sending numbers from android app on the Arduino side we have to receive these number and do some calculation and make the number to do certain action. Let s begin with creating Viewer screen for this app. 1) Start a new project on your MIT app inventor and name your project as Mutliple_servo_control 2) Start with placing a text label for displaying Bluetooth connectivity status 3) Place horizontal arrangement and change its properties width to fill parent 4) Place listpicker from user interface and place it inside horizontal arrangement 5) Place a slider from user interface below the horizontal arrangement 6) Place five slider one after another.


41 Select slider 1 and change its properties width to fill parent and change maximum value to 1180 and minimum value to 1000 and also thumb position to 1000 Select second slider and change its properties width to fill parent and change maximum value to 2180 and minimum value to 2000 and also thumb position to Select third slider and change its properties width to fill parent and change maximum value to 3180 and minimum value to 3000 and also thumb position to Select fourth slider and change its properties width to fill parent and change maximum

42 value to 4180 and minimum value to 4000 and also thumb position to Select fifth slider and change its properties width to fill parent and change maximum value to 5180 and minimum value to 5000 and also thumb position to Select last slider and change its properties width to fill parent and change maximum value to 6180 and minimum value to 6000 and also thumb position to 6000 Pick and place invisible components, Bluetooth client and clock into Viewer screen. Complete the first 3 blocks which has repeated in the first 2 chapters, if you have skipped these chapters and directly launched into this chapter, please go through first or second chapter to make sure how this code works and what you should do to complete the below code given in the screen shot. Above code will connect to the Bluetooth device that is already paired with your android phone and if the device is connected then label 1 text changes to connected else label 1 will display as not connected. Complete the block for first slider, whenever slider position changes, these position will send as a 2 byte number to the connected Bluetooth device. Round block can be pick from Math built in function. Continue the same block which shown in the above screenshot for other sliders

43 Programming for the app has completed now build the code and transfer the app to your android mobile and install the app, make sure you have enabled your setting for installing app from unknown source.

44 Arduino Code Multiple servo When come s to Arduino code this is quite complicated than our previous programs, this code will receive number from android app, the number from android app is a 2 byte number, so the Arduino will receive these number as 2 bytes and later on add the first and second byte and make it as a single digit number. When you using servo motor with Arduino board you should use external power supply to ensure proper working of this board, Arduino board cannot supply enough power to these servo motors if it has connected to PC or Laptop. Connect Tx of Bluetooth to 7 th pin of Arduino and Rx of Bluetooth to 8 th pin of Arduino. Connect first servo signal wire to 9 th pin of Arduino Second servo signal wire to 10 th pin of Arduino Third servo signal wire to 11 th pin of Arduino Fourth servo signal wire to 3 rd pin of Arduino Fifth servo signal wire to 5 th pin of Arduino Sixth servo signal wire to 6 th pin of Arduino // code starts here #include <SoftwareSerial.h> #include <Servo.h> Servo myservo1, myservo2, myservo3, myservo4, myservo5, myservo6; int bluetoothtx = 7;
45 int bluetoothrx = 8; SoftwareSerial bluetooth(bluetoothtx, bluetoothrx); void setup() { myservo1.attach(9); // attach servo1 to 9th pin myservo2.attach(10); // attach servo 2 to 10th pin myservo3.attach(11); // attach servo 3 to 11th pin myservo4.attach(3); // attach servo 4 to 3rd pin myservo5.attach(5); // attach servo 5 to 5th pin myservo6.attach(6); // attach servo 6 to 6th pin //Setup usb serial connection to computer Serial.begin(9600); } //Setup Bluetooth serial connection to android bluetooth.begin(9600); void loop() { //Read from bluetooth and write to usb serial if(bluetooth.available()>= 2 ) // receive two byte numbers { unsigned int servopos = bluetooth.read(); // receive first byte unsigned int servopos1 = bluetooth.read(); // receive second byte unsigned int realservo = (servopos1 *256) + servopos; // add first and second byte to make single digit number Serial.println(realservo); // if number falls between 1000 to 1180 it is first servo if (realservo >= 1000 && realservo <1180){ // check for the number int servo1 = realservo; servo1 = map(servo1, 1000,1180,0,180); myservo1.write(servo1);
46 Serial.println( servo 1 ON ); delay(10); } // if number falls between 2000 to 2180 it is second servo if (realservo >=2000 && realservo <2180){ int servo2 = realservo; servo2 = map(servo2,2000,2180,0,180); myservo2.write(servo2); Serial.println( servo 2 On ); delay(10); } // if number falls between 3000 to 3180 it is third servo if (realservo >=3000 && realservo < 3180){ int servo3 = realservo; servo3 = map(servo3, 3000, 3180,0,180); myservo3.write(servo3); Serial.println( servo 3 On ); delay(10); } // if number falls between 4000 to 4180 it is fourth servo if (realservo >=4000 && realservo < 4180){ int servo4 = realservo; servo4 = map(servo4, 4000, 4180,0,180); myservo4.write(servo4); Serial.println( servo 4 On ); delay(10); } // if number falls between 5000 to 5180 it is fifth servo if (realservo >=5000 && realservo < 5180){
47 } } int servo5 = realservo; servo5 = map(servo5, 5000, 5180,0,180); myservo5.write(servo5); Serial.println( servo 5 On ); delay(10); } // if number falls between 6000 to 6180 it is sixth servo if (realservo >=6000 && realservo < 6180){ int servo6 = realservo; servo6 = map(servo6, 6000, 6180,0,180); myservo6.write(servo6); Serial.println( servo 6 On ); delay(10); } // code ends here Upload the above program to your Arduino board and connect to your android app, you can check the serial monitor for the data receiving from the android app.
48
49 RGB Color Slider In this chapter we will use three slider and mix color using RED slider, GREEN slider and BLUE slider. When we mix RGB we get a new color, this color will be displayed on our app as well as the color data will send to a Bluetooth device connected to Arduino, the same color will be applied to an RGB LED connected to Arduino on the other side.

50 Activity starter This activity starter will be useful when the app initialize if we want to execute certain function in android phone we can make use of this activity starter, we will look in this chapter how to use this activity starter to remind us to turn on our Bluetooth if it is disabled during the opening of the app in the android device. 1) Pick a Label and place it on the viewer screen, change its properties width to fill parent and change the text alignment to centre. 2) Pick a horizontal arrangement from layout and place it below Text label and change its properties width to fill parent. 3) Place a list picker from user interface and change its name from properties to Bluetooth and also place a button next to it and name it to disconnect in this chapter we use a button to disconnect from Bluetooth device when we press the button. 4) Pick canvas from drawing and animation and place it below horizontal arrangement and change the properties of width to fill parent and height to 100 pixels. 5) Pick 3 slider and place

51 it one after another. Change the properties of slider as follows Place non visible components Bluetooth Client, Clock and Activity starter, activity starter can be placed from the connectivity palette.


52 Designer part for this app has completed move on to the blocks for programming this app, click on the blocks to move to the programming window. Program the RGB slider chooser blocks for connecting to a Bluetooth device, above code will show the list of available Bluetooth devices that you paired already and once you connect to a device this will save the address of the Bluetooth device and connect to it. Complete the above blocks to display whether the Bluetooth devices has successfully connected or not. Color to the block can be added from the built in colors function. Complete the below code to disconnect from the Bluetooth device that has currently connect to, when you click the app it will disconnect the communication. When the screen initialize, as we discussed already if the Bluetooth is not currently turned


53 on the activity starter should remind us to turn on the Bluetooth device, and also the canvas should be set to white color. Complete the blocks given below do all this functions. Screen initialize function can be picked from the blocks present inside the Screen1. Click on activity starter and pick activity starter action and place it in screen initialize block and pick block from text and type android.bluetooth.adapter.action.request_enable remove the quotes between the commands. Slider color left block can be find inside the respective slider on the left side functions.


54 Make color block is present inside the colors built in function. Adding two number block is presented in the math built in block, add round block before slider 1 position and also pick an empty number place from Math built in block add two numbers together. Complete above blocks to store the first value in the canvas and also when we change the first slider position if the android device is connected to Bluetooth then the slider value will be added with 3000 and send to connected Bluetooth device, we have already seen why we are sending two byte number in Multiple servo programming. Please refer if you have not completed that tutorial. Get thumb position block can be find in the variables, pick get function in the variables and place it in the color make list and choose thumb position.

55 After placing get block in the make color click on the inverted triangle symbol to select thumb position. This variable will hold the current value of slider. Complete the same block for the second slider, right click on the first slider and duplicate the blocks and select to slider2 wherever slider1 is presented, make sure to edit the value in the Bluetooth client 1. Complete the third slider block to complete the program, this slider does the same function like the other two sliders.
56

57 Complete program for the RGB Slider


58 Arduino Program for RGB Slider There are two types of RGB LED available in the market one is common cathode and another one is common anode. Make sure what type of RGB LED you are using for your practice. Common Anode Type If you have a common anode type RGB LED then you have to connect your anode to 3.3v of Arduino. Connect the red pin to 3 rd pin of Arduino green pin to 5 th pin of Arduino and blue pin to 6 th pin of Arduino. Connect Bluetooth Tx to 7 th pin and Rx to 8 th pin of Arduino. Common Cathode Type If you have a common cathode type RGB LED then you have to connect your cathode to ground pin of Arduino. Connect the red pin to 3 rd pin of Arduino green pin to 5 th pin of Arduino and blue pin to 6 th pin of Arduino. Connect Bluetooth Tx to 7 th pin and Rx to 8 th
59 pin of Arduino. You also need to connect 220 ohm resistor between the pins of LED and Arduino to protect it from burning.
60 Common anode Arduino program #include <SoftwareSerial.h> int bluetoothtx = 7; int bluetoothrx = 8; SoftwareSerial bluetooth(bluetoothtx, bluetoothrx); void setup() { pinmode(3,output); // red pin of RGB LED pinmode(5,output); // Green pin of RGB LED pinmode(6,output); // blue pin of RGB LED digitalwrite(3,high); digitalwrite(5,high); digitalwrite(6,high); //Setup usb serial connection to computer Serial.begin(9600); //Setup Bluetooth serial connection to android bluetooth.begin(9600); } void loop() { //Read from bluetooth and write to usb serial if(bluetooth.available()>= 2 ) { unsigned int color1 = bluetooth.read(); unsigned int color2 = bluetooth.read(); unsigned int color = (color2 *256) + color1; Serial.println(color); if (color >= 1000 && color <1255){ int blue = color; blue = map(blue, 1000,1255,0,255);
61 int blue1 = 255-blue; analogwrite(6,blue1); Serial.println(blue1); delay(10); } if (color >=2000 && color <2255){ int green = color; green = map(green,2000,2255,0,255); int green1 = green; analogwrite(5,green1); Serial.println(green1); delay(10); } if (color >=3000 && color < 3255){ int red = color; red = map(red, 3000, 3255,0,255); int red1 = red; analogwrite(3,red1); Serial.println(red1); delay(10); } } } This program is same as the Mutli servo program that we did in the previous chapter.
62 Common Cathode Arduino program #include <SoftwareSerial.h> int bluetoothtx = 7; int bluetoothrx = 8; SoftwareSerial bluetooth(bluetoothtx, bluetoothrx); void setup() { pinmode(3,output); // red pin of RGB LED pinmode(5,output); // Green pin of RGB LED pinmode(6,output); // blue pin of RGB LED digitalwrite(3,low); digitalwrite(5,low); digitalwrite(6,low); //Setup usb serial connection to computer Serial.begin(9600); } //Setup Bluetooth serial connection to android bluetooth.begin(9600); void loop() { //Read from bluetooth and write to usb serial if(bluetooth.available()>= 2 ) { unsigned int color1 = bluetooth.read(); unsigned int color2 = bluetooth.read(); unsigned int color = (color2 *256) + color1; Serial.println(color); if (color >= 1000 && color <1255){
63 int blue = color; blue = map(blue, 1000,1255,0,255); analogwrite(6,blue); Serial.println(blue); delay(10); } if (color >=2000 && color <2255){ int green = color; green = map(green,2000,2255,0,255); analogwrite(5,green); Serial.println(green); delay(10); } if (color >=3000 && color < 3255){ int red = color; red = map(red, 3000, 3255,0,255); analogwrite(3,red); Serial.println(red); delay(10); } } } This program is same as the Mutli servo program that we did in the previous chapter.
64
65 RGB Color Picker In the previous chapter we have seen how to set a color for an RGB led from android app, this app will be much similar to the previous one but instead on mixing slider we are going to choose the color s by picking existing image from gallery. 1) Pick horizontal arrangement and place it on the viewer screen and change its properties width to fill parent. 2) Pick list picker from user interface and place it on the horizontal arrangement change its image by uploading any Bluetooth image 3) Place a button next to list picker this button will be used for disconnecting from the Bluetooth device, upload any image to the button to make it look more attractive. 4) Pick canvas from Drawing and animation and place it below horizontal arrangement. Change the height of canvas to 250 pixels and width to fill parent in the canvas properties tab. 5) Pick horizontal arrangement and place it below canvas edit its properties and change width to fill parent. 6) Pick image picker from media and place it in horizontal arrangement and change its width in properties to fill parent and change the text to Pick an image. 7) Pick canvas from drawing and animation, place next to image picker and change its properties width to fill parent.
 Place Label 3 above Label 1 (this will store R G and B")
 Place Label 5 below Text")
 We usually add a label to display to know connectivity between Bluetooth")

66 Place Label 1 below to image picker (this will store the canvas X data) Place Label 2 below label 1 (this will store the canvas Y data) Place Label 3 above Label 1 (this will store R G and B pixels) change text label 3 width to fill parent and text alignment to centre. Place Label 4 below Text label 2(this label will store RED pixel value) Place Label 5 below Text label 4(this label will store GREEN pixel value) Place Label 6 below Text label 5(this label will store BLUE pixel value) We usually add a label to display to know connectivity between Bluetooth devices, a label need to add for this purpose. Add label 7 at the top of Bluetooth and disconnect Place Image from user Interface, and upload any RGB image to it and uncheck the visible box in the properties of Image.


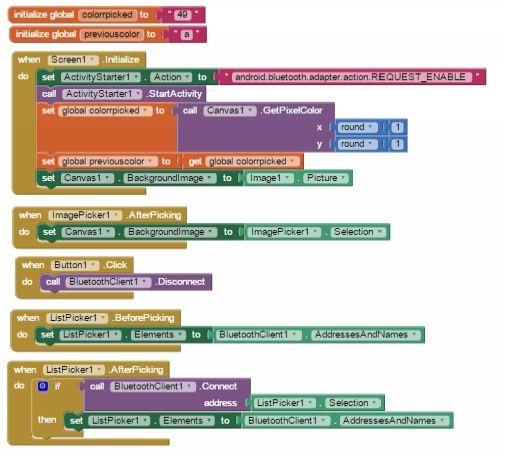
67 Finally place non visible components for this app, Bluetooth client and Activity starter from connectivity and clock from sensors. Designer for Viewer screen has completed and it s time to program for the viewer screen, click on the blocks to program it. Initialize two global variables, this can be of any value and I choose 49 and a you can also choose any values. Initialize global blocks can be find the variables and change the names to colorrpicked and previouscolor. Complete the above blocks, this will initialize the screen and start the activity starter will ask us to enable the Bluetooth function if it s turned off, default image will be displayed in the canvas.

68 Above blocks will split RGB color and store it in label 4, 5, 6, when you touch certain part of the image the above block help to identify RGB values and the values will be displayed in the label 3. When you drag around the image, the above blocks will calculate the RGB pixel values and separate these colors and store it in the respective labels.


69 Above block will set an image to the canvas that is currently picked from the gallery, when you click the button it will disconnect from the Bluetooth device that has currently connect to. This block will set the label 7 to connect or disconnect based upon the app connected to Bluetooth devices. When this app connected to the Bluetooth devices, this will send the RGB values from the Label 4, 5 and 6. Complete code as follows
70
71

72 Arduino Program This RGB color picker uses same code we used in the RGB color slider, but in this chapter you have to change the 3 rd pin to connect RGB blue pin and 6 th pin for RED and 5 th pin for Green. Copy and paste the same Arduino code that we used for RGB color slider. Circuit connection for common anode: Circuit connection for common cathode:

73 Temperature data into Android In this chapter we going to get temperature data from Arduino and display the temperature in android app, and we also going set certain conditions if the temperature is below the set temperature then in our android app it will display as cold, if the temperature exceeded the set temperature then it will display as Hot and if it falls into our set temperature then it will display text as moderate, we also going to change the background picture based upon these temperatures. 1) Pick label-1 and place it on top of viewer screen. 2) Pick horizontal arrangement place it below label-1 and change its properties as we normally do 3) Place list picker from user interface into horizontal arrangement change its name to Bluetooth and width to fill parent 4) Place horizontal arrangement below list picker, we use this for empty space between list picker and a label to follow. 5) Pick label and place it below empty horizontal arrangement 6) Pick another label and place it below the previous label. 7) Pick image from user interface and place it on viewer screen upload an image for cold condition and uncheck the visible in the properties to hide the image, pick and place another image and upload an image for moderate condition, do the same for Hot condition.


74 Place non visible components Bluetooth Client, Clock and Activity starter, activity starter can be placed from the connectivity palette. Move to blocks for programming for the Designer we have completed, click on the blocks and start to program the below blocks. The above blocks will connect to the Bluetooth device, and when app is opened for the first time and if the Bluetooth is disabled activity starter will remind us to turn on the Bluetooth. Complete the below code to finish the program. Blocks used in the If condition


75 And blocks can be find in the logic of inbuilt function, less than and greater or equal to block, is number? Will be presented inside the inbuilt math function. This is exactly like playing a puzzle where you have to place a block inside another to make it work. The conditions are used to check whether the temperature exceed or below the set condition and it also set the image to the background based on the temperature.

76 Arduino Program for Temperature On the Arduino side for this chapter we going to use LM35 temperature sensor, or any other temperature sensor you would like to use can be used for this chapter, if you are changing temperature sensor make sure you also changing the code based on the data sheet for the sensor. In the above circuit connection, Bluetooth, LM35 temperature sensor and common anode type RBG LED are used. Connect Bluetooth Tx pin to 10 th pin of Arduino and Rx to 11 th pin of Arduino. Connect output pin LM35 to A0 pin of Arduino. Connect red pin of RGB LED to 6 th pin of Arduino. Connect green pin of RGB LED to 5 th pin of Arduino. Connect blue pin of RGB LED to 3 rd pin of Arduino. Arduino Program: // code begins here:
77 #include<softwareserial.h> const int Tempsensor = A0; // connect output pin of lm35 to A0 pin of arduino int bluetoothtx = 10; // connect tx of bluetooth to 10th pin int bluetoothrx = 11; // connect rx of bluetooth to 11th pin SoftwareSerial bluetooth(bluetoothtx, bluetoothrx); void setup() { pinmode(tempsensor, INPUT); pinmode(3,output);//blue pin of rgb led pinmode(4,output);// green pin of rgb led pinmode(5,output);//red pin of rgb led Serial.begin(9600);// serial communication begins bluetooth.begin(9600);// bluetooth communication begins } void loop() { float temp = analogread(tempsensor); // read temperature sensor voltage temp = temp * ; // (5*1000)/1024 = from sensor data sheet Serial.println( ); // Serial.println(temp); // watch the current temperature in serial monitor bluetooth.print( ); bluetooth.println(temp); // send temperature to bluetooth device delay(200); if (temp <= 30){ // if temperature is below 30 turn on blue light digitalwrite(3,low); digitalwrite(4,high); digitalwrite(5,high); } else if (temp >30 && temp <=34){ // if temp is above 30 and below 34 turn on green light
78 digitalwrite(3,high); digitalwrite(4,low); digitalwrite(5,high); } else if(temp >36){ // if temperature is above 36 turn on red light digitalwrite(3,high); digitalwrite(4,high); digitalwrite(5,low); } } // code ends here Type the above program in Arduino ide and upload to Arduino board, sensor data from LM35 are calculated and send from Arduino to android device, android device receive these data through app we created in the previous step, temperature data will be checked with the set conditions Condition 1: if the temperature is less than 30, upload background image to photo related to cold condition and change the label 3 to cold Condition 2: if the temperature is greater than 30 and less than 34, upload background image to photo related to moderate condition and change the label 3 to moderate Condition 3: if the temperature exceeds 34 then set the image to hot condition and also change the label to HOT.
79

 Pick list picker and place it inside horizontal arrangement and change the background image of list picker to some Bluetooth image.")
80 Android Remote control Robot This app is very similar to the first chapter we created to turn on and off a single LED that has connected to Arduino, in this chapter we going to send 5 different commands from android app and execute certain functions on the Arduino side. 1) Pick a label and place it on the top of Viewer Screen and edit the properties of the label 2) Pick horizontal arrangement and place it below label. 3) Pick list picker and place it inside horizontal arrangement and change the background image of list picker to some Bluetooth image. 4) Pick table arrangement from layout edit the properties of table arrangement and enter column as 3 and row as 3 and width to fill parent. 5) Pick button from user interface and place it around the table, arrange five button and change the images of the button to reflect like the below screenshot.

81 After completing the above Viewer screen move on to blocks by clicking on the blocks on the upper right side in the MIT app inventor window. Complete the above block for Bluetooth communication and also notification in the text label if the android device connected to Bluetooth device connected to Arduino. Complete the above blocks to finish the program, when you press the up arrow that button is associated to button1 it should send forward as command, when you press down arrow that button is associated to button4 it should send reverse, likewise the command will send from the app based on the selection of button. Think about the button connectivity when programming that has not detailed in this chapter as we crossed many tutorials this is really simple think yourself and accomplish the task.
 L293D Motor driver 2x Gear Motors 1x castor")
82 Arduino Program for Android remote For making this project you need many components, in the previous chapters we have used simple components and we never used more than 2 components in all the chapters, when coming to robot, it involves lot of components to make it work Follows the list of components: Arduino Uno Bluetooth Module (HC-05 or HC-06) L293D Motor driver 2x Gear Motors 1x castor wheel 2x Wheels for Gear motor 9v battery Robot chassis 1x breadboard and connecting wires. Connect the components as shown in the circuit, it is bit complicated if you are starting with electronics and robotics, instead of L293d IC you use any Motor driver module which eliminate fuzzy connection to the IC.

83 This robot works based on the signal passed from Arduino to the motor driver IC, all the motor driver have some logic behind it. Above images shows the motor driver pin configuration and logic behind the motor driver, when you supply High and Low signal to the input 1 and input 2 Motor connected to Output1 and Output2 will rotate clockwise, when the signal is changed to Low and High motor will start to rotate in the anticlockwise. Using the same logic, when we receive a forward command from android app, we have to send a High to input 1 and low to input 2 and High to input 4 and low to input 3 this make two motors to rotate forward. Arduino code: // code begins here #include <SoftwareSerial.h>
84 SoftwareSerial BT(10, 11); //TX, RX respetively String readdata; void setup() { BT.begin(9600); Serial.begin(9600); pinmode(3, OUTPUT); // connect to input 1 of l293d pinmode(4, OUTPUT); // connect to input 4 of l293d pinmode(5, OUTPUT); // connect to input 3 of l293d pinmode(6, OUTPUT); // connect to input 2 of l293d } // // void loop() { while (BT.available()){ //Check if there is an available byte to read delay(10); //Delay added to make thing stable char c = BT.read(); //Conduct a serial read readdata += c; //build the string- forward, reverse, left and right } if (readdata.length() > 0) { Serial.println(readdata); // print data to serial monitor // if data received as forward move robot forward if(readdata == forward ) { digitalwrite(3, HIGH); digitalwrite (4, HIGH); digitalwrite(5,low); digitalwrite(6,low); delay(100); } // if data received as reverse move robot reverse
85 else if(readdata == reverse ) { digitalwrite(3, LOW); digitalwrite(4, LOW); digitalwrite(5, HIGH); digitalwrite(6,high); delay(100); } // if data received as right turn robot to right direction. else if (readdata == right ) { digitalwrite (3,HIGH); digitalwrite (4,LOW); digitalwrite (5,LOW); digitalwrite (6,LOW); delay (100); } // if data received as left turn robot to left direction else if ( readdata == left ) { digitalwrite (3, LOW); digitalwrite (4, HIGH); digitalwrite (5, LOW); digitalwrite (6, LOW); delay (100); } // if data received as stop, halt the robot else if (readdata == stop )
86 { digitalwrite (3, LOW); digitalwrite (4, LOW); digitalwrite (5, LOW); digitalwrite (6, LOW); delay (100); } readdata= ;}} //Reset the variable // code ends here
87 Control the same robot by speech recognition Use the app created in the beginning chapter and speak to your speech recognition send commands like forward reverse left right and stop and play with the robot.
88


89 How to import aia files to MIT app inventor Click projects and select import project (.aia) from my computer. Click browse and point to aia file location in your PC or laptop
EXPERIMENT 7 Please visit https://www.arduino.cc/en/reference/homepage to learn all features of arduino before you start the experiments
 EXPERIMENT 7 Please visit https://www.arduino.cc/en/reference/homepage to learn all features of arduino before you start the experiments TEMPERATURE MEASUREMENT AND CONTROL USING LM35 Purpose: To measure
Lab 8. Communications between Arduino and Android via Bluetooth
 Lab 8. Communications between Arduino and Android via Bluetooth Dr. X. Li xhli@citytech.cuny.edu Dept. of Computer Engineering Technology New York City College of Technology (Copyright Reserved) In this
Arduino 101 AN INTRODUCTION TO ARDUINO BY WOMEN IN ENGINEERING FT T I NA A ND AW E S O ME ME NTO R S
 Arduino 101 AN INTRODUCTION TO ARDUINO BY WOMEN IN ENGINEERING FT T I NA A ND AW E S O ME ME NTO R S Overview Motivation Circuit Design and Arduino Architecture Projects Blink the LED Switch Night Lamp
StenBOT Robot Kit. Stensat Group LLC, Copyright 2018
 StenBOT Robot Kit 1 Stensat Group LLC, Copyright 2018 Legal Stuff Stensat Group LLC assumes no responsibility and/or liability for the use of the kit and documentation. There is a 90 day warranty for the
Note. The above image and many others are courtesy of - this is a wonderful resource for designing circuits.
 Robotics and Electronics Unit 2. Arduino Objectives. Students will understand the basic characteristics of an Arduino Uno microcontroller. understand the basic structure of an Arduino program. know how
Clark College Electrical Engineering & Computer Science
 Clark College Electrical Engineering & Computer Science slide # 1 http://www.engrcs.com/ecsv5.pdf Electrical Engineering & Computer Science Artificial Intelligent (AI) Bio Medical Computers & Digital Systems
USER MANUAL ARDUINO I/O EXPANSION SHIELD
 USER MANUAL ARDUINO I/O EXPANSION SHIELD Description: Sometimes Arduino Uno users run short of pins because there s a lot of projects that requires more than 20 signal pins. The only option they are left
Learn to Code. App Inventor Overview
 App Inventor Overview App Inventor is an Integrated Development Environment (IDE) that you access through a web browser. An IDE provides all of the tools you need to develop in one application. App Inventor
Software Prototyping. & App Inventor
 Software Prototyping & App Inventor Prototyping This & next several slides distilled from: http://appinventor.mit.edu/explore/teaching-app-creation.html Prototype: preliminary, interactive model of an
TA0139 USER MANUAL ARDUINO 2 WHEEL DRIVE WIRELESS BLUETOOTH ROBOT KIT
 TA0139 USER MANUAL ARDUINO 2 WHEEL DRIVE WIRELESS BLUETOOTH ROBOT KIT I Contents Overview TA0139... 1 Getting started: Arduino 2 Wheel Drive Wireless Bluetooth Robot Kit using Arduino UNO... 1 2.1. What
Erasmus+ Project: Yestermorrow Year 1 Maths: Pythagorean Theorem
 Erasmus+ Project: Yestermorrow Year 1 Maths: Pythagorean Theorem Workshop (Coding Android Mobile Apps): Collision Detection and the Pythagorean Theorem (Based on the code.org worksheet) WORKSHOP OVERVIEW
Arduino Programming. Arduino UNO & Innoesys Educational Shield
 Arduino Programming Arduino UNO & Innoesys Educational Shield www.devobox.com Electronic Components & Prototyping Tools 79 Leandrou, 10443, Athens +30 210 51 55 513, info@devobox.com ARDUINO UNO... 3 INNOESYS
ROBOTLINKING THE POWER SUPPLY LEARNING KIT TUTORIAL
 ROBOTLINKING THE POWER SUPPLY LEARNING KIT TUTORIAL 1 Preface About RobotLinking RobotLinking is a technology company focused on 3D Printer, Raspberry Pi and Arduino open source community development.
3. Text to Speech 4. Shake it
 3. Text to Speech 4. Shake it Make your phone speak to you! When you shake your phone, you can make your phone shake too. Type a phrase in a text box. Then press a button, and use the TextToSpeech component
TalkToMe: A beginner App Inventor app
 TalkToMe: A beginner App Inventor app This step-by-step picture tutorial will guide you through making a talking app. To get started, sign up for a free Google Account: http://accounts.google.com/signup
TalkToMe: Your first App Inventor app
 TalkToMe: Your first App Inventor app This step-by-step picture tutorial will guide you through making a talking app. To get started, go to App Inventor on the web. Go directly to ai2.appinventor.mit.edu,
Alessandra de Vitis. Arduino
 Alessandra de Vitis Arduino Arduino types Alessandra de Vitis 2 Interfacing Interfacing represents the link between devices that operate with different physical quantities. Interface board or simply or
Make your own secret locking mechanism to keep unwanted guests out of your space!
 KNOCK LOCK Make your own secret locking mechanism to keep unwanted guests out of your space! Discover : input with a piezo, writing your own functions Time : 1 hour Level : Builds on projects : 1,,3,4,5
Experiment 7: Robotics++ V3 Robot BlueToothbot
 Experiment 7: Robotics++ V3 Robot BlueToothbot 1 Two different ways to control your robot via Bluetooth 1. Android phone wire your robot, download apps from the Google Play Store or install an APK (app
Lab 01 Arduino 程式設計實驗. Essential Arduino Programming and Digital Signal Process
 Lab 01 Arduino 程式設計實驗 Essential Arduino Programming and Digital Signal Process Arduino Arduino is an open-source electronics prototyping platform based on flexible, easy-to-use hardware and software. It's
On the Web sun.com/aboutsun/comm_invest STAROFFICE 8 DRAW
 STAROFFICE 8 DRAW Graphics They say a picture is worth a thousand words. Pictures are often used along with our words for good reason. They help communicate our thoughts. They give extra information that
Arduino Programming and Interfacing
 Arduino Programming and Interfacing Stensat Group LLC, Copyright 2017 1 Robotic Arm Experimenters Kit 2 Legal Stuff Stensat Group LLC assumes no responsibility and/or liability for the use of the kit and
Activity Digital Doodle
 Activity 1.1.2 Digital Doodle Introduction Let's create an app! In this app, you'll be able to take a photograph with the press of a button and then draw on it. You will use MIT App Inventor to create
Lecture 7. Processing Development Environment (or PDE)
") Lecture 7 Processing Development Environment (or PDE) Processing Class Overview What is Processing? Installation and Intro. Serial Comm. from Arduino to Processing Drawing a dot & controlling position
Lecture 7 Processing Development Environment (or PDE) Processing Class Overview What is Processing? Installation and Intro. Serial Comm. from Arduino to Processing Drawing a dot & controlling position
InfoSphere goes Android Flappy Bird
 So you have decided on FlappyBird. FlappyBird is a fun game, where you have to help your bird create an App, which to dodge the storm clouds. This work sheet will help you let s you control a generates
ARDUINO. By Kiran Tiwari BCT 2072 CoTS.
 ARDUINO By Kiran Tiwari BCT 2072 CoTS www.kirantiwari.com.np SO What is an Arduino? WELL!! Arduino is an open-source prototyping platform based on easy-to-use hardware and software. Why Arduino? Simplifies
Lab-3: LCDs Serial Communication Analog Inputs Temperature Measurement System
 Mechatronics Engineering and Automation Faculty of Engineering, Ain Shams University MCT-151, Spring 2015 Lab-3: LCDs Serial Communication Analog Inputs Temperature Measurement System Ahmed Okasha okasha1st@gmail.com
IME-100 ECE. Lab 3. Electrical and Computer Engineering Department Kettering University. G. Tewolde, IME100-ECE,
 IME-100 ECE Lab 3 Electrical and Computer Engineering Department Kettering University 3-1 1. Laboratory Computers Getting Started i. Log-in with User Name: Kettering Student (no password required) ii.
Introduction to Processing
 Processing Introduction to Processing Processing is a programming environment that makes writing programs easier. It contains libraries and functions that make interacting with the program simple. The
Lab 2 - Powering the Fubarino. Fubarino,, Intro to Serial, Functions and Variables
 Lab 2 - Powering the Fubarino Fubarino,, Intro to Serial, Functions and Variables Part 1 - Powering the Fubarino SD The Fubarino SD is a 56 pin device. Each pin on a chipkit device falls broadly into one
Digital Pins and Constants
 Lesson Lesson : Digital Pins and Constants Digital Pins and Constants The Big Idea: This lesson is the first step toward learning to connect the Arduino to its surrounding world. You will connect lights
AppyBuilder Beginner Tutorials
 AppyBuilder Beginner Tutorials Four Simple Tutorials for Getting Started with AppyBuilder 1 TalkToMe: Your first AppyBuilder app 03 2 TalkToMe Part 2: Shaking and User Input 21 3 BallBounce: A simple game
keyestudio Keyestudio MEGA 2560 R3 Board
 Keyestudio MEGA 2560 R3 Board Introduction: Keyestudio Mega 2560 R3 is a microcontroller board based on the ATMEGA2560-16AU, fully compatible with ARDUINO MEGA 2560 REV3. It has 54 digital input/output
Single Menus No other menus will follow necessitating additional user choices
 57 UNIT-III STRUCTURES OF MENUS Single Menus No other menus will follow necessitating additional user choices Sequential Linear Menus Simultaneous Menus 58 Hierarchical Menus When many relationships exist
Arduino Prof. Dr. Magdy M. Abdelhameed
 Course Code: MDP 454, Course Name:, Second Semester 2014 Arduino What is Arduino? Microcontroller Platform Okay but what s a Microcontroller? Tiny, self-contained computers in an IC Often contain peripherals
Robotics Adventure Book Scouter manual STEM 1
 Robotics Robotics Adventure Book Scouter Manual Robotics Adventure Book Scouter manual STEM 1 A word with our Scouters: This activity is designed around a space exploration theme. Your Scouts will learn
Smart Objects. SAPIENZA Università di Roma, M.Sc. in Product Design Fabio Patrizi
 Smart Objects SAPIENZA Università di Roma, M.Sc. in Product Design Fabio Patrizi 1 What is a Smart Object? Essentially, an object that: Senses Thinks Acts 2 Example 1 https://www.youtube.com/watch?v=6bncjd8eke0
Please read this manual carefully before you use the unit and save it for future reference.
 ANDROID STEREO RECEIVER Please read this manual carefully before you use the unit and save it for future reference. Installation Precaution: 1. This unit is designed for using a 12V negative ground system
Discover Robotics & Programming CURRICULUM SAMPLE
 OOUTLINE 5 POINTS FOR EDP Yellow Level Overview Robotics incorporates mechanical engineering, electrical engineering and computer science - all of which deal with the design, construction, operation and
Electronic Brick Starter Kit
 Electronic Brick Starter Kit Getting Started Guide v1.0 by Introduction Hello and thank you for purchasing the Electronic Brick Starter Pack from Little Bird Electronics. We hope that you will find learning
Clark College. Electrical Engineering & Computer Science. slide # 1
 Clark College Electrical Engineering & Computer Science slide # 1 http://www.engrcs.com/institute/workshop.pdf Electrical Engineering & Computer Science Artificial Intelligent (AI) Bio Medical Computers
Sten-SLATE ESP. WiFi
 Sten-SLATE ESP WiFi Stensat Group LLC, Copyright 2016 1 References www.arduino.cc http://esp8266.github.io/arduino/versions/2.1.0/doc/reference.html 2 Introduction The wifi integrated in the processor
Arduino: Serial Monitor Diagrams & Code Brown County Library
 Arduino: Serial Monitor Diagrams & Code All projects require the use of the serial monitor in your Arduino IDE program (or whatever you are using to transfer code to the Arduino). Project 01: Monitor how
Hello App Inventor! Android programming for kids and the rest of us. Chapter 2. by Paula Beer and Carl Simmons. Copyright 2015 Manning Publications
 SAMPLE CHAPTER Hello App Inventor! Android programming for kids and the rest of us by Paula Beer and Carl Simmons Chapter 2 Copyright 2015 Manning Publications Brief contents 1 Getting to know App Inventor
1. Introduction P Package Contents 1.
 1 Contents 1. Introduction ------------------------------------------------------------------------------- P. 3-5 1.1 Package Contents 1.2 Tablet Overview 2. Using the Tablet for the first time ---------------------------------------------------
App Development with MIT App Inventor
 Summer School of Programming time.to.code Workshop 4 App Development with MIT App Inventor Tutorials- Magic 8-Ball [BASIC] BLOCKS 1 st August 2016 Magic 8-ball Now you will create a Magic 8-Ball app which
KNOCK LOCK MAKE YOUR OWN SECRET LOCKING MECHANISM TO KEEP UNWANTED GUESTS OUT OF YOUR SPACE! Discover: input with a piezo, writing your own functions
 125 KNOCK LOCK MAKE YOUR OWN SECRET LOCKING MECHANISM TO KEEP UNWANTED GUESTS OUT OF YOUR SPACE! Discover: input with a piezo, writing your own functions Time: 1 HOUR Level: Builds on projects: 1, 2, 3,
This Tutorial is for Word 2007 but 2003 instructions are included in [brackets] after of each step.
![This Tutorial is for Word 2007 but 2003 instructions are included in [brackets] after of each step.](/thumbs/72/67280806.jpg "This Tutorial is for Word 2007 but 2003 instructions are included in [brackets] after of each step.") This Tutorial is for Word 2007 but 2003 instructions are included in [brackets] after of each step. Table of Contents Just so you know: Things You Can t Do with Word... 1 Get Organized... 1 Create the
This Tutorial is for Word 2007 but 2003 instructions are included in [brackets] after of each step. Table of Contents Just so you know: Things You Can t Do with Word... 1 Get Organized... 1 Create the
User Guide PUSH TO TALK PLUS. For Android
 User Guide PUSH TO TALK PLUS For Android PUSH TO TALK PLUS For Android Contents Introduction and Key Features...4 PTT+ Calling to Individuals and Groups...4 Supervisory Override...4 Real-Time Presence...4
the NXT-G programming environment
 2 the NXT-G programming environment This chapter takes a close look at the NXT-G programming environment and presents a few simple programs. The NXT-G programming environment is fairly complex, with lots
Lab 2.2 Ohm s Law and Introduction to Arduinos
 Lab 2.2 Ohm s Law and Introduction to Arduinos Objectives: Get experience using an Arduino Learn to use a multimeter to measure Potential units of volts (V) Current units of amps (A) Resistance units of
Bluetooth Communications App Using App Inventor
 ABSTRACT 2016 IJSRST Volume 2 Issue 6 Print ISSN: 2395-6011 Online ISSN: 2395-602X Themed Section: Science and Technology Bluetooth Communications App Using App Inventor N. Anju Latha, B. Rama Murthy Department
General Use. Searching for Assets (All users) Browsing for Assets (All users) Viewing and Downloading an Asset (All Users)
 Browsing for Assets (All users) Viewing and Downloading an Asset (All Users)") User Guide Rev1.1 Table of Contents General Use... 2 Searching for Assets (All users)... 2 Browsing for Assets (All users)... 2 Viewing and Downloading an Asset (All Users)... 2 Downloading Large Files
User Guide Rev1.1 Table of Contents General Use... 2 Searching for Assets (All users)... 2 Browsing for Assets (All users)... 2 Viewing and Downloading an Asset (All Users)... 2 Downloading Large Files
Thank you for purchasing your new Moochies Watch. We hope you, and more importantly your kids will love it as much as we did creating it.
 www.moochies.com Thank you for purchasing your new Moochies Watch. We hope you, and more importantly your kids will love it as much as we did creating it. This manual will take you through all the steps
BCSWomen Android programming (with AppInventor) Family fun day World record attempt
 Family fun day World record attempt") BCSWomen Android programming (with AppInventor) Family fun day World record attempt Overview of the day Intros Hello Android! Getting your app on your phone Getting into groups Ideas for apps Overview
BCSWomen Android programming (with AppInventor) Family fun day World record attempt Overview of the day Intros Hello Android! Getting your app on your phone Getting into groups Ideas for apps Overview
How to Add a Text Watermark to a Digital Image
 How to Add a Text Watermark to a Digital Image Placing a watermark on pictures that you plan to publish to the web will identify them as your own work and discourage people from stealing your works or
Robotics/Electronics Review for the Final Exam
 Robotics/Electronics Review for the Final Exam Unit 1 Review. 1. The battery is 12V, R1 is 400 ohms, and the current through R1 is 20 ma. How many ohms is R2? ohms What is the voltage drop across R1? V
Zello Quick Start Guide for Kyocera TORQUE
 Zello Quick Start Guide for Kyocera TORQUE Install Zello Tap Zello in your apps screen then tap UPDATE to start install. When you miss Zello icon in your TORQUE, please search for Zello in Google Play
Section 1. System Technologies and Implications. Modules. Introduction to computers. File management. ICT in perspective. Extended software concepts
 Section 1 System Technologies and Implications Modules 1.1 Introduction to computers 1.2 Software 1.3 Hardware 1.4 File management 1.5 ICT in perspective 1.6 Extended software concepts 1.7 Extended hardware
IME-100 ECE. Lab 4. Electrical and Computer Engineering Department Kettering University. G. Tewolde, IME100-ECE,
 IME-100 ECE Lab 4 Electrical and Computer Engineering Department Kettering University 4-1 1. Laboratory Computers Getting Started i. Log-in with User Name: Kettering Student (no password required) ii.
Using the BlueSMiRF. Introduction. Materials and Tools
 Page 1 of 13 Using the BlueSMiRF Introduction Are you ready to hit the airwaves and add Bluetooth to your project? With the BlueSMiRF and Bluetooth Mate line of products, you re much closer than you think
Understanding an App s Architecture
 Chapter 14 Understanding an App s Architecture This chapter examines the structure of an app from a programmer s perspective. It begins with the traditional analogy that an app is like a recipe and then
Contents. 1 Register and Configure Hi-Gate Add Sensor Node Create a Fresh New Project... 6
 Contents 1 Register and Configure Hi-Gate... 2 1.1 Add Sensor Node... 4 1.2 Create a Fresh New Project... 6 1.3 Project Testing on Real Hardware... 9 1.4 Troubleshoot Guide... 10 2 Connection Modes: WiFi,
Instruction Manual for BE-SP3 Circuit. 10/21/07
 Page 1 of 54 Instruction Manual for BE-SP3 Circuit. 10/21/07 Page 1 Index: Page 2 BE-SP3 Circuit Specifications. Page 3-4 Intro to the BE-SP3. Page 5 Basics of serial to parallel. Page 6-7 ASCII Code.
Your . A setup guide. Last updated March 7, Kingsford Avenue, Glasgow G44 3EU
 fuzzylime WE KNOW DESIGN WEB DESIGN AND CONTENT MANAGEMENT 19 Kingsford Avenue, Glasgow G44 3EU 0141 416 1040 hello@fuzzylime.co.uk www.fuzzylime.co.uk Your email A setup guide Last updated March 7, 2017
This tutorial will show you how to take temperature readings using the Freetronics temperature sensor and an Arduino Uno.
 This tutorial will show you how to take temperature readings using the Freetronics temperature sensor and an Arduino Uno. Note that there are two different module types: the temperature sensor module and
In the first class, you'll learn how to create a simple single-view app, following a 3-step process:
 Class 1 In the first class, you'll learn how to create a simple single-view app, following a 3-step process: 1. Design the app's user interface (UI) in Xcode's storyboard. 2. Open the assistant editor,
Overview. Multiplexor. cs281: Introduction to Computer Systems Lab02 Basic Combinational Circuits: The Mux and the Adder
 cs281: Introduction to Computer Systems Lab02 Basic Combinational Circuits: The Mux and the Adder Overview The objective of this lab is to understand two basic combinational circuits the multiplexor and
What You're Building 2. Getting Started 3 Introduction 4 Iteration or how we will get to Finished App. 4
 Table of Contents What You're Building 2 Getting Started 3 Introduction 4 Iteration or how we will get to Finished App. 4 Iteration 1 Create still image of our Game 5 Getting Ready 5 Set up the Components
University of Hull Department of Computer Science C4DI Interfacing with Arduinos
 Introduction Welcome to our Arduino hardware sessions. University of Hull Department of Computer Science C4DI Interfacing with Arduinos Vsn. 1.0 Rob Miles 2014 Please follow the instructions carefully.
TUTORIAL: MoveYourRobot with Unity3D You created your own robot with servo- motors and you are wondering how to control it.
 TUTORIAL: MoveYourRobot with Unity3D You created your own robot with servo- motors and you are wondering how to control it. This package provide environment and scripts to be easily able to control your
A new clients guide to: Activating a new Studio 3.0 Account Creating a Photo Album Starting a Project Submitting a Project Publishing Tips
 Getting Started With Heritage Makers A Guide to the Heritage Studio 3.0 Drag and Drop Publishing System presented by Heritage Makers A new clients guide to: Activating a new Studio 3.0 Account Creating
An online version of these worksheets is available at:
 Worksheet 1 Tutorial An online version of these worksheets is available at: http://ronanjsmith.com/computingintheclassroom/worksheets.html. In this tutorial, you will discover how to create simple apps
D - Tic Tac Toe. Let's use our 9 sparkles to build a tic tac toe game! 2017 courses.techcamp.org.uk/ Page 1 of 9
 D - Tic Tac Toe Let's use our 9 sparkles to build a tic tac toe game! 2017 courses.techcamp.org.uk/ Page 1 of 9 INTRODUCTION Let's use our 9 sparkles to build a tic tac toe game! Step 1 Assemble the Robot
COPYRIGHTED MATERIAL. Making Excel More Efficient
 Making Excel More Efficient If you find yourself spending a major part of your day working with Excel, you can make those chores go faster and so make your overall work life more productive by making Excel
Lab 2 - Powering the Fubarino, Intro to Serial, Functions and Variables
 Lab 2 - Powering the Fubarino, Intro to Serial, Functions and Variables Part 1 - Powering the Fubarino SD The Fubarino SD is a 56 pin device. Each pin on a chipkit device falls broadly into one of 9 categories:
Following a tour is the easiest way to learn Prism.
 Page 1 of 25 A tour of Prism Following a tour is the easiest way to learn Prism. View a movie Watch and listen to a ten minute introductory movie from Prism's Welcome dialog. Or view it on the web. Read
Computer Basics Microsoft Windows CB 200
 Computer Basics Microsoft Windows CB 200 Table of Contents Using Windows... 3 Desktop... 3 Taskbar... 4 The Start menu... 4 The Quick Launch bar... 5 The System Tray... 6 Customization... 6 How to Use
Creating a Website Using Weebly.com (June 26, 2017 Update)
") Creating a Website Using Weebly.com (June 26, 2017 Update) Weebly.com is a website where anyone with basic word processing skills can create a website at no cost. No special software is required and there
Creating a Website Using Weebly.com (June 26, 2017 Update) Weebly.com is a website where anyone with basic word processing skills can create a website at no cost. No special software is required and there
EV3 Programming Workshop for FLL Coaches
 EV3 Programming Workshop for FLL Coaches Tony Ayad 2017 Outline This workshop is intended for FLL coaches who are interested in learning about Mindstorms EV3 programming language. Programming EV3 Controller
Kuna Installation Guide
 Kuna Installation Guide We ve designed Kuna to replace your existing light fixture in a few easy steps. Just take down your old fixture and connect Kuna to your existing power wires, then mount Kuna to
University Academic Computing Technologies. Web-site:
 University Academic Computing Technologies E-mail: bbcollab@aucegypt.edu Web-site: www.aucegypt.edu/it/uact/bbcollab Last Revised: May 2012 The American University in Cairo University Academic Computing
Getting Started Guide
 Getting Started Guide 1860 38th St. Boulder, CO 80301 www.modrobotics.com 1. Make Your First Robot The Dimbot Uses a clear Flashlight Action block, black Distance Sense block, and a blueish-gray Battery
Android Programming Family Fun Day using AppInventor
 Android Programming Family Fun Day using AppInventor Table of Contents A step-by-step guide to making a simple app...2 Getting your app running on the emulator...9 Getting your app onto your phone or tablet...10
Copyright 2018 MakeUseOf. All Rights Reserved.
 15 Power User Tips for Tabs in Firefox 57 Quantum Written by Lori Kaufman Published March 2018. Read the original article here: https://www.makeuseof.com/tag/firefox-tabs-tips/ This ebook is the intellectual
Joomla! 2.5.x Training Manual
 Joomla! 2.5.x Training Manual 1 Joomla is an online content management system that keeps track of all content on your website including text, images, links, and documents. This manual includes several
Studuino Programming Environment Manual
 Studuino Programming Environment Manual Created 04//0 Revised 07/0/3 Version History Date Content 04//0 First version 07/0/6 Updated for new Studuino website 07/03/8 Revised with added features for Windows
GreenFolders User Manual
 GreenFolders User Manual Welcome! Welcome to GreenFolders the Electronic Records Management Solution. GreenFolders allows you to store and retrieve files with many easy-to-use features for working with
A Hacker s Introduction to the Nokia N900
 A Hacker s Introduction to the Nokia N900 Introduction Welcome to the Hacker s Introduction to the Nokia N900. This guide is intended to help you begin connecting the N900 s builtin capabilities to information
ORB Education Quality Teaching Resources
 These basic resources aim to keep things simple and avoid HTML and CSS completely, whilst helping familiarise students with what can be a daunting interface. The final websites will not demonstrate best
iphones for beginners
 iphones for beginners This handout uses text and images from gcflearnfree.org. Check out www.gcflearnfree.org/iphonebasics for more information! The parts of the iphone: Note: The headphone jack was removed
Inspiring Creative Fun Ysbrydoledig Creadigol Hwyl. App Inventor Workbook
 Inspiring Creative Fun Ysbrydoledig Creadigol Hwyl App Inventor Workbook App Inventor is a cloud-based application development tool, enabling users to develop Android applications for free! App Inventor
Prototyping & Engineering Electronics Kits Basic Kit Guide
 Prototyping & Engineering Electronics Kits Basic Kit Guide odysseyboard.com Please refer to www.odysseyboard.com for a PDF updated version of this guide. Guide version 1.0, February, 2018. Copyright Odyssey
Transitioning Teacher Websites
 Transitioning Teacher Websites Google sites is an online web building tool that can be accessed and updated from anywhere there is an internet connection. Here is a brief video introduction of Google sites.
Code&Drive First steps
 Code&Drive First steps Now that you have built the Code & Drive, you can set the Build&Code 4in1 board using any of the following software: Arduino IDE, Bitbloq or a visual programming software by blocks
PROJECT THREE - EMPHASIS
 PROJECT THREE - EMPHASIS INSTRUCTIONS Before you begin this assignment: 1. Read Design Basics, on the two topics of Emphasis and Color. Study the Introduction to Emphasis, the PowerPoint presentation,
FAQ for KULT Basic. Connections. Settings. Calls. Apps. Media
 FAQ for KULT Basic 1. What do the Icons mean that can be found in notifications bar at the top of my screen? 2. How can I move an item on the home screen? 3. How can I switch between home screens? 4. How
Access Intermediate
 Access 2010 - Intermediate (103-134) Building Access Databases Notes Quick Links Building Databases Pages AC52 AC56 AC91 AC93 Building Access Tables Pages AC59 AC67 Field Types Pages AC54 AC56 AC267 AC270
ibooks Author: An Instructional Guide for Educators
 USING IBOOKS AUTHOR ibooks Author: An Instructional Guide for Educators ETEC533 - MANNY LOYLA SECTION 1 Before you Begin This section provides information on how to download and install the ibooks Author
Dual rocket altimeter using the ATmega 328 microcontroller. The AltiDuo
 Dual rocket altimeter using the ATmega 328 microcontroller The AltiDuo Version date Author Comments 1.0 29/12/2012 Boris du Reau Initial Version Boris.dureau@neuf.fr 1.1 17/02/2013 Boris du Reau Updated