Word 2010 Essentials. Training Manual. Narre Community Learning Centre Inc
|
|
|
- Phyllis Stevens
- 6 years ago
- Views:
Transcription

1 Word 2010 Essentials Training Manual Narre Community Learning Centre Inc
2 TABLE OF CONTENTS Module One: Getting Started... 2 Workshop Objectives... 3 Module Two: Opening and Closing Word... 4 Opening Word... 5 Understanding the Interface... 7 Using Backstage View Creating a Blank Document Closing Word Module Three: Working with Documents Saving Files Opening Files Closing Files Creating a Document from a Template Using the Recent List Module Four: Your First Document Typing Text Selecting Text with the Mouse or Keyboard Dragging and Dropping Text Starting a New Page Module Five: Basic Editing Tasks Using Cut, Copy, and Paste Using the Office Clipboard Using Undo and Redo Finding and Replacing Text... 38
3 Setting Paste Options Using the Selection Pane Module Six: Basic Formatting Tasks Understanding Levels of Formatting Changing Font Face and Size Changing the Font Color Adding Font Enhancements Adding a Visual Effect Clearing Formatting Module Seven: Advanced Formatting Tasks Highlighting Text Changing Case Using the Format Painter Using the Font Dialog Setting Open Text Options Module Eight: Formatting Paragraphs Changing Spacing Setting the Alignment Adding Bullets and Numbering Adding Borders and Shading Module Nine: Working with Styles About Styles Applying a Style Changing the Style Set Changing the Theme Changing Theme Elements... 87
4 Module Ten: Formatting the Page Adding Headers and Footers Formatting Text as Columns Changing Page Orientation Changing the Page Color Adding a Page Border Using the Page Setup Dialog Module Eleven: Adding the Finishing Touches Checking Your Spelling Previewing Your Document Printing Your Document ing Your Document Module Twelve: Wrapping Up Words from the Wise
5
6 Learning is a treasure that will follow its owner everywhere. Chinese Proverb Module One: Getting Started Welcome to the Microsoft Word 2010 Essentials workshop. Word is a powerful word processing application. However, it does much more than create simple documents. It includes several desktop publishing features to make your documents look great.
7 Workshop Objectives Research has consistently demonstrated that when clear goals are associated with learning, it occurs more easily and rapidly. By the end of this workshop, you should be able to: Open and close Word Understand the Word 2010 interface Use the backstage view to create a new blank document or a document from a template Use the backstage view to open files and use the recent list Save documents Type, select, and edit text Use page breaks to start a new page Use cut, copy, and paste, as well as the Office Clipboard Task pane Set default paste options Undo and redo tasks Find and replace text Use the Selection pane to select pictures or objects Format fonts and paragraphs with a variety of features Use bullets and numbering Use borders and shading Understand, create and use styles Use themes Add headers and footers Format text as columns Change page orientation Add a page border or color Use the page setup dialog Check spelling Preview, print, or a document
8 A journey of a thousand miles must begin with a single step. Lao Tsu Module Two: Opening and Closing Word In this module, you will learn to open and close Word. You will also explore the Word interface, including the new Backstage view. Finally, you will learn to create a blank document and close Word.
 to open the Start menu.")
9 Opening Word Select START (or press the Windows key on the keyboard) to open the Start menu. Select ALL PROGRAMS.
10 Next, highlight the Microsoft Office program group. Select MICROSOFT OFFICE WORD 2010.
11 Understanding the Interface Word 2010 has a new interface that builds on interface from the previous version of Word. Word 2010 uses the RIBBON interface that was introduced in Microsoft Office 2007 applications. Each TAB in the RIBBON contains many tools for working with your document. To display a different set of commands, click the tab name. BUTTONS are organized into groups according to their function. In addition to the TABS, Word 2010 also makes use of the QUICK ACCESS TOOLBAR from the MS Office 2007 applications. Two new features in Word 2010 are the File tab, which opens the Backstage View, and the Navigation pane, which helps to navigate through your document.

12 Below is the Word interface, including the Ribbon, the Navigation pane, the document window, the Quick Access toolbar, and the Status bar. Quick Access Toolbar Ribbon Navigation Pane Document widow Status Bar The Quick Access Toolbar appears at the top of the Word window and provides you with one-click shortcuts to commonly used functions. You may customize the contents of the toolbar by clicking the arrow icon immediately to the right of the toolbar. By default, the Quick Access Toolbar contains buttons for Save, Undo and Redo. To customize the toolbar, select the arrow next to the Quick Access Toolbar.

13 Add an item to the Quick Access Toolbar by selecting it from the list. You can remove an item by reopening the list and selecting the item again.

14 If you select More Commands, Word opens the Customize window. To add a command, select the item from the list on the left and select ADD. Select OK when you have finished.
15 Using Backstage View Select the FILE tab in the Ribbon to open the Backstage view. The Backstage view is where you will find the commands for creating, saving, opening, and closing documents, as well as information about the document. The Backstage view includes new interfaces for printing and sharing your documents. The Options command is also available to open a new screen for setting your Word Options. Below is the Backstage View. Use the following procedure. 1. Select the File tab on the Ribbon.

16 Word displays the Backstage View, open to the Info tab by default. A sample is illustrated below.
17 Creating a Blank Document The New tab of the Backstage view provides several options for creating new documents. The Blank Document option is the first choice. To follow is how to create a blank document. Use the following procedure. 1. Select the FILE tab on the Ribbon. 2. Select the NEW tab in the Backstage View. 3. Select BLANK DOCUMENT. 4. Select CREATE. Step One Step Three Step Two Step Four
18 Closing Word When you are finished with Word, you should close it, freeing your system resources for other tasks. To follow is how to close Word from the Backstage View. Use the following procedure. 1. Select the FILE tab on the Ribbon. 2. Select the EXIT command in the Backstage View.
19 Quick Tip: The New Backstage View can be accessed at any time by selecting the File tab on the Ribbon. Module Three: Working with Documents This module will cover some of the specific tasks you can do using the new Backstage view. To open existing files, you can open a file using the Open dialog box or the recent file list. You can create a new file from a template. You can also use the Backstage view to close your file.

20 Saving Files The Backstage view includes the Save and the Save As commands. Word will remind you to save your document if you attempt to close it without saving it first. To follow is how to save a document. Use the following procedure. 1. Select the FILE tab on the Ribbon. 2. Select the SAVE command in the Backstage View. If the document has not yet been saved, the Save As dialog box opens, so that you can name the document and select a location to save it. The Save As dialog box is illustrated below. 3. Enter a name for the document in the FILE NAME field.
21 4. Use the SAVE IN drop down list to help you navigate to the location where you want to save the file. 5. Select SAVE. Or you can select CANCEL to close the dialog box without saving the document. The Backstage view returns to the background after the save operation is complete.
22 Opening Files The Backstage view includes the Open command, which allows you to open a document from any location on your computer or network. To follow is how to open a document. Use the following procedure. 1. Select the FILE tab on the Ribbon. 2. Select the OPEN command in the Backstage View. The Open dialog box opens, so that you can navigation to the location of the desired document and select it. The Open dialog box is illustrated below. 3. Use the LOOK IN drop down list to help you navigate to the location where you the file is located. 4. Highlight the document when you find it. 5. Select OPEN. Or you can select CANCEL to close the dialog box without opening the document.
23 The Backstage view returns to the background after the open operation is complete.
24 Closing Files The Backstage view includes the Close command, which allows you to close a document without closing Word. Use the following procedure to close a document. 1. Select the FILE tab on the Ribbon. 2. Select the CLOSE command in the Backstage View to close the current document. The Backstage view returns to the background after the close operation is complete.
25 Creating a Document from a Template Templates help to save time when creating a document. They can also provide consistency across several related documents. The New tab of the Backstage View provides links to several different templates. Some templates are created by Microsoft, while others are submitted by the community. You can use or download these templates at any time. The new document can be modified to suit your needs. Here is how to create a blank document from an Office.com template. Use the following procedure. 1. Select the FILE tab on the Ribbon. 2. Select the NEW tab in the Backstage View. 3. Select a template from the Office.com templates area. 4. Select CREATE.

26 Step One Step Two Step Three Step Four The Backstage view returns to the background after the new operation is complete.
27 Using the Recent List The Recent tab of the Backstage view allows you to quickly open a document you have recently used, without having to go through the Open dialog box. The Recent Documents list includes the name and file location of the last several documents you have opened. Use the following procedure to use the Recent Documents list. 1. Select the FILE tab on the Ribbon. 2. Select the RECENT tab in the Backstage View. 3. Select a document from the RECENT DOCUMENTS list.

28 Word opens the selected document, and the Backstage view returns to the background.
29 I am trying to get the hang of this new fangled writing machine, but I am not making a shining success of it Mark Twain Module Four: Your First Document In this module, you will create your first document. You will learn how to type text and select it with a mouse or keyboard. With text selected, you can edit or delete text, or you can use the mouse to drag and drop text to a new location. Finally, this module will cover how to start a new page.
30 Typing Text The document window is just like a blank piece of paper in a typewriter. The cursor shows your current location. Once the cursor is where you want your text, simply begin typing. Below is the cursor location in a blank document. Cursor Sample text for students to type: The quick brown fox jumped over the lazy dog. The quick brown fox jumped over the lazy dog. The quick brown fox jumped over the lazy dog. The quick brown fox jumped over the lazy dog. The quick brown fox jumped over the lazy dog. The quick brown fox jumped over the lazy dog. The quick brown fox jumped over the lazy dog. The quick brown fox jumped over the lazy dog. The quick brown fox jumped over the lazy dog. The quick brown fox jumped over the lazy dog. The quick brown fox jumped over the lazy dog.
31 Selecting Text with the Mouse or Keyboard Selecting text is highlighting it in order to edit it, format it, copy it, or delete it. You can use the mouse or the keyboard to select text. Use the following procedure to use the keyboard to select text. 1. Using the arrow keys, place the cursor either at the beginning of the text you want to select, or at the end of the text you want to select. 2. Hold down the shift key while pressing the arrow key to select text in that direction. The selected text is highlighted in blue. Use the following procedure to use the mouse to select text. 1. Point the mouse to either the beginning or the end of the text you want to select. 2. Hold the left mouse button down. 3. Move the mouse to select the text. You can move left, right, up and/or down. 4. Let the mouse button up when you have finished selecting the text. Use the mouse shortcuts for selecting text. You can double click on a word to select it. You can click three times on a paragraph to select the whole paragraph. You can click once to the left of a line to select the whole line. You can press Shift while clicking to add to your selection. The selections must be next to each other. You can press Control while clicking to add non-congruent text to your selection.
32
33 Dragging and Dropping Text One of Word s basic editing tools is the drag and drop option. This feature allows you to select text and quickly move it to a new location. Use the following procedure to drag and drop selected text. 1. Select the text you want to move. 2. Hold the left mouse pointer down. 3. Move the cursor to the location where you want to move the text. The cursor has an arrow and a small box to indicate that you are moving text. 4. Let the mouse button go when the cursor is in the desired location.
34 The text remains highlighted in case you want to move it again or continue editing it.
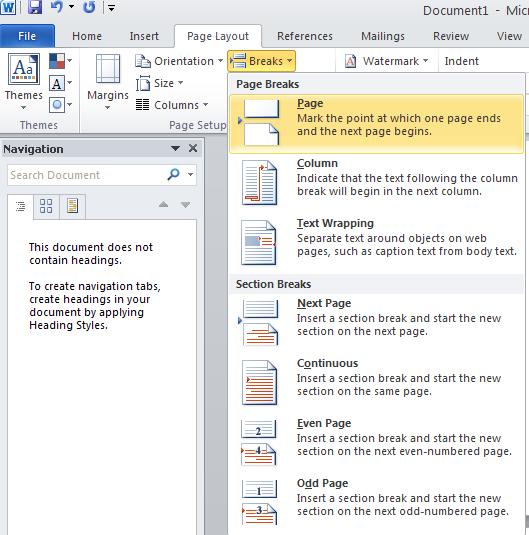
35 Starting a New Page Just as Word automatically wraps text at the end of the line, Word also starts a new page automatically when you fill the page with text. However, you may wish to insert a manual page break. Use the following procedure to insert a page break. 1. Press Enter to start a new paragraph. This will be important for formatting the document later. 2. Select the Page Layout Tab on the Ribbon. 3. Select the Breaks tool on the Page Setup Group. 4. Select Page.
36
37 I'm a big fan of editing and keeping only the interesting bits in. Sarah Vowell Module Five: Basic Editing Tasks The Word 2010 editing tools make editing your document a breeze. This module covers how to cut, copy and paste text, as well as using the clipboard task pane. It explains how to find and replace text, such as when you want to change a word or phrase throughout your document. It introduces the Word Options dialog box to set default paste options. Finally, it introduces the Selection pane for selecting, viewing, or hiding layered objects.

38 Using Cut, Copy, and Paste Word 2010 makes it easy to adjust documents, including a new document based on a template, or a document started by you or another Word user. The cut command deletes selected text from the current location, but allows you to move it somewhere else. The copy command allows you to copy selected text, leaving it in the current location, but also allowing you to include it somewhere else. The paste command allows you to include text you have cut or copied at the cursor s current location. The paste options include keeping the source formatting, merging the formatting, using the destination theme, and keeping the text only. We ll use text only as the paste option for now. Use the following procedure to cut and paste text. 1. Highlight the text you want to cut. 2. Right click the mouse to display the context menu and select cut. 3. Move the cursor to the new location. 4. Right click the mouse to display the context menu and select the Text Only paste option, as illustrated below.

39 Use the following procedure to copy and paste text using the keyboard shortcuts. 1. Highlight the text you want to cut and press the Control key and the C key at the same time. 2. Move the cursor to the new location. 3. Press the Control key and the V key at the same time.

40 Using the Office Clipboard The Office Clipboard stores items you have cut or copied to be pasted in other areas of your document, in other documents, or even in other Office applications. You can store up to 24 different items for easy pasting. The Clipboard Task pane allows you to view these items or quickly use the list to paste the items. Use the following procedure to open the Clipboard Task pane. 1. On the Home tab of the Ribbon, select the icon next to Clipboard. The Clipboard task opens, displaying any items you have cut or copied in this Word 2010 session (or the 24 most recent). A sample is illustrated below. Use the following procedure to paste using the Office Clipboard Task pane. 1. Place the cursor where you want to paste text from the clipboard. 2. Click on the item in the Clipboard task pane that you want to paste.
41 Using Undo and Redo If you make a mistake or change your mind about your most recent task in Word, you can undo the typing or command. The redo command allows you to return the typing or command results back to your document. The redo command also allows you to repeat tasks. The Undo and Redo commands are so common, they appear on the Quick Access toolbar by default. Use the following procedure to undo their most recent typing or command. 1. Select the Undo command from the Quick Access Toolbar. Use the following procedure to redo the last command or repeat it. 1. Select the Redo command from the Quick Access Toolbar.


42 Finding and Replacing Text The Find and Replace dialog box provides several options for finding multiple references to items in your document, and replacing them, if necessary. Use the following procedure to find and replace one instance at a time of Customer Name in the sample document. 1. Select REPLACE from the Editing group on the Home tab of the Ribbon to open the Find and Replace dialog box.. 2. Enter the exact text you want to find in the FIND WHAT field. 3. Enter the replacement text in the REPLACE WITH field. 4. Select FIND NEXT to find the next instance of the item.
43 5. When Word highlights the item, select REPLACE to delete the find item and paste the replace item. 6. Select CLOSE when you have finished. Or select CANCEL to close the dialog box without making any replacements. Use the following procedure to Replace all instances of an item. 1. Open the Find and Replace dialog box by selecting REPLACE from the Ribbon. 2. Enter the exact text you want to find in the FIND WHAT field. 3. Enter the replacement text in the REPLACE WITH field. 4. Select REPLACE ALL. 5. Select CLOSE when you have finished. Or select CANCEL to close the dialog box without making any replacements. Word replaces all instances of the item. If your cursor was not at the beginning of the document, or if you have text selected, Word asks if you want to continue searching at the beginning. When finished, Word displays a message indicating how many replacements were made.

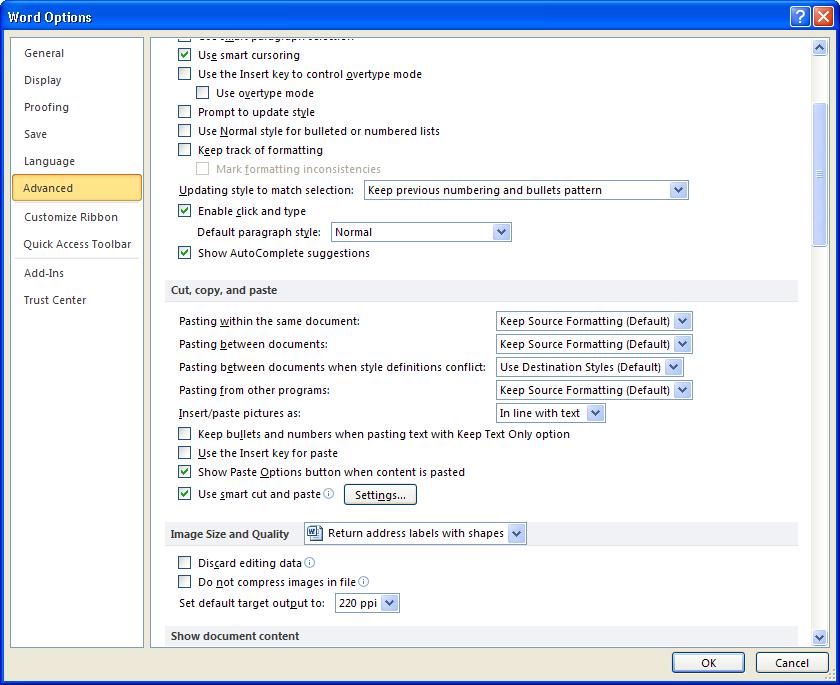
44 Setting Paste Options There are several paste options to help control the formatting of pasted text: Keep Source Formatting Retains the formatting of the location where the item was cut or copied. Use Destination Styles Uses the styles of the destination document for formatting the cut or copied text. Merge Formatting Merges the original formatting with the pasting location formatting. Keep Text Only Strips the formatting from the cut or copied text before pasting. The pasted text will inherit the paragraph formatting of the pasting location. The default paste option can be changed using the Word Options dialog box. Use the following procedure to open the Word Options dialog box for pasting options. 1. Select the Paste command from the Clipboard group of the Home tab on the Ribbon. 2. Select the Set Default Paste option.
45

46 Using the Selection Pane The Selection pane keeps track of shapes and other objects in your document. This is useful if you are trying out different design elements and want to select, hide or view certain aspects of the design. Use the following procedure to open the Selection Pane. 1. From the Editing group on the Home tab of the Ribbon, choose the SELECT option to open the menu. 2. Choose SELECTION pane to open the Selection Pane.

47 The Selection and Visibility pane is illustrated below. Some of the features of the Selection and Visibility pane. Click on an object to select it in the document. Click on the eye icon in the Selection and Visibility pane to hide the object. Click it again to show it. Click Show All or Hide All to show or hide all objects in the document. Click the up and down arrows to re-order layered objects.
48 Information is a source of learning. But unless it is organized, processed, and available to the right people in a format for decision making, it is a burden, not a benefit. William Pollard Module Six: Basic Formatting Tasks Word 2010 allows you to enhance your text in many ways. In this module, we ll discuss the different types of formatting, as well as cover the most basic types of formatting your words. This includes the font face, size, and color, as well as enhancing the text and adding text effects. We ll also discuss how to clear formatting if you change your mind.

49 Understanding Levels of Formatting The basic types of formatting are font formatting and paragraph formatting. The font formatting changes the look and feel of the text at the letter or word level. The paragraph formatting changes the look and feel of the text for the whole paragraph. The Home tab of the Ribbon includes a group for font formatting and a group for paragraph formatting. Below is the Font and Paragraph groups on the Home tab of the Ribbon.
50 Changing Font Face and Size You can easily change the font face to any font installed on your computer. You can use the Font group on the Ribbon, or you can use the context menu that appears when you select text. The Font face list includes the theme fonts first, then the most recently used fonts, then the other fonts installed on your system in alphabetical order. The font size is measured in points, which is unit of measure in typography. Use the following procedure to change the font face and size using the Ribbon tools. 1. Select the text you want to change. 2. Select the arrow next to the current font name to display the list of available fonts.

51 3. Use the scroll bar or the down arrow to scroll down the list of fonts. 4. Select the desired font to change the font of text.

52 5. With the text still selected, select the arrow next to the current font size to see a list of common font sizes. 6. Use the scroll bar or the down arrow key to scroll to the size you want and select it. You can also highlight the current font size and type in a new number to indicate the font size you want. The font context list that appears when you select text. 1. Select the text you want to change. 2. A very faint context menu appears. Move your mouse over the menu to make sure it stays visible. If you don t see it, you can always right-click the mouse to make it appear. 3. Select the new font face or font size just as you would on the Ribbon.

53 Changing the Font Color You can choose any color for your text. The font group includes a gallery to choose one of the following for your font color: Automatic Makes the font black. Theme Colors Includes a palette of colors based on the document s theme. Standard Colors Includes a palette of 10 standard colors. More Colors Opens the Colors dialog box to choose from more colors or to enter the values for a precise color. You can also choose from the variety of gradients. Use the following procedure to select a color for their fonts from the gallery. 1. Select the text you want to change. 2. Select the arrow next to the Font Color tool on the Ribbon to display the gallery. Or select the same tool from the context menu (appears when you select text or by right-clicking).
. 3. Select MORE COLORS to open the Colors dialog box.")
54 3. Select the color to change the font color. The Colors dialog box 1. Select the text you want to change. 2. Select the arrow next to the Font Color tool on the Ribbon to display the gallery. Or select the same tool from the context menu (appears when you select text or by right-clicking). 3. Select MORE COLORS to open the Colors dialog box. In the Standard Colors dialog box, simply click on the color and select OK to use that color.

55 In the Custom Colors dialog box, you can click on the color, or you can enter the red, green, and blue values to get a precise color. When you have the color you want, select OK.
56 Adding Font Enhancements You can choose several enhancements for your text. The font group on the Ribbon and the font context menu allow you to easily change the font to: Bold Italic Underline Strikethrough Subscript Superscript

57 Adding a Visual Effect You can choose several effects for your text. The font group on the Ribbon allows you to add the following effects to your text: A variety of combined fill, outline, and gradient effects that come with the document theme Text outline color, weight, and dashes Shadows Reflections Glow
58 Clearing Formatting The Clear Formatting tool removes all of the formatting properties from the selected text. This is useful if you are experimenting and decide to start over with plain text. With the Clear Formatting tool, you don t have to undo several different formats you can just clear them all at once.
59 Quick Tip: The Format Painter can copy font formatting or paragraph formatting. Module Seven: Advanced Formatting Tasks This module introduces some of the more advanced formatting tasks for formatting your text in Word This module covers using the highlighter and the format painter, as well as changing the case (capitalization) of words. It introduces the Font dialog box for formatting several properties of your font at once. It also introduces the OpenType options for giving your document a professionally printed look.

60 Highlighting Text You can highlight text, such as to point out different items during a document review cycle. Use the following procedure to highlight text they have already selected. 1. Select the text you want to highlight. 2. Select the Text Highlight tool from the Ribbon or the formatting context menu. Or select the arrow next to the Text Highlighting tool to choose a highlighting color. Use the following procedure to turn on the highlighting tool to highlight different areas of text. 1. Select the Text Highlight tool from the Ribbon or the formatting context menu. Or select the arrow next to the Text Highlighting tool to choose a highlighting color. The cursor changes to a highlighting cursor, as illustrated below. 2. Select the text you want to highlight. Word will continue highlighting as many different unconnected pieces of text as you like. 3. To stop highlighting, select the Text Highlight tool again and choose Stop Highlighting. Or just click the Text Highlight tool again.
61 Changing Case The Change Case tool allows you to change the case of selected text to one of the following: Sentence case Lower case Upper case Capitalize each word Toggle Case

62 Using the Format Painter The Format Painter allows you to quickly apply the same formatting from one piece of text to another. Use the following procedure to use the Format Painter. 1. Select the text that has been formatted with the formatting properties that you want to copy. 2. Select the Format Painter tool. The cursor changes to a Format Painter cursor, as illustrated below. Format Painter Cursor 3. Select the text you want to format with the same properties. The cursor returns to normal after applying the formatting properties once. You can always repeat the process to format more text with the same properties.

63 Using the Font Dialog The Font dialog box allows you to control several aspects of font formatting at one time. It also allows you to set formatted text as the default text for the document, or to open the Text Effects dialog box for more advanced text effects. Use the following procedure to open the Font dialog box. 1. Select the text you want to format. 2. Select the square at the bottom right corner of the Font group in the Ribbon.

64 The Font dialog box. The Set as Default dialog box.


65 The Text Effects dialog box.
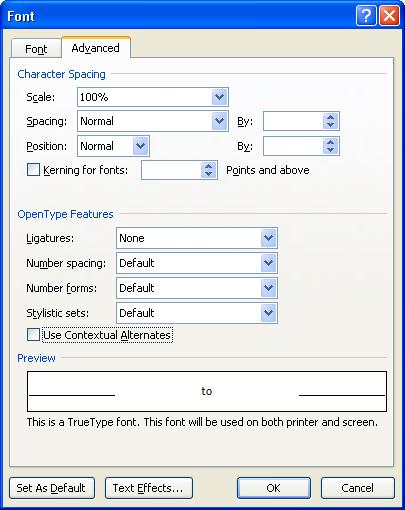
66 Setting Open Text Options Open Type formatting provides an extra level of typographical formatting that can make your document look professionally printed. Word 2010 supports the following Open Type font features: Ligature settings Stylistic sets Number spacing and forms Below is the Font dialog box Advanced tab.
67
68 It's difficult for me to feel that a solid page without the breakups of paragraphs can be interesting. I break mine up perhaps sooner than I should in terms of the usage of the English language. A. E. van Vogt Module Eight: Formatting Paragraphs Paragraph formatting controls the look and feel of an entire paragraph. In this module, we ll discuss how to change the spacing of your text, both the line spacing and the space in between paragraphs. We ll also address setting the alignment and using tabs and indents. We ll also practice using bullets and numbering the document and learn how to add borders and shading to the text.
69 Changing Spacing The Line Spacing options allow you to change the amount of space between lines in a paragraph. You can also add extra space before and/or after a paragraph to give your document a professional look. Use the following procedure to adjust the line spacing using the Line Spacing tool on the Ribbon. 1. With your cursor anywhere in the paragraph you want to adjust (the text does not have to be selected), select the Line and Paragraph spacing tool from the Ribbon. 2. Select one of the following options: 1.0 single spacing 1.15 provides a little more space than single spacing 1.50 One and a half line spacing 2.0 double spacing 2.5 two and a half line spacing 3.0 triple spacing Use the following procedure to add or remove space before or after a paragraph.
70 1. With your cursor anywhere in the paragraph you want to adjust (the text does not have to be selected), select the Line and Paragraph spacing tool from the Ribbon. 2. The Paragraph spacing options listed are based on your current settings. You can choose one of the following to add or remove space before or after your paragraph: Add Space Before Paragraph Remove Space Before Paragraph Add Space After Paragraph Remove Space After Paragraph The amount added by default is usually 12 points. To add more, you will need to use the Paragraph dialog box. Use the following procedure to open the Paragraph dialog box and adjust the line spacing or paragraph spacing options. 1. With your cursor anywhere in the paragraph you want to adjust (the text does not have to be selected), select the Line and Paragraph spacing tool from the Ribbon. 2. Select LINE SPACING OPTIONS to open the Paragraph dialog box.
71 3. You can use the up and down arrows to adjust the paragraph spacing before and after the paragraph. The arrows adjust the points in typographical increments. You can also enter any number in the BEFORE and AFTER fields to adjust the spacing more precisely. 4. The Line Spacing field allows you to select from several line spacing options. If you select AT LEAST, EXACTLY, or MULTIPLE, enter the measurement (points or lines) in the AT field.
, select the desired alignment tool from the Ribbon.")
72 Setting the Alignment You can align your text to the left, to the right, or in the center. You can also justify the text. Use the following procedure to adjust the alignment for the paragraph. 1. With your cursor anywhere in the paragraph you want to adjust (the text does not have to be selected), select the desired alignment tool from the Ribbon. You can also select multiple paragraphs by selecting the text.
. You can create a hanging indent, such as for bulleted information or. You can create mirror indents.")
73 Using Indents and Tabs Tabs allow you to indent the first line of your paragraph. There are a few different kinds of indents: You can indent a whole paragraph. You can indent the first line of a paragraph (First indent). You can create a hanging indent, such as for bulleted information or. You can create mirror indents. You can add a tab at any time by simply placing the cursor in the desired location and pressing the TAB key. You can create indents using the tools on the Ribbon or by using the Paragraph dialog box. Use the following procedure to add a whole paragraph indent. 1. With your cursor anywhere in the paragraph you want to adjust (the text does not have to be selected), select the Indent tool from the Ribbon. You can also select multiple paragraphs by selecting the text. Use the following procedure for the indent options on the Paragraph dialog box. 1. With your cursor anywhere in the paragraph you want to adjust (the text does not have to be selected), select the square at the bottom right corner of the Paragraph group on the Ribbon to open the Paragraph dialog box.
.")
74 2. You can use the up and down arrows to adjust the left and/or right Indentation for the paragraph. The arrows adjust the measurement in 1/10 of an inch increments (by default- your default measurement can be changed). You can also enter any number in the LEFT and RIGHT fields to adjust the indentation more precisely. 3. The Special field allows you to select a first line only or hanging indent. Enter the measurement for the special indent in the BY field.
75 4. Check the MIRROR INDENTS to have the indent on both the left margin and the right margin by the same amounts.
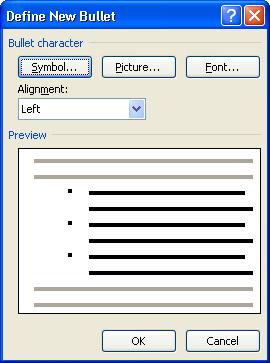
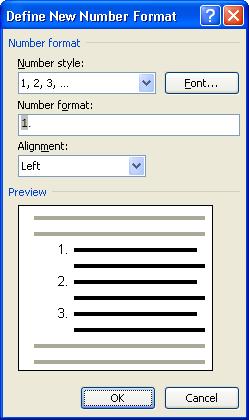
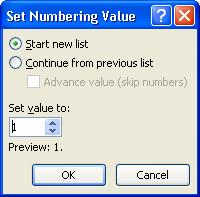
76 Adding Bullets and Numbering To learn how to create lists in Word 2010 using bullets and numbering. To introduce the more advanced options for controlling your bulleted and numbered lists. Use the following procedure to create a simple bulleted or numbered list. 1. Select the paragraphs you want to turn into a bulleted or numbered list. 2. Select the Bullets or Numbering tool from the Ribbon. The Bullet Library and the Numbering Library. 1. Select the arrow next to the Bullets tool or the Numbering tool on the Ribbon to view the library options. 2. Select an option to create a list with that option. For the Define New Bullet dialog box, the Define New Numbering Format dialog box, and the Set Numbering Value dialog box. Use the following procedure. 1. Select the arrow next to the Bullets tool or the Numbering tool on the Ribbon. 2. Select the Define New Bullet option, the Define New Number Format, or the Set Numbering Value option from the menu.
77
78
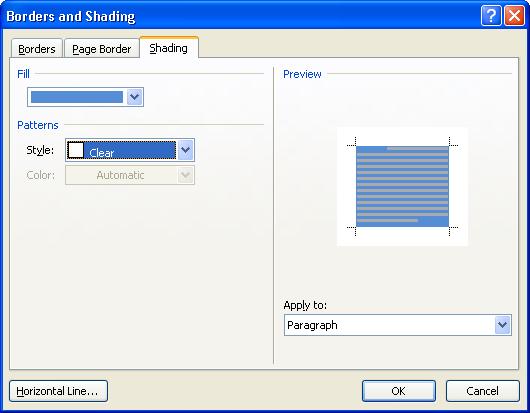
79 Adding Borders and Shading You can create a border around a paragraph or group of paragraphs to make your text stand out. You can even add shading to the paragraph(s) even if there isn t a border. The border and shading tools on the Ribbon make it easy to create simple borders or shading. The Borders and Shading dialog box allow you to customize your borders and shading. The Shading and Border tools on the Ribbon are illustrated below. Shading Tool Borders Tool Use the following procedure to add shading to selected paragraphs. 1. Select the paragraphs you want to shade. If you only want to shade one paragraph, your cursor can be anywhere in the paragraph without selecting it. 2. Select the color from the Shading tool on the Ribbon. The Shading tool includes the same gallery of colors as previously introduced. Use the following procedure to add borders to selected paragraphs. 1. Select the paragraphs you want to border. If you only want to put borders on one paragraph, your cursor can be anywhere in the paragraph without selecting it. 2. Select the border you want to use from the Borders tool on the Ribbon. The Borders tool includes several options for borders. Some of the options only apply for tables.

80 This is the Borders and Shading dialog box. 1. Open the Borders and Shading dialog box by selecting Borders and Shading from the Borders tool on the Ribbon.

81 The Borders tab of the Borders and Shading dialog box is illustrated below. The Shading tab of the Borders and Shading dialog box is illustrated below.
82
83 Fashion fades, only style remains the same. Coco Chanel Module Nine: Working with Styles Styles are a powerful formatting tool to take your Word 2010 document to the next level. Styles help provide consistency. They are also useful if you want to use certain advanced features like generated tables of contents. This module introduces styles and themes to help make your documents look great.
84 About Styles Styles are a way of combing all of the font and paragraph formatting you have developed to reuse it consistently throughout your document. Word includes a number of pre-defined style names. You can change the formatting properties of these styles as needed. The Styles group on the Ribbon includes a gallery of styles available in the current document. The implications of using styles may not be apparent in shorter documents, but they are a great time saver for longer documents. They also help ensure that your document is consistently formatted. Styles also provide an easy way to easily change the look of the whole document if styles have been applied appropriately.

85 Applying a Style Paragraph styles include all of the different formatting options for paragraphs. You can quickly apply the same format to different paragraphs by applying a paragraph style. Character styles include all of the different formatting options for fonts. You can quickly apply the same format to different characters or words by applying a character style. You can apply styles by selecting the desired paragraph or character style from the Styles group on the Ribbon. Or you can use the Apply Styles dialog box for quick style application. Here is how to use the Style gallery to apply a paragraph or character style. 1. Select the text you want to format, or simply place your cursor in the word or paragraph you want to format. 2. Open the Style Gallery by clicking the down arrow next to the styles shown in the Styles group. 3. Select the desired style to apply it to the current word or paragraph. Apply Styles dialog box

86 1. Select the text you want to format, or simply place your cursor in the word or paragraph you want to format. 2. Open the Apply Styles dialog box by clicking the down arrow next to the styles shown in the Styles group, and selecting APPLY STYLES from the menu. 3. To apply a style using the Apply Styles dialog box, simply begin typing the name of the style and press Enter when the desired style is displayed. Or use the drop down list to select the style.

87 Changing the Style Set Word 2010 includes a number of style sets to automatically provide a polished look to your document. The Change Styles tool on the Ribbon allows you to select a new Style Set to quickly change the overall look and feel of your document. Use the following procedure to change the style set. 1. Select the Change Styles tool from the Ribbon and select Style set to see the options. 2. Select a Style set from the list.
88
89 Changing the Theme Themes control the look and feel of your entire document, including the colors, fonts, and effects. Used with applying styles, themes are an efficient way to drastically change the look of your document, making look more professional and modern. Use the following procedure to change the theme. 1. Select the PAGE LAYOUT tab on the Ribbon. 2. Select the THEMES tool from the Ribbon to see the options.

90 3. Select a Theme from the list.


91 Changing Theme Elements You can easily modify your document by controlling the elements of a theme, including the: Colors Changes the colors available in the gallery Fonts Changes the document fonts for styles Effects changes the way some objects look, such as charts, SmartArt graphics, and shapes Use the following procedure to change the theme colors or fonts. 1. Select the PAGE LAYOUT tab on the Ribbon. 2. Select the THEME COLORS tool or the THEME FONTS tool from the Ribbon to see the options. 3. Select an option from the menu to change the color set or font set for the document.
92 All that mankind has done, thought or been: it is lying as in magic preservation in the pages of books. Thomas Carlyle Module Ten: Formatting the Page You have your text and paragraphs looking great, but what about the page? This module covers the basics of page formatting. You ll learn how to add headers and footers, how to format text into columns, how to change the orientation from portrait to landscape, and how to add a page color or border. Finally, you ll learn how to use the Page Setup dialog box.
93 Adding Headers and Footers Word 2010 has a number of built-in header and footer options to help your document look polished. It also includes a number of tools to help control the headers and footers. Once you have inserted a header or footer, Word 2010 includes a Header & Footer Tools Design tab with a number of tools to help create your header and footer. The Header & Footer group on the Ribbon allow you to insert built-in headers and footers based on the document theme. It also allows you to insert page numbers in various positions on the page. The Insert group on the Ribbon allows you to insert the date and time in various formats, autotext and other building blocks, a picture file or clip art. The Navigation group on the Ribbon allows you to easily move from header to footer, or from one section to another. The Link to Previous tool makes the current header or footer the same as the previous header or footer. The Options group on the Ribbon allows you to set up more advanced headers and footers for documents with a two page spread layout (different odd and even pages or a different first page). It also controls whether you can see your document text while headers and footers are open. The Position group on the Ribbon allows you to modify the margins of the header or footer. The Close group on the Ribbon closes the header and footer view and returns to the normal document view. Use the following procedure to add the company name to the header only on the first page of the document. 1. Select the INSERT tab from the Ribbon and select the HEADER tool from the Header & Footer group.

94 2. Select the BLANK option.
95 3. Type the company name. Make sure that the DIFFERENT FIRST PAGE option is checked. Below is the Header & Footer Tools Design tab on the Ribbon as well.

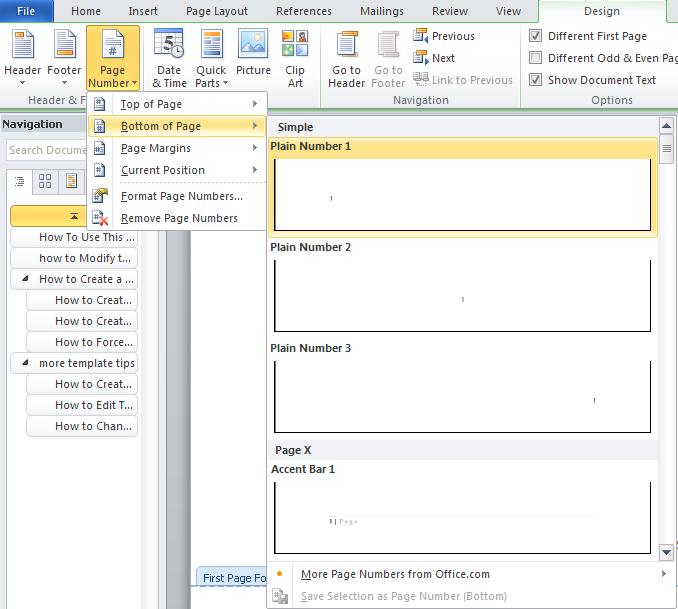
96 Use the following procedure to add page numbers to the even pages of the document. 1. Select the GO TO FOOTER tool in the Ribbon. 2. Click the NEXT tool in the Ribbon to navigation from the First page footer to the Even page footer. 3. Unselect the LINK TO PREVIOUS tool so that the even page footer will be different than the first page footer (where we do not want the page number to appear). The tool is highlighted when it is selected and not highlighted when it is turned off.

97 4. Select the Different Odd & Even Pages tool in the Ribbon. 5. Select the PAGE NUMBER tool in the Ribbon. Choose the BOTTOM OF PAGE and PLAIN NUMBER 1 options.
98

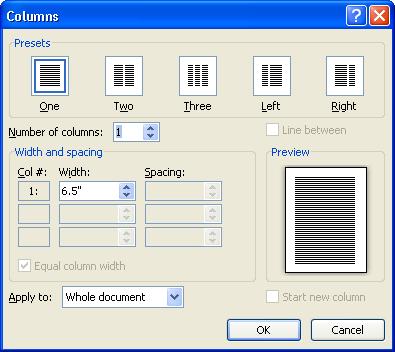
99 Formatting Text as Columns You can easily format your page with a number of multi-column page layouts. The Columns Tool on the Page Layout Tab of the Ribbon includes several popular options to quickly add columns. Or you can open the Columns dialog box to set more advanced options for columns. Columns tool
100

101 Changing Page Orientation To learn how to change the document from portrait layout to landscape layout. Orientation tool on the Page Layout tab of the Ribbon

102 Changing the Page Color The Page Color tool on the Page Layout tab of the Ribbon applies shading to background of the entire document. The Fill Effects dialog box allows you to create interesting effects with the page shading, using gradients, textures, patterns, or a picture. Use the following procedure to add color to the page. 1. Use the Page Colors tool to select a color from the gallery.

103 Fill Effects dialog box.
104 Adding a Page Border The Page Borders tab of the Borders and Shading dialog box allows you to set borders for the page. You can apply page borders to the whole document, only the current section, the first page only, or all but the first page of the document. Use the following procedure to open the Page Borders dialog box. 1. Select the Page Borders tool on the Ribbon to open the Page Borders tab of the Borders and Shading Dialog box.
105
. The Paper tab controls the paper size and the paper source when printing.")
106 Using the Page Setup Dialog The Page Setup dialog box has three tabs: The Margins tab control the page margins, the page orientation, and how to handle multiple pages (such as mirroring the margins or creating a book fold layout). The Paper tab controls the paper size and the paper source when printing. The Layout tab allows you to start a new section (for when you want multiple layouts in one document). It also includes header and footer options and margins and the page alignment option. Use the following procedure to open the Page Setup dialog box. 1. Select the small square in the bottom right corner of the Page Setup group on the Page Layout tab of the Ribbon to open the Page Setup dialog box.


107 The Paper tab controls the paper size and the paper source when printing. The Margins tab control the page margins, the page orientation, and how to handle multiple pages (such as mirroring the margins or creating a book fold layout).
.")
108 The Layout tab allows you to start a new section (for when you want multiple layouts in one document). It also includes header and footer options and margins and the page alignment option.
109 I have a spelling checker It came with my PC It plainly marks for my revue Mistakes I cannot sea I've run this poem threw it I'm sure your please to no, It's letter perfect in it's weigh My checker tolled me sew Anonymous Module Eleven: Adding the Finishing Touches You ve added some nice features to your document. Now it s time to add the finishing touches.
110 Checking Your Spelling Word 2010 can check your spelling as you type. Any misspelled or suspect words are marked with a wavy red underline. You can use the right-click context menu on these suspect words to easily correct them. You can also use the Spelling and Grammar dialog box to check your spelling. The following example uses a misspelling of the word information. 1. Right click on a misspelled word to display the context menu. Use the following procedure to open the Spelling and Grammar dialog box. 1. Select the SPELLING AND GRAMMAR tool from the PROOFING group in the REVIEW tab of the Ribbon. Or select SPELLING from the context menu of a misspelled word.


111 Discuss the buttons on the Spelling and Grammar dialog box. The Ignore Once button allows you to keep the word as the current spelling, but only for the current location. The Ignore All button allows you to ignore the misspelling for the whole document. The Add to Dictionary allows you to add the word to your dictionary for all Word documents. The Suggestions area lists possible changes for the misspelling. There may be many choices, just one, or no choices, based on Word s ability to match the error to other possibilities. The Change button allows you to change the misspelled word to the highlighted choice in the Suggestions area. You can highlight any word in the Suggestions area and select Change.
112 The Change All button allows you to notify Word to make this spelling correction any time it encounters this spelling error in this document. The Auto Correct button allows you to have Word automatically correct certain types of spelling errors. The Check grammar box activates the search for grammar errors as well as spelling errors. The Options button allows you to set the options to have Word automatically correct certain types of errors. The Undo button allows you to undo the previous spelling or grammar change.

113 Previewing Your Document The new Word 2010 Print tab in the Backstage View allows you to preview your document before printing it. Use the following procedure to open the Print tab of the Backstage View to preview the document. 1. Select the FILE tab on the Ribbon. 2. Select the PRINT tab in the Backstage View. Navigation Tools Zoom Tools
114 Printing Your Document The new Word 2010 Print tab in the Backstage View allows you to easily set your printing options and print your document. Buttons on the PRINT tab of the Backstage View. The PRINT button allows you to print the document using the current settings. The COPIES field allows you to print one or more copies of the document. The PRINTER allows you to select a different printer. The printer properties allows you to set the properties for that printer. The SETTINGS tool allows you to select different pages of your document. You can even print document properties, such as a list of styles used in the document. The PAGES field allows you to specify a custom page range to print. The other SETTINGS control additional settings for print, such as one or two sided printing, whether multiple copies are collated, the orientation, the paper size, the default page margins, and how many pages to print per page. There is also a link to the PAGE SETUP dialog box.
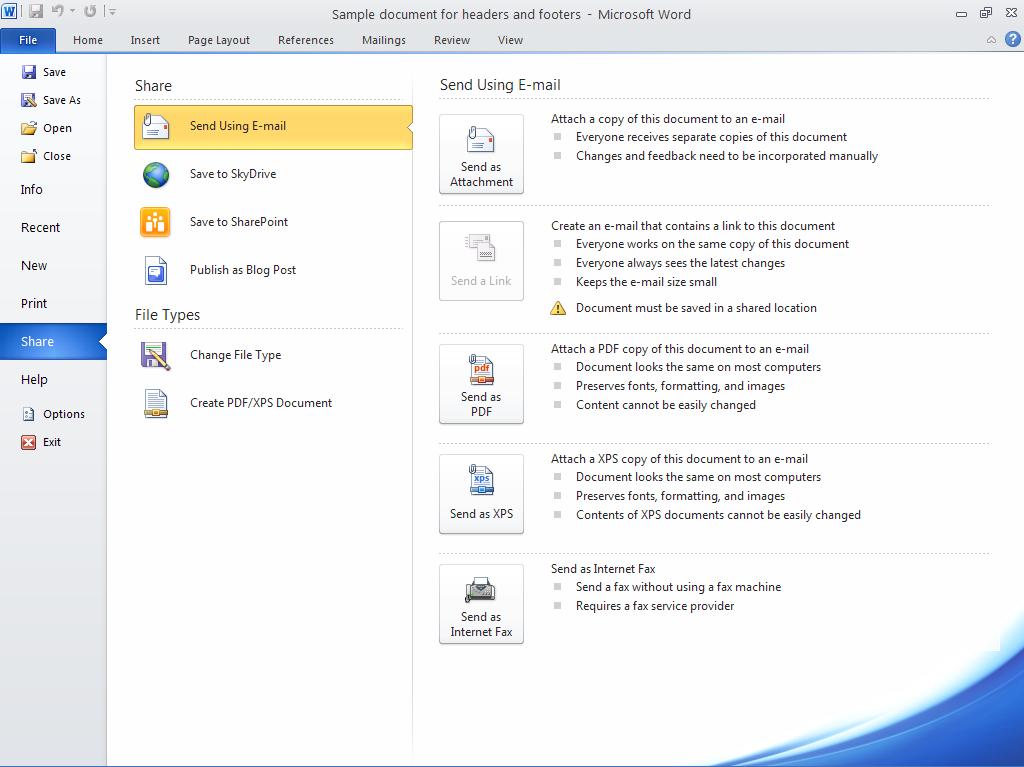
115 ing Your Document The new Word 2010 Share tab in the Backstage View allows you to easily send the current document using your default application. You can send it as an attachment or you can send a link to the file. Use the following procedure to open the Share tab. 1. Select the FILE tab on the Ribbon. 2. Select the SHARE tab in the Backstage View.
116
117 I do the very best I know how - the very best I can; and I mean to keep on doing so until the end. Abraham Lincoln Module Twelve: Wrapping Up Although this workshop is coming to a close, we hope that your journey to improve your Word skills is just beginning. Please take a moment to review and update your action plan. This will be a key tool to guide your progress in the days, weeks, months, and years to come. We wish you the best of luck on the rest of your travels! Words from the Wise We d like to leave you with a few thoughts to accompany you on your Word learning journey. Create professional quality documents either from scratch or using a number of Office.com templates Use the new Backstage view to easily create, open, print, and share your documents. Use the powerful font and paragraph formatting tools to enhance the look of your documents. Use styles to ensure consistent formatting throughout your document. Use the powerful page formatting tools to create eye-catching effect
Core Essentials. Word Module 1. Diocese of St. Petersburg Office of Training
 Core Essentials Word 2010 Module 1 Diocese of St. Petersburg Office of Training Training@dosp.org Diocese of St. Petersburg 9/5/2014 This Page Left Intentionally Blank Diocese of St. Petersburg i 9/5/2014
Core Essentials. Publisher Diocese of St. Petersburg Office of Training
 Core Essentials Publisher 2010 Diocese of St. Petersburg Office of Training Training@dosp.org TABLE OF CONTENTS Topic One: Getting Started... 1 Workshop Objectives... 2 Topic Two: Opening and Closing Publisher...
Word Select New in the left pane. 3. Select Blank document in the Available Templates pane. 4. Click the Create button.
 Microsoft QUICK Word 2010 Source Getting Started The Word Window u v w x z Opening a Document 2. Select Open in the left pane. 3. In the Open dialog box, locate and select the file you want to open. 4.
Word Getting Started The Word Window u vw. Microsoft QUICK Source. Creating a New Blank Document. Creating a New Document from a Template
 Microsoft QUICK Source Word 2007 Getting Started The Word Window u vw x y z u Quick Access Toolbar contains shortcuts for the most commonly used tools. v Microsoft Office Button contains common file and
Word - Basics. Course Description. Getting Started. Objectives. Editing a Document. Proofing a Document. Formatting Characters. Formatting Paragraphs
 Course Description Word - Basics Word is a powerful word processing software package that will increase the productivity of any individual or corporation. It is ranked as one of the best word processors.
MICROSOFT WORD 2010 BASICS
 MICROSOFT WORD 2010 BASICS Word 2010 is a word processing program that allows you to create various types of documents such as letters, papers, flyers, and faxes. The Ribbon contains all of the commands
Microsoft Word 2010 Tutorial
 1 Microsoft Word 2010 Tutorial Microsoft Word 2010 is a word-processing program, designed to help you create professional-quality documents. With the finest documentformatting tools, Word helps you organize
MS WORD. You can use it for writing letters, reports and so on.
 MS WORD MS WORD 2 You can use it for writing letters, reports and so on. Starting Word application 3 To start MS. Word do the following: 1. From the Start button on the taskbar, select All Programs. 2.
Microsoft Word 2010 Lesson Plan
 Microsoft Word 2010 Lesson Plan Objective: This class is a brief introduction to Word 2010. It consists of 2 one and one-half hour sessions. By the end of this class you should be able to create a simple
Introduction to Microsoft Word 2010
 Introduction to Microsoft Word 2010 Microsoft Word is a word processing program you can use to write letters, resumes, reports, and more. Anything you can create with a typewriter, you can create with
Lesson 2 Quick Tour and Features
 Lesson 2 Quick Tour and Features Objectives Students will format a document page. Students will use a spell-checker. Students will copy, cut, and paste text. Students will adjust paragraph indentations.
Lesson 13 Editing and Formatting documents
 Editing and Formatting documents Computer Literacy BASICS: A Comprehensive Guide to IC 3, 4 th Edition 1 Objectives Delete and insert text using Backspace, Delete, Insert, Overtype modes. Undo, redo, and
MICROSOFT WORD 2010 Quick Reference Guide
 MICROSOFT WORD 2010 Quick Reference Guide Word Processing What is Word Processing? How is Word 2010 different from previous versions? Using a computer program, such as Microsoft Word, to create and edit
Introduction to Microsoft Word 2010
 Introduction to Microsoft Word 2010 THE BASICS PAGE 02! What is Microsoft Word?! Opening Microsoft Word! The Title Bar! Page View and Zoom MENUS...PAGE 03! Quick Access Toolbar! The Ribbon! File Tab! Home
Mi c r o s o f t Wo r d Qu i c k Re f e r e n c e Ca r d
 Tech Talk # 5 Mi c r o s o f t Wo r d Qu i c k Re f e r e n c e Ca r d Introduction by Renae Schmidt Hello! Welcome to Tech Talk #5. This week we are sharing a Microsoft Word 2010 Quick Reference Card.
Introduction to Microsoft Office 2016: Word
 Introduction to Microsoft Office 2016: Word Last Updated: September 2018 Cost: $2.00 Microsoft Word is a word processing software. You can use it to type letters, reports, and other documents. This class
Microsoft Office 2000 & Microsoft Word 2000 Page 1. ***** Help Options ***** To access [? ] quickly & for specific use then
![Microsoft Office 2000 & Microsoft Word 2000 Page 1. ***** Help Options ***** To access [? ] quickly & for specific use then](/thumbs/90/104468223.jpg "Microsoft Office 2000 & Microsoft Word 2000 Page 1. ***** Help Options ***** To access [? ] quickly & for specific use then") Microsoft Office 2000 & Microsoft Word 2000 Page 1 ***** Help Options ***** Microsoft Help: Options and Search [ F1 ] Fastest way to get to Office Assistant and MS Office Help! ESC to Exit File > Help
Microsoft Office 2000 & Microsoft Word 2000 Page 1 ***** Help Options ***** Microsoft Help: Options and Search [ F1 ] Fastest way to get to Office Assistant and MS Office Help! ESC to Exit File > Help
Introduction to Microsoft Word 2010
 Introduction to Microsoft Word 2010 Microsoft Word is a word processing program you can use to write letters, resumes, reports, and more. Anything you can create with a typewriter, you can create with
Microsoft Word 2010 Basics
 1 Starting Word 2010 with XP Click the Start Button, All Programs, Microsoft Office, Microsoft Word 2010 Starting Word 2010 with 07 Click the Microsoft Office Button with the Windows flag logo Start Button,
Opening Microsoft Word. 1. Double click the Word 2016 icon on the desktop to launch word.
 Intro to Microsoft Word 2016 Class Description: This class will provide an introduction to the word processing program Microsoft Word 2016. Learn how to create a simple document, edit and format text,
Microsoft Word Chapter 1. Creating, Formatting, and Editing a Word Document with Pictures
 Microsoft Word 2010 Chapter 1 Creating, Formatting, and Editing a Word Document with Pictures Objectives Enter text in a Word document Check spelling as you type Format paragraphs Format text Undo and
Computer Nashua Public Library Introduction to Microsoft Word 2010
 Microsoft Word is a word processing program you can use to write letters, resumes, reports, and more. Anything you can create with a typewriter, you can create with Word. You can make your documents more
Microsoft Word Important Notice
 Microsoft Word 2013 Important Notice All candidates who follow an ICDL/ECDL course must have an official ICDL/ECDL Registration Number (which is proof of your Profile Number with ICDL/ECDL and will track
Contents. Launching Word
 Using Microsoft Office 2007 Introduction to Word Handout INFORMATION TECHNOLOGY SERVICES California State University, Los Angeles Version 1.0 Winter 2009 Contents Launching Word 2007... 3 Working with
Microsoft Office Training Skills 2010
 Lesson 3 - Creating Documents with MS word 2010 Introduction to Word Processing MS-Word 2010 is word processing application that is used create and edit documents such as: Books, letters, reports, newsletters,
Introduction to Microsoft Word 2007 Quickguide
 Introduction to Microsoft Word 2007 Quickguide Opening Word -Click the Start button -Click Programs from the start menu -Select Microsoft Office -Click Microsoft Office Word 2007 -A new blank document
Introduction to Microsoft Word 2008
 1. Launch Microsoft Word icon in Applications > Microsoft Office 2008 (or on the Dock). 2. When the Project Gallery opens, view some of the available Word templates by clicking to expand the Groups, and
Microsoft Word 2007 on Windows
 1 Microsoft Word 2007 on Windows Word is a very popular text formatting and editing program. It is the standard for writing papers and other documents. This tutorial and quick start guide will help you
Microsoft Word 2010 Part 1: Introduction to Word
 CALIFORNIA STATE UNIVERSITY, LOS ANGELES INFORMATION TECHNOLOGY SERVICES Microsoft Word 2010 Part 1: Introduction to Word Summer 2011, Version 1.0 Table of Contents Introduction...3 Starting the Program...3
Microsoft Word Part I Reference Manual
 Microsoft Word 2002 Part I Reference Manual Instructor: Angela Sanderson Computer Training Coordinator Updated by: Angela Sanderson January 11, 2003 Prepared by: Vi Johnson November 20, 2002 THE WORD SCREEN
Introduction to MS Word XP 2002: An Overview
 Introduction to MS Word XP 2002: An Overview Sources Used: http://www.fgcu.edu/support/office2000/word/files.html Florida Gulf Coast University Technology Skills Orientation Word 2000 Tutorial The Computer
Word 2013 Beginning. Technology Integration Center
 Word 2013 Beginning Getting Started... 2 Quick Access Toolbar... 3 The Ribbon... 3 Help... 4 Compatibility Mode... 4 Document Views... 4 Navigating the Document... 5 Moving Around in the Document... 5
Microsoft Word 2011 Tutorial
 Microsoft Word 2011 Tutorial GETTING STARTED Microsoft Word is one of the most popular word processing programs supported by both Mac and PC platforms. Microsoft Word can be used to create documents, brochures,
Microsoft Office Word 2010
 Microsoft Office Word 2010 Content Microsoft Office... 0 A. Word Basics... 4 1.Getting Started with Word... 4 Introduction... 4 Getting to know Word 2010... 4 The Ribbon... 4 Backstage view... 7 The Quick
Microsoft Office Word. Part1
 Microsoft Office 2010 - Word Part1 1 Table of Contents What is Microsoft Word?... 4 Creating a document... 5 Toolbar... 6 Typing in MS Word Text Area... 7 Cut, Copy and Paste Text... 9 Paste Preview...
Microsoft Office Word 2016 for Mac
 Microsoft Office Word 2016 for Mac Introduction to Word University Information Technology Services Learning Technologies, Training & Audiovisual Outreach Copyright 2016 KSU Division of University Information
Microsoft Office Word. Help. Opening a Document. Converting from Older Versions
 Microsoft Office 2007 - Word Help Click on the Microsoft Office Word Help button in the top right corner. Type the desired word in the search box and then press the Enter key. Choose the desired topic
11.1 Create Speaker Notes Print a Presentation Package a Presentation PowerPoint Tips... 44
 Contents 1 Getting Started... 1 1.1 Presentations... 1 1.2 Microsoft Office Button... 1 1.3 Ribbon... 2 1.4 Mini Toolbar... 2 1.5 Navigation... 3 1.6 Slide Views... 4 2 Customize PowerPoint... 5 2.1 Popular...
What can Word 2013 do?
 Mary Ann Wallner What can Word 2013 do? Provide the right tool for: Every aspect of document creation Desktop publishing Web publishing 2 Windows 7: Click Start Choose Microsoft Office > Microsoft Word
The American University in Cairo. Academic Computing Services. Word prepared by. Soumaia Ahmed Al Ayyat
 The American University in Cairo Academic Computing Services Word 2000 prepared by Soumaia Ahmed Al Ayyat Spring 2001 Table of Contents: Opening the Word Program Creating, Opening, and Saving Documents
MICROSOFT WORD. Table of Contents. What is MSWord? Features LINC FIVE
 Table of Contents What is MSWord? MSWord is a word-processing program that allows users to insert, edit, and enhance text in a variety of formats. Word is a powerful word processor with sophisticated editing
WORD (2010) TIPS & TRICKS. Gail Weiss
 TIPS & TRICKS. Gail Weiss") WORD (2010) TIPS & TRICKS Gail Weiss Word (2010) Tips & Tricks Overview: Here are some tips and tricks to use in WORD to make you more productive. TABLE OF CONTENTS CUSTOMIZING THE QUICK ACCESS TOOLBAR...
WORD (2010) TIPS & TRICKS Gail Weiss Word (2010) Tips & Tricks Overview: Here are some tips and tricks to use in WORD to make you more productive. TABLE OF CONTENTS CUSTOMIZING THE QUICK ACCESS TOOLBAR...
Word Tips & Tricks. Status Bar. Add item to Status Bar To add an itme to the status bar, click on the item and a checkmark will display.
 Status Bar The status bar is located on the bottom of the Microsoft Word window. The status bar displays information about the document such as the current page number, the word count in the document,
Microsoft Word Tutorial
 Microsoft Word Tutorial 1 GETTING STARTED Microsoft Word is one of the most popular word processing programs supported by both Mac and PC platforms. Microsoft Word can be used to create documents, brochures,
Word 2010 Beginning. Technology Integration Center
 Word 2010 Beginning File Tab... 2 Quick Access Toolbar... 2 The Ribbon... 3 Help... 3 Opening a Document... 3 Documents from Older Versions... 4 Document Views... 4 Navigating the Document... 5 Moving
MS Word 2010 An Introduction
 MS Word 2010 An Introduction Table of Contents The MS Word 2010 Environment... 1 The Word Window Frame... 1 The File Tab... 1 The Quick Access Toolbar... 4 To Customize the Quick Access Toolbar:... 4
CHAPTER 3: MICROSOFT OFFICE: WORD 2010
 CHAPTER 3: MICROSOFT OFFICE: WORD 2010 Quick Summary Microsoft Office 2010 includes programs, servers, and services for individuals and organizations. The insertion point is a blinking vertical line that
Microsoft Word Intermediate March 25, Exercise 1: Open Word Click on Word. OR Click Start. Click All Programs. Click Microsoft Office.
 Microsoft Word Intermediate March 25, 2014 Exercise 1: Open Word Click on Word. OR Click Start. Click All Programs. Click Microsoft Office. Exercise 2: Create a new document Click File Tab. Select New.
Microsoft Publisher 2010
 Microsoft Publisher 2010 Chapter 2 Publishing a Trifold Brochure Objectives Discuss advantages of the brochure medium Choose brochure options Copy and paste with paste options Wordwrap text Format characters
Unit D Lecture Notes Word 2003
 Unit D Lecture Notes Word 2003 Objectives: In this project you will learn: Set document margins Divide a document into sections Insert page breaks Insert page numbers Add headers and footers Edit headers
Computer Applications Info Processing
 Lesson 2: Modify the Structure and Appearance of Text Microsoft Word 2016 IN THIS CHAPTER, YOU WILL LEARN HOW TO: Apply styles to text. Change a document s theme. Manually change the look of characters
MS Word Basics. Groups within Tabs
 MS Word Basics Instructor: Bev Alderman L e t s G e t S t a r t e d! Open and close MS Word Open Word from the desktop of your computer by Clicking on the Start>All programs>microsoft Office >Word 2010
Microsoft Word 2007 Essential Skills
 The "Anatomy" of the Word Window The typical program window will look similar to that shown below. It is possible to customize your own display, but that is a topic for discussion later on. OFFICE BUTTON
MS Word Professional Document Alignment
 MS Word Professional Document Alignment Table of Contents CHARACTER VS. PARAGRAPH FORMATTING...5 Character formatting...5 Paragraph Formatting...5 USING SHOW/HIDE TO REVEAL NON-PRINTING CHARACTERS...5
Microsoft Word 2010 Guide
 Microsoft Word 2010 Guide 1 Microsoft Word 2010 These notes are devised for Word 2010. You should be aware that it is similar to Word 2007 but is quite different from earlier versions of Word, e.g. Word
Bridge Course Information and Communication Technology
 Bridge Course Information and Communication Technology Microsoft Word 1. Which bar is usually located below that Title Bar that provides categorized options? A. Menu bar B. Status Bar C. Tool bar D. Scroll
button Double-click any tab on the Ribbon to minimize it. To expand, click the Expand the Ribbon button
 PROCEDURES LESSON 1: CREATING WD DOCUMENTS WITH HEADERS AND FOOTERS Starting Word 1 Click the Start button 2 Click All Programs 3 Click the Microsoft Office folder icon 4 Click Microsoft Word 2010 1 Click
Lehigh University Library & Technology Services
 Lehigh University Library & Technology Services Start Word Open a file called day2 Microsoft WORD 2003 Day 2 Click the Open button on the Standard Toolbar Go to the A: drive and highlight day2 and click
Understanding Word Processing
 Understanding Word Processing 3.0 Introduction In this chapter you are going to learn how to create a simple memo or note or a complex and complicated multi column business document using word processing
Excel Select a template category in the Office.com Templates section. 5. Click the Download button.
 Microsoft QUICK Excel 2010 Source Getting Started The Excel Window u v w z Creating a New Blank Workbook 2. Select New in the left pane. 3. Select the Blank workbook template in the Available Templates
The first time you open Word
 Microsoft Word 2010 The first time you open Word When you open Word, you see two things, or main parts: The ribbon, which sits above the document, and includes a set of buttons and commands that you use
Chapter 4 Printing and Viewing a Presentation Using Proofing Tools I. Spell Check II. The Thesaurus... 23
 PowerPoint Level 1 Table of Contents Chapter 1 Getting Started... 7 Interacting with PowerPoint... 7 Slides... 7 I. Adding Slides... 8 II. Deleting Slides... 8 III. Cutting, Copying and Pasting Slides...
Introduction to Microsoft Word 2010
 CDU Short Courses Introduction to Microsoft Word 2010 A 2 day course delivered by Charles Darwin University. COURSE INFORMATION This course focuses on basic document production using Microsoft Word 2010
NOBLE INSTITUTE OF COMPUTER ACCOUNTANCY
 1 The ability to combine name and addressed with a standard document is called a. document formatting b. database management c. mail merge d. form letters 2. Which enables us to send the same letter to
Word 2007/10/13 1 Introduction
 Objectives Word 2007/10/13 1 Introduction Understand the new Word 2007 Interface Navigate the Office button Learn about the Quick Access menu Navigate the Ribbon menu interface Understand the I-beam Learn
San Pedro Junior College. WORD PROCESSING (Microsoft Word 2016) Week 4-7
 Week 4-7") WORD PROCESSING (Microsoft Word 2016) Week 4-7 Creating a New Document In Word, there are several ways to create new document, open existing documents, and save documents: Click the File menu tab and then
WORD PROCESSING (Microsoft Word 2016) Week 4-7 Creating a New Document In Word, there are several ways to create new document, open existing documents, and save documents: Click the File menu tab and then
Gloucester County Library System. Microsoft 2010 PowerPoint
 Gloucester County Library System Microsoft 2010 PowerPoint PowerPoint 2010 is a presentation software that allows you to create dynamic slide presentations that may include animation, narration, images,
Microsoft Word Handout
 Microsoft Word Handout Navigating Microsoft Word Maneuvering your way through Word is the key to working efficiently on all of your documents. This guide will help you locate the necessary tools and understand
Life After Word An Introduction to Microsoft Word The University of Iowa ITS Campus Technology Services Iowa City, IA 52242
 Life After Word 2003 An Introduction to Microsoft Word 2007 ITS Campus Technology Services Iowa City, IA 52242 March 2007 2 TABLE OF CONTENTS TABLE OF CONTENTS... 2 INTRODUCTION... 4 WHAT S NEW... 4 GETTING
Computer Applications Mid-Term Exam
 Computer Applications Mid-Term Exam Multiple Choice Identify the choice that best completes the statement or answers the question. Case WD 1-2 Sam s mouse suddenly stopped working and he has an important
Lesson 4 - Creating a Text Document Using WordPad
 Lesson 4 - Creating a Text Document Using WordPad OBJECTIVES: To learn the basics of word processing programs and to create a document in WordPad from Microsoft Windows. A word processing program is the
Excel Main Screen. Fundamental Concepts. General Keyboard Shortcuts Open a workbook Create New Save Preview and Print Close a Workbook
 Excel 2016 Main Screen Fundamental Concepts General Keyboard Shortcuts Open a workbook Create New Save Preview and Print Close a Ctrl + O Ctrl + N Ctrl + S Ctrl + P Ctrl + W Help Run Spell Check Calculate
Using Microsoft Word. Table of Contents
 Using Microsoft Word Table of Contents The Word Screen... 2 Document View Buttons... 2 Selecting Text... 3 Using the Arrow Keys... 3 Using the Mouse... 3 Line Spacing... 4 Paragraph Alignment... 4 Show/Hide
Minimize Restore Close. Top Level Tabs. Quick Access Toolbar. Title Bar. Ribbon. Group. Rulers. Status Bar View Buttons.
 Microsoft Word 2013 Quick Access Toolbar Top Level Tabs Title Bar Minimize Restore Close Ribbon Group Rulers Status Bar View Buttons Zoom Control Getting to Know Word Word is word processing software.
Office Wo Office W r o d r 2007 Revi i ng and R d Refifini ng a D Document
 Office Word 2007 Lab 2 Revising i and Refining i a Document In this lab, the student will learn more about editing documents They will learn to use many more of the formatting features included in Office
Beginning Microsoft Word Crystal Lake Public Library
 Beginning Microsoft Word 2013 Crystal Lake Public Library Agenda What is it? Do I have it? Why bother? Launch & view Typing time Selecting text Home tab Undo Page layout File backstage Going forward What
Microsoft PowerPoint 2007 Tutorial
 Microsoft PowerPoint 2007 Tutorial Prepared By:- Mohammad Murtaza Khan I. T. Expert Sindh Judicial Academy Contents Getting Started... 5 Presentations... 5 Microsoft Office Button... 5 Ribbon... 6 Quick
Reference Services Division Presents WORD Introductory Class
 Reference Services Division Presents WORD 2010 Introductory Class CLASS OBJECTIVES: Navigate comfortably on a Word page Learn how to use the Ribbon tabs and issue commands Format a simple document Edit,
PowerPoint 2016 Basics for Mac
 1 PowerPoint 2016 Basics for Mac PowerPoint 2016 Basics for Mac Training Objective To learn the tools and features to get started using PowerPoint more efficiently and effectively. What you can expect
Word Introduction SBCUSD IT Training Program. Word Introduction. Page Setup, Paragraph Attributes, Printing and More.
 SBCUSD IT Training Program Word Introduction Page Setup, Paragraph Attributes, Printing and More Revised 2/15/2018 SBCUSD IT Training Page 1 CONTENTS Cursor Movement... 4 Selecting Text... 5 Font/Typeset
Microsoft Publisher Project 2 Designing a Newsletter
 1 Microsoft Publisher Project 2 Designing a Newsletter Introduction Desktop publishing implies doing everything from a desk, including the planning, designing, writing, and layout, as well as printing,
Microsoft Word Introduction
 Academic Computing Services www.ku.edu/acs Abstract: This document introduces users to basic Microsoft Word 2000 tasks, such as creating a new document, formatting that document, using the toolbars, setting
Anleitungen für Word 2016 als Word-Dokument zum Ausdrucken und fürs Intranet
 Anleitungen für Word 2016 als Word-Dokument zum Ausdrucken und fürs Intranet 19 Text and Tabs Tabs (tab stops) help you to write a list, for example, for an order or invoice. Larger spaces should not be
WORD 2010 TIP SHEET GLOSSARY
 GLOSSARY Clipart this term refers to art that is actually a part of the Word package. Clipart does not usually refer to photographs. It is thematic graphic content that is used to spice up Word documents
Microsoft Office Suite
 Module 3 MODULE OVERVIEW Part 1 Getting Familiar with Microsoft Word 2007 for Windows Part 2 Microsoft Word 2007 Basic Features Part 3 More Basic Features Microsoft Office Suite Microsoft Word 2007 Part
Beginning a presentation
 L E S S O N 2 Beginning a presentation Suggested teaching time 40-50 minutes Lesson objectives To learn how to create and edit title and bullet slides, you will: a b c d Select slide types by using the
Spreadsheets Microsoft Office Button Ribbon
 Getting started with Excel 2007 you will notice that there are many similar features to previous versions. You will also notice that there are many new features that you ll be able to utilize. There are
In so many ways summary
 In so many ways summary Many of Word s functions can be activated in a variety of different ways. Often you can use the menu, a tool on the toolbar or a shortcut key to achieve the same result. Rather
Title bar: The top most bar in Word window that usually displays the document and software names.
 1 MICROSOFT WORD Table of Contents LINC ONE Hiding Standard toolbar, Formatting toolbar, and Status bar: To hide the Standard toolbar, click View Toolbars on the Menu bar. Check off Standard. To hide the
Microsoft PowerPoint 2016 Basics Unit 9 Final Review - Student Notes Directions: Fill in the blanks.
 Directions: Fill in the blanks. 1. PowerPoint Window Layout 2. File Tab When clicked, opens - automatically opens the Info option by default Holds the following options: - Info - New - Open - Save - Save
University of Sunderland. Microsoft Word 2007
 Microsoft Word 2007 10/10/2008 Word 2007 Ribbons you first start some of the programs in 2007 Microsoft Office system, you may be surprised by what you see. The menus and toolbars in some programs have
Microsoft Word: Steps To Success (The Bare Essentials)
") Microsoft Word: Steps To Success (The Bare Essentials) Workbook by Joyce Kirst 2005 Microsoft Word: Step to Success (The Bare Essentials) Page Contents 1 Starting Word 2 Save 3 Exit 5 Toolbars, Alignment,
Microsoft Word: Steps To Success (The Bare Essentials) Workbook by Joyce Kirst 2005 Microsoft Word: Step to Success (The Bare Essentials) Page Contents 1 Starting Word 2 Save 3 Exit 5 Toolbars, Alignment,
DOING MORE WITH WORD: MICROSOFT OFFICE 2007
 DOING MORE WITH WORD: MICROSOFT OFFICE 2007 GETTING STARTED PAGE 02 Prerequisites What You Will Learn USING MICROSOFT WORD PAGE 03 Viewing Toolbars Adding and Removing Buttons MORE TASKS IN MICROSOFT WORD
Spring Semester Study Guide
 Spring Semester Study Guide 1. When you create a table in Datasheet view, Access automatically adds a field called ID as the first field in the table. 2. To undo the most recent change to a table structure,
Microsoft Word 2011: Basic Tutorial
 Microsoft Word 2011: Basic Tutorial 1. Create a new blank document In Word, you create and save content in a document. You can start with a blank document, an existing saved document, or a template. When
Word 2010 Guide. A Complete Overview for Connect Users
 Word 2010 Guide A Complete Overview for Connect Users Chapter 1: Introduction... 4 Chapter 2: Getting Around Word... 4 Quick Access Toolbar... 4 The Ribbon... 4 Backstage View... 5 Dialog Box Launcher...
PowerPoint 2010 Introduction. 4/18/2011 Archdiocese of Chicago Mike Riley
 PowerPoint 2010 Introduction 4/18/2011 Archdiocese of Chicago Mike Riley i VIDEO TUTORIALS AVAILABLE Almost 100,000 video tutorials are available from VTC. The available tutorials include Windows 7, GroupWise
PowerPoint Instructions
 PowerPoint Instructions Exercise 1: Type and Format Text and Fix a List 1. Open the PowerPoint Practice file. To add a company name to slide 1, click the slide 1 thumbnail if it's not selected. On the
PowerPoint 2016 Building a Presentation
 PowerPoint 2016 Building a Presentation What is PowerPoint? PowerPoint is presentation software that helps users quickly and efficiently create dynamic, professional-looking presentations through the use
Microsoft Word Introduction to Word Processors
 Microsoft Word 2007 Introduction to Word Processors Practical Objectives After completing this practical, you will be able to: Perform basic tasks in a word processor. Edit and format text. Work with tables