OPERATING INSTRUCTIONS. for the vinyl cutters. Secabo T60 II, T120 II and T160 II
|
|
|
- Elinor Walton
- 5 years ago
- Views:
Transcription

1 OPERATING INSTRUCTIONS for the vinyl cutters Secabo T60 II, T120 II and T160 II Congratulations on the purchase of your Secabo vinyl cutter! Please carefully read the operating manual to easily integrate your unit into your production environment. Any type of reproduction of this operating manual requires the written permission of Secabo GmbH. Changes and errors in the technical data and the product characteristics are reserved. The Secabo GmbH is not liable for any direct or indirect damages occurring as a result of the use of this product. Version 1.0 ( ) 1
2 Safety measures Please read the information and safety measures carefully prior to initial operation of the unit! Do not place any magnetic objects in the vicinity of the cutting head; otherwise uniform contact pressure is not ensured. Do not remove the connection cable to the computer while plotting is in progress. Relieve the pressure on the pressure rollers when not in use by moving the pressure lever up. Do not reach into the unit when it is connected to electricity supply. Never open the casing and do not make any modifications to the unit yourself. Ensure that neither liquids nor metal objects are put inside the vinyl cutter. Ensure that the wall socket used is grounded and protected with a ground fault switch. Ensure that the connected voltage (230V) does not deviate by more than ±10%. Otherwise install a voltage stabilizer. Pull the power plug if the unit will not be in use for a longer period of time. Never reach into the unit in the vicinity of the blade holder during the cutting operation! Discontinue any printing jobs in progress before readjusting the blade holder! Always ensure that the vinyl cutter is out of reach of children during operation and never leave the unit or individual parts of it switched on without supervision. Do not touch the tip of the sliding blade to avoid injury. Always place the unit on a stable base to prevent it from falling down. Do not operate the unit during thunderstorms; it can be damaged or destroyed by lightning. 2


3 Items included Before starting work, please check whether the following items are all present: Article Quantity Vinyl Cutter 1 Power cable 1 USB connection cable 1 Blade holder 1 Pen holder 1 30 Drag knife 1 Pen head 1 Certificate of DrawCut PRO license 1 Stand with roll mount and catchup basket 1 3


4 Assembly of the floor stand Your Secabo vinyl cutter's floor stand is easy to assemble using the supplied parts. Simply follow these steps: Step 1 and 2: Step 3 and 4: Done! 4


5 The following additional steps are required for the T160 II: 5
 e) USB interface f) Roll mount g) Pressure rollers h) Stand with catchup basket i) Power supply and power switch (w/out Fig.")
6 Device parts and their function a) Cutting head with laser diode and LAPOS Q sensor b) Cutting head with laser diode and LAPOS Q sensor c) Blade holder d) Pressure lever for all pressure rollers (w/out Fig.) e) USB interface f) Roll mount g) Pressure rollers h) Stand with catchup basket i) Power supply and power switch (w/out Fig.) 6

7 Control panel Initial operation of machine and software Caution! Please note that the smooth installation and complete configuration requires DrawCut PRO to be installed first. Installation DrawCut PRO Your Secabo vinyl cutter is delivered with the cutting software DrawCut PRO. This software must be activated over the Internet. You do not necessarily need internet access on the computer, on which DrawCut will be installed. The activation can also be done on another computer. In order to control your vinyl cutter via your computer, install the software as described below: Disable the Windows Firewall and your anti virus software for the time of installation. Download the current version of DrawCut PRO at cut.com/#downloads and follow the installation wizard. Find your 26 digit DrawCut serial number on the printout that was delivered with your vinyl cutter. Enter it when you are prompted to do so. Now you can use DrawCut PRO. Installation of your Secabo vinyl cutter in DrawCut Please keep in mind that your Secabo vinyl cutter can only be operated under Windows XP, Windows Vista, Windows 7, Windows 8, Windows 8.1 and Windows 10. Operation with an older version of Windows is not possible. First, make sure that your PC is connected to the Internet. 7

8 Connect the vinyl cutter to your computer using the supplied USB cable. Switch on the device. Your Secabo vinyl cutter will now be detected. Windows will search for the appropriate drivers and automatically install them. This can take some time. After that, the device is ready for operation. Start DrawCut. First, open the "Vinyl Spooler" in Drawcut. Now click on the "Connections" tab. Next, add your vinyl cutter by pressing the "Add" button (a Secabo S60 II is used in the example), select your model and click "Install". 8


9 Click on the button labeled "Automatic detection" and follow the instructions in the installation wizard. Confirm the message regarding successful installation by simply clicking on button labeled "Done". Now you can control your Secabo vinyl cutter using DrawCut. 9

10 Initial operation of the device Make sure that there is sufficient space for the film transport in front of and behind the device. The cutter may only be operated in a clean and dry environment. Connect the vinyl cutter to a 230 V socket using the supplied power cable. Now switch on the cutter. Installing and adjusting the blade Take the supplied cutting blade and place it in the blade holder in such a way, that the sharp side extends at the front. Now set the cutting depth by turning the screw at the upper end of the blade holder. Initially, the depth is correctly set if you can carefully move your fingertip across the blade and feel only a light scratching. Since the depth adjustment for the blade depends on the material, it may be necessary to adjust it later. Secure the blade setting by tightening the gold lock nut. Press the pin on the rear end of the blade holder to remove and replace the blade at any time. Caution risk of injury! The various material thicknesses require different blade settings or even special blades; it may therefore be necessary to repeat the adjustment described above. Inserting the blade holder First, sufficiently loosen the clamping screw for the blade holder on the cutting head. Next, press down the blade holder from above into the hole on the right side until there is contact and pull the lock nut tight. In doing so, please ensure that the blade holder is also secured correctly from above by means of the fixture provided for this purpose. a) Clamp 10

11 b) Blade holder Inserting the film Always insert the material into the device from the rear. Pull the film up to the cutting bar to correctly set the zero point. If inserting a roll instead of a film sheet, you can use the supplied holder integrated into the base to ensure the film is rolled off cleanly. When inserting, please ensure that the film is inserted straight to prevent warping during transport of the film. Inserting a film even a few millimeters off angle can result in significant deviation of the film when processing large cut jobs. You may insert the film into the device at any point, provided the pressure roller is in the area of the black and white rectangles on the crossbar. Fixate both pressure rollers by flipping the clamping lever on the rear right side of the device. The contact pressure can be changed by tensioning the springs on the individual pinch rollers, should this be necessary. Cutting test Execute the cutting test by clicking the Test button. The vinyl cutter will cut a triangle with a rectangular border into the inserted film/vinyl at the currently saved zero point. Afterwards, the vinyl cutter will move the film up by 20cm, so that you can easily check the test cut. You can check the adjustment of the blade holder as well as the contact pressure with this cutting test. The inserted material should be cut cleanly and straight during the cutting test; the carrier material should not be damaged. After reviewing the test cut, press "OK" to move the film back to the zero point. If the carrier material has been cut through, either the contact pressure is set too high or the blade or blade holder are set incorrectly. Change these settings and perform the cutting test again. Also readjust if the vinyl was cut imprecisely or to an insufficient depth. 11
12 The first cut job Start the cutting software DrawCut PRO. Create a logo or a graphic using the text tool and click on the knife holder icon in the menu bar above. The menu "Send to cutting plotter" appears, click on "Cut" in the lower right section of the window. Now, the "Vinyl Spooler" opens and displays a preview of the cut job on the right side. Now click on "Cut" and confirm the question with "Yes". Start the cutting process! The plot can be stopped with the "pause" button at any time, for example allowing you to adjust knife settings while still in the cut job. You can use the "OK" button to continue to run the cut job. Settings and operation Moving the cutting head Pressing the arrow keys lets you move the cutting head left or right, as well as transport the film forwards or backwards. The corresponding X and Y coordinates are shown on the display. Setting the zero point To set the correct starting point for cutting, move the cutting head and film using the arrow keys, so that the knife is located in the front right corner of the film. Now confirm this zero point by pressing "OK". 12
13 Adjust speed and contact pressure You can make the following changes by pressing the corresponding buttons: The "+" function is located at the upper end of the button, while the " " function is at the lower end. Increase and reduce speed Increase and reduce speed The cutting speed and contact pressure cannot be changed while a plotting job is in progress. Other settings The configuration menu is opened by pressing and holding the "Set" button for 5 seconds. Use the up and down arrow keys to cycle through the menu options. Left and right arrow keys allow you to adjust the relevant values. 13
14 Press the "OK" button to leave the configuration menu at any time. These settings are queried in sequence : Baud rate configurable to 38400, 57600, or , depending on the value configured for the interface on the computer only when connecting via serial port. XP and YP in the second and third menu point, you can calibrate the vinyl cutter correctly. Correction may be required here due to wear to the mechanical parts. The X and Y scaling of the data can be changed by changing the XP and YP values. If, for example, an object for which a length of 100cm was entered on the computer is cut on the vinyl cutter to a length of only 98cm, it is necessary to correct the corresponding scaling value on the plotter. Otherwise, these values should not be changed. Tool Offset X and Y in the fourth and fifth menu point, you can adjust the offset between the LAPOS Q sensor and he focal point of the knife holder on the hardware side. However, since the values are determined by the DrawCut PRO software during a simple calibration procedure described below in detail, it is not recommended to change the factory settings in this menu point. Sensitivity this menu allows for adjusting the sensitivity of the LAPOS Q sensor to be adapted to different types of media should there be any problems when reading the marks. In principle, a lower value is better suited for shiny media and a higher value for matte media. Only change in case of problems with reading marks. Fan setting here you can adjust the speed of ventilator for the vacuum by choosing one of three settings or turning it off. Reset settings here you can restore the vinyl cutter's factory settings. To do so, the right arrow key must be held for 3 seconds. Firmware here you can view the firmware version installed on the cutter. 14


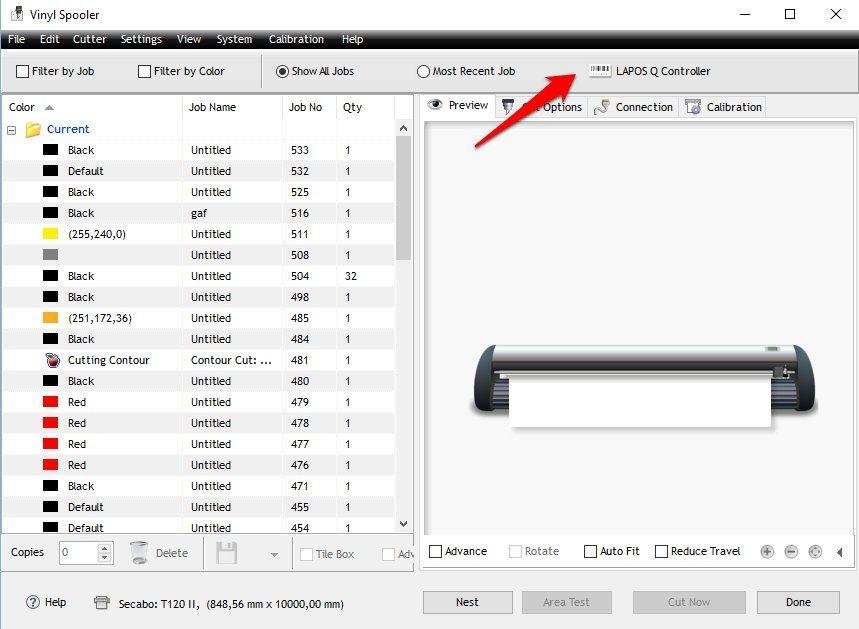
15 Contour cut with LAPOS Q LAPOS Q is a system for automatic positioning of printed media in your T60 II, T120 to II and T160 II vinyl cutter, allowing you to cut printed elements with absolute contour accuracy, and without misalignment or distortion, by using any desired number of crop marks. The use of LAPOS Q with DrawCut Pro is explained in the following steps. Calibration Before the first use of LAPOS Q, the vinyl cutter requires an initial calibration to determine the correct laser offset. The first step is to open the "Vinyl Spooler". Now click on "Lapos Q Controller" 15


16 Next, click on "Cutter" and then click "Auto Calibrate Laser Offset" from the dropdown menu that appears. Insert a blank sheet of paper into vinyl cutter, as requested by DrawCut Pro. Also, the cutter head must be equipped with the plot pen included in the scope of delivery. Roughly position the plot pen in the middle of the paper and set the zero point on the device. Once you've completed these steps, please confirm by clicking the "Yes" button. The plotter will immediately start the calibration. After a brief orientation, you must initiate the process by clicking "Yes" once more. 16

17 The plotter will now automatically perform the calibration and report the correct laser offset for your device, which you need to confirm by clicking on "OK". The first contour cut with LAPOS Q Once the calibration is complete, you can proceed with the actual contour cut. You may for example begin by creating a logo with the text tool or importing any vector graphics. Open the Contour Cut Wizard from the DrawCut PRO header. 17


18 Create an outline using the desired parameters under "Create a cutting contour". Confirm it by clicking "Accept". Now open the Contour Cut Wizard. Make sure that "LAPOS Q" is selected. Now you can print or save the graphics you've created. Ensure that the printer is configured to print it using the actual size and doesn't scale it. In the next step, the saved cut job must be added. To do this, simply click "Add Cut Job". DrawCut PRO will now automatically assign a job ID, which is stored in the software and can be called at any time, either by reading the bar code or by manually loading the job ID. 18


19 Open the "Lapos Q controller" in the Vinyl Spooler. 19

20 Place your printout in the vinyl cutter as seen in the screenshot below. Top or bottom first doesn't matter, because the software will detect the direction the printout was insert when reading the bar code. Position the vinyl cutter's laser analogous to the red dot in the screenshot below and set it as origin. Then simply start the contour cut by clicking on "Start" Using the automatic media detection First, open the Vinyl Spooler. Switch to the "Cut Options" tab and click on "Poll Media". 20


21 Prior to first use, a one time measurement of the vinyl cutter's maximum media width must be performed. To do this, you must click on "Recalibrate" and then click on "OK" to start the process. This process may take several minutes. Now place the film in the vinyl cutter and set the zero point at the desired location. Confirm your zero point by clicking the button "right". Next, click "Detect". The plotter will now search for the left edge of the film. 21

22 The film's actual width will be shown in the window and can be further fine tuned using the arrow keys, if necessary. Once you're done, confirm the media width by clicking on "Apply". The respective edge can be reached in the rapid traverse mode by pressing "Left" and "Right". The measured width will now be saved in the Vinyl Spooler as media width. 22

23 Drag knifes Drag knives are sensitive, sharp and dangerous precision tools. Keep the blade out of the reach of children! To avoid personal injury, caution must be taken in handling the blades. Handle the drag knives carefully and always store them with the protection cap when not in use. Should the tip of a blade come hit hard materials such as glass or stone, it can cause tiny fractures of the tip of the blade, making the blade unusable. Please consider the following instructions to prevent unnecessary wear and tear of your drag knives and to achieve a long durability of these products instead In any case, avoid cuts into the carrier material of the foil. The deeper you cut into the used material, the higher will be the wear and tear of the blade. Adjust the cutting depth of the blade so that the material is merely cut cleanly. If the blade protrudes any further, it reduces the durability of the blade and good cutting results can no longer be guaranteed. For thicker materials, use knives specially suited for it (e.g. flock knife for flock). Frayed edges after cutting the foil indicate a blunt drag knife. Replace worn blades immediately! 23
24 Technical data Model T60 II T120 II Type Vinyl cutter with servomotor and LAPOS Q sensor Max. media width 720mm 1350mm Max. cutting width 630mm 1260mm Connections Display Max. speed Max. media thickness Contact pressure Mechanical resolution Repetition accuracy Power supply Environment USB backlit, graphic LCD screen 960mm/s 1mm 50g 750g 0,01254mm < +/ 0,01mm AC 90V 240V / 50Hz 60Hz +5 C +35 C / 30% 70% relative humidity Weight without packaging 15kg 30kg Weight with packaging 25kg 41kg Dimensions (W x H x D) 920 x 260 x 260mm 1600 x 260 x 260mm 24
25 Model Type Max. media width Max. cutting width Connections Display Max. speed Max. media thickness Contact pressure Mechanical resolution Repetition accuracy Power supply T160 II Vinyl cutter with servomotor and LAPOS Q, roll mount with automatic film unwinder 1750mm 1600mm USB backlit, graphic LCD screen 960mm/s 1mm 50g 750g 0,01254mm < +/ 0,01mm AC 90V 240V / 50Hz 60Hz Environment +5 C +35 C / 30% 70% relative humidity Weight without packaging Weight with packaging Dimensions (W x H x D) 50kg 60kg 1920 x 260 x 260mm 25

26 Declaration of conformity Statement of conformity We hereby declare under our sole responsibility that the product referred to in "technical data" complies with the provisions of the following directives and standards: We herewith declare under sole responsibility that the under 9. technical data mentioned product meet the provisions of the following EC Directives and Harmonized Standards: EC directives / EC directives: 2006/95/EC Low Voltage Directive 2006/95/EC Low Voltage Directive 98/37/EC Directive on machinery (2006/42/EC from 29/12/2009) 98/37/EC Directive on machinery (from : 2006/42/EC) Standard / Standard: EN :2006 Technical documents at / Technical documents at: Secabo GmbH, Hochstatt 6 8, Wolnzach, Germany Dipl. Ing. Fabian Franke Dipl. Ing.(FH) Bernhard Schmidt 26
VINYL CUTTER T II SERIES
 VINYL CUTTER T II SERIES EN T II S E R I E S FEATURES TT 64 bit Simple Menu navigation Low noise Mac compatible 64 bit compatible Plug & play Servo motors High precision DC PRO LAPOS Q DrawCut PRO Cutting
OPERATING INSTRUCTIONS for vinyl cutters Secabo C30III, C60III and C120III
 OPERATING INSTRUCTIONS for vinyl cutters Secabo C30III, C60III and C120III Congratulations on purchasing a Secabo vinyl cutter! Please read these operating instructions thoroughly to ensure that you can
VINYL CUTTER C V SERIES
 VINYL CUTTER C V SERIES EN CV S E R I E S FEATURES 64 bit DC LITE Simple menu navigation Mac compatible USB Interface 64 bit compatible Plug & play Improved LAPOS DrawCut LITE VINYL CUTTER C V SERIES Secabo
VINYL CUTTER C IV SERIES
 VINYL CUTTER C IV SERIES EN CIV S E R I E S FEATURES 64 bit DC LITE Mac compatible USB Interface 64 bit compatible Plug & play LAPOS DrawCut LITE Cutting software VINYL CUTTER C IV SERIES Secabo s C IV
2 1.1 Safety using methods Definition of warning symbols Standard accessories Installation...
 Table of Contents 1 Satety precautions... 2 1.1 Safety using methods...2 1.2 Definition of warning symbols...2 2 Standard accessories......6 3 Installation... 7 3.2 Leg frame... 7 3.3 Installation and
Be sure to read the attached "TO ENSURE SAFE AND CORRECT USE" prior to use. Otherwise, it may cause an unexpected accident or fire.
 CE6000 SERIES CUTTING PLOTTER SETUP MANUAL MANUAL NO.CE6000-UM-8M4 Preface Thank you for choosing this product. Carefully keep this manual in a handy location for quick reference as necessity prior to
 1 Contents Welcome... 3 Cutter Parts... 4 Front View... 4 Detail of Carriage Arm... 5 Right Side View... 6 Left Side View... 7 Back View... 8 Detail of Pinch Roller (Back View)... 9 Control Panel... 10
Ioline 300/350HF System
 Quick Start Guide Ioline 300/350HF System User Notice Trademarks Ioline is a trademark of Ioline Corporation. Other product names, logos, designs, titles, words or phrases mentioned within this publication
PRODUCT MARKING AND BARCODE IDENTIFICATION. up to Serial No Barcode/Label printer MACH4. Service Manual. Edition 11/06
 PRODUCT MARKING AND BARCODE IDENTIFICATION up to Serial No. 9999 Barcode/Label printer MACH4 Service Manual Edition 11/06 copyright by cab / 9008553 / Q49 / 1 All specifications about delivery, design,
MONARCH 9416 XL QUICK REFERENCE
 MONARCH 9416 XL QUICK REFERENCE This Quick Reference contains ribbon loading, supply loading, and general care, maintenance, and troubleshooting procedures for the 9416 XL Thermal Direct and 9416 XL Thermal
Table of Contents. Unpacking and Inspection Setup Loading the Media Mount the Printer on the Wall... 16
 WPL25/WHC25 Table of Contents Unpacking and Inspection... 1 Setup... 5 Loading the Media... 6 Mount the Printer on the Wall... 16 LED and Button Functions... 17 Troubleshooting... 18 Unpacking and Inspection
Removal and Installation8
 8 Screw Types 8-4 Top Cover Assembly 8-5 Left Hand Cover 8-6 Right Hand Cover 8-10 Front Panel Assembly 8-14 Left Rear Cover 8-15 Right Rear Cover 8-16 Extension Cover (60" Model only) 8-17 Media Lever
Vinyl Express Cougar 24
 Vinyl Express Cougar 24 Owner s Manual ValueCut 24 Table of contents 1. Safety precautions...1 2. Standard accessories...3 3. Install machine...5 3.1 Installation and connection......5 3.2 Install cutting
FC7000 Quick Manual E-1 FC7000-UM-8M2
 FC7000 Quick Manual FC7000-UM-8M2 Thank you for choosing an FC7000 Series cutting plotter. To ensure the safe and correct use of your cutting plotter and to fully understand and make optimum use of its
Gerber Tempo 600 Setup Manual and Quick Start Guide
 Gerber Tempo 600 Setup Manual and Quick Start Guide Gerber Tempo 600 Setup Manual...2 1. Check the shipment...2 2. Prepare the connection cable...3 3. Prepare the power source...3 4. Install the plotter
Cutter Option Installation Instructions
 This kit includes the parts and documentation necessary to install the cutter option on the Zebra XiII, XiIII, and XiIIIPlus-Series printers. NOTE: The Cutter Option is not available for the 96XiIII. Adding
Océ User manual. Océ CS2024. Quick Start Guide
 Océ User manual Océ CS2024 Quick Start Guide Océ Technologies B.V. Copyright 2005, Océ-Technologies B.V. Venlo, The Netherlands. All rights reserved. No part of this work may be reproduced, copied, adapted,
TOP - 1. Instruction Manual. Version 1.0 Produced in Jan. 2004
 Version 1.0 Produced in Jan. 2004 Instruction Manual LCD monitor IV-08MP Thank you for purchasing the SHARP IV-08MP LCD monitor. Read this introductory instruction manual carefully to thoroughly familiarize
First Steps with your Secabo CIII vinyl cutter
 First Steps with your Secabo CIII vinyl cutter Installation Secabo FlexiStarter Version 8.5 of the FlexiStarter cutting software is supplied with your Secabo vinyl cutter. To control the vinyl cutter with
icore Kiosk system Installation Guide
 icore Kiosk system Installation Guide The reproduction, transmission or use of this document or its contents is not permitted without express authority. Offenders will be liable for damages. All rights,
FG-7000 Digital Force Gauge Operation Manual
 FG-7000 Digital Force Gauge Operation Manual Operators should wear protection such as a mask and gloves in case pieces or components break away from the unit under test. Whether the unit is ON or OFF,
optimail Postage meter Installation Guide
 optimail Postage meter Installation Guide 2 optimail Installation Guide Commissioning overview The following overview lists the operating steps for using your optimail for the first time. You have to perform
ASTRO UW-1C and RW-1C LABEL PRINTER UNWINDER & WINDER
 ASTRO UW-1C and RW-1C LABEL PRINTER UNWINDER & WINDER OPERATOR MANUAL ASTRO MACHINE CORP. 630 Lively Blvd. Elk Grove Village, IL 60007 Phone: (847) 364-6363 Fax: (847) 364-9898 www.astromachine.com SAFETY
Quick Start Guide Ioline StudioJet
 Quick Start Guide Ioline StudioJet User Notice Trademarks Ioline StudioJet is a trademark of Ioline Corporation. HP is a trademark of the Hewlett-Packard Company. Other product names, logos, designs, titles,
Be sure to read the attached "TO ENSURE SAFE AND CORRECT USE" prior to use. Otherwise, it may cause an unexpected accident or fire.
 FCX4000 SERIES CUTTING PLOTTER SETUP MANUAL MANUAL NO. FCX4000-UM-8M1 Preface Thank you for choosing this product. Carefully keep this manual in a handy location for quick reference as necessity prior
SKIVING MACHINE MAINTENANCE & INSTRUCTIONS MANUAL ASSK2. Allswage UK. Roebuck Street, West Bromwich, B70 6RB
 SKIVING MACHINE ASSK2 MAINTENANCE & INSTRUCTIONS MANUAL A. WARRANTY AND RESPONSIBILITY Warranty: It's the supplier's responsibility to guarantee the conformity of the product, assuring that it's manufactured
User's Manual. Metapace L-22D. Label Printer Rev. 1.00
 User's Manual Metapace L-22D Label Printer Rev. 1.00 Table of Contents MANUAL INFORMATION & USAGE PRECAUTIONS... 3 1. CONTENT CONFIRMATION... 6 2. PRODUCT PARTS... 7 3. INSTALLATION & USAGE... 9 3-1 POWER
Removal and Installation 8
 Removal and Installation 8 8 Introduction 8-2 Service Calibration Guide to Removal and Installation 8-4 Window 8-8 Covers and Trims 8-12 Rear Tray 8-31 Rear Cover 8-32 Media Lever 8-33 Media Lever Position
DOT MATRIX PRINTER SP6000 SERIES
 DOT MATRIX PRINTER SP6000 SERIES Hardware Manual < Approval: CEL > Trademark acknowledgments SP6000 : Star Micronics Co., Ltd. Notice All rights reserved. Reproduction of any part of this manual in any
How to print vehicle graphics. The HP Latex Printing Technologies Application Guide
 How to print vehicle graphics The HP Latex Printing Technologies Application Guide Printing vehicle graphics with HP Latex Printing Technologies The printing process Printing with HP Latex Printing Technologies
MVPplus Quick Reference Guide
 MVPplus Quick Reference Guide Use this guide to operate your printer on a daily basis. For more detailed information, refer to the User Guide. Contents External View...........................................................
SC CUTTING PLOTTERS OPERATION INSTRUCTIONS MUTOH EUROPE N.V.
 SC CUTTING PLOTTERS OPERATION INSTRUCTIONS MUTOH EUROPE N.V. Part n : AP-75026 Rev. 1.0-11/01/00 AP-75026 Rev 1.0-11/01/00 COPYRIGHT NOTICE COPYRIGHT 2000 Mutoh Europe N.V. All rights reserved. This document
FG-3000R Digital Force Gauge Operation Manual
 FG-3000R Digital Force Gauge Operation Manual Operators should wear protection such as a mask and gloves in case pieces or components break away from the unit under test. Whether the unit is ON or OFF,
QUICK REFERENCE. RFID Overview
 QUICK REFERENCE This Quick Reference contains supply loading and general maintenance procedures for the Monarch 9855 RFID printer. Additional RFID documents are available on the Monarch Printer s Documentation
Setting up an Intermec PM43 printer with InterDriver version M-0 or newer
 Setting up an Intermec PM43 printer with InterDriver version 7.3.5 M-0 or newer Setting up a bar code printer with 7.3.5 M-0 Intermec drivers or newer 1 INITIAL PRINTER CONFIGURATION When the printer is
CE5000 Series USER S MANUAL MANUAL NO. CE5000-UM-153
 CE5000 Series CUTTING PLOTTER USER S MANUAL MANUAL NO. CE5000-UM-153 PREFACE Thank you for choosing a Graphtec CE5000 Series cutting plotter. The CE5000-60/120 cutting plotters employ a digital servo
Toucan LT board printer
 Toucan LT board printer Setup and Operating instructions Unpack the Toucan LT board printer as you would any Toucan LT. Follow all cautions associated with installing a standard Toucan LT. Change in wash
Zebra XiII-Series Printer Quick Reference Guide
 Zebra XiII-Series Printer Quick Reference Guide Contents Media and Ribbon Loading...67 Media Loading...67 Ribbon Loading...70 Operator Controls...72 Front Panel Keys...72 Front Panel Lights...72 Calibration...74
Vinyl Express Qe60+ Signwarehouse.com. USER S MANUAL MANUAL NO. VEXQe6+-UM-151 CUTTING PLOTTER
 Vinyl Express Qe60+ CUTTING PLOTTER USER S MANUAL MANUAL NO. VEXQe6+-UM-151 Signwarehouse.com PREFACE Thank you for choosing a Signwarehouse Vinyl Express Series cutting plotter. The Vinyl Express cutting
FengMi Wemax One Laser Projection TV
 FengMi Wemax One Laser Projection TV User`s Manual About electrical ground Transportation Use this device only with a compulsory grounding condition. It is recommended that you use the original packaging
Handling Originals Handling Paper Sending Faxes Receiving Faxes Selecting Send/Receive Settings Printing Reports...
 Fax Guide English Setting Up Your Fax Introducing FAX Utility (Windows Only)... 3 Power Supply Information... 3 Connecting a Phone or Answering Machine... 3 Checking Your Fax Connection... 4 Setting Up
CANADIAN D.O.C. WARNING
 Each product and program carries a respective written warranty, the only warranty on which the customer can rely. Avery Dennison Corp. reserves the right to make changes in the product, the programs, and
EXPERT 24 CUTTING PLOTTER User Manual
 EXPERT 24 CUTTING PLOTTER User Manual ` Great Computer Corporation NOTICE GCC reserves the right to modify the information contained in this user manual at any time without prior notice; un-authorised
FOR PC BOARD TO FLAT CABLE
 AXM FOR PC BOARD TO FLAT CABLE MIL CONNECTORS (AXM) Density mounting Long lever type Short lever type Compliance with RoHS Directive FEATURES 1. High density mounting is possible. Even with mounting right
Gateway Profile 4 service guide
 Gateway Profile 4 service guide Customizing Troubleshooting Contents Replacing Components in Your Gateway Profile 4.................. 1 About this guide.....................................................
Ioline CrystalPress. Quick Start Guide
 Ioline CrystalPress Quick Start Guide The Quick Start Guide is intended to help a new user of the Ioline CrystalPress get everything setup and running quickly. Please note that there are important notices,
E1135C PDU and Pod Upgrade Procedure
 E4030-90010 Rev. B 12/2003 In this Document... Tools Needed, 2 Contents of the Upgrade Kits, 2 Installation Procedures, 4 Verifying the Power Option of the New PDU, 4 Removing the PDU from the Support
User s Manual Rev 008
 Rev 008 FCC Notice The SummaCut cutters have been tested and found to comply with the limits for a Class A digital device, pursuant to part 15 of the FCC Rules. These limits are designed to provide reasonable
User Manual 3D MANIPULATOR Accessory for UZ15 Rapid, UZ18 Hardworker and UZ12 Ultralight bevelling machines.
 User Manual 3D MANIPULATOR Accessory for UZ15 Rapid, UZ18 Hardworker and UZ12 Ultralight bevelling machines. Quality certificate Congratulations on purchasing this high-quality product manufactured by
TABLE OF CONTENTS ADJUSTING YOUR LCD MONITOR
 TABLE OF CONTENTS ADJUSTING YOUR LCD MONITOR -------------- 2 General safety precautions. 2 Unpacking your monitor 5 Viewing angle 6 How to open the back cover 6 Connecting your monitor 7 User controls
Installation Guide V290 (Color) This guide provides basic information for Unitronics LCD color touchscreen models V C30B and V T40B.
 This guide provides basic information for Unitronics LCD color touchscreen models V C30B and V T40B.") Vision OPLC Installation Guide V290 (Color) This guide provides basic information for Unitronics LCD color touchscreen models V290-19-C30B and V290-19-T40B. General Description Vision OPLCs are programmable
Vision OPLC Installation Guide V290 (Color) This guide provides basic information for Unitronics LCD color touchscreen models V290-19-C30B and V290-19-T40B. General Description Vision OPLCs are programmable
USER S MANUAL Software Usage Agreement Registered Trademarks Notes on this Manual Disclaimer
 USER S MANUAL Software Usage Agreement Registered Trademarks Notes on this Manual Disclaimer 1 1.1 1.2 2 3 Introduction 2.1 2.2 Features System Requirements Installing Xyron Wishblade Software 3.1 3.2
ROBO Master OPS656. USER'S MANUAL MANUAL NO. OPS656m-UM Introduction 1.1 Features System Requirements... 3
 USER'S MANUAL MANUAL NO. m-um-152 Software Usage Agreement... 2 Registered Trademarks... 2 Notes on this Manual... 2 Disclaimer... 2 1 Introduction 1.1 Features... 3 1.2 System Requirements... 3 2 Installing
Xi4 Quick Reference Guide
 Xi4 Quick Reference Guide Use this guide to operate your printer on a daily basis. For more detailed information, refer to the User Guide. Printer Components Figure shows the components inside the media
Getting Started. Read Me First. series. Canon Inkjet Premium Photo Printer. 1 Preparation...P.1. Install the Print Head... P.3
 Canon Inkjet Premium Photo Printer series 1 Preparation...P.1 Getting Started Read Me First Symbols Used in This Document Prohibited actions. Instructions including important information. In this guide,
BPL SERIES INSTALLATION INSTRUCTIONS THIS SHEET CONTAINS IMPORTANT SAFETY INSTRUCTIONS. SAVE THESE INSTRUCTIONS.
 BPL SERIES INSTALLATION INSTRUCTIONS Important Warning THIS SHEET CONTAINS IMPORTANT SAFETY INSTRUCTIONS. SAVE THESE INSTRUCTIONS. This product must be installed in accordance with National Electrical
User s Manual Rev 004
 Rev 004 FCC Notice The SummaCut-series cutters have been tested and found to comply with the limits for Class A digital devices, pursuant to Part 15 of the FCC Rules. These limits are designed to provide
BD Laser User Guide * IMPORTANT * PLEASE READ THE FOLLOWING INSTRUCTIONS CAREFULLY AS IMPROPER USE MAY DAMAGE THE MACHINE AND VOID THE WARRANTY.
 BD Laser User Guide * IMPORTANT * PLEASE READ THE FOLLOWING INSTRUCTIONS CAREFULLY AS IMPROPER USE MAY DAMAGE THE MACHINE AND VOID THE WARRANTY. BD Laser arrives ready to use with jaws and cutters preinstalled.
testo Saveris Adjustment software Instruction manual
 testo Saveris Adjustment software Instruction manual 2 1 Contents 1 Contents 1 Contents... 3 2 About this document... 4 3 Specifications... 5 3.1. Use... 5 3.2. Scope of delivery... 5 3.3. System requirements...
USER GUIDE. UniFoilPrinter. for. User Guide for UniFoilPrinter
 1 USER GUIDE for UniFoilPrinter Version 2.9 March 2014 (UniFoilPrinter PC Tool version. 1.0.0.57, Firmware version 2.13, Hardware version 001) 2 TABLE OF CONTENTS 1 ABOUT THIS MANUAL... 6 2 ABOUT UNIFOILPRINTER...
TB-1230 QW. User Manual Please read the instruc on carefully before use
 TB-1230 QW User Manual Please read the instruc on carefully before use CONTENTS 1. Safety Instructions... 2 2. Technical Specifications... 3 3. How To Set The Unit... 4 3.1 Control panel... 4 3.2 Main
TD2100 Electric Gummed Tape Dispenser Owner s Manual
 TD2100 Electric Gummed Tape Dispenser Owner s Manual Marsh Shipping Supply Co. LLC 926 McDonough Lake Road Collinsville, IL 62234 www.msscllc.com Customer Service Phone: (618)-343-1006 Fax: (618)-343-1016
DSTHM-2 COMBINED T AND RH DUCT TRANSMITTER. Mounting and operating instructions
 Mounting and operating instructions Table of contents SAFETY AND PRECAUTIONS 3 PRODUCT DESCRIPTION 4 ARTICLE CODES 4 INTENDED AREA OF USE 4 TECHNICAL DATA 4 STANDARDS 4 OPERATIONAL DIAGRAMS 5 WIRING AND
FG-3000 Digital Force Gauge Operation Manual
 FG-3000 Digital Force Gauge Operation Manual Operators should wear protection such as a mask and gloves in case pieces or components break away from the unit under test. Whether the unit is ON or OFF,
Instructions. elucad Software. Version en Translation of the original instructions. Retain for future use.
 Instructions Version 3.0.0 en Translation of the original instructions. Retain for future use. elusoft GmbH Breitwasenring 4 D 72135 Dettenhausen Phone +49(0)7157 526-6500 Fax +49(0)7157 526-6526 info@elusoft.de
Installation Manual. 65 Interactive LED/LCD. Model: HILF65101 (64.56 )
") Installation Manual 65 (64.56 ) Model: HILF65101 65 Interactive LED/LCD QUICK SETUP GUIDE For further information, see the user manual. Please contact directly if you have questions on the use of the touch
Installation Manual 65 (64.56 ) Model: HILF65101 65 Interactive LED/LCD QUICK SETUP GUIDE For further information, see the user manual. Please contact directly if you have questions on the use of the touch
Summa Cutter Tools. User s Manual Rev 6b
 Rev 6b Notice Summa reserves the right to modify the information contained in this User Manual at any time without prior notice. Unauthorized copying, modification, distribution or display is prohibited.
994 LASER QUICK GUIDE
 994 LASER Quick-Start Guide CONTENTS Machine set-up & password entry Jaw calibration Cut by code & decode How to replace the cutter & change the tracer Short form instructions Replacemente parts list IMPORTANT
Operation Manual Locator Wöhler L 200
 Operation Manual Locator Wöhler L 200 Best.-Nr. 22849 2014-12-18. Contents Contents 1 General Information... 3 1.1 Operation Manual Information... 3 1.2 Notes in this manual... 3 1.3 Proper use... 3 1.4
LYNX. SIGNWarehouse com. User's Guide. lynx_man_rev1_0504
 LYNX User's Guide SIGNWarehouse com lynx_man_rev1_0504 Table of Contents 1. Learning 1.1 Initial Inspection 1-1 1.2 Front View of Lynx 1-2 1.3 Back View of Lynx 1-2 1.4 Side View of Lynx 1-4 2. Installation
Applications Overview...
 Applications Overview........................................ 3 Overview Introduction This chapter explains how to set up for a new board and define parameters for tooling, vision, squeegees, stencil cleaning
Roland CutChoice. Ver. 1.1 USER S MANUAL. Thank the user very much for purchasing the Roland cutter.
 Roland CutChoice Ver. 1.1 USER S MANUAL Thank the user very much for purchasing the Roland cutter. S To ensure correct and safe usage with a full understanding of this product s performance, please be
Power Supply Information... 3 Connecting a Phone or Answering Machine... 3 Setting Up Your Fax Features... 4
 Fax Guide English Setting Up Your Fax Power Supply Information... 3 Connecting a Phone or Answering Machine... 3 Setting Up Your Fax Features... 4 Faxing Photos or Documents Handling Originals... 10 Handling
VJ-1604 INSTALLATION MANUAL
 Please read this manual before using Thank you for purchasing a MUTOH product. This manual explains the steps for unpacking, mounting and basic installation before using the MUTOH Full-color inkjet printer
SCHMIDT Programming Tool SS 20.4xx Instructions for Use
 SCHMIDT Programming Tool SS 20.4xx Instructions for Use SCHMIDT Programming Tool SS 20.4xx Table of Contents 1 Important Information... 3 2 Field of Application... 4 3 Scope of Delivery... 4 4 Programming
TT230SM THERMAL TRANSFER PRINTER USER S MANUAL
 TT230SM THERMAL TRANSFER PRINTER USER S MANUAL Operations Overview Unpacking and Inspection This printer has been specially packaged to withstand damage during shipping. Please carefully inspect the packaging
Table of Contents: TOPIC: Safe Operation: READ THIS FIRST Page: 3 Warranty 4 Specifications 4 Installation 5-7 Operating Instructions 8 Parts Diagram
 INSTALLATION & OPERATIONS MANUAL FlexArm B-19 FlexArm Inc. Division of Midwest Specialties, Inc. 851 Industrial Drive Wapakoneta, Ohio 45895 419-738-8147 Book Part No 360740 12/2014 1 Table of Contents:
Multi-Mount for Mac Pro to 5.25 Drive Bay Converter Bracket. Assembly & Installation Manual
 Multi-Mount for Mac Pro 2009-2010 3.5 to 5.25 Drive Bay Converter Bracket Assembly & Installation Manual 1 INTRODUCTION 1.1 System Requirements 1.1.1 Computer Requirements 1.1.2 Hard Drive Requirements
* IMPORTANT * REGISTERING YOUR MACHINE
 * IMPORTANT * REGISTERING YOUR MACHINE Thank you for your purchase of the Keyline 994 Laser. Before continuing with machine setup and use, please complete the following; COMPLETE PRODUCT REGISTRATION FORM
Mini Cutting Plotter. NODE 101/ Cutok USER S MANUAL
 Mini Cutting Plotter NODE 101/ Cutok USER S MANUAL Thank you for purchasing cutter NODE 101 / Cutok. It can be used for cutting vinyl, heavy-cardstock, paper and sticker film as well as pen plotting. Please
MX-8000 User Manual MX Rev
 MX-8000 Rev. 070202 Greeting Thank you for purchasing PAITEC USA products. This manual is prepared to provide guidelines on how to properly operate and maintain MX-8000. Copyright Any of the contents should
Professional Entertainment Technology. imove 50SR. Innovation, Quality, Performance 21-
 Innovation, Quality, Performance 21- imove 50SR User Guide Professional Entertainment Technology EC Declaration of Conformity We declare that our products (lighting equipments) comply with the following
MIMAKI ENGINEERING CO., LTD. URL: http: // co. jp/ D Original instructions
 MIMAKI ENGINEERING CO., LTD. URL: http: // www.mimaki. co. jp/ D09- Original instructions TABLE OF CONTENS CAUTION...vi CAUTION... vi Requests... vi FCC Statement (USA)... vi Interference to televisions
Craft ROBO USER S MANUAL MANUAL NO. CE50CRP-UM-152
 Craft ROBO Pro Craft ROBO USER S MANUAL MANUAL NO. CE50CRP-UM-152 PREFACE Thank you for choosing a Graphtec Craft ROBO Pro (CE5000-40-CRP) cutting plotter. The Craft ROBO Pro cutting plotters employ a
Interactive WhiteBoard [ Conducting presentations become easier than ever ]
![Interactive WhiteBoard [ Conducting presentations become easier than ever ]](/thumbs/93/111733482.jpg "Interactive WhiteBoard [ Conducting presentations become easier than ever ]") Interactive WhiteBoard [ Conducting presentations become easier than ever ] EN Overview Introduction Interactive White Board is very easy to use. If you know how to use a computer, then you will know how
Interactive WhiteBoard [ Conducting presentations become easier than ever ] EN Overview Introduction Interactive White Board is very easy to use. If you know how to use a computer, then you will know how
GETTING STARTED GUIDE
 GETTING STARTED GUIDE Trimble Variety Tracking System Introduction Getting the most out of the Trimble Variety Tracking system Preparing for installation Calibrating the system Recording varieties during
CANADIAN D.O.C. WARNING
 Each product and program carries a respective written warranty, the only warranty on which the customer can rely. Avery Dennison Corp. reserves the right to make changes in the product, the programs, and
SHIMPO INSTRUMENTS. FG-7000T Digital Torque Gauge Operation Manual
 FG-7000T Digital Torque Gauge Operation Manual SHIMPO INSTRUMENTS Operators should wear protection such as a mask and gloves in case pieces or components break away from the unit under test. Whether the
KM-4800w. Installation Guide
 KM-4800w Installation Guide TABLE OF CONTENTS page 1 Installation Requirements 2 2 Unpacking 3 2. 1 Unpacking 3 2. 2 Confirmation of Accessories 5 3 Leveling the Machine 7 4 Setup of the Roll Deck 9 5
ZT400 Series Quick Reference Guide
 ZT400 Series Quick Reference Guide Use this guide to operate your printer on a daily basis. For more detailed information, refer to the User Guide. Printer Components Figure 1 shows the components inside
Operating Instructions Drill rigs DRU400 DRA400
 Operating Instructions Drill rigs DRU400 DRA400 Index 001 Original operating instructions 10988838 en / 12.05.2017 Congratulations! With a Hydrostress unit from TYROLIT you have chosen a tried and tested
QUICK REFERENCE. Connecting the Cables
 QUICK REFERENCE This Quick Reference contains supply loading and general care and maintenance procedures for the Monarch 9860 printer. For more detailed information, refer to the Operator s Handbook available
LINEAR ACTUATOR CONTROL Use with NEW LEADER 7 manual
 MANUAL FOR MODEL LINEAR ACTUATOR CONTROL Use with NEW LEADER 7 manual INSTALLATION OPERATION TROUBLESHOOTING PARTS LIST This unit may have been built with SPECIAL FEATURES. Provide SERIAL NUMBER when ordering
OPS678 Cutting Master 3 for Macintosh USA Edition
 Software Release Notes April 20, 2017 OPS678 Cutting Master 3 for Macintosh USA Edition Version 2.2.1252.001 Release date: April 19, 2017 1. Scanning error occurred when the 3rd of row is scanning if the
HST -TZ1 Guard-locking mechanism (Translation of Original Manual)
") Installation and Operating Manual for Components HST -TZ1 Guard-locking mechanism (Translation of Original Manual) HST-TZ1 Ident.-No.: 10234 HST-TZ1 Ident.-No.: 10236 HST-TZ1 Ident.-No.: 10235 HST-TZ1
Installation and Operating Manual for Components HST -TZ1 Guard-locking mechanism (Translation of Original Manual) HST-TZ1 Ident.-No.: 10234 HST-TZ1 Ident.-No.: 10236 HST-TZ1 Ident.-No.: 10235 HST-TZ1
EW7033 R2 USB 3.1 / 3.0 Enclosure for 2,5 SATA hard disks
 EW7033 R2 USB 3.1 / 3.0 Enclosure for 2,5 SATA hard disks 2 ENGLISH EW7033 R2 - USB 3.1 / 3.0 Enclosure for 2.5" SATA hard disks Table of contents 1.0 Introduction... 2 1.1 Functions and features... 2
DM-918 OPERATIONS MANUAL AUTORANGING MULTIMETER
 DM-918 OPERATIONS MANUAL AUTORANGING MULTIMETER SAFETY INFORMATION The following safety information must be observed to ensure maximum personal safety during the operation of this meter: This meter is
Servicing and Maintenance
 06/08 Rev. 4.05-01 USER MANUAL Servicing and Maintenance General Notes... 2 Servicing by trained personnel... 2 Safety... 2 Fault correction... 2 Ordering spare parts... 3 Servicing and cleaning... 4 Notes
VJ-1614 INSTALLATION MANUAL
 VJ-6 INSTALLATION MANUAL Please read this manual before using Thank you for purchasing a MUTOH product. This manual explains the steps for unpacking, mounting and basic installation before using the MUTOH
impact INSTRUCTIONS VS-LCD Series Flash lighting equipment and accessories
 impact lighting equipment and accessories VS-LCD Series Flash INSTRUCTIONS Congratulations on your purchase of the Impact VS-LCD Series Studio Strobe. This light incorporates numerous advanced features,