Exercise 1: Importing a PowerPoint Presentation... 6 Importing Files... 6 Editing and Clip Detection... 7
|
|
|
- Melvyn Sims
- 5 years ago
- Views:
Transcription

1
2 Table of Contents Table of Contents... i Features at a Glance... 1 Capturing, importing, and organizing... 1 Synchronizing and editing... 1 Publishing and sharing... 1 Usage Scenarios... 1 Creating Cost-Effective Training Delivered Any Time, on Any Desktop Computer... 2 Creating High-Impact, Engaging, Rich-Media Business Presentations... 3 Creating Sales and Marketing Communications... 3 Delivering Executive Broadcasts... 4 Indexing and Publishing Existing Videos to an Intranet... 4 Guide to Using Key Producer 2007 Features... 5 Creating Presentations... 5 Integration with PowerPoint... 5 Customizing Presentations... 5 Generating a Table of Contents... 5 Exercise 1: Importing a PowerPoint Presentation... 6 Importing Files... 6 Editing and Clip Detection... 7 Exercise 2: Importing Video... 8 Capturing Audio and Video... 8 Using the Capture Wizard... 8 Exercise 3: Capturing & Synchronizing Audio... 9 Exercise 4: Creating Rich-Media Presentations Adding Video Effects and Transitions Adding Video Effects Adding Transitions Exercise 5: Customizing with Templates Exercise 6: Previewing & Publishing a Presentation Previewing a Presentation Publishing a Presentation Exercise 7: Archiving Projects i
3 Features at a Glance The following section provides an overview of Producer 2007 and its functionality. These features let you capture, import, edit, and then publish your presentation. Capturing, importing, and organizing Import a variety of audio and video formats, images, and HTML Capture and integrate live audio and video Organize video clips Automate PowerPoint slide conversion Synchronizing and editing Use PowerPoint slide timings and animations Synchronize audio and video with slides and still images to create rich-media presentations Choose from a wide variety of video effects and transitions Change the presentation layout quickly by adding templates Customize templates to match your business needs Define sections in your presentation quickly by using a table of contents Publishing and sharing Preview the presentation before publishing Share your presentation on a corporate intranet, on the Web, or by CD Create a project archive by using the Pack and Go Wizard, enabling you to move projects from one computer to another Integrate your presentation in a FrontPage Web (by including an IFRAME in a Web page that refers to a published Producer 2007 presentation) Use the Producer for PowerPoint 2003 Software Development Kit (SDK) to create customized publishing solutions Usage Scenarios This section provides some examples of how you can use rich-media presentations that are created with Producer 2007 in various business scenarios. The scenarios include: Create cost-effective training delivered any time, to any desktop Create high-impact and engaging rich-media business presentations Create sales and marketing communications Deliver on-demand executive broadcasts companywide or to small groups Reuse existing video libraries by enabling easy indexing and publishing to intranet Web sites 1


4 Creating Cost-Effective Training Delivered Any Time, on Any Desktop Computer Rebecca, a training manager, uses Producer 2007 to create training content that her customers can access when they want to and review at their own pace. She uses Producer 2007 to create intranet-based training curriculums that deliver video and training content from PowerPoint right to employees desktops through their Web browsers. The following figure shows an example of a rich-media Producer presentation. Employees can quickly find and view specific sections of content by clicking on the table of contents entries that were created automatically when Rebecca imported her slides into Producer This is easier and more efficient than searching through videotapes. Barbara is in charge of human resources (HR) and HR training in a large multinational company. Like many managers today, she is looking for ways to reduce corporate expenses. Barbara uses Producer 2007 to reduce the weekly amount the company spends by thousands of dollars to train new hires. The following figure shows an example of a training presentation that was created in Producer. Currently, the company incurs steep costs associated with delivering its frequently held New Employee Orientation program. Expenses include travel, facilities, and refreshments, as well as time out of the office for both employees and presenters. Barbara saw how using the company s intranet could make a huge impact. She gathered all the slides, videos, and images used by the speakers, videotaped them giving their presentations, captured the video in Producer 2007, and then imported the other content into Producer 2007 to create a Webbased training seminar. Now new employees are sent an message with a link to the New Employee Orientation Web site, and they can view the content in a Web browser on their computer at their convenience. 2


5 Creating High-Impact, Engaging, Rich-Media Business Presentations Marla, the financial analyst for a large manufacturing company, is using Producer 2007 to more effectively communicate key quarterly financial results and analysis within her organization. The following figure shows an example of a quarterly report that was created with Producer. Producer 2007 contains wizards that Marla can use to combine her PowerPoint slides and images with an audio recording of her analysis about the outlook for key product lines in the company. Marla can now share her knowledge and opinions about the bullet points and graphics in the report throughout the company without enduring the timeconsuming process of writing specific notes on slides. This information is stored for future use and is available for on-demand viewing by employees on the corporate intranet. Creating Sales and Marketing Communications Rob owns a landscaping company and is using Producer 2007 to ensure that his Web site better communicates his enthusiasm and charisma, and showcases his past work. Producer 2007 helps Rob go beyond photo albums on the Web. The following figure shows an example of a marketing presentation delivered over the Web. Rob records himself giving his sales presentation on video, combines it with the high-quality photographs and video from his previous landscaping jobs as well as the links from his existing Web site. He then synchronizes these elements with slides that are in a PowerPoint presentation, which communicates the value of his company s services, products, and pricing. He publishes this rich-media presentation to his Web site by using the Producer Publish Wizard. 3


6 Delivering Executive Broadcasts Brian works in his company s audio-visual department, and was tasked with getting the CEO s monthly address posted to the intranet. The following figure shows an example of an executive broadcast that was created by using Producer. Brian makes sure that the CEO uses the Producer 2007 Timing Capture Add-In for PowerPoint program during his presentation so that slide animations and slide timings are recorded automatically. After the CEO delivers his PowerPoint presentation, Brian saves the PowerPoint presentation file and imports it into Producer He also captures the audio and video in Producer 2007, which was recorded on the video camera during the CEO's presentation. Finally, Brian places the slides (which include the slide timings), along with the audio and video files, onto the Producer 2007 timeline, selects a template for the presentation, and then publishes it to the corporate intranet. Indexing and Publishing Existing Videos to an Intranet Alex, the videotape librarian at his company, has found that many people believe it takes too much time to find the information they are looking for on videotapes. The following figure shows an existing videotape captured in Producer. Alex discovered that Producer 2007 provides him with an effective, low-cost means of making the company's library of video content available to all employees through the corporate intranet. By importing a video through the Producer Capture Wizard and by using the Producer Create Clips feature, the video is automatically split into multiple, quickly accessible clips. Alex can then add table of contents entries at appropriate points in the video so employees can quickly find and view specific sections of the content, rather than having to search through videotapes without any indication of where information they are looking for is located. 4
7 Guide to Using Key Producer 2007 Features This document includes several procedures that demonstrate Producer 2007 features. To complete the "Exercises" sections, you need PowerPoint 2003 or later, Producer 2007, and the example files. The procedures are designed to be completed in sequence, although most are not dependant on previous procedures. However, the skills that are taught in the first few procedures opening Producer 2007, importing files, and placing files on the timeline are needed in many of the later procedures. Creating Presentations You can import files such as PowerPoint presentations, still images, video, audio, or even HTML into Producer 2007, and then add these files to the timeline to create a project. The imported files and arrangement of the files on the timeline make up the project and future published presentation. After the files are added to the timeline, you can begin to synchronize them so they can be used together as part of your presentation. A presentation is the finished product of the integrated files that you can publish for others to view in a Web browser. Integration with PowerPoint Producer 2007 integrates seamlessly with PowerPoint 2002 or later so that you can import and edit slides without having to switch from one program to another. In Producer 2007, when you select a slide or PowerPoint presentation and then click Edit Slide on the Edit menu, PowerPoint starts automatically. You can then edit the slides in PowerPoint. After you save your edits in PowerPoint and return to Producer 2007, the updated slides are imported automatically into the Producer 2007 project. This feature is useful for making lastminute changes to slides that have already been imported into Producer Because Producer 2007 converts slides to HTML, it can maintain many of the compelling animations and effects that are used in PowerPoint. Producer 2007 also provides the Timing Capture Add-In for PowerPoint program, which is installed by default when you install Producer This add-in lets presenters automatically record each animation and slide change during their presentation. Producer 2007 recognizes these slide timings when the PowerPoint file is imported. This lets you easily synchronize any audio or video that was recorded during the live presentation with the slides as they were shown in the presentation. Customizing Presentations In addition to all the customization features already described, you can refine your presentations further by choosing different fonts, font sizes, and background colors. You can make these changes as you create the presentation through the New Presentation Wizard, or any time after that by clicking Presentation Scheme on the Edit menu. You can also customize the introduction page the first page the audience will see with a title, image, presenter name, and description of the presentation. Generating a Table of Contents Producer 2007 automatically generates a table of contents from the slide titles and image file names, making it easy for the audience to jump to different places in your presentation. You can customize the table of contents entries by editing the existing entries and by adding your own entries to the Table of Contents tab in Producer
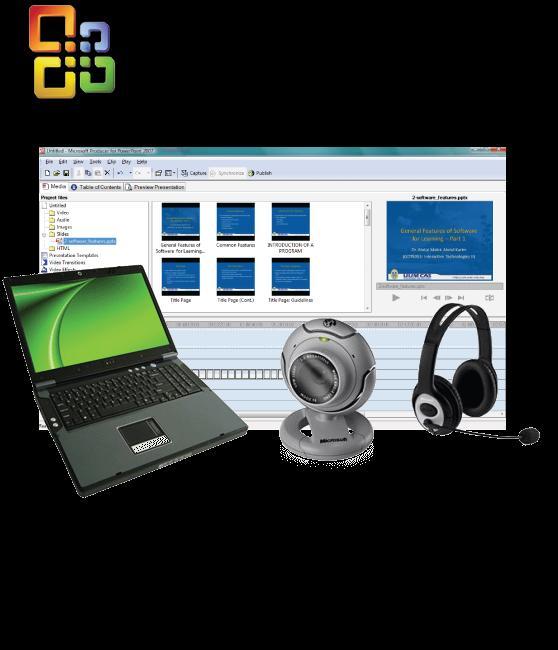
8 Exercise 1: Importing a PowerPoint Presentation In this procedure, you will import a PowerPoint presentation into Producer 2007, and then view and edit the slides. This demonstrates how easy it is to create a Producer 2007 project. 1. To start Producer, click Start, point to All Programs, point to Microsoft Office, and then click Microsoft Producer for PowerPoint In the Microsoft Producer dialog box, click Use the New Presentation Wizard, and then click OK to start the New Presentation Wizard. 3. On the Welcome to the New Presentation Wizard page, click Next to continue. 4. On the Presentation Template page, select one of the many templates based on the digital media you plan to use. If you re not sure which template to use, click Default. 5. On the Choose a Presentation Scheme page, complete the following steps to specify the color scheme and font attributes for your presentation. You may leave the defaults. In the Font list, choose a font for the table of contents text. In the Font size list, choose a size for the table of contents text. In the Font color box, choose the color for the table of contents text and table of contents entries. In the Background box, choose the background color for the table of contents area in your presentation. In the Slides area background box, choose the background color for the area in which your slides are shown in your presentation. 6. On the Presentation Information page, complete the following steps: In the Title box, type the title for your presentation. In the Presenter (optional) box, type the presenter's name. In the Introduction page image (optional) box, type a path and file name for an image you want to display. If you do not know the path and file name, click Browse to locate an image file on your computer or on a network location, and then click Open to select the file. In the Description (optional) box, type a short description of your presentation. The information you enter on this page will appear on the introduction page of your published presentation 7. On the Import Slides and Still Images page, click Browse and locate the folder that contains the downloaded sample files. Click the PowerPoint file Int_Train.ppt, and then click Open to select the file. The selected file is added to the Files area automatically. Click Finish. Producer 2007 imports the file and opens the project. 8. In Producer, click the Media tab. On the timeline, right-click the first slide (titled Train the Interviewer), and then click Edit Slide. PowerPoint starts automatically and the first slide is selected. 9. In PowerPoint, replace the name Rebecca Jones with your name. 10. On the File menu, click Save, and then close PowerPoint. The updated slides are automatically imported into Producer 2007 with your changes when you return to Producer. 11. To save the project, on the File menu, click Save Project. In the File name box, type Producer Demo.MSProducer, and then click Save. Importing Files You can import audio and video files into a rich-media presentation to give it more impact. Using the Import command, you can import a wide range of video file types, such as Windows Media Video (WMV), Audio 6
, MPEG Audio Layer-3 (MP3), and WAV.")
9 Video Interleave (AVI), and Motion Pictures Experts Group (MPEG), including files with.m1v,.mp2,.mp2v,.mpa,.mpe,.mpeg, or.mpv2 file name extensions. Similarly, many audio file types are supported, such as Windows Media Audio (WMA), MPEG Audio Layer-3 (MP3), and WAV. You can add these digital media files to the timeline and synchronize them with slides to create a professional-looking presentation. For a list of supported audio and video file types for Producer 2007 projects, see the "Supported Audio and Video File Types" section. You can also import image and HTML files and include them in your presentation, or you can add a live Web site or link to a Web site from within your presentation. Editing and Clip Detection Video files, whether imported or captured in Producer 2007, can be split into smaller video clips that are based on automatic clip detection. The following figure shows a video file that is divided into clips in Producer Clip detection in Producer 2007 makes it quick and easy to access a specific scene in a long video file, which helps you edit and synchronize content. Splitting the video into smaller clips that are then placed in the timeline also facilitates the use of transitions and video effects. Video editing can also be performed manually within Producer 2007 through commands on the Clip menu or by using the buttons that are under the preview monitor. 7

10 Exercise 2: Importing Video In this procedure, you will import a video file into the project created previously. Although this procedure assumes that you've completed the previous procedure, the following procedure does not depend on it. To split a video into smaller clips automatically, do the following: 1. Start Producer, and then open the Demo Project.MSProducer file that was created in the first procedure. 2. If there is content on the timeline, clear the timeline by clicking Clear Timeline on the Edit menu. 3. To import an existing video file, on the File menu, click Import. Browse to the folder that contains the downloaded sample files. Click Sample_Interview.wmv, and then click Open. 4. In the contents pane of the Media tab, right-click the Sample_Interview icon in the video window, and then click Create Clips. Producer 2007 examines the file and splits it into smaller clips. The resulting clips appear as several individual icons or "thumbnails" that you can drag and drop onto the timeline. Capturing Audio and Video If the audio or video needed for a presentation does not yet exist, you can easily capture new audio and video content, taking full advantage of the Windows Media Audio and Video 9 Series codecs. The Capture Wizard allows users to select the quality and file size settings that best meet their needs and those of their audience. Using the Capture Wizard The Capture Wizard makes the process of creating audio and video in Producer 2007 simple and straightforward. Using devices such as digital and analog video cameras, VCRs, Web cameras, and other video devices, you can capture video content or still images in Producer 2007 that you can use in your presentation. You can also capture video or still images of your computer screen to use in your presentation. The following figure shows the Capture Wizard in Producer
11 Producer 2007 uses the Windows Media Audio and Video 8 codecs and the Windows Media Audio and Video 9 Series codecs for the creation of high-quality, highly compressed audio and video files that are used in presentations. If you want to provide superior quality content at dial-up rates and home-theater-like experiences over broadband connections, use the Windows Media Audio and Video 9 Series codecs. Exercise 3: Capturing & Synchronizing Audio In this procedure, you will import a PowerPoint presentation into Producer 2007, and then capture audio to synchronize with the slides. Although this procedure assumes that you've completed the previous procedures, the following procedure does not depend on any others. To complete this procedure you must have a microphone connected to your computer. 1. Start Producer, and then open the Demo Project.MSProducer file that was created in the first procedure. 2. If there is content on the timeline, clear the timeline by clicking Clear Timeline on the Edit menu. 3. On the File menu, click Import. Locate the folder that contains the downloaded sample files, click Status_report.ppt, and then click Open. 4. To add the file to the timeline, in the tree pane of the Media tab, drag the file Status_report.ppt to the Slide track of the timeline. -or- In the tree pane of the Media tab, right-click the file Status_report.ppt, and then click Add To Timeline. 5. To start the Capture Wizard, on the Tools menu, click Capture. The first page of Capture Wizard appears with several different capture options. 6. Click Narrate slides with audio, and then click Next. 7. Set your audio capture settings based on your audience and delivery method, or simply use the default settings. 8. In the Audio device box, click the microphone you are using, and then set your input level by speaking in a normal voice. 9. To begin capturing audio to your computer, click Capture, and then click Next Slide or Next Effect to advance the slide animation or slide and synchronize the audio with the slides as you speak. 10. To stop capturing audio when you are finished narrating the slides, click Stop. In the File name box, type Status Narration, and then click Save. 11. To close the Capture Wizard, click Finish. The audio file you captured is imported into the current project, placed on the timeline, and synchronized with the slides. Producer 2007 switches to the Preview Presentation tab so that you can preview your presentation. 9
12 Exercise 4: Creating Rich-Media Presentations In this procedure, you will synchronize the Int_train_begin.wmv video file with PowerPoint slides. Although this procedure assumes that you've completed the previous procedures, the following procedure does not depend on any others. To synchronize slides with video, complete the following procedure: 1. Start Producer, and then open the Demo Project.MSProducer file that was created in the first procedure. 2. If there is content on the timeline, clear the timeline by clicking Clear Timeline on the Edit menu. 3. On the File menu, click Import. Locate the folder that contains the downloaded sample files, click Int_train_begin.wmv, and then click Open. If you did not complete other procedures, click Int_Train.ppt as well. 4. Drag the file Int_train_begin.wmv to the Video track of the timeline. 5. In the tree pane, expand the Slides folder, and then click Int_train.ppt. 6. In the content pane, press and hold the CTRL key, and then select the first three slides. Drag these slides to the Slides track of the timeline. 7. To begin the process of synchronizing the slides to the video, on the Tools menu, click Synchronize. 8. To preview the current slide timings, in the Synchronize Slides dialog box, click Preview slide timing, and then click Play to start the video. The video plays back and the current slide timings are displayed. 9. When you are ready to set your own slide timings and synchronize the PowerPoint slides to video, click Set slide timing, and then click Play to start the video. 10. To set the slide timings, click the Next Slide button when you want the slides to change. When slide timings are complete, click Finish. If you are not satisfied with your slide timings, repeat this step. Adding Video Effects and Transitions To further enhance the video included in a presentation, Producer 2007 offers many video effects and transitions. You can easily add these effects, such as fade in and fade out, to video clips by dragging the selected effect and dropping it on a video clip on the timeline. A wide assortment of video transitions is also offered to enhance the transition from one video clip to another in your presentation. Combined, more than 60 video transitions and effects are provided in Producer 2007, which gives you a wide range of video effects and transitions that you can use to customize your presentations. The following figure shows the video effects that are available in Producer

13 The following figure shows the video transitions that are available in Producer
14 Adding Video Effects In this procedure, you will add a video effect to the sample video named Int_train_begin.wmv. Although this procedure assumes that you've completed the previous procedures, the following procedure does not depend on any others. 1. Start Producer, and then open the Demo Project.MSProducer file that was created in the first procedure. If you have not completed any other procedures, import the file Int_train_begin.wmv by using the Import command on the File menu. 2. If there is content on the timeline, clear the timeline by clicking Clear Timeline on the Edit menu. 3. Drag the file Int_train_begin.wmv file to the Video track of the timeline. 4. To view the set of available video effects, on the Tools menu, click Video Effects. Producer 2007 displays sample thumbnails, which are each labeled with the name of an effect. 5. To preview an effect, click the effect to select it, and then click the Play button to preview it in the monitor. 6. Click the Grayscale video effect, and then drag it onto the video clip Int_train_begin.wmv. A paint can icon appears on the clip, indicating that an effect is associated with that clip. 7. On the monitor, click Play to see the resulting video effect. Adding Transitions In the following procedure, you will add a transition between the sample videos Int_train_begin.wmv and Sample_Interview.wmv. Although this procedure assumes that you've completed the previous procedures, the following procedure is not dependant on any others. To add a video transition, you must have two or more clips on the timeline. 1. Start Producer, and then open the Demo Project.MSProducer file that was created in the first procedure. 2. If there is content on the timeline, clear the timeline by clicking Clear Timeline on the Edit menu. 3. If you have not completed any other procedures, on the File menu, click Import. Locate the folder that contains the downloaded sample files, click Int_train_begin.wmv, and then click Open, and then import Sample_Interview.wmv as well. 4. In the tree pane of the Media tab, click the Video folder. Drag Int_train_begin.wmv to the Video track on the timeline, and then drag Sample_Interview.wmv so it appears after Int_train_begin.wmv. 5. To view the set of available video transitions, on Tools menu, click Video Transitions. Producer 2007 displays the available transitions with the names of the transitions. 6. To preview a transition, click the transition to select it, and then click the Play button to preview it in the monitor. 7. After you select a video transition, drag it to the timeline and drop it between the two video clips. 12
15 Exercise 5: Customizing with Templates Producer 2007 also offers the capability of changing Web page layouts (called templates) during the course of a presentation, providing a richer and more engaging user experience. With dozens of templates to choose from you can increase the effectiveness of the digital media being presented. You can highlight key elements in the presentation by using different layouts at appropriate times (available if your audience will be watching the presentation in Microsoft Internet Explorer running on the Windows operating system). Web developers with knowledge of cascading style sheets can also create their own customized templates for use in presentations, or modify those provided. The following figure shows the various templates that are available in Producer This procedure uses the sample files provided to change the template used in a presentation. This procedure assumes that you've completed the previous procedures, and that the video files and slides are on the timeline. 1. Start Producer, and then open the Demo Project.MSProducer file that was created in the first procedure. 2. On the Tools menu, click Presentation Templates. 3. Drag the template Standard Video (240x180)-Resizable Slides to the Template track of the timeline. 4. To adjust the duration of the template, drag the end of the presentation template, so it ends before the last slide on the timeline. 5. In the contents pane where the templates are displayed, drag Organizational Video (240x180)-Resizable Slides and HTML to the Template track of the timeline, to the right of the first template. 6. To view the template change in the presentation, click the Preview Presentation tab, and then click Play. 13

16 Exercise 6: Previewing & Publishing a Presentation Previewing a Presentation Before publishing a presentation for others to see, you can preview it in Producer This lets you view the presentation in the same manner as your audience will before publishing it. To preview the presentation, which includes previewing the audio and video, synchronization with slides, added video transitions and effects, and presentation templates, you can simply click the Preview Presentation tab. Publishing a Presentation After completing a project, you can publish it as a presentation by using the Publish Wizard. You can publish the presentation to your local hard disk, to a shared network location, to a Web server (for viewing on the Internet or corporate intranet), or to a recordable CD. The Publish Wizard lets you choose one or more publish settings, based on your intended audience and how they will access the presentation. The following figure shows the Publish Wizard in Producer This procedure uses the presentation created in the previous procedure. For this procedure, use the files that are already on the timeline or drag other files you would like to use to the timeline. To quickly and easily publish the presentation you have been working on, complete the following steps: 1. Start Producer, and then open the Demo Project.MSProducer file or another Producer project you want to publish. 2. On the File menu, click Publish Presentation. 3. On the first page of the Publish Wizard, click My Computer, and then click Next. 4. In the File name box, type a name for the presentation, and then in the Publish files to box, type the full path and folder for the presentation or click Browse to locate the location on your computer hard disk. 14
17 5. On the Presentation Information page, you can type new information or edit the existing presentation information, which appears on the introduction page of the presentation. 6. On the Publish Setting page, do one of the following: If the settings fit your intended audience, click Use suggested settings (recommended). If the settings do not fit your intended audience, click Choose publish settings for different audiences, and then select the appropriate settings on the Custom Publish Settings page. 7. To begin publishing your presentation, on the Publish Your Presentation page, click Next. 8. You can view the presentation from the Presentation Preview page, or click Finish to exit the Publish Wizard. After you publish a presentation, it can be viewed in a Web browser (such Internet Explorer or Netscape Navigator) with Windows Media Player installed. Specific software requirements to view a presentation are listed in the "System Requirements" section. Also, FrontPage users can import presentations published with Producer 2007 directly into their FrontPagebased Web pages to easily incorporate their presentation into their Web site. 15
18 Exercise 7: Archiving Projects Because a published Producer 2007 presentation is essentially a Web site, the Pack and Go feature that is in Producer 2007 delivers an easy way for you to move projects from one computer to another. The Pack and Go feature packs a project into one file, complete with all the captured or imported audio or video files, images, slides, HTML files, as well as any customized templates. This file also includes the project file and the arrangement of files added to the timeline at the time the project archive was created and saved. This feature can effectively serve as a way to archive your Producer 2007 projects and lets you later edit an existing Producer 2007 project that is on your computer or on another computer that has Producer 2007 installed. This procedure uses the project created in previous procedures. For this procedure, use the files that are already on the timeline or drag other files you would like to use to the timeline. To quickly archive a project you have been working on, complete the following steps: 1. Start Producer, and then open the Demo Project.MSProducer file or another Producer project you want to archive. 2. On the File menu, click Pack and Go, and then click Next to continue. 3. In the File name box, type DemoPackAndGo, and then in the Location box, select the location where you want your project archive to be saved or click Browse to select a location. When you name the project archive, an.msproducerz file name extension is automatically added to the file name to indicate that it is a compressed Producer 2007 file. 4. On the Project Archive Setting page, click One file, and then click Next to start creating the project archive file. 5. After the project archive is created and saved, click Done to close the Pack and Go Wizard. 16
Microsoft Office 2007
 Microsoft Office 2007 Adding Slide Transitions Transition Sound Transitions Transition Speed Apply to All A slide transition is the way one slide changes to the next in Slide Show view. Animations Tab:
Downloaded from
 Chapter 4 Advance features of MS PowerPoint Inside this chapter : Inserting different objects (i.e. images, Word Arts, audio & video etc.), Transitions in slide, Custom Animation with text. PowerPoint
PowerPoint X. 1. The Project Gallery window with the PowerPoint presentation icon already selected. 2. Click on OK.
 PowerPoint X Launching PowerPointX 1. Start PowerPointX by clicking on the PowerPoint icon in the dock or finding it in the hard drive in the Applications folder under Microsoft PowerPoint. PowerPoint
Windows Movie Maker / Microsoft Photo Story Digital Video
 Windows Movie Maker / Microsoft Photo Story Digital Video http://intranet/technology/index.html TRC HELP DESK X5092 April 2006 Photo Story and Movie Maker Microsoft Photo Story 3 allows you to create fantastic
Part 1. Module 3 MODULE OVERVIEW. Microsoft Office Suite Pt 3. Objectives. MS PowerPoint Screen. Microsoft PowerPoint
 Module 3 Microsoft Office Suite Pt 3 Microsoft PowerPoint MODULE OVERVIEW Part 1 Overview MS PowerPoint Screen Part 2 Creating your PowerPoint Presentation Part 3 Working with content graphics & slides
PowerPoint Launching PowerPointX
 PowerPoint 2004 Launching PowerPointX 1. Start PowerPoint by clicking on the PowerPoint icon in the dock or finding it in the hard drive in the Applications folder under Microsoft Office 2004. PowerPoint
Using Windows MovieMaker pt.1
 Using Windows MovieMaker pt.1 Before you begin: Create and name (use your first name, or the title of your movie) a folder on the desktop of your PC. Inside of this folder, create another folder called
PowerPoint 2003 Shortcourse Handout
 PowerPoint 2003 Shortcourse Handout February 24, 2003 Technology Support Shortcourses Texas Tech University Copyright 2003 Introduction PowerPoint is the presentation graphics program in Microsoft Office.
Creating a Multimedia Presentation
 LESSON 8 Creating a Multimedia Presentation 8.1 After completing this lesson, you will be able to: Insert sounds in a presentation. Insert movies in a presentation. Play sounds or movies in a slide show.
Digital Documentaries Premiere Elements 8
 Premiere Elements 8 Creating a new project Select New Project In the Premiere welcome screen and go to File, New Project on the top menu. Type in a project name and select Browse to locate the Desktop
Professional Powerpoint Presentation II
 Professional Powerpoint Presentation II Facilitator: Patrick Ng Fall 2012 Practical concerns in delivering presentation Creative Visual Possibility & Optimization for Presentation PPTII & IV: Quick Style,
Introduction to Microsoft PowerPoint 2010
 Introduction to Microsoft PowerPoint 2010 This class is designed to cover the following basics: Creating a presentation Adding new slides Applying design themes Adding text and content Animating text and
Teaching with Primary Sources
 Teaching with Primary Sources Joining Educators and Students with Library of Congress Resources Creating a Presentation with PowerPoint 2007 Benefits of using PowerPoint in lectures: PowerPoint encourages
New Features. Importing Resources
 CyberLink StreamAuthor 4 is a powerful tool for creating compelling media-rich presentations using video, audio, PowerPoint slides, and other supplementary documents. It allows users to capture live videos
Getting to know Photostage. The software interface. The Menu bar. Step 01: Inserting images/photographs
 Installing Photostage 1. Download the application 2. Double click on the downloaded file to run it. 3. Choose the drive and folder where you want to install Photostage or accept the default "C:\Program
Windows Movie Maker. Panes (Movie and. Menu Bar. Tool Bar. Monitor. Rewind. Play. Storyboard/Timeline. Playhead. Audio. Microphone Playback
 Menu Bar Panes (Movie and Tool Bar Monitor Rewind Play Storyboard/Timeline Playhead Audio Microphone Playback Zoom In/Out 2004 Teaching Matters, Inc.-Page 1 Importing Video (Transfer the footage from the
Camtasia Studio 5.0 PART I. The Basics
 Camtasia Studio 5.0 Techsmith s Camtasia Studio software is a video screenshot creation utility that makes it easy to create video tutorials of an on screen action. This handout is designed to get you
WINDOWS MOVIE MAKER CREATING A VIDEO USING STILL PICTURES
 WINDOWS MOVIE MAKER CREATING A VIDEO USING STILL PICTURES 1. Open your My Documents folder. Open the My Videos folder. Under File and Folder Tasks, select>make a new folder. All of the pictures/video clips
STORYTELLING-PowerPoint-Windows Movie Maker 2
 Judy Honaker Storytelling Using PowerPoint & Movie Maker 2 1 STORYTELLING-PowerPoint-Windows Movie Maker 2 By: Judy Honaker-Instructional Technology Resource Teacher Introduction This tutorial is designed
STEP 1: Import Your Pictures Import pictures *Note:
 STEP 1: Import Your Pictures Transferring your still pictures to your PC is the first step in making your own slide show. Then you'll need to import them into Windows Movie Maker. A tip before you begin
Microsoft PowerPoint 2007 Tutorial
 Microsoft PowerPoint 2007 Tutorial Prepared By:- Mohammad Murtaza Khan I. T. Expert Sindh Judicial Academy Contents Getting Started... 5 Presentations... 5 Microsoft Office Button... 5 Ribbon... 6 Quick
USING POWERPOINT IN THE CLASSROOM LESSON 1 POWERPOINT BASICS
 USING POWERPOINT IN THE CLASSROOM LESSON 1 POWERPOINT BASICS Objectives Start PowerPoint. Open an existing presentation. Save a presentation. Navigate through a presentation, and use the menus and toolbars.
Digital Documentaries. Students as directors of their own learning
 Digital Documentaries Students as directors of their own learning Basic Vocabulary Collection Project Movie Collection A collection contains audio clips, video clips, or pictures that you have imported
PHOTO DVD MAKER USER MANUAL
 Photo DVD Maker User Manual 1 PHOTO DVD MAKER USER MANUAL Version 7.04 http://www.photo-dvd-maker.com Photo DVD Maker User Manual 2 0.1 WELCOME TO PHOTO DVD MAKER...4 0.2 GETTING HELP...5 1. GETTING STARTED...6
Avid epublisher Start-up Guide
 Avid epublisher Start-up Guide S o ft w a re f o r Wi n d ow s 2 0 0 0 1 2 Copyright and Disclaimer Information in this document is subject to change without notice and does not represent commitment on
Creative Uses of PowerPoint 2016
 Creative Uses of PowerPoint 2016 Audio You can add audio, such as music, narration, or sound bites, to your PowerPoint presentation. To record and hear any audio, your computer must be equipped with a
POWERPOINT 2003 OVERVIEW DISCLAIMER:
 DISCLAIMER: POWERPOINT 2003 This reference guide is meant for experienced Microsoft Office users. It provides a list of quick tips and shortcuts for familiar features. This guide does NOT replace training
1.1 Considering for Choosing Layout in SmartArt Graphics
 1. SmartArt A SmartArt graphic is a visual representation of your information that you can quickly and easily create, choosing from among many different layouts, to effectively communicate your message
Welcome. Microsoft PowerPoint 2010 Fundamentals Workshop. Faculty and Staff Development Program
 Faculty and Staff Development Program Welcome Microsoft PowerPoint 2010 Fundamentals Workshop Computing Services and Systems Development Phone: 412-624-HELP (4357) Last Updated: 04/19/13 Technology Help
Lab 2. Task 1 : Learning basic tasks with PowerPoint. Estimated time
 Lab 2 Task 1 : Learning basic tasks with PowerPoint Objective : To familiarize with basic tasks in PowerPoint : 1. Create a presentation 2. Find and apply a template 3. Insert a new slide 4. Format text
Digital Storytelling with Photo Story 3
 Digital Storytelling with Photo Story 3 Before you begin, upload your digital images and save them into an easily identifiable folder in a convenient location on your hard drive eg. the my pictures directory.
Envivio Mindshare Presentation System. for Corporate, Education, Government, and Medical
 Envivio Mindshare Presentation System for Corporate, Education, Government, and Medical Introducing the Envivio Mindshare Presentation System The Envivio Mindshare Presentation system is a highly optimized
PowerPoint Intermediate 2010
 PowerPoint Intermediate 2010 I. Creating a Slide Master A. Using the design feature of PowerPoint essentially sets up similar formatting for all of your slides within a presentation. However, there are
Layout of Movie Maker. Elements of Movie Maker. Step by step instructions on how to use Movie Maker. Web resources for Movie Maker
 Layout of Movie Maker Elements of Movie Maker Step by step instructions on how to use Movie Maker Web resources for Movie Maker Materials needed to use Movie Maker: Laptop Digital camera Digital video
Windows Movie Maker 2 (aka MM2) Tutorial
 Tutorial") Windows Movie Maker 2 (aka MM2) Tutorial - 1 - Introduction This tutorial is designed as a basic introduction and guide to Microsoft s digital video editing program, Windows Movie Maker 2 (MM2) and will
Windows Movie Maker 2 (aka MM2) Tutorial - 1 - Introduction This tutorial is designed as a basic introduction and guide to Microsoft s digital video editing program, Windows Movie Maker 2 (MM2) and will
Digital Storytelling. Movie Maker
 Digital Storytelling Movie Maker http://webclass.org Online Handouts Select Windows Movie Maker 2 Objectives Disk cleanup defrag C: drive Preview podcast equipment Movie Maker settings Create edit save
Getting Started with. PowerPoint 2010
 Getting Started with 13 PowerPoint 2010 You can use PowerPoint to create presentations for almost any occasion, such as a business meeting, government forum, school project or lecture, church function,
Articulate Engage 2013 Tutorial
 How to Access Engage 1. By Launching Engage Directly o You can open Engage directly from the desktop by clicking on the green Engage Icon, which is shown in the top right corner of this manual. 2. By Launching
Gloucester County Library System. Microsoft 2010 PowerPoint
 Gloucester County Library System Microsoft 2010 PowerPoint PowerPoint 2010 is a presentation software that allows you to create dynamic slide presentations that may include animation, narration, images,
Creating a Web Presentation
 LESSON 9 Creating a Web Presentation 9.1 After completing this lesson, you will be able to: Create an agenda slide or home page. Create a hyperlink to a slide. Create a Web presentation with the AutoContent
11.1 Create Speaker Notes Print a Presentation Package a Presentation PowerPoint Tips... 44
 Contents 1 Getting Started... 1 1.1 Presentations... 1 1.2 Microsoft Office Button... 1 1.3 Ribbon... 2 1.4 Mini Toolbar... 2 1.5 Navigation... 3 1.6 Slide Views... 4 2 Customize PowerPoint... 5 2.1 Popular...
Using Animation and Multimedia
 Lesson 9 Page 1 Using Animation and Multimedia Lesson Skill Matrix Skill Exam Objective Objective Number Setting Up Slide Transitions Animating Slide Content Adding Media Clips to a Presentation Insert
Creating a new Photo Story
 Creating a new Photo Story 1. Right click anywhere on your desktop and create a new folder where you will store all the graphics, scripts, files, etc. associated with this Photo Story. 2. Open Photo Story
Table Of Contents. iii
 Table Of Contents About Articulate Engage... 1 About Articulate... 1 Installing Articulate Engage... 2 To install Articulate Engage:... 2 Launching Articulate Engage... 3 To launch Articulate Engage:...
1 THE PNP BASIC COMPUTER ESSENTIALS e-learning (MS Powerpoint 2007)
") 1 THE PNP BASIC COMPUTER ESSENTIALS e-learning (MS Powerpoint 2007) 2 THE PNP BASIC COMPUTER ESSENTIALS e-learning (MS Powerpoint 2007) TABLE OF CONTENTS CHAPTER 1: GETTING STARTED... 4 MICROSOFT OFFICE
1 THE PNP BASIC COMPUTER ESSENTIALS e-learning (MS Powerpoint 2007) 2 THE PNP BASIC COMPUTER ESSENTIALS e-learning (MS Powerpoint 2007) TABLE OF CONTENTS CHAPTER 1: GETTING STARTED... 4 MICROSOFT OFFICE
New Perspectives Microsoft Office 365 and PowerPoint 2016 Comprehensive 1st Edition Pinard TEST BANK
 New Perspectives Microsoft Office 365 and PowerPoint 2016 Comprehensive 1st Edition Pinard TEST BANK Full download at: https://testbankreal.com/download/new-perspectives-microsoft-office-365-powerpoint-
COURSE OUTLINE. MS PowerPoint Last Updated: 19 July 2017
 MS PowerPoint 2016 Last Updated: 19 July 2017 1. Table of Contents 1. Table of Contents... 2 A. COURSE OUTLINES... 3 1. Free online pre-training assessments... 3 2. MS PowerPoint 2016 Level 1... 3 3. MS
Create engaging demonstrations, simulations and evaluations with Adobe Captivate. Creating from a PowerPoint. Importing a presentation
 Creating from a PowerPoint Create engaging demonstrations, simulations and evaluations with Adobe Captivate Preparation Set screen resolution to 1024 X 768 Launch Internet Explorer Turn off browser pop-up
Introduction to PowerPoint 2010
 Introduction to PowerPoint 2010 PowerPoint is a system in the Microsoft Office Suite that enables you to present information in office meetings, lectures and seminars to create maximum impact in a minimal
PowerPoint 2016: Core Presentation Design and Delivery Skills; Exam
 Microsoft Office Specialist PowerPoint 2016: Core Presentation Design and Delivery Skills; Exam 77-729 Successful candidates will have a fundamental understanding of the PowerPoint environment and demonstrate
Working with Windows Movie Maker
 518 442-3608 Working with Windows Movie Maker Windows Movie Maker allows you to make movies and slide shows that can be saved to your computer, put on a CD, uploaded to a Web service (such as YouTube)
imovie: Digital Storytelling
 1 imovie: Digital Storytelling *** imovie s interface with terminology is located on the final page *** 1. Getting Started a) Document your activities by using the provided digital camera b) Using a USB
Make Your Pictures Come to Life with Photo Story 3
 Page 1 of 6 Click Here to Install Silverlight United States Change All Microsoft Sites Search Microsoft.com Submit Windows Media Home For Home Windows Media Player Music & Video Cool Devices For Professionals
PowerPoint 2 (Office 2007)
") Reference Services Division Presents PowerPoint 2 (Office 2007) In this class, we will continue to work with PowerPoint and explore more advanced features through a class exercise. This handout covers
Reference Services Division Presents PowerPoint 2 (Office 2007) In this class, we will continue to work with PowerPoint and explore more advanced features through a class exercise. This handout covers
Apply Your Knowledge. 1. Create a Presentation to Introduce Your Products and Services
 BCIS_U4_AP_PRJ.qxd 2/11/04 3:20 PM Page 668 Apply Your Knowledge Complete the following exercises in order, as directed by your teacher. As you work through these projects, you will use PowerPoint to create
Digital Story Telling Microsoft Windows Movie Maker 2.0
 The Windows Movie Maker Interface Movie Tasks: Takes you step by step through the movie making process Document Area TimeLine: This is called the storyboard Project preview Area: Preview your project Saving
Windows Movie Maker. The Toolbar. The Toolbar
 Windows Movie Maker The Menu Bar The Menu Bar gives access to all parts of the program. On the Menu Bar, click on File. Notice the choices of Save Project As and Save Movie File o Choose Save Project As
Opening the Program. Movie Maker II 1
 1 Opening the Program To open the Movie Maker II application, use the Start Programs Movie Maker combination from the desktop. Alternatively, you can create a shortcut on the desktop. After executing this
Introduction to MS Office Somy Kuriakose Principal Scientist, FRAD, CMFRI
 Introduction to MS Office Somy Kuriakose Principal Scientist, FRAD, CMFRI Email: somycmfri@gmail.com 29 Word, Excel and Power Point Microsoft Office is a productivity suite which integrates office tools
MS Photo Story. An Easy Way to Create a Digital Storybook. Pam Sokolowski ESBOCES Model Schools
 MS Photo Story An Easy Way to Create a Digital Storybook Pam Sokolowski ESBOCES Model Schools psokolow@esboces.org Photo Story, a free software application from Microsoft, is a user friendly program that
Digital Story Telling with Windows Movie Maker
 Digital Story Telling with Windows Movie Maker 1 Getting Started 1. To open Windows moviemaker, go to: Start > All Programs > Windows Movie Maker. (Figure 1.1) Figure 1.1 Please note: You should have your
PresenterPLUS Quick Start
 PresenterPLUS Quick Start 1.1 Overview The following is a Quick Start for Accordent s PresenterPLUS presentation authoring software. This document will guide you through installation of PresenterPLUS and
Table of Contents. Articulate Presenter 5 Documentation -
 Articulate Presenter 5 Documentation - Table of Contents A. Welcome to Articulate Presenter 5 Documentation 2 B. Installing Articulate Presenter... 2 C. Lauching The Program... 2 D. Library and Options...
Windows Movie Maker Instructions
 Windows Movie Maker Instructions A. Getting Started: 1. To open Windows moviemaker, go to: Start > All Programs > Accessories > Windows Movie Maker. 2. Go to File > New Project. Please note: You should
Video Modeling & Video Self-Modeling: Research to Practice
 Video Modeling & Video Self-Modeling: Research to Practice It s Showtime with ShowBiz Presented by the Virginia Department of Education s Autism Priority Project Developed by Teresa Lyons, T-TAC/VT How
PowerPoint Tutorial 2: Adding and Modifying Text and Graphic Objects 2013
 PowerPoint Tutorial 2: Adding and Modifying Text and Graphic Objects Microsoft Office 2013 2013 Objectives Insert a graphic from a file Insert, resize, and reposition clip art Modify the color and shape
How to use Movie Maker
 How to use Movie Maker -Every desktop computer in our district has Windows Movie Maker. In order to access it, visit the Start menu, scroll up to Programs and then move the cursor to the right and locate
Meeting Visuals UCF Toolkit User Guide
 Meeting Visuals UCF Toolkit User Guide We provide Meeting Visuals web conferencing services. Because Meeting Visuals is powered by WebEx, this guide makes several references to the company name, platform
CyberLink. StreamAuthor 4. User's Guide
 CyberLink StreamAuthor 4 User's Guide Copyright and Disclaimer CyberLink reserves all rights to this publication. No part of this publication may be reproduced, duplicated, saved or transmitted without
[Not for Circulation] This document provides a variety of shortcuts for working in PowerPoint 2007.
![[Not for Circulation] This document provides a variety of shortcuts for working in PowerPoint 2007.](/thumbs/72/67772637.jpg "[Not for Circulation] This document provides a variety of shortcuts for working in PowerPoint 2007.") PowerPoint Shortcuts This document provides a variety of shortcuts for working in PowerPoint 2007. Using Slides from Other Presentations To add a slide from an existing presentation to the current presentation,
PowerPoint Shortcuts This document provides a variety of shortcuts for working in PowerPoint 2007. Using Slides from Other Presentations To add a slide from an existing presentation to the current presentation,
Inserting Information into PowerPoint
 LESSON 6 6.1 Inserting Information into PowerPoint After completing this lesson, you will be able to: Change the layout of a slide. Insert a clip art image. Scale an image. Insert and format a table. Insert
B.Sc. VI SEM (CS+BIO)
") Unit I Creating presentation using Slide master and Template in various Themes & Variants. If you want your presentation to contain more than one theme (layouts that contain backgrounds, colors, fonts,
Unit I Creating presentation using Slide master and Template in various Themes & Variants. If you want your presentation to contain more than one theme (layouts that contain backgrounds, colors, fonts,
MS PowerPoint. Module 6
 MS PowerPoint Module 6 Revised 1/1/17 Table of Contents Table of Contents... 2 Animation... 4 Exercise 6A Animation... 6 Animation Pane... 6 Exercise 6B Animation Pane... 8 Slide Sorter View... 9 Exercise
PowerPoint Spring 2002
 PowerPoint 2000 Spring 2002 Table of Contents I. INTRODUCTION... 1 II. GETTING STARTED... 1 A. Opening PowerPoint... 1 B. The Mouse Pointer... 1 C. Working with Text... 2 1. Windows Control Buttons...
EVALUATION COPY. Unauthorized Reproduction or Distribution Prohibited
 ADVANCED MICROSOFT POWERPOINT 2016 Advanced Microsoft PowerPoint 2016 (PPT2016.2 version 1.0.3) Copyright Information Copyright 2016 Webucator. All rights reserved. The Authors Dave Dunn Dave Dunn joined
PowerPoint 2010 Quick Start
 PowerPoint is a slide show presentation program. Use a slide show to convey your message to an audience. PowerPoint can be used for education, employee orientation, business promotion, team motivation,
CyberLink. StreamAuthor 3. User s Guide
 CyberLink StreamAuthor 3 User s Guide Copyright and Disclaimer All rights reserved. No part of this publication may be reproduced, stored in a retrieval system, or transmitted in any form or by any means
Creating Book Trailers Using Photo Story 3 Why Photo Story 3? It is a free program anyone can download.
 Creating Book Trailers Using Photo Story 3 Why Photo Story 3? It is a free program anyone can download. Before you begin using Photo Story 3 you will need to create a folder and title it Book Trailer.
PowerPoint Level 2 (Advancing your knowledge)
") Using the Outline Tab When you are creating a presentation, entering text in Outline View allows you to concentrate on the content and not be distracted by formatting, graphics and layout. 1. Select the
Using the Outline Tab When you are creating a presentation, entering text in Outline View allows you to concentrate on the content and not be distracted by formatting, graphics and layout. 1. Select the
Camtasia... 3 What is Camtasia and how do I download it?... 4 How do I record a video in Camtasia?... 6 How do I edit video and audio in
 CAMTASIA Table of Contents... 3 What is and how do I download it?... 4 How do I record a video in?... 6 How do I edit video and audio in?...14 How do I apply effects in?...19 How do I use a Green Screen
Macromedia Breeze. Introducing web communications that really speak to people.
 Macromedia Breeze Introducing web communications that really speak to people. Macromedia Breeze threatens to change the very definition of an online meeting. Patricia Seybold Group, 2004 Reach. Engage.
BBFlashBack Training for Library Staff
 BBFlashBack Training for Library Staff Learning outcomes: By the end of the course you will be able to: record a screencast insert/import text, images, audio & video edit text, audio & video files produce
ACD Systems at the hub of digital imaging... 1
 User Guide Table of Contents ACD Systems at the hub of digital imaging... 1 Getting Started... 2 Minimum system requirements... 2 Installing and uninstalling... 3 Starting ACD VideoMagic... 3 Starting
Presents: PowerPoint 101. Adapted from the Texas State Library s TEAL for All Texans Student Resources Manual
 Presents: PowerPoint 101 Adapted from the Texas State Library s TEAL for All Texans Student Resources Manual PowerPoint Topics Intro to PowerPoint Designing a Presentation The Next Level Goals and Objectives
An Introduction to Video Editing Using Windows Movie Maker 2 Duncan Whitehurst - ICT Advisory Teacher Pembrokeshire County Council
 1. Connect the DV out socket on your video camera to your computer using an IEEE1394 4pin to 4pin or 4 to 6 pin ( firewire ) cable. 2. Switch your camera on to Play and start up your computer. Movie Tasks
The Basics of PowerPoint
 MaryBeth Rajczewski The Basics of PowerPoint Microsoft PowerPoint is the premiere presentation software. It enables you to create professional presentations in a short amount of time. Presentations using
How UserVue and Morae 1.3 Work Together
 Version 1.0 How UserVue and Morae 1.3 Work Together By TechSmith Corporation Morae 1.3 Online Help Guide Online Help Guide Morae 1.3 Contents How UserVue and Morae 1.3 Work Together 1 About the UserVue
Powerpoint for PC s THE RIBBON
 Powerpoint for PC s THE RIBBON Ribbon - - this has all the commands that PowerPoint users need - - the commands are organized as buttons within the various tabs of the Ribbon. A more detailed explanation
Intermediate PowerPoint 2000
 Intermediate PowerPoint 2000 Academic Computing Support Information Technology Services Tennessee Technological University September 2000 1. Opening PowerPoint In the PC labs, under the Start menu, select
imovie The imovie Screen Monitor Window Shelf Home Play Full Screen Playhead Play Fast Forward Rewind Clip Viewer Timeline Design Panels Volume
 The imovie Screen Monitor Window Shelf Playhead Home Play Full Screen Rewind Play Fast Forward Camera Mode Edit Mode Clip Viewer Timeline Volume Project Trash Design Panels 2004 Teaching Matters, Inc.-Page
PowerPoint Click to access Backstage View. The Ribbon. See Using the Ribbon, below. 4Designing &
 The Original Quick Reference Guides Microsoft PowerPoint 2010 PowerPoint offers a host of wide-ranging creative tools for designing, displaying and sharing presentations. New features in PowerPoint 2010
Introduction to Powerpoint. Written by Deborah Blake
 Introduction to Powerpoint Written by Deborah Blake Center for Social Science Computation & Research 145 Savery Hall University of Washington Seattle WA 98195 U.S.A. (206)543-8110 September 2004 http://julius.csscr.washington.edu/pdf/powerpoint03.pdf
Power Point 2004 in 10 Steps! Rev. 4/9/06: Steven Chevalia, SHS Charlene Chausis, Adlai E. Stevenson HS. Page 5
 PowerPoint 2004 in 10 steps! Used extensively in the business world, slide show presentations are becoming popular learning tools in the classroom. Teachers and students appreciate the easy-to-use layout
Content Author's Reference and Cookbook
 Sitecore CMS 6 Content Author's Reference and Cookbook Rev. 080627 Sitecore CMS 6 Content Author's Reference and Cookbook A Conceptual Overview and Practical Guide to Using Sitecore Table of Contents Chapter
Creating an Animated Sea Aquarium/Getting Acquainted with Power Point
 Creating an Animated Sea Aquarium/Getting Acquainted with Power Point Directions: Power Point is a presentation graphics application program you use to organize and present information. Whether you are
Creating DVDs and CDs. With Your DVD Writer/CD Writer Drive
 Creating DVDs and CDs With Your DVD Writer/CD Writer Drive The information in this document is subject to change without notice. Hewlett-Packard Company makes no warranty of any kind with regard to this
Microsoft Office PowerPoint 2007 Training
 Fayetteville State University presents: Microsoft Office PowerPoint 2007 Training Discover the power of custom layouts Course contents Overview: Choices that suit your content Lesson: The power of layouts
BASIC MICROSOFT POWERPOINT
 BASIC MICROSOFT POWERPOINT PART ONE PHONE: 504-838-1144 IT Training Team Jefferson Parish Library EMAIL: jpltrain@jplibrary.net In this class you will learn to: Launch, close, and interact with Microsoft
Keynote. New Keynote Presentation. Keynote Window. Open Keynote icon in the dock.
 KMS IMOVIE 09 TUTORIAL GRADE LEVEL: 7-8 Keynote New Keynote Presentation 1. Open Keynote icon in the dock. 2. In the Theme Chooser window that appears, select a theme by highlighting the theme and clicking
Double-click on the PowerPoint icon on the desktop. Another way to access the program is to click on the Start button>programs>powerpoint.
 MS PowerPoint 2013 I. About PowerPoint A. What is it? Microsoft PowerPoint is a powerful tool to create professional looking presentations and slide shows. PowerPoint allows you to construct presentations